
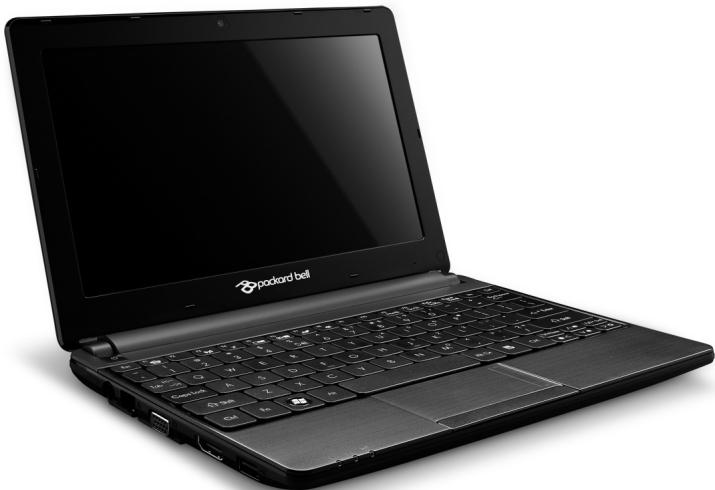
DOT SC/VW-001FR, DOT SC-001FR - Netbook PACKARD BELL - Free user manual and instructions
Find the device manual for free DOT SC/VW-001FR, DOT SC-001FR PACKARD BELL in PDF.

| Product type | Netbook |
| Brand | PACKARD BELL |
| Model | DOT SC/VW-001FR, DOT SC-001FR |
| Dimensions (approx.) | 260 x 180 x 30 mm |
| Weight (approx.) | 1.2 kg |
| Power supply | External power adapter (19 V, 2.1 A); rechargeable lithium-ion battery |
| Battery life | Varies with usage; approximately 4 to 6 hours |
| Display | 10.1-inch LCD display |
| Processor | Intel Atom (depending on configuration) |
| RAM | 1 GB or 2 GB (depending on configuration) |
| Hard drive | SATA hard drive, variable capacity |
| Wireless connectivity | Wi-Fi 802.11 b/g/n, Bluetooth (depending on configuration) |
| Ports | 2 x USB 2.0, 1 x HDMI, 1 x VGA, 1 x Ethernet RJ-45, 1 x headphone/microphone jack, 1 x multi-card reader |
| Webcam | Integrated webcam |
| Microphone | Built-in microphone |
| Keyboard | AZERTY keyboard with special keys |
| Maintenance and cleaning | Unplug before cleaning; use a damp cloth; do not spray liquid |
| Safety | Do not open the case; avoid liquids; use on a stable surface; Kensington lock slot |
| Spare parts and repairability | Removable battery; access to hard drive and memory; replaceable power adapter |
| General information | Do not expose to extreme temperatures; recycle according to WEEE directive |
Frequently Asked Questions - DOT SC/VW-001FR, DOT SC-001FR PACKARD BELL
User questions about DOT SC/VW-001FR, DOT SC-001FR PACKARD BELL
0 question about this device. Answer the ones you know or ask your own.
Ask a new question about this device
Download the instructions for your Netbook in PDF format for free! Find your manual DOT SC/VW-001FR, DOT SC-001FR - PACKARD BELL and take your electronic device back in hand. On this page are published all the documents necessary for the use of your device. DOT SC/VW-001FR, DOT SC-001FR by PACKARD BELL.
USER MANUAL DOT SC/VW-001FR, DOT SC-001FR PACKARD BELL
Packard Bell dots series
TABLE OF CONTENTS
Starting your computer 4
Wireless connection 4
Registration 5
Software installation 6
Recovery 6
Having trouble? 6
Computer Basics 8
Safety and comfort 8
Safety precautions 8
Health precautions 11
Getting to know your computer 13
Top view - display 14
Top view - keyboard 15
Special keys. 16
Rear view 19
Left view 19
Right view 20
Base view 22
Upgrading your computer 24
Expanding through options 24
Connectivity options. 24
Power supply 29
AC power adapter 29
Battery pack 30
Battery pack characteristics 30
Installing or removing the battery pack..... 32
Charging the battery 33
Checking the battery level 33
Optimizing battery life 33
Battery-low warning. 34
Software 36
Using Windows and your software 36
Welcome Center 36
Internet security offer 36
Productivity software 37
Packard Bell Recovery Management.... 37
Playing multimedia files 37
AutoPlay 39
Playing downloaded files 39
Social networks (optional) 40
Internet 45
First steps on the net 45
Protecting your computer 45
Choose an Internet Service Provider 45
Network connections 47
Surf the Net! 51
Security 53
Helpdesk 67
Safe computing 67
Maintenance. 67
Updates 74
Windows Remote Assistance 76
Recovery 77
Packard Bell Recovery Management 77
Creating recovery discs 78
Recovering your system 81
Types of recovery 82
Regulatory information 89
Environment 97
Software license 99
Index 102
Copyright © 11/2011. All Rights Reserved.
Packard Bell dot s series User Guide
Original Issue: 7 November 2011
Visit registration.packardbell.com and discover the benefits of being a customer of Packard Bell.
Remark: All images are for reference purposes only. Actual configuration may vary.
STARTING YOUR COMPUTER
Thank you for purchasing this Packard Bell computer!
This guide has been designed to introduce you to the features of your computer and assist in your computing experience.
After setting up and starting your computer, as shown in the setup instructions, it will ask you questions that will help you connect to the Internet. Your computer will then configure installed software.
WIRELESS CONNECTION
To connect to a wireless network, first check the wireless features of your computer are on, and that the router or modem you want to connect to is also correctly configured.
- If wireless is not on, press the communication key ( I ) to open the Launch Manager and make sure Wi-Fi is On.
- Your computer will detect and display any available networks, select your network and enter the password, if required.
After a short delay, your computer should connect to the Internet.
If your network is not detected, or your computer does not connect to the Internet, please refer to your ISP or router's documentation. After your computer starts and you can use it, open Internet Explorer and follow the instructions.
Alternatively, use a network cable to connect directly to a network port on your router. Please refer to your ISP or router's guide.
REGISTRATION
When using your computer for the first time, it is recommended that you register it. This gives you access to some useful benefits, such as:
- Faster service from our trained representatives.
- Membership in the Packard Bell community: receive promotions and participate in customer surveys.
- The latest news from Packard Bell.
How to register
During the initial startup of your computer, a window will invite you to register. Please fill in the information and click Next. The second window you'll see contains optional fields that will help us to provide you with a more personable customer service experience.
Another option
Another way to register your Packard Bell product is to visit our website at registration.packardbell.com. Choose your country and follow the simple instructions.
After registering, you will be sent a confirmation email with important information that you should keep in a safe place.
SOFTWARE INSTALLATION
Your computer will automatically install software and prepare your computer for use. This may take some time, please do not turn off your computer; wait until the installation has finished.
RECOVERY
You should create recovery discs as soon as you are able. The Packard Bell Recovery Management program allows you to create recovery discs and then to restore or reinstall applications and drivers provided by Packard Bell.
HAVING TROUBLE?
Packard Bell provides several options to support your purchase.
Packard Bell support
Make sure you write down your computer serial number, date and place of purchase and model name on the area provided in this guide; save your proof of purchase. Before you call us, please write down any error message that accompanies the problem, and have the computer in front of you and switched on if possible. Having these items to hand when contacting us will ensure better and quicker service.
Packard Bell website
Remember to visit www.packardbell.com - Check out the support section for up-to-date information, help, drivers and downloads.
Warranty and contact information
You can find information about the warranty for your computer and how to contact technical support in your computer's Warranty.
COMPUTER BASICS
SAFETY AND COMFORT
Safety precautions
Please follow the guidelines below to use your computer comfortably and to avoid health problems.
Computer environment
Make sure that the computer:
- Is used on a stable surface, stand or table. A fall can seriously damage the computer.
- Is not used on a surface that vibrates, or used when taking part in sport, exercise or other activities in a dynamic environment. Vibration or movement can loosen fastenings, damage internal components and even cause battery leakage.
- Is away from direct sunlight and sources of heat.
- Is away from magnetic fields or any device generating static electricity.
- Is kept at least 30 centimetres (one foot) away from a mobile phone.
- Is not in a dusty or damp environment.
- Is not used near water. Never spill liquids of any kind on or into your computer.
- Is not placed on a carpet or any other surface that may have an electrical charge.
Cables
Make sure that:
- Cables are not strained and that there is no risk of people walking or tripping over them.
- Other devices do not crush the cables.
- The power cable is connected to the computer before connecting the power cable to the AC power outlet.
- The power cable is unplugged from the power outlet before disconnecting the power cable from the computer.
- Three-pin power cords are connected to a grounded power outlet.
- The power outlet is easily accessible and as close to the computer as possible (do not overload it with too many adapters).
If your computer uses an external AC adapter:
- Do not cover or place objects on the AC adapter. Allow the adapter to cool properly during use by keeping it clear of objects.
- Only use the AC adapter that is supplied with your computer. Although other adapters may look similar, using them can damage your computer. If a replacement is required, use only parts certified for use with your computer.
Cleaning your computer
- Always unplug your computer from the power outlet before cleaning it.
- Do not use liquid or aerosol cleaners, use a damp cloth instead.
-
Never spray cleaning product directly on the screen.
-
If you spill liquid on your computer, switch it off immediately, unplug the AC adapter, remove the battery and make sure it is completely dry before switching it on again. Wait overnight if necessary.
Note: If your computer includes slots for memory cards or expansion devices, plastic 'dummies' may be installed in the card slots. Dummies protect unused slots from dust, metal objects or other particles. Save the dummies for use when no cards are in the slots.
Servicing your computer
Do not attempt to service your computer yourself, as opening or removing covers may expose you to dangerous voltage or other risks. Refer all servicing to qualified service personnel.
Unplug your computer from the wall outlet and refer servicing to qualified service personnel when:
- the power cord or plug is damaged, cut or frayed,
- liquid was spilled into the product,
- the product was exposed to rain or water,
- the product has been dropped or the case has been damaged,
- the product exhibits a distinct change in performance,
- the product does not operate normally after following the operating instructions
Note: Adjust only those controls that are covered by the operating instructions, since improper adjustment of other controls may result in damage and will often require extensive work by a qualified technician to restore the product to normal condition.
Health precautions
-
The computer and accessories may contain small parts. Keep them out of the reach of small children.
-
If you work or play for hours at a time, then make sure you take regular breaks. Look away from the computer's screen once in a while. Do not use your computer if you are tired.
-
Arrange your computer so that you can work in a natural and relaxed position. Place items that you use frequently within easy reach.
-
Position your computer directly in front of you for increased safety and comfort. Ensure that your keyboard and touchpad are at a comfortable height. The screen should be about 45-70 cm (18-30 inches) from your eyes.
If you use your computer for long periods while sitting at a desk, invest in an external keyboard for improved comfort.
-
To protect your hearing, when using speakers or headphones, increase volume gradually until you can hear clearly and comfortably; do not increase the volume level after your ears have adjusted. Do not listen to high volumes for extended periods. Do not increase the volume to block out noisy surroundings; decrease the volume if you cannot hear people speaking near you.
-
The computer's underside, power adapter and the air from ventilation slots may become hot during use. Avoid continuous body contact and do not place the computer on your lap while it is operating.

- Ensure that the computer's ventilation slots and openings are never obstructed or covered. Do not place the computer on a soft surface (such as a carpet, chair or bed) that may block ventilation slots.
- Do not push objects of any kind into ventilation or case slots as they may touch dangerous voltage points or short-out parts that may result in a fire or electric shock.
- Some disorders of the hands, wrists, arms, neck, shoulders, legs and back may be associated with, or aggravated by certain repetitive actions. To reduce your risk of developing these disorders, type with your wrists straight and your hands and wrists floating above the keyboard. If you experience periods of pain, tingling, numbness or other discomfort, please contact your doctor.
- We advise that parents monitor the use of games by their children. If you or your child experience any of the following symptoms: dizziness, blurred vision, eye or muscle twitches, loss of consciousness, disorientation, any involuntary movement or convulsion, IMMEDIATELY discontinue use and consult your doctor. This may happen even if the person has no medical history of epilepsy.
GETTING TO KNOW YOUR COMPUTER
After setting up your computer as illustrated in the setup instructions, let us show you around your new Packard Bell computer.
Packard Bell dot s series
TOP VIEW - DISPLAY
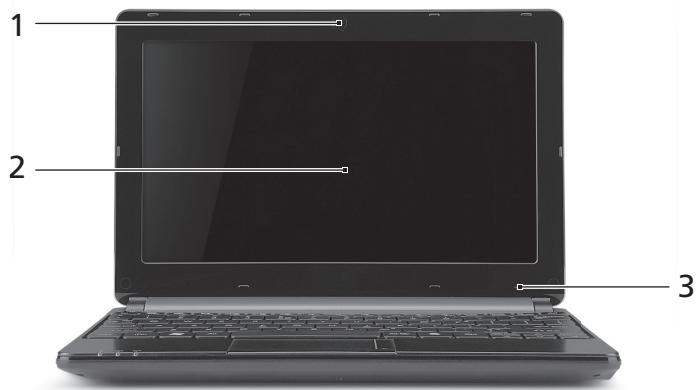
| # | Icon | Item | Description |
| 1 | Webcam | Web camera for video communication. | |
| 2 | Display screen | Also called Liquid-Crystal Display (LCD), displays computer output. | |
| 3 | Microphone | Internal microphone for sound recording. |
TOP VIEW - KEYBOARD
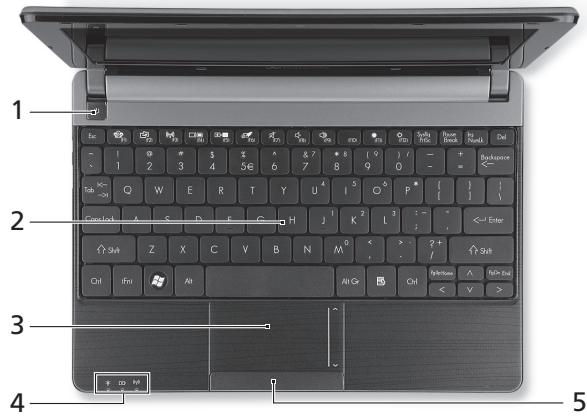
| # | Icon | Item | Description |
| 1 | Power button / indicator | Turns the computer on and off. Indicates the computer's power status. | |
| 2 | Keyboard | For entering data into your computer. - Special keys are described on page 16. | |
| 3 | Touchpad | Touch-sensitive pointing device which functions like a computer mouse. | |
| 4 | Power indicator | Indicates the computer's power status. | |
| Battery indicator | Indicates the computer's battery status. | ||
| - Charging: The light shows amber when the battery is charging. | |||
| - Fully charged: The light shows blue when in AC mode. | |||
| Communication indicator | Indicates the computer's wireless connectivity device status. | ||
| 5 | Click buttons (left and right) | The left and right side of the button function as left and right selection buttons. |
- Note: The front panel indicators are visible even when the computer cover is closed.
Special keys
Your computer's keyboard includes keys that activate special functions. The function of each key is clearly marked with an icon.
| Icon | Function | Description |
| Fn | Hotkey for second function | Activates a second function on certain keys. E.g. press the Fn key to activate the F1 to F12 keys. |
| Social Networking | Opens the Social Networks application. - If this application is not installed, the key will start your instant messaging application. | |
| ? | Help | Opens the help menu for your computer. |
| ( ) | Communication | Enables/disables the computer's communication devices. |
| ☐ ☐ | Display toggle | Switches display output between the display screen, external monitor (if connected) and both. |
| ( ) | Screen blank | Turns the display screen backlight off to save power. Press any key to return. |
| Touchpad toggle | Turns the internal touchpad on and off. | |
| Speaker toggle | Turns the speakers on and off. | |
| Volume down | Decreases the sound volume. | |
| Volume up | Increases the sound volume. | |
| Brightness down | Decreases the screen brightness. | |
| Brightness up | Increases the screen brightness. |
Hotkeys
The computer uses hotkeys (key combinations) to access Num Lock, function keys and navigation commands.
To activate hotkeys, press and hold the Fn key (bottom left) before pressing the other key in the hotkey combination.
| Hotkey | Function | Description |
| Fn + Special keys (see page 16) | Function keys | Activates the F1 to F12 keys. |
| Fn + Page Up | Home | Scrolls to the beginning of a document. |
| Fn + Page Down | End | Scrolls to the end of a document. |

| # | Icon | Item | Description |
| 1 | Battery bay | Houses the computer's battery pack. |
LEFT VIEW
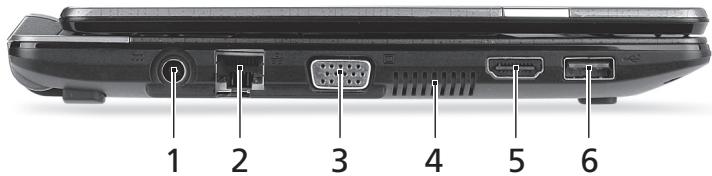
| # | Icon | Item | Description |
| 1 | = = | DC-in jack | Connects to your computer's AC adapter. |
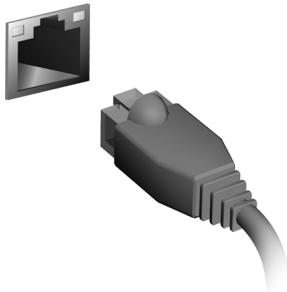
| 2 | = = | Ethernet (RJ-45) port | Connects to an Ethernet 10/100-based network. |
| 3 | = = | External display (VGA) port | Connects to a display device (e.g., external monitor, LCD projector). |
| 4 | Ventilation and cooling fan | Allows the computer to stay cool. - Do not cover or obstruct the openings. | |
| 5 | HDMI | HDMI port | Supports high-definition digital video connections. |
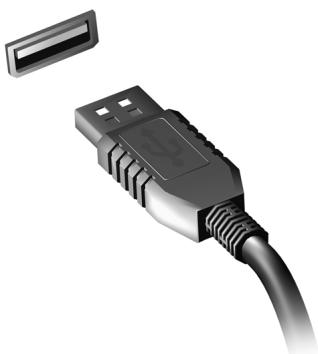
| 6 | USB 2.0 port | Connect to USB devices (e.g., USB mouse, USB camera). | |
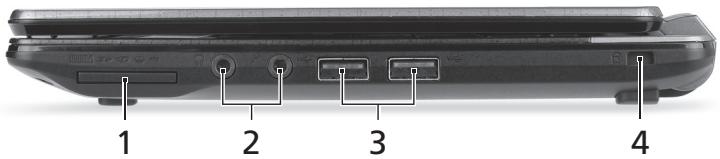
RIGHT VIEW
| # | Icon | Item | Description |
| 1 | Multi-in-1 card reader | Accepts Secure Digital (SD), MultiMediaCard (MMC), Memory Stick PRO (MS PRO), xD-Picture Card (xD). - Push to remove/install the card. Only one card can operate at any given time. | |
| 2 | Microphone jack | Accepts inputs from external microphones. | |
| Headphones / speaker jack | Connects to audio line-out devices (e.g., speakers, headphones).Supports compatible 3.5 mm headsets with built-in microphone (e.g. Acer smart handheld headsets). | ||
| 3 | USB 2.0 port | Connect to USB devices (e.g., USB mouse, USB camera). | |
| 4 | Kensington lock slot | Connects to a Kensington-compatible computer security lock. - Wrap the computer security lock cable around an immovable object such as a table or handle of a locked drawer. Insert the lock into the notch and turn the key to secure the lock. Some keyless models are also available. | |

| # | Icon | Item | Description |
| 1 | Ventilation and cooling fan | Allows the computer to stay cool. - Do not cover or obstruct the openings. | |
| 2 | Memory compartment | Houses the computer's main memory. | |
| Hard disk bay | Houses the computer's hard disk (secured with screws). | ||
| 3 | Battery release latch | Releases the battery for removal. Insert a suitable tool and slide to release. | |
| 4 | Battery bay | Houses the computer's battery pack. | |
| 5 | Battery lock | Locks the battery in position. | |
| 6 | Speakers | Deliver stereo audio output. | |
UPGRADING YOUR COMPUTER
EXPANDING THROUGH OPTIONS
Your computer offers you many options for a complete computing experience.
Connectivity options
Ports allow you to connect peripheral devices to your computer. For instructions on how to connect different external devices to the computer, read the following section.
Memory card reader
Memory cards are used in a wide selection of digital cameras, PDAs, MP3 players and mobile phones.
Inserting a memory card
- Align the card so that the connector points towards the port, with the connectors facing down.
- Carefully slide the card into the port. If you find you need to use any force to insert the card, try reorientating the card slightly.
- Push the card until it clicks into place. A few millimetres of the card will extend from beyond the slot.
If the card contains some files, the Windows Auto Play window may appear (this depends on the contents of the card) and ask you if you wish

to use a program to access the contents of the card. Select an option here if it is appropriate, otherwise select Cancel. If the card contains no files, or unknown files, a window will open showing the contents of the card.
SD, SDHC and SDXC cards
Different types of SD cards cover different capacities, while using the same overall design. SD cards contain up to 4 GB, SDHC cards contain up to 32 GB, and SDXC cards can contain up to 2048 GB (2 TB). Your computer provides an SDHC or SDXC compatible card reader.
Note: SDXC memory cards can only be used in an SDXC-compatible reader; SD and SDHC cards can be used in either type.
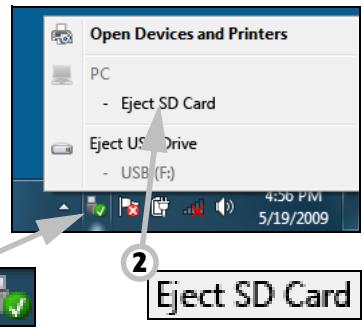
Removing a card from an memory card reader
- Click on the Safely Remove Hardware icon in the Notification Area (next to the clock).
- Click on Eject SD Card (or the name of the device).
- Wait until a Safe to Remove Hardware message is displayed.
- Remove the card.
Built-in networking
The built-in networking allows you to connect your computer to an Ethernet-based network.
Connect an Ethernet cable from the Ethernet (RJ-45) port on the chassis of the computer to a network jack or hub on your network.
Universal Serial Bus (USB)
The USB port is a high-speed serial bus which allows you to connect USB peripherals without taking up system resources.
Certain computers may include one or more USB 3.0 ports. These resemble standard USB ports, except they include additional internal connections and are blue. You may use USB 3.0 compatible devices with these ports to benefit from faster transfer speeds.
Video port
Connect to a monitor with a VGA or DVI port (the type of connection supported depends on your computer's configuration). The appropriate cable is usually included with the monitor.
Follow these steps to connect an monitor to your computer:
- Check that the computer is powered off and the monitor power switch is turned off.
- Attach the video cable to the monitor port on the computer. Secure the cable connection with the screws provided.
- Connect the monitor power cable and plug it into a properly grounded wall outlet.
- Follow any setup instructions in the monitor's user's guide.
- Turn on power to the monitor, then the computer.
- Make sure that the current resolution and refresh rate do not exceed the specifications of the monitor. If necessary change the display settings used by the computer.
Note: To access the display controls: Click on Start, Control Panel, Appearance and Personalization. Click on the Display category, then select Change Display Settings.
High-Definition Multimedia Interface (only for certain models)
HDMI (High-Definition Multimedia Interface) is an industry-supported, uncompressed, all-digital audio/video interface. HDMI provides an interface between any compatible digital audio/video source, such as a set-top box, DVD player, and A/V receiver and a compatible digital audio and/or video monitor, such as a digital television (DTV), over a single cable.

Use the HDMI port on your computer to connect with high-end audio and video equipment. Single cable implementation allows tidy setup and fast connection.
Headphones and microphone
These two ports allow you to connect audio devices. Use the headphone port to plug in stereo headphones or powered speakers. Plugging an audio device to the headphone port disables the built-in speakers. Use the microphone port to connect an external microphone for mono recording; plugging in an external microphone disables the built-in microphone.
POWER SUPPLY
AC POWER ADAPTER
Your computer can use the supplied external power adapter (a power 'brick') to run on AC power. A power cable is provided that is appropriate for the country where the computer was purchased.
The power adapter provides adequate power to run your computer and recharge the battery pack at the same time.
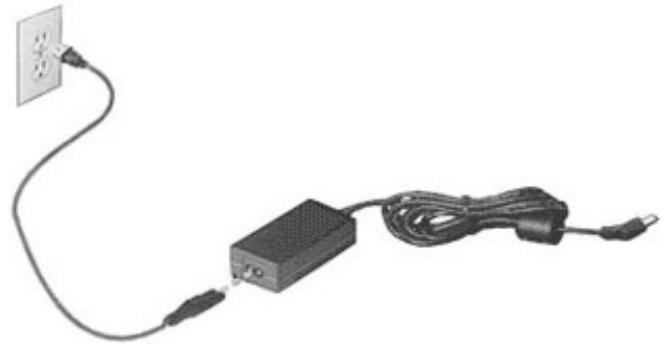
Caution: Do not cover or place objects on the AC adapter. Keeping the adapter clear of objects allows the adapter to cool properly during use.
Only use the AC adapter that is supplied with your computer. Although other adapters may look similar, using them can damage your computer.
Warning: The AC adapter and the underside of the computer can become hot after prolonged use. This is normal, but may cause injury with prolonged contact.
BATTERY PACK
The computer uses a battery pack that gives you extended use between charges.
Battery pack characteristics
The battery pack has the following characteristics:
- Employs current battery technology standards.
- Delivers a battery-low warning.
The battery is recharged whenever you connect the computer to the AC adapter. Your computer supports charge-in-use, enabling you to recharge the battery while you continue to operate the computer. However, recharging with the computer turned off results in a significantly faster charge time.
The battery will come in handy when you travel or during a power failure. It is advisable to have an extra fully-charged battery pack available as backup. Contact your dealer for details on ordering a spare battery pack.
Maximizing the battery's life
Like all other batteries, your computer's battery will degrade over time. This means that the battery's performance will diminish with time and use.
To maximize your battery's life, you are advised to adhere to the recommendations set out below.
Conditioning a new battery pack
Before you use a battery pack for the first time, there is a "conditioning" process that you should follow:
- Insert the new battery without turning the computer on.
- Connect the AC adapter and fully charge the battery.
- Disconnect the AC adapter.
- Turn on the computer and operate using battery power.
- Fully deplete the battery.
- Reconnect the AC adapter and fully charge the battery again.
Follow these steps again until the battery has been charged and discharged three times.
Use this conditioning process for all new batteries, or if a battery hasn't been used for a long time. If the computer is to be stored for more than two weeks, you are advised to remove the battery pack from the unit.
Warning: Do not expose battery packs to temperatures below 0 °C (32 °F) or above 45 °C (113 °F). Extreme temperatures may adversely affect the battery pack.
By following the battery conditioning process you condition your battery to accept the maximum possible charge. Failure to follow this procedure will prevent you from obtaining the maximum battery charge, and will also shorten the effective lifespan of the battery.
In addition, the useful lifespan of the battery is adversely affected by the following usage patterns:
- Using the computer on constant AC power with the battery inserted. If you want to use constant AC power, you are advised to remove the battery pack after it is fully charged.
- Not discharging and recharging the battery to its extremes, as described above.
- Frequent use; the more you use the battery, the faster it will reach the end of its effective life. A standard computer battery has a life span of about 300 charges.
Installing or removing the battery pack
Important! Before removing the battery from the unit, connect the AC adapter if you want to continue using your computer. Otherwise, turn off the computer first.
To install a battery pack:
- Align the battery with the open battery bay; make sure that the end with the contacts will enter first, and that the top surface of the battery is facing up.
- Slide the battery into the battery bay and gently push until the battery locks in place.
To remove a battery pack:
- Slide the battery release latch to release the battery.
- Pull the battery from the battery bay.
Charging the battery
To charge the battery, first make sure that it is correctly installed in the battery bay. Plug the AC adapter into the computer, and connect to a mains power outlet. You can continue to operate your computer on AC power while your battery is charging. However, charging the battery with the computer turned off results in a significantly faster charge time.
Note: You are advised to charge the battery before retiring for the day. Charging the battery overnight before traveling enables you to start the next day with a fully-charged battery.
Checking the battery level
The Windows power meter indicates the current battery level. Rest the cursor over the battery/power icon on the taskbar to see the battery's present charge level.
Optimizing battery life
Optimizing battery life helps you get the most out of battery operation, prolonging the charge/recharge cycle and improving recharging efficiency. You are advised to follow the suggestions set out below:
Purchase an extra battery pack.
- Use AC power whenever possible, reserving battery for on-the-go use.
- Eject a PC Card if it is not being used, as it will continue to draw power (for selected models).
- Store the battery pack in a cool, dry place. The recommended temperature is 10^ ( 50^ ) to 30^ ( 86^ ). Higher temperatures cause the battery to self-discharge faster.
- Excessive recharging decreases the battery life.
- Look after your AC adapter and battery.
Battery-low warning
When using battery power pay attention to the Windows power meter.
Warning: Connect the AC adapter as soon as possible after the battery-low warning appears. Data will be lost if the battery to become fully depleted and the computer shuts down.
When the battery-low warning appears, the recommended course of action depends on your situation:
| Situation | Recommended Action |
| The AC adapter and a power outlet are available. | 1. Plug the AC adapter into the computer, and then connect to the mains power supply. 2. Save all necessary files. 3. Resume work. Turn off the computer if you want to recharge the battery rapidly. |
| An extra fully charged battery pack is available. | 1. Save all necessary files. |
| 2. Close all applications. | |
| 3. Shut down the operating system to turn off the computer. | |
| 4. Replace the battery pack. | |
| 5. Turn on the computer and resume work. | |
| The AC adapter or a power outlet is unavailable. | 1. Save all necessary files. |
| 2. Close all applications. | |
| You have no spare battery pack. | 3. Shut down the operating system to turn off the computer. |
SOFTWARE
USING WINDOWS AND YOUR SOFTWARE
Packard Bell computers include software to help you use your computer; the programs and categories available on your computer depend on the model purchased.
Welcome Center
The first time you turn on your computer, the Welcome Center window opens. The Welcome Center introduces you to the new features and tools of Windows. You can access the Welcome Center later by clicking Start >Getting Started.
Internet security offer
It is vital to protect your computer from viruses and attacks over the Internet (see Security on page 53). An comprehensive Internet security suite, including a free trial subscription period, is offered when you first start your computer. You should activate this protection before connecting to the Internet. This security suite protects your computer from the most recent online threats and protects your personal data (bank account credentials, credit card numbers, passwords, and more).
Productivity software
Work Great with Microsoft® Office 2010 - Express your ideas, solve problems and simplify everyday projects with Office 2010.
Photo editing - Easily edit and print your photos with Windows Live Photo Gallery. Then share them on Facebook, YouTube™ or Windows Live.
Search & Decide with Bing™ - Find and organize the answers you need using Bing™, so you can make faster, more informed decisions.
Packard Bell Recovery Management
To prepare your computer for system recovery options, you should create a set of recovery discs as soon as possible. See page 1 for more information.
Playing multimedia files
You may use the media software on your computer to play music, films or photo slide-shows and watch television (if your computer has a TV tuner).
One or more media programs are installed on your computer, Windows Media Player and optionally Windows Media Center are provided by Microsoft. Other media programs may have been installed by Packard Bell to provide an improved media experience.
Windows Media Player
Windows Media Player may be used to play MP3 or WMA audio files or most video files.
Windows Media Center (optional)
Certain computers include all-in-one media 'centers' such as Windows Media Center. These programs can handle a variety of multimedia content, presented with simple menus that may be easily controlled with a remote control. You may watch live or recorded TV (if your computer has a TV tuner),
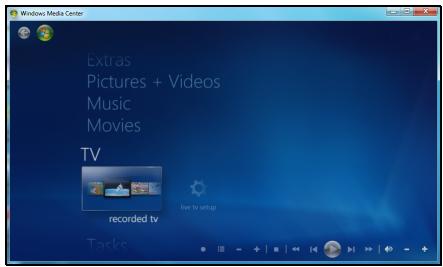
listen to digital music, view pictures and personal videos, or access content from online services.
To start the media program installed on your computer, click on Start > Windows Media Center.
Setup

Caution: If your computer includes a remote control or TV tuner they must be connected and active before starting the media program for the first time.
The first time you start the media program, it will start a setup wizard, which will configure some basic settings. If available, select the Express setup option, you may then configure additional options as needed.

Note: If you have an Internet connection, the Guide (Electronic Program Guide) allows you to view a list of current TV shows. This shows channel and network information, as well as the title, description and scheduled broadcast time of shows.
AutoPlay
The Windows AutoPlay function allows you to choose the way Windows handles media files on devices with removable storage (digital camera, etc).
If you have inserted a disk that contains files (such as a USB key or memory card), Windows will display a dialog box and ask you to choose how you want to open the files.

Playing downloaded files
Downloaded files may work with the media programs installed on your computer, or may require specific programs. Files that include DRM functions may only play in specific programs (e.g. iTunes, Windows Media Player) or only on devices certified for use with the each type of file.
Social networks (optional)
The Social Networks application allows you to quickly view your friends' updates, and make your own updates without leaving the desktop. You can receive notifications and status updates directly to your desktop, using the sidebar to monitor multiple social networks (Facebook, YouTube, Flickr and Twitter).
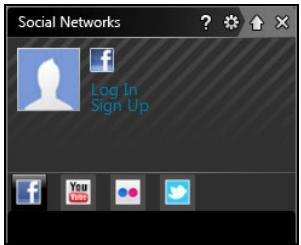
Note: The Social Networks application is a pre-installed option and may not be installed on all computers.
Be aware of your friends' messages and posted images as they happen; a visible notification will alert you whenever a friend (or subscription) shows some activity.
If your computer's keyboard features the optional Social Networks key, press it to open the Social Networks application.

Log in... or Sign up
The top of the application shows your profile picture and account information from Facebook. If you have not yet created or accessed your Facebook profile, the top image is the anonymous white-on-blue placeholder, and no information is shown.
When you first start the Social Networks application, you will be asked to Log in to your social networks. If this does not happen automatically, click
Log In, at the top of the Social Networks window. If you just want to create a new Facebook profile, click Sign Up and follow the instructions.
Note: All social activities require Internet access. Make sure you are connected to the Internet before using this application.
Authorize access
To receive updates, you must authorize access to your social network accounts; each account must be activated separately. Click on the tab for the network you want to activate.
You need your account name and password for each network, or to create a new account if you do not have one.
If you already have an account, click the Log In button to activate access, or Sign up to create an account.
If you choose to create a new account please fill in the requested information, with your email and an appropriate password. You will then continue to authorize access for your account.
If requested, please allow access for all steps, this will ensure all Social Networks features work normally.
Note: Note down all information you use for new accounts, including the account name, email address and password. Keep this information hidden in a safe place, so you may refer to it when you access your accounts in the future.
Accessing your social networks
Once you have authorized access, your profile picture and status information will be displayed. You may update this information with a click.
Quick actions
Click on a link to see more in a new window. I.e. click on a Facebook entry to open your Facebook account and view the entire entry; click on a YouTube video title to view the video.
Enter your status in the What's on your mind? box and click Share. You friends on Facebook will see your status instantly.
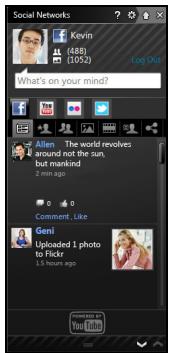
To create a new album of photos in Facebook, select the images you want to add, drag them to your profile picture. You will be prompted for an album name and description. Click on Upload to start copying the images to your Facebook account.
Click the arrows in the bottom bar to see more pages, if there are more entries than can be shown on a page.
Click on the question mark in the top bar to see the help file for Social Networks.
Click on the arrow in the top bar to hide the full application and display a small alert bar on the top of your screen. Click the alert bar (below) to see the full window with a summary of your friends' activities.

Note: Do not use the X icon to exit Social Networks, unless you want to stop sending or receiving updates. Use the arrow in the top bar to display the alert bar.
Checking your news feeds and information
Select the tab for the network you want to view:


A series of buttons for the network are available for each network. Hover over the button to see a description. Select the button you want to see and scroll through the list of items.
Example of Facebook tabs:

The first button, and the section viewed when a tab is first selected, are the News Feed (for Facebook), Most Viewed for YouTube and Contacts for Flickr. If there are more entries than can be shown on one page, use the arrows in the bottom bar to see more pages.
Changing settings
Click the settings icon to access settings for the social networks.
Live Update - If the Live Update button is active, you may download and install an updated version of the Social Networks application.
Click the tab for a network to see specific settings; you may set how often a network is checked (the refresh frequency) and logout from specific networks in this section.
Click the X to exit the Settings section.
FIRST STEPS ON THE NET
Protecting your computer
It is vital to protect your computer from viruses and attacks over the Internet (see Internet security offer on page 25 and Security on page 53). A comprehensive Internet security program is offered when you first start your computer. You should activate this protection as soon as possible, certainly before you connect to the Internet.
Choose an Internet Service Provider

Using the Internet has become a natural part of daily computing. Just a few simple steps can connect you to a vast collection of knowledge and communication tools. To accomplish these steps you should first select an Internet Service Provider (ISP), which supplies the connection between your computer and the Internet. You should research the ISPs available in your region, not
forgetting to talk to friends and family about their experiences or to check reviews and consumer reports. The ISP you select will provide instructions on how to connect to the Internet (you may need additional software or a special 'box' that connects to your phone line).
Connection types
Depending on your computer model, your location and your communication needs, you have several ways to connect to the Internet.
Dial-up
Some computers include a telephone dial-up ('modem') connector. This allows you to connect to the Internet using your telephone line. With a dial-up connection, you cannot use the modem and the telephone simultaneously on a single phone line. This type of connection is recommended only if you have limited use of the Internet as the connection speed is low and connection time is typically charged per hour.
DSL (e.g. ADSL)
DSL (Digital Subscriber Line) is an 'always-on' connection that runs over the phone line. As DSL and phone do not use the same frequencies, you can use your telephone at the same time you are connected to the Internet (this requires a 'micro-filter' on each telephone socket to avoid interference). To be eligible for DSL, you must be located near an DSL-equipped phone exchange (service is sometimes unavailable in rural areas). Connection speeds vary depending on your location, but DSL generally provides very fast and reliable Internet connection. As the connection is always-on, it is generally charged at fixed monthly rates.

Note: A DSL connection requires an appropriate modem. A modem is usually provided by the ISP when you register. Many of these modems include an 'router' that provides network and wi-fi access.
Cable
A cable connection provides fast and always-on Internet service via a cable television line. This service is generally available in large cities. You can use your telephone and watch cable TV at the same time you are connected to the Internet.
3G (WWAN or 'Wireless Wide-Area Network')
A 3G connection allows you to use cellular networks (such as those used by a mobile phone) to connect to the Internet while away from home. The socket for a SIM card may be built in to your computer, or may require an external device, such as a USB modem or even an appropriately equipped mobile phone.

Note: If your computer includes a SIM card slot, you require a compatible SIM card and a contract with a cellular provider.
Before using the 3G features, check with your service provider to see if any additional charges will be incurred, especially roaming charges.
Network connections
A LAN (Local Area Network) is a group of computers (for example, within an office building or home) that share a common communications line and resources. When you set up a network, you can share files, peripheral devices (such as a printer) and an Internet connection. You can set up a LAN using wired technologies (such as Ethernet) or wireless technologies (such as WiFi or Bluetooth).
Wireless networks
A wireless LAN or WLAN is a wireless local area network, which may link two or more computers without using wires. Setting up a wireless network is easy and allows you to share files, peripheral devices and an Internet connection.
What are benefits of a wireless network?
Mobility
Wireless LAN systems allow you and other users of your home network to share access to files and devices connected to the network, for example a printer or scanner.
Also you can share an internet connection with other computers in your home.
Installation speed and simplicity
Installing a wireless LAN system can be fast and easy and eliminates the need to pull cables through walls and ceilings.
Components of a wireless LAN
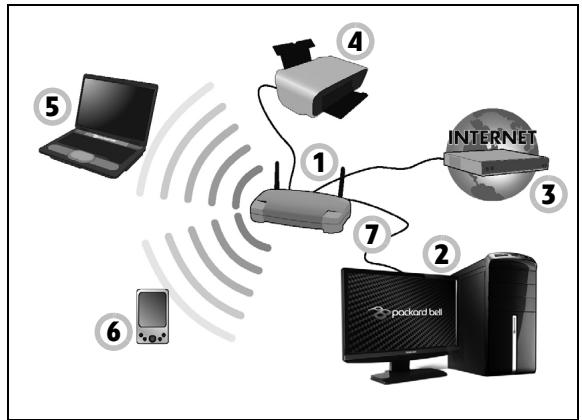
To set up your Wireless network at home you need to have the following:
Access point (router)
Access points (routers) are two-way transceivers that broadcast data into the surrounding environment. Access points act as a mediator between wired and wireless network. Most routers have a built-in DSL modem that will allow you access to a high speed DSL internet connection. The ISP (Internet Service Provider) you have chosen normally supplies a modem/
router with the subscription to their services. Read carefully the documentation supplied with your Access point/rodter for detailed setup instructions.
Network cable (RJ45)
A network cable (also called RJ45 cable) is used to connect the host computer to the access point (see illustration below); this type of cable may also be used to connect peripheral devices to the access point.
Wireless adapter
An internal wireless adapter is normally already installed in your computer. A button or controls in Windows allow you to activate or deactivate the adapter.
Diagram of a working network
- Access point/rodter
- Desktop computer
- Modem
- Printer
- Portable computer
- PDA/Smartphone
- Network cables (RJ45)
Turning on/off a wireless network connection
Most computers feature a 'WiFi' button that turns the network connection on or off. If your computer has wireless access, but does not feature a Communication button, you may turn your wireless network on or off, or control what is shared over the network with the network management options. Click on Start > Control Panel > Network and Internet > Network and Sharing Center.

Warning: Using wireless devices while flying in aircraft is prohibited. Switch off all devices before boarding an aircraft;
they may be dangerous to the operation of the aircraft, disrupt communications, and even be illegal.
Surf the Net!
To surf the Internet, you need a program called an Internet browser. Internet Explorer provides an easy and secure web browsing experience. As soon as you have your Internet access installed and you are connected, click on the Internet Explorer shortcut located on the Windows desktop and take your Internet experience to a new level!

Internet Explorer features
The image below shows the Internet Explorer browser's start page. A brief description of some key aspects of the browser are listed below.
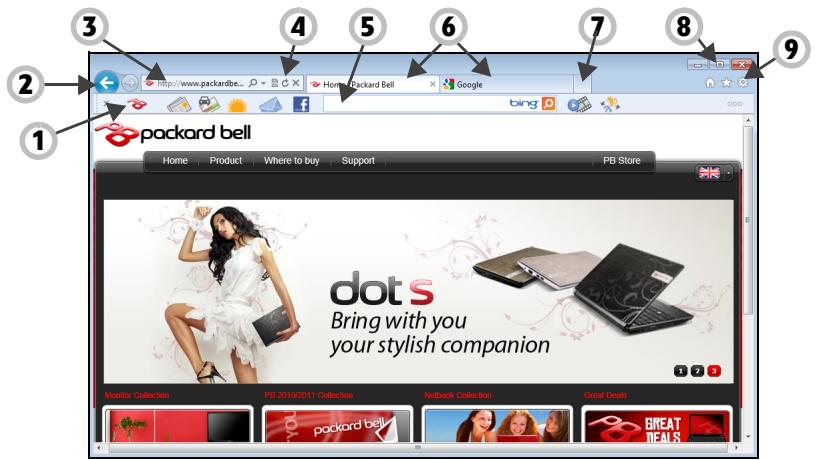
- Bing Bar: Search the web and use Bing tools to alert you of news, fill forms automatically, stay safe online and more.
- Back and Forward buttons: Navigate through pages you have already visited.
- Address bar: Type in an Internet address (e.g. www.packardbell.com) and press the Enter key on your keyboard, this will take you directly to the address you typed.
-
Refresh: Reload the selected page.
-
Search Box: Search the web without having to open a new page.
- Tabs: Each tab displays a web page. The tabs allow you to instantly switch from one site to another.
- New tab: Open a new tab with links to your most popular sites.
- Reduce, maximize or close the window.
- Home, Favorites and Tools: Open the home page; manage your favorite websites, feeds and history; and access browser tools, such as Print, Safety or Options.
Caution: Internet Explorer includes a Phishing Filter that warns you about and helps to protect you from potential or known fraudulent websites (sites that look legitimate but actually are designed to capture your personal information). The address bar will turn yellow and a warning message will be displayed if you visit a suspected phishing site.
Packard Bell website
To get you started why not visit our website, www.packardbell.com.
Packard Bell is dedicated to provide you with on-going personalised support. Check out our Support section to get help tailored to your needs.
www.packardbell.com is your portal to a world of online activities and services: visit us regularly for the latest information and downloads!
Security
You are probably eager to explore everything the Internet has to offer. In order for you to be safe online, Packard Bell has pre-installed Symantec's award-winning Norton Internet Security™ on your computer.
Norton Internet Security runs quietly in the background to block today's complex threats and protect your identity when you shop, bank, or browse online.
Norton Internet Security blocks online identity theft, detects and eliminates spyware, removes viruses and Internet worms, protects against hackers.
Definitions
What is a virus?
Malicious software, typically called 'viruses', are programs designed to infect and damage computers. Most viruses are transmitted over the Internet, emails or malicious Web sites. A typical virus will replicate and pass itself undetected to multiple computers. Other forms of nuisance, such as Trojan horses, worms or spam can infect your computer in various ways, using up resources or clogging up a network.

Note: Packard Bell guarantees that your computer was 100% virus free at the time of purchase and does not cover damages due to viruses.
What is spyware?
Spyware refers to generally unwanted programs that are downloaded onto your computer while connected to the Internet, often without you knowing
it. Once it has infected your computer, it can snoop on your browsing activity, collect personal information, cause pop-up ads to appear, or even change the configuration of your computer. Spyware consumes resources on your computer; it can slow down your Internet connection or entire computer system, and even cause crashes.
Spyware is sometimes used by unscrupulous companies to monitor and track the sites you visit on the Internet so as to determine your web-surfing habits and display targeted pop-up ads on your screen. However, some kinds of spyware go beyond simple tracking and actually monitor keystrokes and capture passwords, posing a serious security risk.
What is malware?
Malicious software, also known as malware, is software designed to deliberately harm your computer. For example, viruses, worms, and Trojan horses are malicious software. To help protect your computer against malware, make sure it is using up-to-date antivirus and antimalware software.
What is a personal firewall?
A personal firewall is a software program designed to prevent unauthorized access to or from a private network. It acts as a shield to protect your Internet connection from unwanted connections, some of which may attempt to take control of your computer to install or redistribute viruses or malicious programs. Each connection to your computer is monitored - programs that attempt to receive information without your permission are detected and the firewall will display an alert. You can then decide if you will allow the connection, if the connection is to
a program you are currently using then normally you would allow it (i.e. a game connecting to a multi-player server or an encyclopediaaedia making a content update).
How to protect your computer
Cybercrime prevention can be straight-forward - when armed with a little technical advice and common sense, many attacks can be avoided. In general, online criminals are trying to make their money as quickly and easily as possible. The more difficult you make their job, the more likely they are to leave you alone and move on to an easier target. The tips below provide basic information on how you can prevent online fraud.
Keep your computer current with the latest patches and updates
One of the best ways to keep attackers away from your computer is to apply patches and other software fixes when they become available. By regularly updating your computer, you block attackers from being able to take advantage of software flaws (vulnerabilities) that they could otherwise use to break into your system.
While keeping your computer up-to-date will not protect you from all attacks, it makes it much more difficult for hackers to gain access to your system, blocks many basic and automated attacks completely, and might be enough to discourage less-determined attackers, so they will give up and look for a more vulnerable computer elsewhere.
More recent versions of Microsoft Windows and other popular software can be configured to download and apply updates automatically so that you do not have to remember to check for the latest software. Taking
advantage of auto-update features in your software is a great start toward keeping yourself safe online.
Protect your computer with security software
Several types of security software are necessary for basic online security. Security software essentials include firewall and antivirus programs. A firewall is usually your computer's first line of defense-it controls who and what can communicate with your computer online. You could think of a firewall as a sort of "policeman" that watches all the data attempting to flow in and out of your computer on the Internet, allowing communications that it knows are safe and blocking "bad" traffic such as attacks from ever reaching your computer.
The next line of defense many times is your antivirus software, which monitors all online activities such as email messages and Web browsing and protects an individual from viruses, worms, Trojan horse and other types of malicious programs. Your antivirus and antispyware software should be configured to update itself, and it should do so every time you connect to the Internet.
Integrated security suites such as Norton Internet Security, which combine firewall, antivirus, antispyware with other features such as antivirus and parental controls, have become popular as they offer all the security software needed for online protection in a single package. Many people find using a comprehensive security suite an attractive alternative to installing, configuring and updating several different types of security software.
A complete version of Norton Internet Security™ is pre-installed on your Packard Bell system. It includes a free trial subscription to protection updates. Make sure you Activate it!
Choose strong passwords and keep them safe
Passwords are a fact of life on the Internet today; we use them for everything from ordering flowers and online banking to logging into our favorite airline Web site to see how many miles we have accumulated. The following tips can help make your online experiences secure:
- Selecting a password that cannot be easily guessed is the first step toward keeping passwords secure and out of the wrong hands. Strong passwords have eight characters or more and use a combination of letters, numbers and symbols (e.g., # $ % !?). Avoid using any of the following as your password: your login name, anything based on your personal information such as your last name, and words that can be found in the dictionary, especially "password". Try to select especially strong, unique passwords for protecting activities like online banking.
- Keep your passwords in a safe place and try not to use the same password for every service you use online.
- Change passwords on a regular basis, at least every 90 days. This can limit the damage caused by someone who has already gained access to your account. If you notice something suspicious with one of your online accounts, one of the first steps you can take is to change your password.
Protect your personal information
Exercise caution when sharing personal information such as your name, home address, phone number, and email address online. To take advantage of many online services, you will inevitably have to provide personal information in order to handle billing and shipping of purchased goods. Since not divulging any personal information is rarely possible, the following list contains some advice for how to share personal information safely online:
- Keep an eye out for phony email messages. Things that indicate a message may be fraudulent are misspellings, poor grammar, odd phrasing, Web site addresses with strange extensions, Web site addresses that are entirely numbers where there are normally words, and anything else out of the ordinary. Additionally, phishing messages will often tell you that you have to act quickly to keep your account open, update your security, or urge you to provide information immediately or else something bad will happen. Don't take the bait.
- Don't respond to email messages that ask for personal information. Legitimate companies will not use email messages to ask for your personal information. When in doubt, contact the company by phone or by typing in the company Web address into your Web browser. Don't click on the links in these messages as they make take you to fraudulent, malicious Web sites.
- Steer clear of fraudulent Web sites used to steal personal information. When visiting a Web site, type the address (URL) directly into the Web browser rather than following a link within an email or instant message. Fraudsters often forge these links to make them look
convincing.
A shopping, banking or any other Web site where sensitive information should have an "S" after the letters "http" (i.e. https://www.yourbank.com not http://www.yourbank.com). The "s" stands for secure and should appear when you are in an area requesting you to login or provide other sensitive data. Another sign that you have a secure connection is the small lock icon in the bottom of your web browser (usually the right-hand corner).
- Pay attention to privacy policies on Web sites and in software. It is important to understand how an organization might collect and use your personal information before you share it with them.
- Guard your email address. Spammers and "phishers" sometimes send millions of messages to email addresses that may or may not exist in hopes of finding a potential victim. Responding to these messages or even downloading images ensures you will be added to their lists for more of the same messages in the future. Also be careful when posting your email address online in newsgroups, blogs or online communities.
Online offers that look too good to be true usually are
The old saying "there's no such thing as a free lunch" still rings true today. Supposedly "free" software such as screen savers or smileys, secret investment tricks sure to make you untold fortunes, and contests that you've surprisingly won without entering are the enticing hooks used by companies to grab your attention.
While you may not directly pay for the software or service with money, the free software or service you asked for may have been bundled with
advertising software ("adware") that tracks your behavior and displays unwanted advertisements. You may have to divulge personal information or purchase something else in order to claim your supposed content winnings. If an offer looks so good it's hard to believe, ask for someone else's opinion, read the fine print, or even better, simply ignore it.
Review bank and credit card statements regularly
The impact of identity theft and online crimes can be greatly reduced if you can catch it shortly after your data is stolen or when the first use of your information is attempted. One of the easiest ways to get the tip-off that something has gone wrong is by reviewing the monthly statements provided by your bank and credit card companies for anything out of the ordinary.
Additionally, many banks and services use fraud prevention systems that call out unusual purchasing behavior (i.e. if you live in Texas and all of the sudden start buying refrigerators in Budapest). In order to confirm these out of the ordinary purchases, they might call you and ask you to confirm them. Don't take these calls lightly; this is your hint that something bad may have happened and you should take necessary action.
Protect your computer with Windows security tools
Windows provides a variety of protection applications.
Windows Action Center
Windows provides a central area from where you can control the security settings of your computer, helping you to protect it from Internet attacks
and ensuring that the latest security updates have been downloaded and installed on your computer.
To open the Action Center, click on Start > Control Panel > System and Security > Action Center.
Alternatively, if a security alert has been reported (in the Notification Area, next to the clock) then you can click on the notification balloon or double-click on the small Security Alert icon.
The Action Center indicates the status and settings used for important applications that protect your computer. In addition Windows Firewall, Windows
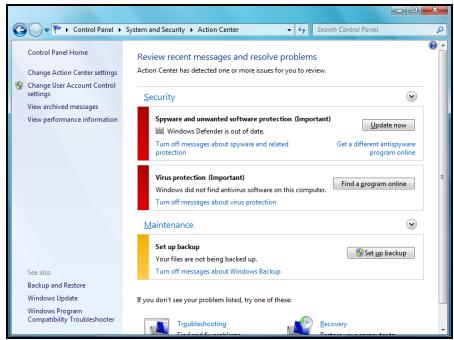
Defender and Windows Automatic Updates are provided by Microsoft as part of a comprehensive system to defend your computer. The antivirus application varies according to the program installed on your computer.
Windows Firewall
Windows has a firewall that protects your computer when connected to the Internet. It stops programs from accessing the Internet without your permission.
Certain programs need access to the Internet to function properly, or even to function at all. If this is the case, you will usually be asked to allow access when you install a program, or the first time you use it. To check firewall settings, click on Start > Control Panel > System and Security > Windows Firewall.
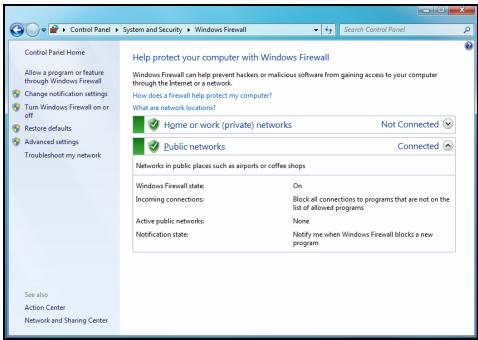

Note: When you first start to use a Firewall it is in a 'Learning mode', you may see pop-up windows alerting you that certain programs you know and trust wish to access the internet. After a period of time the Firewall will know your list of trusted programs and won't ask for permission the next time the program tries to connect to the internet. The Firewall also protects your computer from programs from the internet trying to access your computer; this sometimes is necessary to allow access for program updates, downloads, etc.
Caution: Please note that most security software suites provide similar functionality and will disable Windows Firewall in order to improve system performance.
Windows Updates
If you have an active Internet connection, Windows can check for important updates for your computer and install them automatically. These
updates include security patches and program updates that can improve your computing experience and help protect your computer against new viruses and attacks.
Windows Defender
Windows Defender helps protect your computer against malicious and unwanted software, such as spyware and adware. Windows Defender is installed and turned on by default.
To help protect your privacy and your computer, Windows Defender includes real-time protection options. Real-time protection alerts you when spyware and other potentially

unwanted software attempt to install themselves or run on your computer. You are also alerted if programs attempt to change important Windows settings.

Note: Windows Defender works with your Windows Update settings to automatically install the latest definitions.
Caution: Please note that most security software suites provide similar functionality and will disable Windows Defender in order to improve system performance.
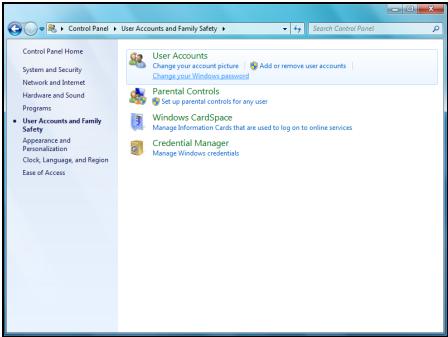
User Account Control
The User Accounts control panel can help prevent unauthorized changes to your computer. User Accounts will ask you for permission or an administrator password before performing actions that could potentially affect your computer's operation or that change settings that affect other users. When you see a User Account message, read it carefully, and then make sure the name of the action or program that's about to start is one that you intended to start.
By verifying these actions before they start, User Account settings can help prevent malicious software (malware) and spyware from installing or making changes to your computer without permission.
To access User Account settings, click on Start > Control Panel > User Accounts and Family Safety > User Accounts.

Note: You may turn off the User Account Control Messages (not recommended) in the User Account Control settings window.
Internet Explorer security settings
Internet sites use small files called cookies to keep track of user preferences and information. You can adjust your Internet browser's security settings to determine how much -or how little- information you are willing to accept from a Web site.
To access Internet Explorer security settings:
- In Internet Explorer, click on Tools > Internet Options.
- In the Privacy tab, move the slider up or down to select a setting.
How do I know when my computer is at risk?
If the Action Center reports an alert, or if your computer behaves erratically, crashes unexpectedly or if some of your programs do not work correctly, your computer may be infected by malicious software. However, do not blame every computer problem on a virus! If you suspect your computer is infected, the first thing to do is update, if you have not already done so, and run your antivirus and anti-spyware software.
SAFE COMPUTING
To make the most of your new computer and ensure it runs smoothly for a long time, you should use the programs below and regularly perform the actions described in this guide.
Maintenance
Recommended maintenance tasks
There are several tasks you should perform periodically (about once per month) to ensure your computer stays in good health:
Error checking
Using the Check Disk tool regularly prevents your system from getting unreliable and information getting lost. It checks and repairs two types of errors:
- file system errors, such as fragmented files that were not deleted and files with invalid sizes or dates;
-
physical errors, which may occur on your hard disk as it wears out over time.
-
Click on Start > Computer. Right-click on the Packard Bell (C:) icon and select Properties.
-
Click on Tools and Check Now in the Error-checking section.
-
Tick Automatically fix file system errors in the options area. If you tick Scan for and attempt recovery of bad sectors, your computer will carry out the physical error checking when you next restart your computer. Click on Start to proceed.
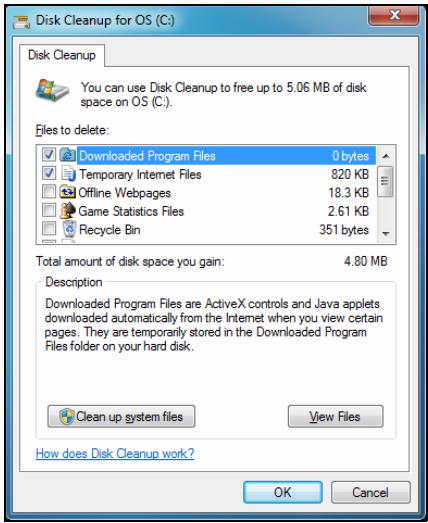
Disk Cleanup
The Disk Cleanup Wizard helps free up space on your disk drive. It searches your drive and displays unused files, such as temporary Internet files, files in the Recycle Bin and other temporary files that you may safely delete.
- Click on Start > Computer. Right-click on the Packard Bell icon and select Properties.
- Select the General tab and click on the Disk Cleanup button (next to the diagram of the disk drive.
- Tick each category in the Files to delete area you wish to delete and click on OK.
Disk Defragmenter
With the creation and deletion of files over time, scattering occurs all over the hard disk area and affects performance. The Disk Defragmenter helps you rearrange the items stored on your hard drive to make your computer run faster and more efficiently.
Running the Disk Defragmenter once a month (depending on computer usage) will decrease wear and tear on your hard drive and thus decrease the chance of a fault developing at a later date.
- Perform a Disk Cleanup and close all open programs.
- Click on Start > Computer. Right-click on the Packard Bell icon and select Properties.
- Click on Tools and Defragment now....
- Click on the volume you want to defragment and click on Defragment to start. The whole process may take several hours
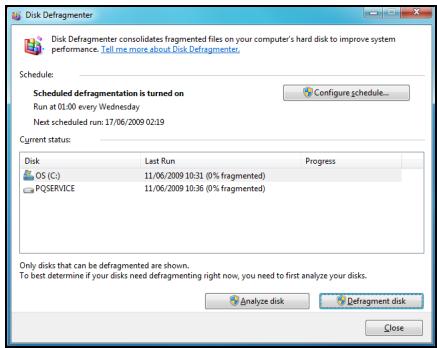
to complete. It is best not to use your computer while running the Disk Defragmenter as any changes on your system may cause the process to restart. If your hard disk is divided into several partitions you should perform the same action for each partition.
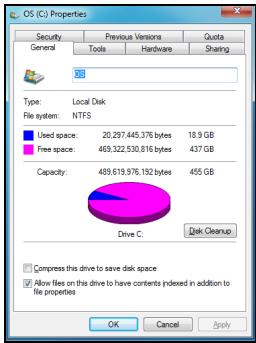
Manage your hard disk drive (HDD)
Check the remaining free space on your hard disk drive
- Click on Start > Computer.
- Right-click on the Packard Bell icon and select Properties.
- The Hard Disk Properties window displays the amount of used space and free space on your hard disk. If your hard disk is almost full (less than 200 MB remaining), you should consider freeing some space.
To see easily how much space is used and how much is left, simply place your pointer over the hard disk drive icon. The information will automatically appear.
Free some Space on your hard disk drive
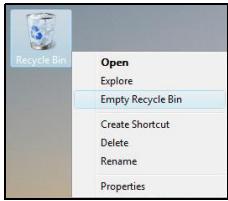
- Empty the Recycle Bin: When you delete a file from your computer, Windows places it in the Recycle Bin. All the deleted files remain there until you decide to permanently delete them from your computer or to restore them to their original location. Double-click on the Recycle Bin on the Windows desktop and click on Empty Recycle
Bin or select only the items you want to delete. Items deleted from external devices, such as memory cards, do not go to the Recycle Bin, they are permanently deleted.
- Uninstall the programs you no longer use:
Click on Start > Control Panel > Programs > Programs and Features.
- Archive files on an external hard disk drive and delete them from the hard disk.
Run Windows System Tools
Windows includes some convenient tools to keep your computer in good shape. Use these tools on a regular basis to maintain a reliable and speedy system! To make it easier, System Tools includes a Scheduled Tasks utility, which you can customise to run specific tasks regularly.
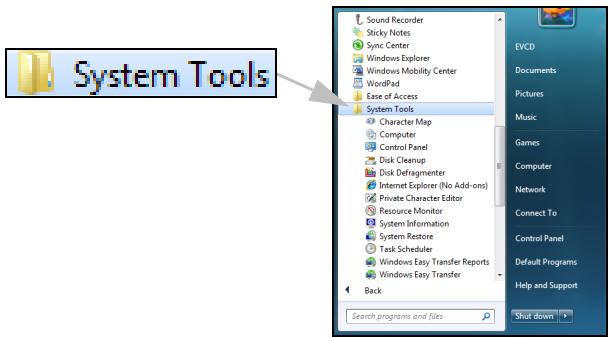
To access the list of System Tools, click Start > All Programs, then the Accessories folder in the list of programs and finally select System Tools.
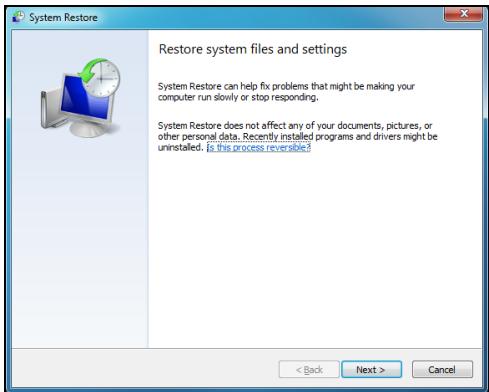
System Restore monitors changes to your computer and automatically creates restore points that store your computer's configuration each time a major change occurs (such as installing programs). It can undo harmful changes to your computer and restore settings and performance without removing your personal data files (such as documents, browsing history, photos, favourites, or emails).

Note: If you only need to uninstall a program, do not use System Restore. To uninstall a program use Programs and Features in the Control Panel.
To start System Restore from the Windows desktop:
Click Start > All Programs > Accessories > System Tools > System Restore.
If you cannot access the Windows desktop:
- Press the Alt+F10 key upon start-up when the Packard Bell logo appears. This will open the Recovery Program.
- Select Windows System Restore and click Next. Your computer will automatically restart and open System Restore.
Restore your computer to an earlier time
This option will return to your computer to how it was on an earlier date, without affecting your personal documents or emails (it will not restore lost documents either). By default Windows saves snapshots of itself when major changes are made to the Operating System (e.g. driver installations or specific software). This is useful when a driver installation failed, or when you changed a system setting, and it did not work.
- Click Next.
- Select from the list the date when the restore point was created and click Next.
- In the confirmation screen, click on Finish to restore the computer to the selected date and time.
Windows creates restore points automatically at regularly scheduled times or before certain programs or drivers are installed. This option allows you to create your own restore points when you need to.
- Click Start > Control Panel > System and Security > System. Click on System protection in the sidebar and then click the Create... button.
- Enter a description to identify this restore point. System Restore automatically adds the date and time to this name.
- To finish, click on Create.
Undo the last restoration
If the system fails after restoring the computer to a certain date, you can use this option to undo the restoration.
Alternatively, you can use Last Known Good Configuration to restore the system to your most recent settings that worked.
- Restart the computer, press F8 to access advanced startup options.
- Use the arrow keys to highlight Last Known Good Configuration and press Enter.
Updates
As new viruses, worms, and other threats are discovered every day, keeping your security applications and operating system up-to-date is crucial.
To keep your computer safe and reliable:
- Perform updates when prompted by Windows Action Center.
- Use Microsoft Windows Automatic Updates.
- Run Windows Update.
Internet security
Norton Internet Security, combined with other security applications can protect your computer from Internet attacks and ensure that the latest security updates have been downloaded and installed on your computer. Norton Internet Security performs automatic updates through Live Update. You can also start a manual update from the main interface of Norton Internet Security and the Live Update link.
Operating system, software and drivers
Windows Update can help you keep your computer up-to-date. It allows you to choose and download updates for your computer's operating system, software, and hardware.
New content is added to Windows Update regularly, so you can always get the most recent updates and solutions to protect your
computer and keep it running smoothly.
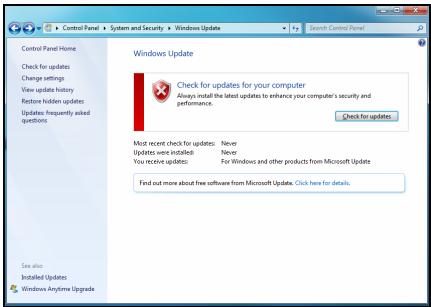
- Start > Control Panel > System and Security > Windows Update.
Windows Remote Assistance
Remote Assistance allows a Windows user to temporarily take over a remote Windows computer over a network or the internet to resolve issues. Remote Assistance makes it possible to diagnose and repair problems with a computer without personally visiting it.
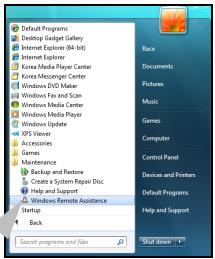

Windows Remote Assistance
You can access Remote Assistance by clicking on Start > All Programs > Maintenance > Windows Remote Assistance. Upon launching Remote Assistance, you will see a screen giving you the choice of either inviting someone to help you or offering to help someone.
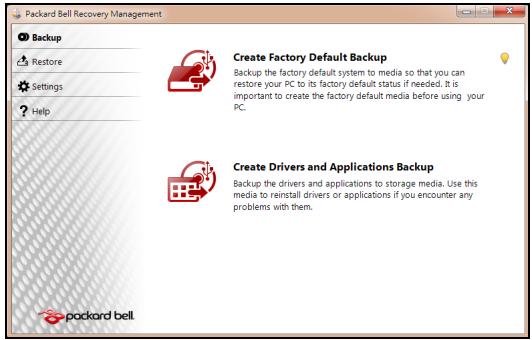
PACKARD BELL RECOVERY MANAGEMENT

Note: Packard Bell Recovery Management is only available with a preinstalled Windows operating system.
If your computer experiences problems that are not recoverable by other methods, you may need to reinstall the Windows operating system and factory-loaded software and drivers. To ensure you can recover your computer when needed, you should create a recovery backup as soon as possible.
Packard Bell Recovery Management consists of the following functions:
- Backup:
Create Factory Default Backup
- Backup Drivers and Applications
-
Restore:
-
Restore Operating System to Factory Defaults
- Restore Operating System and Retain User Data
- Reinstall Drivers or Applications
This chapter will guide you through each process.
Creating recovery discs
To reinstall using discs, you must create a set of recovery discs beforehand. Throughout the process, you will be guided by on-screen instructions. Please read them carefully!
Caution: If you are using a USB flash drive, ensure it is at least 12 GB and does not contain any previous data.
- Click on Start > All Programs > Packard Bell, then click on Packard Bell Recovery Management.
- To create recovery backup for the hard drive's entire original contents, including Windows and all factory-loaded software and drivers, click Create Factory Default Disc, or if your computer has no optical drive, Create Factory Default Backup.
-OR-
To create recovery discs for only the factory-loaded software and drivers, click Create Drivers and Applications Backup.
Important: We recommend that you create each type of recovery disc as soon as possible.
The Create Factory Default Backup dialog box opens.
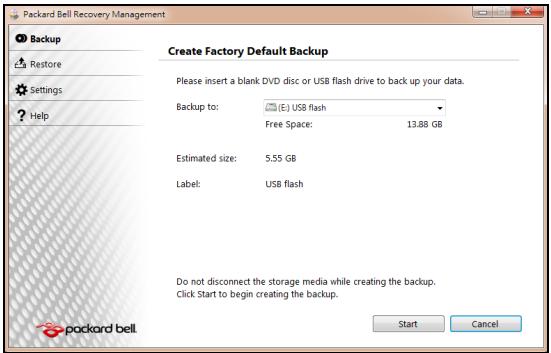
This dialog box tells you the estimated size of the backup file.
- If you are using optical discs, it will also show the number of blank, recordable discs you will need to complete the recovery discs. Make sure that you have the required number of identical, blank discs.
-
If you are using a USB disk, make sure it has enough capacity before continuing.
-
Plug in the USB disk or insert a blank disc into the drive indicated in the Backup to list, then click Next. You will be shown the backup progress on the screen.
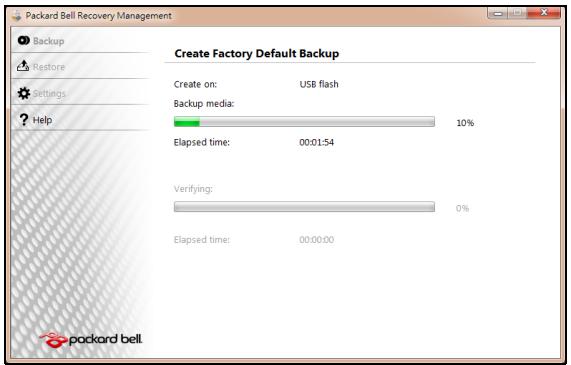
-
Follow the process until it completes:
-
If you are using optical discs, the drive ejects each disc as it completes burning it. Remove the disc from the drive and mark it with a permanent marker.
If multiple discs are required, insert a new disc when prompted, then click OK. Continue until the process is complete.
- If you are using a USB disk, unplug the USB drive and mark it with a permanent marker.
Important: Write a unique, descriptive label on each backup, such as 'Windows Recovery Backup' or 'Apps/Drivers Recovery
Backup'. Make sure you keep the backup in a safe place that you will remember.
RECOVERING YOUR SYSTEM
If Packard Bell support did not help fix your problem, you can use the Packard Bell Recovery Management program. This will restore your computer to the same state as when you purchased it, while giving you an option to retain all settings and personal data for later retrieval.
To recover your system:
- Perform minor fixes.
If only one or two items of software or hardware have stopped working correctly, the problem may be solved by reinstalling the software or the device drivers.
To recover software and drivers that were pre-installed at the factory, see "Recovering pre-installed software and drivers" on page 83.
For instructions on reinstalling software and drivers that were not preinstalled, see that product's documentation or technical support Web site.
- Revert to a previous system condition.
If reinstalling software or drivers does not help, then the problem may be solved by returning your system to a previous state when everything was working correctly.
For instructions, see "Returning to a previous system condition" on page 82.
- Reset your system to its factory condition.
If nothing else has solved the problem and you want to reset your system to factory condition, see "Returning your system to its factory condition" on page 85.
Types of recovery
Returning to a previous system condition
Microsoft System Restore periodically takes 'snapshots' of your system settings and saves them as restore points. In most cases of hard-to-resolve software problems, you can return to one of these restore points to get your system running again.
Windows automatically creates an additional restore point each day, and also each time you install software or device drivers.
Help: For more information about using Microsoft System Restore, click Start, then click Help and Support. Type windows system restore in the Search Help box, then press Enter.
To return to a restore point:
- Click on Start > Control Panel > System and Security > Action Center, then click on Recovery.
- Click on Open System Restore, then Next.
- Click on he restore point you want, click on Next, then Finish. A confirmation message box appears.
- Click on Yes. Your system is restored using the restore point you specified. This process may take several minutes, and may restart your computer.
Recovering pre-installed software and drivers
As a troubleshooting step, you may need to reinstall the software and device drivers that came pre-installed on your computer from the factory. You can recover using either your hard drive or the backup you have created.
- New software - If you need to recover software that did not come pre-installed on your computer, you need to follow that software's installation instructions.
- New device drivers - If you need to recover device drivers that did not come pre-installed on your computer, follow the instructions provided with the device.
Opening the recovery tool
If you are recovering using Windows and the recovery information stored on your computer:
- Click on Start > All Programs > Packard Bell, then click on Packard Bell Recovery Management. Packard Bell Recovery Management opens.
- Click on the Restore tab, then click Reinstall Drivers or Applications. The Packard Bell Application Recovery main menu opens.
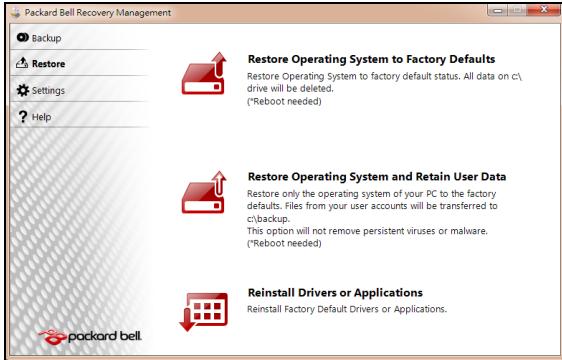
If you are recovering from a driver and application recovery backup on optical discs:
- Insert the driver and application recovery backup disc ('Apps/Drivers Recovery Backup') into the disc drive.
- Restart your computer and wait for the program to start, then go to "Reinstall drivers or applications: Click Contents. A list of software and device drivers opens." on page 85.
If you are recovering from the driver and application recovery backup on a USB drive:
- Insert the USB drive into a USB port. Open the USB drive in Windows Explorer and double-click Recovery.
-
Click Reinstall Drivers or Application from a USB device.
-
Reinstall drivers or applications: Click Contents. A list of software and device drivers opens.
- Click the install icon for the item you want to install, then follow the on-screen prompts to complete the installation. Repeat this step for each item you want to reinstall.
Returning your system to its factory condition
If your computer experiences problems that are not recoverable by other methods, you may need to reinstall everything to return your system to its factory condition. You can reinstall using either your hard drive or the recovery discs you have created.
Caution: This complete recovery deletes everything on your hard drive, then reinstalls Windows and all software and drivers that were pre-installed on your system. If you can access important files on your hard drive, back them up now.
- If you can still run Windows, see "Recovering from within Windows" below.
- If you cannot run Windows and your original hard drive is still working, see "Recovering from the hard drive during startup" on page 87.
- If you cannot run Windows and your original hard drive has been completely re-formatted or you have installed a replacement hard drive, see "Recovering from your recovery backup" on page 87.
To reinstall Windows and all pre-installed software and drivers:
- Click on Start > All Programs > Packard Bell, then click on Packard Bell Recovery Management. Packard Bell Recovery Management opens.
- Click on the Restore tab, then Restore system to factory default. The Confirm Restoration dialog box opens.
- Click on Yes, then Start. A dialog box displays information about the hard drive that the operating system will be recovered to.
Caution: Continuing the process will erase all files on your hard drive.
- Click on OK. The recovery process begins by restarting your computer, then continues by copying files to your hard drive. This process may take a while, but a Packard Bell Recovery Management screen shows you its progress.
When the recovery has finished, a dialog box prompts you to restart your computer.
- Click on OK. Your computer restarts.
- Follow the on-screen prompts for first-time system setup.
Recovering from the hard drive during startup
To reinstall Windows and all pre-installed software and drivers:
- Turn on your computer, then press Alt+F10 during startup. Packard Bell Recovery Management opens.
- Click on Restore system from factory default.
Caution: Continuing the process will erase all files on your hard drive.
- Click on Next. Your hard drive's original, factory-loaded contents are recovered. This process will take several minutes.
Recovering from your recovery backup
To reinstall Windows and all pre-installed software and drivers:
-
Find your recovery backup:
-
If you a using optical discs, turn on your computer, insert the first system recovery disc ('Windows Recovery Backup') into your optical disc drive, then restart your computer.
- If you a using a USB disk, plug in the USB drive and turn on your computer.
Caution: Continuing the process will erase all files on your hard drive.
-
If it is not already enabled, you must enable the F12 Boot Menu:
-
Press F2 when starting your computer.
-
Use the left or right arrow keys to select the Main menu.
-
Press the down key until F12 Boot Menu is selected, press F5 to change this setting to Enabled.
- Use the left or right arrow keys to select the Exit menu.
- Select Save Changes and Exit and press Enter. Select OK to confirm.
-
Your computer will restart.
-
During startup, press F12 to open the boot menu. The boot menu allows you to select which device to start from, such as the hard drive or an optical disc.
- Use your arrow keys to select the line CDROM/DVD or USB HDD, then press Enter. Windows installs from the recovery backup instead of the normal startup process.
- Follow the on-screen prompts to complete the recovery.
REGULATORY INFORMATION
PREVENTION OF HEARING LOSS
- Caution: Permanent hearing loss may occur if earphones or headphones are used at high volume for prolonged periods of time.
This device have been tested to comply with the Sound Pressure Level requirement laid down in the applicable EN 50332-1 and/or EN 50332-2 standards.
- Note: For France, mobile headphones or earphones for this device have
been tested to comply with the Sound Pressure requirement laid down in the applicable NF EN 50332-1:2000 and/or NF EN 50332-2:2003 standards as required by French Article L. 5232-1.
To protect your hearing, follow these instructions.
- Increase the volume gradually until you can hear clearly and comfortably.
- Do not increase the volume level after your ears have adjusted.
- Do not listen to music at high volumes for extended periods.
- Do not increase the volume to block out noisy surroundings.
- Decrease the volume if you can't hear people speaking near you.
RADIO DEVICE REGULATORY NOTICE
- Note: Regulatory information below is for models with wireless LAN and/or Bluetooth only.

General
This product complies with the radio frequency and safety standards of any country or region in which it has been approved for wireless use. Depending on configuration, this product may or may not contain wireless radio devices (such as wireless LAN and/or Bluetooth modules). Information below is for products with such devices.
Wireless operation channels for different domains
N. America
Japan
Europe ETSI
2.412-2.462 GHz
2.412-2.484 GHz
2.412-2.472 GHz
Ch01 through Ch11
Ch01 through Ch14
Ch01 through Ch13
This equipment is in compliance with the essential requirements and other relevant provisions of Directive 1999/5/EC.
France: Restricted wireless frequency bands
Some areas of France have a restricted frequency band. The worst case maximum authorized power indoors is:
- 10 mW for the entire 2.4 GHz band (2400 MHz - 2483.5 MHz)
- 100 mW for frequencies between 2446.5 MHz and 2483.5 MHz
- Note: Channels 10 through 13 inclusive operate in the band 2446.6 MHz to 2483.5 MHz.
There are few possibilities for outdoor use: On private property or on the private property of public persons, use is subject to a preliminary authorization procedure by the Ministry of Defense, with maximum authorized power of 100mW in the 2446.5 - 2483.5 MHz band. Use outdoors on public property is not permitted.
In the departments listed below, for the entire 2.4 GHz band:
Maximum authorized power indoors is 100mW
Maximum authorized power outdoors is 10mW
Departments in which the use of the 2400 - 2483.5 MHz band is permitted with an EIRP of less than 100mW indoors and less than 10mW outdoors:
| 01 Ain Orientales | 25 Doubs | 59 Nord | 75 Paris |
| 02 Aisne | 26 Drome | 60 Oise | 82 Tarn et Garonne |
| 03 Allier | 32 Gers | 61 Orne | 84 Vaucluse |
| 05 Hautes Alpes | 36 Indre | 63 Puy Du Dome | 88 Vosges |
| 08 Ardennes | 37 Indre et Loire | 64 Pyrenees Atlantique | 89 Yonne |
| 09 Ariege | 41 Loir et Cher | 66 Pyrenees | 90 Territoire de Belfort |
| 11 Aude | 45 Loret | 67 Bas Rhin | 94 Val de Marne |
| 12 Aveyron | 50 Manche | 68 Haut Rhin | |
| 16 Charente | 55 Meuse | 70 Haute Saone | |
| 24 Dordogne | 58 Nievre | 71 Saone et Loire |
This requirement is likely to change over time, allowing you to use your wireless LAN card in more areas within France.
Please check with ART for the latest information (www.artelecom.fr).
- Note: Your WLAN Card transmits less than 100mW , but more than 10mW .
List of National Codes
This equipment may be operated in the following countries:
| Country | ISO 31662 letter code | Country | ISO 31662 letter code | Country | ISO 31662 letter code | Country | ISO 31662 letter code |
| Austria | AT | Germany | DE | Malta | MT | United Kingdom | GB |
| Belgium | BE | Greece | GR | Netherlands | NT | Iceland | IS |
| Cyprus | CY | Hungary | HU | Poland | PL | Liechtenstein | LI |
| Czech Republic | CZ | Ireland | IE | Portugal | PT | Norway | NO |
| Denmark | DK | Italy | IT | Slovakia | SK | Switzerland | CH |
| Estonia | EE | Latvia | LV | Slovenia | SL | Bulgaria | BG |
| Finland | FI | Lithuania | LT | Spain | ES | Romania | RO |
| France | FR | Luxembourg | LU | Sweden | SE | Turkey | TR |
CE COMPLIANCE REQUIREMENT
Products with the CE marking comply with both the Electromagnetic Compatibility Directive (2004/108/EC) and the Low Voltage Directive (2006/95/ EC) issued by the Council of the European Communities.
CE
Compliance with these directives implies conformity to the following European Standards:
EN55022: Radio disturbance characteristics
EN55024: Immunity characteristics
EN61000-3-2: Limitation of harmonic current emissions
EN61000-3-3: Limitation of voltage fluctuation and flicker in low-voltage supply system
EN60950-1: Product Safety. If your computer includes a telecommunication network board, the input/output socket is classified as Telecommunication Network Voltage (TNV-3).
Note for computers equipped with wireless controllers and wired modems:
Hereby, Packard Bell, declares that the wireless devices provided with this computer include a low power radio transmitter in full compliance with the essential requirements and other relevant provisions of Directive 1999/05/EC for Low Voltage, EMC and RF of the R&TTE.
C E ①
EN300328 - Electromagnetic compatibility and Radio spectrum Matters (ERM).
EN301489-1/-7/-17/-24 - EMC standard for radio equipment and services, common technical requirements.
EN301893 - Broadband Radio Access Network, 5GHz high performance RLAN, harmonized EN covering essential requirements of article 3.2 of R&TTE directive.
EN62311 - Generic standard to demonstrate the compliance of low power electronic and electrical apparatus with the basic restrictions related to human exposure to electromagnetic fields.
List of applicable countries
This product must be used in strict accordance with the regulations and constraints in the country of use. For further information, contact the local office in the country of use. Please see http://ec.europa.eu/enterprise/rtte/implement.htm for the latest country list.
MODIFICATIONS TO THE PRODUCT
CE Marking
Packard Bell cannot be held responsible for unauthorized modifications made by the user and the consequences thereof, which may alter the conformity of the product with the CE Marking.
Radio frequency interference
The manufacturer is not responsible for any radio or TV interference caused by unauthorised modifications to this equipment.
CONNECTIONS AND REMOTE EARTHSH
PELV (Protected Extra Low Voltage)
To ensure the extra-low voltage integrity of the equipment, only connect equipment with mains-protected electrically-compatible circuits to the external ports.
SELV (Safety Extra Low Voltage)
Every input and output of this product is classified as Safety Extra Low Voltage.
Remote earths
To prevent electrical shock, connect all local (individual office) computers and computer support equipment to the same electrical circuit of the building wiring. If you are unsure, check the building wiring to avoid remote earth conditions.
Building supply
Only connect the equipment to a building supply that is in accordance with current wiring regulations in your country. In the U.K., these are the IEE regulations.
POWER SUPPLY AND CABLES
Power supply
The power supply socket-inlet and socket-outlet (if equipped) are classified as Hazardous Voltage.
You must unplug the power supply cord and remove the battery to disconnect the equipment from the power supply. In that aim, the socket-outlet should be installed near to the equipment and should be easily accessible.
Input rating: Refer to the rating label on the bottom of the computer and ensure that your power adapter complies with the specified rating.
Under no circumstances should the user attempt to disassemble the power supply. The power supply has no user-replaceable parts. Inside the power supply are hazardous voltages that can cause serious personal injury.
A defective power supply must be returned to your dealer.
Power cables and plug
This Product requires a three-wire grounded power cord and plug. The plug only fits in a grounded power outlet. Make sure the power outlet is properly grounded before inserting the plug. Do not insert the plug into a non-grounded power outlet. Contact your electrician for details.
The cord length must not exceed 2.5 metres. To prevent electrical hazards, do not remove or disable the ground contact on the power cord. Replace the power cord if it gets damaged. Contact your dealer for an exact replacement. In Europe, the plug must be rated for 250 VAC, 10 amp minimum. The plug must display an international agency approval marking. The cord must be suitable for use in the end-user country. Consult your dealer or the local electrical authorities if you are unsure of the type of power cord to use in your country.
Cables
For cables which are not delivered with the Product in the computer's packaging:
The EMC performance of the system is guaranteed only if the cable and interface use efficient shielding.
The use of shielded interface cable is required for USB, IEEE1394, serial, printer, game, analog or digital audio/ video, PS2, TV or FM antennas, and generally all high-speed cable interfaces.
Use only UL Listed No. 26AWG or larger telecommunication cords.
Only Ethernet LAN or RTC modem cable can have length exceeding 3 metres.
Packard Bell recommends that you add a ferrite core round clip to each cable connecting your computer to a hardware device that was not included with your computer.
- Ferrite reference: 28A-2029 from Steward (two loops)
During product certification, Packard Bell used the following cable quality:
- USB2.0 Certified Cables from Hama 46778
- IEEE1394 shielded FireWire from Hama 50011
- RCA-RCA shielded Audio/Video Cables from Thomson KHC001M, KHC012M, KHC028M
- Stereo Jack shielded Audio cables from Hama 43330H, 42714H
Heat Build-up and Portable Computers
The AC adapter and the underside of the computer can become hot after prolonged use. Sustained physical contact with either should be avoided.
CHASSIS COVER REMOVAL AND REPLACEMENT
Before removing the chassis cover to service or modify the equipment, you must disconnect all power and modem cords, and remove or disable the battery.
- Caution: Some components inside the computer can become hot after prolonged use.
You then must close the chassis before you plug in and switch on the equipment.
LASER COMPLIANCE STATEMENT
The optical devices are tested and certified to be compliant with International Electrotechnical Commission IEC60825-1 and European EN60825-1 standards for Class 1 laser products.
Class 1 laser products are not considered hazardous. The optical devices are designed such that there is never human access to laser radiation above a Class 1 level during normal operation or prescribed maintenance conditions.
The optical devices installed in your computer are designed for use solely as components of such electronic product and therefore do not comply with the appropriate requirements of Code of Federal Regulation Sec. 1040.10 and Sec. 1040.11 for COMPLETE laser products.
Because exposure to laser radiation is extremely hazardous, under no circumstances should the user attempt to disassemble the laser device.
PACKAGING
The packaging of this product is compliant with the European Environmental Directive 94/62/EC from December 20 th 1994 and its equivalent in the French Legislation by the Decree 98-638 from july 20 th 1998.
COMPLIANT WITH RUSSIAN REGULATORY CERTIFICATION


ME61
ENVIRONMENT
OUR COMMITMENT TO ENVIRONMENTAL PROTECTION
Environment has been at the heart of our products.
Packard Bell is committed to limit the environmental impact of its products during product life cycle.
Starting at design phase, with a very strict procurement policy, maximum attention is given to electronic components in order to limit their weight in heavy metals such as lead, cadmium, chromium, mercury, etc. Suppliers are asked, for each part of any product, to respect all regulations.
As far as end-of-life products are concerned, measures have been taken to anticipate and facilitate the recycling of all our products. Thus, all plastic parts heavier than 25 grams used in Packard Bell products are labelled ISO 11469. This label allows a quick recognition of the material and eases its valorisation. Likewise, desktop computers are designed to be easily dismantled, with screws being replaced by clips.
PRODUCT DISPOSAL
The 2002/96/EC Directive, known as Waste Electrical and Electronic Equipment (WEEE) Directive, requires that used electrical and electronic products must be disposed of separately from normal household waste in order to promote reuse, recycling and other forms of recovery and to reduce the quantity of waste to be eliminated with a view to reducing landfill and incineration. The crossed-out dustbin logo is there to remind you that these products must be sorted separately for disposal. These

rules concern all Packard Bell products and also all accessories, such as keyboard, mouse, speakers, remote control, etc. When you have to dispose of such products, make sure that they are correctly recycled by checking with your local authority, or by returning your old equipment to your retailer if you are replacing it. For information, visit www.packardbell.com/recycling.
Battery disposal (when applicable)
Before disposing of your equipment ensure that you have removed any batteries that may be fitted in the equipment. European law states that batteries must be collected for disposal separately from household waste. Do not throw your used batteries in the dustbin. Disposse of your used batteries via a battery collection scheme where available, or ask your distributor or local authority what infrastructures you can use. Your efforts will enable the safe collection, recycling and destruction of used batteries and will help protect the environment and reduce health hazards.
- Caution: Risk of explosion if battery is replaced by an incorrect type. Dispose of used batteries according to the instructions.
Mercury advisory
For electronic products containing a non-LED-backlit LCD/CRT monitor or display: Lamp(s) inside this product contain mercury and must be recycled or disposed of according to local, state or federal laws. For more information, contact the Electronic Industries Alliance at www.eiae.org. for lamp-specific disposal information, check www.lamprecycle.org.

SOFTWARE LICENSE
- Note: Most of the software applications are already preinstalled on your Packard Bell computer. They are ready to use or to set up. However, some titles require a CD or DVD to run. You will find these discs in your computer's packaging.
Packard Bell License Agreement (CD and/or DVD Products). This copy of the original is your proof of license. Please treat it as valuable property.
Important!
Read carefully before installing the software.
The following License Agreement applies to you. This is a legal agreement between you (either individual or an entity) and Packard Bell. By installing the software you are agreeing to be bound by the terms of this Agreement. If you do not agree to the terms of this Agreement, promptly return your entire computer system, the unopened software packet(s), if any, as well as the accompanying terms (including written materials or other container(s)) in the place you obtained them for a full refund.
PACKARD BELL SOFTWARE LICENSE
1. Grant of License
This Packard Bell License Agreement ("License") permits you to use one copy of the specified version of the Packard Bell SOFTWARE identified above (which may include at least one CD or DVD disc) on any single computer, provided the SOFTWARE is in use on only one computer at any time. If you have multiple Licenses for the SOFTWARE, then at any time you may have as many copies of the SOFTWARE in use as you have Licenses. The SOFTWARE is "in use" on a computer when it is loaded into the temporary memory (i.e. RAM) or installed in the permanent memory (e.g. hard disk, CD and/or DVD, or other storage device of that computer, except that a copy installed on a network server for the sole purpose of distribution of other computer is not "in use." If the anticipated number of users of the SOFTWARE will exceed the number of applicable Licenses, then you must have a reasonable mechanism or process in place to assure that the number of persons
using the SOFTWARE concurrently does no exceed the number of Licenses. If the SOFTWARE is permanently installed on the hard disk or the storage device of a computer (other than a network server) and one person uses that computer more than 80% of the time it is in use, then that person may also use the SOFTWARE on a portable or home computer.
2. Copyright
The SOFTWARE is owned by Packard Bell or its suppliers and is protected by United States copyright laws and international treaty provision. Therefore, you must treat the SOFTWARE like any other copyrighted material (e.g. a book or musical recording) except that you may transfer the CD and/or DVD disc portion of the SOFTWARE, if any, to a single hard disk provided you keep the original solely for backup or archival purposes. You may not copy the CD and/or DVD disc portion of the SOFTWARE or the written materials accompanying the SOFTWARE.
3. Other restrictions
You may not rent or lease the SOFTWARE, but you may transfer the SOFTWARE and accompanying written materials on a permanent basis provided you retain no copies and the recipient agrees to the terms of this Agreement. You may not reverse engineer, decompile or disassemble the SOFTWARE. Any transfer of the SOFTWARE must include the most recent update and all prior versions.
THIRD PARTY SOFTWARE OR FREE SOFTWARE LICENSE INFORMATION
Software pre-loaded, embedded or otherwise distributed with the products provided by Packard Bell does contain free or third party software programs (the "Free Software"), which are licensed under the terms GNU General Public License (the "GPL"). The Free Software is marked as such. Your copying, distribution and/or modification of the Free Software shall be subject to the terms of the GPL.
The Free Software is distributed in the hope that, but it will be useful WITHOUT ANY WARRANTY; without even the implied warranty of MERCHANTABILITY or FITNESS FOR A PARTICULAR PURPOSE. The provisions of the GNU General Public License shall always apply. You may access http://www.gnu.org directly to obtain a copy of the
GPL or write to the free Software Foundation, Inc. and request a copy. The address of the Free Software Foundation, Inc is: 59 Temple Place - Suite 330, Boston, MA, 02111-1307, USA.
For a period of three (3) years as commencing from your receipt of this software, you may obtain a complete machine-readable copy of the source code for the Free Software under the terms of the GPL without charge except for the cost of media, shipping, and handling, upon a written request to us.
Contact us if you have any further questions. Our mailing address is 8F, 88, Sec. 1, Hsin Tai Wu Rd., Hsichih, New Taipei City 221, Taiwan.
INDEX
A
Autplay 39
B
Batteries 98 low conditions 34
battery disposal 98 maximizing life 30
battery pack optimizing 33
battery-low warning 34 removing 32, 33
characteristics 30 using the first time 31
charging 33 brightness
checking charge level 33 hotkeys 17
installing 32 Browser 51
C
Cables 9, 94 features 13
on indicator 16
checking level 33 Computer environment 8
Cleaning your computer. 9 connections
computer network 26
D
Disk Cleanup 68 Packard Bell Website 53
Disk Defragmenter 69 Download 39
Display Drives
hotkeys. 17 Memory card reader.. 24
Documentation DSL 46
E
Electronic Program Guide. 38 Environment 97
Epilepsy warning 12 Error checking. 67
F
Firewall 55, 62
H
HDD (Hard Disk Drive) Health precautions 11
Free space 68 Helpdesk 67
Management. 70 hotkeys. 18
1
Interference 93 Firewall 55,62
Internet Internet Service Provider (ISP) 45
Connection 45, 46
K
Keyboard hotkeys 18
L
LAN (Local Area Network) 47 Last Known Good Configuration 74
M
Maintenance Malware 55
HDD management 70 Memory card reader. 24
Recovery Management Program... 37, Modem 46
77 Multimedia files 37
System tools 71
N
network. 26 Norton Internet Security.. 54, 57
Network connections 47
P
Packard Bell Recovery Management Program ... 37,
77 ports 24
Website 53 Power cords. 9
R
Recovery Removable media devices. 25
Recovery Management Program.... 37, Removing hardware. 25
77 Removing software 70
System Restore 72Restore points. 73
Regulatory Information 89, 97
s
Safe Computing 67 hotkey 17
Safety precautions 8 Spyware 54
Security Support
Antivirus. 56 Packard Bell Website 53
Updates 63, 74 System Restore 72
Windows Action Center 61, 74 System tools
Software Disk Cleanup 68
Removing software. 70 Disk Defragmenter 69
Software License. 99 Error checking.. 67
speakers Windows System Restore. 72
T
TVtuner 37
U
Uninstalling hardware 25 Windows automatic updates.. 63, 75
universal serial bus. 26 User Account Control 65
Update
V
view left 19
front. 19 rear. 19
right 20
W
Warranty. 7
Welcome Center 36
WiFi 47, 48
Windows
System Restore 72
Using Windows 36
Welcome Center 36
Windows Action Center 61, 74
Windows automatic updates.... 63, 75
Windows Defender 64
Windows Media Center 37, 38
Windows Media Player 37
Windows Remote Assistance. 76
VOUS AVEZ DES PROBLEMES?
Support Packard Bell
EXTENSION AVEC DES OPTIONS
Packard Bell Recovery Management
MODIFICATIONS APPORTÉES AU PRODUIT
Homologation CE
MISE AU REBUT DU PRODUIT
Programme Recovery ports 25
Management 39,85 PowerDVD. 41
Packard Bell-Support
Packard Bell Recovery Management
PELV (Protected Extra Low Voltage)
Packard Bell Recovery Management
Recovery Management Pulizia del computer 10
Program. 39,83 Pulizia disco. 73
Recovery Management Program.... 83 Recovery Management Program .... 39
Packard Bell Recovery Management.... 40
Redes sociales (optional) 44
Internet 50
Packard Bell Recovery Management
Norton Internet Security. 59, 63
0
ordenador
Packard Bell Recovery Management.... 40
Redes sociais (optional) 44
Internet 50
Cartoes SD, SDHC e SDXC
Packard Bell Recovery Management
Aceder as sus redes sociais
Restauro doSYSTEMAWindows.
Anular oultimate restauro
Norton Internet Security. 58, 62
P
Packard Bell 26
Programa Recovery PowerDVD. 42
Programa Recovery Remover software 77
Management. 40, 85 Reproducao automatica 42
Restauro do systema 79 Restauro do systema 79
rede 28
s
Segurarca Software
Antivirus 60 Remover software 77
De computer upgraden 25
Packard Bell Recovery Management
3g (WWAN of 'Wireless Wide-Area Network')
PELV (Protected Extra Low Voltage)
SELV (Safety Extra Low Voltage)
VERKLARING LASERPRODUCT
make 27 Downloaden 42
DSL 50
E
network. 27 Norton Internet Security.. 58, 62
Packard Bell Recovery Management. 37
Sosiale nettverk (valgfritt) 41
Internet 47
Dine forste trinn pa nettet 47
Beskyttdatamaskinen 47
Velg Internett-tjenesteleverandr 47
Oprprinnelig utgave: 7 November 2011
Packard Bell Recovery Management
Windows Media Center (tilleggsutstyr)
Enkelte datamaskiner ineholder ogsa alt i ett-mediesentre, som for eksempel Windows Media Center. Disse programmene kan handtere et bredt utvalg av medieinnhold, og vises med enkle menyer som lett kan styres med en fjernkontroll. Du kan se TV live eller som opptak (hvis datamaskinen din har en TV-
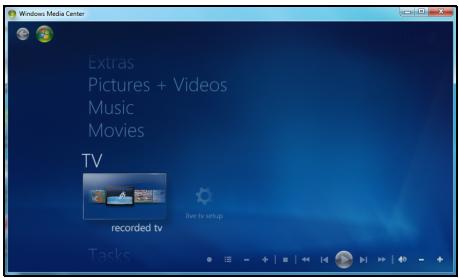
- Ferrittreference: 28A-2029 fra Steward (to slyfer)
Lastned. 40 hurtigmaster 17
M
Miljo 102 Modem 48
Minnekortleser 24
N
nettwerk 26
Norton Internet Security. 56, 60
Windows Automatiske
oppdateringer 67,80
P
Packard Bell
PowerDVD 39
Recovery Management
Programvare
programmet 37,82
Systemgenopppretting. 76
Packard Bell support
Packard Bells websted.
Service of computeren
Packard Bell Recovery Management
Packard Bells websted
Administration of hardisken
PELV (Protected Extra Low Voltage)
SELV (Safety Extra Low Voltage)
Packard Bell-support
Packard Bell Recovery Management
Alternative for systematerstalling
Ominstallera drivrutiner aller program
PELV (Protected Extra Low Voltage)
SELV (Safety Extra Low Voltage)
Program for Recovery
Management 38,80
Webblats 56
portar 25
PowerDVD. 40
Programvara
Avinstallera program. 73
Programlicens 102
R
Rengora datorn. 10
s
Sabotageprogram 58
Program for Recovery Management 38,80
Systemverktyg. 74
Packard Bell Recovery Management
Packard Bell Recovery Management.... 43
CounaalbHbIe cETn (DOnOpHInTeJbHo) .... 47
IHTepHeT 54
PepBbIe WArn B IVHTepHeTe 54
3aunTa KOMnbTepea 54
BbI6op noCTabUzka ycIyr INHTepHET. 54
CetebbIpoKlIOUeHn 57
Pa60Ta B INHTepHete 60
Be30nachoctb 63
Cnyk6a npdpekkn 80
Be3oNaCha pa6ToHa KOMNbTepe 80
O6cnyxnbHne 80
O6HOBLeHnA 90
YdaneHHbI nOMOuHnK Windows. 91
BocctaHOBHeHne 93
Packard Bell Recovery Management 93
Co3dHHe DnCKOB DnB BOCCTaHOBnEHn.94
BocctaHOBHeHne CnCTembl 97
TINbI BOCCTAHOBJIeHnA 98
HopmatuBnaHΦopMaun
107 yka3ATEJIb
3aunTa okpykaioe cpebl
117
JIiueH3nHa nporpaMMHoe
obecneueHne
119
Copyright © 2011. Bce npaba 3aunuenebl.
PykoBODCTBO noIb3OBeTJI KOMnIbTePa Packard Bell cepnn dot s
Bo3MOxHOCnI NOkJIIOueHn
Pa3bEmbl KOMnbIOTepa cnykata NpNkNIOUeHnK Hemy BHeuHX yCTpoiCTB. IopraDOK NOpKnIOUeHn pa3NHyBbIX BHeuHnx yCTPOiCTB K KOMNbIOTepy CM. B cIeDuOJcE m pa3dJIe.
Ucmpoucmso ymeHua Kapm nammu
Kap'ti namrtn npoko nCnOJb3yOTcB uDPOBbIX kamepax, KPK, nIeepax MP3 mO6NJbHbIX TeJefohax.
YcmaHoEka Kapmbi nammu

- BctabJIaTb KapTbI naMaTn B rHe3da yCTpoiCTBa CHTbIBaHnry HxKHO KOHTaKTAMN BHn3.
-
Octopoxho BCTabTe KapTu nAmrTu B rHe3do. EcJn KapTa nAmrTu BCTabJIaTcC TpyDom, To IpeBepHIne ee.
-
BCTaBJIaTb KapTu pAmrTu B rHe3Io HuyKHO Do UeIuKa. I3 rHe3Ja KaPta OCTaHETcB bICTyNaTb Ha HeCKOJIbKO MmJIIMMeTpOB.
B 3aBnCIMoCTN OT TINOB 3aIncAHHbIX Ha KapTe NaMAYTN paJIOB MOKeT OTKpbITbcra OKHO Aemozanyck Windows c npednoXeHneM OTKpbITb INC NOMOu bcoOTBeTcTByUoSei MM nporpammbl. BbIbePte NOxOJaUO nporpammy IJIH HaxMMTE OTMeHa. Ecn HA KapTe HeT paJIOB INIeCTb FaiJIbI HEN3BeCTHO TIna, To OTKpoETcR OKHO, NOKa3bIBaHOe CeOpexmoe KapTbI.
Kapmbi SD, SDHC u SDXC
Hecmotpa Ha CXOXn BHeuHn BnD, pa3HbIe Tnblkapt SD OTInuAOTcpa3HOJ emKocTbHO. Y kapr SD emKocTb DoCTnraet 4 TB, y kapr SDHC-32 TB, a emKocTb Kapr SDXC MoKeT DoCTnRaTb 2048 TB (2 TB).YCTpOJCTBO UTeHn KaPr NaMaTn B BaUem KOMNbIoTepe NOpDepeXnBaETkapTb TINOB SDHC nIIu SDXC.
Пи汞анue: Kapmbi nammy SDXC moxho ucnno3o6ammbonko ycmpoucmee ymenu, noodepkueaouem qopmamSDXC; Kapmbi SD u SDHC moxho ucnno3o6amb e ycmpoucmeeymenurIIO6OZo muna.
I3neueHue Kapmbu 13 ycmpoucmea cumbibaHa KaPm nAmmu
- Haxmte 3NaOK Be3onacHoe n3BneueHne yctpoiCTB n DnCKOB Ha PAnHeu yBedomJIeHu (pIOM c YacAMn).
- Μελικητε Μβληχβ καρτγ SD (ΗΝΙ ΜΜΑ yγθροίνιδα).
3.ДоЖДИТЕСь NOЯВЛЕнЯ COOБцЕня Tepeb MOЖHO 6e3oNacHo u3eJIeY yCmpoUcM60.
4.ИЗВЛЕКИТЕΚAPТУ.
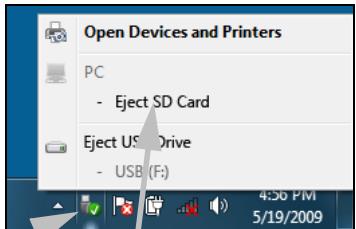
1

2
Eject SD Card
BcmpoeHHbIe cpecdmea paobmbi cemu
BcTpoEHHbIe cpeCTBa pa6oTBi B ceTN no3BOJIaOT noDKNIOUaTb BaW KOMNbIoTeP K ceTN Ethernet.
ПоdkлочиЕ Ethernet-кавь ot pa3bema Ethernet (RJ-45) на Корпусе комъютepа К сеТбОй розелп сеТБOMУ KOнцentpaTopy.
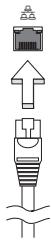
USB (yHueepcaIbHa nocneoeamEnbHa uHa)
Pa3bem USB bIcOKocOpocTHoI IINHbI nocJeIOBaTeJbHOI nepeaHn DaHHbIX PO3BOJIeT IOkJIIOuATb BHeUHHe USB-ycTroPcTBA, He 3aHmam peCypcoB cNCTeMbI.
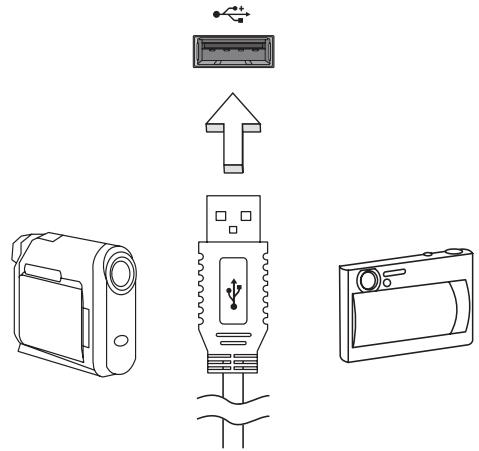
B onpeJeHbIX MoJEnI KOMNbIOTePOB MOKeT 6bIT OINH INH HeCKoJIbKO pa3BeMOB USB 3.0. OHn IOXoxn Ha o6bUHbIE pa3BeMbl USB, HO CoepKaat DOONHHTeJIbHbIe BHyTpEHHne pNOBOdHNKn N IMeOT cINHn CBET. K 3TtM pa3BeMaM MOxHO NOkJIIOuAtb yCTpoiCTBa, POdEpKNaIOUcne CTAndapt USB 3.0, dJa nepeDaun daHbIX c 6OJee BBICOKO CKOpocTbIO.
Pa3beM VGA
Cnyknt IJn PNOKNUOeHn MOHNTopa c pa3bemOM VGA. CoOTBeTCTByUoIuN Ka6eIb OBbluHO BXODHT B KOMJIneKT NOCTaBKN MOHNTopa.
AdaanTep ceTeBOro NITaHnIa
BaW KOMNbIOTep MoKet IcNOJIb3OBAtB npINaRaEmb BHeUHn aAanTep nITAHnI dIpa6Obl OT cTeBOrO 3JeKtpoNTAHnI. PpINaRaEmb UHyp nITAHnI COOTBeTCTByET CTaHdApTaM TOI CTrpaHbI, rDe 6bl KynJIeH KOMNbIOTep.
3TOT aanTep nntaHnna oecneuBaet HxKhoe nntaHne IpaobtI KOMnbIoTepa N OndHOBpeMeHHoNpO3apJkaeT erO akkymyIaTOp.
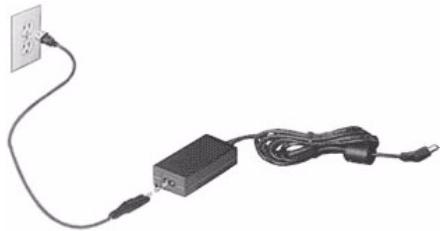
BHMaHne! He 3akpbIbaiTe aadantep cTeBOro nItaHnI H KlaIte Ha Hero noctopOHHe npedMebl. NoctopOHHe npedMebl, noLOXeHHbIe Ha aadantep, He no3BOJr t Emy OxJaXdabcra BO BpeMa pa60TbI.
Приименяп Te Tolyko aадanTep ceteBOrO nITaHnA, BXODaIu B KOMPJIeKT nocTaBKn KOMNbIoTepa. Bo3MoXHo, dpyrne aadanTepbI bByIgIyIaT noXoKe, HO IX II prImeHHeHne MoKet NOBpeDInTB BaU KOMNbIoTeP.
BhImaHne! Nocne npoOJXHTeJbHO pa60tI aanTepeCteBOrO nITaHnI uDnIe KOMNbIOTEpa MOryT HArpeBaTbcr.3To HopMaJIbHOe AIBHeHne, Ho npoOJXHTeJbHbI KOHTaKT CHHM MoRyT pNpUHHnTb TpaBMy.
AkkymyIaTOp
KoMnIbIOTep IcNoJIb3yET aKKymJIaTOp, oBeCneYBaIoUmI npOIOJIxNtTeJIbHOe BpeMra ABTOHOMHO pa6Otbl.
XapakTepnKn aKkymJIaTOPa
AkkymyIaTOp o6laJaAeT cIeDuOuIIMn XapaKTePecNTkAmn:
- COOTBETCTBNE TEKUYUIM TEXHOJIOURueCKNM CTaHdapTaM.
- Bыдача п dedупждени O nH3KOM урове заряda.
AkkymyJIaTOp 3apJxJaTeCp npi noDkJIIOUeHIn aJaITepa ceTeBOrO nITAHnK KOMNbIaTepy. AkkymyJIaTOp MOXHO 3apJxAtb, He npepbIBa pa6oTy c KOMNbIaTePOM dJa 3apJda aKKymyJIaTePoa. Tem He MeHee, pni BbIKJIIOueHHOM KOMNbIaTepe aKKymyJIaTOp 3apJxAeTc 3HaHTeJIbHO 6bICTpee.
AkkymyIaTOp IO3BOJareT IcNoJIb3OBAtB KOMNbIoTeP B IOe3dKe IIN Ipn C60x 3JIeKTPoNITaHnI. Cobetyem IMeTb B pe3epBe IOnIOJIHTeJIbHbI IOJIHOCTbIO 3apXeHHbI aKKymyIaTOp. KyNTb pe3epBHBI aKKymyIaTOp MOXHO B KOMNbIoTePHom MaRa3UHe.
YeenuyeHue cpoKa cnYk6bI akKymnIamopa
Kak n BCE npyrne akkymylantopbl, akkymylantop BaWero KOMnbIOTepa CO BpeMeHem HauHET TepaTb EMKoCTb. 3To 3HaHT, 7TO BpeMpaBoTbI O t akkymylantopa Co BpeMeHem COKpaUaetcra.
Дпя npoДлени Срoka Cnyжь AkkMyЯТopa COBetyem BblONHЯТспдуюше peKOMeHdaци.
Iodomoeka HOB02o akKymyIamopa K UcNoJIb3OeaHIO
Ipei nepBbIM nCNoJIb3OBAHnEM HOBO aKKyMylTOpa COBeTyEm npOBecTu npoueDpy erO "NOIroTOBKn" K paBoTe:
- BcTaBbTe HObIy AkKMyJrTOp B YbIKNoeHHbI KOMnIbOTep.
2.Подсоевине aадантep ceTeBOrO nITaHnI N ПОЛнOCьIO 3apЯДNTe aKKyMylTOp. - OToeDInHte aanTep cTeBOro nItaHn.
- BkIIOUHTe KOMNbIoTeP i paOtaIte, IcNoJIb3yra 3NeKTpOnITaHHe OTAKKyMylrTopa.
5.Дохдntecb nonHoro pa3pra da aKKymyIaTopa. - Choba noДcoeДиHTe aДaПТepe CeTeBOrO nIITaHnI eIe pa3 noJIHOCTbIO 3apAДte aKKyMЛЯrTOp.
Packard Bell Recovery Management
YTo6bI NOIroTOBnTb KOMNbIOTep K BOCCTaHOBJIeHIO CnCTEmbl C nCNoJIb3OBAHnEM DOnONHITeMbHbIX NapaMeTpOB, CNeJyET KaK MOxHO cKopee CO3daTb HabOp INCKOB IJRA BOCCTaHOBJIeHnIA. IOnONHITeMbHbIE CBeDeHnA CM. Ha CTp. 93.
Пουарьамен Windows Media
aBtOMaTnueckoe ObHOBJIeHne, BbINOJIHReMoe Ipr KAcKdOM NODKJIIOUeHNI K INThepHeTy.
Bce 60JIee nOnyIaRbIMn cTaHOBcTcKOMPJIeKCHbIe peSeHnra, TaKne KAK Norton Internet Security, copeJxauue B ODNHom NaKeTe BCE npOrpAMMbI dIg CTeBOI 3aunTbI: 6paHdMay3p, aHTuBnpyChoe u aHTuINIOHCKOE IIO, n DOnOHNtEbnHbIe BO3MOXHOCTN, TaKne KAK 3aunTa OT HeKeJatEbnHoi NoUThbI n OgrpanuHene DoCTyPa Deten. MHorne NOpJB3OBaTeJI npEnoOHNTaOT NcNOJb3OBAb TNaKeTb INTErpnpOBaHHbIX npOrpAMM 3aunTbI, a He yCTaHaBnBaTb, HAcTpAnBaTb N O6HOBJIaTb pa3HbIe TINbI OTDeJIbHbIX 3aUnTHbIX npOrpAMM.
BbIbePnte foaiNbI, KOToPbIe XOTnTe ydaJIITb. FoaiJbI, ydaJIeHHbIe C BHeUHnx ycTpoINCTB, TaKx KAK KapTbI NaMAYN, He NepeHOcRcB KOp3Hy, a ydaJIaHOTc6e3BO3BpaTHO.
- YdaIaIte HeuCNoJIb3yEmble IporpaMMbl:
Hajmte Ncck > NaheJIy npaBneHnra > PporpaMMbl > PporpaMMbl KOMNoHEHTbl.
- CkOIpuIte faJIbI Ha 3aIncbIbAeMbIe KOMnKT-DnCK nJIN DVD-DnCK (ecJN B KOMnIbIOTepe yCTaHOBNeHO yCTpOJCTBO 3aIncn TaKnx DnCKOB) n COtpnTe INC JECTKORo DnCKa
3anyck cnkyke6hby npoapamm cucmembl Windows
B COCTAB CNTEmbl Windows BXoJrT HeCKOJIbKO yIooHbIX cpeIcTB, oBeceNeuBAIOUxN 6ecnepeboHyO pa60Ty KOMNbIoTepa. PeryIpyHO 3aynckaiTe 3TN CpeDCTBa, YTO6bl rapaHTnpOBaTb HAdeJXHOCTb N BvICOKyIO npON3BOIDTEJBHOCTb CNTEmbl. Iy npOSeHnIg OBcnyKINBaHnB Rpynny CnyXe6HbIe BXoJrT pOrpAMMa Ha3NaueHHbIe 3aHaHn, KOtOpYIO MOxHO nCNOJIb3OBAITd PeryIpyHoro 3aNySCa ONpeDeJIeHHbIX 3aJaU.
UTo6bl OTKpbITb CnncOK Cnyxue6HbIe npoepaMMbl, HaxMnte Pnyck > Bce nporpaMMbl, 3aTeB Cnncke nporpamM OTKpoIte nanky CtaHaprTHbIe N, HakoHeu, Bbl6epnTe Cnyxue6HbIe.
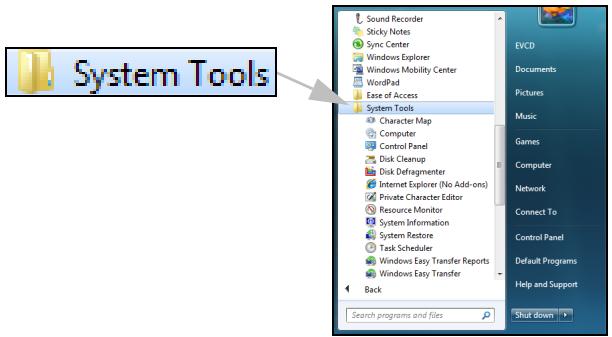
BocsmahOBneHue cucmembl Windows.
Функць ВocsmahoeHeue cucmembI OTCJIeKINBaET N3MeHEnB BwSeM KOMNbIOTepE n ABTomaTHueCKn CO3daET TOOKN BOCCTAHOBJIeHnB, B KOTOpbIX COxpaHReTcK ONfUrgaPauCn BaWeero KOMNbIOTepa npn KaJdOM 3HaunTeJIbHOM N3MeHEnn (HaNPImep, npn ycTaHOBKe npOrpAMM). 3Ta fYHKZmu MOKeT OTMeHrTB BpeDoHOCHbIe N3MeHEnn, pOn3OWeDiuNE B BAWeEM KOMNbIOTepE, n BOCCTaHaBJINaBaTb HAcTpOiKn n pa60TOcNOco6HoCTb, He ydaJIy PhaiJIb BAaNX IInhByx DaHHbIX (Takne KAK DOKyMeHTbl, JxprHaN pOcMoTpa Be6-caITob, fOToRpaΦn, 3JIeMeHTbl CnCKOB N36paHNoE nII coo6UeHn eI. NoUTbl).

Ppumeyue: ecnu xomume moIbko ydaunmb npoapammy, mo He uCnoIb3yUme fynKcuu "BocsmahOeNeHue cucmembi". Dnra ydaJeHua npoapamM u cNoIb3yuMe nyHkm PpoapamMbI u KOMNOHeHmbI Ha PaHenu ynpaBneHua.
Iopraok 3anycka yHKuuu "BocmaHOJIeHue cucmembi" c pa6oyeo cmona Windows:
HaxmTe Nyck Bce nporpaMMbI CtaHapTHbIE Cnyx6hble > BocctaHOBJeHne cncTeMbI.
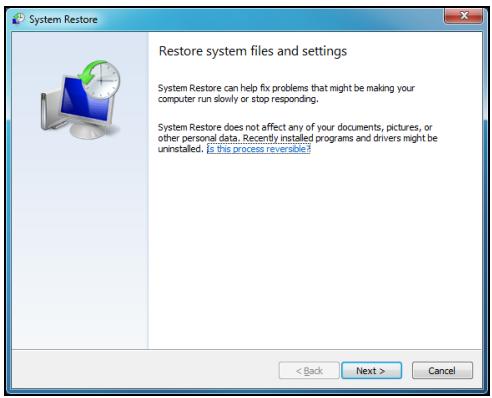
Ecnu pa6ouu cmon Windows He 3aepykaemc:
1.Bo Bpem3aRpy3Kn HaxMnTe KlaBnSi Alt+F10 nocJe nOABNeHn JIorOTnPa Packard Bell. OTKpoEtCn IpoaspMaMe oocMaHOeNeHnJ.
- BbI6epnte BocctaHOBHeHne cncTeMbI Windows n HauKMITE DaJIee. KomlbTOpe aTOMaTHueckn nepe3arpy3NTcR, n 3aNyCTHTC8 yHKUIN BoccmHOeJHua CucMebl.
IapamempbbooccmahObnHeu cUcmeMbI
Bo38pam kOmblomepa K npedbyuemy ccmohn
3TOT BapnAHT NO3BOJRAET BepHyTB KOMNBJOTep K COCTOHNIO Ha 6oJee paHHIO DaTy, He 3aTpaHnBa JIuHbIe DOKymeHTb I 3JeKtPOHHyIO NooTy (XOTy UTePAnHbIe DOKymeHTb I He 6yDyT BOCCTaHOBJIeHbI). ITO yMOnUaHNIO CnCTema Windows coxpanReT Obp3b CBOero COCTOHNIA PnI N3MeHeHIN OCHOBhIX npaMeTpOB CNCTembl (HaNPmEpe, Pnp YcTaHOBKe dpaBepOB INI HeKOToPbIX pporpAMM). 3TO nOle3HO, ecNI yCTaHOBka dpaiBepa 3aKOHUnacb Heydaue INIcStema nepeCTaJa pa60TaTb nocJe N3MeHeHIn ee npaMeTpOB.
- HaxmTe Danee.
- BbIbepeTe B cInsKe DaTy CO3dAnHn ToUKn BOCCTaHOBJIeHn I NaXMtTe Danee.
- Ha экpahe ПОДТВЕРЖDEHЯня HAXMITE FOTOBO,ЧTOБы BOCCTaHOBNTb COCTOHRHe KOMMbIOTepa HabbIbpaHHyO dAty n Bpemr.
Co3daHue moKU 8ocsmahoeHeu
CnCTema Windows abTomatnueckn co3daeT TOUKN BOCCTaHOBHeHnuepe3 paBhble npomexkyTKn BpemeHN nIIN nepeJ yCTaHOBKO HeKOTOpbIXnporpaMM nII nI dpaBepOB. 3TOT BapnaHT N03BOJIeT N0JIb3OBATeHIOco3DaBaTb PnHneO6XODIMOCTN CBOI CO6CTBeHHbIE TOUKN BOCCTaHOBJIeHn.
- HaxmTe Nysk > NaheIb ynpabNeHnra > NaHeIb ynpaBneHnra > CnCTema. Ha 6okOBoi PaHeJIHaxMITE 3aunTa cnCTembl n 3aTeM HaxMITE KhoNkU Co3DaTb...
- BBeDInTe OINCAHHe, xapakTepn3yUouee DaHHyIO TOOKy BOCCTaHOBJIeHnI. ΦYHKUINBocMaHOBJIeHnI CucMeMbI aBTOMaTUnCeKn Do6aBNT DaTy N BpeM K 3TOMy ImeHn.
- YTo6bI 3aBepuNTb npOeDpy, HaxMnTe Co3daTb.
Ommeha nocJeHeo BoccmaHoBneHua
Ecni cncTeMa He pa6otaet NocIe BOCCTaHOBJIeHnA COCTOHHN KOMNbIoTepa Ha OnpeJeIeHHy O DaTy, TO MOxHO IcNoJb3OBaTb 3Ty FyHKUIO dIra OTMeHbI BOCCTaHOBJIeHnI.
Takke moxho nCnoB3OBaBt nyHKT 3aay3ka noCneDHe ydaHou KOhfoeypauuu dny BOCCTaHOBJEHNy NOcJeHHx HAcTpoE, npN KOTOpbIX cnCTema pa6oTaj.
- Пераусятente komьюту и нахмITE F8 Дя Вьбoga осobixВарианTOB 3arpy3kn.
- KnaBnAmu co CtpeKamn BbIbepNte NyHKT 3arpy3ka nocJeDneu daHOn KOhFguraunn HaxMMTe KnaBnUy Enter.
HObIe Bnpycbl, cepBn I npyIne yrpo3bl IOBBIAOTcKaJdbI DeHb, IIO3OMy peryIpaHoe 6OBHbIeHne npoIpAMM 6e3OpaCHocTn ONEpaCIOHOHcCTeMbI OChbB BaxHo.
Дя obecneueHЯ 6e3OaCHOи n HadexKHO pa6Otbl KOMNbIOTepa:
- Bылляп Te obновелся no заюсам LЧмpa noddeржku Windows.
- IcnoIb3yIte yHKUIO aBmomamueeckoO o6HOeHua Windowskopnpaunu MaikpocoT
3anyckaiaTe LcHmp o6Ho8JeHua Windows.
Бezonaacha paoboma e UHmepheme
Прорпамma Norton Internet Security B coчетани C дугимпрорпамma обесоченя 6e3он achoCTN MoKET 3auntb BaU KOMьЮтep ot aTak n3 ИntepHeTa n rapaHTnpOBaTb 3arpy3ky u yctahOBky B KOMьЮтepе полднх obHOBJIeHn 6e3oJacHoCTN. Прорпамma Norton Internet Security BblONHЯТ abTomatueckne obHOBJIeHn ПocpeДСВОm cnyk6bl Live Update.КрOME TOrO,MOxH0 3aynCtNTb pyuHoe obHOBJIeHne n3 rIaNHorO INHTepФeca Прорпамь Norton Internet Security n NaKaTneM CcbIKN Live Update.
OnepauuOHnA cucmema, npoepaMMbI u dpaieepbI
LcHmp 0bNoeJHnra Windows MOKeT NOMOypeYJrPHO 3aRpyKaatb 0bHOJbEHH B KOMIbIOTep. 3Ta npOrpAMMa I03BOJIaET BbIbPaTb 0bHOJbEHnA DJIa OEPaCNUOHNO CNTEmbl KOMIbIOTepa, npOrpAMM N O6OpUdOBaHH.
B LcHTp o6HOBJIeHnIa WindowspeYyIaRHO D06aBJIaIOTc
OBHOBJIeHn, NO3TOMy BcERda MOXHO NOpUHTb NocJeHne O6HOBJIeHn IpeSeHn IJI 3aUNTBI KOMNbIOTepa I OBeCneueHn erO beCnepe6oHn pa60tbl.
- Haxmnte Nysck > Panaelb ynpableny > Panaelb ynpableny > CenTp obNoBJeHnra Windows.
YdaJIeHHbI NOMOuHnK Windows
YdaneHHbI NOMOuHK P03BOJRAET PONBJ3OBATEJIaM Windows NOJyUHTb YdaJeHHbI DOCTyn K KOMPbIOTepy C 3TOI ONepaCIOHHO CnCTeMoN PO cEtN ININ Upe3 INTEpHET dIpy peSeHNA BO3HKnIXN pO6JIem. C NOMOuB O YdaJeHHORO NOMOuHKa MOXHO ydaJeHHO nPOBECTN DInarHOctNKU INeuiTb PNO6JIeMbIC KOMNbIOTePOM.

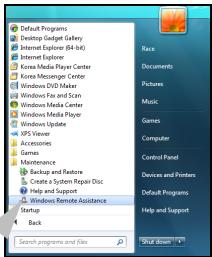

Windows Remote Assistance
BocnoJIb3OBAtbcra ydaJIeHHbIM NOMOuHnKOM MOJHO, HaxaB KHOJIky Pnyck > Bce nporpaMMbI > O6cIyXnBaHne > YdaJIeHHbI NOMoUHnK Windows. Nocne 3anycka nporpaMMbI "YdaJIeHHbI NOMoUHnK Windows" OKpoETcA kpaH, B KOTOpM MOxHO BOCNoJIb3OBAtbcra NOMoUbIO DpyrNX noJIb3OBAteJIe IINI ppeINOxNtB CBOIO NOMoUb IpyrIM.
BocstahOBJIeHne
Packard Bell Recovery Management

Пимеанue: Packard Bell Recovery Management docmynha monьк e monдях c пedingmaHOENHо onepaцuHHOU cucmemon Windows.
Ecni c KOMnbIOTepom BO3HnKIn Ipo6bEmbl, KOToPbIe He ydaetcpeWntb dpYmM CnOCo6amN, TO, BO3MOxHO, NOHaIObITcR NepeyCTaHOBtB onepaunOHHyCnCTemy Windows, a TaKKe yCTaHOBJIeHHbIe H3rTOBHTeMe Iporpammbl I dpaIbepbl. YTo6bl npH Heo6XoIMOcTNI MOxHO 6blIO BOCCTaHOBtB KOMNbIOTep, KaK MOxHO CKopee CO3daiTe pe3epBHyIO KOnIO CnCTeMbI DJIra BOCCTaHOBJIeHNIA.
В порравмpeckard Bell Recovery Management peaJin3oBaHbI cIeJyUOJIneФункцИN:
- Pe3epBHOe KOINIOBaHHe:
Co3daTb pe3epBHyIO KOIIIO 3aBOIDcKINx HAcTpoEK
- Pe3epBHOe KONINPOBaHne IpaNBePoB IN npNJIOXKeHn
- BocctaHOBHeHne:
BocctaHOBVtbopeaHNOHHyU CnCTeMy CO CTaHdapTHbIMN HacTpoiKamn
BocctaHOBHeHne OepaunOHn CnCTeMbICoxpaHeHnEM daHHbIX noJIb3OBAteJIa
-ПepeyctaHOBnTbДpaBebpIиI npIIOxHeHn
Hnke onncana Kaqdaia n3 npoceyp.
BHHMaHHe! HyxHo nCNoB3OBA Tb ΦIaH-NaKoNtEnb USB emKocTbHO He MeHee 12 T6, Ha KOTOpOM He 3aIncaHo HnKaKnx DaHHbIX.
- HaxMNte Pnyck > Bce nporpaMMbl > Packard Bell, 3aTeM HaxMNte Packard Bell Recovery Management.
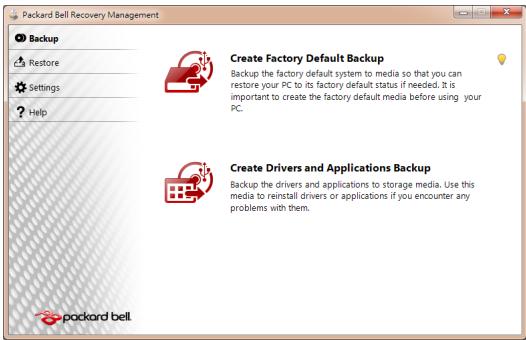
2.Чтобл содаь ДИСКД ДЯ BOCCTаHOBЛЕнгь BCEX ДaHHbIX JeEcTKORO ДИСКА, ВКЛючая OC Windows И BCE пpeДуCTaHOBЛЕньп le nporpaMMы INдраиВеры, НжмITE KHOПКу Содаь ДИСС c 3aBOДСКIMN HAcTpoiKaMn ИЛI, ecnB BAшем KOMПБЮТе р HeT npINbOda ONTNueCKNX DИСКOB, Cодаь peЗepВHyTO KONHIO 3aBOДСКИX HAcTpoEK.
N
Haxmnte KhoIky Co3daTb DnCK c apxNBOM dpaBepOB n npIoXeHn, YTO6bl CO3daTb DnCKn DnA BOCCTaHOBJEHn TOJbKO npEynCTaHOBJEHbIX N3rOToBntTeJe NpOrpaMM n DpaBepOB.

BhImaHne: CoBeTyem KaK MoXHo ckopee co3daTb o6a Tnna DnCKOB dIy BOCCTaHOBJIeHn.
OTKpoETcI dIaIorOBoe OKHO Co3damb pe3ep6HyIO KOnuO 3a6odckux HacmpoeK.
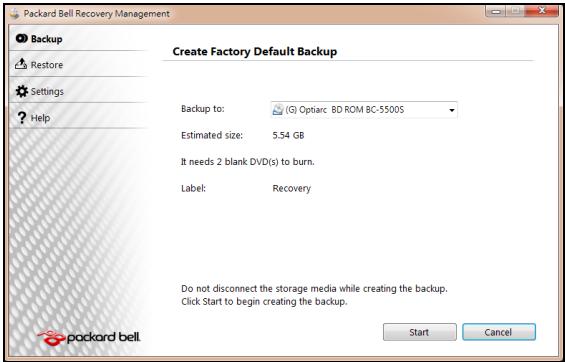
B 3TOM dnaIanoROBOM OKHe 6yJeT yka3aH opneHTnpoBOUHyb pa3Mep
paIIa apxINBa.
-
Ecπn Bbl nCπoNb3yeTe ONTηeCKne DnCKn, TO B Hεm TακKe 6y∫et yKa3aH0 KOιηeCTBO YnCTbIX 3aπncbIBAeMbIX ΣικOB, KOTopoE ΠοTpεδyETcДЯ 3aπnci ΣικOB BOCCTaHOBnEHH. ΠριΓΟΤΟБte Ix περει ḤαγλΩΜ Προεdμβλ.
-
Ecni Bbl nCnoIb3yeTe USB-dnck, To nepeI npoIOnJKeHem y6eIntecb, YTO erO CBO6OdHNoE MKOCTn DOCTaTOUHO.
-
BCTaBbTe USB-ДИСК ИПИЧТБΙДИСКВпИВОД, указань В спиcke ApxuBupoBamHa, И нахмITEДANee.Η заразе 6удET OTOбражаться XOD BBINOJIHHeHЯ pe3epBHOrO KONIPOBAHЯ.
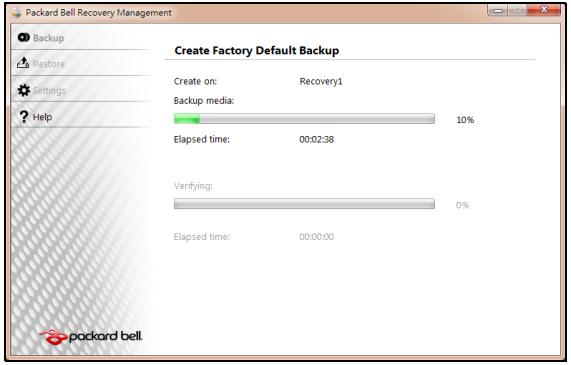
-
BbInOpHnTe yka3aHnI dIy 3aBepSeHn IpoUceCa:
-
Ecπn Bbl nCπoNb3yeTe oNTuYeCKne DnCKn, TO ILOTOK npNbOda 6ydet OTKpbIbTaBcra Nocne 3aπnc KaxdOrO DnCKa. N3BnKeKIne DnCK n3 npNbOda n NOMeTbTe erO nepMaHeHThBIM MapKePOM.
EcnHyxH0 3aIncatb HeckOJIbKO DnCKOB,TO,yBnDEB npeJIOKeHne Ha 3KpaHe, BCTaBte CNeDyUoNi DnCK N HaxMITE OK. PpOOnJaTe 3TN DeIcTBnI, NOKa IpoceCHe 3aBepuNTcra.
- Ecπn Bbl nCπoNb3yTe USB-DnCK, To OTcoeDnHnTe USB-npNbOД nPOMeTbTe erO nepMaHeHThBIM MapKePOM.

BHHMaHHe! MapKnipOBKa Ha KaJdOm apXNBHom DnCKe DoJIKHa 6bIb yHnKaJIbHOH n IOHrTHoH, HAnpIMep, "Dnck 1 n3 2 dJa BOCCTaHOBJeHnra Windows" nnn "Pe3epBHa J konna dJa BOCCTaHOBJeHnra npINOKeHn n dpaIBepOB".
CoxpaHnTe 3TN DNCKn pe3epBbIX KOIN B HaJeXHOM MeCTe N 3aONMHnTe 3TO MecTo.
BocctaHOBJeHne cncTeMbI
Ecnn noDnepkka Packard Bell He nomoxet ycTpaHntb npo6nemy, To nCnoJIb3yIe nporpamMy Packard Bell Recovery Management. OHa BOCCTaHOBNT KOMNBJOTep Do COCTOHN Ha MOMENT NOKyKN. Pprn 3TOM OCTaHETcR BO3MOXHOCTb COxpaHNTb BCE HAcTPOJKN IINHbIE DaHHbIe Dnra BOCCTaHOBJIeHnR B daJIbHeNWeM.
IopraOK BOCCTaHOBHeHnCnCTeMbI:
- UctpaHnTe MeIeNKe npoBneMbI.
EcnB03HnKHyT HEnoJalKn B pa6Ote TOnbKO OndHO NIN DByX npOrpaMMhIX NIN anNapaTHbIX KOMNoHErTOB, TO npObIeMy MOxHO peuHTb NepeyctaHOBKO 3Tnx npOrpAMM NIN dpAIBepOB yCTpoiCTB.
Iopraok BOCCTaHOBLeHnna3HaayanbHo yCTaHOBLeHHbIX nporpamM n dpaibepoB cM. B pa3dJe "BoccmaHOBLeHue npedycmaHOeJIeHHbIX npoapamM u dpaibepo6" Ha cTp. 99.
- BkIIOUHTe MeHIO 3a2py3Ku F12, ecn OHO eue He BKIOUHeO:
1.Bo Bpem3aIpy3Kn KOMNbIOTepa HaxMnTe KJIaNiSy F2.
2. HaxaTneM KnaBnC o CTeJIkAmN BHeBO nIIN BnPaBO BbIbepnte TnaBHOe MeHIO.
3. HaxaTneM KnaBnUc CO CTeJIKO BnI3 BbI6epNte MeHNo 3arpy3Kn F12, 3aTeM HaxmTe KnaBnUy F5, YTO6bl N3MeHnTb 3HaueHne Ha BkIIOyeHo.
4. HaxaTneM KnaBnC o CTpeJIkAmN BNeBO NIN BnpaBO BbIbepnte MeHIO BbIXoD.
5. BbIbepuTe CoXpaHHTb 3MeHeHn N BbIaTN HaKMnTe KJIaBnSy Enter. IJra nOJTBePjKeHnHaKMnTe OK.
6. Komlbótep nepe3aρpy3uTcra.
3.Bo Bpem 3arpy3kn Haxmnte KnaBnuy F12, YTO6bl OTKpbITb MeHIO 3arpy3kn. B MeHIO 3arpy3kn MOxHO BbIbpaTb yCTpoiCTBO, C KOtOporo CJIeDyET 3arpykaTbCn, HapnPmep, C JecTKORO DnCKa NIN C npNBODa ONTNuecknx DNCKOB.
4. HaxaTne KnaBnUc cTepeNkamN BbIeJInte cTPOky CDROM/DVD nIN USB HDD, 3aTem HaxMnTE KnaBnUsy Enter. BMeCTO o6bIuHOn 3aRpy3Kn npOn3oJdeT yCTaHOBka Windows c pe3epBHOJ KOINN BOCCTaHOBNeHInr.
5.ДяЗавершени BOCCTaHOBJIeHЯ BbIOnHInTe OTo6paKaemble Ha 3KpaHe yka3aHnY.
Hopmatubnaya nHopmaçania
PpeoTbpaueHne noTeepn cnyxa
- Bhumahue: Дименьhoe успьзованue hayшнког unu azpumypbl ha ebicokou apomkocmu mojem npueecmu K Heobpamumoi nomepe cnya.
3To yCTpoIcTBO nPoTeCTnPOBaHO HA COOTBETCTBHe Tpe6oBAHmK ypOBHIO 3ByKObOro DaBJeHnry, yCTaHOBJIeHHbIM B npImeHmblx CtaHdapTaX EN 50332-1 n/nn EN 50332-2.

-
П汞сuaунue: Дя Фразч: haywHuKU unu aonobHbI melefoHbI dny daHnoZ ycmpoUcme npomecmupoeaHbI Ha coombeemcBue mpe6oehnM K ypoHIO 38ykoOzO daenHua, ycaHOBeHHbIM e npumeHmblx cmaHdapmax NF EN 50332-1:2000 u/Unu NF EN 50332-2:2003, coaJacHo mpe6oehnM 3akohaФразч Article L. 5232-1.
-
A pleine puissance, l'ucoute prolongue du baladeur peut endommager l'oreille de l'utilisateur.
MEPbI PNEOCTOPOXHOCTN npn npocnyuBaHm
YTo6bI He NoBpeDntb Cnyx, Co6nIOaIte PnpBeDeHHbIe HNKe peKOMeHdaUIN.
- YBéniuBaIte rPOMKoCTb Do HxJHOrO yPoBnA NOCTepeHHO.
- He ybeJIuIyBaIte yOboBeH rPOMKoCTn nOcIe TOrO, KaK yUIN K HEmy npNBbIKHyT.
-He cnyuwaIte My3bIky Ha 60nbJou rPOMKocTn CnUHKOM DoJIro. - He ybeiunuBaIe TpomKoCTb, YTO6bl NepeKpbITb UyM OkpykaUoJe CpeDbl.
-ymehblnte rpmkoctb,ecnHHe cIbllnte pa3roBopa HaxoJxnxcprdom IIOJe.
HopmatNBHOe yBeDomJIeHne B OTHoIeHHn paIIOyctPoIcTB
- Ppumeyue: Hxke npueedeHa HopmuaHna unfoopmaua moIbko oJn Modeneu c Modynmu Bluetooth u/Unu c83u e becnpoobhIx nokalnbix cemx.
06uine cBeHn
3To yctpoiCTBO COOTBETCTBYET CTaHdaptam paanon3JyueHn H63oNaChocTn JIO60B CTpaHbI INn peINOA, Ie OHO 6blno pa3peSeHNO dInr 6ecnpoBOHDoro NcNtobBaHn. B 3aBNCIMOCTN OT KOHNpyauin 3TO yctpoiCTBO MOKet cOepKaTB INn He cOepKaTb Moyn IneCnpoBOHDn PAINOCB8n (HaNPmep, 6ecnpoBOHDn JIBC n/Inn Bluetooth). Hnke npBeHeHa INΦOpMaunia DnryctpoiCTB, cOepKaUnx TaKne Moyn.
Pa3peeHhble KaHaJIbI 6ecnpoBODHO CB83n dIra pa3hblx cTpaH
Ceb. Ameprika 2,412-2,462 TgU KaHaJIb01-11
Jaonna 2,412-2,484 Tc KaHJIb01-14
Ebnona ETSI 2,412-2,472 TgC KaHnbl 01-13
3To yCTpoCTBO COOTBETCTByeT OCHOBHbIM Tpe6oBaHnA M I DpyrM yMeCThblM nIIOJKeHnM DInpeKTINBbl 1999/5/EC.
ΦpaHnIa: 3aPpeHHeIe IJIg 6ecnpoBODHO CBraN dHaNa3OHb YaCTOT
B HeKOTopbIX oblaCTx PhaHcIIM dIuaIa3OH paIIOuAcToT orpaHnueH. MaKcImaJIbHo pa3peeHHa MOUHOCTb B NOMEeHnix:
COBMECTIMOCTN I paIIOuOaCTOTHOrO N3JIyUeHnI OKOHeuHOrO paIIO- I
TeIeKOMMyHnKaUIOHOHorO ObOpyDoBaHnA.
UHypbI nHTaHn I BNlka
Дя Зклпуаташи 3TORO yctpoiCTBa TpebyOTc 3a3emIeHHbIe TpexKINbHbIshyp nITaHn I BnIka. 3Ty BnIKy MoXHO NODKIIuOaTb TOIbKO K 3a3emIeHHbIM 3JIeKTPop03ETkAM. Пржд eM BCTaBnIbTB BnIKy B 3JIeKTPop03ETky, y6eIITecb, YTO 3JIeKTPop03ETka HndJexaUIM O6pa3OM 3a3emJIeHa. He BCTaBJIte BnIKy B He3a3eMJIeHHyIO 3JIeKTPop03ETky. O6paITeCb 3a cnpabKoi K KBaIIINΦnIupoBaHHomY 3JIeKTPnkiy.
Дин ha shypa He doJnxHa npebbIaTaB 2,5 M. Bo n36eXaHne nopaxeHn 3neKtpuYeCKM TOKOM He otKnIouaIte H He ydaIaIte KOHTaKT 3a3eMNeHn B shype nITaHn. NobpeKdEnHbI shypr nITaHn HxHNo 3aMeHntb. JIra 3aMeHbI shHpy a nITaHn o6paTInTeB k npodabuy. B Ebpone BnIka shypa nITaHn DOnxHa 6bItb paCCnuTaHa Ha nepemehHOe haprjExHe 250 B n Ha cnny ToKa He MeHee 10 A. BnIka shypa nITaHn DoJnxHa IMeTb MapKnipOBky COOTBcETCTBuOJUeero MeKdyHapOdHoro areHTCTBa. SHypr
HHTAHNIA DOnJXeH 6bITb PnIroEn IINcNoIb3OBAHnB B CtpaHc EKcnIyatauIN. TIn HxhHO IHHpya NHTAHNIA MOXHO yTOUHNbY npOdaBua INI MeCTHbIX CneIinaICTOB NO 3JIeKTPoTeXnKe.
Ka6eJn
CbeHnO KaBEx, He BXoJauX B KOMJIeK TIOCTaBKn KOMIbIOTepa:
3aBHeHbIe npaMeTpbl 3JIeKtpOMarHHTHOI COBMeCTUMOCTn CNTeMbI rapaHTnpyOTcT OToBko pIn NcNoB3OBaHN 3kpaHnPOBaHHbIX Ka6eNe I INHTeppeNcoB.
3KpaHnroBaHhIe INHTepFeIChIbe KaBEn Tpe6yOToC IЯ pa3bEmOB USB, IEEE1394, nocIeNoBaTeHbHO rNpBOrO NopTOB, pa3bEma npInTEpa, pa3bEMOB aHaIaNOBbIX nIIu cHpOBbIX ayDIO/BnDEoYcTpoiCTB, JOKaJIbHOI CETn Ethernet, nopTa PS/2; rHe3do TeNeBn3IOHHbIX u YKB-aHTeHH, a TaKke pPaKTnueckn BceX BbICOKOCKOpocTHbIX Ka6eBbHbIX INHTepFeiCoB.
IcnoJIb3yIte ToIbKO TeIeKOMMyHnKaIauHOHHbIe Ka6eII MapKn UL 26AWG nIyUwe.
Динаболee 3metpoBdoynyckaetcTOnbkoДЯKaбелЯ lokaJIbHoi cetI Ethernet mOdemHoro Ka6eIa.
Packard Bell coBetyet ochaatab kaskdbi ka6ebIb KpyIbIM 3axHIMOM C feppntOBbIM cTeprKHeM pI npIOdkJIIOUeHm KOMNbHOtepa KO BCEM yCTPOICTBaM, He BXODJUIM B KOMIIKeT NOCTabKn.
- CbeHeHn o fpeppnte: 28A-2029, Steward (DBe peTlin)
Bo Bpemceptnnkaun yctpojCTBa kOmpnaHn PaKard Bell nCnoIb3oBaJa Ka6eNn CneDyUOxN CTaHdApTob:
- Ka6eHama 46778, cepTnΦuIPOBaHbIe no cTaHapTy USB 2.0
- 3KpaHnpoBaHhIe Ka6eI Hama 50011 cTaHapTa IEEE1394 FireWire
- 3kpahnpobAHbIe aydno- n Bvdeoka6en RCA-RCA KHC001M, KHC012M, KHC028M fmpbl Thomson
- 3KpaHnpoBaHHbIe ayDnoka6eN co cTepeopazbemOM 43330H, 42714H pmpbl Hama
TennobideHne n nepeHoCHbIe KOMNbIOTepbl
Iocne npoDOnKInTeHbHO paObTy aadantep cTeBOrO nHTaHnY i DNHee KOMNbIOtepa MOryt HArpeBaTbc. CNeNyET N36eRaTb npoDOnKInTeHbHorO fN3UeCKOrO KOHTaKTA C HIMN.
ChrTne n yctaHObKa KpbIuKn Kopnyca
Ipeed cnTHeM KpbIuKn Kopnyca Ipn ObcnykuaHn IIN MoDnΦkaCnO opOpydoBaHn HxKHO OTOeDiHtB UHp NITaHn I MOeMHb KabEnb IN3BNeUb IIN OTKJIouHTb aKKMyJrTOP.
BHHMaHHe: HeKoTOpbIe KOMnOHeHTbI BHyTpN KOMNbIoTepa MOryT HarpeBaTbCBy B pe3yIbTaTe npoDoJnxTeJIbHoJ pa60TbI.
Ipeed nodkloucheHnem obOpudBaHnra n Bkluoyehnem nItaHn HxKHO 3akpbItb Kopnyc.
3aBHeHne O COOTBeCTBn CtHaIapTaM I Na3ePbIx yctpoIcTB
Ontnueckne yctpojctBa npoJn TecTnpOBaHne n cepTnФkaUHO Ha COOTBcTbNE cTaHapTy MeJxHapOJHON 3NeKtpotexHnuecko KOMnCCnn IEC60825-1 n eBponeckomy cTaHapTy EN60825-1 dIra Ia3epHbIX yctpojCTb KIacca 1.
Ja3epHbIe yctpoiCTBa KIacca 1 He cHTaIOTCn ONaCHbIMN. Ipn HOpMaJIbHOJ 3KcIIpyataunm N ObcIyKbIbAHmN ONTNUeCKNX yCTpoiCTB KOHCTpyKUINy C7pOYCTB 3aIuIaET nonb3OBateJr OT Ja3epHOrO n3IyueHnM OMuHocTbBO BIIe KIacca 1.
OnTnueckne yctpoiCTBa, yctaHOBJIeHHbIe B BaIeM KOMNbItepe, npedHa3HaYeHb I nAICNtB3OBAHnra ToIbKO B KaueCTBe KOMIOHeHTOB 3IeKTKPOHHOrO yctpoiCTBa I N03ToMy He OTBeauIo Tpe6oBaHnIaPazIeNoB 1040.10 n 1040.11 CBoDa fepaIbHbIX Hopm n npabInCUSA dnn PNOJHOCTbIO na3epnbix yctpoiCTB.
Bo3deIcTBnE Ja3epHOrO n3JyEnHa NaeNoBeka KpaHHe onaCHO, PO3ToMy nO1b3oBaTeJIIO KaTEROpUYeCKNs 3aIpeuAetcra36bnpaTb Ja3epHoe ycTroIcBO.
YnakoBka
Ynakobka 3Toro yCtpoiCTBa COOTBETCTBye TTrepeBaHnM DInpeKTHBbE BpObnI NO OkpykaIOSeI cpe94/62/EC ot 20 deKa6p1 1994 r. n aHaIOruHOMy noCTaHOBneHIO 3aKoHOdaTeJIbHorO opraHa FpaHcHm 98-638 ot 20 nIoJr 1998 r.
3auntata okpykaioe cyedbl
Haunob3aTeIbCTBa no 3aunite Okpykaoue cpebl
3aunTa OkpykaIoSeI cpebl - 3TO KpaeyrolbHbI KaMeHb HaWeero NdoXoJa K co3daHIO Hauixx yCTpoiCTB.
Packard Bell CTpeMntcra OparrnHTB BnHnne ee npOyKToB Ha OkpyKaIoU cyEy B TeueHne BCero INx KIn3HeHHOrO ZIKJa.
Uyke Ha 3tane pa3pa6oTkn npimHe8eTcstpora noJNTnka KOHTpOJa NOCTabOK. Oco6oe BHNMaHne ydeIaeTcnpOBepKe 3JIeKTOHHbIX KOMNoHErTOB, YTO6bl CHN3ITb COdepJxHne TaKnx TjKeJbIX MeTaNIOB, KaC BnHeu, KaDMn, XpOM, pTyb N. T. Mbl Tpe6yem, YTO6bl NoCTaBUnk BCex KOMNoHErTOB HauNX yCTpoiCTB CO6IIOdaII BCE HopMaTHBhIE Tpe6oBaHnIA.
Ipei npHmHaembIe HAMM Mepbl IO3BOJHOT CnIIaHINPOBaTb I O6JIeYHTb YTIIN3aUHO yCTpoICTB, cPOK cnYk6bl KOTOpbIX NcTeK. Bce PnactMaCCOBbIe DeTaN BecOM 60nee 25 rpaMM, INoONb3yEmbIe B yCTpoIcTBax Packard Bell, NOMeHbI MapKnipOBkoI ISO 11469. 3Ta MAPKnIPOBKa IO3BOJHET 6bICTPO IDeHTNΦuINPOBaTb MaTePnaJI IN o6JIeYcaET erO nepepa60Ky. HAcToNbHbIe KOMNbHOTepbl IPOeKTHpyIOTc TaK, YTObl IX 6blIO nErKO pa3bnpaTb, IO3tOMy BMeCTO BInHTOB INCNOJIb3yIOTc 3aXIMbl.
yTnIIm3aZu yCTpoiCTB
Cornacno DnpekTne 2002/96/EC o6 ytnin3aunn 3neKtpueckoro n 3neKtpoHoro obopydOBaHn (WEEE), nCnOJb3OBAHNoe 3neKtpueckoe n 3neKtpoHnoe obopydOBaHne dOnxho ytniIN3uPoBaTbcra OTdIbHOOTbOBix OTXODB dnn OBeCneEHHN IOBTOPHOrIO CnOJb3OBAHn, nepepaBoTKn iDpyrnx cNoocob BOCCTAHOBNeHnA, a TaKke COKpaUeHHN OBemOB NpIeKaunx YNHUTOXeHHIO OTXODB. 3m6Iema C n3OpaKeHHm nepepepkHyToM MycOpHoi KOp3InhIyKa3bIbaeT Ha TO, UTO

3TN yCTPOBCTBA CNeIeYET OTCOPTINPOBbIBaTB OT npOeFo Mycopa N yTnIN3NPOBaTb OTdEInbHO. 3TN npABnna OTHocTcKo BCem yCTPOBCTBAM KOMNaHnn Packard Bell, a
Takke KO Bcem akceccyapam, Takim KAK KNaBnAtya, Mblb, KOIOHN, NylbT YI T.I. Ppi Heo6xOaIMocCTN yTuIN3aun TAKIX npOdyKTOB oEcecneYte IX COOTBeTCTBYUOuyo nepepa60Ky, 6paTINBwInCb B MeCTHbIe OprAhbl BnaCTN INI BepHyB CTapoe obOpdyOBaHHe npOdaBuY B cnyae erO 3ameHbI. DOnONHITeNBhIe CBeDeHnma MoKHO y3HaTB Ha Be6-caTe www.packardbell.com/recycling.
YtJIn3aun aKkymyIaTOPOB (npn nX haJIuyn)
Ipepe ytniH3auee o60pyoBAnHn 6b3ateIbHo n3BnEKeIte aKcymyIaTOpbl, KOToPbIe MOrTy B HEM 6bItb yctahOBHeHb. Cornacho eBponeiCKIM 3aKOHam, ytniN3aun AKKMyJrTOPOB OcUyIeCTBnIeTCR OTeJIbHO OT 6bITobIX OTxOIOB. He BbIbpaCIBaIe NTcNoIb3OBAHHBe AKcymyIaTOpbl B KOHTeHep IIN 6bITOBORo Mycopa. IIO Bo3MOXHOCTN CdaBaIte NcNoIb3OBAHHBe AKKMyJrTOpBl B COOTBeTCTByIOuIe PnyKTb l cOpa OTxOIOB ININ O6paTIteCb K npOabuy INN B MeCTHbe OpraHb IbnactN. Co6IIIOJeHne 3TNX IHCTpykui ObecneuNT 6eONacHb I c6Op, Nepepa60Ky u yHNUTOxJHne INcNoIb3OBAHHbIX AKKMyJrTOPOB, PO3BOInT 3aUnITb OkpyKaIOU cyPeDy U CHN3NTb ONaCHOCT bIg 3dOpOBbY IIOdeI.

BHumaHue!PnI NcNoJIb3OBAHHn AkKymJyTopa HeBepHoro Tnna dIra 3aMeHbI BO3MOxHeh PnCK B3pbIbA. IcNoJIb3OBAHHbIe AkKymJyTOpbl CJeDyET CdABaTb Ha yTnIN3aUHBO COOTBeTCTBnC INHCTpyKUJMaM.
PpeDynpexKdHnE O coDepxKaHm n pTuTn
Длгэлктpoньхусточб,codepжашижKK/3ЛТ-монториллэкранбezсветдпогнюног посветкн:лamma(-bl)ВнтурглTOROусточьCoDEPkatpTyb,ПOTOMy ee cIeDyET cIaBaTbHa nepepa60tky nIn yTuINI3aIIOB COOTBeTCTBmN C MeCTHbIMn IIN ΦeDEpaJIbHbIMn 3aKOHAMn.ДОПОНTEIbHbIe CBedeHЯ CM. Ha Be6-caTe Accouaцин 3лeКтpoHнoi ПPOMblJIeHHOCTNwww.eiae.org.CbeDEHЯ ob yTuINI3aUZnIЯMn CM. Ha Be6-caIte www.lamprecycle.org.

PocneHya ydaHna KOHpyaun.89
IocTaBzuk yCnyr INHTepHET (ISP) 54
Oxpana 3dopobb. 12
N
CetebbIpoKlueyenra. 57
ceTb. 30
Cnykba noDepkkn 80
CnyxkeHbIe nporpaMMbl
BocctaHOBJIeHne CnCTembl
Windows 86
PprrmaMnDeeppaMentaun
ДиSCа 83
Iporpamma ounctkn ncka. 82
PpOBePKa Ha NaJIuNue OUn6ok... 80
CmeHHbIe HAKONITeIN 30
Norton Internet Security 63,68
0
UdaJIeHne nporpaMM 85
UdaJIeHne yCTpoIcTB. 30
LcHTp HauJIbHOH HAcTPOJKN 42
UnpaBHeHne yHeTHbIMn 3aIINcMn
noIb3OBAteIeI 77
ToUKNBOcTaHOBJIeHnI 89
yHnBepcaIbHa nOcneIOBaTeIbHa
UINHa. 31
LHypbI nHTaHn 9
YcnoBnIyraPabOtbcKOMnbIOTepom.....8
UcTpoIcTBO UTeHnKaP TnAmrTu 28
yTnIIm3aun aKkMyJrTOPOB. 118
P
Packard Bell
Beb-caT. 63
Iporpamma Recovery
Management 43,93
PowerDVD. 45
W
WiFi 57
Windows
Pa6ota B Windows 42
ABTomatUcheckne O6HOBJIeHnIa
Windows 75,91
BocctaHOBHeHne CnCTeMbI 86
3aunTHNK Windows 76
IponrpbbATEnb Windows Media..... 43
UdaJIeHHbI NOMOuHnK Windows.....91
LcHTpHaayaJIbHOHnAchtpoiKn 42
LcHTP noDdepKKn Windows..... 73,90
Windows Media Center 44

RpkOCTb
Kombinaui KlaBn 20
Packard Bell Recovery Management.... 40
Karty SD, SDHC i SDXC
Packard Bell Recovery Management
Packard Bell Recovery Management

Program Recovery Management.....84
Srodki ostrożnosci 8
Service Provider, ISP) 50
Oprogramowanie
Program Recovery Management..... 40
Packard Bell Recovery Management
Packard Bell Recovery Management

Packard Bell Webhely. 57
Recovery Management port 25
Program 39,84 PowerDVD. 41
R
Karty SD, SDHC a SDXC
Packard Bell Recovery Management
Packard Bell Recovery Management

Baterie a akumulatory. 102
Blu-ray 39
Bezpecné pouziti poçaite 70
Body obnoveni 77
Web Packard Bell. 54 porty. 24
Karty SD, SDHC a SDXC
Packard Bell Recovery Management
Packard Bell Recovery Management

Poznamka: Packard Bell Recovery Management je k disposićii len s vopred nainstalovanym operacnám systémom Windows.
Program Recovery Management.....81
Opravit'
Program Recovery Management..... 38
P
Packard Bell
zozadu 20
Program Recovery
porty 25
Management. 38, 81 Poskytovatel' internetovych sluzieb
Webova stranka. 55 (ISP). 48
Podpora
Posledná funkcnakonfiguracia. 78
Webová stránka Packard Bell. 55 PowerDVD. 40
počitač
Preberanie. 41
Effectuarea unui upgrade la computer
Extinderea prin optiuni
Accumulatorul are urmatoarele characteristic:
- Foloseste standardele actuale de technologie pentru accumulatoare.
- Emite un averisment de nivel scazut al incarcarii.
Packard Bell Recovery Management
Restaurare system Windows.
Packard Bell Recovery Management

Restaurare system Windows. 79
Instrumentede system 78
Norton Internet Security. 59,63
P
Program Recovery Management.... 40 Restaurare system. 79
Redare automata 42
s
Securitate Software
Mepkn 3a 6e3oNaCHOCT. 8
PpeIpa3Hn 3dpaBn Mepkn 12
3aNo3HaBaHe c Baunn KOMnIOrTp 14
I3rpe -nncnn 15
IzrrnD otrope - KnaBnata. 16
Cneunannn KnaBn.. 18
I3rpeo3a.. 21
I3rpeoTnBAO 21
I3rpeoTpaCHO 22
I3rnn oTOny 24
HaandroBaHe Ha BaShn
KOMNIOIbP 26
DOnbHHTeHN Bb3MOxHOCTn 26
Onuun 3a Bpb3ka. 26
PbBn CtbKn B MpeKaTa 52
3aunTa Ha KOMnIOrBpa 52
U36peTe INHTepHeT DOCTaBvNK 52
Mpexobn Bpb3kn 55
Cbpnpahe BmpekaTata! 58
3aunra 61
BIOPO 3a NOMOUI 77
Be3oNa cha pa60Ta c KOMnIObpa. 77
Poiapbckka 77
AkyaIinau 87
Windows OTdaneueHa nOmou 89
Bb3ctaHOBAHe 90
Packard Bell Recovery Management 90
Cb3daBaHe Ha NnCKOBe 3a
Bb3TaHOBraHe 91
Bb3TaHOBBaHe Ha CnCTeMaTa. 94
TINOBe Bb3ctaHOBBAhe 95
PerynaTopha HnΦopMaζη 104
Pa6oTHa cpea 113
CoΦTyepenIinuEn3 115
IHHdEKC 118
Abtopckn npaba © 2011. BcnuKn npaba 3ana3eHn.
Cepna Packard Bell dot s PkobodctBO ha noTpeBnteIa
Пьрваунно Издани: 7 Hoemври 2011 r.
Iocete registration.packardbell.com n OTKPnTe npedmCTBaTa Ha ToBa da 6bdeu KIneHT Ha Packard Bell.
3a6eKka: BcNkU INIOCTpaUcM ca cAmo 3a cnpaBka. JeIcTBNTeHnHaTa KOHpIpyaUmaOKe da e pa3NIuHa.
ВклочеTekmптьра сн
DOnbJIHNTeJIHH Bb3MOxHOCTN
Baunr KOMnTbP Bn npedna MHO OOnu 3a NtNHO KOMnTObPHO n3XNBraHe.
Onznn 3a Bpb3ka
IopToBeTe Bn daBaT Bb3MoXHoCT Da CbBp3BaTe nepuΦepHn yctPoIcTba KbM Baunr KOMNtbp. 3a yka3aHn r OTHocHO KaK Da CbBpxKeTa pa3nHn BbHnHn yctPoIcTba KbM KOMNtBpa Cn, IpOuyTeTe CJIeDaBuaHn pa3deJ.
Yemeusa kapmu c naMem
KapTnte C nameT ce n3nOJ3BaT B pa3NJuH N BuIOBe cIuΦpOvB KAmepn, PDA yctpoiCTBa, MP3 nIeJbprn MO6nIH N TeJIeΦOHi.
Pocmaahe Ha kapma c namem

1.Подравне Картata,Taka ue KoHEKTopbT da coyn KbM nopTa,a KOHeKTopnTe da rIeDaT haDoNy.
2. BHIMATEHNO ПьзHeTe KapTaTа В поТа. Ako снорД Bac e Heo6xOДМо ДИЗПОЛ3ВaTe Cnla, 3a ДЯ NOCTaBnte KapTaTа, ONIaTae BHNMaTeHNo ДА пеopиENTnpaTe KapTaTа.
- Hatnche KapTa, DOKaTo He ⅢpaKHe Ha MrcTo. HraKoJIko MmJImMeTp aOT KApTaTa Ⅲe ca N3BbH Cnota.
Ako KapTaTa CbIbPka 0aIIIOBe, MoKe Da Ce nOBn Ipo3OpeTbT Windows Auto Play (ToBa 3aBnCn OT cbIbPkaHneTO Ha KapTaTa) u Ze Bn noniTa, daN JxelaTe Da n3non3BaTe npOrpama, 3a Da Bne3eTe B CbIbPkaHneTo Ha KapTaTa. N36epTe OOnu Tk Ako e Heo6XoDmO, B npOTuBHe cnyau n36epTe OTKa3. Ako B KapTaTa Hma faiIObe nIMMa HEno3HaTu PhaiIOBe, Ue ce OTbOpN Ipo3OpeU, KOITo Ue NOKaKe CbIbPkaHneTo Ha KapTaTa.
SD, SDHC u SDXC kapmu
Pa3JIuHnTe BnOBe SD KapTn Imat pa3JIuYeKanauTeT KaTo Dn3aHbT Nm KaTO cIe o eDIn n CbU. SD KapTne ca c KanauTe 4 GB, SDHC KapTte - 32 GB, a SDXC KapTne - Do 2048 GB (2 TB). Baunr T KOMIObTp nMa ueTe, KoTo PoNDbPka SDHC nIN SDXC KapTn.
3a6eJekka: SDXC Kapmume c namem Moaam da ce u3non3am camo e yemeu, koumo noodbpxa SDXC; SD u SDHC kapmume Moaam da ce u3non3am c cecku yemeu.
OmcpanhaeHaKapma om Yemeu,HaKapmu Cnamem
- UpaKHeTe Bbpyu IKOHaTa Be3onacHo npemaxBaHe Ha xapdyep B O6nacm 3a yeedomrahe (do yacOBHnka).
2.単pakHe Te Bbpxy N3BaxJaHe Ha SD KapTaTa (NJIIN Bbpxy IMeTo Ha yCTpoiCTBOTO).
3.ИЗчakай TeДOKATO He ce ПОВи CBошценeto Xapdyep, KoUMO Moke da ce npemaxhe 6e3oNaCHO. - OtctpaHete KapTaTata.
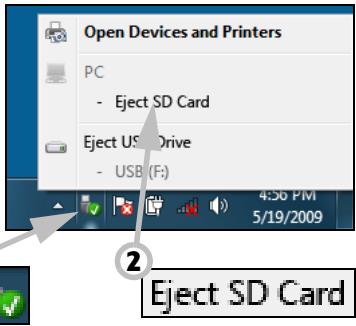
BapadeHa Mpeka
BrpadeHaTmpeKa Bn pO3BOJyBa da CBbpxKeTe KOMNIOrTa cN C Ethernet-6a3npaHa mpeKa.
Cbpxete Ethernet ka6eJa ot Ethernet (RJ-45) npota ha kopnyca Ha komnIObpa c mpeKOB JAK nJIn Xb6 Ha Baawata mpeKa.
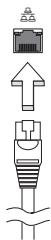
YHuepcanHa cepuHa wuHa (USB)
USB npTbTe BnCOKOCKOcTHa cepnHa shHa, KOrTo Bn no3BOnjBa da CBbp3BaTe USB nepuΦepHn yctpoiCTBa 6e3 da ce OTHeMaT cnCTeMHn pecypcn.

HЯкои komпютprmoже ду Имат сдн Илл NOBEYe USB 3.0 npota.Te npinuayat Ha cTaHapTn USB nopTOBe c Ta3n pa3nka, ye Imat dOnbHInTeHN BbTpEshN Bp3kn ca CnH.N.MoKete da N3noJ3BaTe USB 3.0 cBbMeCTHMn yCtpoiCTBa c Te3n nOpTOBe, 3a Da ce Bb3NoJ3BaTe OT no-6bp3ata ckOPOCT 3a npeHoc Ha daHHN.
Budeo npm
CbpxeTe KbM MOHITOp c VGA nIN DVI nopT (BnIbT Ha noIdbpkaHaTa Bpb3ka 3aBnCn OT KOHfNpyaunraHa KaOMnTOba). POnXoJaunrKa6en ObIKHOBeHo E BKJIIOueH B KOMPiKeTa Ha MOHTopa.
CneIeBaIte Te3n CbIKN, 3a Da CbIpxTe MOHITOp KbM KOMNIOBpa CN:
- YbepeTe ce, Ye 3axpaHbAHeTo Ha KOMnIObpa I TOBa Ha MOHITopa Ca N3KJIIOUeHI.
2.CbpxTe Bndeo Ka6ena c nopTa 3a MOHtopa Ha KOMNHTbpa. 3akpenete Ka6enHaTbPb3Ka c npedocTabeHnte 6oNTOBe. - CbpxeTe 3axpaHbaun Ka6n Ha MOHTopa I ro BkIIOyTe B npaBUNHO 3a3eMeH KOHTaKT.
4.CneBbAte HNCTpyKcHnTe 3a INHCTaJInpaHe B pBKOBOdCTBOTO Ha notpe6nteHa MOHITopa. - BkIIOUeTe IbPBO MOHITopa, a cIeI TOBa I KOMNIOBbpa.
- YBepete ce, Ye HACTOaTa pa3dEInTeHa cNooc6HocT i CKOpocT Ha OboBaHe He NaDbNsaBat CneuKauNTe Ha MOHTopa. Ako e Heo6xOIMo, npomeHeTe HAcToKNe Ha DnCnIe, N3POn3BaHn OT KOMIObpa.
3a6eKka: 3a da bne3eme b KOHmpoIme Ha duCnpe: LpaKHe me bpx CyMapm, KoHpmOen nAhen, O6nuk u nepcoHaun3upahe. LpaKHe me bpxkameezopuraMa Ducnneu, cneo koemo u3bepeme PpomraHa ha ekpanHume hacmpouku.
UHmepcfeuc 3a bucoKoedemaunHa Mylmumedou (cAmO 3a HyaKOU Modeu)
HDMI (High-Definition Multimedia Interface) é npomnshelnoIopdIbpxaH, HekomnpescapaH, n3zraIO zuΦpO BAYNO/BVJeO INTEPpeic. HDMI npedlara INTEPpeic MeJdy BCEKn CbBMeCTIM zuΦpO BAYNO/BVJeO N3TOUHnik, KaTO Haprimep TB DeKoep, DVD pIeYbp IIN A/V npneMHNK CbC CbBMeCTIM zuΦpO BAYIO IIN BVJeO MOHTOP, KaTO zuΦpO BTeJIeBn3Op (DTV), c IOMOuTa cAmo Ha eDIn Kabejl.
Польваite HDMI пота на Baшся Компютbp, 3a за ro CBьржete C BИСКOTEXHОЛOrnHyо aydno N BИдeo obopудвае. CBьрзВанeto CameroonЧрз eДин Кавел ПОЗБЛЯВа Лесна Habстpoиka И БьрзВрьзka.
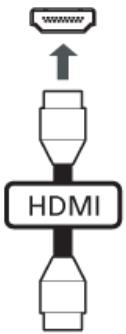
Cnyuanku u Mukpodboh
Te3n IBa nopTa Bn DaBaT Bb3MOxHOCt Da CbBp3BaTe ayDnO yCTpoiCTBa.
I3noJ3BaIe TnpTa 3a CnyuAanKn, 3a Da BkJIIOUHTe Ctepeo CnyuAanKn IIn
BVCOKOROBOPuTEJI.N.BKIOUVAHeTo Ha ayDnO yCTpoiCTBO KbM NopTa 3a
CnyuAanKn DeakTNBupa BrpaDeHnTe BVCOKOROBOPuTEJI.N3noJ3BaIe TnpTa 3a MmKPOΦOH, 3a Da CbBpXeTe BbHWeH MmKPOΦOH 3a MOHO 3aNtsc;
BkJIIOUVAHeTo Ha BbHWeH MmKPOΦOH DeakTNBupa BrpaDeHnMmKPOΦOH.
BdoIbJIHeHne, JNBOITbT Ha 6aTeepnTa ce BInJe HeRaTINBHO OT CpeHNte NaHHn Ha yIpTe6a:
-Даизпольате KMONHOTьра NOCTOЯнHO Ha npOMeHЛВ TOK,абATEPЯТада e В Hero.Акжелаete Дa ИЗПОЛЗВATE NOCTOЯнHOnpOMeHЛВ TOK,сьВETBaMe Bn Дa ИЗВадиTe 6atepniHnma MOnyI, cNeД KaTO rO 3apeДNTe HANbJIHo.
- Да не пазередATE и заразецьдате баразеля дokраи, КakTo e onicaHo no-rope.
- YecTa yNoTpe6a; KOnKOTO no-YeCTO n3nON3BaTe 6atepnaTa, TOnKOBa No-6bp3o Ⅲe CTInHe Do kpa Ha epeKTuBnHa cn XnBOT. CtaHApTHata KOMNtBpHa 6atepna Ima XnBOT OT OKoI0 300 3apeXdaHnA.
IocTabaHHe n 3BaXdaH He 6aTePnHnMaMOnyI
Baxho! Ipeu da u3adume 6amepuma om kOmniombpa, c6bpxeme AC adanmepa, ako kejaeme da npodblxume da u3non36ame kOmniombpa cu. B npomueeH cnyuau nbpeo u3KlIouhe meknlombpa.
IocTabaHHe Ha 6aTepeHmOMyI:
1.Подравнeteбаерияа спразmo OTворено OTделене 3aбаерия;Вкарайтпьрв КраяСКлемпeи ceуberpeTe,чгорнатaстара набаериятагледаharope.
2.Пьзhte Батугяв OTделенeto 3aбатери в Внмателно
НатUCHTe,ДOKATO He 3actaHe Ha MICTOTO cN.
Packard Bell Recovery Management
3aДа NOIROTBnTe CBOR KOMNIOTp 3a ONUInTe 3a Bb3CTaHOBRAHe Ha CnCTeMaTa, Tp6Ba Da Cb3daTe He Na6Op OT DnCKOBe 3a Bb3CTaHOBRAHe BB3MOxHn Hn-CKopo. BnKTe Ctp. 90 3a NObeu INHΦopMaun.
Windows Media Player
Windows Media Player MoKe Da ce n3nOJ3Ba 3a Bb3nPoJ3BExJaHe Ha MP3 nIi WMA ayDIO OaaiNoBe, CD nIckOBe nIi nOBeyeTo BInDeo oaiNoBe.

3a6eIekka: He ce npenopb4ea u3noI3eaHemo Ha Windows Media Player 3a 6b3npou3eXdoHe ha DVD pfumu. Ipyeu mymumeduHu nneBpu (kamo Windows Media Center) npednaam doonbHumeNu onuu 3a 6b3npou3eXdoHe.
Windows Media Center (Kamo onuua)
HЯкои KMПИОТРи IMaT MHOФунКUIOHAJIHN "цЕNTPOBE", KaTO HAnpIMeP Windows Media Center. Te3n nporpaMu MoRat Да образовBat pa3JINuHo MyJTmEДИHc CBdIbPxKahne,пpeДCTaBeHoЧр3 npOCTN MeHOTa, KOINTO MORAT Дa 6bDat ynpabLЯВани ЛecHO C dInCTAHQUOHуnpabLENEHne.
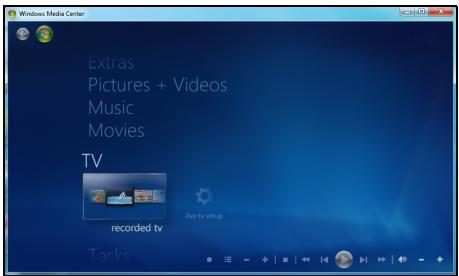
MojkeTe da rIeIaTe TB ha JxNBo IJIN 3aInc (aKO KOMnIObTpBbT Bn IMa TB TyHep), Da cIyUaTe cIuΦpOBA My3Ika, Da rIeIaTe cHIMKn IJIuH N BInDeo KJIInObE, Da cIb3dAbate CD n DVD dIcKOB eIJn da IOnyuaBATE DoCTbN DO cIbDpKJaHne OT OHnaH yCnyr.
3a da cTapTupate MylntMeiHaTa nporpaMa, HnCTaInpaHa Ha Baunia KOMNIOBp, UpaKaHTe Bbpxy Ctapt > Windows Media Center.
Hacmpouka

BHumaHue: Ako BaunrKOMNtbp NMa DnCTaHcNoHNO ynpabIeHne nn TB tyHep, Te Tp6Ba Da 6bDat CbP3aHn n aKTbBn npedn da cTapTpate MyTTmEduHaTa npoRpaMa 3a npbB nT.
Пьрвя Пьт, Когато рунсete Мултумединота поррама, ще сстарпра Сьветнik 3a Инсталларе, кочTO щe конфигурра Няков ochobни nauseюк. Изберete onцята 3a насточа Ezekпесна (akо e haшича), сnéд koETO щe можete дa конфигурра te Довлнителни onцини akо това e HeoбхODIMO.

3a6eIexka: Ako umame uHmephem epb3ka, onuyma
Ibmeodumen (EneKmpoHen npoepamEn cnpaeOchnk) Bu
no3e0JI8a da budume cnucbk Ha mekyuzme meJeBu3UOnHu
npedaaHua. ToJ noka3Ba unfoopmauzra KaHau uMpexku, KaKmo
u 3a2naEuemo, onucahuemo u yaca Ha u3Ib4aHe Ha
npedaaHura.
BbVeDeTe CBOA CTaTyc B KytNkata 3a KaKo MucIume? n UpaKHeTe Bbpy CnoIe. BaunTe npraTeI N BbB Fackbook ue BnJr T cTaTyca Bn He3a6abHo.
3a Da Cb3daTe HOB aIbym Cbc CHIMKn BvB Facebook, n36epete n3o6paXeHnraTa, KOnto XeJnaTe Da IObABnTe, PJIb3HeTe rN Do CHIMKaTa Ha Baunr npOuII. Ue 6bJeTe NOdkaHEn Da BBeDeTe NMe Ha aIbyma n OnncAnHe. UpakHeTe Bbpy KaUBaHe, 3a Da cTapTnpate KOnpuHaTo Ha n3o6paXeHnBaB Baunr Facebook akayHT.
Ako Ha cTpaHnIcTa IMa INoBce 3aIncs OTKoJIKOTo MOraT da 6bDaT POKa3aHn, UpaKHeTe BbPxy CtpeIKNTe B Hau-DoJHaTa JneHTa 一 一 , 3a Da BvDInTe NoBce CTpaHnIe.
UpaKHeTe Bbpyx BbnpocnteHnna 3NaK B Hau-ropHaTa IeHTa ?, 3a da BnDnTE NOMOuHnq aaiJ3a CouaanHu Mpeku.
UpaKHeTe Bbpy CtpeIkata B Hau-rotHaTa JeHTa 3a Da cKpneTe YJIOTo npNIOXeHne N da Ce NOKae MaIka JeHTa 3a N3BecTBAhe B Hau- rotHaTa YacT Ha ekpaHa. UpaKHeTe Bbpy JeHTata 3a N3BecTBAhe (NoDony), 3a Da BnITte npO3opeu Ha qan ekpan c OobSeHne Ha DeHocTnte Ha BaWnte npraTei.

3a6eIekka: He u3non38aume ukoHama X, 3a da u3ne3eme om CouauHnmpexu, ocBEN aKO He Jxenaeme da cnpeme u3npaunHemo ULU NOnyuaHemo Ha akmyanu3auuu.
U3non38aume cmpelkama 8 lehmama na-ope, , 3a da budume lehmama 3a u3ecmrahe.
PnoepeKaHa KaHaJU 3a ducKycuOHHu apyu u UHcbOpMaua
U36epeTa pa3dela 3a MpeKaTa, KOrTO JeJaTe Da BnDnte:


3a BC8ka MpeKa IMa cepn8 OT 6byToH.NIocOte 6byToHa, 3a Da BVInTe OINscAHne. IV36epTe 6byToHa, KOITo JKeJIaeTe Da BVInTe IN ppeBbPteTe CINcBka C eJEMeHTN.
Празмер за раздени Вв Facebook:

ПьрвгБутон uчacTTа, кORATo ce BИЖДа, KORATO pa3dЯЛт e n3бразан 3a npвпьТ ca ИфорmaцоMu KaHAnu 3a duCKycuOHu apynu (3a Facebook), Hau-aneldAnu 3a YouTube n KoHmakmu 3a Flickr. Ako Ima NOBueche 3aINCSN OTKOLKOTO MOrA T da 6bДaT NOKa3aHn, IN3NoJ3BaIte CTpeJIKNTE B Hau-DONHaT a JeHTa, 3a DA BIVInTe NOBueche CTpaHnU.
KaKeo e uuuaOHcku coOpmyep?
UHIOHCKNAT COOHTyep Ce OTHACO OCHOBNO Do HeKeJAHN pOrpAMN, KOITOCa N3TeTJIeHN Ha BaUNA KOMNTOBp, DOKATO ToI e 6NJ CbBp3AH CnHTepHeT, YecTo 6e3 BaWeto 3HaHne. BeINbX CpeI KaTO 3apa3N BaUNA KOMNTOBp, TO3N COOHTyep MOKe Da Na H6JIuDaba BaWeto CbPcHpaNe, Da N3BNIuHa JInHH DaHH, Da IpeDN3BVKBA OTBapHEno HA N3CKaUaU peKJIaMn INJIN DOpN Da IpOMEHN KOHfNpyaunra Ta Ha BaUNA KOMNTOBp. UHOHCKNAT COOHTyep KOHCymnpa pecypcn OT KOMNTOBpa BN; MoKe da 3a6abN INHTepHEr Bpb3kata INJIN cJyNaTa KOMNTOBpHa CSCTema n DOpN da npEdu3Bvka NOBpeDi.
IINHOHCKNAT COOFTyep NOHAKORA CE N3NOJ3Ba OT 6e3CKpyuynH N KOMNaHn 3a H6JIHODeHne Ha caiTOBte, KOINTO NOCUaBAte B INHTepHeT, C ZeI Da
ce onpeJeIeBaHnTe HabuIe Ha ye6 cbpHpaHe n da ce noka3BaT ueHeacOeHn 3CKaUe peKlAmn Ha Baunr ekpan. IOnKaOra HkOu BnIOBe UINOHcN COoTyep npABr T HeU O nobue ot TOBa Da npocneJaBAt. BcUHOCr, Te NaJIouDaBAt KNaBnHi N KOMbHaunu N yJnABr NapOJI, KaTO IO To3n Haunn PpeDCTaBIAr BAt cepNo3eH pNCK 3a cnryphocTTa.
KaKo e 3noHaMepeHcoΦmyep?
3noHaMepeh coΦTyep, oSe n3BecTeH kaTo malware. ToBa e coΦTyep, npoetpand ha HabpeDi Ha KOMnHObpa Bn. PnpMep 3a 3noHaMepeh coΦTyep ca BnpycN, YepBei N TpOraHckN KOHe. 3a Da npEpa3nte KOMnHObpa Cn OT 3noHaMepeh coΦTyep, yBepTe ce, ye Ce n3NoJI3Ba aKtYaJIeH aHTNBupceH coΦTyep i CnCTema npOTIB 3noHaMepeh coΦTyep.
KaKeo e JIuHa 3aUumHa cmeHa?
JinuHaT3aunTHa cTeHa e coOpTyepHa npOrpama, npedHa3NaeHa da npedeOTbpaTBA HeynbHOMOueH DoCTbn Do nnn OT uactHa MpeXa. DeiCTBa KaTo 1nt, 3a Da npednA3n BaWata INTEpHET Bpb3ka OT HekeIaHn Bpb3Kn, HkON OT KOnTO MORAT Da ONiTat Da NOEmAT KOHTPOJa Bbpxy Ba7nKoMnTOBp, 3a Da INHCTanIPaT Nnnpepa3npdeJeT BvpyCn 3IOHaMepeH npOrpamn. BcKa Bpb3ka C Ba7nKoMnTOBp Ce Na6bNoDaBa. Ako 6bDat OTkpNTn npOrpamn, KOtO ce ONITBaT Da NoJyat INFopMauzna 6e3 BaWe pa3peSeHne, 3aUnTHata cTeHa ige Bu npedynpdi. Toraba ige MoKeTe da peWnte da nn da pa3peWnte Bpb3kata, aKO Bpb3kata e do npOrpama, KOrTO n3NO3BaTe B MOMHTa e HopMaJIHO da ja pa3peWnte (HanpImepIrpa, Cbbp3aHa Cbc CbPbBp C
MHOTo yUacTHNci NJIeHcIKNopeDnIaKTo aKTyaJIIN3npa CbIbpxKaHneTO cn).
Kak da zauumume komnombpa cu
Ipeodtbpatahaeto Ha Knbep npceTBnneHn moKe da e Iecho. Mhoro aTAKMORAT Da 6bDat N36erHaTN C MaIKO TexHnueCKN PO3HaHnry N3dpab pa3ym. KaTO cyaNo, OHnaH npceTbHNuTe ce ONTBaT da N3kapat napn no H-bp3nI n lecen hauHH. KoIKOTO NOBee 3aTpynBaTe pa60taTm, TONKOBa No-BepoTHo e Da Bn OCTaBrt HAMnpa N da npoDbJxKat Cno-JLecHa MUsheHa. Cbbetnte No-dony ue Bn daat ochOBHa INΦOpMaquy 3a TOBA ka Da ppeODtbpAte Te OHlaH N3MaMa.
Pedosho akmyanuzupaume KOMnombpa cu c nocneHume Kopekuuu u akmyanuzauu
Eduh ot Hau-do6pnte HauHn Da Ibpxnte HanaIaTeJIte daJeu ot Baun KOMIObpe KaTo npInarate KoepKmN n Dpyrnc oOfTyepHn nonpaBKn, BeHara Te ca HauHn. KaTo peIOBHO aKtyaIIN3npaTe KOMIObpa Cn Bne He N03BOJRAte Ha HauJaTeJIte Da ce Bb3NoI3BaT ot CoOfTyepHn DeOeKTN (yraBIMM MeCTa), KOINTB INOTBEH cNyuAa BnxA u3noI3BaJIi, 3a Da BJIa3AT BvB BaUaTa cNCTema.
IopdbpxaHTo Ha akTyajHo cBcTcHHe Ha KOMnIObpa HJaMa Da Bn PpeJna3n OT BCNUKn aTaKn, Ho Ha xaKepeNte ige NM 6bJe IO-tpyJHO da NOJUAT DoCTbN Do BaWata CnCTema, 6JOKnpat Ce N3ZrJo MHOOCHOBn I ABTomAtuHn aTaKN ToBa MoJCe OKaJe DOCTaTbUHO da pa3y6eNi HapadateJInte, Te Da ce OTkAkaT n Da NOTbpcrT PO-Yra3BIMN KOMnIOTpN HApKbDe DpyraDe.
ПО HOВИТЕ ВERCИН HA Microsoft Windows И другп полярни софтуерни рограми морат да бдат настpoenv Да ИЗтелгп и Инсталлара akтуаллзашни АВТOMATЧУН, Бe3 да ce налara да поверяразе за найновnia софтуер. АВТOMATЧУНОTO akтуаллзиране на Baшни софтуер e чudeSEN Наши ддрьжate Свогта ONнай Бe3Опасноct.
3aumeme komnombpa cu uepe3 coqmyep 3a 3auma
3a ochOBHa OHnaiH 3aunTa ca Heo6xOIMM HAKOJIKO Tnna coΦTyep 3a 3aunTa. OCHOBHATA COΦTyepHa 3aunTa BKNIOUcBa 3aunTHa CTeHa n aHTINBvpychn nporpamn. 3aunTHata CTeHa o6NKHOBeHo e NbpBaTaN Hnna OT OTbpaHATA Ha KOMNtBpa H KOHTPOJnpa C KORo N NO KaKbB NaHn BAsnT KOMNtBp MoKe Da KOMyHKnPa OHJaH. Ha 3aunTHata CTeHa MoKe Da ce rIeDa KaTO Ha "POniCa", KOITo Na6JIIODaBa NOTOKa OT DAHNn BIn3aUn H3n3aUn OT BaShn KOMNtBp, KaTo pa3peWaba KOMyHKaUNrTa C INTEpHET, 3aUnTO pa3No3Haba 6e3Opachnua n IpeuHa "No7n" TpaФnk, KaTO NaPrimep aTakn, Da DoCTNRnat BaShn KOMNtBp.
CleDbauata LaHHa 3aunTa e Baata aHTnbupcna nporpma, KOTo Cnei BcNcKo OHnH DeHocTn KaTO Hnprimepe nektponHn CboBSeHn I cbpOnpaHe Bmpexa TmpeXaTbA O T BnpyC, YepBei, TpoRnckn KoHe N Dpyrtn TnObe 3JOnhamepeH nporpaMn. Baunr AHTNBUPceH n aHTnIINHOckn CoTpyep Tp6Ba Da ce NaCTpon Da Ce akTyAln3npa ABTomatuHo N da npabn TOBa Pn BcKO CBbp3BaHe C nHTepHet.
IHTerpnpaHnT cofTyep 3a 3auNTa, KaTo HanpImep Norton Internet Security, KOITo KOMbHnPa 3auNTHa CTeHa, aHTINBpCyHa n aHTNShnOHcKa 3auNTa C dpyrN fynKcN, KaTO aHTNCpAm npOJTeJckn
KoHTpOJI, Ctana HONyIpaHEn, 3aUTo IpeDnara BCNUKn FyHKcN 3a OHnAH 3aUHTa B eINH EeINHCTBeH nakeT. MHorO Xopa CMrTaT, Ye N3POn3BaHeTO Ha NbIeH nakeT 3a 3aUHTa e npNBLeKaTeJHa aNTepHaTInBa Ha INHCTaJInpaHETo, HAcTPOIKAtI N aKTyaJIIn3IpuAHeTO Ha HRAKOJIko pa3NIuHN TInOBe COfTyep 3a 3aUHTa.
Пьлната Версан Ha Norton Internet Security™ e npedbapntelno нсталupaHa Ha BawaT a Packard Bell cnctema. Тя вкюва 6e3плATEн побен abohament 3a akTuAn3aци 3a 3aцNTa. He 3a6paBЯTe Da ro aktubnpe!
I3bepeme ycmouuubu napolu u zu cbxpaneme
IapoJIte ca fakr OT JxNBOTa B INHTepHET DHeC; Hne rN n3nOJ3BaMe 3a BCNUKO,OT nopBcKa Ha cBeTЯ N OHNaH bAnKpAne Do BVn3aHe B ye6 caIHa npeDnOHTaHaT aOT Hac ABNOKOMpaHna,3a Da npOBepIM KOJIKO MmIcM eHaTPynl. CneDNtceCBbETn Morat Da Bu nOMorHat da 3aUNTTE CBOETO OHnH nPexKJBRAHe:
-
Изборьт на паола, каято He може Лесно за ce OTRAне, спьрвата CTынka Кьм Рдьрхане СИгурhoeТа на паолиte и Ona3BaHeto IM OTЧУЖДи Хор. Устончине паоли NBдьрхаТ OCem Илп NOBEчсимьOLA, Като ИзпОЛЗВATКOMБИначия OTБУКВ, ZINФри И СИМВОЛN (Като НаprIMeP, # $ % !?). Истягва对接 ДАИЗПОЛЗВATEНЯКОН OTСLEДнITE ДАннКато BaSHA паола: Baшето NOTpe6bnteNTeСКОп ME, BCИЧКВ ВьЗ оCHOBA на Лучни Te BДaHHN, Като Фамплия И дУМN, KONTO MORAT ДА БДТ ATOKРNTIВ рechика,.ocobesh "password".ОпигайтЕ сда Изберete ИЗКЛIOЧЕТENHO USTочИнБИн yнікалп ha паола 3a 3aцNTA на Deйнoctи Като OHлайн БанКирранe.
-
Пазerte сбога палona на бezонасно място и не заавайе edна и сьда палona за всякуca услуга, каято ИЗПОЛЗВATE OHlaH.
- Поменяптей napолиte чсTo, На-малko на Всеки 90 ди. Това можеда оранчишетe, пчинени OT Лиц, Което вechе e поучillodoctbnp do Baшся akaynt. Ako 3abelenkite Neшо подзргелно снковот Baшся akayHTN, nbpВaTа CTьпka, когTO можete дanpeidprnemete e,да сmedнite napolata cn.
3aumeme luuHume cu daHHU
Бьдete BнмATEJIи, KORATO CnoDEJIaTe LInuHa INHΦopMaζη, KaTO Ime, DomaSeH aDPEC, TelefoHEn HOpE, eNeKtpoHEn aDPEC. 3a Da ce Bb3PON3BaTe OT MHOrOTo OHnAynH ycnyrN, BnE Heu36exKHo ige Tp8Ba Da npedocTaNTE LInuHa INHΦopMaζη, 3a Da HAnpaBtte NopbUka N da NOnyHTe 3akynHeNTe cTOKn. Hepa3rJaCraBaHeTo Ha LInuHa INHΦopMaζη PRAKO e Bb3MOxHo, Ho NO DoIpy Ca N36poEHn HauHH 3a TOBa KaK 6e30NaCHO da CnoDEJIaTe LInuHa INHΦopMaζη OHNaH:
BhImaBte 3a faJbnB eJekTPOHNn CbOSeHn. Heaata, KOITo ce NOKa3BaT B cBo6eHnra, MOrat da ca I3MaMn C npabOInCHn rpeuKn, loWa rpaMaTHKa, CTpaHHN FOpmyInpOBKn, aDpeCn Ha ye6 caIToBe CbC CTpaHHN pa3ShnpeHn, aDpeCn Ha ye6 caIToBe BKJIouBaUu YncNa, KbJeTO HopMaJIHO ca CymN IdpYn Heua N3BbH ObouHaHOTo. B DoIbJIHeHne, I3MaMHNe TcBo6eHn YecTo Bn Ka3BaT, Ye Tp8Ba Da JeIcTBaTe bbp30, 3a Da 3aIbPjKnte CBOA akayHT OTbOpEn, da AKTuJIIN3npate cnIgPhocTt Ca nIi BN npiz3OBaBAT da npedOctBaTe INfOpMaunrTa He3a6aBHo, 3aIoTO B npOTIBen ClyaH neo loo oce Ce cIyHu. He nonaJaTe B kanaHa.
He otrobapnTe Ha cbo6eHnKoTOn nckat OT Bac da npedocabte NnHa HhOpMaun. JIeHTHMnTe KOMnHN Hma Da n3PON3BaT eNEkTPOHHnTe cbo6eHn, 3a Da NOvCKaT NnHa HhOpMaun. Ako ce cBmHBate, CBpXeTe ce C fnpMaTa IIO TelefoHa uN BbBeDeTe ye6 aDpeca Ha fnpMaTa B ye6 bpay3bpa cn. He hATnCKaTe Bpb3KInTe B Te3n cbo6eHn, 3aUTo Te ue B n OTBeDaT KbM n3MaMHn Ye6 caITObe.
- I368BaIte N3MaMHN ye6 caITOBe, N3PON3BaHn 3a KpaXb6a Ha NnUHa HΦOpMaZna. Korato nOceuabate ye6 caIT, BbBeJeTe HnPaBO aDpeca (URL) B ye6 bpay3bpa, a He cIeDbaiTe Bpb3ka B paMKIne Ha eIeKToHNO CbO6UeHne. N3MaMHNiTe YeCTO npABRT, Taka Ye Bp3KIne Da N3rIeKdAT y6eINTeHNH.
Пи сaitobe 3a пазаруbahe,банкupahe nIn npin dpyn ye6 caitobe, KbdeTo INHΦOPMaunraTe e YyBCTBNTelHa, e Heo6xOJIMo Da nMa 6ykbata "S" cneD "http" (kaTo hAnpimep https://www.yourbank.com, a He http://www.yourbank.com).Бук巴拉 "s" O3NaUaba ,CnIpyhocT" n Tp8Ba Da ce nOBu, Korato Ce n3NcKa Ba DnE3eTe nIn Da npedoctabITE dpyr N yBCTBNTeHNn DaHNn.Дpyr 3nak, Ye nMaTe CnIpyHa Bp3ka e MaNKaTa NKOHa B DoJIHaTa YacT Ha 6pay3bpa Bn (obukHOBEHO Decen bTJ).
- 06bphete BHMaHne Ha noJNTnKaT3a KOHΦnDEHuaJIHOCT Ha ye6 caIToBete n Ha coΦTyepa. BaxHo e da pa3bepeTe kak opraHn3aunTe c6bupat n n3non3Bat BaUaTa BAuHa INΦopMaunn IpeDi Da nM y IpeIoCTaBnte.
- Ппдзвайе Имейл ла reca с. Спамарпу И nзмamнцит eякога n3раша Т mЛонс сьобшени Ha Имейл ла repcnte,
CbIeCTBvBaUHn Hn He, CHaJeKDaTa Da HamepT CBOrTa NOTeHuaJHa JxepTBA. OTroBapAHeTo Ha Te3n CbOSeHn Hn DOpn CBaJHTo Ha 3o6paXeHn rapaHTnpa, Ye 6bDeTe Do6aBeHn B TexHnTe CnscBcU 3a n3PpAaHe Ha OSe PNObHn CbOSeHn B 6bDeUe. CbIo TaKa 6bDeTe BnMaTeHN KOraTO pYbIKyBaTe NMeiJ aDpeCa CN B OHJaH DnCKCuONHH rpyu, 6IIOROBe Hn OHJaH ObuHOCTn.
Ohnaun ofepmume, koumo u3aJIeXdAm npekalJeHo do6pe, 3a da bbdam ucmuna, obukHOeHo He ca ucmuna
CTapata norobopka „6e3npaTeH o6yI Hama" e BCE OSe BApHa I DHeC. PpeDnonara ce, ye „6e3npaTeH" coΦTyep KaTO cKpNlHcEiBbpr NIn YCMNBKN, TaHn TpIKOBe 3a INHBecTnCiuN, KOINTo CbC CnHypHOCT ue Bn HAnpaBArT Heu3MepmIo 6oRaTu, KaKTo N KOHKypCS, KOINTo CTE CneJeJINI N3HeHaDbAaIO 6e3 Da yUCAtBaTe ca npImaMnIBN KkyuCKN, N3NoJI3BaHN OT KOMNaHnnte, 3a da npNBLeKaT BaUeTo BHMaHne.
Дokato He паate 3a cofo Tyepa Ил ycnyrata c napi, beznilatnna cofo Tyep Ил ycnyrata, KOTo Cte 3aBnIn, e B naket C peknaMeH cofo Tyep ("peknameh cofo Tyep"), KOTo CneDn NOBeDeHneTO Bn Inoka3Ba HekeJaan peKlamn. Moze Da Tp6Ba Da pa3KpnTe IuHa HΦopMaucn IIN Da 3aKynIte HeUO dpyro, 3a Da MOxTe Da INsckaTe TOBA, KoTo Ce npdnoJara, Ye Cte CneueNl. Ako daJeHa opepta INrJIeXda pKeJaEHO xy6aba, 3a Da e NCTnHa, nonTaNTE HKO Jpyr 3a MHeHneTo My, IpOyTeTe Dpe6HnI ShpNΦT INn OSe ONo-Do6pe, INrHopnpaTe OoepTaTata.
Yeemno npaeJekdaume bankoome cu u3eJeHua u 3eJeHma om kpeumnu kapmu
Pe3yIaTbT OKpaX6bTaHa cAmOJIuHocT IOHJaH IpIeTbJIpeHnra MoKe Da Ce HamaJIn, aKO rN OTkPneTe HeNOCpeDCTBeHO CNeJ KaTO daHHnte Bn 3a OTkpaIHaTn IJn npn PbPBnA ONIT 3a N3NoJ3BaHe Ha BaUnTe daHHn. EAnH OT hau-JIeCHnTe NaunH Da pa3bepeTe, ye Ima HeIoo HepeNDo, e da nperJExKaTe MeceUHnTe bAHKOBn N3BJeEHn I N3BLeueHnra Ta Ha KpeDHTnTe Cn KapTN KaTO CNeIte 3a HeIoo N3BbH HopMaIhOTO.
OcbEN TOBa, MHOro 6aHKn u ycnyr n3noJ3BaT qaJIuINBn CnCTeMn 3a 3aunTa, KOINTo NODaBAT cHnA npn HeoBuaynHO NOBeJeHne Ha KynyBaHe (HaNPIMep, JxNBeeTe B TeKcac n BHe3aHNO 3aONOBaTe Da KynyBaTe XnaIINHnU B BydaneUa). 3a Da NOTBbPdnte Te3n NOKyKnN 3BbH HOPMaJHOTo, Bb3MOxHo e Da Bn ce oBaJr n Da Bn NpDkaHr Ta da NOTBbPdnte. He rIeJaTe c npene6bpexKeHne Ha Te3n ObaXdaHnra. Toba e BaShnT 3NaK, ye HeIo loWo ce e cLyuHIO u Ye Tpr6Ba Da B3EmeTe HeoBXoDMITE MEPkn.
3aawumeme c6oR KOMnombp C uHcmpymehmume 3a 3auuma Ha Windows
Windows npednara pa3Hoo6pa3Hn npinloxhen 3a 3auNTa.
Windows Pa6omeH ueHmbp
Windows npednara ceHtpaHa oBnaCT, OT KOrTo MoKTe Da ynpabJbBaTe HAcTpoiKnte 3a 3aunTa Ha KOMNtBpa Cn, KaTO Taka Ce npedna3BaTe OT INThepHET aTakn n Ce rapaHTnpa, Ye NaH-HOBata 3aunTa e N3TerIeHa n IHCTaInpaHa Ha Bauny KOMNtBp.
OTbopeTe Pa6omeH ueHmbp, UpaKaHHeTe Bbpyx CtapT > KoHTpOJen naHEn > CnCTema n 3aunTa > Pa6oTeH ueHtbp.
Cbio TaKa, aKo IMa DOKnIaBaHO npEynpeXeHne 3a CnrypHoCT (B oblaactTa 3a yBeDOMyBaHe do yacobnka), Toraba MoKeTe Da UpaKHeTe Tk B 6aNoHa 3a yBeDOMBaHe IIn Da UpaKHeTe DByKpaTHO Ha MaIKAta NKOHa HnpeDynpExeHneTo 3a cnrypHoCT.
PabomeuHmbp Noka3Ba cTaTycn HAcTPOINKInTe, KOnTO
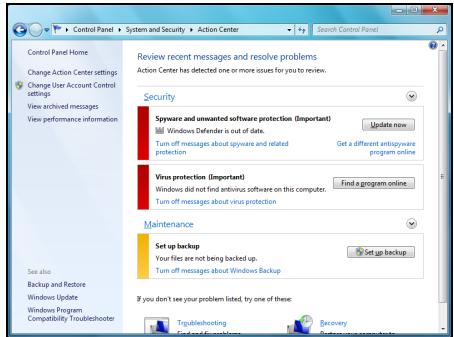
ce n3no3BaT BbB BaXn npJIOxHn, KOnTNO 3aUHTaBt Ba7nKOMNTObp. B DonbLnHeHne,Windows Firewall, Windows Defender uWindows Automatic Updates ce npedocTabr ot Microsoft kato qct ot cyIocTHata 3aUHTa Ha Ba7n KOMNTObp. AHTBnpycHTo npJIOxHne Bapnpa cNopeI nporpaMaTa, HCTaIIpapaHa Ha Ba7n KOMNTObp.
Windows 3auumHa cmeHa
Windows nMa 3aunTHa CTeHa, KOrTO 3aunTbA KOMnHTbPa, KOrato Toe B INTEpHET. TЯ Cnupa DoctbNa Ha nporpaMn Do INTEpHET 6e3 BaSeTo pa3peSeHne.
OnpeJeHn nporpaMn ce HuykdaT OT DoCTbN Do INHTepHET, 3a Da YHKUOHNpAT KaKTKO Tp8Ba HJN Da YHKUOHNpAT N3o6uO. B To3n CnyauAIN Tp8Ba O6NIKHOBeHO Da 6bDeTe NONITAHI DaJI pa3peWabATE DOCTbNa, KOrato IHCTaJInpate NporpMa IJIY I3NOJ3BAte 3a NpBb NT. 3a Da NPOBepNTe HAcTPOKNTE Ha 3aUHTHaTa

CTeHa, ⅢpaKHeTe Bbpxy CTapT > KOHTpOJIeH nAHeJ > CnCTeMa n 3aunTa > Windows 3aunTHa CTEHa.

3a6eJekka: Kozamo smapumame 3aUumHama cmeHa 3a npbE nbm, mE e pexum Ha obyuHue. Moxeme da budume u3ckaauu npo3Opu, Koumo Bu yedomaeam, ye onpeDeIeu npoapmu, Koumo np3HaBame u Ha Koumo Epeame, uckam unhepHem docmbn. Cne du3BecmHo epeme, 3auumhama cmeHa ue 3hae cnucbKa c npoapmu, Ha Koumo ce doeepraame u Hma da ucka pa3pewenuemo Bu cndeaunu npoapama ce onuma da ene3e uUnhepHem. 3auumhama cmeHa cbuo ma Ka npedna3Ba Komnombpa om npoapmu e unhepHem, Koumo ce onumeam da nolyam docmbn do kOmnpbpa Bu. Nohkoea e Heobxodmo da n03Bolume docmbn do akmyanuzauu Ha npoepamu, u3meJyHnua u dp.
Bhumaue: Osbphe Te BHMaHne, ye nobceeto coOpTyepn KOMnJIeKCHn nporpaMn npedlaRat noIO6Ha fYHKUHOHaNHOCT N ue DeakTNbupat Windows 3aunTHa cTeHa, 3a da nOdoPrt npoIN3BOdntENHOCTTt Ha cnCTemata.
Windows AkmyaJU3aUU
Ako imate aKTHBHa nHTepHET Bpb3ka, Windows moXe da npOBepBa 3a BaxHN aKtyaIN3aun 3a KOMNtbpa I da IINCTaINpa ABTOMATUHO. Te3n aKtyaIN3aun BKIOvBaT KOPEKUN 3a 3aUNTA u aKtyaIN3aUN Ha npORpAMN, KONTO npABrT N3NOJ3BaHETo HA KOMNtbpa NO-JECHO IN NOpPraTHO IN Bu nOMarat Da 3aUNITte KOMNtbpa OT HOBN BUPYC IN aTAKN.
Windows Defender
Windows Defender nomara da ce npedna3n komnoTbpa Bn ot 3NoHaMepeH nIe HxKeJaancofTyep, KaTo HApPImepuNIOHcKn IIN peKJIaMeH coFtyep. Windows Defender e INHCTaJInapH N BKNIOUeH NO IOJa3bnpaHe.
3a Da Bn NOMOHe Da 3auNTte JInuHIne Cn DaHHN IN KOMNIObpa cn, Windows Defender pa3noJa r c onuHn 3a aUuma e
peaHNo epeMe. IpeDynpexKdEHHaTb peaHNO BpeMe Bn yBeDomBaT, KOrato UnnOHckn CoOfTyep nIIN dpyrn NoteHuaHNo HeKeJahn nporpamn

ce onnta da ce nhtanipat nn da ce nychat ha Baunia komnoTbp. 6bdeTe yBeDomeHn aKo nporpaMn ce onntaT da npomeHr BaxHn HacTroKn Ha Windows.

3a6eJekka: Windows Defender paBomu c HacmpoKume Ha Windows Akmyanuzua, 3a da ce uHcmanupam aemomamuHno nocJeHume dephiHnU.
BhumaHue: O6bprHe T BHMaHne, ye nobeyeto cofoepn KOMPJIeKCHN nporpamn npedlarat noo6ha fynKunohnoHocT n ige deaktnbnapat Windows Defender, 3a da noo6prr npon3BOIDTeHNOCCTTa Ha cnCTemata.
Ynpaasene Ha nompe6umcnkau ayhm
KoHTpOHNnnaHc nPompe6umEncku akayhmU MOKe da Bn nomorHe da npedOTbpaNTe Hepa3peSeHn npomeHn Ha KOMNtBpa. IOTpeBnteJSCn aKayHTn ige noncka pa3peSeHneTo Bn iIN naDMNHCTpaTOpCk anapoa npedi Da n3Bbprn DaJeHO JeIcTBNe, KOeTO nOTehCuHaNo 6n MOrIo da nobIIae Ha pa6oTaTa Ha KOMNtBpa NIn Da npomeHn HAcTPOKn, KOITO ige OKaKaT BnIHNe Bbpxy DpyrN nOTpeBnteJI. Korato BnuIte Cbo6uHne 3a nOTpe6nTeJckn akayHT, IpOuyTeTe r O BnHMaTeJHo, cJeD KOeTO ce BepeTe, Ye IMeTo Ha DeiCTBnETo IIN npOrpaMaTa, KOrTO ige ce CTapTnpa e TOBa, KOeTO nCKaTe Da cTApTnpaTe.
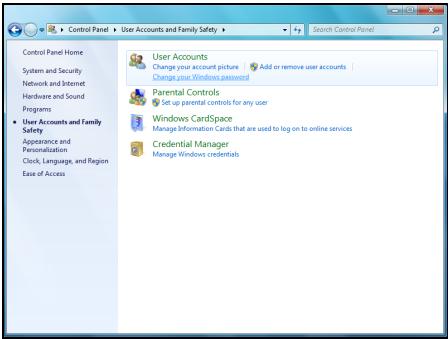
Kato npoBepBa Te3n DeiCTBnI npeDn Da 3aNoCHTe, HactpoiKeTe Ha Iotpe6nteNcKn akayHT Moat Da npedOTbpaTAYHCTaIInpaHETo Ha 3JIOHaMepeH nIINHOHcKn COOFTyeP NIn HeoO6peHn IpomEHn Ha Baunr KOMNIOTbP.
3a DoctbN Do HacTpoiKnTe Ha NompEbumencku akayHm, upaKHeTe Bbpy CtapT > KOnTpOlen naneJ > NTope6nteJcKn akayHTn n CeMeHa 6e3oNaChocT > NTope6nteJcKn akayHTn.

3a6eIeKka: Moxeme da u3KnJIOUme cbo6ueHuaMa 3a ynpaaenHe Ha nompebumencku aKayHM (He ce npenopbyea) 6 npo3opeua c hacmpouku Ha Nompbeumelcku akayHM.
Hacmpouku 3a 3auuma Ha Internet Explorer
IHTepHcTcAITOBeTe N3NOJ3BaT MaJIKN FauJIIOBE, HapeeHn "6NCKBNTKn", 3a Da IpocneJaT IpeIPOUHTaHnraTa Ha Notpe6bnteNa INHΦopMaunrTa 3a Hero. MoKeTe Da KOnFmRypnPate HacTpoKnTe 3a 3aUnTa Ha IHTepHc7bpa Cn 3a Da ONpeDEJIte KOJIKO MHOrO INI MaJIKO 6NXTe JeJIaJIu Na npHeMeTe ot ye6 caI.
Docbno hactpojKeTe 3a 3aunTa Ha Internet Explorer:
- B Internet Explorer, Брак海内外 Webpху Исторгети > Onци 3a nHTepHET.
- B pa3dien NObepntenHocT, npemecTe Te nIb3raa Harope IIN HAnOJy, 3a da n36epete HacTroPkA.
Kak da pa36epa koza kOmniombpbm Mu e u3noxe Ha puck?
Ako Pa6omeH ueHmBp n3npaTn ppeDynpexKdEHHe NIn aKO kOMNHTbPbT Bn Ce dIbpxN HeCBOJCTBeHO, 3a6NuBa HeOuaKaBAHO NIn HAKON nporpaMn He pa60rT kaTO Tp8Ba, BaunrT KOMNtBp MoKe Da e 3apa3eH OT 3IOhAmepen COfTyep. He oBUnraBaTe, Obaue, Bvpycnte 3a BCNUkn np6llem C KOMNtBpa! Ako npednoJarate, Ye KOMNtBpBT Bn moKe Da e 6nI 3apa3eH, nbpBoTo HeIo, KoEt O Tp8Ba Da hAnpaBnTe, e da AKTuAln3npaTe, aKO Beue He cTe rO hAnpaBnII. Cnei KoEtO nychete aHTNBvprchna NIn aHTNUINIOHCKn COfTyep.
Бюpo 3a пооч
Packard Bell Recovery Management

3a6eIeKka: Packard Bell Recovery Management uma camo npu npedapumelno uHcmanupaHa onepauonHa cucmema Windows.
Ako nma npo6JIemn C Baunr KOMNIOTpB, KOINTo He MOraT da 6bDat pa3peSeHn C dpYr MeToDn, MOKe Da ce HAnOxN Da npEnHCTaINpaTe OnpaUNOHHaTa CnCTema Windows n PhapuH NoHCTaINpAHNTe DpaBepncofTyep. 3a Da cTe cnrgPH, Ye MoKeTe Da Bb3CTaHOBnTE CBOR KOMNIOTpB, KORAto TOBa e Heo6XODmO, Tpr6Ba Da apxNBpuAte CNCTeMaTa Bb3MOXHo Hau-CKopo.
Packard Bell Recovery Management pa3noIara cbc cIeHNITe yHKcN:
1.Backup (Pe3epBHO KOIne):
Cb3daBaHe Ha apxNB c fa6pnuHn HacTroKn
- ApxNBupaHe Na dpaBepu n npNJIOXeHnA
- Restore (Bb3ctaHOBAHe):
Bb3ctaHOBAHe Ha a6pHnTe HactpoKn Ha onepaunOHHaTa cnCTema
Bb3ctahOBBAhe Ha onepaunOHHaTa CnCTema n 3ana3BaHe Ha noTpe6nteJcknte daHHN
- Ппенисталларе на драиьери и прилloxженя.
Ta3n rIana 1e Bn hacOyBa BB BCEKn OT Te3n npOceCn.
3a npenHCTaJInpaHe C NOMOuTa Ha DnCKOB TpIbBa PpeDbapnteNo Da cb3daTe HApOp OT DnCKOB 3a Bb3ctaHOBraHe. IIO BpeMe Ha npoueca ue 6bTe HAnbTcBAH Upe3 INHCTpyKcHn Ha ekpaHa. MoJ, npouTeTe rN BHMaTeHNO!
BhImaHne: Ako n3noI3BaTe USB fnaW yCTpoIcTBO, yBepeTe ce, ye To pa3noIara haN-MaIKo c 12 GB n ye He cbDbpJka npednHn daHHn.
- ΜιρακHeTe Bbpxy CṭapT > Bcynchπporpamn > Packard Bell, cneД KOeTO ΜιρακHeTe Bbpxy Packard Bell Recovery Management.
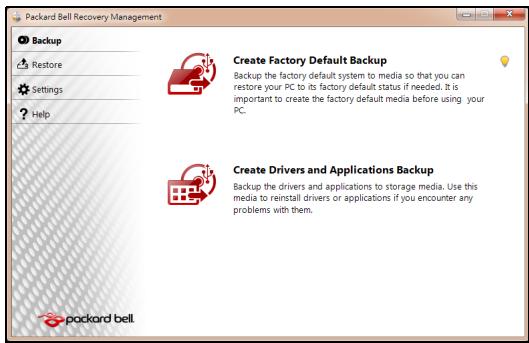
- 3a Да сьзддде apхив 3a Вьзстановвае Ha сялOTO сьдьрхане HabTВьрдя ДИСК, Вьлючпелно Ha Windows И BCИЧК ΦаБРУНОИНСТАЛПАПАД райВери n coФТуер, УразКHETe Вьрху Сьздд ДИСС CфбprUnHn HAcTpoйк.
-ⅡN-
3a Da Cb3daIeTe DnCKOBe 3a Bb3CTaHOBRAHe CaMo Ha fapuHOn IHCTaJIpaHInTe IpaIbepu N COfTyep, UpaKHeTe BbpxU Cb3daI apxNB c dpaiBepu IN pnpIoXeHn.

Baxho: IpenopbUbame Bn da c3daTe BCEKN DnCK 3a Bb3CTaHOBBAHe Bb3MOXHO Ha-CKOPO.
Otbarpe Ce dnaIorOBnT npo3opeu Cb3dau apxue c a6puHu Hacmpouku.
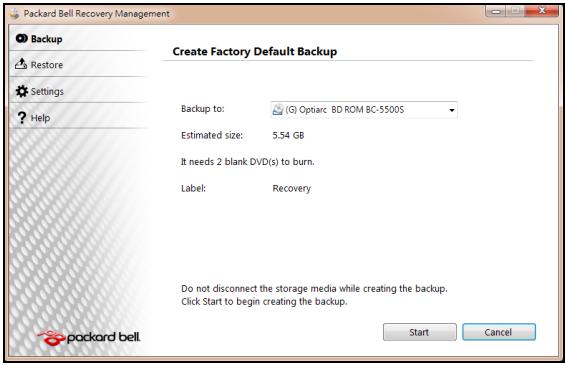
To3n DnaIanoB npo3opeu Bn noka3Ba npi6n3nteHnpa3Mep Ha apxNBnHa paII.
-
Ako n3no13BaTe ONTnUHn DnCKOBe, ige BnDnTe KOkO npa3Hn, 3aIncBaun DnCKOBe ige Bn 6bDat Heo6xOdUmN, 3a da npnkIuOHTe C DnCKOBeTe 3a Bb3ctaHOBraHe.YBepTe ce, ye pa3noIarate C Heo6xOdmMn 6pOy IndtUHn npa3Hn DnCKOBe.
-
Ako n3noI3BaTe USB ДИСК, yBepeTe ce, ye Има DoCTaTbUHOpocTppaHCTBO,празд прдьлжITE.
-
Bknioute USB dinca nnn noctabeTe npaeh nick By ycpoiCTBOTO, nocoyeNo B cnncbKa ApxueupaHe 8, cneJ KOeTo upaKHe Te BbpXy HanpeI. Ie Bnnte nporpeca Ha npoceca Ha apxuBnpaHe Ha ekpaHa.
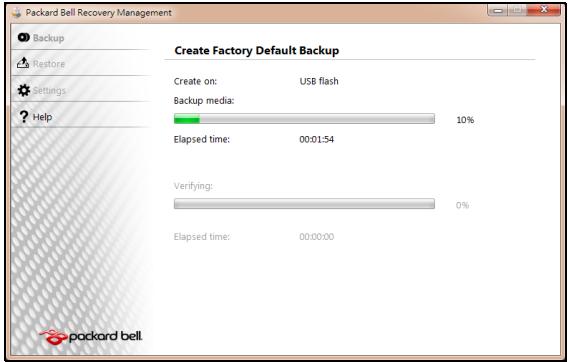
-
CneBae Te npoeca, DOKaTo ToH He npNKluOuH:
-
Ako n3noJ3BaTe onTnUHN dNCKOBe, KOraTO 3aNcBaHeTo Ha daJeH dNCK npNKInOHy, yCTpoiCTBOTO ue ro n3BaDi. OTCpaHeTe dNcKa ot yCTpoiCTBOTO n ro MapKnpaaiTe c nepMaHeHTeH mapkep.
Ako ca Heo6xOIMN HAKONKO DNCKa, NOCTaBeTe HOB DNCK, KOraTO 6bDeTe NODkaHEni, CLeI KOeTo UpaKHeTe Bbpxy OK. IpoDblJkeTe, DOKaTO npOueCbT He npuKJIouHn.
- Ako n3no3BaTe USB dIck, n3KJIuOte USB yCTpoiCTBOTO n ro MapKnpaIe C nePmaHeHTeH MapKepe.

Baxho: Hanuwe Te yHnkaJeH, onncateJeH etHKeT ha BCEKn apxNB, kaTo Hanpnmep ApxNB 3a Bb3ctaHOBAHe Ha Windows nIi ApxNB 3a Bb3ctaHOBAHe Ha npJIOKeHna/daPbEBepn.
Cbxpahete apxnbHa cnrgpno n lecho 3anomhao ce macto.
Bb3ctaHOBraBaHe Ha cNCTeMaTa
Ako noDpBxKaTa Ha Packard Bell He nomorHe c peuBaHeto Ha Baun npo6Iem, MoXeTe da n3noJ3BaTe nporpaMaTa Packard Bell Recovery Management. Toba ue BbpHe fapbnuHnte HacTpoKn Ha Baun KOMnHTbp Do CbCTOHNrETo, B KOeTO ca 6nJIn, Korato CTe rO 3aKynJIn, KaTO CbUeBpeMeHNO ue NMaTe Bb3MOXHOCT Da 3aNa3NTE BCNUKN HaCTPOKn I NUnHn DaHHN, 3a Da MOXeTe da rN 3nNoJ3BaTe PO-KbCHO.
Bb3ctaHOBnte cHCTemata:
- HanpaBeTe MaJIKN IOnpapBKn.
Ako cmo einn nnn Dba enemeHTa Ha cooTyepa nn xapnyepa Hpeabotr npabnIHO, npobJeMbT MOKe da 6bJe peweH KaTO npenHCTaIInpate cooTyepa nn dpaBepTe Ha yctpoiCTBOTO.
3a Da Bb3ctaHOBNTe CoΦTyep N dpaIbEpN, KOnTO ca 6nJIN Pha6pNUH OHCTaJIpaHNI, BIXKTe "Bb3cMaHOB6ReAne Ha npedeapumEnHo UHCmIupaH coΦmyep u dpaueepu" Ha cTp.96.
3a INHCTpykUIN OTHOCNO IpeINHCTaJInpaHe Ha COΦTyep i dpaIbepn, KOINTO He ca IpeIDBapITeJIHO INHCTaJInpaHN, BIXKTe DOKyMeHTaCIIraTa HApOdykTA IIIN ye6 caIta 3a TEXHnuecka nOIpbJka.
- Bpshahe Ha cnCTemata Do npdeNsho cbctOAHne.
Ako npenHctaInpaHeTo Ha coOpTyep nIIN dpaiBepn He nomorHe, TOraba npo6IembT MoKe Da 6bJe peWeH Upe3 BpbUaHe Ha cnCTeMaTa B npeduHO cbCTOaHne, KOraTO BCNUKO e paBoTIIO KaKTo Tp8Ba.
3a INHCTpykCIN, BnKTe "BpbUaHe do npeduHNo cBcmoHue Ha cucmemama"Ha cTp.95.
IpeoTbpaTaBaHe Ha cnlyXOBn yBpeKdAnH
- Bhumaue: Ako cnyuwaankume ce u3non3am npu 20jma cuna ha 38yka 3a dbneu nepuodu om epe me moke da ce na6nlodaaba nocmoHna 3aayba ha cnya.
ToBa yCtpoiCTBO e TecTBaHO n OTROBAPHa Hn3NCKBaHnra 3a HnBO Ha HnAraHe Ha 3Byka Cnped cTaNdApTIne EN 50332-1 n/nn EN 50332-2. - 3a6eIeKka: Bbe ΦpaHcUra, npEnoCumme cnyuAanku 3a moea ycmpoucmeo ca mecmbaH u omOeapram Ha u3ucKeaHuaMa 3a Huso Ha HanaHe Ha 3eYka cnoped cmaDapmume NF EN 50332-1:2000 u/Unu NF EN 50332-2:2003, KaKmo e nocOeHo e Ulen L. 5232-1 Ha PhaHcUra.
- A pleine puissance, l'ucoute prolongue du baladeur peut endommager l'oreille de l'utilisateur.
BHIMAHNE npncnyuane
3a da npednaIte cnyxa cn, cneDbaiTe Te3n INHCTpykUIM.
- YBéniuáBaTe CnIaTa Ha 3Byka NocTeNeHNo, DOKaTO He yBaTe rCHO N KOMΦopTHO.
- He ybeiunuabaTe cnilata Ha 3Byka, cneI kaTo yuInTe Bn cBnKhAt.
- He cnyuwaIte cnJIHa My3nka dbJiro BpeMe.
- He ybeiunabai Te cnilata Ha 3Byka, 3a da HeytpaIn3npate Wyma HAOKOJIO.
- HamaJene TcIinaTa Ha 3Byka, aKo He CyBaTe XopaTa, KOnTo roBoprT Okono Bac.
PerynaTOPHO yBeDomJeHne 3a paNooyctpoiCTBa
- 3a6eIeKka: PeaylamopHama unΦopMaua no-dony ce omhacr cAmo 3a moDeIu c 6e3xueH LAN u/Unu Bluetooth.
OshaunHOpMaun
To3n npodyk Tc0bETCTBa Ha paIIOOyecOTHTte cTaHApTn I cTaHApTnTe 3a 6e3oIacnoct Ha BC8a DpbKaba NII peHOn, B KOINTo npOdykTbT e Oo6peh 3a 6e3xNHa yNoTpe6a. B 3aBncIMocT ot KOHpIgrypaunra Ta CNI, npOdykTbT MoKe Da CbDbPka 6e3xNHN paIIOUcTpoiCTBa (KATO HAnpImep MoDyIn 3a 6e3xNHa LAN MpeKa N/INu Bluetooth). INΦopMaζηrTa NO-dony ce OTHac 3a npOdykTtE CTaknBa ycTPOiCTBa.
Be3xuHn pa6oTHn KaHJIaN 3a pa3nHn paOHn
CseBepHa AmePika 2,412-2,462 GHz K01doK11
JnoH 2,412-2,484 GHz K01doK14
Ebpona ETSI 2,412-2,472 GHz K01 do K13
ToBa obOpuyBaHe e B cBoTBeTCTBHe cBc CbIeCTBeHInTe N3NCKBaHnI N dpYrInTe npInNoXIMn NOctAHOBnEHHa Na DnpeKtNbA 1999/5/EC.
Фразця:OrpahnueH6e3xuHnYeCTOTHNJeHTN
HЯkon oblactn ha Φpaunzma MT orpaunuehenna 3a onpepeene HecToT. MakcimamHaTa pa3peseHa mouchoCT 3a BbTpeseHa yNtpe6Ba b Hau-Jlo7n CnyaH e:
- 10 mW 3a zeta Ta cheToTHa JeHtA 2,4 GHz (2400 MHz - 2483,5 MHz)
- 100 mW 3a cheToTm Mekdy 2446,5 MHz n 2483,5 MHz
- 3a6eJekka: Om 10-mu do 13-mu kaHan EKJIouHmIHo pa6om m eYecmOmHama neHma 2446,6 MHz - 2483,5 MHz.
IIma mAlko Bb3MOxHocTn 3a yNtpe6ha OkPnto: B cactHa co6CTBeHoCT nInB yacTha co6CTBeHOCT Ha oOeCTBeHN Iuca, yNtpe6bata e oEeKt Ha npEdBapntenHa npoeDpya 3a OOnOpHeNe OT MmHcTepcTbTO ha OTbpaHata C MaKcMmaJIHa pa3peSeHa moHocT Ha 100 mW B yeCToTHata JeHTa 2446,52 2483,5 MHz. He ce pa3peUba BbHsHa yNtpe6ha Ha oOeCTBeHa co6CTBeHOCT.
3a De NapTAMeHTIte NocOHeH No-DoNy, 3a ZraJaTa YecToTa 2,4 GHz:
-
MakcimmaJHaTa pa3peSeHa moUHocT ha 3akpuTo e 100 mW.
-
Makcimamhaeta pa3peuheHa moUHocT ha OTKpnto e 10 mW.
Демарente, в КОТУ ИЗПОЛЗВАЕTO на чecToTHATA ЛERTA 2400-2483,5 MHz e pa3peшенос EIRP по-mалко ot 100mW за Вьтpeша и по-mалко ot 10 mW за Вьнша уnotpe6a:
| 01 Ain Orientales | 25 Doubs | 59 Nord | 75 Paris |
| 02 Aisne | 26 Drome | 60 Oise | 82 Tarn et Garonne |
| 03 Allier | 32 Gers | 61 Orne | 84 Vaucluse |
| 05 Hautes Alpes | 36 Indre | 63 Puy Du Dome | 88 Vosges |
| 08 Ardennes | 37 Indre et Loire | 64 Pyrenees Atlantique | 89 Yonne |
| 09 Ariege | 41 Loir et Cher | 66 Pyrenees | 90 Territoire de Belfort |
| 11 Aude | 45 Loret | 67 Bas Rhin | 94 Val de Marne |
| 12 Aveyron | 50 Manche | 68 Haut Rhin | |
| 16 Charente | 55 Meuse | 70 Haute Saone | |
| 24 Dordogne | 58 Nievre | 71 Saone et Loire |
ToBa n3nCKBaHe MoKe Da Ce npOMeHn CBpeMeTO, KoEtO Ue Bn daJe Bb3MOxHoCT Da n3nON3BaTe MpeKoBaTa KapTa BdpYn paOnHn Ha PpaHn.
IpoBepTe Ha cTpaHnUaTa Ha ART 3a Hau-kAtyaJHaTa HnΦopMaun
(www.artelecom.fr).
- 3a6eJekka: Bawama WLAN Kapma npedaa no-malko om 100 mW, Ho noeue om 10 mW.
CnncbK cHaunohaJIH KODObE
Toba obopydbahe moke da ce n3non3Ba B cneHnTe CTpaHn:
PELV (Protected Extra Low Voltage)
3a da rapaHTnPate cyaIOCTHO HnCKO HnpeXeHne Ha o6OpyDbaHeTo, CbPKeTe o6OpyDbaHeTo c.
PELV (БezonaCHO CBpBXHnCKO HanpeXeHne)
Bcekn Bxod n 3x0d Ha To3n npOyKT e KlaCnΦuPah KaTo „Be3oNaCHO HnCKO HanpexKeHne".
Диctahционн 3a3eMaBaHЯ
3a da n36eHHepe pnck OT KOKB ynap, CbpxKeTe BCNUK NIOKAJIHN (B OTdeneH OΦnC) KOMNTOPN IN KOMNTOBpHO OOBpyDbaHe KbM eHa N CbIa ENEKTpyCecka Bepura, Ta3i Ha IHCTaJIaUcIyTa Ha crpaIaTAtA. Ako He cTe ciYupHIn, npOBePe TE IHCTaJIaUcIyTa Ha crpaIaTAtA, 3a da n36eHHeTe dNCTaHcUOHHN 3a3eMBAHHa.
3axpaHbHe Ha crpaJaTa
CbpxKeTe obOpuyBaHeto KbM 3axpaHbaHe Ha cPadaTa, KoETO B CbOTBeTCTBne C TekyuIte pa3nope6n 3a OkabEnyBaHe B cPahata Bn. BbB BeNko6pntaHna, TOBa ca pa3nope6nTE IEE.
EneKtpueecko 3axpaHbHe n Ka6eenn
EneKtpnuecko 3axpaHbaHe
BxOdbTиИЗxoDbT Ha 3axpaHbAHeTo (aKO nMa TaKnBa) ce KlaCnФицрAT KaTO BnCOKo HanpeKeHne.
Tp6bda n3KIIIOHTe 3axpaHbAunna Ka6en n da n3BaIITe 6aTePnraTa, 3a da cnpeTe 3axpaHbAHeTo do obOpdyBaHeTo. 3a Ta3n ceN, KOHTaKTbT Tp6bDa e 6n3o do 06opdyBaHeTo n da 6bJe lecHo DoCTbneH.
BxodHa MoUHoc: BxKTe eTnKeTa OT dOnHaTa cTpaHa Ha KOMNtbpa N CE yBepeTe, Ye 3axpaHbAunrT aanTpE oTRObAp Ha nokaahnraTa.
ПинкakBNOбстогТeNTВа He Tp6Ba NOTpe6nteIЯТ da ce OINTBA da pa3rIIO6Ba 3axpaHbAHeTo. 3axpaHbAHeTo He CbIbPka Yactn, KOITo MOrat Da 6bDat CMeHEn OT nOTpe6nteIa. BbTpe B 3axpaHbAHeTo IMa BvCOKO HAnpExKeHne, KoETO MoKe da npedin3BnKa cepno3HN HapahraBaHna.
Ako 3axpaHbaHeTo e depeKTHo, To Tp8bDa bBbDe BbPhaTo Ha TbproBeua.
3axpaHbauKa6eJnIuenceN
To3n npOdyKT n3NcKBa TpNkInJen 3a3EmeH 3axpaHbAa KabEn I uenceN. UcenBtT naCBA cAmo B 3a3EmeH eNEKtpuYeCKn KOHT.KyBepeTe ce, ye eNEKtpuYeCKnKT KOHTaKTe 3a3EmeH npaBnHNO, npEi Da BkIIOUHTe 7eNCena Ha AC aanTepa. He BKIOuBaIte 7eNCena B He3a3EmeH eNEKtpuYeCKn KOHT.K. 3a NOBEe eoIpo6HoCTn Ce CbByKeTe Cbc CBOE eNEKTPOTExHnik.
Дьлжина на Kaбela He Tpr6Ba DA NaIbIиabA 2,5 MeTpa. 3a Da npEeITBpATte TOKOB yIap, He OTCpaHraBaiTe I He DeakTnBupaiTe 3a3emBAHeTo Ha 3axpaHbaUma Ka6eI. Cmehete 3axpaHbaUma Ka6eI ako 6bJe NOBpeIeN. CbByKeTe ce c TbproBeIc OTHOCHO nOxodUuYn Bn Ka6eI. B Ebpona, KOtAKTInTe Tpr6Ba Da ca C hAnpeXeHne 250 VAC, na-MaIko 10 amp. Ha 7eenceHa Tpr6Ba Da nMa MapKnipOBka 3a OdoBeHne ot MekdyHapOHa areHua. Ka6eIb Tpr6Ba Da e NDoXoJa 3a yNtpe6Ba B CTpaHata Ha KpaHna Notpe6Iten. KoHCyItnPaaiTe ce c TbproBeua nIi MeCTHaTa eNeKTpUcheKa KOMPahnia aKO He CTE cnrypHi KaKbTn 3axpaHbaUca Ka6eI da nI3NoJI3BaTe B CTpaHata CN.
Ka6eJn
OTHOCHO KaBEni, KOITo He ca npedocTaBeHc npoDyKtBa ONaKOBkata Ha KOMNIObpa:
EJIeKTPomarHHTnHTa TcBMeCTNMOCT Ha CnCTeMaT a Ce rapaHTnpa cMo aKO Ka6eIbT INHTeppeCt mAT eFKeTNUBHO ekpaHnpaHe.
I3no3BaHTo Ha ekpaHnpan HInTepeeCen Ka6e e 3aJbKnHtEnHo 3a USB, IEEE1394, cepHnY cTpoiCTBa, npHTEprN, nRpn, aHaIorOB nIIN CuΦpOB ayDIO/BnDeo ciHan, PS2, TeVeBnOpi nI FM aHTeHn I Kato YIIO 3a BCNUK BnCOkOcOpocTHn Ka6eHN HInTepeeCn.
I3no3BaTe cAmo No. 26AWG nnn no-roJeMn TeleKOMyHnKaUOnHH Ka6eN, oO6peHn ot UL.
Само дьлжина淘汰кабенита на Ethernet LAN ип RTС моремпту може за надвишава 3 метра.
Packard Bell npenopbYBa da doabnTe KpbIa ckobc a fepntHO JApO KbM BCEK Ka6eJ, KOITOB BaAaNOMPOTbp C xapdyepHo yCTpOiCTBO, KOET He e CBbp3aHO KbM BaAaNOMPTbp.
- Cnpabka 3a Ферита: 28A-2029 ot Steward (Два Крьга)
CbOTBeTcTbHa Ha pycKaTa peYyNaTOpHa ceptnФнkaци.


ME61
Pa6oTHa cpea
Ctapaem ce da ona3BaMe OKoHaTa Cpea
OkoJHaTa Cpea e B OChOBaTa Ha HauHIne npOdyKtn.
Packard Bell noema anraxmment da orpauuyn Bb3eJcTBneto Ha npodykTnte cn Bbpxy OKoHaTa cpea no BpeMe Ha JxNBoTa Ha npodykTa.
Kato ce 3aonuehe ot fpaata Ha npoeKtnape He ne pnpilara MHO ro ctpnKTHa noHNTka 3a Bb3laaraHe Ha nopbyKn, MaKcImaJIHO BHNMaHne Ce OTdJeHa eJekTPOHHte KOMNoHEHTN, 3a da CE orpAHuN KoINueCTBTO IN3IOIN3BaHN TeKKM MeTaN KaTO OJIOBO, KaDMn, XpOM, JxBAk N dp. DocTaBnuCtE TpIbBa Da cna3BaT BCNUKN pa3nopeD6n 3a BcRAKa edHa qact OT daen npOdyKT.
IIO OTHOWeHHe Ha n3JIe3JIneTe OYIOTope6a npOdyKTn Ca B3eTn MepKn, 3a da Ce pIpeBnInu YIeCN HePcIKNlnpAHeTo Ha BCNUKn HauSi npOdyKTn. C DpyrN dymu, BcUKNIIactMacOBn qactn no-TexkN oT 25 rpaMa, I3NoJ3BaHN B npOdyKTnTE Packard Bell caMapKnpaHn IO ISO 11469.To3n EtNKET No3BOJRA BaBp3o pa3No3HaBAhe Ha MaTePnAnaH IeCHOTo My BaOpN3aZnn. CbIo TaKa, HAcToJHnTe KOMNtprn Ca npOeKTnpaHn Da6bDat IeCHO pa3rNo6Bemn, KaTO BoNTOBeTe ca ZAmEHn C KJIINCS.
N3xBpbJHHe Na npOdyKta
Ди配电нвада 2002/96/EC, ИЗвесна оше Като Ди配电нвада за OTпдьци OT eелкгческо и eелкгюнho obopуданe (WEEE), ИЗнckва ИЗпалбанITE eелкгчесkn и eелкгюнnpolyKTи дae сИЗХырлгот OTденио OT дамкинспite OTпдьци, 3a дae habcprn NOBTOpHaTа уnotpeba, peцклupaHETo, Дугт Формн Ha onOЛЗOTbOPraBaHe, KaKTo n dae сHamajin KOLINyecTBOTO Ha OTпдьциТС сцел дae ce orpanuHdENOnHpaHETo И nI3rapaHETo Ha npolyKTn. ЛorOTO cbc 3aЧерКнatura KoФа


3a 6oknyk ceenn da Bn Hanomhn, ye Te3n npodyktn Tp8bda 6bdat coptnpaHn n 1x3xBpIeHN OTdEHNo OT octaHJInte OTnaDbuN. Te3n npabina ce OTHacrT 3a BCNUKN npodykTN Ha Packard Bell, kakto n 3a BCNUKN akcecoapn kaTO KNABnatypa, Mmka,
Дистанционно управлени и дуг. Korato ce habложида n3xВьрnte takиварpoюктс,CБьржete ce sbcCBOTBeTHaTа мecт haИнстаня,зда ce уberite,чесpoюктete ca peuzNKIpaHn павилно Илвьрhte CTapOTO obopydBaHe Ha BaшяТьproBCKn npedctabuTeN,akO Bb3HaMepeRaTe da ro noДмeHnTe. 3a nobecheMuHфорmaци nocetete www.packardbell.com/recycling.
U3xbpIHe Ha 6aTePnn (KOrato e npnIOxmo)
Ipei Da n3xBpnte BaheTo obOpdyBaHe, yBepTe ce, ye cTe n3BaDnIn BCnKKn 6aTePnN, KOnto MoKe Da ca MOHTnpaHb N B o6OpyDbaHTo. EbponecknT 3akOH rnaCn, Ye 6aTePnNTe Tpr6Ba Da 6bDat Cb6nPaHn 3a n3XBpIne OTeJHo OT DmaknHCKnte OTNaDbu. He XbPnIte n3No3BaHnTe 6aTePnN B KcOfata 3a 60kIyK. N3XBpIne I3No3BaHnTe 6aTePnN cnope Pa3Nope6bTe 3a Cb6PapHe Ha 6aTePnN, KbTeO mMa TaKbNA HIN PONtai Te Ba7nA DNCTPNbTyOp IN IN cbOTBeTHaT MeCTHa IHCTaHcNJa KbDe MoKete Da npedaTe 6aTePnNTe. BlaRoDapeHne Ha BaWnte ycNJa CTaBA B3MOxHO 6e3OnachTO cb6PuaHe, peUKNpaHe u YHnOxKaBaHe Ha n3No3BaHnTe 6aTePnN KaT O Taka CnOMarate 3a Ona3BaHeto Ha OKoJIHaTa CpeDa n 3a HamaJIraBaHe Ha pNCKOBete 3a 3dpaBeTo.

BHumaue: Ima pnck OT ekcnIIO3nA kO n3NOJ3BaTe rpeeH TIN 6aTePN.
N3XBpIeTe n3NOJ3BaHInTe 6aTePN cNope HNCTpyKUnnte.
BHHMaHHe -XnBaK
3a eNeKtpoHnnpOkyTc LCD/CRT MoHtOp nIi DmCInne 6e3 LED 3aHObOCBETBaHe: lamnata(HT) B TO3n npOyKT CbDbpXa(T) XnBAk N Tp8Ba Da cepeunipra(T) INI IN3XbPnI(HT) B CbOTBETCTBNE C MeCTHnTE, DpbXabHnTE IINfepedapJHHte 3akOH. 3a NOBeue INHΦopMaun, CbPxTe Ce c Electronic
Industries Alliance Ha aDpec: www.eiae.org. 3a KoHKeTHa INHOpMaunr 3a n3XbPnHe Ha lamnata, BIXTe www.lamprecycle.org.

CocTyepenIuceH3

3a6eJekka: Iooeyemo coqmyepHu npunoKeHua ca npedeapumelHo uncmIupanu Ha Bauu Packard Bell komnombp. Te 3a oomou 3a ynoppe6a uU 3a hcmpouka. Bce nak, hKou 3aanaBua u3uckeaam CD uU DVD ycmpoucbMa, 3a da ce cmapupam. LHe hamepu mezu duckoe e onakokama Ha kOmIOMbpa.
Packard Bell LInceH3nOHNO cnopazymemHe (CD n/nni DVD npodyktN). Toba konne Ha opunHaJIe e BaueTo doka3aTeNCTBO 3a IuIeH3. MoJ, oTHacraIte ce c Hero kaTO C ueHHa co6ctBeHOCT.
Baxho!
Ppooyete BHHMaTeJIHo, npeDn da IHCTaJInpaTe cofoTyepa.
CneHnTo NIneH3NIOH NoPoc3ymHe ne ce OTHacr 3a Bac. Toba e 3akOHNo cnop3ymHe mExdy Buc (fN3uuecko nIIN IOpNuauecko nIuce) n Packard Bell. C nHCTaIInpaHeTo Ha cOoTpyepa Bue Ce cbIpaBate Da cna3BaTe ycNoBnraTa Ha TOBa cnop3ymHe. Ako He CTBe CbIpaChn C yCNOBnraTa Ha TOBa cnop3ymHe, He3a6abHO BbpHeTe YJIaTata KOMIObTpHa CNTema, HeOTBOpeHnTE COoTpyepHn NaKeTI, Ako IMa TAKIBa, KaKTO N CbIbTCTBaUHTe ycNoBnra (BKJIIOHTeHNO NmCMeHn DOKyMeHTn INI dpyro CbIbPxKaHne) Ha MCTOTO, OT KbJeTO CTe Tn NOUYINJ, 3a da NOUYHTeOteHne.
U3xBbprJHe Ha 6aTePm1 114
IHTepHETIOCTaBvIK (ISP) 52
Klambnatya
IHTeppepeHnra 108
6bprn KnaBn.. 20
HDD (Tbbpd nck)
Koidek. 45
Cbo6oJn npoctpaHCTBO 79
UnpabJIeHne 81
#
Mpeka 28
Hauanen cehtbp 40
MpexkOBn Bpb3kn 55
OkoJHa cpeJa. 113
PpeDnA3Hn 3dpabHn Mepkn. 12
noptobe 26
PpeDynpexdene 3a enniencna 13
Почиствано.. 79
PpemaxBaHe Ha xapdyep. 28
IpeHOCIMM MyTINMeiHH
NoDpBxKKa
yctpoiCTBa 28
Iporpama Recovery
Iporpama 3a DeΦparMeHTnpaHe Ha
Management 41, 90
ДиSCа 80
CnCTemHn HNcTpymeHTn. 82
PpOBeRka 3a rpeuKn. 77
YeicatHa Packard Bell. 61
Mepkn 3a 6e3oNaChocT 8
UnpaBHeHne Ha TBbpD nCK. 81
MoDcM. 53, 54 OtctpaHraBe Ha coΦTyep 81
IocJeHaTa n3BeCTHa do6pa LAN (IokaJaHa mpeKa) 55
pa6oTea KaonHpyaun 86
C
CnCTeMHn INHcTpymEnTHn Windows Bb3ctaHOBraHe Ha
Прогама 3a DeФparMeHTnpaHe CnCTeMaTa 83
Ha dncka 80 CofTyeep
IpoBepka 3a rpeuKn .77 OtctpaHraBaHe Ha coOpTyep. 81
Почистванодпс.. 79 CofTyepen Nizhen 115
Norton Internet Security 61, 66
山
YnpablenneHaNoTpeBnteJckn Packard Bell akayt 74 PporpamaRecovery
ToUkn 3a Bb3ctaHOBBAHe. 85 Management 41,90
yHnBepcaHa cepnHa shHa 29 Ye6 caT. 61
UHMOHcKn coTpyep. 62 PowerDVD. 43
UcTpoNCTBa
YeTeu 3a KapTu c PAmeT. 26
b
WiFi 55 Windows aBToMaTnUHn
Windows 73,88
Bb3ctaHOBBaHe Ha cncTemata..... 83 Windows Defender. 73
I3noJI3BaHe Ha Windows..... 40 Windows OToJaNeHa nOMoU....89
HauJIen ueHTbp 40 Windows Media Center.. 42
Windows Pa60TeH Windows Media Player 41
70, 71, 87ярков
6bp3n KnaBnsu 19
Eyχειρίδιο Xpήστη

Packard Bell Recovery Management
Tia va TPOeTOIaOeTe TOV UToLOyoiToN Oac yia EITINpOoOeTeC EIIAOyEc aTOKataoTaOns Tou OuaTnmuToC, 0a TpeTnei va DnmuOpuynoTe eva oE tiokww aTOKataoTaOns To TaxUtePo duvatov. AvatpeTe OTn eAida 94 ia TEPIOoTepeC PAnpoPoppieC.
Windows Media Player
MTopeTe va xpoiiooioeTo Windows Media Player yia Tnv avapapaywyn apxieiw nXou e foopma MP3 n WMA, CD n ta TepiooTepa apxieia bivtEO.

Ti ειναί to spyware;
To Spyware avapepetai oveikwacvntmueta poypamata ta oioia avovtai otov utoloyiotn oac ooo eioe ouvdoeveoi oTo diaiktuo, ouxva xwpic va to yywipcTe. Ta poypamata auta, apouo louvouv tov utoloyiotn oac, mtopei va npatnpouv tic dpaotnpiotntec oac kat nTv TEpiinyan oac oTO diaiktuo, va oullEyouv tpooawtike c TAnpoopiecs, va Tpokalouv tvn emavion avaduoevw npapaeupwv n akoukai va aalazouv tic puthetaicis tou utoloyiotn oac. To Spyware katavaawvei Tropouc tou utoloyiotn oac. Mtopei va eTIPpaDuvEi tn ouvdocn 0to
ΔiδiKtuO n oλoknpo TO σuotnma Tou UTLOyoiTn σaç, akóma kai va Kávei Tov UTLOyoiTn σaç va "kɔllnoεi".
Meipke fopec, To Spyware xpnoiotoiietai ato aodtakctc etaipieyia va Tapaokaouov kai va Evtontizouv tic tototheic Toun ETIOKETTEOTe OTO Aiaiktuwoateva TPOOdiopiouv tic ouvntheic oac otny Tepinyon OTO Aiaiktuokai va eupaviciouv otnv oboyn oac avaduopeva npapupa Toun ateuohuvovtai eidiKa oE eoac. Oomega, epiKa iDn spyware UTPPbaivouv tnv atan Tapaokaouon kai kataypapouv o,TI TAnkpoLoyeite, Touc kwikooc oac, atotelawntac oobapo kivduvo yia tnV aoaiaia.
Packard Bell Recovery Management

Avoiya rou εpyaεiou aTOKaTaσaon
Av ekteleoe tnv atokataaon xpnoiopoivta T a Windows kai tic
Pnnpopipes atokataaons nou eivai antoehkeuvecs orov utoloyiatn
os:
- KávTE KλIκ ΟTO Evαρξη > Oλa τα προγράματα > Packard Bell και μετά KλIκ ΟTO Packard Bell Recovery Management. To Packard Bell Recovery Management ανοίγει.
KavTE KAIK OTNV KAPTELA ENavaoppa KAI META KAVTE KAIK OTO EAnaveyKataoTn Poypaumatwv oyynons n eapouovv. Avoiyi TO KUPIO MEVOU TnS Packard Bell ATOKaTaOaONc eapouoyv.
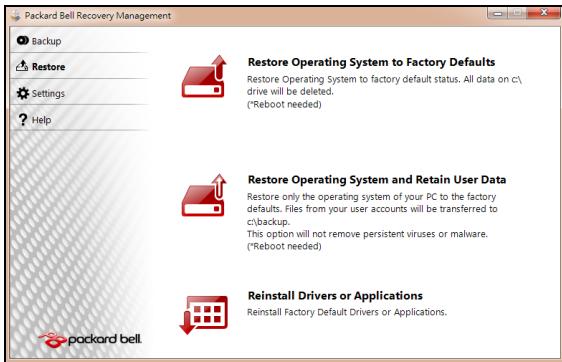
Av ekteleoe tnv antokataa a n ao avitypapo aaepaias yia nv antokataa an npoypaumawv obnyonc kai eapmuoyw Tou utapxie OOTIKOUCs
Eioayete to oiko aviypapou aoaaleiac yia tyn atokataotaon Tpoypamatwov onnyonc kai eapuoyw ('Aviypapo aopaaia c ia Tnv atokataotaon Tpoypamatwov onnyonc kai eapuoyw) otn movadobiokou.
- Eπaνεκκiνnóte tov unloayioTn, περιεve vα Εκiνnσeɪ to προγαμα kai μετα μεταβεITE σην ενοτητα "EπaνεykaTáσTaon πρoγαμαTaw oñnyanç n εφapoyw" ση σελiδα 103.
Av ekteleoe Tnv anokataaotaan ao to avtipapo aopaleia yia tnv anokataaotaan npoypaumawv obnyonc kai eapuoywv nou utapxie o evovada biokou USB:
- EioáyET η μováδa δiokou USB σε θúpa USB. AvoiEτ η μováδa δiokou USB Οην εφapμoyn Explorer twv Windows kai kávtε δπλο KλιK ΘΟ ATtOKaTaσTaση.
Kavte klik oTo EtnaveykataoTaon Tpoypaumaw odynoncn eapayow aTRO uOKEun USB kai mTa mTaBeite OTNV evOTnTa "EtnaveykaTaoTaN Tpoypaumaw odynonc n eapayoyw" Otn 0eAida 103.
Epaneykataaon npoypaumrw oynynons n eapouovw
KataIyoos Eovikw Kwokw
O napwv EoTnAioCtTIPeTTeTAtVa Aeioupei otakolouoEs xwep:
EviaioG eipiaKoC diauLoC 30
Epyaleia ouotnmuos
'Eleyxocsigmaaatawv 81
Etnavapopa ouatmuot wv
Windows 87
Ekkαθάρισ οδικου 83
AvaoukykpoTnO 日 iokou 83
Apaipouuevcs oukeu cToluaeowv..... 29
Norton Internet Security. 63, 68
0
Ytnpesia eugnpetnons. 81
UToIoYoIOTnS
EvEiKTIkiLuxvia EvpyoToinos. 18
OuvatotnteC. 15
YTTOOTnpiEgN AIKTuakocToTTOc Packard Bell. 63
TeLeutaia ywwotn owt npouion
Tapapetpwv 90
Tekunpiown
Aikuaakoc toTioC Packard Bell. 63
Teixoc ppoataiac 56,65
Σημεία επαναφοράς 90 συνδέσεις
DiktuO 29
Luvoeoic DIKTuou 57
Συντήρηση Πρόγραμα Recovery Management 42,94 Διαχείρη HDD 85
EpyaEia ouotmuoC 86
UaKeun avaywns kaptwv uynnc 27
outoixia npatapiwv
PioeioiOionxuaunns FOPTIOs
muatapiaC 39
ελεγxος στάθμις φόρτιασις μπαταρίας 38
Xaunlcsouvthkcs 39
Xpnoynia npwn foopa 35
38
37
34 35
toTioeTnO.. 37
oPtiO.. 37
Packard Bell Recovery Management
Packard Bell Recovery Management

Recovery Management 13
Programi 37,79 Bilgisayar ortami. 8


- Packard Bell dots series
- TABLE OF CONTENTS
- Starting your computer 4
- Computer Basics 8
- Getting to know your computer 13
- Upgrading your computer 24
- Power supply 29
- Software 36
- Internet 45
- Helpdesk 67
- Recovery 77
- STARTING YOUR COMPUTER
- WIRELESS CONNECTION
- REGISTRATION
- How to register
- Another option
- SOFTWARE INSTALLATION
- RECOVERY
- HAVING TROUBLE?
- Packard Bell support
- Packard Bell website
- Warranty and contact information
- COMPUTER BASICS
- SAFETY AND COMFORT
- Safety precautions
- Computer environment
- Cables
- Make sure that:
- Cleaning your computer
- Servicing your computer
- Health precautions
- GETTING TO KNOW YOUR COMPUTER
- TOP VIEW - DISPLAY
- TOP VIEW - KEYBOARD
- Special keys
- Hotkeys
- LEFT VIEW
- UPGRADING YOUR COMPUTER
- EXPANDING THROUGH OPTIONS
- Connectivity options
- Memory card reader
- Inserting a memory card
- SD, SDHC and SDXC cards
- Removing a card from an memory card reader
- Built-in networking
- Universal Serial Bus (USB)
- Video port
- High-Definition Multimedia Interface (only for certain models)
- Headphones and microphone
- POWER SUPPLY
- AC POWER ADAPTER
- BATTERY PACK
- Battery pack characteristics
- Maximizing the battery's life
- Conditioning a new battery pack
- Installing or removing the battery pack
- Charging the battery
- Checking the battery level
- Optimizing battery life
- Battery-low warning
- SOFTWARE
- USING WINDOWS AND YOUR SOFTWARE
- Welcome Center
- Internet security offer
- Productivity software
- Packard Bell Recovery Management
- Playing multimedia files
- Windows Media Player
- Windows Media Center (optional)
- Setup
- AutoPlay
- Playing downloaded files
- Social networks (optional)
- Authorize access
- Accessing your social networks
- Quick actions
- Checking your news feeds and information
- Changing settings
- FIRST STEPS ON THE NET
- Protecting your computer
- Choose an Internet Service Provider
- Connection types
- Dial-up
- DSL (e.g. ADSL)
- Cable
- 3G (WWAN or 'Wireless Wide-Area Network')
- Network connections
- Wireless networks
- Mobility
- Network cable (RJ45)
- Wireless adapter
- Diagram of a working network
- Turning on/off a wireless network connection
- they may be dangerous to the operation of the aircraft, disrupt communications, and even be illegal.
- Surf the Net!
- Internet Explorer features
- Security
- Definitions
- What is malware?
- What is a personal firewall?
- How to protect your computer
- Keep your computer current with the latest patches and updates
- Protect your computer with security software
- A complete version of Norton Internet Security™ is pre-installed on your Packard Bell system. It includes a free trial subscription to protection updates. Make sure you Activate it!
- Choose strong passwords and keep them safe
- Protect your personal information
- Review bank and credit card statements regularly
- Protect your computer with Windows security tools
- Windows Action Center
- Windows Firewall
- Windows Updates
- Windows Defender
- User Account Control
- Internet Explorer security settings
- How do I know when my computer is at risk?
- SAFE COMPUTING
- Maintenance
- Disk Cleanup
- Disk Defragmenter
- Manage your hard disk drive (HDD)
- Run Windows System Tools
- Undo the last restoration
- Updates
- Internet security
- Operating system, software and drivers
- Windows Remote Assistance
- Creating recovery discs
- Backup'. Make sure you keep the backup in a safe place that you will remember.
- RECOVERING YOUR SYSTEM
- Types of recovery
- Returning to a previous system condition
- To return to a restore point:
- Recovering pre-installed software and drivers
- Opening the recovery tool
- Returning your system to its factory condition
- Recovering from the hard drive during startup
- REGULATORY INFORMATION
- PREVENTION OF HEARING LOSS
- RADIO DEVICE REGULATORY NOTICE
- General
- Wireless operation channels for different domains
- France: Restricted wireless frequency bands
- List of National Codes
- CE COMPLIANCE REQUIREMENT
- List of applicable countries
- MODIFICATIONS TO THE PRODUCT
- CE Marking
- Radio frequency interference
- CONNECTIONS AND REMOTE EARTHSH
- PELV (Protected Extra Low Voltage)
- SELV (Safety Extra Low Voltage)
- Remote earths
- Building supply
- POWER SUPPLY AND CABLES
- Power cables and plug
- Heat Build-up and Portable Computers
- CHASSIS COVER REMOVAL AND REPLACEMENT
- LASER COMPLIANCE STATEMENT
- PACKAGING
- COMPLIANT WITH RUSSIAN REGULATORY CERTIFICATION
- ENVIRONMENT
- OUR COMMITMENT TO ENVIRONMENTAL PROTECTION
- PRODUCT DISPOSAL
- Battery disposal (when applicable)
- Mercury advisory
- SOFTWARE LICENSE
- Important!
- Read carefully before installing the software.
- PACKARD BELL SOFTWARE LICENSE
- Grant of License
- Copyright
- Other restrictions
- THIRD PARTY SOFTWARE OR FREE SOFTWARE LICENSE INFORMATION
- INDEX
- A
- B
- C
- D
- E
- F
- H
- 1
- K
- L
- M
- N
- P
- R
- s
- T
- U
- V
- W
- VOUS AVEZ DES PROBLEMES?
- Support Packard Bell
- EXTENSION AVEC DES OPTIONS
- MODIFICATIONS APPORTÉES AU PRODUIT
- Homologation CE
- MISE AU REBUT DU PRODUIT
- Packard Bell-Support
- Internet 50
- 0
- Cartoes SD, SDHC e SDXC
- Aceder as sus redes sociais
- Anular oultimate restauro
- De computer upgraden 25
- 3g (WWAN of 'Wireless Wide-Area Network')
- VERKLARING LASERPRODUCT
- Internet 47
- Windows Media Center (tilleggsutstyr)
- Packard Bells websted.
- Service of computeren
- Packard Bells websted
- Administration of hardisken
- IHTepHeT 54
- Cnyk6a npdpekkn 80
- BocctaHOBHeHne 93
- Bo3MOxHOCnI NOkJIIOueHn
- Kapmbi SD, SDHC u SDXC
- USB (yHueepcaIbHa nocneoeamEnbHa uHa)
- Pa3beM VGA
- AdaanTep ceTeBOro NITaHnIa
- AkkymyIaTOp
- XapakTepnKn aKkymJIaTOPa
- YeenuyeHue cpoKa cnYk6bI akKymnIamopa
- Iodomoeka HOB02o akKymyIamopa K UcNoJIb3OeaHIO
- Пουарьамен Windows Media
- BocsmahOBneHue cucmembl Windows.
- Бezonaacha paoboma e UHmepheme
- OnepauuOHnA cucmema, npoepaMMbI u dpaieepbI
- YdaJIeHHbI NOMOuHnK Windows
- BocstahOBJIeHne
- BhImaHne: CoBeTyem KaK MoXHo ckopee co3daTb o6a Tnna DnCKOB dIy BOCCTaHOBJIeHn.
- BocctaHOBJeHne cncTeMbI
- Hopmatubnaya nHopmaçania
- PpeoTbpaueHne noTeepn cnyxa
- MEPbI PNEOCTOPOXHOCTN npn npocnyuBaHm
- HopmatNBHOe yBeDomJIeHne B OTHoIeHHn paIIOyctPoIcTB
- 06uine cBeHn
- Pa3peeHhble KaHaJIbI 6ecnpoBODHO CB83n dIra pa3hblx cTpaH
- ΦpaHnIa: 3aPpeHHeIe IJIg 6ecnpoBODHO CBraN dHaNa3OHb YaCTOT
- UHypbI nHTaHn I BNlka
- Ka6eJn
- TennobideHne n nepeHoCHbIe KOMNbIOTepbl
- ChrTne n yctaHObKa KpbIuKn Kopnyca
- 3aBHeHne O COOTBeCTBn CtHaIapTaM I Na3ePbIx yctpoIcTB
- YnakoBka
- 3auntata okpykaioe cyedbl
- Haunob3aTeIbCTBa no 3aunite Okpykaoue cpebl
- yTnIIm3aZu yCTpoiCTB
- YtJIn3aun aKkymyIaTOPOB (npn nX haJIuyn)
- PpeDynpexKdHnE O coDepxKaHm n pTuTn
- Karty SD, SDHC i SDXC
- Karty SD, SDHC a SDXC
- Opravit'
- Packard Bell
- Podpora
- počitač
- Effectuarea unui upgrade la computer
- Extinderea prin optiuni
- Restaurare system Windows.
- 3aNo3HaBaHe c Baunn KOMnIOrTp 14
- HaandroBaHe Ha BaShn
- KOMNIOIbP 26
- BIOPO 3a NOMOUI 77
- Bb3ctaHOBAHe 90
- ВклочеTekmптьра сн
- DOnbJIHNTeJIHH Bb3MOxHOCTN
- Onznn 3a Bpb3ka
- Yemeusa kapmu c naMem
- Pocmaahe Ha kapma c namem
- OmcpanhaeHaKapma om Yemeu,HaKapmu Cnamem
- BapadeHa Mpeka
- YHuepcanHa cepuHa wuHa (USB)
- Budeo npm
- UHmepcfeuc 3a bucoKoedemaunHa Mylmumedou (cAmO 3a HyaKOU Modeu)
- Cnyuanku u Mukpodboh
- IocTabaHHe n 3BaXdaH He 6aTePnHnMaMOnyI
- Windows Media Center (Kamo onuua)
- Hacmpouka
- Kak da zauumume komnombpa cu
- 3aumeme komnombpa cu uepe3 coqmyep 3a 3auma
- 3aumeme luuHume cu daHHU
- OTbopeTe Pa6omeH ueHmbp, UpaKaHHeTe Bbpyx CtapT > KoHTpOJen naHEn > CnCTema n 3aunTa > Pa6oTeH ueHtbp.
- Windows 3auumHa cmeHa
- Bhumaue: Osbphe Te BHMaHne, ye nobceeto coOpTyepn KOMnJIeKCHn nporpaMn npedlaRat noIO6Ha fYHKUHOHaNHOCT N ue DeakTNbupat Windows 3aunTHa cTeHa, 3a da nOdoPrt npoIN3BOdntENHOCTTt Ha cnCTemata.
- Windows AkmyaJU3aUU
- Hacmpouku 3a 3auuma Ha Internet Explorer
- Бюpo 3a пооч
- -ⅡN-
- Baxho: IpenopbUbame Bn da c3daTe BCEKN DnCK 3a Bb3CTaHOBBAHe Bb3MOXHO Ha-CKOPO.
- Bb3ctaHOBraBaHe Ha cNCTeMaTa
- Bb3ctaHOBnte cHCTemata:
- IpeoTbpaTaBaHe Ha cnlyXOBn yBpeKdAnH
- BHIMAHNE npncnyuane
- PerynaTOPHO yBeDomJeHne 3a paNooyctpoiCTBa
- OshaunHOpMaun
- Be3xuHn pa6oTHn KaHJIaN 3a pa3nHn paOHn
- Фразця:OrpahnueH6e3xuHnYeCTOTHNJeHTN
- CnncbK cHaunohaJIH KODObE
- PELV (БezonaCHO CBpBXHnCKO HanpeXeHne)
- Диctahционн 3a3eMaBaHЯ
- 3axpaHbHe Ha crpaJaTa
- EneKtpueecko 3axpaHbHe n Ka6eenn
- EneKtpnuecko 3axpaHbaHe
- 3axpaHbauKa6eJnIuenceN
- Pa6oTHa cpea
- Ctapaem ce da ona3BaMe OKoHaTa Cpea
- N3xBpbJHHe Na npOdyKta
- U3xbpIHe Ha 6aTePnn (KOrato e npnIOxmo)
- BHHMaHHe -XnBaK
- CocTyepenIuceH3
- Baxho!
- Ppooyete BHHMaTeJIHo, npeDn da IHCTaJInpaTe cofoTyepa.
- #
- 山
- Eyχειρίδιο Xpήστη
- Avoiya rou εpyaεiou aTOKaTaσaon
- KataIyoos Eovikw Kwokw
Brand : PACKARD BELL
Model : DOT SC/VW-001FR, DOT SC-001FR
Category : Netbook