
KAM 26 N F1 PDH - Air-conditioner GORENJE - Free user manual and instructions
Find the device manual for free KAM 26 N F1 PDH GORENJE in PDF.

| Brand | Gorenje |
| Model | KAM 26 N F1 PDH |
| Product Type | Split air conditioner (indoor + outdoor unit) |
| Cooling Capacity | 2.6 kW (≈ 9,000 BTU/h) |
| Heating Capacity | 2.7 kW (heat pump) |
| Energy Class | A (Cooling) / A+ (Heating) – typical |
| Refrigerant | R32 |
| Indoor Unit Dimensions (H×W×D) | 290 × 820 × 200 mm |
| Outdoor Unit Dimensions (H×W×D) | 550 × 780 × 300 mm |
| Indoor Unit Weight | 9 kg |
| Outdoor Unit Weight | 25 kg |
| Power Supply | 220-240 V ~ 50 Hz |
| Sound Level Indoor | 25 – 40 dB(A) |
| Sound Level Outdoor | 50 – 55 dB(A) |
| Functions | Cooling, Heating, Dehumidification, Fan, Night Mode, Turbo |
| Filter Type | Washable anti-bacterial filter |
| Maintenance | Clean air filters every 2 weeks; professional service annually |
| Safety Features | Auto restart, overheat protection, child lock (remote) |
| Remote Control | Yes (included) |
| Warranty | 2 years (standard), 5 years on compressor (check local) |
Frequently Asked Questions - KAM 26 N F1 PDH GORENJE
User questions about KAM 26 N F1 PDH GORENJE
0 question about this device. Answer the ones you know or ask your own.
Ask a new question about this device
Download the instructions for your Air-conditioner in PDF format for free! Find your manual KAM 26 N F1 PDH - GORENJE and take your electronic device back in hand. On this page are published all the documents necessary for the use of your device. KAM 26 N F1 PDH by GORENJE.
USER MANUAL KAM 26 N F1 PDH GORENJE
PORTABLE ROOM AIR CONDITIONER – USERS MANUAL GB
MOBILT KLIMAANLÆG – BRUGERVEJLEDNING DK
PRIJENOSNI KLIMATSKI UREĐAJ – UPUTE ZA UPORABU HR
PRENOSNI KLIMA UREĐAJ – UPUTSTVO ZA UPOTREBU SR
PRENOSNÁ KLIMATIZAČNÁ JEDNOTKA - NÁVOD NA POUŽITIE SK
PŘENOSNÁ KLIMATIZAČNÍ JEDNOTKA - NÁVOD K POUŽITÍ CS
PRENOSNÁ KLIMATIZAČNÁ JEDNOTKA - NÁVOD NA POUŽITIE SK
KLIMATYZATOR PRZENOŚNY – INSTRUKCJA OBSŁUGI PL
SLOVENSKO KAM xx PD
natural_image
Simple line drawing of a trash bin with crossed lines indicating no waste or discharge (no text or symbols)
OPOZORILA
natural_image
Line drawing of a portable air conditioner unit with a handle and cooling fan (no text or symbols)natural_image
Diagram showing a vehicle and a curved road with a diagonal line crossing (no text or symbols)natural_image
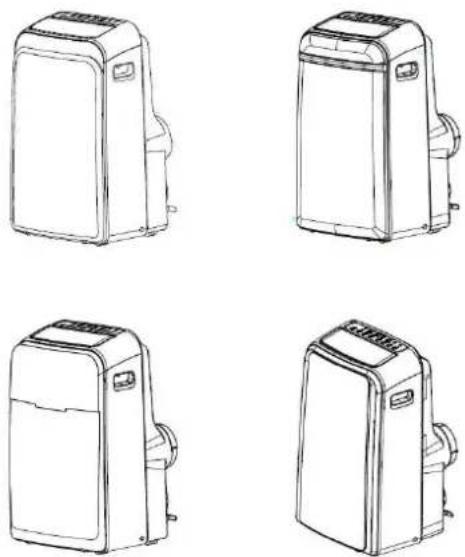
Two identical illustrations of a portable air conditioner unit with a handle and checkmark symbols (no text or labels present)
natural_image
Line drawing of a large industrial air conditioner unit with cooling fans and ventilation slots, showing internal components and a directional arrow (no text or symbols)Before using your air conditioner, please read this manual carefully and keep it for future reference.
MOBILE TYPE AIR CONDITIONER
OWNER'S MANUAL
Read This Manual
Inside you will find many helpful hints on how to use and maintain your air conditioner properly. Just a little preventative care on your part can save you a great deal of time and money over the life of your air conditioner.
SOCIABLE REMARK
Sociable remark 3
SAFETY PRECAUTIONS
Safety rules 4
Warning 'For your safety'......5
Warning 'Electrical connections' 5
IDENTIFICATION OF PARTS
Accessories....6
Names of parts....7
AIR CONDITIONER FEATURES
Electronic control operating instructions 8
OPERATING INSTRUCTIONS
Operating instructions 10
INSTALLATION INSTRUCTIONS
Location....12
Exhaust hose installation 13
Water drainage....14
CARE AND MAINTENANCE
Care and maintenance 16
TROBLESHOOTING TIPS
Troubleshooting tips 17
NOTE
Rated information's, listed on energy label are based on testing condition of installing the un-extended air exhaust duct without adaptor A and B (The duct and adaptors A & B are listed in the accessories chart in the instructions manual).
When using this air conditioner in the European countries, the following information must be followed:
DISPOSAL: Do not dispose this product as unsorted municipal waste. Collection of such waste separately for special treatment is necessary. It is prohibited to dispose of this appliance in domestic household waste. For disposal, there are several possibilities:
A) The municipality has established collection systems, where electronic waste can be disposed of at least free of charge to the user.
B) When buying a new product, the retailer will take back the old product at least free of charge.
C) The manufacture will take back the old appliance for disposal at least free of charge to the user.
D) As old products contain valuable resources, they can be sold to scrap metal dealers.
Wild disposal of waste in forests and landscapes endangers your health when hazardous substances leak into the ground-water and find their way into the food chain.
natural_image
Symbol of a trash bin crossed with diagonal lines, representing waste sorting or anti-poverty (no text or labels)

CAUTION
- This appliance is not intended for use by persons (including children) with reduced physical, sensory or mental capabilities, or lack of experience and knowledge, unless they have been given supervision or instruction concerning use of the appliance by a person responsible for their safety.
- Children should be supervised to ensure that they do not play with the appliance.
Safety rules
To prevent injury to the user or other people and property damage, the following instructions must be followed. Incorrect operation due to ignoring of instructions may cause harm or damage.

Always do this!
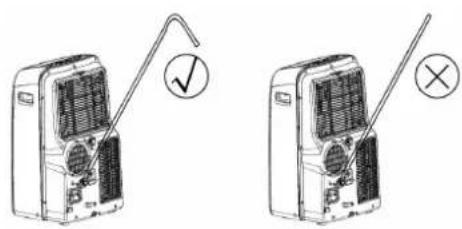
- Your air conditioner should be used in such a way that it is protected from moisture. e.g. condensation, splashed water, etc. Do not place or store your air conditioner where it can fall or be pulled into water or any other liquid. Unplug immediately.
• Always transport your air conditioner in a vertical position and stand on a stable, level surface during use. - Turn off the product when not in use.
• Always contact a qualified person to carry out repairs. If the supply cord is damaged it must be repaired by a qualified repairer. - Keep an air path of at least 30cmall around the unit from walls, furniture and curtains.
- If the air conditioner is knocked over during use, turn off the unit and unplug from the mains supply immediately.

Never do this!
- Do not operate your air conditioner in a wet room such as a bathroom or laundry room.
- Do not touch the unit with wet or damp hands or when barefoot.
- Do not press the buttons on the control panel with anything other than your fingers.
- Do not remove any fixed covers. Never use this appliance if it is not working properly, or if it has been dropped or damaged.
- Never use the plug to start and stop the unit.
• Always use the switch on the control panel. - Do not cover or obstruct the inlet or outlet grilles.
- Do not use hazardous chemicals to clean or come into contact with the unit. Do not use the unit in the presence of inflammable substances or vapor such as alcohol, insecticides, petrol, etc.
- Do not allow children to operate the unit unsupervised.
- Do not use this product for functions other than those described in this instruction manual.
Energy save
- Use the unit in the recommended room size.
- Locate the unit where furniture cannot obstruct the air flow.
- Keep blinds/curtains closed during the sunniest part of the day.
- Keep the filters clean.
- Keep doors and windows closed to keep cool air in and warm air out.
Operating condition
The air conditioner must be operated within the temperature range indicated below:
| Mode\Temperature | Room temperature |
| COOL | 17^ ÷ 35^ |
| DRY | 13^ ÷ 35^ |
| HEAT (some models) | 5^ ÷ 30^ |

WARNING
For your safety
- Do not store or use gasoline or other flammable vapors and liquids in the vicinity of this or any other appliance.
- Avoid fire hazard or electric shock. Do not use an extension cord or an adaptor plug. Do not remove any prong from the power cord.

WARNING
Electrical information's
- Be sure the electrical service is adequate for the model you have chosen. This information can be found on the serial plate, which is located on the side of the cabinet and behind the grille.
- Be sure the air conditioner is properly grounded. To minimize shock and fire hazards, proper grounding is important. The power cord is equipped with a three-prong grounding plug for protection against shock hazards.
- Your air conditioner must be used in a properly grounded wall receptacle. If the wall receptacle you intend to use is not adequately grounded or protected by a time delay fuse or circuit breaker, have a qualified electrician install the proper receptacle.
- Ensure the receptacle is accessible after the unit installation.
Accessories
| Parts: | Name | Quantity |
 | Exhaust hose and Adaptor and Adaptor B (flat mouth or round mouth :depending on models) | 1 |
 | Wall Exhaust Adaptor A* 1 | |
 | Adaptor B(round mouth) * 1 | |
| Expansion Plug and wooden | screw * | 4 |
  | Remote Controller and Battery | 1 |
| Drain hose and drain hose | adaptor * | 1 |
NOTE: Optional parts, some models without *.
Check all the accessories are included in the package and please refer to the installation instructions for their usage.
NOTE: All the illustrations in this manual are for explanation purpose only. Your air conditioner may be slightly different. The actual shape shall prevail.
Names of parts
Front
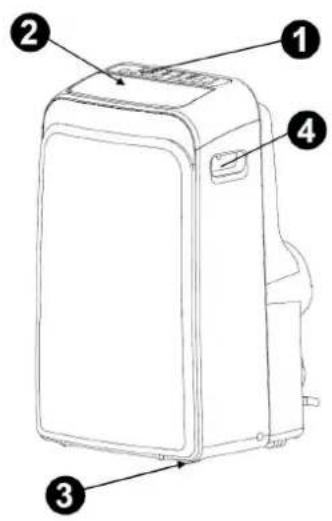
- Operation panel
- Horizontal louver blade (swing automatically)
- Caster
- Carrying handle (both sides)
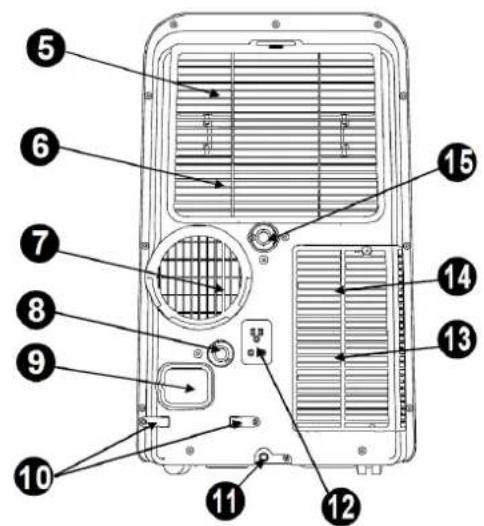
Rear
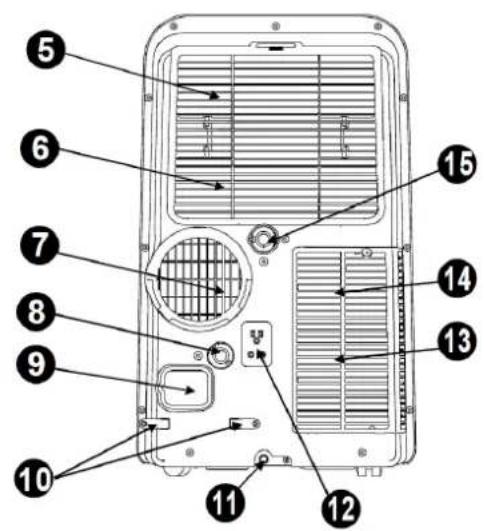
- Upper air filter (Behind the grille)
- Upper air intake
- Air outlet
- Drain outlet (only for Pump heating model)
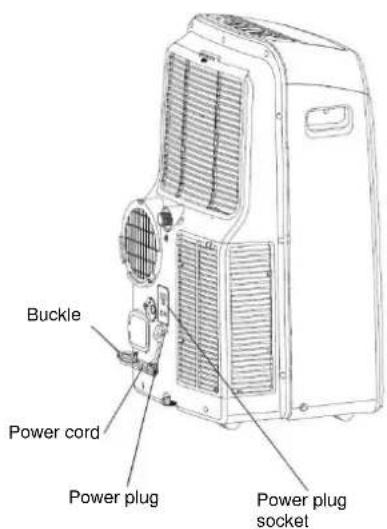
- Power cord outlet
- Power cord buckle (Used when storing unit)
- Bottom tray drain outlet
- Power plug socket (Used when storing unit)
- Lower air filter (Behind the grille)
14 Lower air intake
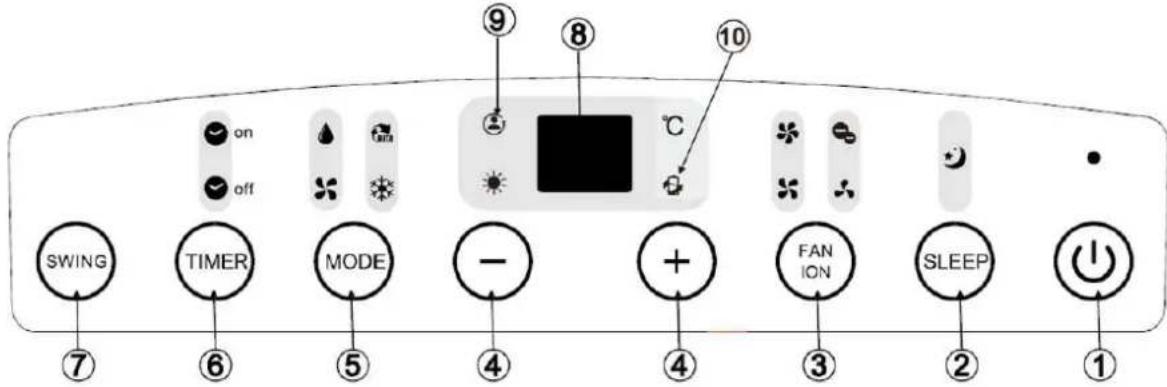
Electronic control operating instructions
Before you begin, thoroughly familiarize yourself with the control panel and remote controller and all its functions, then follow the symbol for the functions you desire. The unit can be controlled by the unit control panel alone or with the remote controller.
NOTE: This manual does not include Remote Controller Operations, see the <
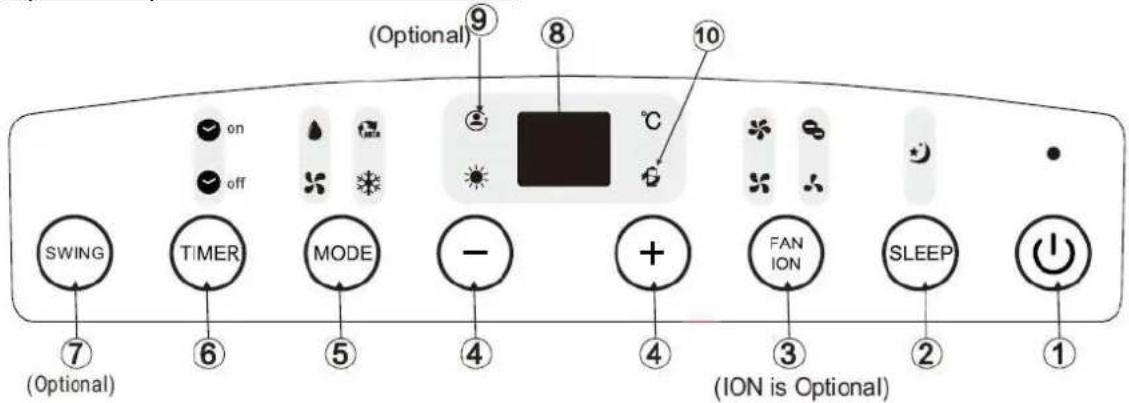
Operation panel of the air conditioner
NOTE: On some models SLEEP button is instead of ECO button.
- Power button
Power switch on/off.
- SLEEP / ECO button
Used to initiate the SLEEP/ECO operation.
- FAN / ION button
(ION is optional). Control the fan speed. Press to select the fan speed in four steps-LOW, MED, HI and AUTO. The fan speed indicator light illuminates under different fan settings except AUTO speed. When select AUTO fan speed, all the fan indicator lights turn dark.
NOTE: Press this button for 3 seconds to initiate ION feature. The ion generator is energized and will help to remove pollen and impurities from the air, and trap them in the filter. Press it for 3 seconds again to stop the ION feature.
- Up (+) and down (-) button
Used to adjust (increasing/decreasing) temperature settings (1°C / 2°F increments) in a range of 17°C (62°F) to 30°C (88°F) or the TIMER setting in a range of 0\~24hrs.
NOTE: The control is capable of displaying temperature in degrees Fahrenheit or degrees Celsius. To convert from one to the other, press and hold the Up and Down buttons at the same time, for 3 seconds.
5. MODE select button
Selects the appropriate operating mode. Each time you press the button, a mode is selected in a sequence that goes from AUTO, COOL, DRY, FAN and HEAT (cooling only models without). The mode indicator light illuminates under the different mode settings.
6. TIMER button
Used to initiate the AUTO ON start time and AUTO OFF stop time program, in conjunction with the & buttons. The timer on/off indicator light illuminates under the timer on/off settings.
7. SWING button
(Applicable to the models with auto swing feature only) Used to initiate the Auto swing feature. When the operation is ON, press the SWING button can stop the louver at the desired angle.
8. LED display
Shows the set temperature in "°C" or "°F" and the Auto-timer settings. While on DRY and FAN modes, it shows the room temperature.
Error codes and protection code:
- E1 – Room temperature sensor error - Unplug the unit and plug it back in. If error repeats, call for service.
- E2 – Evaporator temperature sensor error - Unplug the unit and plug it back in. If error repeats, call for service.
- E3 – Condenser temperature sensor error - Unplug the unit and plug it back in. If error repeats, call for service.
- E4 – Display panel communication error - Unplug the unit and plug it back in. If error repeats, call for service.
- P1 – Bottom tray is full - Connect the drain hose and drain the collected water away. If protection error repeats, call for service.
9. FOLLOW ME / TEMP SENSING feature (optional)
NOTE: This feature can be activated from the remote control ONLY. The remote control serves as a remote thermostat allowing for the precise temperature control at its location. To activate the Follow Me/Temp Sensing feature, point the remote control towards the unit and press the Follow Me/Temp Sensing button. The remote display is actual temperature at its location. The remote control will send this signal to the air conditioner every 3 minutes interval until press the Follow Me/Temp Sensing button again. If the unit does not receive the Follow Me / Temp Sensing signal during any 7 minutes interval, the unit will beep to indicate the Follow Me/Temp Sensing mode has ended.
- POWER MANAGEMENT feature When the ambient temperature is lower (Cooling mode) or higher (Heating mode) than the setting temperature for a period of time, the unit will be automatically operate power management feature. The compressor and fan motor stop and the power management indicator light illuminates. When the ambient temperature is higher (Cooling mode) or lower (Heating mode) than the setting temperature, the unit will be automatically quit the power management. The power management indicator light turns dark and the compressor and (or) fan motor run.
Operating instructions
COOL operation
- Press the "MODE" button until the "COOL" indicator light comes on.
- Press the ADJUST buttons "+" or "-" to select your desired room temperature. The temperature can be set within a range of 17^ C – 30^ C.
- Press the "FAN SPEED" button to choose the fan speed.
HEAT operation (cooling only models without)
- Press the "MODE" button until the "HEAT" indicator light comes on.
- Press the ADJUST buttons "+" or "-" to select your desired room temperature. The temperature can be set within a range of 17°C - 30°C.
- Press the "FAN SPEED" button to choose the fan speed. For some models, the fan speed cannot be adjusted under HEAT mode.
DRY operation
- Press the "MODE" button until the "DRY" indicator light comes on.
- Under this mode, you cannot select a fan speed or adjust the temperature. The fan motor operates at LOW speed.
- Keep windows and doors closed for the best dehumidifying effect.
- Do not put the duct to window.
AUTO operation
- When you set the air conditioner in AUTO mode, it will automatically select cooling, heating (cooling only models without), or fan only operation depending on what temperature you have selected and the room temperature.
- The air conditioner will control room temperature automatically round the temperature point set by you.
- Under AUTO mode, you cannot select the fan speed.
FAN operation
- Press the "MODE" button until the "FAN" indicator light comes on.
- Press the "FAN SPEED" button to choose the fan speed. The temperature cannot be adjusted.
- Do not put the duct to window.
TIMER operation
- When the unit is on, press the Timer button will initiate the Auto-off stop program, the TIMER OFF indicator light illuminates. Press the UP or down button to select the desired time. Press the TIMER button again within 5 seconds, the Auto-on start program is initiated. And the TIMER-ON indicator light illuminates. Press the up or down button to select the desired Auto-on start time.
-
When the unit is off, press the Timer button to initiate the Auto-on start program, press it again within five seconds will initiate the Auto-off stop program.
-
Press or hold the UP or DOWN button to change the Auto time by 0.5 hour increments, up to 10 hours, then at 1 hour increments up to 24 hours. The control will count down the time remaining until start.
- The system will automatically revert back to display the previous temperature setting if there is no operation in a five seconds period.
- Turning the unit ON or OFF at any time or adjusting the timer setting to 0.0 will cancel the Auto Start / Stop timer program.
- When the malfunction (E1, E2, E3 or E4) occurs, the Auto Start/Stop timed program will also be cancelled.
SLEEP / ECO operation
Press this button, the selected temperature will increase (cooling) or decrease (heating) by 1^ C / 2^ F 30 minutes. The temperature will then increase (cooling) or decrease (heating) by another 1^ C / 2^ F after an additional 30 minutes. This new temperature will be maintained for 7 hours before it returns to the originally selected temperature. This ends the Sleep/Eco mode and the unit will continue to operate as originally programmed.
NOTE: This feature is unavailable under FAN or DRY mode.
Other features
Auto – Restart (on some models)
If the unit breaks off unexpectedly due to the power cut, it will restart with the previous function setting automatically when the power resumes.
Wait 3 minutes before resuming operation
After the unit has stopped, it cannot be restarted operation in the first 3 minutes.
This is to protect the unit. Operation will automatically start after 3 minutes.
Air flow direction adjustment
natural_image
Line drawing of a portable air conditioner unit with a handle and side panel (no text or symbols)The louver can be adjusted automatically.
- Adjust the air flow direction automatically
- When the Power is ON, the louver opens fully. Press the SWING button on the panel or remote controller to initiate the Auto swing feature.
- The louver will swing up and down automatically. Please do not adjust the louver manually.
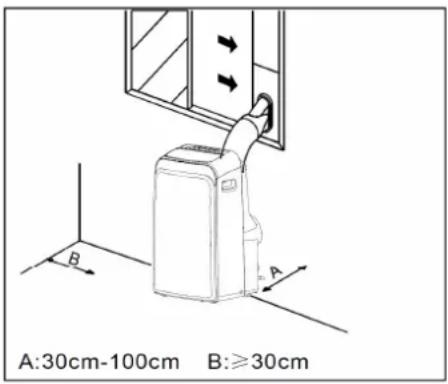
Location
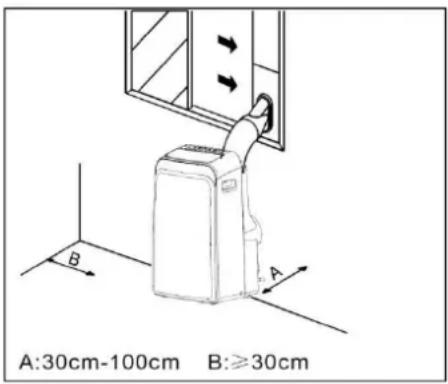
- The air conditioner should be placed on a firm foundation to minimize noise and vibration. For safe and secure positioning, place the unit on a smooth, level floor strong enough to support the unit.
- The unit has casters to aid placement, but it should only be rolled on smooth, flat surfaces. Use caution when rolling on carpet surfaces. Do not attempt to roll the unit over objects.
- The unit must be placed within reach of a properly rated grounded socket.
- Never place any obstacles around the air inlet or outlet of the unit.
- Allow 30cm to 100cm of space from the wall with for efficient air-conditioning.
NOTE: All the illustrations in this manual are for explanation purpose only. Your unit may be slightly different. The actual shape shall prevail.
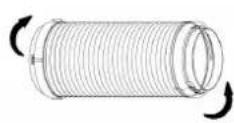
Exhaust hose installation
The exhaust hose and adaptor must be installed or removed in accordance with the usage mode.
| COOL, HEAT(heat pump type) or AUTO mode | Install |
| FAN, DEHUMIDIIFY or HEAT(electrical heat type) mode | Remove |
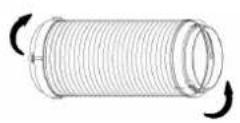
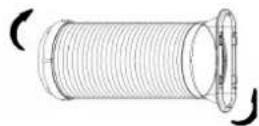
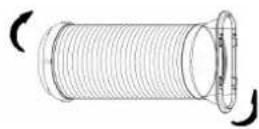
-
Install the adaptor B and adaptor I onto the exhaust hose. Refer to the previous pages for window kit installation.
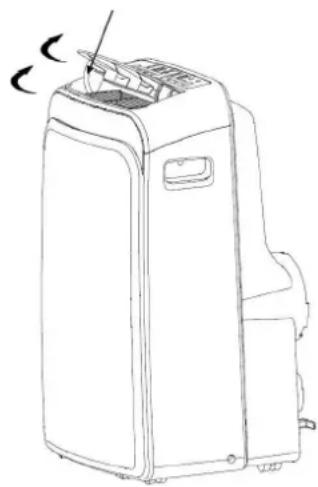
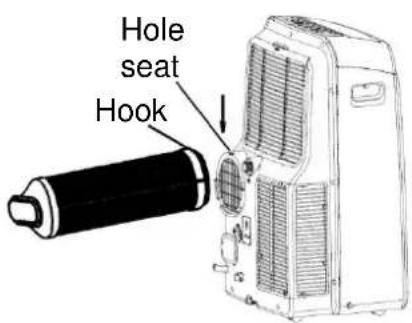
-
Reset the hook of the Exhaust hose into the hole seat of the air outlet and slide down the Exhaust hose along the arrow direction for installation.
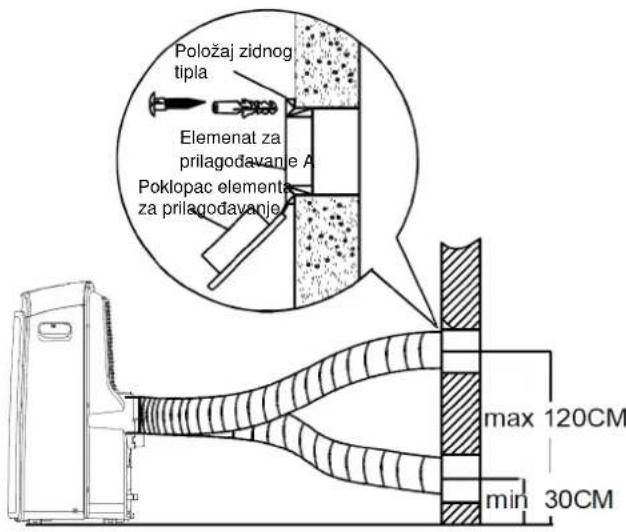
Exhaust hose installation in to the wall
Not applicable to the units without adaptor A, expansion plugs and wooden screws.
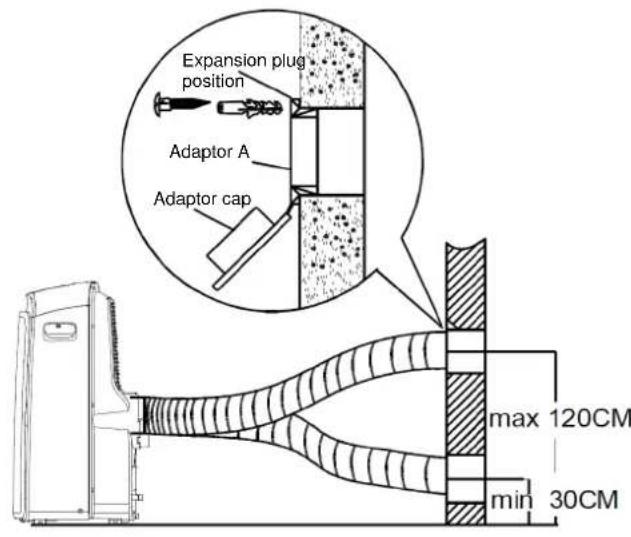
-
Prepare a hole in the wall. Install the wall exhaust adaptor A onto the wall (outside) by using 4 expansion plugs and wooden screws, be sure to fix thoroughly.
-
Attach the exhaust hose to wall exhaust adaptor A.
NOTE: Cover the hole using the adaptor cap when not in use. The exhaust hose can be compressed or extended moderately according to the installation requirement, but it is desirable to keep the hose length to a minimum.
natural_image
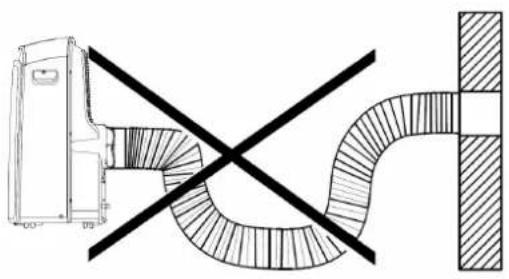
Diagram showing a vehicle with a cross-shaped road and a shaded rectangular area, no text or symbols present.IMPORTANT: DO NOT OVER BENDTHE EXHAUST HOSE.
CAUTION: Make sure that there is no obstacle around the air outlet of the exhaust hose (in the range of 500mm) in order to the exhaust system works properly.
Water drainage

- During dehumidifying modes, remove the upper drain plug from the back of the unit, install the drain connector (5/8 universal female mender) with 3/4 hose (locally purchased). For the models without drain connector, just attach the drain hose to the hole. Place the open end of the hose adaptor directly over the drain area in your basement floor.
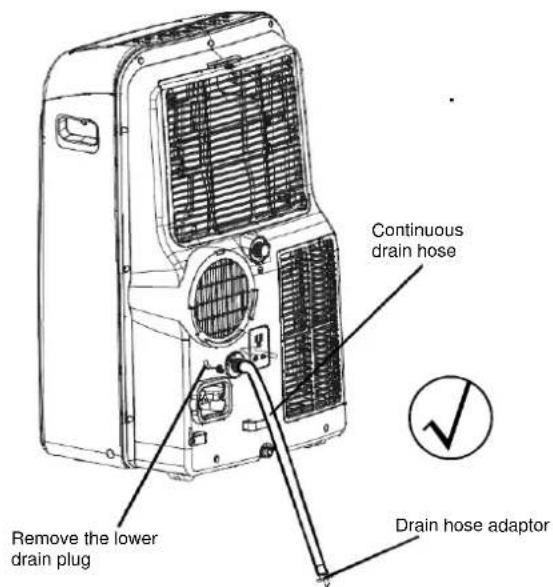
- During heating pump mode, remove the lower drain plug from the back of the unit, install the drain connector (5/8 universal female mender) with 3/4 hose (locally purchased). For the models without drain connector, just attach the drain hose to the hole. Place the open end of the hose adaptor directly over the drain area in your basement floor.
NOTE: Make sure the hose is secure so there are no leaks. Direct the hose toward the drain, making sure that there are no kinks that will stop the water flowing. Place the end of the hose into the drain and make sure the end of the hose is down to let the water flow smoothly. Do never let it up.

natural_image
Line drawing of an air conditioning unit with cooling fan and ventilation slots (no text or symbols)- When the water level of the bottom tray reaches a predetermined level, the unit beeps 8 times, the digital display area shows 'P1'. At this time the air conditioning/dehumidification process will immediately stop. However, the fan motor will continue to operate (this is normal). Carefully move the unit to a drain location, remove the bottom drain plug and let the water drain away. Reinstall the bottom drain plug and restart the machine until the P1 symbol disappears. If the error repeats, call for service.
NOTE: Be sure to reinstall the bottom drain plug before using the unit.
Care and maintenance
IMPORTANT:
- Be sure to unplug the unit before cleaning or servicing.
- Do not use gasoline, thinner or other chemicals to clean the unit.
- Do not wash the unit directly under a tap or using a hose.
It may cause electrical danger. - If the power cord is damaged, it should be repaired by manufacture or its agency.
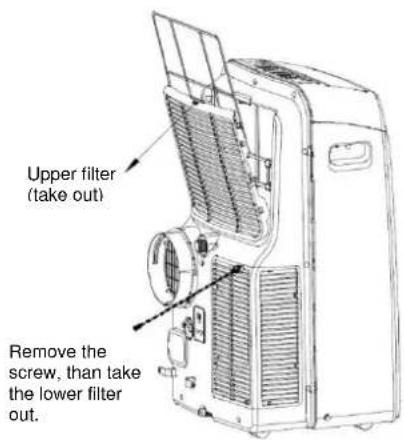
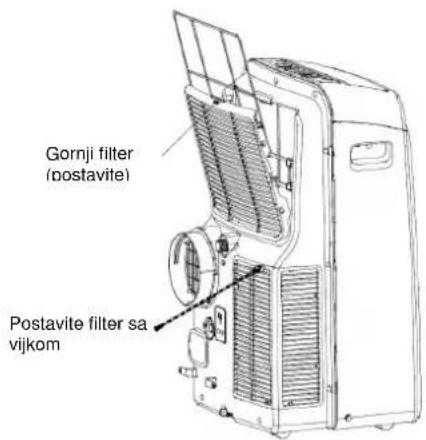
1. Air filter
- Clean the air filter at least once every two weeks to prevent inferior fan operation because of dust.
- Removal
This unit has two filters. Take the upper filter out along the arrow direction, and then take the filter down.
Remove the lower filter by loosening the screw, taking out the filter.
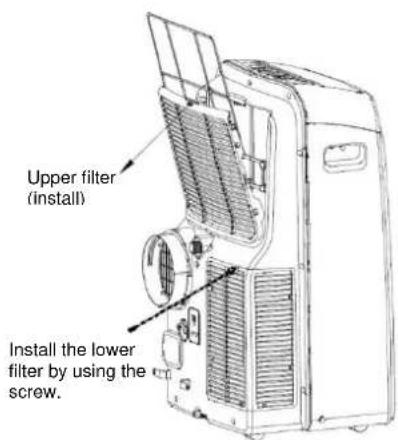
- Cleaning
Wash the air filter by immersing it gently in warm water (about 40^ C/104°F) with a neutral detergent. Rinse the filter and dry it in a shady place.
- Mounting
Install the upper air filter after cleaning, and install the lower filter by using the screw.
2. Unit enclosure
- Use a lint-free cloth soaked with neutral detergent to clean the unit enclosure. Finish with a dry, clean cloth.
3. Unit idle for a long time
- Remove the rubber plug at the back of the unit and attach a hose to drain outlet. Place the open end of the hose directly over the drain area in your basement floor.
- Remove the plug from the bottom drain outlet, all the water in the bottom tray would drain out.
- Keep the appliance running on FAN mode for half a day in a warm room to dry the appliance inside and prevent mold forming.
- Stop the appliance and unplug it, wrapped the cord and bundle it with the tape. Remove the batteries from the remote Clean the air filter and reinstall it.
TROUBLESHOOTING
| Stop the air conditioner immediately if one of the following faults occurs.Disconnect the power and contact the nearest customer service center. | |
| Trouble | OPERATION indicator or other indicators flash rapidly (5 times every second) and this flash can't be fixed by disconnecting the power, and then connect it in again. |
| Fuse blows frequently or circuit breaker trips frequently. | |
| The remote controller won't work or works abnormally. | |
| If one of the following codes appears on the display area:E1, E2, E3, E4, P1 | |
| TROUBLES | POSSIBLE CAUSES | SUGGEST REMEDIES |
| Unit does not Start when Pressing on/off Button | P1 appears in the display window Drain the | water in the bottom tray. |
| Room temperature is lower than the set temperature.(Cooling mode) | Reset the temperature. | |
| Not cool enough | The windows or doors in the room are not closed. | Make sure all the windows and doors are closed. |
| There are heat sources inside the room. Remove the heat sources if possible. | ||
| Exhaust air duct is not connected or blocked. | Connect the duct and make sure it can function properly. | |
| Temperature setting is too high. Decrease the set temperature. | ||
| Air filter is blocked by dust. Clean the air filter. | ||
| Noisy or vibration | The ground is not level or not flat enough. Place the unit on a flat, level ground if possible. | |
| Gurgling sound | The sound comes from the flowing of the refrigerant inside the air-conditioner. | It is normal. |
| Power shut off at Heating mode | The automatic over heat protection function. When the temperature at the air outlet exceed 70°C/158°F,the device will stop. | Switch on again after the unit has cool down. |
| If the trouble has not been corrected, please contact a local dealer or the nearest customer service center. Be sure to inform them of the detailed malfunctions and unit model. | ||
Notes: Do not attempt to repair the unit yourself. Always consult an authorized service provider.
DANSK KAM xx PD
DRIFT INDSTRUKTIONER
Drift instruktioner....10
INSTALLATIONS VEJLEDNING
Placering 12
natural_image
Symbolic illustration of a trash bin with crossed lines indicating no waste or discharge (no text or labels)
FORSIGTIG
Figur 1
Figur 2
natural_image
Line drawing of a portable air conditioner unit with a handle and side arm, showing airflow direction (no text or symbols)Figur 4
Figur 5
natural_image
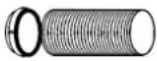
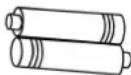
Diagram of a mechanical device with a cylindrical component inserted into a housing (no text or symbols visible)Figur 8
| COOL, HEAT (Varmepumpe type) eller AUTO | Installer |
| FAN, DEHUMIDIIFY eller HEAT (Elektrisk varmetype) tilstand. | Fjern |
natural_image
Diagram showing a vehicle with a diagonal line crossing over a curved road or pipeline (no text or symbols present)Figur 10
natural_image
Line drawing of a Billede 14 air conditioner unit with cooling fan and ventilation slots (no text or symbols on the device itself)- Når vandstanden i den nederste bakke når et bestemt niveau, bipper enheden 8 gange, og det digitale display viser 'P1'.
natural_image
Simple line drawing of a trash bin with crossed lines indicating no waste or restriction (no text or symbols)
⚠ UPOZORENJA
- Gornji zračni filtar (za zaštitnu mrežu).
- Gornji dovod zraka
- Odvod zraka (izlaz).
- Izlaz kondenzata (samo za modele za grijanje
- Izlaz priključnoga kabela.
- Kopča za spremanje priključnoga kabela (koristi se prilikom pospremanja jedinice)
- Čep za ispust kondenzirane vode iz donje posude.
- Doza dovodnoga priključka
- Donji zračni filtar (za zaštitnu mrežu).
- Donji dovod zraka
- Ispust kondenzata
Upute za uporabu elektronskog upravljača
Prije nego što počnete koristiti klimatski uređaj, temeljito proučite upravljačku jedinicu, daljinski upravljač i sve njihove funkcije. Klimatski uređaj možete upravljati preko upravljačke jedinice ili daljinskog upravljača.
NAPOMENA: U ovim uputama nije opisan rad daljinskog upravljača. Detaljan opis naveden je u Uputama za uporabu daljinskog upravljača.
Upravljačka jedinica klimatskog uređaja
Način rada ventilator (FAN operation)
- Pritisnite tipku NAČIN RADA i odaberite ventilator (FAN).
- Pritisnite tipku brzina ventilatora (FAN SPEED) i odaberite jedno od 4 moguća podešavanja brzine ventilatora (AUTO, LOW, MED, HI).
- U ovome načinu rada ne može se podešavati željena temperatura.
- Cijev otpadnoga zraka ne smije biti postavljena.
Način rada vremenski program (TIMER)
- Kada je klimatski uređaj uključen, pritiskom na tipku TIMER pokrećete podešavanje programa AUTO-OFF. Indikator TIMER OFF zasvijetli.
Tipkama gore (+) i dolje (-) podešava se željeno vrijeme. Ako se u roku od 5 sekundi ponovno pritisne tipka TIMER, pokreće se podešavanje programa AUTO-ON. Indikator TIMER-ON zasvijetli. Tipkama gore (+) i dolje (-) podešava se željeno vrijeme.
Kada je klimatski uređaj isključen, pritiskom na tipku TIMER pokrećete podešavanje programa AUTO-ON, a ponovnim pritiskom u roku od 5 sekundi pokreće se podešavanje programa AUTO-OFF.
-
Pritisnite, odnosno držite tipke gore (+) ili dolje (-) za promjenu vremena automatskog uključenja u koracima po 0,5 h do skupnoga podešenog vremena od 10 h, a zatim u koracima po 1 h do skupnoga podešavanja vremena od 24 h. Klimatski uređaj odbrojava vrijeme do uključenja, odnosno isključenja.
-
Prikaz preostaloga vremena vremenskoga programa zamijenit će prikaz podešene temperature nakon 5 sekundi neaktivnosti na daljinskom upravljaču.
-
Ručno isključenje/uključenje klimatskog uređaja ili podešavanje vremenskoga programa na 0.0 opozvat će automatsko uključenje/ isključenje.
-
U slučaju pogreški E1, E2 automatsko podešavanje uključenja/isključenja nije aktivno.
Noćni način rada (SLEEP / ECO)
-
Pritisnite tipku SLEEP / ECO
-
U noćnome načinu rada jedinica prilikom hlađenja (grijanja) u okviru prvoga sata automatski povećava (smanjuje) podešenu sobnu temperaturu svakih 30 minuta za 1 °C, a zatim tu sobnu temperaturu održava narednih 6 sati. Nakon isteka 7 sati jedinica se automatski vraća u prethodno podešeni način rada.
-
Ova funkcija nije na raspolaganju u načinu rada FAN ili DRY.
Ostale funkcije
Auto – Restart (na nekim modelima)
U slučaju prekida u dovodu električne energije i ponovnog uspostavljanja električne mreže klimatski uređaj automatski počinje raditi prema prethodnim podešavanjima.
Minimalno trajanje isključenosti 3 minute
Uređaj se nakon zaustavljanja ne može u trenutku pokrenuti. Automatsko pokretanje počinje nakon 3 minute. Ta funkcija štiti uređaj i produljuje njegov životni vijek.
natural_image
Line drawing of a portable air conditioner unit with a handle and control panel (no text or symbols)Krilce se može pomicati automatski.
- Pritiskom na tipku uključenje otvara se krilce maksimalnoga položaja. Pritisnite tipku SWING na upravljačkoj jedinici ili na daljinskom upravljaču za početak automatskoga pomicanja krilca.
NAPOMENA: Ponovni pritisak na tipku SWING zaustavlja krilce na željenome položaju.

POZOR: Nemojte ručno podešavati krilce!
Postavljanje uređaja u prostoriji
- Klimatski uređaj mora biti postavljen na čvrstu površinu. Time se smanjuje mogućnost prijenosa vibracija i buke. Za sigurno i pouzdano postavljanje, smjestite uređaj na glatku i dovoljno jaku površinu koja može izdržati njegovu masu.
- Na jedinici su postavljeni kotačići kao pomoć prilikom postavljanja. Jedinica se može pomicati na kotačićima samo po ravnim i glatkim površinama. Budite oprezni prilikom pomicanja po površinama koje su prekrivene sagovima. Nemojte pokušavati pomicati jedinicu na kotačićima preko predmeta.
- Jedinica mora biti postavljena u blizini primjereno uzemljene električne priključne doze.
- Nemojte zatvarati, odnosno postavljati prepreke oko dovoda/odvoda zraka.
- Za učinkovit rad klimatskog uređaja omogućite razmak od 30 cm do 100 cm od zida.
NAPOMENA: Sve slike u ovim uputama služe isključivo kao prikaz uređaja. Vaš klimatski uređaj može biti drukčiji od prikazanog uređaja. Vrijedi stvarni oblik.
natural_image
Technical line drawing of a mechanical device with a cylindrical component and internal components (no text or symbols)| Način rada grijanje (HEAT), hlađenje (COOL), automatski (AUTO) | postaviti |
| Način rada ventilator (FAN), razvlaživanje (DEHUMIDIFY) | ukloniti |
natural_image
Line drawing of a large industrial air conditioner unit with cooling fan and ventilation slots (no text or symbols)natural_image
Line drawing of a portable air conditioner unit (no text or symbols)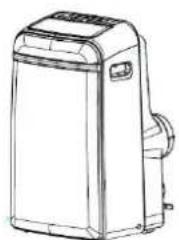
natural_image
Line drawing of a portable air conditioner unit (no text or symbols)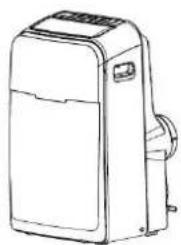
natural_image
Line drawing of a portable air conditioner unit (no text or symbols)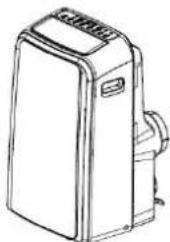
natural_image
Line drawing of a portable air conditioner unit (no text or symbols)natural_image
Symbol of a trash bin crossed with diagonal lines, representing waste or discharge (no text or labels)
⚠ UPOZORENJA
- Nije dopušteno korišćenje ovog uređaja za osobe (uključujući i decu) sa smanjenim telesnim, senzornim i psihičkim sposobnostima, odnosno nedostatkom iskustva i znanja, osim ako su pod nadzorom, odnosno ako im uputstva daje staratelj koji je odgovoran za njihovu bezbednost.
• Staratelji djece moraju da obezbede da se djeca ne bi igrala uređajem. - Klima ure đaj je namenjen upotrebi u domaćinstvu.
- Upravljačka jedinica.
- Vodoravno krilce za usmeravanje vazduha (automatsko ljuljanje)
- Točkići za lakše pomeranje u prostoru.
- Ručice za lakši prenos jedinice (sa obe strane).
Zadnji deo
- Gornji filter vazduha (za zaštitnu mrežu).
- Gornji dovod vazduha
- Odvod vazduha (izlaz)
- Izlaz kondenzata (samo za modele za grejanje
- Izlaz dovodnog priključka
- Kopča za pospremanje priključnog kabla (koristi se kod pospremanja jedinice)
- Čep za ispuštanje kondenzovane vode iz donje posude.
- Doza dovodnog priključka
- Donji filter vazduha (za zaštitnu mrežu).
- Donji dovod vazduha
- Ispust kondenzata
Način rada ventilator (FAN operation)
- Pritisnite taster NAČIN RADA i izaberite ventilator (FAN).
- Pritisnite taster brzina ventilatora (FAN SPEED) i izaberite jedno od 4 moguća podešavanja brzine ventilatora (AUTO, LOW, MED, HI).
- U ovom načinu rada ne može da se podešava željena temperatura.
- Cev otpadnog vazduha ne sme da bude postavljena.
natural_image
Line drawing of a portable air conditioner unit with a handle and cooling fan (no text or symbols)Krilce može da se pomera automatski.
- Klima uređaj mora da bude postavljen na čvrstu površinu. Tako se smanjuje mogućnost prenosa vibracija i buke. Za bezbedno i pouzdano postavljanje, smestite uređaj na glatku i dovoljno jaku površinu koja može da izdrži njegovu masu.
- Na jedinici su postavljeni točkići kao pomoć kod postavljanja. Jedinica može da se pomera na točkićima samo po ravnim i glatkim površinama. Budite pažljivi prilikom pomeranja po površinama koje su prekrivene tepisima. Ne pokušavajte da pomerite jedinicu na točkićima preko predmeta.
- Jedinica mora da bude postavljena u blizini odgovarajuće uzemljene električne priključne doze.
- Nemojte da zatvarate, odnosno postavljate prepreke oko dovoda/odvoda vazduha.
- Za efikasan rad klima uređaja omogućite razdaljinu od 30 cm do 100 cm od zida.
NAPOMENA: Sve slike u ovom uputstvu namenjene su isključivo prikazu uređaja. Vaš klima uređaj može da se razlikuje prikazanog uređaja. Važi stvarni oblik.
Postavljanje cevi otpadnog vazduha
Cev otpadnog vazduha i elemenat za prilagođavanje bi trebalo da se postave, odnosno uklone zavisno od načina rada klima uređaja.
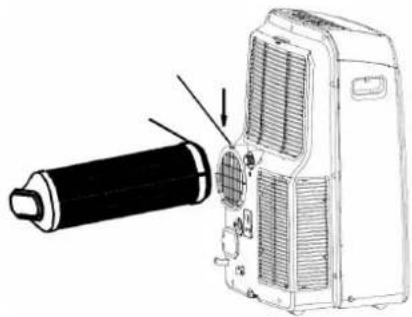
natural_image
Technical line drawing of a mechanical device with a cylindrical component and internal components (no text or symbols)| Način rada grejanje (HEAT), hlađenje (COOL), automatski (AUTO) | postaviti |
| Način rada ventilator (FAN), razvlaživanje (DEHUMIDIFY) | ukloniti |
-
Postavite elemente za prilagođavanje B i I na cev otpadnog vazduha.
-
Podesite cev sa zasunima na rupu za izlazni vazduh koja sadrži proreze. Zatim postavite cev tako da je gurnete u smeru strelice.
Postavljanje cevi otpadnog vazduha neposredo u zid
natural_image
Diagram showing a vehicle with a diagonal line crossing over a curved road, no text or symbols present

natural_image
Line drawing of a large industrial air conditioner unit with cooling fan and ventilation slots (no text or symbols)- Za vreme rada u načinu grejanje uklonite donji čep za ispuštanje kondenzata koji se nalazi na poleđini jedinice. Postavite nastavak za odvod kondenzata (5/8" univerzalni ženski nastavak) sa cevi od 3/4" (cev se ne isporučuje u sklopu klima uređaja). Za modele bez nastavka za odvod kondenzata pričvrstite cev za odvod kondenzata neposredno u rupu. Drugi kraj cevi za odvod kondenzata sa elementom za prilagođavanje postavite neposredno na odvod.
VAŽNO:
- Isključite uređaj iz električne mreže pre čišćenja ili servisiranja.
- Nemojte da koristite benzin, razređivače ili druge hemikalije za čišćenje uređaja.
- Nemojte da perete uređaj neposrednim mlazom vode. To bi moglo da uzrokuje električni udar!
- Ukoliko je oštećen priključni kabl, mora da ga popravi stručno osposobljeno lice, odnosno proizvođač.
Filter za vazduh
- Očistite filter za vazduh najmanje jednom u dve nedelje da biste sprečili slabljenje rada unutrašnjeg ventilatora zbog prašine.
- Uklanjanje filtera: jedinica sadrži dva filtera. Uklonite gornji filter iz uređaja u smeru strelice. Donji filter: odvrnite vijak i uklonite filter.
- Čišćenje: Nežno zaronite filter u mlačnu vodu (40 °C) i očistite ga neutralnim deterdžentom. Isperite filter i osušite ga na mestu koje nije osunčano.
- Postavljanje: postavite filtere nazad obratnim redosledom koji je opisan gore.
Kućište
- Koristite meku krpu sa neutralnim deterdžentom za čišćenje kućišta. Na kraju ga obrišite suvom krpom.

Priprema na duže mirovanje jedinice
- Uklonite gumeni čep na poledini jedinice i postavite cev za odvod kondenzata. Drugi kraj cevi sa elementom za prilagođavanje postavite neposredno na odvod.
- Uklonite čep na donjoj strani uređaja i ispustite kondenzat.
- Neka klima uređaj radi u toplom prostoru 12 časova u načinu rada VENTILATOR da se osuši. Tako ćete da sprečite nastanak plesni.
- Zaustavite jedinicu i izvucite utikač. Savijte priključni kabl i pričvrstite ga kopčom na poleđini jedinice. Iz daljinskog upravljača uklonite baterije.
- Očistite filtere za vazduh i ponovo ih stavite.
Uklanjanje smetnji kod rada
natural_image
Symbol of a trash bin crossed with diagonal lines, representing waste sorting or disposal (no text or labels)
⚠️ UPOZORNENIE
natural_image
Line drawing of a portable air conditioner unit with a handle and side panel (no text or symbols)Žaluziu je možné nastavit' automaticky.
natural_image
Diagram showing a vehicle with a cross-shaped warning sign crossed out by a curved road (no text or symbols present)- Pripravte dieru v stene.

natural_image
Line drawing of an air conditioning unit with cooling fan and ventilation slots (no text or symbols)natural_image
Symbolic illustration of a trash bin crossed with diagonal lines, no text or labels present⚠️UPOZORNĚNÍ
natural_image
Line drawing of a portable air conditioner unit with cooling fan and ventilation slots (no text or symbols)Žaluzii lze nastavit automaticky.
natural_image
Diagram showing a vehicle with a cross-shaped warning sign crossed out by a curved road (no text or symbols present)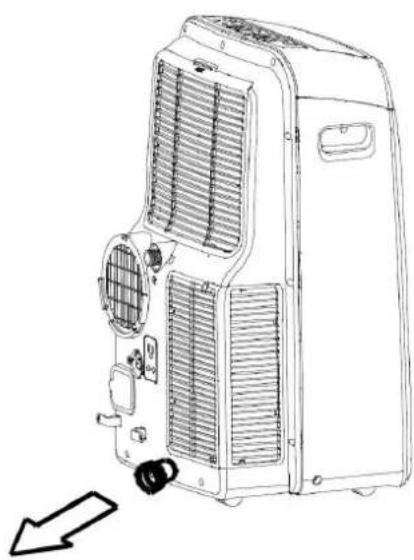
natural_image
Line drawing of an air conditioning unit with cooling fan and ventilation slots, showing internal components and a directional arrow (no text or symbols)FUNKCJE KLIMATYZATORA
natural_image
Simple line drawing of a trash bin with crossed lines indicating no waste or discharge (no text or symbols)
⚠ OSTRZEŻENIE
natural_image
Line drawing of a portable air conditioner unit with a handle and cooling fan (no text or symbols)natural_image
Diagram showing a vehicle with a cross-shaped warning sign crossed out by a curved pipe (no text or symbols present)