
OR2500MFM - Air conditioner GORENJE - Free user manual and instructions
Find the device manual for free OR2500MFM GORENJE in PDF.


| Product Type | Portable Air Conditioner |
| Brand | Gorenje |
| Model | OR2500MFM |
| Cooling Capacity | 7000 BTU/h |
| Power Consumption (Cooling) | 650 W |
| Voltage / Frequency | 220-240 V / 50 Hz |
| Refrigerant | R290 |
| Airflow Rate | 250 m³/h |
| Noise Level | 54 dB(A) |
| Dimensions (W x H x D) | 330 x 650 x 340 mm |
| Weight | 22 kg |
| Coverage Area | Up to 20 m² |
| Timer Function | Yes, up to 24 hours |
| Remote Control | Included |
| Castors / Wheels | Yes, for easy mobility |
| Self-Evaporating | Partial self-evaporation |
| Air Filter | Washable mesh filter |
| Maintenance | Clean filter every 2 weeks |
| Safety Features | Auto restart, compressor delay, overload protection |
| Energy Class | A |
Frequently Asked Questions - OR2500MFM GORENJE
User questions about OR2500MFM GORENJE
0 question about this device. Answer the ones you know or ask your own.
Ask a new question about this device
Download the instructions for your Air conditioner in PDF format for free! Find your manual OR2500MFM - GORENJE and take your electronic device back in hand. On this page are published all the documents necessary for the use of your device. OR2500MFM by GORENJE.
USER MANUAL OR2500MFM GORENJE
natural_image
Line drawing of a multi-tiered industrial air conditioner unit with cooling fans and wheels (no text or symbols)OR2500MFM
INSTRUCTIONS FOR USE
NAVODILA ZA UPORABO
UPUTSTVO ZA UPOTREBU
UPUTSTVO ZA UPOTREBU
ІНСТРУКЦІЯ 3
ВИКОРИСТАННЯ
This product is only suitable for well insulated spaces or occasional use.
IMPORTANT SAFEGUARDS
When using any electrical appliance, basic precautions should always be followed to reduce the risk of fire, electrical shock and injury to persons, including the following:
- Read all instructions before using heater.
-
This heater is hot when in use. To avoid burns, do not let bare skin touch hot surface. Keep combustible materials such as furniture, pillows, bedding, papers, clothes and curtains at least 3 feet (0.9m) from the heater. Allow heater to cool before moving and then use the built-in handle for easy movement.
-
Extreme caution is necessary when heater is used by or near children and whenever heater is left unattended.
-
Always unplug the heater when it is not in use.
-
Do not operate any heater with a damaged cord or plug, or after the heater malfunctions, or has been dropped or damaged in any manner. Return heater to the manufacturer for examination, electrical or mechanical adjustment, or repair.
-
Do not use heater outdoors. This product is intended for normal household indoor use only.
-
This heater is not intended for use in bathrooms, laundry areas or similar moist indoor locations. Never locate heater where it may fall into a bathtub or other water container.
-
Do not run power cord under carpeting. Do not cover cord with throw rugs, runners or the like. Arrange cord away from traffic areas and where it will not be tripped over.
-
To disconnect heater, set controls to OFF, then remove plug from outlet.
-
Keep this heater clean. DO NOT allow foreign objects to enter any ventilation or exhaust opening as this may cause electric shock, or fire, or damage the heater.
-
To prevent a possible fire, do not block air intakes or exhaust in any manner. Do not use on soft surfaces, like a bed, where openings may become blocked.
-
A heater has hot and arcing or sparking parts inside. Do not use it in areas where gasoline, paint, or flammable liquids are used or stored.
-
Use this heater only as described in this manual. Any other use not recommended by the manufacturer may cause fire, electric shock, or injury to persons.
-
Warning: In order to avoid overheating, do not cover the heater.
-
Do not use this heater in the immediate surroundings of a bath, a shower or a swimming pool.
-
The heater must not be located immediately below a socket-outlet.
-
If the supply cord is damaged, it must be replaced by the manufacturer or its service agent or a similarly qualified person in order to avoid a hazard.
-
This appliance can be used by children aged from 8 years and above and persons with reduced physical, sensory or mental capabilities or lack of experience and knowledge if they have been given supervision or instruction concerning use of the appliance in a safe way and understand the hazards involved. Children shall not play with the appliance. Cleaning and user maintenance shall not be made by children without supervision.
19. Correct Disposal of this product

This marking indicates that this product should not be disposed with other household wastes throughout the EU. To prevent possible harm to the environment or human health from uncontrolled waste disposal, recycle it responsibly to promote the sustainable reuse of material resources. To return your used device, please use the return and collection systems or contact the retailer where the product was purchased. They can take this product for environmental safe recycling.
-
Children of less than 3 years should be kept away unless continuously supervised. Children aged from 3 years and less than 8 years shall only switch on/off the appliance provided that it has been placed or installed in its intended normal operating position and they have been given supervision or instruction concerning use of the appliance in a safe way and understand the hazards involved. Children aged from 3 years and less than 8 years shall not plug in, regulate and clean the appliance or perform user maintenance.
-
CAUTION — Some parts of this product can become very hot and cause burns. Particular attention has to be given where children and vulnerable people are present.
-
This heater is filled with a precise quantity of special oil.
Repairs requiring opening of oil-container are only to be made by the manufacturer or his service agent who should be contacted if there is an oil leak.
When scrapping the heater, follow the regulations concerning the disposal of oil.
WARNING: IN ORDER TO AVOID OVERHEATING, DO NOT COVER THE HEATER.
PART FIGURE
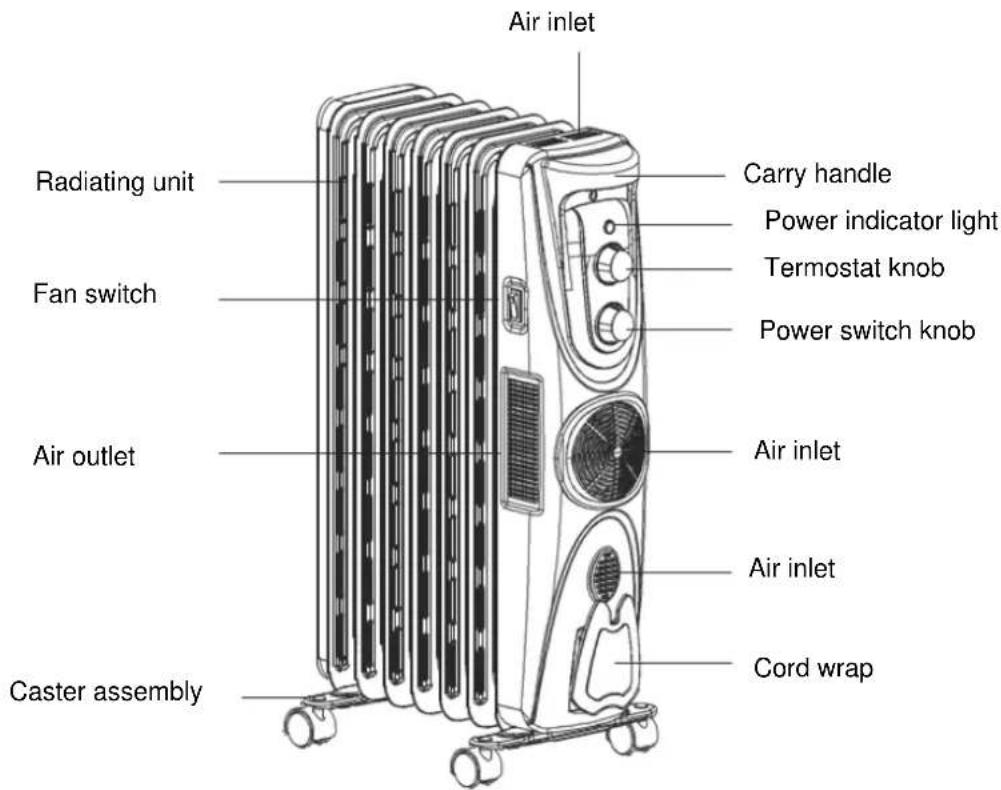
ASSEMBLY INSTRUCTIONS
Unpack your heater and find the wheel-holding plate and butterfly nuts between the fins assemblies.
- Make sure the heater is unplugged and in the "0" position.
- TURN THE HEATER UPSIDE DOWN.
- Attach the wheel-holding plates onto the heater as Fig.1
shows. The U plate is fixed between the last tow fins and the other one is fixed under metal control box.
Fix the castors to the vertical axis of both the wheel holding plates.
- Insert the butterfly nuts and tighten them securely.
- TURN THE HEATER UPRIGHT. Your heater is now ready to use.

natural_image
Technical illustration of a mechanical component with cross-sectional view (no text or symbols)WARNING: Risk of fire. Do not operate heater without wheel assemblies attached. Operate heater in upright position only (wheels on bottom, controls on top). Any other position could create a hazardous situation. Ensure that the surface beneath the heater is clean and free of any obstructions. It is not recommended that this heater be placed on high-pile carpeting or any other surface that impedes the flow of air underneath the heater.
This heater include an a visual alarm to warn that parts of the heater are getting excessively hot. If the alarm flashes, immediately turn the heater off and inspect for any objects on or adjacent to the heater that may cause high temperatures. DO NOT OPERATE THE HEATER WITH THE ALARM FLASHING.
-
Insert the plug into the suitable wall outlet.
-
Never use the unit in place where is not even, make sure there is nothing flammable or easy deform object within 1 meter (36 inches).
- Insert the plug after setting the thermostat to "MIN" position and setting the power selected switches to "0" position.
- Do not cover the unit.
-
The heater is suitable for operation on an A.C. electricity supply having the same voltage as that show on its rating label.
-
Rotate power switch to the "III" position then turn thermostat to the "MAX" position, at this moment, the unit begins to work, when the temperature rises to which you are satisfied with, slowly turn the thermostat counter clockwise until the indicating light of the key for power choice is out, and the room temperature thus can keep constant. If you want to raise or lower the room temperature, you can make another regulation: Turn the thermostat clockwise to raise the temperature and counterclockwise to lower it, or press only one shift of power switches to "ON" position.
3. Turbo function
Press the switch to "ON" position, the fan heater begins to work separately and used as a fan heater. The temperature in the room will rise rapidly.
NOTES:
- The pilot lamp will be on only if the temperature is below the setting value of the thermostat.
- The room must be sealed in good condition, if not, it will not make good result because of the influx of heat.
- The outlets of the control chamber must be kept ventilative, if not, undue move of the thermostat may occur.
- After use, turn the power switch to the "0" position first, then turn the thermostat to the "MIN" position, and pull out the power supply plug.
SAFETY FEATURES
Thermal cut-off: This heater includes a thermal cut-off that shuts the heater off if it overheats due to abnormal conditions. If this occurs, turn the heater off, unplug it, and inspect and remove any objects on or adjacent to the heater. Allow it to cool for a few minutes, and then plug it back in and resume normal operation.
Tip-over switch: This heater includes a safety tip-over protection feature that will shut the heater off in case it is tipped over. If, at any time, the heater tips over, please put the heater back in the upright position. The heater will resume its normal operation.
CLEANING AND MAINTENANCE INSTRUCTIONS
- The electric heater should be cleaned regularly to wipe out the dust on the surface of flanges. As this may influence the radiating efficiency.
- Disconnect electricity supply and allow radiator to cool, wipe out dust with a soft damp cloth. Do not use detergent or abrasives.
- Do not scrap the surfaces of flanges with sharp hard tools, to avoid surfaces getting rusty, because of damage of the paint coat.
SPECIFICATIONS
Power supply: AC220-240V \~ 50Hz
| MODEL | POWER REGULATION RANGE (W) | |||
| FAN | LO | MED | HI | |
| OR2500MFM | 500 | 800 | 1200 | 2000 |
Table 2
Information requirements for electric local space heaters
| Model identifier(s): OR2500MFM | ||||||
| Item | Symbol | Value | Unit | Item | Unit | |
| Heat output | Tpye of heat input, for electric storage local space heaters only (select one) | |||||
| Nominal heat output | Pnom | 1.9 | kW | manual heat charge control, with integrated thermostat | [no] | |
| Minimum heat output (indicative) | Pmin | 0.5 | kW | manual heat charge control with room and/or outdoor temperature feedback | [no] | |
| Maximum continuous heat output | Pmax,c | 1.9 | kW | electronic heat charge control with room and/or outdoor temperature feedback | [no] | |
| Auxiliary electricity consumption | fan assisted heat output | [no] | ||||
| At nominal heat output | elmax | 1.924 | kW | Type of heat output/room temperature control (select one) | ||
| At minimum heat output | elmin | 0.510 | kW | single stage heat output and no room temperature control | [no] | |
| In standby mode | elSB | N/A* | kW | Two or more manual stages, no room temperature control | [no] | |
| with mechanic thermostat room temperature control | [yes] | |||||
| with electronic room temperature control | [no] | |||||
| electronic room temperature control plus day timer | [no] | |||||
| electronic room temperature control plus week timer | [no] | |||||
| Other control options (multiple selections possible) | ||||||
| room temperature control, with presence detection | [no] | |||||
| room temperature control, with open window detection | [no] | |||||
| with distance control option | [no] | |||||
| with adaptive start control | [no] | |||||
| with working time limitation | [no] | |||||
| with black bulb sensor | [no] | |||||
| Contact details | Gorenje d.d., Partizanska 12, 3320 Velenje | |||||
| * This product is mechanical control and with off mode only. | ||||||
| The seasonal space heating energy efficiency of all local space heaters except commercial local space heaters, η s(%) | 36.0% |
POMEMBNO
natural_image
Technical line drawing of a mechanical component with cross-sectional view (no text or symbols)natural_image
Technical illustration of a mechanical component with cross-sectional view (no text or symbols)UPOZORENJE: Opasnost od požara. Radijator ne koristite bez montiranih kotačića. Radijator može raditi samo u uspravnom položaju (kotači dolje, element za upravljanje gore). Svaki drugi položaj predstavlja opasnu situaciju. Površina ispod radijatora neka bude čista i bez prepreka. Ne preporučujemo postavljanje radijatora na debele tepihe ili bilo koju drugu površinu koja sprječava protok zraka ispod radijatora.
Radijator uključuje vizualni alarm koji upozorava na vrlo vruće dijelove. Ako alarm treperi, odmah isključite radijator i pregledajte jesu li neki predmeti na ili kraj radijatora, koji mogu izazvati visoke temperature. KADA ALARM TREPERI, RADIJATOR NEMOJTE KORISTITI.
UPUTE ZA UPORABU
natural_image
Technical illustration of a mechanical component with cross-sectional view (no text or symbols)UPOZORENJE: Opasnost od požara. Radijator ne koristite bez montiranih kotačića. Radijator može raditi samo u uspravnom položaju (kotači dolje, element za upravljanje gore). Svaki drugi položaj predstavlja opasnu situaciju. Površina ispod radijatora neka bude čista i bez prepreka. Ne preporučujemo postavljanje radijatora na debele tepihe ili bilo koju drugu površinu koja sprječava protok zraka ispod radijatora.
Radijator uključuje vizualni alarm koji upozorava na vrlo vruće dijelove. Ako alarm treperi, odmah isključite radiator i pregledajte jesu li neki predmeti na ili kraj radijatora, koji mogu izazvati visoke temperature. KADA ALARM TREPERI, RADIJATOR NEMOJTE KORISTITI.
UPUTE ZA UPORABU
natural_image
Technical line drawing of a mechanical component with cross-sectional view (no text or symbols)
Brand : GORENJE
Model : OR2500MFM
Category : Air conditioner