
EM170 - Digital decoder Emos - Free user manual and instructions
Find the device manual for free EM170 Emos in PDF.


| Product Type | Digital Terrestrial Receiver (DVB-T2/T) |
| Brand | Emos |
| Model | EM170 |
| Video Resolution | Up to 1080p (Full HD) |
| Video Standards | MPEG-4 AVC/H.264 HP@L4 |
| Audio Outputs | Coaxial, HDMI, Scart |
| Power Supply | 110–250 V, 50~60 Hz |
| USB Port | USB 2.0 (max 500 mA) |
| Recording | PVR via USB (FAT32/NTFS), TimeShift |
| EPG | 7-day electronic programme guide |
| Channel Memory | Up to 1000 channels |
| Multimedia Playback | JPEG, BMP, PNG; MP3, AAC; AVI, MPG, MKV, etc. |
| Tuner | MXL608, VHF 174–230 MHz / UHF 474–860 MHz |
| Remote Control | Included, with full function buttons |
| Display | LED display on front panel |
| Parental Control | PIN-coded (default 000000) |
| OSD Languages | Multilingual (selectable) |
| Safety Features | Do not expose to extreme temperatures or humidity; no self-repair |
| Weight (approx.) | 0.5 kg |
| Dimensions (approx.) | 15 x 10 x 3 cm |
| Warranty | Standard manufacturer warranty (check local terms) |
Frequently Asked Questions - EM170 Emos
User questions about EM170 Emos
0 question about this device. Answer the ones you know or ask your own.
Ask a new question about this device
Download the instructions for your Digital decoder in PDF format for free! Find your manual EM170 - Emos and take your electronic device back in hand. On this page are published all the documents necessary for the use of your device. EM170 by Emos.
USER MANUAL EM170 Emos
GB Digital Terrestrial Receiver
INSTRUCTIONS AND INFORMATION ON DISPOSING OF USED PACKAGING
Dispose of the used packaging material at a place designated by your municipality for storing waste.
DISPOSAL OF USED ELECTRICAL AND ELECTRONIC DEVICES

This symbol on products or accompanying documentation means that used electrical and electronic products must not be added to standard municipal waste. Hand these products in at designated collection points for proper disposal, renewal and recycling. Alternatively, in some countries of the European Union or other European countries, you can return your products to the local retailer when buying an equivalent new product. By properly disposing of this product, you will aid in preserving valuable natural resources and help prevent potential negative impact on the environment and human health which could result from improper disposal of waste. Contact the local authority or the nearest collection point for further details. In accordance with national regulations, persons disposing of this waste incorrectly may be fined.
For Business Entities in EU Countries
If you wish to dispose of electrical and electronic devices, request the necessary information from your supplier or dealer.
Disposal in Other Countries outside of EU

This symbol is valid in the European Union. If you wish to dispose of this product, request the necessary information about proper methods of disposal from your local authorities or your retailer. This product is in conformity with the requirements of EU directives on electromagnetic compatibility and electrical safety. Changes in the text, design and technical specifications can be made without prior warning. Right for changes is reserved.
Declaration of Conformity
EMOS spol s.r.o. declares that the EM170 HD is in compliance with the essential requirements and other relevant provisions of directives and standards which apply to the device. The device can be freely operated in the EU.
The EU Declaration of Conformity is included in the manual or can be found at http://www.emos.eu/download
SAFETY WARNING:
- In order for the device to serve long and reliably, do not expose it to extreme temperatures or high humidity. For instance, never put it in places intended for bathing or within proximity of heat sources.
- If the device does not work correctly, please take it to the nearest service centre. Do not attempt to repair it yourself.
Warning for Use of USB Devices

To fully make use of the USB port, the storage connected to it must support standard USB 2.0. For flawless, stable recording and play, USB devices with writing speed 9.0
UNIVERSAL SERIAL BUS
MB/s or faster are required. Slower hard drives and flash storage may have problems which will manifest themselves by image freezing, or may not work at all. Proper functional only using drives with one basic partition with file system NTFS or FAT32. If a item is present on the drive, format the drive on a PC to the recommended file system is it to the receiver.
Strongly fragmented or overfilled storage devices also may not work properly and smoothly.
External HDDs must have their own power supply, the USB port built into the receiver is not capable of supplying sufficient voltage to power a portable USB drive.
While recording or playing, the USB device must not under any circumstances be disconnected from the receiver. Disconnection while the receiver is working may cause damage to the receiver or the flash drive and also damage the data located on the medium.
Standby
The receiver has a function of minimum power consumption in standby mode and is therefore more friendly to the environment.
Firmware
The control software for this receiver is constantly in development. A new version of the software may change some functions and operation of the receiver. Images and descriptions in this manual are only informative in nature. If you notice an error, please inform us. We will do all in our power to correct it.
Receiver Connection and Control Elements:
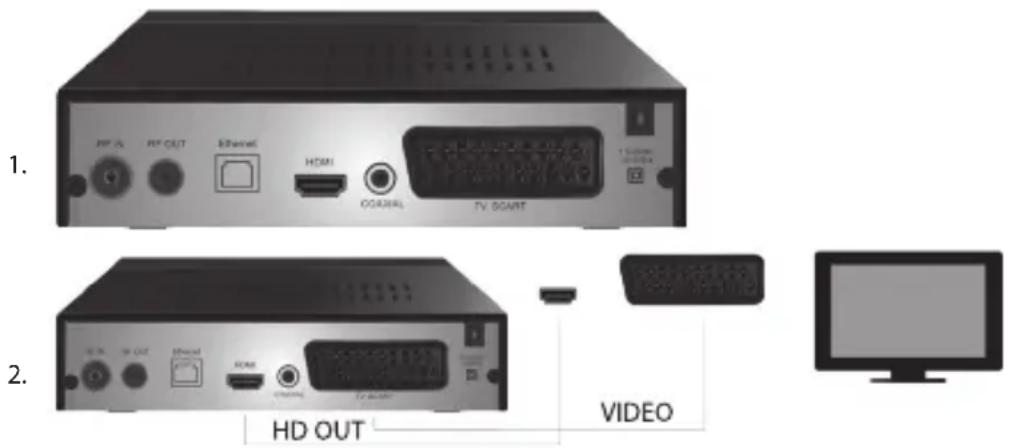
Front and Rear Panel of the Device
Front Panel
- LED DISPLAY: Shows the number of the currently selected channel
Rear Panel (Fig. 1)
- RF input: Connector for antenna connection
- RF OUT: Output loop for connecting another device
• HDMI: HDTV digital output
• Coaxial: Digital audio output
• TV Scart: Analogue A/V output for connecting an older type of TV
Remote Control
• STANDBY: turn the receiver on/off
• MUTE: immediately mute audio
• EPG: Electronic programme guide
- INFO: show information about the current channel
- TTX: Teletext
• AUDIO: select audio track
• REC: instant recording button
- SUB-T: show DVB-T subtitles (is they are broadcast)
- MENU: show the main menu
- CH+/-: next/previous channel
- EXIT: back, exit menu
• VOL-/+: reduce/increase audio track volume
- OK: select menu item, show list of channels
• FAV: show list of favourite channels
• TV/RADIO: switch between list of TV/radio channels
- 0-9 (Numeric buttons): direct access to channel presets
- RECALL: return to previous menu
- GOTO: direct jump to the selected time in the recording, video
- REW: quick rewind
- FWD: fast forward
- PREV: previous file
- NEXT: next file
- PLAY: play file
- PAUSE: pause play
- STOP: stop play
- REPEAT: repeat play
Receiver Operation
The ensure sufficient ventilation and cooling, use the receiver in horizontal position. Do not place heavy objects onto the receiver and do not cover it. Do not place the receiver into closed cabinets or places with high air humidity.
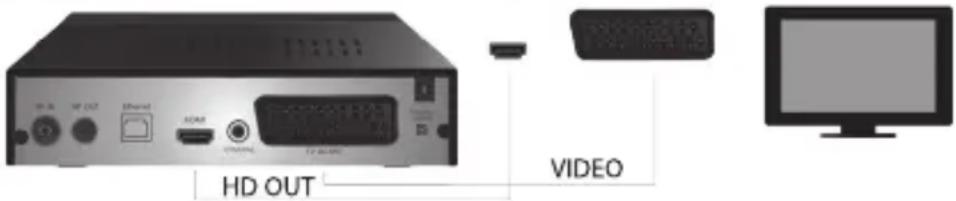
Connecting the Receiver to TV (Fig. 2)
Connect the receiver to your TV using the appropriate cable in accordance with Figure 2. If your TV is equipped with HDMI input, use this connector to enable watching TV broadcasts in the highest image quality.
Receiver Installation and Controls
- After properly linking the TV and the receiver and connecting the antenna, turn on the TV and make sure the receiver is connected to power supply. Turn on the receiver by pressing the STANDBY button. If you are turning on the receiver for the first time or you set it to factory settings, the screen will show an installation guide menu.
- You can move inside the menu using the ▲/▼ buttons.
- Use the OK button to confirm your selection.
- Use the EXIT button to go back or end.
OSD Language
Use the ◀/▶ buttons to select language for the receiver.
Country
Set the country where you will be using the receiver using the ◀/▶ buttons.


Channel Tuning
- Confirm automatic channel search by pushing the OK button. The process may take several minutes.
- Once the process is complete, the receiver will automatically switch to the first channel found and you can begin watching TV programmes.
Main Menu
Press the MENU button to enter the device's menu.
Programme Settings
Press the MENU button and go to
Channel Editing
To edit the properties of your programmes (Lock, Skip, FAV, Move or Delete), you must enter Channel Editing by pressing the OK button.
The enter password (by default set to 000000).
Setting Favourite TV and Radio Channels (FAV)
You can create a list of your favourite channels for easy access as follows:
- Move the cursor to the chosen channel and press the FAV button.
- In the menu: As favourite type, select the category in which you want to place the channel, and confirm with OK.
- A channel can be included in multiple categories of your choice.
• To confirm and leave, press EXIT. - The channel is then highlighted in the list with a red star icon.
Cancelling the FAV Function:
- Move the cursor to the chosen channel and press the FAV button.
- Press the FAV button.
- Set the cursor to item Ban and confirm with the OK button and then EXIT.
- The chosen programme will no longer be highlighted with a red star.
Browsing Favourite Channels
- While watching the TV, press the FAV button to open the list of favourite channels.
- Move the cursor between favourite channels with the ▲/▼ buttons.
- Press OK to select the desired channel.
Skipping TV or Radio Channels
- In the Channel Editing menu, select the desired programme using the ▲/▼ buttons and press the GREEN button.
- A green SKIP icon will be shown next to the channel.
- Repeat the setting procedure for other channels you wish to skip.
- Reverse the procedure to remove the SKIP function.
Removing TV or Radio Channels
- In the Channel Editing menu, select the desired programme using the ▲/▼ buttons and press the BLUE button.
- The screen will show: INFORMATION: Do you wish to remove?
- Confirm with OK or cancel with EXIT.
- Repeat the procedure for other channels.
Moving TV or Radio Channels
- In the Channel Editing menu, select the desired programme using the ▲/▼ buttons and press the RED button.
- An orange arrow icon will be shown; use the ▲/▼ buttons to move to the desired position.
- Use the OK button to confirm your choice.
- Repeat the procedure for other channels.
Locking TV or Radio Channels
- You can select channels you wish to lock with a PIN code.


- In the Channel Editing menu, select the desired programme using the ▲/▼ buttons and press the YELLOW button.
- A table will be shown: Enter the password – by default set to 000000. After entering the code, the menu will require no further confirmation. A blue lock icon will be shown next to the channel.
- Repeat the procedure for other channels.
- Pressing the YELLOW button again on a locked channel will remove the lock.
- If you encounter a locked channel while watching the TV and switching channels, you will be prompted to enter password. After entering the correct password, the channel will be unlocked for viewing.
Renaming TV or Radio Channels
- In the Channel Editing menu, select the desired programme using the ▲/▼ buttons and press the RECALL button.
- The screen will show a keyboard; enter your desired channel name and confirm with the OK button on the screen.
EPG
Programme Guide
- The EPG functions shows the broadcasting schedule of the majority of channels for the upcoming 7 days.
- You can call up the function by pressing the EPG button on the remote.
- Use the ▲/▼ buttons to browse the list of programmes within a single channel; change channels using the ◀/► buttons.
- If you need to move pages, use the RED and GREEN buttons.
- The YELLOW and BLUE buttons will scroll the individual pages of information about the selected programme.
Adding TV or Radio Programme into Timer, Setting Recording
- To add a programme into the recording timer, press the OK button.
- Check or adjust the timer setting:
- timer repeat (once, weekly, daily)
- select timer mode (switching, recording)
- Confirm the timer with OK.
Selection (Channel Sorting
- [By LCN]: Channels will be sorted in order determined by the operator.
- [By name]: Sorts channels by name.
• [By service ID]: Sorts channels by ID.
• [By ONID]: Sorts channels by ONID.
LCN
• [Off]: Cancels sorting by LCN.
• [On]: Enables sorting by LCN.
Image
To enter the Image menu, press the MENU button and select item Image using the ◀/▶ buttons. The menu contains all display settings for your TV. Use this menu if your TV channels are displaying incorrectly. A large portion of the settings is intended mainly for HDMI interfaces.
Aspect Ratio
Here you can select based on which ratio suits you the best. However, we recommend keeping the default value displayed by the receiver. Only then can you be sure that there will be no deformation or cropping of video.
Resolution
• [480P]: Only for NTSC standard and primarily SCART connection
• [576P]: Only for PAL and primarily for SCART connection
• [720P]: For both NTSC and PAL standards connected via HDMI
• [1080I]: For both NTSC and PAL standards connected via HDMI
• [1080P]: For both NTSC and PAL standards connected via HDMI


TV Format
If the image does not display correctly, you can change the following settings by changing the standard.
• [NTSC]: For American NTSC standard
• [PAL]: For European PAL standard
Video Output
The following option is available only for connection via SCART.
- [RGB]: For analogue separation of the three colour components of RGB.
- [CVBS]: For analogue merging of colour components into a single channel.
Channel Tuning
To enter the tuning menu, press the MENU button and then select the Channel Tuning tab using the ◀/▶ buttons.
This menu offers options for tuning channels for TV broadcast reception.
Automatic Tuning
This option automatically searches the entire broadcast band and automatically saves all channels found. All previously saved channels will be automatically erased.
- Select [Automatic Tuning] and press the OK button. The receiver will immediately begin searching.
- To stop the search, press the EXIT button. All channels found before the button press will be automatically saved.
Manual Tuning
This option allows searching for station on a specific channel if you do not want to search the entire channel spectrum. Manual search will not erase previously found and saved channels.
- Select channel number using the ◀/▶ buttons. The frequency in MHz will be automatically shown for each channel and it cannot be changed.
- Pressing the OK button will begin search on the selected channel.
- If a TV channel is successfully found, it will be saved automatically.
Setting Country of Use
Set the country in which you will be using the receiver, or another closest.
Antenna Power Supply
- If you are using an antenna with a built-in amplifier and +5 V power supply voltage, turn on this function.
- If you are using a passive antenna or an active antenna with power supply voltage +12V, use a power adapter and turn off this function in the menu; otherwise, the device will be damaged or destroyed.
Time
Time Difference
[Time Difference]: Using the ◀/▶ buttons, you can change between automatic and manual setting.
: Mode is chosen by the device from the TV signal. : You choose time and date (can affect incorrect display in EPG). - In manual selection, you then choose [Date] and [Time].
Sleep
The function automatically turns off the receiver after a chosen time limit.
By default, the function is off; can be set in hourly intervals from 1 to 12 hours.
Summer Time
For correct time settings, select whether your country uses summer time.
On / Off
This function allows you to choose the time when you want the device to automatically turn on and off.
- [On]: Use the ◀/▶ buttons to select whether you want to Disable or Enable the automatic ON function.
- If Enabled, set the Time for turning on to the desired value. The receiver will automatically turn on at the set time every day.
- [Off]: Use the ◀/▶ buttons to select whether you want to Disable or Enable the automatic OFF function.
- If Enabled, set the Time for turning off to the desired value. The receiver will automatically turn off at the set time every day.
Options
- [OSD language]: Use the ◀/▶ buttons to select the language for on-screen display of menus.
- [Subtitle language]: Use the ◀/▶ buttons to select the language for subtitles.
- [Audio language]: Use the ◀/▶ buttons to select the default audio track for your programmes
- [Digital audio]: Use the ◀/▶ buttons to select the required digital output for audio.
a.
b.
c.
- [AD story description]: Sets the volume for complementary audio track with story description for the visually impaired (off – 31)
• [Auto hide OSD]: Set the duration of information window display after switching between channels.
System Settings
Press the ▲/▼ button to select.
- [Parental control]: Press the OK button to select age category.
- [Set password]: Press the OK button to confirm password.
• [Factory settings]: Press the OK button to reset to factory values.
• [Information]: Press the OK button to learn information about the receiver, SW and HW version.
• [Firmware update]: You can select SW update via USB.
• [Network settings]: Set up network connection.
Parental Control
: Default 000000 - Change the age category by pressing the ◀/▶ buttons. Proper functioning is dependent on the TV broadcast provider.
- Confirm by pressing the OK button.
Set Password
- [Enter old password]: Enter original numerical password.
- [Enter new password]: Enter new numerical password.
- [Confirm password]: Again enter the new numerical password to verify.
- Confirm by pressing the OK button.
Factory Settings
: Default 000000 - Press the OK button to reset the receiver to factory settings (all settings made on the device will be erased).
- If you wish to leave the factory settings window without resetting, press the EXIT button.
Information
Press the OK the view information about the model, software and hardware. Leave by pressing the EXIT button.
Update Firmware
: This function is unavailable. : See procedure below.
a.
b. Press the EXIT button to leave.
Network Settings
Set up a network based on local conditions (DHCP, static).
USB
- [Multimedia]: Press the OK button to select multimedia (Music, Photo, Film and PVR).
- [Photo settings]: Press the OK button to set parameters for viewing photos.
- [Film settings]: Press the OK button to set parameters for playing video files.
- [PVR configuration]: Press the OK button to set parameters for your PVR recordings.
- [Network applications]: Display interactive applications using Internet connection.


Multimedia
• [Music]: Press the OK button to select music files. The player supports formats: mp3, wma etc.
- [Ok]/[▶]: Press the OK/PLAY button to play the music file.
- [ |<< ]: Press the PREV button to change to previous track.
- [>>|]: Press the NEXT button to next track.
- [<<<]: Press the REW button to rewind the current track. Pressing the button again changes speed in following steps: -2×,-4×,-8×,-16×,-32×.
- [>>]: Press the FWD button to fast forward the current track. Pressing the button again changes speed in following steps: 2×, 4×, 8×, 16×, 32×.
• [■]: Press the STOP button to stop playing music.
- [ || ]: Press the PAUSE button to pause music.
- [Photo]: Press the OK button to select photos. The player supports formats: jpg, bmp etc.
- [Ok]: Press the OK button to view photo.
- [Presentation]: Press the PLAY button for automatic viewing of photos (Slide Show).
- [Grid]: Press the BLUE button for a grid overview of photos.
- [EXIT]: Leave by pressing the EXIT button.
• [Film]: Press the OK button to select video files. The player supports files: mp4, 3gp, avi etc.
- [Ok]/[▶]: Press the OK/PLAY button to play the video file.
- [ |<< ]: Press the PREV button to play the previous video file.
- [>>|]: Press the NEXT button to play the next video file.
- [<<]: Press the REW button to rewind the current video back. Pressing the button again changes speed in following steps: -2x, -4x, -8x, -16x, -32x.
- [ >> ]: Press the FWD button to move forward in the current video. Pressing the button again changes speed in following steps: 2×, 4×, 8×, 16×, 32×.
- [■]: Press the STOP button to stop playing video.
- [ || ]: Press the PAUSE button to pause playback.
• [Fullscreen]: Press the RED button to switch display to full screen.
- [PVR]: Press the OK button to select from your PVR recordings. The player only supports file format: mts.
- [Ok]/[▶]: Press the OK/PLAY button to play the recorded video file. You can find the files in folder
with automatically generated file name. - [ |<< ]: Press the PREV button to play the previous video file.
- [>>|]: Press the NEXT button to play the next video file.
- [< < ]: Press the REW button to reverse play. Pressing the button again changes speed in following steps: -2×, -4×, -8×, -16×, -32×.
- 5.[>>]: Press the FWD for fast forwarding. Pressing the button again changes speed in following steps: 2×, 4×, 8×, 16×, 32×.
• [■]: Press the STOP button to stop playing video. - [ || ]: Press the PAUSE button to pause playback.
- [Fullscreen]: Press the RED button to switch display to full screen.
- [Delete]: Press the YELLOW button to select recording/recordings for deletion. Pressing the OK button afterwards will show message:
, pressing OK again will irreversibly delete the recording. You can cancel by pressing the EXIT button. - [Rename]: Press the GREEN button to change the name of the recording.
Photo Settings
- [Picture duration]: You can change the duration for which a photo is shown in seconds by pressing the ◀/▶ buttons.
- [Presentation mode]: Use the ◀/▶ buttons to change between different picture transitions.


- [Aspect ratio]: Using the ◀/▶ buttons, you can change between options
- i.e. the original aspect ratio of the picture is preserved, and where the photo is stretched to full screen and is deformed.
• 5.7.3 Film Settings - [Subtitle type]: You can change subtitle font size using the ◀/▶ buttons.
• - [Subtitle background]: Use the ◀/▶ buttons to change the subtitle background for better legibility.
- [Subtitle colour]: You can change subtitle font colour using the ◀/▶ buttons.
PVR Configuration
[Recording device]: Press the OK button for information about the USB device and capacity settings for TimeShift function.
- [Disc]: Use the ◀/▶ buttons to select medium for recording.
- [Size of TimeShift file]: Use the ◀/▶ buttons to change the maximum size for the TimeShift file. (After the set size is reached, the file will automatically start rewriting in a so-called loop; we therefore recommend setting the value as high as possible).
- [Medium type]: The item displays the current file system – only FAT32 is supported.
- [Disc size]: The item displays the maximum capacity of the inserted disc.
- [Free space on disc]: The item displays the available capacity for PVR recording or TimeShift function. [Format]: Press the OK button to enter the menu for formatting the USB device.
- [Format]: Use the ◀/▶ buttons to select a medium for formatting.
- [File system]: The set-top box only supports the FAT32 file system.
- [OK]: Press the OK for formatting the medium. (WARNING: Formatting results in losing all data on the medium. Back up all data before performing this step).
Watching TV and Controls
While watching a TV broadcast, you can do the following:
- [CH▲/CH▼]: Using the CH+/- buttons switches between channels in order.
- [VOL◄/VOL►]: VOL+/- buttons set the volume on the set-top box.
- [0 \~ 9]: Numerical buttons select a specific channel.
- [REC]: Press the REC button to begin recording the current programme – only if a medium is connected.
- [SUB-T]: Pressing the SUB-T button allows you to choose subtitles. (Subtitles can be selected only if they are being broadcast).
- [AUDIO]: Pressing the AUDIO changes audio track.
- [OK]: Pressing the OK button shows the list of channels.
- [FAV]: Pressing the FAV button allows you to select between channels you set as favourite.
-
[INFO]: Pressing the INFO button shows the name of the current show and the next show. The yellow indicator shows the point where you are in the current show. Repeatedly pressing the INFO button (before the previous window automatically disappears after 10 s) shows details about the current show.
-
Colour buttons:
-
Red – quick access to recorded programmes (PVR menu)
- Green – quick change of image resolution
- Yellow – quick change of aspect ratio
- Blue – quick access to recording timer menu


Resolving Common Issues
If you find any defect, make sure it is not listed in the below table of most common issues. If you do not find the answer or have any other questions, contact the supplier's customer support.
| Problem Possible cause | Solution | |
| Red indicator in standby mode is off. | Lead unplugged from the socket Fuse in the device is interrupted | Check the power supply cable connection.Check the fuse |
| No signal found. Antenna | is not connected.Incorrect antenna settingsYou are in a place without signal coverage. | Check the antenna connection.Relocate the antenna.Contact a local professional company. |
| No image, or audio. Scart | AV/HDMI is not selected on the input switch of your TV. | Switch to the correct input on the TV control. |
| "Encoded channel" message is shown. | The channel is encoded. Select a different channel for viewing. | |
| Remote control not working. | The receiver is off.The remote is not aimed directly on the device.The front panel is obstructed.The batteries in the remote are flat. | Turn on the receiver.Aim the remote directly onto the front panel of the device.Remove the obstacle screening the front panel.Replace batteries. |
| Unable to record onto a USB device. | The USB device has incorrect format.The USB device has low writing speed. | Format the USB device to NTFS or FAT32 file format.Try a higher quality USB device with higher writing speed. |
| The box stopped receiving channels after being moved to another room. | Extending the antenna lead length reduced the signal quality below functional level. | Use a link amplifier to cover the losses in the cabling system.Contact a local professional company for concrete plan for your antenna system. |
Technical specifications
| Main PropertiesFull support for DVB-T2/T, HD MPEG2, MPEG4, HD H.264, H.265Image resolution: 720P,1080i,1080P (FULL HD)Image aspect ratio: 16:9 and 4:3Multilingual OSD menu7 day EPG programme guide for setting recordingPlayback of multimedia from USB 2.0 memory devicesPVR recording function onto USB 2.0 devices, TimeShift functionParent lockMemory for storing 1,000 channels | Multimedia FunctionsPictures: JPEG, BMP, PNGAudio: MP3, AAC (.mp3, .m4a)Video: MPEG1, MPEG2, MPEG4, H264Multimedia file playback:.avi, .mpg, .dat, .vob, .div, .mov, .mkv.mjpeg, .ts, .trpSupported file systems: NTFS, FAT32, FAT16Presenting photos with background music |
| Demodulator: MSB1241Standard: DVB-T2/T (EN 302755/EN 300744)QPSK, 16-QAM, 64-QAM, 256-QAMFEC: 1/2, 3/5, 2/3, 3/4, 4/5, 5/6Guard interval: 1/128, 1/32, 1/16, 19/256, 1/8, 19/128, 1⁄4FFT Modes:1K, 2K, 4K, 8K, 8KE, 16K, 16KE, 32K, 32KE | |
| Tuner: MXL608RF input frequency: VHF: 174 MHz – 230 MHz/UHF: 474 MHz – 860 MHzBandwidth: 6/7/8 MHzInput signal sensitivity: -83 dBmInput connector type: IEC-type femaleDecoderMpeg transport stream A/V decodingVideo standard: MPEG-4 AVC/H.264 HP@L4Image aspect ratio: 4:3, 16:9Video resolution: 576i, 576p, 720p,1080i and 1080pAudio standard: ISO/IEC 14.496-3, AAC, Audio modes: mono, dual-channel, stereo | Inputs/OutputsIR receiver DO frequency: 38 KHzUSB: USB 2.0 (max. 500 mA)HDMI output 1.4Antenna input/loopDigital coaxial audio outputScart output |
| Power supply110–250 V 50~60 Hz | |
| DemultiplexerStandard ISO/IEC 13818-1ARIB STB-B10Maximum data speed on input: 120 Mbps (serial)/15 MBps (parallel) |


- GB Digital Terrestrial Receiver
- INSTRUCTIONS AND INFORMATION ON DISPOSING OF USED PACKAGING
- DISPOSAL OF USED ELECTRICAL AND ELECTRONIC DEVICES
- For Business Entities in EU Countries
- Disposal in Other Countries outside of EU
- Declaration of Conformity
- SAFETY WARNING:
- Warning for Use of USB Devices
- Standby
- Firmware
- Receiver Connection and Control Elements:
- Front and Rear Panel of the Device
- Front Panel
- Rear Panel (Fig. 1)
- Remote Control
- Receiver Operation
- Connecting the Receiver to TV (Fig. 2)
- Receiver Installation and Controls
- OSD Language
- Country
- Channel Tuning
- Main Menu
- Programme Settings
- Channel Editing
- Setting Favourite TV and Radio Channels (FAV)
- Cancelling the FAV Function:
- Browsing Favourite Channels
- Skipping TV or Radio Channels
- Removing TV or Radio Channels
- Moving TV or Radio Channels
- Locking TV or Radio Channels
- Renaming TV or Radio Channels
- EPG
- Programme Guide
- Adding TV or Radio Programme into Timer, Setting Recording
- Selection (Channel Sorting
- LCN
- Image
- Aspect Ratio
- Resolution
- TV Format
- Video Output
- Automatic Tuning
- Manual Tuning
- Setting Country of Use
- Antenna Power Supply
- Time
- Time Difference
- Sleep
- Summer Time
- On / Off
- Options
- System Settings
- Parental Control
- Set Password
- Factory Settings
- Information
- Update Firmware
- Network Settings
- USB
- Multimedia
- Photo Settings
- PVR Configuration
- Watching TV and Controls
- Resolving Common Issues
Brand : Emos
Model : EM170
Category : Digital decoder