
GZ 125 - Ice machine Guzzanti - Free user manual and instructions
Find the device manual for free GZ 125 Guzzanti in PDF.


| Product Type | Countertop Ice Maker |
| Model Number | GZ 125 |
| Color Options | Stainless Steel, Silver, Red |
| Dimensions (Width x Height x Depth) | 225 mm x 313 mm x 334 mm |
| Power Supply | 220-240 V, 50 Hz |
| Ice Cube Size Selection | Small or Large |
| Automatic Shut-Off When Full | Yes (Ice Full indicator) |
| Water Shortage Indicator | Yes (ADD WATER indicator) |
| Ice Full Indicator | Yes |
| Control Panel | Touch display with ON/OFF and SELECT buttons |
| Water Drain Cap | At front underside |
| Included Accessories | Ice basket, ice scoop |
| Cleaning Method | Diluted detergent, warm water, soft cloth; drain plug for water removal |
| Safety Features | Grounded plug, no flammable fluids, ventilation clearances, child supervision warning |
| Ventilation Clearance | Minimum 5 inches (12.7 cm) at rear and sides, 8 inches (20.3 cm) at top |
| Refrigerant | Not specified in manual; consult qualified technician |
| Repairability | Contact certified technician for internal issues; supply cord replacement by manufacturer |
| Disposal | Proper electrical waste recycling per local regulations |
Frequently Asked Questions - GZ 125 Guzzanti
User questions about GZ 125 Guzzanti
0 question about this device. Answer the ones you know or ask your own.
Ask a new question about this device
Download the instructions for your Ice machine in PDF format for free! Find your manual GZ 125 - Guzzanti and take your electronic device back in hand. On this page are published all the documents necessary for the use of your device. GZ 125 by Guzzanti.
USER MANUAL GZ 125 Guzzanti
natural_image
Line drawing of a modern kitchen or oven with ventilation grilles and control panel (no text or symbols)Návod k obsluze
Návod na obsluhu
Instrukcja obsługi
Használati útmutató
Navodila za uporabo
Gebrauchsanleitung
Instruction manual
OBSAH
PŘED PRVNÍM POUŽITÍM....3
DŮLEŽITÉ BEZPEČNOSTNÍ POKYNY....3
DŮLEŽITÉ BEZPEČNOSTNÍ TIPY 3
POPIS SPOTŘEBIČE....5
POUŽÍVÁNÍ A ÚDRŽBA SPOTŘEBIČE......6
VYBALENÍ VÝROBNÍKU LEDU....6
PŘIPOJENÍ VÝROBNÍKU LEDU K ELEKTRICKÉ SÍTI....6
POUŽÍVÁNÍ A ÚDRŽBA SPOTŘEBIČE
VYBALENÍ VÝROBNÍKU LEDU
natural_image
Symbol of a trash bin crossed with no text or numbers, representing environmental restriction (no text present)DÔLEŽITÉ BEZPEČNOSTNÉ POKYNY ....3
DÔLEŽITÉ BEZPEČNOSTNÉ TIPY....3
NÁZVY JEDNOTLIVÝCH ČASTÍ......5
PREVÁDZKOVÉ POSTUPY A ÚDRŽBA 6
VYBALENIE VÝROBNÍKA L'ADU 6
PRIPOJENIE VÁŠHO VÝROBNÍKA L'ADU 6
SPÔSOB ČISTENIA 7
STAROSTLIVOSŤ A ÚDRŽBA....7
POUŽÍVANIE VÁŠHO VÝROBNÍKA L'ADU....7
ODSTRÁNENIE MOŽNÝCH PROBLÉMOV......8
TECHNICKÉ ÚDAJE....11
DÔLEŽITÉ BEZPEČNOSTNÉ POKYNY
DÔLEŽITÉ BEZPEČNOSTNÉ TIPY
VYBALENIE VÝROBNÍKA L'ADU
natural_image
Symbol of a trash bin crossed with no text or numbers, representing environmental restriction (no text present)ROZWIĄZYWANIE MOŻLIWYCH PROBLEMÓW....8
SPECYFIKACJA TECHNICZNA....11
ROZPAKOWANIE KOSTKARKI DO LODU
natural_image
Symbol of a trash bin crossed with no text or numbers, representing environmental protection (no text present)natural_image
Symbol of a trash bin crossed with no text or numbers, representing environmental protection (no text present)RAZPAKIRANJE APARATA ZA PRIPRAVO LEDU
natural_image
Symbol of a trash bin crossed with no text or numbers, representing environmental protection (no text present)natural_image
Symbol of a trash bin crossed with no text or numbers, representing environmental protection (no text present)IMPORTANT SAFETY INSTRUCTION....3
IMPORTANT SAFETY TIPS....3
NAME OF THE PARTS....5
OPERATING PROCEDURES & MAINTENANCE......6
UNPACKING YOUR ICE MAKER....6
CONNECTING YOUR ICE MAKER....6
HOW TO CLEAN 7
CARE AND MAINTENANCE 7
USING YOUR ICE MAKER....7
TROUBLESHOOTING 8
SPECIFICATION....11
To ensure proper use of this appliance and for your safety, please read the following instructions completely before operating this appliance.
- Before connecting the appliance to the power supply, let the unit stand upright for 1 hour, which will reduce the possibility of the cooling system malfunctioning due to improper handling.
- Clean your unit thoroughly before putting into use.
(See "How to Clean") - Use the parts diagram on page 5 to insure proper positioning of internal components.
IMPORTANT SAFETY INSTRUCTION
IMPORTANT SAFETY TIPS
When using electrical appliances, basic safety precautions should be followed to reduce the risk of fire, electric shock, and injury to persons or property. Read all instructions before using any appliance.
- Do not operate this or any other appliance with a damaged cord.
-
Connect to properly polarized outlets only. No other appliance should be plugged into the same outlet. Be sure that the plug is fully inserted into the receptacle.
-
Do not run cord over carpeting or other heat insulators. Do not cover the cord. Keep cord away from traffic areas, and do not submerge in water.
-
Unplug the ice maker before cleaning or making repairs.
-
Exercise caution and use reasonable supervision when appliance is used near children.
-
Do not clean your ice maker with flammable fluids. The fumes can create a fire hazard or explosion.
-
Do not tip over.
-
If the ice maker is brought indoors from outdoors during the wintertime, give it a few hours to adjust to room temperature before plugging it in.
-
To change the cord, make sure to unplug ice maker or disconnect unit from power supply before removing the cord. Replace the current cord with a new one carrying the same or similar warning sticker as below.
This appliance is not intended for use by persons (including children) with reduced physical, sensory or mental capabilities, or lack of experience and knowledge, unless they have been given supervision or instruction concerning use of the appliance by a person responsible for their safety.
- Children should be supervised to ensure that they do not play with the appliance.
- Do not use extension cords or ungrounded (two prong) adapters;
- If the supply cord is damaged, it must be replaced by the manufacturer, its service agent or similar qualified person in order to avoid hazard.
- Do not store explosive substances such as aerosol cans with a flammable propellant in this appliance.
WARNING: Keep ventilation openings, in the appliance enclosure or in the built-in structure, clear of obstruction.
WARNING: Do not use mechanical devices or other means to accelerate the defrosting process, other than those recommended by the manufacturer.
WARNING: Do not damage the refrigerant circuit.
WARNING: Do not use electrical appliances inside the food storage compartments of the appliance, unless they are of the type recommended by the manufacturer.
WARNING: Ice-make shall only use potable water.
This appliance is intended to be used in household and similar applications such as
- Staff kitchen areas in shops, offices and other working environments;
- Farm houses and by clients in hotels, motels and other residential type environments;
- Bed and breakfast type environments;
- Catering and similar non-retail applications.
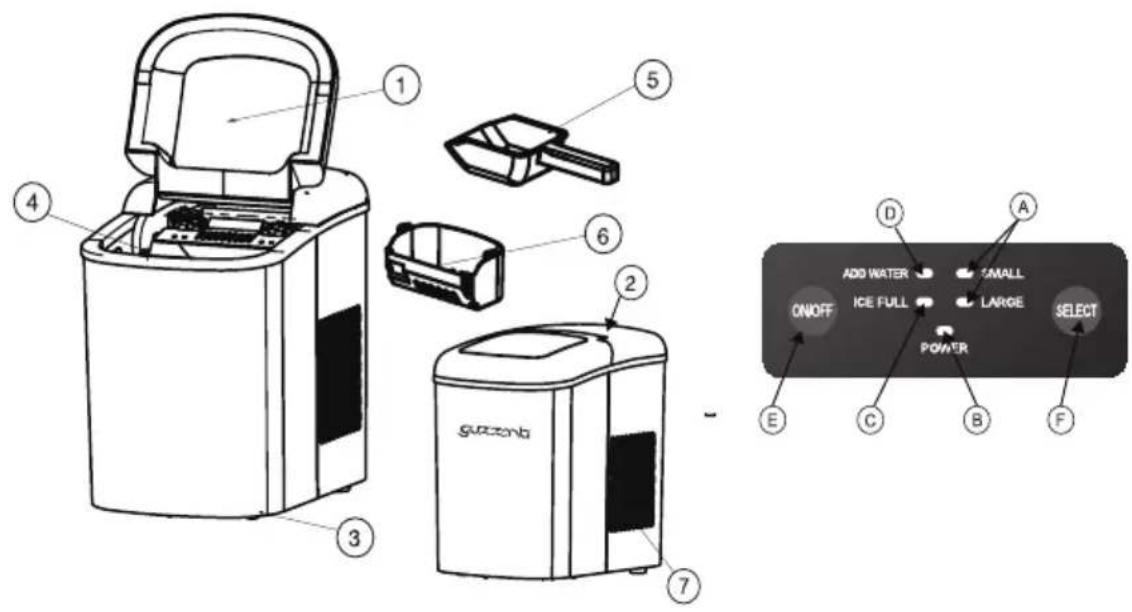
NAME OF THE PARTS
- Cover: See through window to allow interior visibility.
- Control panel: Easy to use, visible functions touch display setting.
A) Selected ice size: small or large.
B) Power indicator.
C) Ice Full indicator.
D) Water shortage indicator.
E) Button to turn on/off the unit.
F) Button to select ice cube size.
- Water drain cap: At front underside of the unit.
- Ice full sensor.
- Ice scoop.
- Ice basket.
- Air outlet.
- MAXIMUM WATER LEVEL:
---- △ ----(Not shown on the below unit image.)
Remove the ice basket, you can see the water level mark.
- Remove all exterior and interior packaging. Check that ice basket and ice scoop is included. If any part or accessory is missing, please contact our customer service.
- Clean the interior with lukewarm water and a soft cloth. Remove the ice basket and wash it in warm water.
- Find a location for your ice maker that is protected from direct sunlight and other sources of heat (i.e.: stove, furnace, radiator). Place the ice maker on a level surface. Make sure that there is at least 5 inches of space between the back and slides of your ice maker and the wall.
- Allow one hour for the refrigerant fluid to settle before plugging in the unit.
- The appliance must be positioned so that the plug is accessible.
CONNECTING YOUR ICE MAKER

DANGER
Improper use of the grounded plug can result in the risk of electrical shock. If the power cord is damaged please call our customer service at 800-562-0738.
- This unit should be properly grounded for your safety. The power cord of this appliance is equipped with a three-prong plug which connects with standard three prong wall outlets to minimize the possibility of electric shock.
- Plug your appliance into an exclusive, properly installed, grounded wall outlet. Do not under any circumstances, cut or remove the third (ground) prong from the power cord. Any questions concerning power and/or grounding should be directed toward a certified electrician.
- This appliance requires a standard 220-240 volt, 50Hz electrical outlet with three-prong ground.
Before using your ice maker, it is strongly recommended to clean it thoroughly.
The ice maker is not designed to be installed in an outside area such as a garage or a porch. Ambient temperatures of below 50OF or above 100OF will hinder the performance of the appliance.
HOW TO CLEAN
Remove the ice basket.
- Pull off the drain plug from the front underside to drain out the water.
- Clean the interior with diluted detergent, warm water and a soft cloth.
- The outside of the ice maker should be cleaned regularly with a mild detergent solution and warm water.
- Dry the interior and exterior with a soft cloth.
- Put back the drain plug.
- When the machine is not in use, open water drain cap to drain water completely from water reservoir.
CARE AND MAINTENANCE
- The ice maker should be cleaned on a regular basis. (See:"HOW TO CLEAN")
- It is necessary to have adequate ventilation space around the ice maker in order to sustain proper performance, dissipation of heat, maintain efficiency, and low power consumption. Clearance of minimum 5 inches should be maintained at the rear and sides of the unit and 8 inches at the top of the unit.
- To attain proper performance, be sure to plug the appliance into a properly grounded 220-240/50 Hz outlet.
- Do not modify the power cord under any circumstances to allow the unit to be plugged into a non-grounded outlet. To avoid heat damage to the power cord, please ensure that it does not come in proximity or in direct contact with the compressor of the ice maker.
- Please avoid installing the ice maker in a location where the appliance will come in contact with water or moisture to minimize rusting of metal parts.
- The ice maker should not be installed near any heat source or in a location where it will come in direct contact with the sunlight.
USING YOUR ICE MAKER
- Clean your ice maker thoroughly.
-
Open the cover, remove the ice basket and pour drinkable water (preferably purified water or distilled water) into tank.
-
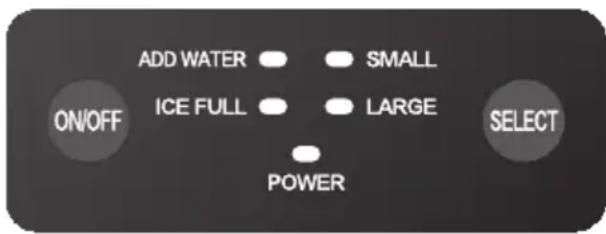
Plug in the unit and the "POWER" indicator light will blink.
-
Press "ON/OFF" on the control panel to begin the ice making cycle. The "POWER" indicator light will light.
-
Select the size of the ice cube by pressing the "SELECT" button. If ambient temperature is below 60^ F, it is recommended to select small size to avoid ice sticking together.
-
While the icemaker is on, check water level periodically. If water pump can't inject water, the ice maker will stop automatically, and the "ADD WATER" indicator will be on. Press the "ON/OFF" button, fill water up to the level mark and press "ON/OFF" again. Allow 3 minutes for the refrigerant to settle before restarting.
-
The ice maker automatically stops working when the ice basket is full and the "ICE FULL" indicator will be illuminated. Warning: Direct sunlight or sunlight reflection may cause infrared sensor malfunction. If the unit does not stop, even ice cubes can obstruct sensor, move the unit where there is no sunlight.
-
Change water in the water reservoir every 24 hours to ensure a reasonable hygiene level. If unit is not in use, drain all water in the tank reservoir.
TROUBLESHOOTING
| PROBLEM POSSIBLE CAUSE SOLUTION | ||
| "ADD WATER" indicator is on. | Lack of water. | Stop the ice maker, fill water, and press "ON/OFF" button again to restart the unit. |
| "ICE FULL" indicator is on. Ice basket is full. | Remove ice from ice basket. | |
| No ice, but "ICE FULL" indicator is illuminated. | 1. Ice-Full sensor (transmitter and receiver) is covered by the impurities contained in water or other pollutants.2. Ice-Full sensor is malfunctioning. | Use a soft cloth dip into water to clean the Ice-Full sensor. After cleaning, to see if the ice maker resume working, otherwise, please consult a certified technician. |
| "ICE FULL" indicator is on for 3 seconds and off for 3 seconds. | Ice shovel is stuck or the flip system is malfunctioning. | Check if the ice is blocking the ice shovel, otherwise, press "ON/OFF" button to turn off the ice maker and press it again to turn it on to see if it can make ice normally. If the "ICE FULL"indicator is still on for 3 seconds and off for 3 seconds, press "ON/OFF" button to turn off the machine and consult a certified technician. |
| Water is added, but "ADD WATER" indicator is illuminated and ice is not made. | Ice-Full sensor is malfunctioning. | Please consult a certified technician. |
| Ice cubes stick together. | Ice making cycle is too long. | Stop the ice maker, and restart when the ice blocks melt. Select the small ice size. |
| Water temperature in inner tank is too low. | Change the water in the reservoir. Use water between 45°F-90°F. | |
| Leaving ice in the appliance for an extended period of time may result in the appliance recycling the ice by melting it down and making a new batch. | Transfer ready-made ice to another container and store in a cooler or freezer to avoid recycling. | |
| The ice cubes are melting. | Leaving ice in the appliance for an extended period of time may result in the appliance recycling the ice by melting it down and making a new batch. The ice maker is not designed to store ice for very long. Melting ice is normal operation if ice is not used or moved to a cooler or freezer regularly. | After extended period transfer ready-made ice to another container and store in a cooler or freezer to avoid recycling. |
| Ice making cycle is normal but no ice is made. | Ambient temperature or water temperature in inner tank is too high. | Please operate the ice maker below ambient temperature of 90°F and use cold water. |
| Refrigerant liquid leakage. | Consult a qualified technician. | |
| Pipe in the cooling system is blocked. | Consult a qualified technician. | |
SPECIFICATION
| Product Description Countertop Ice Maker | |||
| Model No. GZ 125 | |||
| Color Stainless Steel/Silver/Red | |||
| Unit Dimensions | Width Height Depth | ||
| 225 313 334 | |||
DISPOSAL OF USED ELECTRICAL AND ELECTRONIC EQUIPMENT
natural_image
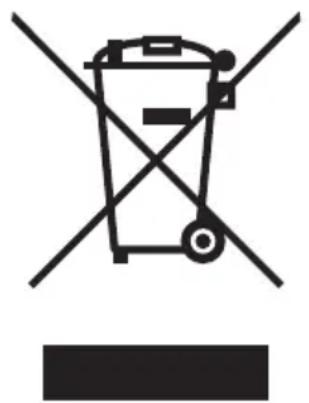
Symbol of a trash bin crossed with no text or numbers, representing environmental restriction (no text present)This symbol on products or original documents means that used electric or electronic products must not be added to ordinary municipal waste. For proper disposal, renewal and recycling hand over these appliances to determined collection points. Alternatively, in some European Union states or other European countries you may return your appliances to the local retailer when buying an equivalent new appliance. Correct disposal of this product helps save valuable natural resources and prevents potential negative effects on the environment and human health, which could result from improper waste disposal. Ask your local authorities or collection facility for more details. In accordance with national regulations penalties may be imposed for the incorrect disposal of this type of waste.
For business entities in European Union states
If you want to dispose of electric or electronic appliances, ask your retailer or supplier for the necessary information.
Disposal in other countries outside the European Union.
This symbol is valid in the European Union. If you wish to dispose of this product, request the necessary information about the correct disposal method from the local council or from your retailer.


- OBSAH
- POUŽÍVÁNÍ A ÚDRŽBA SPOTŘEBIČE
- VYBALENÍ VÝROBNÍKU LEDU
- DÔLEŽITÉ BEZPEČNOSTNÉ POKYNY
- DÔLEŽITÉ BEZPEČNOSTNÉ TIPY
- VYBALENIE VÝROBNÍKA L'ADU
- ROZPAKOWANIE KOSTKARKI DO LODU
- RAZPAKIRANJE APARATA ZA PRIPRAVO LEDU
- IMPORTANT SAFETY INSTRUCTION
- IMPORTANT SAFETY TIPS
- NAME OF THE PARTS
- CONNECTING YOUR ICE MAKER
- DANGER
- HOW TO CLEAN
- Remove the ice basket.
- CARE AND MAINTENANCE
- USING YOUR ICE MAKER
- SPECIFICATION
- DISPOSAL OF USED ELECTRICAL AND ELECTRONIC EQUIPMENT
- For business entities in European Union states
- Disposal in other countries outside the European Union.
Brand : Guzzanti
Model : GZ 125
Category : Ice machine