
DV80TA220AE - Tumble drier SAMSUNG - Free user manual and instructions
Find the device manual for free DV80TA220AE SAMSUNG in PDF.

User questions about DV80TA220AE SAMSUNG
0 question about this device. Answer the ones you know or ask your own.
Ask a new question about this device
Download the instructions for your Tumble drier in PDF format for free! Find your manual DV80TA220AE - SAMSUNG and take your electronic device back in hand. On this page are published all the documents necessary for the use of your device. DV80TA220AE by SAMSUNG.
USER MANUAL DV80TA220AE SAMSUNG
natural_image
Medical X-ray image showing internal anatomical structures with no visible text or labelsHeat Pump Dryer
User manual
DV9*TA2****/DV8*TA2****/DV7*TA2****
DV9*TA0****/DV8*TA0****/DV7*TA0****

SAMSUNG
Contents
Safety information 4
What you need to know about the safety instructions 4
Important safety symbols 4
Important safety precautions 5
Critical installation warnings 9
Critical usage warnings 11
Usage cautions 12
Critical cleaning warnings 15
Instructions about the WEEE 16
Installation 17
What's included 17
Installation requirements 20
Levelling 23
Drain hose (if necessary) 24
Installation checklist 27
Before using the dryer 27
Door reversal (DV**TA***A*/DV**TA***T* only) 28
Operations 32
Control panel 32
Getting started 39
Special features 43
2 English

Maintenance 44
Control panel 44
Exterior 44
Drum 44
Lint filter 45
Water tank 47
Heat exchanger 48
Troubleshooting 50
Checkpoints 50
Information codes 52
Appendix 53
Fabric care chart 53
Protecting the environment 55
Specification 56
Consumption data 57
Specification sheet 60
Safety information
Congratulations on your new Samsung dryer. This manual contains important information on the installation, use, and care of your appliance. Please take the time to read this manual to take full advantage of your dryer's many benefits and features.
What you need to know about the safety instructions
Warnings and Important Safety Instructions in this manual do not cover all possible conditions and situations that may occur. It is your responsibility to use common sense, caution, and care when installing, maintaining, or operating your dryer. Always contact your manufacturer about problems or conditions you do not understand.
Important safety symbols
What the icons and signs in this user manual mean:

WARNING
Hazards or unsafe practices that may result in severe personal injury, death and/or property damage.

CAUTION
Hazards or unsafe practices that may result in personal injury and/or property damage.

NOTE
Indicates that a risk of personal injury or material damage exists.

Read the instructions
These warning signs are here to prevent injury to yourself and others.
Please follow them explicitly.
After reading this manual, store it in a safe place for future reference.
Read all instructions before using the appliance.
4 English

As with any equipment that uses electricity and moving parts, potential hazards exist. To safely operate this appliance, familiarize yourself with its operation and exercise care when using it.

WARNING - Risk of Fire
• Clothes dryer installation must be performed by a qualified technician.
- Install the clothes dryer according to the manufacturer's instructions and local codes.
- To reduce the risk of severe injury or death, follow all installation instructions.
Important safety precautions

WARNING
To reduce the risk of fire, electric shock, or injury to persons when using your appliance, follow basic precautions, including the following:
- This appliance is not to be used by persons (including children) with reduced physical, sensory or mental capabilities, or lack of experience and knowledge, unless they have been given supervision or instruction concerning use of the appliance by a person responsible for their safety.
Safety information
-
For use in Europe: This appliance can be used by children aged from 8 years and above and persons with reduced physical, sensory or mental capabilities or lack of experience and knowledge if they have been given supervision or instruction concerning use of the appliance in a safe way and understand the hazards involved. Children shall not play with the appliance. Cleaning and user maintenance shall not be made by children without supervision.
-
Children should be supervised to ensure that they do not play with the appliance.
- If the supply cord is damaged, it must be replaced by the manufacturer, its service agent or similarly qualified persons in order to avoid a hazard.
- The new hose-sets supplied with the appliance are to be used and that old hose-sets should not be reused.
- For appliances with ventilation openings in the base, that a carpet must not obstruct the openings.
-
For use in Europe: Children of less than 3 years should be kept away unless continuously supervised.
-
CAUTION: In order to avoid a hazard due to inadvertent resetting of the thermal cut-out, this appliance must not be supplied through an external switching device, such as a timer, or connected to a circuit that is regularly switched on and off by the utility.
- The tumble dryer is not to be used if industrial chemicals have been used for cleaning.
- The lint trap has to be cleaned frequently, if applicable.
- Lint must not to be allowed to accumulate around the tumble dryer. (not applicable for appliances intended to be vented to the exterior of the building)
- Adequate ventilation has to be provided to avoid the back flow of gases into the room from appliances burning other fuels, including open fires.
- Do not dry unwashed items in the tumble dryer.
- Items that have been soiled with substances such as cooking oil, acetone, alcohol, petrol, kerosene, spot removers, turpentine, waxes and wax removers should be washed in hot water with an extra amount of detergent before being dried in the tumble dryer.
Safety information
- Items such as foam rubber (latex foam), shower caps, waterproof textiles, rubber backed articles and clothes or pillows fitted with foam rubber pads should not be dried in the tumble dryer.
- Fabric softeners, or similar products, should be used as specified by the fabric softener instructions.
- The final part of a tumble dryer cycle occurs without heat (cool down cycle) to ensure that the items are left at a temperature that ensures that the items will not be damaged.
- Remove all objects from pockets such as lighters and matches.
- WARNING: Never stop a tumble dryer before the end of the drying cycle unless all items are quickly removed and spread out so that the heat is dissipated.
- Exhaust air must not be discharged into a flue which is used for exhausting fumes from appliances burning gas or other fuels.
-
The appliance must not be installed behind a lockable door, a sliding door or a door with a hinge on the opposite side to that of the tumble dryer, in such a way that a full opening of the tumble dryer door is restricted.
-
WARNING: The appliance must not be supplied through an external switching device, such as a timer, or connected to a circuit that is regularly switched on and off by a utility.
Heat pump model only: The instructions shall also include the substance of the following:
WARNING: In the appliance enclosure or in the built-in structure, keep ventilation openings clear of obstruction.
WARNING: Do not damage the refrigerant circuit.
Critical installation warnings

WARNING
The installation of this appliance must be performed by a qualified technician or service company.
- Failure to do so may result in electric shock, fire, an explosion, problems with the product, or injury.
Plug the power cord into a wall socket and use the socket for this appliance only. In addition, do not use an extension cord.
- Sharing a wall socket with other appliances using a power strip or extending the power cord may result in electric shock or fire.
- Ensure that the power voltage, frequency and current are the same as those of the product specifications. Failure to do so may result in electric shock or fire. Failure Plug the power plug into the wall socket firmly.
Remove all foreign substances such as dust or water from the power plug terminals and contact points using a dry cloth on a regular basis.
- Unplug the power plug and clean it with a dry cloth.
- Failure to do so may result in electric shock or fire.
English
Safety information
Keep all packaging materials well out of the reach of children, as packaging materials can be dangerous to children.
- If a child places a bag over its head, it may result in suffocation.
This appliance must be properly grounded.
Do not ground the appliance to a gas pipe, plastic water pipe, or telephone line.
- This may result in electric shock, fire, an explosion, or problems with the product
- Never plug the power cord into a socket that is not grounded correctly and make sure that it is in accordance with local and national codes.
Do not install or keep the product exposed to the outdoor elements.
Do not use a damaged power plug, damaged power cord or loose wall socket.
• This may result in electric shock or fire.
If the plug (power supply cord) is damaged, it must be replaced by the manufacturer or its service agent or a similar qualified technician in order to avoid a hazard.
This appliance should be positioned to be accessible to the power plug after installation.
Do not pull or excessively bend the power cord.
Do not twist or tie the power cord.
Do not hook the power cord over a metal object, place a heavy object on the power cord, insert the power cord between objects, or push the power cord into the space behind the appliance.
• This may result in electric shock or fire.
Do not pull the power cord, when unplugging the power plug.
- Unplug the power plug by holding the plug.
- Failure to do so may result in electric shock or fire.
This appliance must be properly grounded. Never plug the power cord into a receptacle that is not grounded adequately and in accordance with local and national codes. See installation instructions for grounding this appliance.
Install this appliance in a location with solid, level floor.
- Failing to do so may result in abnormal vibrations, noise or problems with the product.
Since an ingredient in hair spray may degrade the hydrophile property of the heat exchanger so that dew may appear on the outer surface of the appliance when the cooling operation is running, do not install the appliance in a beauty salon.
This appliance should be positioned so that the power plug, the water supply taps, and the drain pipes are accessible.
Critical usage warnings

WARNING
Do not let children or pets on or into the product. In addition, when disposing of this product, disassemble the door lock (lever).
• This may result in children falling and injuring themselves.
- If children become locked in the product, there is a danger of suffocation.
Do not try to access the inside of the product when the drum is rotating.
Do not sit on the product or lean against the door.
• This may result in the product turning over and resulting in injury.
Dry the laundry only after it was spun by an appropriate washing machine.
Do not dry unwashed items in the tumble dryer.
Do not drink the condensed water.
Never stop a tumble dryer before the end of the drying cycle unless all items are quickly removed and spread out so that the heat is dissipated.
Do not dry laundry contaminated by inflammable materials such as gasoline, kerosene, benzene, thinner, alcohol, etc.
• This may result in electric shock, fire or explosion.
Do not let pets chew or play with the dryer.
• This may result in electric shock or injury.
When disposing of the product, separate the door and the power cord before disposing of the product.
- Failing to do so may result in damage to the power code or an injury.
Do not touch the power plug with wet hands.
Safety information
• This may result in electric shock.
When gas (city gas, propane gas, LP gas) leaks, do not touch this appliance or the power cord, ventilate immediately.
- At this time, do not use the ventilating fan.
- A spark may cause an explosion or fire.
Do not repair, replace, or attempt to service any part of the appliance unless specifically recommended in the user-repair instructions. You must also have the skills necessary to service this appliance.
Do not attempt to repair, disassemble, or modify the appliance yourself.
- Do not use any fuse(such as cooper, steel wire, etc.) other than the standard fuse.
- When repairing or reinstalling the appliance is required, contact your nearest service center.
- Failure to do so may result in electric shock, fire, problems with the product, or injury.
The product you have purchased is designed for domestic use only.
The use for business purposes qualifies as product misuse. In this case, the product will not be covered by the standard warranty provided by Samsung and no responsibility can be attributed to Samsung for malfunctions or damages resulting from such misuse.
If the product generates strange noise, smells of something burning, or generates smoke, immediately cut-off the power and contact the service center.
- Otherwise, it may cause an electric shock or fire as a result.
Do not let children (or pets) play in or on your product. The product door does not open easily from the inside and children may be seriously injured if trapped inside.
Usage cautions
CAUTION
Do not stand on top of the appliance or place objects (such as laundry, lighted candles, lighted cigarettes, dishes, chemicals, metal objects, etc.) on the appliance.
- This may result in electric shock, fire, problems with the product, or injury.
12 English
Do not touch the glass door and inside of the drum during or just after drying as it is hot.
• This may result in burns.
The door glass becomes hot during washing and drying. Therefore, do not touch the door glass.
Also, do not allow children to play around the washing machine or touch the door glass.
• This may result in burns.
Do not press the buttons using sharp objects such as pins, knives, fingernails, etc.
• This may result in electric shock or injury.
Do not dry laundry containing forming rubber (latex) or similar rubber textures.
- If forming rubber is heated, it may start a fire.
Do not dry laundry contaminated by vegetable oil or cooking oil as a large amount of the oil will not be removed when washing the laundry. In addition, use the Cool Down cycle so that the laundry is not heated.
- The oxidization heat of the oil may start a fire.
Make sure that the pockets of all clothing to be dried are empty.
- Hard, sharp objects, such as coins, safety pins, nails, screws, or stones can cause extensive damage to the appliance.
Do not dry clothing with large buckles, buttons, or other heavy metal (zippers, hooks and eyelets, button-up covers).
If necessary, use the laundry net for small and lightweight laundry such as fabric tie belt, apron strings, and underwire bras which can dissolve or break during a cycle.
Dryer sheets are compatible with this model, and are recommended for better drying performance.
Dryer sheets are also beneficial in reducing the static electricity generated during a drying cycle. Static electricity could lead to damage of laundry items and potentially the appliance.
Do not use the dryer near dangerous powders such as coal dust, wheat flour, etc.
- This may result in electric shock, fire or an explosion.
Safety information
Do not place inflammable materials near the product.
- This may result in toxic gases from the product, damage to parts, electric shock, fire or an explosion.
- The appliance should not be placed behind lockable doors etc.
Do not touch the rear side of the appliance during or immediately after drying is complete.
- The appliance remains hot and may cause burns.
Contains fluorinated greenhouse gases.
Hermetically sealed equipment.
Do not vent gases into the atmosphere.
Refrigerant (Type): R-134a (GWP = 1430)
Refrigerant (Charging)
- DV**TA2****: 0.43kg, 0.615tCO2e
• DV**TA0****: 0.37kg, 0.529tCO2e
Critical cleaning warnings

WARNING
Do not clean the appliance by spraying water directly onto it.
Do not use benzene, thinner or alcohol to clean the appliance.
- This may result in discoloration, deformation, damage, electric shock or fire.
Before cleaning or performing maintenance, unplug the appliance from the wall socket.
- Failure to do so may result in electric shock or fire.
Clean the filter case before and after using the dryer.
Clean the inside of the product on a regular basis by asking an authorized service engineer.
Clean the Heat Exchanger with a soft brush or vacuum cleaner once a month, Do not touch the heat exchanger with your hand. Otherwise, it may cause an injury.
The interior of the dryer should be cleaned periodically by qualified service personnel.
Safety information
Instructions about the WEEE
Correct Disposal of This Product (Waste Electrical & Electronic Equipment)
(Applicable in countries with separate collection systems)
This marking on the product, accessories or literature indicates that the product and its electronic accessories (e.g. charger, headset, USB cable) should not be disposed of with other household waste at the end of their working life. To prevent possible harm to the environment or human health from uncontrolled waste disposal, please separate these items from other types of waste and recycle them responsibly to promote the sustainable reuse of material resources.
Household users should contact either the retailer where they purchased this product, or their local government office, for details of where and how they can take these items for environmentally safe recycling.
Business users should contact their supplier and check the terms and conditions of the purchase contract. This product and its electronic accessories should not be mixed with other commercial wastes for disposal.
For information on Samsung's environmental commitments and product regulatory obligations, e.g. REACH, WEEE or Batteries, visit our sustainability page available via www.samsung.com
Installation
What's included
Carefully unpack the dryer. Keep all packaging materials away from children. The parts and location of parts shown below may differ from your dryer. Before installation, make sure the dryer has all the parts listed here. If the dryer and/or parts are damaged or missing, contact the nearest Samsung customer service centre.
Dryer at a glance
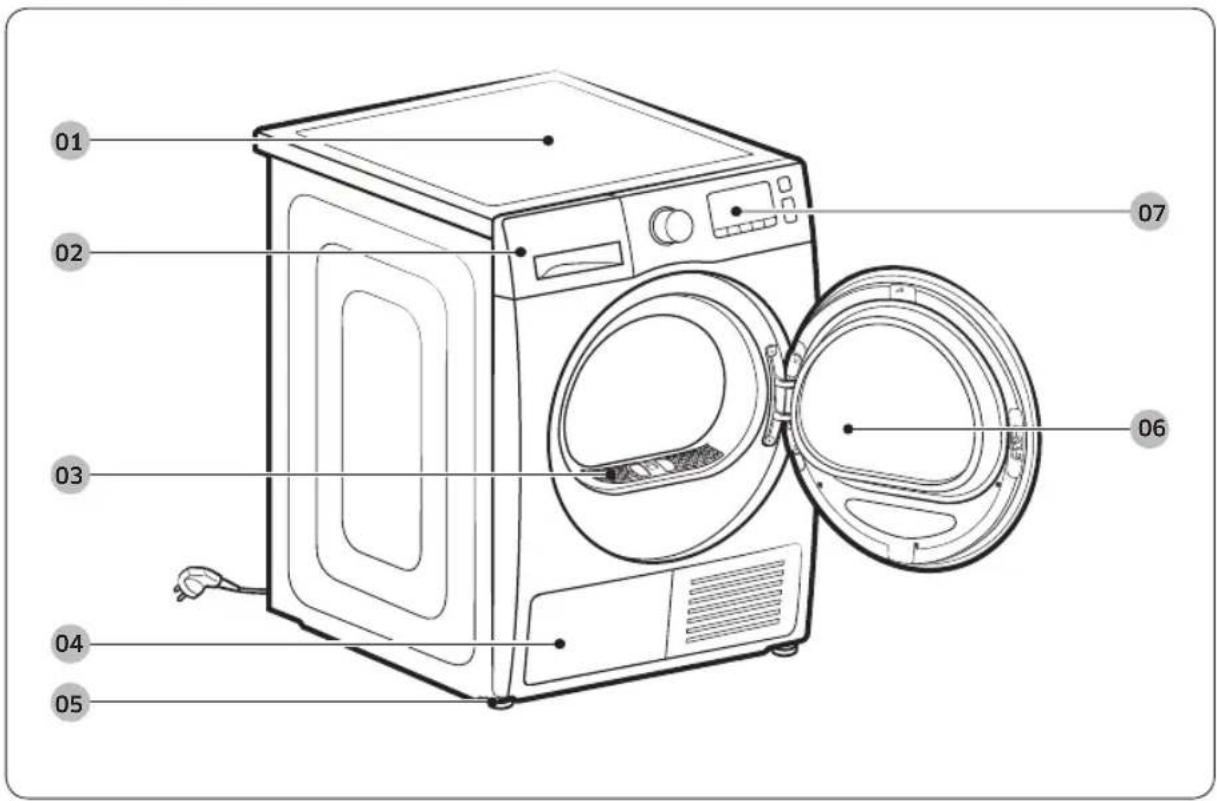
01 Top cover 02 Water Tank
03 Lint filter
04 Heat exchanger
05 Levelling Leg
06 Door
07 Control Panel
Installation
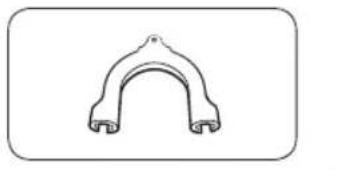
Accessories (supplied)
natural_image
Simple line drawing of a curved mechanical component (no text or symbols)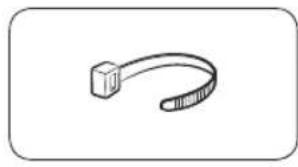
natural_image
Simple line drawing of a curved mechanical or cable component (no text or symbols)
natural_image
Simple line drawing of a bulb-like object with a flared top and base (no text or symbols)Hose guide Cable tie Hose connector
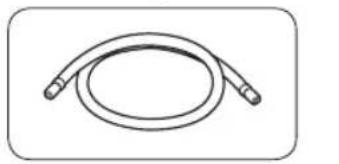
natural_image
Simple line drawing of a coiled cable or hose with two connectors (no text or symbols)
natural_image
Simple line drawing of a closed book with a blank cover (no text or symbols)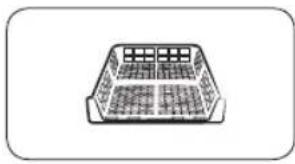
natural_image
Simple line drawing of a rectangular container with internal compartments (no text or symbols)Long drain hose (2m) User manual Rack Dry (applicable
models only)
natural_image
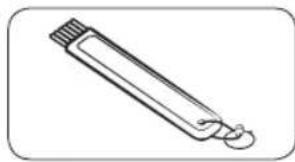
Simple line drawing of a pen-like object with a loop handle (no text or symbols)Cleaning brush
Accessories (not supplied)
natural_image
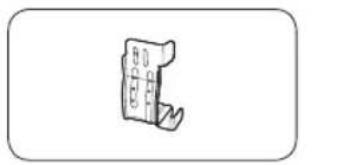
Simple line drawing of a mechanical component or bracket (no text or symbols)Bracket-Stacking kit (SK-DH, SK-DA, SKK-DF)

natural_image
Isometric line drawing of a rectangular electronic component with mounting holes (no text or symbols)Stacking kit (SKK-DD, SKK-DDX)
NOTE
- The stacking kit allows the dryer to be stacked on top of a washer. Please note that the stacking kit can only be used with Samsung washers and dryers. To purchase a bracket stacking kit (SK-DH, SK-DA, SKK-DF) or stacking kit (SKK-DD, SKK-DDX), contact a Samsung service centre or local appliance retailer. The stacking kit differs with the washer model.
- For stacking instructions with the dryer, see the installation manual included in the stacking kit.
- For information about model-specific availability of the stacking kit, see the installation manual included in the stacking kit.
Installation requirements

NOTE
This dryer must be installed by a qualified installer. If service is required due to poor or faulty installation, it is considered the owner's responsibility and may void the warranty. Keep these instructions for future reference.

WARNING
- Do not plug the power cord into a wall outlet before the dryer is completely installed.
- Have two or more persons help move the dryer.
- Do not let children or pets play in, on, or around the dryer. Proper supervision is necessary at all times.
- Keep all packaging materials away from children.
- Do not replace a damaged power cord or power plug yourself. Have Samsung or a qualified service technician replace a damaged power cord or power plug.
- Do not attempt to repair, disassemble, or modify the dryer. For any repairs, contact the nearest Samsung service centre.
- Remove the door/lids from all discarded appliances to avoid children from suffocating.
- If the dryer generates a strange noise, burning smells, or smoke, unplug the power plug immediately and contact the nearest Samsung service centre.
- Do not unplug the dryer while it is operating.
- Do not place flammable objects near the dryer.
Location requirements
Select a level, well-constructed surface that will withstand vibrations. Select a location where a grounded, 3-prong outlet is easily accessible.

WARNING
• Install the dryer indoors only.
- Do not install the dryer in areas exposed to the weather.
- Do not install the dryer where the temperature may fall below 5 °C or rise above 35 °C.
- Do not install the dryer where gas may leak.
- Do not block the cooling grill's air inlet located at the dryer front.
Alcove or closet installation
For alcove or closet installation, the dryer requires the following minimum clearances:
| Sides Top Front Rear | ||
| 25 mm 25 mm 490 mm 51 mm |
If installing the dryer with a washer, the front of the alcove or closet must have an unobstructed air opening of at least 490 mm.
Electrical and grounding requirements
- The dryer requires an AC 220-240 V / 50 Hz electrical supply.
- The dryer must be properly grounded. If the dryer malfunctions or breaks down, grounding reduces the risk of electric shock by providing a path of least resistance for the electric current. The dryer comes with a power cord that has a 3-prong grounding plug. The plug must be plugged into an appropriate outlet that is properly installed and grounded in accordance with all local codes and ordinances.
- If you have any questions regarding the electrical or grounding requirements, please contact Samsung or a qualified electrician.
Installation

WARNING
- Plug into a grounded, 3-prong outlet.
- Do not use a damaged power plug, cord, or loose or damaged wall outlet.
- Do not use an adaptor or an extension cord.
- Improper connection of the equipment-grounding conductor may result in electric shock. If you are unsure if the dryer is properly grounded, check with a qualified electrician.
- Do not modify the power plug, power cord, or power outlet in any way.
- Do not connect the ground wire to plastic plumbing lines, gas lines, or hot water pipes.
Levelling
Before you install the dryer, make sure you have read Installation requirements on page 20. Please note that the following instructions are for installation without using a drain hose. For instructions for using a drain hose, see the next section, Drain hose (if necessary). For convenience, consider installing the dryer next to your washer.
natural_image
Two identical diagrams showing a mechanical component with rotational arrows, labeled C and D (no text or symbols beyond labels)- Gently slide the dryer into the desired location.
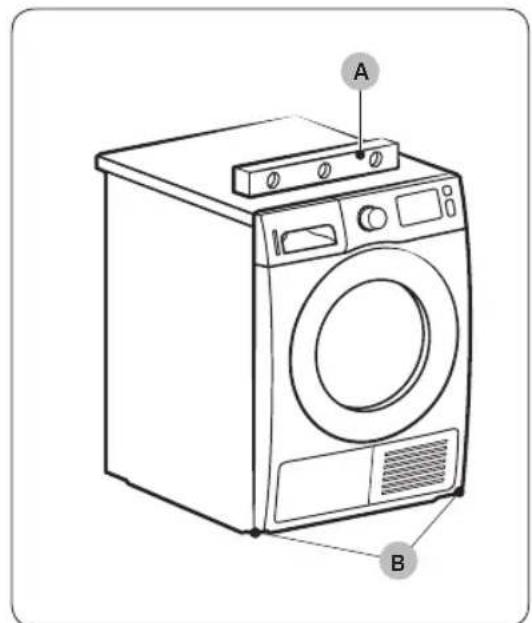
- Use a level (A) and check the levelness of the dryer from side to side and front to back.
- If the dryer is not level, adjust the levelling leg (B). Turning the leg counter-clockwise retracts the leg. Turning the leg clockwise extends the leg.
- Once the dryer is level, make sure the dryer stands firmly on the floor.
- Plug in the dryer.
NOTE
- The dryer can be levelled using either or both of the front and rear legs of the dryer.
- To set the dryer to the same height as the washer, fully retract (C) the levelling legs by turning them counter clockwise, then loosen (D) the legs by turning them clockwise.
- Extend the levelling leg only as much as necessary. Extending the levelling leg more than necessary can cause the dryer to vibrate.
Installation
Drain hose (if necessary)

natural_image
Line drawing of a front view of a washing machine casing with internal components and a highlighted inset showing a component (no text or symbols present)
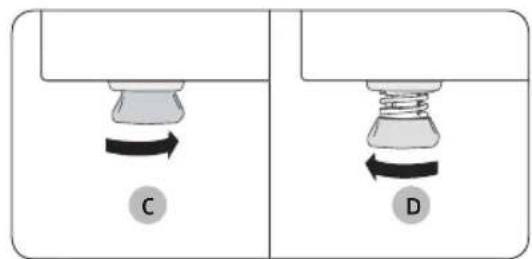
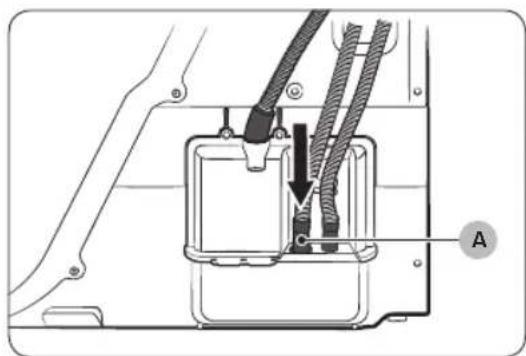
The dryer comes with a built-in water tank. However, if you do not want to use the water tank, you may install the drain hose. The provided accessory hose (long drain hose) can be used as an extension to the drain hose.
- Remove the drain hose from hole (A), and insert it into hole (B).
natural_image
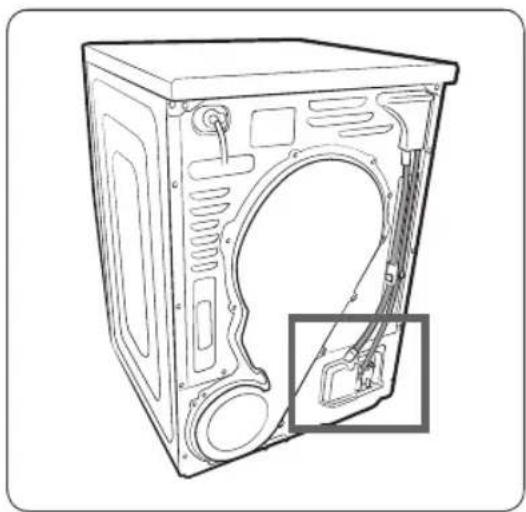
Technical diagram of a mechanical assembly with labeled component A (no text or symbols beyond label)Over a wash basin:
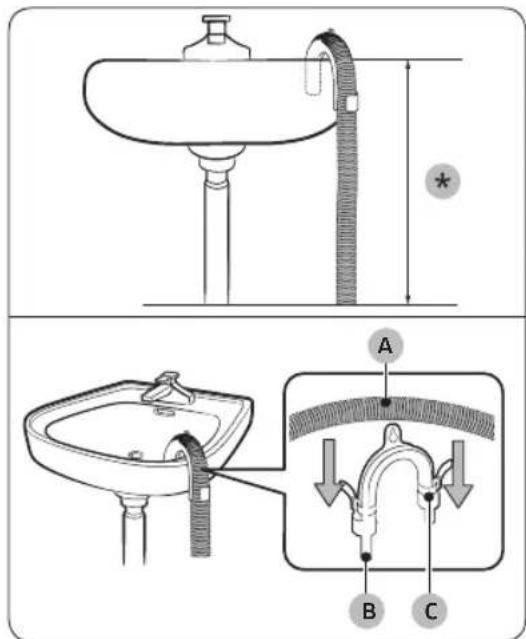
- Insert one end of the accessory hose (long drain hose) into hole (A).
-
Insert the other end (outlet) of the accessory hose to the drainage system in one of the following ways:
-
Make sure to place the end of the accessory hose lower than 90 cm (*) from the bottom of dryer.
- To bend some point of the accessory hose, use the supplied plastic hose guide (B) and secure the guide to the wall with a hook or to the tap with a piece of string. Assemble the drain hose (A) and the hose guide (B) and fix them with the cable-tie (C).
- You can drain the condensed water by connecting the accessory hose (long drain hose) to the drain-outlet directly.
CAUTION
Do not extend the drain hose. Water may leak from the connected area. Use a long drain hose.
Installation
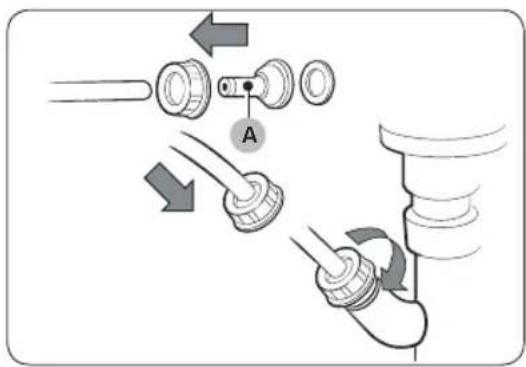
By using the drain pipe of the wash basin:

natural_image
Line drawing of a square sink with a faucet and pipe fitting (no text or symbols)- Assemble the hose connector (A), and attach it to the end of the accessory hose as shown.
CAUTION
To prevent water leak, make sure to connect the hose and the connector firmly.
- Connect the hose adaptor directly to the drain pipe of the wash basin.
Installation checklist
- The dryer is plugged into a properly grounded outlet.
- All packaging material is completely removed and properly disposed.
- The dryer is level and standing firmly on the floor.
- Start the dryer to make sure that it runs, heats, and shuts off.
- Run a TIME DRY cycle for 20 minutes to see if the HC information code is displayed. If this is the case, contact a local service centre.
- After installation, we recommend that you wait at least 1 hour before using the dryer.
Before using the dryer
- Make sure no accessory remains inside the drum.
- Plug in the power cord just before operating the dryer.
- Do not block the air inlet hole of the cooling grill at the front of the dryer.
- Do not place inflammable objects near the dryer and keep the surroundings clean.
- Keep the dryer level with the ground.
- Do not remove the adjustable levelling legs of the dryer. They are necessary to keep the dryer level with the ground.

Installation
Door reversal (DV\*\*TA\*\*\*A\*/DV\*\*TA\*\*\*T\* only)
You might want to reverse the direction of the door, depending on your site conditions or to your needs.

WARNING
Make sure door reversal is performed by a qualified technician.
natural_image
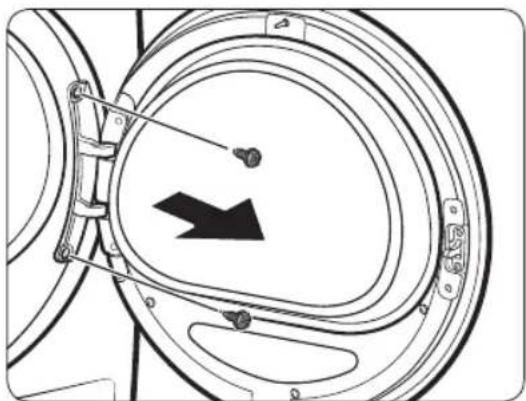
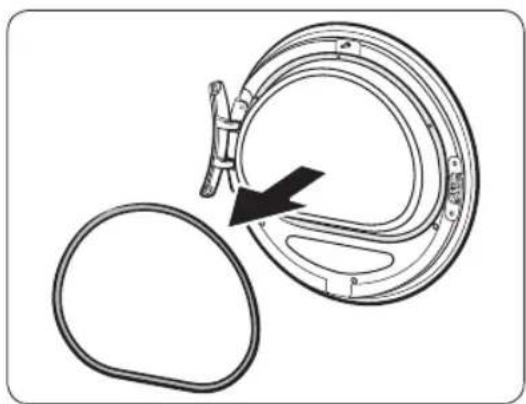
Technical line drawing of a mechanical component with a black arrow indicating direction (no text or symbols)- Open the door, and then remove the two screws on the door hinge. While holding the door with both hands, slightly lift to remove it.
natural_image
Diagram of a mechanical component with a black arrow indicating rotation or assembly (no text or symbols present)- Use a thin object to remove the door sealing.
natural_image
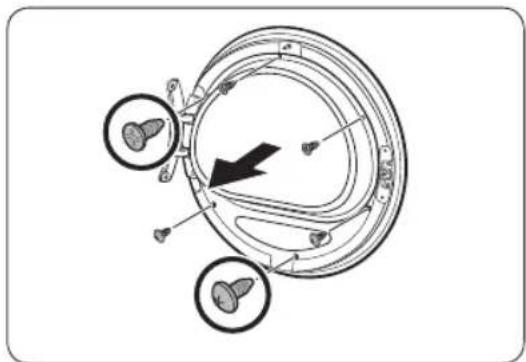
Diagram of a mechanical or electrical component with three circular features and an arrow indicating direction (no text or symbols present)- Remove the upper 3 screws and the lower 3 screws on the glass holder.
natural_image
Diagram of a mechanical device with two circular components and directional arrows indicating rotation or assembly (no text or symbols)
natural_image
Technical illustration of a mechanical component with two views, one showing a circular opening and the other a ring with a black arrow indicating direction (no text or symbols)
natural_image
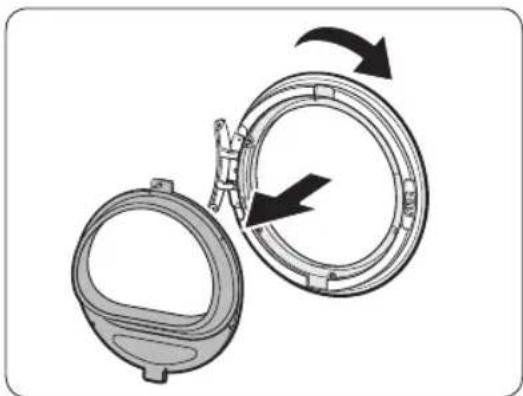
Technical diagram of a mechanical component with three circular features and a central arrow indicating direction (no text or symbols present)-
Remove the glass holder, and then rotate the door cover by 180 degrees.
-
Insert the glass holder into the new position of the door cover. Make sure the door hinge is in the same position as in the figure.
-
Tighten the upper 3 screws and the lower 3 screws on the glass holder.
NOTE
The screw shapes differ by dimension. Make sure you tighten the correct screw.
Installation


natural_image
Diagram of a mechanical component with an arrow indicating rotation or assembly (no text or symbols present)

-
Insert the door sealing in the correct position.
-
Remove the 2 screws that remain after removing the door hinge.
-
Remove the 4 screws on the door lock. Remove the door lock, and then reinsert it to the opposite side.

natural_image
Diagram showing a door with a keyhole and arrow pointing to it, surrounded by coins and a square (no text or symbols)
natural_image
Technical diagram of a mechanical component with an inset showing a close-up view of a bracket detail (no text or symbols present)
natural_image
Diagram of a mechanical component with concentric circular parts and an arrow indicating direction (no text or symbols)-
Tighten the 2 screws that were removed from step 8 on the hinge frame at the opposite side. Note that you must tighten them on the right (top-right and bottom-right) of the frame.
-
Remove the screw on the bottom of the door hinge, and the fasten it on the top of the door hinge.
-
Put the door hinge on the opposite side, and then tighten the 2 screws to fix the door to the dryer.
NOTE
To return the door to the initial position, follow the steps again. Please note that the door, hinges, and other parts would be in the opposite orientation as listed in these steps.
Operations
Control panel
DV9*TA*****/DV8*TA****

DV7*TA*****
32 English

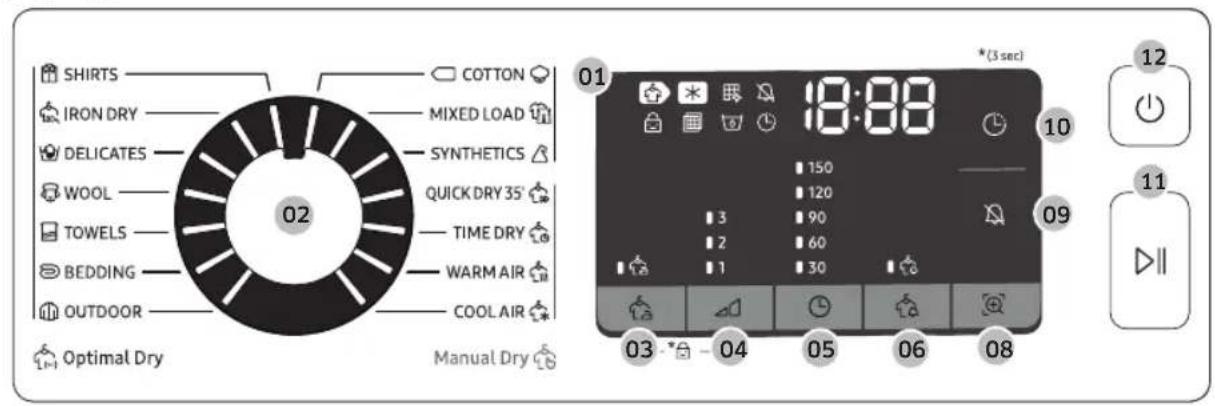
| 01 Digital Graphic Display | Displays all cycle information, including cycle time, information codes, and dryer status. See the table below for status details. | |||
| Drying Cooling | * | |||
| Heat-exchanger clean alarm | Sound on/off | |||
| Child Lock Check filter alarm | ||||
| Water Tank Full Delay End | ||||
| Wrinkle Prevent Damp Alert | ||||
| Smart Check | ||||
| 02 Cycle Selector | Turn the dial to select a cycle. See theCycle overviewon page 35for available cycles. | |||
| 03 ⚙ Wrinkle Prevent | Adds approximately 3 hours of intermittent tumbling at the end of the selected cycle to reduce wrinkles. A large circle appears in display panel, and the drum rotates intermittently. To activate, press ⚙ Wrinkle Prevent. The corresponding indicator lights up. | |||
| 04 ⚠ Drying Level | Press to select the dryness level in the ⚡ SHIRTS, ⚙ COTTON ⚙, ⚡ MIXED LOAD, and ⚗ SYNTHETICS cycles. The dryness can be set in three levels (1-3). Level 1 is used to partially dry items that lay flat or hang to dry. Level 3 is the strongest and is used to dry larger or bulk loads. | |||
Operations
| 05 Time | Press to adjust the cycle time for TIME DRY, WARM AIR, and COOL AIR cycles.The following time options (unit: minute) are available: 30, 60, 90, 120, and 150.120 minutes and 150 minutes are not available for WARM AIR and COOL AIR cycles.The exact drying time differs depending on the humidity of the load. |
| 06 Damp Alert | This alarm is available only with SHIRTS, MIXED LOAD, and SYNTHETICS cycle. If a load contains mixed fabrics, the Damp Alert indicator (blinks when the average dryness of the item is 80 % dry. This lets you take items that you don't want fully dried or that dry quickly out of the dryer early while letting others continue to dry. |
| 07 Lamp(DV9*TA****/DV8*TA****) | Press to turn on or off the interior lamp. The lamp stays lit for 2 minutes after it has turned on, and then turns off automatically. |
| 08 Smart Check(DV7*TA****) | If the dryer has detected an issue, Smart Check allows you to check the status of the dryer using a smart phone. |
| 09 Sound On/Off | Press to mute/unmute the alarm. The sound setting is retained when you turn the dryer off and turn it on again. |
| 10 Delay End | You can adjust the finish time of the selected cycle in 1-hour increments all the way up to 24 hours. |
| 11 Start/Pause(Hold to Start) | Press to start or pause a cycle. If the dryer is running, press the button once to pause the dryer. Press again to resume. |
| 12 Power | Press to turn the dryer on/off. If the dryer turns on for 10 minutes without any button being pressed, the dryer automatically turns off. |
Cycle overview
Optimal Dry
| Cycle Description | Max load (kg) | |
| SHIRTS | Use to quickly dry one item such as a shirt. | 2 |
| IRON DRY | This cycle finishes the drying process in a moist state, which facilitates ironing. | 4 |
| DELICATES | For items to be handled with care such as lingerie. | 2 |
| WOOL | For machine washable and tumble dryable wool only. For best results, turn laundry inside out before drying. | 1 |
| TOWELS | Use to dry loads such as bath towels. | 4 |
| BEDDING | For bulky items such as blankets, sheets, comforters, and light duvets. | 2 |
| OUTDOOR | For outdoor wear such as skiwear and mountain clothing, and also for fabrics such as spandex, stretch, and microfiber. It is recommended to use this cycle after you have washed your laundry using the OUTDOOR cycle with your washing machine. | 2 |
| COTTON | For lightly cottons, bed linen, table linen, underwear, towels, and shirts. | MAX |
| MIXED LOAD | For mixed loads consisting of cotton and synthetic fabrics. | MAX |
| SYNTHETICS | For lightly soiled blouses, and shirts that are made of polyester (Diolen, Trevira), polyamide (Perlon, nylon), or other similar blends. | 4 |
Operations
Manual Dry
| Cycle Description | Max load(kg) |
| QUICK DRY35' | For drying light cotton synthetics or items that needs quick drying. The default Time is 35 minutes. |
| TIME DRY | Use to set a desired Time.Turn the Cycle Selector to select TIME DRY.Press Time to set the drying time between 30 minutes and 150 minutes. Keep pressing Time cycles through the available time options in 30-minute increments.NOTEThe actual cycle time may differ depending on the dryness of items. |
| WARM AIR | For small, pre-dried items. The Time defaults to 30 minutes.Timed cycle for all types of fabric except for wool and silk. Dry laundry that is still slightly damp or has already been pre-dried. Also suitable for the subsequent drying of multi-layered, thick laundry that does not dry readily.NOTEThis cycle is suitable for drying individual woollen fabrics, sports shoes and soft toys. Only dry these using the basket for woollens. |
| COOL AIR | All types of fabric. For freshening up or airing items of laundry that have not been worn for long. |
Cycle chart

NOTE
For best results, follow the load size recommendations for each dry cycle.
- Large load: Fill the drum to about 34 full. Do not add items over this level as they need to tumble freely.
• Medium load : Fill the drum to about 12 full. - Small load: Fill the drum with 3-5 items, not more than 14 full.
| Cycle Recommended items Load size Drying Level | |||
| SHIRTS | Non-iron shirts or blouses made of cotton, linen, synthetic fibres or blended fabrics. |  | Available |
| IRON DRY | This cycle finishes the drying process in a moist state, which facilitates ironing. | 4 | Unavailable |
| DELICATES | Silk, fine fabrics and lingerie. | 2 | Unavailable |
| WOOL | For machine washable and tumble dryable wool only. | 1 | Unavailable |
| TOWELS | Use to dry loads such as bath towels. | 4 | Unavailable |
| BEDDING | For bulky items such as blankets, sheets, comforters, and light duvets. | 2[X832] | Unavailable |
| OUTDOOR | For outdoor wear such as skiwear and mountain clothing, and also for fabrics such as spandex, stretch, and microfiber. | 2 – – | Unavailable |
| COTTON | For lightly cottons, bed linen, table linen, underwear, towels, and shirts. | MAX Available | |
| MIXED LOAD | Mixed load consisting of cotton and synthetic fabrics |  [11] [11] | Available |
| SYNTHETICS | Synthetic or blended fabrics. | -CW33] | Available |
| QUICK DRY 35' | Synthetics and light cottons | 1 – – | Unavailable |
Operations
| Cycle Recommended items Load size Drying Level | |||
| TIME DRY | All types of fabric; time programme. – Unavailable | ||
| WARM AIR | Small Items & damp clothing Everyday items suitable for heat drying | – Unavailable | |
| COOL AIR | All types of fabric. For freshening up or airing items of laundry that have not been worn for long. | – Unavailable | |

Getting started
Simple steps to start
- Press ⏻ Power to turn the dryer on.
- Load the dryer and close the door.
- Turn the Cycle Selector to select a cycle.
- Change the cycle settings ( △ Drying Level, and Ⓛ Time ) as necessary.
- Select necessary settings and options to your preference. ( ⏻ Wrinkle Prevent, ⚙ Lamp, ⚡ Damp Alert, and/or ⏱ Delay End).
- Press and hold ▷II Start/Pause (Hold to Start). The dryer indicator lights up, and the estimated cycle time appears on the display.

NOTE
The number of available settings and options differs with the cycle.
To change the cycle during operation
- Press Start/Pause (Hold to Start) to stop operation.
- Select a different cycle.
- Press and hold Start/Pause (Hold to Start) to start new cycle.
Sorting and loading
- Put only one wash load in the dryer at a time.
- Avoid mixing heavy and lightweight items together.
- To increase drying efficiency when drying one or two items, add a dry towel to the load.
- For best results, untangle items before inserting into the dryer.
• Overloading restricts the tumbling process, resulting in uneven drying and wrinkling. - Unless recommended on the care label, avoid drying woollens or fibreglass items.
- Avoid drying unwashed items.
- Do not dry items soiled with oil, alcohol, gasoline, etc.
Operations
Rack Dry (applicable models only)
Set the drying time up to 150 minutes according to the moisture and weight of the items to dry. When drying laundry using the drying rack, the TIME DRY cycle is recommended.
natural_image
Technical line drawing of a car rear bumper with decorative patterned seating and door panel (no text or symbols)
A. Rack dry
- Position the drying rack in the drum, inserting the front lips of the rack into the holes of the door diaphragm.
- Place items on the rack, leaving enough space where air can circulate. For clothing items, fold and place flat on the rack. For shoes, place shoes with their soles facing down.
- Close the door and press ⏻ Power. Select ⏻ TIME DRY, and then press Time to select the drying time.
- Press and hold ▷ll Start/Pause (Hold to Start).
Drying suggestions
| Items (max 1.5 kg) Description | |
| Washable sweaters (block to shape and lay flat on rack) | When drying the laundry using the rack, fold and place the clothes on the rack to prevent the clothing from becoming wrinkled. |
| Stuffed toys (cotton or polyester fibre filled) | |
| Stuffed toys (foam or rubber-filled) | |
| Foam rubber pillows | |
| Sneakers To dry sports shoes, place the | shoes on the rack so that the soles of the shoes are facing downwards. |

CAUTION
- Drying foam rubber, plastic, or rubber on a heat setting may cause damage to the items and lead to a fire hazard.
• To prevent damage to shoes, use Rack Dry.
Operations
Cycle guide
Always follow the care label when drying. If care label instructions are not available, refer to the following table.
| Bedspreads and comforters | • Use the High temperature settings. |
| Blankets • For best results, dry only one blanket at a time. | |
| Cloth diapers • Use the High temperature settings. | |
| Down-filled items | • Do not dry on a heat setting. Doing so may cause a fire hazard. Only use the COOL AIR cycle. |
| Foam rubber (rug backs, stuffed toys, etc.) | • Do not dry on a heat setting. Doing so may cause a fire hazard. Only use the COOL AIR cycle. |
| Pillows • Add a few dry towels to help tumble and fluff items.• Do not dry kapok or foam pillows with heat. Use only the COOL AIR cycle. | |
| Plastics (shower curtains, outdoor furniture covers, etc.) | • Use COOL AIR or TIME DRY. |

CAUTION
Use caution when drying items that are not listed above.
Special features
Delay End ⏱
You can set the dryer to complete a selected cycle at your set time.
- Select a cycle with necessary options.
- Press the - or + Ⓛ Delay End buttons to set a time between 1 to 24 hours in 1-hour increment.
- Press and hold ▷II Start/Pause (Hold to Start). The corresponding indicator blinks, and the clock begins counting down to the set time.
NOTE
To cancel the Delay End settings, restart the dryer using the ⏻ Power button.
Child Lock
Child Lock prevents children from playing with the dryer. When Child Lock is activated, all buttons except for the ⏻ Power button are disabled. To activate/deactivate Child Lock, simultaneously press and hold 📄 Damp Alert and Smart Control or 🌘 Wrinkle Prevent and ▲ Drying Level for 3 seconds.
NOTE
If Child Lock is activated, and the dryer is turned off and then on again, Child Lock remains activated.
Smart Check
If the dryer has detected an issue, Smart Check allows you to check the status of the dryer using a smartphone. Please note that Smart Check can only be used for Galaxy and iPhone series smartphones. To use Smart Check, make sure you have downloaded the Samsung Smart Washer/Dryer app, and then follow the steps below.
- Press and hold 📊 Time and Damp Alert for 3 seconds or press Smart Check. The LED's on the display panel rotate, and the Smart Check code is displayed.
- On the smartphone, open the Samsung Smart Washer/Dryer app and tap the Smart Check button.
- Focus the smartphone's camera on the Smart Check code shown on the display panel.
- If the information code is recognised, the app provides detailed information for the issue and further instructions.
NOTE
- If the dryer re ects light on the display, the smartphone may fail to recognise the information code.
- If the smartphone fails to recognise the code, manually enter the information code into the smartphone.
Maintenance

WARNING
- Do not clean the dryer by directly spraying water onto the dryer.
- Do not clean the dryer with benzene, thinner, alcohol, or acetone. This may cause discoloration, deformation, damage, electric shock, or fire.
- Before cleaning the dryer, be sure to unplug the power cord.
Control panel
Clean with a soft, damp cloth. Do not use abrasive cleaners. Do not spray cleaners directly on the panel. Immediately wipe up any spills or liquids from the control panel.
Exterior
Clean with a soft, damp cloth. Do not use abrasive cleaners. Avoid using or placing sharp or heavy objects near/on the dryer. Keep detergent and laundry supplies on the pedestal (sold separately) or in a separate storage container.
Drum
Clean with a damp cloth with a mild, non-abrasive cleaner suitable for stainless steel. Wipe remaining residue with a clean, dry cloth.
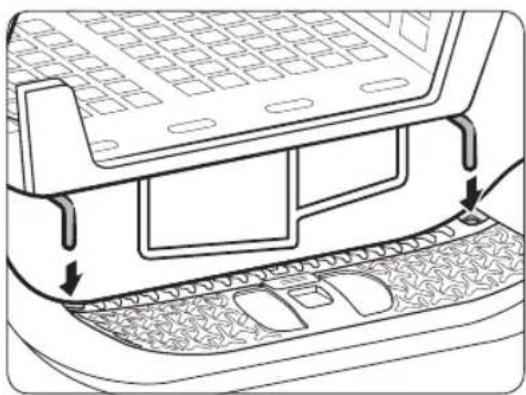
Lint filter
Clean the lint filter after each load.

natural_image
Diagram of a car interior with a directional arrow indicating upward motion (no text or symbols)
natural_image
Technical diagram of a mechanical device with labeled component A and directional arrows indicating motion (no text or symbols beyond label)
natural_image
Diagram showing two views of a toilet handle mechanism, one with an arrow indicating direction and the other with a tool inserted into a sink (no text or symbols present)-
Open the door and pull the lint filter upward to remove.
-
Open the outer filter and remove the inner filter (A).
-
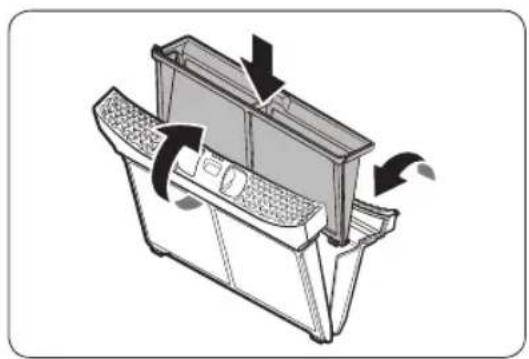
Unfold both the inner filter and the outer filter.
-
Remove the lint from both filters, and then clean the filters with the cleaning brush.
NOTE
To clean the filters thoroughly, clean the filters in running water, and then dry them completely.
Maintenance
natural_image
Diagram of a mechanical device with directional arrows indicating motion or flow (no text or symbols)- Put the inner filter into the outer filter, and then reinsert the lint filter into the original position.
CAUTION
- Clean the lint filter after each load. Otherwise, the drying performance may decrease.
- Do not operate the dryer without the inner filter inside the outer filter.
- Using the dryer with a wet lint filter may cause mold, bad odours, or a decrease in drying performance.
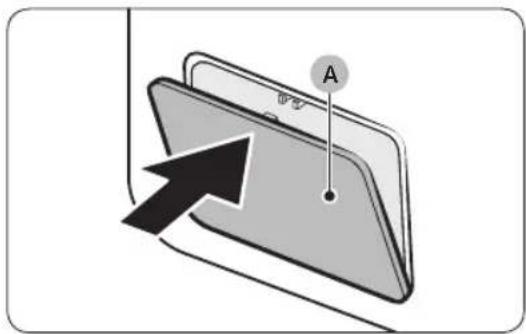
Water tank
To avoid leaks, empty the water tank after every load.

- Using both hands, pull the water tank (A) forward to remove.

natural_image
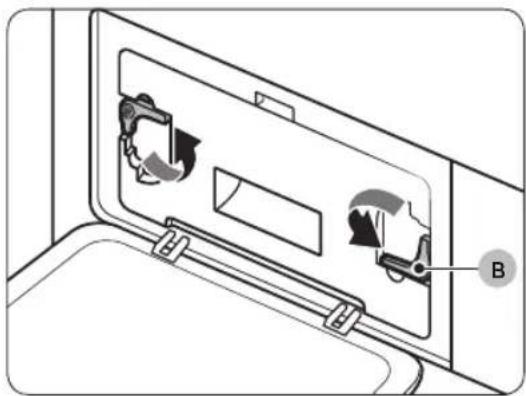
Technical line drawing of a rectangular electronic component with mounting flanges and a labeled point B (no text or symbols beyond label)- Empty the water through the drain hole (B) and place the water tank back into place.
NOTE
If you empty the water tank and press and hold Start/Pause (Hold to Start), the corresponding indicator turns off.
Maintenance
Heat exchanger
Clean the heat exchanger at least once a month. (or When the Buzzer rings and the heat exchanger indicator lights up on the display.)
- Gently press the top part of the outer cover (A) to open.

natural_image
Diagram of a door panel with two hanging items and a labeled component B (no text or symbols present)- Unlock the fixers (B).

natural_image
Diagram of a device with a labeled component (C) and an arrow indicating direction, no text or symbols present.- Remove the inner cover (C).

natural_image
Line drawing of a toothbrush inside a rectangular appliance (no text or symbols)
natural_image
Illustration of a mechanical component with a cloth hanging from its side (no text or symbols)
natural_image
Diagram of a device being inserted into a housing, showing internal components and an arrow indicating insertion (no text or symbols present)- Clean the heat exchanger with the provided cleaning brush or a vacuum cleaner with a brush attachment. Take care not to bend or damage the heat exchanger fins when cleaning. This may lead to a decrease in drying performance.
CAUTION
- To avoid physical injury and burns, do not touch or clean the heat exchanger with bare hands.
- Do not use water to clean the heat exchanger.
- Clean the inner cover with a smooth, damp cloth.
- Reinsert the inner cover to its original position, and then lock the fixers.
- Close the outer cover.
NOTE
After cleaning, make sure the fixers are locked.
Troubleshooting
Checkpoints
If you encounter an issue with the dryer, first check the table below and try the suggestions.
| Symptom Action | |
| Dryer does not run | Make sure the door is completely closed.Make sure the power cord is plugged in.Check the home's circuit breaker and fuses.Empty the water tank.Clean the lint filter. |
| Dryer does not heat | Check the home's circuit breaker and fuses.Select a heat setting other than 📣 COOL AIR.Check the lint filter and heat exchanger. Clean them if necessary.Dryer may be in the cool-down phase of the cycle. |
| Dryer does not dry | Check the above, plus...Make sure the dryer is not overloaded.Sort light and heavy items separately.Reposition large, bulky items to ensure even drying.Check that the dryer is draining properly.For small loads, add a few dry towels.Clean the lint filter and heat exchanger. |
| Dryer is noisy | Check for coins, buttons, lighters, etc.Make sure the dryer is level and standing firmly on the floor.The dryer may hum due to air moving through the drum and fan. This is normal. |
| Dries unevenly | Seams, pockets, and other parts of clothing are harder to dry than others. This is normal.Sort heavy and light items separately. |
| Dryer emits an odour | The dryer may draw household odours in from the surrounding air and then exhaust them. This is normal. |
| Dryer turns off before the load is dry | Dryer load is too small. Add more items and restart the cycle.Dryer load is too large. Remove items and restart the cycle. |
| Lint on clothes | Make sure the lint filter is clean before every load.Dry lint-producing items (fuzzy towels) separate from lint trappers, such as black linen pants.Divide larger loads into smaller loads. |
| Items still wrinkled after 📄 Wrinkle Prevent | Small loads of 1-4 items work best.Load fewer items. Load similar type items. |
| Odours remain in items after 🌐 COOL AIR | Make sure to thoroughly wash items with strong odours. |
Troubleshooting
Information codes
If the dryer fails to operate, you may see an information code on the display. Check the table below and try the suggestions.
| Information code | Meaning Action | |
| tC | Air temperature sensor issue | Clean the lint filter and/or heat exchanger. If this continues, call for service. |
| tC5 | Compressor temperature sensor issue | Wait 2-3 minutes. Turn the power on and restart. |
| dC | Running the dryer with door open | Close the door and restart.If this continues, call for service. |
| HC Compressor | overheat Call for service. | |
| 5C | Water tank fullDrain pump is out of order | Empty the water tank, turn the power on, and restart. If this continues, call for service. |
| AC6 | Check communications between the main and the inverter PBAs. | Depending on the state, the dryer may automatically returns to normal operation.Turn the dryer off and turn it on again. Then, restart the cycle.If the information code continues to appear, call for service. |
| 3C | Check the motor for operation. | Try restarting the cycle.If the information code continues to appear, call for service. |
| FIL+tEr (Buzzer rings) | Heat exchanger needs to be cleaned | Clean the heat exchanger. |
For any codes not listed above, or if the information code continues to appear, call for service.
Appendix
Fabric care chart
The following symbols provide garment care direction. The Clothing care labels include symbols for drying, bleaching, drying and ironing, or dry cleaning when necessary. The use of symbols ensures consistency among garment manufacturers of domestic and imported items. Follow care label directions to maximise garment life and reduce laundering problems.
Wash cycle
| Normal | |
| Permanent Press / Wrinkle Resistant / Wrinkle Control | |
| Gentle / Delicates | |
| Hand Wash |
Water Temperature**
| ●●● | Hot |
| ●● | Warm |
| ● | Cold |
NOTE
** The dot symbols represent appropriate wash water temperatures for various items. The temperature range for Hot is 41-52 °C, for Warm 29-41 °C and for Cold 16-29 °C. (Wash water temperature must be a minimum of 16 °C for detergent activation and effective cleaning.)
Appendix
Bleach
 | Any Bleach (when needed) |
 | Only Non-Chlorine (colour-safe)Bleach (when needed) |
 | Tumble Dry Cycle |
Normal
 | Permanent Press / Wrinkle Resistant / Wrinkle Control |
 | Gentle / Delicates |
Special instructions
 | Line Dry / Hang to Dry |
 | Drip Dry |
 | Dry Flat |
Heat setting
| High | |
| Medium | |
| Low | |
| Any Heat | |
| No Heat / Air |
Iron dry or steam temperatures
 | High |
 | Medium |
 | Low |
Warning symbols for laundering
 | Do Not Wash |
 | Do Not Wring |
 | Do Not Bleach |
 | Do Not Tumble Dry |
 | No Steam (added to iron) |
 | Do Not Iron |
Dry-clean
| Dry-clean | |
| Do Not dry-clean |
| Line Dry / Hang to Dry | |
| Drip Dry | |
| Dry Flat |
Protecting the environment
This appliance is manufactured from recyclable materials. If you decide to dispose of this appliance, please observe local waste disposal regulations. Cut off the power cord so that the appliance cannot be connected to a power source. Remove the door so that animals and small children cannot get trapped inside the appliance.
Appendix
Specification
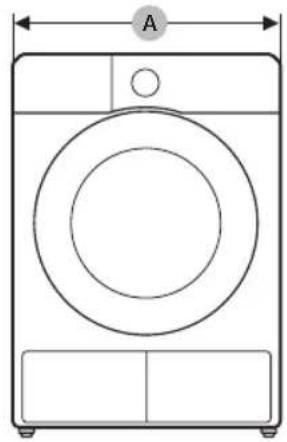
natural_image
Line drawing of a front-loading washing machine with circular vent and side panel (no text or symbols)
DV9*TA2****, DV8*TA2****, DV7*TA2****
| TYPE FRONT LOADING DRYER | ||
| DIMENSIONS | A 600 mm | |
| B 850 mm | ||
| C 600 mm | ||
| D 650 mm | ||
| E 1100 mm | ||
| WEIGHT | 50 kg | |
| ELECTRICAL REQUIREMENTS | 220-240 V / 50 Hz 780-800 W | |
| ALLOWABLE TEMPERATURE | 5-35 °C | |
DV9*TA0****, DV8*TA0****, DV7*TA0****
| TYPE FRONT LOADING DRYER | ||
| DIMENSIONS | A 600 mm | |
| B 850 mm | ||
| C 600 mm | ||
| D 650 mm | ||
| E 1100 mm | ||
| WEIGHT | Door Glass Type | 49 kg |
| * Non Door Glass Type | 48 kg | |
| ELECTRICAL REQUIREMENTS | 220-240 V / 50 Hz 600-650 W | |
| ALLOWABLE TEMPERATURE | 5-35 °C | |

NOTE
(1): Weight of dry laundry
(2): EN 61121:2013 test program
All data without a "star" against it was calculated using EN 61121:2013
Consumption data can vary from the nominal values given above depending in the size of the load, types of textiles, residual moisture levels after spinning, fluctuations in the electricity supply and any extra options selected.
| Model Program Load (kg) | (1) | Energy (kWh) | Max. Duration (Minutes) | |
| DV9*TA0**** | COTTON (2) | 9.0 2.15 210 | ||
| 4.5 1.12 145 | ||||
| IRON DRY (2) | 9.0 1.05 130 | |||
| SYNTHETICS | 4.5 0.78 | 90 | ||
| DV8*TA0**** | COTTON (2) | 8.0 1.85 190 | ||
| 4.0 1.10 135 | ||||
| IRON DRY (2) | 8.0 0.95 120 | |||
| SYNTHETICS | 4.0 0.70 | 85 | ||
| DV7*TA0**** | COTTON (2) | 7.0 1.65 170 | ||
| 3.5 1.00 | 125 | |||
| IRON DRY (2) | 7.0 0.90 110 | |||
| SYNTHETICS | 3.5 0.62 80 | |||
(1): Weight of dry laundry
(2): EN 61121:2013 test program
All data without a "star" against it was calculated using EN 61121:2013
Consumption data can vary from the nominal values given above depending in the size of the load, types of textiles, residual moisture levels after spinning, fluctuations in the electricity supply and any extra options selected.
Appendix
Specification sheet
In accordance with applicable energy labelling regulations.

NOTE
“*” Asterisk(s) means variant model and can be varied (0-9) or (A-Z).
| Samsung | ||||
| Model Name DV9*TA2**** DV8*TA2**** DV7*TA2**** | ||||
| Capacity kg 9.0 8.0 7.0 | ||||
| Type Condenser Condenser Condenser | ||||
| Energy Efficiency | ||||
| A+++ (highest efficiency) to D (least efficient) A+++ A+++ | A+++ | |||
| Energy Consumption | ||||
| Annual Energy Consumption (AE_C) (Energy consumption is based on 160 drying cycles of the standard cotton programme at full and partial load, and the consumption of the low-power modes. Actual energy consumption per cycle will depend on how the appliance is used.) | kWh/yr | 194.0 176.0 158.0 | ||
| Automatic tumble drier | Yes | Yes | Yes | |
| Energy consumption (E_dry) standard cotton programme at full load | kWh | 1.54 | 1.41 | 1.25 |
| Energy consumption (E_dry.1/2) standard cotton programme at partial load | kWh | 0.89 | 0.80 | 0.73 |
| off mode and left-on mode | ||||
| The power consumption off-mode (P_o) at full load | W | 0.50 | 0.50 | 0.50 |
| The power consumption in left-on mode (P_l) at full load | W | 5.00 | 5.00 | 5.00 |
| Duration of the left-on mode | min | 10 | 10 | 10 |
| Programme to which the information on the label and the Sheet relate ('standard cotton programme' used at full and partial load is the standard drying programme to which the information in the label and the fiche relates. This programme is suitable for drying normal wet cotton laundry and it is the most efficient programme in terms of energy consumption for cotton. Consumption data can vary from the nominal values given above depending on the size of the load, types of textiles, residual moisture levels after spinning, fluctuations in the electricity supply and any extra options selected.) | Cotton + Drying Level 2 + (Wrinkle Prevent Off) | |||
| programme duration of the standard program | ||||
| Weighted Programme time standard cotton programme at full load and partial load | min 174 160 146 | |||
| Programme Time (T_dry) standard cotton programme at full load | min 220 200 180 | |||
| Programme Time (T_dry.1/2) standard cotton programme at partial load | min 140 130 120 | |||
| condensation efficiency class | ||||
| A (most efficient) to G (least efficient) B B B | ||||
| Average condensation efficiency at full load | % | 87 | 87 | 87 |
| Average condensation efficiency at partial load | % | 87 | 87 | 87 |
| Weighted condensation efficiency | % | 87 | 87 | 87 |
| Airborne noise emissions | ||||
| Dry at full load | dB (A) re 1 pW | 65 | 65 | 65 |
English 61
Appendix
| Samsung | ||||
| Model Name DV9*TA0**** DV8*TA0**** DV7*TA0**** | ||||
| Capacity kg 9.0 8.0 7.0 | ||||
| Type Condenser Condenser Condenser | ||||
| Energy Efficiency | ||||
| A+++ (highest efficiency) to D (least efficient) A++ A++ A++ | ||||
| Energy Consumption | ||||
| Annual Energy Consumption (AE_C) (Energy consumption is based on 160 drying cycles of the standard cotton programme at full and partial load, and the consumption of the low-power modes. Actual energy consumption per cycle will depend on how the appliance is used.) | kWh/yr | 258.0 235.0 | 211.0 | |
| Automatic tumble drier | Yes | Yes | Yes | |
| Energy consumption (E_dry) standard cotton programme at full load | kWh | 2.15 | 1.85 | 1.65 |
| Energy consumption (E_dry.1/2) standard cotton programme at partial load | kWh | 1.12 1.10 1.00 | ||
| off mode and left-on mode | ||||
| The power consumption off-mode (P_o) at full load | W | 0.50 | 0.50 | 0.50 |
| The power consumption in left-on mode (P_I) at full load | W | 5.00 | 5.00 | 5.00 |
| Duration of the left-on mode | min | 10 | 10 | 10 |
| Programme to which the information on the label and the Sheet relate ('standard cotton programme' used at full and partial load is the standard drying programme to which the information in the label and the fiche relates. This programme is suitable for drying normal wet cotton laundry and it is the most efficient programme in terms of energy consumption for cotton. Consumption data can vary from the nominal values given above depending on the size of the load, types of textiles, residual moisture levels after spinning, fluctuations in the electricity supply and any extra options selected.) | Cotton + Drying Level 2 + (Wrinkle Prevent Off) | |||
| programme duration of the standard program | ||||
| Weighted Programme time standard cotton programme at full load and partial load | min | 173 | 159 | 144 |
62 English
| Programme Time (T_dry) standard cotton programme at full load | min 210 190 170 | ||
| Programme Time (T_dry.1/2) standard cotton programme at partial load | min 145 135 125 | ||
| condensation efficiency class | |||
| A (most efficient) to G (least efficient) B B B | |||
| Average condensation efficiency at full load % 86 86 86 | |||
| Average condensation efficiency at partial load % 86 86 86 | |||
| Weighted condensation efficiency % 86 86 86 | |||
| Airborne noise emissions | |||
| Dry at full load | dB (A)re 1pW | 65 65 | 65 |


SAMSUNG
QUESTIONS OR COMMENTS?
| COUNTRY CALL OR VISIT US ONLINE AT | ||
| HUNGARY 0680$ | SAMSUNG (0680-726-7864) www.samsung.com/hu/support | |
| CZECH 800 - SAMSUNG (800-726786) www.samsung.com/cz/support | ||
| SLOVAKIA | 0800 - SAMSUNG (0800-726786) | www.samsung.com/sk/support |
| CROATIA 072 726 | 786 www.samsung.com/hr/support | |
| BOSNIA 055 233 | 999 www.samsung.com/ba/support | |
| North Macedonia | 023 207 777 www.samsung.com/mk/support | |
| MONTENEGRO 020 | 405 888 www.samsung.com/support | |
| SLOVENIA 080 697 | 267 (brezplačna številka) www.samsung.com/si/support | |
| SERBIA 011 321 | 6899 www.samsung.com/rs/support | |
| Kosovo 0800 10 | 10 1 www.samsung.com/support | |
| ALBANIA 045 620 | 202 www.samsung.com/al/support | |
| BULGARIA | *3000 Цена на един градски разговор0800 111 31 Безплатен за всички оператори | www.samsung.com/bg/support |
| ROMANIA | *8000 (apel in retea)08008-726-78-64(08008-SAMSUNG) Apel GRATUITAtenție: Dacă efectuați apelul din rețeaua Digi(RCS/RDS), vă rugăm să ne contactați formând numărul Telverde fără ultimele două cifre, astfel: 0800872678. | www.samsung.com/ro/support |
| LITHUANIA | 8-800-77777 www.samsung.com/lt/support | |
| LATVIA | 8000-7267 | www.samsung.com/lv/support |
| ESTONIA | 800-7267 | www.samsung.com/ee/support |
natural_image
Medical X-ray image showing internal anatomical structures with no visible text or labelsnatural_image
Symbol of a trash bin crossed with no text or numbers, representing waste sorting or restriction (no text present)natural_image
Simple line drawing of a curved mechanical bracket (no text or symbols)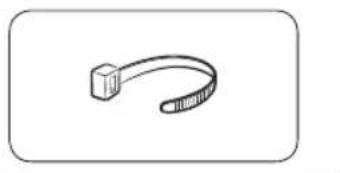
natural_image
Simple line drawing of a USB cable with a square end (no text or symbols)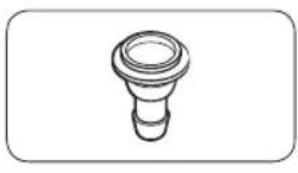
natural_image
Simple line drawing of a bulb-like object with a flared top and base (no text or symbols)natural_image
Simple line drawing of a coiled cable or hose with two connectors (no text or symbols)natural_image
Simple line drawing of a closed book with a blank cover (no text or symbols)natural_image
Simple line drawing of a rectangular container with internal grid pattern (no text or symbols)natural_image
Simple line drawing of a pen-like object with a loop handle (no text or symbols)Почистваща четка
natural_image
Simple line drawing of a mechanical component or bracket (no text or symbols)natural_image
Isometric line drawing of a rectangular electronic component with mounting holes (no text or symbols)natural_image
Line drawing of a washing machine casing with internal components and a magnified inset showing a small component (no text or symbols)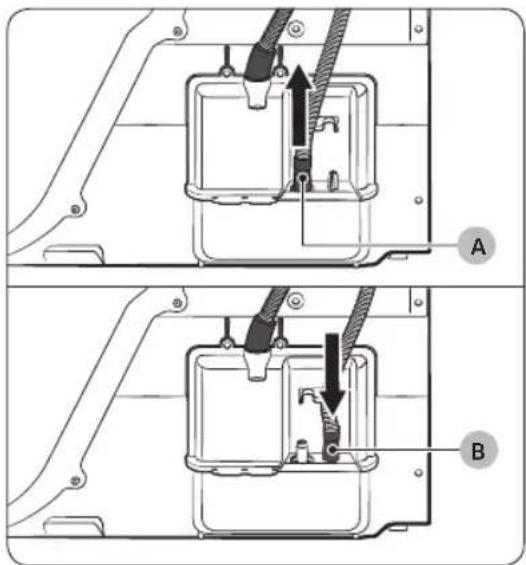
natural_image
Technical diagram of a mechanical assembly with labeled component A (no text or symbols beyond label)Над мивка:


natural_image
Line drawing of a square sink with a pipe and outlet pipe (no text or symbols)natural_image
Technical line drawing of a mechanical component with a black arrow indicating direction (no text or symbols)natural_image
Diagram of a mechanical component with a black arrow indicating rotation or assembly (no text or symbols present)natural_image
Diagram of a mechanical or electrical component with three circular features and a central arrow indicating direction (no text or symbols present)natural_image
Diagram of a mechanical device with two circular components and directional arrows indicating rotation or assembly (no text or symbols)
natural_image
Technical illustration of two mechanical components with a directional arrow indicating rotation (no text or symbols)
natural_image
Technical diagram of a mechanical component with three circular features and a central arrow indicating direction (no text or symbols present)natural_image
Diagram of a mechanical component with an arrow indicating rotation or assembly (no text or symbols present)
natural_image
Diagram of a door panel with screwdrivers and a switch, showing no text or symbols
natural_image
Diagram showing a door with a keyhole and coin, pointing to a window (no text or symbols)
natural_image
Technical diagram of a mechanical component with an inset showing a close-up view of a bracket detail (no text or symbols present)
natural_image
Diagram of a mechanical component with circular parts and an arrow indicating direction (no text or symbols)natural_image
Technical line drawing of a car rear bumper with decorative patterns and mounting brackets (no text or symbols)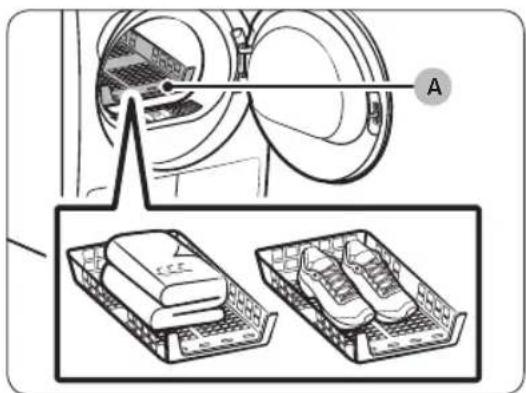
A. Скара за сушене
natural_image
Diagram of a car air conditioner unit with an upward arrow indicating airflow direction (no text or symbols)natural_image
Technical diagram of a mechanical device with labeled component A and directional arrows indicating motion (no text or symbols beyond labels)natural_image
Diagram showing four steps of a toilet or sink assembly, with no visible text or symbols.natural_image
Diagram of a refrigerator interior with arrows indicating flow or movement (no text or symbols)natural_image
Technical line drawing of a rectangular electronic component with mounting flanges and a labeled point B (no text or symbols beyond label)natural_image
Diagram of a door panel with two hanging objects and a labeled component 'B' (no text or symbols beyond label)natural_image
Diagram of a device being inserted into a tray, showing internal components and a labeled component (no text or symbols present)natural_image
Line drawing of a microwave oven with a brush inside, showing internal grating and base (no text or symbols)natural_image
Illustration of a metal bracket with a cloth hanging from its side (no text or symbols)natural_image
Diagram of a device being inserted into a housing, showing internal components and an arrow indicating insertion (no text or symbols present)natural_image
Line drawing of a front-loading washing machine with circular vent and side panel (no text or symbols)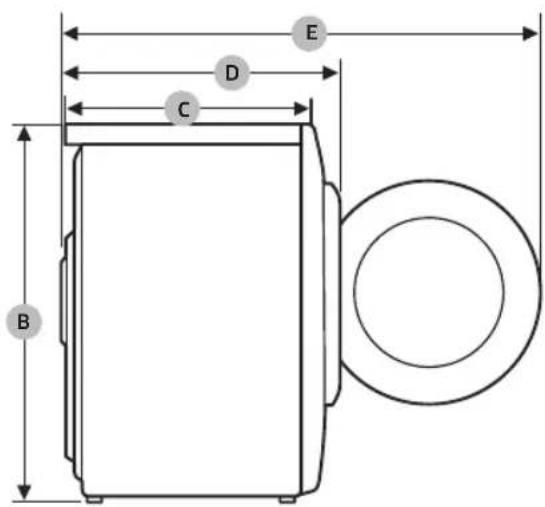
DV9*TA2****, DV8*TA2****, DV7*TA2****
natural_image
Medical X-ray image showing internal anatomical structures with no visible text or labelsSušilica rublja s toplinskom pumpom
natural_image
Simple line drawing of a curved mechanical component (no text or symbols)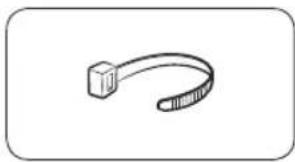
natural_image
Simple line drawing of a curved object resembling a stylized arm or tool (no text or symbols)
natural_image
Simple line drawing of a bulb-shaped object with a flared top and rounded base (no text or symbols)natural_image
Simple line drawing of a coiled tube or hose with two connectors (no text or symbols)natural_image
Simple line drawing of a closed book with a blank cover (no text or symbols)natural_image
Simple line drawing of a rectangular container with internal compartments (no text or symbols)natural_image
Simple line drawing of a pen-like object with a loop handle (no text or symbols)Četka za čišćenje
natural_image
Simple line drawing of a mechanical component or bracket (no text or symbols)Nosač – komplet za montažu (SK-DH, SK-DA, SKK-DF)

natural_image
Isometric line drawing of a rectangular electronic component or housing (no text or symbols)Komplet za montažu (SKK-DD, SKK-DDX)

NAPOMENA
- Komplet za montažu omogućuje postavljanje sušilice na perilicu rublja. Imajte na umu da se komplet za montažu može koristiti samo za perilice i sušilice rublja tvrtke Samsung. Za kupovinu nosača kompleta za montažu (SK-DH, SK-DA, SKK-DF) ili kompleta za montažu na drugi uređaj (SKK-DD, SKK-DDX), obratite se servisnom centru tvrtke Samsung ili lokalnom dobavljaču uređaja. Komplet za montažu na drugi uređaj razlikuje se od modela za perilicu.
- Upute za montažu sušilice rublja potražite u uputama za montažu priloženim uz komplet za montažu.
- Informacije o dostupnosti kompleta za montažu za pojedinačne modele potražite u uputama za montažu priloženim uz komplet za montažu.
natural_image
Line drawing of a front view of a washing machine casing with internal components and a highlighted inset showing a component (no text or symbols present)
natural_image
Technical diagram of a mechanical assembly with labeled component A (no text or symbols present)Preko umivaonika:


natural_image
Line drawing of a square sink with a faucet and pipe connection (no text or symbols)natural_image
Technical line drawing of a mechanical component with a circular housing and directional arrow (no text or symbols)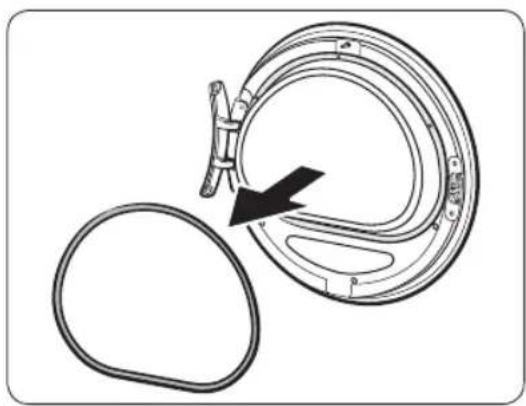
natural_image
Diagram of a mechanical component with a circular housing and a black arrow indicating direction (no text or symbols)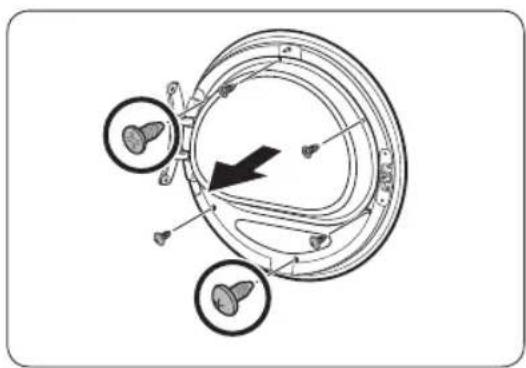
natural_image
Diagram of a mechanical or electrical component with three circular features and an arrow indicating direction (no text or symbols present)-
Otvorite vrata, a zatim otpustite dva vijka na šarki vrata. Držeći vrata objema rukama malo ih podignite kako biste ih uklonili.
-
Tankim predmetom uklonite brtvu vrata.
-
Uklonite gornja 3 vijka i donja 3 vijka na držaču stakla.

natural_image
Diagram of a mechanical device with two circular components and directional arrows indicating rotation or assembly (no text or symbols)
natural_image
Technical illustration of two mechanical components with a directional arrow indicating rotation (no text or symbols)
natural_image
Technical diagram of a mechanical component with three circular features and a central arrow indicating direction (no text or symbols present)-
Uklonite držač stakla, a zatim okrenite poklopac vrata za 180 stupnjeva.
-
Umetnite držač stakla u novi položaj poklopca vrata. Uvjerite se da je šarka vrata u istom položaju kao na slici.
-
Zategnite gornja 3 vijka i donja 3 vijka na držaču stakla.
NAPOMENA
Oblici vijaka razlikuju se po dimenziji. Pazite da zategnete pravi vijak.
Montaža


natural_image
Diagram of a mechanical component with an arrow indicating rotation or assembly (no text or symbols present)

-
Umetnite brtvu vrata u ispravan položaj.
-
Uklonite 2 vijka koja su ostala nakon uklanjanja šarke vrata.
-
Uklonite 4 vijka na bravi vrata. Uklonite bravu vrata, a zatim je ponovno postavite na suprotnu stranu.

natural_image
Diagram showing a door with keyhole and coin symbols, no text or labels present
natural_image
Technical diagram of a mechanical component with an inset showing a close-up view of a shaft and mounting features (no text or symbols present)
natural_image
Diagram of a mechanical component with circular housing and directional arrow (no text or symbols)-
Pričvrstite 2 vijka koja su uklonjena u koraku br. 8 na okviru šarke na suprotnoj strani. Imajte na umu da ih morate zategnuti s desne strane okvira (gore desno i dolje desno).
-
Uklonite vijak na dnu šarke vrata i pričvrstite ga na vrhu šarke vrata.
-
Stavite šarku vrata na suprotnu stranu, a zatim zategnite 2 vijka kako biste pričvrstili vrata na sušilicu rublja.
NAPOMENA
natural_image
Line drawing of a car rear bumper with decorative patterned seating and door panel (no text or symbols)
natural_image
Diagram showing a device with labeled components and two views of a shoe rack (no text or symbols present)A. Stalak za sušenje
-
Stalak za sušenje postavite u bubanj sušilice rublja tako da prednji rub stalka umetnete u otvore dijafragme vrata.
-
Postavite predmete na stalak tako da ostavite dovoljno prostora za cirkulaciju zraka. Odjeću složite i položite na stalak. Obuću postavite s potplatima prema dolje.
-
Zatvorite vrata i pritisnite 🙏 Napajanje. Odaberite 🚠 TIME DRY (SUŠENJE S ODREĐENIM VREMENOM), a zatim pritisnite 🚡 Vrijeme za odabir vremena sušenja.
-
Pritisnite i držite ▷ll Pokretanje/pauza (Pritisnite za pokretanje).

Preporuke za sušenje
| Predmeti (maks. 1,5 kg) Opis | |
| Džemperi koji se smiju strojno prati (složite ih i položite na stalak) | Ako za sušenje rublja koristite stalak, odjeću položite na stalak složenu kako biste spriječili gužvanje. |
| Plišane igračke (ispunjene pamučnim ili poliesterskim vlaknima) | |
| Plišane igračke (ispunjene pjenom ili gumom) | |
| Jastuci od pjene | |
| Tenisice Kada sušite sportsku obuću, | postavite je na stalak tako da je potplat okrenut prema dolje. |

OPREZ
- Sušenje predmeta od pjene, plastike ili gume na postavkama s grijanjem može oštetiti predmete i predstavlja rizik od požara.
- Kako biste spriječili oštećivanje obuće, koristite stalak za sušenje.
Rad
Vodič kroz cikluse
natural_image
Diagram of a car interior with a directional arrow indicating upward movement (no text or symbols)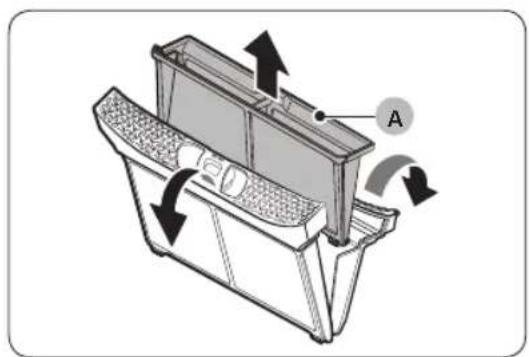
natural_image
Technical diagram of a mechanical component with directional arrows indicating motion or flow (no text or symbols present)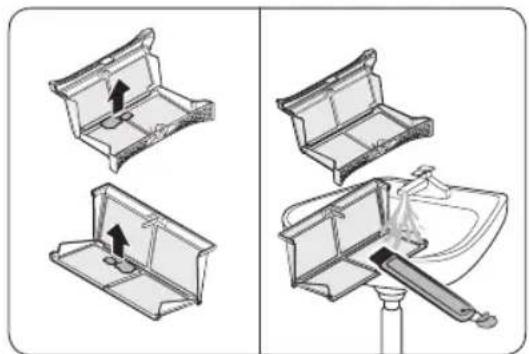
natural_image
Diagram showing two views of a toilet handle mechanism, one with an arrow indicating direction and the other with a tool inserted (no text or symbols present)natural_image
Diagram of a refrigerator interior with arrows indicating airflow or movement (no text or symbols)- Stavite unutarnji filtar u vanjski filtar, a zatim filtar za vlakna ponovno umetnite u izvorni položaj.
! OPREZ
natural_image
Technical line drawing of a mechanical component with labeled point B (no text or symbols beyond label)natural_image
Diagram of a door latch with two hanging clips and a labeled component (B), no text or symbols present.natural_image
Diagram of a device with a labeled component 'C' and an arrow indicating direction (no text or symbols beyond label)- Uklonite unutarnji poklopac (C).

natural_image
Line drawing of a grater inside a rectangular appliance with a toothbrush touching the interior (no text or symbols)
natural_image
Illustration of a mechanical component with a cloth hanging from its side (no text or symbols)
natural_image
Diagram of a device being inserted into a housing, showing internal components and an arrow indicating insertion (no text or symbols present)- Očistite izmjenjivač topline priloženom četkom za čišćenje ili usisivačem s dodatkom četke za čišćenje. Pazite da ne savijete ili oštetite peraja izmjenjivača topline prilikom čišćenja. To može dovesti do smanjenja učinkovitosti sušenja.
! OPREZ
- Kako biste izbjegli tjelesne ozljede i opekline, izmjenjivač topline nemojte dirati ili čistiti golim rukama.
natural_image
Line drawing of a front-loading washing machine with circular vent and side panel (no text or symbols)
DV9*TA2****, DV8*TA2****, DV7*TA2****
| VRSTA | SUŠILICA S VRATIMA NA PREDNJOJ STRANI | |
| DIMENZIJE | A 600 mm | |
| B 850 mm | ||
| C 600 mm | ||
| D 650 mm | ||
| E 1100 mm | ||
| TEŽINA | 50 kg | |
| PREDUVJETI ZA ELEKTRIČNO PRIKLJUČIVANJE | 220–240 V / 50 Hz | 780-800 W |
| DOZVOLJENI TEMPERATURNI RASPON | 5–35 °C | |
DV9*TA0****, DV8*TA0****, DV7*TA0****
| VRSTA | SUŠILICA S VRATIMA NA PREDNJOJ STRANI | |
| DIMENZIJE | A 600 mm | |
| B 850 mm | ||
| C 600 mm | ||
| D 650 mm | ||
| E 1100 mm | ||
| TEŽINA | Tip stakla na vratima | 49 kg |
| * Tip bez stakla na vratima | 48 kg | |
| PREDUVJETI ZA ELEKTRIČNO PRIKLJUČIVANJE | 220-240 V / 50 Hz 600-650 W | |
| DOZVOLJENI TEMPERATURNI RASPON | 5-35 °C | |

NAPOMENA
Model bez stakla na vratima: DV**TA***D*
Podaci o potrošnji
| Model Program | Količina (kg) (1) | Struja (kWh) | Maksimalno trajanje (u minutama) | |
| DV9*TA2**** | COTTON (PAMUK) (2) | 9,0 1,54 | 220 | |
| 4,5 0,89 | 140 | |||
| IRON DRY (SUŠENJE ZA GLAČANJE) (2) | 9,0 0,95 | 140 | ||
| SYNTHETICS (SINTETIKA) | 4,5 0,70 | 98 | ||
| DV8*TA2**** | COTTON (PAMUK) (2) | 8,0 1,41 | 200 | |
| 4,0 0,80 | 130 | |||
| IRON DRY (SUŠENJE ZA GLAČANJE) (2) | 8,0 0,90 | 130 | ||
| SYNTHETICS (SINTETIKA) | 4,0 0,60 | 90 | ||
| DV7*TA2**** | COTTON (PAMUK) (2) | 7,0 1,25 | 180 | |
| 3,5 0,73 | 120 | |||
| IRON DRY (SUŠENJE ZA GLAČANJE) (2) | 7,0 | 0,85 120 | ||
| SYNTHETICS (SINTETIKA) | 3,5 0,50 | 82 |
(1) : Težina suhog rublja
(2): Program testiranja EN 61121: 2013
Svi podaci pored kojih se nalazi zvjezdica dobiveni su prema standardu EN 61121:2013
natural_image
Medical X-ray image showing internal anatomical structures with no visible text or labelsnatural_image
Symbol of a trash bin crossed with a diagonal line, no text or numbers presentnatural_image
Simple line drawing of a curved mechanical bracket or clamp (no text or symbols)
natural_image
Simple line drawing of a curved mechanical or electrical component (no text or symbols)
natural_image
Simple line drawing of a bulb-like object with a flared top and rounded base (no text or symbols)natural_image
Simple line drawing of a coiled hose or tube with two connectors (no text or symbols)
natural_image
Simple line drawing of a closed book with a blank cover (no text or symbols)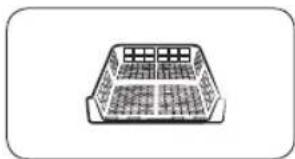
natural_image
Simple line drawing of a rectangular container with internal compartments (no text or symbols)natural_image
Simple line drawing of a pen-like object with a loop handle (no text or symbols)Tisztítókefe
natural_image
Simple line drawing of a stylized object resembling a rocket or container (no text or symbols)
natural_image
Isometric line drawing of a rectangular electronic device with mounting holes (no text or symbols)natural_image
Two identical diagrams showing a mechanical component with arrows indicating motion, labeled C and D (no text or symbols beyond labels)natural_image
Line drawing of a front view of a washing machine casing with internal components and a highlighted inset showing a component (no text or symbols present)
natural_image
Technical diagram of a mechanical assembly with labeled component A (no text or symbols beyond label)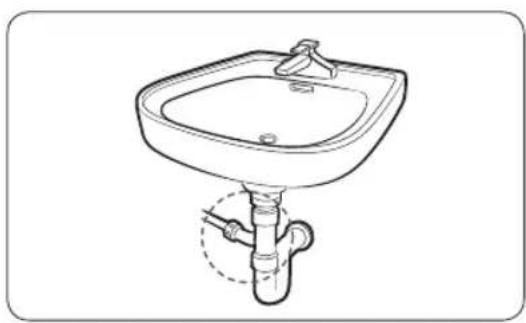
natural_image
Line drawing of a standard square sink with a pipe fitting at the base (no text or symbols)natural_image
Technical line drawing of a mechanical component with a black arrow indicating direction (no text or symbols)natural_image
Diagram of a mechanical component with an arrow indicating direction, showing a circular component and a separate oval (no text or symbols)natural_image
Diagram of a mechanical or electrical component with three circular features and directional arrows, no visible text or symbols.natural_image
Diagram of a mechanical device with two circular components and directional arrows indicating rotation or assembly (no text or symbols)
natural_image
Technical illustration of two mechanical components with a directional arrow indicating rotation or assembly (no text or symbols)
natural_image
Technical diagram of a mechanical component with three circular features and a central arrow indicating direction (no text or symbols present)natural_image
Diagram of a mechanical component with an arrow indicating rotation or assembly (no text or symbols present)
natural_image
Diagram of a door panel with screw holes and a switch, showing no text or symbols
natural_image
Diagram showing a door lock with a black arrow pointing to the lock, surrounded by coins and keys (no text or symbols)
natural_image
Technical diagram of a mechanical component with an inset showing a close-up view of a shaft and mounting holes (no text or symbols present)
natural_image
Diagram of a mechanical component with circular housing and directional arrow (no text or symbols)natural_image
Line drawing of a car rear bumper with decorative patterned seating and door panel (no text or symbols)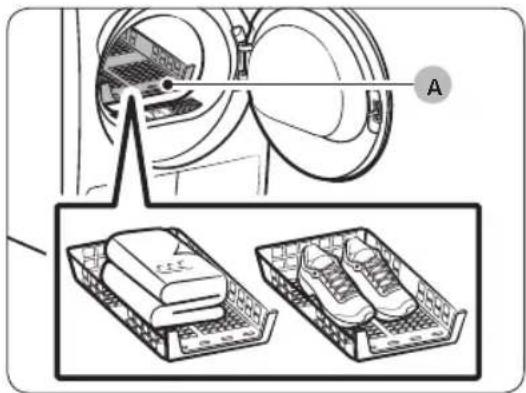
A. Szárítókosár
natural_image
Diagram of a car interior with a directional arrow indicating upward motion (no text or symbols)
natural_image
Technical diagram of a mechanical device with labeled component A and directional arrows indicating motion (no text or symbols beyond label)
natural_image
Diagram showing four steps of a toilet or sink assembly, with no visible text or symbols.natural_image
Diagram of a refrigerator interior with arrows indicating airflow or movement (no text or symbols)natural_image
Technical line drawing of a rectangular electronic device casing with mounting brackets and a labeled component (B), no text or symbols present.natural_image
Diagram of a door panel with two hanging items and a labeled component 'B' (no text or symbols beyond label)natural_image
Diagram of a device with a labeled component 'C' and an arrow indicating direction (no text or symbols present)natural_image
Line drawing of a toothbrush inside a rectangular appliance (no text or symbols)
natural_image
Illustration of a mechanical component with a cloth hanging from its side (no text or symbols)
natural_image
Diagram of a device being inserted into a housing, showing internal components and an arrow indicating insertion (no text or symbols present)natural_image
Line drawing of a front-loading washing machine with circular vent and side panel (no text or symbols)
DV9*TA2****, DV8*TA2****, DV7*TA2****
natural_image
Medical X-ray image showing internal anatomical structures with no visible text or labelsnatural_image
Symbol of a trash bin crossed with a diagonal line, no text or numbers presentnatural_image
Simple line drawing of a curved mechanical component (no text or symbols)
natural_image
Simple line drawing of a curved object resembling a stylized arm or tool (no text or symbols)
natural_image
Simple line drawing of a bulb-like object with a flared top and rounded base (no text or symbols)natural_image
Simple line drawing of a coiled tube or hose with two connectors (no text or symbols)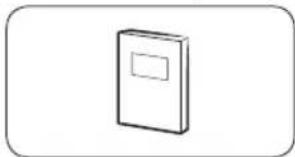
natural_image
Simple line drawing of a closed book with a blank cover (no text or symbols)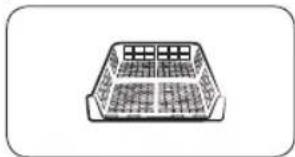
natural_image
Simple line drawing of a rectangular container with internal compartments (no text or symbols)natural_image
Simple line drawing of a pen-like object with a loop handle (no text or symbols)Четка за чистење
natural_image
Simple line drawing of a mechanical component or bracket (no text or symbols)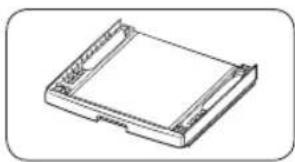
natural_image
Isometric line drawing of a rectangular electronic component or housing (no text or symbols)natural_image
Two identical diagrams showing a mechanical component with arrows indicating motion, labeled C and D (no text or symbols beyond labels)natural_image
Line drawing of a front view of a washing machine casing with internal components and a highlighted inset showing a component (no text or symbols present)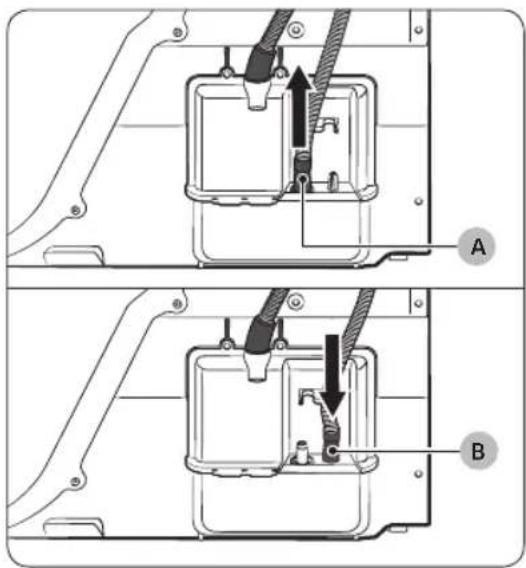
natural_image
Technical diagram of a mechanical assembly with labeled component A (no text or symbols beyond label)Над лавабо:

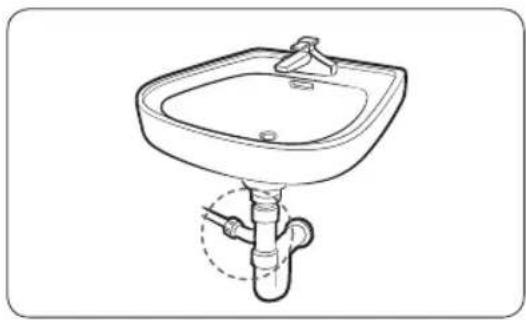
natural_image
Line drawing of a standard square sink with a pipe fitting underneath (no text or symbols)natural_image
Technical line drawing of a mechanical component with a black arrow indicating direction (no text or symbols)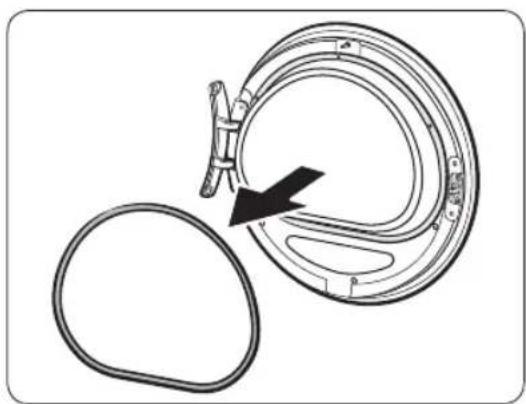
natural_image
Diagram of a mechanical component with a black arrow indicating rotation or assembly (no text or symbols present)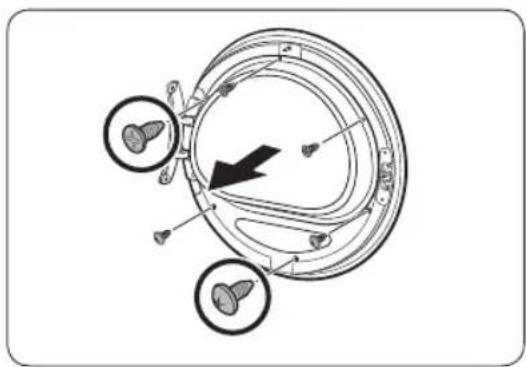
natural_image
Diagram of a mechanical component with three circular features and a black arrow indicating direction (no text or symbols)natural_image
Diagram showing a mechanical component with rotating parts and directional arrows indicating motion (no text or symbols)
natural_image
Technical illustration of two mechanical components with a directional arrow indicating rotation or assembly (no text or symbols)
natural_image
Technical diagram of a mechanical component with three circular features and an arrow indicating direction (no text or symbols present)natural_image
Diagram of a mechanical component with an arrow indicating rotation or assembly (no text or symbols present)
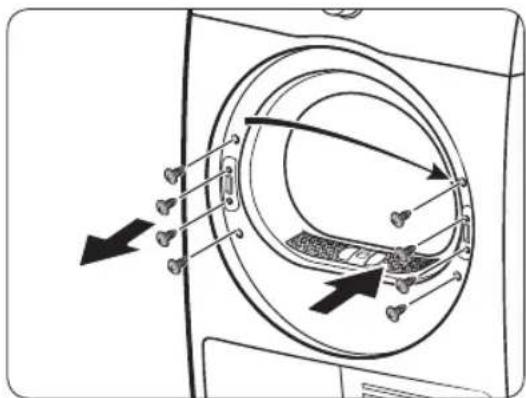
natural_image
Diagram showing a door with keyhole and coin symbols, no text or labels present
natural_image
Technical diagram of a mechanical component with an inset showing a close-up view of a shaft and mounting holes (no text or symbols present)
natural_image
Diagram of a mechanical component with circular housing and directional arrow (no text or symbols)natural_image
Technical line drawing of a car rear bumper with decorative panel and doorways (no text or symbols)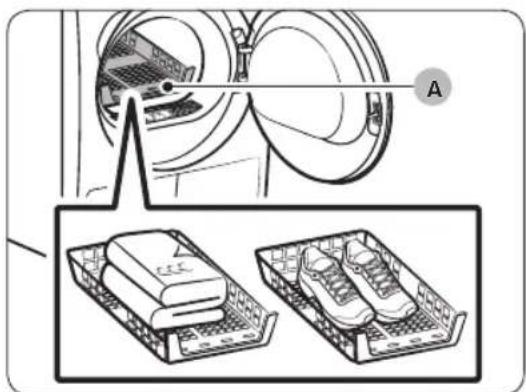
natural_image
Diagram showing a washing machine with two views of the same base (no text or symbols present)natural_image
Diagram of a car interior with a directional arrow indicating upward motion (no text or symbols)
natural_image
Technical diagram of a mechanical component with directional arrows indicating motion or flow (no text or symbols present)
natural_image
Diagram showing four steps of a mechanical device with arrows indicating movement, no text or symbols present.natural_image
Diagram of a refrigerator interior with airflow arrows indicating movement (no text or symbols)natural_image
Technical line drawing of a rectangular electronic device with mounting flanges and a labeled component (B), no text or symbols present.natural_image
Diagram of a door panel with two hanging items and a labeled component B (no text or symbols present)natural_image
Diagram of a device with a labeled component 'C' and an arrow indicating direction (no text or symbols beyond label)natural_image
Line drawing of a toothbrush inside a rectangular appliance (no text or symbols)
natural_image
Illustration of a metal bracket with a cloth hanging from its side (no text or symbols)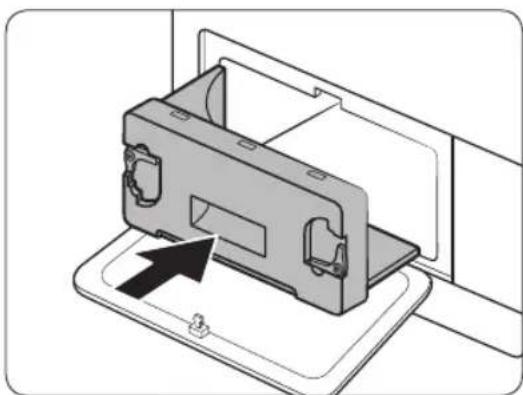
natural_image
Diagram of a device casing with an arrow indicating assembly or insertion, no text or symbols presentnatural_image
Line drawing of a front-loading washing machine with circular vent and side panel (no text or symbols)
DV9*TA2****, DV8*TA2****, DV7*TA2****
| ТИП | МАШИНА ЗА СУШЕЊЕСО ПРЕДНО ПОЛНЕЊЕ | |
| ДИМЕНЗИИ | A 600 mm | |
| B 850 mm | ||
| C 600 mm | ||
| D 650 mm | ||
| E 1100 mm | ||
| ТЕЖИНА | 50 kg | |
| ЕЛЕКТРИЧНИ ПРЕДУСЛОВИ | 220-240 V / 50 Hz 780-800 W | |
| ДОЗВОЛЕНА ТЕМПЕРАТУРА | 5-35 °C | |
OraTok
DV9*TA0****, DV8*TA0****, DV7*TA0****
| ТИП | МАШИНА ЗА СУШЕЊЕСО ПРЕДНО ПОЛНЕЊЕ | |
| ДИМЕНЗИИ | A 600 mm | |
| B 850 mm | ||
| C 600 mm | ||
| D 650 mm | ||
| E 1100 mm | ||
| ТЕЖИНА | Тип на стакло заврата | 49 kg |
| * Тип на стакло штоне е за врата | 48 kg | |
| ЕЛЕКТРИЧНИПРЕДУСЛОВИ | 220-240 V / 50 Hz 600-650 W | |
| ДОЗВОЛЕНА ТЕМПЕРАТУРА | 5-35 °C | |

ЗАБЕЛЕШКА
natural_image
Medical X-ray image showing internal anatomical structures with no visible text or labelsDate privind consumul 58
Agent frigorific (tip): R-134a (GWP = 1430)
Agent frigorific (alimentare)
• DV**TA2****: 0,43kg, 0,615tCO2e
• DV**TA0****: 0,37kg, 0,529tCO2e
natural_image
Symbol of a trash bin crossed with a diagonal line, no text or numbers presentnatural_image
Simple line drawing of a curved mechanical bracket (no text or symbols)
natural_image
Simple line drawing of a USB cable with a square end (no text or symbols)
natural_image
Simple line drawing of a bulb-like object with a flared top and base (no text or symbols)natural_image
Simple line drawing of a coiled cable or hose with two connectors (no text or symbols)Furtun de evacuare lung (2m)

natural_image
Simple line drawing of a closed book with a blank cover (no text or symbols)natural_image
Simple line drawing of a rectangular container with internal grid pattern (no text or symbols)natural_image
Simple line drawing of a laboratory pipette with a loop handle (no text or symbols)Perie curățare
natural_image
Simple line drawing of a mechanical component or bracket (no text or symbols)natural_image
Technical line drawing of a rectangular electronic device with mounting holes (no text or symbols)Kit de suprapunere (SKK-DD, SKK-DDX)

NOTĂ
natural_image
Line drawing of a front view of a washing machine casing with internal components and a highlighted inset (no text or symbols)
natural_image
Technical diagram of a mechanical assembly with labeled component A (no text or symbols beyond label)Peste o chiuvetă:


natural_image
Line drawing of a standard square sink with a pipe and handle, no text or symbols presentnatural_image
Technical line drawing of a mechanical component with a circular housing and directional arrow (no text or symbols)natural_image
Diagram of a mechanical component with a circular housing and a black arrow indicating direction (no text or symbols)natural_image
Diagram of a circular mechanical or biological structure with internal components and directional arrows, no visible text or symbols.natural_image
Diagram of a mechanical device with two circular components and directional arrows indicating rotation or assembly (no text or symbols)
natural_image
Technical illustration of two mechanical components with a directional arrow indicating rotation (no text or symbols)
natural_image
Technical diagram of a mechanical component with three circular features and an arrow indicating direction (no text or symbols present)natural_image
Diagram of a mechanical component with an arrow indicating rotation or assembly (no text or symbols present)

natural_image
Diagram showing a door lock with a keyhole and arrow pointing to the lock (no text or symbols)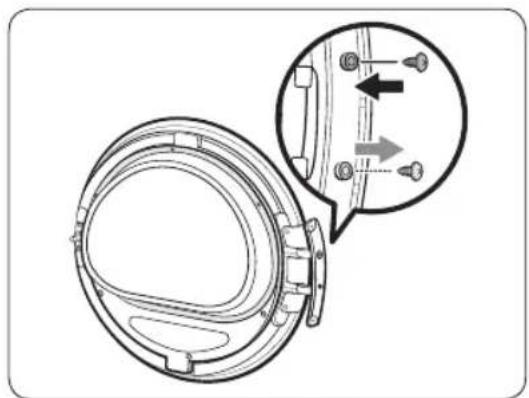
natural_image
Technical diagram of a mechanical component with an inset showing a close-up view of a bracket detail (no text or symbols present)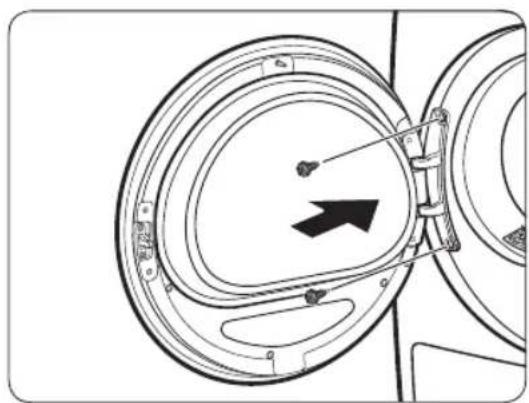
natural_image
Diagram of a mechanical component with concentric circular parts and an arrow indicating direction (no text or symbols)natural_image
Technical line drawing of a car rear bumper with decorative patterned seating and door panel (no text or symbols)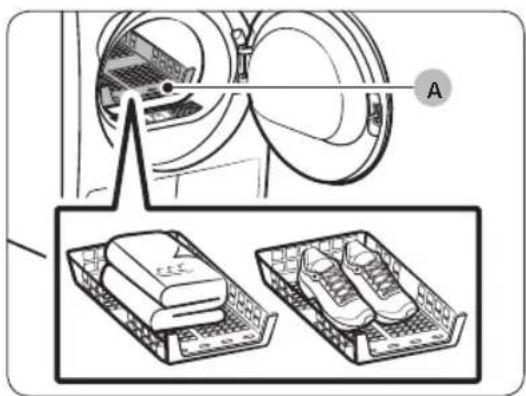
A. Uscare pe suport
natural_image
Diagram of a car interior with a directional arrow indicating upward motion (no text or symbols)
natural_image
Technical diagram of a mechanical device with labeled component A and directional arrows indicating motion (no text or symbols beyond label)
natural_image
Diagram showing three steps of a toilet or sink assembly: opening, lifting a handle, and pouring liquid into a sink (no text or labels present)natural_image
Diagram of a refrigerator interior with arrows indicating airflow or movement (no text or symbols)natural_image
Technical line drawing of a rectangular electronic component with mounting flanges and a labeled point B (no text or symbols beyond label)natural_image
Diagram of a door panel with two hanging items and a labeled component B (no text or symbols present)natural_image
Diagram of a device with a labeled component 'C' and an arrow indicating direction (no text or symbols beyond label)natural_image
Line drawing of a toothbrush inside a rectangular appliance (no text or symbols)
natural_image
Illustration of a metal bracket with a cloth hanging from its side (no text or symbols)
natural_image
Diagram of a device being inserted into a housing, showing internal components and an arrow indicating insertion (no text or symbols present)natural_image
Line drawing of a front-loading washing machine with circular vent and side panel (no text or symbols)
DV9*TA2****, DV8*TA2****, DV7*TA2****
| TIP | USCĂTOR CU ÎNCĂRCAREFRONTALĂ | |
| DIMENSIUNI | A 600 mm | |
| B 850 mm | ||
| C 600 mm | ||
| D 650 mm | ||
| E 1100 mm | ||
| GREUTATE | 50 kg | |
| CERINȚE ELECTRICE | 220-240 V / 50 Hz 780-800 W | |
| TEMPERATURĂ PERMISĂ | 5-35 °C | |
DV9*TA0****, DV8*TA0****, DV7*TA0****
| TIP | USCĂTOR CU ÎNCĂRCAREFRONTALĂ | |
| DIMENSIUNI | A 600 mm | |
| B 850 mm | ||
| C 600 mm | ||
| D 650 mm | ||
| E 1100 mm | ||
| GREUTATE | Tipul sticlei ușii | 49 kg |
| * Tip ușă fără sticlă | 48 kg | |
| CERINȚE ELECTRICE | 220-240 V / 50 Hz 600-650 W | |
| TEMPERATURĂ PERMISĂ | 5-35 °C | |

NOTĂ
Date privind consumul
| Model Program | Încărcătură (kg) (1) | Energie (kWh) | Durată max. (minute) | |
| DV9*TA2**** | COTTON (BUMBAC)(2) | 9,0 1,54 2 | 20 | |
| 4,5 0,89 1 | 40 | |||
| IRON DRY (USCARE PENTRU CĂLCARE) (2) | 9,0 0,95 1 | 40 | ||
| SYNTHETICS (MATERIALE SINTETICE) | 4,5 0,70 9 | 8 | ||
| DV8*TA2**** | COTTON (BUMBAC)(2) | 8,0 1,41 2 | 00 | |
| 4,0 0,80 1 | 30 | |||
| IRON DRY (USCARE PENTRU CĂLCARE) (2) | 8,0 0,90 1 | 30 | ||
| SYNTHETICS (MATERIALE SINTETICE) | 4,0 0,60 9 | 0 | ||
| DV7*TA2**** | COTTON (BUMBAC)(2) | 7,0 1,25 1 | 80 | |
| 3,5 0,73 1 | 20 | |||
| IRON DRY (USCARE PENTRU CĂLCARE) (2) | 7,0 | 0,85 120 | ||
| SYNTHETICS (MATERIALE SINTETICE) | 3,5 0,50 8 | 2 |
natural_image
Medical X-ray image showing internal anatomical structures with no visible text or labelsnatural_image
Symbol of a trash bin crossed with a diagonal line, no text or numbers presentnatural_image
Simple line drawing of a curved mechanical component (no text or symbols)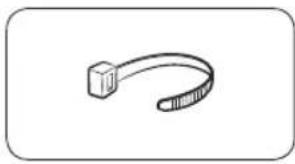
natural_image
Simple line drawing of a curved object resembling a stylized arm or tool (no text or symbols)
natural_image
Simple line drawing of a bulb-like object with a flared top and rounded base (no text or symbols)natural_image
Simple line drawing of a coiled cable or hose with two connectors (no text or symbols)
natural_image
Simple line drawing of a closed book with a blank cover (no text or symbols)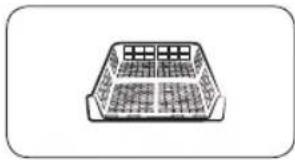
natural_image
Simple line drawing of a rectangular container with internal compartments (no text or symbols)Dolga odvodna cev (2m)
natural_image
Simple line drawing of a pen-like object with a loop handle (no text or symbols)Krtača za čiščenje
Dodatna oprema (ni priložena)
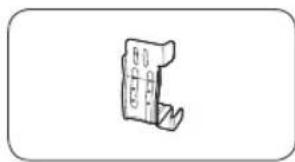
natural_image
Simple line drawing of a mechanical component or bracket (no text or symbols)
natural_image
Isometric line drawing of a rectangular electronic component or housing (no text or symbols)natural_image
Line drawing of a front view of a washing machine casing with internal components and a close-up inset showing a component detail (no text or symbols)
natural_image
Technical diagram of a mechanical assembly with labeled component A (no text or symbols present)Prek umivalnika:

- Sestavite priključek za cev (A) in ga pritrdite na konec dodatne cevi, kot je prikazano na sliki.
POZOR
natural_image
Line drawing of a square sink with a pipe and valve, no text or symbols presentnatural_image
Technical line drawing of a mechanical component with a black arrow indicating direction (no text or symbols)natural_image
Diagram of a mechanical component with a circular housing and a black arrow indicating direction (no text or symbols)- S tankim predmetom odstranite tesnilo vrat.
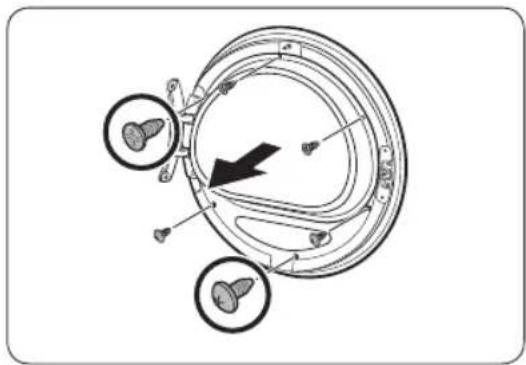
natural_image
Diagram of a circular mechanical or biological structure with internal components and directional arrows, no visible text or symbols.natural_image
Diagram showing a mechanical component with rotating parts and directional arrows indicating motion (no text or symbols)
natural_image
Technical illustration of two mechanical components with a directional arrow indicating rotation (no text or symbols)
natural_image
Technical diagram of a mechanical component with three circular features and a central arrow indicating direction (no text or symbols present)-
Odstranite držalo za steklo in nato zavrtite pokrov vrat za 180 stopinj.
-
Držalo stekla vstavite v novi položaj pokrova vrat. Tečaj vrat mora biti v enakem položaju, kot je prikazano na sliki.
-
Privijte zgornje 3 in spodnje 3 vijake držala stekla.
OPOMBA
Oblike vijakov se različne, glede na njihove velikosti. Vijake morate ustrezno priviti.
Namestitev


natural_image
Diagram of a mechanical component with an arrow indicating rotation or assembly (no text or symbols present)
natural_image
Diagram of a door panel with screwdrivers and a switch, showing no text or symbols
-
Tesnilo vrat vstavite v pravilen položaj.
-
Odstranite 2 vijaka, ki sta še vedno pritrjena, ko odstranite tečaj vrat.
-
Odstranite 4 vijake na ključavnici vrat. Odstranite ključavnico vrat in jo nato znova namestite na nasprotno stran.
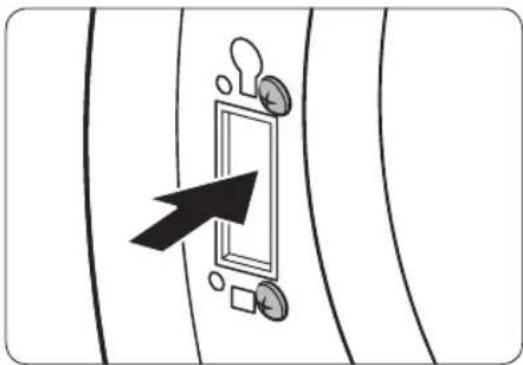
natural_image
Diagram showing a door with a keyhole and arrow pointing to it, surrounded by coins and a square (no text or symbols)
natural_image
Technical diagram of a mechanical component with an inset showing a close-up view of a bracket detail (no text or symbols present)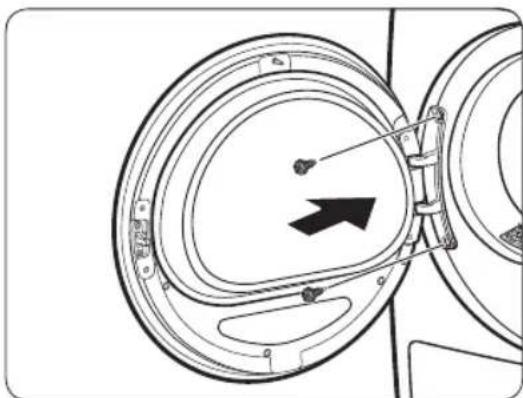
natural_image
Diagram of a mechanical component with concentric circular parts and an arrow indicating direction (no text or symbols)-
Privijte 2 vijaka, ki sta bila odstranjena v koraku 8 na okvirju tečaja na nasprotni strani. Privijte ju na desni strani (zgornji in spodnji desni strani) okvira.
-
Odstranite vijak na dnu tečaja vrat in ga pritrdite na vrh tečaja vrat.
-
Tečaj vrat namestite na nasprotno stran in privijte 2 vijaka, da pritrdite vrata na sušilni stroj.
OPOMBA
natural_image
Technical line drawing of a car rear bumper with decorative patterned seating and doorways (no text or symbols)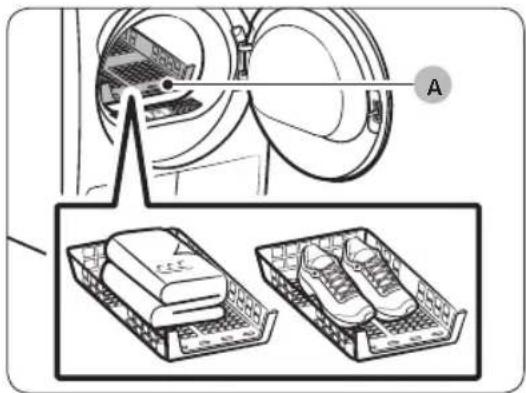
natural_image
Diagram showing a washing machine with two labeled parts: one for a device and another for a shoe rack (no text or symbols present)natural_image
Diagram of a car interior with a directional arrow indicating upward motion (no text or symbols)
natural_image
Technical diagram of a mechanical device with labeled component A and directional arrows indicating motion (no text or symbols beyond label)
natural_image
Diagram showing four steps of a mechanical device with arrows indicating movement, no text or symbols present.-
Odprite vrata in povlecite filter za vlakna navzgor, da ga odstranite.
-
Odprite zunanji filter in odstranite notranji filter (A).
-
Razprite notranji in zunanji filter.
- Odstranite vlakna z obeh filtrov in ju nato očistite s krtačo za čiščenje.
OPOMBA
Da boste filtra temeljito očistili, ju očistite pod tekočo vodo in ju nato povsem posušite.
Vzdrževanje
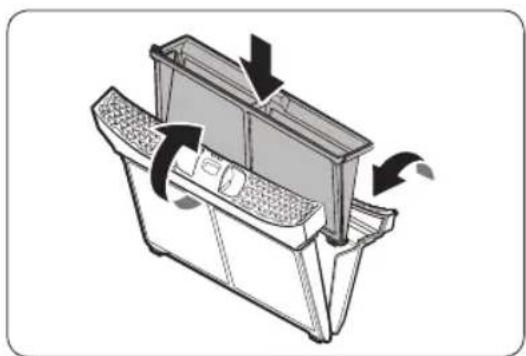
natural_image
Diagram of a mechanical device with directional arrows indicating motion or flow (no text or symbols)- Notranji filter vstavite v zunanji filter, nato pa vstavite filter za vlakna v prvotni položaj.
POZOR
natural_image
Technical line drawing of a mechanical component with labeled point B (no text or symbols beyond label)- Iztočite vodo skozi luknjo za odvod vode (B) in vstavite zbiralnik za vodo nazaj na svoje mesto.
OPOMBA
natural_image
Diagram of a door panel with two hanging items and a labeled component 'B' (no text or symbols on the main diagram)- Odklenite zapahe (B).

natural_image
Diagram of a device with a labeled component 'C' and an arrow indicating direction (no text or symbols present)- Odstranite notranji pokrov (C).
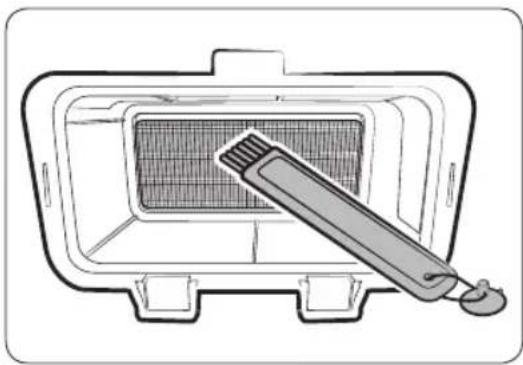
natural_image
Line drawing of a microwave oven with a toothbrush inside (no text or symbols)
natural_image
Illustration of a mechanical component with a cloth hanging from its side (no text or symbols)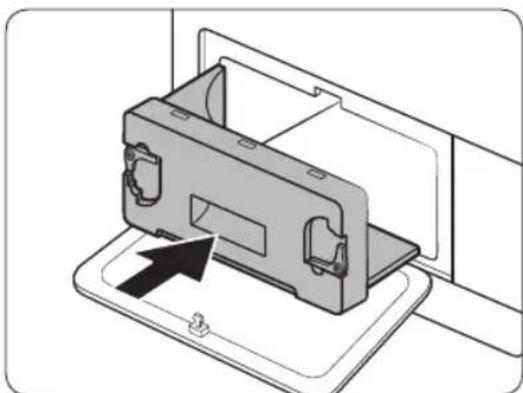
natural_image
Diagram of a device being inserted into a housing, showing internal components and an arrow indicating insertion (no text or symbols present)natural_image
Line drawing of a washing machine with circular vent and side panel (no text or symbols)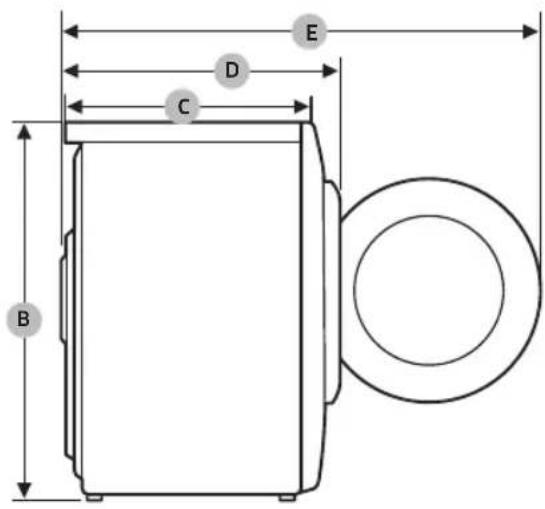
DV9*TA2****, DV8*TA2****, DV7*TA2****
| VRSTA | SUŠILNI STROJ Z VRATI SPREDAJ | |
| DIMENZIJE | A 600 mm | |
| B 850 mm | ||
| C 600 mm | ||
| D 650 mm | ||
| E 1100 mm | ||
| TEŽA | 50 kg | |
| ELEKTRIČNE ZAHTEVE | 220–240 V / 50 Hz | 780-800 W |
| DOVOLJENA TEMPERATURA | 5–35 °C | |
DV9*TA0****, DV8*TA0****, DV7*TA0****
| VRSTA | SUŠILNI STROJ Z VRATI SPREDAJ | |
| DIMENZIJE | A 600 mm | |
| B 850 mm | ||
| C 600 mm | ||
| D 650 mm | ||
| E 1100 mm | ||
| TEŽA | Steklena vrata | 49 kg |
| * Nesteklena vrata | 48 kg | |
| ELEKTRIČNE ZAHTEVE | 220–240 V / 50 Hz 600-650 W | |
| DOVOLJENA TEMPERATURA | 5–35 °C | |

OPOMBA
Modeli z nesteklenimi vrati: DV**TA***D*
Podatki o porabi
| Model Program | Teža perila (kg) (1) | Energija (kWh) | Najdaljši čas trajanja (minut) |
| DV9*TA2**** | COTTON (BOMBAŽ) (2) | 9,0 1,54 220 | |
| 4,5 0,89 140 | |||
| IRON DRY (SUHO LIKANJE) (2) | 9,0 0,95 140 | ||
| SYNTHETICS (SINTETIKA) | 4,5 0,70 98 | ||
| DV8*TA2**** | COTTON (BOMBAŽ) (2) | 8,0 1,41 200 | |
| 4,0 0,80 130 | |||
| IRON DRY (SUHO LIKANJE) (2) | 8,0 0,90 130 | ||
| SYNTHETICS (SINTETIKA) | 4,0 0,60 90 | ||
| DV7*TA2**** | COTTON (BOMBAŽ) (2) | 7,0 1,25 180 | |
| 3,5 0,73 120 | |||
| IRON DRY (SUHO LIKANJE) (2) | 7,0 0,85 120 | ||
| SYNTHETICS (SINTETIKA) | 3,5 0,50 82 |
natural_image
Medical X-ray image showing internal anatomical structures with no visible text or labelsnatural_image
Symbol of a trash bin crossed with no text or numbers, representing waste sorting or restriction (no text present)natural_image
Simple line drawing of a curved mechanical bracket (no text or symbols)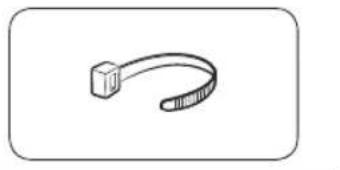
natural_image
Simple line drawing of a USB cable (no text or symbols)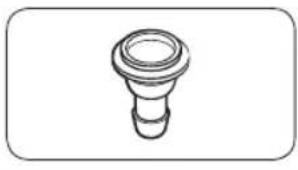
natural_image
Simple line drawing of a bulb-like object with no text or symbolsnatural_image
Simple line drawing of a coiled cable or hose with two connectors (no text or symbols)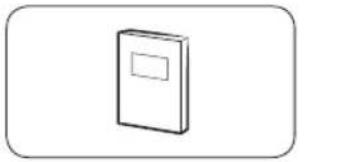
natural_image
Simple line drawing of a closed book with a blank cover (no text or symbols)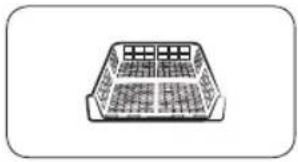
natural_image
Simple line drawing of a rectangular container with grid pattern (no text or symbols)natural_image
Simple line drawing of a pen-like object with a handle and loop (no text or symbols)natural_image
Simple line drawing of a mechanical component or bracket (no text or symbols)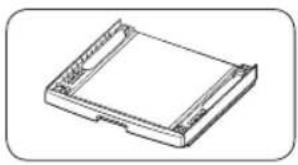
natural_image
Technical line drawing of a rectangular electronic device with mounting holes (no text or symbols)natural_image
Line drawing of a front view of a washing machine casing with internal components and a highlighted inset showing a component (no text or symbols present)
natural_image
Technical diagram of a mechanical assembly with labeled component A (no text or symbols present)Mbi lavaman:


natural_image
Line drawing of a standard square sink with a pipe and handle, no text or symbols presentnatural_image
Technical line drawing of a mechanical component with a black arrow indicating direction (no text or symbols)natural_image
Diagram of a mechanical component with a black arrow indicating rotation or assembly (no text or symbols present)natural_image
Diagram of a mechanical component with three circular features and a black arrow indicating direction (no text or symbols)natural_image
Diagram of a mechanical device with two circular components and directional arrows indicating rotation or assembly (no text or symbols)
natural_image
Two mechanical components with circular features, one open and one closed, showing a black arrow indicating direction (no text or symbols)
natural_image
Technical diagram of a mechanical component with three circular features and a central arrow indicating direction (no text or symbols present)natural_image
Diagram of a mechanical component with an arrow indicating rotation or assembly (no text or symbols present)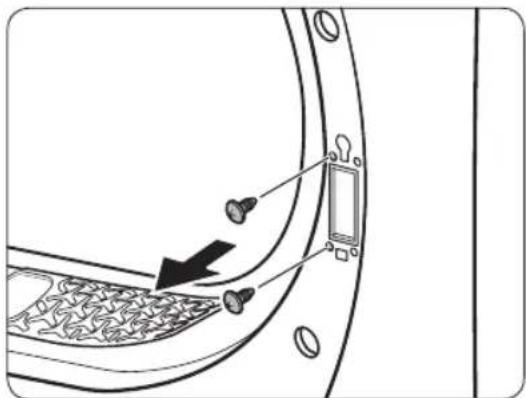

natural_image
Diagram showing a door with a keyhole and coin, pointing at it (no text or symbols present)
natural_image
Technical diagram of a mechanical component with an inset showing a close-up view of a bracket detail (no text or symbols present)
natural_image
Diagram of a mechanical component with concentric circular parts and an arrow indicating direction (no text or symbols)natural_image
Technical line drawing of a car rear bumper with decorative panel and doorways (no text or symbols)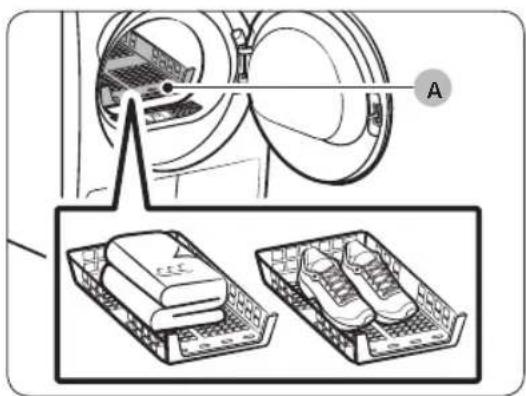
A. Tharje në skarë
natural_image
Diagram of a car interior with a directional arrow indicating upward motion (no text or symbols)
natural_image
Technical diagram of a car intake tray with directional arrows indicating flow or movement (no text or symbols present)
natural_image
Diagram showing four steps of a mechanical device with arrows indicating movement, no text or symbols present.natural_image
Diagram of a refrigerator interior with arrows indicating airflow or movement (no text or symbols)natural_image
Technical line drawing of a rectangular electronic component with mounting flanges and a labeled point B (no text or symbols beyond label)natural_image
Diagram of a door panel with two hanging items and a labeled component 'B' (no text or symbols on the main diagram)- Shkyçni fiksuesit (B).
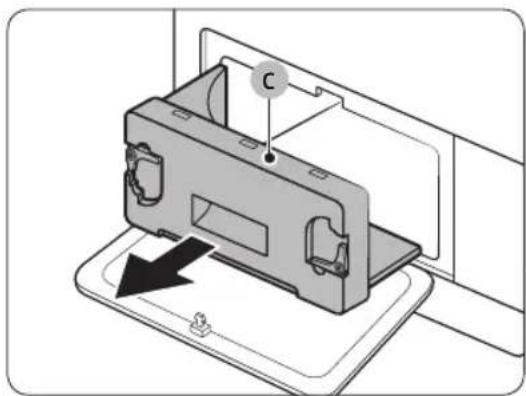
natural_image
Diagram of a device with a labeled component 'C' and an arrow indicating direction (no text or symbols present)- Hiqni kapakun e brendshëm (C).

natural_image
Line drawing of a grater inside a rectangular appliance, with a toothbrush touching the interior (no text or symbols)
natural_image
Illustration of a metal bracket with a cloth hanging from its side (no text or symbols)
natural_image
Diagram of a device being inserted into a housing, showing internal components and an arrow indicating insertion (no text or symbols present)natural_image
Line drawing of a front-loading washing machine with circular vent and side panel (no text or symbols)
DV9*TA2****, DV8*TA2****, DV7*TA2****
| LLOJI | MAKINË THARËSE MENGARKIM NGA PËRPARA | |
| PËRMASAT | A 600 mm | |
| B 850 mm | ||
| C 600 mm | ||
| D 650 mm | ||
| E 1100 mm | ||
| PESHA | 50 kg | |
| KËRKESAT ELEKTRIKE | 220-240 V, 50 Hz 780-800 W | |
| TEMPERATURA E LEJUESHME | 5-35 °C | |
DV9*TA0****, DV8*TA0****, DV7*TA0****
| LLOJI | MAKINË THARËSE MENGARKIM NGA PËRPARA | |
| PËRMASAT | A 600 mm | |
| B 850 mm | ||
| C 600 mm | ||
| D 650 mm | ||
| E 1100 mm | ||
| PESHA | Lloji i xhamit të derës | 49 kg |
| * Lloji i xhamit jo përderë | 48 kg | |
| KËRKESAT ELEKTRIKE | 220-240 V, 50 Hz 600-650 W | |
| TEMPERATURA E LEJUESHME | 5-35 °C | |

SHËNIM
natural_image
Medical X-ray image showing internal anatomical structures with no visible text or labelsSušilica sa toplotnom pumpom
natural_image
Symbol of a trash bin crossed with no text or numbers, representing waste sorting or restriction (no text present)Ovo obeležje na proizvodu, dodaci ili dokumentacija označavaju to da proizvod i njegovi elektronski dodaci (npr. punjač, slušalice, USB kabl) ne bi smeli da se odlăžu zajedno sa ostalim otpadom iz domaćinstva, kada im istekne vek trajanja. Da biste sprečili moguće ugrožavanje čovekove okoline ili ljudskog zdravlja usled nekontrolisanog odlaganja, odvojite ove proizvode od ostalog otpada i odgovorno ga reciklirajte kako biste promovisali trajnu ponovnu upotrebu materijalnih resursa.
natural_image
Simple line drawing of a curved mechanical component (no text or symbols)
natural_image
Simple line drawing of a curved object resembling a stylized arm or tool (no text or symbols)
natural_image
Simple line drawing of a bulb-like object with a flared top and rounded base (no text or symbols)natural_image
Simple line drawing of a coiled cable or hose with two connectors (no text or symbols)Dugačko odvodno crevo (2m)

natural_image
Simple line drawing of a closed book with a blank cover (no text or symbols)natural_image
Simple line drawing of a rectangular container with internal compartments (no text or symbols)natural_image
Simple line drawing of a pen-like object with a loop handle (no text or symbols)Četka za čišćenje
Dodaci (ne isporučuju se)

natural_image
Simple line drawing of a mechanical component or bracket (no text or symbols)Komplet nosača za slaganje (SK-DH, SK-DA, SKK-DF)

natural_image
Isometric line drawing of a rectangular electronic component or housing (no text or symbols)Komplet za slaganje (SKK-DD, SKK-DDX)

NAPOMENA
natural_image
Two identical diagrams showing a mechanical component with arrows indicating motion, labeled C and D (no text or symbols beyond labels)- Polako gurnite sušilicu na željeno mesto.
- Pomoću libele (A) proverite poravnanje sušilice od jedne strane do druge i od prednjeg do zadnjeg dela.
- Ako sušilica nije pravilno poravnata, podesite nožicu za ravnanje (B). Ako okrenete nožicu suprotno od smera kretanja kazaljki na satu, ona će se uvući. Ako okrenete nožicu u smeru kretanja kazaljki na satu, ona će se izvući.
- Nakon što poravnate sušilicu, proverite da li se stabilno oslanja na pod.
- Priključite sušilicu.
NAPOMENA
natural_image
Line drawing of a front view of a washing machine casing with internal components and a highlighted inset showing a component (no text or symbols present)
Sušilica se isporučuje sa ugrađenim rezervoarom za vodu. Međutim, ako ne želite da koristite rezervoar za vodu, možete da priključite odvodno crevo. Isporučeno pomoćno crevo (dugačko odvodno crevo) koristi se kao produžetak odvodnog creva.
natural_image
Technical diagram of a mechanical assembly with labeled component A (no text or symbols present)Preko umivaonika:

-
Gurnite jedan kraj pomoćnog creva (dugačko odvodno crevo) u otvor (A).
-
Priključite drugi kraj (odvod) pomoćnog creva na odvodni sistem na jedan od sledećih načina:
-
Obavezno postavite kraj pomoćnog creva na visinu manju od 90 cm (*) u odnosu na dno sušilice.
-
Za savijanje određenog dela pomoćnog creva upotrebite plastičnu vodicu za crevo (B) koju ste dobili u kompletu i pričvrstite je na zid pomoću kuke ili na slavinu parčetom kanapa. Povežite odvodno crevo (A) i vodicu za crevo (B) i pričvrstite ih pomoću vezice (C).
-
Pomoćno crevo (dugačko odvodno crevo) možete da priključite direktno na odvod za kondenzovanu vodu.
! OPREZ

natural_image
Line drawing of a square sink with a faucet and pipe connection (no text or symbols)- Sklopite priključak za crevo (A) i pričvrstite ga na kraj pomoćnog creva na prikazan način.
! OPREZ
natural_image
Technical line drawing of a mechanical component with a black arrow indicating direction (no text or symbols)- Otvorite vrata i otpustite dva zavrtnja na šarki vrata. Uhvatite vrata sa obe ruke, pa ih malo podignite da biste ih skinuli.
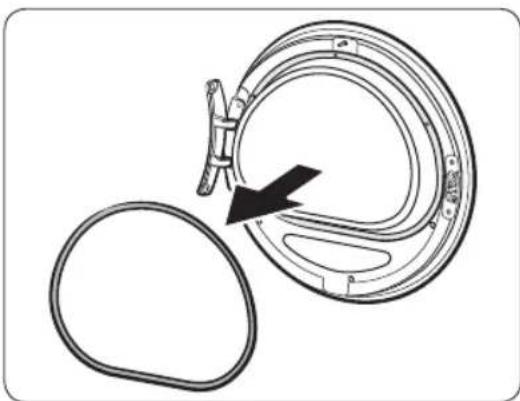
natural_image
Diagram of a mechanical component with an arrow indicating rotation or assembly (no text or symbols present)- Zaptivnu gumu uklonite tankim predmetom sa vrata.
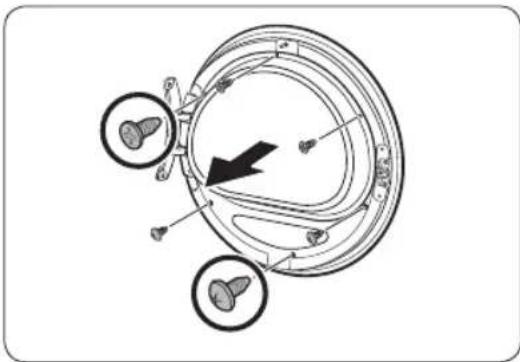
natural_image
Diagram of a mechanical or biological structure with circular components and directional arrows, no visible text or symbols.natural_image
Diagram of a mechanical device with two circular components and directional arrows indicating rotation or assembly (no text or symbols)
natural_image
Technical illustration of two mechanical components with a directional arrow indicating rotation (no text or symbols)
natural_image
Technical diagram of a mechanical component with three circular features and a central arrow indicating direction (no text or symbols present)-
Uklonite držač stakla, zatim zarotirajte držač vrata za 180 stepeni.
-
Postavite držač stakla na novi položaj u vratima. Šarka na vratima mora da bude u istom položaju kao na slici.
-
Pričvrstite gornja 3 zavrtnja i donja 3 zavrtnja na držaču stakla.
NAPOMENA
Oblici zavrtanja se razlikuju u zavisnosti od dimenzija. Proverite da li ste pričvrstili odgovarajući zavrtanj.
Postavljanje

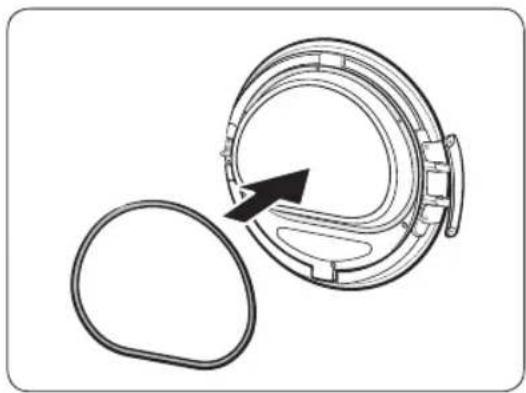
natural_image
Diagram of a mechanical component with an arrow indicating rotation or assembly (no text or symbols present)
natural_image
Diagram of a door panel with screw holes and a switch, showing no text or symbols
-
Postavite zaptivnu gumu na vrata u odgovarajućem položaju.
-
Skinite 2 zavrtnja koja su ostala kada ste skinuli šarku sa vrata.
-
Uklonite 4 vijka sa brave vrata. Uklonite bravu, potom je ponovo montirajte na suprotnu stranu.

natural_image
Diagram showing a door with a keyhole and coin, pointing at it (no text or symbols present)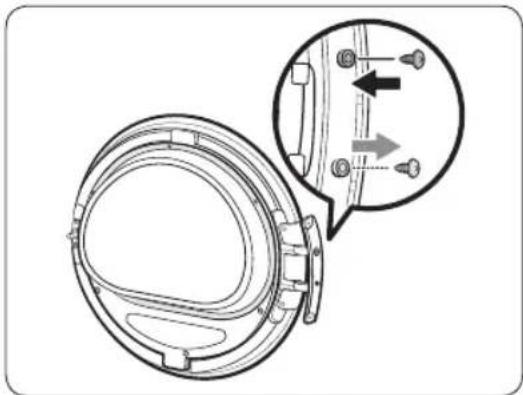
natural_image
Technical diagram of a mechanical component with an inset showing a close-up view of a bracket detail (no text or symbols present)
natural_image
Diagram of a mechanical component with concentric circular parts and an arrow indicating direction (no text or symbols)-
Zategnite 2 vijka koja ste uklonili u koraku 8, nalaze se na ramu šarke, na suprotnoj strani. Imajte u vidu da treba da ih pričvrstite na desnoj strani (gornjoj i donjoj desnoj strani) okvira.
-
Uklonite vijak na donjem delu šarke vrata i pričvrstite ga na gornjem delu šarke.
-
Stavite šarke za vrata na suprotnu stranu, pa pričvrstite 2 zavrtnja da biste pričvrstili vrata na sušilicu.
NAPOMENA
Ako želite da vratite vrata u prvobitni položaj, ponovite ove korake. Imajte u vidu da će vrata, šarke i ostali delovi biti na suprotnoj strani u odnosu na položaje opisane u ovim koracima.
Korišćenje
Kontrolna tabla
DV9*TA*****/DV8*TA*****
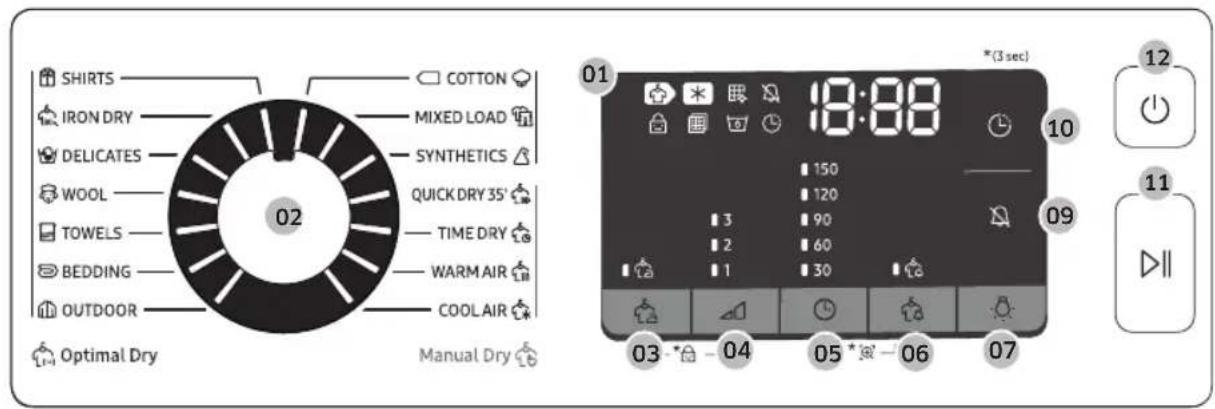
DV7*TA*****

| 01 Digitalni grafički ekran | Prikaz svih informacija o programu: trajanje programa, informativni kodovi i status sušilice. Detaljne informacije o statusu nalaze se u tabeli u nastavku. | |||
 | Sušenje Hlađenje |  | ||
 | Alarm za čišćenje izmenjivača toplote |  | Uključivanje/isključivanje zvuka | |
 | Roditeljska kontrola |  | Provera alarma filtera | |
 | Rezervoar za vodu je pun |  | Odloženi kraj | |
 | Sprečavanje gužvanja |  | Upozorenje na vlažan veš | |
| Smart Check | ||||
| 02 Regulator programa | Okrenite regulator da biste izabrali program. Pogledajte Pregled programa na stranici 35 za informacije o dostupnim programima. | |||
| 03 Sprečavanje gužvanja | Dodatna 3 sata povremenog okretanja u bubnju na kraju izabranog programa u cilju smanjivanja gužvanja. Na ekranu se pojavljuje veliki krug, a bubanj se povremeno okreće. Pritisnite Sprečavanje gužvanja da biste aktivirali ovu funkciju.Odgovarajući indikator će se uključiti. | |||
| 04 Nivo sušenja | Pritisnite ovo dugme da biste izabrali nivo sušenja u programima SHIRTS (KOŠULJE) , COTTON (PAMUK) MIXED LOAD (MEŠANO) i SYNTHETICS (SINTETIKA). Sušenje se podešava u tri nivoa (1-3). 1. nivo se koristi za delimično sušenje veša koji se suši položen ili okačen. 3. nivo je najjači i koristi se za sušenje većih količina veša ili krupnijih komada veša. | |||
Korišćenje
| 05 Vreme | Pritisnite ovo dugme da biste podesili trajanje programa TIME DRY (VREMENSKI OGRANIČENO SUŠENJE), WARM AIR (TOPAO VAZDUH) i COOL AIR (HLADAN VAZDUH).Dostupne su sledeće opcije trajanja (u minutima): 30, 60, 90, 120 i 150.Opcije od 120 minuta i 150 minuta nisu dostupne za programe WARM AIR (TOPAO VAZDUH) i COOL AIR (HLADAN VAZDUH).Tačno vreme sušenja zavisi od stepena vlažnosti veša. |
| 06 Upozorenje na vlažan veš | Ovaj alarm je dostupan samo za programe SHIRTS (KOŠULJE), COTTON (PAMUK) MIXED LOAD (MEŠANO) i SYNTHETICS (SINTETIKA). Ako sušite različite vrste tkanina zajedno, indikator funkcije Upozorenje na vlažan veš upočinje da trepti kada se veš osuši u proseku do 80%. Zahvaljujući tome, možete ranije da izvadite iz sušilice odeću koju ne želite potpuno da osušite ili koja se brzo suši, a da ostavite ostatak veša da nastavi da se suši. |
| 07 Lampa (DV9*TA*****/DV8*TA***** ) | Pritisnite ovo dugme da biste uključili ili isključili unutrašnju lampu. Lampa ostaje upaljena 2 minuta nakon što se uključi, a zatim se automatski isključuje. |
| 08 Smart Check (DV7*TA***** ) | Ako sušilica detektuje problem, funkcija Smart Check vam omogućava da proverite status sušilice pomoću pametnog telefona. |
| 09 Uključivanje/isključivanje zvuka | Pritisnite ovo dugme da biste isključili/uključili zvuk upozorenja. Podešavanje zvuka će biti sačuvano nakon što isključite sušilicu i ponovo je uključite. |
| 10 Odloženi kraj | Podesite vreme završetka izabranog programa u koracima od 1 sata sve do 24 sata. |
| 11 ▷II Pokretanje/pauziranje (Zadržite da biste pokrenuli) | Pritisnite ovo dugme da biste pokrenuli ili pauzirali sušilicu. Ako sušilica radi, pritisnite jedanput ovo dugme da biste pauzirali sušilicu. Ponovo pritisnite dugme za nastavak rada. |
| 12 Uključivanje/Isključivanje | Pritisnite ovo dugme da biste uključili/isključili sušilicu. Ako u roku od 10 minuta nakon uključivanja sušilice ne pritisnete nijedno dugme, sušilica će se automatski isključiti. |
Pregled programa
Optimal Dry (Optimalno sušenje)
natural_image
Line drawing of a car rear bumper with decorative patterned seating and door panel (no text or symbols)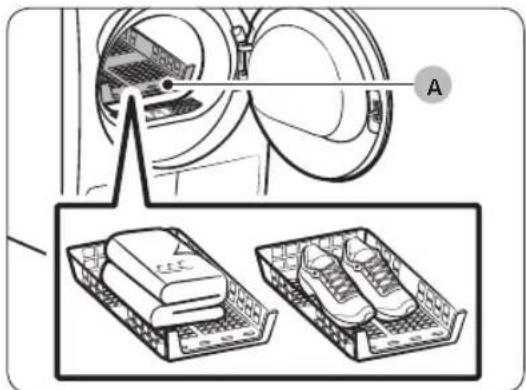
A. Rešetka za sušenje
- Postavite rešetku za sušenje u bubanj tako što ćete prednje ivice rešetke postaviti u otvore na dijafragmi vrata.
- Stavite veš na rešetku i ostavite dovoljno prostora za cirkulaciju vazduha. Odeću složite i postavite ravno na rešetku. Cipele stavite tako da donovi budu okrenuti nadole.
- Zatvorite vrata i pritisnite dugme ⏻ Uključivanje/lsključivanje. Pritisnite dugme ⚫TIME DRY (VREMENSKI OGRANIČENO SUŠENJE), a zatim pritisnite dugme ⚫ Vreme da biste izabrali trajanje sušenja.
- Pritisnite i zadržite dugme ▷II Pokretanje/pauziranje (Zadržite da biste pokrenuli).
Predlozi za sušenje
| Artikli (maks. 1,5 kg) Opis | |
| Džemperi koji mogu da se peru (oblikujte ih prema rešetki i položite na nju) | Kada koristite rešetku za sušenje, složite i stavite odeću na rešetku kako se ne bi izgužvala. |
| Plišane igračke (punjene pamukom ili poliesterom) | |
| Plišane igračke (punjene penom ili gumom) | |
| Jastuci sa ulošcima od penaste gume | |
| Patike Sportsku obuću stavite na rešetku za sušenje tako da don obuće bude okrenut nadole. | |

OPREZ
natural_image
Diagram of a car interior with a directional arrow indicating upward motion (no text or symbols)
natural_image
Technical diagram of a mechanical device with labeled component A and directional arrows indicating motion (no text or symbols beyond label)
natural_image
Diagram showing four steps of a toilet or sink assembly, with no visible text or symbols.natural_image
Diagram of a mechanical device with directional arrows indicating motion or flow (no text or symbols)- Stavite unutrašnji filter u spoljašnji filter, pa vratite filter za dlačice u prvobitni položaj.
! OPREZ
- Očistite filter za dlačice nakon svakog sušenja veša. U suprotnom, efikasnosti sušenja može biti umanjena.
- Nemojte da koristite sušilicu ako unutrašnji filter nije postavljen u spoljašnji filter.
- Ako sušilicu koristite dok je filter za dlačice vlažan, mogu se javiti buđ i neugodni mirisi, odnosno može se smanjiti efikasnost sušenja.
Rezervoar za vodu
Ispraznite rezervoar za vodu nakon svakog sušenja da voda ne bi iscurela.
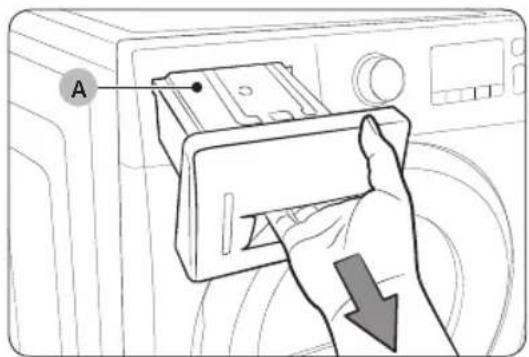
- Uhvatite sa obe ruke rezervoar za vodu (A) i povucite ga napred kako biste ga izvadili.

natural_image
Technical line drawing of a rectangular electronic component with mounting flanges and a labeled point B (no text or symbols beyond label)- Ispraznite vodu kroz odvod (B) i vratite rezervoar za vodu na mesto.
NAPOMENA
Kada ispraznite rezervoar za vodu i pritisnete i držite dugme Pokretanje/pauziranje (Zadržite da biste pokrenuli), odgovarajući indikator će se isključiti.
Održavanje
Izmenjivač toplote
- Pažljivo pritisnite gornji deo spoljašnjeg poklopca (A) da biste ga otvorili.


natural_image
Diagram of a door panel with two hanging items and a labeled component B (no text or symbols present)natural_image
Diagram of a device with a labeled component 'C' and an arrow indicating direction (no text or symbols beyond label)- Skinite unutrašnji poklopac (C).

natural_image
Line drawing of a grater inside a rectangular appliance with a toothbrush touching the interior (no text or symbols)
natural_image
Illustration of a mechanical component with a cloth hanging from its side (no text or symbols)
natural_image
Diagram of a device being inserted into a housing, showing internal components and an arrow indicating insertion (no text or symbols present)- Očistite izmenjivač toplote isporučenom četkom za čišćenje ili usisivačem sa dodatkom za četku. Pazite da ne savijete ili oštetite peraje izmenjivača toplote prilikom čišćenja. To može dovesti do smanjenja efikasnosti sušenja.
! OPREZ
natural_image
Line drawing of a front-loading washing machine with circular vent and side panel (no text or symbols)
DV9*TA2****, DV8*TA2****, DV7*TA2****
| TIP | SUŠILICA SA PREDNJIMPUNJENJEM | |
| DIMENZIJE | A 600 mm | |
| B 850 mm | ||
| C 600 mm | ||
| D 650 mm | ||
| E 1100 mm | ||
| TEŽINA | 50 kg | |
| ZAHTEVI U POGLEDUELEKTRIČNIH INSTALACIJA | 220–240 V / 50 Hz | 780-800 W |
| RADNA TEMPERATURA | 5-35 °C | |
Dodatk
DV9*TA0****, DV8*TA0****, DV7*TA0****
| TIP | SUŠILICA SA PREDNJIMPUNJENJEM | |
| DIMENZIJE | A 600 mm | |
| B 850 mm | ||
| C 600 mm | ||
| D 650 mm | ||
| E 1100 mm | ||
| TEŽINA | Vrata sa staklom | 49 kg |
| * Vrata bez stakla | 48 kg | |
| ZAHTEVI U POGLEDUELEKTRIČNIH INSTALACIJA | 220-240 V / 50 Hz 600-650 W | |
| RADNA TEMPERATURA | 5-35 °C | |

NAPOMENA
Modeli bez stakla: DV**TA***D*
Podaci o potrošnji
| Model Program | Količina veša (kg) (1) | Energija (kWh) | Maks. trajanje (u minutima) | |
| DV9*TA2**** | COTTON (PAMUK)(2) | 9,0 1,54 2 | 20 | |
| 4,5 0,89 1 | 40 | |||
| IRON DRY (SUŠENJE ZA PEGLANJE) (2) | 9,0 0,95 1 | 40 | ||
| SYNTHETICS (SINTETIKA) | 4,5 0,70 9 | 8 | ||
| DV8*TA2**** | COTTON (PAMUK)(2) | 8,0 1,41 2 | 00 | |
| 4,0 0,80 1 | 30 | |||
| IRON DRY (SUŠENJE ZA PEGLANJE) (2) | 8,0 0,90 1 | 30 | ||
| SYNTHETICS (SINTETIKA) | 4,0 0,60 9 | 0 | ||
| DV7*TA2**** | COTTON (PAMUK)(2) | 7,0 1,25 1 | 80 | |
| 3,5 0,73 1 | 20 | |||
| IRON DRY (SUŠENJE ZA PEGLANJE) (2) | 7,0 | 0,85 120 | ||
| SYNTHETICS (SINTETIKA) | 3,5 0,50 8 | 2 |
Svi podaci pored kojih se ne nalazi zvezdica dobijeni su na osnovu standarda EN 61121:2013
Podaci o potrošnji mogu da se razlikuju od prethodno navedenih nominalnih vrednosti u zavisnosti od količine veša, vrste tekstila, nivoa preostale vlage nakon centrifuge, promena u napajanju električnom energijom i izabranih dodatnih opcija.
natural_image
Medical X-ray image showing internal anatomical structures with no visible text or labelsnatural_image
Symbol of a trash bin crossed with no text or numbers, indicating no waste or restriction.natural_image
Simple line drawing of a curved mechanical bracket (no text or symbols)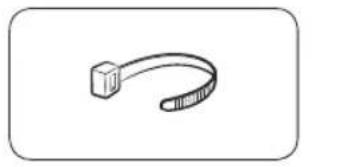
natural_image
Simple line drawing of a ribbon or clamp (no text or symbols)
natural_image
Simple line drawing of a bulb-like object with a flared top and base (no text or symbols)Žarnos kreiptuvas
Kabelio raištis Žarnos jungtis
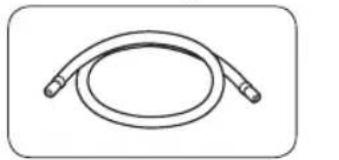
natural_image
Simple line drawing of a coiled cable or hose with two connectors (no text or symbols)
natural_image
Simple line drawing of a closed book with a blank cover (no text or symbols)
natural_image
Simple line drawing of a rectangular container with internal compartments (no text or symbols)natural_image
Simple line drawing of a pen-like object with a loop handle (no text or symbols)Valymo šepetys
Priedai (nepridedami)
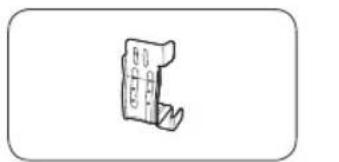
natural_image
Simple line drawing of a handheld device with no text or symbolsnatural_image
Isometric line drawing of a rectangular electronic component or housing (no text or symbols)Tvirtinimo rémas
(SKK-DD, SKK-DDX)

PASTABA
natural_image
Two identical diagrams showing a mechanical component with arrows indicating motion, labeled C and D (no text or symbols beyond labels)natural_image
Line drawing of a front view of a washing machine casing with internal components and a close-up inset showing a component detail (no text or symbols)
natural_image
Technical diagram of a mechanical assembly with labeled component A (no text or symbols present)Virš kriauklės:


natural_image
Line drawing of a square sink with a pipe and outlet pipe (no text or symbols)natural_image
Technical line drawing of a mechanical component with a black arrow indicating direction (no text or symbols)natural_image
Diagram of a mechanical component with a circular housing and a separate oval component, showing no text or symbols.natural_image
Diagram of a mechanical or biological structure with circular components and directional arrows, no visible text or symbols.natural_image
Diagram of a mechanical device with two circular components and directional arrows indicating rotation or assembly (no text or symbols)
natural_image
Two mechanical components with circular features, one open and one closed, showing a black arrow indicating direction (no text or symbols)
natural_image
Technical diagram of a mechanical component with three circular features and an arrow indicating direction (no text or symbols present)natural_image
Diagram of a mechanical component with an arrow indicating rotation or assembly (no text or symbols present)
natural_image
Diagram of a door panel with screwdrivers and a switch, showing no text or symbols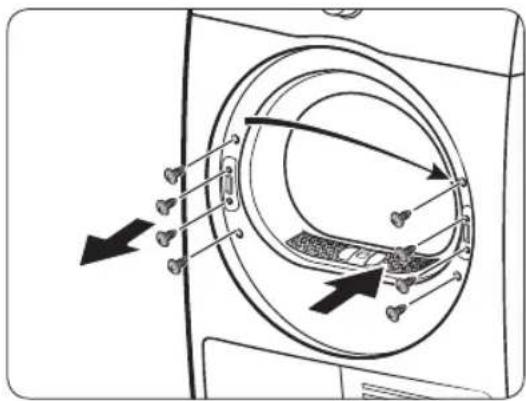
natural_image
Diagram of a washing machine interior showing internal components and directional arrows (no text or symbols)natural_image
Diagram showing a door with a keyhole and arrow pointing to it, surrounded by coins and a square (no text or symbols)
natural_image
Technical diagram of a mechanical component with an inset showing a close-up view of a bracket detail (no text or symbols present)
natural_image
Diagram of a mechanical component with concentric circular parts and an arrow indicating direction (no text or symbols)natural_image
Technical line drawing of a car rear bumper with decorative patterned seating and door panel (no text or symbols)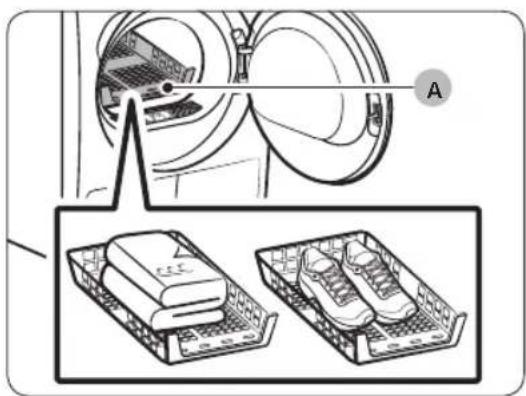
natural_image
Diagram of a car interior with a directional arrow indicating upward movement (no text or symbols present)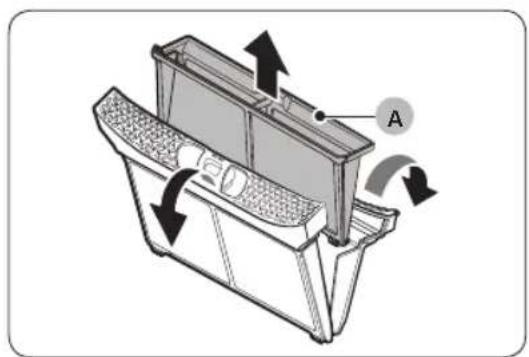
natural_image
Technical diagram of a car intake tray with directional arrows indicating flow or movement (no text or symbols present)
natural_image
Diagram showing four steps of a toilet or sink assembly, with no visible text or symbols.natural_image
Diagram of a refrigerator interior with arrows indicating airflow or movement (no text or symbols)natural_image
Technical line drawing of a rectangular electronic component with mounting flanges and a labeled point B (no text or symbols beyond label)natural_image
Diagram of a door panel with two hanging objects and a labeled component B (no text or symbols present)- Atlaisvinkite fiksatorius (B).

natural_image
Diagram of a device with a labeled component 'C' and an arrow indicating direction (no text or symbols beyond label)natural_image
Line drawing of a grater inside a rectangular appliance, with a toothbrush touching the interior (no text or symbols)
natural_image
Illustration of a mechanical component with a cloth hanging from its side (no text or symbols)
natural_image
Diagram of a device being inserted into a housing, showing internal components and an arrow indicating insertion (no text or symbols present)natural_image
Line drawing of a front-loading washing machine with circular vent and side panel (no text or symbols)
DV9*TA2****, DV8*TA2****, DV7*TA2****
| TIPAS | DŽIOVYKLĖ SU PRIEKYJE ESANČIOMIS DURELĖMIS | |
| MATMENYS | A 600 mm | |
| B 850 mm | ||
| C 600 mm | ||
| D 650 mm | ||
| E 1100 mm | ||
| SVORIS | 50 kg | |
| ELEKTROS REIKALAVIMAI | 220–240 V / 50 Hz | 780-800 W |
| LEISTINA TEMPERATŪRA | 5–35 °C | |
DV9*TA0****, DV8*TA0****, DV7*TA0****
| TIPAS | DŽIOVYKLĖ SU PRIEKYJE ESANČIOMIS DURELĖMIS | |
| MATMENYS | A 600 mm | |
| B 850 mm | ||
| C 600 mm | ||
| D 650 mm | ||
| E 1100 mm | ||
| SVORIS | Durų stiklo tipas | 49 kg |
| * Ne durų stiklo tipas | 48 kg | |
| ELEKTROS REIKALAVIMAI | 220–240 V / 50 Hz 600-650 W | |
| LEISTINA TEMPERATŪRA | 5–35 °C | |

PASTABA
natural_image
Medical X-ray image showing internal anatomical structures with no visible text or labelsnatural_image
Symbol of a trash bin crossed with a diagonal line, no text or numbers presentnatural_image
Simple line drawing of a curved mechanical bracket or clamp (no text or symbols)natural_image
Simple line drawing of a curved object resembling a stylized arm or tool (no text or symbols)natural_image
Simple line drawing of a bulb-shaped object with a flared top and rounded base (no text or symbols)
natural_image
Simple line drawing of a coiled tube or hose with two connectors (no text or symbols)Garā novadcaurule (2m)

natural_image
Simple line drawing of a closed book with a blank cover (no text or symbols)natural_image
Simple line drawing of a rectangular container with internal grid pattern (no text or symbols)natural_image
Simple line drawing of a pen-like object with a loop handle (no text or symbols)Tīrīšanas birstīte
natural_image
Simple line drawing of a mechanical component or bracket (no text or symbols)natural_image
Isometric line drawing of a rectangular electronic component or housing (no text or symbols)natural_image
Two identical diagrams showing a mechanical component with rotational arrows, labeled C and D (no text or symbols beyond labels)natural_image
Line drawing of a front view of a washing machine casing with internal components and a close-up inset showing a component detail (no text or symbols)
natural_image
Technical diagram of a mechanical assembly with labeled component A (no text or symbols beyond label)
natural_image
Line drawing of a standard square sink with a pipe and handle, no text or symbols presentnatural_image
Technical line drawing of a mechanical component with a black arrow indicating direction (no text or symbols)natural_image
Diagram of a mechanical component with an arrow indicating rotation or assembly (no text or symbols present)- Ar smalku priekšmetu atvienojiet durtinu blivi.
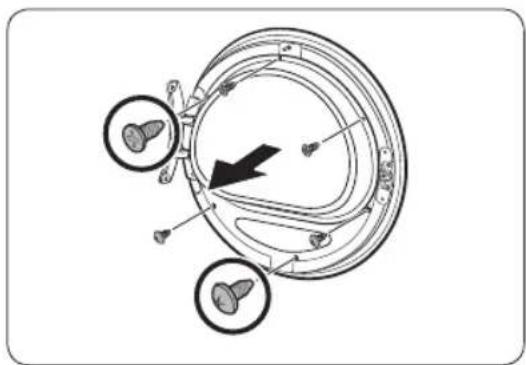
natural_image
Diagram of a mechanical or electrical component with three circular features and an arrow indicating direction (no text or symbols present)natural_image
Diagram of a mechanical device with two circular components and directional arrows indicating rotation or assembly (no text or symbols)
natural_image
Technical illustration of two mechanical components with a directional arrow indicating rotation (no text or symbols)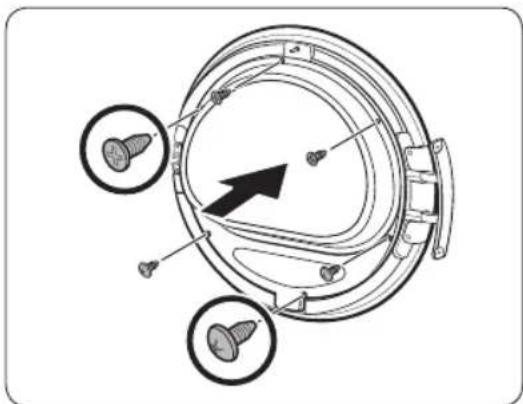
natural_image
Technical diagram of a mechanical component with three circular features and a central arrow indicating direction (no text or symbols present)natural_image
Diagram of a mechanical component with an arrow indicating rotation or assembly (no text or symbols present)

natural_image
Diagram showing a door with keyhole and coin symbols, no text or labels present
natural_image
Technical diagram of a mechanical component with an inset showing a close-up view of a shaft and mounting holes (no text or symbols present)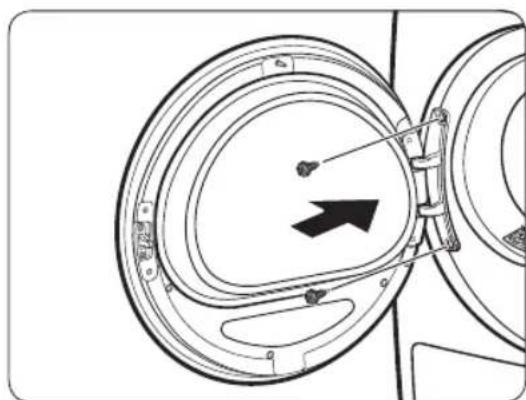
natural_image
Diagram of a mechanical component with circular housing and directional arrow (no text or symbols)natural_image
Technical line drawing of a car rear bumper with decorative patterned seating and door panel (no text or symbols)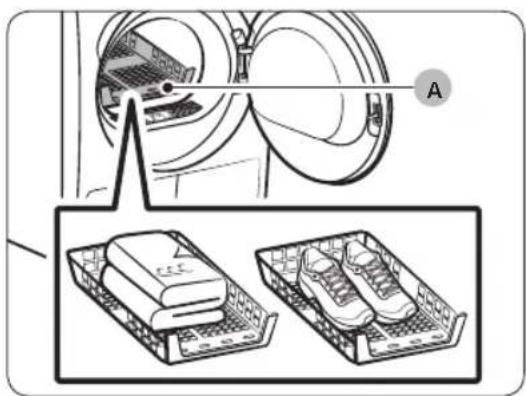
natural_image
Diagram showing a device with labeled components and two separate views of a laptop case (no text or symbols present)natural_image
Diagram of a car interior with a directional arrow indicating upward motion (no text or symbols)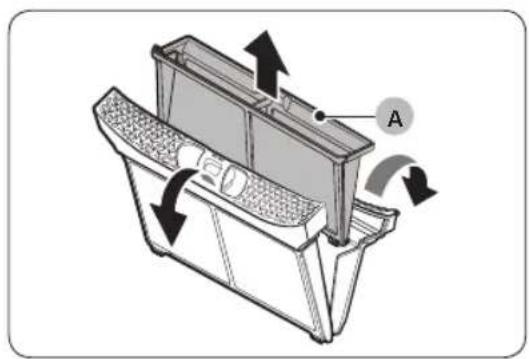
natural_image
Technical diagram of a mechanical device with labeled component A and directional arrows indicating motion (no text or symbols beyond label)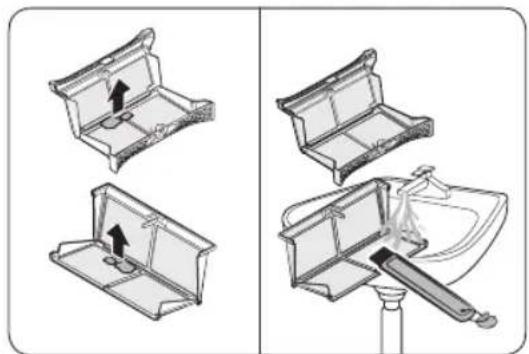
natural_image
Diagram showing four steps of a toilet or sink assembly, with no visible text or symbols.natural_image
Diagram of a mechanical device with directional arrows indicating motion or flow (no text or symbols)natural_image
Technical line drawing of a rectangular electronic component with mounting flanges and a labeled point B (no text or symbols beyond label)natural_image
Diagram of a door panel with two hanging items and a labeled component B (no text or symbols present)natural_image
Diagram of a device with a labeled component 'C' and an arrow indicating direction (no text or symbols beyond label)natural_image
Line drawing of a grater inside a rectangular appliance with a toothbrush touching the interior (no text or symbols)
natural_image
Illustration of a mechanical clamp or bracket with a cloth hanging from its side (no text or symbols)
natural_image
Diagram of a device being inserted into a housing, showing internal components and an arrow indicating insertion (no text or symbols present)natural_image
Line drawing of a front-loading washing machine with circular vent and side panel (no text or symbols)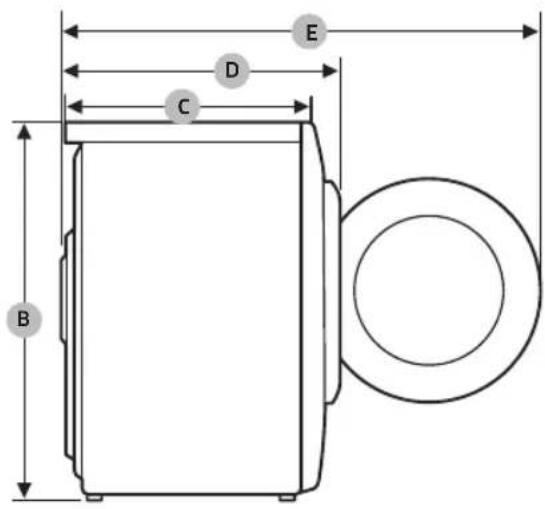
DV9*TA2****, DV8*TA2****, DV7*TA2****
| TIPS | VEŁAS ŽAVETĀJS ARIEVIETOŠANAS LŪKUPRIEKŠPUSĒ | |
| IZMĒRI | A 600 mm | |
| B 850 mm | ||
| C 600 mm | ||
| D 650 mm | ||
| E 1100 mm | ||
| SVARS | 50 kg | |
| ELEKTROSISTĒMASPRASĪBAS | 220–240 V / 50 Hz 780-800 W | |
| PIELAUJAMĀ IZMANTOŠANAS TEMPERATŪRA | 5-35 °C | |
DV9*TA0****, DV8*TA0****, DV7*TA0****
| TIPS | VEŁAS ŽAVETAJS ARIEVIETOŠANAS LUKUPRIEKŠPUSE | |
| IZMĚRI | A 600 mm | |
| B 850 mm | ||
| C 600 mm | ||
| D 650 mm | ||
| E 1100 mm | ||
| SVARS | Durvju stikla veids | 49 kg |
| * Stikla veids bez durvīm | 48 kg | |
| ELEKTROSISTEMAS PRASÍBAS | 220-240 V / 50 Hz 600-650 W | |
| PIELAUJAMÁ IZMANTOŠANAS TEMPERATURA | 5-35 °C | |

PIEZIME
Stikla modeli bez durvim: DV**TA***D*
natural_image
Medical X-ray image showing internal anatomical structures with no visible text or labelsSoojuspump-kuivati
Kasutusjuhend
DV9*TA2****/DV8*TA2****/DV7*TA2****
DV9*TA0****/DV8*TA0****/DV7*TA0****

SAMSUNG
Sisukord
Ohutusteave 4
natural_image
Symbol of a trash bin crossed with a diagonal line, no text or numbers presentnatural_image
Simple line drawing of a curved mechanical bracket (no text or symbols)
natural_image
Simple line drawing of a curved mechanical component (no text or symbols)
natural_image
Simple line drawing of a bulb-like object with a flared top and rounded base (no text or symbols)natural_image
Simple line drawing of a coiled cable or hose with two connectors (no text or symbols)
natural_image
Simple line drawing of a closed book with a blank cover (no text or symbols)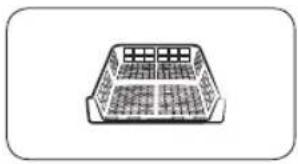
natural_image
Simple line drawing of a rectangular container with internal grid pattern (no text or symbols)natural_image
Simple line drawing of a pen-like object with a handle and loop (no text or symbols)natural_image
Simple line drawing of a mechanical component or bracket (no text or symbols)
natural_image
Technical line drawing of a rectangular electronic device with mounting holes (no text or symbols)Virnastamiskronstein (SK-DH, SK-DA, SKK-DF)
Virnastamiskomplekt (SKK-DD, SKK-DDX)

MÄRKUS
natural_image
Two identical diagrams showing a mechanical component with arrows indicating rotation, labeled C and D (no text or symbols beyond labels)natural_image
Line drawing of a front view of a washing machine casing with internal components and a close-up inset showing a component detail (no text or symbols)
natural_image
Technical diagram of a mechanical assembly with labeled component A (no text or symbols beyond label)Üle valamuserva:


natural_image
Line drawing of a square sink with a pipe and outlet pipe (no text or symbols)natural_image
Technical line drawing of a mechanical component with a black arrow indicating direction (no text or symbols)natural_image
Diagram of a mechanical component with a circular housing and a black arrow indicating rotation (no text or symbols)natural_image
Diagram of a mechanical or electrical component with three circular features and an arrow indicating direction (no text or symbols present)natural_image
Diagram of a mechanical device with two circular components and directional arrows indicating rotation or assembly (no text or symbols)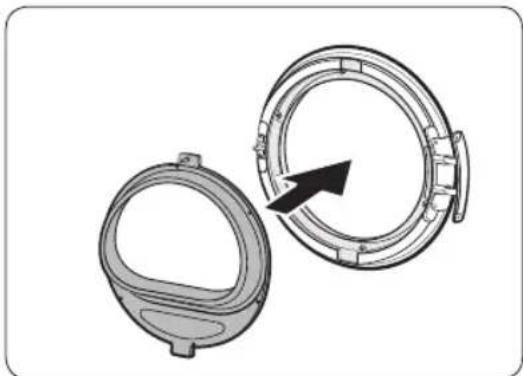
natural_image
Technical illustration of two mechanical components with a directional arrow indicating rotation or assembly (no text or symbols)
natural_image
Technical diagram of a mechanical component with three circular features and a central arrow indicating direction (no text or symbols present)natural_image
Diagram of a mechanical component with an arrow indicating rotation or assembly (no text or symbols present)
natural_image
Diagram of a door panel with screwdrivers and a switch, showing no text or symbols
natural_image
Diagram showing a door with a keyhole and arrow pointing to it, surrounded by coins and a square (no text or symbols)
natural_image
Technical diagram of a mechanical component with an inset showing a close-up view of a bracket detail (no text or symbols present)
natural_image
Diagram of a mechanical component with concentric circular parts and an arrow indicating direction (no text or symbols)natural_image
Line drawing of a car rear bumper with decorative patterned seating and door panel (no text or symbols)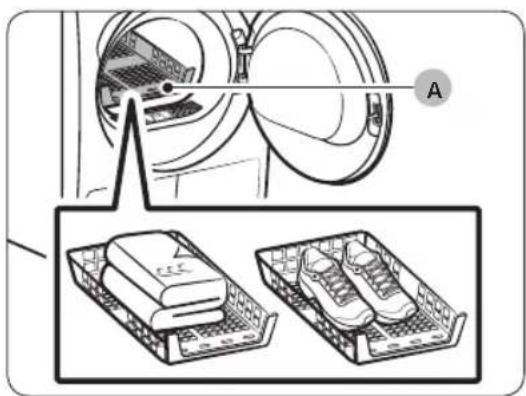
A. Restil kuivatamine
natural_image
Diagram of a car interior with a directional arrow indicating upward motion (no text or symbols)
natural_image
Technical diagram of a car intake manifold with directional arrows indicating flow or movement (no text or symbols)
natural_image
Diagram showing two views of a toilet handle mechanism, one with an arrow indicating direction and the other with a tool inserted (no text or symbols present)natural_image
Diagram of a mechanical device with arrows indicating motion or flow, no text or symbols presentnatural_image
Technical line drawing of a mechanical component with labeled point B (no text or symbols beyond label)natural_image
Diagram of a door latch with two labeled parts (A and B), showing internal components and scroll arrows (no text or symbols beyond labels)- Avage fiksaatorid (B).

natural_image
Diagram of a device with a labeled component 'C' and an arrow indicating direction (no text or symbols present)- Eemaldage sisemine kate (C).

natural_image
Line drawing of a grater inside a rectangular appliance with a toothbrush touching the grille (no text or symbols)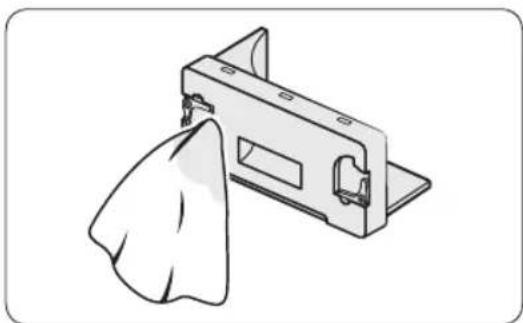
natural_image
Illustration of a mechanical component with a cloth hanging from its side (no text or symbols)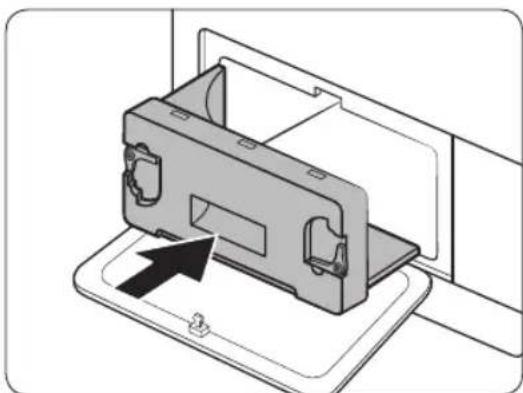
natural_image
Diagram of a device being inserted into a housing, showing internal components and an arrow indicating insertion (no text or symbols present)natural_image
Line drawing of a front-loading washing machine with circular vent and side panel (no text or symbols)
DV9*TA2****, DV8*TA2****, DV7*TA2****
| TÜÜP EESTLAADITAV KUIVATI | ||
| MÕÕTMED | A 600 mm | |
| B 850 mm | ||
| C 600 mm | ||
| D 650 mm | ||
| E 1100 mm | ||
| MASS | 50 kg | |
| ELEKTRINÕUDED | 220–240 V / 50 Hz 780-800 W | |
| LUBATAV TEMPERATUUR | 5–35 °C | |
Lisa
DV9*TA0****, DV8*TA0****, DV7*TA0****
| TÜÜP EESTLAADITAV KUIVATI | ||
| MÕÕTMED | A 600 mm | |
| B 850 mm | ||
| C 600 mm | ||
| D 650 mm | ||
| E 1100 mm | ||
| MASS | Ukseklaasi tüüp | 49 kg |
| * Uks, mis ei ole klaasist | 48 kg | |
| ELEKTRINÕUDED | 220–240 V / 50 Hz 600-650 W | |
| LUBATAV TEMPERATUUR | 5–35 °C | |

MÄRKUS
natural_image
Medical X-ray image showing internal anatomical structures with no visible text or labelsnatural_image
Symbol of a trash bin crossed with no text or numbers, representing environmental restriction (no text present)natural_image
Simple line drawing of a curved mechanical bracket or clamp (no text or symbols)
natural_image
Simple line drawing of a curved object resembling a stylized tool or bracket (no text or symbols)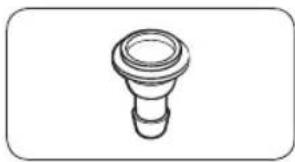
natural_image
Simple line drawing of a bulb-like object with a flared top and rounded base (no text or symbols)natural_image
Simple line drawing of a coiled cable or hose with two connectors (no text or symbols)natural_image
Simple line drawing of a closed book with a blank cover (no text or symbols)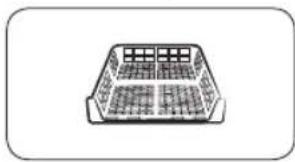
natural_image
Simple line drawing of a rectangular container with internal grid pattern (no text or symbols)natural_image
Simple line drawing of a pen-like object with a loop handle (no text or symbols)Βούρτσα καθαρισμού
natural_image
Simple line drawing of a mechanical component or bracket (no text or symbols)natural_image
Isometric line drawing of a rectangular electronic device with mounting holes (no text or symbols)natural_image
Two identical diagrams showing a mechanical component with arrows indicating rotation, labeled C and D (no text or symbols beyond labels)natural_image
Line drawing of a washing machine casing with internal components and a magnified inset showing a close-up detail (no text or symbols)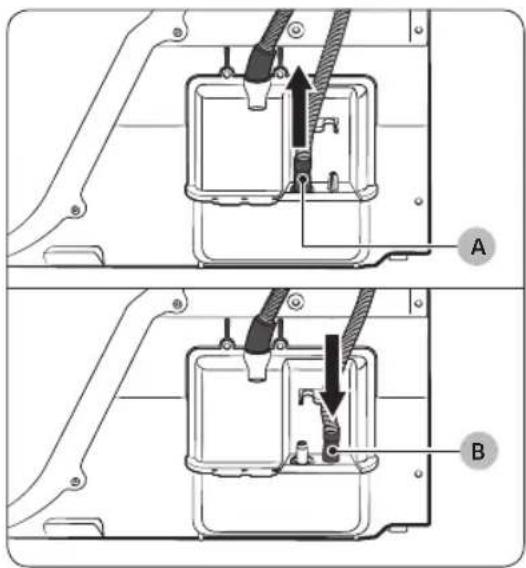
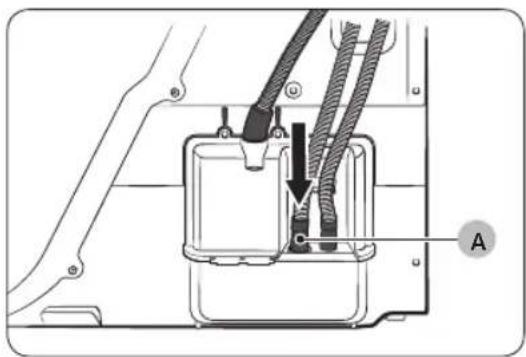
natural_image
Technical diagram of a mechanical assembly with labeled component A (no text or symbols beyond label)
natural_image
Line drawing of a standard square sink with a pipe fitting underneath (no text or symbols)natural_image
Technical line drawing of a mechanical component with a black arrow indicating direction (no text or symbols)natural_image
Diagram of a mechanical component with a black arrow indicating rotation or assembly (no text or symbols present)natural_image
Diagram of a mechanical component with three circular features and a black arrow indicating direction (no text or symbols)natural_image
Diagram of a mechanical device with two circular components and directional arrows indicating rotation or assembly (no text or symbols)
natural_image
Technical illustration of two mechanical components with a directional arrow indicating rotation (no text or symbols)
natural_image
Technical diagram of a mechanical component with three circular features and a central arrow indicating direction (no text or symbols present)natural_image
Diagram of a mechanical component with an arrow indicating rotation or assembly (no text or symbols present)

natural_image
Diagram showing a door with a keyhole and arrow pointing to it, surrounded by coins and a square (no text or symbols)
natural_image
Technical diagram of a mechanical component with an inset showing a close-up view of a bracket detail (no text or symbols present)
natural_image
Diagram of a mechanical component with concentric circular parts and an arrow indicating direction (no text or symbols)natural_image
Line drawing of a car rear bumper with decorative patterned backrest and side door (no text or symbols)
natural_image
Diagram of a car interior with a directional arrow indicating upward motion (no text or symbols)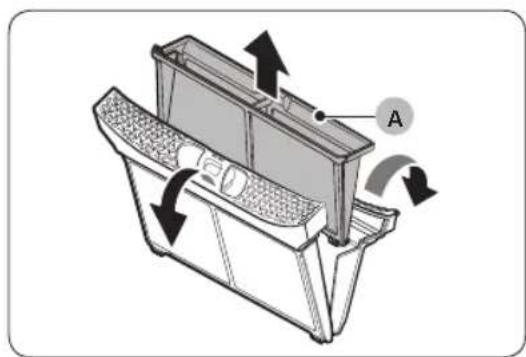
natural_image
Technical diagram of a mechanical device with labeled component A and directional arrows indicating motion (no text or symbols beyond label)
natural_image
Diagram showing four steps of a toilet or sink assembly, with no visible text or symbols.natural_image
Diagram of a mechanical device with directional arrows indicating motion or flow (no text or symbols)natural_image
Technical line drawing of a rectangular electronic device with mounting flanges and a labeled component (B), no text or symbols present.natural_image
Diagram of a door panel with two hanging items and a labeled component B (no text or symbols present)natural_image
Diagram of a device with a labeled component 'C' and an arrow indicating direction (no text or symbols present)natural_image
Line drawing of a microwave oven with a toothbrush inside (no text or symbols)
natural_image
Illustration of a mechanical component with a cloth hanging from its side (no text or symbols)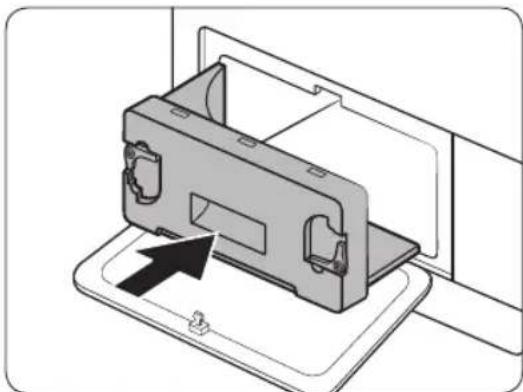
natural_image
Diagram of a device being inserted into a tray, showing internal components and an arrow indicating insertion (no text or symbols present)natural_image
Line drawing of a front-loading washing machine with circular vent and side panel (no text or symbols)
DV9*TA2****, DV8*TA2****, DV7*TA2****
natural_image
Medical X-ray image showing internal anatomical structures with no visible text or labelsnatural_image
Simple line drawing of a curved mechanical bracket or clamp (no text or symbols)
natural_image
Simple line drawing of a curved mechanical or cable component (no text or symbols)
natural_image
Simple line drawing of a bulb-like object with a flared top and rounded base (no text or symbols)Držák hadice Kabelová spona Spojka hadice
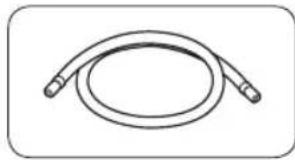
natural_image
Simple line drawing of a coiled cable or hose with two connectors (no text or symbols)
natural_image
Simple line drawing of a closed book with a blank cover (no text or symbols)
natural_image
Simple line drawing of a rectangular container with internal compartments (no text or symbols)natural_image
Simple line drawing of a pen-like object with a loop handle (no text or symbols)natural_image
Simple line drawing of a stylized object resembling a rocket or container (no text or symbols)
natural_image
Isometric line drawing of a rectangular electronic device with mounting holes (no text or symbols)Sada pro instalaci s konzolou (SK-DH, SK-DA, SKK-DF)
Sada pro instalaci na sebe (SKK-DD, SKK-DDX)

POZNÁMKA
natural_image
Two diagrams showing a mechanical component with arrows indicating motion, labeled C and D (no text or symbols beyond labels)natural_image
Line drawing of a front view of a washing machine casing with internal components and a highlighted inset showing a component (no text or symbols present)
natural_image
Technical diagram of a mechanical assembly with labeled component A (no text or symbols present)Nad umyvadlem:


natural_image
Line drawing of a standard square sink with a pipe and handle, no text or symbols presentnatural_image
Technical line drawing of a mechanical component with a black arrow indicating direction (no text or symbols)natural_image
Diagram of a mechanical component with an arrow indicating direction, showing a circular component and a separate oval (no text or symbols)natural_image
Diagram of a mechanical or electrical component with three circular features and directional arrows, no visible text or symbols.natural_image
Diagram showing a mechanical component with a rotating ring and directional arrows indicating motion (no text or symbols)
natural_image
Technical illustration of two mechanical components with a directional arrow indicating rotation (no text or symbols)
natural_image
Technical diagram of a mechanical component with three circular features and a central arrow indicating direction (no text or symbols present)natural_image
Diagram of a mechanical component with an arrow indicating rotation or assembly (no text or symbols present)

natural_image
Diagram showing a door with keyhole and coin symbols, no text or labels present
natural_image
Technical diagram of a mechanical component with an inset showing a close-up view of a shaft and mounting features (no text or symbols present)
natural_image
Diagram of a mechanical component with circular housing and directional arrow (no text or symbols)natural_image
Technical line drawing of a car rear bumper with decorative patterned seating and door panel (no text or symbols)
A. Šetrné sušení
natural_image
Diagram of a car interior with a directional arrow indicating upward motion (no text or symbols)
natural_image
Technical diagram of a mechanical device with labeled component A and directional arrows indicating motion (no text or symbols beyond label)
natural_image
Diagram showing four steps of a mechanical device with arrows indicating movement, no text or symbols present.natural_image
Diagram of a mechanical device with arrows indicating motion or flow, no text or symbols presentnatural_image
Technical line drawing of a mechanical component with labeled point B (no text or symbols beyond label)natural_image
Diagram of a door panel with two hanging items and a labeled component 'B' (no text or symbols on the main diagram)natural_image
Diagram of a device with a labeled component 'C' and an arrow indicating direction (no text or symbols beyond label)natural_image
Line drawing of a toothbrush inside a rectangular appliance (no text or symbols)
natural_image
Illustration of a metal bracket with a cloth hanging from its side (no text or symbols)
natural_image
Diagram of a device being inserted into a tray, showing internal components and an arrow indicating insertion (no text or symbols present)natural_image
Line drawing of a front-loading washing machine with circular vent and side panel (no text or symbols)
DV9*TA2****, DV8*TA2****, DV7*TA2****
| TYPSUŠIČKA S PŘEDNÍM PLNĚNÍM | ||
| ROZMĚRY | A 600 mm | |
| B850 mm | ||
| C600 mm | ||
| D650 mm | ||
| E 1100 mm | ||
| HMOTNOST | 50 kg | |
| POŽADAVKY NA ELEKTRICKÉ PŘIPOJENÍ | 220-240 V / 50 Hz 780-800 W | |
| POVOLENÁ TEPLOTA | 5-35 °C | |
DV9*TA0****, DV8*TA0****, DV7*TA0****
natural_image
Medical X-ray image showing internal anatomical structures with no visible text or labelsChladivo (typ): R-134a (GWP = 1430)
Chladivo (plnenie)
- DV**TA2****: 0,43kg, 0,615tCO2e
• DV**TA0****: 0,37kg, 0,529tCO2e
natural_image
Symbol of a trash bin crossed with a diagonal line, no text or numbers presentnatural_image
Simple line drawing of a curved mechanical bracket or clamp (no text or symbols)
natural_image
Simple line drawing of a curved object resembling a stylized tool or bracket (no text or symbols)
natural_image
Simple line drawing of a bulb-like object with a flared top and rounded base (no text or symbols)Vodiaci prvok hadice Svorka na káble Konektor na hadicu
natural_image
Simple line drawing of a coiled hose or tube with two connectors (no text or symbols)
natural_image
Simple line drawing of a closed book with a blank cover (no text or symbols)
natural_image
Simple line drawing of a rectangular container with internal compartments (no text or symbols)Dlhá odtoková hadica (2m)
natural_image
Simple line drawing of a pen or tool with a loop handle (no text or symbols)Čistiaca kefa
natural_image
Simple line drawing of a stylized object resembling a rocket or container (no text or symbols)
natural_image
Isometric line drawing of a rectangular electronic device with mounting holes (no text or symbols)natural_image
Two identical diagrams showing a mechanical component with arrows indicating motion, labeled C and D (no text or symbols on the components themselves)natural_image
Line drawing of a front view of a washing machine casing with internal components and a close-up inset showing a component detail (no text or symbols)
natural_image
Technical diagram of a mechanical assembly with labeled component A (no text or symbols present)Cez umývadlo:


natural_image
Line drawing of a square sink with a faucet and pipe (no text or symbols)natural_image
Technical line drawing of a mechanical component with a black arrow indicating direction (no text or symbols)- Otvorte dvierka a uvol'nite dve skrutky na pánte dvierok. Dvierka uchopte oboma rukami a opatrným nadvihnutím ich zložte.

natural_image
Diagram of a mechanical component with a circular housing and a separate oval component, showing no text or symbols.natural_image
Diagram of a circular mechanical or biological structure with internal components and directional arrows, no visible text or symbols.natural_image
Diagram showing a mechanical component with a rotating ring and directional arrows indicating motion (no text or symbols)
natural_image
Technical illustration of two mechanical components with a directional arrow indicating rotation (no text or symbols)
natural_image
Technical diagram of a mechanical component with three circular features and a central arrow indicating direction (no text or symbols present)natural_image
Diagram of a mechanical component with an arrow indicating rotation or assembly (no text or symbols present)
natural_image
Diagram of a door panel with screwdrivers and a switch, showing no text or symbols
natural_image
Diagram showing a door with a keyhole and coin, pointing at it (no text or symbols present)
natural_image
Technical diagram of a mechanical component with an inset showing a close-up view of a bracket detail (no text or symbols present)
natural_image
Diagram of a mechanical component with concentric circular parts and an arrow indicating direction (no text or symbols)natural_image
Line drawing of a car rear bumper with decorative patterned seating and door panel (no text or symbols)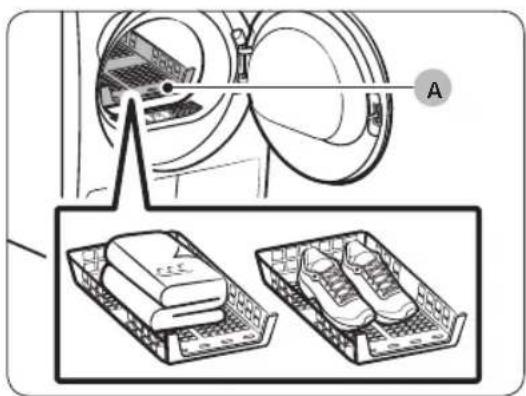
A. Sušenie so stojanom
-
Stojan na sušenie vložte do bubna tak, že predný okraj stojana zasuniete do otvorov v otvore dvierok.
-
Položte jednotlivé kusy na stojan tak, aby bolo medzi nimi dost miesta na prúdenie vzduchu. Ak sušíte odevy, poskladajte ich a položte na stojan. Ak sušíte obuv, položte ju tak, aby podrážky smerovali nadol.
-
Zatvorte dvierka a stlačte tlačidlo Napájanie. Vyberte cyklus TIME DRY (ČASOVÝ PROGRAM) a stláčaním tlačidla čas vyberte čas sušenia.
-
Stlačte a podržte tlačidlo ▷II Spustit/Pozastavit (Pre štart stlačte).
Návrhy na sušenie
natural_image
Diagram of a car interior with a directional arrow indicating upward motion (no text or symbols)
natural_image
Technical diagram of a mechanical device with labeled component A and directional arrows indicating motion (no text or symbols beyond label)
natural_image
Diagram showing four steps of a mechanical device with arrows indicating movement, no text or symbols present.natural_image
Diagram of a refrigerator interior with arrows indicating airflow or movement (no text or symbols)natural_image
Technical line drawing of a mechanical component with labeled point B (no text or symbols beyond label)natural_image
Diagram of a door panel with two hanging items and a labeled component B (no text or symbols present)natural_image
Diagram of a device with a labeled component 'C' and an arrow indicating direction (no text or symbols present)natural_image
Line drawing of a microwave oven with a toothbrush inside (no text or symbols)
natural_image
Illustration of a metal bracket with a cloth hanging from its side (no text or symbols)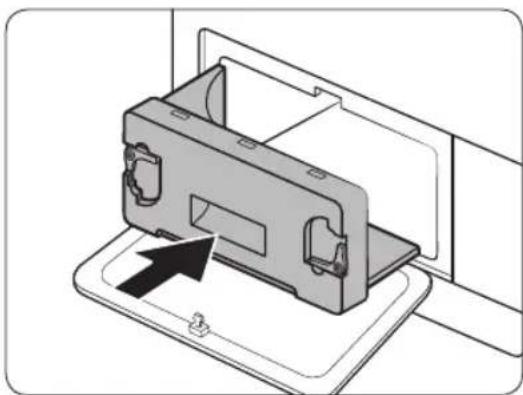
natural_image
Diagram of a device being inserted into a housing panel, showing internal components and an arrow indicating insertion direction (no text or symbols present)natural_image
Line drawing of a front-loading washing machine with circular vent and side panel (no text or symbols)
DV9*TA2****, DV8*TA2****, DV7*TA2****
| TYP | SUŠIČKA Z VKLADANÍM SPREDU | |
| ROZMERY | A 600 mm | |
| B850 mm | ||
| C600 mm | ||
| D650 mm | ||
| E 1100 mm | ||
| HMOTNOST | 50 kg | |
| POŽIADAVKY NA PRÍVOD ELEKTRICKEJ ENERGIE | 220-240 V / 50 Hz 780-800 W | |
| PRÍPUSTNÁ TEPLOTA | 5-35 °C | |
Príloha
DV9*TA0****, DV8*TA0****, DV7*TA0****
| TYP | SUŠIČKA Z VKLADANÍM SPREDU | |
| ROZMERY | A 600 mm | |
| B850 mm | ||
| C600 mm | ||
| D650 mm | ||
| E 1100 mm | ||
| HMOTNOST | Typ so sklom v dvierkach | 49 kg |
| * Typy bez skla v dvierkach | 48 kg | |
| POŽIADAVKY NA PRÍVOD ELEKTRICKEJ ENERGIE | 220-240 V / 50 Hz 600-650 W | |
| PRÍPUSTNÁ TEPLOTA | 5-35 °C | |

POZNÁMKA
Modely bez skla v dvierkach: DV**TA***D*
Údaje o spotrebe
| Model Program | Várka (kg)(1) | Elektrina(kWh) | Maximálnetrvanie (minúty) |
| DV9*TA2**** | COTTON(BAVLNA)(2) | 9,0 1,54 220 | |
| 4,5 0,89 140 | |||
| IRON DRY (SUCHÉ K ŽEHLENIU)(2) | 9,0 0,95 140 | ||
| SYNTHETICS(SYNTETIKA) | 4,5 0,70 98 | ||
| DV8*TA2**** | COTTON(BAVLNA)(2) | 8,0 1,41 200 | |
| 4,0 0,80 130 | |||
| IRON DRY (SUCHÉ K ŽEHLENIU)(2) | 8,0 0,90 130 | ||
| SYNTHETICS(SYNTETIKA) | 4,0 0,60 90 | ||
| DV7*TA2**** | COTTON(BAVLNA)(2) | 7,0 1,25 180 | |
| 3,5 0,73 120 | |||
| IRON DRY (SUCHÉ K ŽEHLENIU)(2) | 7,0 0,85 120 | ||
| SYNTHETICS(SYNTETIKA) | 3,5 0,50 82 |
- Heat Pump Dryer
- Contents
- Safety information 4
- Installation 17
- Operations 32
- English
- Maintenance 44
- Troubleshooting 50
- Appendix 53
- Safety information
- What you need to know about the safety instructions
- Important safety symbols
- WARNING
- CAUTION
- NOTE
- Read the instructions
- English
- WARNING - Risk of Fire
- Critical installation warnings
- Critical usage warnings
- Usage cautions
- English
- Critical cleaning warnings
- Instructions about the WEEE
- Correct Disposal of This Product (Waste Electrical & Electronic Equipment)
- Installation
- What's included
- Accessories (supplied)
- Accessories (not supplied)
- Installation requirements
- Location requirements
- Alcove or closet installation
- Electrical and grounding requirements
- Levelling
- Drain hose (if necessary)
- Installation checklist
- Before using the dryer
- Door reversal (DV\*\*TA\*\*\*A\*/DV\*\*TA\*\*\*T\* only)
- Operations
- Control panel
- Cycle overview
- Optimal Dry
- Cycle chart
- Getting started
- Simple steps to start
- Sorting and loading
- Rack Dry (applicable models only)
- Cycle guide
- Special features
- Delay End ⏱
- Child Lock
- Smart Check
- Maintenance
- Exterior
- Drum
- Lint filter
- Water tank
- Heat exchanger
- Troubleshooting
- Checkpoints
- Information codes
- Appendix
- Fabric care chart
- Protecting the environment
- Specification sheet
- SAMSUNG
- Sušilica rublja s toplinskom pumpom
- NAPOMENA
- Montaža
- OPREZ
- Rad
- Vodič kroz cikluse
- ! OPREZ
- ЗАБЕЛЕШКА
- NOTĂ
- Dolga odvodna cev (2m)
- Krtača za čiščenje
- Dodatna oprema (ni priložena)
- POZOR
- OPOMBA
- Namestitev
- Vzdrževanje
- SHËNIM
- Sušilica sa toplotnom pumpom
- Dodaci (ne isporučuju se)
- Postavljanje
- Korišćenje
- Kontrolna tabla
- Pregled programa
- Rezervoar za vodu
- Održavanje
- Izmenjivač toplote
- Priedai (nepridedami)
- PASTABA
- PIEZIME
- Soojuspump-kuivati
- Kasutusjuhend
- Sisukord
- Ohutusteave 4
- MÄRKUS
- POZNÁMKA
Brand : SAMSUNG
Model : DV80TA220AE
Category : Tumble drier