
TK 2040 DR - Cooker ECG - Free user manual and instructions
Find the device manual for free TK 2040 DR ECG in PDF.


| Product Type | Convector Heater |
| Brand | ECG |
| Model | TK 2040 DR |
| Power Levels | 3 (1000W, 1300W, 2300W) |
| Nominal Voltage | 220-240 V~ 50/60 Hz |
| Max Power | 2300 W |
| Noise Level | ≤ 35 dB |
| Temperature Range | 5 °C to 37 °C (41 °F to 99 °F) |
| Timer | 1 to 24 hours |
| Modes | 1000W, 1300W, 2300W, Tempering (5°C) |
| Fan (Turbo) Function | Yes, can be turned on/off in heating modes |
| Remote Control | Yes, with CR2032 battery (included) |
| Display | Digital, shows ambient and set temperature |
| Overheat Protection | Thermal fuse, displays "- -" if overheating |
| Safety Distance | At least 90 cm from objects |
| Installation | Free-standing on flat surface, must use included stand |
| Cleaning | Wipe with damp cloth, do not use abrasives |
| Repairability | Professional service only, do not open |
| Package Contents | Convector, stand (2 pcs), mounting bolts, manual |
| Suitable For | Well-insulated rooms or temporary use |
Frequently Asked Questions - TK 2040 DR ECG
User questions about TK 2040 DR ECG
0 question about this device. Answer the ones you know or ask your own.
Ask a new question about this device
Download the instructions for your Cooker in PDF format for free! Find your manual TK 2040 DR - ECG and take your electronic device back in hand. On this page are published all the documents necessary for the use of your device. TK 2040 DR by ECG.
USER MANUAL TK 2040 DR ECG
natural_image
Black electric heater with digital display and control panel (no visible text or symbols)TK 2040 DR
CZ
TEPLOVZDUŠNÝ KONVEKTOR
NÁVOD K OBSLUZE
This product is only suitable for well-insulated rooms or temporary use.
HR/BIH
KONVEKTORSKA GRIJALICA
UPUTE ZA UPORABU
Ova proizvod je prikladan samo za dobro izolirane prostore i kratkotrajnu uporabu.
SI
KONVEKCIJSKI GRELNIK
NAVODILA
CZ
POPIS PŘÍSTROJE
- 0/l main switch
- Air output in the Turbo mode
- Display and control panel
- Hot air vent
- Handles
- Case for storing the remote controller + the controller
- The stands
- Air inlet
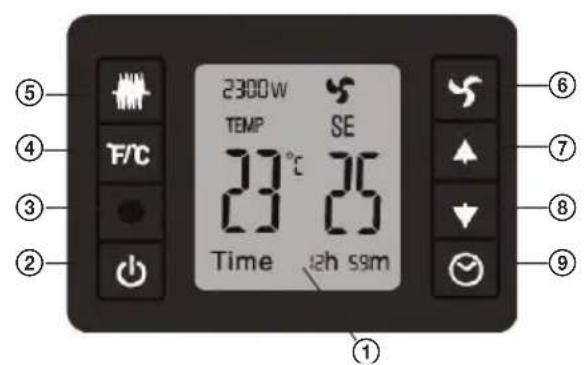
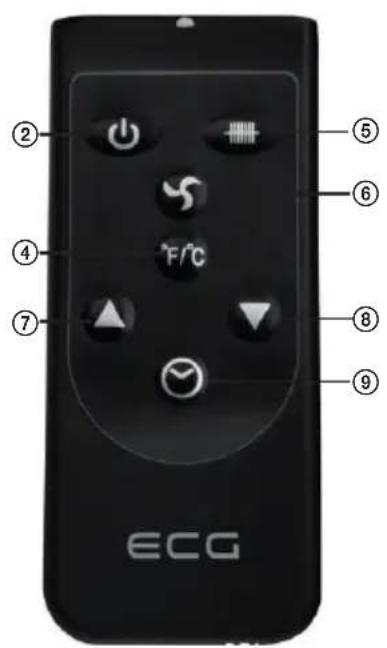
DESCRIPTION OF THE CONTROL PANEL/REMOTE CONTROLLER
- Display
- Switch button
- Remote control sensor
- Button to switch the temperature scale
- Button to switch the operating mode (power)
- Fan button - TURBO function
- Button +
- Button -
- Timer button
HR/BIH
OPIS UREĐAJA
Do not immerse in water! – Neponořovat do vody!

NEZAKRÝVAT!

Horký povrch!
VÝSTRAHA:
natural_image
Line drawing of a microwave oven with two top-mounted devices (no text or symbols)POKYNY K POUŽÍVÁNÍ
natural_image
Line drawing of a microwave oven with two top-mounted devices (no text or symbols)POKYNY NA POUŽÍVANIE
natural_image
Line drawing of a rectangular electronic device with two top-mounted ports and a central display (no text or symbols)INSTRUKCJE UŻYTKOWANIA
natural_image
Line drawing of a microwave oven with two top-mounted sensors above it (no text or symbols)HASZNÁLATI ÚTMUTATÓ
natural_image
Line drawing of a microwave oven with two top-mounted sensors (no text or symbols)GEBRAUCHSHINWEISE
Please read carefully and keep for future reference.
Warning: The safety measures and instructions contained in this manual do not include all potential conditions and scenarios. The user must understand that common sense, caution and care are factors that cannot be integrated into a product. Therefore, the user is responsible for these factors when using and operating this appliance. We are not liable for any damages caused during shipping, by incorrect use, voltage fluctuation or the modification or adjustment of any part of the appliance.
To protect against the risk of fire or electric shock, basic precautions must be taken while using electrical appliances, including the following:
- Make sure the voltage in your outlet corresponds to the voltage provided on the appliance label and that the socket is correctly grounded. The outlet must be installed in accordance with applicable electrical codes according to EN.
- Do not operate the heat convector without the base properly attached.
- Do not operate the device if the cord is damaged. All repairs, including cord replacements, must be carried out at a professional service centre! Do not remove the protective covers from the appliance; there is a risk of electric shock!
- Protect the device against direct contact with water and other liquids, to prevent potential electric shock.
- Do not operate the convector outdoors or in a moist environment and do not touch the cord or appliance with wet hands. Risk of electric shock.
- Close supervision is necessary for operating the heat convector near children!
- Make sure the convector is placed on a flat surface.
- Do not use the convector near inflammable items or underneath them, for example, near curtains. The temperature of surfaces
near the heat convector (0.9 m) can be hotter than usual. Place the convector to ensure sufficient air circulation.
- Do not place the convector on a high pile carpet.
- Do not place the convector in front of or directly under an electric socket.
- Do not cover the heat convector! Risk of overheating or catching fire if covered.
- The convector must not be plugged into the socket through a timer switch or connected to a remotely switched supply circuit; risk of fire in case of a remotely activated covered or insufficiently placed convector.
- Do not use the convector in the direct vicinity of the bath, shower or pool and do not use in places from which it may fall into the bath or other water containers!
- If an unusual smell or smoke begins to come from the device, disconnect the device and have it checked by a service centre.
- Do not switch off the device by pulling on the power cord. Always turn off the main switch of the convector first!
- Always unplug the convector when moving it to another location.
- Do not leave a convector with inserted power cord unsupervised. Disconnect the cord from the electrical outlet prior to any maintenance. Do not unplug the device by pulling the power cord. Unplug the power cord from the outlet by grasping the plug.
- Do not allow the power cord to touch hot surfaces or run the cord over sharp edges.
- Do not use the convector in places where inflammable materials are stored (paint, gasoline, solvent etc.) or where there is a risk of inflammable fumes appearing.
- Do not put your fingers or other objects into the openings of the heat convector.
-
Use the convector only in accordance with the instructions given in this manual. The manufacturer is not liable for damages caused by the improper use.
-
This appliance can be used by children aged eight and older and by the physically and mentally impaired or by individuals with insufficient experience and knowledge, if supervised or trained to use the appliance in a safe manner and understand potential dangers. Children must not play with the appliance. Cleaning and maintenance operations must not be carried out by children unless supervised by an adult. Children under the age of 8 shall keep away from the appliance and its power supply.
-
Children under 3 years of age should not be near the device unless they are under constant supervision.
- Children between 3 and 8 years of age can only switch on and off the appliance if it is correctly positioned and installed in its proper working position when supervised or instructed to use the appliance in a safe way and understand the potential hazards. Children between the ages of 3 and 8 may not connect the appliance, regulate it, clean it, or perform maintenance performed by the user.
WARNING: Some parts of the appliance may become very hot during operation and may cause burns. Increased attention should be paid in the presence of children or people with reduced physical or mental abilities.
Do not immerse in water! – Do not immerse in water!

DO NOT COVER!

Hot surface!
WARNING: To prevent overheating, do not cover the heater. The heater must not be placed directly under an outlet. Marked surfaces become hot during use
INSTALLATION REQUIREMENTS
- Place the convector on a flat surface with a sufficient amount of space around the appliance to ensure the proper function of exhaust vents.
- Between the device and surrounding objects must be a distance of at least 90 cm.
CONVECTOR ASSEMBLY
Unplug the appliance prior to any form of manipulation, to prevent injury by electric shock.
Make sure the package contains all parts necessary for assembling the convector. Contact your vendor if this is not the case. Package contents:
- Convector 1 pc
- Stand 2 pcs
- Mounting bolts for supports 4 pcs
- Operating manual 1 pc
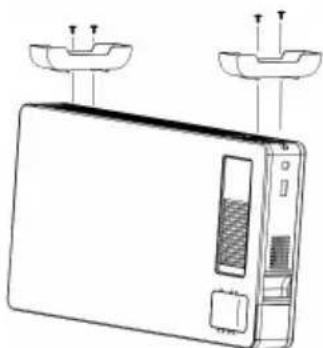
Prior to use, the supports should be attached to the convector.
- Turn the convector upside down.
- Attach both supports to the bottom of the convector so that the holes in the supports are aligned with the holes in the convector body.
- Attach them using the included screws.
- After assembling, turn the convector back into its normal working position and start using it.
natural_image
Line drawing of a microwave oven with two top-mounted sensors above it (no text or symbols)WARNING: The heater must not be operated without the attached supports.
USER'S INSTRUCTIONS
Inserting battery in the remote control:
- Remove the cover of the battery compartment on the back of the remote control.
- Insert in the holder in the cover the battery CR2032 (included), pay attention to proper polarity of the battery.
- Insert the cover with the battery back in the remote control.
Note: An odour or smoke may emit from the heat elements during the first use of the appliance or when turning on after a longer period of time. This effect is normal and will go away after a short while.
After plugging it to the outlet, turn on the heating first with the main switch 0/I and then with the switch on the control panel or the remote control.
You cannot change the setting or the temperature without switching on both switches.
Display and Control
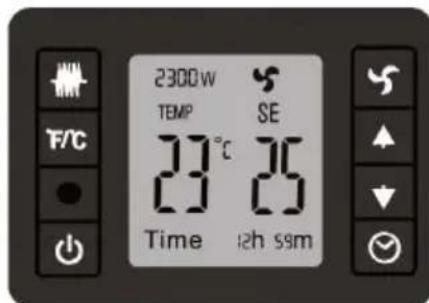
1. Display
The first time you switch it on (or after a long power disconnection), all segments and symbols of the display are displayed for 6 seconds, and then the display enters normal mode. The ambient temperature is displayed in the range of 0 to 36 °C, the set temperature is in the range of 5 to 37 °C or 41 to 99 °F. The temperature can be set between 5 °C and 37 °C with a tolerance of ± 1 °C.
2. Switch button ⏻
When you connect the appliance to the power supply and turn on both switches, the display shows the current temperature of the room and the current set temperature. Wait about 6 seconds and then you can freely change any values on the display using the buttons, see below.
3. The button to switch the temperature scale °C/°F
Pressing this button repeatedly switches the temperature display between the Celsius and Fahrenheit scale.
4. Operating mode button

Press this button repeatedly to switch between power modes: 1000W > 1300W > 2300W > tempering (the display shows a star) > 1000W > etc...
5. Fan button (Turbo)

Press the button repeatedly to turn the fan on or off. When the fan mode is active, the fan indicator is lit up.
6. Button +
Press the + button to increase the temperature, the maximum value is 37 °C. (Only in 1000W / 1300W / 2300W modes. In the tempering mode the temperature is set firmly to 5 °C and cannot be changed.)
7. Button - ▼
Press the – button to lower the temperature, the minimum value is 5 °C (only in 1000W / 1300W / 2300W modes).
8. Timer button 🕒
The appliance is equipped with a timer, which allows you to set the desired time of heating in the range 1 to 24 hours. After this time period expires, the appliance automatically shuts off. Press the timer button repeatedly, until the required time period appears (e.g. 1h 00m). If you want to deactivate the timer, press the timer button repeatedly until the time indicator disappears from the display.
Note: You can set only whole hours with the timer, the countdown displays hours and minutes.
Operation modes and functions of the appliance
1. Modes 1000W, 1300W, 2300W:
The heating power is set to 1000 W, 1300 W or 2300 W. The display shows the appropriate icon (1000W, 1300W or 2300W). Heating switches on when the ambient temperature drops 2 °C under the set temperature and switches off once the set ambient temperature is reached.
2. Tempering mode
When you select this mode a star symbol lights up. The heating switches on when the ambient temperature is 5 °C with 1000W heating power and the icon "1000W" lights up. The heating switches on when the ambient temperature is 4 °C with 1300W heating power and the icon "1300W" lights up. Both heating elements turn on when the ambient temperature is 3 °C and less (1000 and 1300 W) and the icon "2300W" lights up on the display. When the temperature rises above 6 °C, the heating elements turn off, the power icons turn off and only the tempering icon stays on.
3. Fan:
You can turn on/off the fan in the 1000W, 1300W and 2300W modes. You cannot use the fan in other modes.
4. Audio signals:
You can hear an audio signal every time you press a button, confirming the press of the button.
5. Temperature sensor:
The heating is equipped with thermal fuse. When overheating occurs, the control unit shuts off the heating elements and the symbol “- -” appears on the display of ambient temperature. After normal operation resumes, the appliance returns to its original operating mode.
6. Turning off the convector:
First switch off the convector by pressing the button on the display and with the main switch 0/I, then unplug the cable from the outlet!
Any handling of the device can only be performed if is switches are turned off and it is unplugged from the electrical outlet!
CLEANING
- Prior to cleaning, unplug the convector and leave the appliance to completely cool down.
- Clean the outer surface with a moist cloth and wipe dry using a towel. Do not use detergents or abrasive cleaning agents and prevent water from entering the appliance.
- If you do not plan to use the appliance for a longer period of time, it should be placed in a clean and dry location protected against dust. It is best to store the appliance in the original package to prevent dust from entering the device.
TECHNICAL SPECIFICATIONS
3 power levels 1000/1300/2300 W
Nominal voltage: 220–240 V\~ 50/60 Hz
Power: 2300 W
Remote controller: 1× Lithium battery 3 V CR2032 (included)
Noise level: ≤ 35 dB
USE AND DISPOSAL OF WASTE
Wrapping paper and corrugated paperboard – deliver to scrapyard. Packing foil, PE bags, plastic elements – throw into plastic recycling containers.
DISPOSAL OF PRODUCTS AT THE END OF LIFETIME
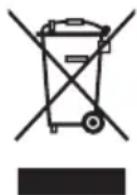
Disposal of electric and electronic equipment (valid in EU member countries and other European countries with an implemented recycling system)
The represented symbol on the product or package means the product shall not be treated as domestic waste. Hand over the product to the specified location for recycling electric and electronic equipment. Prevent negative impacts on human health and the environment by properly recycling your product.
Recycling contributes to preserving natural resources. For more information on the recycling of this product, refer to your local authority, domestic waste processing organization or store, where you purchased the product.
This product complies with EU directive requirements on electromagnetic compatibility and electrical safety.
08/05

The instruction manual is available at website www.ecg-electro.eu.
Changes in text and technical parameters reserved.
SIGURNOSNE UPUTE
natural_image
Line drawing of a microwave oven with two top-mounted sensors above it (no text or symbols)3 razine snage - 1000/1300/2300 W
Nazivni napon: 220–240 V\~ 50/60 Hz
Snaga: 2300 W
Daljinski upravljač: 1 × Litijska baterija 3 V CR2032 (priložena)
Buka: ≤ 35 dB
UPORABA I ODLAGANJE OTPADA
natural_image
Line drawing of a microwave oven with two top-mounted sensors above it (no text or symbols)natural_image
Line drawing of a microwave oven with two top-mounted sensors above it (no text or symbols)natural_image
Line drawing of a microwave oven with two top-mounted sensors above it (no text or symbols)natural_image
Line drawing of a microwave oven with two top-mounted sensors above it (no text or symbols)natural_image
Line drawing of a microwave oven with two top-mounted sensors above it (no text or symbols)250 69 Klíčany, Czech Rep. e-post: ECG@kbexpert.cz
LT
K+B Progres, a.s.
U Expertu 91 tel.: +420 272 122 111
250 69 Klíčany, Czech Rep. el. paštas: ECG@kbexpert.cz
LV
K+B Progres, a.s.
U Expertu 91 tel.: +420 272 122 111
250 69 Klíčany, Czech Rep. e-pasts: ECG@kbexpert.cz

- TK 2040 DR
- CZ
- TEPLOVZDUŠNÝ KONVEKTOR
- HR/BIH
- KONVEKTORSKA GRIJALICA
- SI
- KONVEKCIJSKI GRELNIK
- POPIS PŘÍSTROJE
- DESCRIPTION OF THE CONTROL PANEL/REMOTE CONTROLLER
- OPIS UREĐAJA
- Do not immerse in water! – Neponořovat do vody!
- NEZAKRÝVAT!
- Horký povrch!
- VÝSTRAHA:
- POKYNY K POUŽÍVÁNÍ
- POKYNY NA POUŽÍVANIE
- INSTRUKCJE UŻYTKOWANIA
- HASZNÁLATI ÚTMUTATÓ
- GEBRAUCHSHINWEISE
- Please read carefully and keep for future reference.
- DO NOT COVER!
- Hot surface!
- INSTALLATION REQUIREMENTS
- CONVECTOR ASSEMBLY
- USER'S INSTRUCTIONS
- Inserting battery in the remote control:
- Display and Control
- Display
- Switch button ⏻
- The button to switch the temperature scale °C/°F
- Operating mode button
- Fan button (Turbo)
- Button +
- Button - ▼
- Timer button 🕒
- Operation modes and functions of the appliance
- Modes 1000W, 1300W, 2300W:
- Tempering mode
- Fan:
- Audio signals:
- Temperature sensor:
- Turning off the convector:
- CLEANING
- TECHNICAL SPECIFICATIONS
- USE AND DISPOSAL OF WASTE
- DISPOSAL OF PRODUCTS AT THE END OF LIFETIME
- SIGURNOSNE UPUTE
- UPORABA I ODLAGANJE OTPADA
- LT
- LV
Brand : ECG
Model : TK 2040 DR
Category : Cooker