HG8 Ultra Sense HG870HU 011 - Vacuum Cleaner HOOVER - Free user manual and instructions
Find the device manual for free HG8 Ultra Sense HG870HU 011 HOOVER in PDF.

User questions about HG8 Ultra Sense HG870HU 011 HOOVER
0 question about this device. Answer the ones you know or ask your own.
Ask a new question about this device
Download the instructions for your Vacuum Cleaner in PDF format for free! Find your manual HG8 Ultra Sense HG870HU 011 - HOOVER and take your electronic device back in hand. On this page are published all the documents necessary for the use of your device. HG8 Ultra Sense HG870HU 011 by HOOVER.
USER MANUAL HG8 Ultra Sense HG870HU 011 HOOVER
INSTRUCTIONS POUR UNE UTILISATION SÛRE (FR) 16
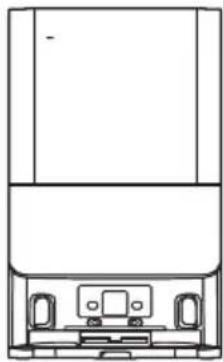
natural_image
Line drawing of a circular robotic vacuum cleaner with control buttons and a central hub (no text or symbols)INSTRUCTIONS FOR SAFE USE
This appliance should only be used for domestic cleaning, as described in this user guide.
Please ensure that this quide is fully understood before operating the appliance.
Always switch off and remove the charger from the socket before cleaning the appliance or any maintenance task.
This appliance can be used by children aged from 8 years and above and persons with reduced physical, sensory or mental capabilities or lack of experience and knowledge if they have been given supervision or instruction concerning use of the appliance in a safe way and understand the hazards involved. Children shall not play with the appliance.
Cleaning and user maintenance shall not be made by children without supervision.
If the power cord is damaged stop using the appliance immediately. To avoid a safety hazard, an authorised Hoover service engineer must replace the power cord.
If the area to be cleaned contains a balcony or stairs, a physical barrier should be used to prevent access to the balcony or stairs and ensure safe operation. Small children and pets must be supervised while the Robot is cleaning.
Always store the appliance indoors. Do not use outdoors or expose the appliance to the elements, humidity or heating sources (oven, fireplace, wet floor).
Do not expose the Robot or accessories to excessive heat / cold (keep between 0-30°C).
Do not drop the Robot or use any accessory if it has been dropped, damaged, left outdoors or dropped in water.
Never unplug or pull the mains power adaptor by the power cord. Do not use to clean stairs.
Battery Charging
WARNING: For the purposes of recharging the battery, only use the docking station (Ref: HG8DCS).
Check that your supply voltage is the same as that stated on the charger. Never charge the batteries in temperatures above 30^ C or below 0^ C. Plug the charger delivered with this appliance into a suitable socket.
Only use the approved battery type (type ref.: XT2406-4S2P-5200-MMEV) recommended by HOOVER Failing to do so may cause the lithium-ion battery to become a potential hazard.
Leaks from battery cells can occur under extreme usage or temperature conditions. If the liquid gets on skin, wash quickly with water. If the liquid gets into the eyes, flush them immediately with clean water for a minimum of 10 minutes. Seek medical attention.
It is normal for the charger to become warm to the touch when charging.
Use only attachments, consumables or spares recommended or supplied by Hoover. Do not pick up hard or sharp objects, matches, hot ashes, cigarette ends or other similar items.
Do not spray with or pick up flammable liquids, cleaning fluids, aerosols or their vapours.
Do not continue to use your appliance or charger if it appears faulty.

Class 1 Consumer laser product
Hoover service: To ensure the continued safe and efficient operation of this appliance we recommend that any servicing or repairs are only carried out by an authorised Hooverservice engineer.
Do not use the appliance to clean animals or people.
Do not replace the Robot batteries with non-rechargeable batteries.
If the Robot will not be used for a long time (several weeks), unplug the mains power adaptor.
End of life battery removal
If the appliance is to be disposed of the batteries must first be removed. The appliance must be disconnected from the supply mains when removing the battery. Dispose of the batteries safely. Run the appliance until it stops because the batteries are fully discharged. Used batteries should be taken to a recycling station and not disposed of with household waste. To remove the batteries, please contact the Hoover Customer Centre or proceed according to the following instructions.
Unplug the charger and switch off the Robot. Turn the Robot over and place on a level surface. Remove the screws and battery compartment cover. Remove the battery pack NOTE: Should you experience any difficulty in dismantling the unit or for more detailed information on treatment, recovery and recycling of this appliance, please contact your local city office or your household waste disposal service.
IMPORTANT NOTES BEFORE USE
Please read the following information carefully before using your Robot or its accessories.
Do not disassemble the Robot and do not attempt to repair it yourself. If a fault occurs, please contact the Hoover after Sales Service for professional advice.
Stairs: The Robot uses sensors to avoid falling down steps, stairs or over an edge. In some situations the sensors can become confused.
The Robot cannot detect steps that are less than 10 cm in height. Steps less than 10cm may cause the Robot to fall down. If available, set No-go areas or Virtual walls through the app to protect your Robot from falling.
Highly reflective or very dark surfaces used on some steps or stairs, such as glass or polished ceramics may cause the Robot to fall down.
If available set No-go areas or Virtual walls through the app or place a carpet on the lower step to protect your Robot from falling.
Using your Robot on mezzanines, landings or raised areas without borders should be avoided. If available set No-go areas or Virtual walls through the app to prevent your Robot entering these areas.
Battery Use: Your Robot is powered by rechargeable, high capacity lithium ion batteries. These rechargeable batteries are guaranteed for a period of 6 months if they are maintained and operated according to this User Manual.
In the event of a significant drop in the Robot's performance, replacement batteries can be obtained from your Hoover retailer.
Only use Hoover approved replacement parts for your Robot. Use of parts that are not approved by Hoover are dangerous and will invalidate your warranty.
Only use the supplied charging station and mains power adaptor to recharge your Robot. Use of the incorrect charging station or mains power adaptor is dangerous and will invalidate your warranty.
D-□-C : detachable supply unit
| Frequency bands | 2.400 GHz~2.4835 GHz(2.4 GHz ISM Band) |
| Maximum RF power transmitted in the frequency band | 802.11b/11Mbps: 18dBm±2 dB802.11g/54Mbps: 15dBm±2 dB802.11n/MCS7: 15dBm±2 dB |
The Environment
The symbol on this appliance indicates that this appliance may not be treated as household waste. Instead it must be handed over to the applicable collection point for the recycling of electrical and electronic equipment. Disposal must be carried out in accordance with local environmental regulations for waste disposal. For more detailed information about treatment, recovery and recycling of this appliance, please contact your local city office, your household and waste disposal service or the shop where you purchased the appliance.

CE This appliance complies with the European Directives 2014/53/EU and 2011/65/EU. To receive a copy of the declaration of conformity, please contact the manufacturer through the website: www.candy-group.com.
CANDY HOOVER GROUP S.r.l. Via Comolli 16, 20861 Brugherio (MB) Italy
CONTENTS OF THE BOX
natural_image
Line drawing of a circular robotic vacuum cleaner with a central hub and mounting feet (no text or symbols)Robot Cleaner

natural_image
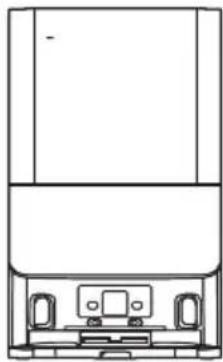
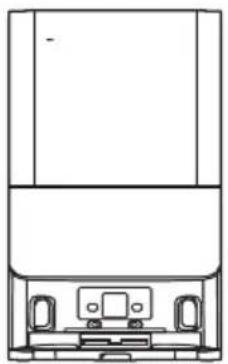
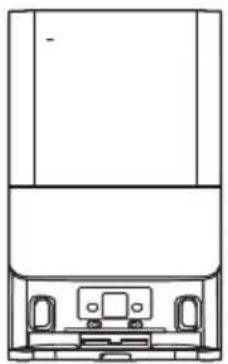
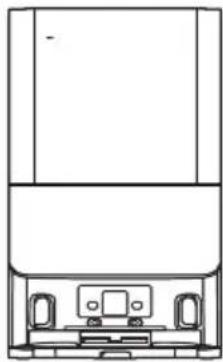
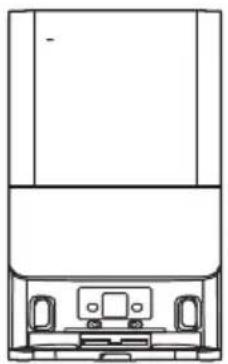
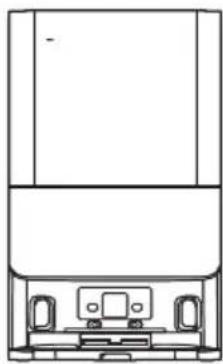
Line drawing of a mechanical device with front and top views (no text or symbols)6in1 Docking Station
User Manual
Additional filter for Robot
Additional Bag for Station
2x Additional Mops for Robot
Wash Plate for Station
GETTING TO KNOW YOUR ROBOT CLEANER
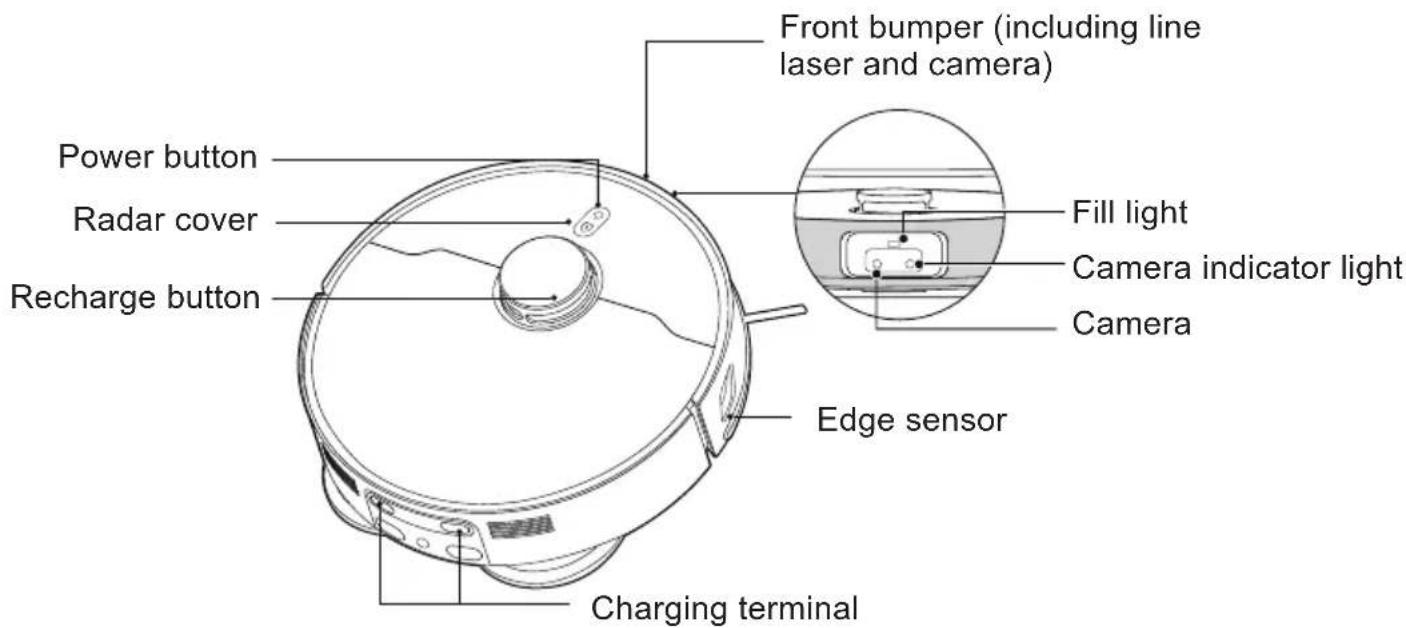
text_image
Front bumper (including line laser and camera) Power button Radar cover Recharge button Fill light Camera indicator light Camera Edge sensor Charging terminal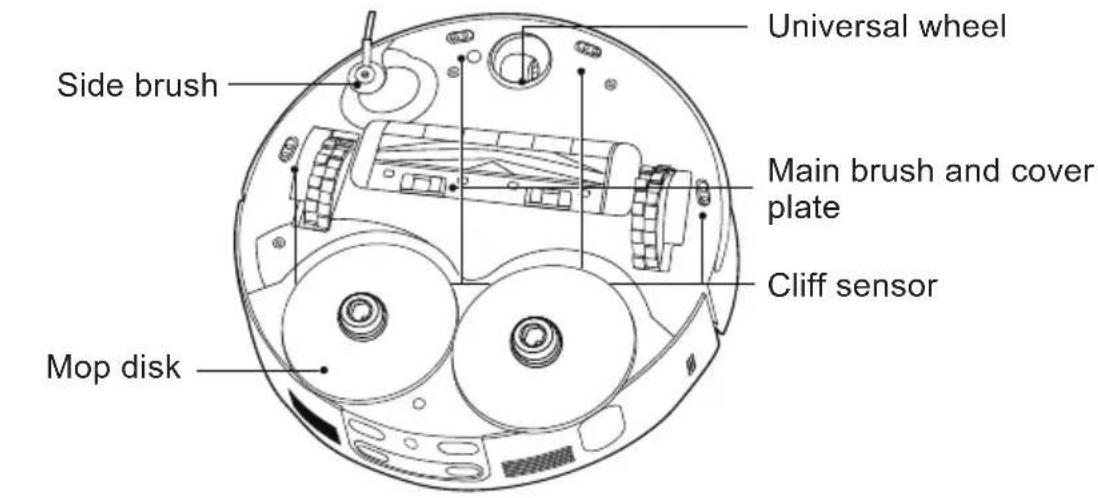
text_image
Universal wheel Side brush Main brush and cover plate Cliff sensor Mop disk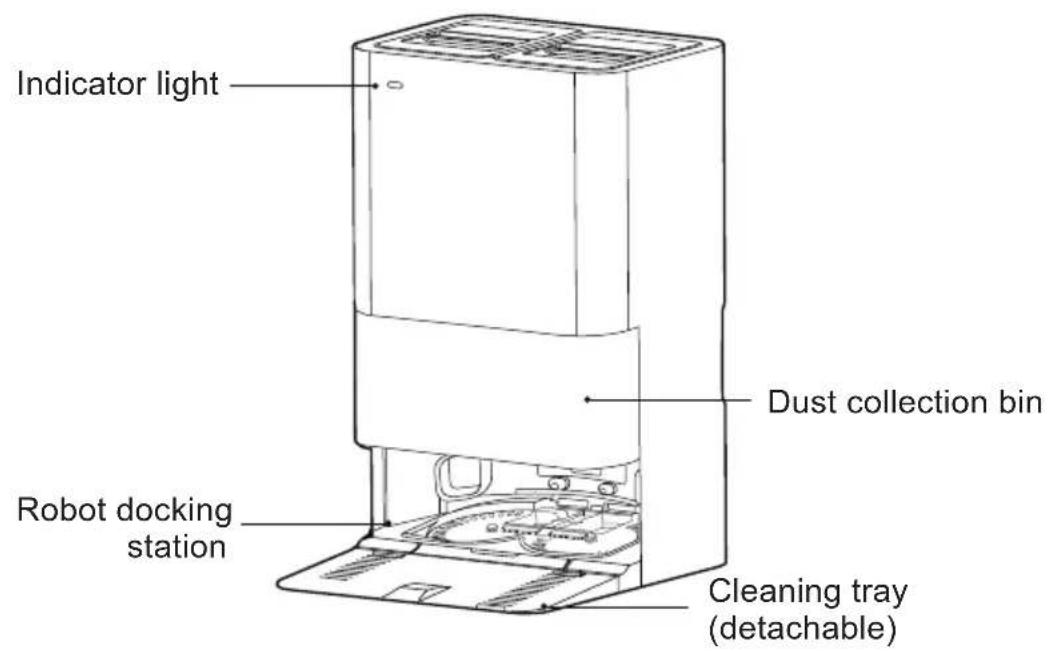
text_image
Indicator light Dust collection bin Robot docking station Cleaning tray (detachable)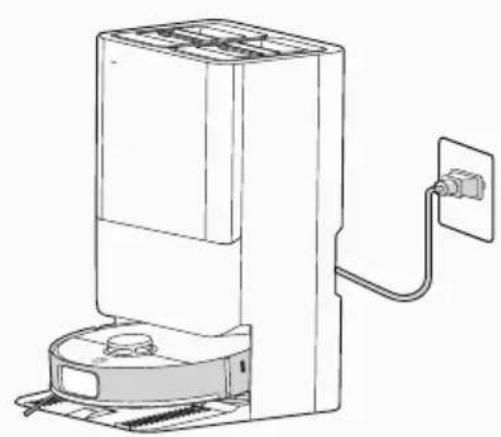
natural_image
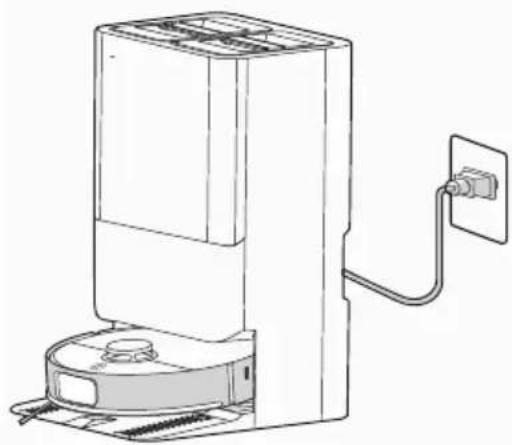
Line drawing of a portable air conditioner unit with attached power outlet (no text or symbols)Fig. 1
PREPARE YOUR ROBOT CLEANER
PACKAGING
Do not dispose of your Robot packaging. It may be required for the validity of your guarantee in the future.
When unpacking your Robot and its accessories, take care to keep bags away from babies, young children and animals to avoid the risk of suffocation.
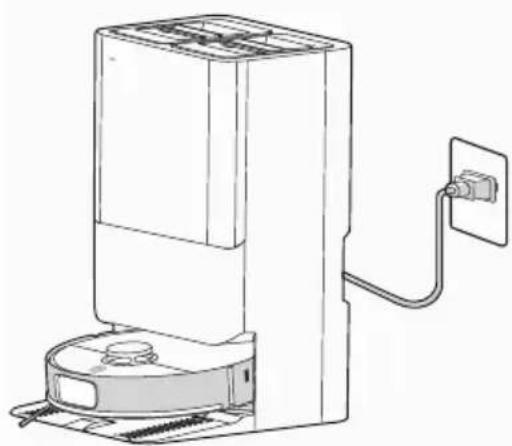
Before first use, charge your appliance for 6 hours.
[Fig. 1]
Do not expose the docking station to temperatures below 0^ C or above 30^ C as this may damage the battery.
The docking station must only be connected to a standard mains power outlet.
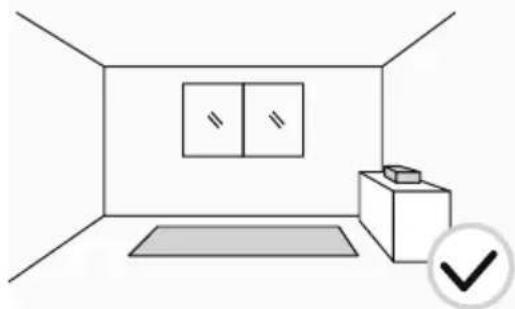
natural_image
Simple line drawing of a room interior with a cabinet, rug, and wall (no text or symbols)Fig. 2

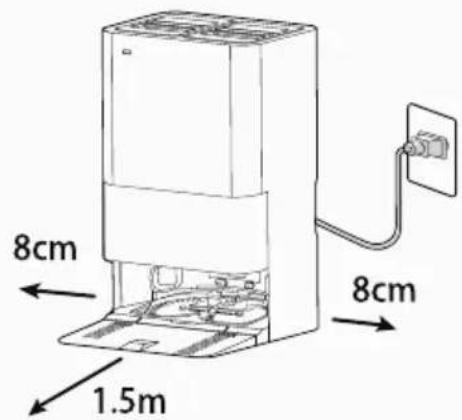
text_image
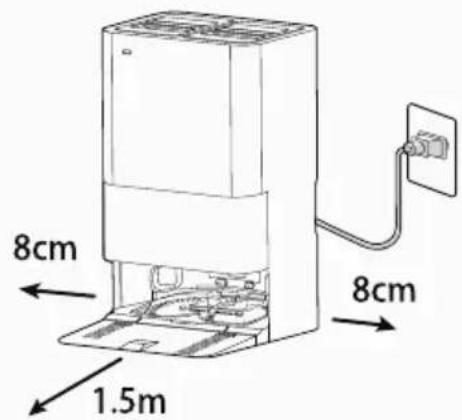
8cm 1.5m 8cmFig. 3

natural_image
Line drawing of a vacuum cleaner with attached power outlet (no text or symbols)Fig. 4
BATTERY
For optimum battery performance it is recommended that you keep your robot batteries fully charged. When the robot is not in use it should be left connected to the docking station. The robot has an intelligent charging system. This prevents the batteries from becoming overcharged.
To avoid accidents, make sure that every person in the room is aware of the presence of the robot.
PREPARE YOUR HOME
Before use, remove obstacles that may get in the path of the Robot. [Fig. 2] Pay attention to:
Objects that can be easily knocked over.
Edges of carpets or rugs that it may get caught on.
Floor length curtains and tablecloths.
Heat sources or flammable items.
Power cords and cables.
Fragile objects.
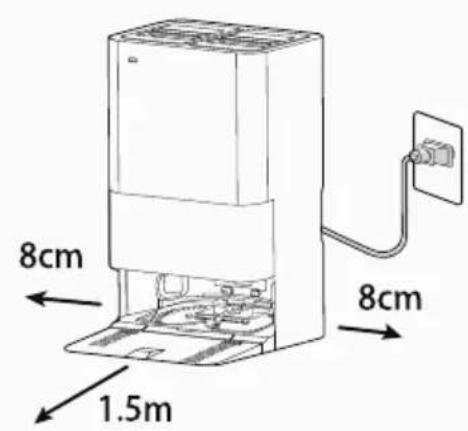
DOCKING STATION SETUP
-
Plug in the docking station
-
Make sure the power cord is not caught underneath the docking station.
-
Place the docking station on a non-reflective level floor, preferably against a wall. If the floor surface is too reflective, it will interfere with the Robot navigation system and it may have difficulties locating the docking station. Ensure there is at least 8 cm of space on both sides and at least 1.5 m of open area in front [Fig. 3]
-
There should not be any object in the area around the docking station for 2 meters in front and 1 meter on each side.
-
Avoid direct exposure to the sunlight and do not cover the base station's signal transmission area with stickers or other objects.
-
Do not place the base station on soft surfaces such as carpets and ensure the charging area is dry.
-
Make sure the power cord is not tangled or stretched. If there is an excess, rewind it on docking station back.
-
Check that the dust container is inserted correctly into the robot and that the dust bag, clean and dirty water tank and wash plate is correctly inserted into the docking station.
-
Remove the sponges from robot cleaner. Guide your robot into the docking station to begin. During normal use, it will take approximately 6 hours to complete a full recharge.
-
Before starting first cleaning session, remove the clean water tank on the right side, open the lid, add clean water with Hoover detergent (35602971-DETHHOOV) [Fig. 5]
-
Do not add laundry detergent, laundry liquid, non-Hoover official cleaning agents, disinfectants, hand soap, unknown oily liquids, or acidic or alkaline substances to the clean water tank, as this may cause a damage.
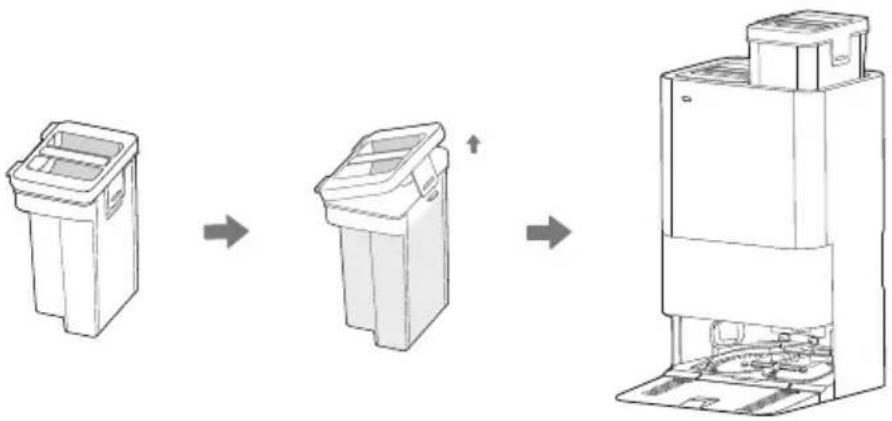
flowchart
graph LR
    A["Initial Bin"] --> B["Intermediate Bin"]
    B --> C["Final Disposal Unit"]
Fig. 5
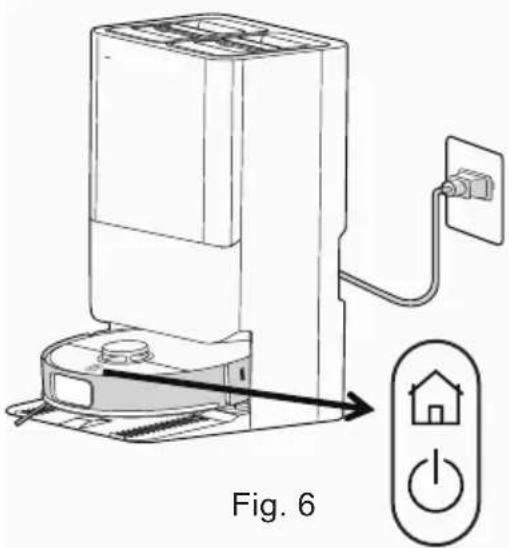
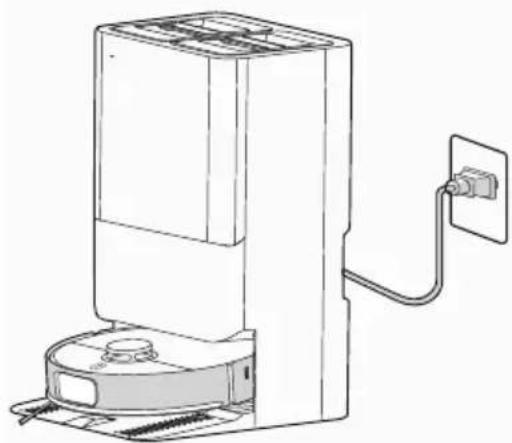
CHARGING THE BATTERY
Connect the base station power supply, and press and hold the robot “ON/OFF” button for 3 seconds to power it on. Once the power indicator is on, position the robot close to the docking station for charging, as shown in the illustration. [Fig. 4]
For daily use, please keep the robot in a charging state.
Before the first cleaning, ensure the robot is fully charged to 100%.
Automatic charging
If the robot battery capacity is low during the cleaning session, the robot cleaner will stop cleaning and start to search for the docking station to charge itself.
When the Robot Cleaner finishes the cleaning session, it will automatically switch to recharge mode, and start to look for the docking station to charge itself.
NOTE: Make sure that the Charging Contacts of the robot and docking station are not dirty.
Clean the Charging Contacts if necessary.
If the robot cannot be turned on due to low power, please manually move the robot to the docking station for charging. The Charging Contacts should be aligned.
Battery
Over time the capacity of your robot battery will decrease, and it will need to be replaced. A replacement battery can be purchased from an approved Hoover retailer. Only use genuine Hoover spare parts and accessories.
USING YOUR ROBOT CLEANER
| Buttons (fig.5) Operation Function | ||
| On/Off Button ⏻ | Press and hold for 3 seconds Power on/off | |
| Press once briefly Start cleaning | ||
| Home Button ⏻ | When the robot is on standby outside the docking station, press once briefly | Start recharging |
| When the robot is inside the docking station, press once briefly | Start dust collection | |
| When the robot is inside the docking station, press twice briefly in succession | Start mop cleaning | |
| When the robot is on standby outside the docking station, press twice briefly in succession | Start spot cleaning | |
| Press and hold for 3 seconds Enable/disable child lock | ||
| Wi-fi connection Button | Press and hold for 3 seconds | Enter network configuration mode |
| Reset Button Press | and hold for 15 seconds | Hardware is forced to shut down |
| + | Press and hold for 7 seconds Restore factory settings | |
text_image
Fig. 6On/Off and Home Button
Off: Power off/Sleep/Do not disturb
White light slowly brighten: Powering on
White light always on: Working
White light fl ashing: Relocating/charging/drying
Red light always on: Low battery
Red light fl ashing: Faults
Wi-Fi Connection Light
Red light fl ashing quickly: Entering network
confi guration mode
Red light fl ashing slowly: Connecting to the Wi-fi
Off: Network configuration failed
Docking Station Light
Off: Power off/Sleep/Do not disturb
White light always on: Working
White light slowly brighten: Powering on
Red light fl ashing: Faults, refer to the app

text_image
QR code with embedded logo in center, likely linking to a website or digital content


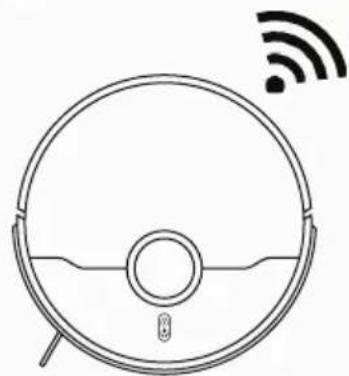
natural_image
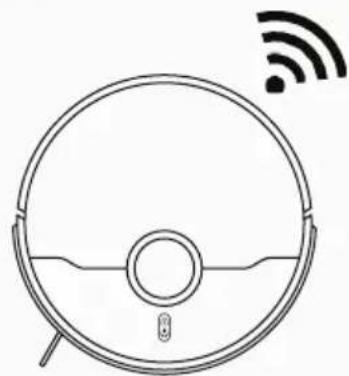
Line drawing of a robotic vacuum cleaner with Wi-Fi signal icon above (no text or symbols on the device itself)Fig. 7
Operation of the robot
A. Start: When the robot is powered on, press the robot's ⏻ button briefly to start the cleaning, or this operation could be managed via mobile App
B. Pause: While the robot is working, press ⏻ button on the robot to pause the cleaning activity, or this operation could be managed via mobile App.
C. Resume: When robot is paused, briefly press the robot's ⏻ button to restart the cleaning, or this operation could be managed via mobile App.
D. Power off: When the robot is powered on, press and hold the robot's ⏻ button for 3 seconds to power it off.
E. Recharge: When the robot is powered on, briefly press the robot's button, and the robot will automatically return to docking station to charge, or this operation could be managed via mobile App.
F. Child Lock: The user can enable the child lock function by pressing and holding the robot's button for 3 seconds or through the APP. Once enabled, the robot will have a voice prompt of "Child lock enabled". Once the child lock is enabled, the buttons on both the docking station and the robot will no longer be functional. Operations can only be performed through the APP to prevent accidental
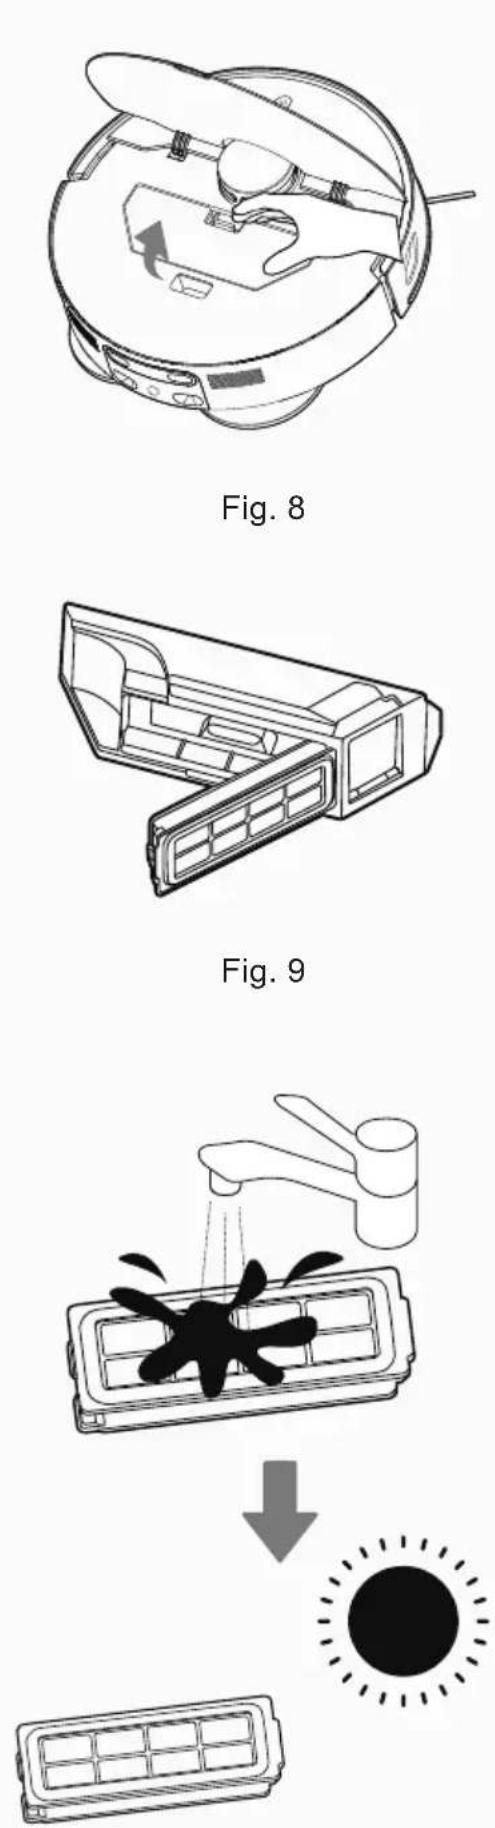
Fig. 10
activation by pets or children. To disable the child lock, press and hold the 📄 button for 3 seconds or use the APP to disable it in the "More" settings. After disabling, the robot will have a voice prompt of "Child lock disabled".
Operation of the station
Mop Cleaning: To ensure optimal mopping performance, the robot is set by default to return to the base station to clean the mop once every 10 minutes during mopping. You can also manually set the docking cleaning frequency in the APP. After completing a mopping task and returning to the docking station, the robot will automatically wash the mops (this cleaning cycle will take slightly longer).
Mop Drying: After the robot completes a mopping task and returns to the docking station, it will automatically dry the mop once mop washing sessions is finished (hot air is used by default; this setting can be adjusted in the APP). In the APP, drying session can be start and stop manually.
Dust Collection: During or after a cleaning task, the robot will return to the docking station to perform automatic dust collection. In the APP, users can manually initiate a dust collection task; the dust collection frequency can also be adjusted through the APP under base station settings.
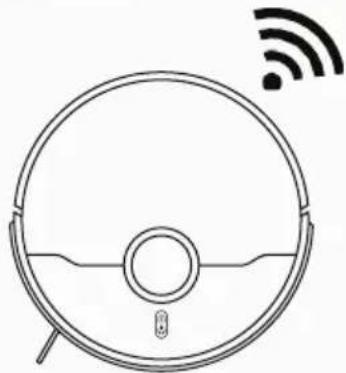
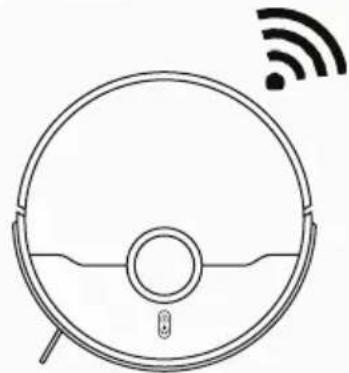
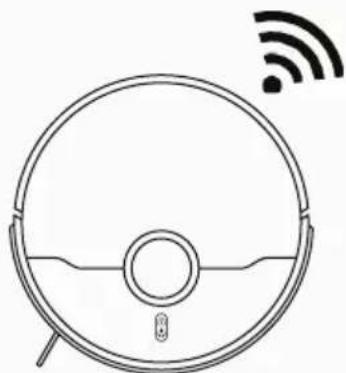
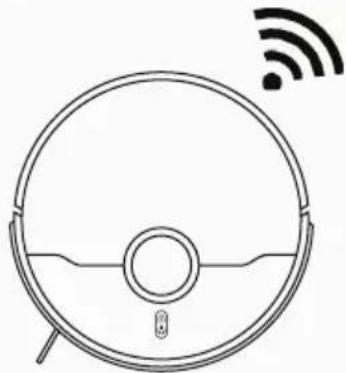
APP DOWNLOAD AND CONNECTION VIA THE WIFI [Fig. 7]
In order to access all the Robot's Functions from anywhere, it is suggested to download the HG ROBOTS APP. You will be able to control the Robot in the most efficient way.
- Download the "HG ROBOTS" APP using the QR code or from your App Store, Google Play or Huawei APP Gallery.
- Open the APP, create an account with your email and a password. Confirm login.
- Ensure your mobile device is connected to WiFi.
- Click the "add device" on APP, follow instructions to complete the pairing.
WARNING
The WiFi name cannot exceed 32 characters. If the connection is failed, follow below steps to check: Make sure to have inserted correct WiFi password Make sure to set your WiFi network to 2.4GHz Make sure the Robot is not too far away from the router.
WITH HG ROBOTS APP
After having successfully paired your robot, you can directly start to clean or make quick mapping in order to create cleaning route of the home.
natural_image
Diagram of a robotic device with hands operating the internal components (no text or symbols visible)Fig. 11

natural_image
Diagram of a circular mechanical device with visible gears and a central component (no text or symbols)Fig. 12
natural_image
Illustration of a hand cleaning a wooden door with visible wood and fabric (no text or symbols)Fig. 13

natural_image
Line drawing of a hand using a tool to adjust or install a component on a car interior (no text or symbols)Fig. 14
Suggestion is to start with quick mapping and to doing this will let you access fully customizable settings and cleaning schedules of your robot.
Before doing the mapping, remember to remove any obstacle on the floor (cables, socks, shoes) in order to have most accurate mapping results.
When mapping process is started, you'll see the map creating on your home page. Once the robot has scanned your whole apartment you'll see the complete map on your phone. You can give a name to each room, customize it and set up a dedicated cleaning schedule (suction power level, mopping level, frequency of cleaning, etc.).
• Cleaning Time: indicates the duration of the latest cleaning session
- Area Cleaned: indicates the square meters covered by the robot during the latest cleaning session
- Battery: current level of the battery
- START ( ▶ )
Robot starts cleaning following the current cleaning settings.
- PAUSE( II )
Robot will pause the cleaning
- RETURN TO STATION( )
Robot will pause the cleaning and come back to the docking station
All the other icons will turn on and be available only after clicking on START icon.
- WHOLE
The robot will start its cleaning session following the current cleaning settings for whole map area.
- ROOM
Select a specific room on the map, the robot will go there and start its cleaning session following the room cleaning settings.
- ZONE
Select a specific area on the map with (+), the robot will go there and start its cleaning session following the current cleaning settings.
- RESTRICTED ZONE ( 7 )
Under the maps management can be defined a specific area where the robot won't be allowed to go. You can define restricted zone for mopping, for vacuum or both.
- CUSTOMISE ( )
Customise rooms on the map. It is possible to merge or split different rooms, fully reset the map, rename rooms.
- SETTINGS ( … )
Full settings list of the robot available including maps management, schedules, station and robot cleaning settings.
natural_image
Illustration of a hand cleaning a device with a cloth (no text or symbols)Fig. 15

natural_image
Diagram showing a circular device with internal components and a hand cleaning it (no text or symbols)Fig. 16

natural_image
Line drawing of a robotic vacuum cleaner with a hand cleaning it (no text or symbols)Fig. 17

natural_image
Diagram of a hand operating a CD or DVD disc assembly with visible gears and components (no text or labels)Fig. 18
CLEANING PREFERENCES
Through the app, cleaning preferences can be choose as below:
- Vacuum and Mop simultaneously
- Only Vacuum
- Only Mop
- Vacuum and after mop
Vacuum levels can be chosen based on cleaning needs: Low, Mid, High, Max
Mop levels can be chosen based on cleaning needs:
Min, Mid, Max
MAINTAINING YOUR ROBOT CLEANER
EMPTYING THE DUST CONTAINER
Before performing any maintenance task, ensure the robot is switched off.
- Turn the robot off and remove it from docking station.
- Use a dry cloth to clean all surfaces. DO NOT allow water into any part of the product while cleaning.
CLEANING DUST CONTAINER
- Dust container will be automatically emptied every time the robot goes back to the docking station.
- Open the robot's top cover, press and hold the dust box release button to remove the dust box. [Fig. 8]
- Detach the dust box filter from the dust box filter latch and empty the dust box. [Fig. 9]
- Refit the dust container into the robot.
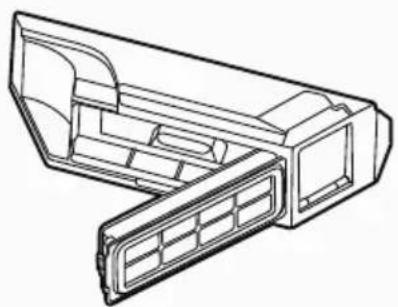
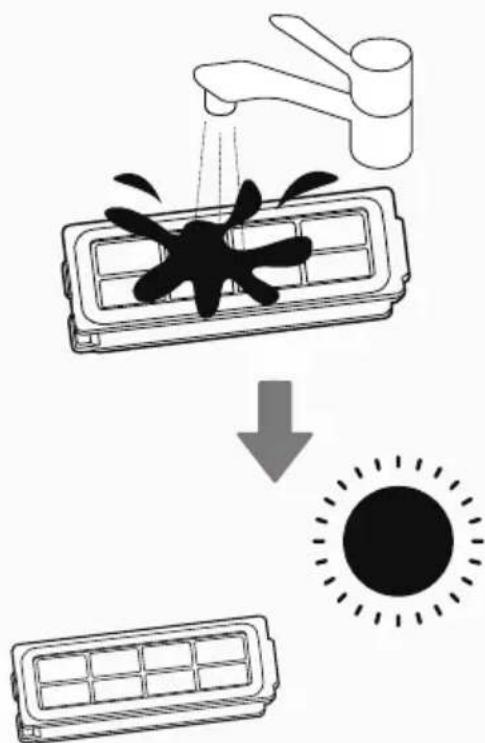
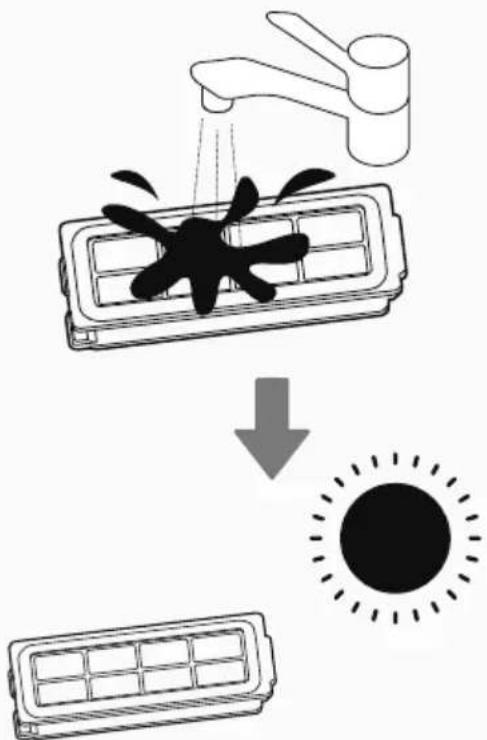
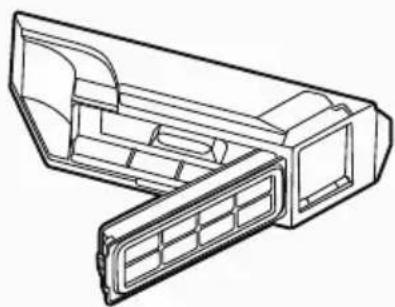
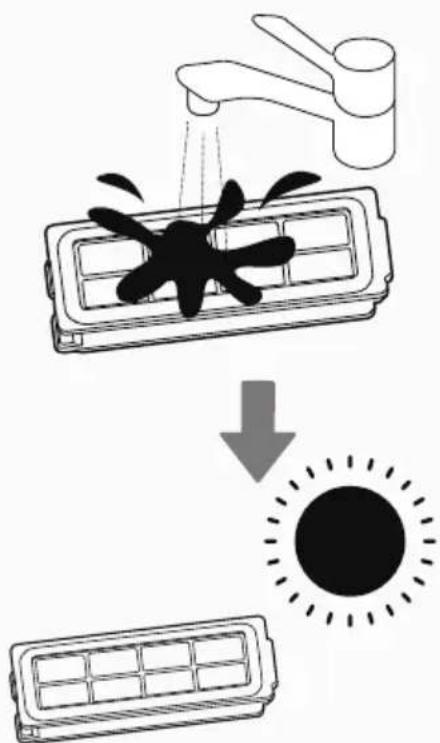
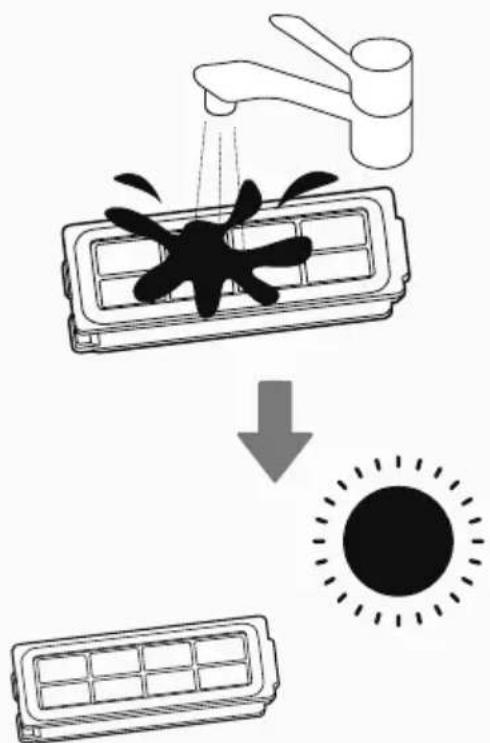
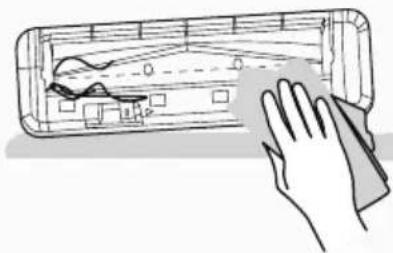
CLEANING THE FILTERS
The Robot is fitted with a dust box HEPA filter. To maintain optimum cleaning performance, regularly clean the filter cover and the filter itself. They should be cleaned regularly, the dust box filter is washable. After washing, keep it dry completely before placing it back in the dust box. [Fig. 10]
IMPORTANT: Regularly check and maintain the filters following the filter maintenance instructions.
This will maintain maximum cleaning performance. If the filter mesh and filter are damaged, they should be removed immediately and replaced in time to avoid damage to the vacuum motor.
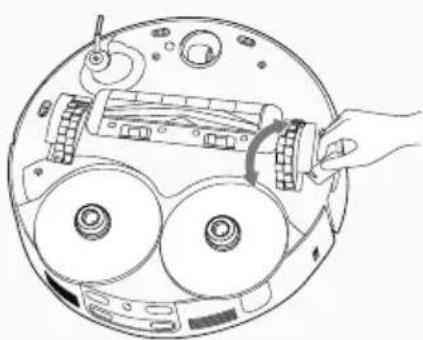
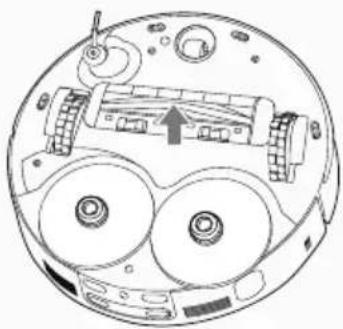
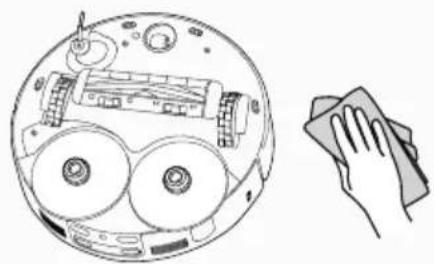
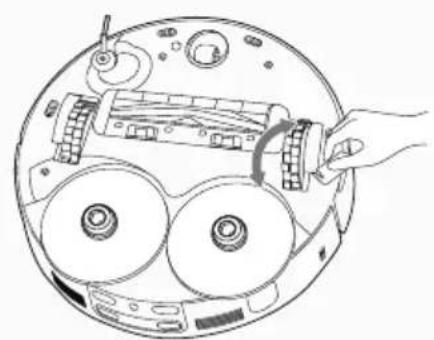
CLEANING THE AGITATOR
Agitator is equipped with blade that after cleaning completed hairs will be cut in the station based on the preferences chosen through APP. Although regularly cleaning the agitator will help maintain maximum cleaning performance.
-
Turn the Robot OFF and turn it over.
-
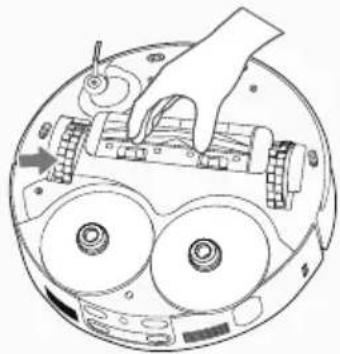
Press the clips on the sole plate remove the agitator cover. [Fig. 11]
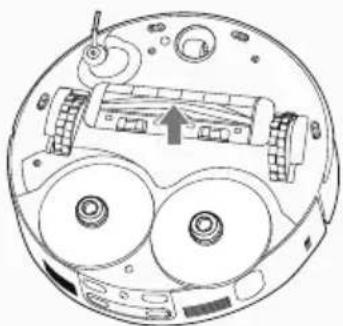
- Lift up the agitator by grasping one end of agitator. [Fig. 12]
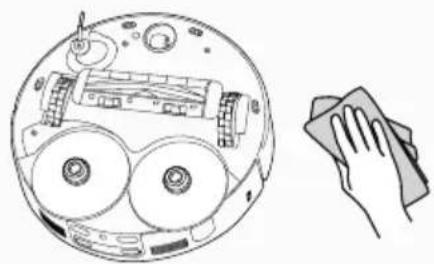
- Use the dry cloth to remove any entanglement from the agitator and the dirt on the bristles. Do not lose the rubber sleeve on the ball bearing. [Fig. 13]
- Agitator can be washed with water, after the washing and drying it, can be re-assembled into the robot for use.
- After cleaning, put the agitator and the agitator cover back into the robot.
Attention: All maintenance tasks should be carried out after taking out the Dust Container, to avoid the dirt in the Dust Container being dumped out accidentally.
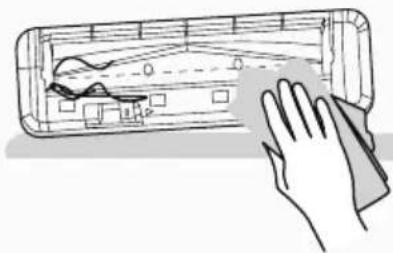
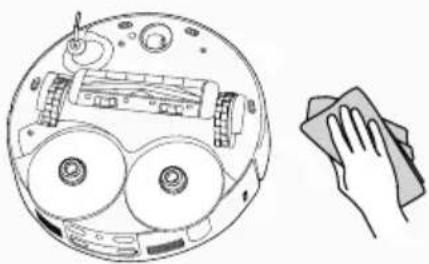
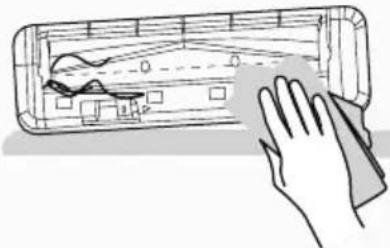
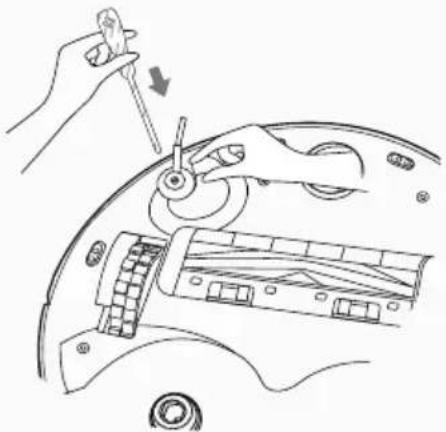
CLEANING THE EDGE CLEANING BRUSHES
When the edge brushes become dirty, clean them with dry cloth; if is needed remove the screwn and detach the brush for cleaning. [Fig. 14] If the edge brush is damaged and cannot work normally, please replace it.
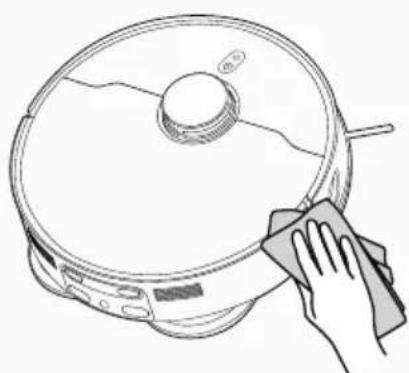
CLEANING THE SENSORS LENS
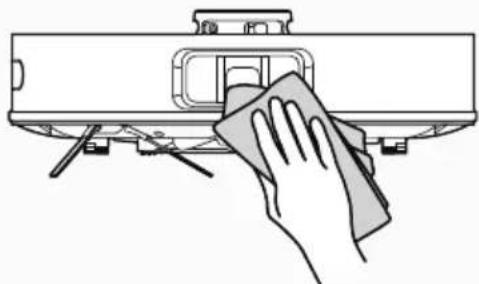
To maintain the safe operation of your robot it is important to keep the front laser sensor [Fig. 15], Anti fall sensors [Fig. 16] and edge laser sensor [Fig. 17] clean. There are 4 sensors located on the bottom side of the robot. Turn the robot upside down and clean them with dry cloth to remove any accumulation of dust, dirt or debris.
CLEANING THE DRIVE WHEELS [Fig. 18]
- Switch the Robot off and turn it over.
- Remove any dirt or hair trapped in the wheels.
- Clean the wheels with a dry cloth.
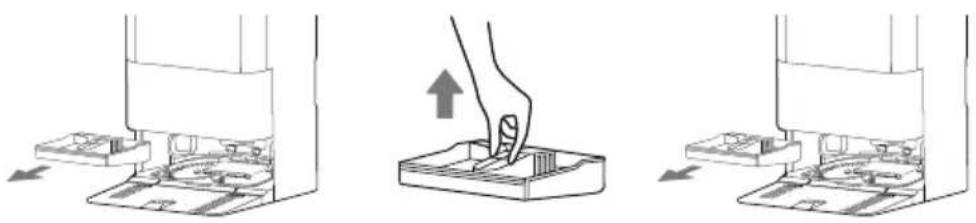
REPLACING THE DUST BAG
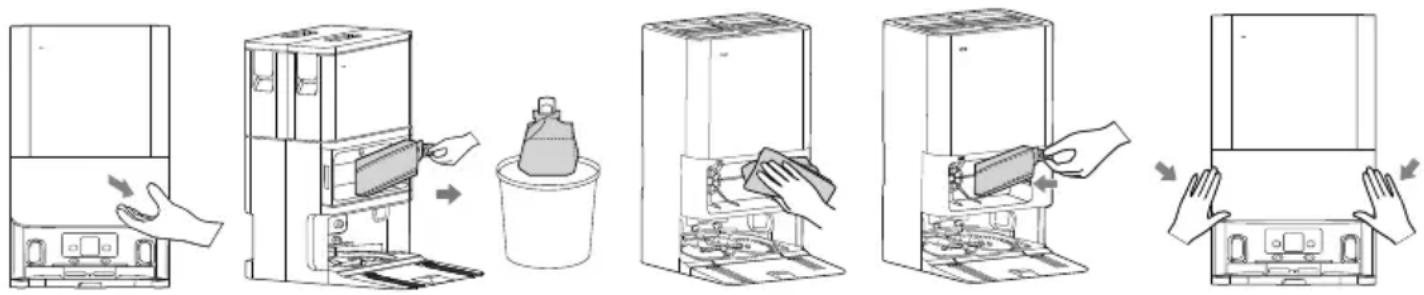
When the dust bag in the docking station is full you need to replace it.
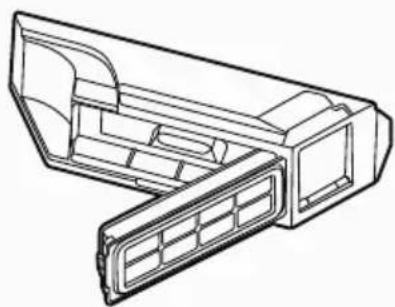
- Open the docking station cover. [Fig. 19]
- Remove the dust bag by pulling up the dust bag collar. The dust bag should be disposed correctly and carefully. [Fig. 20]
- Clean dust bag opening hole with dry cloth. [Fig. 21]
- Place a new dust bag into the docking station inserting the collar. [Fig. 22]
- Close the docking station cover. [Fig. 23]
text_image
Diagram illustrating the process of cleaning a refrigerator with hand gestures and labeled steps in Chinese.Fig. 19 Fig. 21 Fig. 22 Fig. 23 Fig. 20
CLEANING DOCKING STATION
Wash plate in the docking station should be clean periodically to have better cleaning results.
- Gently tap the center handle of the base station chassis and pull upward to remove the docking station cleaning tray (wash plate). [Fig. 24]
- Rinse the cleaning tray with water, allow it to dry, then place it back into the chassis and reassemble the docking station. [Fig. 25]
- In order to avoid bad odor, dirty water tank should be emptied periodically.
natural_image
Three-step diagram showing a hand pressing down on a device component, with arrows indicating the process (no text or symbols present)Fig. 24 Fig. 25
BATTERY REPLACEMENT
Use a screwdriver to remove the screws from the battery cover at the bottom of the robot;
- Remove the battery cover.
- Disconnect the connector and remove the battery from the compartment;
- Put the new battery into the compartment and reconnect to the connector.
- Pay attention to the correct alignment of the connector and the wires. Refit the battery cover and close it with the screws.
- Power on to check whether it is normal.
Attention!
Please recycle the replaced batteries in an environmentally friendly method to avoid pollution.
IMPORTANT NOTICE
Only use approved replacement parts for your robot.
Using parts not validated by Hoover is dangerous and will invalidate your guarantee.
If the robot will not to be used for several months, please remove the batteries and store in a cool dry location.
IMPORTANT: Always make sure your device is switched off before maintenance. Always use two hands to lift and carry, and ensure the robot is held level.
When liting the robot cleaner, ensure you do not grip the dust container to avoid accidental opening.
You should avoid using your robot cleaner in direct sunlight or on dark polished surfaces as these conditions will adversely affect the behaviour of your robot.
| Component Cleaning Frequency Function | ||
| Base station cleaning tray (Wash plate) | Once every 1-2 weeks / | |
| Agitator Once every 2 weeks 6-12 months | ||
| Edge Cleaning brush Once every 2 weeks 3-6 months | ||
| Dust box On demand / | ||
| Dust box filter Once every 2 weeks 3-6 months | ||
| Mop cloth / | 1-3 months | |
| Driving wheel | Once every month | / |
| Sensor | ||
| Dust bag / | About 2.5 months or based on actual use | |
TROUBLESHOOTING
If you have any problem with your robot, follow this simple check list before calling the Hoover Customer Service Centre.
| Fault Possible Reasons | Solutions | |
| The robot can not be charged | The robot is not making contact with the charging terminals. | Place the robot directly in front of the docking station and press the home buttonManually push the robot backward into the base station and confirm that you hear the voice prompt "Start charging" |
| The robot can not return to the docking station for charging | The docking station is not placed correctly. | For detailed instructions, please refer to the "Docking Station Setup" section of the manual |
| The robot is stuck | The robot is tangled or blocked by cables or sundriesThe side brush or agitator is blocked, preventing the robot from moving properlyThe robot is blocked by an obstacle | Clear any cables scattered on the floorRemove any sundries blocking the agitator or side brush, then place the robot on a flat surface and start itRemove obstacles or set custom no-go zones in the APP |
| The robot returns to docking station for charging or stops working before completing the cleaning | The robot is in low battery | Have the robot return for chargingEnable resume cleaning from breakpoint; once the robot's battery is fully charged, it will automatically continue the unfinished cleaning |
| The robot does not clean at the scheduled time | The cleaning schedule in the APP is turned offThe robot is in Do Not Disturb mode | Reset the cleaning schedule in the APPDisable Do Not Disturb mode or adjust the Do Not Disturb time period |
| The robot is suspended | The left and right wheels are suspended | Place the robot on a flat surface before starting |
| The robot is moving backward | The navigation module cover is stuckThe robot encounters an obstacle in its pathThe bumper is jammedThe anti-collision sensor is clogged with dust | Gently tap the protective cover to remove any foreign objectsRemove obstacles in a timely mannerAfter clearing obstacles or foreign objects, gently tap the bumperClean the dust on the surface of the anti-collision sensor lens |
| The station is not collecting the dust | The dust bag is not installed | Please reinstall the dust bag and ensure it is properly installed |
| The station washing is not working | The dirty water tank is full or not installedClean water is insufficient, or the clean water tank is not installedThe docking station cleaning tray is full or not installed | Remove the dirty water tank, clean out all the dirty water, reinstall the tank and ensure it is properly installed.Remove the clean water tank, add enough clean water, reinstall the tank and ensure it is properly installedRemove the docking station cleaning tray filter, clean any hair and debris, and reinstall itCheck if there are any blockages in the docking station cleaning tray's water absorption pipeCheck if the lid of the dirty water tank is properly securedCheck if the dirty water tank is properly installed |
IMPORTANT INFORMATION
Hoover Spares and Consumables
Always replace parts with genuine Hoover spares. These are available from your local Hoover dealer or direct from Hoover. When ordering parts always quote your model number. Quality
Hoover's factories have been independently assessed for quality. Our products are made using a quality system which meets the requirements of ISO 9001.
Your Guarantee
The guarantee conditions for this appliance are as defined by our representative in the country in which it is sold. Details regarding these conditions can be obtained from the dealer from whom the appliance was purchased. The bill of sale or receipt must be produced when making any claim under the terms of this guarantee.
Subject to change without notice.
INSTRUCTIONS D'UTILISATION SECURISÉE
natural_image
Line drawing of a circular robotic vacuum cleaner with a central hub and mounting feet (no text or symbols)Robot
natural_image
Line drawing of a mechanical device with front and top views (no text or symbols)Station de recharge 6-en-1
natural_image
Line drawing of a vacuum cleaner with attached power outlet (no text or symbols)fig. 1
PRÉPARATION DE VOTRE ROBOT
EMBALLAGE
natural_image
Simple line drawing of a room interior with a cabinet, rug, and wall (no text or symbols)fig. 2

text_image
8cm 1.5m 8cmfig. 3

natural_image
Line drawing of a vacuum cleaner with attached power outlet (no text or symbols)fig. 4
BATTERIE
flowchart
graph LR
    A["Initial Bin"] --> B["Intermediate Bin"]
    B --> C["Final Disposal Unit"]
fig. 5
CHARGEMENT DE LA BATTERIE
text_image
QR code with embedded logo in center, likely linking to a website or digital content

natural_image
Line drawing of a robotic vacuum cleaner with Wi-Fi signal icon (no text or symbols)fi g. 7
natural_image
Line drawing of a robotic device with a handle and control panel (no text or symbols)fig. 8
natural_image
Technical line drawing of a mechanical component with internal compartments and housing (no text or symbols)fig. 9
text_image
Diagram illustrating the process of cleaning a car air conditioner, showing air intake, cooling effect, and sun emission.fig. 10
AVEC L'APPLI HG ROBOTS
natural_image
Diagram of a robotic device with hands operating the internal components (no text or symbols visible)fig. 11

natural_image
Diagram of a circular mechanical device with visible gears and a central component (no text or symbols)fig. 12

natural_image
Hand cleaning a rectangular electronic device with a cloth (no text or symbols visible)Fig. 13

natural_image
Line drawing of a hand using a tool to adjust or install a component on a car interior (no text or symbols)Fig. 14
natural_image
Illustration of a hand cleaning a laptop (no text or symbols present)Fig. 15

natural_image
Diagram of a circular device with internal components and a hand holding a cloth (no text or symbols)Fig. 16

natural_image
Line drawing of a robotic vacuum cleaner with a hand cleaning it (no text or symbols)Fig. 17

natural_image
Diagram of a hand operating a circular device with multiple wheels and a central component (no text or symbols visible)Fig. 18
PRÉFÉRENCES DE NETTOYAGE
text_image
Illustration showing a hand washing a refrigerator with cleaning steps and a plastic bag being placed inside.Fig. 19 Fig. 21 Fig. 22 Fig. 23 Fig. 20
NETTOYER LA STATION DE CHARGE
natural_image
Three-step diagram showing a hand pressing down on a device component, with arrows indicating the process (no text or symbols present)Fig. 24 Fig. 25
CHANGEMENT DE LA BATTERIE
natural_image
Line drawing of a circular robotic vacuum cleaner with a central hub and mounting feet (no text or symbols)Saugroboter
natural_image
Technical line drawing of a mechanical device with front and top views (no text or symbols)6in1 Wandhalterung
Bedienungsanleitung
natural_image
Line drawing of a robotic vacuum cleaner with attached power outlet, labeled 'Abbildung 1' (no other text or symbols)natural_image
Simple line drawing of a room interior with a cabinet, rug, and wall (no text or symbols)Abbildung 2

text_image
8cm 1.5m 8cmAbbildung 3

natural_image
Line drawing of a vacuum cleaner with attached power outlet (no text or symbols)Abbildung 4
AKKU
flowchart
graph LR
    A["Initial Bin"] --> B["Intermediate Bin"]
    B --> C["Final Disposal Unit"]
Abbildung 5
AKKU AUFLADEN
text_image
QR code with embedded logo in center, likely linking to a website or digital content


natural_image
Line drawing of a robotic vacuum cleaner with Wi-Fi signal icon (no text or symbols)Abbildung 7
natural_image
Line drawing of a robotic vacuum cleaner with a hand operating the valve (no text or symbols)Abbildung 8
natural_image
Technical line drawing of a mechanical component with no visible text or symbolsAbbildung 9
text_image
Diagram illustrating the process of surface cooling from a fan array to a sun, with Chinese text labels.Abbildung 10
natural_image
Diagram of a robotic device with hands operating the internal components (no text or symbols visible)Abbildung 11

natural_image
Diagram of a circular mechanical device with visible gears and a central component (no text or symbols)Abbildung 12

natural_image
Hand cleaning a wooden door frame with visible hand and cloth (no text or symbols)Abbildung 13

natural_image
Line drawing of a hand using a tool to adjust or install a mechanical component, with no visible text or symbols.Abbildung 14
natural_image
Illustration of a hand cleaning a device with a cloth (no text or symbols)Abbildung 15

natural_image
Diagram showing a circular device with internal components and a hand holding a cloth (no text or symbols)Abbildung 16

natural_image
Line drawing of a robotic vacuum cleaner with a hand cleaning it (no text or symbols)Abbildung 17
natural_image
Diagram of a hand inserting a CD into a circular device with three wheels and a central component (no text or symbols)Abbildung 18
text_image
Diagram illustrating the process of cleaning a refrigerator with labeled steps and hand gestures.natural_image
Three-step diagram showing a hand pressing down on a device component, with arrows indicating the process (no text or symbols present)natural_image
Line drawing of a circular robotic vacuum cleaner with a central hub and mounting feet (no text or symbols)natural_image
Line drawing of a mechanical device with front and top views (no text or symbols)natural_image
Line drawing of a vacuum cleaner with attached power outlet (no text or symbols)Fig. 1
natural_image
Simple line drawing of a room interior with a cabinet, rug, and wall (no text or symbols)Fig. 2
text_image
8cm 1.5m 8cmFig. 3

natural_image
Line drawing of a vacuum cleaner with attached power outlet (no text or symbols)Fig. 4
BATTERIA
flowchart
graph LR
    A["Initial Bin"] --> B["Intermediate Bin"]
    B --> C["Final Disposal Unit"]
Fig. 5
text_image
QR code with embedded logo in center, likely linking to a website or digital content


natural_image
Line drawing of a robotic vacuum cleaner with Wi-Fi signal icon above (no text or symbols on the device itself)Fig. 7
natural_image
Diagram of a robotic device with visible gears and a hand operating the top component (no text or symbols)Fig. 11

natural_image
Diagram of a circular mechanical device with visible gears and a central component (no text or symbols)Fig. 12

natural_image
Hand cleaning a wooden door frame with visible hand and cloth (no text or symbols)Fig. 13

natural_image
Line drawing of a hand using a tool to adjust or install a mechanical component, with no visible text or symbols.Fig. 14
natural_image
Line drawing of a hand cleaning a device with a cloth (no text or symbols)Fig. 15
natural_image
Diagram showing a circular device with internal components and a hand holding a cloth (no text or symbols)Fig. 16

natural_image
Line drawing of a hand cleaning a circular object with a cloth (no text or symbols)Fig. 17

natural_image
Diagram of a hand operating a circular device with multiple wheels and a central mechanical component (no text or symbols visible)Fig. 18
PREFERENZE DI PULIZIA
text_image
Diagram illustrating the step-by-step installation of a refrigerator with hand gestures and cleaning processFig. 19 Fig. 21 Fig. 22 Fig. 23 Fig. 20
natural_image
Three-step diagram showing a hand pressing down on a device component, with arrows indicating the process (no text or symbols present)Fig. 24 Fig. 25
natural_image
Line drawing of a circular robotic vacuum cleaner with a central hub and mounting feet (no text or symbols)Robotreiniger
natural_image
Line drawing of a mechanical device with front and top views (no text or symbols)6in1 Dockingstation
natural_image
Line drawing of a microwave oven with attached power outlet (no text or symbols)BEREID UW ROBOT VOOR
VERPAKKING
natural_image
Simple line drawing of a room interior with a cabinet, rug, and wall (no text or symbols)Afb. 2

text_image
8cm 1.5m 8cmAfb. 3

natural_image
Line drawing of a robotic vacuum cleaner with attached power outlet (no text or symbols)Afb. 4
BATTERIJ
flowchart
graph LR
    A["Initial Bin"] --> B["Intermediate Bin"]
    B --> C["Final Disposal Unit"]
Afb. 5
DE BATTERIJ OPLADEN
text_image
QR code with embedded logo in center, likely linking to a website or digital content

natural_image
Line drawing of a robotic vacuum cleaner with Wi-Fi signal icon above (no text or symbols on the device itself)Afb. 7
natural_image
Diagram of a robotic device with hands operating the internal components (no text or symbols visible)Afb. 11

natural_image
Diagram of a circular mechanical device with visible gears and a central component (no text or symbols)Afb. 12

natural_image
Illustration of a hand cleaning a wooden door frame with a cloth (no text or symbols)Afb. 13

natural_image
Line drawing of a hand using a tool to adjust or install a mechanical component, with no visible text or symbols.Afb. 14
natural_image
Illustration of a hand cleaning a device with a cloth (no text or symbols)Afb. 15

natural_image
Diagram showing a circular device with internal components and a hand cleaning it (no text or symbols)Afb. 16

natural_image
Line drawing of a robotic vacuum cleaner with a hand cleaning it (no text or symbols)Afb. 17

natural_image
Diagram of a hand operating a CD or DVD disc assembly with three circular components (no text or labels)Afb. 18
REINIGINGSVOORKEUREN
text_image
Diagram illustrating the process of cleaning a refrigerator with hand gestures and labeled steps in Chinesenatural_image
Three-step diagram showing a hand pressing down on a device component, with arrows indicating the process (no text or symbols present)Afb. 24 Afb. 25
BATTERIJEN VERVANGEN
natural_image
Line drawing of a circular robotic vacuum cleaner with a central hub and mounting feet (no text or symbols)Aspirador Robot
natural_image
Line drawing of a mechanical device with front and top views (no text or symbols)natural_image
Line drawing of a vacuum cleaner with attached power outlet (no text or symbols)Fig. 1
PREPARE SEU ASPIRADOR ROBOT
EMBALAGEM
natural_image
Simple line drawing of a room interior with a cabinet, rug, and wall (no text or symbols)Fig. 2
text_image
8cm 1.5m 8cmFig. 3

natural_image
Line drawing of a robotic vacuum cleaner with attached power outlet (no text or symbols)Fig. 4
BATERIA
natural_image
Diagram showing three stages of a waste sorting machine: initial bin, intermediate bin, and final disposal unit (no text or symbols)text_image
QR code with embedded logo in center, likely linking to a website or digital content


natural_image
Line drawing of a robotic vacuum cleaner with Wi-Fi signal icon (no text or symbols)Fig. 7
natural_image
Line drawing of a robotic vacuum cleaner with a handle and control panel (no text or symbols)Fig. 8
natural_image
Technical line drawing of a mechanical component with no visible text or symbolsFig. 9

text_image
Diagram illustrating the process of air conditioner cooling system, showing fan drying and sun emissionFig. 10
natural_image
Diagram of a robotic device with hands operating the internal components (no text or symbols visible)Fig. 11
natural_image
Diagram of a circular mechanical device with internal components and an arrow indicating a specific part (no text or symbols present)Fig. 12

natural_image
Hand cleaning a wooden door frame with a cloth (no text or symbols visible)Fig. 13

natural_image
Line drawing of a hand using a tool to adjust or install a component on a car interior (no text or symbols)Fig. 14
natural_image
Illustration of a hand cleaning a device with a cloth (no text or symbols)Fig. 15

natural_image
Diagram showing a circular device with internal components and a hand cleaning it (no text or symbols)Fig. 16

natural_image
Line drawing of a robotic vacuum cleaner with a hand cleaning it (no text or symbols)Fig. 17

natural_image
Diagram of a hand operating a circular device with three wheels and a central component (no text or symbols visible)Fig. 18
PREFERÊNCIAS DE LIMPEZA
text_image
Diagram illustrating the step-by-step installation of a refrigerator with hand gestures and cleaning processFig. 19 Fig. 21 Fig. 22 Fig. 23 Fig. 20
natural_image
Three-step diagram showing a hand pressing down on a device component, with arrows indicating the process (no text or symbols present)Fig. 24 Fig. 25
natural_image
Line drawing of a circular robotic vacuum cleaner with a central hub and mounting feet (no text or symbols)Robot aspirador

natural_image
Line drawing of a mechanical device with front and top views (no text or symbols)natural_image
Line drawing of a vacuum cleaner with attached power outlet (no text or symbols)fig. 1
natural_image
Simple line drawing of a room interior with a cabinet, rug, and wall (no text or symbols)fig. 2

text_image
8cm 1.5m 8cmfig. 3

natural_image
Line drawing of a vacuum cleaner with attached power outlet (no text or symbols)Fig. 4
BATERÍA
flowchart
graph LR
    A["Initial Bin"] --> B["Intermediate Bin"]
    B --> C["Final Bin with Internal Components"]
fig. 5
CARGA DE LA BATERÍA
text_image
QR code with embedded logo in center, likely linking to a website or digital content


natural_image
Line drawing of a robotic vacuum cleaner with Wi-Fi signal icon (no text or symbols)fi g. 7
natural_image
Line drawing of a robotic device with a handle and internal components (no text or symbols)fig. 8
natural_image
Technical line drawing of a mechanical component with internal compartments and housing (no text or symbols)fig. 9
text_image
Diagram illustrating the process of removing a hair into a fan, with sunlight illumination and component details shown.fig. 10
natural_image
Diagram of a robotic device with hands operating the internal components (no text or symbols visible)fig. 11

natural_image
Diagram of a circular mechanical device with visible gears and a central component (no text or symbols)fig. 12

natural_image
Illustration of a hand cleaning a wooden door panel with a cloth (no text or symbols)Fig. 13

natural_image
Line drawing of a hand using a tool to adjust or install a device component (no text or symbols visible)Fig. 14
natural_image
Illustration of a hand cleaning a device with a cloth (no text or symbols)Fig. 15
natural_image
Illustration of a circular device with internal components and a hand holding a cloth (no text or symbols)Fig. 16

natural_image
Line drawing of a robotic vacuum cleaner with a hand cleaning it (no text or symbols)Fig. 17

natural_image
Diagram of a hand operating a CD or DVD disc assembly with visible components and no text or symbolsFig. 18
text_image
Diagram illustrating the process of cleaning a refrigerator with hand gestures and labeled steps in Chinese.Fig. 19 Fig. 21 Fig. 22 Fig. 23 Fig. 20
natural_image
Three-step diagram showing a hand pressing down on a device component, with arrows indicating the process (no text or symbols present)Fig. 24 Fig. 25
REEMPLAZO DE LAS BATERÍAS
natural_image
Line drawing of a circular robotic vacuum cleaner with a central hub and mounting feet (no text or symbols)Robotstøvsuger
natural_image
Line drawing of a mechanical device with front panel and side ports (no text or symbols)6-i-1- dockingstation

Brugervejledning
natural_image
Line drawing of a vacuum cleaner with attached power outlet (no text or symbols)Fig. 1
KLARG∅R DIN ROBOT ST∅VSUGER
EMBALLAGE
natural_image
Simple line drawing of a room interior with a cabinet and two doors, no text or symbols presentFig. 2

text_image
8cm 1.5m 8cmFig. 3

natural_image
Line drawing of a robotic vacuum cleaner with attached power outlet (no text or symbols)Fig. 4
BATTERI
flowchart
graph LR
    A["Initial Bin"] --> B["Intermediate Bin"]
    B --> C["Final Disposal Unit"]
Fig. 5
OPLADNING AF BATTERIET
text_image
QR code with embedded logo in center, likely linking to a website or digital content


natural_image
Line drawing of a robotic vacuum cleaner with Wi-Fi signal icon above (no text or symbols on the device itself)Fig. 7
natural_image
Line drawing of a robotic device with a handle and control panel (no text or symbols)Fig. 8
natural_image
Technical line drawing of a mechanical component with no visible text or symbolsFig. 9

text_image
Diagram illustrating the process of cleaning a car air conditioner, showing air intake, cooling effect, and sun emission.Fig. 10
natural_image
Diagram of a robotic device with hands operating the internal components (no text or symbols visible)Fig. 11

natural_image
Diagram of a circular mechanical device with visible gears and a central component (no text or symbols)Fig. 12

natural_image
Hand cleaning a wooden door frame with visible hand and cloth (no text or symbols)Fig. 13

natural_image
Line drawing of a hand using a tool to adjust or install a component on a car interior (no text or symbols)Fig. 14
natural_image
Illustration of a hand cleaning a device with a cloth (no text or symbols)Fig. 15

natural_image
Diagram showing a circular device with internal components and a hand cleaning it (no text or symbols)Fig. 16
natural_image
Line drawing of a robotic vacuum cleaner with a hand cleaning it (no text or symbols)Fig. 17

natural_image
Diagram of a hand operating a CD or DVD disc assembly with three reels and a central control panel (no text or labels)Fig. 18
RENG∅RINGSPRAREFERENCER
T∅MNING AF ST∅VBEHOLDER
RENG∅RING AF ST∅VBEHOLDER
UDSKIFTNING AF ST∅VPOSEN
text_image
Diagram illustrating the process of cleaning a refrigerator with hand gestures and labeled steps in ChineseFig. 19 Fig. 21 Fig. 22 Fig. 23 Fig. 20
RENG∅RING AF DOCKINGSTATION
natural_image
Three-step diagram showing a hand pressing down on a device component, with no visible text or symbols.Fig. 24 Fig. 25
UDSKIFTNING AF BATTERI
natural_image
Line drawing of a circular robotic vacuum cleaner with a central hub and mounting feet (no text or symbols)Rengjøringsrobot
natural_image
Line drawing of a rectangular electronic device with front panel and top ports (no text or symbols)
Ekstra filter for robot
natural_image
Line drawing of a vacuum cleaner with attached power outlet (no text or symbols)Fig. 1
FORBERED RENGJ∅RINGSROBOTEN
EMBALLASJE
natural_image
Simple line drawing of a room interior with a cabinet, rug, and wall (no text or symbols)Fig. 2

text_image
8cm 1.5m 8cmFig. 3
natural_image
Line drawing of a vacuum cleaner with attached power outlet (no text or symbols)Fig. 4
BATTERI
flowchart
graph LR
    A["Initial Bin"] --> B["Intermediate Bin"]
    B --> C["Final Disposal Unit"]
Fig. 5
LADE BATTERIET
text_image
QR code with embedded logo in center, likely linking to a website or digital content

natural_image
Line drawing of a robotic vacuum cleaner with Wi-Fi signal icon (no text or symbols)Fig. 7
På/av og Hjem-knapp
natural_image
Diagram of a robotic device with visible gears and a hand operating the top component (no text or symbols)Fig. 11

natural_image
Diagram of a mechanical device with gears and a central component, no visible text or symbolsFig. 12

natural_image
Hand cleaning a wooden door frame with visible hand and cloth (no text or symbols)Fig. 13

natural_image
Line drawing of a hand using a tool to adjust or install a component on a car interior (no text or symbols)Fig. 14
natural_image
Illustration of a hand cleaning a kitchen appliance with a cloth (no text or symbols)Fig. 15

natural_image
Diagram showing a circular device with internal components and a hand holding a cloth (no text or symbols)Fig. 16

natural_image
Line drawing of a robotic vacuum cleaner with a hand cleaning it (no text or symbols)Fig. 17

natural_image
Diagram of a hand operating a circular device with three wheels and a central component (no text or symbols visible)Fig. 18
RENGJ∅RINGSPREFERANSER
T∅MME ST∅VBEHOLDEREN
text_image
Diagram illustrating the process of cleaning a refrigerator with hand gestures and labeled steps in ChineseFig. 19 Fig. 21 Fig. 22 Fig. 23 Fig. 20
RENGJ∅RE DOKKINGSSTASJONEN
natural_image
Three-step diagram showing a hand pressing down on a device component, with arrows indicating the process (no text or symbols present)Fig. 24 Fig. 25
UTSKIFTING AV BATTERI
natural_image
Line drawing of a circular robotic vacuum cleaner with a central hub and mounting feet (no text or symbols)Robotrengörare

natural_image
Line drawing of a mechanical device with front and top views (no text or symbols)natural_image
Line drawing of a vacuum cleaner with attached power outlet (no text or symbols)Fig. 1
FÖRBERED DIN ROBOTDAMMSUGARE
FÖRPACKNING
natural_image
Simple line drawing of a room interior with a cabinet, rug, and wall (no text or symbols)Fig. 2

text_image
8cm 1.5m 8cmFig. 3

natural_image
Line drawing of a vacuum cleaner with attached power outlet (no text or symbols)Fig. 4
BATTERI
flowchart
graph LR
    A["Initial Bin"] --> B["Intermediate Bin"]
    B --> C["Final Disposal Unit"]
Fig. 5
LADDNING AV BATTERIET
text_image
QR code with embedded logo in center, likely linking to a website or digital content


natural_image
Line drawing of a robotic vacuum cleaner with Wi-Fi signal icon (no text or symbols)Fig. 7
På/Av- och hemknapp
natural_image
Line drawing of a robotic vacuum cleaner with a handle and control panel (no text or symbols)Fig. 8

natural_image
Technical line drawing of a mechanical component with no visible text or symbolsFig. 9

text_image
Diagram illustrating the process of air conditioner cooling, showing airflow from a drain to a sun.Fig. 10
natural_image
Diagram of a robotic device with hands operating the internal components (no text or symbols visible)Fig. 11

natural_image
Diagram of a circular mechanical device with visible gears and a central component (no text or symbols)Fig. 12

natural_image
Line drawing of a hand cleaning a rectangular object with a meshed panel (no text or symbols)Fig. 13

natural_image
Line drawing of a hand using a tool to adjust or install a mechanical component, with no visible text or symbols.Fig. 14
natural_image
Illustration of a hand cleaning a kitchen appliance with a cloth (no text or symbols)Fig. 15

natural_image
Diagram showing a circular device with internal components and a hand holding a cloth (no text or symbols)Fig. 16

natural_image
Line drawing of a robotic vacuum cleaner with a hand cleaning it (no text or symbols)Fig. 17
natural_image
Diagram of a hand operating a circular device with multiple wheels and a central component (no text or symbols visible)Fig. 18
STÄDINSTÄLLNINGAR
text_image
Diagram illustrating the step-by-step installation of a refrigerator with hand gestures and cleaning processFig. 19 Fig. 21 Fig. 22 Fig. 23 Fig. 20
RENGÖRING AV DOCKNINGSSTATION
natural_image
Three-step diagram showing a hand pressing down on a device component, with arrows indicating the process (no text or symbols present)Fig. 24 Fig. 25
BYTE AV BATTERIER
natural_image
Line drawing of a circular robotic vacuum cleaner with a central hub and mounting feet (no text or symbols)Robotti-imuri
natural_image
Line drawing of a mechanical device with front and top views (no text or symbols)6in1 latausasema

Käyttöohje
2 reunaharjaa
natural_image
Line drawing of a vacuum cleaner with attached power outlet (no text or symbols)Kuva 1
ROBOTTI-IMURIN VALMISTELEMINEN
PAKKAUS
natural_image
Simple line drawing of a room interior with a cabinet, rug, and wall (no text or symbols)Kuva 2

text_image
8cm 1.5m 8cmKuva 3

natural_image
Line drawing of a vacuum cleaner with attached power outlet (no text or symbols)Kuva 4
AKKU
flowchart
graph LR
    A["Initial Bin"] --> B["Intermediate Bin"]
    B --> C["Final Disposal Unit"]
Kuva 5
AKUN LATAUS
text_image
QR code with embedded logo in center, likely linking to a website or digital content

natural_image
Line drawing of a robotic vacuum cleaner with Wi-Fi signal icon (no text or symbols)Kuva 7
natural_image
Diagram of a robotic device with hands operating the internal components (no text or symbols visible)Kuva 11

natural_image
Diagram of a mechanical device with gears and a central component, no text or symbols presentKuva 12

natural_image
Hand cleaning a wooden door panel with visible hand and cloth (no text or symbols)Kuva 13

natural_image
Line drawing of a hand using a tool to adjust or install a mechanical component, with no visible text or symbols.Kuva 14
natural_image
Illustration of a hand cleaning a kitchen appliance with a cloth (no text or symbols)Kuva 15
natural_image
Diagram showing a circular device with internal components and a hand holding a cloth (no text or symbols)Kuva 16

natural_image
Line drawing of a robotic vacuum cleaner with a hand cleaning it (no text or symbols)Kuva 17

natural_image
Diagram of a hand operating a circular device with three wheels and a central component (no text or symbols visible)Kuva 18
PUHDISTUSASETUKSET
PÖLYSÄILIÖN TYHJENNYS
text_image
Illustration showing a hand washing a refrigerator with cleaning steps and a spray bottle being placed inside.natural_image
Three-step diagram showing a hand pressing down on a device component, with no visible text or symbols.Kuva 24 Kuva 25
AKUN VAIHTO
natural_image
Line drawing of a circular robotic vacuum cleaner with a central hub and mounting feet (no text or symbols)Σκούπα ρομπότ

natural_image
Line drawing of a mechanical device with front and top views (no text or symbols)natural_image
Line drawing of a vacuum cleaner with attached power outlet (no text or symbols)Eik.1
natural_image
Simple line drawing of a room interior with a cabinet, rug, and wall (no text or symbols)Eik.2

text_image
8cm 1.5m 8cmEik.3

natural_image
Line drawing of a vacuum cleaner with attached power outlet (no text or symbols)Eik.4
ΜΠΑΤΑΡΙΑ
flowchart
graph LR
    A["Initial Bin"] --> B["Intermediate Bin"]
    B --> C["Final Disposal Unit"]
Eik.5
text_image
QR code with embedded logo in center, likely linking to a website or digital content

natural_image
Line drawing of a robotic vacuum cleaner with Wi-Fi signal icon above (no text or symbols on the device itself)Eik 7
natural_image
Diagram of a robotic device with visible gears and a hand operating the top component (no text or symbols)Eik.11

natural_image
Diagram of a circular mechanical device with visible gears and a central component (no text or symbols)Eik.12

natural_image
Hand cleaning a wooden door with visible hand and cloth (no text or symbols)Eik.13

natural_image
Line drawing of a hand using a tool to adjust or install a mechanical component, with no visible text or symbols.Eik.14
natural_image
Illustration of a hand cleaning a kitchen appliance with a cloth (no text or symbols)Eik.15

natural_image
Diagram showing a circular device with internal components and a hand cleaning it (no text or symbols)Eik.16

natural_image
Line drawing of a robotic vacuum cleaner with a hand cleaning it (no text or symbols)Eik.17

natural_image
Diagram of a hand operating a circular device with multiple wheels and a central component (no text or symbols visible)Eik.18
text_image
Diagram illustrating the step-by-step installation of a refrigerator with cleaning and cleaning process, showing hand placement and cleaning steps.Eik.19 Eik.21 Eik.22 Eik.23 Eik.20
natural_image
Three-step diagram showing a hand pressing down on a device component, with arrows indicating the process (no text or symbols present)Eik.24 Eik.25
natural_image
Line drawing of a circular robotic vacuum cleaner with a central hub and mounting feet (no text or symbols)Робот-пылесос

natural_image
Line drawing of a mechanical device with front and top views (no text or symbols)Док-станция 6-в-1
natural_image
Line drawing of a vacuum cleaner with attached power outlet (no text or symbols)Рис. 1
natural_image
Simple line drawing of a room interior with a cabinet, rug, and wall (no text or symbols)Рис. 2

text_image
8cm 1.5m 8cmРис. 3

natural_image
Line drawing of a vacuum cleaner with attached power outlet (no text or symbols)Рис. 4
flowchart
graph LR
    A["Initial Bin"] --> B["Intermediate Bin"]
    B --> C["Final Disposal Unit"]
Рис. 5
text_image
QR code with embedded logo in center, likely linking to a website or digital content


natural_image
Line drawing of a robotic vacuum cleaner with Wi-Fi signal icon above (no text or symbols on the device itself)Рис. 7
natural_image
Line drawing of a robotic device with a handle and control panel (no text or symbols)Рис. 8

natural_image
Technical line drawing of a mechanical component with no visible text or symbolsРис. 9
text_image
Diagram illustrating the process of cleaning a car air conditioner, showing air intake, cooling effect, and sun emission.Рис. 10
natural_image
Diagram of a robotic device with hands operating the internal components (no text or symbols visible)Рис. 11

natural_image
Diagram of a mechanical device with gears and a central component, no visible text or symbolsРис. 12
natural_image
Hand cleaning a wooden door with visible wood and tools (no text or symbols)Рис. 13

natural_image
Line drawing of a hand using a screwdriver to adjust or install a component on a car head (no text or symbols)Рис. 14
natural_image
Illustration of a hand cleaning a kitchen appliance with a cloth (no text or symbols)Рис. 15

natural_image
Diagram showing a circular device with internal components and a hand cleaning it (no text or symbols)Рис. 16

natural_image
Line drawing of a robotic vacuum cleaner with a hand cleaning it (no text or symbols)Рис. 17

natural_image
Diagram of a hand operating a CD or DVD disc assembly with visible components and no text or symbolsРис. 18
НАСТРОЙКИ УБОРКИ
flowchart
graph TD
    A["Handwashing"] --> B["Cleaning"]
    B --> C["Lighting Bottle"]
    C --> D["Cleaner"]
    D --> E["Heating"]
    E --> F["Cleaning"]
    F --> G["Lighting Bottle"]
    G --> H["Heating"]
natural_image
Three-step diagram showing a hand pressing down on a device component, with arrows indicating the process (no text or symbols present)Рис. 24 Рис. 25
ЗАМЕНА АККУМУЛЯТОРА
natural_image
Line drawing of a circular robotic vacuum cleaner with a central hub and mounting feet (no text or symbols)Robot-Odkurzacz
natural_image
Line drawing of a mechanical device with front and top views (no text or symbols)natural_image
Line drawing of a vacuum cleaner with attached power outlet (no text or symbols)Rys. 1
PRZYGOTOWANIE ROBOTA-ODKURZACZA
PAKOWANIE
natural_image
Simple line drawing of a room interior with a cabinet, rug, and wall (no text or symbols)Rys. 2
text_image
8cm 1.5m 8cmRys. 3

natural_image
Line drawing of a vacuum cleaner with attached power outlet (no text or symbols)Rys. 4
AKUMULATOR
flowchart
graph LR
    A["Initial Bin"] --> B["Intermediate Bin"]
    B --> C["Final Disposal Unit"]
Rys. 5
ŁADOWANIE AKUMULATORA
text_image
QR code with embedded logo in center, likely linking to a website or digital content


natural_image
Line drawing of a robotic vacuum cleaner with Wi-Fi signal icon (no text or symbols)Rys. 7
Z APLIKACJA HG ROBOTS
natural_image
Diagram of a robotic device with hands operating the internal components (no text or symbols visible)Rys. 11
natural_image
Diagram of a circular mechanical device with visible gears and a central component (no text or symbols)Rys. 12

natural_image
Line drawing of a hand cleaning a wooden door panel (no text or symbols)Rys. 13

natural_image
Line drawing of a hand using a tool to adjust or install a component on a car interior (no text or symbols)Rys. 14
natural_image
Illustration of a hand cleaning a kitchen appliance with a cloth (no text or symbols)Rys. 15

natural_image
Diagram showing a circular device with internal components and a hand holding a cloth (no text or symbols)Rys. 16

natural_image
Line drawing of a robotic vacuum cleaner with a hand cleaning it (no text or symbols)Rys. 17

natural_image
Diagram of a hand operating a CD or DVD disc assembly with three wheels and a central component (no text or symbols visible)Rys. 18
PREFERENCJE SPRZĄTANIA
text_image
Diagram illustrating the step-by-step installation of a kitchen appliance, showing handwashing, cleaning, and cleaning steps.natural_image
Three-step diagram showing a hand pressing down on a device into a container, with no visible text or symbols.Rys. 24 Rys. 25
WYMIANA AKUMULATORÓW
natural_image
Line drawing of a circular robotic vacuum cleaner with a central hub and mounting feet (no text or symbols)Robotický vysavač

natural_image
Line drawing of a mechanical device with front and top views (no text or symbols)natural_image
Line drawing of a vacuum cleaner with attached power outlet (no text or symbols)Obr. 1
PŘIPRAVTE SVŮJ ROBOTICKÝ VYSAVAČ
BALENÍ
natural_image
Simple line drawing of a room interior with a cabinet, rug, and wall (no text or symbols)Obr. 2

text_image
8cm 1.5m 8cmObr. 3
natural_image
Line drawing of a vacuum cleaner with attached electrical outlet (no text or symbols)Obr. 4
BATERIE
text_image
QR code with embedded logo in center, likely linking to a website or digital content


natural_image
Line drawing of a robotic vacuum cleaner with Wi-Fi signal icon above (no text or symbols on the device itself)Obr. 7
natural_image
Diagram of a robotic device with hands operating the internal components (no text or symbols visible)Obr. 11

natural_image
Diagram of a circular mechanical device with visible gears and a central component (no text or symbols)Obr. 12

natural_image
Hand cleaning a wooden door with visible wood and surface details (no text or symbols)Obr. 13
natural_image
Line drawing of a hand using a tool to adjust or install a mechanical component (no text or symbols visible)Obr. 14
S APLIKACÍ HG ROBOTS
natural_image
Illustration of a hand cleaning a device with a cloth (no text or symbols)Obr. 15

natural_image
Diagram showing a circular device with internal components and a hand holding a cloth (no text or symbols)Obr. 16

natural_image
Line drawing of a robotic vacuum cleaner with a hand cleaning it (no text or symbols)Obr. 17

natural_image
Diagram of a hand operating a circular device with three wheels and a central component (no text or symbols visible)Obr. 18
PŘEDVOLBY ÚKLIDU
flowchart
graph TD
    A["Handwashing"] --> B["Cleaning with a bottle"]
    B --> C["Coiling with a cloth"]
    C --> D["Packaging with a brush"]
    D --> E["Recycling with a cloth"]
    E --> F["Product handling with a bag and tray"]
Obr. 19 Obr. 21 Obr. 22 Obr. 23 Obr. 20
natural_image
Three-step diagram showing a hand pressing down on a device component, with no visible text or symbols.Obr. 24 Obr. 25
VÝMĚNA BATERIE
NAVODILA ZA VARNO UPORABO
natural_image
Line drawing of a circular robotic vacuum cleaner with a central hub and mounting feet (no text or symbols)Robotski Čistilnik

natural_image
Line drawing of a mechanical device with front and top views (no text or symbols)Priklopna postaja 6v1
natural_image
Line drawing of a vacuum cleaner with attached power outlet (no text or symbols)Slik. 1
PRIPRAVITE SVOJ ROBOTSKI SESALNIK
EMBALAŽA
natural_image
Simple line drawing of a room interior with a cabinet, rug, and wall (no text or symbols)Slika 2

text_image
8cm 1.5m 8cmslika 3

natural_image
Line drawing of a vacuum cleaner with attached power outlet (no text or symbols)Slika 4
BATERIJA
flowchart
graph LR
    A["Bin Disposal"] --> B["Recycler"]
    B --> C["Recycler with Up Arrow"]
    C --> D["Final Disposal"]
Slika 5
POLNJENJE BATERIJE
Priključite napajalnik bazne postaje in pritisnite gumb za vklop/izklop robota ter ga držite 3 sekunde, da ga vklopite. Ko indikator napajanja sveti, postavite robota blizu polnilne postaje za polnjenje, kot je prikazano na sliki. [Slika 4]
text_image
QR code with embedded logo in center, likely linking to a website or digital content


natural_image
Line drawing of a robotic vacuum cleaner with Wi-Fi signal icon above (no text or symbols on the device itself)Slika 7
Gumb za vklop/izklop in gumb za domov
Izklop: Izklop napajanja/Spanje/Ne moti
natural_image
Diagram of a robotic device with hands operating the internal components (no text or symbols visible)Slika 11

natural_image
Diagram of a mechanical device with gears and a central component, no visible text or symbolsSlika 12

natural_image
Hand cleaning a wooden door frame with visible hand and cloth (no text or symbols)Slika 13

natural_image
Line drawing of a hand using a tool to adjust or install a component on a car interior (no text or symbols)Slika 14
• PRILAGODI (CUSTOMISE) ( 📋 )
natural_image
Illustration of a hand cleaning a kitchen appliance with a cloth (no text or symbols)Slika 15

natural_image
Illustration of a circular device with internal components and a hand holding a cloth (no text or symbols)Slika 16

natural_image
Line drawing of a robotic vacuum cleaner with a hand cleaning it (no text or symbols)Slika 17

natural_image
Diagram of a hand operating a circular device with multiple wheels and a central component (no text or symbols visible)Slika 18
PREDNOST ČIŠČENJA
text_image
Diagram illustrating the process of cleaning a refrigerator with hand gestures and cleaning stepsnatural_image
Three-step diagram showing a hand pressing down on a device component, with no visible text or symbols.Slika 24 Slika 25
ZAMENJAVA BATERIJE
natural_image
Line drawing of a circular robotic vacuum cleaner with a central hub and mounting feet (no text or symbols)Robot Süpürge

natural_image
Line drawing of a mechanical device with front and top views (no text or symbols)natural_image
Line drawing of a device with a power outlet and labeled section 'Şekil 1' (no other text or symbols)ROBOT SÜPÜRGENİZİN HAZIRLANMASI
PAKETLEME
natural_image
Simple line drawing of a room interior with a cabinet, rug, and wall (no text or symbols)Şekil 2

text_image
8cm 1.5m 8cmŞekil 3
natural_image
Line drawing of a vacuum cleaner with attached power outlet (no text or symbols)Şekil 4
pIL
flowchart
graph LR
    A["Start"] --> B["Add"]
    B --> C["Replace to a waste bin with a handle"]
    C --> D["Open the unit"]
Şekil 5
text_image
QR code with embedded logo in center, likely linking to a website or digital content

natural_image
Line drawing of a robotic vacuum cleaner with Wi-Fi signal icon (no text or symbols)Şekil 7
natural_image
Diagram of a robotic device with hands operating the internal components (no text or symbols visible)Şekil 11

natural_image
Diagram of a circular mechanical device with visible gears and a central component (no text or symbols)Şekil 12
natural_image
Hand cleaning a wooden door frame with visible hand and cloth (no text or symbols)Şekil 13

natural_image
Line drawing of a hand using a tool to adjust or install a component on a car interior (no text or symbols)Şekil 14
natural_image
Illustration of a hand cleaning a kitchen appliance with a cloth (no text or symbols)Şekil 15

natural_image
Diagram showing a circular device with internal components and a hand cleaning it (no text or symbols)Şekil 16

natural_image
Line drawing of a robotic vacuum cleaner with a hand cleaning it (no text or symbols)Şekil 17

natural_image
Diagram of a hand operating a CD or DVD disc assembly with visible gears and components (no text or labels)Şekil 18
TEMİZLİK TERCİHLERİ
flowchart
graph TD
    A["Handwashing"] --> B["Cleaning with a bottle"]
    B --> C["Coiling with a cloth"]
    C --> D["Packaging with a brush"]
    D --> E["Recycling with a cloth"]
    E --> F["Product handling with a cloth"]
    F --> G["Storage with a cloth"]
    G --> H["Backpack with a cloth"]
natural_image
Three-step diagram showing a hand pressing down on a device component, with arrows indicating the process (no text or symbols present)Şekil 24 Şekil 25