HF210P1 011 - Vacuum Cleaner HOOVER - Free user manual and instructions
Find the device manual for free HF210P1 011 HOOVER in PDF.

User questions about HF210P1 011 HOOVER
0 question about this device. Answer the ones you know or ask your own.
Ask a new question about this device
Download the instructions for your Vacuum Cleaner in PDF format for free! Find your manual HF210P1 011 - HOOVER and take your electronic device back in hand. On this page are published all the documents necessary for the use of your device. HF210P1 011 by HOOVER.
USER MANUAL HF210P1 011 HOOVER
RU PykoBODCTBO noIb30BaTeJI 110
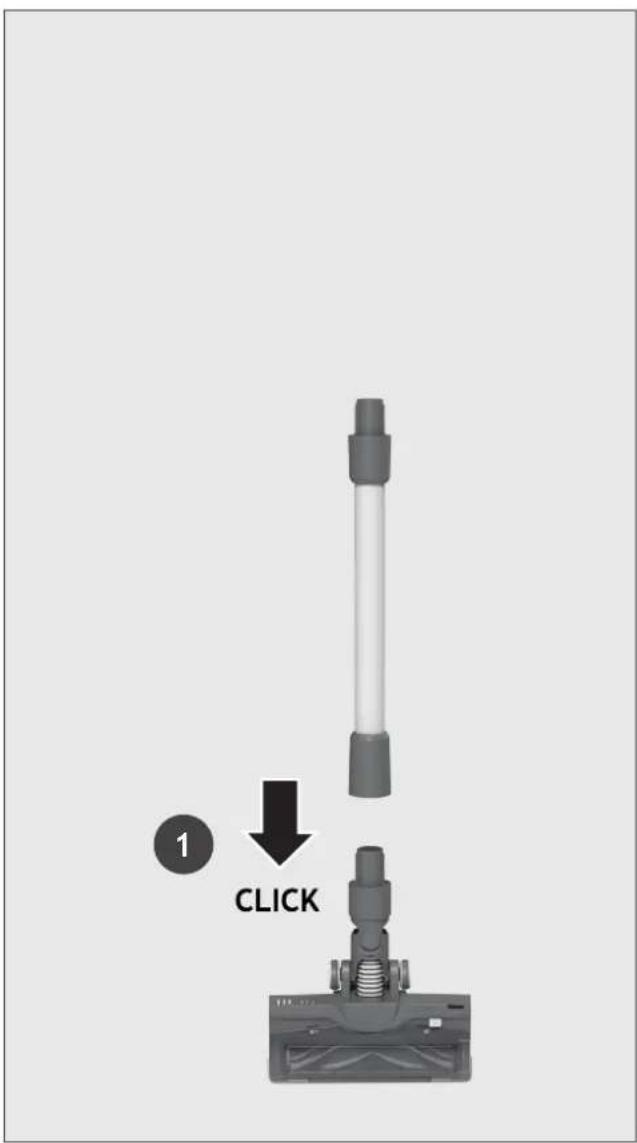
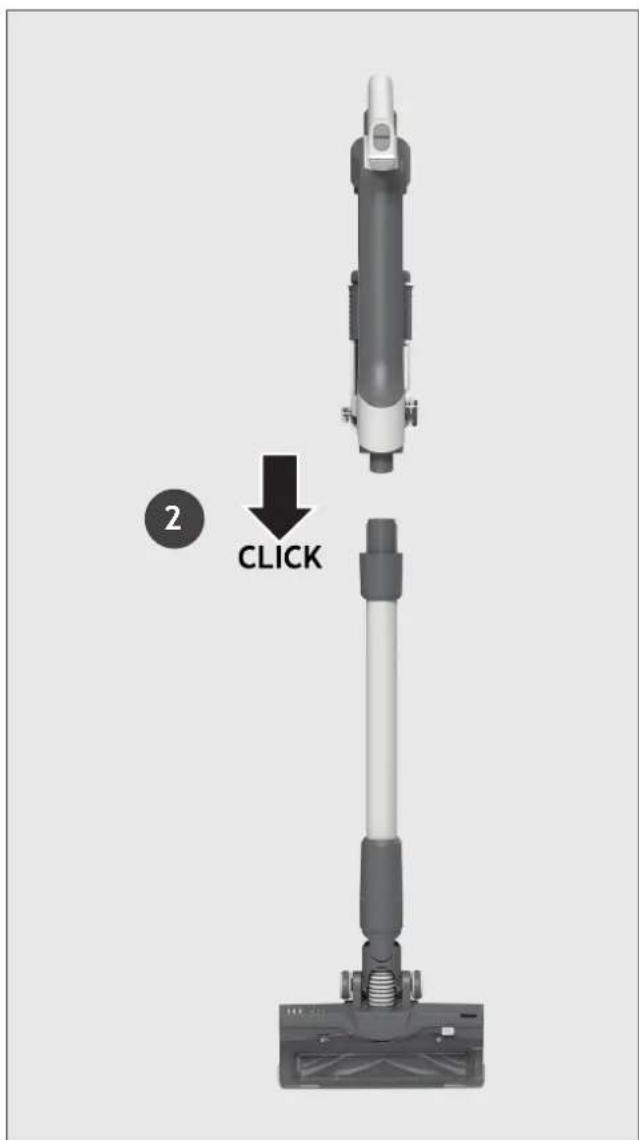
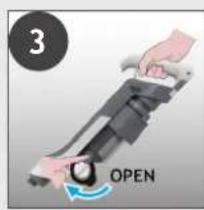
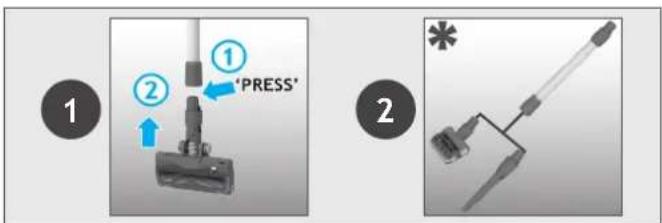
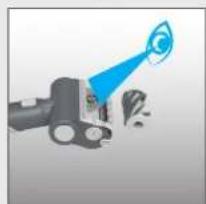
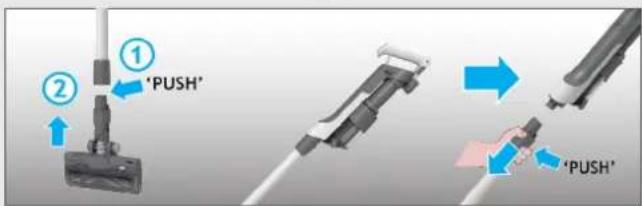
Remove all product parts from the packaging and assemble your cleaner.
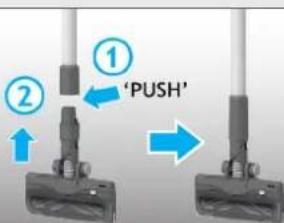
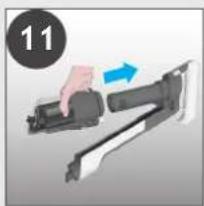
STEP 1: Fit the tube into the floor nozzle.
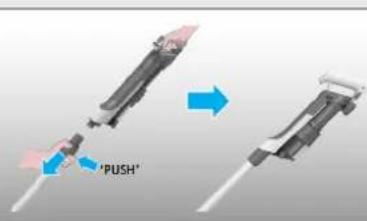
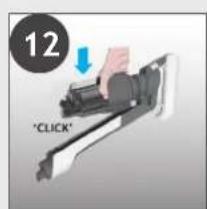
STEP 2: Fit the handheld unit onto the tube.
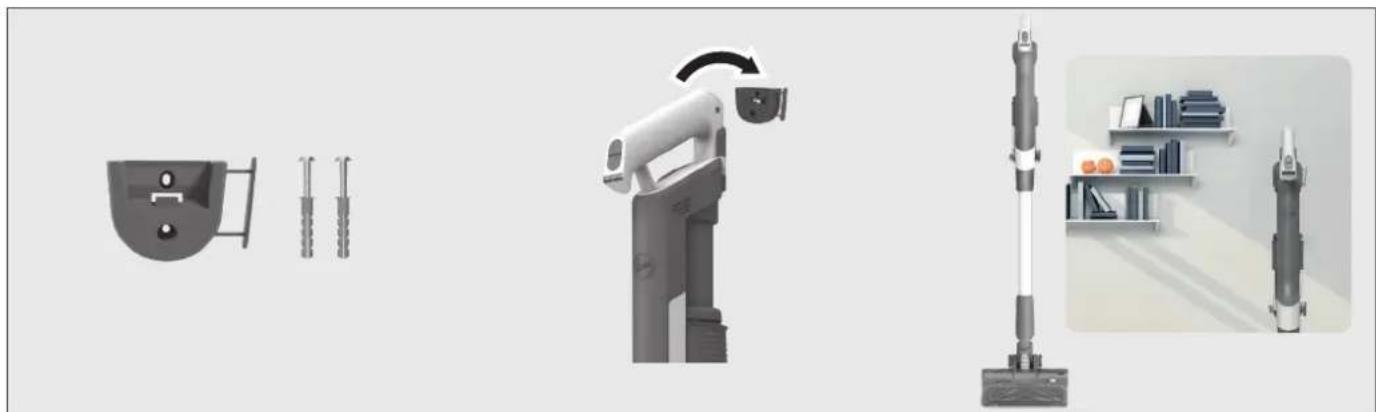
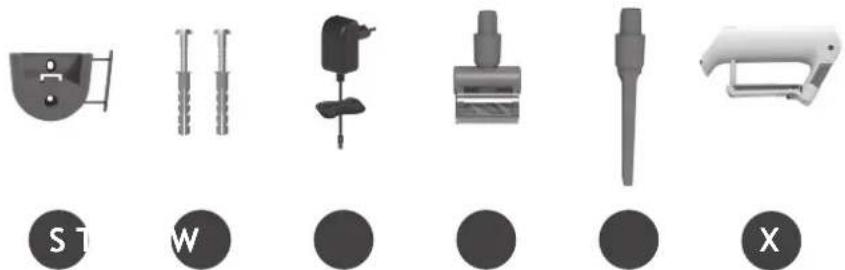
We provide a wall mount for optional storage.
You can fix the wall mount to a suitable wall using the screws and fixings provided.
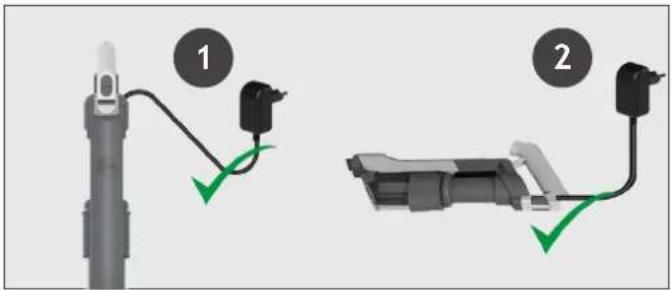
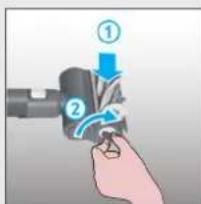
3. CHARGING THE BATTERY
GB
The battery of your product does not come fully charged.
Before first use, please charge your product completely. It takes around 4 hours.
You can charge your product in three different conditions, and the Battery status will be indicated on the LED DISPLAY.
- With the product fully assembled in stick mode or located in the wall mount.
- With the product in the handheld mode.
- With the battery removed from the product.
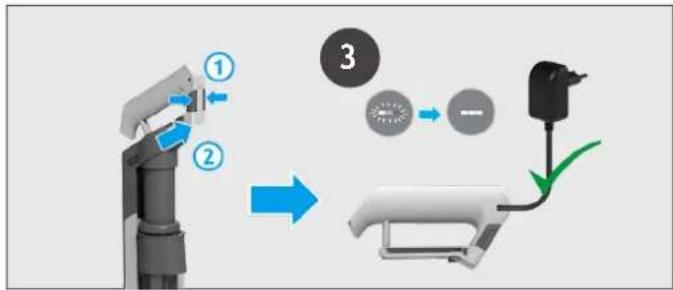
When using your product, the real time charge level of your battery is indicated on the Battery Status LED located on the handheld.
When the remaining run time is finishing, the LED display icons will begin to blink white. It is recommend you switch off your product and recharge the battery.
4. USING YOUR CLEANER
There are 3 different working modes for your cleaner:
- Stick mode.
- Above Floor mode.
- Handheld mode.
To use your product in Stick Mode:
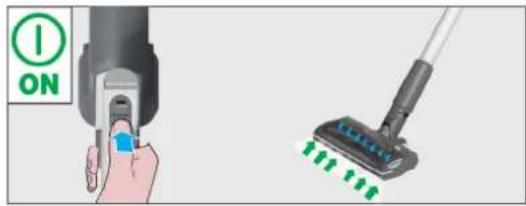
Press the ON/OFF button to begin cleaning, the default mode is STANDARD. Press the Power Mode Button to shift the working mode between Turbo/ECO/Standard.
NOTE: The nozzle LED lights are always on and the brushbar is always rotating.

If you require a deeper clean when using your product in Stick Mode, press the Power Mode Button once to enter TURBO Mode. The Power Mode icon will illuminate white on the LED display to confirm your selection. Please note this will reduce your battery runtime.
If you require a lighter clean when using your product in Stick Mode, press the Power Mode Button two times to enter ECO Mode. The Power Mode icon will illuminate green to confirm your selection.
Press again the Power Mode Button to go back to Standard Mode. The Power Mode icon will turn off to confirm your selection.
4.2 ABOVE FLOOR / HANDHELD MODE
To use your product in Above Floor mode:
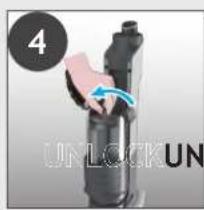
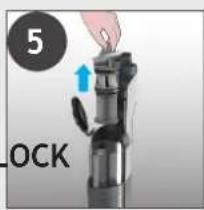
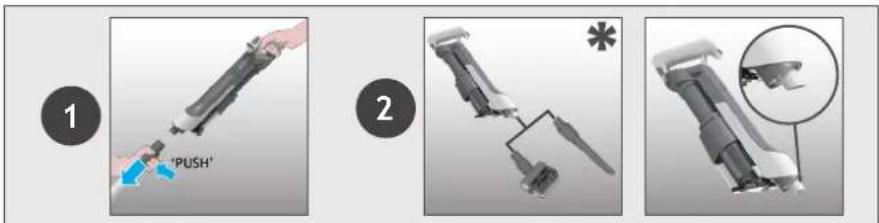
- Detach the Nozzle from the tube by pressing the Nozzle Release Button.
- Fit your desired accessory to the end of the Tube, all of your available accessories will fit onto the end of the Tube.
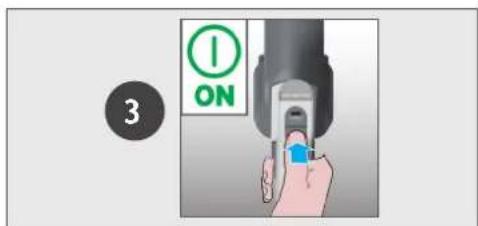
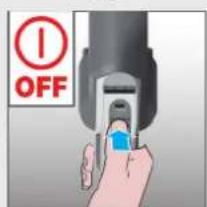
- Press the ON/OFF Button to start cleaning.

To use your product in Handheld mode:
- Detach the Tube from the handheld unit by pressing the Tube Release Button.
- Fit your desired accessory to the end of the handheld unit, all of your available accessories will fit onto the end of the handheld unit. You also can use the Integrated Crevice tool.
- Press the ON/OFF button to start cleaning.

Control settings:
Press the ON/OFF button to begin cleaning, the default mode is STANDARD. Press the Power Mode Button to shift the working mode between Turbo/ECO/Standard.
If you require a deeper clean, press the Power Mode Button once to enter TURBO Mode. The Power Mode icon will illuminate white on the LED display to confirm your selection. Please note this will reduce your battery runtime.
If you require a lighter clean, press the Power Mode Button two times to enter ECO Mode. The Power Mode icon will illuminate green to confirm your selection.
Press again the Power Mode Button to go back to Standard Mode. The Power Mode icon will turn off to confirm your selection.

5. CLEANER MAINTENANCE
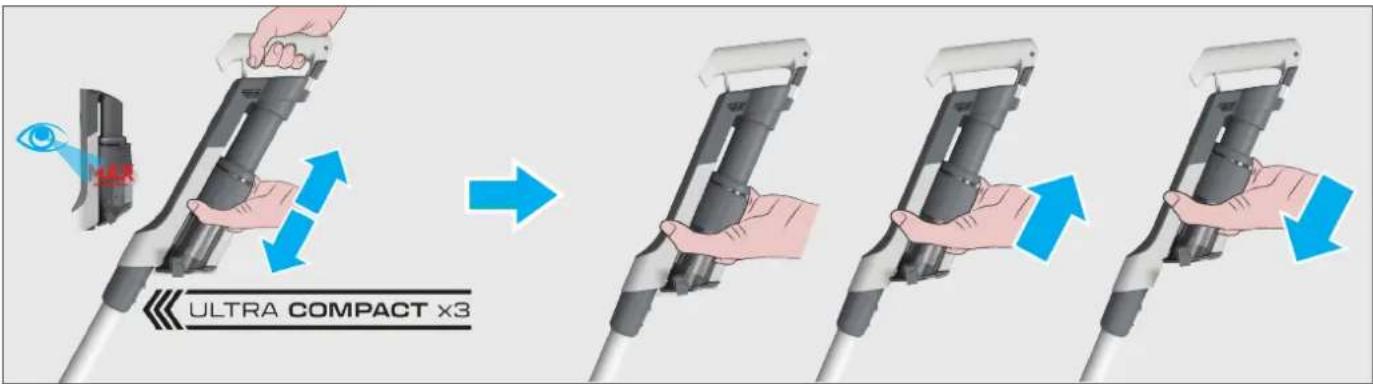
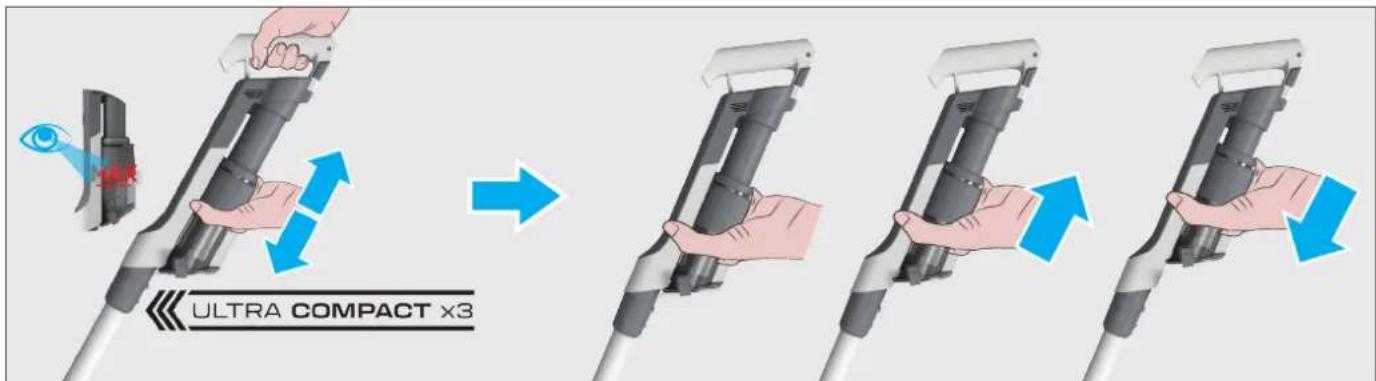
5.1 ULTRA COMPACT X3: DUST COMPACTION FUNCTION
You can compress the debris in the DUST BIN to increase the debris capacity of the DUST BIN. Move the slider upwards then downwards to perform dust compaction function.
5. CLEANER MAINTENANCE
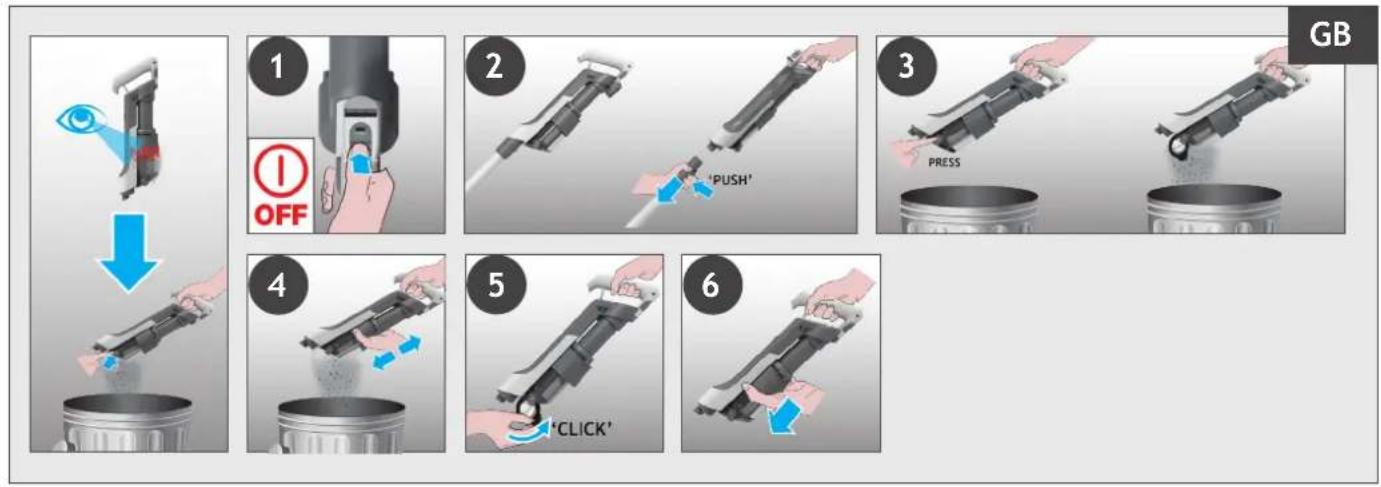
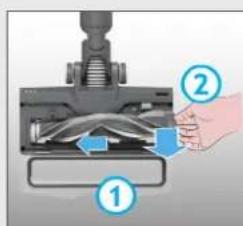
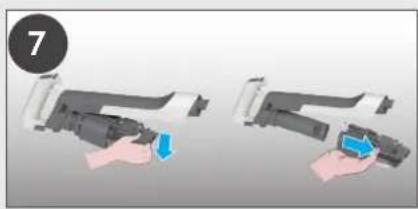
5.2 EMPTYING THE DUST BIN
When the debris in your dust bin reaches the max fill line, empty your bin.
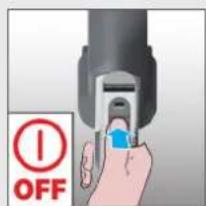
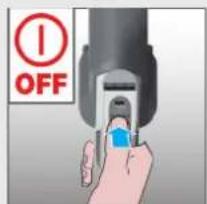
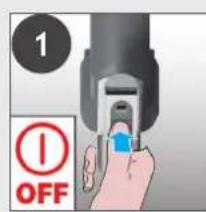
- Switch off your product.
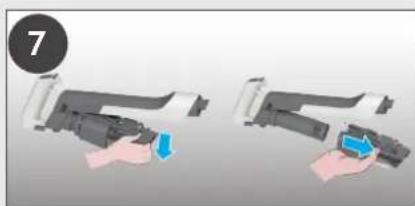
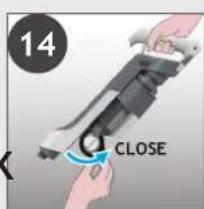
- Press the Tube Release Button and to detach the Tube from handheld.
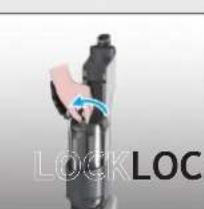
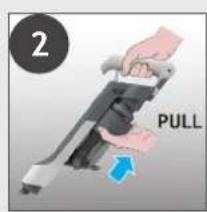
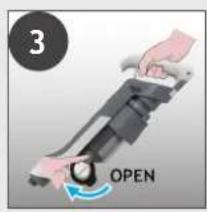
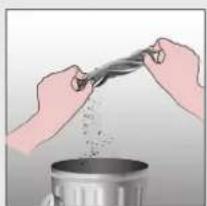
- Hold the handheld over a Dust Bin and press the Dust Bin Empty Release Button to open the flap and release the debris into the trash.
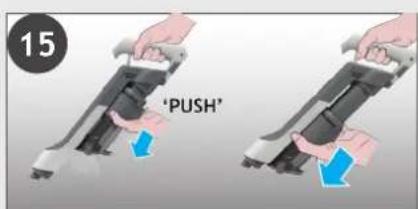
- Hold the Dust Bin ULTRA COMPACT X3 Slider and move it upwards and downwards to remove any residual dirt.
- Close the Bin Flap.
- Check that the Dust Bin ULTRA COMPACT X3 Slider is back into its original position.
5. CLEANER MAINTENANCE
5.3 CLEANING THE FILTER AND THE BIN
IMPORTANT: for optimum performance, we recommend to wash the filters after every 5 bin empties.
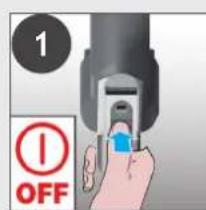
- Ensure your product is switched off.
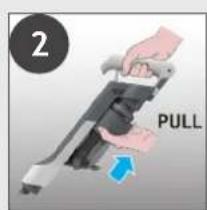
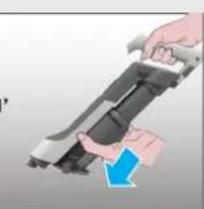
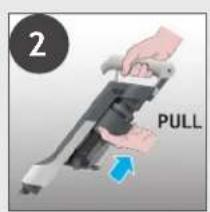
- Hold the Dust Bin ULTRA COMPACT X3 Slider and pull it upwards.
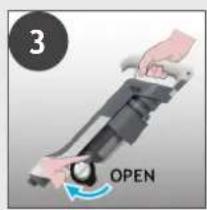
- Press the Dust Bin Empty Release Button to open the Bin Flap.
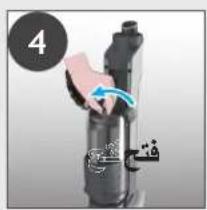
- Rotate the Filter anti-clockwise.
- Remove the Filter from the handheld unit.
Note: Remove any excess debris from the Filter.
- Press the Dust Bin Removal Lever to release the bin moving it downwards.
- Remove the bin from the main unit sliding it downwards.
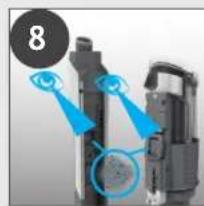
- Check for any residual dust or debris on the main unit.
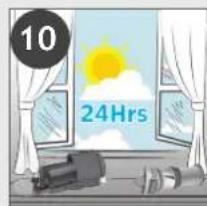
- Wash the filter and the bin using lukewarm water.
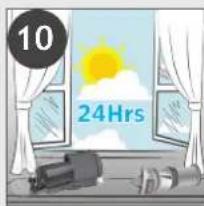
- Leave them to dry for 24hrs before refitting to your product.
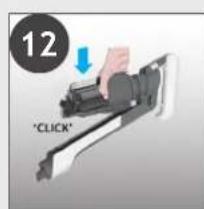
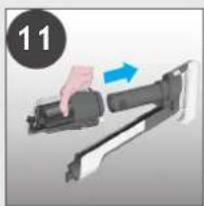
- Refit the bin onto the main unit.
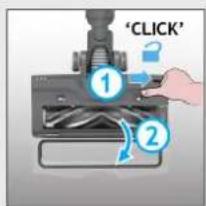
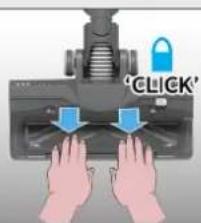
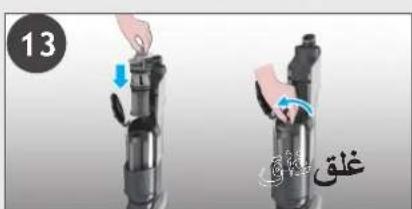
- Attach the bin sliding it upwards on the main unit until you hear a "click" sound.
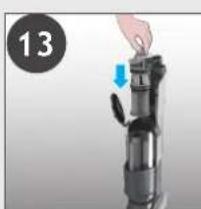
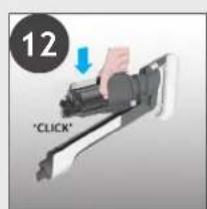
- Insert the filter back into position and rotate it clockwise until you hear a "click" sound.
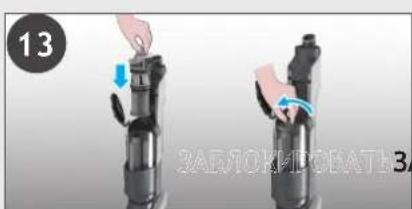
- Close the bin flap.
- Hold the Dust Bin Ultra Compact x3 Slider and move it downwards into its original position.


5. CLEANER MAINTENANCE
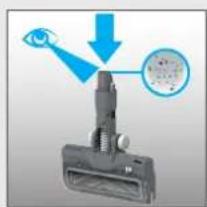
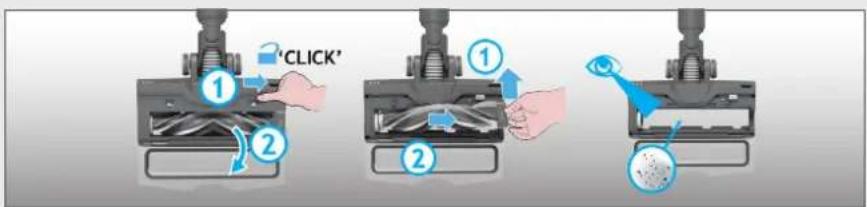
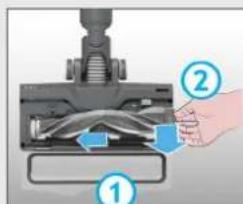
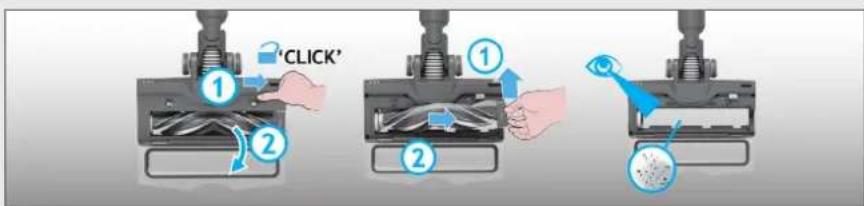
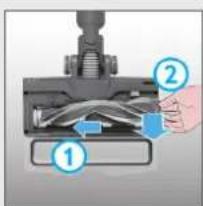
5.4 CLEAN FLOOR NOZZLE
Thanks to ANTI-TWIST, your Hoover vacuum features an integrated comb which radically reduces hair wrapping around the brushbar. However, if your cleaner is not picking up efficiently your brushbar may need to be cleaned.
- Ensure your product is switched off.
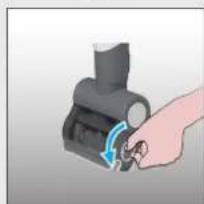
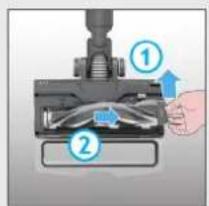
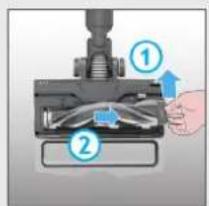
- Slide the nozzle brushbar release slider and open the nozzle window.
- Using the brushbar release latch, remove the brushbar from the nozzle.
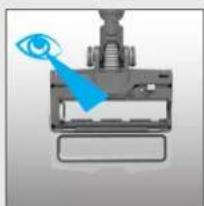
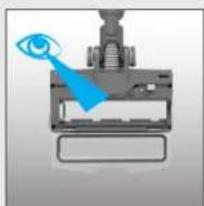
- Check for and remove any large debris from inside the nozzle. Carefully check for and remove any tangled debris from the comb.
- Remove any excess debris from the brushbar.
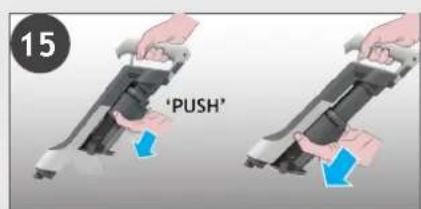
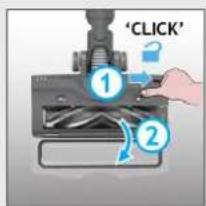
- Refit the brushbar to the nozzle ensuring the latch is fully in place. The brush bar can only fit in one direction. Press the end slightly to make sure the brush bar is in place.
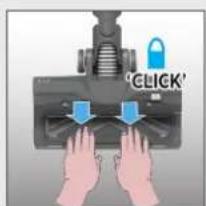
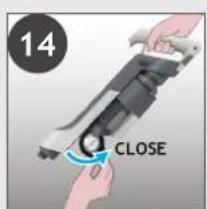
- Close the window by pressing gently on the middle area until you hear it "click" into place. Check the window is completely locked by pressing on both sides.
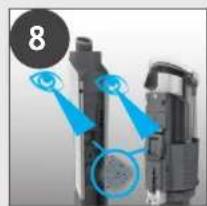
IMPORTANT: Ensure the window is fully closed. If the nozzle window is not correctly reassembled, the nozzle LED lights will flash and the brushbar status light will turn red.


5. CLEANER MAINTENANCE
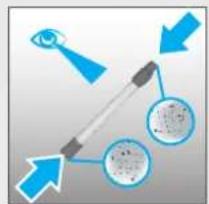
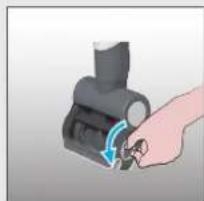
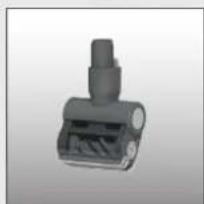
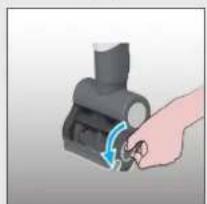
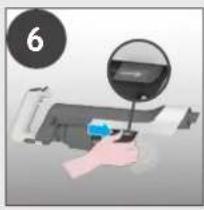
5.5 CLEAN MINI POWER NOZZLE
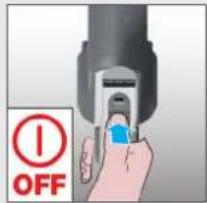
- Ensure your product is switched off.
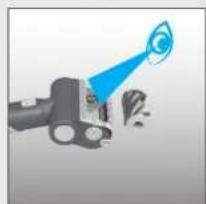
- Detach the mini-power nozzle from your product.
- To remove the brushbar, unlock the release latch with a coin.
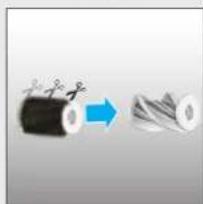
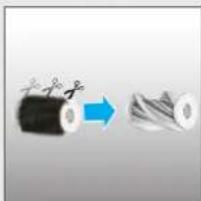
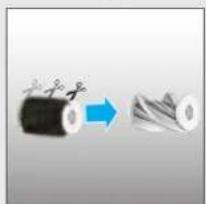
- Using scissors, remove any tangled fibres or debris from the Brushbar.
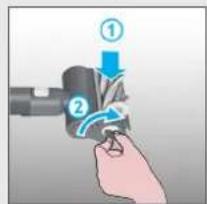
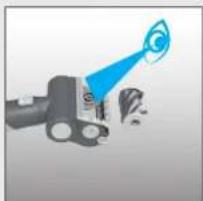
- Look inside the nozzle and remove any debris.
- Re-fit the brushbar, push and lock the release latch with a coin.


5. CLEANER MAINTENANCE
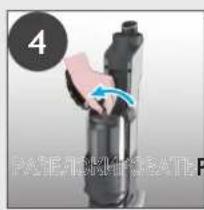
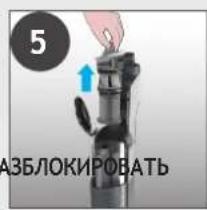
5.6 BLOCKAGES
If your product is still working but has low or no suction, your product may have a blockage. A red steady light may appear on the battery status led bar. Carry out all maintenance instructions included in sections, 5.1, 5.2, 5.3, 5.4, 5.5. The following additional areas of your product should also be checked for any debris or blockages:
- Ensure your product is switched off.
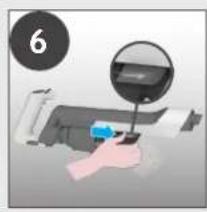
- Detach the nozzle, tube and handheld unit as per previous instructions.
- Visually check the handheld inlets for any debris or obstructions and clean it.
- Visually inspect the nozzle joints area for any debris or obstructions and clean it.
- Remove the Brushbar and check the nozzle inlet area for any debris or obstructions and clean it.
- Visually check both ends of the tube and remove any debris or obstructions.
- Re-Assemble your product.
1

2

3
4
5
6
7

The following is a list of commonly encountered problems and solutions.
A. Cleaner does not switch on.
Check if the cleaner is charged.
Check if the battery pack is assembled in place.
Check if the filter is assembled in place.
Check if the dust bin is assembled in place.
B. If a red flashing light appears on the battery status LED bar.
Check if the battery is assembled correctly.
Check if the Dust Bin ULTRA COMPACT X3 slider is the correct position.
Check if the filter is assembled correctly.
C. Cleaner stop working.
Check if there is an obstruction in air inlet or in the tube, clear it and ensure the product is OFF. Once this is done simply press the on/off button, the product will start working again.
D. The All Floor Nozzle status LED light goes off and the warning symbol on Hand-Held LED is RED.
There is a blockage in the nozzle or an obstruction to the brushbar or the nozzle window is not properly located.
Ensure your product is switched OFF and remove any debris or obstruction and following cleaner maintenance 5.4.
E. Batteries cannot be charged.
This may be a result of very long storage periods (over half year).
Contact Hoover customer service to arrange battery replacement.
If the problem persists, contact the Hoover customer service center.
If there is any doubt call the Hoover Service Office for advice. They may be able to assist you over the telephone. A service charge will be made if the cleaner is examined and found to be in working order, has not been assembled in accordance with these instructions or has been used incorrectly.
7. IMPORTANT INFORMATION
Hoover Spares and Consumables
Always replace parts with genuine Hoover spares. These are available from your local Hoover dealer or direct from Hoover. When ordering parts always quote your model number.
Quality
Hoover's factories have been independently assessed for quality. Our products are made using a quality system which meets the requirements of ISO 9001.
Your Guarantee
The guarantee conditions for this appliance are as defined by our representative in the country in which it is sold. Details regarding these conditions can be obtained from the dealer from whom the appliance was purchased. The bill of sale or receipt must be produced when making any claim under the terms of this guarantee.
Subject to change without notice.
COMPOSANTS PRINCIPAUX :
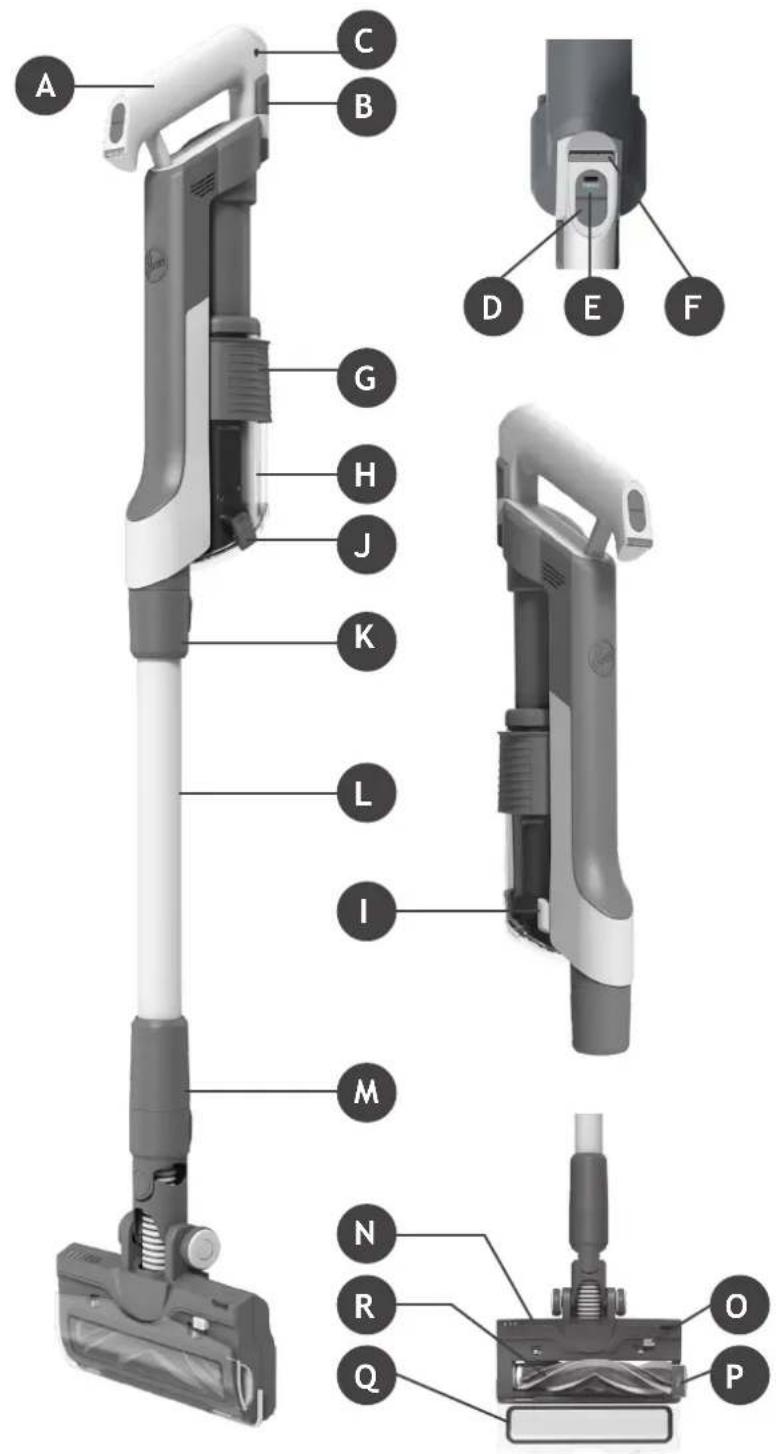
A. BLOC BATTERIE
B. BOUTONS DE DÉVERROUILAGE DU BLOC BATTERIE
C. ENTRÉE DU CHARGEUR DE BATTERIE
D. BOUTON MARCHE / ARRET
E. BOUTON POWER MODE (MODE PUISSANCE)
F. LED D'ETAT DE LA BATTERIE
G. COULISSEAU ULTRA COMPACT X3 BAC à POUSSIÈRE
H. BACÀPOUSSIÈRE
I. LEVIER DE DÉPOSE DU BAC À POUSSIÈRE
J. BOUTON DE DÉVERROUILAGE DE VIDANGE DU BAC À POUSSIÈRE
K. BOUTON DE DÉVERROUILAGE DU TUBE
L. TUBE
M. BOUTON POUR DETACHER LA BROSSE
N. BUSE DE SOL
O. COULISSEAU DE DÉVERROUILAGE DE LA BARRE DE BROSSE
P. LOQUET DE DÉVERROUILAGE DE LA BROSSE DE LA BUSE
Q. COUVERCLE SUPERIEUR
R. BROSSE DE LA BUSE
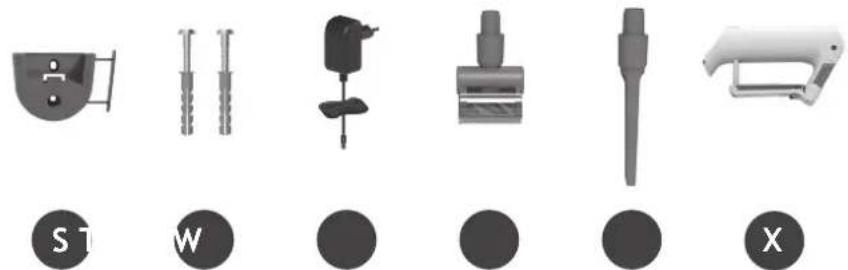
S. SUPPORT MURAL
T. VIS DE BASE MURALE ET FIXATIONS
U. CHARGEUR
V. MINI TURBOBROSSE
W. SUCEUR PLAT
X. BLOC-BATTERIE SUPPLEMENTaire
5.5 MINIBOQUILLA CLEAN POWER
5.5 RENGOR MINI POWER-MUNDSTYKKET
5. VEDLIKEHOLD AV STØVSUGEREN
5.1 ULTRA COMPACT X3: STØVKOMPRIMERINGSFUNKSJON
5. VEDLIKEHOLD AV STØVSUGEREN
5.2 TOMME STØVBEHOLDEREN
5. VEDLIKEHOLD AV STØVSUGEREN
5.3 RENGJØRING AV FILTERET OG BEHOLDEREN
VIKTIG: For best ytelse anbefales det Å vaske filtrene hvr 5. gang beholderen tommes.
5. VEDLIKEHOLD AV STØVSUGEREN
5.4 RENGJØRE GULVMUNNSTYKKET
Takket vare ANTI TWIST har Hoover-stvsgeren en integrett kam som reduserer betraktelig hare som vikler seg rundt borstangen. Uansett, hvis stvsgeren ikke suger effektiv, ma kanskje borstangen rengøres.
5. VEDLIKEHOLD AV STØVSUGEREN
5.5 RENGJORE DET LILLE MUNNSSTYKKET
1.Pass pà at produits er slätt av.
2. Løsne det lille munnstykket fraprodukter.
3. Bruk en mynt og las opp utloserluken for a ta ut borstangen.
4. Fjern sammenfiltret fibrer eller avfallsrester fra børstestangen med bruk av en saks.
5. Kontroller munnstykket innvendig og fjern eventuelle avfallsrester.
6. Gjenmonter børstangen, skyv og lås utløserluken med en mynt.

1
2.4
5
6
5. VEDLIKEHOLD AV STØVSUGEREN
5.6 BLOKKERINGER
NO
5.2 POLYSAILION TYHJENNYS
YTo6bI HcNoIb3OBAbI npOdyKT BpeKHe HaI noIOM:
- CHHMMTE Hacdky C Tpy6bl, HaxkAB KhoNkO tCOeHNHeHnHa cakn.
- YctaHOBInTe HxKHyIO npHaIeJXHocTb Ha KOHeU Tpy6Kn (Bce npHaIeJXHocTHn 3 KOMJIeKTa CTbIKyIOTc C KOHcOm Tpy6Kn).
- Haxmnte KhoNky BkIIOueHnry/BbIKIOueHnry, yTo6bl Haayatb y6OpKy.

YTO6bI HcNoJIb3OBaTb yCTpOJCTBO BpyHOM peKHMe:
- OToeHNHte Tpy6y ot pyuHoro 6JIOka, HauKab KhoNky OToeDHeHnry Tpy6bl.
- YctahOBHTe HxKHyIO npHnAdIeXHoCTb Ha KOHeu pyHoro 6Ioka (Bce npHnAdIeXHOCTN 3 KOMnJIeKTa CTbIKyIOTc c KOHcO mpyHoro 6Ioka).TakKe moXHO nCnoJb3ObaT b CTopeHHyIO IeJeByIO HacaIky.
- Haxmte KhoNky BkIIOueHnry/ BbIKIOueHnry, YTO6bl Haatb y6OpKy.
HactpoynynpaBleHHa:
HaKMMTe KONky BkIIOueHnry/ BbIKIOueHnry, yTO6bl Haayatb y6OpKy. No yMOJauHHy yCTaHOBHeH STANDARD. HAKMnte KONky BbI6opa MoUHOCTn dJIpeKeKIOueHnry MeJy peKIMAMn Turbo/ECO/Standard.
EcnBamHyxHO yBeHnHTb MoHocb y6OpKn, HaxMnte KhoNky Bb6opa MoHocn OdNH pa3, YTO6bl Bb6paTb pexm TURBO. 3HaOc MOHocn Ha CBeToIOHOH OM DInCnIee 3aRopNTc 6eNbIM, NOITBepKdA Bau Bb6op. O6paTHe BHMaHHe, YTO 3TO npNBedet K cokpaueHIO BpeMeHN pa60tbi 6atapEn.
Ecnn Bam DoctaToH NoIeKoN y6OpKn, HaxMnte KhoNky Bb6opa MoOIOCTn Dba pa3a, YTO6bl Bb6paTb peKIM ECO. 3NaOH KO MOUHOCTn Ha CBeTOdNOdHOM dncJIeee 3arOpNTcra 3eJeHbIM, NOdTBePckJaBaw Bb6op. HaxMnte KhoNky Bb6opa MoOIOCTn eue pa3, YTO6bl BePHyTBcR B pexm Standard. 3NaOH KO MOUHOCTn Ha CBtOIOHOHOM dncJIeee NorachET, NODTBePckJaBaw Bb6op.

5. TEXHINUECKOE OBCJYKUBAHNE NblIECOCA
5.1 ULTRA COMPACT X3:ФУнкцЯ уПЛOTHEHЯ nbIJIИ
Mycop B KOHTEHEPE IJI NBIJIM MOXHO yNIOHTb, yBEJIYNB BMECTNTeJbHOCTb KOHTeHepa. IepetAHTE NOI3yHOK BBepx, a 3aTeM BHN3, YTO6bl yNIOHTb IIbB BYTpN KOHTeHepa.
5. TEXHINUECKOE OBCJYKUBAHNE IbIIECOCA
5.2 ONOPOXHEHNE KOHTENHEPA DnB CBOPA nbln
Korda KaJIueCTBO Mycopa B KOHTeHepE dIa c6opa IIbIIN DOCTnHET IINHHM MaKcMaJIbHOrO 3aONHeHn, ONOpOXHnTE KOHTeHep.
- BbIKHIOUHTe yCTPOINCTBO.
- HaxMMTE KONKy OTOeHNHeHn Tpy6bl n CHMMTE Tpy6c pyHoro 6Ioka.
- YdepnBra pyHn6nK HnMycOpHbIM BeDpOM, HaxMnte 3aueJky KpbIuKN, YTO6bl OTKnHyTb ee N Bbyrpy3HTb MycOp B MycOpHoe BeDpo.
4.Bo3bMntecb 3a noJ3yHOK ULTRA COMPACT X3 Ha KOHTeHHepe IJIЯ nbIIN I nepeMeCTnTe erO BBepx-BHN3, YTO6bl BbIrpy3NtB OCTaTKM Mycopa. - 3akpoTe 3acloHky KOHTeHepa.
- Y6eHntecb, yTO IOn3yHOK ULTRA COMPACT X3 Ha KOHTeHHepe dIa NbIIN BepHyIcB HxCOdHoe NoIOXKeHne.

5. TEXHINUCKOE OBCJNKBAHNE IIIECOCA
5.3 OUHCTKA ΦИЛbTPA И KOHTENHEPA
BHIMAHHE!ДЯ ONTImaJIbHoi pa6Otbl peKOMeHdyetc npombiBaTb ΦnIbTpbl nocJe KaJdIx 5 onopoxHeHH KOHTeHepa.
- y6eIntecb, yTO yCTponCTBO BbIKIOueHo.
2.Bo3bMntecb 3a noJ3yHok ULTRA COMPACT X3 Ha KOHTeHHepe Iy nbIIN nepeMeCTte erO BBepx. - Haxmnte 3aueKky KpbIuKN KOHTeHepa Iny nbIn, YTO6bl OTKNHyTb KpbIuKy.
- Nobepnhte nIbtp npOTNB YacOBON CTpeJIKN.
- Chmnte pnlbtp c pyHoro 6loka.
PpmeHHe:YdaHnTe octaTkn Mycopa c Hnltpa.
- Haxmte pbyar 3auejkn KOHTeHepa dny nbll, yTObbl BICBO6oNTb KOHTeHep, nepemecTNB erO BHn3.
- CHIMITE KOHTeHep c rIaBHOrO 6noka, notaHyB erO BHN3.
- Pn Heo6xOaHMoCTn OoHCTne octatkn nbIn nn Mycopa c rnaBHoro 6loka.
9.Помогteфильтп контейнер сlerka tennoBdoN. - DainTe HbBICOXHyTb B TeueHHe 24 hacob nepeD yctaHOBko Ha np6Op.
- Choba yctaHOBNTe KOHTeHep Ha rnaBBh6IOK.
- PnKpeNte KOHTeHep, npoTaNbEero BBePx Ha rNaBbI 6Jok Do ueLka.
- YctaHOBHTe HJIbTp Ha3aI NIOBepHHTe ero No yacOBOn CTpeJIke Do IeJyka.
- 3aKpOte 3acJIOHky KOHTeHepa.
- Bo3bMntecb 3a noJ3yHok ULTRA COMPACT X3 Ha KOHTeHHepe IJI IN nepemecHTe erO BHN3 BnCXoJHOe noJIOKeHne.


5. TEXHnueCKOE OBCJYXHBAHNE NblIECOCA
5.4 OYHCTKA HACADKN IJRA NOJA
Blaoradapra cnteme ANTI-TWIST Baun nbinecoc Hoover ochauen BCTpoehno rpe6eHko, KOTopar 3haHTelbHO yMehbaaet HamaTbBaHne BOLOC Ha ueTKy. Ondako ecln Baun nbinecoc co6npaet nbIb HeofoekTNBHO, MoKET notpe6obatcbq YNCTKa ueTKn.
- Y6eIHTecb, yTO yCTPOINCTBO BbIKJIHOeHO.
- NepetAHHTe noJ3yHOK oTcoeINHeHnI eTKn n OTKpoITe OKoUko HacaKn.
3.C NOMOUIBIO 3aIeJIKN CHIMITEIeTKy C HacaIKN. - IpoBepbTe HaJIuHne H ydaJInte KpynHbI MyCop n3HyTpH HacaKn. TuaTeIbHo npOBepbTe H ydaJInte cnyTaHHbI YeactNcbl N3 rpe6eHNK.
5.YdaJInte JINHm MycOp co 1eTKn. - YctaHOBInTe TeKy Ha HacaNky, y6eINbUncb, yTO 3aueJka NIOHOCbO BCTaHa MeCTo. PJIaHKy C eTKoM OXXHO YcTaHaBJIbBaTb ToIbKO B ODNOM HApabLeHH. CJeRka pniXMMte KOHeI PJIaHKn, YTO6bl OHa CeJa Ha MeCTo.
- 3akpoIte okoIko, npnKab ero nocepeDInHe do uelka. Y6eHITecb, yTO OKoIko nolHOCTbIO 3aKpbIIOcb, npnKab ero c o6eHX CTOpOH.
BHIMAHHE! Y6eHNTecb, yTO OKHO pIoHocTbO 3aKpbIto. EcJIN OKoUKO hacaKn cO6pAno HnPaBnJIbHo, CBToDnOHDhIe INdNKaTOPbI hacaKn bdyT MmTa, a INdNKaTOP COCTOHNu cTeKN cTaHET KpaChbIM.


5. TEXHHUHECKOE OBCJYXHBAHNE IIJIIECOCA
5.5 OUHCTKA MNHHACADKN
- y6eHntecb, yTO yCTPOINCTBO BbIKIOUHeHO.
- CHIMITE MHHHacdky c np6opa.
- Yto6bI cHrTb 7eTKy, OTKpOInTe 3aueJky C NOMoU bIO MOHeTKn.
4.CnMOoBIO HOxHnU ydaJIInTe CnyTaHHbIe BOJIOKHa HIN MyCOP CO CTePxHr IeTKn. - 3arIaHHTe BHyTp b HacaIKN ydaIaHTe MycOp.
- YcTaHOBnTe 5eTKy Ha MeCTo, npnxMnTe n 3aФнКсUpyIte 3aIeJky MoHETKoN.


5. TEXHINHECKOE OBCJNYKIBAHNE ПыIECOCA 5.6 3ACOPbl
EcIn nbIeoc npoJnKaet pa60TaB, Ho BCacbHaHne Cna6oe nnn OTCyTCTByET, BO3MOKHO, BHyTpN 3acOp. CBeToIOHbI INHINKaTOp COCTOAHN NOCTOAHNO RopNT KpaChbIM. BblONHITE BCE IHCTpyKcUN N O6ClyjKNBaHNU, pInBeDeHHBie B pa3dEnax 5.1,5.2,5.3,5.4,5.5. CJeDyUOnne DOJONHHTeJIbHbIe O6NaCTN yctpOCTBa TaKke CJeDyET npOBepTu Ha HAnuHe Mycopa nn 3acopeHn:
- y6eHITecb, yTO yCTPOINCTBO BbIKIOUHeHO.
- OToCoeHNHHe Hacaiky, Tpy6y n pyuHoi 6Iok B COOTBeTCTBnC npebldyuumn NHCTpykuaMn.
- Bn3yaJIbHo npOBepbTe BXoDbI pyHOrO 6LoKa Ha HAIuHne Mycopa HIn npenTCTBn H OChTHe.
- Bn3yaJIbHo npOBepbTe 06IaCTb npHcOeDINHeHnaCaJKN Ha HAIyue MyCopa NIn IpeTCTBn IN OCHNTte.
- Bn3yaJIbHo npOBepbTe 8eTKy I OTBepCTHe HacaIKN Ha HAIJNue MyCopa IIIN IppeTCTBn I ONUCTHte.
- Bn3yaJIbHo npOBepbTe oBa KOHcA Tpy6Kn uYdaJIte IIO6oMycOp nI npEnTCTBna.
- Co6epHTe yctpoNCTBO 3aHOBO.

1
2
3

4
5
6
7


Hnke npnbdehen nepeueh bacto BCTpeaouxxc npo6lem nnx peweHH.
A.Пьilecoc He BKIOUOaETCRA
PpOBepbTe,3apJxKeHn nIpbIeoc.
PpOBepTe, npaBnIbHO JIn yCTaHOJIeHa aKKyMylTOpHaj 6aTapeJ.
PpOBepTe, npaBnIbHO JyctaHOBJIeH fNJIbTp.
PpOBepbTe, npaBnIbHO nn yCTaHOBnEe KOHTeHep dIy nbIi.
B. CBeToaHbHbI HnHkATop COCToHnAkkymyIaTOp aMnraet KpaChbIM.
PpOBepbTe, npaBnIbHO nY yCTaHOBJIeH aKKyMyJITOp.
PpOBepbTe, B npaBnblbHom IIN noIIOxKeHH HaxoDHTcN pON3yHOK ULTRA COMPACT X3 Ha KOnTeHHepe dJIra nbHIn.
PpOBepbTe, npaBnIbHO nn yCTaHOBJIeH fNJIbTp.
C. Пьлесoc nepectan pa6otab.
PpOBepbTe Bo3dyuHny CnCTeMy nbIeococ N Tpy6y Ha HauNue 3acopOB, yCTpaHnte Hx N y6eHTecb, YTO nbIeococ HaxoDITcB B BYKJIouEHHom COCTOHHN. PocIe COBepseHn EToI npOeDypbl, HAXMnte Ha KONKy BKIOUeHn, N nbIeococ 6ydt pa60TaTb CHOba.
D. BCE INHdkatopbl Hacaikn IJIA NOI rachyt, a CnHraHbHbIN Hndkatop Ha pyHOM 6IOke3aropaetc KpaChbIM. HacaKa 3acopnlacb, uETka 3actpnaI nn He npabHbHO pa3MeueHO OKoUKO HacaIK. BbIKIOHTe np6Op n ydaJIte BeCb MycOp nn NoCTOPOHHne ppeMteB corlaCHO nyHKTy 5.4 pa3deJa o TexHNueckOM 6cbLyKBAHHn PbIEcoca.
E.AkkymyIaTOPHa6aTapeHHe3apXkaeTc
Takoe moket cIyHtbcra B pe3yIbTaTe dIITeIbHoro xpaHEnra 6e3 pa60Tb (6oJIee noLyroDa).
CBAKHTecb c ceHTpOM o6cnykBaHn KIneHTOB dIa opraHn3aun 3aMeHbI aKKyMylTOpHoB 6aTapeN.
Ecn npo6Iema He yctpaHeHa, obaTnTeCb B aBTOpH3OBaHHb CepBHCbI cHTp.
B clyuae comhenn o6paauitecb B cepbnchb yentp Hoover 3a koncyltauee. Bo3moxho, Bam nomoryt no Telefohy. A Ilaata 3a cepbnchoe obcnykbaHne B3maetc, ecnn nocne ocmoTpa nbinecoca 6ydet yctahOBHeHO, YTO OH HaxoNTcB P a60yem coCTOHHN, 6bl CO6paH C hapyuHHeHmnpHBEx 3decb HhCTpyKm nn NCNoIb3OBAJcHnPaBnBHo.
7. BAXKHAR INHΦOPMAÇNIA
3anachbte yactn npacxodhble MaTepehaJIb KOMnaHHo Hoover
Pn 3aMeHe uacte HcnoB3yIte TolbKO opuHnaHbIbe 3aNaChbIe qactn npacOdHbIe MaTePnAbI KoMaHaHn Hoover. Ix MoKHO npio6pctN y BaWero MeCTHO dIJIepa KOMnAHn Hoover nIN B OfHuaNbHom INTEpHETMara3InHe shop.hoover.ru (Kpome 3anachbIX qacte). Pn oOpMLeHH 3aKa3a Ha 3anachbIe qactn 68aTeNbHo yKa3bBaIte Homep moEJI np6opa.
KaueCTBO
3aObdi KOMnHaH Hoover npoIIN He3aBnCmMy OueHky Ha npedMeT co6IIOeHn Tpe6oBaHn K KaecTBy Bblnyckaemoi npoykun. Hsa npodyKunu n3rotabInBaETcR C npimeHeHnEM CNCTeMbI KaeeCTBa, yDobletBopraoue Tpe6oBaHnM cTaNapTa ISO 9001.
UCIOBNA TAPAHTN
YcNoBnra rapaHTn nla daHHoro 6bITOBORo 3JeKTPnueCKOrO npH6opa onpeJJIOTc HauWM npDeCTaBntbCTBOM B CTpaHe, rde 3OT 3JeKTPponp6Op npOdaH.Bolee noDpo6HyIO INΦopMaunio 6 3THX yCNoBnx BBI MOKeTe NOLyUHTb y npOdaBua nn H3 rapaHTnHoro cepTnФHKata Ha daHHbI npH6Op. B clyuae BO3NkHOBeHNr CHTyaun, POKpbBaemor rapaHTnHbIMN o83aTeNbCTBaMn H3ROTOBtEJI, pni ObaPaeHN BYoJHMOueHHyO cepBNCHyO OprAHn3aUNo Heo6xODmO npDeTBaNTb TOBapHO-KaccOBbl Yek NNn HNOJ DOKyMeHT, NOdTBeKJaOUnn HauAINO HCteUeHnRApaHTnHoro cPoka, npEDyCMTopeHHoro ycNoBmRr rapaHTn dna daHHoro np60pa.
Bc npedctabHna B nHCTpykun HhOpmaun, KacaohuaC KOMnEkaun, TexHnuecknx XapaKTePNCK, fHKn,UBeTOBbIX CoeTaHn N T.D. HOCHT HhOpmaunOHbX XapaKTep Hn npKaHX yCNOBnX He ABJETcnyHOn OeptOu.N3rTOBnTeJb He YcTaNBAET YCNOBnN NOLOKeHN NOKyKnO OHn DOJIKNbI COOTBeTCTBOBaTb Tpe6oBaHnM perHOHaIbHOrO n/nn HaOnHOaIbHOrO 3aKOHoDaTeJIbCTBa CTPaHb IpoDAxN TOBapOB.
GLOWNE KOMPONENTY:
A. ZESTAW AKUMULATOROW
B. PRZYCISKI ZWALNIAJACE AKUMULATOR
C. WEJSCIE LADOWARKI AKUMULATORA
D. PRZYCISK ZASILANIA ON / OFF
E. PRZYCISK TRYBU ZASILANIA
F. DIODA LED STANU AKUMULATORA
G. SUWAK Z POJEMNIKIAM NA KURZ ULTRA COMPACT X3
H. POJEMNIK NA KURZ
I. DZWIGNIA ZDEJMOWANIA POJEMNIKA NA KURZ
J. PRZYCISK ZWALNIAJACY DO OPRÖZNIANIA POJEMNIKA NA KURZ
K. PRZYCISK ZWALNIAJACY RURE
L. RURA
M. PRZYCISK ZWALNIANIA KONCOWKI
N. GLOWNA SZCZOTKA
O. SUWAK ZWALNIAJACY WALEK SZCZOTKI SSAWKI
P. ZATRZASK ZWALNIAJACY LISTWE SZCZOTKI KONCOWKI
Q. OKNO KONCOWKI
R. DYSZA KONCOWKI
S. WSPORNIK DO MONTAZU NA SCIANIE
T. SRUBY I AKCESORIA WSPORNIKA DO MONTAZU NA SCIANIE
U. LADOWARKA
V. MINI TURBOSZCZOTKA PET
W. SSAWKA SZCZELINOWA
X. DODATKOWY ZESTAW AKUMULATOROW

Aajjlll Jusuiy Aaeu jHover oae aai
.Hoover eaoa jay aai
A. aiee eae 1
iola ciIaglas .7
Hooover
J (Hoover) "j" (Hoover)
.(Hoover)
gill
.ISO 9001 plll llll bai jy gji ybi liydu lyiia iie iia ygi yj ydi aai d jil g , Hoover as jh glu c hua
a aal lallll 1 1 1 1 1 1 1 1 1 1 1 1 1 1 1 1 1 1
Jalll l 10000000000000000000000000000000000000000000000
i 1
a a a a a a a a a a a a a a a a a a a a a
- S1 = 12 · S1 · S2 = 12 · ( a1 + a2) = 12( a1 + a_2) = 14 .
a gill 1 a gill
aill jol 1jil slll jil jil jil jil jil jil jil
A
.51jall 1 j 1 j 1 j 1 j 1 .5
6
aikso slw jll u
7
i 1
y
1235


aill jgs a 5
5.5
1.
a jge jao aalll 1s yaaall gall Jae aaiy
Aaieae aee 1y jaiil Jaae e ae aee aee aee 3
.
J51 Jj, jssll 5.5
a a a a a a a a a a a a a a a a a a a a a a a a a a a a a a a a a
jlae alp 1211y y jalil Jai.9
aIggaLgusjdo! 24 201
a. a. a. a. a. a. a. a. a. a. a. a. a. a. a. a. a. a. a. a. a. a. a. a. a. a. a. a. a. a. a. a. a. a. a. a. a. a. a. a. a. a. a. a. a. a. a. a. a. a. a.
"12
"13
14
LULTRA COMPACT X3 2Jao .15


( x + 1) ( x + 2) = 0
e 1
S_ OBC = 12 · CO · BC = 12 × CD × 5
1 1
yjll j 100
y 1
1
alal alal alal alal alal alal alal alal alal alal
Aaia 1y y all jy Jy y y y y y y ULTRA COMPACT X3 y y y.4
eclglchc jie1.5
ULTRA COMPACT X3 6
:laeai gao
J 1 J 1 1 1 1 1 1 1 1 1 1 1 1 1 1 1 1 1 1 1 1 1 1 1 1 1 1 1 1 1 1

| Manufacturer Name | Dongguan Guanjin Electronics Technology Co., Ltd. |
| Manufacturer Address | Block 16 Qiantou New industrial Park, Niushan, DongchengDistrict,Dongguan City,Guangdong Province, China |
| Model | K12B176070B/K12B176070G |
| Input Voltage | 100-240V- |
| Input AC Frequency | 50/60 Hz |
| Output Voltage | 17.6V DC |
| Output Current | 0.7 A |
| Output Power | 12.3 W |
| Average Active Efficiency | 83.1% |
| Efficiency at load 10% | 79.0% |
| No-Load Power Consumption | 0.10 W |