
Midnight Sun - Heating Klarstein - Free user manual and instructions
Find the device manual for free Midnight Sun Klarstein in PDF.

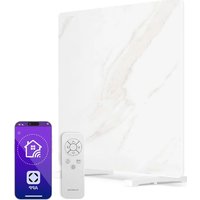
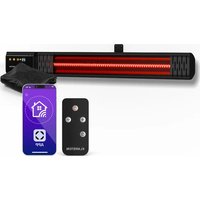
| Product Type | Ceiling heater with LED ceiling light |
| Brand and Model | Klarstein Midnight Sun |
| Article Numbers | 10035321, 10035322, 10035323 |
| Dimensions (W x D x H) | 10035321: 660 x 635 x 35 mm 10035322: 1085 x 635 x 35 mm 10035323: 1285 x 635 x 35 mm |
| Weight | Approx. 6 kg (estimate) |
| Heating Power | 10035321: 350 W + 32 W LED 10035322: 800 W + 40 W LED 10035323: 800 W + 40 W LED |
| Voltage and Frequency | 230 V ~ 50 Hz |
| Rated Current | 10035321: 1.7 A 10035322/10035323: 3.6 A |
| Control Type | Digital remote control with LCD display and plug-in receiver |
| Adjustable Temperature Range | 0 - 45 °C (accuracy 1 °C) |
| Programming | 5+2 mode (4 periods/day for weekdays and weekend) or 1...7 mode (2 periods/day) |
| Special Functions | Open window detection, child lock, favorite temperature (FAV), shut-off timer |
| Installation | On ceiling, height > 1.8 m, by a professional electrician |
| Remote Control Power Supply | 2 AAA 1.5 V batteries (not included) |
| Standby Consumption (Receiver) | 0.2 W |
| Safety | Do not cover, hot surface, splash-proof (IPX0), automatic shut-off in case of overheating |
| Cleaning and Maintenance | Unplug and let cool; vacuum the grilles; clean the exterior with a damp cloth; do not immerse |
| Importing Country (UK) | Chal-Tec GmbH, Wallstraße 16, 10179 Berlin, Germany |
Frequently Asked Questions - Midnight Sun Klarstein
User questions about Midnight Sun Klarstein
0 question about this device. Answer the ones you know or ask your own.
Ask a new question about this device
Download the instructions for your Heating in PDF format for free! Find your manual Midnight Sun - Klarstein and take your electronic device back in hand. On this page are published all the documents necessary for the use of your device. Midnight Sun by Klarstein.
USER MANUAL Midnight Sun Klarstein
Note: This product is only suitable for well insulated spaces or occasional use.
bar
| Category | Value | |---|---| | Category 1 | 100 | | Category 2 | 100 | | Category 3 | 100 | | Category 4 | 100 | | Category 5 | 100 | | Category 6 | 100 | | Category 7 | 100 | | Category 8 | 100 | | Category 9 | 100 | | Category 10 | 100 | | Category 11 | 100 | | Category 12 | 100 | | Category 13 | 100 | | Category 14 | 100 | | Category 15 | 100 | | Category 16 | 100 | | Category 17 | 100 | | Category 18 | 100 | | Category 19 | 100 | | Category 20 | 100 | | Category 21 | 100 | | Category 22 | 100 | | Category 23 | 100 | | Category 24 | 100 | | Category 25 | 100 | | Category 26 | 100 | | Category 27 | 100 | | Category 28 | 100 | | Category 29 | 100 | | Category 30 | 100 | | Category 31 | 100 | | Category 32 | 100 | | Category 33 | 100 | | Category 34 | 100 | | Category 35 | 100 | | Category 36 | 100 | | Category 37 | 100 | | Category 38 | 100 | | Category 39 | 100 | | Category 40 | 100 | | Category 41 | 100 | | Category 42 | 100 | | Category 43 | 100 | | Category 44 | 100 | | Category 45 | 100 | | Category 46 | 100 | | Category 47 | 100 | | Category 48 | 100 | | Category 49 | 100 | | Category 50 | 100 | | Category 51 | 100 | | Category 52 | 100 | | Category 53 | 100 | | Category 54 | 100 | | Category 55 | 100 | | Category 56 | 100 | | Category 57 | 100 | | Category 58 | 100 | | Category 59 | 100 | | Category 60 | 100 | | Category 61 | 100 | | Category 62 | 100 | | Category 63 | 100 | | Category 64 | 100 | | Category 65 | 100 | | Category 66 | 100 | | Category 67 | 100 | | Category 68 | 100 | | Category 69 | 100 | | Category 70 | 100 | | Category 71 | 100 | | Category 72 | 100 | | Category 73 | 100 | | Category 74 | 100 | | Category 75 | 100 | | Category 76 | 100 | | Category 77 | 100 | | Category 78 | 100 | | Category 79 | 100 | | Category 80 | 100 | | Category 81 | 100 | | Category 82 | 100 | | Category 83 | 100 | | Category 84 | 100 | | Category 85 | 100 | | Category 86 | 100 | | Category 87 | 100 | | Category 88 | 100 | | Category 89 | 100 | | Category 90 | 100 | | Category 91 | 100 | | Category 92 | 100 | | Category 93 | 100 | | Category 94 | 100 | | Category 95 | 100 | | Category 96 | 100 | | Category 97 | 100 | | Category 98 | 100 | | Category 99 | 100 | | Total (Total) = [sum of bars] / [values] * (sum of bars + bars) * (sum of bars + bars) * (sum of bars + bars) * (sum of bars + bars) * (sum of bars + bars) * (sum of bars + bars) * (sum of bars + bars) * (sum of bars + bars) * (sum of bars + bars) * (sum of bars + bars) * (sum of bars + bars) * (sum of bars + bars) * (sum of bars + bars) * (sum in brackets) * (sum in brackets) * (sum in brackets) * (sum in brackets) * (sum in brackets) * (sum in brackets) * (sum in brackets) * (sum in brackets) * (sum in brackets) * (sum in brackets) * (sum in brackets) * (sum in brackets) * (sum in brackets) * (sum in brackets) * (sum in brackets) * (sum in brackets) * (sum in brackets) * (total).* (sum in brackets) * (sum in brackets) * (sum in brackets) * (sum in brackets) * (sum in brackets) * (sum in brackets) * (sum in brackets) * (sum in brackets) * (sum in brackets) * (sum in brackets) * (sum in brackets) * (sum in brackets) * (total).* (sum in brackets) * (sum in brackets) * (sum in brackets) * (sum in brackets)INHALTSVERZEICHNIS
Technische Daten 4
natural_image
Four schematic diagrams of a mechanical or structural assembly with arrows indicating direction, no text or symbols present.natural_image
Isometric line drawing of a square frame with mounting holes and vertical supports (no text or symbols)natural_image
Symbol of a trash bin crossed with a diagonal line, no text or numbers presentBerlin Brands Group UK Limited
PO Box 42
272 Kensington High Street
London, W8 6ND
United Kingdom
Member of Berlin Brands Group
Handwerkerstr. 11
15366 Dahlwitz-Hoppegarten
Deutschland
Congratulations on your purchase. Please read the following instructions carefully and follow them to prevent potential damage. We accept no liability for damage caused by disregarding the instructions and improper use. Please scan the QR code to access the latest operating instructions and further information about the product.

CONTENTS
Technical Data 30
Safety Instructions 31
Scope of Delivery 35
Device Overview 36
Installation 36
Set Description and General Functions 39
Remote Control 40
Socket Receiver 41
Operation in Detail 42
Programming Heating Periods 43
Important Notes on Operation 47
Cleaning and Care 47
Disposal Considerations 48
Manufacturer & Importer (UK) 48
Product Data Sheets 49
TECHNICAL DATA
Heating
| Article number Dimensions: Power Rated voltage Power supply | ||||
| 10035321 660 * 635 * 35 350 + 32 W 1.7 A | 230 V ~ 50 Hz10035322 1085 | |||
| 10035323 1285 * 635 * 35 800 + 40 W 3.6 A | ||||
Remote Control
| Power supply DC 3 V (2 x 1.5 V AAA batteries, not included) | |
| Adjustable temperature range 0-45 °C (resolution: 1 °C)□ | |
| Room temperature range 0-50 °C (resolution: 0.1 °C) | |
| Accuracy of the measured temperature: | ± 0.5 °C□ |
| Dimensions (L x W x H) 135 mm × 56 mm × 18 mm | |
| Weight: 86 g |
Socket receiver
| Power supply 220-240 V ~ 50/60 Hz | |
| Power consumption | 0.2 W |
SAFETY INSTRUCTIONS
Warning symbols
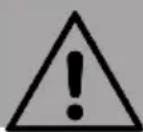
WARNING
This signal word indicates a hazard with a medium level of risk which, if not avoided, may result in serious injury or death.
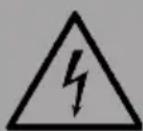
WARNING OF ELECTRICAL VOLTAGE
This symbol indicates danger to life and health of persons due to electrical voltage.
| SymbolsMeaning | |
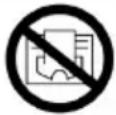 | This symbol placed on the appliance indicates that it is forbidden to place objects (such as towels, clothes, etc.) above or directly in front of the device. To avoid overheating and fire hazard, do not cover the unit. |
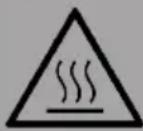
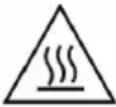 | This symbol on the device indicates danger to life and health of persons due to the hot surface. |
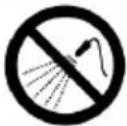 | This symbol placed on the device indicates that it is forbidden to spray the device. |
 | This symbol on the unit and the marked information indicate that the operating instructions must be observed. |
Safety Instructions
Read all safety instructions and all operating instructions. Failure to observe the warnings and instructions may result in electric shock, fire and / or serious injury. Keep all warnings and safety instructions for future reference
- Failure to observe the warnings and instructions may result in electric shock, fire and / or serious injury. Keep all warnings and safety instructions for future reference.
- This model range must be mounted at a height of over 1.8 m.
- Check which model series you have purchased and install it according to the instructions in the "Installation" section.
- This device can only be used by children from the age of 8 and persons with limited physical, sensory or mental abilities or a lack of experience and knowledge if they are supervised or have been instructed in the safe use of the device and understand the dangers involved.
- Children must not play with the device. Cleaning and maintenance work must not be carried out by children without supervision.
- Children under 3 years of age should be kept away from the device unless they can be continuously supervised.
- Children aged 3 to under 8 years may only switch the appliance on and off if it has been placed or installed in the intended normal operating position and they have been supervised or instructed in the safe use of the appliance and understand the hazards involved.
- Children aged 3 and under 8 years old are not allowed to plug in, adjust and clean the device or carry out maintenance work.
- Do not use the unit in small rooms if people are present who cannot leave the room independently and there is no permanent possibility of supervision.
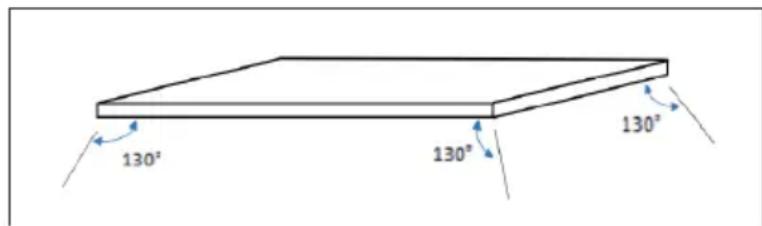
- Sensors with temperature detection or temperature controllers should not be placed within the 130 degree radiation range of the ceiling heating panel, otherwise the actual temperature detection may be affected.
WARNING
Risk of burns! Some parts of this device can become very hot and cause burns. Special care should be taken when children and infirm persons are present.
- It is dangerous to place the device near curtains and other combustible materials.
- To avoid the risk of burns, special care should be taken when using the heater in the presence of the following people: babies and children, people with sensitive skin, old people, sick people, intoxicated people and people taking sleeping pills.
- Remove the protective film on the front before use.
- Make sure that the voltage of use is between 220 - 240 V \~ 50 Hz.
- This device consumes more power than small devices, so a separate 5A socket is required.
- Do not use the device in a potentially explosive room.
- Do not use the device in an aggressive environment.
- Place the unit in an upright and stable position.
- Allow the unit to dry completely after wet cleaning. Do not operate when wet.
- Do not use the device with wet or damp hands.
- Do not expose the unit to splashing water.
- Do not put any objects or limbs inside the unit.
- Do not cover the device or transport it during operation.
- Do not sit on the unit.
- This device is not a toy. Keep away from children and pets. Do not leave the device unattended during operation.
- Check accessories and connection parts for possible damage before each use of the unit. Do not use defective devices or device parts.
- Make sure that all electrical cables outside the unit are protected from damage (e.g. by animals). Never use the unit if electrical cables or the mains connection are damaged.
- The electrical connection must comply with the specifications in the "Technical Data" section.
- Insert the mains plug into a properly secured mains socket.
- Do not use the device if the socket or the cable is overloaded.
- When selecting power cord extensions, consider the power consumption of the unit, the cable length and the intended use. Unroll extension cables completely. Avoid electrical overloads.
- Disconnect the mains plug from the mains socket before carrying out maintenance, servicing or repair work on the device. Hold the mains plug while doing so.
- Switch off the device and unplug the power cord from the socket when the device is not in use.
- Never use the device if the mains plug or mains cable is damaged. If the power cord is damaged, it must be replaced by the manufacturer, customer service or a similarly qualified person in order to avoid a hazard. Defective mains cables pose a serious health risk.
- When setting up the unit, observe the minimum distances to walls and other objects as well as the storage and operating conditions specified in the "Technical Data" section.
- Never drill into the heater.
- Do not use the unit in the immediate vicinity of curtains.
- Do not place the device on a flammable surface.
- Do not transport the device during operation.
- To avoid burns, do not touch the surfaces during operation of the device.
- Allow the unit to cool down before transport and / or maintenance work.
- Do not use the device near bathtubs, shower trays, swimming pools or other water containers. There is a risk of electric shock.
- The device must be positioned so that the switches and controls cannot be operated by a person in the bath or shower.
- Do not use this device in nurseries or bathrooms (valid for Sweden only).
SCOPE OF DELIVERY
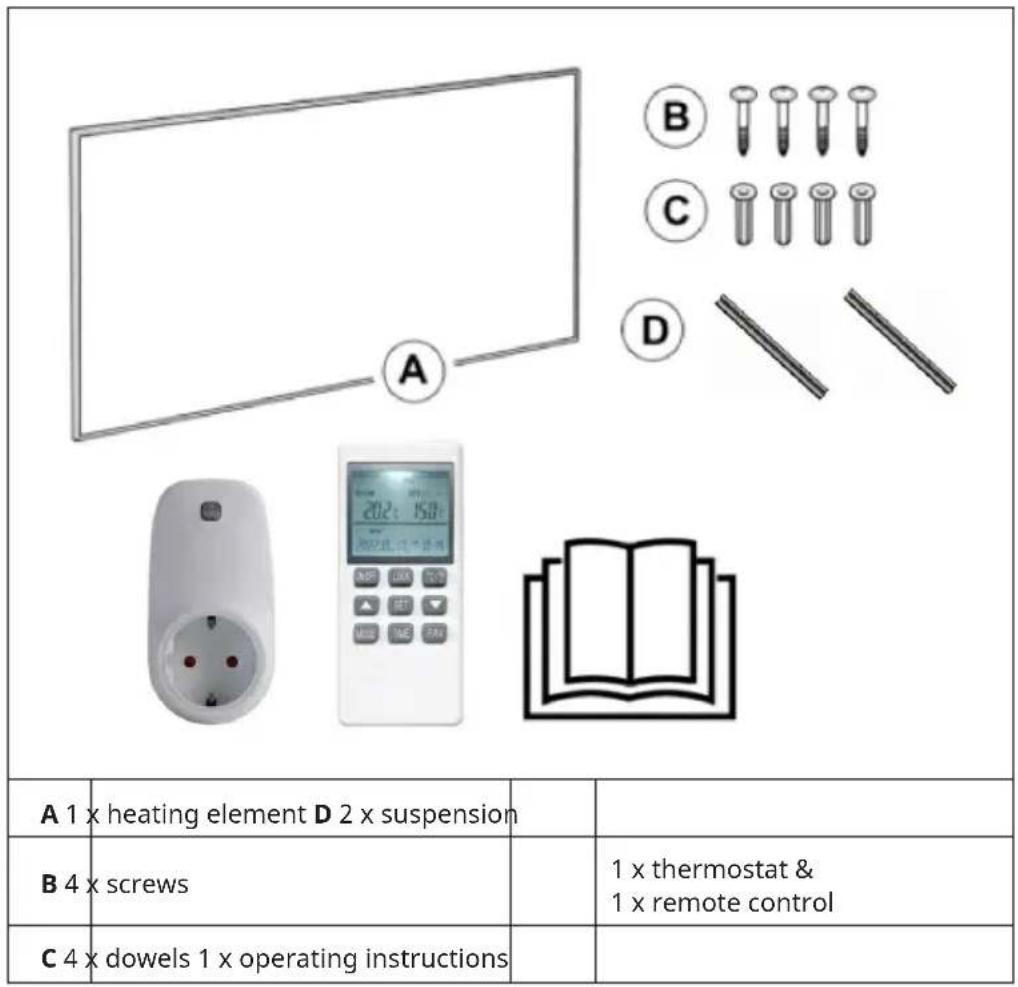
DEVICE OVERVIEW
| Front side Back side | |
| 1 2 3 4 |
| 1 Front surface 3 LED surround | ||
| 2 Power cable 4 LED mains input |
INSTALLATION
Please note:
• The installation work must be carried out by a professional electrician.
- LED input lines must be wired with switches that can interrupt the current-carrying lines without hindrance.
- Before mounting and wiring, disconnect all lines that are to be wired to the LED input line from the mains.
• LED input lines must be earthed.
- Do not hang panels on heating lines or LED input lines.
- No adhesive devices may be used for the suspension or hanging of the beam.
- Remove the front protective film before use.
Installation
- Drill four holes on the ceiling with the correct spacing A and B. Use a drill with the right diameter so that the panel does not fall down.
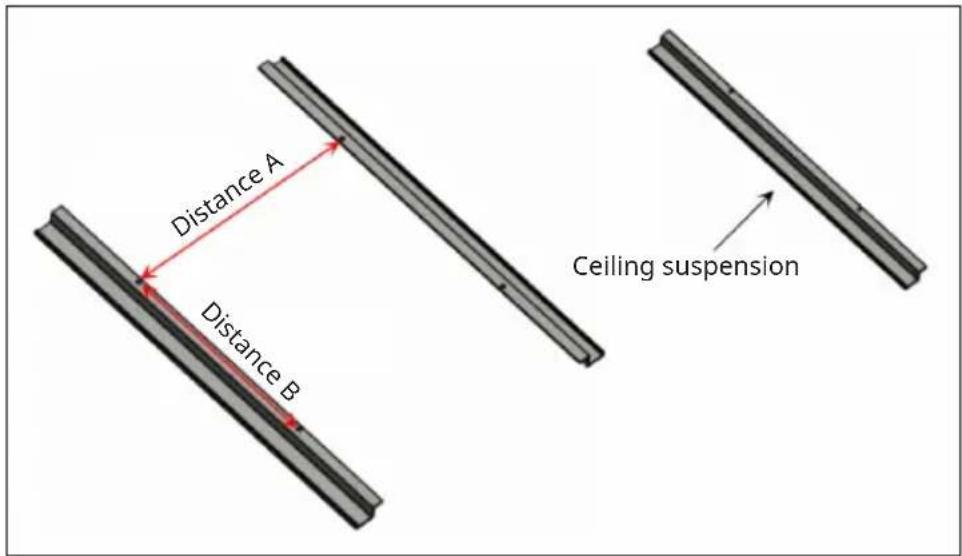
| Panel size (mm) Hole spacing of the screws (mm) | |
| 660 * 635 (or similar) A500*B100 mm | |
| 1085 * 635 (or similar) A500*B300 mm | |
| 1285 * 635 (or similar) A500*B300 mm | |
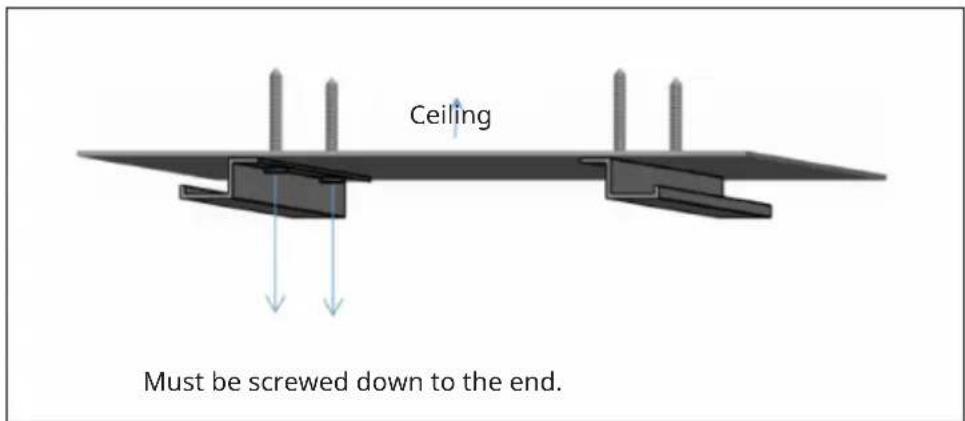
- Fasten the two wall units to the ceiling with screws and tighten the screws. This is very important.
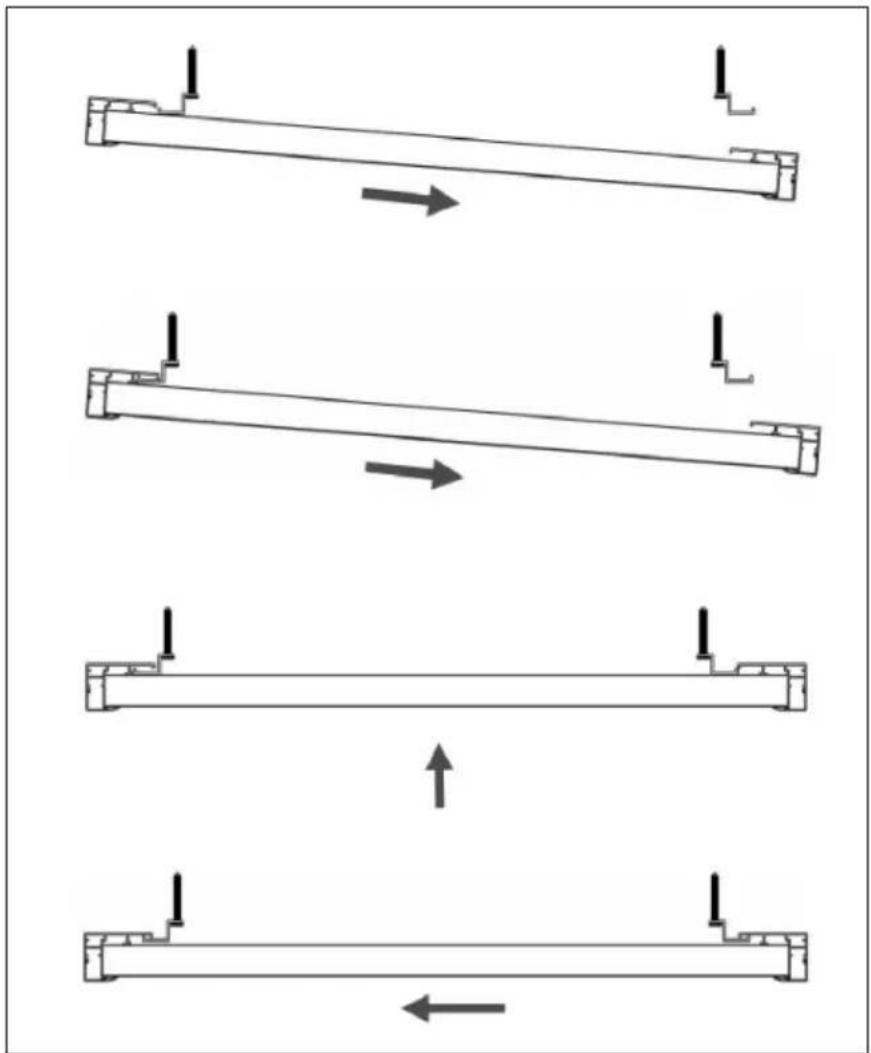
- First push in the rear frame of the panel. Then insert the other end of the ceiling suspension on the other side.
natural_image
Four schematic diagrams of a mechanical or structural assembly with arrows indicating direction, no text or symbols present.View after completed assembly
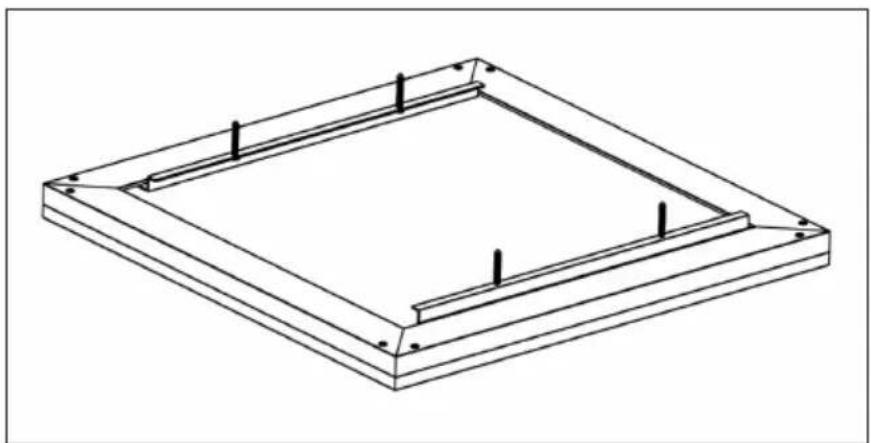
natural_image
Isometric line drawing of a square frame with mounting holes and vertical supports (no text or symbols)SET DESCRIPTION AND GENERAL FUNCTIONS
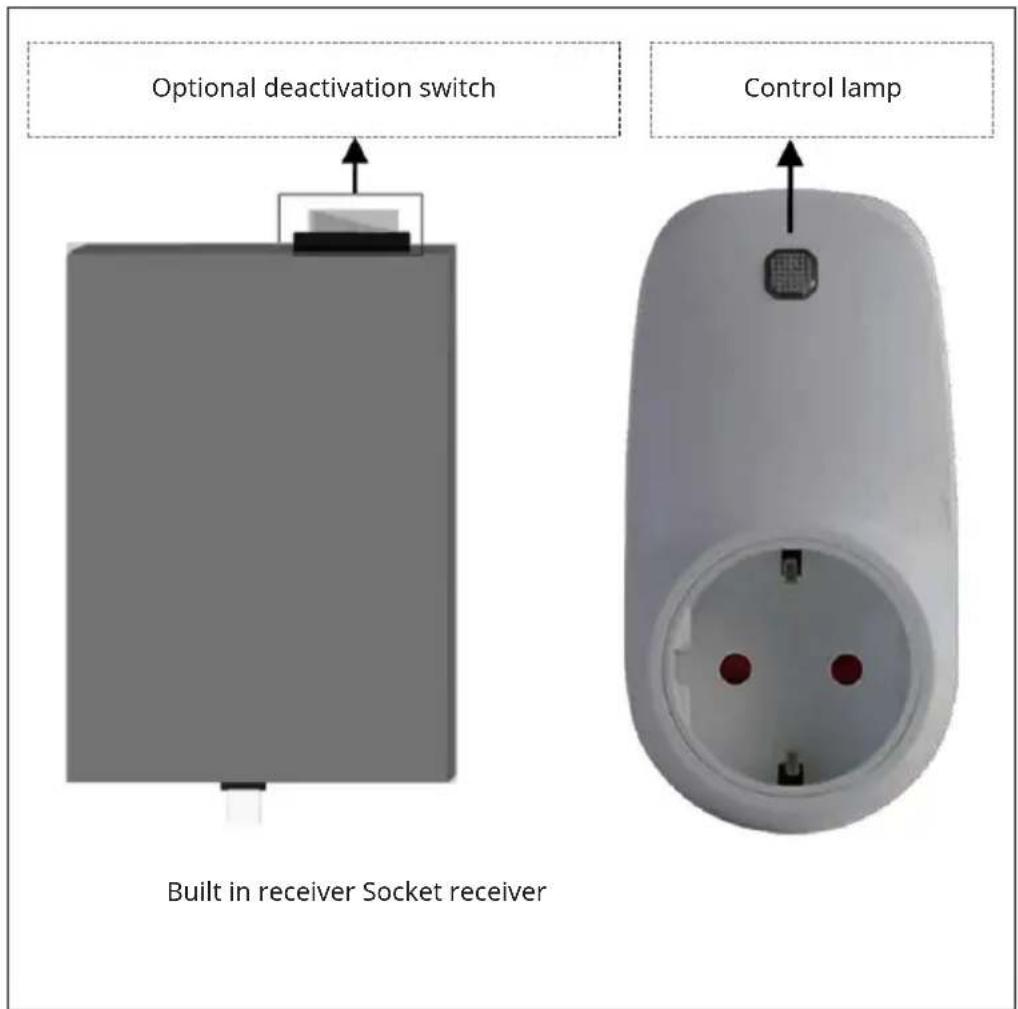
Each set consists of two parts:
- A remote control with digital display, which houses the electronics, the controls and the built-in room temperature sensor.
- A socket receiver that can receive and decode the signal from the remote control.
Remote control functions
The remote control uses its integrated sensor to detect the room temperature and sends a signal to the socket receiver to switch the heater on and off when the ambient temperature changes, thus maintaining a constant room temperature.
- If the room temperature is 0.5^ higher than the target temperature, the remote control sends an OFF command to the receiver. The heater is switched off.
- If the room temperature is 0.5^ lower than the target temperature, the remote control sends an ON command to the receiver. The heater is switched on.
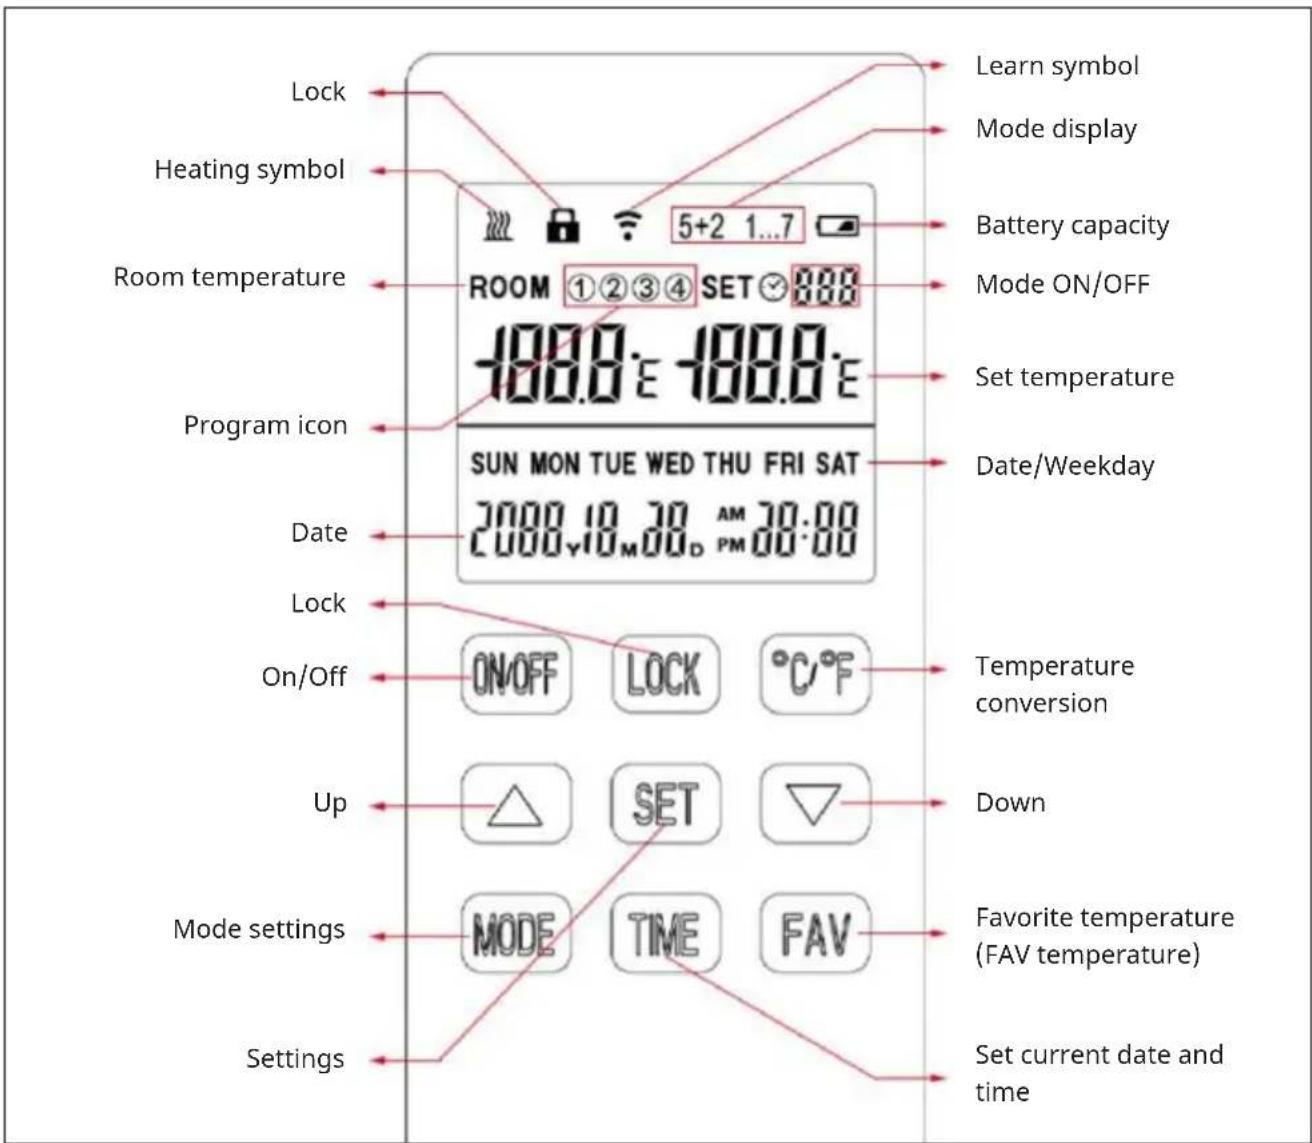
The display of the remote control shows the set temperature, the measured temperature, time, date, modes and various other values. With the remote control you can program the week, set the auto OFF timer and many other functions.
Note: The remote control is powered by two 1.5 V AA batteries. Please replace the batteries as soon as the battery symbol flashes, otherwise the remote control will no longer be able to control the heater.
The remote control has a lock function (parental lock) which ensures that children cannot change the heater settings.
When the LCD screen is switched off, only the receiver (heater) is switched off; the remote control itself is still in operating mode until the batteries are empty. The LCD screen of the remote control only works within an ambient temperature of 1-50 °C.
REMOTE CONTROL
SOCKET RECEIVER
OPERATION IN DETAIL
To pair the receiver with the remote control
Turn on the unit using the built-in receiver or the plug-in receiver and press the indicator light for 3 seconds to make it blink. Then press the °C / °F and MODE buttons simultaneously to pair the remote and receiver until a long beep is heard.
- Pairing should be completed within 1 minute, otherwise you will need to turn the unit back on.
- Turn the unit off and on again if you want to pair it with another remote control.
- Before pairing, turn off the devices you do not want to pair.
Set the time and day
It is important that the time and day are set accurately if you want your programmed heating periods to start on time.
| 1 Press and hold the TIME button for 3 seconds until the year of the date flashes. |
| 2 Use the ▲ or ▼button to set the year. Then press the TIME button to save the entry and continue setting month/day/hours/minutes in a similar manner. |
| 3 Finally, press the TIME button again to save all entries and exit the setting. |
Switching the thermostat on and off manually
- Press the ON/OFF button to manually turn the heater on or off. When the heater is off, the remote control display shows the current room temperature reading. When the heater is on, press ▲ or ▼ to increase or decrease the set temperature.
- If the set temperature is below the room temperature, the heater will turn off.
- When the set temperature is above the room temperature, the heater turns on and the heating icon 🎯 appears on the remote control display.
Activating and deactivating the key lock
Press and hold the LOCK key for 3 seconds until a lock symbol appears on the remote control display. All keys are now locked. To end the key lock, press and hold the LOCK key again for 3 seconds until the lock symbol disappears from the display again.
Changing the temperature display to ^ C/ ^ F
Press the °C/°F key to select the desired display in °C or °F.
FAV function (save favorite temperature)
| 1 Press and hold the FAV key for 3 seconds until the set temperature icon flashes. |
| 2 Then press ▲ or ▼ to set a favorite temperature. |
| 3 Briefly press the FAV key to confirm. |
For daily use, the heating is set to its favorite temperature by briefly pressing the FAV key. As soon as a preset timer becomes active, the temperature set there is adopted again.
PROGRAMMING HEATING PERIODS
Switching programming mode on/off
Press and hold the MODE key for 3 seconds until ON is displayed. The programming mode is now switched on. Press and hold the MODE button again for 3 seconds to turn programming mode off again.
To program your heater
Press and hold the SET button for 3-5 seconds to enter programming mode.
Note: Programming mode has a timeout limit, which will bring up the main screen if no button is pressed within 3-5 seconds.
5+2 or 1...7 programming mode
Press the MODE and TIME keys simultaneously to select programming mode 5+2 or 1...7.
Programming mode 5+2
In this mode you can program 4 heating intervals each for all weekdays (Monday-Friday) and the weekend days (Saturday-Sunday).
| 1 In 5+2 mode, press and hold the SET key for 3-5 seconds until the program icon (1) and MON TUE WED THU FRI are displayed with the ON icon and time icon flashing on the screen. |
| 2 Press the ▲key to set the hours of the the start time of program (1) in 1-hour increments. Press the▼key to set the minute the start time of program (1) in 5-minute increments. |
| 3 Press the SET key once and the OFF symbol flashes on the screen. Use the ▲key to set the hour of the end time of program (1). Press the▼key to set the minute of the end time of program (1). |
| 4 Press the SET key again and the symbol for the set temperature flashes on the screen. Use the ▲or▼key to set the desired temperature to be maintained for program (1). |
| 5 Press the SET key again to enter the program (2) of the weekdays. Repeat steps 2-5 to set program (3) and (4) in the same way. |
| 6 After setting program (4), press the SET key to enter the settings for SAT and SUN (weekend) days. Repeat steps 2-5 to set program (1) (2) (3) (4) for the weekend. |
| 7 At the end, press the SET key again to save the settings. |
Programming mode 1...7
In this mode, you can program 2 heating intervals for each individual day of the week.
| 1 In mode 1...7, press and hold the SET key for 3-5 seconds until the program icon (1) and MON are displayed while ON and the time icon flash on the screen. | |
| 2 Press the ▲ key to set the hours of the the start time of program (1) in 1-hour increments. Press the▼ key to set the minute the start time of program (1) in 5-minute increments. | |
| 3 Press the SET key once and the OFF symbol flashes on the screen. Use the ▲ key to set the hour of the end time of program (1). Press the▼key to set the minute of the end time of program (1). | |
| 4 Press the SET key again and the symbol for the set temperature flashes on the screen. Use the▲ or▼key to set the desired temperature to be maintained for program (1). | |
| 5 Press the SET key again to call up and program the program (2). Repeat steps 2-5 to program the two heating intervals for each individual day of the week. | |
| 6 Finally, press the SET key again to save the settings. |
Notes on programming
- The preset start time is 00:00, the preset end time is 00:00, and the preset operating temperature is 15^ C .
- If you do not adjust the preset on and off time of 00:00, the programming settings will be invalid.
- The running time of program (1) (2) (3) (4) should not overlap and the end time of each program must be after the start time, otherwise the setting is invalid.
- If you do not want to set a noon heating time (program 2 or 3) in 5+2 mode, simply set programs (2) or (3) to a lower temperature than the default temperature at very short intervals. An example is shown below.
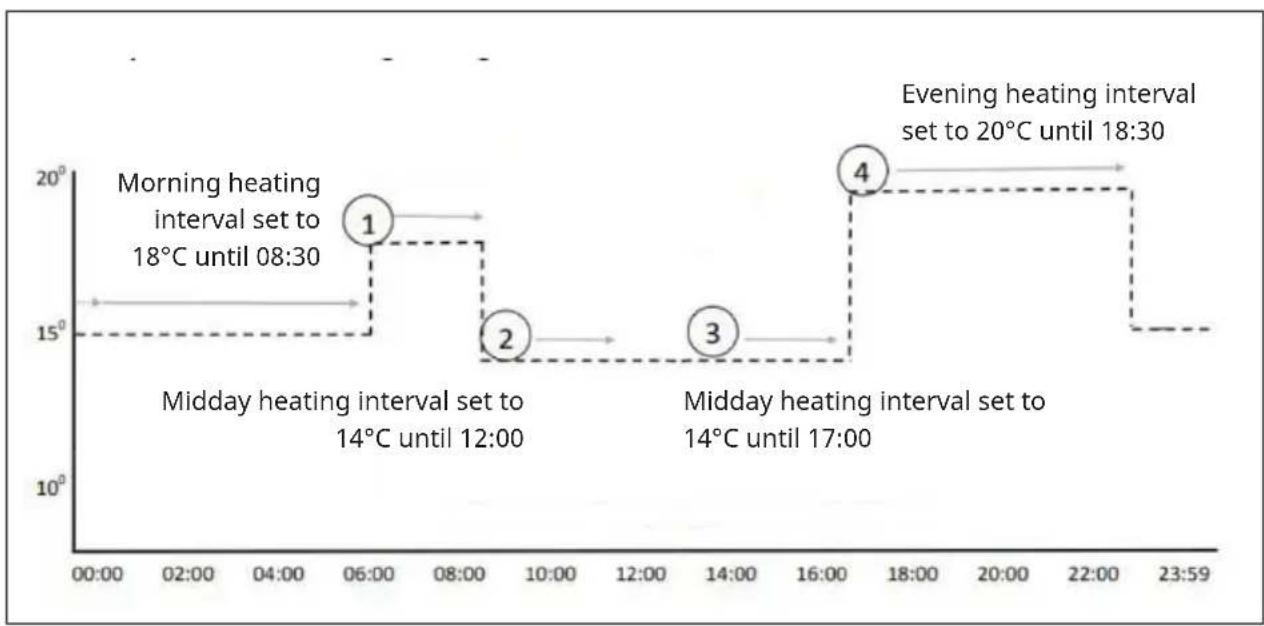
line
| Time | Phase | Value | | :--- | :--- | :--- | | 06:00 | Morning heating interval set to 18°C until 08:30 | 18 | | 08:30 | Morning heating interval set to 18°C until 08:30 | 18 | | 12:00 | Midday heating interval set to 14°C until 12:00 | 14 | | 12:00 | Midday heating interval set to 14°C until 12:00 | 14 | | 14:00 | Midday heating interval set to 14°C until 17:00 | 14 | | 16:00 | Midday heating interval set to 14°C until 17:00 | 14 | | 18:30 | Evening heating interval set to 20°C until 18:30 | 20 | | 22:30 | Evening heating interval set to 20°C until 18:30 | 20 | | 23:59 | Evening heating interval set to 20°C until 18:30 | 15 |- Once the programming mode setting is completed, the heater will run in ON programming mode even if the heater is turned off. The heater is automatically turned on or off according to the programming setting.
IMPORTANT NOTES ON OPERATION
- All settings must be reset after battery replacement.
- If the buttons on the remote control no longer respond, replace the old batteries completely with new batteries.
The remote control is powered by two 1.5 V AA batteries. Replace the batteries as soon as the battery symbol flashes, otherwise the remote control will no longer be able to control the heater.
- If the heating cannot be switched on by remote control, check whether the set temperature is higher than the room temperature. Only then will the heater turn on.
- To use the programming mode, make sure that it is set to ON by pressing the MODE key for a long time. If you prefer to operate the heater manually, set the programming mode to OFF.
- Do not cover or touch the temperature sensor of the remote control.
- Leave the remote control open in the room. Do not place the remote control in the sun and do not put it in a drawer / pocket or under pillows / blankets. Otherwise, the temperature sensor will not work properly.
- Unplug the heater from the wall outlet if you are not going to use it for a long time.
CLEANING AND CARE
Note: Turn off the unit and unplug it from the power outlet. Wait until the unit has completely cooled down before cleaning it.
- Use a vacuum cleaner to clean the ventilation slots and grilles.
- Remove dust on the outside surfaces with a damp (not wet) cloth.
- Do not use strong cleaning agents or abrasives.
- Do not spray the device with liquids or immerse it in water or other liquids.
- Never open the heater housing.
DISPOSAL CONSIDERATIONS
natural_image
Symbol of a trash bin crossed with a diagonal line, no text or labels presentIf there is a legal regulation in your country regarding the disposal of electrical and electronic equipment, this symbol on the product or on the packaging indicates that this product must not be disposed of with household waste. Instead, it must be taken to a collection point for the recycling of electrical and electronic equipment. By disposing of this product in accordance with the regulations, you protect the environment and the health of those around you from negative consequences. For information on recycling and disposal of this product, contact your local government or household waste disposal service.
MANUFACTURER & IMPORTER (UK)
Manufacturer:
Chal-Tec GmbH, Wallstrasse 16, 10179 Berlin, Germany.
Importer for Great Britain:
Berlin Brands Group UK Limited
PO Box 42
272 Kensington High Street
London, W8 6ND
United Kingdom
PRODUCT DATA SHEETS
| Model identifier(s): | 10035321 | |||||
| Item Symbol Value Unit Item Unit | Unit | |||||
| Heat output Type of heat input, for electric storage local space | heaters only | |||||
| Nominal heat output P | nom | 0.35 kW | manual heat | heat | charge control, with integrated thermostat | N/A |
| Minimum heat output (indicative) | Pmin | 0.35 kW | manual heat | heat | charge control with room and/or outdoor temperature feedback | N/A |
| Maximum continuous heat output | Pmax,c | 0.35 kW | electronic heat | heat | charge control with room and/or outdoor temperature feedback | N/A |
| Auxiliary electricity consumption fan assisted heat output N/A | ||||||
| At nominal heat output el | max | N/A kW | Type of heat | heat | output/room temperature control | |
| At minimum heat output el | min | N/A kW | single stage | heat | heat output and no room temperature control | no |
| In standby mode el | SB | 0.0002 | W | Two or more manual stages, no room temperature control | no | |
| with mechanic thermostat room temperature control | no | |||||
| with electronic room temperature control | no | |||||
| electronic room temperature control plus day timer | no | |||||
| electronic room temperature control plus week timer | yes | |||||
| Other control options | ||||||
| room temperature control, with presence detection | no | |||||
| room temperature control, with open window detection | no | |||||
| with distance control option | yes | |||||
| with adaptive start control | no | |||||
| with working time limitation | yes | |||||
| with black bulb sensor | no | |||||
| Contact details | Chal-Tec GmbH, Wallstraße 16, 10179, Berlin, Germany | |||||
| Model identifier(s): | 10035322 | |||||
| Item Symbol Value Unit Item Unit | ||||||
| Heat output Type of heat input, for electric storage local space | heaters only | |||||
| Nominal heat output P | nom | 0.6 kW | manual heat | charge control, with integrated thermostat | N/A | |
| Minimum heat output (indicative) | Pmin | 0.6 kW | manual heat | charge control with room and/or outdoor temperature feedback | N/A | |
| Maximum continuous heat output | Pmax,c | 0.6 kW | electronic heat | charge control with room and/or outdoor temperature feedback | N/A | |
| Auxiliary electricity consumption fan assisted heat output N/A | ||||||
| At nominal heat output el | max | N/A kW | Type of heat | output/room temperature control | ||
| At minimum heat output el | min | N/A kW | single stage | heat output and no room temperature control | no | |
| In standby mode el | SB | 0.0002 W | Two | or more manual stages, no room temperature control | no | |
| with mechanic thermostat room temperature control | no | |||||
| with electronic room temperature control | no | |||||
| electronic room temperature control plus day timer | no | |||||
| electronic room temperature control plus week timer | yes | |||||
| Other control options | ||||||
| room temperature control, with presence detection | no | |||||
| room temperature control, with open window detection | no | |||||
| with distance control option | yes | |||||
| with adaptive start control | no | |||||
| with working time limitation | yes | |||||
| with black bulb sensor | no | |||||
| Contact details | Chal-Tec GmbH, Wallstraße 16, 10179, Berlin, Germany | |||||
| Model identifier(s): | 10035323 | |||||
| Item Symbol Value Unit Item Unit | Unit | |||||
| Heat output Type of heat input, for electric storage local space | heaters only | |||||
| Nominal heat output P | nom | 0.8 kW | manual heat | charge control, with integrated thermostat | N/A | |
| Minimum heat output (indicative) | P_min | 0.8 kW | manual heat | charge control with room and/or outdoor temperature feedback | N/A | |
| Maximum continuous heat output | P_max,c | 0.8 kW | electronic heat | charge control with room and/or outdoor temperature feedback | N/A | |
| Auxiliary electricity consumption fan assisted heat output N/A | ||||||
| At nominal heat output el | max | N/A kW | Type of heat | output/room temperature control | ||
| At minimum heat output el | min | N/A kW | single stage | heat output and no room temperature control | no | |
| In standby mode el | SB | 0.0002 W | Two | or more manual stages, no room temperature control | no | |
| with mechanic thermostat room temperature control | no | |||||
| with electronic room temperature control | no | |||||
| electronic room temperature control plus day timer | no | |||||
| electronic room temperature control plus week timer | yes | |||||
| Other control options | ||||||
| room temperature control, with presence detection | no | |||||
| room temperature control, with open window detection | no | |||||
| with distance control option | yes | |||||
| with adaptive start control | no | |||||
| with working time limitation | yes | |||||
| with black bulb sensor | no | |||||
| Contact details | Chal-Tec GmbH, Wallstraße 16, 10179, Berlin, Germany | |||||

KLARSTEIN
Cher client, chère cliente,
SOMMAIRE
Fiche technique 54
natural_image
Four schematic diagrams of a mechanical or structural assembly with arrows indicating direction, no text or symbols present.natural_image
Isometric line drawing of a square frame with four corner holes and vertical supports (no text or symbols)DESCRIPTION DE L'ENSEMBLE ET FONCTIONS GÉNÉRALES
natural_image
Symbol of a trash bin crossed with a diagonal line, no text or numbers presentBerlin Brands Group UK Ltd
PO Box 42
272 Kensington High Street
London, W8 6ND
United Kingdom
FICHES DE DONNÉES PRODUIT
INDICE
Dati tecnici 78
natural_image
Four schematic diagrams showing beam loading and displacement directions, with arrows indicating direction of movement (no text or symbols)natural_image
Isometric line drawing of a square frame with internal supports and mounting holes (no text or symbols)natural_image
Line drawing of a dual-pin electrical socket (no text or symbols)natural_image
Symbol of a trash bin crossed with a diagonal line, no text or numbers presentPRODUTTORE E IMPORTATORE (UK)
Produttore:
Chal-Tec GmbH, Wallstraße 16, 10179 Berlino, Germania.
Berlin Brands Group UK Ltd
PO Box 1145
Oxford, OX1 9UW
United Kingdom
Estimado cliente:
ÍNDICE
Datos técnicos 100
natural_image
Four schematic diagrams of a structural beam with arrows indicating direction, showing different compression or loading states (no text or symbols present)natural_image
Isometric line drawing of a square frame structure with mounting holes and vertical supports (no text or symbols)natural_image
Line drawing of a wall socket with two pins and a handle (no text or symbols)natural_image
Symbol of a trash bin crossed with a diagonal line, no text or labels presentBerlin Brands Group UK Ltd
PO Box 1145
Oxford, OX1 9UW
Reino Unido
Geachte klant,
INHOUDSOPGAVE
natural_image
Four schematic diagrams of a mechanical or structural assembly with arrows indicating direction, no text or symbols present.natural_image
Isometric line drawing of a square frame structure with mounting holes and internal supports (no text or symbols)BESCHRIJVING SET EN ALGEMENE FUNCTIES
natural_image
Line drawing of a wall socket with two pins and a handle (no text or symbols)INSTRUCTIES VOOR AFVOER
natural_image
Symbol of a trash bin crossed out by a diagonal line, with no text or labels present.Berlin Brands Group UK Limited
PO Box 42
272 Kensington High Street
London, W8 6ND
United Kingdom
PRODUCTINFORMATIEBLAD
bar
| Category | Value | |---|---| | Category 1 | 100 | | Category 2 | 100 | | Category 3 | 100 | | Category 4 | 100 | | Category 5 | 100 | | Category 6 | 100 | | Category 7 | 100 | | Category 8 | 100 | | Category 9 | 100 | | Category 10 | 100 | | Category 11 | 100 | | Category 12 | 100 | | Category 13 | 100 | | Category 14 | 100 | | Category 15 | 100 | | Category 16 | 100 | | Category 17 | 100 | | Category 18 | 100 | | Category 19 | 100 | | Category 20 | 100 | | Category 21 | 100 | | Category 22 | 100 | | Category 23 | 100 | | Category 24 | 100 | | Category 25 | 100 | | Category 26 | 100 | | Category 27 | 100 | | Category 28 | 100 | | Category 29 | 100 | | Category 30 | 100 | | Category 31 | 100 | | Category 32 | 100 | | Category 33 | 100 | | Category 34 | 100 | | Category 35 | 100 | | Category 36 | 100 | | Category 37 | 100 | | Category 38 | 100 | | Category 39 | 100 | | Category 40 | 100 | | Category 41 | 100 | | Category 42 | 100 | | Category 43 | 100 | | Category 44 | 100 | | Category 45 | 100 | | Category 46 | 100 | | Category 47 | 100 | | Category 48 | 100 | | Category 49 | 100 | | Category 50 | 100 | | Category 51 | 100 | | Category 52 | 100 | | Category 53 | 100 | | Category 54 | 100 | | Category 55 | 100 | | Category 56 | 100 | | Category 57 | 100 | | Category 58 | 100 | | Category 59 | 100 | | Category 60 | 100 | | Category 61 | 100 | | Category 62 | 100 | | Category 63 | 100 | | Category 64 | 100 | | Category 65 | 100 | | Category 66 | 100 | | Category 67 | 100 | | Category 68 | 100 | | Category 69 | 100 | | Category 70 | 100 | | Category 71 | 100 | | Category 72 | 100 | | Category 73 | 100 | | Category 74 | 100 | | Category 75 | 100 | | Category 76 | 100 | | Category 77 | 100 | | Category 78 | 100 | | Category 79 | 100 | | Category 80 | 100 | | Category 81 | 100 | | Category 82 | 100 | | Category 83 | 100 | | Category 84 | 100 | | Category 85 | 100 | | Category 86 | 100 | | Category 87 | 100 | | Category 88 | 100 | | Category 89 | 100 | | Category 90 | 100 | | Category 91 | 100 | | Category 92 | 100 | | Category 93 | 100 | | Category 94 | 100 | | Category 95 | 100 | | Category 96 | 100 | | Category 97 | 100 | | Category 98 | 100 | | Category 99 | 100 | | Total (Total) = [sum of bars] / [values] * (sum of bars + bars) * (sum of bars + bars) * (sum of bars + bars) * (sum of bars + bars) * (sum of bars + bars) * (sum of bars + bars) * (sum of bars + bars) * (sum of bars + bars) * (sum of bars + bars) * (sum of bars + bars) * (sum of bars + bars) * (sum of bars + bars) * (sum of bars + bars) * (sum in brackets) * (sum in brackets) * (sum in brackets) * (sum in brackets) * (sum in brackets) * (sum in brackets) * (sum in brackets) * (sum in brackets) * (sum in brackets) * (sum in brackets) * (sum in brackets) * (sum in brackets) * (sum in brackets) * (sum in brackets) * (sum in brackets) * (sum in brackets) * (sum in brackets) * (total).* (sum in brackets) * (sum in brackets) * (sum in brackets) * (sum in brackets) * (sum in brackets) * (sum in brackets) * (sum in brackets) * (sum in brackets) * (sum in brackets) * (sum in brackets) * (sum in brackets) * (sum in brackets) * (total).* (sum in brackets) * (sum in brackets) * (sum in brackets) * (sum in brackets)
KLARSTEIN
- INHALTSVERZEICHNIS
- Member of Berlin Brands Group
- Dahlwitz-Hoppegarten
- CONTENTS
- TECHNICAL DATA
- SAFETY INSTRUCTIONS
- Warning symbols
- WARNING
- WARNING OF ELECTRICAL VOLTAGE
- SCOPE OF DELIVERY
- DEVICE OVERVIEW
- INSTALLATION
- Please note:
- SET DESCRIPTION AND GENERAL FUNCTIONS
- Remote control functions
- REMOTE CONTROL
- SOCKET RECEIVER
- OPERATION IN DETAIL
- Set the time and day
- Switching the thermostat on and off manually
- Activating and deactivating the key lock
- Changing the temperature display to ° C/ ° F
- FAV function (save favorite temperature)
- PROGRAMMING HEATING PERIODS
- Switching programming mode on/off
- To program your heater
- 5+2 or 1...7 programming mode
- Programming mode 5+2
- Programming mode 1...7
- Notes on programming
- IMPORTANT NOTES ON OPERATION
- CLEANING AND CARE
- DISPOSAL CONSIDERATIONS
- MANUFACTURER & IMPORTER (UK)
- Manufacturer:
- Importer for Great Britain:
- PRODUCT DATA SHEETS
- KLARSTEIN
- SOMMAIRE
- DESCRIPTION DE L'ENSEMBLE ET FONCTIONS GÉNÉRALES
- FICHES DE DONNÉES PRODUIT
- INDICE
- PRODUTTORE E IMPORTATORE (UK)
- Produttore:
- Estimado cliente:
- ÍNDICE
- Geachte klant,
- INHOUDSOPGAVE
- BESCHRIJVING SET EN ALGEMENE FUNCTIES
- INSTRUCTIES VOOR AFVOER
- PRODUCTINFORMATIEBLAD
Brand : Klarstein
Model : Midnight Sun
Category : Heating