
Wonderbeam - Heating Klarstein - Free user manual and instructions
Find the device manual for free Wonderbeam Klarstein in PDF.

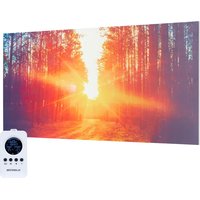
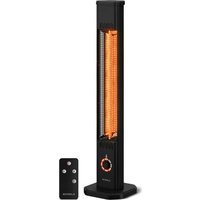
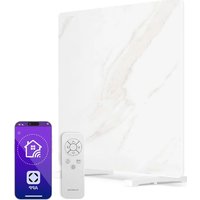
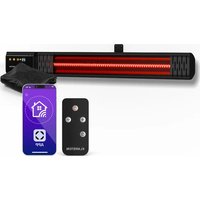
| Product type | Infrared heater |
| Brand | Klarstein |
| Model | Wonderbeam |
| Available references | 10045437 (450 W), 10045438 (650 W), 10045439 (900 W) |
| Power supply | 220-240 V~ 50/60 Hz |
| Power consumption | 450 W / 650 W / 900 W depending on model |
| Dimensions (L x H x D) | 60 x 60 cm (450 W), 84 x 60 cm (650 W), 108 x 60 cm (900 W) |
| Installation | Wall mounting or floor mounting with included feet |
| Control panel | Digital with touch keys and timer |
| Remote control | Not included |
| Temperature range | 10 °C to 50 °C (in increments of 1 °C) |
| Weekly programming | Yes, 7 days with predefined time slots |
| Open window detection | Yes, can be activated via + key |
| Operating time limiter | Yes, timer from 1 to 24 h |
| Electronic thermostat | Yes, with control of room temperature and days of the week |
| Overheating protection | Yes, automatic shutdown in case of excessive temperature |
| Usage | Indoor only, do not use in bathrooms or wet areas |
| Maintenance | Unplug before cleaning, use a soft dry cloth |
| Recycling | Do not dispose of with household waste, take to a collection point |
Frequently Asked Questions - Wonderbeam Klarstein
User questions about Wonderbeam Klarstein
0 question about this device. Answer the ones you know or ask your own.
Ask a new question about this device
Download the instructions for your Heating in PDF format for free! Find your manual Wonderbeam - Klarstein and take your electronic device back in hand. On this page are published all the documents necessary for the use of your device. Wonderbeam by Klarstein.
USER MANUAL Wonderbeam Klarstein
bar
| Category | Value | |---|---| | Category 1 | 100 | | Category 2 | 100 | | Category 3 | 100 | | Category 4 | 100 | | Category 5 | 100 | | Category 6 | 100 | | Category 7 | 100 | | Category 8 | 100 | | Category 9 | 100 | | Category 10 | 100 | | Category 11 | 100 | | Category 12 | 100 | | Category 13 | 100 | | Category 14 | 100 | | Category 15 | 100 | | Category 16 | 100 | | Category 17 | 100 | | Category 18 | 100 | | Category 19 | 100 | | Category 20 | 100 | | Category 21 | 100 | | Category 22 | 100 | | Category 23 | 100 | | Category 24 | 100 | | Category 25 | 100 | | Category 26 | 100 | | Category 27 | 100 | | Category 28 | 100 | | Category 29 | 100 | | Category 30 | 100 | | Category 31 | 100 | | Category 32 | 100 | | Category 33 | 100 | | Category 34 | 100 | | Category 35 | 100 | | Category 36 | 100 | | Category 37 | 100 | | Category 38 | 100 | | Category 39 | 100 | | Category 40 | 100 | | Category 41 | 100 | | Category 42 | 100 | | Category 43 | 100 | | Category 44 | 100 | | Category 45 | 100 | | Category 46 | 100 | | Category 47 | 100 | | Category 48 | 100 | | Category 49 | 100 | | Category 50 | 100 | | Category 51 | 100 | | Category 52 | 100 | | Category 53 | 100 | | Category 54 | 100 | | Category 55 | 100 | | Category 56 | 100 | | Category 57 | 100 | | Category 58 | 100 | | Category 59 | 100 | | Category 60 | 100 | | Category 61 | 100 | | Category 62 | 100 | | Category 63 | 100 | | Category 64 | 100 | | Category 65 | 100 | | Category 66 | 100 | | Category 67 | 100 | | Category 68 | 100 | | Category 69 | 100 | | Category 70 | 100 | | Category 71 | 100 | | Category 72 | 100 | | Category 73 | 100 | | Category 74 | 100 | | Category 75 | 100 | | Category 76 | 100 | | Category 77 | 100 | | Category 78 | 100 | | Category 79 | 100 | | Category 80 | 100 | | Category 81 | 100 | | Category 82 | 100 | | Category 83 | 100 | | Category 84 | 100 | | Category 85 | 100 | | Category 86 | 100 | | Category 87 | 100 | | Category 88 | 100 | | Category 89 | 100 | | Category 90 | 100 | | Category 91 | 100 | | Category 92 | 100 | | Category 93 | 100 | | Category 94 | 100 | | Category 95 | 100 | | Category 96 | 100 | | Category 97 | 100 | | Category 98 | 100 | | Category 99 | 100 | | Total (Total) = [sum of bars] / [values] * (sum of bars + bars) * (sum of bars + bars) * (sum of bars + bars) * (sum of bars + bars) * (sum of bars + bars) * (sum of bars + bars) * (sum of bars + bars) * (sum of bars + bars) * (sum of bars + bars) * (sum of bars + bars) * (sum of bars + bars) * (sum of bars + bars) * (sum of bars + bars) * (sum in brackets) * (sum in brackets) * (sum in brackets) * (sum in brackets) * (sum in brackets) * (sum in brackets) * (sum in brackets) * (sum in brackets) * (sum in brackets) * (sum in brackets) * (sum in brackets) * (sum in brackets) * (sum in brackets) * (sum in brackets) * (sum in brackets) * (sum in brackets) * (sum in brackets) * (total).* (sum in brackets) * (sum in brackets) * (sum in brackets) * (sum in brackets) * (sum in brackets) * (sum in brackets) * (sum in brackets) * (sum in brackets) * (sum in brackets) * (sum in brackets) * (sum in brackets) * (sum in brackets) * (total).* (sum in brackets) * (sum in brackets) * (sum in brackets) * (sum in brackets)INHALTSVERZEICHNIS
Technische Daten 3
natural_image
Pure electrical circuit lines without any symbols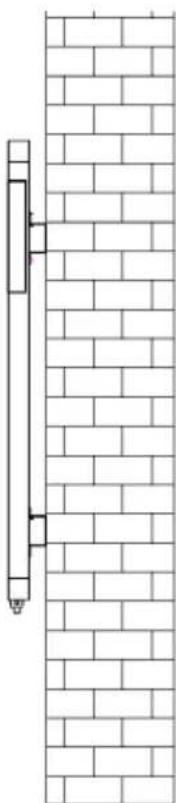
natural_image
Pure architectural line drawing of a brick wall with vertical supports (no text or symbols)natural_image
Blank rectangular frame with a small vertical button labeled 'H' on the right side (no text or symbols on the frame itself)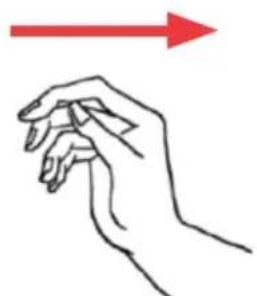
natural_image
Line drawing of a hand holding a small object with a red arrow pointing right (no text or symbols)natural_image
Symbol of a trash bin crossed with a diagonal line, no text or labels presentBerlin Brands Group UK Limited
PO Box 42
272 Kensington High Street
London, W8 6ND
United Kingdom
Dear Customer,
Congratulations on purchasing this equipment. Please read this manual carefully and take care of the following hints on installation and use to avoid technical damages. Any failure caused by ignoring the items and cautions mentioned in the operation and installation instructions are not covered by our warranty and any liability. Scan the QR code to get access to the latest user manual and more product information.

CONTENTS
Technical Data 17
Safety Instructions 18
Installation 20
Operation 21
Product Data Sheet 24
Disposal Considerations 27
Manufacturer & Importer (UK) 27
TECHNICAL DATA
| Item number 10045437 10045438 10045439 | |||
| Power supply 220-240 V~ 50/60 Hz | |||
| Power | 450 W 650 W 900 W | ||
| Dimensions | 60 x 60 cm 84 x | 60 cm 108 x 60 cm | |
SAFETY INSTRUCTIONS
- Read the user manual before using the heater. Keep the user manual and make sure it stays with the heater if you pass it on to a new owner.
- Before use, make sure that the heater and the supplied accessories are complete and undamaged.
- The heater must be installed according to the instructions in the installation manual. The power plug must be connected to an outlet that meets the following requirements: AC230V, frequency 50/60 Hz.
- The heater is only suitable for indoor use. Do not use it outdoors.
- Do not leave the heater unattended during operation. Keep the heater away from children: risk of burns.
- Do not use external control with the heater. The heater should not be set to turn on when left unattended.
- Do not use the heater near flammable or explosive materials: risk of fire or explosion.
- Strictly avoid inserting objects into the heater's protective grille: risk of electric shock.
- Do not touch the metal housing as it gets hot when the heater is in operation: risk of burns. Allow the heater to cool before turning off and storing.
- Pull the plug out of the socket if you do not intend to use the device for a long period of time.
- Before each use of the electric heater, make sure that it is in good condition and intact. Do not plug in the heater if the housing, cable or power plug is damaged.
- The heating element can be damaged if dropped or hit. Before each use, make sure the heating element is not damaged. Do not use the heater if the heating element is defective.
- Unplug the power cord from the outlet when moving or cleaning the heater. To do this, first turn off the switch, and then unplug the power cord. Do not pull on the cable.
- It is strictly forbidden to dismantle the electric heater without authorisation. If the heater is damaged, contact professional service personnel.
- The device is intended for household use only.
- Do not touch the surface of the device with bare skin during use: risk of burns.
- Do not share the heater socket with other devices: risk of fire due to overloading.
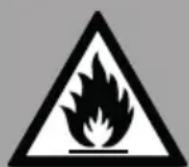
CAUTION
Fire hazard
Never cover the heater. If you cover the device, there is a risk of overheating and fire. The heater must not be placed directly under a power socket.
- If the power cord is damaged, it must be replaced by the manufacturer, its after-sales service or a similarly qualified person in order to avoid any hazards
- Avoid using an extension cord as it can overheat and pose a fire hazard.
- This heater is not intended for use in bathrooms, laundry rooms or similar
areas where moisture may occur. Never place the heater where it can fall into a bathtub or other body of water.
- Do not use the heater in the immediate vicinity of a bathtub, shower or swimming pool.
- Children under the age of 3 should be kept away unless constantly supervised.
- Children aged 3 to 8 years should not turn the appliance on or off unless it is placed or installed in the normal position for use and they are supervised or have been instructed in the safe use of the appliance and understand the hazards involved. Children from 3 years and under 8 years of age must not plug in the power plug, operate the device, clean it or carry out any maintenance work.
- This device may be used by children aged 8 years and over and by persons with reduced physical, sensory or mental abilities or lack of experience and knowledge if they are supervised or have been instructed in the safe use of the device and understand the hazards involved. Children must not play with the device. Cleaning and maintenance work must not be carried out by children without supervision.
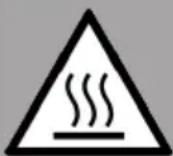
CAUTION
Risk of burns
Some parts of this appliance can become very hot and cause burns. Special care should be taken when children and infirm persons are present.
INSTALLATION
Before assembly, make sure that all parts are complete and that the product is undamaged.
If you wish to use the electric heater freestanding, please mount it using the feet provided and follow the instructions below. Make sure the fan heater is mounted on a flat, stable and clean surface.
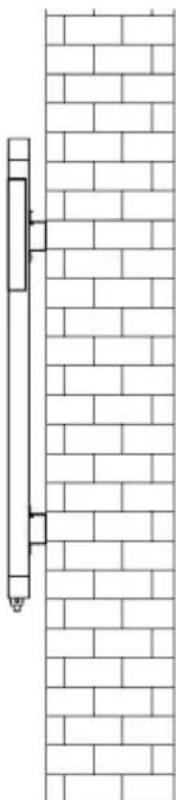
Wall mounting
- Remove the wall brackets and expansion bolts from the box. Hook and screw the wall brackets to the holes on the back of the unit as shown in the figure below.
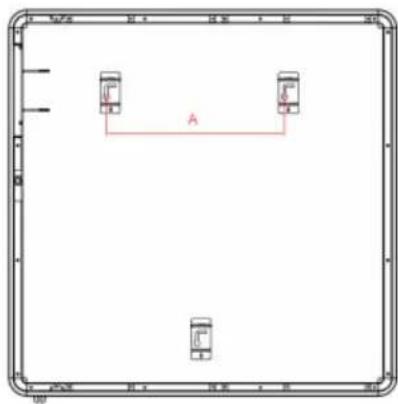

natural_image
Vertical brick wall pattern with a vertical pipe or tube, no text or symbols present- Drill two holes, each 8 mm in diameter and 35 mm deep, in the wall as shown in the figure below. The distance between the two holes must be 275,5/375,5/480,5 mm as in the table below.
- Then insert the expansion bolts into the holes and screw tight, leaving 5 mm of length sticking out of each. Only 2 screws need to be attached to the wall, the bottom bracket only plays a supporting role. No screws have to be screwed in for this.
- Align the holes on the wall bracket fixed to the wall at the upper part of the back of the unit with the expansion screws, and hook the unit to the screws. Move the device up and then to the left to slide the screws into the slot (see image below).
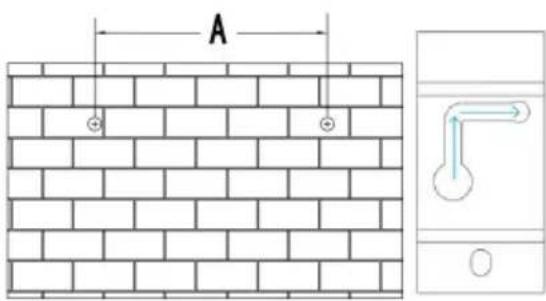
| Model (Power) Distance | |
| 10045437 (450 W) 275.5 | mm |
| 10045438 (650 W) 375.5 | mm |
| 10045439 (900 W) 480.5 | mm |
OPERATION
Control panel
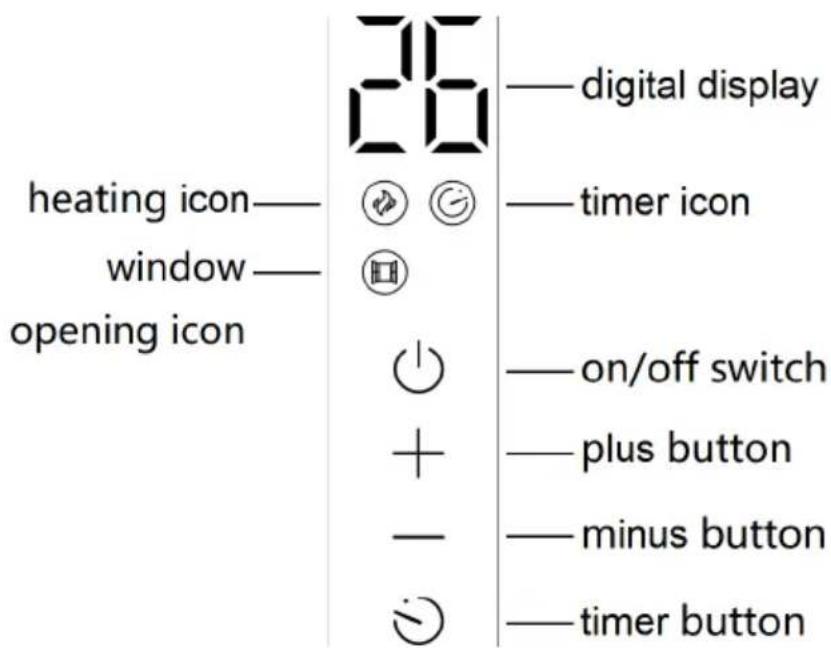
Control Panel
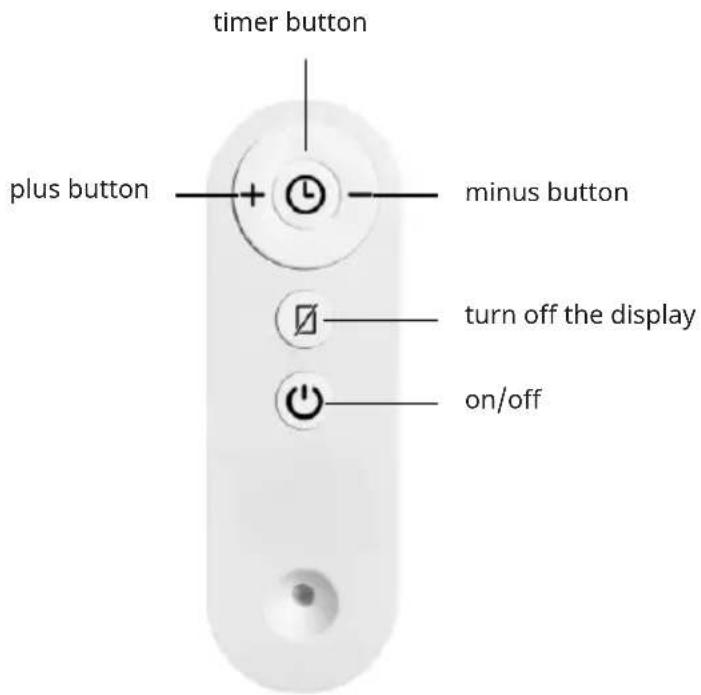
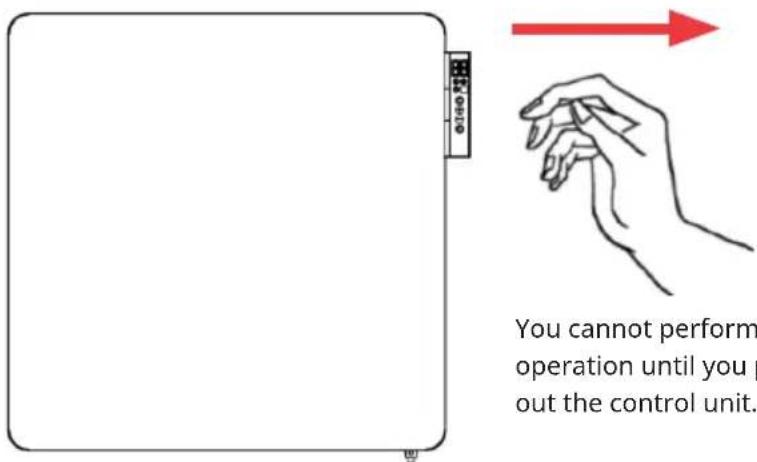
You cannot perform any button operation until you pick up and pull out the control unit.
-
After switching on, the device is in standby mode, the buzzer will make a "beep" sound, the digital display will show the current ambient temperature, the on/off button will be lit, the brightness will be at half level.
-
Press the on/off button to turn on the device. The power button, plus button, minus button, and timer button are all on. The heating indicator is on or off depending on the ambient temperature. The initial temperature is 25 degrees; when the ambient temperature is above 25 degrees, the heating indicator will not light up. The heater does not heat, but when the temperature is below 25 degrees, it will light up. The heater heats up. Press the plus button for 3 seconds to switch the open window function on or off.
-
Press the plus or minus buttons. The digital display starts flashing at 25^ C. Set the target temperature. After setting, the device only displays the ambient temperature. If the set temperature is at least 1 degree higher than the current ambient temperature, the heater goes into heating mode and the heating symbol lights up. When the set temperature is 2 degrees lower than the current ambient temperature, the heating will stop and the heating icon will be off. The adjustable temperature range is 10^ C - 50^ C.
-
Press the timer button, the digital display will flash at 00 and the timer icon will flash simultaneously with a timer setting of 1-24 hours. After the timer is set successfully, the timer lamp will remain on; after the timer is completed, the timer lamp will turn off. If you set the digital display to 00, the timer lamp will turn off after 3 seconds. The setting is complete.
-
After you make an adjustment for 30 seconds, the control panel lights up at half level. If you press the minus button for 3 seconds, the panel light will turn off and only the power button will light up at half level. Touch any button again, and the digital display and all 4 buttons will light up. The open window icon, heat indicator and timer indicator light up when the unit is in use but not when it is off.
-
If you switch the device on and off while the power supply is continuous, the settings will be saved. After disconnecting and reconnecting the power supply, the device will be reset to the factory settings.
Setting the weekly mode
Press and hold the timer button for 6 seconds to enter week mode. "P1" flashes in the digital display. Touch the plus or minus buttons to go from P1 to P7, i.e. from Monday to Sunday. Press the timer button to confirm the day of the week and jump to the hour setting. The digital display will flash at 00. Press the plus or minus buttons to cycle through the hour setting from 00 to 23, then press the timer button to confirm the hour setting and skip to the minute setting, the digital display will flash at 00. Press the plus or minus buttons to scroll through the minute setting from 00 to 59. Then press the timer button to confirm the minutes setting and jump to the following setting of the day of the week, loop.
If there is no action for 10 seconds, the weekly mode setting is considered successful. When you enter the weekly mode setting again, the data of the previous setting is displayed.
The weekly program is as follows:
from Monday to Friday
• 20 °C from 00:00 a.m. to 06:59 a.m.
• 25 °C from 07:00 a.m. to 07:59 a.m.
• no heating from 08:00 a.m. to 2:59 p.m.
• 25°C from 3:00 p.m. to 9:59 p.m
• 20 °C from 10:00 p.m. to 11:59 p.m.
on Saturday and Sunday
• 20 °C from 00:00 a.m. to 06:59 a.m.
• 25 °C from 07:00 a.m. to 10:59 p.m.
• 20 °C from 11:00 p.m. to 11:59 p.m.
PRODUCT DATA SHEETS
| Model identifier(s): 10045437 | ||||||
| Item Symbol Value Unit Item Unit | ||||||
| Heat output Type of heat input, for electric storage local space | heaters only | |||||
| Nominal heat output P | nom | 0.45 kW | manual heat | charge control, with integrated thermostat | no | |
| Minimum heat output (indicative) | Pmin | 0.45 kW | manual heat | charge control with room and/or outdoor temperature feedback | no | |
| Maximum continuous heat output | Pmax | 0.45 kW | electronic heat | charge control with room and/or outdoor temperature feedback | no | |
| Auxiliary electricity consumption fan assisted heat output no | ||||||
| At nominal heat output el | max | N/A kW | Type of heat | output/room temperature control | ||
| At minimum heat output el | min | N/A kW | single stage heat | heat output and no room temperature control | no | |
| In standby mode el | SB | 0.0012 | W | Two or more manual stages, no room temperature control | no | |
| with mechanic thermostat room temperature control | no | |||||
| with electronic room temperature control no | ||||||
| electronic room temperature control plus day timer | no | |||||
| electronic room temperature control plus week timer | yes | |||||
| Other control options | ||||||
| room temperature control, with presence detection | no | |||||
| room temperature control, with open window detection | yes | |||||
| with distance control option | no | |||||
| with adaptive start control | no | |||||
| with working time limitation | yes | |||||
| with black bulb sensor | no | |||||
| Contact details | Chal-Tec GmbH, Wallstraße 16, 10179, Berlin, Germany | |||||
| Model identifier(s): 10045438 | ||||||
| Item Symbol Value Unit Item Unit | ||||||
| Heat output Type of heat input, for electric storage local space | heaters only | |||||
| Nominal heat output P | nom | 0.65 kW | manual heat | heat | charge control, with integrated thermostat | no |
| Minimum heat output (indicative) | P_min | 0.65 kW | manual heat | heat | charge control with room and/or outdoor temperature feedback | no |
| Maximum continuous heat output | P_max | 0.65 kW | electronic heat | heat | charge control with room and/or outdoor temperature feedback | no |
| Auxiliary electricity consumption fan assisted heat output no | ||||||
| At nominal heat output el | max | N/A kW | Type of heat | heat | output/room temperature control | |
| At minimum heat output el | min | N/A kW | single stage | heat | heat output and no room temperature control | no |
| In standby mode el | SB | 0.0012 | W | Two or more manual stages, no room temperature control | no | |
| with mechanic thermostat room temperature control | no | |||||
| with electronic room temperature control no | ||||||
| electronic room temperature control plus day timer | no | |||||
| electronic room temperature control plus week timer | yes | |||||
| Other control options | ||||||
| room temperature control, with presence detection | no | |||||
| room temperature control, with open window detection | yes | |||||
| with distance control option | no | |||||
| with adaptive start control | no | |||||
| with working time limitation | yes | |||||
| with black bulb sensor | no | |||||
| Contact details | Chal-Tec GmbH, Wallstraße 16, 10179, Berlin, Germany | |||||
| Model identifier(s): 10045439 | ||||||
| Item Symbol Value Unit Item Unit | ||||||
| Heat output Type of heat input, for electric storage local space | heaters only | |||||
| Nominal heat output P | nom | 0.9 kW | manual heat control | charge control, with integrated thermostat | no | |
| Minimum heat output (indicative) | Pmin | 0.9 kW | manual heat control | charge control with room and/or outdoor temperature feedback | no | |
| Maximum continuous heat output | Pmax | 0.9 kW | electronic heat control | charge control with room and/or outdoor temperature feedback | no | |
| Auxiliary electricity consumption fan assisted heat output no | ||||||
| At nominal heat output el | max | N/A kW | Type of heat control | output/room temperature control | ||
| At minimum heat output el | min | N/A kW | single stage heat control | heat output and no room temperature control | no | |
| In standby mode el | SB | 0.0012 W | Two or more manual stages, no room temperature control | no | ||
| with mechanic thermostat room temperature control | no | |||||
| with electronic room temperature control no | ||||||
| electronic room temperature control plus day timer | no | |||||
| electronic room temperature control plus week timer | yes | |||||
| Other control options | ||||||
| room temperature control, with presence detection | no | |||||
| room temperature control, with open window detection | yes | |||||
| with distance control option | no | |||||
| with adaptive start control | no | |||||
| with working time limitation | yes | |||||
| with black bulb sensor | no | |||||
| Contact details | Chal-Tec GmbH, Wallstraße 16, 10179, Berlin, Germany | |||||
DISPOSAL CONSIDERATIONS
natural_image
Symbol of a trash bin with crossed lines indicating no waste or discharge, and a solid black rectangle below (no text or labels)If there is a legal regulation for the disposal of electrical and electronic devices in your country, this symbol on the product or on the packaging indicates that this product must not be disposed of with household waste. Instead, it must be taken to a collection point for the recycling of electrical and electronic equipment. By disposing of it in accordance with the rules, you are protecting the environment and the health of your fellow human beings from negative consequences. For information about the recycling and disposal of this product, please contact your local authority or your household waste disposal service.
This product contains batteries. If there is a legal regulation for the disposal of batteries in your country, the batteries must not be disposed of with household waste. Find out about local regulations for disposing of batteries. By disposing of them in accordance with the rules, you are protecting the environment and the health of your fellow human beings from negative consequences.
MANUFACTURER & IMPORTER (UK)
Manufacturer:
Chal-Tec GmbH, Wallstrasse 16, 10179 Berlin, Germany.
Importer for Great Britain:
Berlin Brands Group UK Limited
PO Box 42
272 Kensington High Street
London, W8 6ND
United Kingdom
Estimado cliente:
ÍNDICE
Datos técnicos 29

natural_image
Pure architectural line drawing of a brick wall with vertical supports (no text or symbols)natural_image
Blank rectangular frame with a small vertical button labeled 'H' on the right side (no text or symbols on the main area)
natural_image
Line drawing of a hand holding a small object with a red arrow pointing right (no text or symbols)natural_image
Symbol of a trash bin crossed with a diagonal line, no text or labels presentBerlin Brands Group UK Limited
PO Box 42
272 Kensington High Street
London, W8 6ND
Reino Unido
Cher client, chère cliente,
SOMMAIRE
Fiche technique 41
natural_image
Vertical brick wall pattern with a vertical pipe or tube, no text or symbols presentnatural_image
Blank rectangular frame with a small vertical button on the right side (no text or symbols)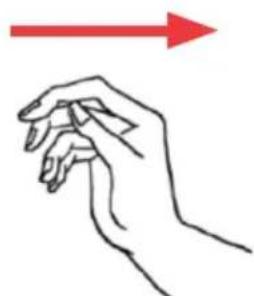
natural_image
Line drawing of a hand holding a small object with a red arrow pointing right (no text or symbols)FICHES DE DONNÉES PRODUIT
natural_image
Symbol of a trash bin crossed with a diagonal line, no text or labels presentBerlin Brands GOIup UK Ltd
PO Box 42
272 Kensington High Street
London, W8 6ND
United Kingdom
Gentile cliente,
INDICE
Dati tecnici 53

natural_image
Vertical brick wall pattern with a vertical pipe or tube, no text or symbols presentnatural_image
Symbol of a trash bin crossed with a diagonal line, no text or labels presentPRODUTTORE E IMPORTATORE (UK)
Produttore:
Chal-Tec GmbH, Wallstraße 16, 10179 Berlino, Germania.
Berlin Brands Group UK Limited
PO Box 42
272 Kensington High Street
London, W8 6ND
United Kingdom

KLARSTEIN
- INHALTSVERZEICHNIS
- Dear Customer,
- CONTENTS
- SAFETY INSTRUCTIONS
- CAUTION
- Fire hazard
- Risk of burns
- INSTALLATION
- Wall mounting
- OPERATION
- Setting the weekly mode
- PRODUCT DATA SHEETS
- DISPOSAL CONSIDERATIONS
- MANUFACTURER & IMPORTER (UK)
- Manufacturer:
- Importer for Great Britain:
- Estimado cliente:
- ÍNDICE
- SOMMAIRE
- FICHES DE DONNÉES PRODUIT
- Gentile cliente,
- INDICE
- PRODUTTORE E IMPORTATORE (UK)
- Produttore:
- KLARSTEIN
Brand : Klarstein
Model : Wonderbeam
Category : Heating