
ASB26BE - Blower SCHEPPACH - Free user manual and instructions
Find the device manual for free ASB26BE SCHEPPACH in PDF.

| Product type | Thermal blower/vacuum |
| Brand | Scheppach |
| Model | ASB26BE |
| Dimensions (L x W x H) | 1081 x 236 x 351 mm |
| Weight (blower) | 4.6 kg |
| Weight (vacuum) | 5.8 kg |
| Engine type | 2-stroke air-cooled engine |
| Displacement | 25.4 cm³ |
| Engine power | 0.75 kW (1 HP) |
| Spark plug | L7RTC |
| Idle speed | 3000 min⁻¹ (±300) |
| Maximum speed | 7500 min⁻¹ |
| Fuel tank capacity | 0.45 L |
| Fuel/oil mix | 40:1 |
| Fuel | Unleaded Super E10 (RON 95 min) |
| Oil | High quality 2-stroke engine oil (ISO-L-EGD/JASO FD) |
| Max air speed (blower) | 260 km/h |
| Max air volume flow (blower) | 578 m³/h |
| Max air speed (vacuum) | 268 km/h |
| Max air volume flow (vacuum) | 678 m³/h |
| Collection bag volume | 35 L |
| Sound pressure level (LpA) | 94 dB |
| Guaranteed sound power level (LWA) | 113 dB |
| Vibration (handle) | 3.132 m/s² |
| CO₂ emission | 1495 g/kWh |
| Functions | Blowing, vacuuming with shredding |
| Maintenance | Air filter cleaning, spark plug, tank draining, screw check |
| Safety | Hearing protection, visor, gloves, safety shoes |
Frequently Asked Questions - ASB26BE SCHEPPACH
User questions about ASB26BE SCHEPPACH
0 question about this device. Answer the ones you know or ask your own.
Ask a new question about this device
Download the instructions for your Blower in PDF format for free! Find your manual ASB26BE - SCHEPPACH and take your electronic device back in hand. On this page are published all the documents necessary for the use of your device. ASB26BE by SCHEPPACH.
USER MANUAL ASB26BE SCHEPPACH
natural_image
Technical line drawing of a mechanical device with internal components and a base plate (no text or symbols)
PLB32/ASB26BE


DE Benzin-Laubsauger/-bläser | Originalbetriebsanleitung | WARNUNG: VOR GEBRAUCH SORGFÄLTIG LESEN UND FÜR DEN SPÄTEREN GEBRAUCH SICHER AUFBEWAHREN.... 5
GB Petrol leaf vacuum/blower | Translation of the original instructions | WARNING: READ CAREFULLY BEFORE USE AND STORE IN A SAFE PLACE FOR FUTURE REFERENCE. 24
FR Aspirateur souffleur thermique | Traduction de la notice originale | AVERTISSEMENT : LIRE ATTENTIVEMENT AVANT UTILISATION ET CONSERVER SOIGNEUSEMENT POUR UNE UTILISATION FUTURE. 39
IT Aspiratore/soffiatore a benzina per fogliame | Traduzione delle istruzioni per l'uso originali | AVVISO: LEGGERE ATTENTAMENTE PRIMA DELL'UTILIZZO E CONSERVARE IN MODO SICURO PER UN USO SUCCESSIVO. 56
NL Benzine bladzuiger/-blazer | Vertaling van de oorspronkelijke gebruiksaanwijzing |
WAARSCHUWING: VOOR GEBRUIK
ZORGVULDIG DOORLEZEN EN GOED
BEWAREN VOOR LATER GEBRUIK...... 73
ES Aspirador/soplador de hojas de gasolina | Traducción del manual de instrucciones original | ADVERTENCIA: LEER ATENTAMENTE ANTES DEL USO Y CONSERVAR EN LUGAR SEGURO PARA SU CONSULTA POSTERIOR.... 89
PT Aspirador/soprador de folhas a gasolina | Tradução do manual original | AVISO: ANTES DA UTILIZAÇÃO, LEIA ATENTAMENTE E GUARDE NUM LOCAL SEGURO PARA USO FUTURO. 106
1
2
natural_image
Pure technical line drawing of a cylindrical mechanical component with no text or symbols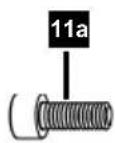

natural_image
Simple line drawing of a device with no text or symbols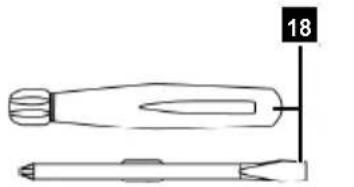
natural_image
Technical line drawing of a screwdriver with a flanged head and shaft, no text or symbols present
natural_image
Pure diagram of a cylindrical object with horizontal lines and a small protrusion, no text or symbols present.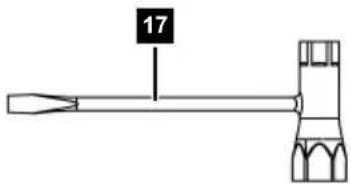
natural_image
Technical line drawing of a mechanical clamp or bracket assembly with a bolt and pin (no text or symbols)
natural_image
Line drawing of a U-shaped pipe fitting with a flange and a labeled dimension (14), no text or symbols present.


Inhaltsverzeichnis
Günzburger Straße 69
D-89335 Ichenhausen
Hinweis:
Günzburger Straße 69
D-89335 Ichenhausen
Division Manager Product Center

Head of Project Management
Garantiebedingungen
Revisionsdatum 26.11.2021
1 Introduction ...... 25
2 Proper use.... 25
3 Product description (Fig. 1-12).... 25
4 Scope of delivery (Fig. 1, 2) ...... 25
5 Unpacking 26
6 Technical data....26
7 Safety instructions.... 27
8 Assembly.... 30
9 Before commissioning.... 31
10 Operation 32
11 Working instructions.... 34
12 Cleaning and maintenance 34
13 Storage and transport 36
14 Repair and ordering spare parts 37
15 Disposal and recycling 37
16 Troubleshooting 37
17 EU Declaration of Conformity.... 38
18 Exploded view 123
Explanation of the symbols on the product
Symbols are used in this manual to draw your attention to potential hazards. The safety symbols and the accompanying explanations must be fully understood. The warnings themselves will not rectify a hazard and cannot replace proper accident prevention measures.
| Attention! Failure to observe the safety signs and warning information affixed to the product and failure to observe the safety and operating manual can result in serious injury or even death. | |
| Before commissioning, read and observe the operating manual and safety instructions! | |
| Before commissioning, read and observe the operating manual and safety instructions! | |
| Wear safety goggles. | |
| Wear hearing protection. Excessive noise can result in a loss of hearing. | |
| Wear protective gloves. | |
| Wear safety shoes! |


Explanation of the signal words in the operating manual
! DANGER
Signal word to indicate an imminently hazardous situation which, if not avoided, will result in death or serious injury.
WARNING
Signal word to indicate a potentially hazardous situation which, if not avoided, could result in death or serious injury.

CAUTION
Signal word to indicate a potentially hazardous situation which, if not avoided, could result in minor or moderate injury.
ATTENTION
Signal word to indicate a potentially hazardous situation which, if not avoided, could result in product or property damage.
1 Introduction
Manufacturer:
Scheppach GmbH
Günzburger Straße 69
D-89335 Ichenhausen
Note:
In accordance with the applicable product liability laws, the manufacturer of this product assumes no liability for damage to the product or caused by the product arising from:
- Improper handling
- Failure to comply with the operating manual
• Repairs carried out by third parties, unauthorised specialists
• Installing and replacing non-original spare parts - Improper use
Note:
The operating manual is part of the product and contain important information for safe, proper and economical operation. Please also observe the applicable national regulations. Read all operating and safety instructions carefully before use and only use the product as described. Keep the manual and pass it on when you give the product to someone else.
2 Proper use
Only use the cordless leaf vacuum/blower for the following purposes:
- In blowing mode for collecting leaves or general garden waste such as prunings or for removing them from hard-to-reach places.
- In suction mode for vacuuming and shredding dry leaves and other light, loose and non-combustible garden waste.
- The product must not be used for collecting flammable or explosive products, hot embers, ashes, burning cigarettes and pieces of branches, sharp objects, metal objects, stones and other objects that could be dangerous for the operator. This can result in injuries and can damage the product.
Do not blow or suck up materials that are hazardous to health!
The product may only be used in the intended manner. Any use beyond this is improper. The user, not the manufacturer, is responsible for damages or injuries of any type resulting from this.
An element of the intended use is also the observance of the safety instructions, as well as the assembly instructions and operating information in the operating manual.
Persons who operate and maintain the product must be familiar with the manual and must be informed about potential dangers.
The liability of the manufacturer and resulting damages are excluded in the event of modifications of the product.
The product may only be operated with original parts and original accessories from the manufacturer.
The safety, operating and maintenance specifications of the manufacturer, as well as the dimensions specified in the technical data, must be observed.
Please note that our products were not designed with the intention of use for commercial or industrial purposes. We assume no guarantee if the product is used in commercial or industrial applications, or for equivalent work.
3 Product description (Fig. 1-12)
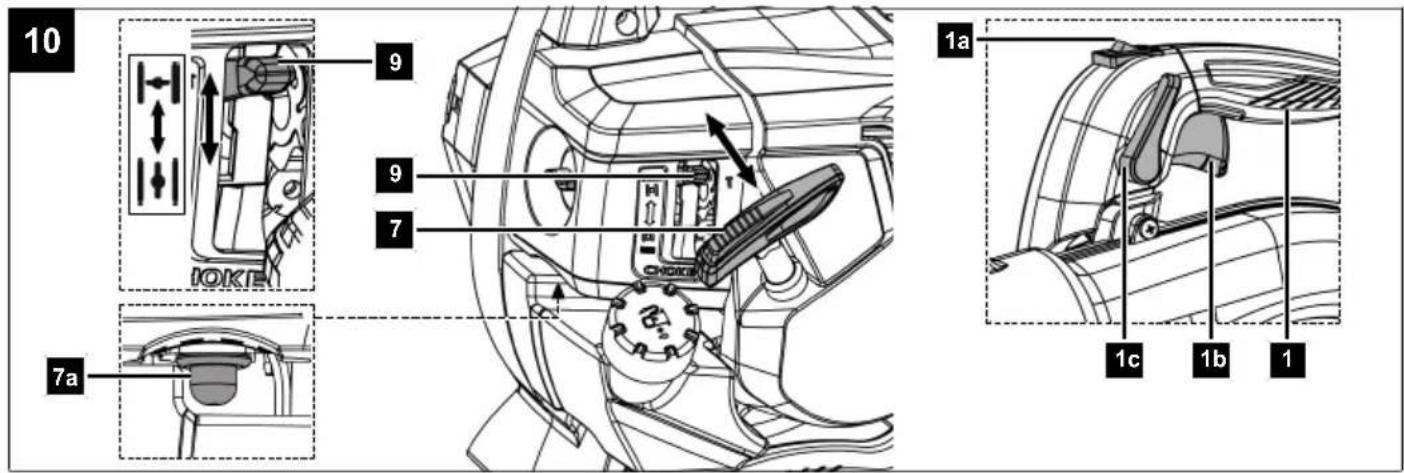
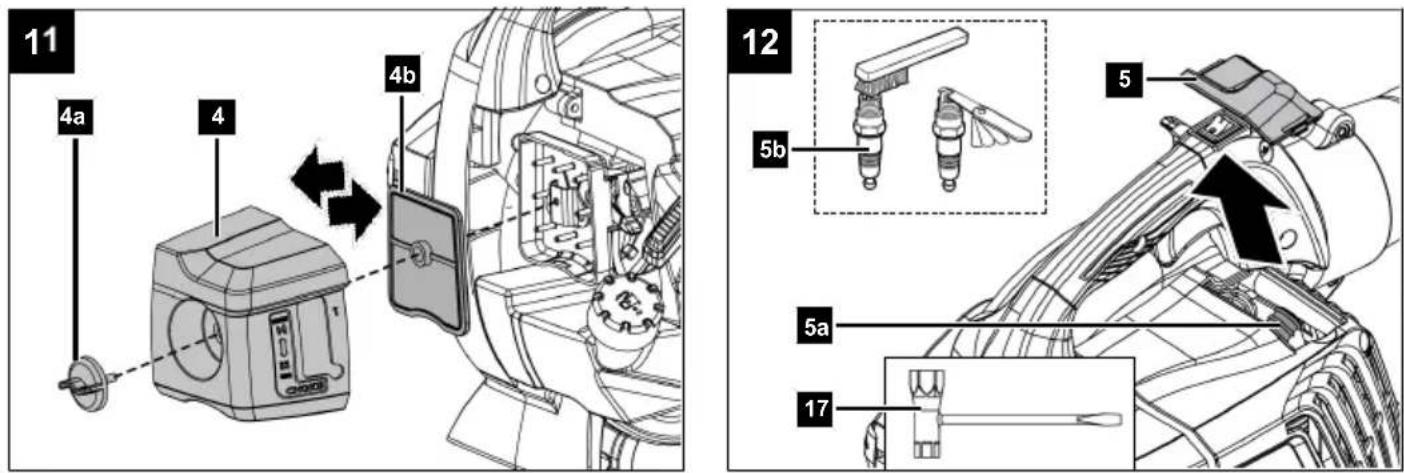
- Handle
1a. On/off switch
1b. Throttle
1c. Throttle lock - Protective grate
2a. Lock
2b. Vacuum connection - Blast connection
3a. Clamping screw
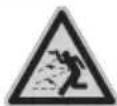
3b. Nut - Air filter cover
4a. Air filter screw
4b. Air filter - Spark plug cover
5a. Spark plug connector
5b. Spark plug - Handle
- Pull starter
7a. Fuel pump (primer) - Fuel tank
8a. Fuel filler cap - Choke lever
- Flat nozzle
- Blast pipe
11a. Pins.
11b. Locking screw - Suction nozzle
- Vacuum tube
13a. Locking screw
13b. Nut - Outlet tube
- Collection bag
- Mixing container
- Installation spanner
- Reversible screwdriver
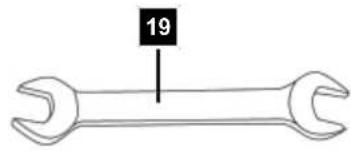
- Open-ended spanner, size 8 mm
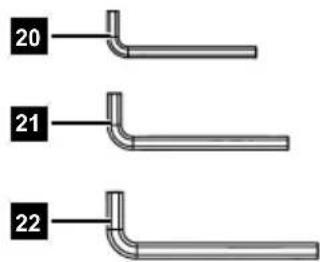
20 Allen key, 3 mm - Allen key, 4 mm
- Allen key, 5 mm
4 Scope of delivery (Fig. 1, 2)
Item Quantity Designation
-
1 x Flat nozzle
-
1 x Blast pipe
11b. 1 x Locking screw
- 1 x Suction nozzle
- 1 x Vacuum tube
13a. 2 x Locking screw
13b. 2 x Nut - 1 x Outlet tube
- 1 x Collection bag
- 1 x Mixing container
- 1 x Installation spanner
- 1 x Reversible screwdriver
- 1 x Open-ended spanner, size 8 mm
- 1 x Allen key, 3 mm
- 1 x Allen key, 4 mm
- 1 x Allen key, 5 mm
1 x Petrol leaf vacuum/blower
1 x Operating manual
5 Unpacking

WARNING
The product and the packaging material are not children's toys!
Do not let children play with plastic bags, films or small parts! There is a danger of choking or suffocating!
- Open the packaging and carefully remove the product.
- Remove the packaging material, as well as the packaging and transport safety devices (if present).
- Check whether the scope of delivery is complete.
- Check the product and accessory parts for transport damage. Immediately report any damage to the transport company that delivered the Product. Later claims will not be recognised.
- If possible, keep the packaging until the expiry of the warranty period.
- Familiarise yourself with the product by means of the operating manual before using for the first time.
- With accessories as well as wearing parts and replacement parts use only original parts. Spare parts can be obtained from your specialist dealer.
- When ordering please provide our article number as well as type and year of manufacture for the product.
6 Technical data
| Dimensions | |
| L x W x H 1081 x 236 x 351 mm | |
| Drive | |
| Type of engine 2-stroke engine, air-cooled | |
| Displacement 25.4 cm3 | |
| Engine output 0.75 kW (1 PS) | |
| Spark plug L7RTC | |
| Idle speed | 3000 min-1(±300 min-1) |
| Max. speed | 7500 min-1 |
| Max. tank volume | 0.45 l |
| Mixing ratio fuel / oil | 40:1 |
| Fuel/oil | Super E10 / 2-stroke engine oil |
| CO2 output | 1495.00 g/kWh |
| Leaf vacuum | |
| Max. air speed | 268 km/h |
| Max. air volume | 678 m^3 /h |
| Collection bag volume | 35 l |
| Leaf vacuum weight | 5.8 kg |
| Leaf blower | |
| Max. air speed | 260 km/h |
| Max. air volume | 578 m^3 /h |
| Leaf blower weight | 4.6 kg |
Subject to technical changes!
Noise and vibration

WARNING
Noise can have serious effects on your health. If the machine noise exceeds 85 dB, please wear suitable hearing protection for you and persons in the vicinity.
The noise levels have been determined in accordance with EN ISO 3744:1995.and ISO 11094:1991. Total vibration emission values (vector sum of three directions) determined per ISO 22867.
Noise data
| Sound pressure level L_pA | 94 dB |
| Measurement uncertainty K_pA | 3 dB |
| Measured sound power level L_wA | 106.2 dB |
| Measurement uncertainty K_wA | 3 dB |
| Guaranteed sound power level L_wA | 113 dB |
The specified device emissions values have been measured in accordance with a standardised test procedure and can be used for the comparison of one tool with another.
The specified device emissions values can also be used for an initial estimation of the load.
If necessary, adhere to rest periods and limit the duration of work to the bare minimum.
Vibration parameters (hand/arm vibration)
| Handle ahv | 3.132 m/s2 |
| Measurement uncertainty Kh | 1.5 m/s2 |
Keep the noise level and vibration to a minimum!
- Only use faultless products.
- Maintain and clean the product at regular intervals.
- Adapt your working methods to the product.
- Do not overload the product.
- Have the product checked if necessary.
- Switch the product off if it is not in use.
- Wear gloves.

WARNING
In case of extended working periods, the operating personnel may suffer circulatory disturbances in their hands (vibration white finger) due to vibrations.
Raynaud's syndrome is a vascular disease that causes the small blood vessels on the fingers and toes to cramp in spasms. The affected areas are no longer supplied with sufficient blood and therefore appear extremely pale. The frequent use of vibrating products can cause nerve damage in people whose circulation is impaired (e.g. smokers, diabetics).
If you notice unusual adverse effects, stop working immediately and seek medical advice.
Observe the following information to reduce hazards:
- Keep your body and especially your hands warm in cold weather.
• Take regular breaks and move your hands to promote circulation. - Ensure as little vibration as possible of the product via regular maintenance and stable parts on the product.
7 Safety instructions
General safety instructions

WARNING
For your own safety, please thoroughly read this manual and the general safety instructions before turning the product on. If you give the product to third parties, always include these operating instructions.

WARNING
Use only the fuels recommended in these instructions.

WARNING
Do not use fuel that has not been correctly mixed with 2-stroke oil. This may cause permanent engine damage and will void the manufacturer's warranty on this product. Never use a fuel mixture that has been stored for more than 90 days.
Keep all safety information and instructions for future reference!
7.1 Briefing
- Read the entire operating manual before using the product.
- Familiarise yourself with the controls and the proper use of the product.
- Learn how to turn off the product in an emergency.
-
Only use the product as intended for:
-
The movement and accumulation of leaves and grass of various, but limited, weight and of small size, by blowing.
- Vacuum collection of leaves and grass, various wastes of limited weight and small size, excluding liquids of any kind.
- The product must not be used for collecting flammable or explosive products, hot embers, ashes, burning cigarettes and pieces of branches, sharp
objects, metal objects, stones and other objects that could be dangerous for the operator. This can result in injuries and can damage the product.
• Children may not work with this product.
- The product shall not be operated by persons (including children) with reduced physical, sensory or mental abilities or who have inadequate experience or knowledge.
- Never operate the product while people, especially children, or animals are nearby.
- Never permit other persons who are not familiar with these operating instructions to use the product. Local regulations may stipulate a minimum age for users.
- Do not use the product while tired or under the influence of drugs, alcohol or medication. Do not use products if you are tired.
- If the device is passed on to a third party then pass all of the documentation on with it.
- Note that the user is responsible for accidents or hazards to other people or their property.
- Always carry out a visual inspection before use to check that the shredder, the bolts of the shredder and other fasteners are secured, that the housing is undamaged and that the guards and shields are in place. Replace worn or damaged components in sets to maintain balance. Replace damaged or illegible labelling.
7.2 General information
- Dress properly. Do not wear loose clothing or jewellery. Keep your hair and clothing away from moving parts. Loose clothes, jewellery or long hair can be caught in moving parts.
• Tie long hair back in a hair net. - Always wear safety gloves, safety goggles, hearing protection, sturdy shoes and long trousers when working with this product.
• Always switch off the engine of the product when you put the product down and before working on the product. - Check the covers and protective devices for damage and correct seating. Replace them if necessary.
- Never operate the product with defective guards or without safety devices.

WARNING
Fuel is highly flammable:
- Store fuel in tanks specifically designed for this purpose.
- Before refuelling, switch off the combustion engine and let it cool down.
- Refuel outdoors only and do not smoke while refueling.
- Open the fuel cap carefully and slowly. Wait for the pressure to equalise and only then remove the fuel filler cap completely.
- Use a suitable funnel or filler pipe for refuelling so that no fuel can spill onto the combustion engine and housing.
Do not overfill the fuel tank!
- Fuel must be filled before starting the engine. While the engine is running or immediately after switching off the product, do not open the fuel filler cap or add fuel.
- If fuel overflows, no attempts should be made to start the engine. Instead, the product must be removed from the area contaminated with fuel. Do not try to start the engine until the fuel vapours have evaporated.
• Always wipe up spilled fuel immediately.
- Start the product at a distance of at least 3 m from the fuel filling point.
- If fuel has got on clothing, it must be changed.
- The tank cover must be properly screwed on and tightened after each refuelling operation. The product must not be put into operation without the original tank cover screwed on.
- Replace defective silencers.
• Always carry out a visual inspection before using of the product. Check in particular:
- The throttle lever must move freely and should return to the neutral position independently and quickly.
- The on/off switch must be easy to operate.
- All electrical cables such as spark plug cables and the spark plug connector must be in perfect condition to avoid sparks. The spark plug connector must be firmly seated on the spark plug.
- Keep the handle dry, clean and free of oil and grease. Handles and guards must be undamaged.
– The fan must be undamaged.
– The collection bag must be undamaged.
- Before starting work, always remove any objects lying on the ground that
– could be thrown when operating the product (when using as a blower)
– could jam the vacuum tube (when using as a leaf vacuum)
– could represent a hazard (stones, sticks, wire, bones, etc.)
7.3 Operation
- Keep hands and feet away from the rotating parts.
- Do not run the combustion engine in closed rooms in which hazardous carbon monoxide can collect.
- Do not fit any products or accessories to the product that are not provided by or approved by the manufacturer.
- Keep your work area clean and well-lit. Cluttered or dark areas invite accidents.
- Do not use a product that has a defective switch. Any product that cannot be switched on or off is dangerous and must be repaired.
- Never use the product:
- Without having mounted all accessories intended for the respective use (when used as a leaf vacuum or blower)
- Whilst other persons, in particular children or animals, are nearby.
- In enclosed spaces, in an explosive environment, where flammable liquids, gases or dusts may be located.
• Always ensure that you have a safe and firm footing so that you can control the product and maintain your working posture even in the event of unexpected movements.
- If possible, avoid working on wet or slippery ground. Avoid working on uneven or steep ground that does not guarantee the operator a safe working posture.
- Move slowly, do not run. Pay attention to the ground conditions and any obstacles.
- Make sure the product is fully assembled before starting it.
- Start the product at a distance of at least 3 m from the fuel filling point.
- People should keep a safe distance of at least 15 metres from the work area.
- Do not point the silencer and thus the exhaust gases at combustible materials.
- Do not make any modifications to the engine.
- Do not overload the product. Use the correct tool for your application. The correct tool will do the job better and safer at the rate for which it was designed.
- Make sure that the product does not come into contact with foreign bodies or with foreign bodies and dust that may be stirred up by the air.
- Never point the air stream at people or animals.
- Never insert objects into the openings of the product and avoid sucking in large objects that could damage the fan.
- Keep your hands away from the intake grille and the air outlet during use and never block the fan.
- Stop the engine:
- When converting the product from a leaf vacuum to a leaf blower.
- When you are leaving the product unattended.
- Before refuelling.
- When you move to a different working area.
- Stop the engine and disconnect the spark plug connector:
– Before cleaning and maintenance work.
- If a foreign body is sucked in. Check the product for damage before operating it again.
- If the product starts to produce unusual vibrations.
- When you are not using the product.
- Do not leave the product on leaves, dry grass or other combustible material when the engine is hot. Fire hazard!
- Do not work with the product in an explosive environment where flammable liquids, gases or dusts may be located. The product creates sparks which may ignite the dust or vapours.
- Warning! Do not work near open windows. Watch out for children, pets and blow away foreign objects safely.
- Keep children and other people away while using the product. Distractions may cause you to lose control of the product.
- Avoid abnormal postures. Keep proper footing and balance at all times. This enables better control of the tool in unexpected situations.
- Stay alert, watch what you are doing and use common sense when operating the tool. Do not use any tool while you are tired or under the influence of drugs, alcohol or medication. A moment of carelessness when using the tool can result in serious injuries.
- Prevent unintentional starting. Carrying tools with your finger on the switch on invites accidents.
- Remove any adjusting tools or spanners before turning the tool on. A tool or spanner that is located in a rotating device part may result in injuries.
- It is recommended to operate the product only at reasonable times - not early in the morning or late at night when others may be disturbed.
- Before starting to blow, loosen foreign objects with a rake and broom.
- In dusty conditions, lightly moisten the surface or use an irrigation attachment if available.
- It is recommended to use the entire nozzle attachment so that the airflow can work close to the ground.
7.4 Maintenance and storage
- Take care of tools. Check for misalignment or binding of moving parts, breakage of parts and any other condition that may affect the tool's operation. Have damaged parts repaired before using the device. Many accidents are caused by poorly maintained tools.
- Do not carry out any work on the product that is not described in this manual.
- Never store the product with fuel in the tank inside a building in which fuel vapours may come into contact with naked flames or sparks.
- Allow the engine to cool down before maintenance and cleaning work, as well as before storage.
- Keep the engine, silencer and fuel tank free of dust, branches and leaves. Fire hazard!
- Only empty the tank outdoors or in well-ventilated rooms.
- Wear gloves when carrying out maintenance tasks.
- For safety reasons, never operate the product with worn or damaged parts. Damaged parts must be replaced or repaired. Only use original spare parts. Defective parts can cause injuries or damage the product.
- Remove all tools used for maintenance before operating or storing the product.
- Store the product out of the reach of children.
7.5 Transport
• If the product is to be worn, you must:
- Switch off the engine and disconnect the spark plug connector.
- Carry the product by the handles. Do not lift the product by the tube.
- When transporting in a vehicle, remove the tubes and load the product in such a way that there is no danger to persons. The product should be secured to prevent it toppling during transport in vehicles in order to ensure that fuel does not escape and to prevent damage and injuries.
7.6 Environmental protection
• Make sure that no fuel gets into the soil.
- Dispose of packaging and waste materials in accordance with applicable local laws.
- Fuel residues, oils and liquids used for cleaning must be disposed of in an environmentally friendly manner!
- Dispose of the product properly in accordance with the regulations in force in your country.
7.7 Safe use of fuels
WARNING
Fuels and fuel vapours are flammable and can cause serious damage if they are inhaled or come into contact with the skin. You should therefore exercise caution when handling fuel, and ensure good ventilation.
- Before refuelling, switch off the combustion engine and let it cool down.
- Refuel outdoors only and do not smoke while refuelling. Avoid naked flames (danger of explosion!).
- Wear gloves when refuelling.
- Be careful not to spill fuel or oil.
- If fuel overflows, no attempts should be made to start the engine. Instead, the product must be removed from the area contaminated with fuel. Do not try to start the engine until the fuel vapours have evaporated. If fuel or oil is spilled over it, change your clothing immediately.
• Make sure that no fuel gets into the soil.
- The tank cover must be properly screwed on and tightened after each refuelling operation. The product must not be put into operation without the original tank cover screwed on.
- For safety reasons, check fuel line, fuel tank, fuel cap and connections regularly for damage, ageing (brittleness), tight fit and leaks and replace if necessary.
- Only transport and store fuel in containers (canisters) designed for this purpose.
- Keep fuel away from children.
- Do not transport or store fuels in the vicinity of combustible or highly flammable materials/substances, or near sparks or naked flames.
- Start the product at a distance of at least 3 m from the fuel filling point.
- Keep handles and grasping surfaces dry, clean and free from oil and grease. Slippery handles and grasping surfaces do not allow for safe handling and control of the tool in unexpected situations.
- Before refuelling, switch off the combustion engine and let it cool down.
7.8 Residual risks
The product has been built according to state-of-the-art and the recognised technical safety rules. However, individual residual risks can arise during operation.
- Residual risks can be minimised if the "Safety Instructions" and the "Intended Use" together with the operating instructions as a whole are observed.
- Use the product in the way that is recommended in this operating manual. This is how to ensure that your product provides optimum performance.
- Prevent the product being unintentionally started up.
- Keep your hands away from the working area when the product is in operation.
- Comply with the stipulated maintenance and safety instructions in the operating instructions.
• Furthermore, despite all precautions having been met, some non-obvious residual risks may still remain.

WARNING
In case of extended working periods, the operating personnel may suffer circulatory disturbances in their hands (vibration white finger) due to vibrations.
Raynaud's syndrome is a vascular disease that causes the small blood vessels on the fingers and toes to cramp in spasms. The affected areas are no longer supplied with sufficient blood and therefore appear extremely pale. The frequent use of vibrating products can cause nerve damage in people whose circulation is impaired (e.g. smokers, diabetics).
If you notice unusual adverse effects, stop working immediately and seek medical advice.
8 Assembly
The product can be used both as a petrol leaf blower and as a petrol leaf vacuum. It is necessary to set up the product in accordance with the respective purpose.
Tool required:
• Reversible screwdriver (18)
- Open-ended spanner, size 8 mm (19)
- Allen key, 4 mm (21)
• Allen key, 5 mm (22)
8.1 Structure of petrol leaf blowers
8.1.1 Fit the blast pipe (11) to the blasting connection (3) (Fig. 3)
- Align the blast pipe (11) with the blasting connection (3) as shown.
- Loosen the locking screws (3a) and nuts (3b) slightly. Use a 5 mm Allen key (22).
- Slide the blast pipe (11) into the blasting connection (3).
- Tighten the clamping screws (3a) and the nuts (3b) again. Use a 5 mm Allen key (22).
8.1.2 Fit the flat nozzle (10) to the blast pipe (11) (Fig. 4)
The petrol leaf blower can be operated with a flat nozzle (10).
- Align the flat nozzle (10) with the pin (11a) of the blast pipe (11).
- Push the flat nozzle (10) and the blast pipe (11) together and turn the flat nozzle (10) clockwise until it clicks into place.
- Secure the connection with the locking screw (11b). Use the reversible screwdriver (18).
Note:
- The petrol leaf blower is correctly mounted when the flat nozzle (10) points towards the ground.
8.2 Structure of petrol leaf vacuums

WARNING
Danger of personal injury!
Never use the leaf vacuum/blower with only one assembled suction tube part.
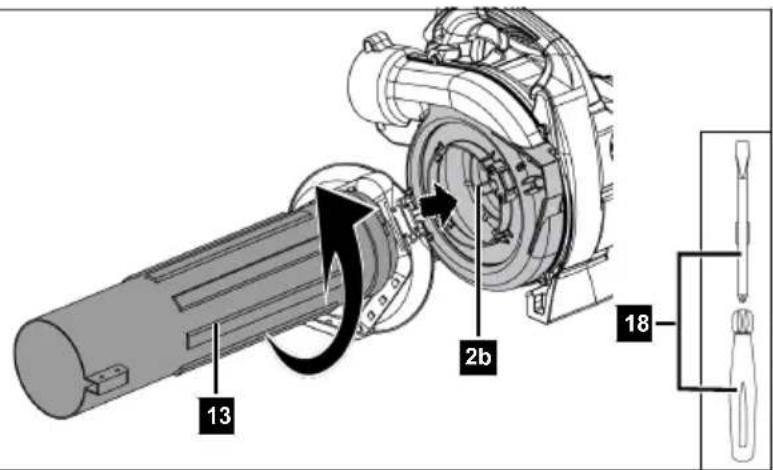
8.2.1 Fitting the vacuum pipe (13) to the vacuum connection (2b) (Fig. 5)
- Open the protective grille (2) by releasing the lock (2a). Use the reversible screwdriver (18).
- Fold open the protective grille (2).
- Fit the vacuum tube (13) to the vacuum connection (2b). Pay attention to the pins on the vacuum connection (2b).
- Turn the vacuum tube (13) anticlockwise until it clicks into place to secure the vacuum tube (13).
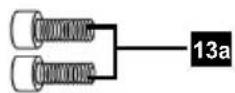
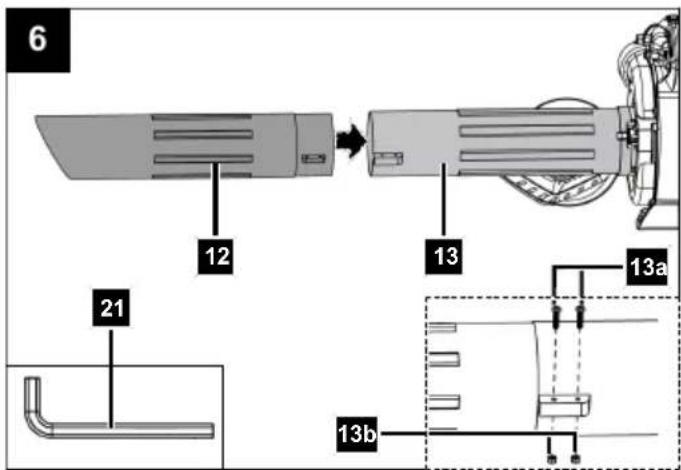
8.2.2 Fit the suction nozzle (12) to the vacuum tube (13) (Fig. 6)
- Align the suction nozzle (12) with the vacuum tube (13).
- Push the suction nozzle (12) into the vacuum tube (13). Ensure that the mounting holes align with each other.
- Insert the locking screws (13a) through the mounting holes and secure them with the nuts (13b). Use a 4 mm Allen key (21) and an 8 mm open-end spanner (19).
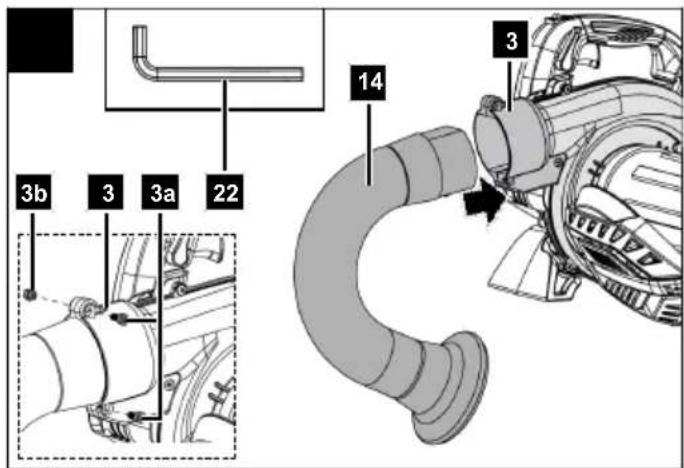
8.2.3 Fit the outlet tube (14) to the vacuum tube (3) (Fig. 7)
- Align the outlet tube (14) with the blasting connection (3) as shown.
- Loosen the locking screws (3a) and nuts (3b) slightly. Use a 5 mm Allen key (22).
- Slide the outlet tube (14) into the blasting connection (3).
- Tighten the clamping screws (3a) and the nuts (3b) again. Use a 5 mm Allen key (22).
8.2.4 Fitting the collection bag (15) to the outlet tube (14) (Fig. 8)

WARNING
Danger of injury!
If the collection bag is not secured during operation of the cordless leaf vacuum/blower, this can lead to injuries from flying parts.
- Only use the leaf vacuum when the collection bag is properly fitted.
- Close the zip of the collection bag.
-
Ensure that the collection bag is not damaged.
-
Pull the collection bag (15) over the outlet tube (14).
- Secure the collection bag (15) in position by pulling the Velcro fastener together and closing it.
- Disassembly takes place in reverse order.
8.2.4.1 Adjusting the carrying strap of the collection bag (15)
Note:
Never wear the carrying strap diagonally across your shoulder and chest, but only on one shoulder, this allows you to quickly remove the product from your body in the event of danger.
- Hook the carrying strap of the collection bag (15) over your right shoulder.
- Adjust the height of the carrying strap. Make sure that the collection bag (15) is not kinked at the transition to the outlet tube (14).
Note:
The petrol leaf vacuum/blower is correctly mounted when
- The outlet tube (14) points slightly downwards and to the right side of the operator.
- The rounded part of the suction nozzle (12) points towards the ground.
Note:
The petrol leaf vacuum/blower cannot be started if the vacuum tube is not fitted.
9 Before commissioning

WARNING
Health hazard!
Inhalation of fuel / lubricating oil vapours and exhaust gases can cause serious damage to health, unconsciousness and in extreme cases death.
- Do not breathe fuel / lubricating oil vapours and exhaust gases.
- Operate the product outdoors only.
ATTENTION
Always make sure the product is fully assembled before commissioning!
9.1 Check before operation
- Check all sides of the engine for oil or fuel leaks.
- Check the fuel level – the fuel tank should be at least half-full.
- Check the condition of the air filter.
- Check the condition of the fuel lines.
- Look for signs of damage.
- Check that all protective covers are in place and all screws, nuts and bolts are tightened.
- Ensure that the product is sufficiently ventilated.
• Make sure that the spark plug connector is attached to the spark plug.
- Keep the handle dry, clean and free of oil and grease. Handles and guards must be undamaged. Important for safe guidance of the power tool.
- Check the smooth running of all moving parts.
• Prepare the product for the respective use and make sure that all parts are correctly assembled.
9.2 Mixing fuel/oil (Fig. 9)
This product is equipped with a 2-stroke engine that requires a mixture of petrol and 2-stroke oil.
Special 2-stroke oil for air-cooled 2-stroke engines with a mixing ratio of 40:1 must be used.

WARNING
Do not use fuel that has not been correctly mixed with 2-stroke oil. This may cause permanent engine damage and will void the manufacturer's warranty on this product. Never use a fuel mixture that has been stored for more than 90 days.
9.2.1 Suitable fuel
Use only unleaded petrol (min. RON 95).
NOTE
Unleaded petrol tends to form deposits in the storage container and tank if stored for longer than 1 month. Always use fresh petrol!
9.2.2 Suitable oil
Only use high-quality 2-stroke engine oil in accordance with the specification ISO - L - EGD / JASO FD. Suitable oils are available from specialist retailers.
Do not use 2-stroke oil that recommends a mixing ratio of 100:1. Engine damage due to inadequate lubrication will invalidate the manufacturer's engine warranty.
Never use oil for 4-stroke engines or water-cooled 2-stroke engines. This can cause the spark plug to become fouled, the exhaust part to become blocked or the piston ring to become stuck.
9.2.3 Fuel mixture

WARNING
Fuels and fuel vapours are flammable and can cause serious damage if they are inhaled or come into contact with the skin. You should therefore exercise caution when handling fuel, and ensure good ventilation.

WARNING
Avoid direct skin contact with fuel and inhalation of fuel vapours. Wear safety gloves.

WARNING
Petrol and the fuel-oil mixture are highly flammable!
- Only transport and store fuel in containers (canisters) designed for this purpose.
- Keep fuel tanks out of reach of children.
- Do not smoke when dealing with fuel.
- Do not mix the fuel mixture in the tank.
9.2.4 Preparing the fuel-oil mixture
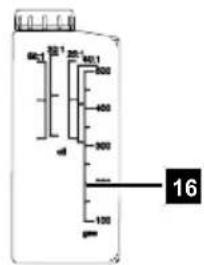
Fuel mixing table
| Fuel 2-stroke engine | oil (40:1) |
| 1 litres 0.025 litres | |
| 2 litres 0.050 litres | |
| 5 litres 0.125 litres |
- Mix the correct amount of petrol and 2-stroke oil in the mixing container (16).
- Close the mixing container (16) and shake the fuel-oil mixture thoroughly.
NOTE
Do not use a fuel-oil mixture that has been stored for more than 90 days.
Fuel-oil mixtures that have not been used for one month or longer can clog the carburettor or impair engine operation.
9.2.5 Fill in fuel-oil mixture

DANGER
Risk of fire and explosion!
Only fill the fuel when the engine is switched off and has cooled down. Do not smoke when refuelling the product.

WARNING
Only refuel the product outdoors or in sufficiently ventilated rooms.
- Set the product down on a flat surface with the fuel filler cap (8a) facing upwards.
- Always clean the area around the fuel tank cap (8a) before filling to prevent dirt from falling into the fuel tank (8). Use a dry, lint-free cloth for this purpose.
- Carefully open the tank cap (8a) to relieve any possible overpressure in the fuel tank (8).
- Shake the mixing container (16) with the fuel-oil mixture thoroughly.
- Open the mixing container (16) carefully and allow any overpressure to dissipate first.
-
Turn the chain oil tank cap (8a) anti-clockwise and open it. The fuel filler cap (8a) is connected to an anti-loss device in the fuel tank (8) and thus cannot fall off.
-
Pour the fuel mixture into the fuel tank (8). Do not spill fuel when refuelling and do not fill the fuel tank (8) to the brim.
- Close the fuel filler cap (8a) again.
- Clean the tank cover (8a) and the surroundings. Wipe up spilled fuel immediately.
- Check the fuel tank (8) and fuel lines for leaks.
10 Operation
10.1 Starting the engine (Fig. 10)

DANGER
Danger of poisoning!
Only use the product outdoors and never in closed or poorly ventilated rooms.
ATTENTION
– Always pull the pull starter out straight.
- Hold the handle of the pull starter firmly when the pull starter winds back in.
- Do not let the pull starter whip back in. This can result in damage.
- Do not pull the pull starter all the way out. This prevents the starter cable breaking.
– In case of cool weather, it may be necessary to repeat the starting process numerous times.
NOTE
Only use the fuel pump "primer" when the engine is cold!
NOTE
If the engine is being started for the first time, several tries are required to start until the fuel has been delivered from the tank to the engine.
10.1.1 Starting the engine when cold
When the engine is "cold":
- Set the choke lever (9) to the position.
- Set the on/off switch (1a) to the "l" position.
- In colder temperatures, press the fuel pump "primer" (7a) seven times. This makes it easier to start the engine.
- Hold the product firmly by the handle (1) and pull the pull starter (7) out slowly until you feel the first resistance.
- Now pull the pull starter (7) several times more forcefully until the engine starts briefly and then stops again.
- As soon as the engine has stopped, actuate the throttle (1b). The choke lever (9) will automatically spring back to the "warm start" operating position
- Now pull the pull starter (7) and the engine should start. If the engine does not start, repeat the process.
- Allow the product to run for 1-2 minutes.
Note:
The product has an auto-choke function. As soon as you operate the throttle lever, the choke lever jumps into position ||
With high outside temperatures, it may be necessary to start the engine without the choke even when the engine is cold!
10.1.2 Starting the engine when warm
The product was stopped for less than 15-20 minutes.
When the engine is "warm":
- The choke lever (9) does not have to be set to position if the engine is warm.
- Set the on/off switch (1a) to the "I" position.
- Hold the product firmly by the handle (1) and pull the pull starter (7) out slowly until you feel the first resistance.
- Now pull the pull starter (7) quickly. The product should start after 2 pulls. If the product has still not started, repeat the procedure described under 10.1.1.
10.2 Adjusting the engine speed (Fig. 10)
The engine speed should be adapted to the type of material to be removed:
- Use the product at low speed for light material on the ground.
- Use the product at average speed to move grass and light leaves on asphalt or firm ground.
-
Use the product at high speed for heavier materials such as dirt.
-
Press the throttle lever (1b) until the desired speed is reached. The speed can be steplessly controlled by the throttle (1b).
-
Secure the throttle lever position with the throttle lever lock (1c).
Note:
Avoid running the engine at full power for the first 6-8 operating hours.
10.3 Shutting the engine off
10.3.1 Emergency stop procedure
- If it is necessary to stop the product immediately, switch the on/off switch (1a) to position "0".
10.3.2 Normal procedure
- Release the throttle lock (1c).
- Release the throttle (1b).
- Set the on/off switch (1a) to the "0" position.
10.4 Operation of the petrol leaf blower

WARNING
Danger of injury!
If you direct the airflow at people, animals or objects, this can cause injury and damage.
– Direct the air flow away from you.
- Never direct the airflow at other people, animals or objects.
- Do not blow away hard objects such as stones or branches.

WARNING
Danger of injury
Objects hurled away and rotating parts can cause severe injuries.
- Make sure that other persons maintain a sufficient safety distance.
- Keep uninvolved persons away from the product.
– Hold the product in front of you. - Never point the product at yourself, other people or animals.
- Always make sure that no objects or dust are blown in the direction of people or animals and make sure that objects will not be damaged.
- Always observe the wind direction and never work against the wind.
Hold the leaf blower by the handle (1) during operation. Always adapt the speed to the material being removed.
10.5 Operation of the petrol leaf vacuum

WARNING
Danger of injury!
If the collection bag is not secured during operation of the cordless leaf vacuum/blower, this can lead to injuries from flying parts.
- Only use the leaf vacuum when the collection bag is properly fitted.
- Close the zip of the collection bag.
- Ensure that the collection bag is not damaged.

CAUTION
Hold the product with both hands during the work. Grasp both handles.
Notes:
When operating the cordless leaf vacuum/blower, we recommend a medium/high speed.
Do not vacuum too many leaves at once, do not collect any wet grass or leaves, this can lead to blockages. Do not vacuum any hard materials.
A leaf blower is not a wet vacuum cleaner!
Please avoid vacuuming wet materials (leaves, dirt as well as twigs, branches, pine cones, grass, soil, sand, bark mulch/chippings, etc.).
Do not vacuum on damp or wet lawns, grass or meadows, as incorrect use may lead to blockages in the shredding chamber and thus to reduced performance.
The collection bag works like a filter, similar to an ordinary household vacuum cleaner. For this reason, it is best not to fill the collection bag completely and remove bulky objects immediately.
- Place your left hand on the handle (1) and your right hand on the handrail (6).
- Hold the handle (6) so that the collection bag (15) is on the right side of the operator.
- During collection, hold the rounded end of the suction nozzle (12) a few centimetres above the ground.
Note:
To avoid unnecessary wear on the collection bag, avoid dragging it across the ground while working.
10.5.1 Emptying the collection bag (15) (Fig. 8)
If the collection bag is too full this reduces the performance of the product and can cause the motor to overheat.
- Switch off the engine as in 10.3.2.
- Wait until the product has come to a standstill.
- Open the zip on the collection bag (15) and empty the collection bag (15). The collection bag does not need to be removed from the outlet tube (14) for this purpose.
10.5.2 Remove blockage

WARNING
Danger of injury!
If you remove blockages with your bare hands, you may injure yourself.
- Wear protective gloves.
- Use suitable tools (e.g. a wooden stick).
Note:
When using the product as a leaf vacuum, there is a risk of sucking in objects that may block the product and the rotor.
- Switch off the engine as in 10.3.2.
- Remove the spark plug cover (5) by levering it upwards. Use the reversible screwdriver (18).
-
Remove the spark plug connector (5a) from the spark plug (5b).
-
Remove the vacuum tube (13).
-
Check the vacuum tube (13) for blockages. Gently tap the vacuum tube (13) or use a wooden stick to loosen blockages. If necessary, tap the vacuum tube (13) lightly on the ground to loosen the blockage.
-
If necessary, remove any foreign objects from the vacuum connection (2b).
-
Make sure that nothing is blocking the rotor before using the product again.
-
Assemble everything in reverse order.
11 Working instructions
Notes:
- Some noise pollution from this product is unavoidable. Postpone noisy work to approved and designated times. If necessary, adhere to rest periods and limit the duration of work to the bare minimum.
- For your personal protection and the protection of nearby persons, wear suitable hearing protection.
- Before switching on the product, make sure that it is not directed towards people or animals.
- Hold the product with both hands during the work. Grasp both handles.
- Lightly dampen surfaces in dusty conditions.
The product may only be used for the following purposes:
- As a blower for piling up dry foliage or blowing it away from hard-to-reach places.
- As a suction unit for sucking up dry foliage. With the suction function, the product also serves as a shredder. The dry leaves are shredded, their volume reduced and prepared for possible composting. The intensity of the shredding depends on the size of the leaves and the residual moisture they still contain.
Any other use may result in damage to the product and pose a danger to the user.
11.1 When used as a petrol leaf blower
- You will achieve optimum results when using the blower at a distance of 5 - 10 cm from the ground.
- Point the air jet forward and move slowly to blow leaves or garden waste together or remove them from hard-to-reach places.
- Use rakes and brooms to loosen up waste before blowing.
- Start work with the highest blowing power to quickly collect the leaves lying around. Select a lower blowing power to compact the previously collected pile of leaves.
• Always observe the wind direction and never work against the wind.
11.2 When used as a petrol leaf vacuum
- Make sure that not too many leaves are sucked in at the same time. This will prevent the suction tube from clogging and the shredder from jamming.
12 Cleaning and maintenance

WARNING
Have maintenance and repair tasks that are not described in this operating manual, carried out by a specialist workshop. Use only original spare parts.

WARNING
Improper maintenance or cleaning work can cause injuries!

WARNING
The product may start unexpectedly and cause injuries and burns during cleaning, repair and maintenance work.
- Switch the product off.
- Remove the spark plug connector from the spark plug.
- Allow the product to cool.

WARNING
Carry out a visual and functional check/maintenance regularly/daily and before commissioning to ensure that the product is in good operating condition.
- Incorrect maintenance, use of non-conforming replacement parts, or removal or modification of safety equipment may lead to severe property or personal damages.
- If this work cannot be carried out by the user themselves, see a specialist dealer.
12.1 Cleaning
Note:
The product should be thoroughly cleaned after each use.
- Keep protective devices, air vents and the motor housing as free of dust and dirt as possible. Rub the product clean with a clean cloth or blow it off with compressed air at low pressure. We recommend that you clean the product directly after every use.
- To reduce the risk of fire, regularly clean the cooling fins of the engine with compressed air. Clear the silencer area of dust, leaves or other foreign objects.
-
Ventilation openings must always be free.
-
Clean the product at regular intervals using a damp cloth and a little soft soap. Do not use any cleaning products or solvents; they could attack the plastic parts of the product. Make sure that no water can penetrate the product interior.
- Never immerse the product in water or other liquids for cleaning.
Cleaning the leaf blower
- Clean the blast pipe (11) and flat nozzle (10) with a brush when dirty.
Cleaning the leaf vacuum
- Remove the collection bag (15) after the work. Turn the collection bag (15) inside out, clean it thoroughly and dry it. This prevents the development of mould and unpleasant odours.
- A heavily soiled collection bag (15) can be washed with soap and water and then dried.
- If the zip is difficult to operate, rub the zip teeth with a dry soap bar.
- Clean the vacuum tube (13) and suction nozzle (12) and outlet tube (14) with a brush when dirty.
12.2 Maintenance
Note:
Maintain the product carefully. Check for misalignment or binding of moving parts, breakage of parts and any other condition that may affect the product's operation. Have damaged parts repaired before using the product.
Regular, careful servicing is required to guarantee the safety level and performance of the product.
Remove all tools used for maintenance before operating or storing the product.
All protective and safety equipment must be reassembled immediately after repair and maintenance work is completed.
12.2.1 Maintenance plan
Always comply with the following maintenance intervals in order to ensure problem-free operation.
Attention! The fuel/oil mixture must be filled in before the device is used for the first time.
| Component Before every use Every 3 months | or 20h | Every 6 months or 50h | Every 12 months or 100h | Every 2 years or 300h | ||
| Air filter Check | X | |||||
| Clean | X | |||||
| Spark plug | Check and adjust | first time after 10h, then every 50h | ||||
| Replace | X | |||||
| Spark plug connector | Clean | X | ||||
| Cooling fins | Test | X | ||||
| Fasteners such as screws and nuts | Check (tighten if necessary) | X | ||||
| Fuel/oil mixture | Check | X | ||||
| Fuel tank | Check | X | ||||
| Fuel filter | Replace | See 12.2.4 | ||||
| Fuel line | Check | Before every use. Have replaced by an authorised specialist company if damaged. | ||||
| Gasifier setting | Check If the engine stops on its own when releasing the accelerator.Only to be carried out by an authorised specialist company (see 12.2.5). | |
| Collection bag C | Check Before every use. Replace if damaged. | |
| Clean In the event of heavy contamination. | ||
12.2.2 Maintenance of the air filter (4b) (Fig. 11)
ATTENTION
Fouled air filters diminish the engine output due to reduced air supply to the carburettor. Regular inspection is therefore essential.

DANGER
Risk of fire and explosion!
If not cleaned correctly, fuel may ignite and even explode. This can lead to severe burns or death.
- Clean the air filter foam insert, air filter non-woven insert and the air filter metal insert by tapping or blowing them out.
- Never clean with petrol or combustible solvents.
ATTENTION
Risk of damage!
Operating the engine without a filter element or with a damaged filter element can cause engine damage.
- Never run the engine without the air filter element or with a damaged filter element. This would allow dirt into the engine, which would result in severe damage to the engine.
The air filter (4b) should be checked regularly and cleaned as required.
- Loosen the air filter screw (4a) by turning anti-clockwise.
- Remove the air filter cover (4).
- Take the air filter (4b) out. Clean the air filter (4b) by tapping it or blowing it out with compressed air.
- The re-assembly takes place in reverse order.
12.2.3 Spark plug maintenance (5b) (Fig. 12)
ATTENTION
Only replace the spark plug when the engine is cold!
Check the spark plug (5b) for dirt for the first time after 10 operating hours and clean it with a copper wire brush if necessary. Then service the spark plug (5b) every 50 operating hours.
- Remove the spark plug cover (5) by levering it upwards. Use the installation spanner (17).
- Remove the spark plug connector (5a) from the spark plug (5b).
- Use the spark plug spanner (17) to remove the spark plug (5b).
- Use a feeler gauge to set the electrode gap to 0.6 -0.7 mm.
-
Refit the spark plug (5b) and take care not to over-tighten it.
-
The re-assembly takes place in reverse order.
12.2.4 Fuel filter maintenance
Inside the fuel tank (8) there is a fuel filter that prevents impurities from entering the engine. The fuel filter should be replaced once a year by your dealer.
12.2.5 Carburettor setting maintenance
If the engine stops by itself when the throttle is released, a carburettor adjustment must be made.
Have carburettor adjustments (e.g. idle speed adjustment) carried out only by qualified specialists to avoid engine damage.
13 Storage and transport

WARNING
Danger of injury and burning!
The product can start unexpectedly and cause injuries.
- Switch off the engine before carrying out any cleaning or maintenance work.
- Allow the engine to cool down.
- Disconnect the spark plug connector from the spark plug.
• Empty the product completely.
- Clean and check the product for damage.
13.1 Preparation for storage

WARNING
Do not remove the fuel in enclosed spaces, near fire or when smoking. Petrol fumes can cause explosions and fire.
If the product will not be used for a period of more than 30 days, the following measures must be taken to prepare it for storage.
- Clean and check the product for damage.
- Empty the fuel tank using a petrol extraction pump.
- Start the engine and let it run until the remaining fuel is used up.
- Store fuel in tanks specifically designed for this purpose.
- Change the oil at the end of every season.
- Remove the spark plug connector from the spark plug.
- Pour 1 teaspoon of clean 2-stroke oil into the combustion chamber. Pull the starter rope slowly several times to coat internal components.
- Store the product in a well-ventilated place or area.
13.2 Transport
- The product must be secured against tipping and slipping during transport in vehicles in order to prevent damage and injuries.
- Protect the product from impacts, shocks and severe vibrations, e.g. during vehicular transport.
• The product can be lifted and moved via the handle.
14 Repair and ordering spare parts
After repairs or maintenance, make sure that all safety-related parts are installed and are in perfect condition. All parts which may cause injury must be kept where they are inaccessible to children or others.
ATTENTION
According to the German Product Liability Act, no liability is accepted for damage caused by improper repairs or by not using original spare parts.
Such work should be performed by a customer service centre or an authorised specialists. The same applies to accessory parts.
Spare parts and accessories can be obtained from our Service Centre. To do this, scan the QR code on the front page.
ATTENTION
Important note in the case of repairs
When returning the product for repair, for safety reasons, ensure that it is free of oil and fuel when it is sent to the service centre.
14.1 Ordering spare parts
Please provide the following information when ordering spare parts:
- Model designation
- Item number
- Type plate data
14.2 Service information
With this product, it is necessary to note that the following parts are subject to natural or usage-related wear, or that the following parts are required as consumables.
Wearing parts*: Spark plug, air filter, collection bag
* = may not be included in the scope of delivery!
15 Disposal and recycling
Notes for packaging


The packaging materials are recyclable. Please dispose of packaging in an environmentally friendly manner.
You can find out how to dispose of the disused device from your local authority or city administration.
Fuels and oils
- Before disposing of the product, the fuel tank and the engine oil tank must be emptied!
- Fuel and engine oil do not belong in household waste or drains, but must be collected or disposed of separately!
- Empty oil and fuel tanks must be disposed of in an environmentally friendly manner.
16 Troubleshooting
The following table shows fault symptoms and describes remedial measures in the event of your product failing to work properly. If you cannot localise and rectify the problem with this, please contact your service workshop.
| Fault Possible cause Remedy | ||
| The product cannot be started Air | Air filter dirty. Clean/replace the air filter. | |
| Fuel filter blocked. Clean or replace the fuel filter. | ||
| Missing fuel supply. Check fuel tank has sufficient fuel and refill if necessary. | ||
| Fault in the fuel line. Check the fuel line for kinks or damage. | ||
| Starter unit is defective. Check the spark plug connector is seated properly. Contact the service point. | ||
| Spark plug is too dirty/too wet due to too much fuel. | Remove spark plug, clean and dry; then pull the starter cable several times; re-insert the spark plug. | |
| Spark plug connector not plugged in. | Check the spark plug connector is seated correctly. | |
| No ignition spark. | Check the spark plug connector is seated correctly. Check spark plug for dirt and correct electrode gap. Check ignition cable for damage. Contact the service point. | |
| Motor defective. | Contact the service point. | |
| Carburettor defective. | Contact the service point. | |
| Blast/suction pipe not fully fitted. | Fit the two-part blast/suction pipe. | |
| The product can be started but switches off again immediately. | Incorrect carburettor setting (idle speed). | Contact the service point. |
| Engine runs unsteadily Incorrect | carburettor setting. Contact the service point. |
| Air filter dirty Clean or replace the air filter. | |
| Spark plug dirty Clean or replace the spark plug. | |
| On/off switch defective. Contact the service point. | |
| Smoke is produced Incorrect fuel | mixture. Use 2-stroke mixture with the mixing ratio of 40:1. |
| Incorrect carburettor setting. Contact the service point. | |
| Product does not work at full power | Air filter dirty. Clean or replace the air filter. |
| Spark plug dirty Clean or replace the spark plug. | |
| Incorrect carburettor setting. Contact the service point. | |
| Collection bag is full. Empty collection bag. | |
| Collection bag is contaminated. Clean collection bag. | |
| Tube or shredder are blocked. Remove any blockage as described in the operating manual. |
17 EU Declaration of Conformity
Translation of the original Declaration of Conformity Manufacturer:
Scheppach GmbH
Günzburger Straße 69
D-89335 Ichenhausen
We declare under our sole responsibility that the product described here complies with the applicable directives and standards.
Brand: SCHEPPACH
Art. designation:
Petrol leaf vacuum/blower - PLB32/ASB26BE
Art. no.
5911108903, 5811102952
EU directives:
2014/30/EU, 2006/42/EG, 2000/14/EG_2005/88/EG, 2016/1628/EU, 2011/65/EU*,
* The object of the declaration described above fulfils the regulations of the directive 2011/65/EU of the European Parliament and Council from 8th June 2011, on the restriction of the use of certain hazardous substances in electrical and electronic equipment.
Applied standards:
EN 15503:2009+A2:2015;
EN ISO 14982:2009
Conformity assessment procedure:
2000/14/EG\_2005/88/EC - Appendix: V
Guaranteed sound power level (LWA): 113 dB
Measured sound power level ( L_WA ): 106.2 dB
2016/1628/EU
Emission. No: e9*2016/1628*2016/1628SHA1/P*1189*00
Documentation authorised representative:
Stefan Hartinger
Günzburger Str. 69
D-89335 Ichenhausen
Division Manager Product Center

Andreas Pecher
Head of Project Management
Sommaire
Günzburger Straße 69
D-89335 Ichenhausen
Remarque :
Günzburger Straße 69
D-89335 Ichenhausen
Division Manager Product Center

Andreas Pecher
Head of Project Management
Indice
Günzburger Straße 69
D-89335 Ichenhausen, Germania
Indicazione:
Günzburger Straße 69
D-89335 Ichenhausen
Division Manager Product Center

Andreas Pecher
Head of Project Management
Inhoudsopgave
Günzburger Straße 69
D-89335 Ichenhausen
Aanwijzing:
Günzburger Straße 69
D-89335 Ichenhausen
Division Manager Product Center

Head of Project Management
Índice
Günzburger Straße 69
Günzburger Straße 69
D-89335 Ichenhausen
gasolina - PLB32/ASB26BE
N.° de art. 5911108903, 5811102952
Directivas UE:
2014/30/UE, 2006/42/EG, 2000/14/EG_2005/88/EG, 2016/1628/UE, 2011/65/UE*,
Division Manager Product Center

Andreas Pecher
Head of Project Management
Índice
Günzburger Straße 69
Günzburger Straße 69
D-89335 Ichenhausen
gasolina - PLB32/ASB26BE
N.° art. 5911108903, 5811102952
Diretivas UE:
2014/30/UE, 2006/42/EG, 2000/14/EG_2005/88/EG, 2016/1628/UE, 2011/65/UE*,
Division Manager Product Center

Andreas Pecher
Head of Project Management
CE
SCHEPPACH GMBH
Günzburger Str. 69
D-89335 Ichenhausen

Stand der Informationen · Status of the information · Version des informations · Versione delle informazioni · Stand van de informatie · Información disponible · Versão das informações
Update: 03/2026 · Ident.-No.: 5911108903, 5811102952


- PLB32/ASB26BE
- Inhaltsverzeichnis
- Garantiebedingungen
- Explanation of the symbols on the product
- Explanation of the signal words in the operating manual
- ! DANGER
- WARNING
- CAUTION
- ATTENTION
- Introduction
- Manufacturer:
- Note:
- Proper use
- Product description (Fig. 1-12)
- Scope of delivery (Fig. 1, 2)
- Item Quantity Designation
- Unpacking
- Noise and vibration
- Keep the noise level and vibration to a minimum!
- Safety instructions
- Briefing
- General information
- Fuel is highly flammable:
- Operation
- Maintenance and storage
- Transport
- Environmental protection
- Safe use of fuels
- Fuels and fuel vapours are flammable and can cause serious damage if they are inhaled or come into contact with the skin. You should therefore exercise caution when handling fuel, and ensure good ventilation.
- Residual risks
- Assembly
- Structure of petrol leaf blowers
- Fit the blast pipe (11) to the blasting connection (3) (Fig. 3)
- Fit the flat nozzle (10) to the blast pipe (11) (Fig. 4)
- Structure of petrol leaf vacuums
- Danger of personal injury!
- Fitting the vacuum pipe (13) to the vacuum connection (2b) (Fig. 5)
- Fit the suction nozzle (12) to the vacuum tube (13) (Fig. 6)
- Fit the outlet tube (14) to the vacuum tube (3) (Fig. 7)
- Fitting the collection bag (15) to the outlet tube (14) (Fig. 8)
- Danger of injury!
- Adjusting the carrying strap of the collection bag (15)
- Before commissioning
- Health hazard!
- Check before operation
- Mixing fuel/oil (Fig. 9)
- Suitable fuel
- NOTE
- Suitable oil
- Fuel mixture
- Preparing the fuel-oil mixture
- Fill in fuel-oil mixture
- DANGER
- Risk of fire and explosion!
- Operation
- Starting the engine (Fig. 10)
- Danger of poisoning!
- Only use the fuel pump "primer" when the engine is cold!
- Starting the engine when cold
- When the engine is "cold":
- Starting the engine when warm
- The product was stopped for less than 15-20 minutes.
- When the engine is "warm":
- Adjusting the engine speed (Fig. 10)
- Shutting the engine off
- Emergency stop procedure
- Normal procedure
- Operation of the petrol leaf blower
- Danger of injury
- Operation of the petrol leaf vacuum
- Notes:
- Emptying the collection bag (15) (Fig. 8)
- Remove blockage
- Working instructions
- When used as a petrol leaf blower
- When used as a petrol leaf vacuum
- Cleaning and maintenance
- Cleaning
- Cleaning the leaf blower
- Cleaning the leaf vacuum
- Maintenance
- Maintenance plan
- Maintenance of the air filter (4b) (Fig. 11)
- Risk of damage!
- Spark plug maintenance (5b) (Fig. 12)
- Fuel filter maintenance
- Carburettor setting maintenance
- Storage and transport
- Danger of injury and burning!
- Preparation for storage
- Transport
- Repair and ordering spare parts
- Important note in the case of repairs
- Ordering spare parts
- Service information
- Disposal and recycling
- Notes for packaging
- Fuels and oils
- Troubleshooting
- EU Declaration of Conformity
- Translation of the original Declaration of Conformity Manufacturer:
- EU directives:
- Applied standards:
- Conformity assessment procedure:
- 2000/14/EG\_2005/88/EC - Appendix: V
- 2016/1628/EU
- Documentation authorised representative:
- Sommaire
- Remarque :
- Indice
- Indicazione:
- Inhoudsopgave
- Aanwijzing:
- Índice
- Directivas UE:
- Diretivas UE:
Brand : SCHEPPACH
Model : ASB26BE
Category : Blower