
Haarlem - Child bike seat Luvion - Free user manual and instructions
Find the device manual for free Haarlem Luvion in PDF.


| Product type | Rear child bike seat |
| Brand | Luvion |
| Model | Haarlem |
| Recommended age | 9 months to 5 years |
| Maximum supported weight | 22 kg |
| Maximum child height | 110 cm |
| Safety standard | EN 14344:2022 |
| Mounting type | On seat tube (diameter 28-40 mm) or on luggage carrier (width 120-159 mm, min. capacity 27 kg, standard ISO 11243:2016) |
| Bike compatibility | Bikes 24", 26", 28" (round frame only, not square, triangular or carbon fiber frame) |
| Restraint system | Adjustable 5-point harness |
| Footrests | Height adjustable, with retaining straps |
| Quick release | Self-locking bracket with red button release |
| Safety strap | Front strap to attach to seat post |
| Finger guard | Provided to cover seat springs |
| Rear reflector | Must remain visible after installation |
| Maintenance and cleaning | Warm soapy water only |
| Materials | Plastic, metal |
| Spare parts | Contact Luvion customer service |
| Repairability | Do not modify the seat; in case of crack or degradation, replace |
Frequently Asked Questions - Haarlem Luvion
User questions about Haarlem Luvion
0 question about this device. Answer the ones you know or ask your own.
Ask a new question about this device
Download the instructions for your Child bike seat in PDF format for free! Find your manual Haarlem - Luvion and take your electronic device back in hand. On this page are published all the documents necessary for the use of your device. Haarlem by Luvion.
USER MANUAL Haarlem Luvion
natural_image
Black and white photo of a child's backrest seat with LUVION branding, showing seat, straps, and connector (no text or symbols on main body)EN Thank you for purchasing the LUVION® Baby Bike Seat Haarlem. With this instruction manual you have all the information to quickly start using your LUVION® product. Please preserve this guide for further reference.
natural_image
Black and white photo of a bicycle seat with visible frame, legs, and seatbelt (no text or symbols)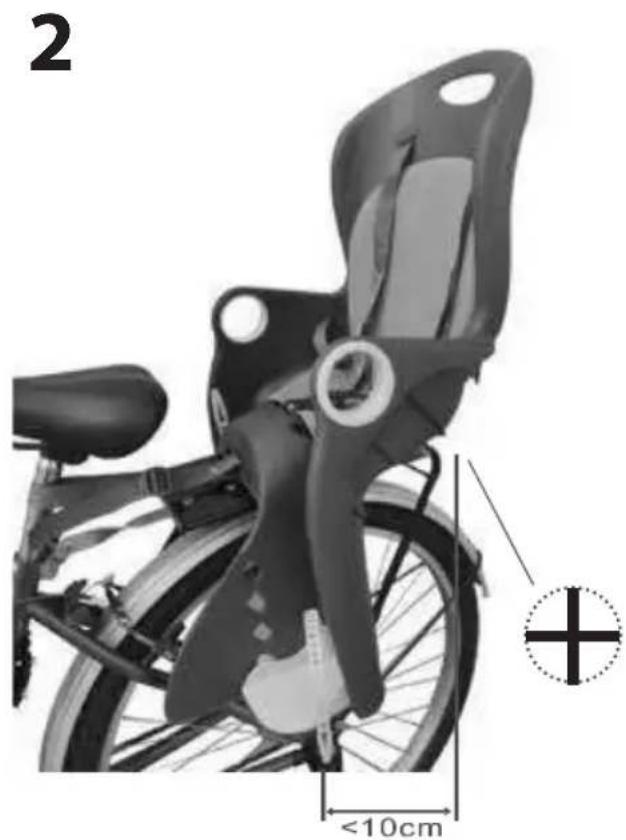
text_image
2 <10cmtext_image
3 Ø28-40mm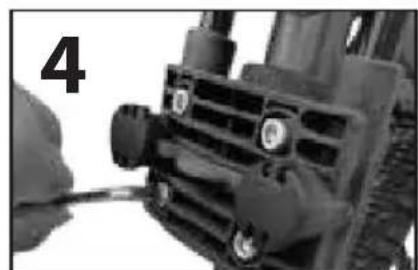
natural_image
Close-up of a vehicle's front grille and engine compartment, no visible text or symbols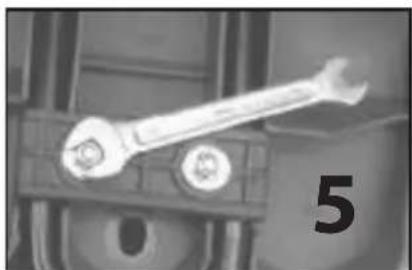
natural_image
Close-up of a wrench gripping a mechanical component, labeled with the number 5 (no text or symbols on the wrench itself)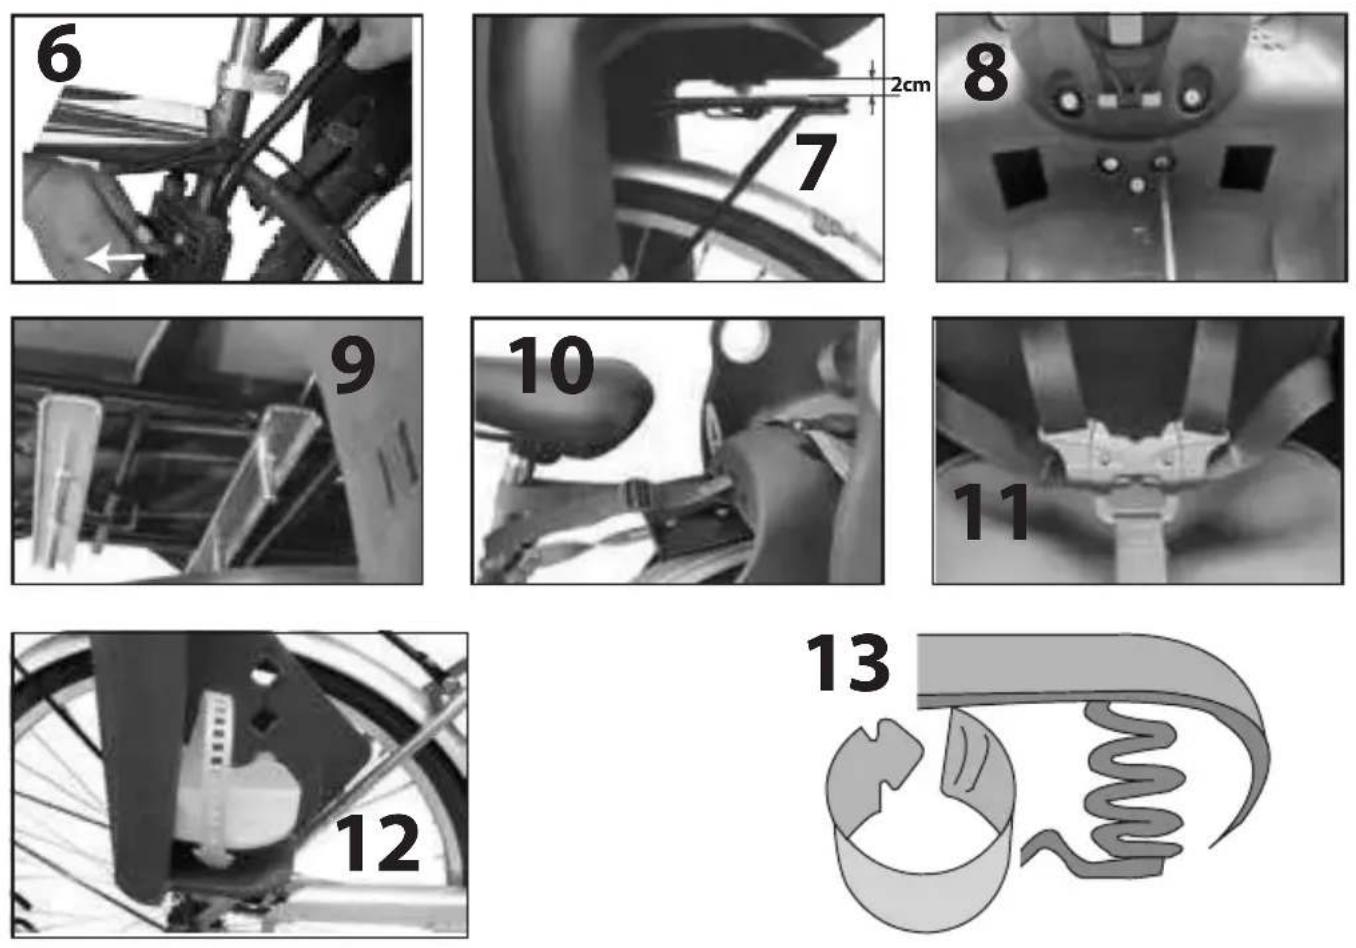
IMPORTANT - READ CAREFULLY AND KEEP FOR FUTURE REFERENCE.
WARNING
FAILURE TO COMPLY WITH THE MANUFACTURER'S INSTRUCTIONS CAN LEAD TO SERIOUS INJURY OR DEATH OF THE PASSENGER/RIDER!
GENERAL
- Do not attach additional luggage to the child seat. Any extra load is best attached to the front end of the bicycle.
- Do not modify the product in any way.
• The cycle could behave differently with a child in the seat. Particularly with regard to balance, steering and braking. - Never leave the cycle parked with a child in the child seat unattended.
- For any form of crack or if the surface starts to deconstruct, this indicates that the life of the child seat has been reached and it should be replaced. A professional shall be contacted in case of doubt.
• Always check the surface temperature of the product before any use.
• Always ensure that the head of your child is supported in reclined position.
• This child seat is not suitable for use during sporting activities. - Before each ride, ensure the mounted seat does not interfere with braking, pedaling, or steering of the bicycle.
- Do not allow any of the child's body, clothing, shoe laces, or toys to come in contact with moving parts of the bicycle.
- A rear reflector that complies with current regulations must be visible whether the seat is on the bicycle or not.
• The load of a child seat may lessen the stability and alter the riding characteristics of the bicycle, particularly regarding steering and braking. - Do not use the seat if any part is broken.
- The bicycle to which the seat is attached must be in good working order.
• Additional luggage or accessories should not be attached to the child seat, as they may exceed the load limit and may lessen the stability. Total load limit for the seat is 22kg.
INSTALLATION
Make sure your bicycle is compatible with this child seat. If you have any questions, please check the information supplied with the bicycle, or ask the bicycle dealer or manufacturer.
Make sure the bracket screws and attachment points are fully tightened, and check them frequently.
This product is not suitable for use on a moped.
For optimum comfort and safety, make sure that the child seat does not slope forwards, risking the child to slide out of it.
The backrest of the seat should slope backwards slightly.
Check that all parts of the bicycle function correctly with the child seat mounted.
FRAME MOUNTED
Mount the seat as is described in the instruction manual. Pay attention to maximum and minimum measurements.
Cannot be mounted on bicycles with square, triangular or carbon fibre frames.
REAR SEATS FOR ATTACHMENT TO A LUGGAGE CARRIER
Check the product manual for maximum width of the luggage carrier.
Mount the seat as is described in the instruction manual. Pay attention to maximum and minimum measurements.
Only mount the child seat to a luggage carrier that conforms to ISO 11243:2016 and has a load capacity of minimum 27 kg.
This child seat cannot be mounted on bicycles with a luggage carrier that does not have straight and parallel sides.
Fasten the safety strap to the bicycle frame according to instruction.
Additional retention system shall always be fastened.
USE
This product is approved for children from 9 months up to 5 years old, with a weight of 9-22 kg (20-48.5 lb) and max height of 110 cm (43.3 inch). Do not carry a child that is too young, and always consult a pediatrician before transporting a child younger than 1 year. Carry only children that are able to sit unaided for a longer period of time, at least as long as the intended cycle journey. Regardless of age, the child must be able to hold his/her head up while wearing a correctly sized bicycle helmet. Check regularly that the child does not exceed the maximum height and weight.
Carefully consider the stability/balance when installing the child into the seat on the bicycle.
Before each use, check all screws and attachment points to ensure that the child seat is securely fastened to the bicycle. When riding for the first time with the child bike seat fitted - test ride the cycle in a safe/quiet environment before riding on the street.
During the ride, make sure both you and the child wears an EN 1078:2012 + A1:2012 compliant bicycle helmet.
Pay attention to your child on a regular basis during the ride.
Never leave the child unattended in the seat.
Never leave the child in the seat when the bicycle is parked and supported only by a kickstand.
Never ride the bicycle at night without adequate lighting. Do not cover the rear reflectors or rear light when using the child seat on a bicycle.
The presence of a child bike seat may require you to change the way you get on/off the bicycle. Please pay extra attention to this.
Before each ride, ensure the mounted child bike seat does not interfere with braking, pedalling or steering.
Always use the harness, and make sure you fasten it correctly round the child. Ensure the harness and footstraps are not loose or could become trapped in moving parts such as wheels. This also applies when you are using the bicycle without a child in the child seat.
Make sure the child's clothes, shoes, toys or body parts do not come into contact with any moving parts of the bicycle, such as wheels, wires and saddle springs. Check this regularly as the child grows. Saddle springs can be covered with a suitable spring guard.
Ensure there are no sharp objects within reach of the child, e.g. frayed cables.
The seated child often needs warmer clothes than the rider does. To protect you both from unexpected rain it is wise to carry waterproof clothing. Never ride in inclement or hazardous conditions, such as cold weather that could cause the child to suffer frostbite.
Check the temperature of the seat before seating the child, especially on hot, sunny days.
Remove the child seat when transporting the bicycle on a car. Air turbulence might damage the child bike seat or loosen its fastening, which could result in an accident.
Before use, check whether there are any national laws and regulations specific to carrying a child in a child bike seat.
The manufacturer is not liable for damages arising from use beyond what is recommended in this owner's manual.
MAINTENANCE
To clean the child seat, only use lukewarm soapy water.
If any part of the child seat is damaged or broken, please contact customer service.
Complying with European Standard EN14344:2022
Fixing position: Bicycle rear seat (a bicycle rear rack is necessary)
Suitable for: 24", 26", 28" bicycles and for children aged 1–5 years
Max loading: 22 kg
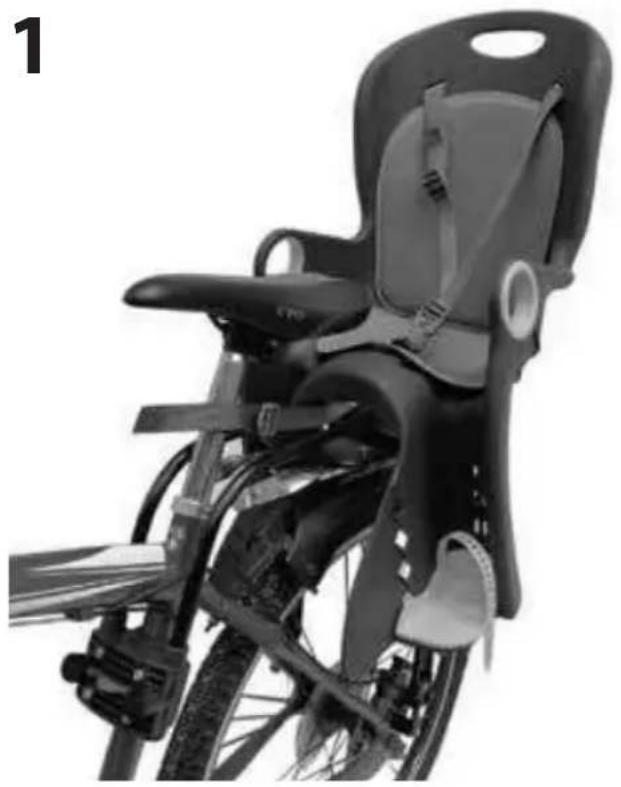
Feature: Equipped with a quick-release auto-lock bracket; two installation options (see pictures 1 and 2)
natural_image
Black and white photo of a bicycle front seat with visible seats, legs, and support brackets (no text or symbols)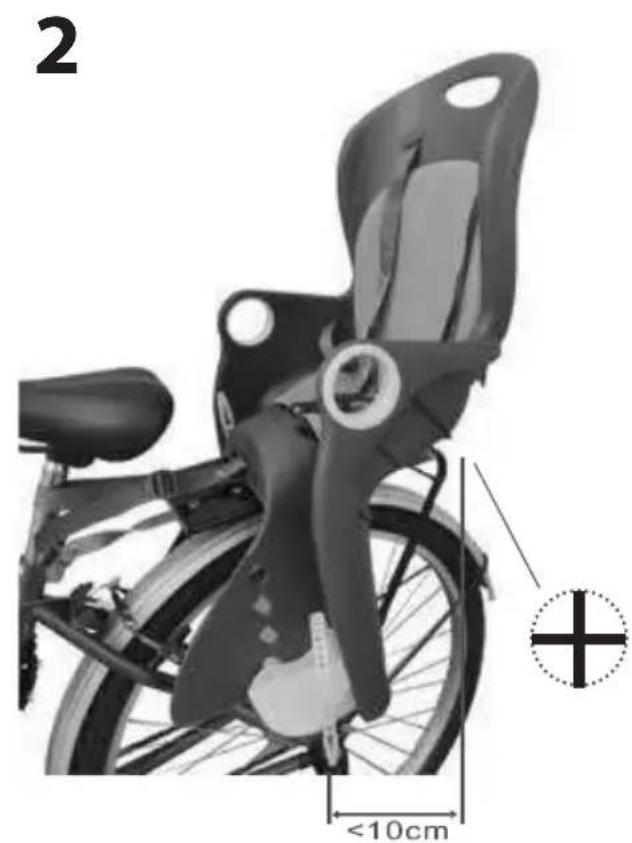
text_image
2 <10cmThe child seat should be installed behind the cyclist. There are two installation options (see pictures 1 and 2).
The child seat is suitable for 24"-28" bicycles.
For improved safety, install the seat as far forward as possible. The seat should not lean forward—it is better if it leans slightly backward.
The installation steps are as follows:
Installing the seat on the saddle post using the metal elbow tube and plastic bracket.
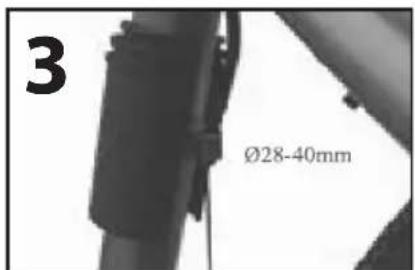
The saddle post should be round, with a diameter between 28–40mm:
Remove the screws from the plastic auto-lock bracket. Select the appropriate size plastic bush to fit the saddle post:
For saddle posts over 36mm in diameter, use a half bush to protect the paint.
For 36mm, use one bush.
For 32mm, use two bushes.
For 28mm, use three bushes (see picture 3).
If there is a shift cable on the bike, align it with the opening of the plastic bush to ensure the cable fits into the groove and functions properly. Tighten the screws using an Allen (hex) key to secure the bracket (picture 4).
Securely attach the metal elbow tube to the underside of the child seat (picture 5).
text_image
3 Ø28-40mm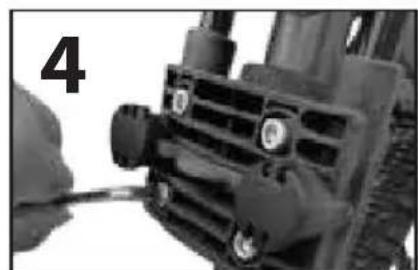
natural_image
Close-up of a vehicle's front grille and engine compartment, no visible text or symbols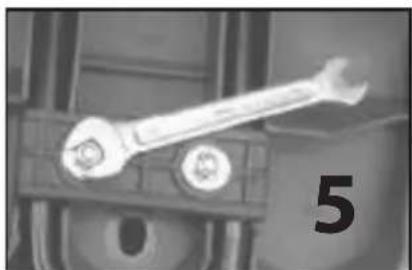
natural_image
Close-up of a wrench gripping a mechanical component, with the number 5 visible on the side (no text or symbols on the wrench itself)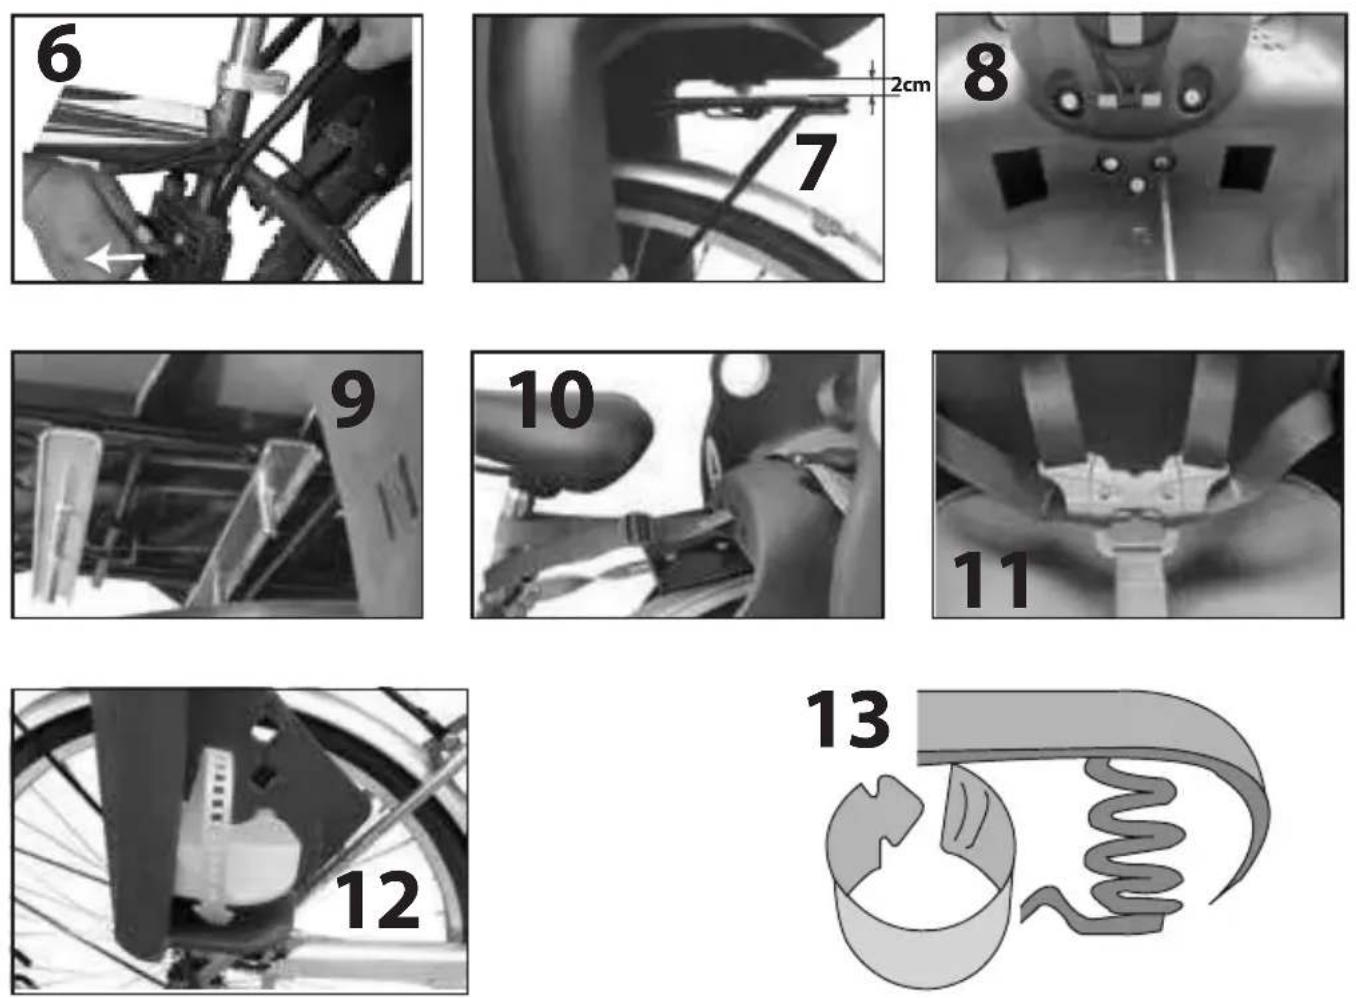
Insert the metal elbow tube into the plastic auto-lock bracket until it reaches the bottom. The auto-lock system will lock it in place. Try pulling the tube upward—if you hear a "click" and it does not come out, it is locked. If it can still be pulled out, reinsert it. To remove the seat, press and hold the red button while pulling the tube out (picture 6). Check the space between the child seat and rear rack—ensure a 1.5–2 cm gap to avoid scratching during bumps (picture 7).
Fasten the front safety belt of the child seat to the saddle tube (picture 10).
Place your child in the seat and adjust the 5-point safety harness. It should be snug, not too tight or too loose (picture 11).
Adjust the pedal position according to the child's leg length. Fix the pedals firmly into the side holes and secure the straps—again, not too tightly or loosely (picture 12).
Mounting the seat on the rear luggage rack.
The seat is suitable for a luggage rack with a width of 120-159 mm:
Attach the seat using 2 steel straps and 4 screws.
Place the seat on the rear carrier rack. The center of gravity of the child seat should not exceed 10cm behind the rear wheel axis (picture 2). There is a gravity center mark “⊕” on the side of the child seat.
Insert the 4 screws into the holes in the seat (picture 8).
Position the 2 steel straps under the rack and align the screws with the holes. Tighten all screws securely (picture 9).
Seat your child, adjust the 5-point harness, and lock it securely (pictures 2 & 11). Do not fasten too tightly or too loosely.
Adjust the pedals according to the child's leg length. Fix them in place and tie the foot straps—again, not too tight or loose (picture 12).
After completing installation, regularly check that the seat is securely mounted and that the bike operates properly.
Always keep the front safety belt fastened around the saddle post for safety (picture 10).
If your rear saddle has spiral springs or similar structures, use the included plastic finger protector to prevent injury (picture 13).
IMPORTANT - À LIRE ATTENTIVEMENT ET À CONSERVER POUR CONSULTATION ULTÉRIEURE.
AVERTISSMENT UNE UTILISATION NON CONFORME AUX INSTRUCTIONS DU PROPRIÉTAIRE PEUT PROVOQUER DES BLESSURES GRAVES, VOIRE MORTELLES, POUR L'ENFANT OU LE CYCLISTE!
GÉNÉRALES
natural_image
Black and white photo of a bicycle front seat with visible seats, legs, and support brackets (no text or symbols)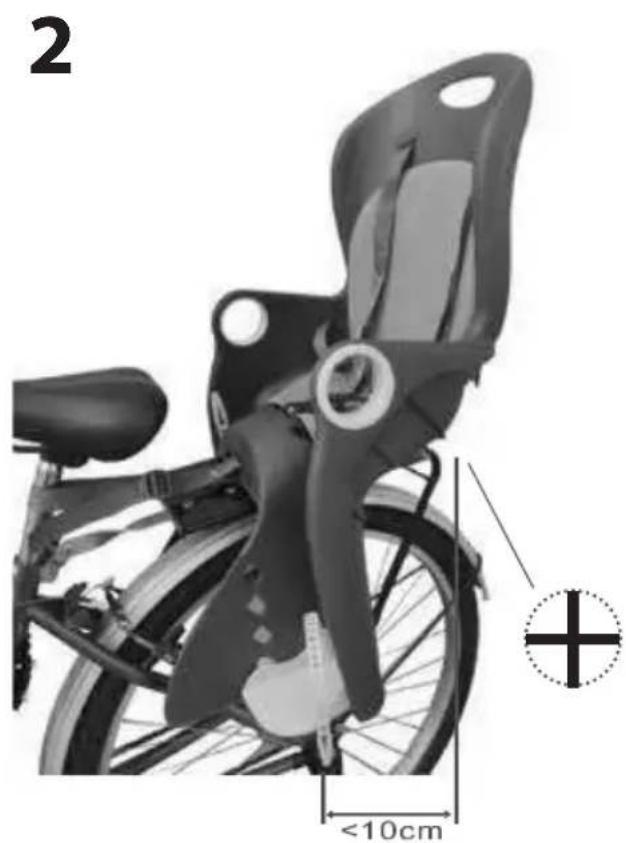
text_image
2 <10cmtext_image
3 Ø28-40mm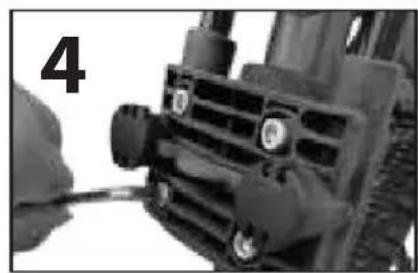
natural_image
Close-up of a vehicle's front grille and side-mounted sensors, no visible text or symbols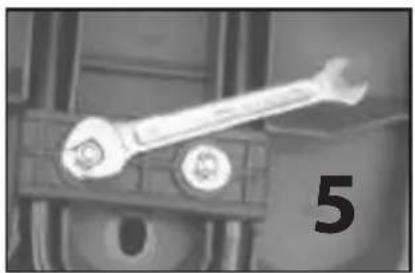
natural_image
Close-up of a wrench tool with two circular buttons, mounted on a mechanical bracket (no visible text or symbols)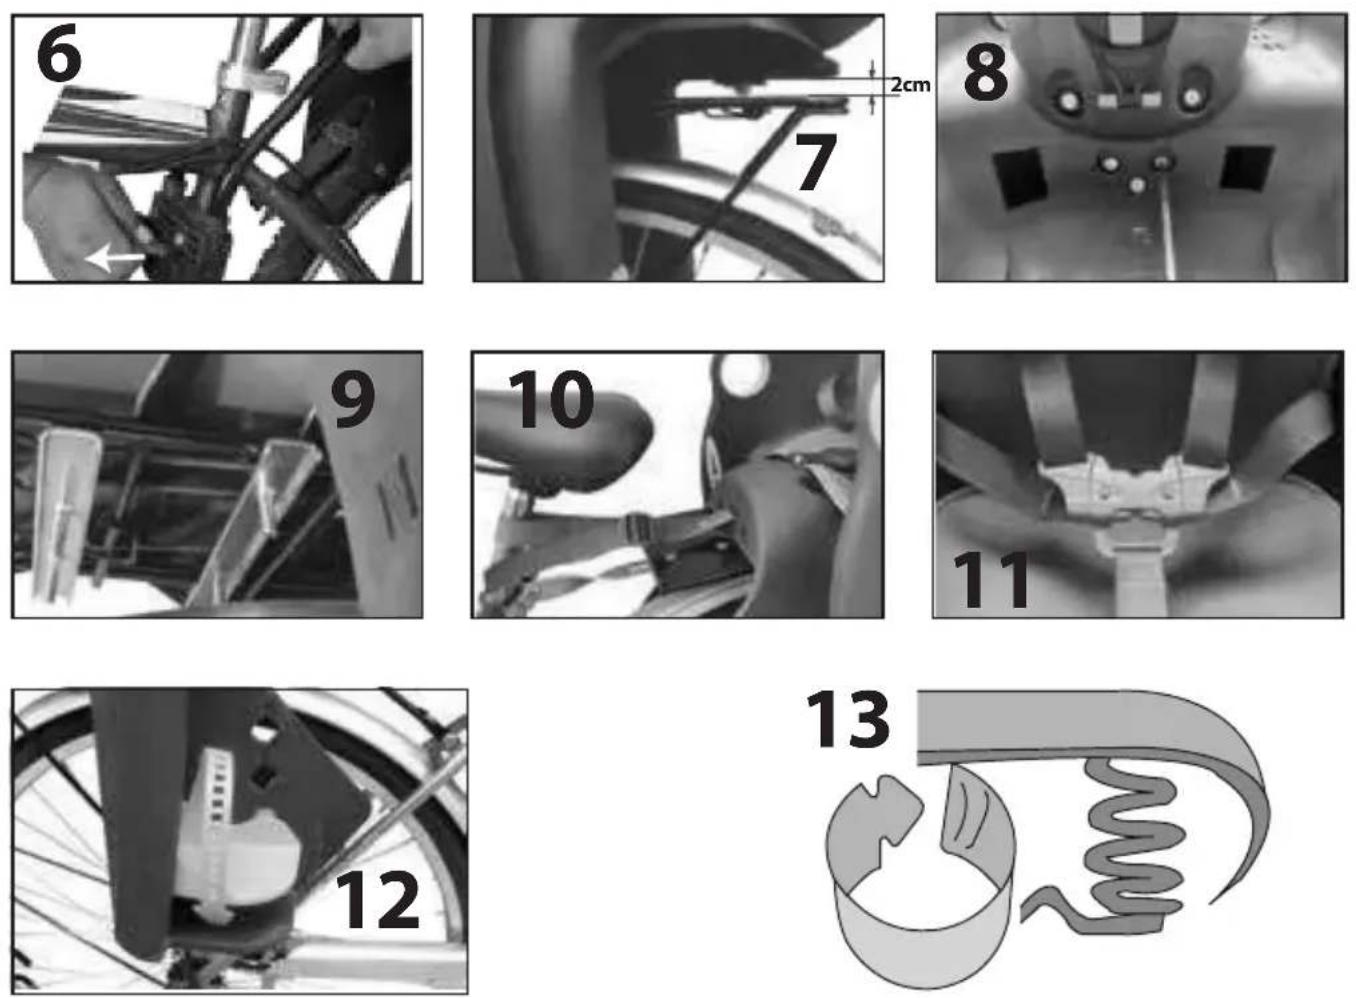
natural_image
Black and white photo of a bicycle front seat with visible seats, legs, and support brackets (no text or symbols)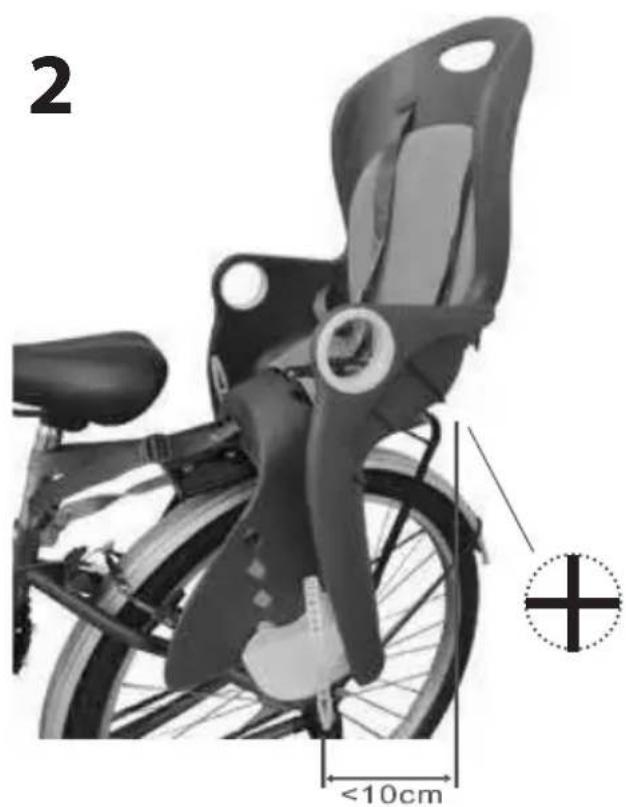
text_image
2 <10cmtext_image
3 Ø28-40mm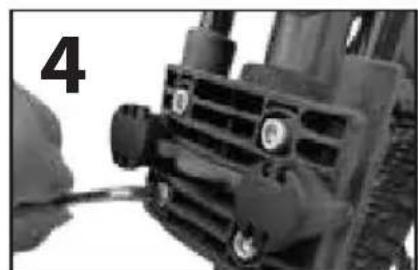
natural_image
Close-up of a vehicle's front grille and engine compartment, no visible text or symbols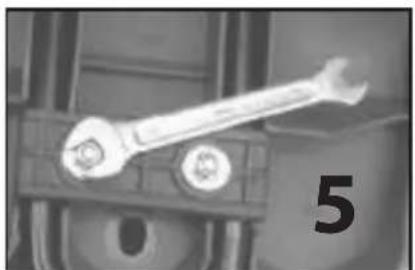
natural_image
Close-up of a wrench resting on a mechanical component, labeled with the number 5 (no text or symbols on the wrench itself)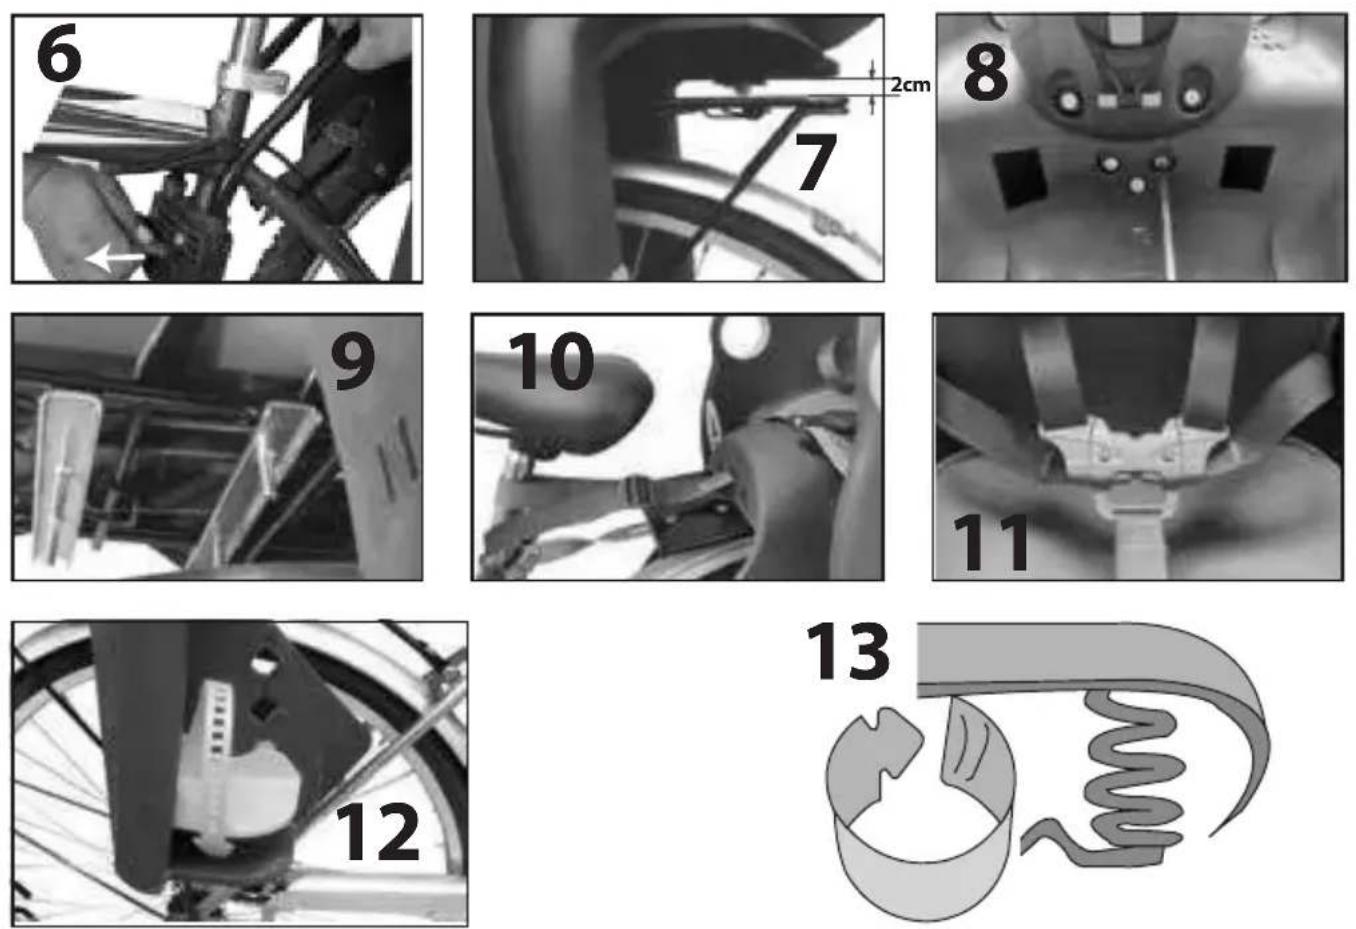
Delft, The Netherlands
Visit us on www.Luvion.com