
YT-09206 - Stapler Yato - Free user manual and instructions
Find the device manual for free YT-09206 Yato in PDF.

| Brand | Yato |
| Model | YT-09206 |
| Product type | Pneumatic stapler |
| Weight | 1.45 kg |
| Air connection diameter | 6.3 mm (1/4") |
| Supply hose inner diameter | 10 mm (3/8") |
| Compatible fastener type | Staples and nails |
| Magazine capacity | 100 pieces |
| Fastener length | 16 to 40 mm |
| Maximum working pressure | 0.8 MPa (8 bar) |
| Recommended working pressure | 0.4 - 0.8 MPa |
| Sound pressure (L_nA) | 86.3 dB(A) ± 2.5 |
| Sound power (L_nA) | 99.3 dB(A) ± 2.5 |
| Vibration (a_h) | 2.2 m/s² ± 0.89 |
| Power supply | Compressed air |
| Trigger mode | Single sequential trigger |
| Recommended lubrication | SAE 10 oil |
| Recommended safety equipment | Safety glasses, hearing protection |
| Regular maintenance | Clean and lubricate before each use |
Frequently Asked Questions - YT-09206 Yato
User questions about YT-09206 Yato
0 question about this device. Answer the ones you know or ask your own.
Ask a new question about this device
Download the instructions for your Stapler in PDF format for free! Find your manual YT-09206 - Yato and take your electronic device back in hand. On this page are published all the documents necessary for the use of your device. YT-09206 by Yato.
USER MANUAL YT-09206 Yato
natural_image
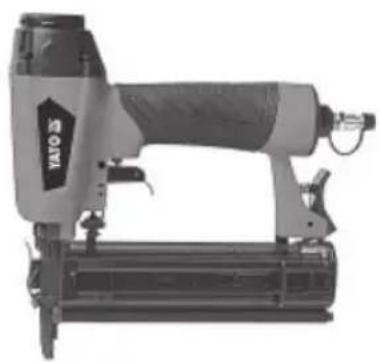
Exterior view of a YATO N1940 rice cooker (no text or symbols visible)YT-09205
natural_image
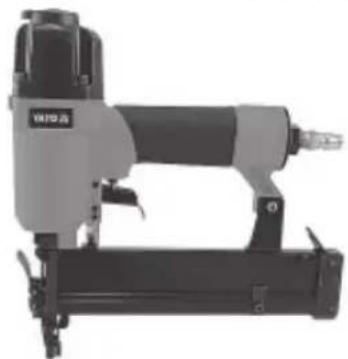
Exterior view of a VATO N1400 electric drill press (no text or symbols visible)YT-09206
natural_image
Exterior view of a Hitdo kit (no visible text or symbols)CE
natural_image
Close-up of a mechanical tool with a metallic handle and threaded connector (no visible text or symbols)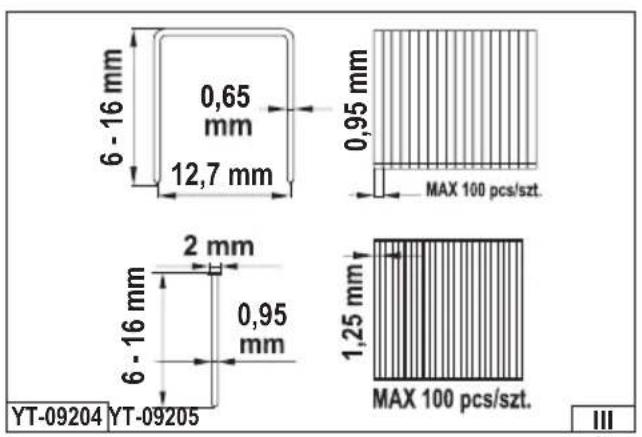
natural_image
Close-up of mechanical components with textured surfaces, no visible text or symbols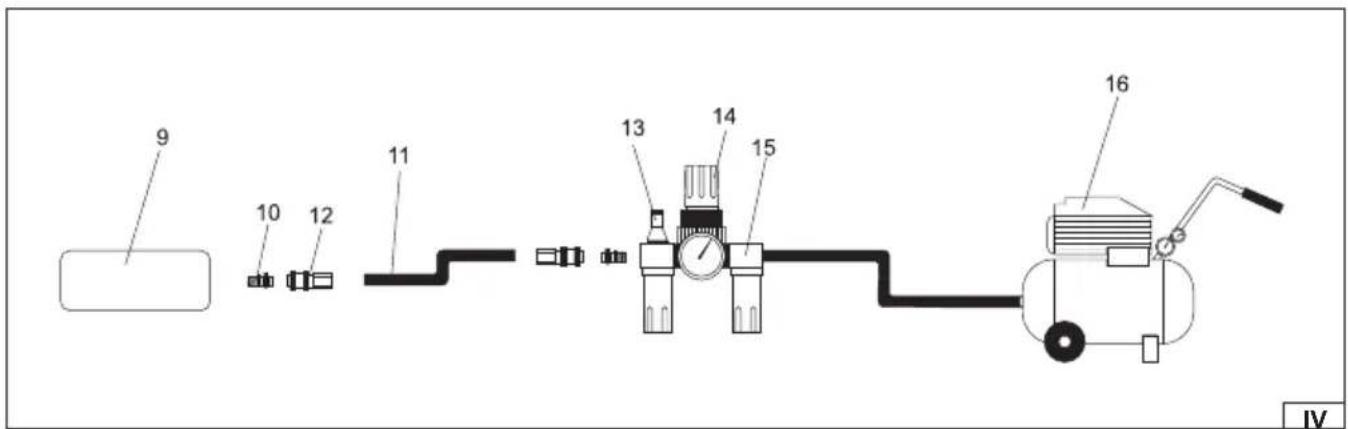
natural_image
Hand holding a UHF98 electric drill press tool (no visible text or symbols)PL
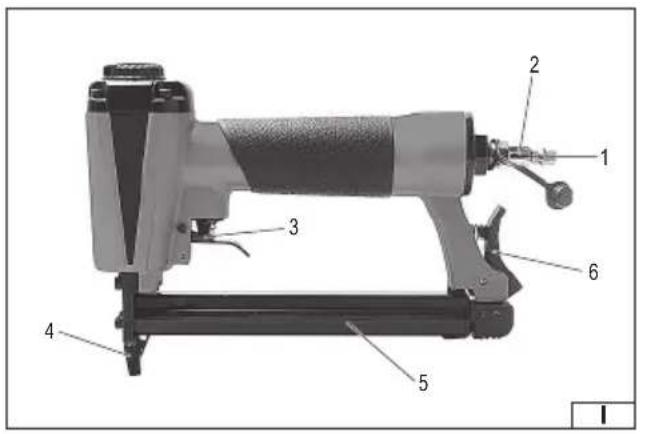
- air inlet
- air inlet connection
- trigger
- safety device
- dispenser
6 .snap fastener of the dispenser - tool
- hose socket
- hose
- hose connection
- lubricator
- reducer
- filter
- compressor
DE
Read the operating instruction
Wear protective goggles
Wear hearing protectors
Do not use the trip operating mode when making a contact to close crates and boxes and fit transport safety systems on trailers and load beds. Always use the tool in safe working areas. Exercise caution when changing the driving point.
The pneumatic nailing machine is a device that is powered with a stream of compressed air at the correct pressure. By means of nails and stitches it facilitates tasks consisting in connecting elements. The correct, reliable and safe functioning of the machine depends upon proper operation, therefore:
Before any work may be commenced with the machine, it is indispensable to read the whole manual and keep it.
The supplier cannot be held responsible for any damage and injuries caused in a result of using the machine in a manner that does not correspond to its designed purpose, not observing safety regulations and the recommendations specified in the present instruction. Using the machine in a manner that does not correspond to its designed purpose will also result in cancellation of the guarantee, and so is the case in the event of incompliance with the contract.
EQUIPMENT
The nailing machine is equipped with a connector that facilitates its connection to a pneumatic system.
TECHNICAL DATA
| Parameter Unit of measurement Value | ||||
| Catalogue number YT-09204 YT-09205 YT-09206 | ||||
| Libra [kg] 0,83 1,1 1,45 | ||||
| Air connection diameter (PT) [mm / ”] 6,3 / 1,4 6,3 / 1,4 6,3 / 1,4 | ||||
| Air supply hose diameter (internal) [mm / ”] 10 / 3/8 10 / 3/8 10 / 3/8 | ||||
| Type of fasteners staples / nails staples / nails | staples / nails | |||
| Hopper capacity | [pcs] | 100 100 100 | ||
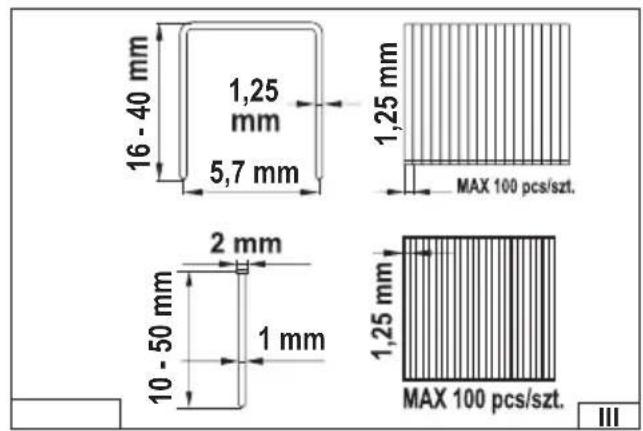
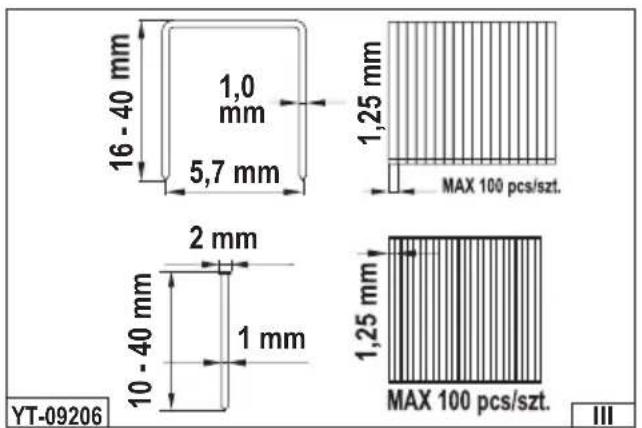
| Length of fasteners | [mm] | 6 - 16 | 16 - 40 | 16 - 40 |
| Dimensions of fasteners | drawing III | drawing III | drawing III | |
| Maximum working pressure p_smax | [MPa] | 0,8 | 0,8 | 0,8 |
| Recommended working pressure | [MPa] | 0,4 - 0,8 | 0,4 - 0,8 | 0,4 - 0,8 |
| Sound pressure (EN 12549) L_pA ± K_pA | [dB(A)] | 87,8 ± 2,5 | 91,4 ± 2,5 | 86,3 ± 2,5 |
| Sound power (EN 12549) L_pA ± K_pA | [dB(A)] | 100,8 ± 2,5 | 104,4 ± 2,5 | 99,3 ± 2,5 |
| Vibrations (EN ISO 8662-11) a_i ± K | [m/s2] | 3,0 ± 1,5 | 6,3 ± 1,5 | 2,2 ± 0,89 |
GENERAL SAFETY PRINCIPLES
Keep your fingers away from the trigger when not using this tool and when changing your working position.
Several hazards. Read and understand the safety instructions before connecting, disconnecting, loading, operating, maintaining, changing accessories, or working near the tool. Failure to follow the instructions may cause serious bodily injuries.
Keep all parts of the body, such as arms and legs, etc. away from the ejection direction of the fastener and make sure that the fastener cannot pierce the workpiece and drive into the body parts.
When using the tool, remember that the fastener may bounce and cause injury.
Hold the tool with a fi rm grip and be prepared to handle the kickback.
Only technically qualified operators should use the tool for driving fasteners.
Do not modify the tool for driving the fasteners. Modifications may reduce the effectiveness of safety measures and increase the risk for the operator or a bystander.
Do not dispose of the safety instructions.
Do not use the tool if it has been damaged.
Exercise caution when operating the fasteners, especially during loading and unloading, as the fasteners have sharp points that can cause injuries.
Always check the tool for damaged, poorly connected or worn parts before use.
Do not overreach. Use only in a safe working area. Always maintain the right posture and balance.
Keep unauthorised persons away (when working in an area where people are likely to pass). Visibly mark your working area.
Never point the tool at yourself or others.
Wear only gloves that provide adequate sensation and safe control of the triggers and any adjusting devices.
Always use an additional handle (if supplied).
Projectile hazard
The fastener driving tool should be disconnected when unloading fasteners, making adjustments, removing jams, or changing accessories.
EN
During operation, ensure that the fasteners are correctly inserted into the material and cannot be deflected/ejected towards the operator or bystanders.
Contaminants may be released from the workpiece and the fastening/sorting system during operation.
Always wear impact-resistant eye protection with side guards when operating the tool.
The operator assesses the risk for others.
Exercise caution when using tools that do not come into contact with the workpiece, as they can be accidentally activated and injure the operator or bystanders.
Ensure that the tool is always securely attached to the workpiece and cannot slip off.
Operation hazards
Hold the tool correctly: be ready to handle normal or sudden movements such as kickback.
Maintain a balanced and stable body posture.
Wear suitable protective glasses. It is recommended to use appropriate gloves and protective clothing.
Wear appropriate hearing protection.
Use the correct energy source according to the instructions.
The tool can only be used to drive fasteners into surfaces and materials made of wood or wood-based materials. It is forbidden to use the tool to drive fasteners into hard materials such as metal, concrete or other materials of similar hardness.
When working on vehicles or mobile platforms, always apply safety measures to prevent injuries and hazards for the operator and bystanders. It is forbidden to work when vehicles or platforms are in motion.
The tool operates in trip operating mode at the time of contact. This means that the fastener is driven when the tool is in contact with the workpiece while the trigger is pressed. When working with the continuously pressed trigger, pay particular attention to the driving point of the fastener. Do not rush and observe that the driving point of the fastener is not a hard material from which the fastener can bounce. Take particular care not to drive the fastener into the body. This operating mode should not be used for closing crates and boxes and for fitting transport safety systems on trailers and load beds.
Hazards related to repetitive movements
When using the tool, the operator should adopt an appropriate but ergonomic posture. Maintain a stable posture and avoid uncomfortable or unbalanced positions.
If the operator experiences symptoms such as persistent or recurrent discomfort, pain, pulsation, tingling, numbness, burning, or stiffness, he should not ignore these warning signs. The operator should consult a qualified health care professional for general advice.
Despite the safe design of the machine, there is a residual risk associated with performing repetitive movements during operation.
Observe the principle that repetitive movements should be performed less than 2 times per minute during operation. The force exerted on the tool must not exceed 250 N for professional use and 184 N for home use. For more detailed information on working hours and forces, see EN 1005-3 and EN 1005-4.
The operator or his employer should carry out a risk assessment of repetitive movements during operation. Every risk assessment should focus on musculoskeletal disorders and be based primarily on the assumption that work fatigue reduction is effective in reducing disorders.
Hazards related to accessories and consumables
Only use fasteners such as staples or nails intended for use with the pneumatic tools. Do not use ordinary nails or staples, even if their sizes fit or can be installed in the tool. Do not use staples in tools adapted only for driving nails. Do not use nails in tools adapted only for driving staples.
Disconnect supply of the tool such as air before changing/replacing accessories, coming into contact with the workpiece or making any adjustments.
Use only sizes and types of accessories that are allowed by the manufacturer.
Use only the lubricants recommended by the tool manufacturer.
The specification of the fasteners should be in accordance with that given in the instructions manual.
Hazards at working area
Slips, stumbles and falls are the main causes of working area injuries. Remember about the slippery surfaces caused by the use of the tool, as well as the dangers of tripping caused by the air hose.
Exercise particular caution in an unfamiliar environment. Hidden hazards, such as electricity or other utility lines, may exist.
The tool is not intended for use in potentially explosive areas and is not insulated against contact with electricity.
Make sure that there are no electric cables, gas pipes, etc. which could pose a risk in the case of damage to the tool.
Hazards related to dust and flue gases
Perform a risk assessment for dust and flue gas hazards. The risk assessment should include the dust generated by the use of the tool and the possibility of existing dust disruption.
Direct the air outlet of the tool so as to minimise dust disturbance in a dusty environment.
In the event of dust or flue gas hazards, the priority is to control them at the point of emission.
EN
Noise hazards
Exposure to high levels of noise when unprotected can cause permanent disability, hearing loss and other problems such as tinnitus (ringing, buzzing, whistling or tooting in ears).
Performance of the risk assessment and the implementation of appropriate control measures for these hazards are necessary.
Appropriate controls to reduce the risk may include measures such as using soundproofing materials to prevent the workpiece from “ringing”.
Use adequate hearing protection.
Operate and maintain the tool in accordance with the guidelines in this instructions manual to prevent an unnecessary increase in the noise level.
If the tool is equipped with a silencer, always make sure that it is in place and in good condition when the tool is used.
Vibration hazards
Check the vibration level of the tool given in the instructions manual. Check the level of vibration acceptable for work in the country where the tool is used. Check the tool regularly for loose connections. Loosely fastened parts of the tool can increase vibrations transmitted to the operator's hands. If it is not possible to further minimise the vibrations of the tool, use shock-absorbing pads for grips or personal protective equipment that will reduce the vibrations transmitted to the operator's hands, e.g. special gloves. Before starting work, it is necessary to perform a risk assessment and implement appropriate controls.
Vibration exposure may result in damage to the nerves and the blood circulation in the hands and the arms.
Wear warm clothes when working at low temperatures and keep your hands warm and dry.
In case of experiencing numbness, tingling, pain or seeing that the fingers or palms get pale, consult a qualified occupational health professional for general advice.
Operate and maintain the tool in accordance with the guidelines in this instructions manual to prevent an unnecessary increase in the vibration level.
Hold the tool with a light but safe grip as the risk of vibration is generally greater when the grip force is greater.
Additional safety instructions for pneumatic tools
Compressed air may cause serious injuries.
Always close the air supply and disconnect the tool from the air supply when not in use.
Always disconnect the tool from the compressed air supply before changing accessories, performing adjustments or repairs and when moving to another working area.
Keep your fingers away from the trigger when not using the tool and when changing your working position.
Never point the compressed air at yourself or anyone else.
The sudden, unexpected movement of the hoses can cause serious injuries. Always check for damaged or loose hoses or fittings.
Never carry the pneumatic tool holding it by the hose. Never pull the pneumatic tool holding it by the hose.
When using pneumatic tools, do not exceed the maximum operating pressure Ps max.
Pneumatic tools should only be supplied with compressed air at the lowest pressure required in the work process to reduce noise, vibration and wear.
The use of oxygen or flammable gases to operate pneumatic tools poses fire and explosion hazards.
Exercise caution when using pneumatic tools, as the tool may cool down, affecting the grip and control.
CONDITIONS OF OPERATION
It is indispensable that the source of compressed air permits generating of the appropriate working pressure. Should the pressure of the fed air be too high, it is necessary to use a reducer with a safety valve. The pneumatic device must be supplied with compressed air through a filter and lubricator system. It will guarantee both cleanliness and lubrication of the air with oil. The conditions of the filter and the lubricator must be revised between each use and, if necessary, clean the filter or replenish oil in the lubricator. It will guarantee appropriate operation of the machine and prolong its durability.
It is only allowed to use in the tools only those connecting elements that are specified in the manual. The tool which is used to drive connecting elements and the connecting elements specified in the manual are considered to constitute a single system from the point of view of safety.
In order to connect the tool to the pneumatic system, it is recommended to use snapping connections, and the tool itself should have a non-sealing screwed connector, so that after the tool has been disconnected, there is no remaining air in it.
The tool must not be supplied with oxygen or other inflammable gases.
Tools should be connected solely to such a supplying system in which it is not possible to exceed the pressure by more than 10% of the maximum value. In case there are higher pressures, it is necessary to apply a reduction valve with a safety valve.
The tools may be repaired solely with original spare parts, which are specified by the manufacturer or their representative. Repairs should be realised by experts who are authorised by the manufacturer. ATTENTION! Experts are meant to be persons who in a result of a professional training or experience have sufficient knowledge regarding machines used to drive connecting elements and have sufficient knowledge of appropriate industrial safety regulations, accident prevention regulations, directives and general technical regulations (e.g. CEN and CENELEC), in order to guarantee safe working conditions for the tools whose purpose is to drive connecting elements.
EN
Racks supporting the tools which are installed, for example, in the working table should be designed and manufactured by the producer of the racks in a manner which guarantees safe installation of the tool, in accordance with its purpose and in a manner that prevents its damage, deformation or movement.
Maintenance of the tool is only possible using the lubricants specified in the manual.
Tools designed to drive connecting elements with contact actuation or constant contact actuation which are marked with the symbol „Do not use on scaffolds or ladders” must not be used to certain purposes. For example, if a change of the position where the connecting elements are driven requires using scaffolds, stairs, ladders or constructions that resemble ladders, e.g. roof rules, to close boxes or cages, to fasten transport safety systems, e.g. in vehicles and wagons.
The specified noise values are characteristic values for the tool and they do not apply to the noise emitted in the location of their operation. The noise emitted in the location of their operation will be dependent e.g. upon the working environment, the processed object, the support of the processed object. Depending upon the working conditions at the workstation and the shape of the processed object, it is possible it will be necessary to apply individual means of noise reduction, such as placing of the processed objects upon noise reducing supports, pressing or covering of the processed objects. Regulation of the pressure to the minimum value that is sufficient to perform the task. In special cases, it is necessary to wear hearing protections.
The specified values of vibrations are characteristic for the tool and they do not reflect manual action upon the tool during its operation. Each manual action upon the tool during operation of the tool will be dependent e.g. upon the strength of the grip, the pressure, the direction of work, adjustment of power supply, the processed object or the support of the processed object.
Before each operation, it is necessary to revise whether the safety device mechanism and the release mechanism function properly and whether all the screws and nuts are tightened.
Do not modify any elements of the machine without previous authorisation issued by the manufacturer.
Do not dismantle any elements of the tool, such as the safety device; do not cause their malfunction.
Do not perform any "emergency repairs" without appropriate tools and equipment.
It is recommended that the tool be subject to appropriate maintenance actions regularly, in accordance with instructions specified by the manufacturer.
Avoid impairment or damage of the machine, e.g. as a result of perforation or engraving, modifications that has not been authorised by the manufacturer, leading upon templates made of hard materials, e.g. steel, dropping or pushing along the floor, using the tool as a hammer, application of excessive strength of any kind.
Do not direct a working tool towards yourself or any other person.
During work, the tool must be held in such a manner that prevents any injuries of the head or the body in the event of a possible rough movement of the tool which might be caused by any disturbance in power supply or by hard parts of the processed object.
Do not start the machine towards empty space. It will permit to avoid a danger caused by freely moving connecting elements and a danger related to excessive stress in the tool.
While carrying the tool, it must be disconnected from the power supply system, particularly when it is necessary to use ladders or to adopt an unusual position. At the workplace, the tool may be carried solely by the handle and it is strictly prohibited to carry it with the trigger pressed.
Give consideration to the conditions at the workplace. The connecting elements may penetrate thin processed objects or slip down the corners or edges of the processed objects and thus be dangerous for persons.
For the purpose of personal safety, use protective equipment, such as hearing or sight protections.
USE OF THE TOOL
Before each use of the tool, make sure that no element of the pneumatic system is damaged. In the case any damage is detected, it must be immediately replaced with a new, undamaged element of the system.
Before each use of the pneumatic system, it is necessary to dry the humidity condensed inside the tool, compressor and the conduits.
Connection of the tool to the pneumatic system
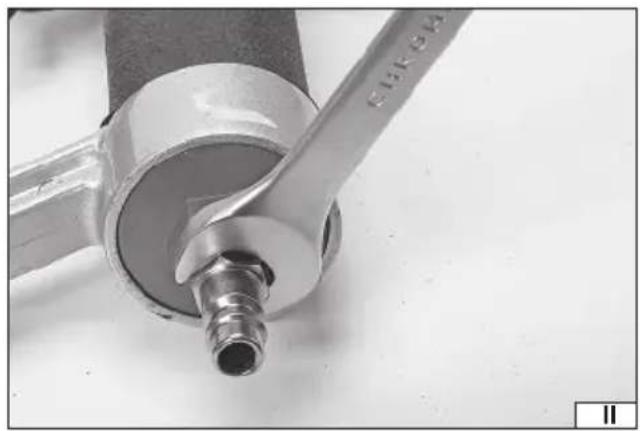
Insert few drops of oil of SAE 10 viscosity, to air inlet.
Screw in proper tip to the thread of air inlet the that allows connecting air supply hose, tightly and securely (II).
Make sure that the tool magazine is empty, if not, empty it. This will allow avoiding the risk caused by accidentally ejected fasteners.
Figure shows the recommended method of connecting the tool to pneumatic system. Method presented will ensure the most effective use of tool and will also prolong its service life (IV).
Connect the tool to pneumatic system using a hose with internal diameter shown in the table. Make sure the strength of hose is at least 1,38 MPa.
If the product features the ability to change the direction of air outlet, direct it away from the human body. Prolonged exposure to a stream of compressed air can lead to a cooling of place reached by the stream of compressed air, which can cause serious injuries.
Check the correctness of connection and operation by applying the tool outlet to a piece of wood or wood-based material and by pressing the trigger once or twice.
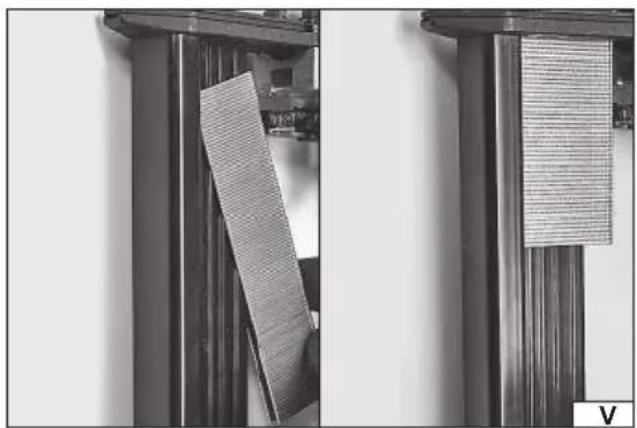
Filling the magazine (V)
Note! The magazine should be filled only when the product is disconnected from the compressed air supply.
Only fasteners listed in the user manual may be used.
EN
When filling, hold the tool in such a way that the outlet is not directed towards the user or towards others.
When filling, do not hold your finger on the trigger.
Press the magazine latch and pull out the pusher.
Insert the package of fasteners and push in the pusher so that it pushes fasteners towards the face of magazine and then it is secured with a latch.
Do not use different types and/or different sizes of fasteners in one magazine cartridge.
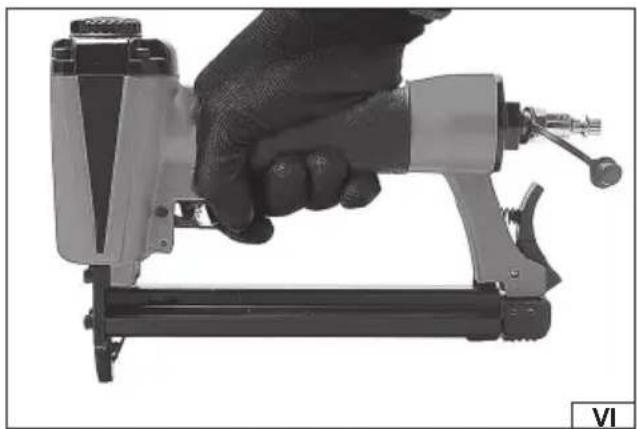
Working with product
The product has a single sequential start system. This means that after applying the product to starting place, only a single operation is started after pulling the trigger. Subsequent nailing operations can only be carried out after the trigger returns from the neutral position and has been pulled again.
Press the tool in the nailing area and pull the trigger (VI).
If the fastener has been nailed too deep, reduce the pressure in the system every 0,05 MPa until the desired effect is achieved. If the fastener protrudes from the workpiece, increase the pressure in the system every 0,05 MPa until the desired effect is achieved. Do not exceed the maximum pressure for the device.
It is recommended to apply at work the lowest possible pressure, which will save energy, reduce noise, reduce tool wear and increase work safety.
MAINTENANCE
Never use petrol, solvents or other inflammable liquids to clean the tool. The fumes may ignite and cause an explosion of the tool and serious injuries. Solvents used to clean the handle of the tool and its body may cause softening of the sealing. Dry the tool thoroughly before the work is commenced.
In case of any irregularities in the operation of the tool, it must be immediately disconnected from the pneumatic system.
All the elements of the pneumatic system must be protected from contamination. The contamination in the pneumatic system may damage the tool and other elements of the pneumatic system.
Maintenance of the tool before each use
Disconnect the tool from the pneumatic tool.
Before each use, it is necessary to place a small amount of maintenance liquid (e.g. WD-40) in the air inlet.
Connect the tool to the pneumatic system and set it in motion for approximately 30 seconds in order to distribute the maintenance liquid inside the tool and clean it.
Disconnect the tool from the pneumatic tool again.
Place a small quantity of SAE 10 oil inside the tool through the air inlet and special holes. It is recommended to use SAE 10 oil designed for maintenance of pneumatic tools. Connect the tool and set it in motion for a while.
Attention! WD-40 may not be used as the proper lubricating oil.
Wipe off the excess of oil which comes out of the outlet openings. The remaining oil may damage the sealing of the device.
Other maintenance actions
Before each use of the tool, it is necessary to check whether there are any signs of damage of the tool. Drivers, tool holders and spindles must be kept clean.
Every six months or after 100 hours of operation, the device must be revised by qualified personnel in a repair shop. If the tool has been used without the recommended air supply system, then it is necessary to increase the frequency of such controls.
Repairs
Operation of the machine must be interrupted immediately if any defects have been detected. Work with a defective machine may cause injuries. All repairs or replacements of the elements of the tool must be realised by qualified personnel in an authorised repair shop.
| Damage | Possible solution |
| The air blown out of the slots at the top of the tool or around the trigger | Check whether the screws are not loosened. Check the condition of the sealing. |
| The tool does not start or works slowly | The compressor does not guarantee the appropriate air supply. Connect the device to a more efficient compressor. Insufficient lubrication. Check the condition of the sealing. |
| Frequent jamming of the tool. | Incorrect or damaged connecting elements. The dispenser is dirty and does not guarantee appropriate supply of connecting elements. |
| Insufficient power | Make sure the hoses have the correct internal diameter which must correspond at least to the value specified in the table. Check the adjustment of pressure; it must be set to the maximum acceptable value. Make sure the tool has been properly cleaned and lubricated. If the problem persists send the tool for repair. |
EN
Once the functioning has been concluded, the casing, ventilation slots, switches, additional handle and protections must be cleansed with a stream of air (at a pressure not exceeding 0.3 MPa), with a brush or a cloth without any chemical substances or cleaning liquids. Tools and handles must be cleansed with a clean cloth.
Worn tools are recyclable waste – it is prohibited to dispose of them throwing them away along with domestic waste, since the tools contain substances that are harmful for people and the environment! We ask for your active assistance in economic management of natural resources and protection of the natural environment by sending the tools to a worn tools disposal point. In order to reduce the quantity of waste that is disposed if, it is necessary to recycle them.
CHARAKTERISTIK DES WERKZEUGES
DEKLARACJA ZGODNOŚCI | DECLARATION OF CONFORMITY DECLARAȚIE DE CONFORMITATE
0225/YT-09204/EC/2025
