SDM 1800 A2 - Steam cleaner SILVERCREST - Free user manual and instructions
Find the device manual for free SDM 1800 A2 SILVERCREST in PDF.

User questions about SDM 1800 A2 SILVERCREST
0 question about this device. Answer the ones you know or ask your own.
Ask a new question about this device
Download the instructions for your Steam cleaner in PDF format for free! Find your manual SDM 1800 A2 - SILVERCREST and take your electronic device back in hand. On this page are published all the documents necessary for the use of your device. SDM 1800 A2 by SILVERCREST.
USER MANUAL SDM 1800 A2 SILVERCREST
No. and in all otherwise
NETTOYEUR VAPEUR 3 EN
(34)
STOOMREINIGER 2 IN 1
公有 113
E SINUS BARBOWA QILY
LAVASUPERICI A YAPORE
(2)
GÖZTISZÍTÓ 3 A7 LREN
PARNÍ ČISTIČ 3 V 1
\$02192M
i
| DATE: 2013 | ||
| S&P 500 index trading | ||
| Page 77 | ||
| 1. US | shares trading | Pages 47 |
| 2. M | stock trading | Shares 97 |
| 3. JP | stock trading | Shares 74 |
| 4. SC | stock trading | Shares 87 |
| 5. DE | to market trading | Pages 100 |
| 6. DE | to stock trading | 24 - 112 |
| 7. F | stock trading | Pages 120 |
| 8. FX | stocks trading | Shares 29 |
DAN SEK & CO
- By, a schedule 1
- DUT (from day
2019年
Model No. 021175023
IAN 485881_2501 IAN 485881_258

图 10 图 20 图 30 图
图5-234
text_image
Technical diagram of a vacuum cleaner with labeled components in Chinese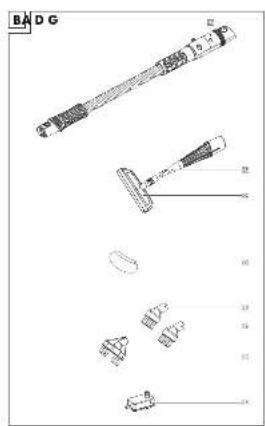
text_image
BADG 12 22 32 42 52 62 72 82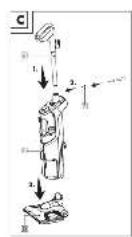
natural_image
Technical line drawing of a mechanical component with an arrow indicating assembly or detail (no text or symbols present)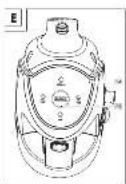
text_image
Technical diagram of a mechanical device with labeled parts H, D, and BIntended use....Page 21
Scope of delivery....Page 21
Parts list Page 21
Technical data Page 21
General safety instructions....Page 22
First use Page 25
Assembly Page 25
Attaching the tube Page 25
Attaching the vacuum nozzle....Page 25
Installing the mop pad....Page 25
Assembly of the handheld steamer Page 26
Operation Page 26
Filling the water tank Page 26
Switching on. Page 27
Adjusting the steam intensity Page 28
Switching off....Page 28
Cleaning and maintenance Page 28
Cleaning. Page 28
Maintenance Page 29
Storage Page 29
Disposal Page 29
Warranty Page 30
Warranty claim procedure....Page 30
Service Page 31
19GB/IE
| List of pictograms usedThe following warnings are used in this user manual and on the packaging: | |||
 | DANGER! - Designating a hazard with high risk, which will result in death or severe injury if not avoided (e.g. risk of suffocation) |  | Alternating current/voltage |
 | Hertz (supply frequency) | ||
 | WARNING! - Designating a hazard with moderate risk, which can result in death or severe injury if not avoided (e.g. risk of electric shock) |  | Watt |
| IPX4 | Protection against water splashes | ||
 | CAUTION! - Designating a hazard with low risk, which could result in minor or moderate injury if not avoided (e.g. risk of scalding) |  | INFO: This symbol in combination with “Info” provides additional useful information. |
 | NOTICE! - Warns of possible damage to property/the product if not avoided (e.g. risk of short circuit) |  | Danger - risk of electric shock! |
 | Warning - danger of scalding! |  | Washable at 40 °C |
 | Do not use bleach Do not tumble dry |  | |
 | Do not iron Do not dry clean |  | |
 | CE mark indicates conformity with relevant EU directives applicable for this product. |  | Safety informationInstructions for use |
3-IN-1 STEAM CLEANER
Introduction
We congratulate you on the purchase of your new product. You have chosen a high quality product. The instructions for use are part of the product. They contain important information concerning safety, use and disposal. Before using the product, please familiarise yourself with all
of the safety information and instructions for use. Only use the product as described and for the specified applications. If you pass the product on to anyone else, please ensure that you also pass on all the documentation with it.
20 GB/IE
Intended use
This product is designed for cleaning indoor surfaces. Do not use the product for any other purpose.
This product is only intended for private household use, not for commercial purposes.
The manufacturer accepts no liability for damages caused by improper use.
- Scope of delivery
After unpacking the product, check if the delivery is complete and if all parts are in good condition. Remove all packing materials before use.
1 3-in-1 Steam cleaner
2 Mop pad
1 Hose
1 Concentration nozzle
1 Squeegee nozzle
1 Small cloth
1 Metal brush
1 Plastic brush
1 Grout brush
1 Water filter
1 Short manual
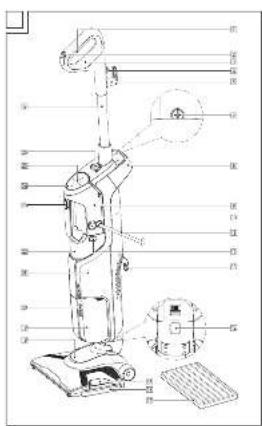
Parts list
Fig. A
| 1 | Handle steam trigger |
| 2 | Vacuum power switch |
| 3 | Handle |
| 4 | Cord clip |
| 5 | Handle cord clip |
| 6 | Tube |
| 7 | Screw |
| 8 | Lifting handle |
| 9 | Handheld steamer |
| 10 | Power switch (I/O) |
| 11 | Mains cord with mains plug |
| 12 | Water tank release button |
| 13 | Mainframe cord clip |
| 14 | Vacuum nozzle release button |
| 15 | Tray release button |
| 16 | Tray |
| 17 | Mop pad |
| 18 | Vacuum nozzle |
19 Dirt bin
20 Dirt bin release button
21 Mainframe
22 Water tank
23 (handheld steam trigger button)
24 Control panel
25 STEAM REGULATION (steam adjustment button)
26 Handheld steamer release button
Fig. B
Accessories
| 27 | Hose |
| 28 | Concentration nozzle |
| 29 | Squeegee nozzle |
| 30 | Small cloth |
| 31 | Metal brush |
| 32 | Plastic brush |
| 33 | Grout brush |
| 34 | Water filter |
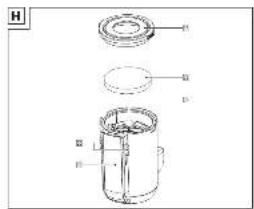
Fig. H
| 35 | Filter unit lid |
| 36 | Sponge |
| 37 | Filter unit cover |
- Technical data
| Input voltage: 220-240 V | ~,50-60 Hz |
| Power consumption: 1,800 W | |
| Power consumption(steam function): 1,200 W | |
| Power consumption(off mode): 0.0 W | |
| Water tank capacity: | 340 ml |
| Protection class: | I |
| Ingress protection: | IPX4 |

General safety instructions
BEFORE USING THE PRODUCT, FAMILIARISE YOURSELF WITH ALL OF THE SAFETY INFORMATION AND INSTRUCTIONS FOR USE! WHEN PASSING THIS PRODUCT ON TO OTHERS, ALSO INCLUDE ALL THE DOCUMENTS!
In the case of damage resulting from non-compliance with these operating instructions the warranty claim becomes invalid! No liability is accepted for consequential damage! In the case of material damage or personal injury caused by incorrect handling or non-compliance with the safety instructions, no liability is accepted!
Children and persons with disabilities

WARNING! RISK OF LOSS OF LIFE OR ACCIDENT TO INFANTS AND CHILDREN!
Never leave children unsupervised with the packaging material. The packaging material represents
a danger of suffocation.
Children frequently underestimate the dangers.
Always keep children away from the packaging material.
This product can be used by persons with reduced physical, sensory or mental capabilities or lack of experience and knowledge if they have been given supervision or instruction concerning use of the product in a safe way and understand the hazards involved.
■ Children shall not play with the product.
■ Cleaning and user maintenance shall not be made by children without supervision.
- Keep the product and its mains cord out of reach of children when it is energized or cooling down.
Intended use

WARNING! Risk of
injury! Use this product solely in accordance with these instructions. Do not attempt to modify the product in any way.
■ Use the product only on floors that have been well sealed and treated and are impervious to water.
22 GB/IE
—With any steam power setting: on marble, stone, tile flooring —With lowest steam power setting and with damp mop pad 17: on laminate, parquet or hardwood flooring
- Never use the product -on untreated or permeable floors, -on wax polished furniture or floors, -on carpets with wool content, -on the frozen windows, -on leather, synthetic fabrics, velvet or other delicate, -on steam sensitive materials.
- Be careful when using the product on glass under cold environment, as the glass may break.
■ Use on waxed or some unwaxed floors may result in diminished glossiness.
■ The product can only be used on glass panes that are at least room temperature. Do not use on exterior panes/windows in sub-zero temperatures.
■ Before use: We recommended to perform a material test on an isolated area of the working surface.
Electrical safety
⚠️ DANGER! Risk of electric shock! Never attempt to repair the product yourself. In case of malfunction, repairs are to be conducted by qualified personnel only.
⚠ WARNING! Risk of electric shock! Do not immerse the product's electrical components in water or other liquids. Never hold the product under running water.
⚠ WARNING! Risk of electric shock! Never use a damaged product. Disconnect the product from the mains supply and contact your retailer if the product is damaged.
⚠ WARNING! Risk of injury! The product has to be unplugged after use and before cleaning or maintaining the product.
■ Connect the product only to an earthed mains socket.
■ Always make sure that the mains plug is correctly inserted into the mains socket.
The product is not to be used if it has been dropped, if there are visible signs of damage or if it is leaking.
23GB/IE
Before connecting the produBurn hazards
to the mains supply, check that the voltage and current rating corresponds with the mains supply details shown on the product's rating label.
■ Regularly check the mains plug and the mains cord for damages. If the mains cord is damaged, it must be replaced by the manufacturer, its service agent or similarly qualified persons in order to avoid a hazard.
■ Protect the mains cord against damages. Do not let it hang over sharp edges, do not squeeze or bend it. Keep the mains cord away from hot surfaces and open flames and ensure that nobody can pull on or trip over it unintentionally.
■ The product must not be left unattended while it is connected to the mains supply.
■ The liquid or steam must not be directed towards equipment containing electrical components, such as the interior of ovens.
■ The filling aperture must not be open during use.
⚠️ CAUTION! Risk of burns!
Do not touch hot surfaces and beware of escaping steam.
Hold the product by its handle only.
■ Steam is very hot. Never put your hands in front of the steam jet.
Operation
■ Only use the product in dry indoor rooms.
■ The mains plug must be removed from the mains socket before the water tank is filled with water.
The use of extension cords is not recommended. If the use of an extension cord is necessary, it must be designed for a current flow of at least 10 A. Lay cords in such a way that they may not be tripped over or otherwise damaged.
- Do not operate the product with wet hands or while standing on a wet floor. Do not touch the mains plug with wet hands.
■ Stop using the product if the anti-kink protection on the mains cord is damaged!
Cleaning and storage
■ Always turn off the product before disconnecting it from the mains supply.
- Do not pull the mains plug out of the mains socket by the mains cord. Do not wrap the mains cord around the product.
■ Protect the product, its mains cord and mains plug against dust, direct sunlight, dripping and splashing water.
■ Store the product in a cool, dry place, protected from moisture and out of the reach of children.
■ Protect the product against heat. Do not place the product close to open flames or heat sources such as stoves or heating appliances.
- First use
☐ Remove all packaging materials. Check if all parts are complete.
Assembly
- Attaching the tube
Fig. C
① INFO: A cross-head screwdriver is required for these steps.
- Use a cross-head screwdriver to loosen the screw 7. Remove the screw from the tube 6.
-
Connect the tube 6 to the mainframe 21 (Fig. C, step 1).
-
Insert the screw 7. Use a cross-head screwdriver to tighten the screw (Fig. C, step 2).
- Attaching the vacuum nozzle
Fig. C
① INFO: Do not force the vacuum nozzle 18 onto the mainframe 21. Always use both hands while connecting the parts.
- Align the locking hole of the vacuum nozzle 18 with the mainframe 21.
- Push the mainframe 21 into the vacuum nozzle 18 . The vacuum nozzle release button 14 locks in place (Fig. C, step 3).
Adjusting the angle of the vacuum nozzle
☐ Release and lock the vacuum nozzle 18 to adjust the angle:
| Position Instructions | |
| Release 1. | Gently step on the vacuum nozzle 18.2. Pull the mainframe 21 backwards. |
| Lock | 1. Pull the mainframe 21 forward.2. The vacuum nozzle 18 locks in place. |
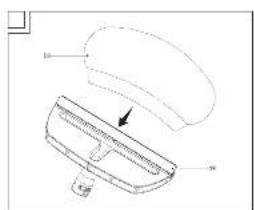
- Installing the mop pad
① INFO: The mop pad 17 is used for wet cleaning of floors.
- Gently step on the tray release button 15. Remove the tray 16 from the vacuum nozzle 18.
- Wrap the mop pad 17 around the bottom of the tray 16.
- Place the tray 16 back on the floor with the mop pad 17 facing downwards.
- Place the vacuum nozzle 18 on top of the tray 16.
- Push the vacuum nozzle 18 down until the tray 16 clicks into place.
25GB/IE
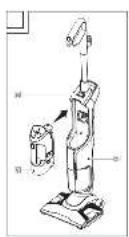
● Assembly of the handheld steamer
Fig. D
Removing the handheld steamer
- Press the handheld steamer release button 26.
- Remove the handheld steamer 9 from the mainframe 21.
Attaching the handheld steamer
- Position the handheld steamer 9 on the mainframe 21.
- Push the handheld steamer 9 into the mainframe 21. The handheld steamer clicks into place.
Installing the hose
i INFO: The hose 27 is useful for hard-to-reach areas.
- Installing the hose 27: Align the release lever with the locking hole of the handheld steamer 9.
- Push the hose 27 into the handheld steamer 9 until it clicks into place.
Installing the concentration nozzle
① INFO: The metal brush 31 is made of copper alloy. Be careful during use not to leave scratches on the cleaning surface.
- Align the release lever of the concentration nozzle 28 with the locking hole of the handheld steamer 9/hose 27.
- Push the concentration nozzle 28 into the handheld steamer 9/hose 27 until it clicks into place.
- Choose the desired accessory:
| Accessory Suggested place of use | |
| 29 Squeegee nozzle | Shower screens, mirrors, glass |
| Accessory Suggested place of use | |
| 29 Squeegee nozzle +30 Small cloth | Sofas, tablecloths, garments |
| 31 Metal brush | Hobs |
| 32 Plastic brush | Hobs, showers, refrigerators |
| 33 Grout brush | Grout lines |
- Place the selected accessory 29/31/32/33 on the concentration nozzle 28.
- Refreshing textiles/garments: Place the small cloth 30 onto squeegee nozzle 29 (Fig. G).
Operation
● Filling the water tank
⚠ WARNING! Risk of electric shock!
Always disconnect the mains plug 11 from the mains socket before filling the water tank 22 .
⚠ NOTICE! Risk of product damage! Fill the water tank 22 with tap water or distilled water without any additives. If your tap water is hard, use distilled water. If the water is moderately hard, mix distilled water and tap water (ratio of 1:1).
i INFO:
The water tank 22 is transparent, so that you can check the water level at all times.
- When the water tank 22 is empty: The product stops to release steam.
☐ Checking the water hardness: Use a test strip or ask the water supplier.
☐ Do not exceed the water tank's 22 maximum capacity of 340 ml.
☐ Restarting operations: Fill the water tank 22 again.
- Remove the handheld steamer 9 from the mainframe 21 (see "Assembly of the handheld steamer").
- Removing the water tank 22 from the handheld steamer 9: Press the water tank release button 12.
26 GB/IE
- Fill the water tank 22 through its filling aperture.
- Push the water tank 22 into the handheld steamer 9 until it clicks into place.
- Switching on
⚠ WARNING! Risk of electric shock!
Switch off the product and remove the mains plug 11 from the mains socket before:
-making any adjustments,
-performing maintenance,
-cleaning the product and
-when the product is not in use.
① INFO: There are 4 different ways to use the product. The product can be used as:
-vacuum cleaner
-steam mop
-vacuum cleaner with steam function
-handheld steamer
- Unwind the mains cord 11 completely.
- Connect the mains plug 11 with a suitable mains socket.
| Use (Accessories) Description | |
| Vacuum cleaner | 1. Press the power switch 10 to the I position.2. Press the vacuum power switch 2 on the handle.3. Begin vacuuming surfaces. |
| Steam mop17 Mop pad | 1. Press the power switch 10 to the I position. ON flashes green on the control panel 24.2. Wait for approx. 30 seconds until ON lights up green.3. Adjust the steam intensity (see “Adjusting the steam intensity”).4. Press and hold the handle steam trigger 1. During use, move the product back and forth to add steam. |
| Vacuum cleaner with steam function17 Mop pad | i INFO: The combined use of steam and suction allows dust to be removed and the floor to be sanitized in a single stroke.1. Press the power switch 10 to the I position. ON flashes green on the control panel 24.2. Wait for approx. 30 seconds until ON lights up green.3. Adjust the steam intensity (see “Adjusting the steam intensity”).4. Press the vacuum power switch 2 on the handle.5. Press and hold the handle steam trigger 1. During use, move the product back and forth to vacuum surfaces while adding steam. |
27GB/IE
| Use (Accessories) Description | |
| Handheld steamer29 Squeegee nozzle30 Small cloth31 Metal brush32 Plastic brush33 Grout brush | ⚠ WARNING! Risk of electric shock! When the product is powered on: Do not point the product towards equipments containing electrical components (such as the interior of ovens). ⓘ INFO: The product needs around 30 seconds to preheat. After preheating, the pump starts operating and with audible sound. The steam runs continuously until the water tank 22 is empty.1. Remove the handheld steamer 9 from the mainframe 21 (see “Assembly of the handheld steamer”).2. Press the power switch 10 to the I position. ⚙ flashes green on the control panel 24.3. Wait for approx. 30 seconds until ⚙ lights up green.4. Adjust the steam intensity (see “Adjusting the steam intensity”).5. Press and hold ⚙ 23. The handheld steamer 9 releases steam. |

Adjusting the steam intensity ^3 .
Remove the mains plug 11 from the mains socket.
Fig. E
① INFO: 3 steam intensities are available.
☐ Setting the steam level based on the intended use: Press STEAM REGULATION 25 one or multiple times:
| Steam intensity | Use |
 | Cleaning parquet and laminate, delicate fabrics, upholstery, sofas and mattresses, etc., steaming plants |
 MEDIUM MEDIUM | Cleaning windows and floors |
 | Removing scaling, stains, grease |

Switching off
i INFO: Off mode: The mains plug 11 is connected to the mains socket and the power switch 10 is in ○ position.
- Press the vacuum power switch 2 on the handle.
- Press the power switch 10 to the ○ position. ON on the control panel 24 goes off.

Cleaning and maintenance

Cleaning
⚠ WARNING! Risk of electric shock!
Before cleaning: Switch off the product. Remove the mains plug 11 from the mains socket.
WARNING! Do not immerse the product's electrical components in water or other liquids. Never hold the product under running water.
⚠ NOTICE! Risk of product damage! Do not use any abrasive, aggressive cleaners or hard brushes to clean the product.
Cleaning the main unit
- Wipe down the product with a slightly damp cloth.
- Do not let any water or other liquids enter the product interior.
- After cleaning: Let all parts dry completely.
Cleaning the accessories
Accessories: 27 to 34
- Clean the accessories in warm, soapy water.
- After cleaning: Let all accessories dry completely.
28 GB/IE
Cleaning the mop pad
■ The mop pad 17 can be cleaned in a washing machine.
□ Wash the mop pad 17 in hot water (up to +40 °C).
☐ Only use non-chlorine bleach when needed.
□ Do not tumble dry.
□ Do not iron.
□ Do not dry clean.
Emptying and cleaning the dirt bin
Fig. H
⚠️ NOTICE! Risk of product damage!
Do not use the product when the dirt bin [19] is not inserted.
① INFO: Clean the dirt bin 19 after each use.
- Press both dirt bin release buttons 20 inwards. Remove the dirt bin 19 from the mainframe 21.
- Pull the sponge 36 and the filter unit lid 35 upwards to remove them from the dirt bin 19.
- Turn the filter unit cover 37 anti-clockwise and pull it out.
- Empty the dirt bin 19.
- Reassemble the dirt bin 19 in reverse order.
- Position the dirt bin 19 on the mainframe 21.
- Push the dirt bin 19 onto the mainframe 21 until it clicks into place.
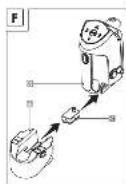
Maintenance
Replacing the water filter
Fig. F
⚠ WARNING! Risk of electric shock!
Switch off the product and remove the mains plug 11 from the mains socket before performing maintenance.
① INFO: If the steam power reduces drastically: Replace the water filter 34.
- Remove the handheld steamer 9 from the mainframe 21 (see "Assembly of the handheld steamer").
- Remove the water tank 22 from the handheld steamer 9 (see "Filling the water tank").
- Remove the old water filter 34: Pull the water filter downwards.
- Position the new water filter 34. Push the water filter down gently. Make sure that the water filter is perfectly inserted.
- Attach the water tank 22 to the handheld steamer 9 (see "Filling the water tank").
Replacement parts/Accessories
Customers can obtain compatible replacement parts and accessories via www.optimex-shop.com.
- Orders can only be placed and processed online.
□ Contact theLidl service hotline (see "Service") for further information.
| Part | |
| 17 | Mop pad |
| 30 | Small cloth |
| 34 | Water filter |
| 36 | Sponge |
Storage
☐ Store the product in the original packaging when it is not in use.
☐ Store the product at a dry location out of the reach of children.
□ Store the product with an emptied water tank 22 only.
□ Evenly roll up the mains cord 11 on the handle cord clip 5 and on the mainframe cord clip 13.
● Disposal
The packaging is made entirely of recyclable materials, which you may dispose of at local recycling facilities.
29GB/IE

Observe the marking of the packaging materials for waste separation, which are marked with abbreviations (a) and numbers (b) with following meaning: 1-7:plastics/20-22: paper and fibreboard/80-98: composite materials.
Product:
The product incl. accessories and packaging materials are recyclable and are subject to extended producer responsibility.
Dispose them separately, following the illustrated Info-tri (sorting information), for better waste treatment.
The Triman logo is valid in France only.

Contact your local refuse disposal authority for more details of how to dispose of your worn-out product.

To help protect the environment, please dispose of the product properly when it has reached the end of its useful life and not in the household waste. Information on collection points and their opening hours can be obtained from your local authority.
Warranty
The product has been manufactured to strict quality guidelines and meticulously examined before delivery. In the event of material or manufacturing defects you have legal rights against the retailer of this product. Your legal rights are not limited in any way by our warranty detailed below.
The warranty for this product is 3 years from the date of purchase. The warranty period begins on the date of purchase. Keep the original sales receipt in a safe location as this document is required as proof of purchase.
Any damage or defects already present at the time of purchase must be reported without delay after unpacking the product.
Should the product show any fault in materials or manufacture within 3 years from the date of purchase, we will repair or replace it – at our choice – free of charge to you. The warranty period is not extended as a result of a claim being granted. This also applies to replaced and repaired parts.
This warranty becomes void if the product has been damaged, or used or maintained improperly.
The warranty covers material or manufacturing defects. This warranty does not cover product parts subject to normal wear and tear, thus considered consumables (e.g. batteries, rechargeable batteries, tubes, cartridges), nor damage to fragile parts, e.g. switches or glass parts.
● Warranty claim procedure
To ensure quick processing of your claim, observe the following instructions:
Make sure to have the original sales receipt and the item number (IAN 485881_2501) available as proof of purchase.
You can find the item number on the rating plate, an engraving on the product, on the front page of the instruction manual (bottom left), or as a sticker on the rear or bottom of the product.
If functional or other defects occur, contact the service department listed below either by telephone or by e-mail.
Once the product has been recorded as defective you can return it free of charge to the service address that will be provided to you.
30 GB/IE
Ensure to enclose the proof of purchase (sales receipt) and a short, written description outlining the details of the defect and when it occurred.

Service

Service Great Britain
Tel.:0800 0569216
E-Mail: owim@lidl.co.uk

Service Ireland
Tel.:1800 200736
E-Mail: owim@lidl.ie

31GB/IE