
DW10 - Dishwasher Duronic - Free user manual and instructions
Find the device manual for free DW10 Duronic in PDF.

| Product Type | Compact Dishwasher |
| Brand | Duronic |
| Model | DW10 |
| Dimensions (W × D × H) | 428 × 425 × 458 mm |
| Power Supply | 220-240 V, 50-60 Hz, 950 W |
| Recommended Water Pressure | 0.04 - 1.00 MPa |
| Water Consumption per Cycle | 5 L |
| Wash Programs | Normal, Eco, Quick, Intensive, Glass, Fruits |
| Cycle Duration | Normal 69 min, Eco 68 min, Quick 29 min, Intensive 89 min, Glass 50 min, Fruits 19 min |
| Drying | 60 min integrated (except Fruits) |
| Wash Temperatures | Normal 55°C, Eco 46°C, Quick 50°C, Intensive 55°C, Glass 55°C, Fruits cold |
| Filling Type | Manual (1.8 L jug included) or direct via inlet hose |
| Capacity (place settings) | Approximately 5-6 place settings (depending on loading) |
| Included Accessories | 1.8 L jug, fruit basket, inlet hose, drain hose, collar |
| Special Functions | Child lock, delayed start up to 18 h |
| Detergent Types | Powder, liquid or tablets for dishwasher |
| Indicator Lights | Tap/tank mode, door open, temperature, drying |
| Maintenance | Regular cleaning of filters and spray arm |
| Safety | Child lock, automatic stop in case of problem |
| Error Code E2 | Drainage problem: check hose and filter |
| Error Code E3 | Overflow: tilt the machine to drain water |
| Intended Use | Indoor domestic use only |
Frequently Asked Questions - DW10 Duronic
User questions about DW10 Duronic
0 question about this device. Answer the ones you know or ask your own.
Ask a new question about this device
Download the instructions for your Dishwasher in PDF format for free! Find your manual DW10 - Duronic and take your electronic device back in hand. On this page are published all the documents necessary for the use of your device. DW10 by Duronic.
USER MANUAL DW10 Duronic
Creative Consumer Products
natural_image
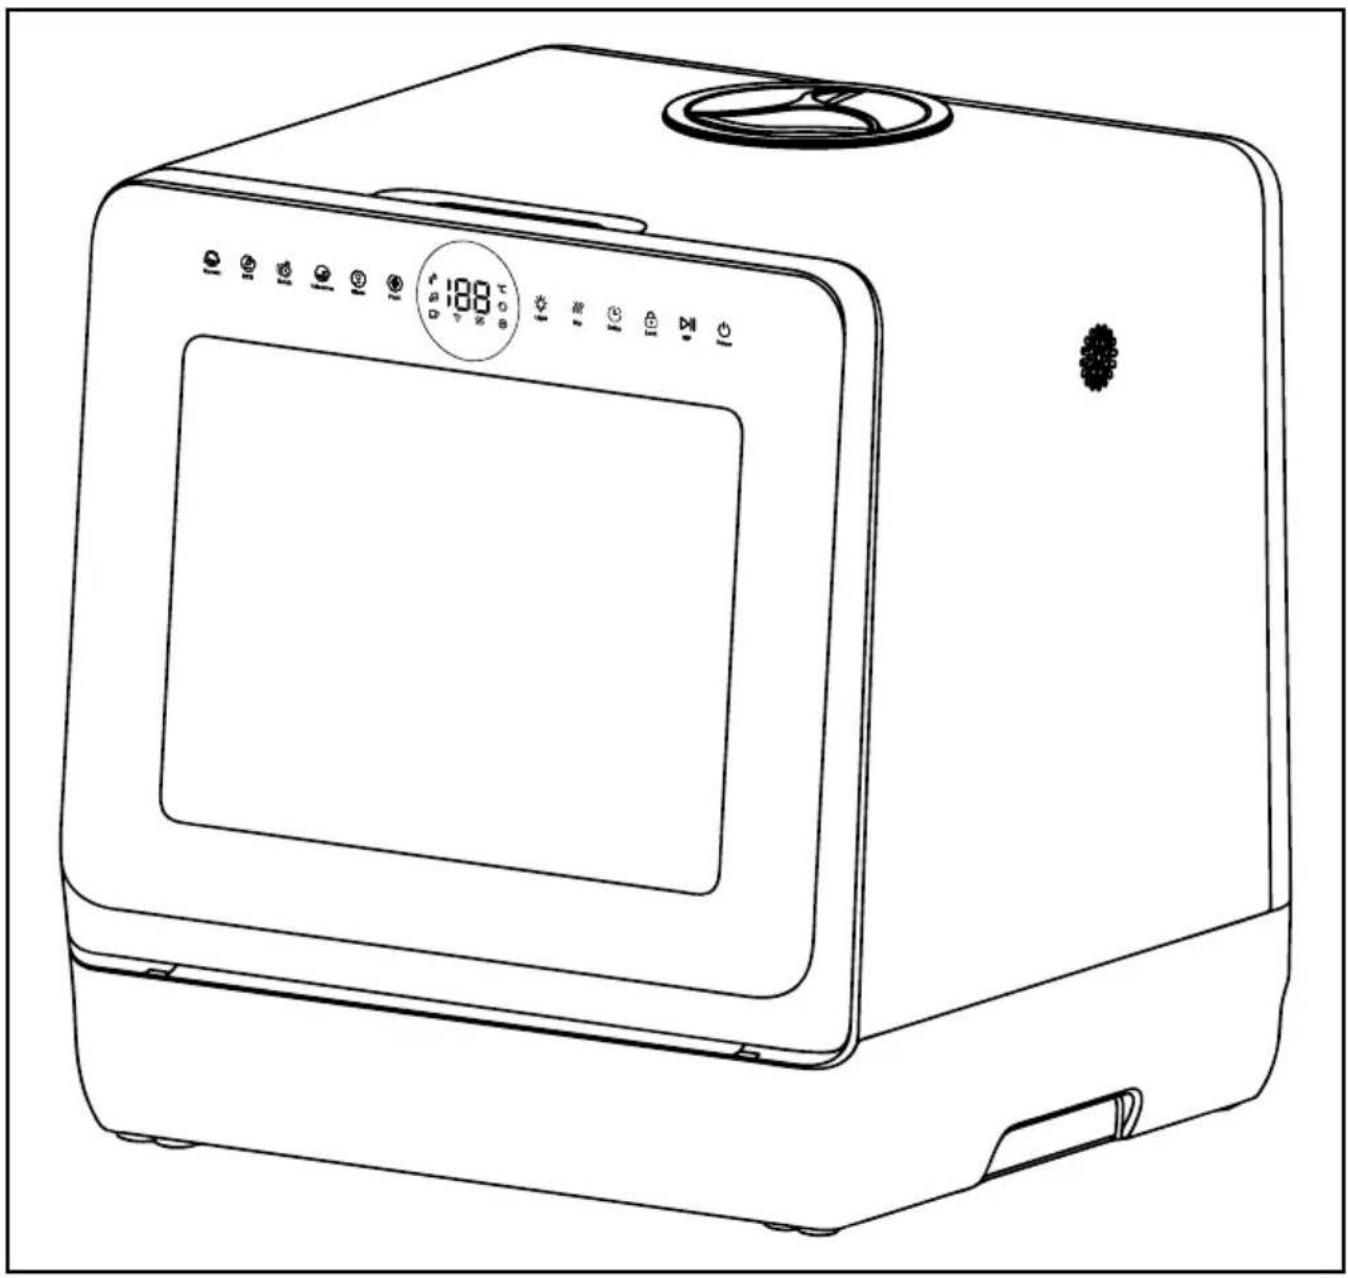
Line drawing of a modern kitchen appliance with digital display and control buttons (no text or symbols)DW5 Dishwasher
PLEASE READ ALL THE INSTRUCTIONS BEFORE USE

duronic.com

duronic

@duronicmedia

Duronic

@duronicmedia
Contents
English Manual 3
Features and Specifications
| Dimensions Inlet | Pressure | Water Consumption | Power Voltage | |
| 428x425x458mm5.6x3x3.7in | 0.04-1.00MPa 5L | 950W | 220-240V50-60Hz |
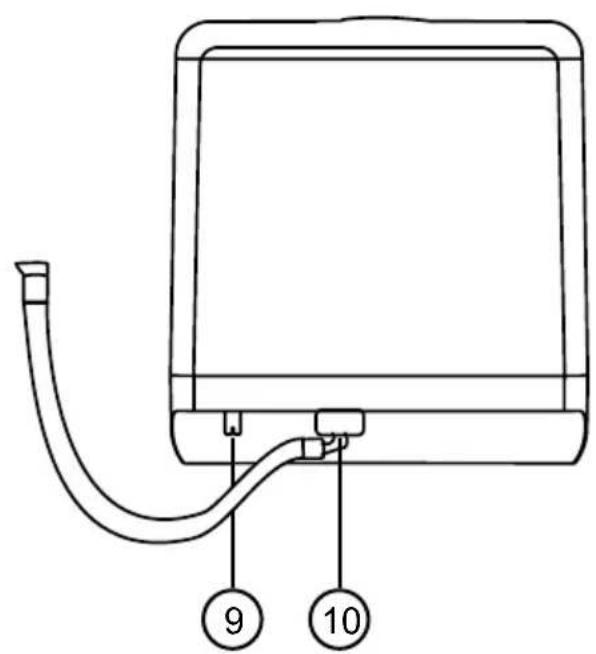
Components
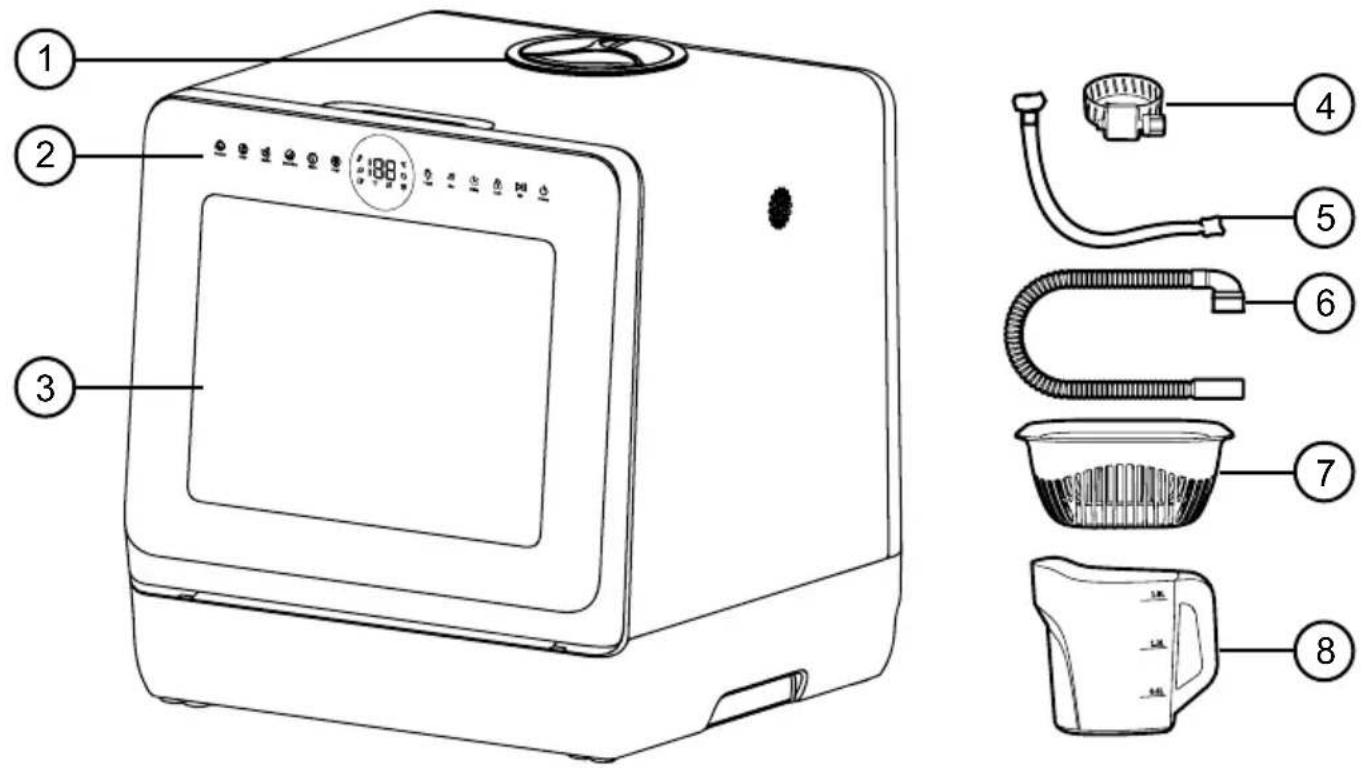

- Manual water inlet
- Control Panel
- Door
- Pipe collar
- Inlet pipe
- Drain pipe
- Fruit basket
- 1.8L jug
- Water outlet
- Direct water inlet
DURONIC
Control Panel
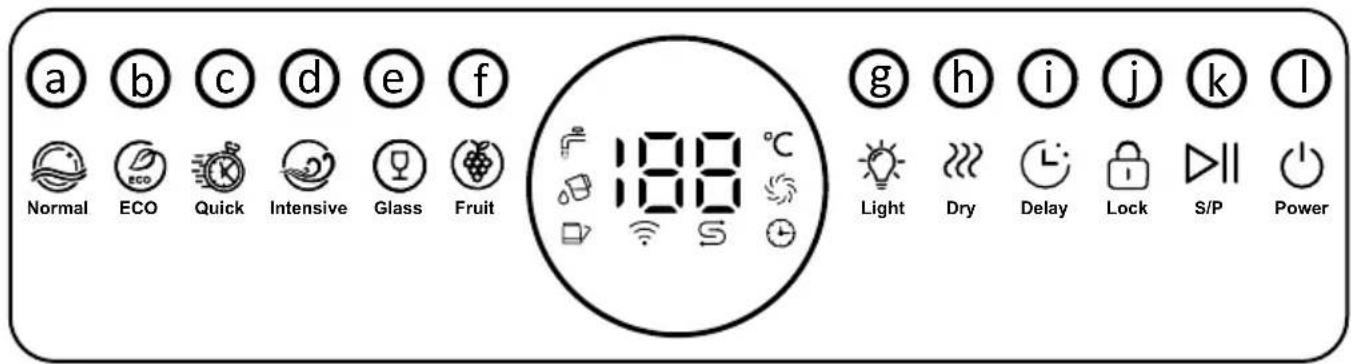
a. Normal wash
b. ECO wash
c. Quick wash
d. Intensive wash
e. Glass wash
f. Fruit wash
g. Light
h. Dry
i. Delay
j. Lock
k. Start / Pause
I. Power
| Washtype | Wash Time | Dry Time | Detergent | Temperature | |
| Wash | Rinse | ||||
| Normal | 69 min | 60 min | 8g | 55° | 68° |
| Eco | 68 min | 60 min | 11g | 46° | 62° |
| Quick | 29 min | 60 min | 8g | 50° | 62° |
| Intensive | 89 min | 60 min | 8g | 55° | 75° |
| Glass | 50 min | 60 min | 8g | 55° | 68° |
| Fruit | 19 min | / | / | / | cold |
| Dry | / | 60 min | / | / | / |
Display
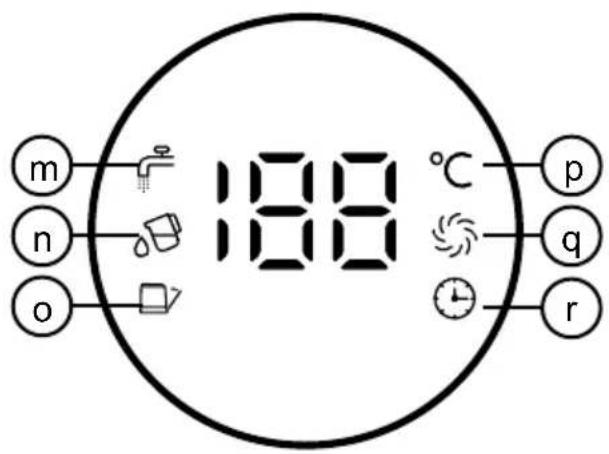
m. Tap Mode: If the red light shows, fill with water from tap
n. Tank Mode: If the red light shows, fill with water from jug
o. Door Open
p. Temperature Display
q. Dry Indicator
r. Time Display
DURONIC
Safety Information
PLEASE READ THIS MANUAL CAREFULLY AND RETAIN FOR FUTURE REFERENCE
- This appliance is for indoor/household use only. This device is not intended for professional cleaning services.
- This appliance is not intended for use by persons (including children) with reduced physical, sensory or mental capabilities, or lack of experience and knowledge, unless they have been given supervision or instruction concerning use of the appliance by a person responsible for their safety.
- Children should be closely supervised at all times to ensure that they do not play with the appliance.

CAUTION:
Do not operate this appliance if the power cable or plug is damaged. If either is damaged, return it to Duronic for service or repair by professional technician.
- Never open and repair the machine yourself. Do not modify the machine in any way that is not described in the instructions for use. The machine contains live parts. Repairs may only be carried out by Duronic, using original spare parts and accessories.
-
If an extension lead/cable is needed to reach the appliance to a mains power socket that is too far away out of reach of the machine's accompanying cable, please ensure that:
-
the marked electrical rating of the extension lead is at least as great as the electrical rating of the appliance.
- the extension lead is of the grounded type.
- no other appliance is plugged into the same extension lead.
- the extension cable is safely positioned to avoid it being pulled on by children or animals or being tripped over.
DURONIC
Safety Information
- Never immerse appliances, mains cable, or plug in water or any liquid to prevent electric shock.
- Ensure this appliance is plugged directly into a wall outlet away from water.
- Avoid kinking or crushing the mains cable.
- Use the appliance solely for its intended purpose and adhere to all procedures outlined within this manual.
- Do not touch the appliance with wet hands.
- Do not splash water inside the dishwasher to prevent electric shocks or fires.
- Do not keep the appliance in an environment under 0^ .
- Ensure the dishwasher is installed and used on a flat and level surface.
- Keep the appliance and its components away from open flames and hot surfaces.
- Do not use or place the dishwasher near any heat source such as a stove.
- Ensure inlet and drain pipes are properly connected to prevent leaks.
• Always ensure the dishwasher is off when pouring in water using the jug.
- Do not overload the dishwasher.
- In the case of any faults or issues, stop the washing cycle, turn the dishwasher off, close the tap and contact customer service.
- Only use detergent that has been made for dishwasher use only.
- When the dishwasher door is open, don't place anything heavy on top of it.
- Do not open the dishwasher when washing is in progress to avoid any injuries.
- Do not drink the leftover water in the machine.
DURONIC
Safety Information
- Do not touch or block the air outlet on the side.
- Do not tilt or move the dishwasher when in use.
- Check the drain hose is clean and free from stale/old water before using it to prevent any dirty water being used.
- Place sharp objects away from the seal of the door to prevent accidental damage and load them handle side up to also prevent injuries.
- Only wash items that are marked dishwasher safe or equivalent, if unsure, please check the manufacturer details.
- Do not touch the internal heating element straight after use.
- Ensure everything is in place before using.
- Do not use this dishwasher for anything other than washing dishes and fruits.
- Please take off sharp objects like knives when opening the dishwasher.
- Ensure the appliance and accessories have cooled completely before cleaning or storing.
- Do not use abrasive or caustic cleaning agents on the appliance's outer surfaces.
- Never leave the appliance unattended during operation.

WARNING:
Under some conditions, hydrogen gas may be produced in a hot water system that has not been used for 2 weeks or more. HYDROGEN GAS IS EXPLOSIVE. To use after this period of time, turn all the faucets on and allow the water to flow from each for several minutes. This will release any accumulated hydrogen gas. When this is happening, don't smoke or use an open flame.
DURONIC
Installation
Inlet Pipe:
- Connect the inlet pipe to the direct water inlet found at the back of the dishwasher.
- This pipe can now be connected to a water valve or tap via an adaptor to allow the water to be taken in.
Please note: The dishwasher can alternatively be filled with the jug at the manual water inlet.
Drain Pipe:
- Connect the drain pipe to the water outlet found at the back of the dishwasher.
- The pipe can now be connected to any of the following to drain water:
a. Attached to the sink via the suction pad.
b. Connected to the sink trap.
How to use the Dishwasher
- Remove any large food particles from the plates and dishes before loading into the dishwasher.
- When loading the dishes, place them tilted or stained side down. Please refer to the tableware diagram below.
- Plug the dishwasher in and press the power button to turn on.
- Use the 1.8L jug to pour water in the mesh opening found at the top of the dishwasher. Fill until the water can just about be seen. Alternatively, the inlet pipe can be connected to the tap directly.
DURONIC
How to use the Dishwasher
- Open the dishwasher door and fill the detergent hole in the door with the appropriate amount of detergent. Alternatively, place a detergent block inside instead.
- Select the washing setting you require from the control panel, then press the start/pause button.
- The start/pause button can be presseed whilst washing to stop the washing, allowing you to add more dishes in the middle if needed.
- Holding the power button for 3 seconds will stop the setting chosen, the machine will drain and then turn off.
Washtypes
Normal
In the normal wash mode, the dishwasher operates with a 69-minute wash cycle followed by a 60-minute dry cycle. The wash temperature is set at 55^ and the rinse temperature at 68^ . It requires 8 grams of detergent.
To select this mode, press and hold the on button. Then use the pad of your finger to select Normal Mode.
Eco
Eco mode uses less energy by washing at a lower temperature. In Eco mode, the dishwasher operates with a 68-minute wash cycle, followed by a 60-minute dry time. The wash temperature is set to 46^ and the rinse temperature to 62^ . It requires 11 grams of detergent.
18 minutes before the washing finishes, pause the washing by pressing the S/P button, open the door and add 2ml rinse aid before closing the door and letting the rinse finish.
DURONIC
Washtypes
To select this mode, press and hold the on button. Then use the pad of your finger to select Eco Mode.
Quick
When you're in a rush, set the dishwasher to quick mode. In Quick mode, the dishwasher completes a 29-minute wash cycle followed by a 60-minute dry time. The wash temperature is set at 50^ and the rinse temperature at 62^ . It uses 8 grams of detergent.
To select this mode, press and hold the on button. Then use the pad of your finger to select Quick Mode.
Intensive
This setting is perfect for more focused cleaning. In Intensive mode, the dishwasher runs an 89-minute wash cycle with a 60-minute dry time. The wash temperature is set at 55^ and the rinse temperature at 75^ . It uses 8 grams of detergent.
To select this mode, press and hold the on button. Then use the pad of your finger to select Intensive Mode.
Glass
Choose this mode when washing valuable and fragile glass. In Glass mode, the dishwasher runs a 50-minute wash cycle with a 60-minute dry time. The wash temperature is set at 55^ C and the rinse temperature at 68^ C . It uses 8 grams of detergent.
To select this mode, press and hold the on button. Then use the pad of your finger to select Glass Mode.
DURONIC
Washtypes
Fruit
This dishwasher has a fruit washing mode. In this mode, it completes a 19 minute wash cycle only with cold water. This does not require any detergent.
To select this mode, press and hold the on button. Then use the pad of your finger to select Fruit Mode.
Child Lock
Child lock can be enabled on this dishwasher to prevent children from accidentally opening it or activating the control panel. When the child lock is activated, all other keys will not work until the child lock has been removed.
To enable this, press and hold the lock button to lock the dishwasher and to unlock it when you need to access it.
Delay:
This delay feature can be used to start the washing at a later time.
Select the washing mode you wish to use (normal, eco, quick, intensive, glass).
Touch the delay button to display 1hr and keep touching each time to increase by another hour. You can delay the time by up to 18 hours.
DURONIC
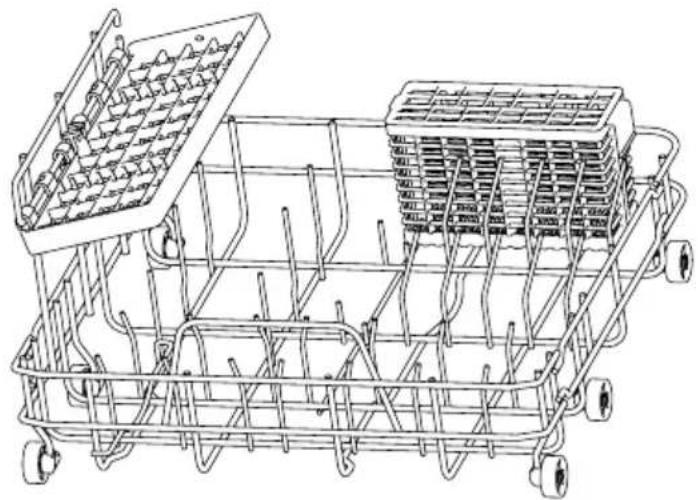
Loading the Dishwasher
- Please remove all food residue on the tableware before placing into the dishwasher. Excess food can block the drain pipe.
- Make sure all appropriate tableware such as cups and bowls are placed upside-down.
- Below is a list of the items you could wash in a typical load;
| Tableware Quantity | |
| 190mm Dessert Plate 5 | |
| 130mm Dessert Bowl 2 | |
| 70 mm Mug 2 | |
| 60mm Glass 3 | |
| Fork 3 | |
| Knife 3 | |
| Soup spoon 3 | |
| Tea spoon 3 | |
| 230mm soup plate 3 | |
| 140mm saucer 1 | |
| 78cm cup 1 | |
| 213mm Melamine Bowl 1 | |
| Serving Fork 1 | |
| 195mm Melamine dessert plate | 1 |
| Gravy ladle | 1 |
natural_image
Line drawing of a multi-wheeled cart with a grid-patterned top frame and wheels, no text or symbols present.
natural_image
Technical line drawing of a mechanical assembly with rollers, gears, and housing (no text or labels)Error Codes
| Code Fault What to do | ||
| E2 Draining | ·Check drain pipe. Make sure the pipe is not bent. ·Turn the power off and check to see if anything is blocking the filter or the drain pipe ·Make sure all the pipes are clear and are not being blocked by anything. | |
| E3 Overflowing | ·Tilt the machine 30-45 degrees to pour all the water out from the base of the dishwasher. ·Restart the dishwasher. ·If the dishwasher still keeps overflowing, contact our customer support team for more assistance. | |
| E4 Temperature | Restart the dishwasher, if the appliance is still faulty, contact customer support for more assistance. | |
| E5 Message | Restart the dishwasher, if the appliance is still faulty, contact customer support for more assistance. | |
| E6 Heating | Restart the dishwasher, if the appliance is still faulty, contact customer support for more assistance. | |
| E7 Pressure | Restart the dishwasher, if the appliance is still faulty, contact customer support for more assistance. |
Troubleshooting
| Problem Reason What to do | ||
| Dishes are still dirty | Dishes loaded incorrectly | Ensure there is enough space between the dishes. |
| Spray arm is trapped | Make sure nothing is trapping the spray arm. | |
| Spray arm is blocked | If the spray arm is blocked, clean the spray arm. | |
| Blocked filter If the filter is blocked, clean the filter. | ||
| Filter installed incorrectly | Assemble the filter correctly. | |
| Wrong programme selected | Select the correct washing programme. | |
| No detergent | Add detergent block, powder or liquid. | |
| Dishwasher is not starting | Not enough water Add water until indicator light is off. | |
| Door is not closed properly | Check the dishwasher door is fully closed. | |
| Can't select programme | Wrong washing setting selected | Select the correct washing programme. |
| Plastic dishes not drying properly | Dry these by hand. | |
| Dishes loaded incorrectly | Place the dishes in an appropriate manner, refer to the tableware diagram above. | |
| Drying programme doesn't stop running | Wait for the drying programme to stop. | |
| Wooden dishes not dry | Dry the wooden dishes by hand. | |
Troubleshooting
| Problem Reason What to do | ||
| Can’t select programme | Washing has already started | Turn off the machine or wait for the cycle to finish, then try again. |
| Discoloration of plastic dishes | Washing temperature too high | Select a lower washing temperature. |
| Leftover Detergent | Spray arm is trapped and could not wash the detergent | Spray arm is trapped and could not wash the detergent. |
| Low quality or compacted detergent used | Use a higher quality or different detergent. | |
| A lot of foam in the dishwasher | Incorrect detergent used | · Use detergent ONLY made for dishwashers. · Open the dishwasher and wipe the foam by hand. · Pour 2-3L of water into the dishwasher. Select any setting and after 1-2 minutes the foam will drain away. This can be repeated if necessary. |
| Abnormal sound in the dishwasher | Spray arm is knocking the dishes | Make sure the dishes have been correctly loaded. |
| Dishes have moved position | Fix the position of the dishes before washing. | |
| Egg Custard left on the dishes | Protein solidification W | ash the egg custard off by hand. |
| Water drops left inside the dishwasher | Drying time is too short | Select the ‘Dry’ programme |
a. Lavage normal
b. Lavage ECO
c. Lavage rapide
d. Lavage intensif
e. Lavage des verres
f. Lavage des fruits
g. Lumière
h. Sécher
i. Délai
j. Verrouillage
k. Démarrer / Pause
I. Alimentation
natural_image
Line drawing of a multi-wheeled cart with a grid-patterned top frame and wheels, no text or symbols present.
natural_image
Technical line drawing of a mechanical assembly with gears, springs, and housing (no text or labels)Codes d'erreur

natural_image
Line drawing of a multi-wheeled cart with a grid-patterned top frame and wheels, no text or symbols present.
natural_image
Technical line drawing of a mechanical assembly with gears, springs, and housing (no text or labels)Fehlermeldungen

natural_image
Line drawing of a multi-wheeled cart with a grid-patterned top frame and wheels, no text or symbols present.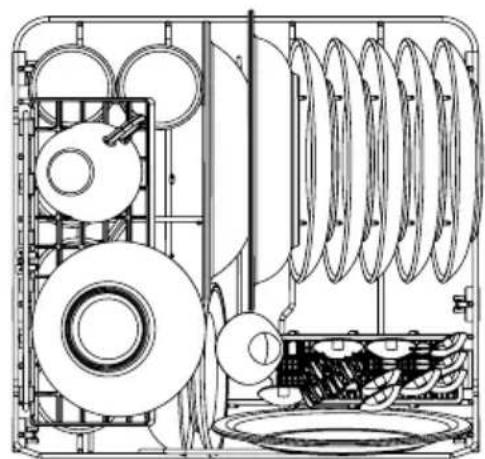
natural_image
Technical line drawing of a mechanical assembly with rollers, gears, and housing (no text or labels)Códigos de error

natural_image
Line drawing of a multi-wheeled cart with a grid-patterned top frame and wheels, no text or symbols present.
natural_image
Technical line drawing of a mechanical assembly with rollers, gears, and housing (no text or labels)Codici di Errore

natural_image
Line drawing of a multi-wheeled cart with a grid-patterned top frame and wheels, no text or symbols present.
natural_image
Technical line drawing of a mechanical assembly with gears, springs, and housing (no text or labels)Kody błędów

a. Normal Yıkama
b. ECO Yıkama
c. Hızlı Yıkama
d. Yoğun Yıkama
e. Bardak Yıkama
f. Meyve Yıkama
g. Işık
h. Kurulama
i. Gecikme
j. Kilitleme
k. Başlat / Durdur
I. Güç
natural_image
Line drawing of a multi-wheeled cart with a grid-patterned top frame and wheels, no text or symbols present.
natural_image
Technical line drawing of a mechanical assembly with rollers, gears, and housing (no text or labels)Hata Kodlari

a. Normaal wassen
b. ECO wassen
c. Snel wassen
d. Intensief wassen
e. Glas wassen
f. Fruit wassen
natural_image
Line drawing of a multi-wheeled cart with a grid-patterned top frame and wheels, no text or symbols present.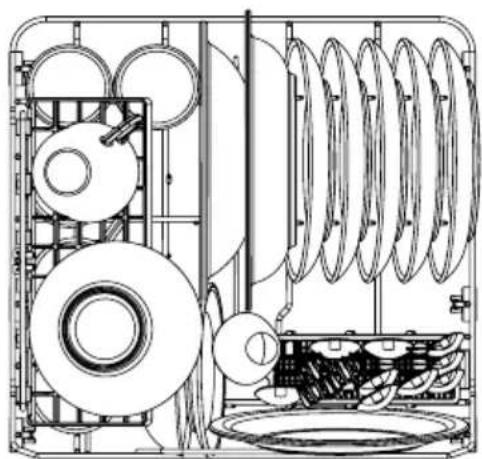
natural_image
Technical line drawing of a mechanical assembly with gears, springs, and housing (no text or labels)Foutcodes

natural_image
Line drawing of a multi-wheeled cart with a grid-patterned top frame and wheels, no text or symbols present.
natural_image
Technical line drawing of a mechanical assembly with rollers, gears, and housing (no text or labels)Felkoder
Information for consumers on the disposal of Waste Electrical & Electronic Equipment (WEEE).
This mark on a product and/or accompanying documents indicates that when it is to be disposed of, it must be treated as Waste Electrical & Electronic Equipment, (WEEE).
Any WEEE marked products must not be mixed with general household waste, but kept separate for the treatment, recovery and recycling of the materials used. For proper treatment, recovery and recycling; please take all WEEE marked waste to your Local Authority Civic waste site, where it will be accepted free of charge.
If customers dispose of Waste Electrical & Electronic Equipment correctly, they will be helping to save valuable resources and preventing any potential negative effects upon human health and the environment, of any hazardous materials that the waste may contain.

Information for consumers on the disposal of Waste Electrical & Electronic Equipment (WEEE).