
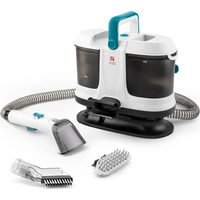
Velluto - Vacuum Cleaner Di4 - Free user manual and instructions
Find the device manual for free Velluto Di4 in PDF.

| Product type | Wet/Dry Vacuum |
| Brand | Di4 |
| Model | Velluto |
| Power supply | Rechargeable battery via removable AC adapter |
| Maximum runtime | Approximately 35 minutes (depending on mode used) |
| Clean water tank capacity | Not specified in the manual, estimated at about 500 ml |
| Dirty water tank capacity | Not specified in the manual, estimated at about 400 ml |
| Weight | Not specified in the manual, estimated at about 4.5 kg |
| Dimensions (H x W x D) | Not specified in the manual |
| Operating modes | Smart mode (suction and washing), suction mode, self-cleaning mode |
| Key functions | Hard floor cleaning, simultaneous suction and washing, dirt detection, LED screen, voice control |
| Filter type | Washable HEPA filter |
| Main brush | Removable and washable brush roller |
| Maintenance and cleaning | Clean regularly the tanks, HEPA filter, brush roller and dirt sensor. Use a neutral detergent and avoid water in electrical parts. |
| Safety | Use only the supplied adapter. Do not use on sharp or incandescent objects. Do not immerse in water. Keep out of reach of children. |
| Spare parts and repairability | Spare parts available through authorized after-sales service. Brush roller, HEPA filter, tanks and accessory brushes are replaceable. |
| General information | Legal warranty according to directive 1999/44/EC. For domestic use only. Recycle at waste disposal site. Compliant with WEEE. |
Frequently Asked Questions - Velluto Di4
User questions about Velluto Di4
0 question about this device. Answer the ones you know or ask your own.
Ask a new question about this device
Download the instructions for your Vacuum Cleaner in PDF format for free! Find your manual Velluto - Di4 and take your electronic device back in hand. On this page are published all the documents necessary for the use of your device. Velluto by Di4.
USER MANUAL Velluto Di4
ELECTRIC FLOOR WASHER
BALAI ÉLECTRIQUE
MOCIO ELETTRICO
PAL DE FREGAR ELÈCTRIC
natural_image
Line drawing of a mechanical component with internal grooves and a base plate (no text or symbols)
natural_image
Line drawing of two mechanical components with internal compartments (no text or symbols)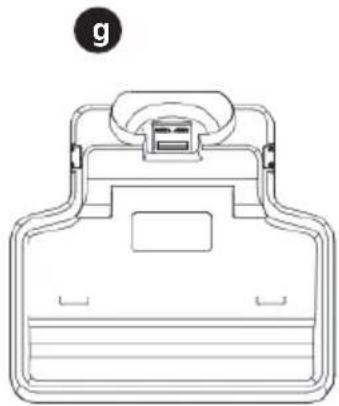
natural_image
Line drawing of a mechanical device with a handle and top component (no text or symbols)


FIG 1
natural_image
Technical line drawing of a vacuum cleaner with two views showing mechanical components and adjustment arrows (no text or symbols)FIG 2 FIG 3
natural_image
Four sequential line drawings of a mechanical device with arrows indicating motion or rotation (no text or symbols)FIG 4
natural_image
Illustration of two hands performing a manual press operation on a wheeled device (no text or symbols present)FIG 5
natural_image
Illustration of two hands operating a cylindrical device with rollers, showing mechanical assembly (no text or symbols)FIG 6 FIG 7 FIG 8
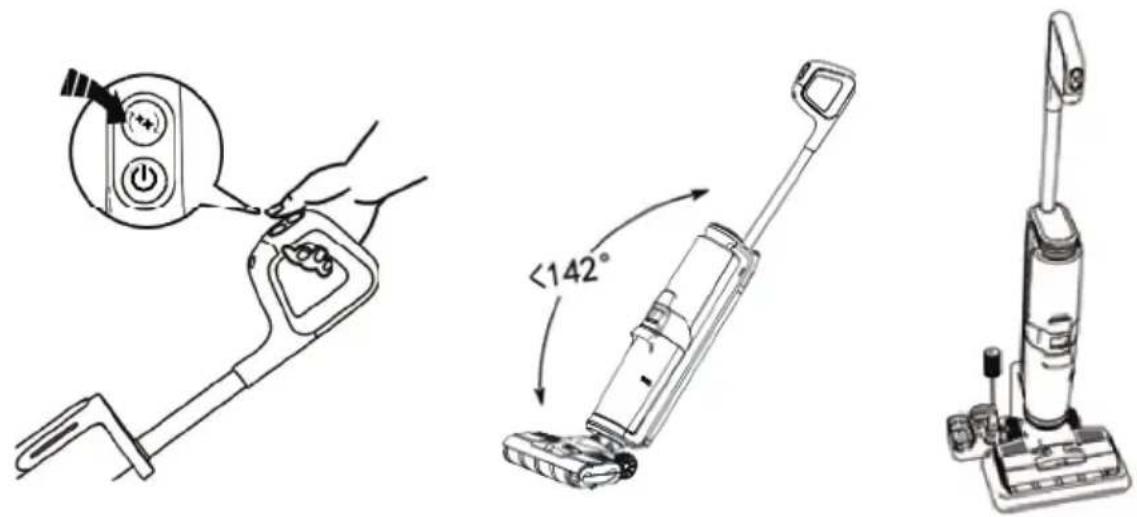
FIG 9
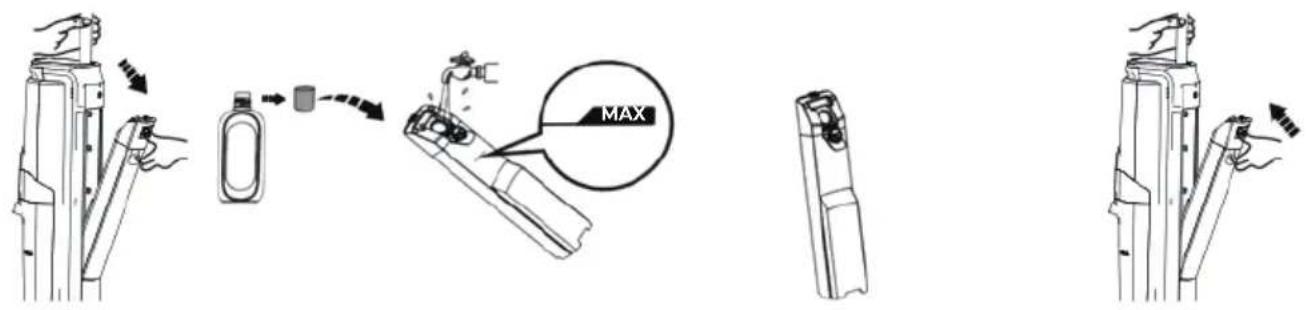
FIG 10
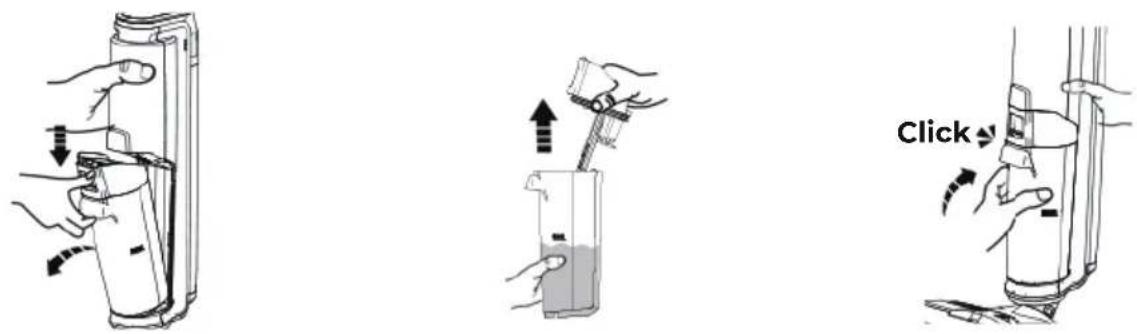
FIG 11 FIG 12
natural_image
Line drawing of a vacuum cleaner with attached circuit board (no text or symbols)
FIG 13

natural_image
Diagram of a hand holding a cylindrical device with a scroll, showing mechanical components and directional arrows (no text or symbols)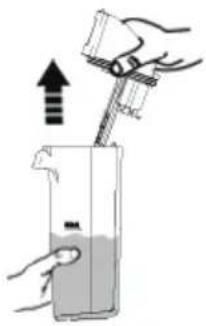
natural_image
Illustration of a hand pouring liquid from a faucet into a container with a tool (no text or symbols)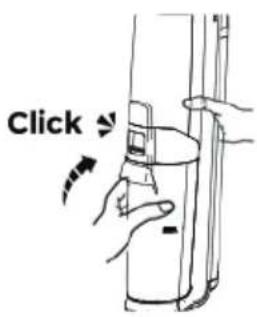
FIG 14
natural_image
Line drawing of a vacuum cleaner with attached screwdriver and base mount (no text or symbols)FIG 15
natural_image
Illustration of a hand using a tool to lift a container with an upward arrow (no text or symbols)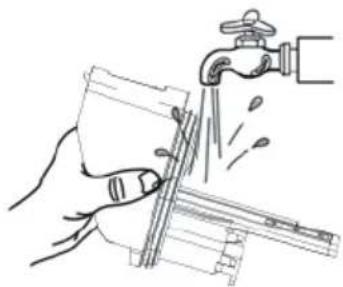
natural_image
Illustration of hands using a tool to lift a water tap (no text or symbols present)FIG 16
natural_image
Line drawing of hands holding a device with a paper airplane being turned (no text or symbols)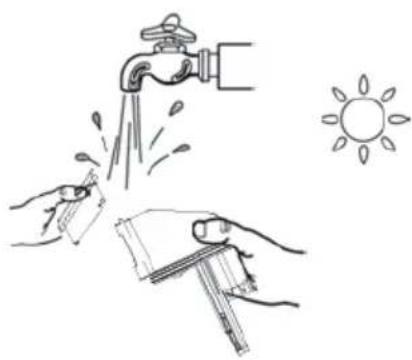
natural_image
Illustration of hands cleaning a water tap with a sun symbol nearby (no text or symbols)FIG 17
natural_image
Line drawing of a vacuum cleaner with a close-up inset showing the lid (no text or symbols)FIG 18
natural_image
Illustration of a hand pressing down on a mechanical component with an upward arrow (no text or symbols)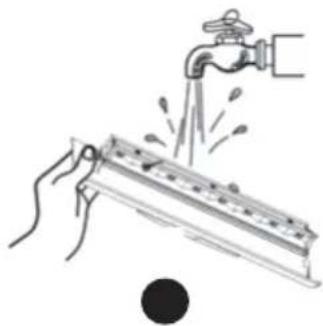
natural_image
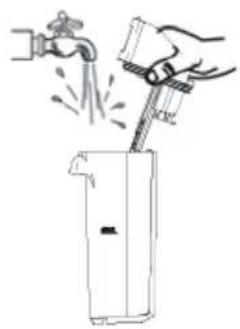
Illustration of hands using a faucet to lift water from a metal tank (no text or symbols)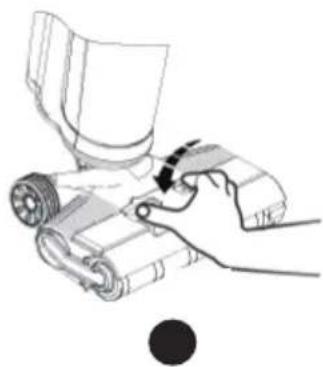
natural_image
Illustration of a hand using a tool to interact with a mechanical device (no text or symbols visible)FIG 19
natural_image
Diagram of a mechanical device with rollers and a handle, showing motion direction (no text or symbols)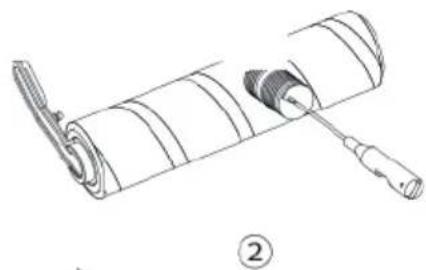
natural_image
Diagram of a mechanical assembly with a cylindrical component and a tool inserted, labeled with number ② (no text or symbols on the diagram itself)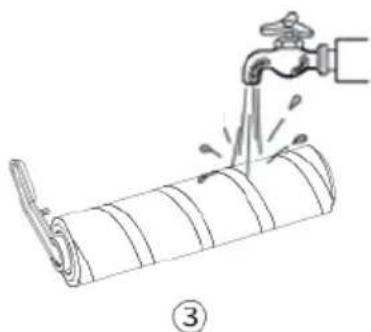
natural_image
Illustration of a hand pouring liquid into a rolled-up pipe with a faucet (no text or symbols)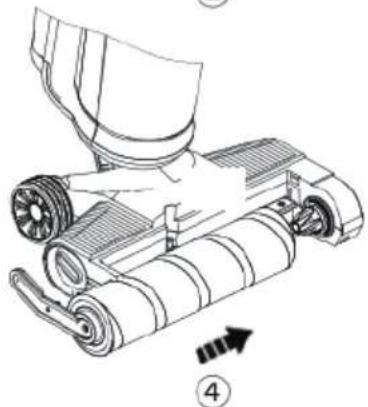
natural_image
Technical line drawing of a mechanical device with rollers and a handle, showing no text or symbolsESPAÑOL
GRACIAS POR HABER ELEGIDO UN PRODUCTO Di4. ESPERAMOS QUE SE AJUSTE A SUS NECESIDADES Y SEA DE SU AGRADO.
INFORMACIÓN GENERAL
COMPRUEBE QUE EL APARATO ESTÁ COMPLETO Y NO PRESENTA NINGÚN DAÑO. EN CASO DE DUDA CONTACTE CON EL ESTABLECIMIENTO DONDE ADQUIRIÓ EL PRODUCTO.
DESCRIPCIÓN
WE WOULD LIKE TO THANK YOU FOR CHOOSING Di4. WE WISH THE PRODUCT PERFORMS TO YOUR SATISFACTION AND PLEASURE.
GENERAL INFORMATION
FIRST CHECK THAT THE APPLIANCE IS COMPLETE AND UNDAMAGED. CONTACT THE STORE WHERE YOU PURCHASED THE PRODUCT IN THE EVENT OF ANY DOUBT.
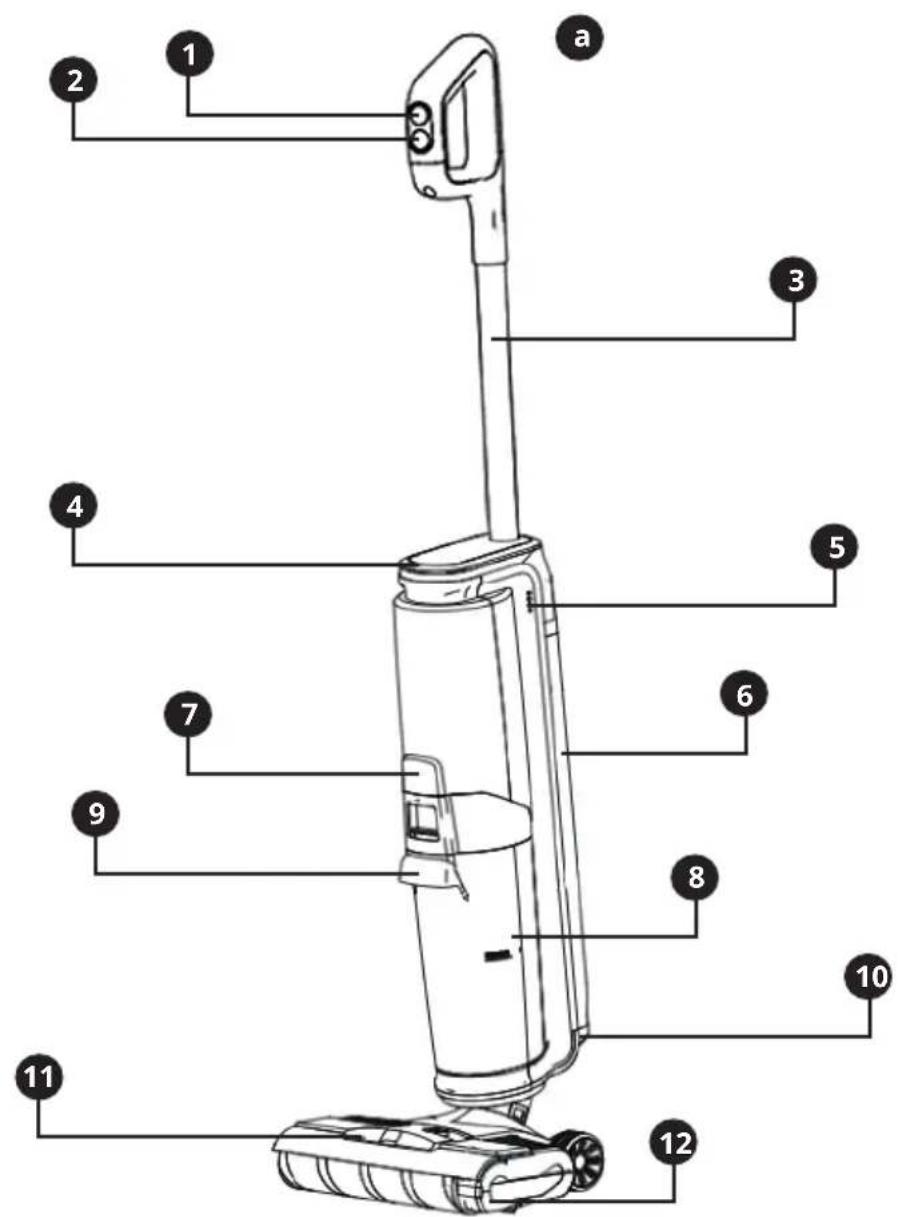
DESCRIPTION
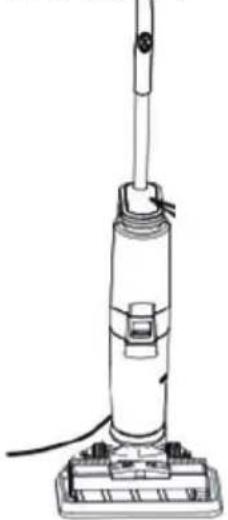
- Mode selection button
- Power switch
- Handle
- LED Screen
- Voice Switch
- Clean water tank
- Dirty water tank release button
- Dirty water tank
- Dirty water tank handle
- Brush cover
- Brush cover release button
- Brush roller
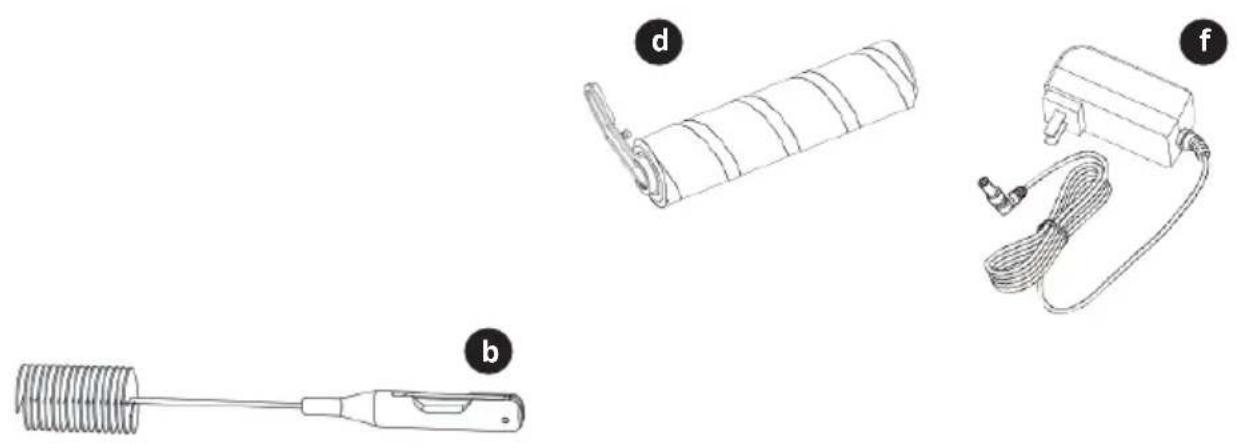
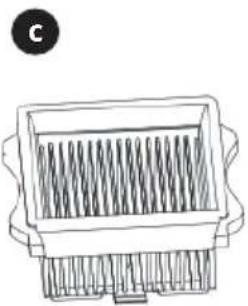
Unit and Accessory
a) Machine body
b) Cleaning brush
c) HEPA Filter
d) Brush roller
e) Accessory bracket
f) Adaptor
g) Charging base
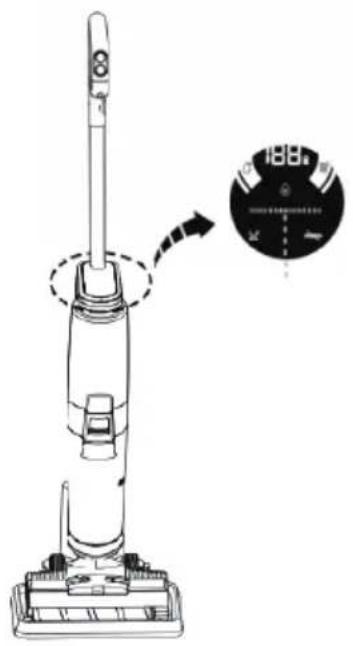
LED Screen / Mode
1) Self-cleaning Mode
2) Vacuum Mode
3) Smart Mode (Vaccum & Mop)
4) Clean water shortage warning
5) Dirty water full warning
SAFETY INSTRUCTIONS
This appliance can be used by children aged from 8 years and above and persons with reduced physical, sensory or mental capabilities or lack of experience and knowledge if they have been given supervision or instruction concerning use of the appliance in a safe way and understand the hazards involved. Children shall not play with the appliance. Cleaning and user maintenance shall not be made by children without supervision. The adaptor cable cannot be replaced. If the cable is damaged, the adaptor will be discarded.
WARNING: For the purpose of recharging the battery, only use the detachable supply unit provided with this appliance.
This symbol means that the appliance is intended to be supplied from a detachable supply unit. A hazard may occur if the appliance runs over the supply cord. Do not expose the appliance or battery to excessive temperatures. Be aware of the risk of terminals of the battery-operated appliance or battery being short circuited by metal objects. This appliance contains batteries that are non-replaceable. When the battery is at end of life, the appliance shall be properly disposed of. Plug must be removed from socket-outlet before cleaning or maintaining the appliance. This device is designed for use at a maximum altitude up to 2000m above sea level. The cleaner should be on the base if not used by hand.
WARNING! Plastic bags can be dangerous. To avoid danger, keep plastic bags away from babies and children. Do not allow children to play with packaging materials. Suffocation hazard!
IMPORTANT WARNINGS
Prior to plugging in the product, check that your mains voltage is the same as the one indicated on the product label. The mains connection cable must not be tangled or wrapped around the product during use. Do not pull on the connection cord in order to unplug it. Do not use, connect, or disconnect the device to the mains with your hands or feet wet. Proceed according to the conservation and cleaning section of this manual for cleaning. Unplug the product immediately from the mains in the event of any breakdown or damage and contact an authorised technical support service. In order to prevent any risk of danger, do not open the device. Only qualified technical personnel from the brand's Official Technical support service may carry out repairs or procedures on the device. Any incorrect use or improper handling of the product shall render the warranty null and void. Only an authorised technical support service centre may carry out repairs on this product. This appliance is designed exclusively for domestic use, in no case should be a commercial or industrial use. In case of misuse or tampering with the product, it will be out of warranty. Do not use the appliance to vacuum sharp objects (pins, nails, glass, etc), incandescent objects (matches, cigarettes). Never use the brush to: polish floors, suck (hot ash, burning objects, such as cigarettes, matches, sharp and hard items, such us: razors, pins, thumbtacks, pieces of glass, etc), flour, cement, plaster, printer or photocopier toner, etc.
B&B TRENDS SL. disclaims all liability for damage that may occur to people, animals or objects, for the non-observance of these warnings.
INSTRUCTIONS FOR USE
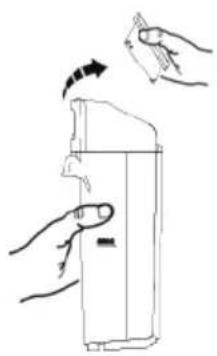
Handle Installation Instruction
Insert the end of the handle vertically into the fuselage jack. After hearing the click, ensure that the handle is firmly and securely installed.
To disassemble, please press the shrapnel with a hard object into the hole on the back of the fuselage and pull out the handle of the machine upward. FIG 1)
Clean Water Tank Installation
If to remove the cleaning tank, hold the fuselage with one hand, push the tank button with the other hand, and then pull out to remove the barrel.
To install the cleaning tank, firstly put the bottom of the cleaning tank into the support position of the fuselage, and then gently push the cleaning tank, after hearing the click, the installation is successful. (FIG 2)
Dirty Water Tank Installation
To remove the dirty water tank, hold the fuselage with one hand, push the slop tank button with the other hand, and then pull it out.
To install the dirty water tank, firstly put the bottom of the dirty water tank into the support position of the fuselage, and then gently push the dirty water tank. When the click is heard, the installation is successful. (FIG 3)
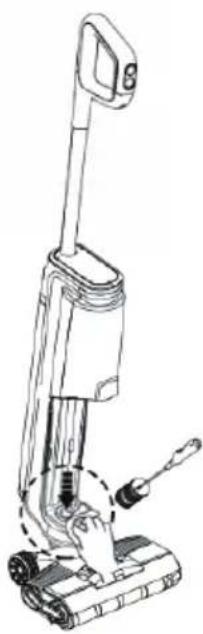
Brush Cover Disassembly Instruction
To remove the brush cover, first apply your finger to the position as shown in the picture and press the release buttons at both ends with your thumb and forefinger to lift the brush cover. When installing, firstly apply your finger to the position as shown in the picture and press the release buttons at both ends with your thumb and forefinger at the same time. Press down and hear the click sound, the installation is successful. (FIG 4)
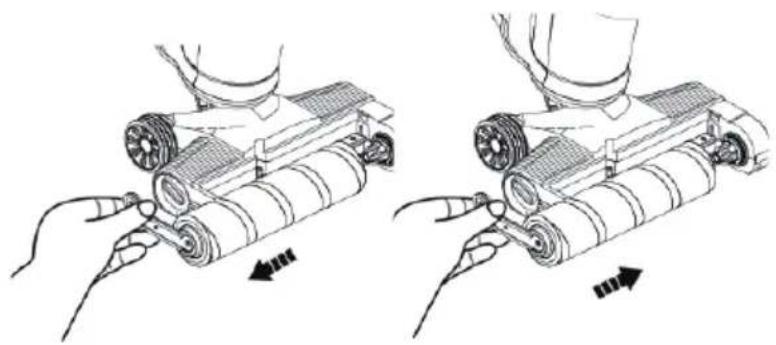
Brush Roller Disassembly Instruction
To remove the brush roller, pull the left roller handle with your fingers and remove it.
During installation, hold the handle of the brush roller by hand, align the right side of the brush roller with the right end cover, and then put the left handle of the brush roller into the slot, and the brush roller can be installed successfully. (FIG 5)
Preparation Before Use
Before use, please check whether your floor washer has electricity. If not, please charge it in time (refer to "Product Charge" for details). It's better to get it fully charged before using it.
The startup mode is vacuum mode by default. You can select a mode based on actual requirements.
Press the mode button to switch between smart mode and vacuum mode. Select the required mode to automatically enter the working state. (FIG 6)
The machine has an upright switch, please tilt before starting the machine, but do not tilt the machine more than 142 degrees, so as not to cause water leakage. (FIG 7)
After using the machine, it is recommended to place it vertically on the tray specially provided for you. (FIG 8)
Add Water in Clean Water Tank
Gently press the release button to remove the cleaning tank.
Open the top cover of the water bucket and inject clean water (below 60^ C) to the water level.
Close the top cover of the cleaning bucket to ensure that it is tight and not loose.
Install the cleaning tank back to the fuselage, and the installation is successful after hearing the click. (FIG 9)
Pour Water From Dirty Water Tank
Gently press the dirty water tank button to remove the dirty water tank.
Hold the bucket with one hand and pull out the dirty water tank cover with the other hand.
After the sewage is dumped, install the dirty water tank back to the fuselage, and the installation will be successful when the click is heard. (FIG 10)
Product Charge
Firstly, put the machine into the charging base, connect one end of the charger to the charging base, and the other end to the home socket; The power cord can be folded up when no charge is required. When charging, please keep the machine upright and close to the corner to avoid tripping and other injuries. (FIG 11)
Note: If the product is not used for a long time after purchasing, please charge the battery for 3 hours every 3 months by using the charging base specially provided by the appliance (no need to fully charge the battery).
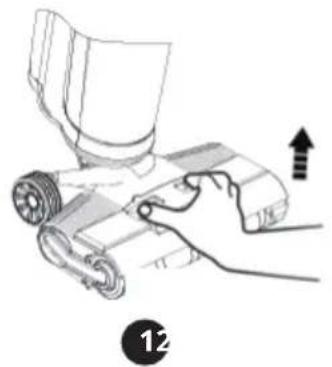
MAINTENANCE AND CLEANING
It is recommended that you perform regular maintenance on its components in order to keep the machine in good functioning order.
Please stop the machine before cleaning. Scrub with water or neutral detergent, be sure to wring out the cleaning cloth before scrubbing, do not let water get inside the electrical parts of the appliance. (FIG 12)
Clean the Clean Water Tank
- When the clean water tank is empty, the machine will automatically power off during Smart Mode and Self-Cleaning, with the prompt of display screen and voice when voice switch is on.
- If there is stubborn dirt on the inside wall of the cleaner water tank, please clean it directly with a small cleaning tool.
- After cleaning, close the cover of the clean water tank and install it back to the machine. After hearing the click, it will be installed in place.
Clean the Dirty Water Tank
- When the dirty water tank is full, the machine will automatically power off, with the prompt of display screen and voice when voice switch is on.
- If there is stubborn dirt on the inside wall of the dirty water tank, please clean it directly with a small cleaning tool.
- After cleaning, close the cover of the dirty water tank and install it back to the machine. After hearing the click, it will be installed in place. (FIG 13)
Clean the Dirt Sensor
-
There is no obvious dirt on the ground, but when the cleaning strip flashes in red, the dirt sensor may be blocked by dirt.
-
Remove the dirty water tank, wipe the dirt sensor in the pipe with a damp cloth, or clean the internal dirt of the pipe with a cleaning tool before reuse. (FIG 14)
Clean the Dirty Water Tank Cover
- If the dirty water tank is blocked, clean it in time.
- Remove the top cover of the dirty water tank and clean with water.
- After cleaning, load the dirty water tank. FIG 15)
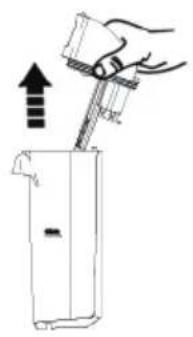
Clean the Filter
It is recommended to clean and dry the filter after each use to keep it clean and tidy.
- Remove the filter from the top of the dirty water tank.
- Remove and wash the filter with clean water, dry it thoroughly before putting it into then dirty water tank. (FIG 16)
Self - Cleaning
It is recommended that you have regular maintenance on its components. in order to avoid the using function of machine in order to avoid the using function of machine.
- Put the machine back to the base after use, press self-cleaning button to start self-cleaning.
- After the self-cleaning, the machine continues to enter the charging state. (FIG 17)
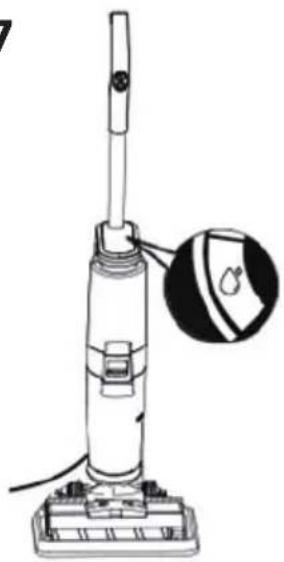
Clean the Brush Cover
It is recommended that the roller brush cover be cleaned regularly after the machine has been used to avoid odors.
- To remove the brush cover, firstly put your finger on the position as shown in the picture and press the release buttons at both ends with your thumb and forefinger to lift the brush roller cover upward and take out the brush cover.
- After removal, rinse with water until it is clean.
- After cleaning, install the brush cover into the base. (FIG 18)
Clean the Brush Roller
It is recommended to clean and dry the brush roller after use to keep it clean and tidy.
Note: If residual stains are found at the mouth of suction nozzle, please wipe with wet cloth, do not wash with Water.
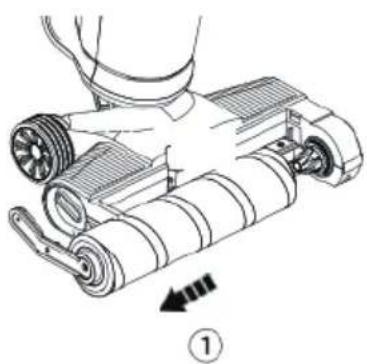
- Pull up the handle on the left end of the brush roller and remove it.
- Remove the brush roller handle and use the brush roller cleaning tool to remove tangled hair or debris on the brush head.
- Then clean the brush roller with water.
- After cleaning, install the brush roller handle first, and then install the brush roller to the brush. During installation, first align the right side of the brush roller (without protruding structure) into the right slot, and then push the left side (one side with handle) along the left and right slots. (FIG 19)
TROUBLE SHOOTING
TROUBLE SHOOTING shall be reworked totally, below is example for reference
| PROBLEM POSSIBLE CAUSES SOLUTION | ||
| The appliance does not switch on. | This can happen if the appliance has not been used for a long time. | Follow “Product Charge” |
| The LED Screen does not light up during charging. | Power from the charger may not reach the charging base or power from the charging base may not reach the appliance. | Follow “Product Charge” |
| The Brush roller does not rotate. | This usually happens when there are too many fibres wrapped around the roller of the brush restricting its movement. | Follow “Clean the Brush Roller” |
| The performance of suction power and mopping is reduced. | This is probably due to the appliance shall maintain and clean. | Follow the section of “MAINTENANCE AND CLEANING” |
| The maximum running time of the vacuum cleaner is shorter than it used to be. | If the charging cycle is too short, the operating time of the appliance will be reduced. The battery may also be used up. | Make sure that the battery has completed a full charge cycle. The capacity of the battery may also have decreased. This is normal and occurs gradually over time in all batteries. |
PRODUCT DISPOSAL
This product complies with European Directive 2012/19/EU on electrical and electronic devices, known as WEEE (Waste electrical and electronic equipment), which establishes the applicable legal framework in the European Union regarding the elimination and recycling of electrical and electronic devices. Do not put this product in the bin. Take it to your closest electrical and electronic waste treatment centre.
The product may contain batteries. Remove them before disposing of the product and dispose in special containers approved for this purpose.
Information related to power consumption in the off and standby modes, as well as in the network standby mode of the appliance pursuant to EU Regulation 2023/826 can be found at the following link: https://di4-home.com/pages/ecodesign-info
FRANÇAIS
NOUS AIMERIONS VOUS REMERCIER D'AVOIR CHOISI Di4. NOUS ESPÉRONS QUE CE PRODUIT RÉPONDRA À VOS BESOINS ET À VOS GOÛTS.
INFORMATIONS GÉNÉRALES
VÉRIFIEZ AVANT TOUT QUE L'APPAREIL EST COMPLET ET NE PRÉSENTE AUCUN DOMMAGE. EN CAS DE DOUTE, VEUILLEZ CONTACTER LE MAGASIN DANS LEQUEL VOUS AVEZ ACHETÉ LE PRODUIT.
DESCRIPTION
MISE AU REBUT DU PRODUIT
B&B TRENDS, SL. guarantees compliance of this product, for the use for which it is, during the period established by the legislation in force in the country of sale. In the case of breakdown during the term of this warranty, users are entitled to repair or else the replacement of the product at no charge if the former is unavailable, unless one of these options proves impossible to fulfil or is disproportionate. In this case, you can then opt for a reduction in price or cancellation of the sale, which must be dealt with directly with the sales vendor. This also covers replacement of spare parts provided that the product has been used according to the recommendations specified in this manual for both cases, and has not been tampered with by any third party that is not authorised by B & B TRENDS, SL. The warranty will not cover any parts subject to wear and tear. This warranty does not affect your rights as a consumer in accordance with the provisions in Directive 1999/44/EC for member states of the European Union.
USE OF WARRANTY
Customers must contact a B&B TRENDS, SL., authorised Technical Service for repair of the product. Since any tampering of the same by anyone not authorised by B&B TRENDS, SL., or the careless or improper use of the same shall render this warranty null and void. You must keep the purchase invoice, receipt or delivery docket in order to exercise your warranty rights. For technical service and after-sales care outside the Spanish territory, please submit your query to the point of sale where you purchased the item.
BON DE GARANTIE


- ESPAÑOL
- INFORMACIÓN GENERAL
- DESCRIPCIÓN
- GENERAL INFORMATION
- DESCRIPTION
- Unit and Accessory
- LED Screen / Mode
- SAFETY INSTRUCTIONS
- WARNING! Plastic bags can be dangerous. To avoid danger, keep plastic bags away from babies and children. Do not allow children to play with packaging materials. Suffocation hazard!
- IMPORTANT WARNINGS
- INSTRUCTIONS FOR USE
- Handle Installation Instruction
- Clean Water Tank Installation
- Dirty Water Tank Installation
- Brush Cover Disassembly Instruction
- Brush Roller Disassembly Instruction
- Preparation Before Use
- Add Water in Clean Water Tank
- Pour Water From Dirty Water Tank
- Product Charge
- MAINTENANCE AND CLEANING
- Clean the Clean Water Tank
- Clean the Dirty Water Tank
- Clean the Dirt Sensor
- Clean the Dirty Water Tank Cover
- Clean the Filter
- Self - Cleaning
- Clean the Brush Cover
- Clean the Brush Roller
- TROUBLE SHOOTING
- TROUBLE SHOOTING shall be reworked totally, below is example for reference
- PRODUCT DISPOSAL
- FRANÇAIS
- INFORMATIONS GÉNÉRALES
- MISE AU REBUT DU PRODUIT
- USE OF WARRANTY
- BON DE GARANTIE
Brand : Di4
Model : Velluto
Category : Vacuum Cleaner