
GOAT A3000 Lidar Pro - Vacuum Cleaner ECOVACS - Free user manual and instructions
Find the device manual for free GOAT A3000 Lidar Pro ECOVACS in PDF.

| Product Type | Cordless robotic lawn mower |
| Brand | ECOVACS |
| Model | GOAT A3000 Lidar Pro (MR2507D/MR2507E/MR2507F) |
| Dimensions (L × W × H) | 680 × 540 × 336 mm |
| Net weight (battery included) | 18.3 kg |
| Power supply | External power supply: input 100-240 V~, 50-60 Hz; output 37.8 V, 5 A |
| Battery | Lithium-ion, 32.4 V, 7500 mAh |
| Charging time | 70 ± 5 min |
| Cutting width | 33 cm |
| Cutting height | 3 to 9 cm (adjustable) |
| Navigation technology | 360° LiDAR (60 m range), 150° fisheye camera, 3D-ToF LiDAR (obstacle avoidance) |
| Sensors | Rain sensor, anti-lift and anti-jam safety sensors |
| Connectivity | Wi-Fi 2.4 GHz, Bluetooth, ECOVACS HOME app, 4G option |
| Rotation speed (main blade) | 3000 rpm |
| Rotation speed (cutting module) | 8500 rpm |
| Sound level (acoustic power) | 62 dB(A) (mowing) / 82 dB(A) (cutting) |
| Working capacity | 3000 m² |
| Routine maintenance | Weekly cleaning of LiDAR sensor; blade replacement every 4-6 weeks; cutting line every 4-8 weeks |
| Spare parts | Blades, cutting line, cutting brush, battery (original only) |
| Repairability | Battery replaceable by a professional; cutting module and blades accessible by user |
| Limited warranty | Manufacturer's warranty according to ECOVACS terms |
Frequently Asked Questions - GOAT A3000 Lidar Pro ECOVACS
User questions about GOAT A3000 Lidar Pro ECOVACS
0 question about this device. Answer the ones you know or ask your own.
Ask a new question about this device
Download the instructions for your Vacuum Cleaner in PDF format for free! Find your manual GOAT A3000 Lidar Pro - ECOVACS and take your electronic device back in hand. On this page are published all the documents necessary for the use of your device. GOAT A3000 Lidar Pro by ECOVACS.
USER MANUAL GOAT A3000 Lidar Pro ECOVACS
1. Important Safety Instructions - Read Carefully Before Use and Keep for Future Reference
Read the instructions carefully. Make sure you understand the instructions and be familiar with the controls and the proper use of the appliance. Please understand that you can reduce the risk by following the instructions and warnings in this manual, but you cannot eliminate all the risks.
Lawn Mowing Robot (hereinafter referred to as "GOAT") has many built-in safety sensors, however, safety risks still exist.
All related residual risks have been described or informed in this manual.
Description of intended use: Intelligent lawn mowers are mainly used in mowing grass, especially in parks, private villa yards, and football fields.
For machines used in public areas, that warning signs shall be placed around the working area of the machine.
They shall show the substance of the following text:WARNING! Automatic lawnmower! Keep away from the machine! Supervise children! DO NOT modify the mower by yourself.
Modifications could interfere with mower operations, result in serious injury and/or damage, or void the Limited Warranty. Use only Ecovacs approved parts and accessories.
Warning
Never allow children, persons with reduced physical, sensory or mental capabilities or lack of experience and knowledge or people unfamiliar with these instructions to use the machine, local regulations may restrict the age of the operator. To avoid using the machine and its peripherals in bad weather conditions especially when there is a risk of lightning.
Before each mowing session, check that all parts of the mower can function normally.
Periodically inspect the area where the machine is to be used and remove all stones, sticks, wires, bones, and other foreign objects.
NEVER allow children to touch the power supply unit, charging station, blades, the battery compartment, or any parts with gaps such as the wheels.
Warning
Never to operate the machine and/or its peripherals with defective guards or shields, or without safety devices, or if the cord is damaged or worn.
Keep away from the rotating blades! DO NOT put hands or feet under or near the rotating blades. Keep a safe distance from the mower when operating.
DO NOT overreach. Keep your balance at all times and always be sure of the footing on slopes. Walk, never run while operating the machine or its peripherals.
Warning
Never allow children to be in the vicinity or play with the machine when it is operating.
Warning
DO NOT touch moving hazardous parts before they have come to a complete stop.
Warning
For the purposes of recharging the battery, only use the detachable supply unit provided with this appliance (CH2491C/CH2491D).
This appliance contains batteries that are only replaceable by skilled persons.
Safe Usage:
Not to connect a damaged cord to the supply or touch a damaged cord before it is disconnected from the supply for the reason that damaged cords can lead to contact with live parts; keep extension cords away from moving hazardous parts to avoid damage to the cords which can lead to contact with live parts; to connect the machine and/or its peripherals only to a supply circuit protected by a residual current device (RCD) with a tripping current of not more than 30mA .
Unplug the Power Supply from the power socket and then untangle when the power cord or the extension cable is damaged or entangled during use. During the operation, pull the body of the plug rather than the cord to avoid the hazard. Contact Customer Service and let the skilled professional to repair or replace the cord.
Please use the extension cable manufactured by ECOVACS.If you have any problem, contact Customer Service.
If the SUPPLY CORD is damaged, it must be replaced by the manufacturer, its service agent
or similarly qualified persons in order to avoid a hazard.
Press the STOP Button at once when the mower makes the abnormal sound or raises the alarm. In case of leakage of electrolyte flush with water or neutralizing agent, ask for medical help once it gets contact with the eyes etc. If there are abnormal vibrations, please restart the mower. If the problem persists, please Contact Customer Service.
Instructions to always wear substantial footwear and long trousers while operating the machine with a manual controller.
Additionally when using the manual controller a)Mow only in daylight or in good artificial light. b) Avoid operating the machine in wet grass. c) Do not operate the machine when barefoot or wearing open sandals. Always wear substantial footwear and long trousers. d) Always be sure of your footing on slopes. e) Use extreme caution when reversing the machine towards you. f) Always switch on the motor according to instructions with feet well away from the blade(s).
Device Update
Typically, some devices are updated bi-monthly, but not always so specific.
Some devices, especially those that went on sale more than three years ago, will only be updated if a critical vulnerability is found and fixed.
Do not use and store in extremely hot or cold environments (below 5^ / 41^ or above 45^ / 113^ ).
This equipment must be installed and operated in accordance with provided instructions and the antenna(s) used for this transmitter must be installed to provide a separation distance of at least 20cm from all persons and must not be collocated or operating in conjunction with any other antenna or transmitter.
European Union Compliance Statement
Information on Disposal for Users of Waste Electrical & Electronic Equipment

This symbol on the product or on its packaging indicates that used electrical and electronic products should not be mixed with unsorted municipal waste. For proper treatment, it is your responsibility to dispose of your waste equipment by arranging to return it to designated collection points.
Disposing of this product correctly will help save valuable resources and prevent any potential negative effects on human health and the environment, which could otherwise arise from inappropriate waste handling.
To return your used device, please use the return and collection systems or contact the retailer where the product was purchased, which is free of charge, please contact your local authority for further details of your nearest designated collection point.
Penalties may be applicable for incorrect disposal of this waste, in accordance with your national legislation.
Information on Disposal for Users of used batteries

This symbol means that batteries and accumulators, at their end-of-life, should not be mixed with unsorted municipal waste. Your participation is an important part of the effort to minimize the impact of batteries and accumulators on the environment and on human health. For proper recycling you can return this product or the batteries or accumulators it contains to your supplier or to a designated collection point, which is free of charge.
Disposing of this product correctly will help save valuable resources and prevent any potential negative effects on human health and the environment, which could otherwise arise from inappropriate waste handling.
Penalties may be applicable for incorrect disposal of this waste, in accordance with your national legislation.
there are separate collection systems for used batteries and accumulators.
Please, dispose of batteries and accumulators correctly at your local community waste collection/recycling center.
Restriction of the use of certain hazardous substances (RoHS) Directive
Ecovacs Home Service Robotics Co., Ltd. hereby declares the whole product including parts (cables, cords, and so on) meets the requirements of RoHS Directive 2011/65/EU and amendment Commission Delegated Directive (EU) 2015/863 on the restriction of the use of certain hazardous substances in electrical and electronic equipment ("RoHS recast" or "RoHS 2.0").
Radio Equipment Directive
Ecovacs Home Service Robotics Co., Ltd. hereby declares that the product listed in this section comply with the essential requirements and other relevant provisions of the Radio Equipment Directive 2014/53/EU.
Machinery Directive
Ecovacs Home Service Robotics Co., Ltd. hereby declares that the product listed in this section comply with the essential requirements and other relevant provisions of the Machinery Directive 2006/42/EC.
Europe Authorised Representative:

ECOVACs Europe GmbH Holzstrasse 2 I D-40221 Dusseldorf I Germany
Ecovacs Home Service Robotics Co., Ltd. hereby declares that the product comply with the essential requirements and other relevant provisions of the RoHS Directive 2011/65/EU and amendment Commission Delegated Directive (EU) 2015/863, the Radio Equipment Directive 2014/53/EU and the Machinery Directive 2006/42/EC.
The declaration of conformity can be viewed at the following address: https://www.ecovacs.com/global/compliance.
| III | Class III appliance |
| --- | Direct current |
| ~ | Alternating current |
| CE | This product conforms to the applicable EC Directives. |
| Polarity of the charging port | |
| Before charging, read the instructions. |
Symbols
| WARNING-Read instruction manual before operating the machine. |
| WARNING-Keep a safe distance from the machine when operating. |
| WARNING-Do not ride on the machine. |
| WARNING-Operate the disabling device before working on or lifting the machine. |
| CAUTION-Do not touch rotating blade. |
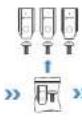
2. What's in the Box
2.1 Package Contents
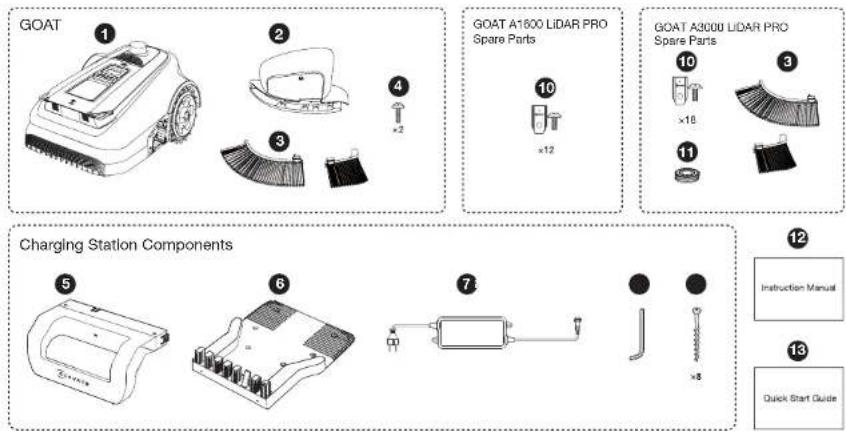
GOAT
5 Pile of Charging Station
9 Screws (For Base)
2 Trimmer Module
6Base of Charging Station
10 Spare Blade Kit
3Trimmer Brush
7 Power Supply
1 Trimmer Line
4 Screw
Allen Key
12 Instruction Manual
Quick Start Guide
2.2 Views and Functions

Top View

Bottom View


Back View
Sensors
| Name | Description |
| LiDAR sensor | By measuring the distance between GOAT and the surrounding environment, the sensor helps GOAT determine its own position. Horizontal: 360 degrees; Vertical: 50 degrees. The farthest distance is 60m(196.85'). |
| Fisheye Camera | Perceive the environmental information around GOAT, identify special targets, and help GOAT to interact with the user intelligently. Horizontal: 150 degrees; Vertical: 80 degrees |
| 3D-ToF LiDAR | Perceive obstacle information in front of GOAT and help GOAT to avoid obstacles actively. Range: Detect the longitude and latitude coordinates of GOAT position. Horizontal: 90 degrees; Vertical: 70 degrees The farthest distance is 3-4m (9.84' - 13.12'). |
| Rain Sensor | Detect whether it is raining in the current environment, and help GOAT decide whether to continue working. |
Interface
| Name Description | |
| Bluetooth(GOAT) | Enable Bluetooth during network setup to connect the robot to the network. During regular use, enable Bluetooth mode to perform tasks like manual mapping and manual mowing. |
| WiFi | Enable Wi-Fi to transmit data between the app and the robot, allowing app-based control. |
| ECOVACS HOME APP | Download and enable the latest version of the ECOVACS HOME app to access smart features such as network setup, mapping, and mowing (features may vary by product). |
| Charging Contacts | Enable charging by connecting the robot to a power source. |
| Bluetooth(Charging Station) | Bluetooth is used to connect the charging station to GOAT. During regular use, this connection supports functions such as OTA firmware updates. |
Charging Station
Station Indicator Light

Charging Station Light
Solid Blue: Powered on/ Fully charged.
Quick Flashing Blue: Charging.
3. Get Your GOAT Ready
3.1 Charging Station Installation
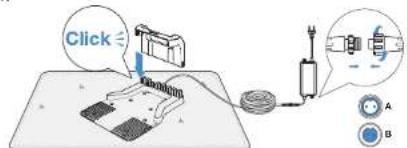
1 Assemble the Charging Station
Insert the Pile into the Base until you hear a 'click'.
Connect the power cable to the power adapter. Please align the notch (A) with the groove (B) and screw the nut until they are locked into each other.
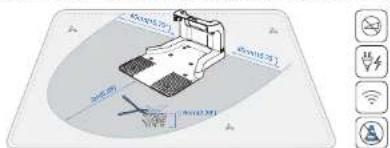
Place the Charging Station
The specific range will be formed around the Charging Station installation site (as shown in the figure), and it needs to meet the following conditions.
Strong Wi-Fi signal coverage
- Flat and open area without slopes
- No obstacles around the Charging Station
- Precut the grass around the Charging Station to a height<6cm (2.36)
Connect Power
Connect the Plug to the power supply and ensure the blue light on the Charging Station is steady on.
Note:
-
Please ensure the Power Adapter is positioned 30cm (11.8') above the ground to prevent water and moisture damage.
-
Please plug the device into an indoor outlet or an outdoor waterproof outlet.
- You can choose to buy the Extension Cable by connecting it to Power Inter if needed.
Fix the Charging Station
Please use the Charging Station Fastening Anchors and the Allen key to fix the Charging Station to the ground.
Note:
Fix the Charging Station only after everything is set up.
3.2 GOAT Setup
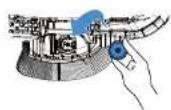
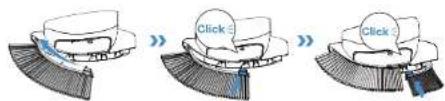
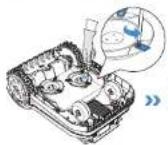
1 Trimmer Module Installation
- Turn Off GOAT
Warning: DON't forget to wear gloves and turn off your GOAT before installing the Trimmer module.
- Place GOAT upright
- Align the Trimmer's connector and insert the Trimmer Module into GOAT's interface.
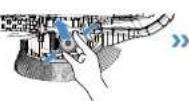
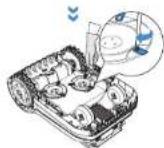
-
Install the screws in the three screw holes on the Trimmer Module.
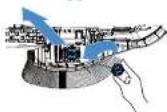
-
Place the brush onto the buckle position of the Trimmer and install the brush until a "click" sound confirms installation.

Warning:
GOAT CANNOT be used if the Trimmer Module is not installed properly.
-
If the Trimmer Brush next to the Trimmer Module is not installed, grass pulp may adhere to GOAT during trimming, making cleaning difficult. Please ensure the Brush is installed and replace it regularly.
-
Do not use the trimming function at night.
| Buttons Functions | |
| →OK | Start mowing.Resume mowing. |
| OK | Press to confirm.Press and hold for 3 seconds to power on the GOAT. |
| →OK | Send GOAT back to the Charging Station to get charged. |
| STOP Stop GOAT. | |
| → | Press and hold for 5 seconds to reset the GOAT. |
| [+] For a bigger number. | |
| [-] For a smaller number. | |
| Press and hold for 3 seconds to enable Bluetooth pairing. | |
| Press 5 times to show the battery level. | |
| Press and hold for 5 seconds to enter in the Trimmer's maintenance status. | |
Panel Display Reads:
| Display Description | |
| Standing by. No task assigned | |
| Current Battery Level (For example, the number shown in the image represents the current battery level as 100%). | |
| STOP GOAT is paused. Please press▶→OK to continue working, or▶> OK to return to the charging station. | |
| ON GOAT is working | |
| OTA GOAT is undergoing OTA updates | |
| E and a 3-digit Error Code. Go to the Troubleshooting section of this manual or visit https://www.ecovacs.com/global for the meaning of the Error Code messages and recommended solutions. | |
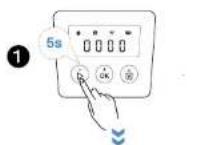
1.Start Your GOAT:
Press and hold [OK] for 3 seconds on GOAT and the digital tube display will flash as below. Note: Your GOAT will be automatically powered on when it docks at the Station.


2.Set PIN Code:
The PIN code you set for your GOAT at the very beginning is used to prevent the device from being stolen or operated by children. When GOAT is off the map, or needs to be powered on or reset, it will automatically be locked. You can unlock it by entering the right PIN code.
Set the PIN code when the display shows as below
Press [+] or [-] to select the PIN code numbers one by one. After the first digit is decided, press [OK] to confirm, and the cursor will move to the next digit. Repeat until all 4 digits are confirmed, and the display will show a new PIN code input page with at the left top corner. Now enter the PIN code you just set to confirm and unlock your GOAT.
Note:
- 0000 is an invalid PIN code.
PIN code is to be entered twice to confirm the setting. - If you enter the wrong numbers while setting the PIN code, the setting process will start all over again.
- After the initial setup or reset, you must set the PIN code on GCAT. You may then change the PIN code in the App.
3.3 APP Setup
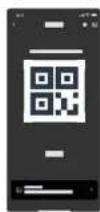
Download the ECOVACS HOME App
Scan the QR code on the GOAT, Download and install the ECOVACS HOME App, complete the registration, and log in. You may also find the Instruction Manual and How-to-use by scanning the QR code.

Connect GOAT to the App
Note:
- Your mobile phone is connected to a Wi-Fi network. The 2.4GHz band wireless signal is enabled on your
Make sure your GOAT and your phone are in the same 2.4GHz network router environment. - Ensure your phone has Bluetooth function and your GOAT is within the effective distance of 10 m (32.8).
- The GOAT series robotic lawn mowers are designed for domestic mowing scenarios. A home Wi-Fi network is required for operation, and anti-DDoS protection can be configured by users through router settings.
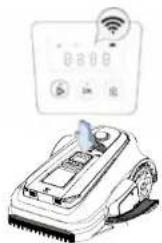
Bluetooth Connection and Wi-Fi Connection
- Turn on the Bluetooth on your phone.
2.Scan the QR Code on GOAT or select GOAT manually on the App.

- Follow the instructions on the App to complete the Bluetooth connection and Wi-Fi connection.
- On GOAT's panel display will light up after successful connection.
How to unbind your GOAT?
Allowing binding to one App account currently, your GOAT is unable to be bound to another App account before unbinding. You can unbind your GOAT in the App. Feel assured to take this operation which would not erase the working data such as schedules of your GOAT. You also can cancel the account in by clicking the small triangle next to the GOAT name to delete it.
3.4 Prepare GOAT for Operation
Place GOAT it at the Charging Station for charging. GOAT will turn on automatically. The PIN code is needed every time the GOAT is turned on.
Remove the LiDAR cover from on your GOAT and store the cover it properly.
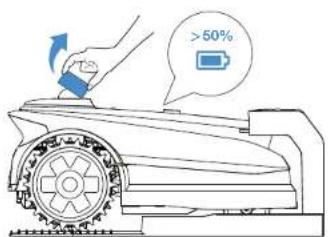
Note:
- The GOAT's panel will flash white, displaying the current battery level on the screen.
The battery level must be higher than 50% before starting.
4. Map Your Garden
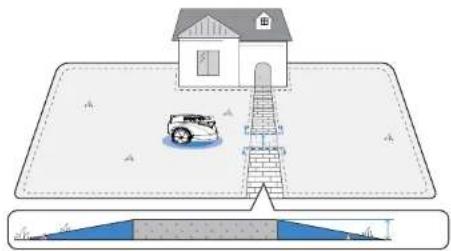
- If your lawn is split into two parts by a road with a height of more than 3cm (1.18^) , you can place a ramped object (such as an uphill mat) that is as high as the road and wider than 1.5m (4.92^) before mapping, to create a path to connect the two parts when mapping.
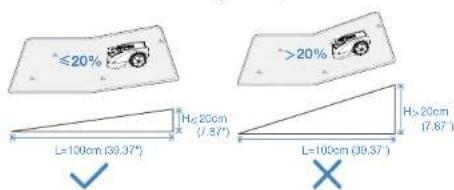
- Do not create the virtual boundary on a slope that exceeds 20% .
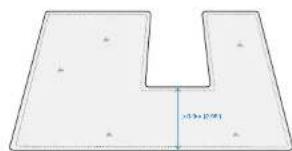
Note: If GOAT needs to pass through a narrow passage, ensure that the minimum width of the passage is greater than 0.9 meters (2.95').
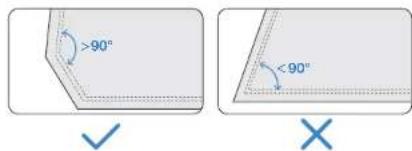
Make sure that the turning angle is greater than 90^
4.2 Create a Map
4.2.1 Set the Virtual Boundary
1 Boundary Types
Various types of boundaries define the outline of your lawn, such as hedges, fences, and drainage ditches. For different types of physical boundaries, it is recommended that when remotely controlling GOAT, you pay attention to the distance between GOAT and the boundary to achieve the best cutting results.
- Barriers
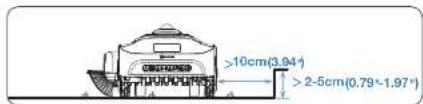
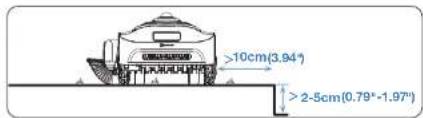
Walls or fences that rise more than 5cm (1.97") above ground level. Recommendation: When mapping along this type of boundary, remotely control GOAT to follow the barrier's edge closely.
- Restrained Boundaries
Steps with a height of 2-5cm (0.79"-1.97") above ground level.
Concave surfaces lower than the surrounding ground.
Recommendation: When mapping, keep GOAT approximately 10cm (3.94) away from this type of boundary.
Flat Boundaries
Flat road surfaces flush with the lawn. Recommendation: When mapping along this type of boundary, extend the mapping path slightly outward.
Create a Map
- Build the map at daytime under optimal sunlight.
- Ensure your GOAT docks properly at the Charging Station and starts from there.
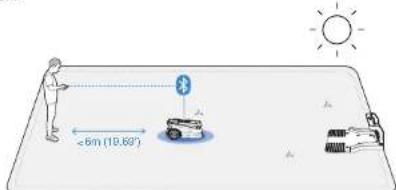
- Keep close to GOAT within 6m (19.69) for a steady Bluetooth connection.
-
Tap to start mapping on the APP. GOAT will automatically exit the Charging Station.
-
Once GOAT has exited the station, use on the APP to control its movement.
- Drive GOAT to the boundary and position it at a suitable starting point, then tap to start mapping.
- Control GOAT along the boundary following the recommendations in the "Boundary Types" chapter.
- When GOAT approaches the starting point, the button will appear on the APP. Tap to close the boundary and generate the map.

Function Button During Mapping
This function becomes available when GOAT detects a clear boundary between grass and non-grass areas. The button will flash to indicate availability.
Tap it, and GOAT will automatically follow the boundary until the boundary becomes unclear.
*Monitor GOAT and switch to manual mode if the automatic mapping is not as expected.
This function allows GOAT to reverse its most recent mapping path. Press and hold the button until GOAT returns to the point where you want it to stop reversing.
4.2.2 Explore Map Features
You can explore more mapping features on the App. You can enter Map Editing once the map is finished.
Map Editing Functions
Area
A working area that you can add, delete, merge, or divide. The first area is the boundary you just drew by remotely controlling GOAT.
- Path
A connection between two areas.
A path can be created manually using the add path function or generated automatically when you create a new area by starting from one area and reaching the starting point of another.
No-Entry Zone
A zone that GOAT will not enter.
It is necessary to set up No-Entry Zones for objects, such as flowerbeds, trampolines, vegetable plots, raised tree roots, exposed wires, and slopes that exceed 45% .
You can create a No-Entry Zone and control GOAT to draw a boundary around the zone—just like creating the map, including setting the starting point and end point.
Note:
It is recommended to keep the No-Entry Zone boundaries 30cm (11.8') away from dangerous areas such as ponds or cliffs.
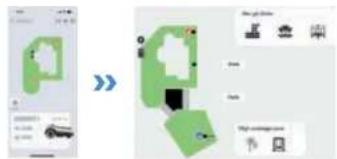
High Coverage Area
To ensure a comprehensive mowing experience, GOAT is equipped with sensitive multi-obstacle avoidance sensors. Sometimes, the obstacle avoidance function may be triggered by taller objects such as dandelions or wild grass. This feature allows you to create Non-Obstacle Avoidance Areas, enabling GOAT to cut smoothly through these plants.
Note:
If the wild grass covers a large area, it is recommended to use a push mower for cutting.
Map
It involves functions such as map modification, backup, deletion, and restoration.
Mowing Settings
- Mowing Parameter Setting
Once the mapping is complete, you can set mowing parameters such as mowing direction, mowing speed, and cutting height. Different parameters can be assigned to each area, allowing you to create the optimal mowing plan for your lawn.
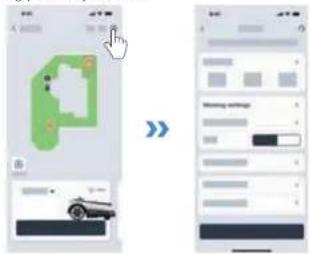
- Boundary Type Settings
Please refer to Chapter "Boundary Types" By default, GOAT will strictly follow the original path recorded during mapping.
You can also choose boundary sections such as Barriers or Flat Boundaries, as described in "Boundary Types."
Select these sections on the App and enable the Adaptive Mode. This allows GOAT to intelligently identify the actual grass-non-grass edge and extend mowing coverage.
| Cutting Height Setting Recommendation | |
| Grass Height Cutting Height Setting | |
| 7-10cm (2.8"-3.9") | 5-8cm (2.0"-3.2") (cut by 2cm / 0.8") |
| 4-7cm (1.6"-2.8") | 3-6cm (1.2"-2.4") (cut by 1cm / 0.4") |
5. Time for Mowing
5.1 Tips Before First Mowing
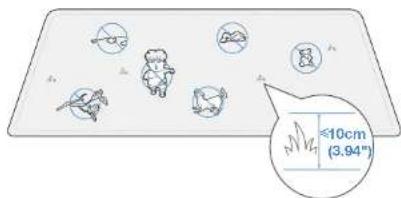
- Procut the grass to a height of no more than 10cm (3.94^) with your manual lawnGOAT and clear away obstacles including debris, piles of leaves, foys, wires and stones.
- Do not let your children play on the lawn when your GOAT is mowing.
- GOAT will pause mowing when it is raining or the battery is low, and will resume mowing automatically afterward.
Note: The rain delay time can be adjusted in Settings.
5.2 Manually Triggered Tasks

-
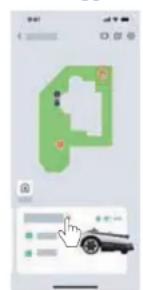
Auto Tap and select the cutting sequence for the area. GOAT will start mowing the entire area. After completing logical mowing within the area, it will mow along the boundaries, including the Area and No-Entry Zone boundaries. This function can also be triggered from GOAT's panel.
Area Tap and select the mowing area, GOAT will start mowing the selected areas. After completing logical mowing within these areas, it will mow along their boundaries, including the Area and No-Entry Zone boundaries. -
Trim Tap and select the edges to trim, including the parts of the Area and No-Entry Zones boundaries.
Note:
- To ensure optimal trimming. GOAT will mow as close to the edge as possible. When selecting trimming boundaries, avoid areas with objects that could be damaged.
- When the Trimmer is operating and the system detects a person nearby, trimming will stop. Keep at least 2 meters (6.56) away from GOAT during operation.
- To reduce wear caused by frequent starts and stops, the Trimmer will not stop rotating between tasks if trimming is incomplete. Instead, it will switch to a low-speed mode, which is less effective at cutting grass, until it reaches the next task area.
- Manual
Tap to enter manual mode, allowing GOAT to mow or trim under Bluetooth control.
Note:
Keep within 6m (19.69') of GOAT to maintain an effective Bluetooth connection.
5.3 Schedule Triggered Tasks

Animal Protection Time
To protect nocturnal animals, you can set non-working time periods. By default, this period is 19:00-7:00. Tap to adjust the time period as needed.
- Auto Mowing Time
You can set a mowing schedule if needed. GOAT will then mow automatically according to the schedule.
6. Maintenance
For better performance and a longer lifespan of your GOAT, please maintain it properly and replace worn parts as needed.
6.1 Routine Maintenance
Recommended Frequency
| Part | Frequency |
| LiDAR Sensor Wipe every 1 week | |
| Front AI Camera Wipe every 1 to 2 weeks | |
| ToF Sensor Wipe every 1 to 2 weeks | |
| Blades Replace every 4 to 6 weeks | |
| Trimmer Line Replace every 4 to 8 weeks | |
| Trimmer Brush Replace every 4 to 8 weeks | |
Note: Please utilize only the original battery or that of the same model as specified by ECOVACS.
6.2 Warnings Before Maintenance
Always power off your GOAT before maintenance operation.
Always wear protective gloves especially when replacing the Blades.
- Cover the LiDAR sensor when replacing the blades or cleaning the machine before turning GOAT over.
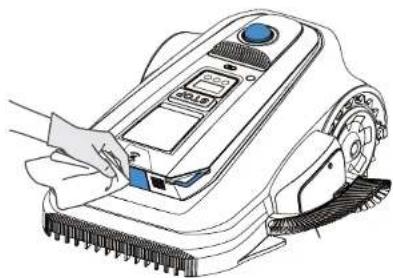
Steps to Clean the Main Parts
- Clean the Blade Disc and Wheels with a brush, wipe other components with a clean, dry cloth.
- Clean the trimmer structure using a brush or cloth.
DO NOT use cleaning sprays or detergents.
DO NOT use a high-pressure sprinkler, as it may damage electronic components.
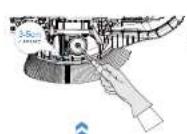
Trimmer Line Replacement
- Press and hold for 5 seconds to enter the Trimmer's maintenance status.
- Loosen and remove the screws of the trimmer line cover. 3. Pinch the clips on both sides of the cover and pull out the
- Remove the old reel, install the new one, and pull the trimmer line out of the hole.
- Close the cover and tighten the screws.
- Hold the line-release button and extend the line by 3-5cm (1.18^ - 1.97^)

2

3

Trimmer Module Brush Replacement
If the Trimmer Brush is deformed, press down the brush clip to remove the Brush. Then insert the new brush clip into the Trimmer housing until it clicks into place.
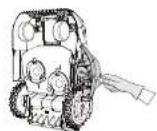
4 Blade Replacement
- Loosen and remove the Screws and Blades with a screwdriver.
- Install the new Blades and the Screws, ensuring the Blades can spin freely.
- Use only the Blades manufactured by ECOVACS and new screws when assembling the Blades.


5 Battery Maintenance
For long-time storage, charge GOAT every 6 months. The Limited Warranty does not cover battery damage caused by over-discharge. The battery CANNOT be charged when the ambient temperature is above 40^ / 104^ or below 5^ / 41^ . The recommended temperature for GOAT operation is between 5 - 40^ / 41 - 104^ . The storage temperature range is -20 - 75^ / 4 - 4 - 167^ .
Note: The life-span of GOAT's battery depends on the frequency of usage and the total hours of use. It is also non-rechargeable. DO NOT dispose of disused or faulty batteries casually. Check with your Local Authority for advice.
6.3 Seasonal Maintenance
Winter Storage
- Power off your GOAT after it is fully charged.
- Disconnect the Power Adapter from the Charging Station.
- Mark the location of the Charging Station for reference in the next working season.
- Store GOAT in a cool, well-ventilated, and dry place away from direct sunlight.
Note: It is necessary to put the Charging Station in the original position for working in a new season. Otherwise, it may lead to location faults or map invalidation.
Spring Restart
- Assemble the Station, putting it back to where it was in the last working season.
- Check the Blades for sharpness, the trimmer line and brush, replace them if necessary.
- Power on your GOAT and test if it is connected to the App and works properly.
7. Troubleshooting
If there is something wrong with your GOAT when working, you can consult the table below. The ECOVACS HOME App will also send detailed problem notifications. Please contact our Customer Service if the problems still exist.
| Issue | Error Code Cause Solution | ||
| The Indicator Light on the Charging Station does NOT light up. | / | There is no power supply or the current and voltage are unstable. | 1. Ensure the Charging Station is properly connected to a power supply, and the plug is inserted into a suitable socket. |
| The GOAT stops within the working area. | / | The GOAT fails to dock at the Charging Station. | 1. Ensure the Charging Station is connected to a power supply. The indicator Light should be steady blue.2. Check if the reflective film on the Charging Station is blocked.3. Check for obstacles near the Charging Station, and remove them if necessary.4. Ensure the Charging Station is installed correctly. If not, reinstall it properly. |
| E621E622E623E627 | The GOAT is lifted or trapped for a long time. | 1. It is recommended to turn off the GOAT to avoid injury, then place it back on a level lawn.2. If the GOAT detects that the issue has been resolved, the error code will disappear.3. If the error code is still displayed, please turn off the GOAT and check for any obstacles or conditions that might be causing it to get trapped.4. Remove any obstacles that may cause the GOAT to get stuck, or set up a no-entry zone.5. If relocation failure persists, control/place the GOAT back at the Charging Station and restart it. | |
| The Trimmer Module doesn't work well. | E613 | The Trimmer Module cannot rotate normally. | Please wear gloves and pay attention to operational safety.1. Check whether the module is blocked by grass clippings, and assist in restoring normal rotation.2. Adjust the boundary to prevent GOAT from colliding with hard objects at the boundary. |
| GOAT stops working and returns to the Charging Station. | E674 | The battery temperature is out of range. | 1. Place the GOAT in an area with an appropriate temperature, or wait until the battery temperature returns to normal. 2. Restart the GOAT. |
| E641 E642 | The LiDAR Sensor temperature is out of range. | 1. Place GOAT in an area with an appropriate temperature, or wait until the temperature returns to normal. 2. Restart GOAT. | |
| E643 | There is an error positioning. | 1. Control/place GOAT back at the Charging Station and restart it. 2. Restart GOAT. | |
| / The battery voltage is low. Wait until the battery is fully charged. | |||
| / The Rain Sensor is triggered, or it is the end of a scheduled task. | Normal phenomenon, please wait until the task resumes, or you can change the rain delay setting or schedule on the APP. | ||
| The GOAT is not operating at the correct time. | / The schedule for the GOAT is not correct or the timezone is not correct. | Please check if the settings are correct. | |
| / GOAT automatically starts the recutting task, due to reasons like recharging, rain delay. | You can also set the "Animal Protection" time on the APP to limit the time GOAT can operate. | ||
| Other Issues or Situations. | / Any other abnormal phenomena. | 1. You can check the error message on the APP for detailed information. 2. Resolve the issue, and then you can restart the GOAT to resume operation. 3. If the problem still exists, please contact the Customer Service. | |
8. Technical Specifications
| Basic Information | Product Name Lawn Mowing Robot | ||
| Model | ECOVACS GOAT A1600 LIDAR PRO ECOVACS GOAT A3000 LIDAR PRO | ||
| MR2507/MR2507A/MR2507B | MR2507D/MR2507E/MR2507F | ||
| Brand ECOVACS | |||
| Dimensions:Length (mm) × Width (mm) × Height(mm) | 680*540*336 (26.8**21.3**13.2") | ||
| Net Weight (kg) (Battery Included) 17 | 8 (39.24 lb) 18.3 (40.34 lb) | ||
| GOAT Parameters | Rated Voltage | 37.8V = = | |
| Working Capacity (m³) | 1600 (2/5 acre) 3000 (3/4 acre) | ||
| Cutting Width (cm) 33 (13.0") | |||
| Trimming Width (cm) 18 (7.09") | |||
| Cutting Height (cm) 3-9 (1.21-3.6") | |||
| Charging Time (min.) 50±5 70±5 | |||
| Noise Emissions | Measured Sound Power Level LwA 62 dB(A) | ||
| Sound Power Uncertainties KwA | 3 dB(A) | ||
| Sound Pressure Level LaA | 54 dB(A) | ||
| Sound Pressure Uncertainties KpA | 3 dB(A) | ||
| Trimmer Noise Emissions | Measured Sound Power Level LwA 82 dB(A) | ||
| Sound Power Uncertainties KwA | 3 dB(A) | ||
| Sound Pressure Level LaA | 74 dB(A) | ||
| Sound Pressure Uncertainties KpA | 3 dB(A) | ||
| Connectivity Frequency Range | Bluetooth® | 2400MHz - 2483.5MHz | |
| Wi-Fi 2400MHz - 2483.5MHz | |||
| Cellular Network (purchased) | WCDMA: BAND I: Uplink:1920-1980MHz, Downlink:2110-2170MHzBAND VIII: Uplink:880-915MHz, Downlink:925-960MHzLTE:E-UTRABAND 1: Uplink:1920-1980MHz,Downlink:2110-2170MHz-E-UTRABAND 3: Uplink:1710-1785MHz, Downlink:1805-1880MHz-E-UTRABAND 7: Uplink:2500-2570MHz, Downlink:2620-2690MHz-E-UTRABAND 8: Uplink:880-915MHz, Downlink:925-960MHz-E-UTRAPAND 20: Uplink:832-862MHz, Downlink:791-821MHz-E-UTRAPAND 28: Uplink:703-748MHz, Downlink:758-803MHz-E-UTRAPAND 38: Uplink:2570-2620MHz, Downlink:2570-2620MHz-E-UTRAPAND 40: Uplink:2300-2400MHz, Downlink:2300-2400MHz Available frequency bands for LTE Band 28 in Europe are 703-736MHz(TX), 758-791MHz(RX) | ||
| GNSS (purchased) | BDS: 1559 MHz -1610 MHzGalileo: 1559MHz-1610MHz, 1164MHz - 1215MHz, 1215MHz - 1300MHzGLONASS: 1559 MHz -1610 MHz, 1215MHz - 1300MHzGPS: 1559MHz - 1610MHz, 1215MHz - 1300MHz, 1164MHz - 1215MHz | ||
| MAX. radio-frequency power | Bluetooth® ≤20dBm | ||
| Wi-Fi ≤20dBm | |||
| Cellular Network (purchased) | WCDMA:+24dBm+1.7/-3.7dBLTE: E-UTRA Band28:23dBm+2.7/-3.2dB other Bands:23dBm±2.7dB | ||
| GNSS (purchased) Only receive but not transmit | |||
| Driving Motor | Rated Speed (r/min) | 34.7 | |
| Top Speed (r/min) | 60.8 | ||
| Blade Motor Speed (r/min) | 3000 | ||
| Trimmer Motor Speed (r/min) | 8500 | ||
| Battery (GOAT) | Battery Type Lithium-ion | ||
| Rated Voltage 32.4V | --- | ||
| Battery Capacity 3000 mAh 7500 mAh | |||
| Power Supply | Supply Unit Model | GM152-3780300-2DGGM152-3780300-3DGGM152-3780300-SDGBLJ125W378300P-SWBLJ125W378300P-VBLJ125W378300P-B | GM403-3780500-2DGGM403-3780500-3DGGM403-3780500-SDGBLJ240W378500P-SWBLJ240W378500P-VBLJ240W378500P-B |
| Input Voltage 100 - 240 V - 50-60Hz | |||
| Output Voltage | 37.8V --- | ||
| Output Current 3A 5A | |||
| Station | Model CH2491C CH2491D | ||
| Input Voltage | 37.8V --- | ||
| Input Current 3A 5A | |||
| Output Voltage | 37.8V --- | ||
| Output Current 3A 5A | |||
Note: Technical and design specifications may be changed for continuous product improvement.
Explore more accessories at https://www.ecovacs.com.
Directive relative aux machines
5 Pile de station de charge
Vis (pour la base)
Module de coupe
6Base de station de charge
10 Kit de lames de rechange
Brossedecoupe