
D45 - Vacuum Cleaner ECOVACS - Free user manual and instructions
Find the device manual for free D45 ECOVACS in PDF.


| Product Type | Robot Vacuum Cleaner |
| Brand | ECOVACS |
| Model | D45 |
| Dimensions (Diameter x Height) | 330 mm x 79 mm |
| Weight | 3.2 kg |
| Battery Type | Lithium-ion |
| Battery Capacity | 2600 mAh |
| Runtime | Up to 100 minutes |
| Charging Time | Approx. 4 hours |
| Suction Power | 2000 Pa |
| Dust Bin Capacity | 0.4 L |
| Cleaning Modes | Auto, Spot, Edge, Random |
| Navigation System | Gyroscope and infrared sensors |
| Smart Features | Wi-Fi connectivity, ECOVACS Home app, voice control |
| HEPA Filter | Yes, washable |
| Brush Type | Side brushes (3) and main roller brush |
| Auto Recharge | Yes, when battery low |
| Cliff Sensor | Yes, to prevent falls |
| Maintenance | Clean dust bin after each use, replace filters every 3-6 months |
| Spare Parts Available | Filters, brushes, battery, charging dock |
| Safety | Overheat protection, low battery shutdown |
Frequently Asked Questions - D45 ECOVACS
User questions about D45 ECOVACS
0 question about this device. Answer the ones you know or ask your own.
Ask a new question about this device
Download the instructions for your Vacuum Cleaner in PDF format for free! Find your manual D45 - ECOVACS and take your electronic device back in hand. On this page are published all the documents necessary for the use of your device. D45 by ECOVACS.
USER MANUAL D45 ECOVACS
natural_image
Close-up of a white robotic vacuum cleaner with black and white stripes, emitting smoke or dust (no visible text or symbols)JA 取扱説明書 2
EN Instruction Manual....18
ZH-TW 說明書 34
KO 사용 설명서 48
natural_image
Simple line drawing of a circular container with two side handles and a central slot (no text or symbols)ロボット

natural_image
Line drawing of a 3D object resembling a container or bracket (no text or symbols)充電ドック

取扱説明書

natural_image
Simple line drawing of a remote control unit and two batteries (no text or symbols)リモコン(電池付)

natural_image
Four identical diagrams of droplets with pointed tips, arranged in a row (no text or symbols)サイドブラシ
natural_image
Simple line drawing of a symmetrical shape with four dark rectangular cutouts at the bottom (no text or symbols)natural_image
Technical drawing of a mechanical part with diagonal hatching (no text or symbols)能マイクロファイバー清
掃布

natural_image
Technical line drawing of a mechanical component with internal grooves and a central mounting hole (no text or symbols)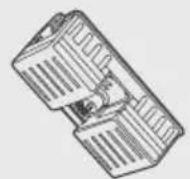
2.2 仕様
natural_image
Illustration of a vacuum cleaner connected to a plug with wires and a warning symbol (no text or labels)natural_image
Simple line drawing of a robotic device with warning symbols (no text or labels)natural_image
Line drawing of a sofa with a pillow placed on the backrest, connected to a circular device (no text or symbols)natural_image
Line drawing of a staircase with an overhead device on top (no text or symbols)natural_image
Illustration of a hand placing a small electronic device into a circuit board (no text or symbols visible)natural_image
Diagram of a drone's internal components with a hand pointing to a device, showing no text or symbols.3. 操作とプログラミング
4 清掃布の取り付け
natural_image
Line drawing of a robotic vacuum cleaner with a mesh cover and handle (no text or symbols)5 電源オン
natural_image
Line drawing of a robotic vacuum cleaner with power outlet and battery icon (no text or symbols)3. 操作とプログラミング
7 開始
4 充電ドック帰還モード
3. 操作とプログラミング
natural_image
Line drawing of a robotic vacuum cleaner with power outlet, no text or symbols presentnatural_image
Illustration showing hands using a portable air conditioner to clean food from a sink (no text or symbols present)natural_image
Illustration of a hand holding a water tap and a container with cleaning tools, both without any text or symbols.natural_image
Illustration showing a robotic arm interacting with a device and a hand cleaning a textured surface (no text or symbols)natural_image
Illustration of a portable electronic device with solar radiation symbol above it, accompanied by three separate compartments (no text or symbols present)4. メンテナンス
4.2 清掃布
natural_image
Illustration showing a robotic vacuum cleaner and its hand holding a device with an arrow (no text or symbols)清掃布を洗って、乾燥させます。

natural_image
Illustration showing a faucet pouring water into a cracked surface and sunlight rising, symbolizing environmental impact (no text or symbols)4.3 吸入口とサイドブラシ
natural_image
Line drawing of a hand pointing to the internal components of an electronic device (no text or symbols visible)
natural_image
Illustration showing a hand using a tool to adjust or install a component, with no visible text or symbols.4. メンテナンス
4.4 その他の部品
natural_image
Hand inserting a device into a circular device with buttons and ports (no text or symbols visible)natural_image
Hand inserting a device into a circular device (no text or symbols visible)natural_image
Diagram of a device's internal components, showing a hand pointing to a component with no visible text or symbols.
natural_image
Line drawing of a hand holding a small electronic device with ports, no text or symbols present5. トラブルシューティング
Congratulations on the purchase of your ECOVACS Robotics DEEBOT! We hope it brings you many years of satisfaction. We trust the purchase of your new robot will help keep your home clean and provide you more quality time to do other things.
Live Smart. Enjoy Life.
Should you encounter situations that have not been properly addressed in this Instruction Manual, please contact our Customer Service Center where a technician can address your specific problem or question.
For more information, please visit the ECOVACS official website :www.ecovacs.com
The company reserves the right to make technological and/or design changes to this product for continuous improvement.
Thank you for choosing DEEBOT!
Contents
- Important Safety Instructions....18
- Package Contents and Technical Specifications....20
2.1 Package Contents....20
2.2 Specifications....20
2.3 Product Diagram....21
- Operating and Programming......23
3.1 Notes Before Cleaning....23
3.2 Quick Start....24
3.3 Cleaning Mode Selection....27
3.4 Intelligent Scheduling....28
- Maintenance....29
4.1 Dust Bin and Filters....29
4.2 Cleaning Cloth....30
4.3 Suction Intake and Side Brushes....30
4.4 Other Components....31
- Troubleshooting....32
1. Important Safety Instructions
When using an electrical appliance, basic precautions should always be followed, including the following:
READ ALL INSTRUCTIONS BEFORE USING THIS APPLIANCE.
SAVE THESE INSTRUCTIONS
- This Appliance is not intended to be used by children under 8 or anyone lacking knowledge on proper use. Supervision may be necessary. Do not allow children to sit on or play with the Appliance.
- Clear the area to be cleaned. Remove power cords and small objects from the floor that could entangle the Appliance. Tuck rug fringe under the rug base, and lift items such as curtains and tablecloths off the floor.
- If there is a drop off in the cleaning area due to a step or stairs, you should operate the Appliance to ensure that it can detect the step without falling over the edge. It may become necessary to place a physical barrier at the edge to keep the unit from falling. Make sure the physical barrier is not a trip hazard.
- Only use as described in this manual. Only use attachments recommended or sold by the manufacturer.
- Please make sure your power supply voltage matches the power voltage marked on the Charging Dock.
- For INDOOR household use ONLY. Do not use the Appliance in outdoor, commercial or industrial environments.
- Use only the original rechargeable battery and Charging Dock provided with the Appliance from the manufacturer. Non-rechargeable batteries are prohibited. For battery information, please refer to Specifications section.
- Do not use without dust bin and/or filters in place.
- Do not operate the Appliance in an area where there are lit candles or fragile objects.
- Do not use in extremely hot or cold environments (below -5^/23^ or above 40^/104^ ).
- Keep hair, loose clothing, fingers, and all parts of body away from any openings and moving parts.
- Do not operate the Appliance in a room where an infant or child is sleeping.
- Do not use Appliance on wet surfaces or surfaces with standing water.
- Do not allow the Appliance to pick up large objects like stones, large pieces of paper or any item that may clog the Appliance.
- Do not use Appliance to pick up flammable or combustible materials such as gasoline, printer or copier toner, or use in areas where they may be present.
- Do not use Appliance to pick up anything that is burning or smoking, such as cigarettes, matches, hot ashes, or anything that could cause a fire.
- Do not put objects into the suction intake. Do not use if the suction intake is blocked. Keep the intake clear of dust, lint, hair, or anything that may reduce air flow.
- Take care not to damage the power cord. Do not pull on or carry the Appliance or Charging Dock by the power cord, use the power cord as a handle, close a door on the power cord, or pull power cord around sharp edges or corners. Do not run Appliance over the power cord. Keep power cord away from hot surfaces.
- If the power cord is damaged, it must be replaced by the manufacturer or its service agent in order to avoid a hazard.
- Do not use the Charging Dock if it is damaged.
- Do not use with a damaged power cord or receptacle. Do not use the Appliance or Charging Dock if it is not working properly, has been dropped, damaged, left outdoors, or come in contact with water. It must be repaired by the manufacturer or its service agent in order to avoid a hazard.
1. Important Safety Instructions
- Turn OFF the power switch before cleaning or maintaining the Appliance.
- The plug must be removed from the receptacle before cleaning or maintaining the Charging Dock.
- Remove the Appliance from the Charging Dock, and turn OFF the power switch to the Appliance before removing the battery for disposal of the Appliance.
- The battery must be removed and discarded according to local laws and regulations before disposal of the Appliance.
- Please dispose of used batteries according to local laws and regulations.
- Do not incinerate the Appliance even if it is severely damaged. The batteries can explode in a fire.
- When not using the Charging Dock for a long period of time, please unplug it.
- The Appliance must be used in accordance with the directions in this Instruction Manual. ECOVACS Robotics cannot be held liable or responsible for any damages or injuries caused by improper use.
2. Package Contents and Technical Specifications
2.1 Package Contents

natural_image
Simple line drawing of a circular object with two protruding wires (no text or symbols)DEEBOT 4
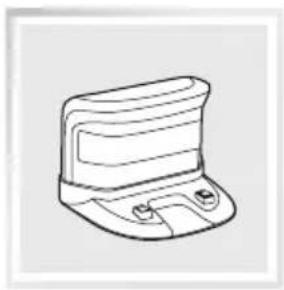
natural_image
Line drawing of a small electronic device with a top and base (no text or symbols)Charging Dock

Instruction Manual

natural_image
Simple line drawing of a remote control unit and two batteries (no text or symbols)Remote Control with Batteries

chemical
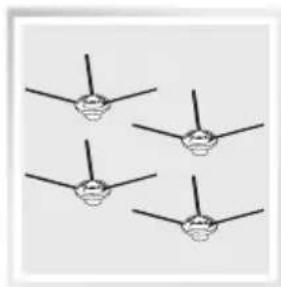
Simple molecular structure diagram showing four identical units connected by single bonds(4) Side Brushes
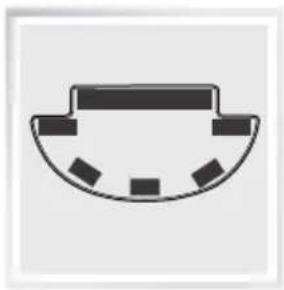
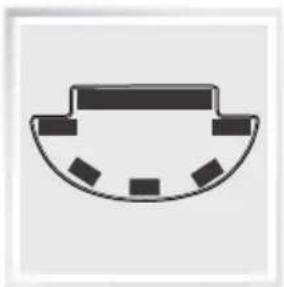
natural_image
Simple line drawing of a symmetrical shape with four small squares at the bottom (no text or symbols)Cleaning Cloth Plate

natural_image
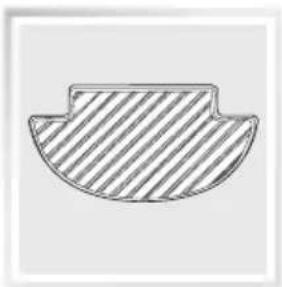
Technical drawing of a mechanical part with diagonal hatching (no text or symbols)Washable/Reusable Microfiber Cleaning Cloth
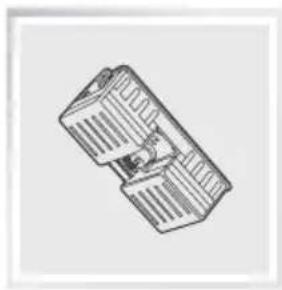
natural_image
Technical line drawing of a mechanical component with internal grooves and mounting holes (no text or symbols)Battery Pack
2.2 Specifications
| Model DEEBOT 4 | |||
| Working Voltage 12V DC Rated | Power 15W | ||
| Charging Dock Model | CH1442B | ||
| Rated Input Voltage 100-240V AC | Rated Output V | Voltage 14.5V DC | |
| Rated Output Current | 0.75A | Rated Power | 20W |
| Remote Control Model | RC0713 | Input voltage | 3V DC |
| Battery Ni-MH SC 1800mAh | |||
* Technical and design specifications may be changed in the course of continuous product improvement.
2. Package Contents and Technical Specifications
2.3 Product Diagram
Robot


- Bumper Strip
- Battery Pack
- Anti-Collision Sensors
- Anti-Drop Sensors
- AUTO Mode Button
- Suction Intake
- Top Cover
- Driving Wheels
- Universal Wheel
- Cleaning Cloth Plate Slots
- Side Brushes
- Infrared Receiver for Remote Control
- Charging Contacts
Charging Dock

- Infrared Signal Generator
- Charging Dock Pins
2. Package Contents and Technical Specifications
Remote Control
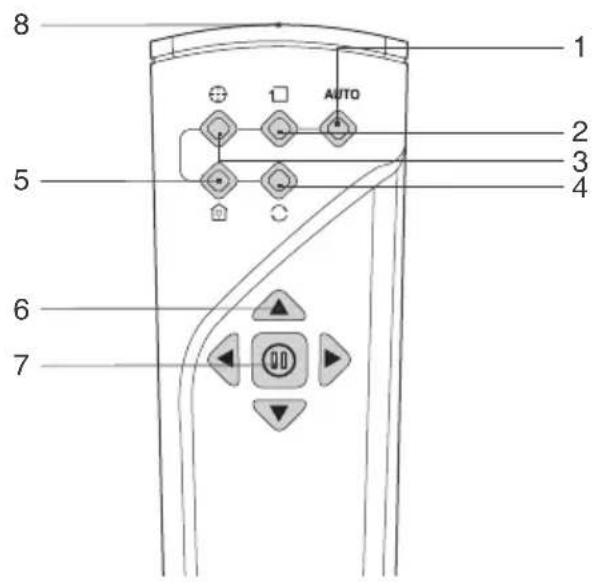
- AUTO Mode Button
- Edge Cleaning Mode Button
- Spot Cleaning Mode Button
- Intelligent Scheduling Button
- Return to Charger Mode Button
- Direction Control Buttons
- Pause Button
- Infrared Emitter
Dust Bin
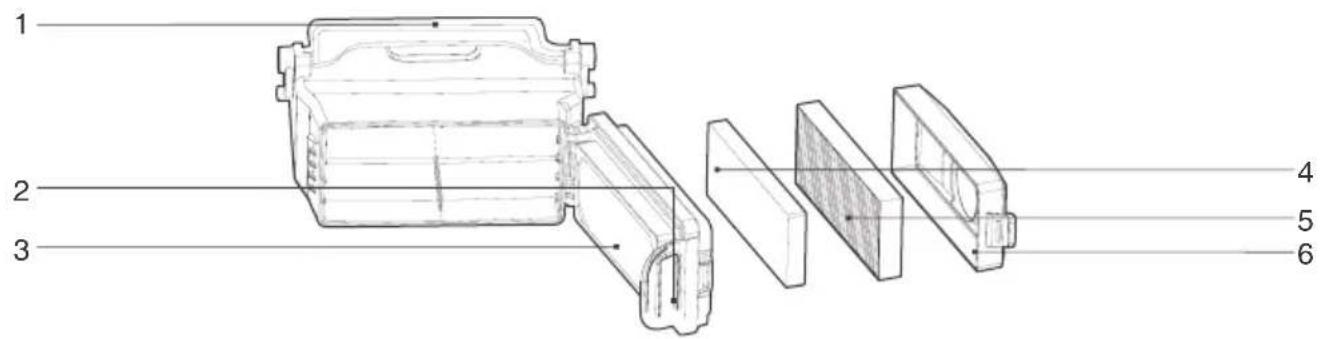
- Dust Bin Handle
- Dust Bin Lock
-
Filter Net
-
Sponge Filter
- High Efficiency Filter
- Dust Bin Cover
3. Operating and Programming
3.1 Notes Before Cleaning
Before Operating DEEBOT, take a few moments to survey the area to be cleaned and remove any obstacles.

natural_image
Line drawing of a vacuum cleaner connected to a plug, with warning symbols and an 'X' mark (no text or labels)Remove power cords and small objects from the floor that could entangle the product.

natural_image
Simple line drawing of a robotic device with warning symbols (no text or labels)The product is not suitable for use on carpet. Before using the product near an area rug with tasseled edges, please fold area rug edges under themselves.

natural_image
Line drawing of a sofa with a pillow placed on the back, connected to wheels (no text or symbols)Please be aware that the robot needs at least a 9 cm (3.5") clearance to clean under furniture without complications.
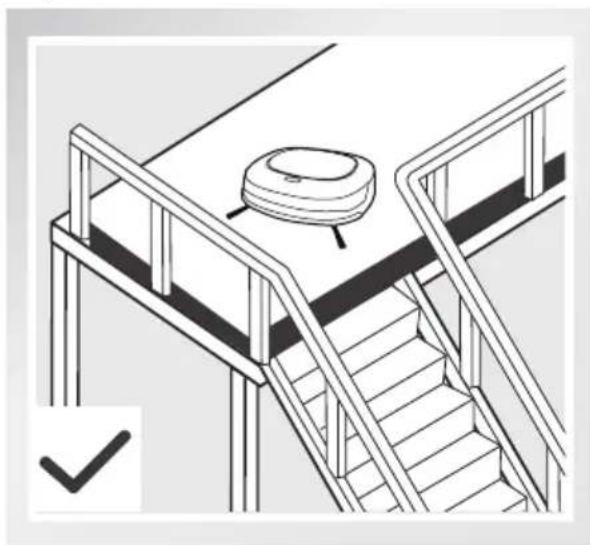
natural_image
Line drawing of a staircase with a circular object on top, no text or symbols presentIf there is a step or stairs in the cleaning area, please operate DEEBOT 4 to ensure its Anti-Drop Sensors can detect the drop off. It may be necessary to place a physical barrier at the edge of the drop off to keep the unit from falling over the edge.
3. Operating and Programming
3.2 Quick Start
1 Charging Dock Placement
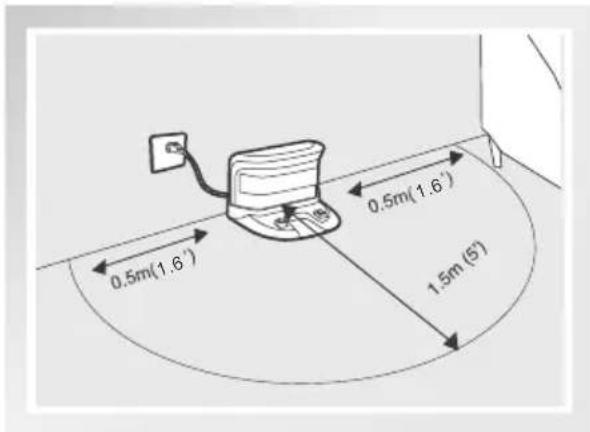
- Place the Charging Dock on a level floor surface against the wall with the base perpendicular to the ground. Keep the immediate area 1.5m(5') in front of the charger and 0.5m(1.6') on both sides of the charger clear of objects and reflective surfaces.
■ Plug the Charging Dock in.
2 Install Battery
- Insert the Battery Pack into the battery slot on the bottom of DEEBOT 4. Press it until it is fully locked in place.

natural_image
Illustration of hands assembling a device component on a circuit board (no text or symbols)* Remove DEEBOT 4's battery if the robot will not be used for a long time. In case of battery leakage, please remove the battery and wipe the battery slot clean while wearing protective gloves.
* If DEEBOT 4's battery is fully discharged or not used for a long time, its capacity may decrease and need to be reactivated.
* To reactivate the battery: Place the robot on the Charging Dock by hand, remove after charging for 3 minutes; repeat 3 times, then charge normally for 3-5 hours.
* DEEBOT 4 uses a long life Ni-MH battery and does not require frequent replacement. To replace the battery, contact Customer Service or follow the below instructions:
a. Push the tabs on both sides of the Battery Pack to remove the Battery Pack.
b. Insert new Battery Pack and press until it's fully locked in place.
3 Install Side Brushes
■ Attach Side Brushes to the bottom of DEEBOT 4 by pressing a brush into each slot until it clicks.

natural_image
Diagram of a drone's internal components with a hand inserting a tool into the engine compartment (no text or symbols present)3. Operating and Programming
4 Attach Cleaning Cloth
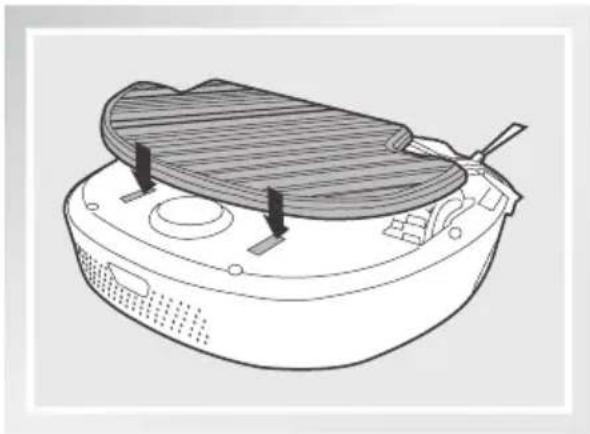
* To use DEEBOT 4's optional mopping feature, attach the provided Cleaning Cloth. When using the mopping feature, fold area rug edges under themselves so DEEBOT 4 will avoid the rug.
- Attach the Cleaning Cloth to the Cleaning Cloth Plate.
- Insert the Cleaning Cloth Plate tabs into the slots on the bottom of DEEBOT 4 until you hear a click.
natural_image
Line drawing of a robotic vacuum cleaner with a mesh cover and control panel (no text or symbols)5 Power ON
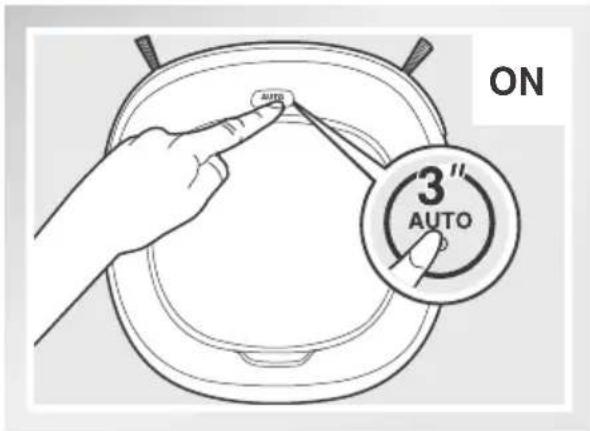
■ Press and hold the AUTO Mode Button on DEEBOT 4 for 3 seconds. DEEBOT 4 is powered ON when the AUTO Mode Button illuminates.
6 Charge DEEBOT 4
■ Place DEEBOT 4 on the Charging Dock making sure the Charging Contacts on DEEBOT 4 and the Charging Dock Pins make a connection.
- Charge DEEBOT 4 for at least 12 hours before the first use.
* AUTO Mode Button blinks when DEEBOT 4 is charging. DEEBOT 4 is fully charged when the AUTO Mode Button glows continuously. Charge DEEBOT 4 for at least 12 hours before the first use.

natural_image
Line drawing of a toilet with a power outlet and battery icon (no text or symbols)3. Operating and Programming
7 Start
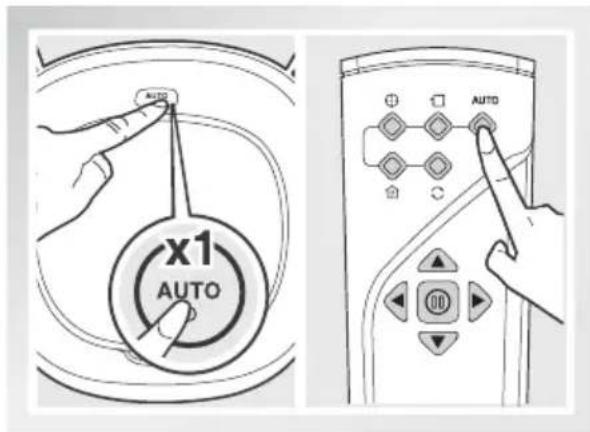
- Press the AUTO Mode Button on DEEBOT 4 or on the Remote Control. DEEBOT 4 starts to work immediately in AUTO Cleaning Mode.
* To choose another Cleaning Mode, please refer to section 3.3 Cleaning Mode Selection for details.
8 Pause
■ Pause DEEBOT 4 by pressing the AUTO Mode Button on DEEBOT 4 or the Pause Button on the Remote Control.
* DEEBOT 4 can be directed to move forward, backward, left and right using the Direction Control Buttons on the Remote Control when it is Paused. DEEBOT 4 does not clean when Paused.

9 Power OFF
- Press and hold the AUTO Mode Button on DEEBOT 4 for 3 seconds. DEEBOT 4 is powered OFF when the AUTO Mode Button stops glowing.
* When DEEBOT 4 is not working, it is suggested to keep it powered ON and charging.

3. Operating and Programming
3.3 Cleaning Mode Selection
DEEBOT 4 has several Cleaning Modes to choose from to effectively clean different floors. Cleaning Modes are selected using the Remote Control.
* Pause DEEBOT 4 before switching Cleaning Modes.
1 AUTO Cleaning Mode
This is the most commonly used mode. In AUTO Cleaning Mode, DEEBOT 4 cleans in a straight line and changes direction when it meets an obstacle.

This mode is good for cleaning the edges and corners of a room. In Edge Cleaning Mode, DEEBOT 4 cleans along a border (e.g. wall).
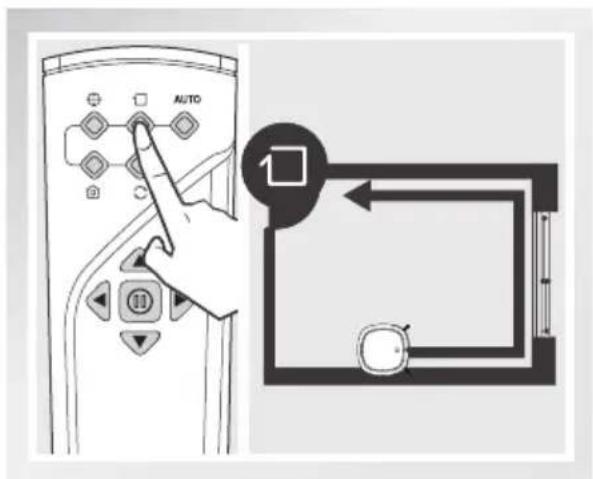
2 Spot Cleaning Mode
This mode is applicable for an area of highly concentrated dirt or dust. In Spot Cleaning Mode, DEEBOT 4 focuses on a specific area to clean.

4 Return to Charger Mode
When battery power gets low, DEEBOT 4 automatically switches to Return to Charger Mode and returns to the Charging Dock to recharge itself.
* DEEBOT 4 can be also be sent back to the Charging Dock at any time by pressing the Return to Charger Mode Button on the Remote Control.

3. Operating and Programming
3.4 Intelligent Scheduling
DEEBOT 4 has an Intelligent Scheduling function. DEEBOT 4 can be scheduled to clean once per day at the same time, even if nobody is at home.
1 Set Intelligent Scheduling
Set Intelligent Scheduling using one of the methods below:
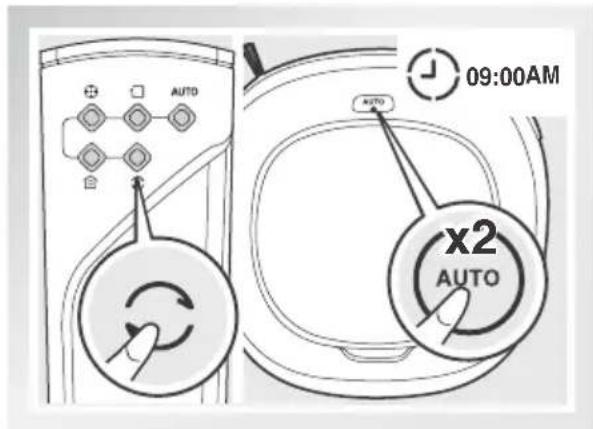
- Press ○ on the Remote Control to set the current time as the scheduled cleaning time. DEEBOT 4 will automatically clean at the scheduled time every day.
- Press the AUTO Mode Button on DEEBOT 4 twice to set the current time as the scheduled cleaning time.
For example: Set Intelligent Scheduling successfully to 09:00 am, and DEEBOT 4 automatically cleans at 09:00 am every day.

2 Cancel Intelligent Scheduling
Cancel Intelligent Scheduling using one of the methods below:
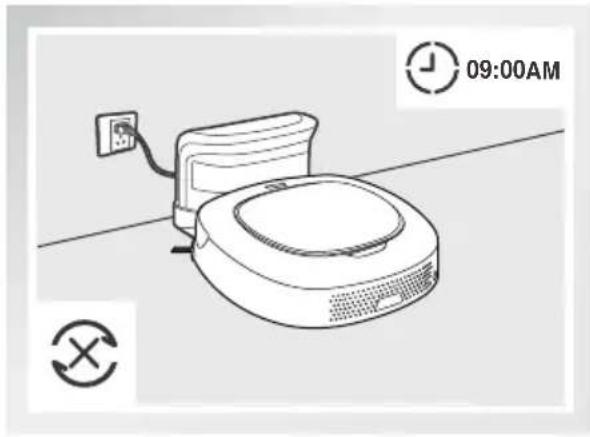
- Press ☉ on the Remote Control. Intelligent Scheduling is cancelled.
- Press the AUTO Mode Button on DEEBOT 4 twice. Intelligent Scheduling is cancelled.

natural_image
Line drawing of a robotic vacuum cleaner with power outlet, no text or symbols present* To automatically clean at another time, first cancel the current Intelligent Scheduling, then set Intelligent Scheduling again at the desired time.
* If DEEBOT 4 is turned OFF, Intelligent Scheduling is cancelled.
4. Maintenance
Before performing cleaning and maintenance, power OFF DEEBOT 4 and unplug the Charging Dock.
4.1 Dust Bin and Filters
Open DEEBOT 4's Top Cover and remove the Dust Bin. Open the Dust Bin Cover and empty the Dust Bin.

natural_image
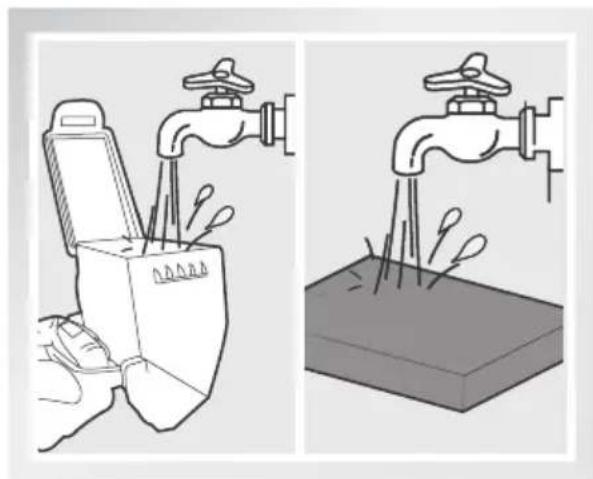
Illustration showing hands using a toaster to clean food items from a pot (no text or symbols present)Rinse the Dust Bin, Sponge Filter and Filter Net under running water.
Remove the filters. Pat the High Efficiency Filter clean. Do not rinse the High Efficiency Filter under water.

natural_image
Illustration showing two steps of cleaning a surface: one with a tool, the other with a hand cleaning a textured surface (no text or symbols)Dry the Dust Bin and filters completely before reinstalling.
natural_image
Illustration of two different methods for removing a tool from a surface, showing hand positioning and water drop (no text or symbols)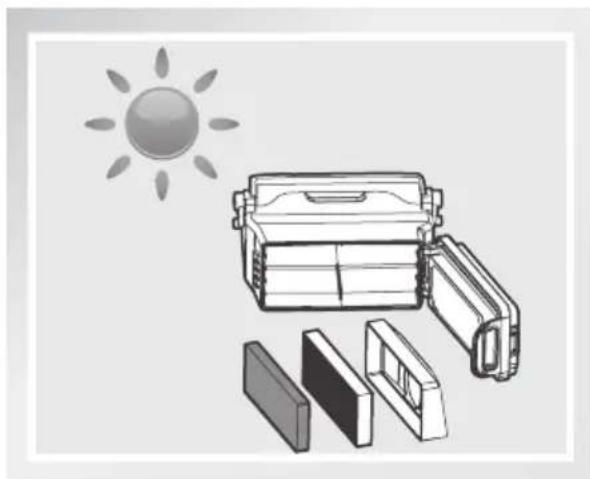
natural_image
Illustration of a solar-powered device with a sun symbol above it, showing internal components and casing (no text or symbols present)4. Maintenance
4.2 Cleaning Cloth
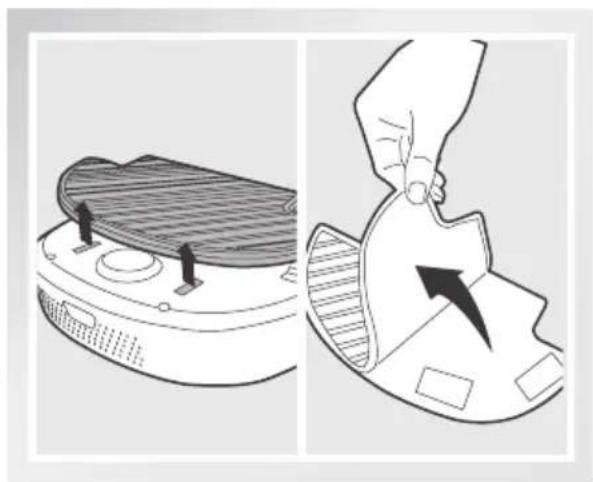
Remove the Cleaning Cloth Plate from DEEBOT 4 and remove the Cleaning Cloth.
Wash and dry the Cleaning Cloth.
natural_image
Diagram showing a cleaning device with a lid and a hand holding a tool, both without any text or symbols.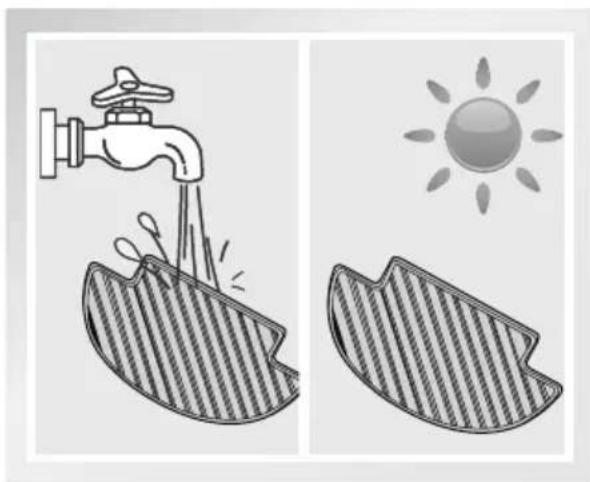
natural_image
Illustration showing a faucet pouring water into a cracked surface and sunlight rising, with no text or symbols present.4.3 Suction Intake and Side Brushes
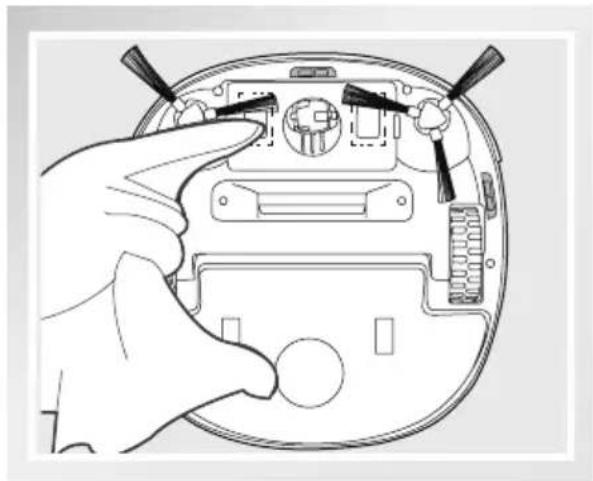
Wipe the Suction Intake with a dry cloth. Remove the Side Brushes. Wipe the Side Brushes and their slots with a dry cloth.

natural_image
Line drawing of a hand pointing to the internal components of an electronic device (no text or symbols visible)
natural_image
Illustration showing two-step procedure: hand holding tool, with arrow indicating action (no text or symbols)4. Maintenance
4.4 Other Components
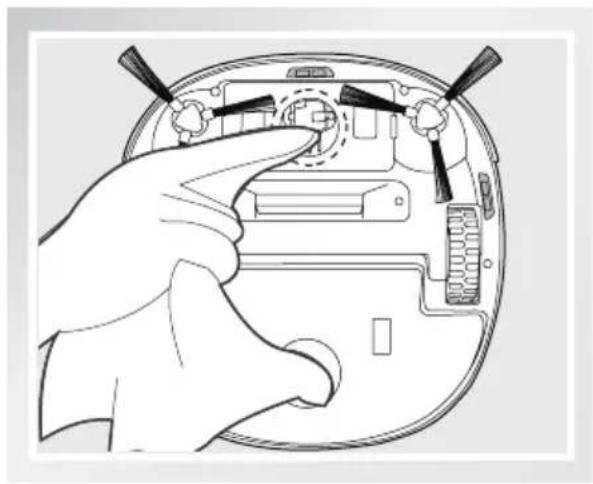
Clean the Universal Wheel by removing any hair tangled around it.
Wipe the Anti-Drop Sensors with a dry cloth to maintain their effectiveness.

natural_image
Illustration of a hand pointing to internal components of a device (no text or symbols visible)
natural_image
Diagram of a hand pointing to the internal components of a device casing (no text or symbols visible)Wipe the Charging Contacts and Charging Dock Pins with a dry cloth.
natural_image
Hand inserting a device into a circular device with buttons and ports (no text or symbols visible)
natural_image
Line drawing of a hand holding a small electronic device with buttons (no text or symbols)5. Troubleshooting
Please use this chart to troubleshoot common problems using DEEBOT 4.
| No. | Malfunction Possible Causes Solutions | ||
| 1 | DEEBOT 4 will not charge. | DEEBOT 4 is not powered ON. | Press and hold AUTO Mode Button for 3 seconds to power ON DEEBOT 4 then charge. |
| DEEBOT 4 has not made a connection with the Charging Dock. | Be sure that DEEBOT 4 has made a connection with the Charging Dock Pins. You may move the robot manually to make the connection if necessary. | ||
| Charging Dock is unplugged while DEEBOT 4 is powered ON, which causes battery consumption. | Plug in the Charging Dock and ensure DEEBOT 4 is powered ON. Keep DEEBOT 4 on the Charging Dock to make sure it has a full battery to work at any time. | ||
| The battery is completely discharged. | Re-activate the battery. Place DEEBOT 4 on the Charging Dock by hand, remove after charging for 3 minutes, repeat 3 times; then charge normally. | ||
| 2 | DEEBOT 4 gets into trouble while working and stops. | DEEBOT 4 is tangled with something on the floor (electrical cords, drooping curtains, area rug fringe etc). | DEEBOT 4 will try various ways to get itself out of trouble. If it is unsuccessful, manually remove the obstacles and restart. |
| 3 | DEEBOT 4 cleans for a shorter time per charge in some areas. | Working time varies according to floor surface, room complexity and the selected Cleaning Mode. | This is normal. No solution necessary. |
| 4 | DEEBOT 4 will not clean automatically at scheduled time. | Intelligent Scheduling function is cancelled. | Please refer to section 3.3 Intelligent Scheduling for details. |
| DEEBOT 4 is powered OFF. | Power ON DEEBOT 4. | ||
| DEEBOT 4's battery is low. | Keep DEEBOT 4 powered ON and on the Charging Dock to make sure it has a full battery to work at any time. | ||
| DEEBOT 4's Suction Intake is blocked and/or its components are tangled with debris. | Turn DEEBOT 4's power OFF, clean the Dust Bin, and invert the robot. Clean DEEBOT 4's Suction Intake and Side Brushes. | ||
5. Troubleshooting
| No. | Malfunction Possible | Causes Solutions | |
| 5 | Remote Control failure (effective control range of Remote Control is 5m (16')). | The batteries in the Remote Control need to be replaced. | Replace with new batteries making sure they are installed correctly. |
| DEEBOT 4 is powered OFF or DEEBOT 4's battery is low. | Make sure DEEBOT 4 is powered ON and fully charged. | ||
| The infrared signal cannot be transmitted because the Infrared Emitter on Remote Control or the Infrared Receiver on DEEBOT 4 is dirty. | Use dry cotton cloth to wipe the Infrared Emitter on Remote Control and the Infrared Receiver on DEEBOT 4. | ||
| There is other equipment interfering with the infrared signal to DEEBOT 4. | Avoid using the Remote Control near other equipment using infrared signals. |
natural_image
Simple line drawing of a circular object with a central square and two protruding lines (no text or symbols)DEEBOT 4

natural_image
Line drawing of a 3D object resembling a container or housing with a handle and base (no text or symbols)充電座

說明書

natural_image
Simple line drawing of a remote control unit with two batteries (no text or symbols)遙控器(含電池)

natural_image
Four identical diagrams of a droplet with three arms, arranged in a grid (no text or symbols)邊刷

natural_image
Simple line drawing of a symmetrical shape with four small squares at the bottom (no text or symbols)清潔布底板 電池

natural_image
Technical drawing of a mechanical part with diagonal hatching (no text or symbols)可洗滌 / 可重複利用的 微纖維清潔布

natural_image
Technical line drawing of a mechanical component with internal grooves and mounting holes (no text or symbols)
2.2 技術參數
natural_image
Simple line drawing of a robotic vacuum cleaner with warning symbols (no text or labels)natural_image
Line drawing of a sofa with a pillow placed on the backrest and wheels attached (no text or symbols)natural_image
Line drawing of a staircase with a circular object on top, no text or symbols present2 安装電池
natural_image
Line drawing of a hand pressing a component on a computer motherboard (no text or symbols)natural_image
Diagram of a drone's internal components with a hand holding a tool, showing no text or symbols.3. 運行與程式
4 黏貼清潔布
natural_image
Line drawing of a robotic vacuum cleaner with a mesh cover and control panel (no text or symbols)5 開啟電源
natural_image
Line drawing of a robotic vacuum cleaner with power outlet and battery icon (no text or symbols)3. 運行與程式
7 開始運作
natural_image
Line drawing of a robotic vacuum cleaner with power outlet, no text or symbols presentnatural_image
Illustration showing hands using a steamer to clean food from a kitchen (left) and a container with food being poured into a bowl (right), no text or symbols present.取出濾材高效過濾器。不可水洗。

natural_image
Illustration showing two steps of cleaning a surface: one with a tool, the other with a hand cleaning a textured surface (no text or symbols)natural_image
Illustration of two different methods for removing a faucet from a device, showing the first method with a handle and the second with a drain (no text or symbols present)
natural_image
Illustration of a portable electronic device with solar background and open compartments (no text or symbols)4. 維護保養
4.2 清潔布
natural_image
Illustration showing a robotic vacuum cleaner and its hand holding a device with an arrow (no text or symbols)清洗並晾乾清潔布。

natural_image
Illustration showing a faucet pouring water into a cracked surface, with sunlight shining on it (no text or symbols)4.3 吸入口與邊刷
natural_image
Line drawing of a hand pointing to the interior of a device casing with visible internal components (no text or symbols)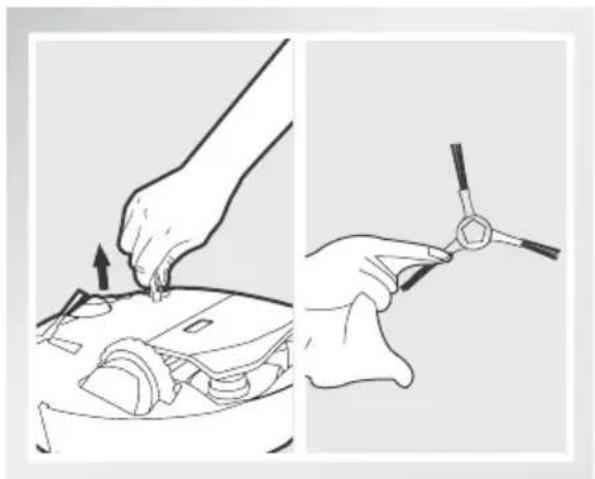
natural_image
Illustration showing two hands operating a tool on a device, one holding a small component and the other holding a wrench (no text or symbols present)4. 維護保養
4.4 其他零組件
清潔萬向輪,將上面纏繞的頭髮取下。
natural_image
Hand inserting a device into a circular device with visible internal components (no text or symbols)用乾布擦拭下視感測器,保持靈敏度。

natural_image
Top-down line drawing of a device's internal components, possibly an electric scooter or robotic head (no text or symbols)用乾布擦拭對接電極以及對接電極片。

natural_image
Hand inserting a device into a circular device with visible internal components (no text or symbols)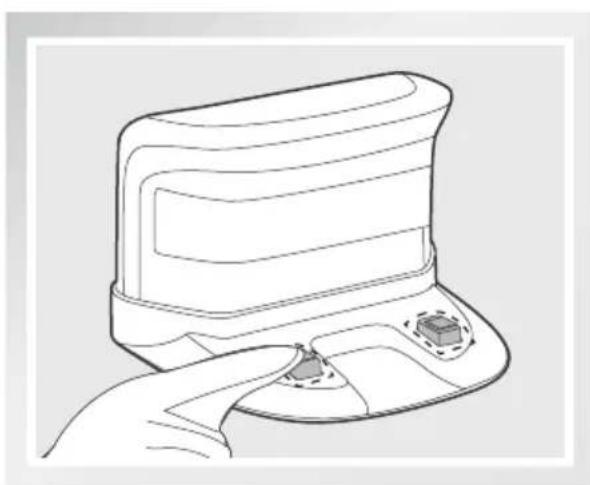
natural_image
Line drawing of a hand holding a device with a knob and adjustment knob (no text or symbols)5. 疑難排解
natural_image
Simple line drawing of a circular object with a central square and two protruding lines (no text or symbols)로봇
natural_image
Line drawing of a small mechanical component with a flat top and side ports (no text or symbols)충전용 도크

natural_image
Simple line drawing of a remote control with two batteries (no text or symbols)리모컨(배터리 포함)
natural_image
Four identical diagrams of a droplet with three arms, arranged in a row (no text or symbols)측면 브러시

natural_image
Simple line drawing of a symmetrical shape with four dark rectangular cutouts at the bottom (no text or symbols)청소 패드 플 레이트
natural_image
Simple line drawing of a semi-circular object with diagonal hatching (no text or symbols)natural_image
Technical line drawing of a mechanical component with no visible text or symbols배터리 팩
2.2 사양
- 적외선 신호 발생기
- 충전용 도크 핀
2. 포장 내용물 및 기술 사양
리모컨

natural_image
Line drawing of a vacuum cleaner with warning symbols and electrical plug, no text or labels presentnatural_image
Simple line drawing of a robotic device with a warning symbol and cross mark (no text or labels)natural_image
Line drawing of a sofa with a pillow placed on top, connected to wheels (no text or symbols)natural_image
Line drawing of a staircase with a robotic vacuum cleaner on top (no text or symbols)natural_image
Illustration of a hand placing a small electronic device into a circuit board (no text or symbols visible)natural_image
Diagram of a drone's internal components with a hand pointing to a device, showing no text or symbols.3. 작동 및 프로그래밍
4 청소 패드 부착
natural_image
Line drawing of a robotic vacuum cleaner with a mesh cover and handle (no text or symbols)5 전원 공급
natural_image
Line drawing of a robotic vacuum cleaner with power outlet and battery icon (no text or symbols)3. 작동 및 프로그래밍
7 시작
natural_image
Line drawing of a robotic vacuum cleaner with power outlet, no text or symbols presentnatural_image
Illustration showing hands using a kitchen appliance to clean food from a pot (no text or symbols present)natural_image
Illustration of a hand holding a water tap and a container with liquid, both showing water droplets (no text or symbols)natural_image
Illustration showing a hand cleaning a tiled surface with bubbles (no text or symbols)natural_image
Illustration of a portable device with sun symbol above it, accompanied by three rectangular compartments (no text or symbols)4. 유지관리
4.2 청소 패드
natural_image
Diagram showing a robotic device and its hand holding a device with an arrow, both without any text or symbols.청소 패드를 세척하고 건조합니다.

natural_image
Illustration showing a faucet pouring water into a cracked surface and sunlight shining on it (no text or symbols)4.3 흡입구 및 측면 브러시
natural_image
Line drawing of a hand pointing at an open electronic device casing with visible internal components (no text or symbols)
natural_image
Illustration showing two hands performing a manual task: one applying material to a container, the other holding a tool (no text or symbols present)4. 유지관리
4.4 기타 구성품
natural_image
Illustration of a hand pointing to an open electronic device with visible internal components (no text or symbols)natural_image
Diagram of a device's internal components, possibly an LCD or scanner, with no visible text or symbols.natural_image
Line drawing of a hand inserting a device into a circular device (no text or symbols)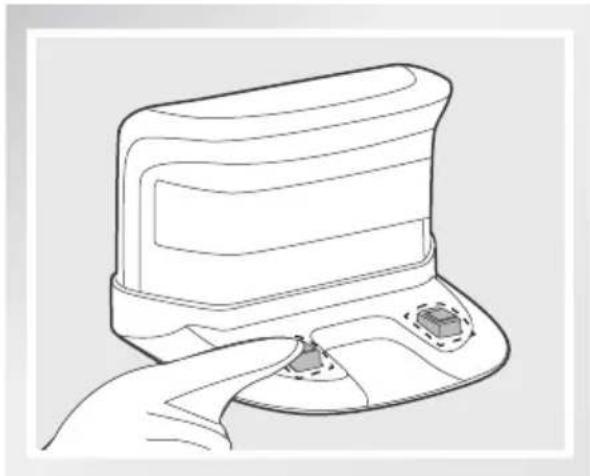
natural_image
Line drawing of a hand holding a device with a knob and connector (no text or symbols)5.문제 해결


- 仕様
- 操作とプログラミング
- 清掃布の取り付け
- 電源オン
- 開始
- 充電ドック帰還モード
- メンテナンス
- 清掃布
- 吸入口とサイドブラシ
- その他の部品
- トラブルシューティング
- Contents
- Important Safety Instructions
- READ ALL INSTRUCTIONS BEFORE USING THIS APPLIANCE.
- SAVE THESE INSTRUCTIONS
- Package Contents and Technical Specifications
- Package Contents
- Specifications
- Product Diagram
- Operating and Programming
- Notes Before Cleaning
- Quick Start
- Charging Dock Placement
- Install Battery
- Install Side Brushes
- Attach Cleaning Cloth
- Power ON
- Charge DEEBOT 4
- Start
- Pause
- Power OFF
- Cleaning Mode Selection
- AUTO Cleaning Mode
- Spot Cleaning Mode
- Return to Charger Mode
- Intelligent Scheduling
- Set Intelligent Scheduling
- Cancel Intelligent Scheduling
- Maintenance
- Dust Bin and Filters
- Cleaning Cloth
- Suction Intake and Side Brushes
- Other Components
- Troubleshooting
- 技術參數
- 安装電池
- 運行與程式
- 黏貼清潔布
- 開啟電源
- 開始運作
- 維護保養
- 清潔布
- 吸入口與邊刷
- 其他零組件
- 疑難排解
- 사양
- 포장 내용물 및 기술 사양
- 작동 및 프로그래밍
- 청소 패드 부착
- 전원 공급
- 시작
- 유지관리
- 청소 패드
- 흡입구 및 측면 브러시
- 기타 구성품
- 5.문제 해결
Brand : ECOVACS
Model : D45
Category : Vacuum Cleaner