
PC-BS 3141 - Vacuum Cleaner ProfiCare - Free user manual and instructions
Find the device manual for free PC-BS 3141 ProfiCare in PDF.

| Brand | ProfiCare |
| Model | PC-BS 3141 |
| Vacuum cleaner type | Bagged canister vacuum cleaner |
| Power supply | 220–240 V~, 50/60 Hz |
| Power consumption | 700 W |
| Protection class | II |
| Net weight | Approx. 4 kg |
| Compatible dust bag | Swirl® Y298® EcoPor® |
| Outlet filter | HEPA filter (washable) |
| Inlet filter | Motor protection filter (washable) |
| Suction hose | Telescopic, adjustable length |
| Included accessories | Floor nozzle with carpet/hard floor selector, brush nozzle and combined crevice nozzle |
| Features | Air regulator on handle, bag change indicator, automatic cord rewinder |
| Power cable length | Approx. 5 m (estimated) |
| Dust bag capacity | Approx. 3.5 L (estimated) |
| Filter maintenance | Clean with hot water without additives, dry completely before reinstalling |
| Important safety instructions | Do not vacuum liquids or flammable objects, do not use without filter |
| Standards | Complies with current CE directives |
Frequently Asked Questions - PC-BS 3141 ProfiCare
User questions about PC-BS 3141 ProfiCare
0 question about this device. Answer the ones you know or ask your own.
Ask a new question about this device
Download the instructions for your Vacuum Cleaner in PDF format for free! Find your manual PC-BS 3141 - ProfiCare and take your electronic device back in hand. On this page are published all the documents necessary for the use of your device. PC-BS 3141 by ProfiCare.
USER MANUAL PC-BS 3141 ProfiCare
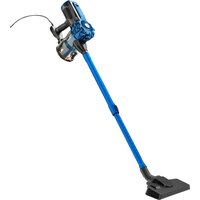
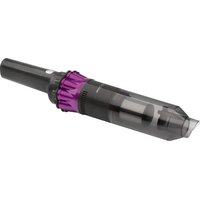
natural_image
Black and red vacuum cleaner with a long black handle, shown against a plain background (no text or symbols visible)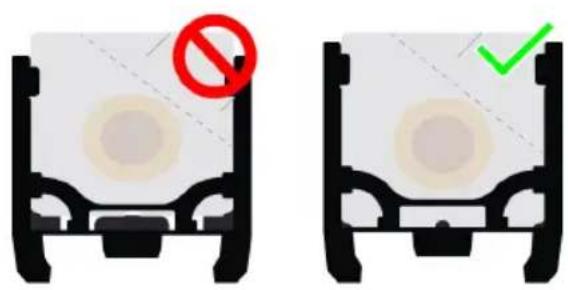
WICHTIG:
Be sure to read the separately enclosed safety instructions first.
Instruction Manual
Thank you for choosing our product. We hope you will enjoy using the appliance.
Read the instruction manual and the separately enclosed safety instructions very carefully before using this appliance. Keep these documents, including the warranty certificate, receipt and, if possible, the box with the inner packaging in a safe place. If you pass the appliance on to a third party, always include all the relevant documents.
Symbols in this Instruction Manual
Important information for your safety is specially marked. It is essential to comply with these instructions in order to avoid accidents and prevent damage to the appliance:

WARNING:
This warns you of dangers to your health and indicates possible injury risks.

CAUTION:
This refers to possible hazards to the appliance or other objects.
Content
Overview of the Components....3
Unpacking the Appliance....9
Overview of the Components / Scope of Delivery......9
Warnings for the Use of the Appliance 9
Notes for Use....10
Floor Nozzle 10
Combined Crevice Nozzle and Brush Nozzle ....10
Telescopic Suction Pipe....10
Mains Cable 10
Electrical Connection 10
Switching the Appliance On/Off 10
Start-up....10
Using the Appliance 10
Air Slide....10
Switching Off and Winding Up the Mains Cable......10
Maintenance....10
Dust bag change indicator (6)....10
Changing the dust bag....11
Filter....11
Cleaning....11
Storage....11
Troubleshooting....12
Technical Data....12
Disposal....12
Meaning of the "Dustbin" Symbol ....12
Unpacking the Appliance
- Remove the appliance from its packaging.
- Remove all packaging material, such as foils, filling material, cable ties and cardboard packaging.
- Remove the two protective parts from the bottom of the appliance.
- Check the scope of delivery for completeness.
- If the contents of the packaging are incomplete or if damage can be detected, do not operate the appliance. Return it to the dealer immediately.
Overview of the Components / Scope of Delivery
1 Air slide
2 Handle
3 Suction hose
4 Connection head of the vacuum hose
5 Hose connection
6 Indicator for dust bag change
7 Positioning aid
8 HEPA filter (outlet filter)
9 Cable-winding button
10 On / off switch
11 Mains cable
12 Opener for dust bag compartment
13 Carrying handle
14 Combined crevice and brush nozzle
15 Carpet / hard floor selector
16 Floor nozzle (with hook (not shown))
17 Telescopic suction tube
18 Sliding button for telescopic suction tube
Warnings for the Use of the Appliance
CAUTION:
- Do not vacuum anything flammable or liquid!
- Never vacuum without a filter. Always check that the filters are correctly seated after insertion!
- When vacuuming smooth floors such as laminate, parquet, etc. with the floor nozzle (16), be sure to use it with the brushes extended to avoid damaging the floor.
- Pull the mains cable no further than the yellow mark.
- Never pull the power cable up to the red mark as the cable winder may be damaged. Such damage is not covered by the warranty.
Notes for Use
- The nozzle attachments can be plugged directly onto the handle connection or onto the mounted suction hose.
- To detach the nozzle attachments, pull them off with a slight twist.
Floor Nozzle
You can clean smooth surfaces and carpets with the floor nozzle. It is equipped with rollers to make it easier to guide.
- With the lever (15), you can move the brushes outwards or inwards.
The optimal use depends on the condition of the floor. We recommend the following use:
- Use without brushes:
For vacuuming carpeted floors.
- Use with brushes:
For vacuuming smooth floors.
Combined Crevice Nozzle and Brush Nozzle
When folded, you can use this as a crevice nozzle. If you want to use the brush nozzle, pull the brush part in the direction of the arrow until it engages mechanically.
- Crevice Nozzle:
Use this to vacuum dirt from corners, joints and small gaps.
- Brush Nozzle:
Gently removes dirt from slits in upholstery and mattresses. Also suitable for picking up dust on sensitive surfaces such as furniture or curtains.
Telescopic Suction Pipe
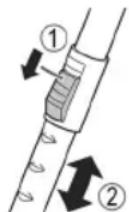
The length of the telescopic suction pipe can be adjusted individually:
- Loosen the locking mechanism by sliding and holding the button in the direction of the arrow marking.
- Extract one tube from the other to the desired length.
- Release the button in order to lock the connection.
Mains Cable
Pull the Mains cable out of the cable compartment up to the yellow marking at the most. The cable compartment is located at the back of the appliance below.
- If the red mark is visible, pull in the cable with the help of the cable winding button back to the yellow mark.
Electrical Connection
- Before inserting the mains plug into the socket, check that the mains voltage is correct. You will find the details of the appliance on the type plate.
- Only connect the appliance to an approved socket.
Switching the Appliance On/Off
Press the button (10) to switch the appliance on or off.
Start-up
- Insert the connection head of the suction hose into the hose connection of the appliance. It must engage audibly.
- To release the hose again, press the two clips on the connection head inwards. Hold the clips down and pull out the hose.
- Insert the vacuum tube into the handle if required.
- Then assemble the floor nozzle and / or the accessories. To detach the nozzle attachments from the suction pipe, pull them off by turning them slightly.
Using the Appliance
- Insert the mains plug into a correctly installed power socket.
- Turn the appliance on by the on / off switch by pressing down the button.
- Set the "carpet / hard floor" switch, depending on the floor covering.
- Vacuum at a steady speed. There is no need to exert pressure.
- Pay attention to the range that can be covered with the cable length!
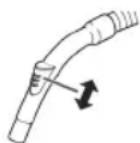
Air Slide
Open the air slide on the hose handle in order to regulate the airflow or to clear any particles sticking to the nozzle.
Switching Off and Winding Up the Mains Cable
- Switch off the floor vacuum cleaner at the on / off switch and unplug the mains plug from the socket.
- Keep the plug in your hand.
- Press the cable winding button and guide the cable. Hold the cable to avoid wrapping.
Maintenance
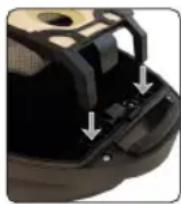
Pull the mains plug out of the socket before cleaning or maintaining the appliance. When changing the dust bag, follow the illustrations on page 3.
Dust bag change indicator (6)
Hold the suction hose in the air, not pointing down. If the dust bag change indicator is red, the dust bag is full. Please change it.
Changing the dust bag
- Unplug the mains plug from the socket.
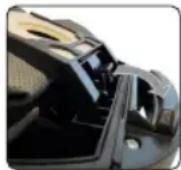
- Open the dust bag compartment cover with the opener (12).
-
The cover can be locked in an upright position. Do not push the cover beyond the lock! The holder could break.
-
Press the lever down to release the dust bag holder.
-
Pull the dust bag holder up and out. Take out the dust bag by pulling it out of the holder.
-
Insert a new bag, making sure that it is correctly positioned in the guide.
- The bag must be pushed into the holder as far as it will go.
- Insert the dust bag with the fastening back into the recesses provided. The bag must be completely inside the dust bag compartment. Close the cover so that it clicks into place.
Filter
Your appliance has two filters.

CAUTION:
- Never wash the filter in the washing machine.

CAUTION:
- Do not use a hairdryer for drying.
- Only use the appliance after the filters have been installed correctly.
Protective motor filter (inlet filter)
The inlet filter is located in the dust bag compartment. The filter is located vertically at the rear of the dust housing. Pull the filter upwards to remove it.
Cleaning the filter insert
Clean the motor protection filter after approx. every 10th dust bag change. If necessary, you can clean the filter in warm water, without additives. Only replace it when it is completely dry and in the direction of the arrow!
Outlet filter (8)
Your appliance also has an outlet filter. It is located on the back of the appliance behind a cover.
- Press the lever down and remove the ventilation grille.
- Take out the filter insert and clean it as described above.
- Replace the filter insert when it is completely dry. Note the guide lug. The filter insert must engage audibly.
- Put the ventilation grill back on the appliance. Note the guide lugs. The ventilation grill must engage audibly.
Cleaning

WARNING:
- Pull the mains plug out of the socket before cleaning or maintaining the appliance.
- Under no circumstances should you immerse the appliance in water for cleaning purposes. Otherwise this might result in an electric shock or fire.

CAUTION:
- Do not use a wire brush or any abrasive items.
- Do not use any acidic or abrasive detergents.
- Clean the housing with a soft, dry cloth without any additives.
- For cleaning the filters, please read the chapter "Maintenance".
Storage
- Let the appliance cool down completely.
- Roll up the cable completely.
- Hook the hook of the floor nozzle into the parking aid on the back of the appliance.
- If you want to place the appliance vertically: Hook the hook of the floor nozzle into the parking aid on the underside of the appliance.
Troubleshooting
| Problem Possible Cause Remedy | ||
| The appliance has no function. | The appliance has no power supply. | Check the power socket with another appliance. |
| Insert the mains plug correctly. | ||
| Check the house fuse. | ||
| The appliance is defective. Contact our service or a specialist. | ||
| Weak suction power. The dust collector is full. Empty the dust collector. | ||
Technical Data
Model: PC-BS 3141
Power supply: 220-240V\~, 50/60Hz
Power consumption: 700 W
Protection class: II
Net weight: .... approx. 4 kg
Dust filter bag: Swirl® Y 298® EcoPor®
Swirl ^® , Y 298 ^® and EcoPor ^® are registered trademarks of a company of the Melitta Group.
The right to make technical and design modifications in the course of continuous product development remains reserved.
This appliance has been tested according to all applicable, current CE directives and built according to the latest safety regulations.
Disposal
Meaning of the "Dustbin" Symbol
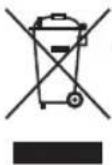
Protect our environment: do not dispose of electrical equipment in the domestic waste.
Please return any electrical equipment that you will no longer use to the collection points provided for their disposal.
This helps avoid the potential effects of incorrect disposal on the environment and human health.
This will contribute to the recycling and other forms of re-utilisation of electrical and electronic equipment.
Information concerning where the equipment can be disposed of can be obtained from your local authority. Your dealer and contractual partner is also obliged to take back the old appliance free of charge.
BELANGRIJK:
CTC Clatronic Sp. z o.o
Ul. Brzeska 1
45-960 Opole
Usuwanie
- WICHTIG:
- Be sure to read the separately enclosed safety instructions first.
- Instruction Manual
- Symbols in this Instruction Manual
- WARNING:
- CAUTION:
- Content
- Unpacking the Appliance
- Overview of the Components / Scope of Delivery
- Warnings for the Use of the Appliance
- Notes for Use
- Floor Nozzle
- Combined Crevice Nozzle and Brush Nozzle
- Telescopic Suction Pipe
- Mains Cable
- Electrical Connection
- Switching the Appliance On/Off
- Start-up
- Using the Appliance
- Air Slide
- Switching Off and Winding Up the Mains Cable
- Maintenance
- Dust bag change indicator (6)
- Changing the dust bag
- Filter
- Protective motor filter (inlet filter)
- Cleaning the filter insert
- Outlet filter (8)
- Cleaning
- Storage
- Troubleshooting
- Technical Data
- Disposal
- Meaning of the "Dustbin" Symbol
- BELANGRIJK:
- Usuwanie
Brand : ProfiCare
Model : PC-BS 3141
Category : Vacuum Cleaner