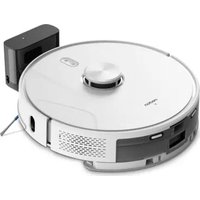
X23 SW+ - Robot vacuum MEDION - Free user manual and instructions
Find the device manual for free X23 SW+ MEDION in PDF.

| Product type | Intelligent robot vacuum and mop with self-emptying station |
| Brand | MEDION |
| Model | X23 SW+ (MD 100051) |
| Dimensions (robot) | Approx. 32.2 × 32.0 × 9.5 cm |
| Weight (robot) | Approx. 2.5 kg |
| Power (robot) | Lithium-ion battery 14.8 V, 2900 mAh (42.92 Wh) |
| Power (station) | 220-240 V~, 50/60 Hz, 650 W |
| Runtime (Eco Mode) | Up to 180 min |
| Runtime (Standard Mode) | Up to 135 min |
| Runtime (Powerful Mode) | Up to 110 min |
| Runtime (Super Powerful Mode) | Up to 65 min |
| Charging time | Less than 5 hours |
| Dustbin capacity (robot) | 0.275 L |
| Water tank capacity | 0.200 L |
| Dust bag capacity (station) | 2.5 L |
| Noise level (robot) | 58-68 dB depending on mode |
| Noise level (station) | Max. 72 dB |
| Main functions | Vacuuming, mopping, auto-empty, app scheduling, voice control, laser detection and anti-drop |
| Connectivity | Wi-Fi 2.4/5 GHz, Bluetooth, medion Life+ app |
| Filter | HEPA H13 + foam filter |
| Maintenance | Regular cleaning of dustbin, filter, brushes, charging contacts, mop cloth |
| Safety | Anti-drop detection, bumper, infrared sensor, protected lithium-ion battery |
| Spare parts | Available at medionserviceshop |
Frequently Asked Questions - X23 SW+ MEDION
User questions about X23 SW+ MEDION
0 question about this device. Answer the ones you know or ask your own.
Ask a new question about this device
Download the instructions for your Robot vacuum in PDF format for free! Find your manual X23 SW+ - MEDION and take your electronic device back in hand. On this page are published all the documents necessary for the use of your device. X23 SW+ by MEDION.
USER MANUAL X23 SW+ MEDION
natural_image
Black and gray robotic vacuum cleaner with a rectangular base unit (no visible text or symbols)Smarter Saug-Wischroboter
mit Absaugstation
Smart robot vacuum and mop
with dust collector
MEDION X23 SW+ (MD 100051)
Inhaltsverzeichnis
natural_image
Three technical line drawings of mechanical components, labeled 32, 33, and 34 (no text or symbols on the diagrams themselves)Abb. 4 - Bürstentypen
- Fluffy-Bürste
- Gummi-Bürste
- Standard-Bürste

natural_image
Line drawing of hands holding a circular device with a central component, no text or symbols presentnatural_image
Technical line drawing of a mechanical component with labeled parts (no text or symbols)natural_image
Line drawing of a device with an open lid and a flat base, showing internal components (no text or symbols)natural_image
Line drawing of a rectangular electronic device with a flat base and mounting holes (no text or symbols)natural_image
Simple line drawing of a cylindrical container with liquid inside, placed on a hatched surface (no text or symbols)natural_image
Line drawing of a robotic vacuum cleaner with a circular base and rectangular housing (no text or symbols)Abb. 11 - Akkublock laden
natural_image
Technical line drawing of a robotic vacuum cleaner with a black arrow indicating the component (no text or symbols present)natural_image
Technical line drawing of a robotic vacuum cleaner with internal components and a black arrow indicating a specific part (no text or symbols present)natural_image
Technical line drawing of a robotic vacuum cleaner with internal components and housing (no text or symbols)natural_image
Technical line drawing of a mechanical component with an inset showing a close-up of a cylindrical component being inserted (no text or symbols present)natural_image
Technical line drawing of a robotic vacuum cleaner with internal components and housing (no text or symbols)natural_image
Diagram showing a curved object being lifted by an arrow, with no text or symbols present.natural_image
Technical diagram of a robotic vacuum cleaner with labeled components and an arrow indicating a specific part (no text or symbols present)
natural_image
Line drawing of a hand inserting a card into a device (no text or symbols)natural_image
Line drawing of a device casing with a plastic cover being inserted (no text or symbols)natural_image
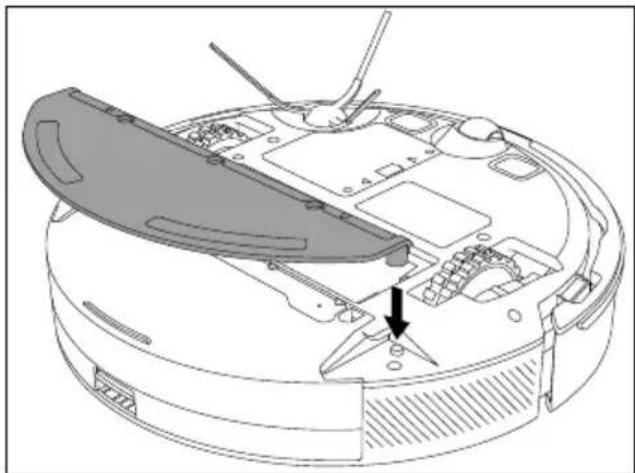
Diagram of a device interior with a hand cleaning the top panel and internal components (no text or symbols)Abb. 23 - Ladekontakte reinigen
natural_image
Diagram of a hand cleaning a circular device with labeled components and a handle (no text or symbols present)Abb. 24 – Sturzsensoren reinigen
natural_image
Line drawing of a robotic vacuum cleaner with a circular housing and internal components, showing no text or symbols.natural_image
Line drawing of hands using a portable electric fan to lift a cup with steam rising (no text or symbols)natural_image
Illustration of a hand using a tool to remove or brush into a bowl (no text or symbols)natural_image
Technical line drawing of a robotic vacuum cleaner with internal components and a tool (no text or symbols)natural_image
Technical line drawing of a robotic vacuum cleaner with internal components and a black arrow indicating a specific part (no text or symbols present)natural_image
Illustration of two hand-painted diagrams showing mechanical components, one with a propeller and the other a coiled spring (no text or symbols)natural_image
Line drawing of a hand holding a medical or surgical tool near a circular device (no text or symbols)Verschlüsselung: WEP/WPA/WPA2/WPA3
| Frequenzbereich MHz Kanal | max. Sende-leistung/dBm | |
| WLAN 2,4 GHz 2412-2472 40 < 20 | ||
| WLAN 5 GHz 5180-5240 6 < 10 | ||
| 5260-5320 6 < 10 | ||
| 5500-5700 16 < 10 | ||
| 5745-5825 | 7 (wenn vorhanden < 14) | |
| Bluetooth® 2,4 GHz | 2402-2480 | 40 < 10 |
www.medion.com/conformity.
21. Impressum
Copyright 2025
Fig. 3 - Accessoires/station de vidange/charge
natural_image
Line drawing of hands holding a circular device with a central knob and two clamps (no text or symbols)natural_image
Technical line drawing of a mechanical component with labeled parts (no readable text or symbols)natural_image
Line drawing of a device with an open lid and internal components, showing no text or symbols.natural_image
Line drawing of a rectangular electronic device with a flat base and mounting holes (no text or symbols)natural_image
Simple line drawing of a cylindrical container with liquid inside, placed on a hatched surface (no text or symbols)Fig. 9 – Installer la station de vidange/charge
natural_image
Line drawing of a robotic vacuum cleaner with a rectangular housing and circular base (no text or symbols)natural_image
Technical line drawing of a robotic vacuum cleaner with a black arrow indicating the component (no text or symbols present)natural_image
Technical line drawing of a robotic vacuum cleaner with a black arrow pointing to the component (no text or symbols present)Fig. 13 - Retirer la brosse
natural_image
Technical line drawing of a robotic vacuum cleaner with internal components and housing (no text or symbols)natural_image
Technical line drawing of a mechanical component with an inset showing a hand holding a curved tool or bracket (no text or symbols present)natural_image
Technical line drawing of a robotic vacuum cleaner with a circular housing and internal components, showing no text or symbols.natural_image
Diagram showing a curved object being lifted by an arrow, with no text or symbols present.natural_image
Technical line drawing of a robotic vacuum cleaner's internal components, showing handle and mounting base with no text or symbols
natural_image
Line drawing of a hand inserting a card into a device (no text or symbols)natural_image
Diagram of a device interior with labeled components and a hand holding a cloth (no text or symbols present)natural_image
Technical line drawing of a mechanical assembly with a hand holding a tool, showing internal components and no text or symbols.natural_image
Line drawing of a device with a folder and internal components, showing a downward arrow indicating process (no text or symbols)natural_image
Line drawing of a robotic vacuum cleaner with a circular housing and internal components, showing no text or symbols.natural_image
Line drawing of hands holding a device with a fan inside, emitting exhaust smoke from a cup (no text or symbols)natural_image
Illustration of a hand using a brush to remove or spread material from a tray into a bowl (no text or symbols)natural_image
Technical line drawing of a mechanical device with internal components and a central component (no text or symbols)natural_image
Technical line drawing of a robotic vacuum cleaner with a black arrow indicating the component (no text or symbols present)Fig. 30 - Retirer la brosse
natural_image
Illustration of two hand-painted diagrams showing a propeller and a mechanical component (no text or symbols)natural_image
Line drawing of a hand holding a medical or surgical tool near a circular object (no text or symbols)www.medion.com/conformity.
Cd = cadmium, Hg = mercure, Pb = plomb.
Afb. 3 - Accessoires/afzuig-/laadstation
2-in-1 stofreservoir
- Filterafdekking
- Vulopening
- Ontgrendeling stofreservoir
Accessoires
natural_image
Line drawing of hands holding a circular device with a central knob, no text or symbols presentnatural_image
Technical line drawing of a mechanical component with labeled parts (no readable text or symbols)natural_image
Line drawing of a device with an open lid and internal components, showing no text or symbols.natural_image
Line drawing of a rectangular electronic device with mounting base and side panel (no text or symbols)natural_image
Simple line drawing of a cylindrical container with liquid inside, placed on a hatched surface (no text or symbols)Afb. 9 – Afzuig-/laadstation opstellen
natural_image
Line drawing of a robotic vacuum cleaner with a rectangular housing and circular base (no text or symbols)Afb. 11 - Accu opladen
natural_image
Technical line drawing of a robotic vacuum cleaner with mechanical components and a black arrow indicating a specific part (no text or symbols present)natural_image
Technical line drawing of a robotic vacuum cleaner with a black arrow indicating the component (no text or symbols present)natural_image
Technical line drawing of a robotic vacuum cleaner with internal components and housing (no text or symbols)natural_image
Technical line drawing of a mechanical component with an inset showing a close-up of a component being inserted (no text or symbols present)natural_image
Line drawing of a robotic vacuum cleaner with a circular housing and internal components, showing no text or symbols.natural_image
Diagram showing a curved object being lifted by an arrow, with no text or symbols present.natural_image
Technical line drawing of a robotic vacuum cleaner with a handle and mounting bracket (no text or symbols)
natural_image
Line drawing of a hand inserting a card into a device (no text or symbols)Afb. 22 - Laadcontacten reinigen
natural_image
Diagram of a device interior with labeled components and a hand holding a cloth (no text or symbols present)Afb. 23 - Laadcontacten reinigen
natural_image
Diagram of a hand cleaning a circular device with labeled components and a central control panel (no text or symbols present)Afb. 24 – Valsensoren reinigen
natural_image
Line drawing of a device casing with a lid removed, showing internal components and a downward arrow indicating process (no text or symbols)natural_image
Line drawing of a robotic vacuum cleaner with a circular housing and a separate open casing (no text or symbols)natural_image
Line drawing of hands using a portable device to lift a cup (no text or symbols)Afb. 27 - Stofreservoir legen
natural_image
Illustration of a hand using a brush to remove or spread material from a bowl (no text or symbols)natural_image
Technical line drawing of a robotic vacuum cleaner with internal components and a central blade (no text or symbols)natural_image
Technical line drawing of a robotic vacuum cleaner with internal components and a black arrow indicating a specific part (no text or symbols present)natural_image
Illustration of two hand-painted diagrams showing a mechanical component being adjusted, with no text or symbols present.natural_image
Line drawing of a hand holding a medical or surgical tool near a circular object (no text or symbols)Codering: WEP/WPA/WPA2/WPA3
| Frequentiebereik | MHz | Kanaal | Max. zendvermo-gen / dBm |
| Wifi 2,4 GHz | 2412-2472 | 40 | < 20 |
| Wifi 5 GHz | 5180-5240 | 6 | < 10 |
| 5260-5320 | 6 | < 10 | |
| 5500-5700 | 16 | < 10 | |
| 5745-5825 | 7 | (indien aanwezig < 14) | |
| Bluetooth® 2,4 GHz | 2402-2480 | 40 | < 10 |
Cd = cadmium, Hg = kwikzilver, Pb = lood.
21. Colofon
Copyright 2025
Stand: 21. juli 2025
natural_image
Line drawing of hands holding a circular device with a central knob and two clamps (no text or symbols)natural_image
Technical line drawing of a mechanical component with labeled parts (no readable text or symbols)natural_image
Line drawing of a device with an open lid and internal components, showing mounting points (no text or symbols)natural_image
Line drawing of a rectangular electronic device with mounting flanges and a side panel (no text or symbols)natural_image
Simple line drawing of a cylindrical container with liquid inside, placed on a hatched surface (no text or symbols)natural_image
Line drawing of a robotic vacuum cleaner with a cylindrical housing and circular base (no text or symbols)natural_image
Technical line drawing of a robotic vacuum cleaner with a black arrow indicating the component (no text or symbols present)natural_image
Technical line drawing of a robotic vacuum cleaner with mechanical components and a black arrow indicating a specific part (no text or symbols present)natural_image
Technical line drawing of a robotic vacuum cleaner with internal components and a directional arrow indicating motion (no text or symbols)natural_image
Technical line drawing of a mechanical component with an inset showing a close-up of a component being inserted (no text or symbols present)natural_image
Technical line drawing of a robotic vacuum cleaner with internal components and a directional arrow indicating motion (no text or symbols)natural_image
Diagram showing a curved object being lifted by an arrow, with no text or symbols present.natural_image
Technical line drawing of a robotic vacuum cleaner's internal components, showing no text or symbols
natural_image
Line drawing of a device with a hand inserting a paper into a housing (no text or symbols)natural_image
Diagram of a device interior with labeled components and a hand holding a cloth (no text or symbols present)natural_image
Diagram of a hand installing or adjusting a device component on a circular base, showing internal layout and no text or symbols.natural_image
Line drawing of a device with a folder and internal components, showing an open lid being inserted (no text or symbols)natural_image
Line drawing of a robotic vacuum cleaner with a circular housing and a separate casing (no text or symbols)natural_image
Line drawing of hands using a vacuum cleaner to lift a cup (no text or symbols)natural_image
Illustration of a hand using a tool to remove or brush into a bowl (no text or symbols)natural_image
Technical line drawing of a robotic vacuum cleaner with internal components and a central component (no text or symbols)natural_image
Technical line drawing of a robotic vacuum cleaner with internal components and a black arrow indicating a specific part (no text or symbols present)natural_image
Illustration of two hands operating a mechanical component, one pinning and the other rolling a gear (no text or symbols)natural_image
Line drawing of a hand holding a piece of paper with a circular object nearby (no text or symbols)Fig. 32 - Limpieza del cepillo lateral
MEDION Service Center
ENAME, S.A
21. Aviso legal
Copyright 2025
natural_image
Line drawing of hands holding a circular object with a central hole, no text or symbols presentnatural_image
Technical line drawing of a mechanical component with labeled parts (no readable text or symbols)natural_image
Line drawing of a device with an open lid and a rectangular housing, showing internal components (no text or symbols)natural_image
Line drawing of a rectangular electronic device with a flat base and mounting bracket (no text or symbols)natural_image
Simple line drawing of a cylindrical container with liquid inside, placed on a hatched wall (no text or symbols)natural_image
Line drawing of a vacuum cleaner with a cylindrical housing and circular base (no text or symbols)natural_image
Technical line drawing of a robotic vacuum cleaner with a black arrow indicating the component (no text or symbols present)natural_image
Technical line drawing of a robotic vacuum cleaner with a black arrow pointing to the component (no text or symbols present)natural_image
Technical line drawing of a robotic vacuum cleaner with internal components and housing (no text or symbols)natural_image
Technical line drawing of a mechanical component with an inset showing a close-up of a component being inserted (no text or symbols present)natural_image
Technical line drawing of a robotic vacuum cleaner with internal components and a directional arrow indicating motion (no text or symbols)natural_image
Diagram showing a curved object being lifted by an arrow, with no text or symbols present.natural_image
Technical line drawing of a robotic vacuum cleaner with a highlighted component and mounting hardware (no text or symbols)
natural_image
Line drawing of a hand inserting a card into a device (no text or symbols)natural_image
Diagram of a device interior with labeled components and a hand holding a tool (no text or symbols present)natural_image
Technical line drawing of a mechanical assembly with a hand adjusting a component (no text or symbols)natural_image
Line drawing of a device with a folder and internal components, showing a process step (no text or symbols)natural_image
Line drawing of a robotic vacuum cleaner with a circular housing and a separate view showing internal components (no text or symbols)natural_image
Line drawing of hands using a portable electric fan to lift a cup (no text or symbols)natural_image
Illustration of a hand using a tool to remove or brush into a bowl (no text or symbols)natural_image
Technical line drawing of a mechanical device with internal components and a central component (no text or symbols)natural_image
Technical line drawing of a robotic vacuum cleaner with internal components and a black arrow indicating a specific part (no text or symbols present)natural_image
Illustration of two hand-painted diagrams showing mechanical components (no text or symbols)natural_image
Line drawing of a hand holding a medical or surgical tool near a stethoscope (no text or symbols)21. Note legali
Copyright 2025
- About this user manual .... 154
1.1. Explanation of symbols .....154 FR
-
Proper use 155
-
Safety instructions ....158
3.1. Information on the battery pack 158
-
Package contents 159
-
Appliance overview 160
5.1. Meanings of the operating lights 162 IT
- Preparing the robot vacuum and mop 163
6.1. Placing the dust collector/charging station on the floor protection mat .... 163
6.2. Setting up the dust collector/charging station 164
6.3. Charging the battery pack....164
- Vacuum cleaning mode 165
7.1. Additional brush set 165
- Mopping mode ....166
8.1. Preparing the water tank 166
-
Creating cleaning plans ....167
-
App control 168
10.1. System requirements .... 168
10.2. Connecting the appliance to the app....168
10.3. Resetting the WLAN 169
- Cleaning and maintenance ....169
11.1. Cleaning and replacement intervals 169
11.2. Cleaning surfaces....170
11.3. Replacing the dust container in the dust collector/charging station....170
11.4. Cleaning the dust container/water tank....171
11.5. Cleaning the dust filter....171
11.6. Cleaning the suction opening and brush.... 172
11.7. Cleaning the side brushes.... 172
11.8. Cleaning wheel/drive wheels.... 172
11.9. Cleaning the wiping cloth/mop attachment 173
-
Replacing the battery pack 173
-
Longer periods without use....173
-
Troubleshooting ....174
-
Spare parts....176
-
Technical specifications....177
16.1. Information on WLAN/Bluetooth ^® 178
-
EU declaration of conformity ....178
-
Trademark information....178
-
Disposal....179
-
Service information.... 180
-
Legal Notice.... 180
1. About this user manual

Thank you for choosing our product. We hope you enjoy using this appliance.
Read the safety instructions carefully before using the appliance for the first time. Note the warnings on the appliance and in the user manual.
Always keep the user manual close to hand. If you sell the appliance or give it away, please ensure that you also pass on this user manual. It is an essential component of the product.
1.1. Explanation of symbols
If a passage is marked with one of the warning symbols listed below, follow the warning notices in order to prevent the hazards described in the text and the potential consequences described there.
DANGER!
Warning: risk of fatal injury!
WARNING!
Warning: risk of possible fatal injury and/or serious irreversible injuries!
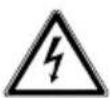
WARNING!
Warning: risk of electric shock!
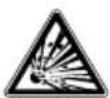
WARNING!
Warning: risk of explosive materials!

CAUTION!
Warning: risk of minor and/or moderate injuries!

NOTICE!
Follow these instructions to prevent damage to the appliance!

More detailed information about using the appliance!

NOTICE!
Follow the instructions in the user manual!

Symbol for protection class II
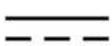
Direct current symbol
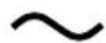
Alternating current symbol
Fuse
Appliances bearing this symbol have a fuse that burns out when the specified rated current (T3.15A) is exceeded, thus breaking the electrical circuit.
Indoor use
2. Proper use
The robot vacuum and mop is used for automatic dry and damp cleaning of smooth and even floors indoors.
Do not use the appliance outdoors. This appliance is designed for use in private households and similar household applications, such as
- in kitchens for staff in retail outlets, offices and other commercial areas
• on agricultural estates - by customers in hotels, motels and other accommodation facilities
- in bed-and-breakfast establishments.
The appliance is not intended for commercial or industrial use.
Please note that we shall not be liable in cases of improper use:
▶ Do not modify the appliance without our consent and do not use any auxiliary equipment that we have not approved or supplied.
▶ Only use replacement parts or accessories that we have supplied or approved.
Comply with all the information in this user manual, especially the safety instructions. Any other use is considered improper and can cause personal injury or property damage.
3. Safety instructions
DE
- Keep the appliance and its accessories out of the reach of children.
FR
NL
■ This appliance can be used by children of 8 years and older, and by people with reduced physical, sensory or mental capacity, or with a lack of experience and/or knowledge, but only with proper supervision, or if they have been told how to use the appliance safely, and have understood the risks involved if they use it improperly.
■ Children must not be allowed to play with the appliance.
■ Do not allow children to clean the appliance or perform maintenance tasks on it unless they are aged 8 years or older, and properly supervised.
■ Children younger than 8 should be kept away from the appliance and mains cable.
IT
EN
DANGER!
Risk of electric shock!
Live parts. There is a risk of electric shock/short circuit.
■ Use the charging station to charge the battery.
■ The charging station must only be used in dry rooms.
■ Only connect the mains cable to a properly installed, easily accessible socket. The local mains voltage must match the voltage stated in the technical specifications for the appliance.
■ The power socket must be easily accessible so that you can unplug the appliance from the mains quickly if necessary.
■ When unplugging the mains cable from the socket, always pull on the plug rather than on the mains cable. Do not kink or crush the mains cable.
■ Unplug the appliance from the socket:
– before cleaning or maintaining the appliance
– in the event of damage to the plug, mains cable, charging station or the ap-
pliance itself
- if liquids or foreign objects have penetrated inside the appliance
– before fitting or removing accessories - if the appliance is damp or wet
- if you are away for a long period
– during thunderstorms.
■ Only use the appliance in enclosed spaces and never expose the appliance to water droplets or spray.
■ Do not touch the appliance with damp or wet hands while the appliance is charging.
■ Check the robot vacuum and mop and the mains cable for damage before using the appliance for the first time and after every use.
■ Do not use the appliance if the robot vacuum and mop, charging station or mains cable is visibly damaged.
■ Contact our Service Centre without delay if the appliance has been damaged during transport.
■ Never immerse the robot vacuum and mop, charging station or mains adapter in water or other liquids!
WARNING!
Risk of explosion!
There is a risk of fire or explosion when vacuuming up flammable liquids or certain solid materials.
■ Never use the appliance near highly flammable materials.
■ Do not vacuum up sharp-edged or highly flammable objects and liquids such as matches, hot ashes or petrol.
■ Do not vacuum up toner dust (carbon black from laser printers, photocopiers) under any circumstances.

CAUTION!
Risk of injury/risk of damage to the appli- ance!
There is a risk of injury and/or damage to the appliance due to improper use.
■ Only use the appliance to vacuum small amounts of dust, dirt and crumbs. Empty the dust container after every use.
■ Do not use the appliance to vacuum up liquids or damp dirt. Allow damp, cleaned carpets to dry fully before vacuuming.
DE FR NL
In order to avoid the risk of tripping, do not use an extension cable and inform any persons present about the operation of the robot vacuum and mop.
■ Do not cover the sensors and ventilation slots on the robot vacuum and mop.
■ Avoid collisions with rough, brushed or grainy surfaces (e.g. skirting boards on fireplaces or stoves), as the surfaces themselves or those on the appliance may be damaged. Exclude these types of areas from vacuuming.
3.1. Information on the batt ery pack
This appliance contains a removable lithium-ion battery pack (see "12. Replacing the battery pack" on page 173).
DANGER! Risk of explosion!
Batteries could explode if exposed to extreme heat.
Extreme temperatures also impair the battery's charging capacity.
■ Never throw the appliance/battery into a fire.
■ Do not expose the appliance/battery to extreme conditions. Avoid:
– high humidity or wet conditions
- extremely high (> 40°C) or low temperatures (< 0°C)
- direct sunlight
- naked flames.
■ Do not use the charging station in a highly reflective environment, e.g. in direct sunlight or near mirrors.

NOTICE! Possible damage to battery!
Improper handling of the bat- tery can completely destroy it.
■ Avoid heavy impacts and vibrations.
■ Charge the battery regularly and as fully as possible. Do not leave the battery discharged for a long period of time.
■ If the battery no longer charges or only charges partially, contact our Service Centre.
■ Do not use damaged chargers.
■ Dispose of the battery in an environmentally friendly manner (see "19. Disposal" on page 179).
■ Only use the supplied charging station to charge the rechargeable battery.

The laser distance measurement device complies with the IEC 60825-1:2014 Class 1 laser product standard and does not generate any hazardous laser radiation.
4. Package contents

DANGER!
Risk of choking and suffocation!
There is a risk of choking and suffocation due to swallowing or inhaling small parts or plastic wrap.
- Keep the plastic packaging out of the reach of children.
Check whether all package contents are present. Contact us within 14 days after purchase if any package contents are missing.
The following items are supplied with your product:
- Robot vacuum and mop with built-in lithium-ion battery pack, incl.
-1x mop attachment
- 1 x 2-in-1 dust container
- 1 x dust collector
- 4 x wiping cloths
- 4 x HEPA H13 filters/sponge filters (including 3x replacement filters)
- 1 x fluffy brush
- 1 x rubber brush
- 1 x standard brush
- 6 x dust bags, 2.5 l
- 5 x side brushes
- 1 x cleaning brush
- 1 x floor protector mat
- 1 x short manual
5. Appliance overview
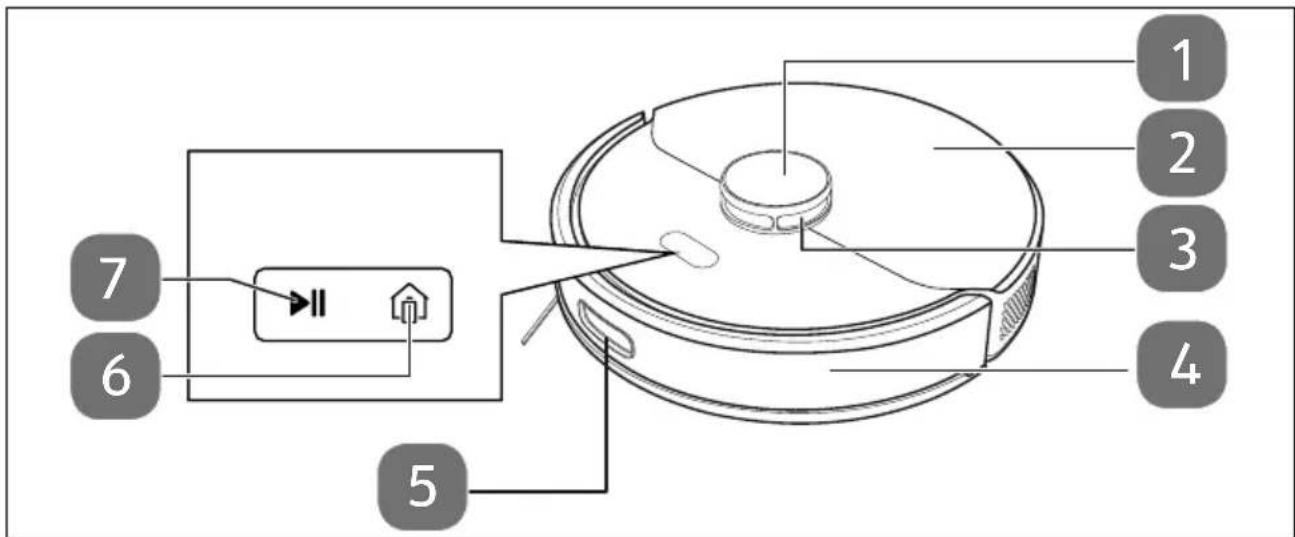
Fig. 1 – Front with open storage compartment
- Laser sensor cap
- Appliance cover
- Laser sensor
- Bumper
- Infrared front sensor
-
button: return/recharge at the charging station; operating light
-
▶|| button: start/pause cleaning; long press: switch the appliance on/off; operating light
Long button press: start the WLAN connection and login process
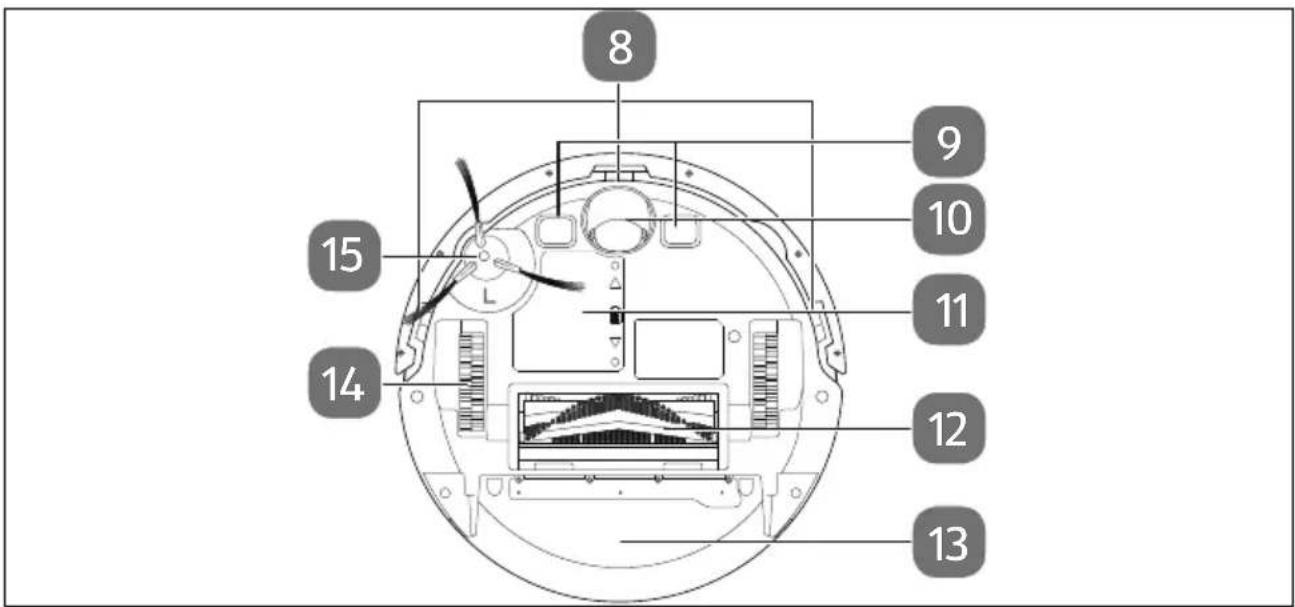
Fig. 2 - Bottom
- Anti-fall sensors
- Charging contacts
- Wheel: to aid the direction of movement
- Battery compartment
-
Rotating brush
-
2-in-1 dust container
- Wheel for driving
- Side brush
Fig. 3 – Accessories / dust collector/charging station
2-in-1 dust container
- Filter cover
- Filling opening
- Dust container release
Accessories
- HEPA filter/sponge filter
- Mop attachment
- Wiping cloth
- Side brushes
- Cleaning brush with blade
- Floor protection mat of the dust collector/charging station
Dust collector/charging station
- Cleaning brush storage
- Lid
- Dust bag
- Display
- Infrared sensor
- Charging contacts
- Suction opening
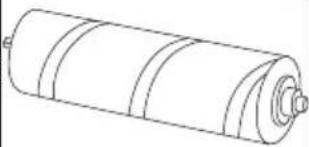
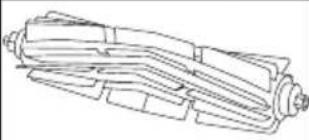
Fig. 4 - Brush types
- Fluffy brush
- Rubber brush
- Standard brush

The robot vacuum and mop has a voice output. Status and error messages are indicated by voice outputs. These voice outputs are not mentioned separately in the user manual as they are self-explanatory.
5.1. Meanings of the operating lights
| State | Operating lights | |
| Online Offline | ||
| Standby | Lights up white constantly | Lights up pink constantly |
| Energy-saving mode | Off Off | |
| Pause | Lights up white constantly | Lights up pink constantly |
| Cleaning | Lights up white constantly | Lights up pink constantly |
| Return to the charging station | Lights up white constantly | Lights up pink constantly |
| Charging process | Pulses white slowly | Pulses pink slowly |
| Fault Flashes | red Flashes red | |
| Shut down Off Off | ||
| Low battery level | Lights up red constantly | Lights up red constantly |
| Locate robot vacuum and mop | Flashes pink | Flashes pink |

If the operating lights are lit up constantly or pulsing pink, no WLAN connection has been established.
6. Preparing the robot vacuum and mop
natural_image
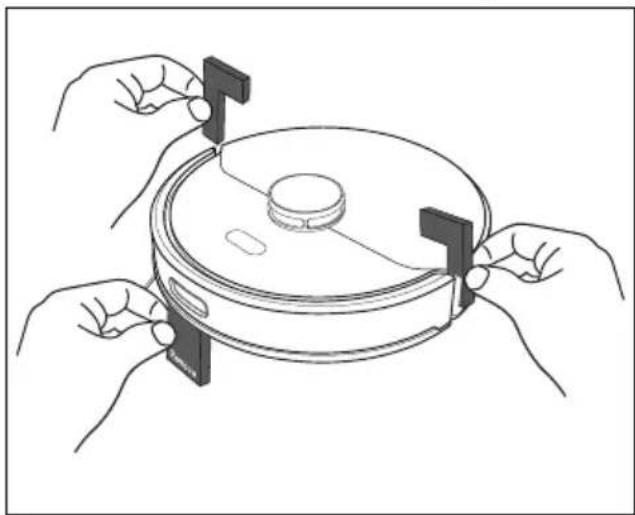
Line drawing of hands holding a circular device with a central knob, no text or symbols presentFig. 5 - Removing the transport lock
Remove all packaging materials and the transport lock from the appliance.
natural_image
Technical line drawing of a mechanical component with labeled parts (no readable text or symbols)Fig. 6 - Attaching the side brush
▶ Turn the robot vacuum and mop over and place it on a soft surface.
Place the side brush supplied vertically on the drive shaft and press it on until you hear it click into place.
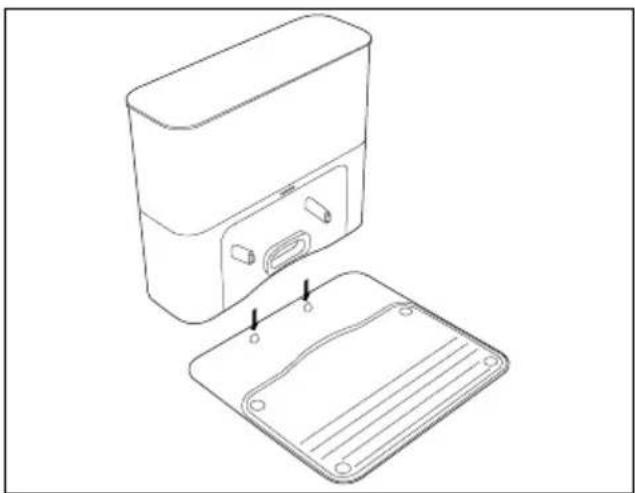
6.1. Placing the dust collector/charging station on the floor protection mat
natural_image
Line drawing of a device with an open lid and internal components, showing no text or symbols.Fig. 7 – Placing the dust collector/charging station on the floor protection mat
When placing the dust collector/charging station on the floor protection mat, make sure that the anti-slip pin is positioned in the recess on the underside of the dust collector/charging station.

natural_image
Line drawing of a rectangular electronic device with a flat base and mounting bracket (no text or symbols)Fig. 8 - Floor protection mat correctly placed
6.2. Sett ing up the dust collector/charging station
natural_image
Simple line drawing of a cylindrical container with liquid inside, placed on a hatched surface (no text or symbols)Fig. 9 – Setting up the dust collector/charging station
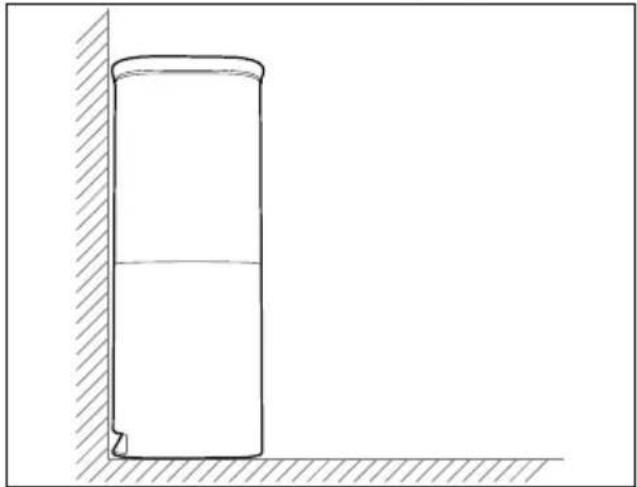
▶ Position the dust collector/charging station on a wall with a level surface and avoid direct sunlight.
▶ Ensure that the required clearance of approx. 0.5 m to the sides and approx. 1.5 m to the front is maintained and that the charging contacts for the robot vacuum and mop are freely accessible.
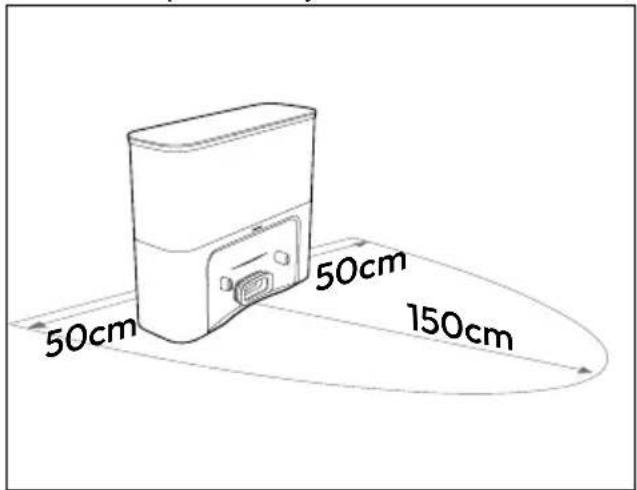
Fig. 10 - Setting up the dust collector/charging station
▶ Insert the mains plug into the mains socket.
6.3. Charging the battery pack
natural_image
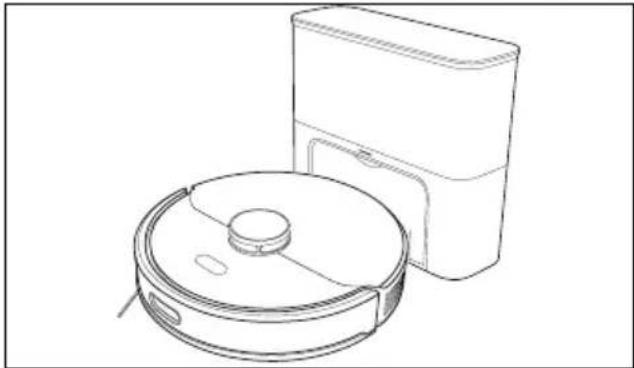
Line drawing of a robotic vacuum cleaner with a cylindrical component and a rectangular housing (no text or symbols)Fig. 11 - Charging battery pack
The robot vacuum and mop is fitted with a lithium-ion battery pack. Fully charge the appliance's battery pack for approx. 5–6 hours.
Place the robot vacuum and mop on the charging station so that the charging contacts are on top of each other. The robot vacuum cleaner is switched on automatically.
The charging indicator flashes during the charging process and lights up continuously when the charging process is complete.

The robot vacuum and mop automatically returns to the dust collector/charging station when the battery is low.
You can use the button or the app to instruct the robot vacuum and mop to automatically return to the dust collector/charging station and charge.
This return to the dust collector/charging station interrupts the cleaning process.
If the robot vacuum cleaner cannot find its way back to the dust collector/charging station, it returns to the starting point. In this case, return the robot vacuum cleaner to the dust collector/charging station by hand.

If the performance of the battery decreases significantly even when charged, contact our Service Centre.
7. Vacuum cleaning mode

NOTICE!
Risk of damage to property!
Loose cabling can get caught around your robot vacuum and mop during vacuum cleaning and be pulled along by the appliance. This can result in appliances being pulled off a table and consequently damaged.
■ Lay cables out of the reach of the appliance.
■ Remove all fragile items (e.g. glass, lamp vases) and objects that could become trapped in the brushes or sucked up (e.g. cords, clothing, newspapers, curtains) from the working area before operating the appliance.

This robot vacuum and mop is not suitable for use on deep-pile carpets or for vacuuming up liquids.
▶ Make sure that the dust container is clean and empty and that the filter is inserted correctly.
Place the robot vacuum and mop in an open space in the room.
▶ Press the ▶ button to start the cleaning process.
▶ Press the ▶ button again to pause the cleaning process.
▶ Press the ▶ button again to continue cleaning.
▶ Switch off the appliance:
- If necessary, remove the robot vacuum cleaner from the dust collector/charging station.
- Press the ▶|| button for approx. 3–5 seconds.
Press the ▶ button on the appliance again for approx. 3–5 seconds to switch on the robot vacuum and mop again.
With the appliance switched off, clean the suction opening at regular intervals and empty the dust container after every use.
7.1. Additional brush set

If you would like to order an additional brush set, please visit our MEDION service shop at https://www.medion.com/medionservice-shop.
You will be able to find out all the details about your specific product while you're there.
▶ Use the brushes according to the overview below:
| Brush Application | |
 | Suitable for all floor coverings. |
 | Suitable for hard floors, tiles and wooden floors. |
 | Suitable for hard floors and removing pet hair. |
▶ Switch off the appliance and place it on a level surface.
natural_image
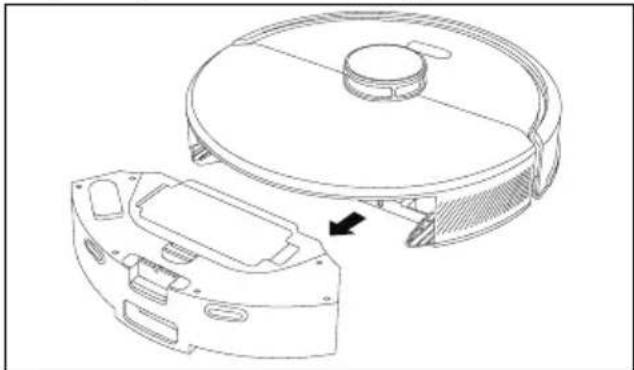
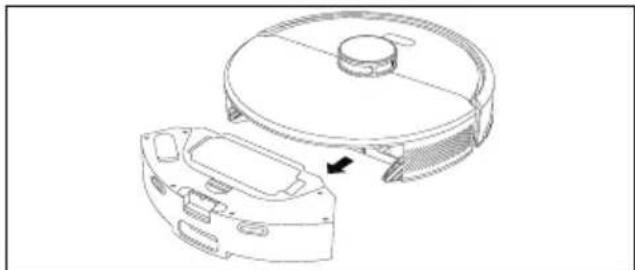
Technical line drawing of a robotic vacuum cleaner with a mechanical component and an arrow indicating assembly (no text or symbols present)Fig. 12 - Removing the brush frame
▶ Press both locking tabs on the brush frame inwards and lift the brush frame off.
natural_image
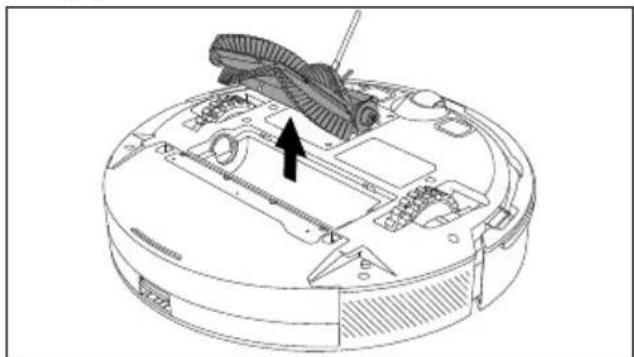
Technical line drawing of a robotic vacuum cleaner with a black arrow pointing to the component (no text or symbols present)Fig. 13 - Removing the brush
Remove the brush from the suction opening.
Insert the desired brush into the opening. First insert the brush into the square holder and then place the brush fully into the opening.
Place the brush frame with the two locking tabs on the suction opening first and press it on until you hear it click into place.
8. Mopping mode

NOTICE!
Possible material damage!
Floor coverings may be damaged by leaking water/liquids.
■ Only use the robot vacuum and mop in mopping mode on tiles and sealed floor surfaces, not on carpets.
■ Before use, check whether the floor covering is suitable for damp cleaning.
In the medion Life+ app, select the compatible water output quantity for the floor covering.

NOTICE!
Possibility of damage to the appliance!
Unsuitable additives in the water can cause damage to the appliance.
■ Only use clean tap water for the fresh water tank.
8.1. Preparing the water tank
The appliance can be converted into a robot mop using the accessories supplied.
natural_image
Technical line drawing of a robotic vacuum cleaner with internal components and a highlighted section (no text or symbols)Fig. 14 - Removing the dust container/water tank
▶ Press the release button on the dust container/water tank.
Remove the dust container/water tank.
natural_image
Technical line drawing of a mechanical component with an inset showing a close-up of a cylindrical component being inserted (no text or symbols present)Fig. 15 – Fill the water tank.
▶ Open the cap on the water tank.
▶ Fill the water tank with clean water. Do not use any additional cleaning agents.
▶ Close the cap on the water tank.
natural_image
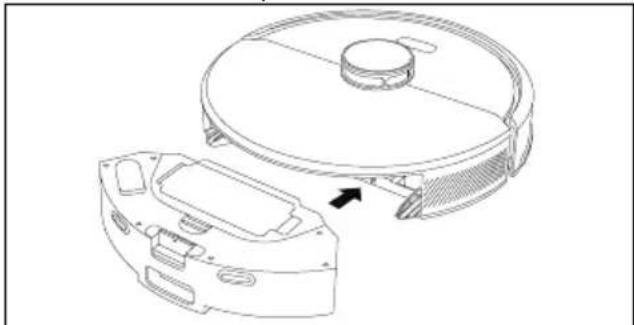
Technical line drawing of a robotic vacuum cleaner with a circular housing and internal components, showing no text or symbols.Fig. 16 - Inserting the dust container/water tank
Place the dust container/water tank back in the robot vacuum and mop and close the dust container cover.
▶ Moisten the wiping cloth with water and wring it out until it stops dripping.
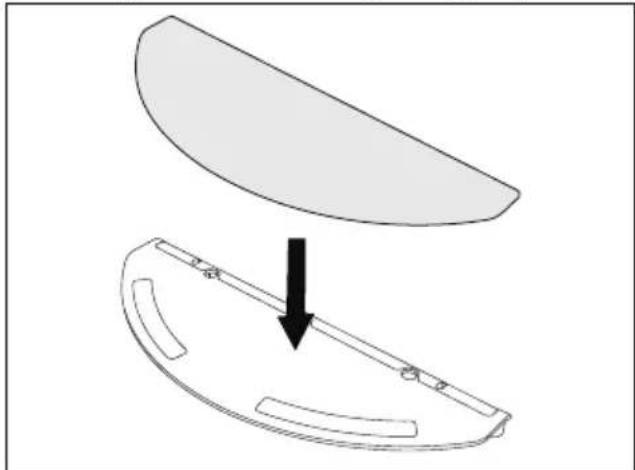
natural_image
Diagram showing a curved object being lifted by an arrow, with no text or symbols present.Fig. 17 - Assembling the mop attachment
▶ Turn the robot vacuum and mop over and place it on a soft surface.
Place the wiping cloth on the mop attachment. It is held in place by a hook-and-loop fastener. Make sure that it is lying smoothly.
Place the robot vacuum cleaner and mop back on its wheels.
natural_image
Technical line drawing of a robotic vacuum cleaner with a handle and mounting bracket (no text or symbols)Fig. 18 - Attaching the mop attachment
▶ Press the || button to start wet cleaning.
To remove the mop attachment again after cleaning, grasp the mop attachment with both hands and pull it upwards to remove it.
▶ Empty the water tank and rinse the wiping cloth after every wet cleaning and allow it to dry.
9. Creating cleaning plans
flowchart
graph TD
    A["A"] --> B["B"]
    B --> C["C"]
    style A fill:#f9f,stroke:#333
    style B fill:#f9f,stroke:#333
    style C fill:#ccf,stroke:#333
Fig. 19 - Standard cleaning
▶ Press the || button to start cleaning.
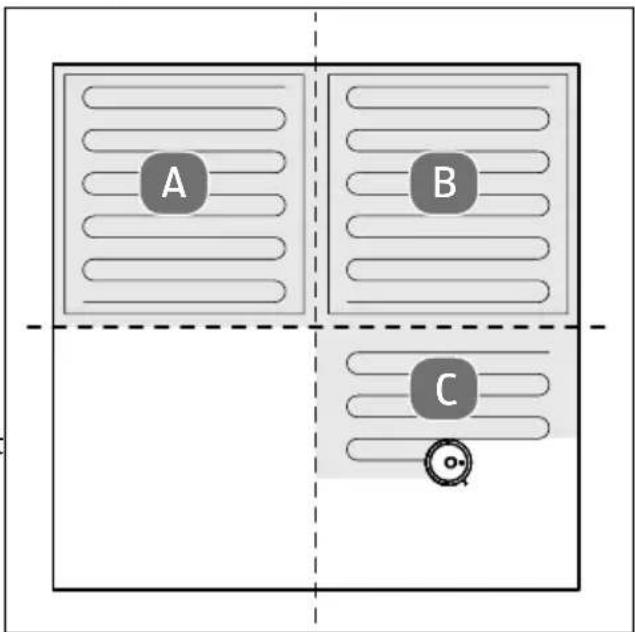
The robot vacuum cleaner and mop dynamically plans the cleaning path according to the map created during the exploratory trip (set via the app) and cleans the various zones one after the other. In each zone, the robot vacuum cleaner and mop starts by cleaning the corners and then carries out the rest of the cleaning in a zigzag pattern (see Fig. 19).

The app provides additional setting options, e.g.:
• Exploratory trip through the premises
- Set up restricted areas/an invisible wall
- Set up restricted areas for damp mopping
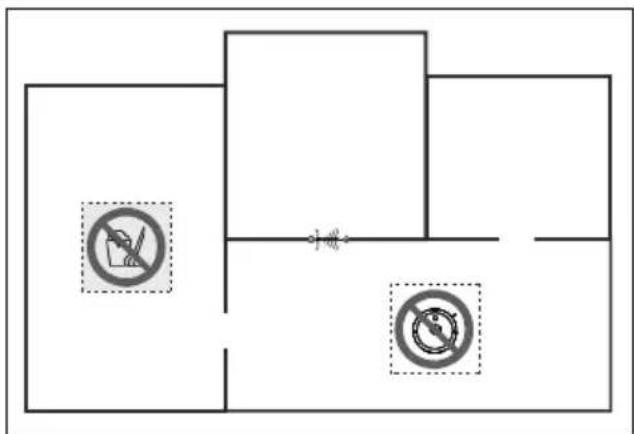
Fig. 20 - Setting up restricted areas
- Set up restricted areas for vacuuming
- Set up rooms to be cleaned
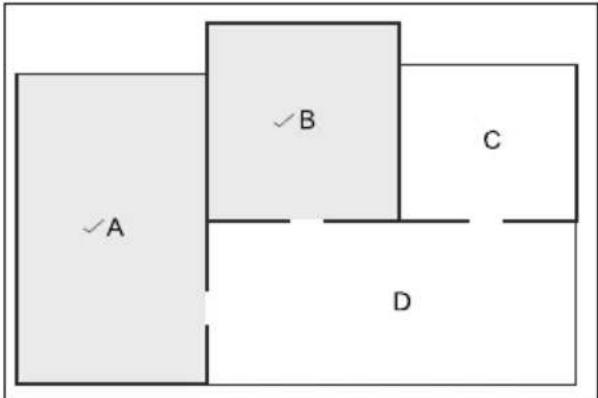
Fig. 21 - Defining rooms

Do not move the robot vacuum cleaner randomly or too frequently during operation. After moving the robot vacuum cleaner, place it back near its original location.
When restarting, the appliance searches for its new position. After successfully positioning, the robot vacuum cleaner continues to work according to the cleaning plan.
If positioning fails due to too frequent manual movement, the appliance abandons the previous task and creates a new map for cleaning. In this case, the robot vacuum cleaner may not return to the dust collector/charging station.
10. App control
To make use of the full functionality of your robot vacuum and mop, please download the medion Life+ app free of charge to your smartphone.
▶ Scan the following QR code or visit the Play Store (Android™) or App Store (iOS®) and search for medion Life+ app.


A customer account is required to use the app. For this, you need a valid email address. Follow the instructions in the app.
10.1. System requirements
- Smartphone with at least WLAN 802.11 b/g/n
• 2.4 GHz/5 GHz WLAN network - Android™ 9 or higher
- iOS 14 or higher
• Install the medion Life+ app on your smartphone
10.2. Connecting the appliance to the app
▶ Open the medion Life+ app.
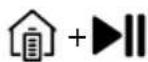
Press the button and the button on the robot vacuum and mop at the same time to put the appliance into pairing mode.
The operating light flashes slowly.

If the Bluetooth® function on your smart-phone is switched on, the app automatically finds the appliance during the initial setup and displays it. Without Bluetooth, select the appliance as described below.
The installation process may vary for different operating systems.
▶ If you have not yet registered an appliance in the medion Life+ app, tap the Add appliance button.
If you have already integrated an appliance in the app, click on the + button at the top right.
▶ Select the X23 SW+ (MD100051) model in the Vacuum robots category.
Now follow the instructions in the app to connect.

Further information and support for installing the medion Life+ app and instructions for optional troubleshooting can be found at: https://www.medion.com/de/service/.

The first time it is used, the robot vacuum and mop carries out an exploratory trip. Follow the instructions shown in the app.
▶ Use the app to select the Cleaning setting e.g. vacuum or mop and the suction level.
▶ Create cleaning plans and restricted zones. Follow the relevant instructions in the app.
10.3. Resetting the WLAN
Press the button and the button on the robot vacuum and mop simultaneously for a few seconds to reset the WLAN information.
11. Cleaning and maintenance

WARNING!
Risk of electric shock!
There is a risk of electric shock/short circuit from live parts.
■ Never immerse the robot vacuum and mop, charging station or mains adapter in water or other liquids!
■ Only clean the appliance and all accessories with a dry or slightly damp cloth.
■ Switch off the appliance completely and pull the mains plug out of the socket before cleaning and maintenance as well as before assembly or disassembly of the accessories.
11.1. Cleaning and replacement intervals
| Part | Cleaning interval | Replacement interval |
| Dust container | After each cleaning | |
| DUST BAG After notification that the dust bag is full | ||
| Filter Once a week | Every 2 months | |
| Brush roller Once a week | Every 6–12 months | |
| Side brushes | Once a week | Every 3–6 months or when the brushes are used up |
| Sensors Once a month | ||
| Charging contacts | Once a month | |
| Wheel Once a month | ||
| Mop attachment | After each cleaning | |
| Wiping cloth | After each cleaning | |
| Water tank After each cleaning | ||
11.2. Cleaning surfaces
▶ Switch off the robot vacuum and mop.
Remove the dust container/water tank.
Do not use any solvents or caustic/gaseous cleaning agents to clean the appliance's surfaces.
Wipe the surface of the robot vacuum and mop and the charging station with a damp cloth.
Remove dirt and dust with a clean, dry cloth
– from the infrared front sensor,
– from the drop sensors,
– from the charging contacts of the robot vacuum and mop and the dust collector.
natural_image
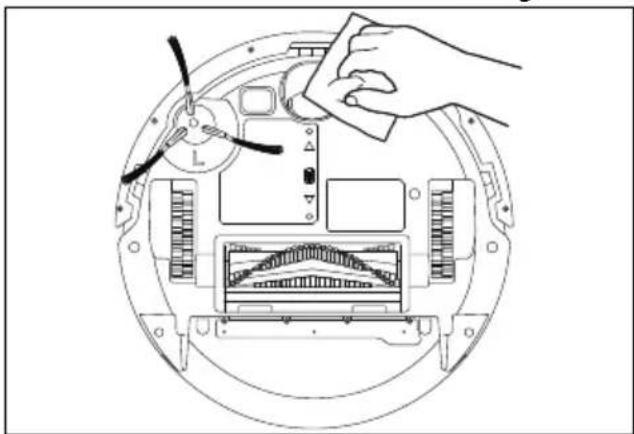
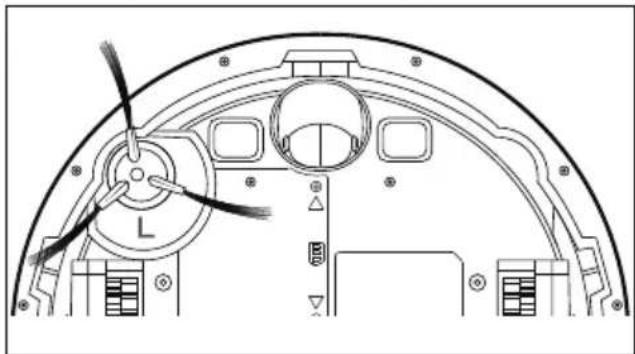
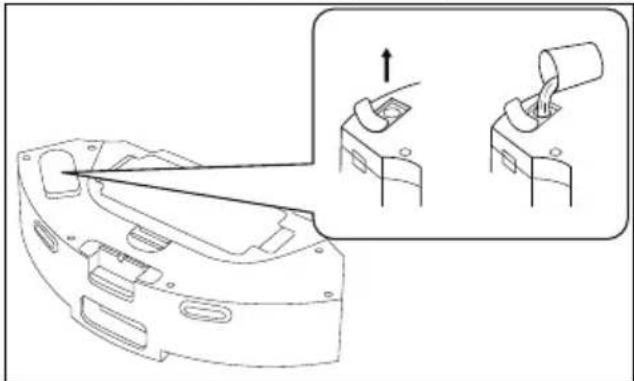
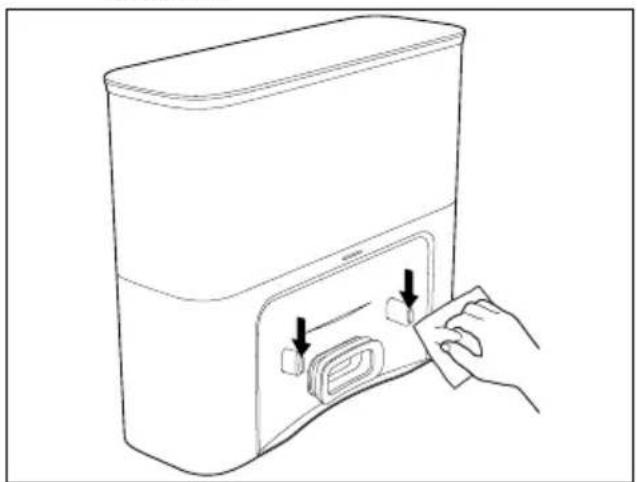
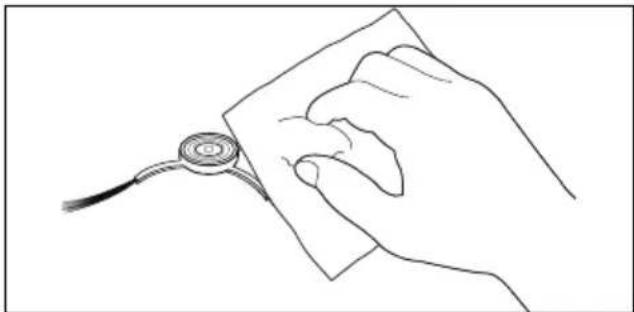
Line drawing of a hand inserting a card into a device (no text or symbols)Fig. 22 - Cleaning charging contacts
natural_image
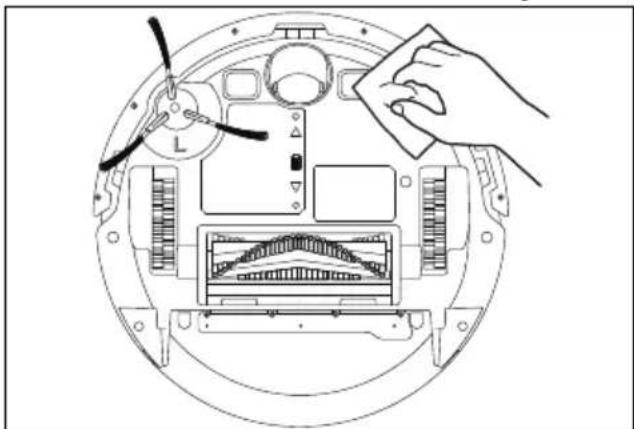
Diagram of a device interior with a hand cleaning the top panel and internal components (no text or symbols)Fig. 23 - Cleaning charging contacts
natural_image
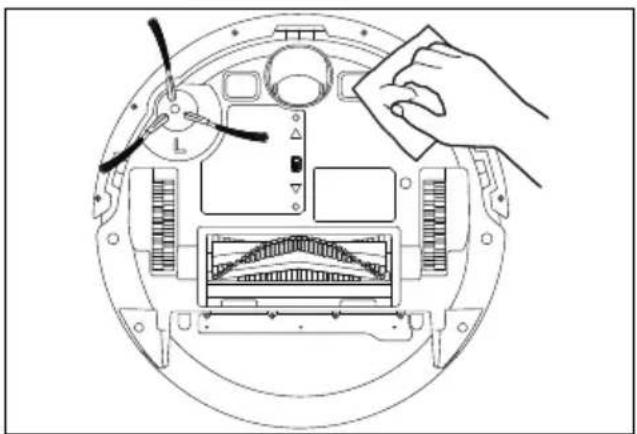
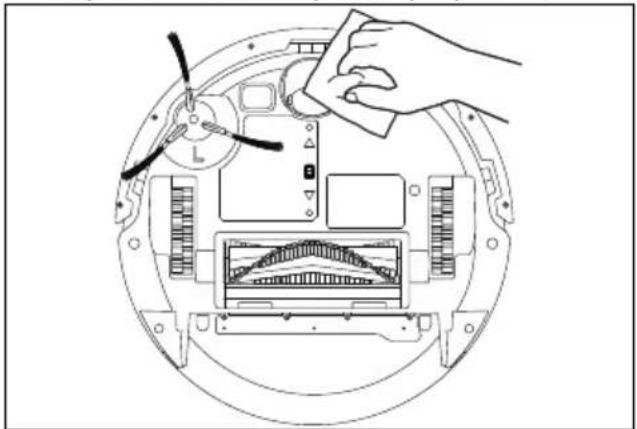
Technical line drawing of a mechanical assembly with a hand adjusting a component (no text or symbols)Fig. 24 - Cleaning drop sensors
11.3. Replacing the dust container in the dust collector/charging station
Regularly clean the dust container of the dust collector and change the dust bag as soon as it is full.
natural_image
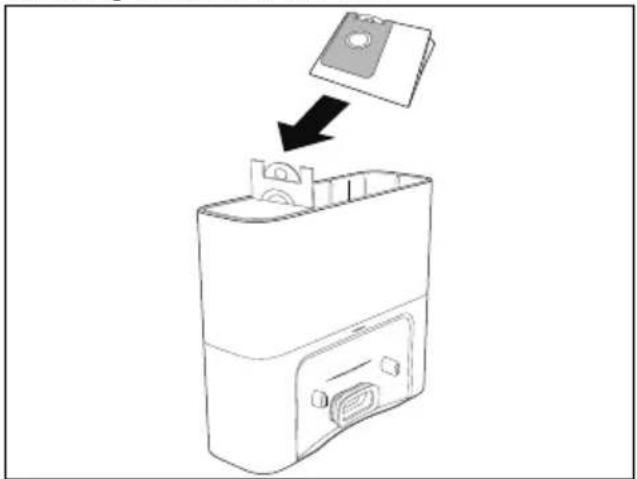
Line drawing of a device with a plastic cover emerging from its side panel (no text or symbols)Fig. 25 - Replacing the dust bag
▶ Open the lid of the dust collector/charging station.
▶ Pull the dust bag out upwards by the tab.
▶ Dispose of the filled dust bag in a suitable dustbin.
Insert a new dust bag into the holder in the chamber as shown (see Fig. 25).
▶ Check that the dust bag is correctly seated in the lifting device.
▶ Close the lid.
The dust collector/charging station is ready for operation again.
11.4. Cleaning the dust container/water tank
natural_image
Line drawing of a robotic vacuum cleaner with a circular housing and a separate component, showing no text or symbols.Fig. 26 - Removing the dust container/water tank
▶ Press the release button on the dust container/water tank.
Remove the dust container/water tank.
Empty and clean the dust container/water tank after each use.
Remove the HEPA filter before cleaning with water (see following section).
▶ Open the cap on the water tank. Empty the water tank over a sink.
natural_image
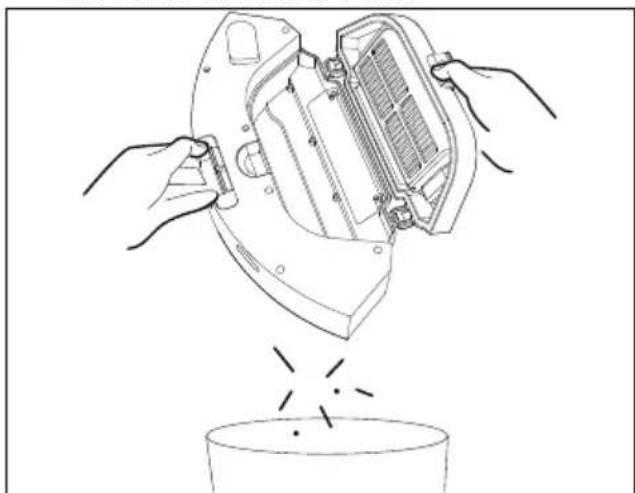
Line drawing of hands using a vacuum cleaner to lift a cup with steam rising (no text or symbols)Fig. 27 - Emptying the dust container
▶ Empty the dust container over a dustbin. Gently knock out the dust.
- Rinse the dust container/water tank with water as required.

▶ Never put the dust container/water tank in the dishwasher!
▶ Allow the dust container/water tank to dry completely.
Place the dust container/water tank back into the appliance with the release button pointing forwards and upwards.
11.5. Cleaning the dust fi Iter
natural_image
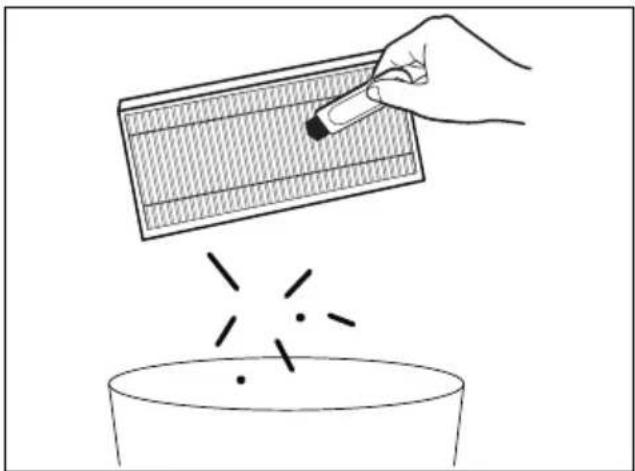
Illustration of a hand using a brush to remove or paint from a grid-patterned plate above a bowl (no text or symbols)Fig. 28 - Removing the dust filter
▶ Pull up the filter flap. Pull the tab to remove the dust filter.
▶ Remove the HEPA filter.
▶ Carefully tap out the HEPA filter.

The HEPA filter is not suitable for cleaning with water.
▶ Do not expose the filter to direct sunlight.
With the filter flap open, rinse the dust container with water as required. Dry it carefully.
▶ Replace the HEPA filter with the black foam filter facing downwards.
11.6. Cleaning the suction opening and brush
Dirt and dust can accumulate around the suction opening and impair the suction power. To keep the suction power constant, clean the suction opening on the underside regularly. Switch off the appliance.
natural_image
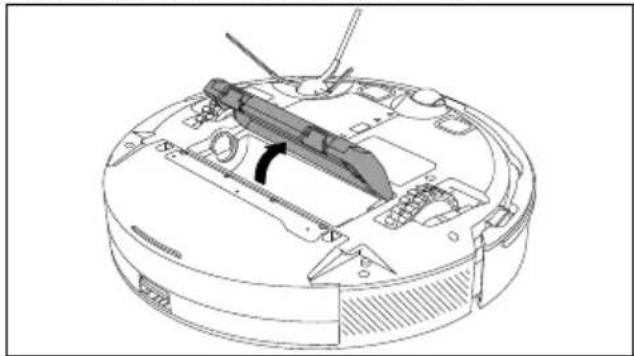
Technical line drawing of a mechanical device with internal components and a central component (no text or symbols)Fig. 29 - Removing the brush frame
▶ Turn the robot vacuum and mop over and place it on a soft surface.
▶ Press both locking tabs on the brush frame inwards and lift the brush frame off.
natural_image
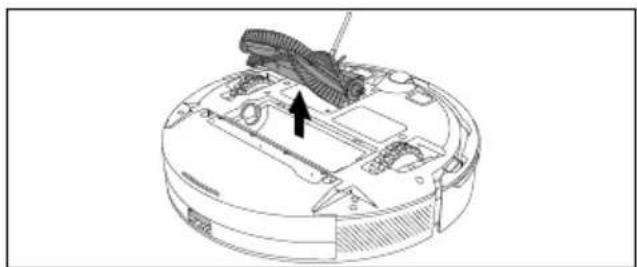
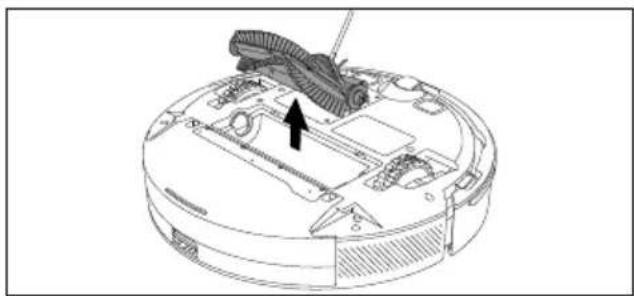
Technical line drawing of a robotic vacuum cleaner with internal components and a black arrow indicating a specific part (no text or symbols present)Fig. 30 - Removing the brush
Remove the brush from the suction opening.
Remove dirt and dust on and in the suction opening with a damp wiping cloth.
natural_image
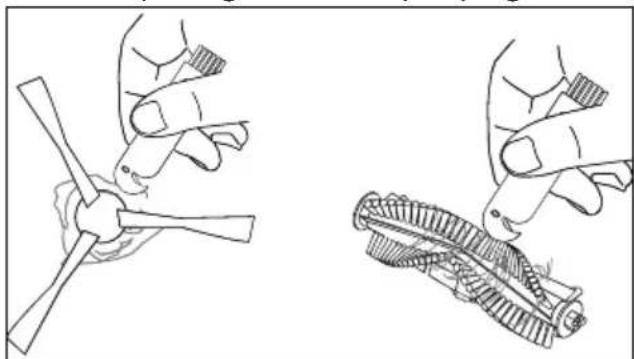
Illustration of two hand-painted diagrams showing a propeller being handled and a mechanical component being inserted (no text or symbols)Fig. 31 - Removing hair/threads
▶ If long hairs or threads have become wrapped around the brush, cut them and then brush the brush thoroughly.
▶ First insert the brush into the square holder and then place the brush fully back into the opening.
Place the brush frame with the two locking tabs on the suction opening first and press it on until you hear it click into place.
11.7. Cleaning the side brushes
natural_image
Line drawing of a hand holding a medical or electronic device with a circular component, no text or symbols presentFig. 32 - Cleaning the side brush
▶ Switch off the appliance and place it up-side down onto a soft surface.
▶ Clean the brushes to remove dirt and hair.
Remove stubborn dirt from the brushes using a damp cloth.
Remove the side brushes to make them easier to clean.
▶ After cleaning, reattach the brush (see Fig. 6).

If the bristles become bent, place the brushes in hot water so that the bristles return to their original shape.
11.8. Cleaning wheel/drive wheels
▶ Clean it to remove dirt with a damp cloth.
▶ Wipe the drive wheels with a damp cloth.
11.9. Cleaning the wiping cloth/mop att achment
Remove the wiping cloth from the mop attachment and rinse it under running water. If very dirty, wash the wiping cloth at 60^ C in the washing machine. Allow it to dry completely.
▶ Hold the mop attachment with both hands and pull it upwards to remove it.
Clean it with a mild washing-up liquid and a soft cloth. Dry it thoroughly before reinserting the mop attachment. Ensure that you hear it click into place (see Fig. 17).
▶ After cleaning, place the robot vacuum and mop back on its wheels.
12. Replacing the battery pack

CAUTION!
Risk of injury!
There is a risk of injury in case of contact with the removed batteries.
- Keep removed batteries away from children. Do not throw batteries into fire, short-circuit or dismantle them.
■ Do not expose removed batteries to extreme conditions such as radiators, direct sunlight! Increased risk of leakage!
■ Avoid contact with the skin, eyes and mucous membranes. In the event of contact with battery acid, rinse the affected areas immediately with plenty of clean water and consult a doctor immediately.
Remove the battery pack before disposing of the robot vacuum cleaner or in case of a fault with the battery pack.
▶ Make sure that the battery pack is completely discharged before removing.
▶ Switch the appliance off completely.
▶ Loosen the 2 screws on the robot vacuum cleaner base with a small Phillips screw-driver and remove it.
▶ Hold the tabs and carefully remove the battery pack.

When using tools to lever out the battery, do not use any pointed or sharp objects that could damage the battery pack. The battery pack can be removed by turning the appliance over and carefully shaking out the battery pack.
Remove the battery pack plug from the appliance socket.
▶ Connect the plug of the new, identical battery pack to the appliance socket.
▶ Place the rechargeable battery in the battery compartment.
▶ Replace the robot vacuum cleaner base and secure it with both screws.
▶ Turn over the robot vacuum cleaner and place it on its wheels.
▶ Charge the battery.
13. Longer periods without use
▶ Switch off the appliance:
- Remove the robot vacuum cleaner from the dust collector/charging station.
- Press the ▶ button for approx. 3–5 seconds to switch off the robot vacuum and mop completely.
If the robot is not in operation for a longer period of time, fully charge the battery, pull out the mains plug, clean the appliance and store it in a dry place protected from direct sunlight.
14. Troubleshooting
If the appliance malfunctions, the operating light flashes red and a corresponding announcement sounds. First, check whether you can remedy the problem yourself using the following overview.
Never attempt to repair the appliance yourself. If a repair is necessary, contact our MEDION Service Centre or a suitable authorised repair workshop.
| Problem/cause Solution | |
| The robot vacuum cleaner could not be switched on.• The battery power is inadequate.• The ambient temperature is below 0°C or above 40°C. | ▸ Place the robot vacuum cleaner on the dust collector/charging station and align it with the charging contact. The robot vacuum cleaner switches on automatically.▸ Use the appliance at an ambient temperature of 0°C to 40°C. |
| The robot vacuum cleaner could not be charged. | ▸ Remove the robot vacuum cleaner from the dust collector/charging station and check whether the dust collector/charging station indicator lights up. Ensure that the mains cable is connected correctly.▸ The dust collector/charging station is not properly connected to the robot vacuum cleaner. Clean the charging contacts of the dust collector/charging station and the charging contact on the robot vacuum cleaner; if necessary, move the side brush to the side to ensure connection to the charging contact. |
| The dust container has been removed. | ▸ Reinsert the dust container correctly. Cleaning only starts when the container is inserted. |
| The robot vacuum cleaner has been lifted up or is hanging in the air. | ▸ Place the robot vacuum cleaner on level ground and start it again. |
| The robot vacuum cleaner is tilted. | ▸ Place the robot vacuum cleaner on a level surface without obstacles and restart it. |
| The bumper or sensor is blocked. | ▸ Carefully push the bumper to the left and check whether it can move freely. |
| The battery level is too low for operation. | ▸ Place the robot vacuum cleaner on the charging station to charge the battery. |
| The robot vacuum cleaner is stuck. | ▸ Move the robot vacuum cleaner to a free location and restart it. |
| The drive wheel is blocked or tangled. | ▸ Check the left, right and front drive wheel.▸ Remove any foreign objects from the main drive wheel. |
| The main brush is blocked or tangled. | ▸ Remove dirt or hair from the main brush. |
| The side brush is blocked or tangled. | ▸ Remove foreign objects from the side brush. |
| The robot vacuum cleaner could not return to the dust collector/charging station | ▸ The robot vacuum cleaner is too far away from the dust collector/charging station. Place the robot vacuum cleaner near the dust collector/charging station. |
| Abnormal behaviour | ▸ Switch the robot vacuum cleaner off and then on again. |
| Abnormal noises occur during cleaning. | ▸ The cleaning brush, the side brushes or the wheels may have become entangled with foreign objects. Switch off the robot vacuum cleaner and clean the parts. |
| The cleaning performance decreases. The robot vacuum cleaner loses dust.·Dust has clogged the appliance.·The cleaning brush has become entangled with foreign objects.·Dust container is full. | ▸ Clean or replace the filter.▸ Empty and clean the dust container.▸ Clean the cleaning brush. |
| The WLAN network cannot be connected.·The WLAN connection is too weak/disrupted.·The password is incorrect. | ▸ Make sure that the appliance is in a location with a good WLAN signal.▸ Reset the WLAN settings, download the latest version of the app and try to connect to the WLAN network again. |
| Scheduled cleaning cannot be performed. | The battery power is inadequate. Scheduled cleaning is only started if the remaining power is at least 15%. |
| Not enough water in the water tank | ▸ Fill the tank with water.▸ If the error persists, contact the Service Centre. |
| Unusual noises·Obstruction possible due to foreign objects on brush, side brushes or main wheel. | ▸ Clean the affected parts. |
| FAQ | |
| Is power consumed if the robot vacuum cleaner always remains in the dust collector/charging station? | Power consumption is extremely low if the robot vacuum cleaner always remains in the dust collector/charging station. This helps the battery to maintain its optimum performance. |
| Does the battery need to be charged for 16 hours when the robot vacuum cleaner is used for the first three times? | The lithium battery has no memory effect. The appliance can be used immediately after the battery is fully charged. |
15. Spare parts
Please visit our MEDIONservice-shop at https://www.medion.com/medionserviceshop to order any spare parts you need.
You will be able to find out all the details about your specific product while you're there.
- Technical specifications
| Appliance | |
| Distributor: MEDION AG | Am Zehnthof 7745307 EssenGermany |
| Model X23 SW+ (MD 100051) | |
| Noise level: Eco mode: 58 dB (+/- 5 dB) | Standard mode: 63 dB (+/- 5 dB)Strong mode: 65 dB (+/- 5 dB)Super strong mode: 68 dB (+/- 5 dB) |
| Max. motor suction: 5 kPa (+/- 10%) | |
| Dust container capacity: 0.275 l | |
| Water tank capacity: 0.200 l | |
| Operating duration according to vacuum level: | Eco mode: 180 min (+/-10%)Standard mode: 135 min (+/-10%)Strong mode: 110 min (+/-10%)Super strong mode: 65 min (+/-10%) |
| Weight: Approx. 2.5 kg | |
| Dimensions: Approx. 32.2 x 32.0 x 9.5 cm | |
| Battery pack/battery | |
| Lithium-ion battery packModel: | INR18650 MH1-4S1P |
| Manufacturer: BYD COMPANY LIMITED, China | |
| Battery voltage: 14.8 V | |
| Battery capacity: 2900 mAh | |
| Output: | 42.92 Wh |
| Charging time: | < 5 hours |
| Operating temperature: | 0°C to 40°C |
| Dust collector/charging station | |
| Input: | 220–240 V~, 50/60 Hz |
| Rated power | 650 W |
| Output: | 19 V --- 1.0 A |
| Max. motor suction: 20 kPa (+/- 10%) | |
| Noise level: Max. 72 dB (+/- 5%) | |
| Weight: | Approx. 1.9 kg |
| Dust bag capacity: | 2.5 l |
| Dimensions: Approx. 30.5 x 26.3 x 11.0 cm | |
16.1. Information on WLAN/Bluetooth®
Frequency range: 2.4 GHz/5 GHz
WLAN standard: 802.11 b/g/n
Encryption: WEP/WPA/WPA2/WPA3
| Frequency range MHz Channel | Max. transmitting power/dBm | |
| WLAN 2.4 GHz 2412 | -2472 40 < 20 | |
| WLAN 5 GHz 5180 | -5240 6 < 10 | |
| 5260–5320 6 < 10 | ||
| 5500–5700 16 | < 10 | |
| 5745–5825 | 7 (if available < 14) | |
| Bluetooth® 2.4 GHz | 2402–2480 | 40 < 10 |
17. EU declaration of conformity
CE MEDION AG hereby declares that the radio equipment type MD 100051 complies with the Directive 2014/53/EU and the Directive 2011/65/EU. The complete EU declaration of conformity is available at:
www.medion.com/conformity.
18. Trademark information
The Bluetooth ^® word mark and logos are registered trademarks of Bluetooth SIG, Inc. and are used by LENOVO/MEDION under licence. Other trademarks are the property of their respective owners.
19. Disposal
PACKAGING
Your appliance has been packaged to protect it from damage in transit. The packaging is made of materials that can be recycled in an environmentally friendly manner.
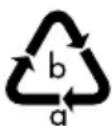
Observe the following labels on the packaging materials regarding waste separation with the abbreviations (a) and numbers (b):
1–7: plastics/20–22: paper and cardboard/80–98: composite materials (France only)

The “Triman” symbol tells the consumer that the product can be recycled, is covered by an extended system of manufacturer’s responsibility and must be sorted by material type in France.
(Spain only)
This symbol indicates disposal according to the type of packaging material used (blue = paper and cardboard; yellow = plastic, metal, composite packaging; green = glass).
Use the disposal options available to you in your area.
APPLIANCE
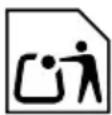
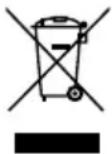
All old appliances marked with the symbol shown must not be disposed of in normal household waste.
In accordance with Directive 2012/19/EU, the appliance must be properly disposed of at the end of its service life.
This involves separating the materials in the appliance for the purpose of recycling as well as minimising the environmental impact and negative effects on human health.
Take old appliances to an electrical scrap collection point or a recycling centre.
Contact your local waste disposal company or your local authority for more information on this subject.
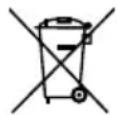
BATTERIES/RECHARGEABLE BATTERIES
Batteries/rechargeable that carry the symbol illustrated must not be disposed of in ordinary household waste.
In accordance with Regulation 2023/1542, batteries/rechargeable batteries must be disposed of properly at the end of their service life.
They may contain toxic heavy metals and are subject to hazardous waste treatment.
The chemical symbols of the heavy metals are as follows:
Cd = cadmium, Hg = mercury, Pb = lead.
You are legally obliged to return old batteries and rechargeable batteries after use. Therefore, please return used batteries and rechargeable batteries free of charge to a retailer or a municipal collection point.
Batteries and rechargeable batteries may contain substances that are harmful to human health and the environment. The negative effects can only be avoided if old batteries and rechargeable batteries are collected and recycled separately.
Take particular care when handling batteries and rechargeable batteries containing lithium, as there is an increased risk of fire if they are used incorrectly. Tape the poles to prevent an external short circuit.
Use batteries with a long service life or rechargeable batteries to reduce the generation of waste from old batteries.
Follow the storage instructions and avoid completely discharging and recharging the battery to extend its service life.
In addition, batteries or electrical and electronic devices with batteries or rechargeable batteries must not be left in public areas in order to avoid littering. Check options for reusing batteries instead of disposing of them, for example by repairing the battery.
20. Service information
Please contact our Customer Service team if your device ever stops working the way you want or expect it to. There are several ways for you to contact us:
- In our Service-Community, you can meet other users, as well as our staff, and you can exchange your experiences and pass on your knowledge there.
You will find our Service-Community at community.medion.com.
• Alternatively, use our contact form at www.medion.com/contact. - You can also contact our Service team via our hotline or by post.
Hotline number
① 0333 3213106
Opening times
Mon – Fri: 08.00 – 20.00
Sat – Sun: 10.00 – 16.00
Service address
MEDION Electronics Ltd. 120 Faraday Park, Faraday Road, Dorcan
Swindon SN3 5JF, Wiltshire United Kingdom
You can download this and many other sets of operating instructions from our service portal at www.medionservice.com.
We have stopped providing printed copies of our warranty terms and conditions as part of our commitment to sustainability, but you can access the warranty terms and conditions on our service portal.
You can also scan the QR code below and to download the operating instructions onto your mobile device from the service portal.

21. Legal Notice
Copyright 2025
Date: 21. July 2025
All rights reserved.
These operating instructions are protected by copyright.
Mechanical, electronic and any other forms of reproduction are prohibited without the written permission of the manufacturer.
Copyright is owned by the company:
MEDION AG
Am Zehnthof 77
45307 Essen
Germany
Please note that you cannot use the address above for returns. Please always contact our Customer Service team first.