MD19601 - Robot vacuum MEDION - Free user manual and instructions
Find the device manual for free MD19601 MEDION in PDF.
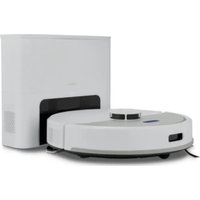
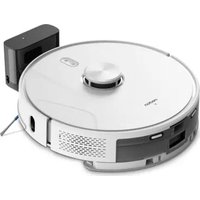
| Product type | Robot vacuum with mopping function |
| Brand | Medion |
| Model | MD19601 |
| Dimensions | approx. 325 x 80 mm (diameter x height) |
| Weight | approx. 2.9 kg |
| Power supply | Lithium-ion battery 14.4 V, 2400 mAh |
| Battery life | approx. 60 min (highest power level) / approx. 100 min (lowest level) |
| Charging time | approx. 300 minutes |
| Dust bin capacity | 0.5 L |
| Noise level | approx. 65 dB |
| Suction power | approx. 0.8 kPa |
| Functions | Vacuuming, mopping (with water tank and mop cloth), automatic return to charging station, app control |
| Connectivity | Wi-Fi 2.4 GHz, MEDION Robots app (Android 7+ / iOS 12+) |
| Filter | EPA filter + sponge |
| Package contents | Robot vacuum, charging station, power adapter, 2 side brushes (installed), 2 spare side brushes, water tank, 2 mop cloths, 1 spare filter, cleaning brush, manual |
| Spare parts and accessories | Side brushes, EPA filter, water tank, mop cloths, cleaning brush |
| Cleaning and maintenance | Empty the dust bin and clean the filter after each use; regularly clean the suction opening, side brushes, and guide wheel |
| Repairability | Battery not replaceable by user; Medion customer service for repairs |
| Warranty | 24 months |
| Safety instructions | Do not vacuum liquids or flammable substances; do not use on long-pile carpets; keep cables out of reach |
Frequently Asked Questions - MD19601 MEDION
User questions about MD19601 MEDION
0 question about this device. Answer the ones you know or ask your own.
Ask a new question about this device
Download the instructions for your Robot vacuum in PDF format for free! Find your manual MD19601 - MEDION and take your electronic device back in hand. On this page are published all the documents necessary for the use of your device. MD19601 by MEDION.
USER MANUAL MD19601 MEDION
natural_image
Black and white robotic vacuum cleaner with visible sensor legs and base (no text or symbols)Saugroboter
Aspirateur-robot
Robotstofzuiger
Robot aspirador
Robot aspirapolvere
Robot vacuum cleaner
MEDION® MD 19601
Inhaltsverzeichnis
DE
natural_image
Line drawing of a hand holding a small object inside a circular basin with legs and supports (no text or symbols)natural_image
Illustration of a hand pressing down on a curved surface with directional arrows indicating motion (no text or symbols)8. Wischerbetrieb

HINWEIS!
natural_image
Illustration of a hand pressing down on a textured surface with dots and stripes (no text or symbols)natural_image
Illustration of a hand holding a small object on a circular surface, no text or symbols present
natural_image
Illustration of a hand holding a tool near a car wheel (no text or symbols)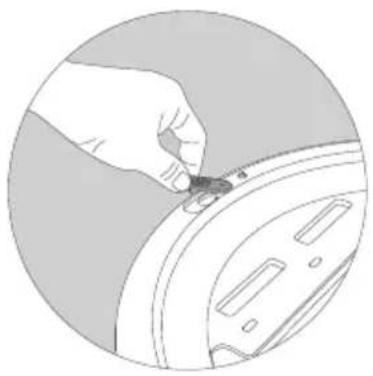
natural_image
Illustration of a hand pressing down on a mechanical component (no text or symbols visible)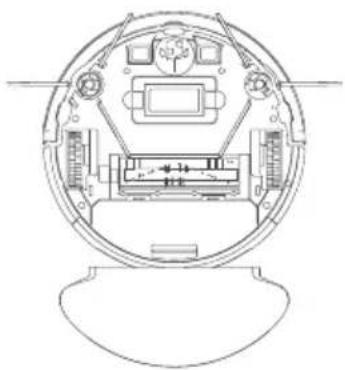
natural_image
Technical line drawing of a circular mechanical or electrical component with internal components and no visible text or symbolsnatural_image
Technical line drawing of a mechanical assembly inside a circular frame (no text or symbols)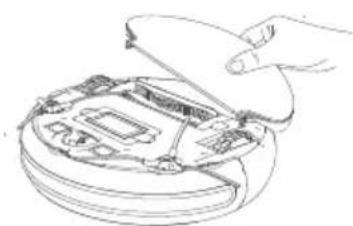
natural_image
Line drawing of a hand opening a computer case with an open lid (no text or symbols)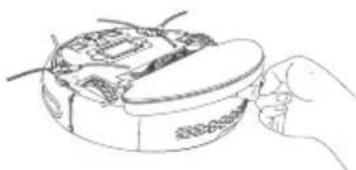
natural_image
Line drawing of a hand holding a food item with a lid (no text or symbols)
natural_image
Illustration of a hand pressing down on a curved surface with directional arrows indicating motion (no text or symbols)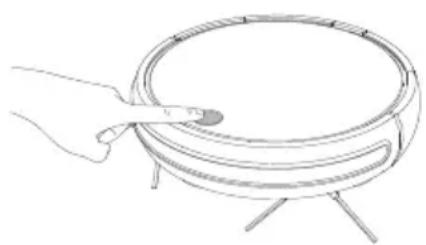
natural_image
Line drawing of a hand holding a circular tray with a pointer, no text or symbols presentnatural_image
Line drawing of a hand holding a circular tray with a handle, no text or symbols present
WARNUNG!
Stromschlaggefahr!
natural_image
Line drawing of a hand pressing a button on a device control panel (no text or symbols)natural_image
Line drawing of a hand inserting a small component into a computer motherboard (no text or symbols)natural_image
Line drawing of a hand holding an object with a black arrow pointing to a curved mechanical component (no text or symbols present)natural_image
Illustration of hands holding a device with a grid pattern inside, showing a curved arrow indicating rotation (no text or symbols)natural_image
Diagram of a printer's internal structure showing layered components and an upward arrow (no text or symbols)natural_image
Illustration of a hand inserting a component into a device panel (no text or symbols visible)
flowchart
graph TD
    A["Water Inlet"] --> B["Collection Tank"]
    B --> C["Storage Unit"]
    style A fill:#f9f,stroke:#333
    style B fill:#ccf,stroke:#333
    style C fill:#cfc,stroke:#333

natural_image
Diagram of a printer's internal structure showing layered components and a downward arrow indicating assembly (no text or symbols present)natural_image
Line drawing of hands holding a device with ports and buttons (no text or symbols)natural_image
Illustration of hands using a tool to adjust or install a mechanical component (no text or symbols visible)natural_image
Line drawing of hands installing or adjusting a mechanical component on a circular base (no text or symbols)natural_image
Line drawing of two hands holding a coiled object, no text or symbols presentnatural_image
Diagram of a wind turbine blade assembly inside a circular frame (no text or labels)natural_image
Line drawing of a hand holding a small mechanical component (no text or symbols)natural_image
Line drawing of a hand inserting a component into an electronic device (no text or symbols)natural_image
Line drawing of a hand holding a circular object with a knob, placed on a tripod (no text or symbols)natural_image
Illustration of a hand pressing down on a curved surface with directional arrows indicating motion (no text or symbols)natural_image
Illustration of a hand pressing down on a curved surface with dots and a striped pattern (no text or symbols)natural_image
Illustration of a hand adjusting a small component on a circular surface (no text or symbols)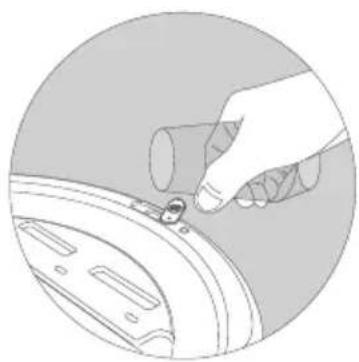
natural_image
Illustration of a hand holding a small object on a circular surface, no text or symbols present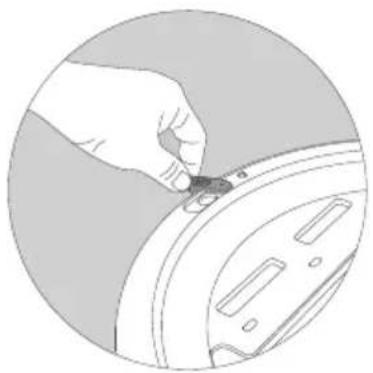
natural_image
Illustration of a hand pressing down on a mechanical component (no text or symbols visible)
natural_image
Technical line drawing of a circular mechanical or electronic component with internal components and no visible text or symbolsnatural_image
Technical line drawing of a car interior showing dashboard and steering wheel (no text or symbols)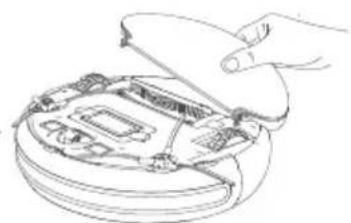
natural_image
Line drawing of a hand opening a computer case with an open lid (no text or symbols)
natural_image
Line drawing of a hand holding a food item with a plate and utensils (no text or symbols)
natural_image
Illustration of a hand pressing down on a curved surface with directional arrows indicating motion (no text or symbols)
natural_image
Line drawing of a hand holding a circular tray with a knob, no text or symbols presentnatural_image
Line drawing of a hand holding a circular tray with a handle, no text or symbols present
AVERTISSEMENT!
natural_image
Line drawing of a hand interacting with a device panel and control buttons (no text or symbols)natural_image
Line drawing of a hand inserting a component into a computer (no text or symbols)natural_image
Line drawing of a hand holding a curved mechanical component with an arrow pointing to it (no text or symbols present)natural_image
Illustration of hands holding a device with a grid pattern inside, showing a curved arrow indicating rotation (no text or symbols)natural_image
Diagram of a printer's internal structure showing layered components and an upward arrow (no text or symbols)natural_image
Illustration of a hand holding a small mechanical component, partially enclosed in a circular frame (no text or symbols visible)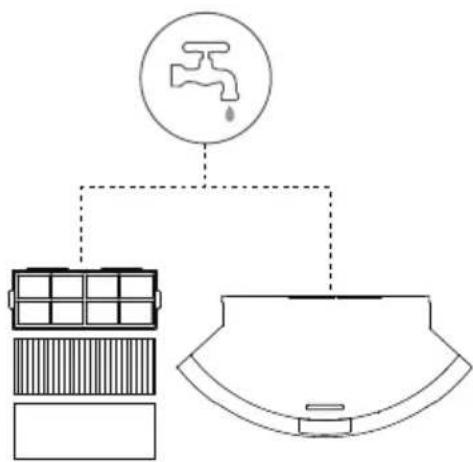
flowchart
graph TD
    A["Water Supply"] --> B["Water Tank"]
    B --> C["Internal compartments"]
    C --> D["Outlet"]
natural_image
Diagram of a printer's internal structure showing layered components and a downward arrow indicating assembly (no text or symbols present)natural_image
Line drawing of hands holding a device component with visible internal components (no text or symbols)natural_image
Illustration of hands using a tool to adjust or install a mechanical component (no text or symbols visible)natural_image
Line drawing of hands installing or adjusting a mechanical component on a circular base (no text or symbols)natural_image
Line drawing of two hands holding a coiled object, no text or symbols presentnatural_image
Diagram of a mechanical device with a propeller and internal components, enclosed in a circular frame (no text or symbols)natural_image
Line drawing of a hand holding a tool with a small mechanical component attached (no text or symbols)natural_image
Line drawing of a hand inserting a plug into a device component (no text or symbols)natural_image
Line drawing of a hand holding a small object over a circular tray or basin (no text or symbols)natural_image
Illustration of a hand pressing down on a curved surface with directional arrows indicating motion (no text or symbols)8. Veegmodus

LET OP!
natural_image
Illustration of a hand pressing down on a textured surface with dots and stripes (no text or symbols)natural_image
Illustration of a hand using a tool to adjust or install a mechanical component (no text or symbols visible)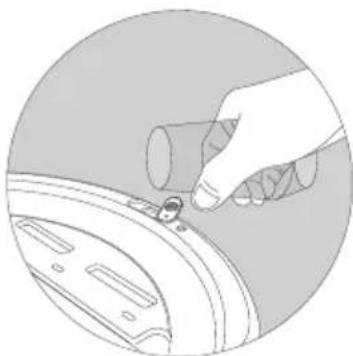
natural_image
Illustration of a hand using a tool to press or install a component on a circular surface (no text or symbols)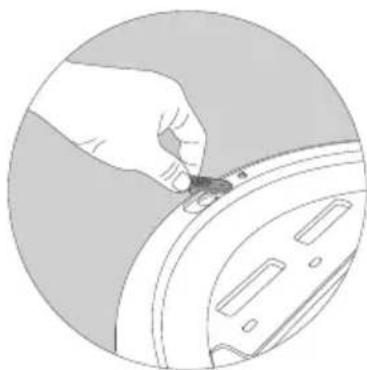
natural_image
Illustration of a hand holding a small object near a circular mechanical component (no text or symbols)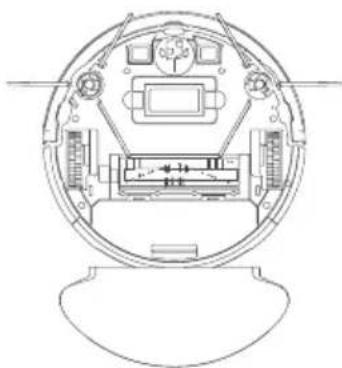
natural_image
Technical line drawing of a circular mechanical or electronic component with internal components and mounting base (no text or symbols)natural_image
Technical line drawing of a mechanical assembly inside a circular frame (no text or symbols)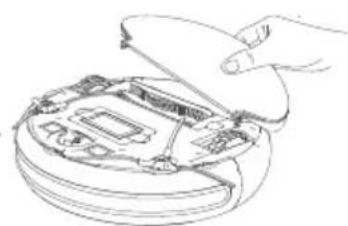
natural_image
Line drawing of a hand opening a computer case with an open lid (no text or symbols)
natural_image
Line drawing of a hand holding a food item on a circular plate (no text or symbols)
natural_image
Illustration of a hand pressing down on a curved surface with directional arrows indicating motion (no text or symbols)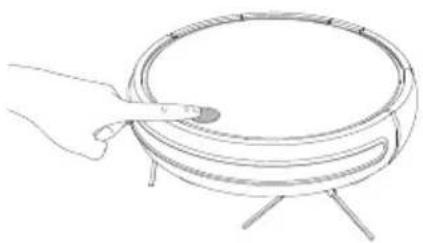
natural_image
Line drawing of a hand holding a circular tray with a handle, no text or symbols presentnatural_image
Line drawing of a hand holding a small object over a circular tray (no text or symbols)
WAARSCHUWING!
natural_image
Line drawing of a hand inserting a component into a device control panel (no text or symbols)natural_image
Line drawing of a hand inserting a small component into a computer motherboard (no text or symbols)10.1. Stofreservoir reinigen
natural_image
Line drawing of a hand holding a computer with an arrow pointing to a curved interface (no text or symbols)natural_image
Illustration of hands holding a device with a grid pattern inside, showing a curved arrow indicating rotation (no text or symbols)natural_image
Diagram of a printer's internal structure showing layered components and an upward arrow (no text or symbols)natural_image
Illustration of a hand holding a small electronic component, partially enclosed in a circular frame (no text or symbols visible)
flowchart
graph TD
    A["Water Inlet"] --> B["Collection Tank"]
    B --> C["Storage Unit"]
    style A fill:#f9f,stroke:#333
    style B fill:#ccf,stroke:#333
    style C fill:#cfc,stroke:#333
natural_image
Diagram of a printer's internal structure showing layered components and a downward arrow indicating assembly (no text or symbols present)10.2. Zuigopening en borstel reinigen
natural_image
Line drawing of hands holding a device component with no visible text or symbolsnatural_image
Illustration of hands using a tool to adjust or install a mechanical component (no text or symbols visible)natural_image
Line drawing of hands installing or adjusting a mechanical component on a circular base (no text or symbols)natural_image
Line drawing of two hands holding a coiled object, no text or symbols presentnatural_image
Technical line drawing of a mechanical assembly inside a circular frame, showing components like gears and springs (no text or symbols)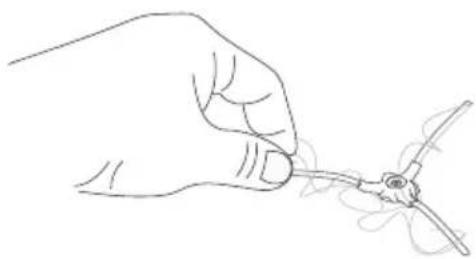
natural_image
Line drawing of a hand holding a tool with a small mechanical component nearby (no text or symbols)natural_image
Line drawing of a hand inserting a plug into a device (no text or symbols)natural_image
Line drawing of a hand holding a circular object with a knob, placed on a tripod (no text or symbols)natural_image
Illustration of a hand pressing down on a curved object with directional arrows indicating motion (no text or symbols)natural_image
Illustration of a hand pressing down on a textured surface with dots, enclosed in a circular frame (no text or symbols)natural_image
Illustration of a hand using a tool to adjust or install a mechanical component (no text or symbols visible)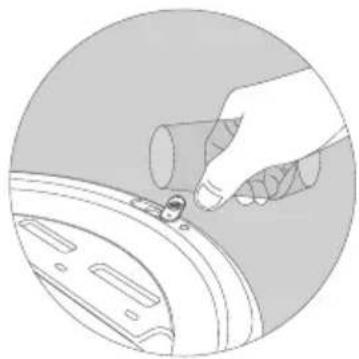
natural_image
Illustration of a hand adjusting a car wheel component (no text or symbols)
natural_image
Illustration of a hand using a tool to adjust or install a mechanical component (no text or symbols visible)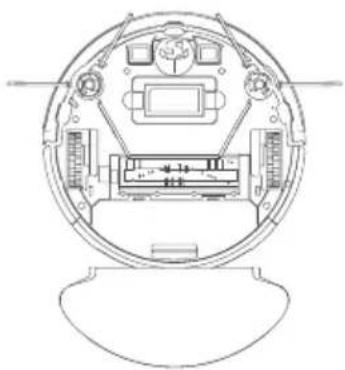
natural_image
Technical line drawing of a circular mechanical or electrical component with internal components and no visible text or symbolsnatural_image
Technical line drawing of a mechanical assembly inside a circular frame (no text or symbols)
natural_image
Line drawing of a hand opening a computer case with an open lid (no text or symbols)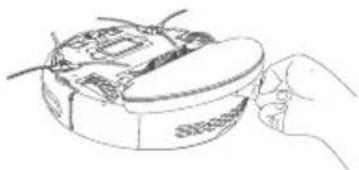
natural_image
Line drawing of a hand holding a bowl with food items (no text or symbols)
natural_image
Illustration of a hand pressing down on a curved surface with directional arrows indicating motion (no text or symbols)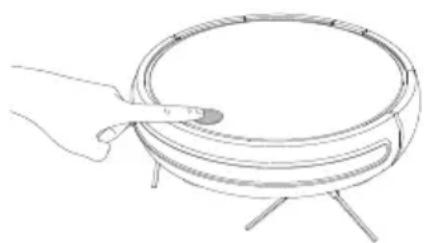
natural_image
Line drawing of a hand holding a circular tray with a pointer, no text or symbols presentnatural_image
Line drawing of a hand holding a circular tray with a handle, no text or symbols presentnatural_image
Line drawing of a hand pressing a button on a device (no text or symbols)natural_image
Line drawing of a hand inserting a small component into a mechanical device (no text or symbols)natural_image
Line drawing of a hand holding a small object with an arrow pointing to a curved structure (no text or symbols)natural_image
Illustration of hands holding a device with a grid pattern inside, showing a curved arrow indicating rotation (no text or symbols)natural_image
Diagram of a printer's internal structure showing layered components and an upward arrow (no text or symbols)natural_image
Illustration of a hand inserting a small component into a device panel (no text or symbols visible)
flowchart
graph TD
    A["Water Supply"] --> B["Storage Unit"]
    A --> C["Delivery Container"]

natural_image
Diagram of a printer's internal structure showing layered components and a downward arrow indicating assembly (no text or symbols present)natural_image
Line drawing of hands holding a device component with no visible text or symbolsnatural_image
Illustration of hands using a tool to adjust or install a mechanical component (no text or symbols visible)natural_image
Line drawing of hands installing or adjusting a mechanical component on a circular base (no text or symbols)natural_image
Line drawing of two hands holding a coiled object, no text or symbols presentnatural_image
Close-up of a mechanical component with wires and components, no visible text or symbolsnatural_image
Line drawing of a hand holding a small mechanical component (no text or symbols)natural_image
Line drawing of a hand inserting a small electronic component into a device (no text or symbols)natural_image
Line drawing of a hand holding a circular object with a knob, placed on a tripod (no text or symbols)natural_image
Illustration of a hand pressing down on a curved object with directional arrows indicating motion (no text or symbols)natural_image
Illustration of a hand pressing down on a curved surface with dots, no text or symbols presentnatural_image
Illustration of a hand using a tool to adjust or install a mechanical component (no text or symbols visible)
natural_image
Illustration of a hand holding a tool near a car wheel (no text or symbols)
natural_image
Illustration of a hand using a tool to adjust or install a mechanical component (no text or symbols visible)
natural_image
Technical line drawing of a circular mechanical or electronic component with internal components and no visible text or symbolsnatural_image
Technical line drawing of a car interior showing dashboard and steering wheel (no text or symbols)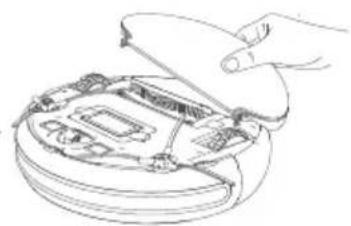
natural_image
Hand holding a computer monitor with an open lid (no text or symbols visible)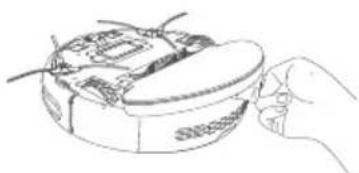
natural_image
Line drawing of a hand holding a food item with a lid (no text or symbols)9. Controllo del robot aspirapolvere tramite l'app

natural_image
Illustration of a hand pressing down on a curved surface with directional arrows indicating motion (no text or symbols)
natural_image
Line drawing of a hand holding a circular tray with a handle, no text or symbols presentnatural_image
Line drawing of a hand holding a small object over a circular container (no text or symbols)
AVVERTENZA!
natural_image
Line drawing of a hand pressing a button on a device panel (no text or symbols)natural_image
Line drawing of a hand inserting a small component into a computer motherboard (no text or symbols)natural_image
Line drawing of a hand holding a small object with an arrow pointing to a curved structure (no text or symbols)natural_image
Illustration of hands holding a device with a grid pattern inside, showing a rotating arrow (no text or symbols)natural_image
Diagram of a printer's internal structure showing layered components and an upward arrow (no text or symbols)natural_image
Illustration of a hand holding a small electronic component, partially enclosed in a circular frame (no text or symbols visible)
flowchart
graph TD
    A["Water Inlet"] --> B["Collection Tank"]
    B --> C["Storage Unit"]
    D["Water Drop"] --> E["Water Supply"]

natural_image
Diagram of a printer's internal structure showing layered components and a downward arrow indicating assembly (no text or symbols present)natural_image
Line drawing of hands holding a device panel with internal components (no text or symbols)natural_image
Illustration of hands using a tool to adjust or install a mechanical component (no text or symbols visible)natural_image
Line drawing of hands installing or adjusting a mechanical component on a circular base (no text or symbols)natural_image
Line drawing of two hands holding a coiled object, no text or symbols presentnatural_image
Diagram of a computer monitor with cable, lens, and control panel (no text or symbols)natural_image
Line drawing of a hand holding a tool with a small mechanical component nearby (no text or symbols)natural_image
Line drawing of a hand inserting a small electronic component into a device (no text or symbols)1. About this user manual .... 197
1.1. Explanation of symbols ...... 197
FR
2. Proper use
3. Safety information
3.1. Information on the rechargeable battery ....204
ES
4. Package contents
5. Appliance overview IT
5.1. Appliance 206
5.2. Back....206
5.3. Bottom 207
5.4. Dust container with filter....208
5.5. Charging station 208
5.6. Sensors on the robot vacuum cleaner 209
EN
6. Using the appliance for the first time 210
6.1. Positioning the charging station 210
6.2. Charging the battery block....210
7. Vacuum mode
8. Mopping mode
8.1. Preparing the water tank 212
8.2. Mounting the water tank on the robot vacuum cleaner 214
9. Controlling the robot vacuum cleaner using the app 215
9.1. System requirements
9.2. Installation via the Google Play Store® or the Apple® App Store .... 215
9.3. Setting up the app and connecting with the robot vacuum cleaner....216
10. Cleaning and care 217
10.1. Cleaning the dust container 218
10.2. Cleaning the suction opening and brushes 219
10.3. Cleaning the side brushes....221
10.4. Cleaning the wheel....221
10.5. Energy management of the robot vacuum cleaner 222
10.6. End of operation....222
11. Troubleshooting 223
12. Disposing of the battery block 224
13. Disposal 225
14. Technical specifications 226
15. Declaration of conformity 227
16. Service information 228
17. Legal Notice....229
18. Privacy statement....229
19. General Warranty Conditions 23
19.1. General information 230
1. About this user manual

Thank you for choosing our product. We hope you enjoy using this appliance.
Read the safety instructions carefully before using the appliance for the first time. Note the warnings on the appliance and in the user manual.
Always keep the user manual close to hand. If you sell the appliance or give it away, please ensure that you also pass on this user manual. It is an essential component of the product.
1.1. Explanation of symbols
If a block of text is marked with one of the warning symbols listed below, the hazard described in that text must be avoided to prevent the potential consequences described there from occurring.

DANGER!
Warning: risk of fatal injury!

WARNING!
Warning: risk of possible fatal injury and/or serious irreversible injuries!

WARNING!
Warning: risk of electric shock!

WARNING!
Warning: risk of explosive materials!

CAUTION!
Warning: risk of minor and/or moderate injuries!

NOTICE!
Follow these instructions to prevent damage to the appliance!

More detailed information about using the appliance!

NOTICE!
Follow the instructions in the user manual!
- Bullet point/information on steps during operation
▶ Instruction to be carried out

Declaration of Conformity (see "Declaration of Conformity" section): Products that feature this symbol meet the requirements of the EC directives.
Protection class II

Electrical appliances in protection class II are appliances that have double and/or reinforced insulation throughout, and do not have an option for connecting a protective earth. The housing of an electrical appliance in protection class II, with surrounding insulating material, might either form all of the additional or reinforced insulation, or part of it.

DC current symbol
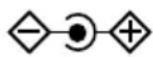
Polarity markings
Symbol denoting the polarity of the DC connector (according to IEC 60417).
On appliances carrying this marking, negative is on the inside and positive on the outside.
Symbol for electrical switched-mode power supply
Transformer – short circuit-proof
A transformer in which the temperature does not exceed specified limits if the transformer is overloaded or short-circuited and which continues to meet all the requirements specified in the relevant standard once the overload or short circuit has been rectified.

Indoor use
Appliances with this symbol are intended solely for indoor use.
Dispose of the appliance in compliance with environmental regulations (see "13. Disposal" on page 225).

Energy efficiency level VI
Energy efficiency levels are used to describe the efficiency levels of internal and external power supply units. Energy efficiency is sub-divided into a number of categories, where Level VI is the most efficient.
The AC/DC adapter provides protection class IP20 in compliance with DIN EN 60529. This means:
The AC/DC adapter is protected:
IP20
- against access to hazardous parts by fingers.
- against intrusion of solid foreign objects with a diameter of 12.5 mm or larger.
The AC/DC adapter is not waterproof.
Ta=45°
The mains adapter can be used at ambient temperatures of up to 45 °C.
Only use the mains adapter provided.
Only use the charging station provided.
2. Proper use
The robot vacuum cleaner is designed to automatically vacuum dry indoor surfaces such as smooth and level floors.
Do not use the appliance outdoors. This appliance is designed for use in private households and similar household applications, such as
-in kitchens for staff in retail outlets, offices and other commercial areas
-on agricultural estates
-by customers in hotels, motels and other accommodation facilities
-in bed & breakfast accommodation
The appliance is not intended for commercial or industrial use. Please note that we shall not be liable in cases of improper use:
- Do not modify the appliance without our consent and do not use any auxiliary equipment that we have not approved or supplied.
- Only use replacement parts or accessories that we have supplied or approved.
- Comply with all the information in this user manual, especially the safety information. Any other use is considered improper and can cause personal injury or property damage.
3. Safety information

WARNING!
Risk of injury!
Risk of injury to children and persons with limited physical, sensory or mental abilities (for example, partially disabled people or older people with limited physical and mental abilities) or to those without experience and knowledge (such as older children).
- Keep the appliance and its accessories out of the reach of children.
This appliance can be used by children over the age of 8 and by persons with reduced physical, sensory or mental abilities or by those without experience and/or knowledge, if they are supervised or have been instructed in the safe use of the appliance and have understood the dangers that result from it.
▶ Children must not be allowed to play with the appliance.
▶ Cleaning and user maintenance must not be carried out by children, unless they are aged 8 or over and are supervised.
Children younger than 8 should be kept away from the appliance, mains adapter and mains cable.

DANGER!
Risk of choking and suffocation!
There is a risk of choking and suffocation if plastic film or small parts are breathed in or swallowed.
▶ Keep packaging away from children.
DANGER!
Risk of electric shock!
Live parts. There is a risk of electric shock/short circuit.
▶ Use the supplied mains adapter and the charging station to charge the battery.
The mains adapter may only be used in dry rooms.
▶ Only connect the mains adapter to a properly installed, easily accessible power socket. The local mains voltage must correspond to the technical data for the mains adapter.
The mains socket must be easily accessible so you can unplug the appliance from the mains quickly if necessary.
When unplugging the mains cable from the socket, always pull on the plug rather than on the cable. Do not kink or crush the mains cable.
In the event of damage to the plug, mains cable, charging station or the appliance itself or if liquids or foreign bodies get into the appliance, unplug the appliance from the socket immediately.
▶ Only use the appliance in enclosed spaces and never expose the appliance to water droplets or spray.
▶ Do not touch the appliance with wet hands while the appliance is charging.
▶ Check the robot vacuum cleaner and the mains cable for damage before using the appliance for the first time and after every use.
▶ Do not use the appliance if the robot vacuum cleaner, charging station or mains adapter is visibly damaged.
▶ Contact the MEDION Service Centre without delay if the appliance has been damaged during transport.
▶ Unplug the mains adapter from the socket if you are away for a long period or in the event of a thunderstorm.
▶ Never immerse the robot vacuum cleaner, charging station or mains adapter in water or other liquids! Always unplug the mains adapter from the socket before cleaning or servicing the appliance and before fitting or removing accessories.

WARNING!
Risk of explosion!
There is a risk of fire or explosion when vacuuming up flammable liquids or certain solid materials.
▶ Never use the appliance near highly flammable materials. Do not vacuum up sharp-edged or highly flammable objects and liquids such as matches or hot ashes.
▶ Do not vacuum up toner particles (laser printer, photocopier) NL under any circumstances.

CAUTION! Risk of injury/risk of damage to the appliance!
There is a risk of injury or damage to the appliance due to improper use.
▶ Only use the appliance to vacuum small amounts of dust, dirt and crumbs. Empty the dust container after every use.
▶ Do not use the appliance to vacuum up liquids or damp dirt. Allow damp, cleaned carpets to dry fully before vacuuming.
In order to avoid the risk of tripping, do not use an extension cable and inform any persons present about the operation of the robot vacuum cleaner.
Remove all fragile items (e.g. glass, lamps, vases) and objects that could become trapped in the brushes or sucked up (e.g. cords, clothing, newspapers, curtains) from the working area before operating the appliance. If required, set the light barrier to limit the working area.
▶ Do not cover the sensors and ventilation slots on the robot vacuum cleaner.
- Do not expose the appliance to extreme conditions. Avoid:
–high humidity or wet conditions
—extremely high or low temperatures
-direct sunlight
-open flames.
3.1. Information on the rechargeable battery
This appliance contains a lithium-ion battery block.

WARNING! Risk of explosion!
There is a risk of explosion if the battery is replaced incorrectly.
▶ Do not heat up the battery to temperatures above the specified maximum ambient temperature.
▶ Never open the rechargeable battery.
▶ Never throw the battery into an open fire.
▶ Never short-circuit the rechargeable battery.
▶ Only replace batteries with the same type or an equivalent type recommended by the manufacturer.
- Dispose of used rechargeable batteries according to the manufacturer's specifications.
Observe the following instructions to prolong the service life and performance of your rechargeable battery and to ensure safe operation:
- Use only the supplied genuine mains cable to charge the rechargeable battery.
- Users cannot simply replace the rechargeable battery themselves. In this case, the rechargeable battery must be replaced by a service technician.
4. Package contents

DANGER!
Risk of choking and suffocation!
There is a risk of choking and suffocation due to swallowing or inhaling small parts or plastic wrap.
- Keep the plastic packaging out of the reach of children.
Please check your purchase to ensure that all items are included. If anything is missing, please contact us within 14 days of purchase.
The following items are supplied with your product:
– Robot vacuum cleaner with integrated lithium-ion battery block
-Charging station
-Mains adapter
-2 side brushes (already fitted)
-Water tank
-2 mop attachments
-2 replacement side brushes
-1 replacement filter
-Cleaning brush
-User manual and warranty documents
5. Appliance overview
5.1. Appliance
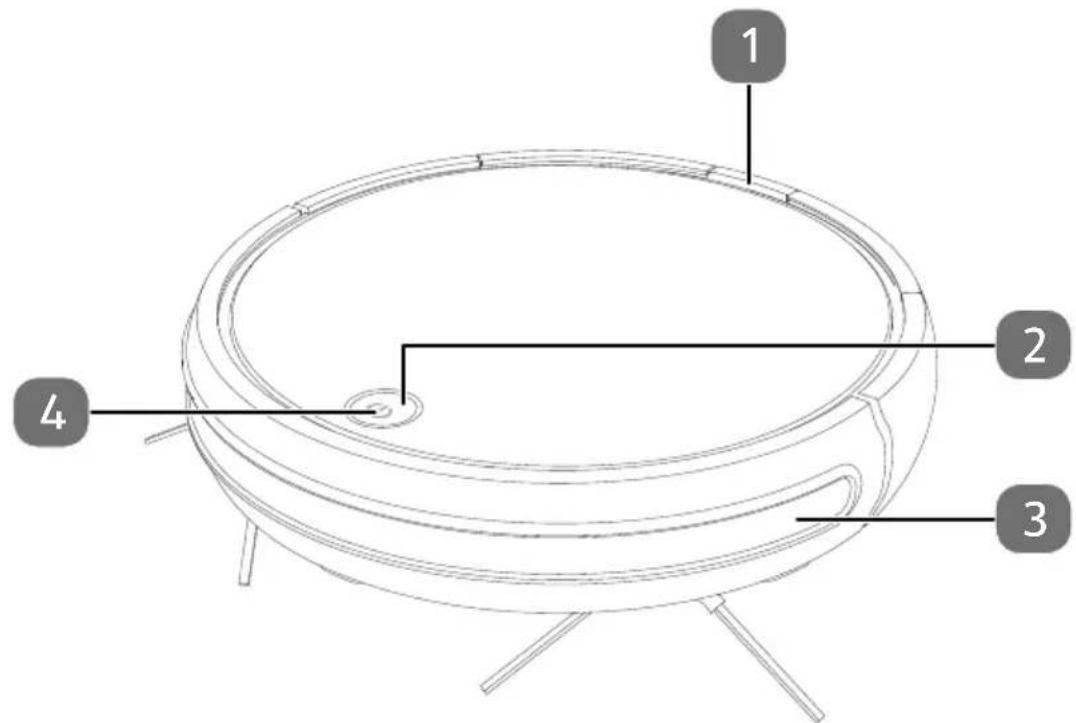
1) Release button for dust container
2) On/Off button
3) Bumpers
4) Operating LED
5.2. Back
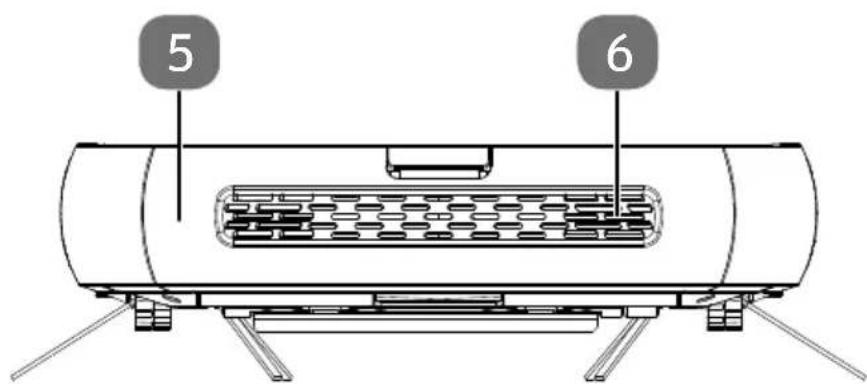
5) Dust container with EPA filter
6) Fan openings
5.3. Bottom
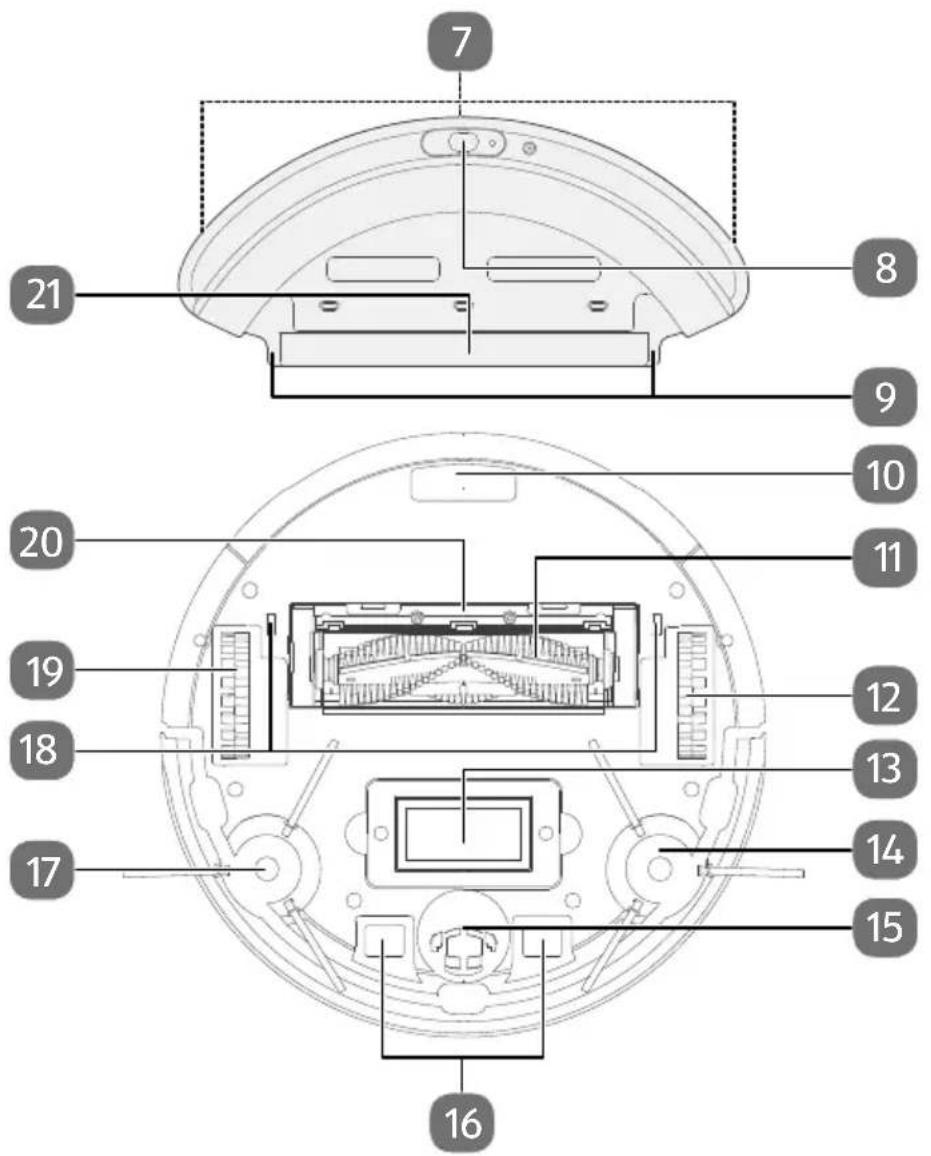
7) Mounting pads for wiping cloth (on back)
8) Water tank filler opening with sealing cap
9) Water tank locking tabs
10) Dust container
11) Suction opening with brush
12) Right wheel: for driving the appliance
13) Type plate and battery compartment
14) Cleaning brush, right
15) Wheel: to aid the direction of movement
16) Charging contacts
17) Cleaning brush, left
18) Locking slot for the water tank
19) Left wheel: for driving the appliance
20) Brush frame
21) Retaining lugs for mop attachment
5.4. Dust container with fi Iter

22) Dust filter
23) Sponge
24) EPA filter
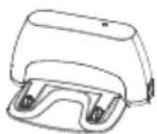
5.5. Charging station
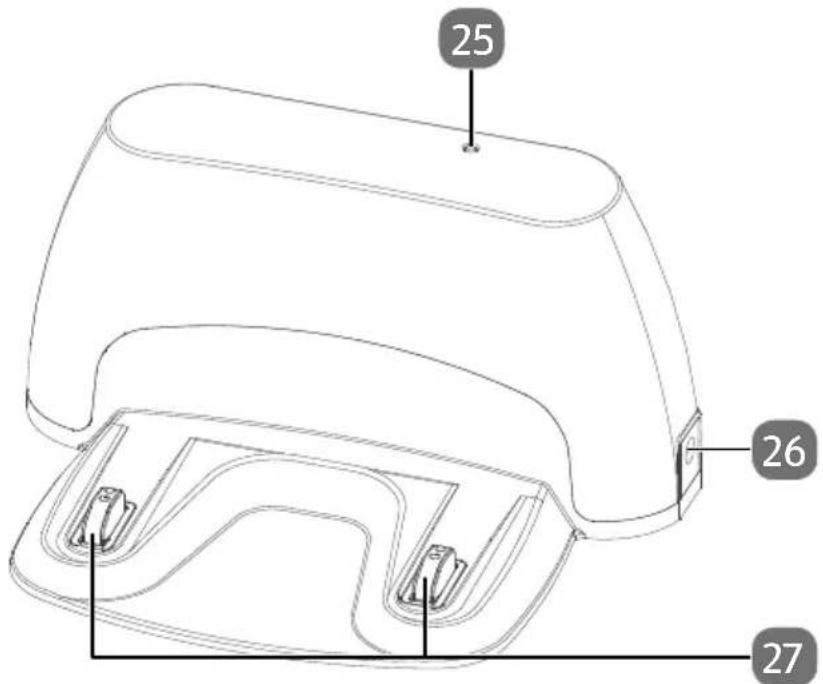
25) Operating light
26) Mains connection
27) Charging contacts
5.6. Sensors on the robot vacuum cleaner

28) Drop sensor, right
29) Drop sensor, front
30) Drop sensor, left
6. Using the appliance for the first time
6.1. Positioning the charging station
▶ Position the charging station on a wall with a level surface and avoid direct sunlight.
▶ Ensure that the required clearance of approx. 0.5 m to the sides and approx. 1.5 m to the front is maintained and that the charging contacts for the robot vacuum cleaner are freely accessible.
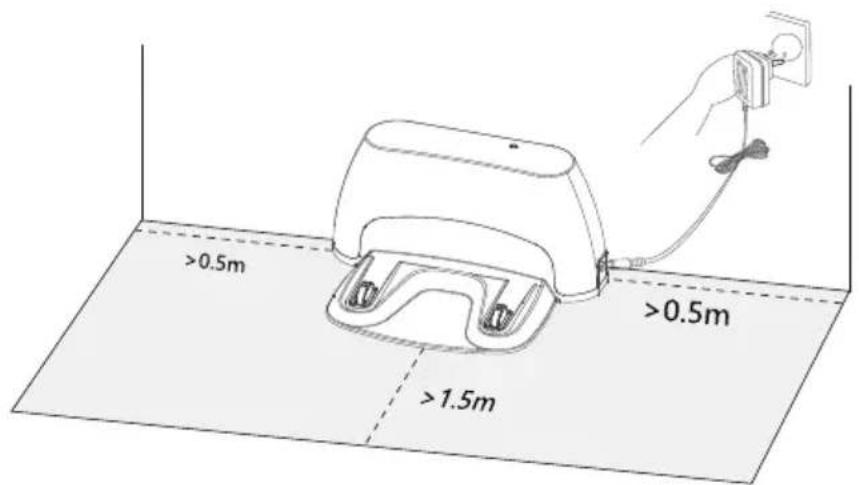
Connect the mains cable to the mains connection on the charging station.
Insert the mains plug into the mains socket.
Remove all fragile items (e.g. glass, lamps, vases) and objects that could become trapped in the brushes or sucked up (e.g. cords, clothing, newspapers, curtains) from the working area before operating the appliance.
6.2. Charging the battery block
The robot vacuum cleaner is fitted with a lithium-ion battery block. After unpacking the appliance, first charge the battery block for approx. 5 hours. This benefits battery performance in the long run.
Place the robot vacuum cleaner onto the charging station so that the charging contacts lie on top of each other.
The appliance is charged, the operating LED pulses green. When the battery block is fully charged, the operating LED lights up continuously.
▶ Charge the battery block before the next cleaning operation. The robot vacuum cleaner automatically returns to the charging station if the battery level is low. This return to the charging station interrupts the cleaning process.

If battery performance is drastically reduced, contact the MEDION Service Centre.
7. Vacuum mode
To achieve the best cleaning performance, ensure that all loose objects (curtains, clothing, paper, loose cables and extension cables) are removed from the floor.

NOTICE!
Risk of damage to property!
Loose cabling can become caught around your robot vacuum cleaner during vacuuming and be pulled by the appliance. This can result in appliances being pulled off a table and consequently damaged.
▶ Lay cables out of the reach of the appliance.

Remove the brushes before vacuuming on carpet. This robot vacuum cleaner is not suitable for use on deep-pile carpets.
▶ Ensure that the dust container is clean and that the filter has been correctly inserted.
Place the robot vacuum cleaner in an open space in the room.
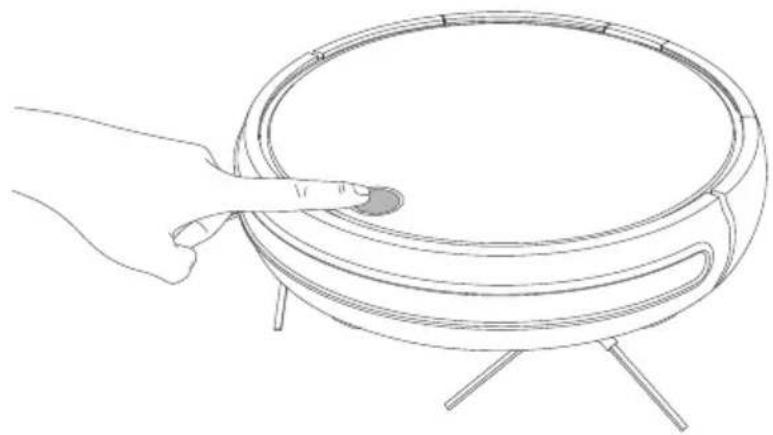
▶ Press the On/Off button on the appliance for approx. 3 seconds to switch on the robot vacuum cleaner.
▶ Press the On/Off button on the appliance again to start the cleaning process.
natural_image
Line drawing of a hand holding a circular object with a knob, placed on a tripod (no text or symbols)The operating LED lights up constantly green.
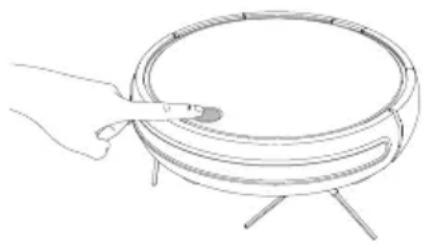
▶ Press the On/Off button again to pause the cleaning process.
▶ Press the On/Off button again to continue cleaning.

When the battery charge level is low, the robot vacuum cleaner automatically returns to the charging station. This return to the charging station interrupts the cleaning process.
▶ Press the On/Off button twice in quick succession to have the robot vacuum cleaner return to the charging station. The operating LED flashes green until the robot vacuum cleaner has reached the charging station.
▶ Press and hold the On/Off button and the bumper at the same time for approx. 3 seconds to switch off the robot vacuum cleaner completely.
With the appliance switched off, clean the suction opening at regular intervals and empty the dust container after every use.
natural_image
Illustration of a hand pressing down on a curved object with arrows indicating motion (no text or symbols)8. Mopping mode

NOTICE!
Risk of damage to property!
Leaking water may lead to water damage to the floor covering.
▶ Only use the wiper robot on tiles and sealed floor surfaces.
8.1. Preparing the water tank
Your robot vacuum cleaner can be converted for use as a wiper robot using the accessories supplied. To do so, proceed as follows:
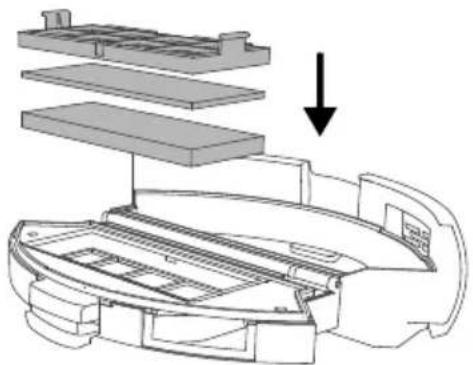
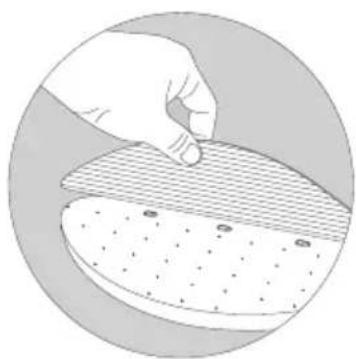
- Secure one of the mop attachments to the water tank.
Insert the mop attachment with the three tabs on the lower end into the retaining lugs for the mop attachment on the water tank.
▶ Firmly press the mop attachment onto the mounting pads on the bottom of the water tank.
natural_image
Illustration of a hand pressing down on a textured surface with dots and stripes (no text or symbols)▶ Open the sealing cap for the water tank.
▶ Carefully fill the water tank with water.

NOTICE!
Risk of damage to property!
The use of additives (detergents etc.) in the water or distilled/ demineralised water may damage the appliance.
▶ Use only tap water.
▶ Close the sealing cap for the water tank.
- Secure the water tank to the robot vacuum cleaner. (see section "8.2. Mounting the water tank on the robot vacuum cleaner" on page 214).

natural_image
Illustration of a hand inserting a small component into a circular mechanical component (no text or symbols)
natural_image
Illustration of a hand holding a cylindrical object with a small knob, next to a curved mechanical component (no text or symbols)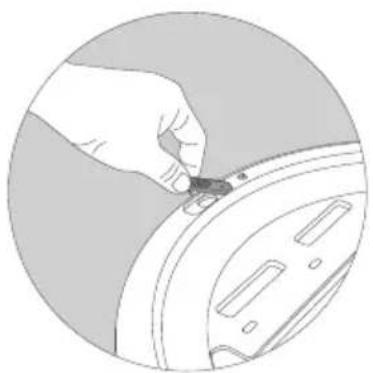
natural_image
Illustration of a hand using a tool to adjust or install a mechanical component (no text or symbols visible)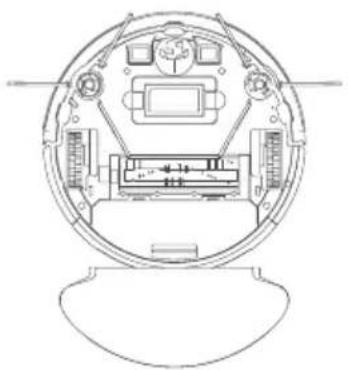
natural_image
Technical line drawing of a circular mechanical or electrical component with internal components and no visible text or symbols8.2. Mounting the water tank on the robot vacuum cleaner

NOTICE!
Risk of damage to property!
Moisture from the mop attachment and residual water in the water tank may damage the appliance or the charging station.
Remove the water tank immediately before returning the wiper robot to the charging station.
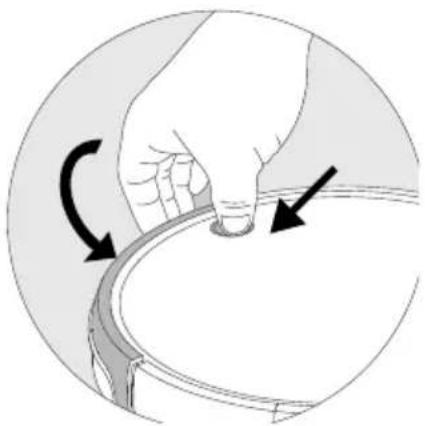
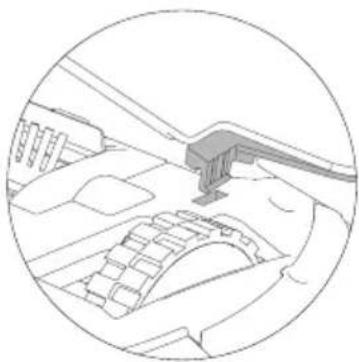
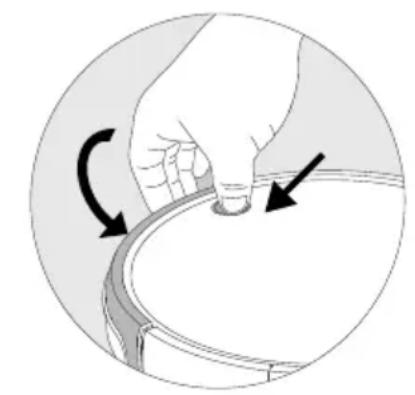
▶ Hook one of the water tank locking tabs into the intended locking slot.
Then, carefully press the water tank downwards until the second locking tab audibly clicks into the locking slot.
To release the water tank, lift the water tank by the front and pull the water tank out of the robot vacuum cleaner, being careful not to apply too much force.
natural_image
Technical line drawing of a car interior showing dashboard and steering wheel (no text or symbols)
natural_image
Line drawing of a hand opening a computer case with an open lid (no text or symbols)
natural_image
Line drawing of a hand holding a food item with a lid (no text or symbols)9. Controlling the robot vacuum cleaner using the app
The full functionality of your robot vacuum cleaner can be accessed using our control app.
Download our app from the Google Play Store® or the Apple® App Store.
9.1. System requirements
• Smartphone/tablet with WLAN 802.11 b/g
• 2.4 GHz WLAN network
- Android™ platform 7 or higher
- iOS 12 or higher
• Free MEDION Robots app installed

The MEDION Robots app can only be used to control the appliance using a 2.4 GHz network. A 5 GHz WLAN network cannot be used for operation.
9.2. Installation via the Google Play Store® or the Apple® App Store
Connect the robot vacuum cleaner to the mains cable or place it on the charging station.
▶ Scan the OR Code shown.
This QR code takes you directly to the Google Play Store® or the Apple® App Store where you can download the control app.
▶ Install the app and follow the instructions shown on the screen.


You need an Internet connection to install the apps.

The installation process may vary for different operating systems.
9.3. Setting up the app and connecting with the robot vacuum cleaner

Follow the instructions in the app to connect the robot vacuum cleaner correctly and complete the setup.
To control the robot vacuum cleaner using the app, you must have a MEDION customer account or register an account the first time you use it.
▶ Open the app.
▶ Set up a new account the first time you use the app.
▶ To do so, enter your name and email address.
▶ Specify a password. Re-enter the password to confirm.
If you already have a MEDION customer account, you can also use this.
▶ Then enter your username and password on the login screen.
▶ Confirm all entries and follow the instructions in the app.
▶ Ensure that the WLAN signal in the room that the robot vacuum cleaner is being used is sufficiently strong.

The MEDION Robots app can only be used to control the appliance using a 2.4 GHz WLAN network. A 5 GHz WLAN network cannot be used for operation.
▶ Select your 2.4 GHz WLAN network and enter the password.
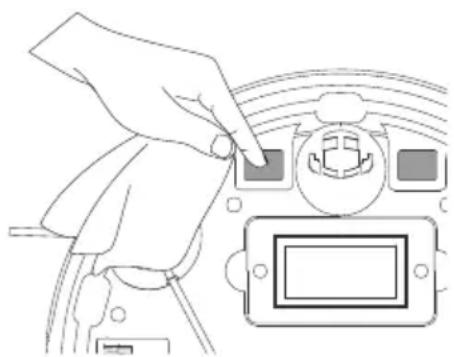
▶ Press and hold the On/Off button and the bumper at the same time for approx. 3 seconds to switch off the robot vacuum cleaner completely.
▶ Press the On/Off button on the appliance until a signal sounds and the operating LED lights up.
natural_image
Illustration of a hand pressing down on a curved surface with directional arrows indicating motion (no text or symbols)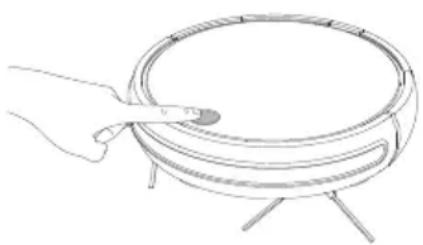
natural_image
Line drawing of a hand holding a circular tray with a handle, no text or symbols present▶ Press and hold the On/Off button on the appliance for at least 5 seconds until a signal sounds and the operating LED flashes red and green alternately.
▶ Confirm the start of the pairing process and follow the instructions on the screen.
10. Cleaning and care
natural_image
Line drawing of a hand holding a circular tray with a handle, no text or symbols present
WARNING!
Risk of electric shock!
There is a risk of electric shock/short circuit from live parts.
▶ Never immerse the robot vacuum cleaner, charging station or mains adapter in water or other liquids!
▶ Only clean the appliance and all accessories with a dry or slightly damp cloth.
▶ Switch off the appliance completely and pull the mains plug out of the socket before cleaning and maintenance as well as before assembly or disassembly of the accessories.
Your robot vacuum cleaner is easy to clean and maintain. Empty the dust container and clean the dust filter after every use. Clean the suction openings as required.
Do not use any solvents or caustic/gaseous cleaning agents to clean the appliance's surfaces. Wipe the surface of the robot vacuum cleaner and the charging station with a damp cloth.
▶ Switch off the robot vacuum cleaner completely.
▶ Clean the charging contacts with a clean, dry cloth.
natural_image
Line drawing of a hand pressing a button on a device control panel (no text or symbols)▶ Clean the sensor surfaces with a clean, dry cloth.
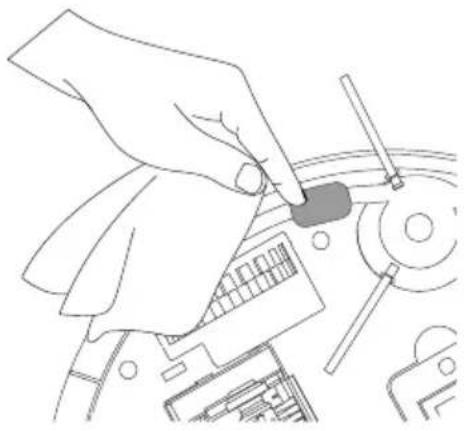
natural_image
Line drawing of a hand inserting a component into a mechanical device (no text or symbols)10.1. Cleaning the dust container
We recommend emptying the dust container and cleaning the filter after every use. Carry out the following steps:
▶ Press on the release button for the dust container and pull out the dust container.

natural_image
Line drawing of a hand holding a curved mechanical component with an arrow pointing to it (no text or symbols present)▶ Lift up the dust container lid.
▶ Empty the dust container over a dustbin.
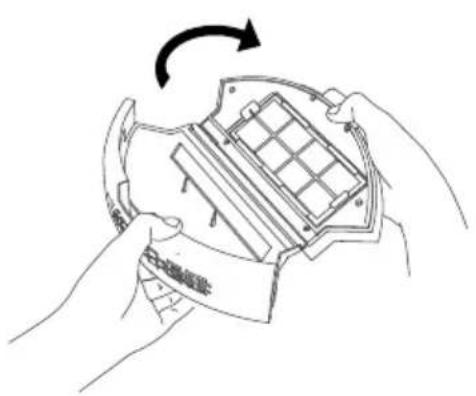
natural_image
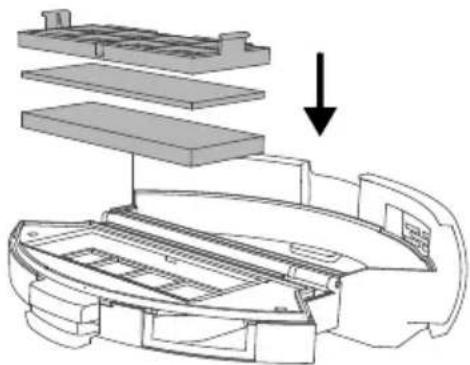
Illustration of hands assembling a device with a grid pattern inside (no text or symbols)Remove the EPA filter with EPA filter frame.
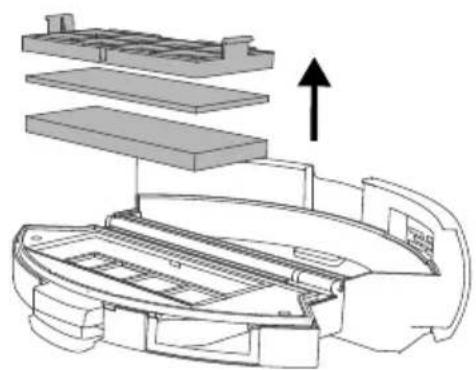
natural_image
Diagram of a printer's internal structure showing layered components and an upward arrow (no text or symbols)▶ Clean the dust filter and EPA filter regularly using the brush supplied.
- Rinse the dust container and filter components with water. It is not necessary to rinse with water every time.
Never put the dust container in the dishwasher!
When the dust container and filter components are dry again, reinsert the filters. Once cleaning has been completed successfully, reinsert the dust container.
Before using the appliance for the first time, ensure that the filter has been inserted correctly in the dust container.
natural_image
Illustration of a hand holding a small electronic component, partially enclosed in a circular frame (no text or symbols visible)
flowchart
graph TD
    A["Water Supply"] --> B["Water Tank"]
    B --> C["Internal compartments"]
    C --> D["Outlet"]

natural_image
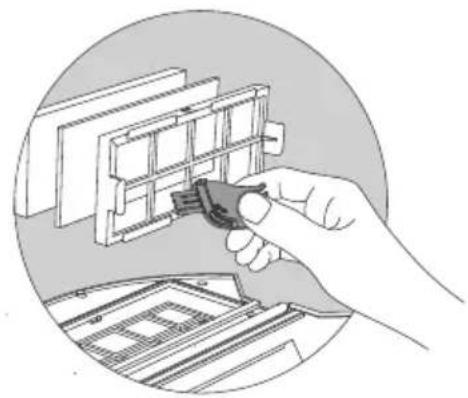
Diagram of a printer's internal structure showing layered components and a downward arrow indicating assembly (no text or symbols present)10.2. Cleaning the suction opening and brushes
After a while, dirt and dust can collect around the suction opening and can reduce the vacuum power. To avoid this, the suction opening should be cleaned regularly.
▶ Switch off the appliance and place it on a level surface.
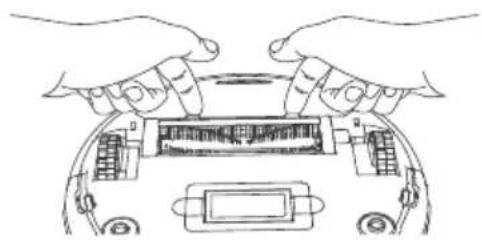
▶ Press both locking tabs on the brush frame inwards and lift off the brush frame.
natural_image
Line drawing of hands holding a device panel with internal components (no text or symbols)Remove the brushes from the suction opening.
natural_image
Illustration of hands using a tool to adjust or install a mechanical component (no text or symbols visible)Remove dust and dirt on and in the suction opening.
natural_image
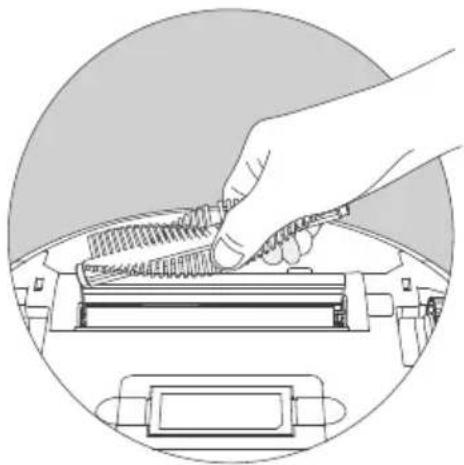
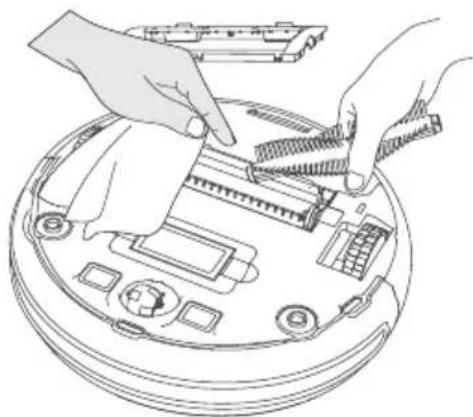
Line drawing of hands installing or adjusting a mechanical component on a circular base (no text or symbols)▶ Clean the brushes using the cleaning brush supplied.
If long hairs or threads have become tangled in the brushes, you can use the cutting element on the cleaning brush to cut and brush away these threads.
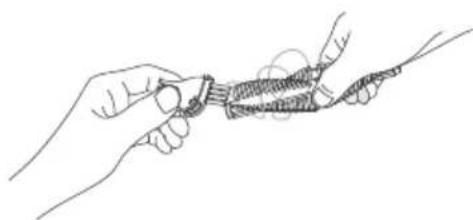
natural_image
Line drawing of two hands holding a coiled object, no text or symbols presentThen reinsert the brush in the opening and press the brush frame back onto the suction opening.
10.3. Cleaning the side brushes
We recommend that the brushes are cleaned regularly. Please carry out the following steps:
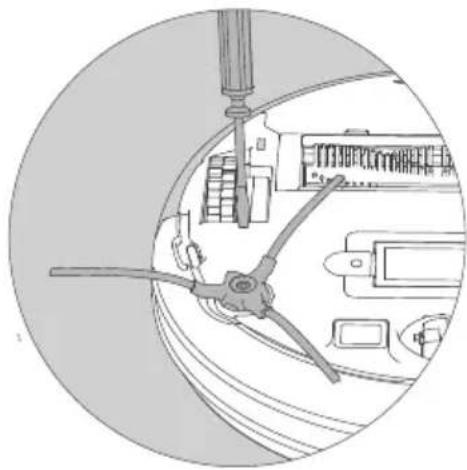
▶ Switch off the appliance and place it upside down onto a flat surface with the bottom of the appliance facing upwards.
▶ Release the screw on the brush using the Phillips screwdriver supplied.
Hold the brushes firmly and pull them straight up to remove them from the appliance.
natural_image
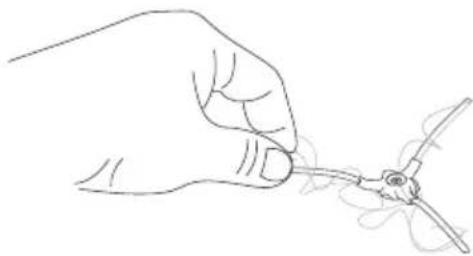
Diagram of a mechanical device with a central blade and surrounding components, enclosed in a circular frame (no text or symbols)▶ Clean the brushes to remove dirt and hair.
natural_image
Line drawing of a hand holding a small object with a pointed tip, possibly a tool or device (no text or symbols present)▶ After cleaning, reattach the brushes.
After a while, the brushes will need to be replaced to ensure the appliance works efficiently. Please contact our Service Centre for more information on replaceable accessories.

If the brushes bend, it may help to place the brushes in hot water to encourage them to return to their original shape.
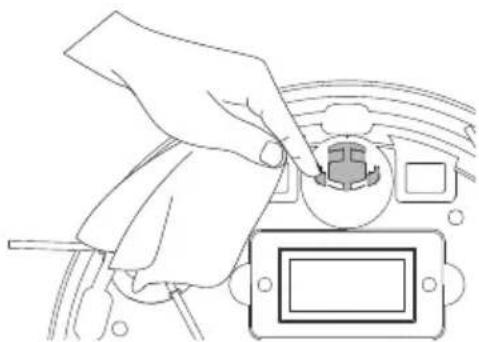
10.4. Cleaning the wheel
If the front wheel or side wheels are blocked, remove the wheel and clean the dirt from it using a damp cloth.
natural_image
Line drawing of a hand inserting a small electronic component into a device (no text or symbols)10.5. Energy management of the robot vacuum cleaner
You use the robot vacuum cleaner occasionally
If you do not intend to use the robot vacuum cleaner several times a day, daily or regularly for cleaning, we recommend disconnecting the charger and/or mains adapter from the socket each time after it is fully charged.
You use the robot vacuum cleaner daily
We recommend continuous charging in the charging station if used several times a day so as to ensure the full suction capacity required by the robot vacuum cleaner. Once fully charged, the operating LED on the robot vacuum cleaner lights up green permanently and energy consumption is minimised by trickle charging.
You use the robot vacuum cleaner occasionally or regularly for small areas
The robot vacuum cleaner has a sleep mode. We recommend sleep mode if smaller areas have been cleaned and there is still enough energy, without charging the battery again.
Disconnect the charger and/or mains adapter from the socket.
The robot vacuum cleaner switches to sleep mode after 15 seconds; the operating LED on the robot vacuum cleaner turns off.
The robot vacuum cleaner can be activated for vacuuming at any time through existing programming or using the On/Off button on the appliance.
| Consumption in watts | |
| Mains adapter 0,061W | |
| Charging directly using the mains adapter on the vacuum robot cleaner | 11,2W |
| Charging with charging station 11,4W | |
| Trickle charging on the charging station 1,3W | |
| Trickle charging on the mains adapter 1,2W |
10.6. End of operation
If you do not plan to use the appliance for a long period of time, charge the battery fully, disconnect the mains plug from the power socket, clean the appliance and store it in a dry location.
11. Troubleshooting
If the appliance stops working properly, please refer to the troubleshooting table shown below to see if you can resolve the problem yourself.
Never attempt to repair the appliance yourself. If a repair is necessary, please contact our Service Centre or a suitable authorised repair workshop.
| Problem Possible cause Solution | ||
| The appliance cannot be switched on. | The battery block is flat. | ▸ Leave the battery block to charge fully for approx. 4.5 hours. |
| The operating light flashes red quickly after the appliance has been switched on. | The battery block is flat. | ▸ Leave the battery block to charge fully for approx. 4.5 hours.▸ Clear all faults. |
| The operating light lights up red permanently.The robot vacuum cleaner does not move. | Wheels are blocked. | ▸ Remedy the fault on the wheels. |
| The operating light flashes red slowly.Sensor fault | The robot vacuum cleaner is on a dark floor.The sensor is obscured. | ▸ Move the robot vacuum cleaner to a brighter place.▸ Clean the sensor. |
| The operating light flashes red slowly. The appliance is blocked. | Robot vacuum cleaner is stuck. | ▸ Move the robot vacuum cleaner to a different place. |
| The operating light lights up red. The brushes do not move. | Blocked by dirt. | ▸ Remove the brushes, clean them thoroughly and then re-attach. |
| Vacuuming/mopping process no longer functions properly. | The water container is empty.The cleaning cloth is too dirty. | ▸ Fill the water tank.▸ Replace/clean the cleaning cloth. |
12. Disposing of the battery block

CAUTION!
Risk of injury.
There is a risk of injury in case of contact with the removed battery.
▶ Keep removed batteries away from children. Do not throw batteries into fire, short-circuit or dismantle them.
▶ Do not expose removed batteries to extreme conditions such as radiators, direct sunlight! Increased risk of leakage!
▶ Avoid contact with the skin, eyes and mucous membranes. In the event of contact with battery acid, rinse the affected areas immediately with plenty of clean water and consult a doctor immediately.
Remove the battery block before disposing of the robot vacuum cleaner or in case of a fault with the battery block.
▶ Make sure that the battery block is completely discharged before removing.
▶ Switch off the appliance and disconnect the mains adapter from the socket and the mains cable from the appliance.
▶ Loosen both screws on the bottom of the robot vacuum cleaner using the Phillips screwdriver supplied and open the battery compartment.
Remove the battery block by pulling on the tab.
Remove the battery block plug from the appliance socket.
▶ Dispose of the battery block in an environmentally friendly manner (see "13. Disposal" on page 225).
- Contact the MEDION Service Centre or another suitable repair workshop to have the rechargeable battery replaced.
▶ Close the battery compartment using both screws.
13. Disposal

PACKAGING
Your appliance has been packaged to protect it from damage in transit. The packaging is made of materials that can be recycled in an environmentally friendly manner.
APPLIANCE
Do not dispose of old appliances in normal household waste.
In accordance with Directive 2012/19/EU, the appliance must be disposed of correctly at the end of its service life.
This involves separating the materials in the appliance for the purpose of recycling and minimising the environmental impact.
Take old appliances to an electrical scrap collection point or a recycling centre. Before doing so, remove the batteries/rechargeable batteries from the appliance and take them to a separate collection point for used batteries.
Contact your local waste disposal company or your local authority for more information on this subject.
BATTERIES
Do not dispose of used batteries/rechargeable batteries with normal household rubbish. Batteries/rechargeable batteries must be disposed of correctly. For this purpose, retailers that sell batteries and local collection points provide containers in which you can dispose of them. Contact your local waste disposal company or your local authority for more information.
In connection with the sale of batteries/rechargeable batteries or the supply of appliances containing batteries/rechargeable batteries, we are obliged to draw your attention to the following:
As the end user, you are legally required to return used batteries/re-chargeable batteries.
The crossed-out wheelie bin symbol means that the batteries/rechargeable batteries must not be disposed of with household rubbish.
14. Technical specifications
| Appliance | |
| Vacuum power: Approx. 0.8 Kpa | |
| Noise level: Approx. 65 dB | |
| Dust container capacity: 0.5 l | |
| Operating duration: | Approx. 60 min. (maximum suction level)Approx. 100 min. (minimum suction level) |
| Operating range via Wifi in enclosed spaces: | Up to approx. 10 m |
| Weight: Approx. 2.9 kg | |
| Dimensions: Approx. 325 x 80 mm | |
| Battery block | |
| Lithium-ion battery block | |
| Model: | U094-INR-M26-4S1P |
| Manufacturer: BYD, China | |
| Battery voltage: 14.4 V | |
| Battery capacity: 2400 mAh | |
| Output: 34.56 Wh | |
| Charging time: Approx. 300 minutes | |
| Operating temperature: 10°C to 40°C | |
| Mains adapter | |
| Manufacturer | Dongguan Guanjin Electronics Technology Co., Ltd.Importer:MEDION AGAm Zehnthof 7745307 EssenGermanyHR number: HRB 13274 |
| Model name K12S190060G | |
| Input voltage/current/input AC frequency | 100–240 V~ 0.35 A, 50/60 Hz, |
| Output voltage/current | 19 V— — — 600 mA |
| Output power 11.4 W | |
| Average efficiency during operation 84.96% | |
| Efficiency with low load (10%) 80.35% | |
| Power consumption with zero load 0.061 W | |
15. Declaration of conformity

MEDION AG hereby declares that this appliance complies with the fundamental requirements and the other relevant provisions of:
• Radio Equipment Directive 2014/53/EU
• Ecodesign Directive 2009/125/EC
• RoHS Directive 2011/65/EU.
Complete Declarations of Conformity are available at www.medion.com/conformity.
16. Service information
Please contact our Customer Service team if your device ever stops working the way you want or expect it to. There are several ways for you to contact us:
- In our Service Community, you can meet other users, as well as our staff, and you can exchange your experiences and pass on your knowledge there.
You will find our Service Community at community.medion.com.
• Alternatively, use our contact form at www.medion.com/contact.
- You can also contact our Service team via our hotline or by post.
| Opening times Hotline number UK | |
| Mon – Fri: 08.00 – 20.00Sat – Sun: 10.00 – 16.00 | 0333 3213106 |
| Hotline number Ireland | |
| 1 800 992508 | |
| Service address | |
| MEDION Electronics Ltd.120 Faraday Park, Faraday Road, DorcanSwindon SN3 5JF, WiltshireUnited Kingdom | |

You can download this and many other sets of operating instructions from our service portal at www.medion.com/gb/service/.
You will also find drivers and other software for a wide range of devices there.
You can also scan the QR code on the side of the screen, to download the operating instructions onto your mobile device from the service portal.
17. Legal Notice
Copyright © 2020
Date: 28.09.2020
All rights reserved.
These operating instructions are protected by copyright.
Mechanical, electronic and any other forms of reproduction are prohibited without the written permission of the manufacturer.
Copyright is owned by the company:
MEDION AG
Am Zehnthof 77
45307 Essen
Germany
Please note that you cannot use the address above for returns. Please always contact our Customer Service team first.
18. Privacy statement
Dear customer,
We wish to inform you that we, MEDION AG, Am Zehnthof 77, 45307 Essen, Germany process your personal data as a data controller.
For matters regarding data protection, we are supported by our company data protection officer who can be contacted at MEDION AG, Datenschutz, Am Zehnthof 77, D – 45307 Essen; datenschutz@medion.com. We process your data for the purpose of warranty processing and associated processes (e.g. repairs) and therefore rely on processing your data for the sales contract concluded with us.
Your data will be provided to repairers contracted to us for the purpose of warranty processing and associated processes. We generally store your personal data for a period of three years in order to fulfil your legal warranty rights.
You have the right to be informed of the personal data concerned as well as the right to rectification, deletion, restriction of processing, the right to object to processing, as well as the right to data portability.
In case of access and cancellation rights, restrictions apply according to S 34 and S 35 of BDSG (Federal Data Protection Act) (Art. 23 GDPR). In addition, there is a right of appeal to a competent data protection supervisory authority (Article 77 GDPR in conjunction with S 19 BDSG). The state official for data protection and freedom of information for MEDION AG is Nordrhein Westfalen, P box 200444, 40212 Düsseldorf, Germany. www.ldi.nrw.de.
The processing of your data is necessary for warranty processing: it is not possible to process the warranty without the provision of the required data.
19. General Warranty Conditions
19.1. General information
The warranty period is 24 months and begins on the day the product is purchased.
The warranty covers all types of material and product damage that could occur during normal use.
Please keep your original proof of purchase in a safe place. The warranty provider reserves the right to refuse to confirm the status of the warranty or to carry out a repair under warranty if a valid proof of purchase cannot be produced.
If it is necessary to return your device for repair, please ensure that it is suitably packaged for transportation. Unless otherwise specified, you shall bear the costs for sending the device and the transport risk. The warranty provider does not assume any liability for additional materials sent with the product that do not belong to the original package contents supplied with the product.
Please enclose as much information as possible about the fault when sending the device to the warranty provider. In order to make a valid claim under warranty and before returning the device, please contact the Service Hotline operated by the warranty provider or the Service Portal. They will provide you with information on how to proceed further.
This warranty has no effect on your statutory warranty rights and is subject to the laws of the country in which the first purchase of the product was made by the end customer.
19.1.1. Scope
In the event of a fault on your product that is covered by this warranty, the warranty provider guarantees to repair or replace the product. The decision about whether to repair or replace the device is taken by the warranty provider. Therefore, the warranty provider can at its own discretion decide to replace a device submitted for repair under warranty with a refurbished device of the same quality.
No warranty is provided for batteries or rechargeable batteries or for consumable materials i.e. parts which have to be replaced at regular intervals during the normal use of the product e.g. video projector lamps.
A pixel error (permanently coloured, light or dark point in an image) is not generally considered a fault. Please refer to the information provided in the manual for this product for the precise number of permissible defects in the image.
The warranty provider gives no warranty for burnt-in images on plasma or LCD devices that result from the improper use of the device. Please refer to the information provided in the manual for this product for precise instructions on operating your plasma or LCD device.
The warranty does not cover errors relating to the playback of data media that have been created in an incompatible format or as a result of using unsuitable software. If it is discovered during the repair that the fault concerned is not covered under warranty, the warranty provider reserves the right to invoice the customer for the
costs already incurred in the form of a flat-rate handling charge, as well as to charge the customer for the materials and labour required for the repair after submitting a cost estimate. You will be informed in advance as the customer about these repair charges; you are responsible for accepting or rejecting the repair process.
19.1.2. Exclusions
Malfunctions and damage to the device caused by external influences, accidental damage, improper use, changes made to the product, modifications, upgrades, the use of third-party parts, neglect, viruses or software faults, improper transport, improper packaging or loss during the return of the product are not covered by the warranty issued by the warranty provider.
The warranty will be invalidated if the fault to the device is caused by maintenance or repair carried out by someone other than a service partner authorized by the warranty provider. The warranty will also be invalidated if labels or serial numbers on the device or a component of the device have been modified or made illegible.
19.1.3. Service Hotline
Before sending the device to the warranty provider, you must contact us via the Service Hotline or the Service Portal. This ensures that you receive further information on how to make a valid claim under warranty.
The use of the hotline may be subject to a charge.
The Service Hotline should under no circumstances be considered a substitute for user training for software and hardware or reading the manual, nor does it provide support for third-party products.
MSN 5006 4564
Made in China