TSB A60 A1 - Soundbar TRONIC - Free user manual and instructions
Find the device manual for free TSB A60 A1 TRONIC in PDF.

User questions about TSB A60 A1 TRONIC
0 question about this device. Answer the ones you know or ask your own.
Ask a new question about this device
Download the instructions for your Soundbar in PDF format for free! Find your manual TSB A60 A1 - TRONIC and take your electronic device back in hand. On this page are published all the documents necessary for the use of your device. TSB A60 A1 by TRONIC.
USER MANUAL TSB A60 A1 TRONIC
⚠️ WARNUNG! EXPLOSIONSGEFAHR!
text_image
Diagram showing three-step battery installation process with labeled steps 1, 2, and 3natural_image
Simple line drawing of a monitor above a wall-mounted device, enclosed in a circle (no text or symbols)
natural_image
Simple line drawing of a 3D box with a horizontal bar inside, enclosed in a circle (no text or symbols)flowchart
graph TD
    A["Optical"] --> B["TV"]
    C["Optical IN"] --> D["TV"]
Warnings and symbols used Page 16
Short manual Page 17
Intended use.... Page 17
Trademark notices Page 17
Scope of delivery.... Page 17
Technical data Page 17
Safety Page 18
Before use Page 19
Remote Control Page 20
Prepare the Remote Control.... Page 20
Replace the Remote Control Battery ...... Page 20
Precautions Concerning Batteries.... Page 20
Placement and Mounting Page 21
Placement.... Page 21
Wall Mounting.... Page 21
Connections Page 21
Use the HDMI eARC Socket Page 21
Use the OPTICAL Socket Page 22
Use the AUX Socket.... Page 22
Connect Power.... Page 22
Basic Operation.... Page 22
Standby/ON Page 22
Adjust the Volume. Page 23
Select a Preset Sound Effect. Page 23
Adjust the Bass/Treble Page 23
AUX / OPTICAL / HDMI eARC Operation Page 23
Bluetooth® Operation Page 23
Disposal Page 24
Simplified EU declaration of conformity Page 24
Warranty and service Page 24
Warranty Page 24
Warranty claim procedure.... Page 25
Service Page 25
| Warnings and symbols usedThe following warnings are used in the instruction manual, short manual, on the packaging, on the product, and on the power adaptor: | |
| DANGER! This symbol with the signal word “DANGER” indicates a hazard with a high level of risk which, if not avoided, will result in serious injury or death. | |
| WARNING! This symbol with the signal word “WARNING” indicates a hazard with a medium level of risk which, if not avoided, could result in serious injury or death. | |
| CAUTION! This symbol with the signal word “CAUTION” indicates a hazard with a low level of risk which, if not avoided, could result in minor or moderate injury. | |
| ATTENTION! This symbol with the signal word “ATTENTION” indicates possible property damage. | |
| NOTE: This symbol with the signal word “NOTE” provides additional useful information. | |
| This mandatory sign indicates to wear suitable protective gloves! Follow the instructions of this warning to avoid hand injuries caused by objects or contact with hot or chemical materials. | |
| This symbol means that the operating instructions must be observed before using the product. | |
| Alternating current / voltage | |
| The lightning flash with arrowhead symbol, within an equilateral triangle, is intended to alert the user to the presence of uninsulated “dangerous voltage” within the product's enclosure that may be of sufficient magnitude as to constitute a risk of electric shock to persons. | |
| The exclamation point within an equilateral triangle is intended to alert the user to the presence of important operating and maintenance (servicing) instructions in the literature accompanying the appliance. | |
| Direct current / voltage | |
| This symbol refers to the special rule of conduct associated with children. | |
| Symbol for a Protection Class II product | |
| Use the product in dry indoor spaces only. | |
| CE | CE mark indicates conformity with relevant EU directives applicable for this product. |
| Safety Information Instructions for use |
DOLBY ATMOS® 2.0
SOUNDBAR
● Short manual
This document is a shorter printed version of the complete instruction manual. Scanning the QR code takes you straight to the Lidl service website (www.lidl-service.com) where you can view and download the complete instruction manual by entering the article number (IAN) 512390_2501. The short guide forms an integral part of this product. Prior to using the product, familiarize yourself with all operation and safety notes. Store the short guide in a safe place, and if you give the product to third parties, all documentation should be passed on to them as well.
Intended use
This DOLBY ATMOS® 2.0 SOUNDBAR (hereinafter referred to as "product") is a consumer electronic intended to playback sound from audio devices.
Any other use is considered improper. Any claims resulting from improper use or due to unauthorised modification of the speaker will be considered unwarranted. Any such use is at your own risk. The product is not intended for commercial use.
Trademark notices
- USB is a registered trademark of USB Implementers Forum, Inc.
- Dolby, Dolby Atmos, and the double-D symbol are registered trademarks of Dolby Laboratories Licensing Corporation.
- Manufactured under license from Dolby Laboratories. Confidential unpublished works. Copyright © 2012-2024 Dolby Laboratories. All rights reserved.
- hTe Terms HDMI, HDMI High-Definition Multimedia Interface, HDMI trade dress and the HDMI Logos are trademarks or registered trademarks of HDMI Licensing Administrator, Inc.
- The Bluetooth®word mark and logos are registered trademarks owned by Bluetooth® SIG, Inc. and any use of such marks by OWIM GmbH & Co. KG is under license.
- The TRONIC trademark and trade name is the property of their respective owners.
- Any other names and products are trademarks or registered trademarks of their respective owners.
- Scope of delivery
☐ Remove all packaging material and check the contents of the packaging for completeness. Please contact the dealer if parts are missing or damaged.
1× Soundbar
1× Remote control
2× 1.5V AAA (LRO3) Alkaline batteries
1× Wall mounting set incl. screws, wall plugs and mounting bracket
1× 1.5m Power cable
1× Audio cable with a 3.5 mm plug and other cinch plugs (cinch)
1× 1.5m optical cable (included protective cap)
1× 1.5m HDMI ARC cable
1× Quick start guide
1× Instructions for use
- Technical data
DOLBY ATMOS® 2.0 SOUNDBAR
AC Input: 100 - 240V\~ 50/60Hz
Power consumption: 20W
Standby power
consumption: <0.5W
Music output: 2 × 30W R MS at 10% THD
Frequency
response: 65Hz to 20kHz
AUX-in jack: 3.5 mm jack plug
Audio format at
inputs: Stereo PCM
SPDIF for digital
input: Optical (Toslink)
HDMI input: HDMI (ARC) jack
USB port output
voltage/ Current: 5V = 500mA
USB-A support
file format: FAT16, FAT32, ex FAT
USB-A playable
audio formats: MP3
USB-A max.
support USB
storage device
capacity: 128GB
Dimensions: Approx. 600.6 x 109.4 x 60mm (W × D × H)
Weight: Approx. 1980 g
Operating
conditions: 10^ - 35^ ,
40% - 85% rel. humidity
Storage
temperature: -20^ - +60^
Wireless standard: Blue tooth ^® 5.3
Frequency band: 2400 MHz - 2483 .5 MHz
Max. transmitted
power: <20 mW
Bluetooth ^® range: Approx. 10m
Bluetooth ^® protocols:
AVRCP (remotely controls key audio functions via mobile phone), A2DP (wireless audio transmission)
Remote control:
Working distance: Approx. 6m/30°
Battery type: 2 x 1.5V AAA/LR03 batteries

Safety
This chapter provides important safety information for handing the product. Improper use can result in personal injury and property damage. Before using the product, please familiarise yourself with all of the safety instructions and instructions for use! When passing this product on to others, please also include all the documents!

DANGER!
■ DANGER TO LIFE AND RISK OF ACCIDENT! FOR INFANTS AND CHILDREN!

DANGER!
RISK OF SUFFOCATION!
Packaging material (i.e film or polystyrene) should not be used to play with. Always keep children away from the packaging material. The packaging material is not a toy.
This product can be used by children aged from 8 years and above and persons with reduced physical, sensory or mental capabilities or lack of experience and knowledge if they have been given supervision or instruction concerning use of the product in a safe way and understand the hazards involved. Children shall not play with the product. Cleaning and user maintenance shall not be made by children without supervision. The product is not a toy.

ATTENTION! RISK OF DAMAGE
- hisTproduct does not contain any parts which can be serviced by the user.
Choice product before every use! Discontinue use if any damage to the product or the charging cable is detected!
■ db/notice anything unusual during use (e.g. unusual noise, strange odour or smoke), switch the product off immediately and disconnect all cables. Do not use the product anymore.
■ Sudden premature changes may cause condensation inside the product. In this case, allow the product to acclimatise for some time before using it again. - o Dot place burning candles or open fire on or next to the product.
- o Dot use the product near heat sources such as radiators or other devices emitting heat!
- o Dot throw the product into fire and do not expose to high temperatures.
Do not leave the product inside a vehicle on a hot day. High temperatures can cause irreversible damage to the product, and in some cases even cause it to combust.
■ he Product must not be exposed to dripping or splashing water.
WARNING! EXPLOSION HAZARD!
- o Dot throw the product into fire and do not expose to high temperatures.
■ ever open the housing of the product as there is a risk of explosion! The product has no internal parts requiring maintenance.
RISK OF ELECTRIC SHOCK!

WARNING! Risk of electric shock! Never open the housing of the product or of the power adaptor. In case of malfunction, repairs are to be conducted by qualified personnel only.

WARNING! Protect the product from dripping and splashing water. Do not place containers filled with liquids (such as vases or drinks) on or near the product. Do not immerse any product components in liquids. Never hold the product under running water.
To avoid fire, do not place burning candles on or near the product.

WARNING! Do not touch the power plug with wet hands.

CAUTION! Never use a damaged product. If you notice any damage, disconnect the power adaptor immediately from the mains network. Contact your retailer if the product is damaged.
■ Always turn the product off before disconnecting from the power supply.
o avoid damaging the cord, do not place any objects on it or chafe it on sharp edges. Keep it away from hot surfaces and open flames as well.
■ay but the cord in such a way that no unintentional pulling or tripping over is possible. Keep the power adaptor and its cord out of reach of children.
■ how disconnecting the product from the electrical outlet, do not pull by the connection cord.
- o Dot wrap the connection cord around the product.
■ onect the product to an electrical outlet that is always easily reachable so that in case of an emergency the plug can be unplugged immediately.
- Fuel power plug out of the power supply to completely disconnect the product from the mains network.
The Product continues to draw a small amount of electricity, even without the radio being operated, as long as the product is connected to the power supply. To completely switch off the power adaptor, it must be disconnected from the mains network.
- o Dot subject the product to physical shock or strong vibrations.
If shock unusual sounds are observed, immediately unplug the product from the power supply.
■he Product shall not be covered.
■ Dissect the product from the power supply when the product is not in use and before cleaning.
- et the product dry completely before connecting it to the mains supply and before storage. Allow the product to cool down completely before storage.
- o Dot insert any foreign objects into the product.
o Dot expose the product to high temperatures (e.g. in the direct vicinity of a heater).
NOTE: This product is equipped with rubber feet to protect delicate surfaces. It cannot be ruled out that furniture care agents will attack or damage the rubber feet.

WARNING!
Wireless interference?
Switch the product off on airplanes, in hospitals, service rooms, or near medical electronic systems.
The wireless signals transmitted could impact the functionality of sensitive electronics. Keep the product at least 20 cm from pacemakers or implantable cardioverter defibrillators, as the electromagnetic radiation may impair the functionality of pacemakers. The radio waves transmitted could cause interference in hearing aids. Do not place the product near flammable gasses or potentially explosives areas (e.g. paint shops) with the wireless components on, as the radio waves emitted can cause explosions and fire.
NOTE: When using the product it is recommended that ALL cables (USB / AUX) are less than 3 meters in length to avoid any interference.

ATTENTION!
The range of the radio waves varies by environmental conditions. In the event of wireless data transmission, unauthorised third parties receiving the data cannot be excluded. The OWIM GmbH & Co. KG is not responsible for interference with radios or televisions due to unauthorised modification of the device.
The OWIM GmbH & Co. KG further assumes no liability for using or replacing cables and devices not distributed by OWIM. The user of the device is fully responsible for correcting interference caused by such unauthorised modification of the device, as well as replacement of such devices.

Before use
Before use, verify the package contents are complete and undamaged!
☐ Place the product on a level, even surface for operation.
Remote Control
| 1 ⏻ | Switch the soundbar between ON and Standby mode. | 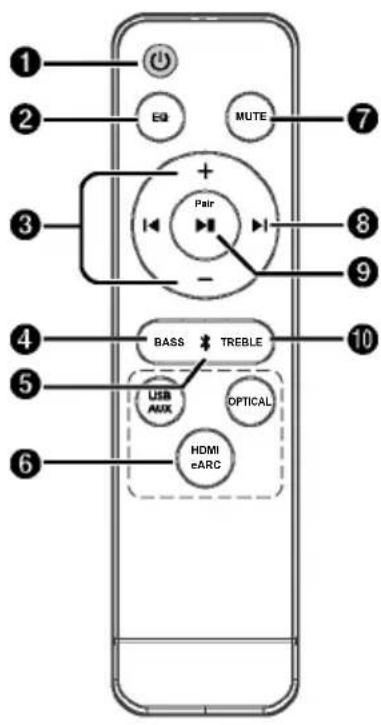 |
| 2 EQ | Select Equalizer (EQ) Effect. (NEWS/ MOVIE/MUSIC) | |
| 3 +/- (VOL) | Increase/decrease the volume level. | |
| 4 BASS | Press "BASS" then press +/- buttons to increase or decrease the bass. | |
| 5 ✗ | Select the Bluetooth mode. | |
| 6 USB/AUXOPTICALHDMI eARC | Select the play function. | |
| 7 MUTE | Mute or resume the sound. | |
| 8 ▶, ▶kip to previous/next track. (In Bluetooth mode) | ||
| 9 ▶/ Pair | Play/pause/resume playback. (In Bluetooth mode).Press and hold to activate the pairing function in Bluetooth mode or disconnect the existing paired Bluetooth device. | |
| 10 TREBLE | Press "TREBLE" then press +/- buttons to increase or decrease the treble. | |
Prepare the Remote Control
The provided Remote Control allows the unit to be operated from a distance.
■ver if the Remote Control is operated within the effective range 19.7 feet (6m), remote control operation may be impossible if there are any obstacles between the unit and the remote control.
■ her Remote Control is operated near other products which generate infrared rays, or if other remote control devices using infra-red rays are used near the unit, it may operate incorrectly. Conversely, the other products may operate incorrectly.
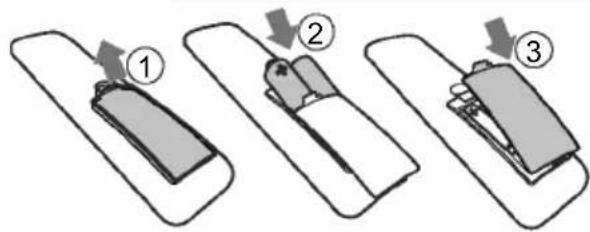
- Replace the Remote Control Battery
-
Press and slide the back cover to open the battery compartment of the remote control.
-
Insert two AAA size batteries (included). Make sure the (+) and (-) ends of the batteries match the (+) and (-) ends indicated in the battery compartment.
-
Close the battery compartment cover.
text_image
Diagram showing three-step assembly steps of a battery or switch, labeled ①, ②, and ③.● Precautions Concerning Batteries
Be sure to insert the batteries with correct positive "⊕" and negative "⊖" polarities.
■ Use batteries of the same type. Never use different types of batteries together.
■ either rechargeable or non-rechargeable batteries can be used. Refer to the precautions on their labels.
- Be aware of your fingernails when removing the battery cover and the battery.
Do not drop the remote control.
Do not allow anything to impact the remote control.
- Do not spill water or any liquid on the remote control.
Do not place the remote control on a wet object.
Do not place the remote control under direct sunlight or near sources of excessive heat.
■ Remove the battery from the remote control when not in use for a long period of time, as corrosion or battery leakage may occur and result in physical injury, and/or property damage, and/or fire.
- o Dot use any batteries other than those specified.
Do not mix new batteries with old ones.
■ ever recharge a battery unless it is confirmed to be a rechargeable type.
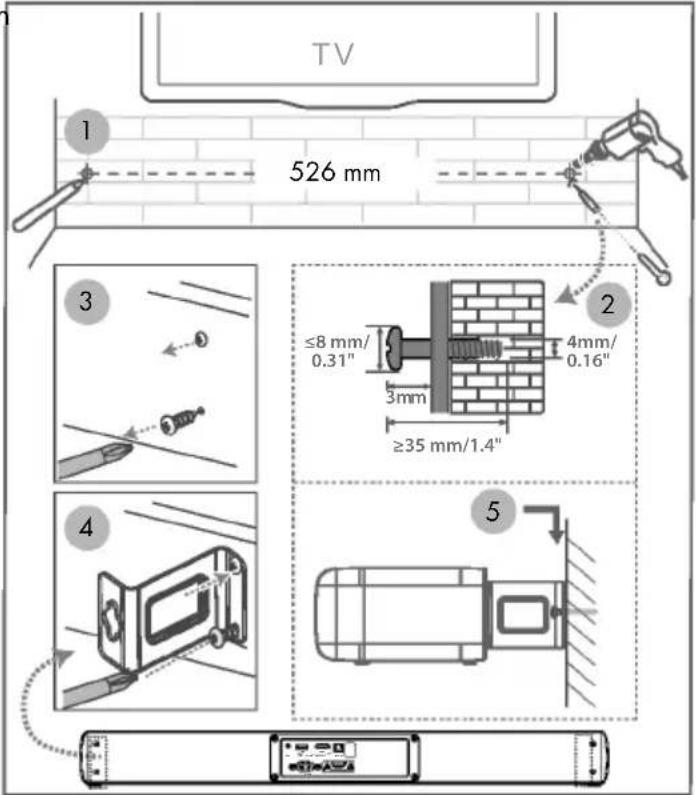
● Placement and Mounting
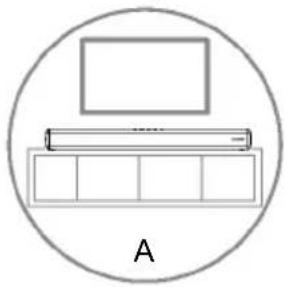
Placement
A. If your TV is placed on a table, you can place the unit on the table directly in front of the TV stand, centred with the TV screen.
B. If your TV is attached to a wall, you can mount the unit on the wall directly below the TV screen.
Wall Mounting
Note:
- Installation must be carried out by qualified personnel only.
natural_image
Simple line drawing of a cabinet with a monitor above it, labeled 'A' at the bottom (no text or symbols on the diagram itself)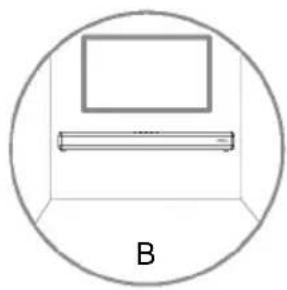
natural_image
Simple line drawing of a room with a monitor and a ruler inside a circle (no text or symbols)- Additional tools (not included) are required for the installation.
- Do not overtighten screws.
- Keep this instruction manual for future reference.
- Use an electronic stud finder to check the wall type before drilling and mounting.
WARNING
To prevent injury, this apparatus must be securely attached to the floor/wall in accordance with the installation instructions.
■ Suggested wall mounting height: ≤ 1.5 meters.
text_image
TV 526 mm ≤8 mm/ 0.31" 4mm/ 0.16" 3mm ≥35 mm/1.4" 3 2 4 5- Connections
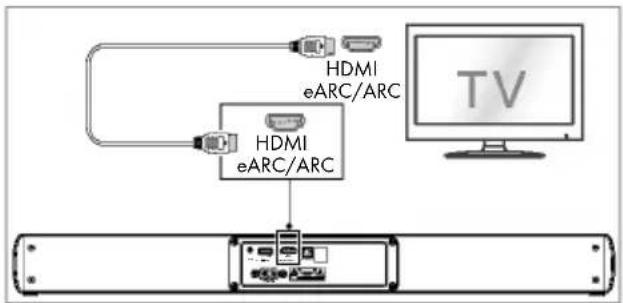
Use the HDMI eARC Socket
The eARC (Enhance Audio Return Channel) function allows you to send audio from your ARC-compliant TV to your soundbar through a single HDMI connection. To enjoy the ARC function, please ensure your TV is both HDMI-CEC and ARC compliant and set up accordingly. When correctly set up, you can use your TV remote control to adjust the volume output (VOL + / - and Mute) of the soundbar.
Connect the HDMI cable from Soundbar's HDMI eARC socket to the HDMI eARC socket on your eARC compliant TV. Then press the remote control to select HDMI eARC.
flowchart
graph TD
    A["+"] --> B["HDMI eARC/ARC"]
    C["+"] --> D["HDMI eARC/ARC"]
    B --> E["TV Monitor"]
Tips:
■ outYTV must support the HDMI-CEC and ARC function. HDMI-CEC and ARC must be set to On.
■ the Setting method of HDMI-CEC and ARC may differ depending on the TV. For details about ARC function, please refer to the owner's manual.
■ Only HDMI 1.4 or higher version cable can support the ARC function.
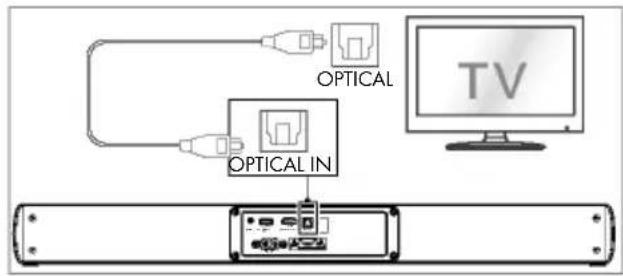
Use the OPTICAL Socket
- Remove the protective cap of the OPTICAL socket, then connect an OPTICAL cable to the TV's OPTICAL OUT socket and the OPTICAL socket on the Soundbar.
flowchart
graph TD
    A["Optical"] --> B["Optical IN"]
    B --> C["TV"]
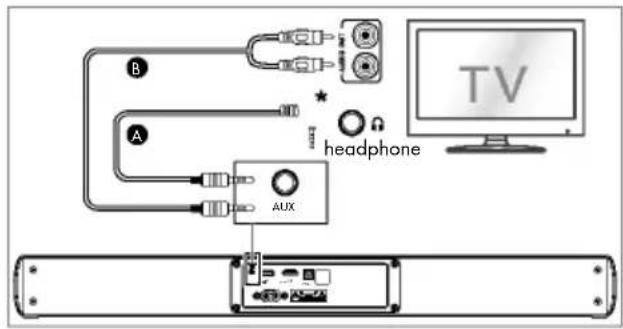
Use the AUX Socket
A. Use a 3.5mm to 3.5mm audio cable (*not included) to connect the TV's or external audio device headphone socket to the AUX socket on the Soundbar.
text_image
B A headphone AUX TVB. Use a RCA to 3.5mm audio cable to connect the TV's audio output sockets to the AUX socket on the Soundbar.
Connect Power
Risk of product damage! Ensure that the power supply voltage corresponds to the voltage printed on the back or the underside of the unit.
Before connecting the AC power cord, ensure you have completed all other connections.
Soundbar
Connect the mains cable to the AC\~ socket of the Soundbar and then into a mains socket.
Basic Operation
Stardby/ON
When you first connect the main unit to the mains socket, the main unit will be in Standby mode.
- Press the button on the remote control to switch the Soundbar ON or STANDBY mode. - Disconnect the mains plug from the mains socket if you want to switch the Soundbar OFF completely.
Auto Wake
If a TV or an external device is connected (AUX/HDMI ARC), the Soundbar will switch on automatically when the TV or the external device is switched on.
Automatic Power Off Function
The Soundbar automatically turns to Standby mode after about 15 minutes if the TV or the external Soundbar is disconnected, switched off.
To switch the Soundbar off completely, remove the mains plug from the mains socket.
Please turn the Soundbar off completely to save energy when not in use.
Select Modes
Press the (SOURCE) button repeatedly on the unit or the HDMI eARC, ✝ (Bluetooth), OPTICAL, USB and AUX buttons on the remote control to select the desired mode.
The indicator light on the front of the main unit will show which mode is currently in use.
| LED | Mode |
| Red Standby | |
| Green AUX | |
| Green flash USB | |
| Blue | * (Bluetooth) |
| Amber Optical | |
| White HDMI eARC |
- Adjust the Volume
Press the +/- (Volume) on the Soundbar or on the remote control to adjust the volume.
If you wish to turn the sound off, press the MUTE button on the remote control. Press the MUTE button again or press the +/- (Volume) buttons to resume normal listening.
- Select a Preset Sound Effect
While playing, press the EQ button on the remote control to select the NEWS / MUSIC / MOVIE preset equalizers.
■ LEDs blink 3 sec to show current EQ mode according to the EQ mode definition (Fig).
| EQ mode | LED |
| NEWS | ●●● |
| MUSIC | ○●●● |
| MOVIE | ○○●●● |
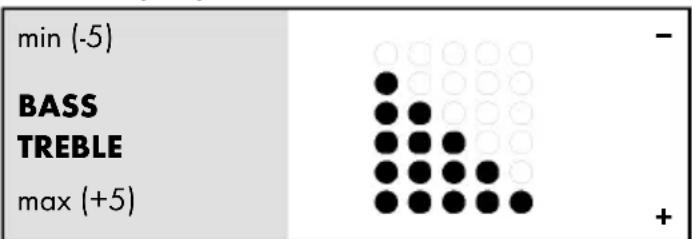
- Adjust the Bass/Treble
- Press the BASS button then press VOL +/- button to increase or decrease the bass.
Press the TREBLE button then press VOL +/- button to increase or decrease the treble.
After about 5 seconds, the unit will exit from bass/treble setting. You may now press the VOL +/- buttons to adjust volume.
When adjusting the treble/bass, the indicator will increase / decrease the amount of light. According to the corresponding light display / blinking (Fig), determine the current volume level.
other
| Statistic | Value | | --------- | ----- | | min (-5) | - | | BASS TREBLE | | | max (+5) | + |● AUX / OPTICAL / HDMI eARC Operation
- Ensure that the Soundbar is connected to the TV or audio device.
-
Press the → (SOURCE) button repeatedly on the Soundbar to select the AUX, Optical, USB, HDMI eARC mode.
-
Operate your audio device directly for playback features.
- Press the +/- (Volume) button to adjust the volume to your desired level.
Tip: The Soundbar may not be able to decode all digital audio formats from the input source. In this case, the Soundbar will mute. This is NOT a defect. Ensure that the audio setting of the input source (e.g. TV, game console, DVD player, etc.) is set to PCM or Dolby Digital (Refer to the user manual of the input source device for its audio setting details) with HDMI eARC / OPTICAL input.
BluetoothOperation
Through Bluetooth, connect the Soundbar with your Bluetooth device (such as an iPad, iPhone, iPod touch, Android phone, or laptop), and then you can listen to the audio files stored on the device through your Soundbar speakers.
First time pairing
- Press the → (SOURCE) button on the Soundbar or press the ✗ button on the remote control to select Bluetooth® mode. The Blue indicator will flash slowly.
- On the Bluetooth device, switch on Bluetooth, search for and select "TSB A60 A1" to start connection.
- After audio prompt, the system is successfully connected and the Blue indicator will light up solidly.
- Select and play audio files or music on your Bluetooth device.
If you want to connect your Soundbar with another Bluetooth device, press and hold ▶ button to disconnect from current Bluetooth connected devices and enter the Bluetooth pairing mode. You will hear audio prompt and Blue indicator will flash rapidly. Follow step 2-3 to pair your Bluetooth® device.
If your Bluetooth device supports A2DP, play music via your device.
If your Bluetooth device supports AVRCP, use supplied remote control to control play.
▶||
Start, pause or resume play
◀
▶Skip to the previous or next track
Tips:
■ he Operational range between the Soundbar and the device is approximately 8 metres.
- be connecting a Bluetooth® device to the Soundbar, ensure you know the device's capabilities.
- on compatibility with all Bluetooth ^ devices is not guaranteed.
■ Any obstacle between the device and the Soundbar can reduce operational range.
- Keep this player away from other electronic devices that may cause interference.
The player will also be disconnected when your device is moved beyond the operational range.
● Disposal
Packaging:
The packaging is made of environmentally friendly materials, which you be disposed through your local recycling facilities.

Observe the marking of the packaging materials for waste separation, which are marked with abbreviations (a) and numbers (b) with following meaning: 1–7: plastics/20–22: paper and fibreboard/80–98: composite materials.
Product:

Contact your local refuse disposal authority for more details of how to dispose of your worn-out product.
The adjacent symbol of a crossed out dustbin on wheels indicates this product is subject to directive 2012/19/EU. This directive states at the end of the life this product must not be disposed of through regular household refuse but must be returned to special collection sites, recycling depots or waste management companies.
This disposal is free of charge to you.
Protect the environment and dispose of properly.
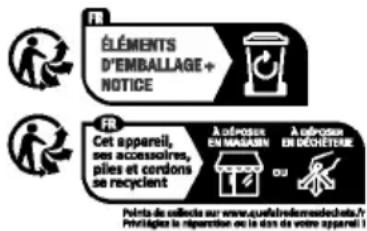
The product incl. accessories, manual and packaging materials are recyclable and are subject to extended producer responsibility.
Dispose them separately, following the illustrated Infotri (sorting information), for better waste treatment.
The Triman logo is valid in France only.
Batteries/accumulators:
Environmental damage through incorrect disposal of the batteries/accumulators!
Defective or exhausted batteries/rechargeable batteries must be recycled in accordance with Regulation 2023 / 1542. Return batteries/rechargeable batteries to the appropriate local collection facilities.
The symbol showing the crossed-out bin on batteries or rechargeable batteries means that such batteries must not be disposed of in domestic waste. Remove the batteries/battery pack from the product before disposing of them/it. They may contain toxic heavy metals and are subject to hazardous waste regulations.
The chemical symbols of the heavy metals are: Cd = cadmium, Hg = mercury, Pb = lead.
- Simplified EU declaration of conformity
Hereby, OWIM GmbH & Co. KG, Stiftsbergstraße 1, 74167 Neckarsulm, GERMANY declares that the product DOLBY ATMOS® 2.0 SOUNDBAR, HG11579, is in compliance with Directives 2014/53/EU, 2011/65/EU and 2009/125/EC.
The full text of the EU declaration of conformity is available at the following internet address:
www.owim.com
CE
● Warranty and service
Warranty
The product has been manufactured to strict quality guidelines and meticulously examined before delivery. In the event of material or manufacturing defects you have legal rights against the retailer of this product. Your legal rights are not limited in any way by our warranty detailed below.
The warranty for this product is 3 years from the date of purchase. The warranty period begins on the date of purchase. Keep the original sales receipt in a safe location as this document is required as proof of purchase.
Any damage or defects already present at the time of purchase must be reported without delay after unpacking the product.
Should the product show any fault in materials or manufacture within 3 years from the date of purchase, we will repair or replace it – at our choice – free of charge to you. The warranty period is not extended as a result of a claim being granted. This also applies to replaced and repaired parts.
This warranty becomes void if the product has been damaged, or used or maintained improperly.
The warranty covers material or manufacturing defects. This warranty does not cover product parts subject to normal wear and tear, thus considered consumables (e.g. batteries, rechargeable batteries, tubes, cartridges), nor damage to fragile parts, e.g. switches or glass parts.
● Warranty claim procedure
To ensure quick processing of your claim, observe the following instructions:
Make sure to have the original sales receipt and the item number (IAN 512390_2501) available as proof of purchase.
You can find the item number on the rating plate, an engraving on the product, on the front page of the instruction manual (bottom left), or as a sticker on the rear or bottom of the product.
If functional or other defects occur, contact the service department listed below either by telephone or by e-mail.
Once the product has been recorded as defective you can return it free of charge to the service address that will be provided to you. Ensure to enclose the proof of purchase (sales receipt) and a short, written description outlining the details of the defect and when it occurred.
Service
GB Service Great Britain
Tel.:08000569216
E-Mail: owim@lidl.co.uk
IE Service Ireland
Tel.:1800200736
E-Mail:owim@lidl.ie
text_image
Diagram showing three steps of battery charging process with numbered instructionsnatural_image
Simple line drawing of a monitor above a wall-mounted device, enclosed in a circle (no text or symbols)
natural_image
Simple line drawing of a room with a monitor and a ruler inside a circular frame (no text or symbols)Piles/accumulateurs:
⚠ WAARSCHUWING! EXPLOSIEGEVAAR!
text_image
Diagram showing three steps of battery charging process with numbered instructionsnatural_image
Simple line drawing of a monitor above a wall-mounted device, enclosed in a circle (no text or symbols)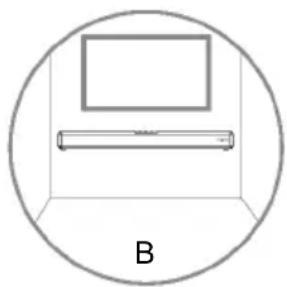
natural_image
Simple line drawing of a room with a monitor and a ruler inside a circular frame (no text or symbols)flowchart
graph TD
    A["Optical"] --> B["TV"]
    C["Optical IN"] --> D["TV"]
other
| Category | Value | |---|---| | BASS TREBLE | ● | | BASS TREBLE | ● | | BASS TREBLE | ● | | BASS TREBLE | ● | | BASS TREBLE | ● | | BASS TREBLE | ● | | BASS TREBLE | ● | | BASS TREBLE | ● | | BASS TREBLE | ● | | BASS TREBLE | ● | | BASS TREBLE | ● | | BASS TREBLE | ● | | BASS TREBLE | ● | | BASS TREBLE | ● | | BASS TREBLE | ● | | BASS TREBLE | ● | | BASS TREBLE | ● | | BASS TREBLE | ● | | BASS TREBLE | ● | | BASS TREBLE | ● | | BASS TREBLE | ● | | BASS TREBLE | ● | | BASS TREBLE | ● | | BASS TREBLE | ● | | BASS TREBLE | ● | | BASS TREBLE | ● |● Werking van AUX / OPTICAL / HDMI eARC
text_image
Diagram showing three-step battery assembly process with numbered steps and directional arrowsnatural_image
Simple line drawing of a monitor above a shelf with a circular frame and label 'A' below (no text or symbols on the diagram itself)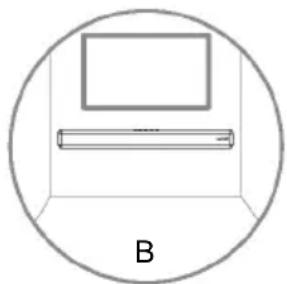
natural_image
Simple line drawing of a 3D box with a rectangle above it and a horizontal bar inside, labeled 'B' below (no text or symbols on the diagram itself)flowchart
graph TD
    A["Optical"] --> B["TV"]
    C["Optical IN"] --> D["TV"]
text_image
Diagram showing three-step battery shipment process with labeled steps 1, 2, and 3natural_image
Simple line drawing of a monitor above a grid, enclosed in a circle (no text or symbols)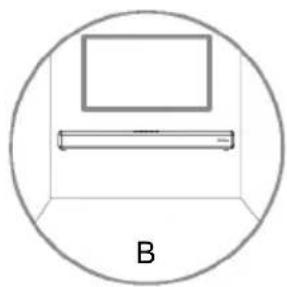
natural_image
Simple line drawing of a room with a monitor and a ruler inside a circular frame (no text or symbols)flowchart
graph TD
    A["OPTICAL"] --> B["OPTICAL IN"]
    B --> C["TV"]
štandard: Blue tooth® 5.3
text_image
Diagram showing three-step steps of a battery storage or cleaning process, labeled ①, ②, and ③.natural_image
Simple line drawing of a monitor above a stack of books, enclosed in a circle labeled 'A' (no text or symbols on the diagram itself)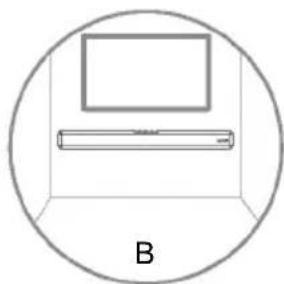
natural_image
Simple line drawing of a rectangular box placed inside a circular frame, labeled 'B' at the bottom (no text or symbols on the diagram itself)flowchart
graph TD
    A["Optical IN"] --> B["Optical"]
    B --> C["TV"]
text_image
min (-5) BASS TREBLE max (+5)● Funkcie AUX / OPTICAL / HDMI eARC
text_image
Diagram showing three steps of battery charging process with numbered instructionsnatural_image
Simple line drawing of a monitor above a shelf with a circular frame, labeled 'A' at bottom (no text or symbols on the diagram itself)
natural_image
Simple line drawing of a room with a monitor and a ruler inside a circle (no text or symbols)flowchart
graph TD
    A["HDMI eARC/ARC"] --> B["TV Monitor"]
    C["HDMI eARC/ARC"] --> B
    B --> D["Device with ports and labels"]
Consejos:
flowchart
graph TD
    A["TV"] --> B["OPTICA"]
    B --> C["ENTRADA OPTICA"]
    C --> D["Monitor with ports and connectors"]
Uso de la toma AUX
⚠ ADVARSEL! EXPLOSIONSFARE!
text_image
Diagram showing three steps of battery installation: first with arrow indicating direction, second with downward arrow, and third with rightward arrow.natural_image
Simple line drawing of a room layout with a monitor and cabinet, labeled A (no text or symbols on the diagram itself)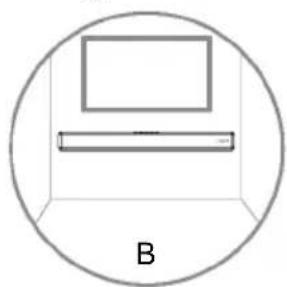
natural_image
Simple line drawing of a box inside a circle, labeled 'B' at the bottom (no text or symbols on the diagram itself)Batterier/akkumulatorer:
Interferenza wireless?
text_image
Diagram showing three steps of a battery or cable assembly with numbered arrows indicating sequence.natural_image
Simple line drawing of a monitor and a shelf with a grid, enclosed in a circle (no text or symbols)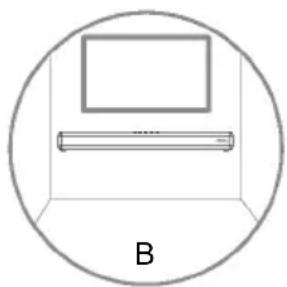
natural_image
Simple line drawing of a room with a monitor and a ruler inside a circular frame (no text or symbols)flowchart
graph TD
    A["Optical IN"] --> B["Optical"]
    B --> C["TV"]
text_image
Diagram showing three-step battery shipment process with labeled steps 1, 2, and 3natural_image
Simple line drawing of a room layout with a monitor and a bed, labeled A (no text or symbols on the diagram itself)