
68503 - Coffee machine Lund - Free user manual and instructions
Find the device manual for free 68503 Lund in PDF.

| Product type | Espresso coffee machine with integrated milk reservoir |
| Brand and model | Lund 68503 |
| Weight | 5.3 kg |
| Power supply | 220-240 V ~ 50/60 Hz, 1350 W |
| Working pressure | 20 bar |
| Water tank capacity | 1.8 L |
| Milk reservoir capacity | 0.43 L |
| Insulation class | I |
| Preparable beverages | Espresso, double espresso, cappuccino, double cappuccino, cafe latte, double cafe latte |
| Milk froth function | Automatic milk frothing with foam level adjustment |
| Pod compatibility | ESE pods (dedicated filter provided) |
| Settings | Temperature (90, 93, 96 °C), beverage volume, infusion time |
| Auto shut-off | After 15 minutes of inactivity |
| Heated plate | Yes, to warm cups |
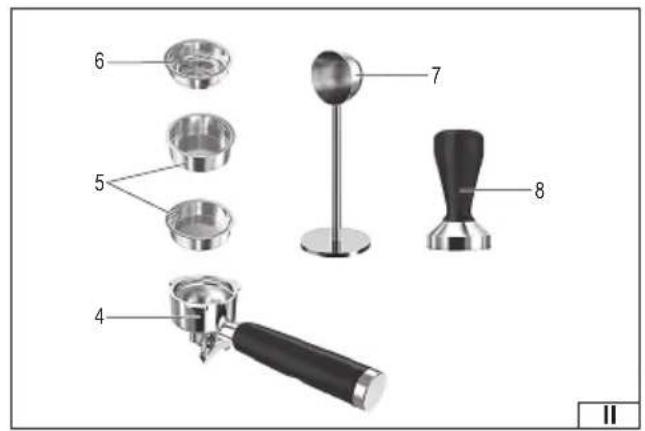
| Included accessories | Filter holder, 2 filters (1 cup and 2 cups), ESE pod filter, coffee scoop with tamper, tamper |
| Maintenance | Manual cleaning of milk reservoir, filter holder and filters; monthly descaling recommended |
| Safety | Burn protection (steam and hot surface), auto shut-off, use by children aged 8 and above under supervision |
| Repairability index | Not specified in the manual; no information on spare parts |
| Warranty | Not specified; incorrect maintenance may void warranty |
Frequently Asked Questions - 68503 Lund
User questions about 68503 Lund
0 question about this device. Answer the ones you know or ask your own.
Ask a new question about this device
Download the instructions for your Coffee machine in PDF format for free! Find your manual 68503 - Lund and take your electronic device back in hand. On this page are published all the documents necessary for the use of your device. 68503 by Lund.
USER MANUAL 68503 Lund
natural_image
Exterior view of a modern LUND coffee machine with digital display and control knobs (no visible text or symbols)CE
PL EN DE RU UA LT LV CZ SK HU RO ES FR IT NL GR BG PT HR AR


natural_image
Line drawing of a portable coffee machine with exploded view and internal components (no text or symbols)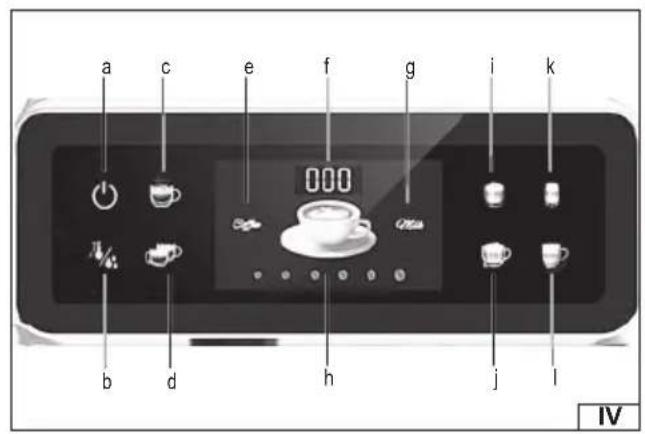
natural_image
Two views of a black electronic device with a hand adjusting its top panel, shown from front and side (no text or symbols visible)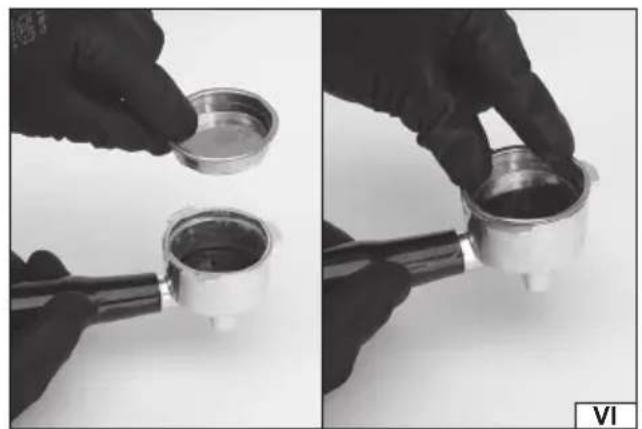
natural_image
Two-panel black-and-white photo showing hands holding a small metallic component, no text or symbols visible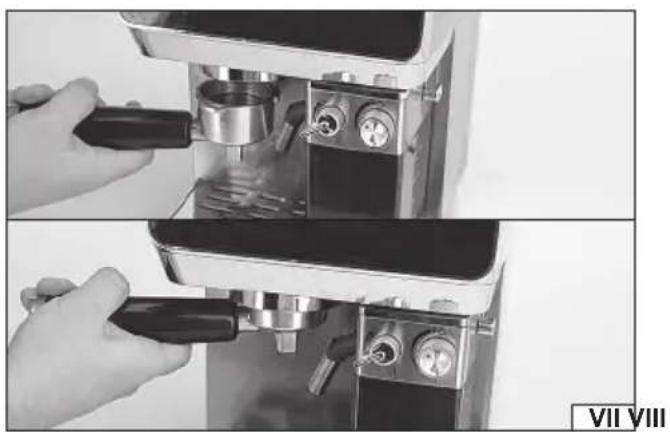
natural_image
Two-panel black-and-white photo showing a hand using a coffee machine to press or adjust the cup into a glass (no visible text or symbols)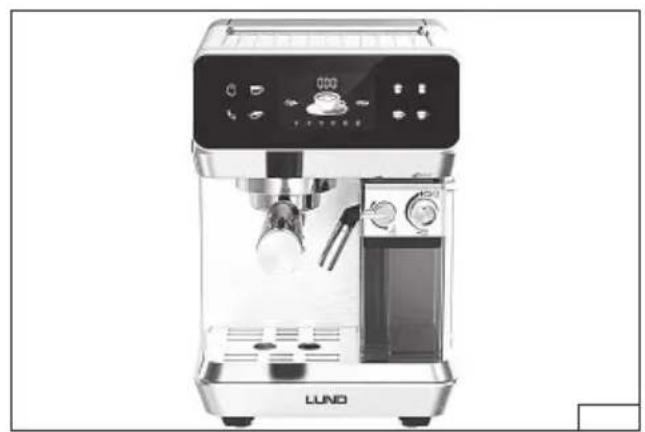
natural_image
Exterior view of a modern LUND coffee machine with digital display and control panel (no visible text or symbols)natural_image
Two-panel black-and-white photo showing hands assembling electronic components, no visible text or symbols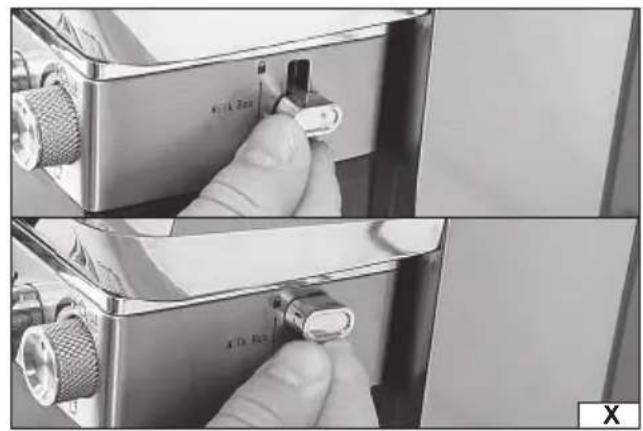
natural_image
Close-up of hands adjusting a metal switch component, showing adjustment from 4.1x magnification (no text or symbols visible)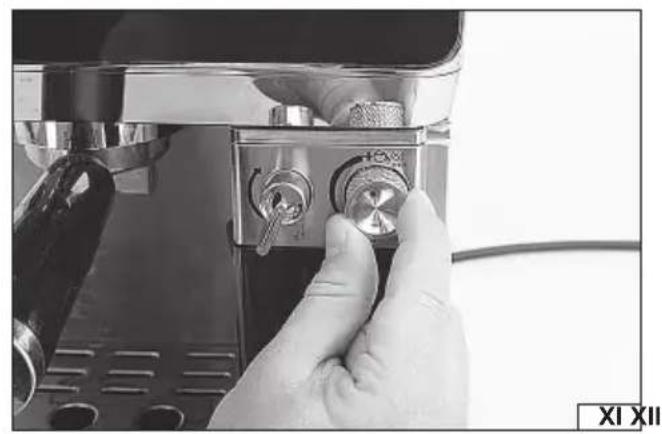
natural_image
Close-up of a hand operating a coffee machine with a rotary knob (no visible text or symbols)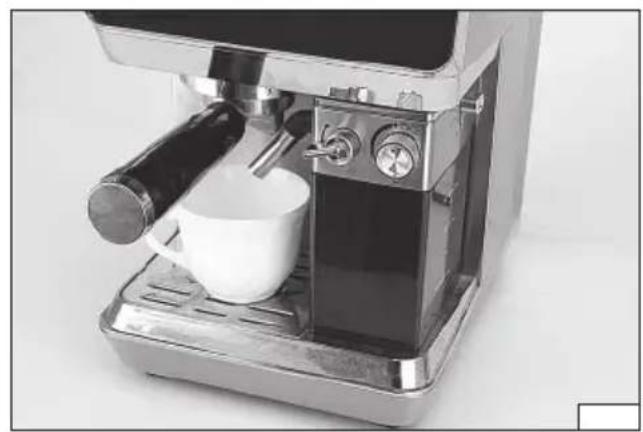
natural_image
Close-up of a modern espresso machine with a white cup and black lever (no visible text or symbols)PL
- housing
- water tank
- milk tank
- stock
- strainer
- strainer for ESE sachets
- coff ee measuring cup with tamper
- tamper
- control panel
- switch
- stock holder
- drip tray
- warming tray
DE
Read the operating instruction
Safe contact with food
First class electrical safety
This symbol indicates that waste electrical and electronic equipment (including batteries and storage cells) cannot be disposed of with other types of waste. Waste equipment should be collected and handed over separately to a collection point for recycling and recovery, in order to reduce the amount of waste and the use of natural resources. Uncontrolled release of hazardous components contained in electrical and electronic equipment may pose a risk to human health and have adverse effects for the environment. The household plays an important role in contributing to reuse and recovery, including recycling of waste equipment. For more information about the appropriate recycling methods, contact your local authority or retailer.
PRODUCT CHARACTERISTICS
A pressure espresso machine is used to brew coffee. Ground coffee beans are placed in a special strainer in the portafilter. Water from the espresso tank is forced through the ground coffee beans at high pressure and flows as a beverage into a container placed under the portafilter outlets. The device also has a separate nozzle for frothing milk. This device is intended for home use only. Proper, reliable, and safe operation of the device depends on proper use, therefore:
Before using the device, please read the entire manual and keep it.
The supplier is not liable for any damage resulting from failure to comply with the safety regulations and recommendations of this manual.
EQUIPMENT
The product is delivered complete, but some preparation is required, as described later in the manual. The accessories include a portafilter, two strainers of varying capacities, a strainer for ESE pods, a coffee measuring cup with a tamper, and a tamper.
SAFETY INSTRUCTIONS
WARNING! The device can become very hot during operation, please be careful when handling it.
Recommendations for transportation and installation
The device should only be placed on a hard, flat, even, and non-flammable surface resistant to high temperatures. The surface should be able to support the weight of the device itself and any water contained within. Ensure a gap of at least 10 cm around the side walls of the device, and do not place any heat-sensitive materials above the device. This will allow for proper ventilation. Do not place it near the edge of a table, for example. Do not place anything on top of the device. This will impede air circulation and may cause damage to the device or a fire. Do not place the device near flammable materials, such as curtains or drapes. Do not place any electrical devices above the device. Steam is released during operation, which can cause a short circuit and electric shock. Do not drill any holes in the device or make any other modifications to the device other than those described in the manual. Do not move the device by pulling on the power cord. The temperature at the place of installation and use of the device must be in the range of +10°C ÷ +38°C, and the relative humidity must be below 90% without condensation.
Recommendations for connecting the product to the power supply
Before connecting the device to the power supply, ensure that the voltage, frequency, and capacity of the mains supply match the values indicated on the product's rating plate. The plug must fit the socket. Do not modify the plug or socket to fit your needs. The device must be connected directly to a single mains socket. Extension cords, multi-sockets, or double sockets are prohibited. The mains circuit must be equipped with a protective conductor and 16A fuse. Avoid contact between the power cord and sharp edges, hot objects, or surfaces. When operating the device, the power cord must always be fully unwound and positioned so that it does not obstruct operation. The power cord should be positioned so that the device's power plug can be quickly disconnected at all times. When disconnecting the power cord, always pull on the plug housing, never on the cable. If the power cord or plug becomes
EN
damaged, immediately disconnect it from the power supply and contact an authorized manufacturer's service center for replacement. Do not use the device with a damaged power cord or plug. If the power cord or plug is damaged, it cannot be repaired and must be replaced with a new, fault-free one.
Recommendations for use
WARNING! This device emits steam or a high-temperature water jet. Avoid body contact with the steam or water jet, as this may result in serious burns.
Warning! This appliance is intended for preparing coffee only. Do not use the appliance to prepare or heat other beverages. The appliance should only be used with the supplied accessories or those specified by the manufacturer. The power cord must be fully unwound when in use. A coiled cord can overheat and create a risk of fire and electric shock. Ensure that the floor near the appliance is not slippery to avoid slipping, which could result in serious injury. Fill the appliance only with cold water. Fill the product tank only by pouring water as directed in the instructions. If the tank is not detachable from the appliance, unplug the power cord from the socket when filling. Never immerse the tank or the appliance in water. If water splashes while filling the tank, dry it thoroughly before connecting the appliance to the power supply. Do not operate the appliance without water. The water level must always be between the minimum and maximum marks. A lower water level may damage the appliance or cause the appliance to fail to start.
WARNING! Do not open the lid while coffee is being prepared. Do not attempt to repair, disassemble, or modify the appliance yourself. All repairs to this product must be carried out by an authorized service center. The appliance may be used by children aged 8 years and older if they are supervised or have received instructions on how to use the appliance safely and have understood the risks involved. Cleaning and user maintenance should not be performed by children unless they are aged 8 years or older and supervised. Keep the appliance and its power cord out of the reach of children under 8 years of age. Do not use harsh chemicals, solvents, caustic agents, alcohol, gasoline, or abrasives to clean the product.
SERVICE
Preparing for work
Unpack the product, removing all packaging materials. Unwind the cable. Position the device according to the instructions in the manual. Before first use, wash the device components according to the instructions in the product maintenance section.
Dosing water and starting the coffee machine
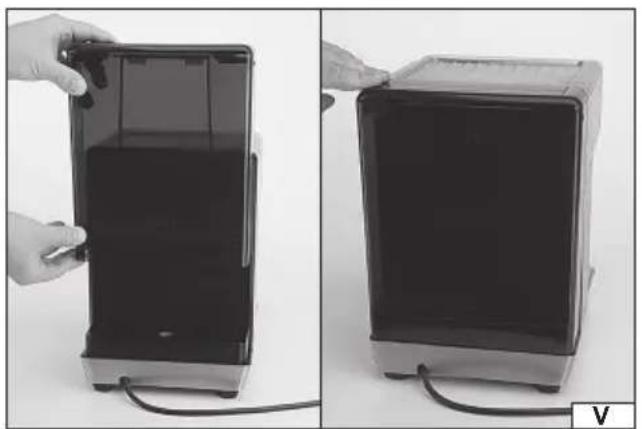
Remove the water tank by sliding it upwards. Open the lid and fill with cold, clean water. The water level must be between the minimum (MIN) and maximum (MAX) water level marks. Close the tank lid and place it back in the housing at the back of the coffee machine (V).
Plug the power cord into a power outlet; the power light will illuminate, indicating standby mode. Touch the power button (a) on the touch control panel (IV). The coffee button lights will flash, indicating the machine is warming up. Depending on the machine and room temperature, warming up may take up to 2 minutes. Wait until warming up is complete. When the lights stop flashing and remain lit, warming up is complete. The machine is now in standby mode and you can begin brewing coffee.
Note! If the water tank is empty, the coffee machine will prompt you to refill immediately. This will be indicated by all the lights on the control panel flashing. The water tank should then be refilled. Then, rinse the coffee machine, making a cup of coffee of your choice, and then pour the rinse water down the sink, for example.
EN
Dosing ground coff ee beans
Select the type of strainer. A smaller strainer is suitable for making one cup of coffee, while a larger strainer is suitable for making two cups. Place the strainer in the portafilter (VI). Using the included measuring cup, pour ground coffee beans into the strainer and tamp them down using the flattened side of the measuring cup or a tamper. The coffee level should not be higher than the edge of the strainer and the marked level symbol. Thoroughly clean the edge of the strainer and portafilter of any coffee residue. Note: Coffee beans intended for espresso machines should be ground properly. They should not be too finely or too coarsely ground. If the beverage dispenses too slowly from the portafilter spout, it means the beans are too finely ground. If the beverage is not strong enough, it means the beans are too coarsely ground. The proper grinding method should be determined through experimentation.
Place the portafilter with the strainer and coffee grounds into the portafilter holder in the espresso machine's housing. To do this, turn the portafilter handle counterclockwise and insert it into the housing socket (VII) in the position marked with the Unlock symbol. Holding the portafilter at the same height, turn it all the way to the right to the position marked with the Lock symbol. A properly installed portafilter handle is perpendicular to the front of the espresso machine (VIII).
Milk dosing
The espresso machine is equipped with a milk tank and an automatic milk heating and frothing function. To pour milk, first slide the locking slider down to the position marked with an open padlock (X). Pull the milk tank forward and remove the top cover. Then, pour milk into the tank, not exceeding the maximum level (MAX). Replace the tank cover, placing the intake tube in the milk, and then insert the tank into the espresso machine (IX). Move the locking slider to the position marked with a closed padlock (X). Use the knob to select the milk frothing level. Turning the knob clockwise decreases the milk frothing level, while turning it counterclockwise increases it (XI). Using the lever on the front of the tank, turn the frothed milk dispensing nozzle so that its outlet is directed into the container (XII).
Please note! If the milk tank is missing or incorrectly installed, for example, with the locking slider in the open padlock position, the milk coffee varieties will not be available for preparation. The milk coffee indicator lights on the control panel will not illuminate. In this case, refill the tank with milk and properly install it in the coffee machine. Then, move the locking slider to the upper position with the closed padlock symbol.
WARNING! When frothing milk, hot milk and pressurized steam may escape from the nozzle. This may cause the milk to splash. Be careful not to burn yourself.
WARNING! The nozzle is only intended for frothing milk. Do not froth other foods, such as cream, condensed milk, yogurt, etc.
Brewing ground coff ee
Place a container (glass, mug, or cup) on the drip tray to receive the coffee. The portafilter has two outlets, and the container should be positioned so that both streams of the beverage flow into the container. If preparing coffee without milk, you can also place two containers, one under each outlet.
Touch the button marked with the thermometer symbol (b) to set the coffee brewing temperature. Each time you touch the button, the temperature setting changes between: 90°C, 93°C, 96°C. The temperature selection will be confirmed by the indicator light fl ashing three times and a beep.
Touch the button for the desired coffee type to start brewing. The light for the selected coffee will flash, indicating the beverage is being brewed. The machine allows you to prepare various types of coffee with or without milk: Espresso (c), Double Espresso (d), Cappuccino (i), Double Cappuccino (j), Cafe Latte (k), Double Cafe Latte (l).
To add any additional amount of frothed milk to your drink, touch the Cappuccino button (i) twice. The milk will begin frothing. Once the desired amount is reached, touch the button again to stop adding milk.
On the control panel, you can also select the cleaning function by touching and holding the button marked with the droplet symbol for 2 seconds.
The coffee machine will automatically stop the water flow after brewing. This will be signaled by returning to standby mode – the coffee type buttons will illuminate continuously. Keep an eye on the container to avoid overfilling. To pour a smaller amount, you can stop the coffee flow early at any time by pressing the previously selected coffee type button on the control panel again. Remove the container with the prepared beverage from the drip tray.
WARNING! The container containing the prepared beverage is hot. Hold it by the handle or, if there is no handle, protect your hand with a heat-resistant glove.
If you wish to prepare further beverages, prepare the espresso machine for use again. Detach the portafilter from the housing, pour out any remaining coffee, rinse the strainer and portafilter under running lukewarm water, and wipe dry. Then, fill the strainer with another portion of ground coffee beans, attach the portafilter to the espresso machine holder, and prepare another beverage as described above.
Once you've finished brewing, turn the coffee machine off by pressing the power button. Then, remove the portafilter and strainer and clean both components of any coffee residue. Wait for the milk nozzle to cool, then clean it of any milk and coffee residue. Proceed with the maintenance described in the manual.
The milk container can be removed from the machine and stored in the refrigerator when the machine is not in use.
EN
| Type of coff ee Volume Preparation tips | ||
| Espresso 40 ml | ||
| Espresso x2 80 ml | ||
| Latte 300 - 400 ml Set the milk frothing level using the knob. | ||
| Latte x2 380 - 530 ml Set the milk frothing level using the knob. | ||
| Cappuccino 140 - 240 ml Set the milk frothing level using the knob. | ||
| Cappuccino x2 250 - 370 ml Set the milk frothing level using the knob. |
Cleaning the coff ee machine
To clean the coffee machine, first empty and clean the milk tank with the frothing system. Fill the water tank and fill the milk tank with clean water. Place a large, empty container on the drip tray under the coffee and milk dispensing nozzles. Turn the knob on the milk tank to the droplet symbol. Then, touch and hold the button marked with the droplet symbol on the control panel for 2 seconds to start cleaning. This will rinse the coffee brewing system and the milk frothing system. After approximately 1 minute, cleaning will be complete. Empty the container from the drip tray and empty and clean the milk tank with the frothing system. Reassemble all the components of the coffee machine.
Brewing coffee in ESE pods
The product comes with a strainer for brewing ESE coffee pods. To prepare this type of coffee, place the strainer in the portafilter, then place the coffee pod in the strainer (XIII). Mount the portafilter in the coffee machine's handle and select the coffee type by touching the button on the control panel.
Warming tray
The top of the coffee machine features a metal warming tray that heats up as the machine heats up and remains warm for a while. This tray is used to warm coffee containers. Place a dry, clean container upside down on the tray. It will warm up after a while. It's recommended that after washing and drying the container, it be placed on the coffee machine's warming tray to raise its temperature before preparing the next beverage.
Please note: Even after disconnecting the coffee machine from the power supply by unplugging it from the power outlet, the warming tray remains warm for some time. This is due to thermal inertia. Do not attempt to accelerate the cooling of the tray in any way.
Adjusting the coffee volume
The coffee machine allows you to enter your own settings to adjust the volume of prepared drinks to your needs.
To adjust the espresso or double espresso coffee, touch and hold the espresso or double espresso button for 2 seconds. The machine will beep three times to confirm the setting. Coffee preparation will begin. Once the desired coffee volume is reached, immediately touch the button for the previously selected coffee again. Coffee brewing will end, and the machine will beep three times to confirm the set coffee volume has been saved and return to standby mode. The brewing time can be adjusted from 8 to 60 seconds.
To adjust the Cappuccino or Cafe Latte, touch and hold the Cappuccino, Double Cappuccino, Cafe Latte, or Double Caffe Latte button for 2 seconds. The machine will beep 3 times to confirm the setting mode. Frothed milk preparation will begin. Once the desired milk volume is reached, immediately touch the button for the previously selected coffee again. The machine will beep 3 times to confirm the milk volume has been saved. Milk addition will finish, and then coffee brewing will begin. Once the desired coffee volume is reached, immediately touch the button for the previously selected coffee again. The machine will beep 3 times to confirm the coffee volume has been saved and return to standby mode. Frothed milk preparation times can be set from 6 to 120 seconds, and coffee preparation times can be set from 8 to 60 seconds.
Automatic shutdown
After 15 minutes of inactivity, the device will automatically turn off and all the lights on the control panel will turn off. You can restart the device by touching the power button.
MAINTENANCE, TRANSPORT AND STORAGE
Coff ee machine maintenance
Since this product is intended for preparing beverages intended for consumption, it must be kept clean and serviced regularly. Maintenance is not covered by the warranty. Failure to maintain it properly may result in the rejection of any warranty claims and may void the product warranty.
Before first use: the strainer, portafilter, water tank and milk tank should be cleaned as described below.
WARNING! All maintenance must be performed with the product powered off. To do this, disconnect the power cord from the wall outlet.
WARNING! Before beginning any maintenance, allow all components to cool completely. Do not accelerate the cooling process in any way, such as by filling the appliance with cold water.
Immediately after each use, remove the portafilter and strainer and discard the used coffee beans. Since the strainer and strainer
EN
may be hot, gently tap the portafilter against the edge of the container and discard the used coffee beans. Then, rinse the strainer and strainer under lukewarm, running water, and only then remove the strainer from the portafilter once it has cooled. Rinse both components separately again to remove any remaining coffee grounds and dry them with a cloth or paper towel.
Regularly wash the tank and milk spout to remove any milk residue from inside the frothing system. Remove them from the machine and wash them under running lukewarm water with dishwashing liquid, then dry them with a cloth or paper towel.
WARNING! Failure to follow this procedure may result in the milk drying out, restricting flow, or completely clogging the milk frothing system. Milk residue poses a bacteriological risk. Even a partially clogged milk frothing system can damage the espresso machine.
The drip tray is designed to collect any water or remaining beverage that leaks from the portafilter spout. If the drip tray becomes full, carefully remove the lid and empty the residue. Then, wipe it dry with a cloth or paper towel and replace the lid on the drip tray. Do not use the espresso machine without the drip tray properly installed. It is recommended to empty and clean the drip tray regularly.
Clean the water tank after removing it from the device. Rinse it with clean water and then empty it. Leave it to dry with the lid open, or fill it with clean water and reinstall it in the device.
The remaining components of the device are not suitable for immersion in water or exposure to water jets.
None of the appliance's components are dishwasher-safe or suitable for high-pressure jetting. The water tank and milk reservoir should be emptied and cleaned at least once a day.
Clean the housing and parts that cannot be washed with a water jet with a soft, slightly damp cloth and then wipe dry.
Removing mineral deposits
Depending on the water quality, minerals precipitated from the water during the heating process (scale) may form inside the water system. This is normal, but it can damage the appliance or reduce its performance. If deposits accumulate, remove them using acetic or citric acid. Pour 0,5 liters of vinegar or 40 grams of citric acid into the container, top up the container with water, and then pour it into the espresso machine's water reservoir. Install the reservoir in the espresso machine. Install the portafilter with one of the strainers. Place the container under the portafilter spouts and touch the Double Espresso button. After brewing, touch the Double Cafe Latte button. Wait until the water flow stops and remove the portafilter and strainer. Rinse the portafilter and strainer with lukewarm running water to cool them. Install the second strainer in the portafilter, the portafilter in the espresso machine, and repeat the procedure.
Once you've finished descaling, remove the water tank, drain any remaining solution, rinse it, and fill it with clean water. Repeat the entire rinsing procedure (both strainers and the nozzle) with clean water. This will remove any remaining cleaning solution from the interior of the coffee machine.
The mineral deposit removal procedure should be performed at least once a month.
Note: Mineral deposits will build up more slowly if filtered water is used to brew coffee.
Note: Special, ready-made fluids designed for this purpose can be used to remove mineral deposits. Before using the fluid, read and follow the instructions included with the fluid.
Storage and transportation
When storing the device, store it in a closed room, protected from dust, dirt, and moisture. It is recommended to store the device in its original packaging. Store the device in its operating position. Do not stack it in layers.
Transport the device in its original packaging. Protect it from excessive shock during transport. Do not place anything on top of the device during storage or transport. Store and transport the device with the water tank empty and dry.
TECHNICAL DATA
| Parameter Unit of measurement Value | ||
| Catalog number 68503 | ||
| Nominal voltage [V~] 220 - 240 | ||
| Nominal frequency [Hz] 50 - 60 | ||
| Rated power of the coffee machine | [W] | 1350 |
| Insulation class | I | |
| Working pressure | [bar] | 20 |
| Water tank capacity | [I] | 1,8 |
| Milk tank capacity | [I] | 0,43 |
| Mass | [kg] | 5,3 |
PRODUKTMERKMALE
PRODUKTA RAKSTUROJUMS
CARACTÉRISTIQUES DU PRODUIT

- PL
- DE
- PRODUCT CHARACTERISTICS
- Before using the device, please read the entire manual and keep it.
- EQUIPMENT
- SAFETY INSTRUCTIONS
- EN
- Recommendations for use
- SERVICE
- Preparing for work
- Dosing water and starting the coffee machine
- Dosing ground coff ee beans
- Milk dosing
- Brewing ground coff ee
- Cleaning the coff ee machine
- Brewing coffee in ESE pods
- Warming tray
- Adjusting the coffee volume
- Automatic shutdown
- MAINTENANCE, TRANSPORT AND STORAGE
- Coff ee machine maintenance
- Removing mineral deposits
- Storage and transportation
- PRODUKTMERKMALE
- PRODUKTA RAKSTUROJUMS
- CARACTÉRISTIQUES DU PRODUIT
Brand : Lund
Model : 68503
Category : Coffee machine