
Matrix M9 Pro - Water filter JIMMY - Free user manual and instructions
Find the device manual for free Matrix M9 Pro JIMMY in PDF.


| Brand | JIMMY |
| Model | Matrix M9 Pro |
| Product Type | Reverse Osmosis Water Purifier |
| Dimensions (L x W x H) | 278 mm x 310 mm x 366 mm |
| Power Supply | 220-230 V~, 50-60 Hz |
| Rated Power | 2200 W |
| Purification Flow Rate | 0.3 L/min (at 25 °C) |
| Water Inlet Pressure | 0 to 0.04 MPa |
| Working Pressure | 0.4 to 0.8 MPa |
| Inlet Water Temperature | 5 °C to 35 °C |
| Number of Filtration Stages | 3 stages |
| Filter Type | Activated Carbon Composite + Reverse Osmosis Membrane + Activated Carbon Mineralized |
| Filter Lifespan | Levels 1 and 3: 12 months; Level 2: 24 months |
| Hot Water Temperatures | 45 °C, 55 °C, 65 °C, 75 °C, 85 °C, 98 °C |
| Preset Water Volumes | 60 mL, 150 mL, 240 mL, 450 mL |
| Safety Functions | Child lock, grounding, UV protection (door lock), automatic shutdown in case of failure |
| Display | Screen with TDS indicators, filter life, faults, water level |
| Maintenance | Clean water tank every 2 months; automatic rinse after 72 h of inactivity |
| Manufacturer | Kingclean Electric Co., Ltd, China |
| Warranty | 2 years (excluding filters and normal wear) |
Frequently Asked Questions - Matrix M9 Pro JIMMY
User questions about Matrix M9 Pro JIMMY
0 question about this device. Answer the ones you know or ask your own.
Ask a new question about this device
Download the instructions for your Water filter in PDF format for free! Find your manual Matrix M9 Pro - JIMMY and take your electronic device back in hand. On this page are published all the documents necessary for the use of your device. Matrix M9 Pro by JIMMY.
USER MANUAL Matrix M9 Pro JIMMY
natural_image
Line drawing of a refrigerator front view with lid and door (no text or symbols)bewinch Matrix M9 Pro
| User Manual Reverse Osmosis | Water Purifier |
| Instrukcja Obsługi Oczyszczacz | wody z odwróconą osmozą |
| Bedienungsanleitung Umkehrosmose | Wasserreiniger |
| Mode d'emploi Purificateur d'eau à osmose inverse | |
| Manuale d'utilizzo Purificatore | d'acqua ad osmosi inversa |
| Manual del usuario Purificador | de agua por ósmosis inversa |
| Посібник користувача Очищувач води зі зворотним осмосом | |
Please read this instruction carefully before using the product and keep it properly.
Contents
English 2
Polski 15
Deutsch 30
Français 45
Italiano 60
Español 74
Українська 89
Important Safety Instructions
WARNING
- Do not use broken cords or plugs, as well as loose power sockets.
- Do not drag the power cord to carry the machine.
- Do not disassemble, repair or modify the machine by yourself to avoid malfunctions and dangers or even cause fire.
- Do not immerse the machine in water.
- Do not place flammable dangerous items such as candles and lighters on this product.
- Children must operate under the guidance of adults to avoid burns.
- The power cord can only be connected to a power supply that matches the rated voltage indicated on the nameplate.
- If there is abnormal sound or water leakage on this product, please unplug it immediately and contact after service.
- If water gets inside the product, please unplug power cord and contact after service. If there is abnormal sound or water leakage, unplug the power cord and contact after service.
- If the power cord is damaged, it must be replaced by the manufacturer and its designated repair department or similar department professionals to avoid danger.
Notes
- Please read the manual carefully before using and keep it for future reference.
- In the manual, there may be slight differences between the product design and specification data and the actual product, please refer to the actual product.
- If the product has not been used for more than 72 hours, When restarted, drain all the water inside the machine and replace the water in the raw water tank with new water; Wait for the pure water cup to be full and then empty it (repeat the above operation for 1 time).
- Do not place any containers containing water, medications, food, small metal objects on top of the product.
- Please use water that meets municipal tap water standards as raw water.
- Do not use pure water cup to store liquids other than normal temperature clean water.
- When using this product, place the machine smoothly and avoid water ingress.
- Do not suspend the drip tray to avoid the cup from falling.
- Please replace the filter on time, the time to replace the filter depending on the amount of water consumption and water quality.
- After replacing the new filter, turn on the machine, wait for the pure water cup to be filled with water and drain the water (flushing mode) for three times, then it can be used normally.
- Keep the surroundings of the machine clean and clean water tank every two months.
- When cleaning the machine, do not wipe it with corrosive solution to avoid fading or corrosion on the surface.
- Non-original filters may have problems such as lack of hygienic safety assurance of raw materials, reduced filtration performance and seal matching, which may lead to abnormal water quality, safety risks and affect the life of the machine. Please only use JIMMY bewinch filter for replacement.
-
This appliance can be used by children aged from 8 years and above if they have been given supervision or instruction concerning use of the appliance in a safe way and if they understand the hazards involved. Cleaning and user maintenance shall not be made by children unless they are older than 8 and supervised. Keep the appliance and its cord out of reach of children aged less than 8 years.
-
Appliances can be used by persons with reduced physical, sensory or mental capabilities or lack of experience and knowledge if they have been given supervision or instruction concerning use of the appliance in a safe way and understand the hazards involved.
- Children shall not play with the appliance.
- If the supply cord is damaged, it must be replaced by the manufacturer, its service agent or similarly qualified persons in order to avoid a hazard.
Product Assembly and Flushing
Parts Name
Check if all parts are included. Contact us via email:support@jimmyglobal.com if there is any part missing or damaged. Keep the outer packing for future transportation.
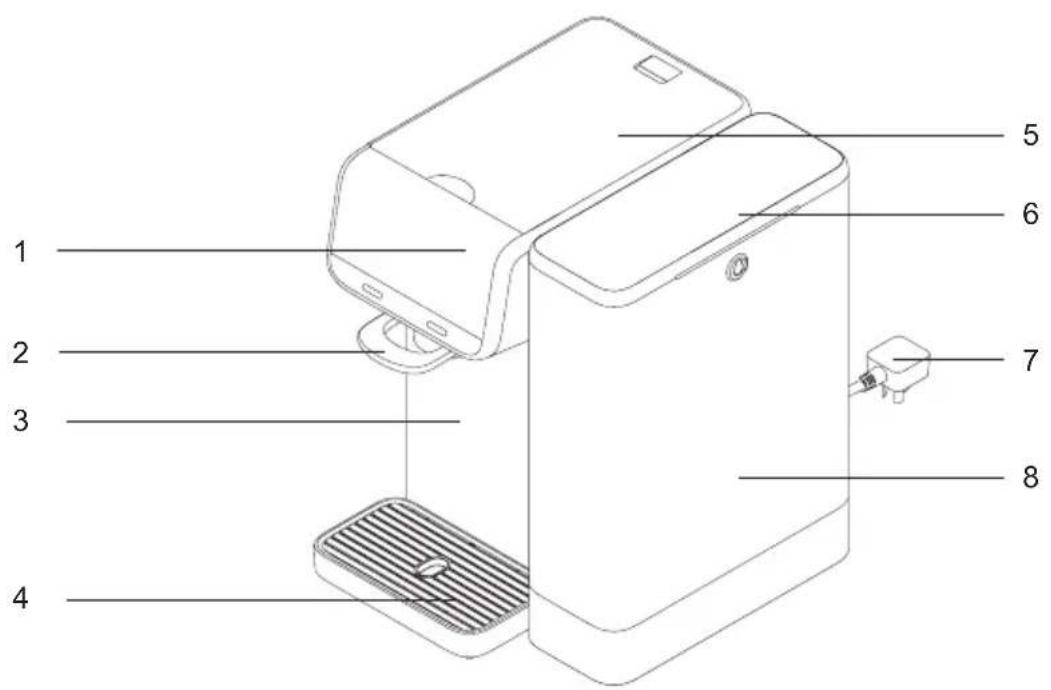
- Display screen
- Dispense tap
- Housing
-
Drip tray
-
Top cover
- Raw water tank cover
- Power cord
- Raw water tank
Placement position
The water purifier must be placed on a smooth, firm and dry table. Do not place the machine in direct sunlight or places with a lot of oil and smoke which will affect the appearance of cleanliness.
New machine inspection
Take out the machine and all accessories, remove upper cover, raw water tank cover, raw water tank, pure water cup and place the machine for 8 to 12 hours and then put all parts back.
Connect the power supply
Before inserting the power cable plug into the power socket, please ensure that the power supply is 220V-230V\~. Keep the power plug and hand dry.
Note: If there is any damage to the power cord, in order to avoid danger, the machine must be replaced by the manufacturer, other maintenance offices, or professionals from similar offices.
Flushing before first use
Please flush the whole machine before first use.
Remove the raw water tank cover, hold the handle of the raw water tank, and lift it. Fill the raw water tank with the municipal tap water up to max line, then put it back in the machine and start purifying water. The water purification process is completed after the water purification indicator “ goes off.
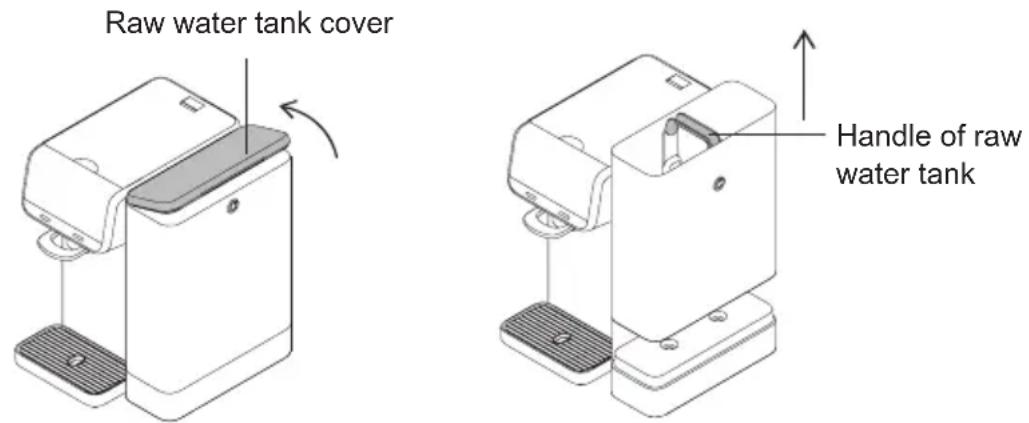
Handle of raw water tank
Step1: Ambient temperature water path flushing
Put a container larger than 3.5L under the water outlet. Press and hold the dispense tap for 5 seconds until a “Beep” is heard, the dispense light turns green and the device enters the flushing mode to flush the filter and the water path. After completing the flushing, empty the waste water in the raw water tank, refill it with tap water, and start the purification process again.
Repeat for 3 times.
Step2: Hot water path flushing
When water purification indicator shows “☐”, put a container larger than 3.5L under the water outlet. Select “98°C /200 °F” and press the dispense tap to dispense water. Until the pure water tank is empty, the water purification indicator shows “☐”. Then the device can be used normally.
Note:
- To ensure better use, leave the machine powered on even if it is long idled.
-
If the device hasn't been used for more than 12 hours, it is recommended to drain 98^ (200 °F) hot water for 5 seconds before using it again.
-
At the beginning of use, the purified water needs to fill the filter and the water path first. As a result, there will be less water storage in the pure water tank. Replace the raw water after the raw water replacement indicator “ ! ” lights up, and continue the purification process.
-
When use the new filter to purify water, the massive air exhaust from the filter during the first use will cause the water in the raw water tank to become turbid. This is a normal physical phenomenon, and the bubbles will disappear after standing for a few minutes. The device can be used normally.
Product Use
Product function introduce
Display indicator description and usage
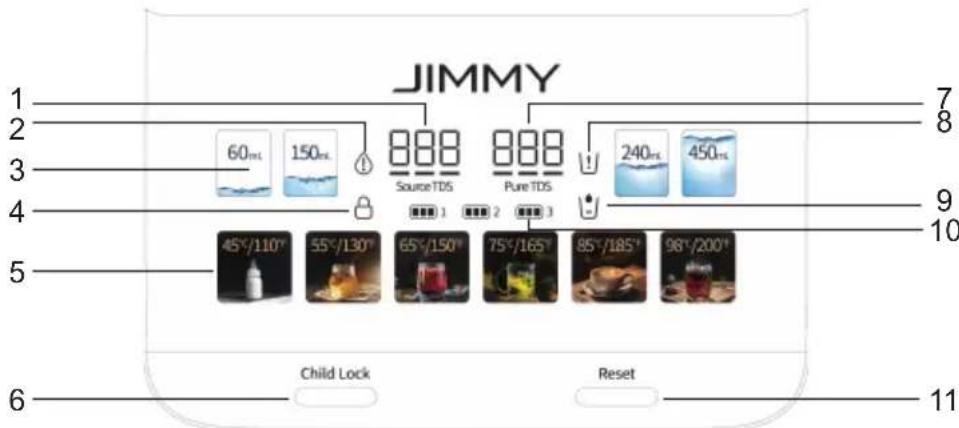
-
Raw water TDS indicator
-
Error indicator
-
Water volume button
-
Child lock indicator
-
Temperature button
-
Child lock button
-
Pure water TDS indicator
-
Raw water replacement indicator
-
Water purification indicator
-
Filter life indicator
-
Reset button

Temperature button
Click on the temperature button to select the water temperature. The temperature available is ambient, 45^ C/110°F, 55^ C/130°F, 65^ C/150°F, 75^ C/165°F, 85^ C/185°F, 98^ C/200°F.
The dispensing light will turn blue when dispensing ambient temperature water; it will turn red when dispensing hot water; and it will turn green when the machine enters flushing mode. The dispensing light goes off when stop dispensing.
Note:
The machine is equipped with plateau mode, when taking 98^ C /200°F hot water, if the temperature cannot reach 98^ C /200°F after 20 seconds, the plateau mode will be automatically turned on to adjust the water temperature. If the altitude of the use environment is more than 1500 meters, it is not recommended to use 98^ C /200°F hot water at this time, there may be steam spraying, please be careful of scalding.
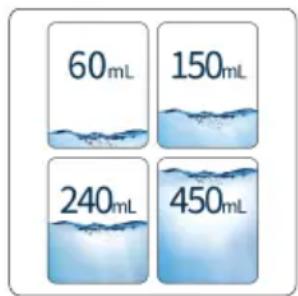
Water volume button
Click on the water volume button to select fixed water volume for single discharge. The fixed water volume available for select is 60mL, 150mL, 240mL, 450mL.
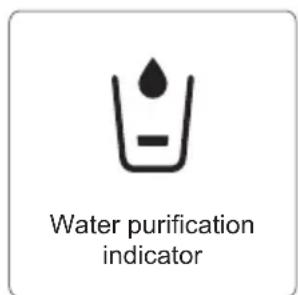
Water purification indicator
When the pure water tank is empty, water purification indicator shows “∪”. When the machine starts to purify water, water purification indicator shows “∪” and “●” is flashing.
As the water level in the pure water tank rises, water purification indicator shows “💡” and the drop icon “💡” is flashing.
The water purification indicator “ ➕ goes off when the pure water tank is full.
| ∪ or ∪Water cannot be dispensed | |
| ∪ or ∪or goes out Water can be dispensed |
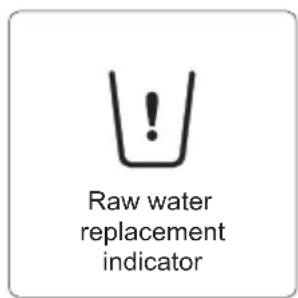
Raw water replacement indicator
In below three occasions, the screen shows “!” and the device beeps for three times.
- When the raw water tank is not installed.
- Water level in raw water tank is lower than the minimum water level mark.
- Raw water TDS value higher than 999.
In occasion 2 and 3, please empty the remaining water in the raw water tank and refill the raw water tank with tap water.
Child lock function
When child lock function is turned on, the device cannot dispense water or drain water. Child lock is turned off by default each time the device turned on.
Turn on child lock function: Press and hold the child lock button for 5 seconds until a beep sound is heard, the child lock indicator “ ⏻ ” lights up.
Turn off child lock function: Press and hold the child lock button for 5 seconds until a beep sound is heard, the child lock indicator “ ⏰ ” goes off.
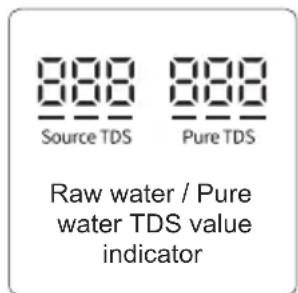
Raw water / Pure water TDS value indicator
TDS (Total Dissolved Solids) is a general value for inorganic salts and heavy metals dissolved in water. It represents the amount of impurities dissolved in water. Normally the lower the TDS value, the purer the water is.
Raw water TDS value: Indicates the TDS value of the water in the raw water tank, when it is not filtered by RO membrane of the device.
Pure water TDS value: indicates the pure water TDS value after the raw water is filtered by RO membrane of the device.
Filter life indicator
Filter life indicator
Filter life indicators 1, 2, 3 represent the service life of the 1st, 2nd and 3rd stage filters respectively. Each indicator has 3 cells “ ”The more cells the indicator lights are on, the longer the remaining life of the filter. If all the cells of the indicator go out, “ ”flashes, and the machine beeps for 10 seconds each time you dispense water, it means that the service life of the corresponding filter has expired and the filter needs to be replaced.

Error indicator
Error indicator
When the system detects error, the error indicator “ ⚠ ” lights up, flashes and beeps for 10 seconds and corresponding error warning interface appears. Before the error is resolved, the device can not be used. As long as the button is touched, the error indicator “ ⚠ ” flashes again with beep for 10 seconds.
Usage of device
Start up
Fill the raw water tank to its maximum level and install it in place. Once plugged in, the machine will emit a "beep" sound, and all the icons on the screen will light up for 1 second before enter the normal display state. The device starts to purify water.
Water purification icon shows “∪” or “∪”, water cannot be dispensed.
When water purification icon shows “💡” or “💡” or goes out, water can be dispensed.
Take ambient temperature water
Press the dispense tap to get ambient temperature water, and press it again to finish the water dispensing.
Take hot water
First, touch the temperature button on the screen to select water temperature. The temperature can be selected from 45^ C /110 °F, 55^ C /130 °F, 65^ C /150 °F, 75^ C /165 °F, 85^ C /185 °F, 98^ C /200 °F. Press the dispense tap to get water at the selected temperature, the dispensing light will turn red. Press the tap again to stop taking water.
Customize water volume
Touch the water volume button to select the water output volume, which can be selected from 60mL, 150mL, 240mL or 450mL. Press the dispense tap to dispense a specific amount of water.
Replace raw water
When the display screen shows “☐”, empty the remaining water in the raw water tank, fill the raw water tank with water up to below the handle.
Flushing
If the product is idled for more than 72 hours, place a container larger than 3.5L below dispense
tap. Press and hold the dispense tap for 5 seconds and loose after hearing the "beep" sound, and the dispense tap light turns green. The device enters flushing mode. After flushing stops, display screen automatically resumes user interface.
Turn on and turn off the raw water 999 warning
When the raw water TDS value is higher than 999, the raw water replacement indicator “∪” will light up, and the machine starts to make a beep alarm to remind user to replace raw water.
Press and hold the “45°C /110 °F” button until a beep sound is heard to turn off the raw water 999 warning, the raw water TDS display shows UAL for 1 second. Press and hold again to restore the reminder function. The raw water TDS display shows AL for 1 second.
When raw water TDS is higher than 999, filter life will be greatly reduced, so it is recommended to keep this alarm function turned on.
Turn on/ off energy-saving mode
The device has energy saving mode. Under energy saving mode, when the device is not operated for 1 minute, display screen will darken. The energy saving mode is turned on by default.
To turn on or turn off the energy-saving mode, press and hold the 240mL button for 5 seconds until a beep is heard. When the energy-saving mode is turned on, raw water TDS indicator will display ECO for 1 second; when it is turned off, the raw water TDS indicator will display OFF for 1 second.
Cleaning and Maintenance
Clean the water tank
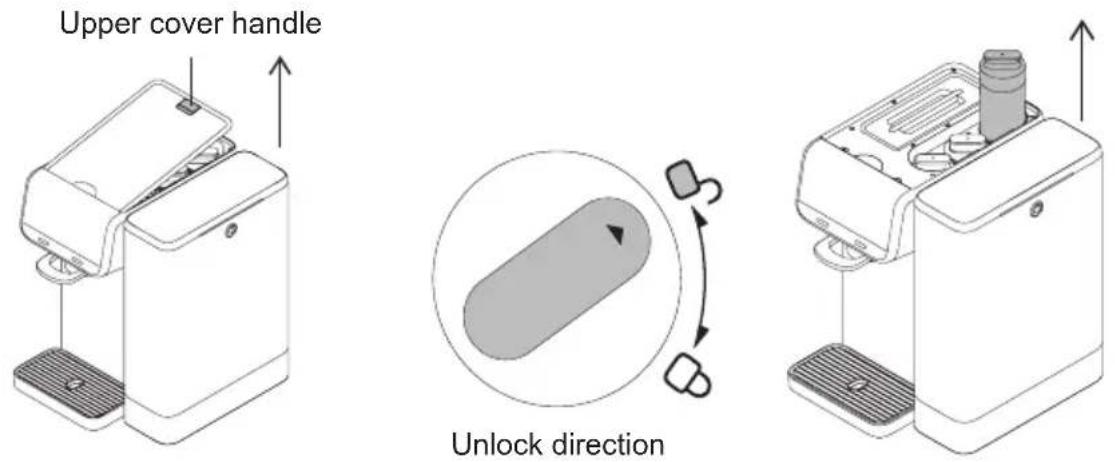
- Press and hold the dispense tap for 5 seconds to activate the flushing mode. After emptying the water in the pure water tank and the water path, pull off the power plug. Then, hold the upper cover handle and remove it. Take out the pure water tank cover.
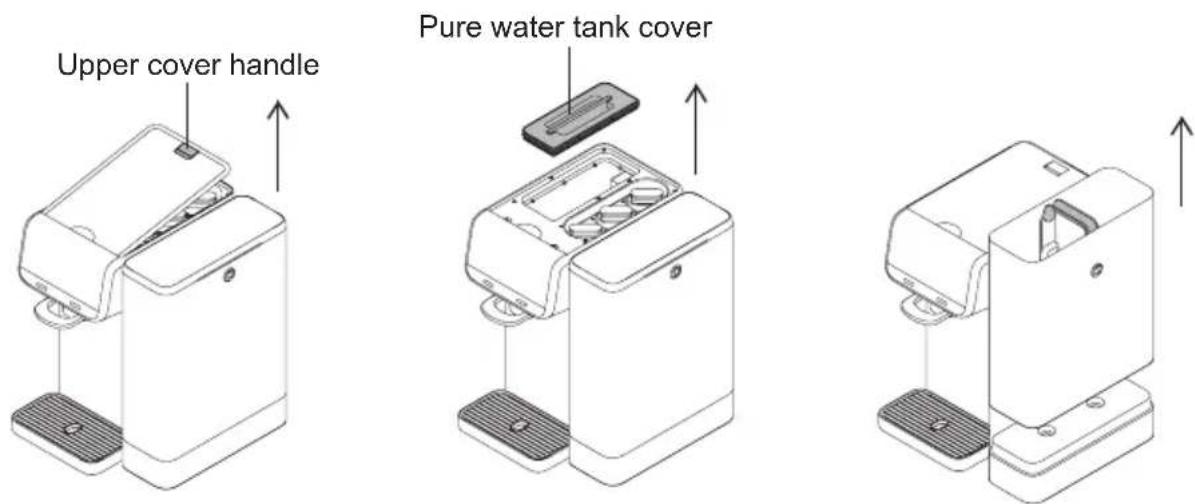
- Wipe the inner surface of the pure water tank, pure water tank lid, raw water tank and raw water tank lid with a clean and soft cloth. Power on the machine to start purifying water. After the water level reaches its maximum capacity, activate the flushing mode to flush both the pure water tank and the water path again.
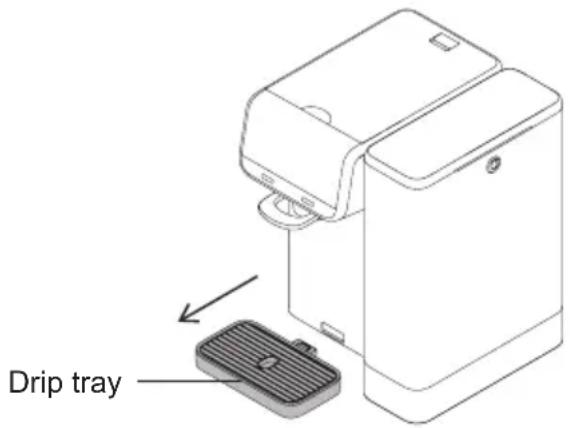
- Remove the drip tray and empty the water in it.
Attention: It is recommended to clean raw water tank and pure water tank every two months.
Filter replacement
Filter life description
When the filter life indicator becomes from “☐” to “☐” and the machine beeps for 10 seconds each time you take water, the filter needs to be replaced.
If the filter is not replaced regularly, the water quality after purification may be reduced. The replacement cycle of the filter varies depending on the quality of water source and the amount of water consumed.
| Filter Filter name | Recommended replacement cycle | |
| Filter 1 | Micro fiber and activated carbon composite filter | 12 months |
| Filter 2 RO membrane filter 24 months | ||
| Filter 3 Activated carbon mineralized filter 12 months | ||
Attention:
- The filter replacement cycle described above does not refer to the quality assurance period of the filter, but the expected life of the filter to maintain its original performance. In areas with poor water quality or in the case of high water consumption, the filter replacement cycle will be shortened.
- Activated carbon mineralized filter improves water taste. If water taste becomes worse, it is recommended to replace this filter immediately.
- Please purchase filter from official channels, if you buy non-genuine filter, the damage caused will not be guaranteed.
Filter replacement method and filter life indicator reset
- Disconnect the power supply, remove the raw water tank and top cover of the device, twist the filter to unlock position according to the markings on the machine, and lift out the filter.
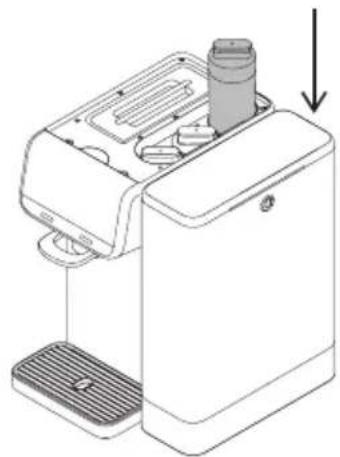
- Place the new filter by pointing the arrow down and twisting the filter from the unlock direction to the lock direction.
natural_image
Line drawing of a modern water dispenser with a downward arrow indicating motion (no text or symbols)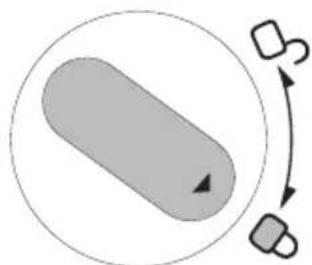
flowchart
graph TD
    A["Start"] --> B{Step 1}
    B --> C["Process Step"]
    C --> D["End"]
lock direction
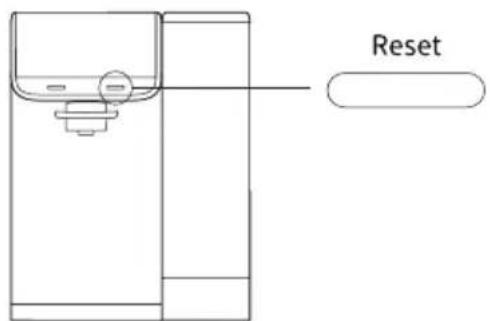
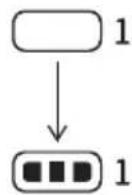
- Power on the machine, then press and hold the Reset button for 5 seconds to activate the filter reset mode. By default, the filter life indicator No.1 will flash. Press the Reset button to switch the selected filter. Press and hold the Reset button for 5 seconds again to reset the filter's lifetime.
(The device will automatically quit filter reset mode if there is no operation within 10 seconds.)
- After replacing the filter, please refer to the steps of "flushing before first use" in the "Product Assembly and Flushing" to complete the flushing of the new filter.
Trouble Shooting
Please check the following issues before sending to designated repair offices.
| Trouble Possible Causes Solutions | ||
| The screen remains inactivate, and the device doesn’t purify water | The machine is not connected to the power supply | Plug in the power plug |
| Raw water replacement indicator “∪” incorrectly lights up when the raw water tank is full | The raw water tank float falls off | Check whether float is assembled inside the raw water tank, and assemble it to raw water tank if it falls off |
| Raw water tank is not pushed to the bottom | Reinstall raw water tank, press it to the bottom | |
| Low purification speed or machine cannot purifying water | Raw water tank is not pressed to the bottom | Reinstall raw water tank, press it to the bottom |
| The filter exceeds its service life or blocked | Replace the filter | |
| Input voltage is lower than device rating label | Switch to a power supply with a same rated voltage | |
| The pump is out of service Contact | the official after-sales service | |
| Raw water temperature is too low | Use raw water that meets the water temperature required in rating label | |
| Using non-original filter Replace with JIMMY brand filter | ||
| Water leakage | Raw water tank has exceeded the handled joint (the MAX level) | Make sure that raw water tank is filled below the MAX line |
| The machine cannot dispense hot water | The hot water temperature is not selected | Refer to “Take hot water” |
| The water level in the pure water cup is below minimum water level | After the water level of the pure water cup reaches higher level, taking hot water again | |
| Odor | The filter exceeds its service life Replace the filter | |
| The device has not been used for a long time | Follow user manual to flush the device for three times | |
| The pure water TDS value remains unchanged at 30 | The raw water has not been replaced | Replace the raw water and remake water |
| The filter exceeds its service life Replace filter | ||
Attention:
If any other failures occurred, which need professional tools, in order to avoid danger, the machine must be repaired or replaced by manufacturer, other maintenance offices or professionals from similar offices.
Product Specification
Technical specification
Please check the following issues before sending to designated repair offices.
| Model No M9 Pro | |
| Product name Reverse Osmosis | Water Purifier |
| Power supply 220-230V~50-60Hz | |
| Machine Size (Width*depth*height) | 278mm*310mm*366 mm |
| Inlet water temperature range 5 | °C -35°C (41 °F -95 °F ) |
| Purified water flow 0.3L/min | (25°C /77 °F ) |
| Inlet water pressure 0MPa-0.04MPa | |
| Work pressure 0.4MPa-0.8MPa | |
| Rated power 2200W | |
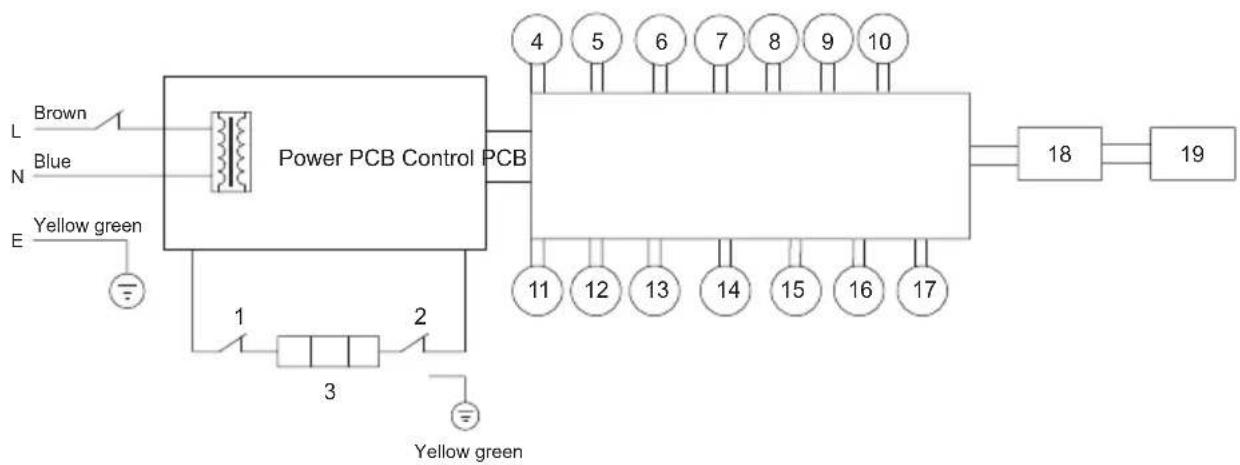
Circuit Diagram
220-230V\~ / 50-60Hz
flowchart
graph TD
    A["Brown"] --> B["Power PCB Control"]
    C["Blue"] --> B
    D["N"] --> B
    E["E"] --> B
    B --> E
    B --> F["4"]
    B --> G["5"]
    B --> H["6"]
    B --> I["7"]
    B --> J["8"]
    B --> K["9"]
    B --> L["10"]
    B --> M["11"]
    B --> N["12"]
    B --> O["13"]
    B --> P["14"]
    B --> Q["15"]
    B --> R["16"]
    B --> S["17"]
    M --> T["18"]
    N --> T
    O --> T
    P --> T
    Q --> T
    R --> T
    S --> T
    T --> U["19"]
- Temperature controller 1
- Temperature controller 2
- Electric heater
- Waste water valve
- Diaphragm pump
- Booster pump
-
UV lamp
-
TDS sensor
- Dispensing micro switch
- Dispensing light PCB
- Water outlet NTC
- Water inlet NTC
- Pure water tank water full sensor
-
Pure water tank water empty sensor
-
Flow meter
- Raw water tank water level reed switch
- Raw water tank in-place reed switch
- Screen PCB
- Button PCB
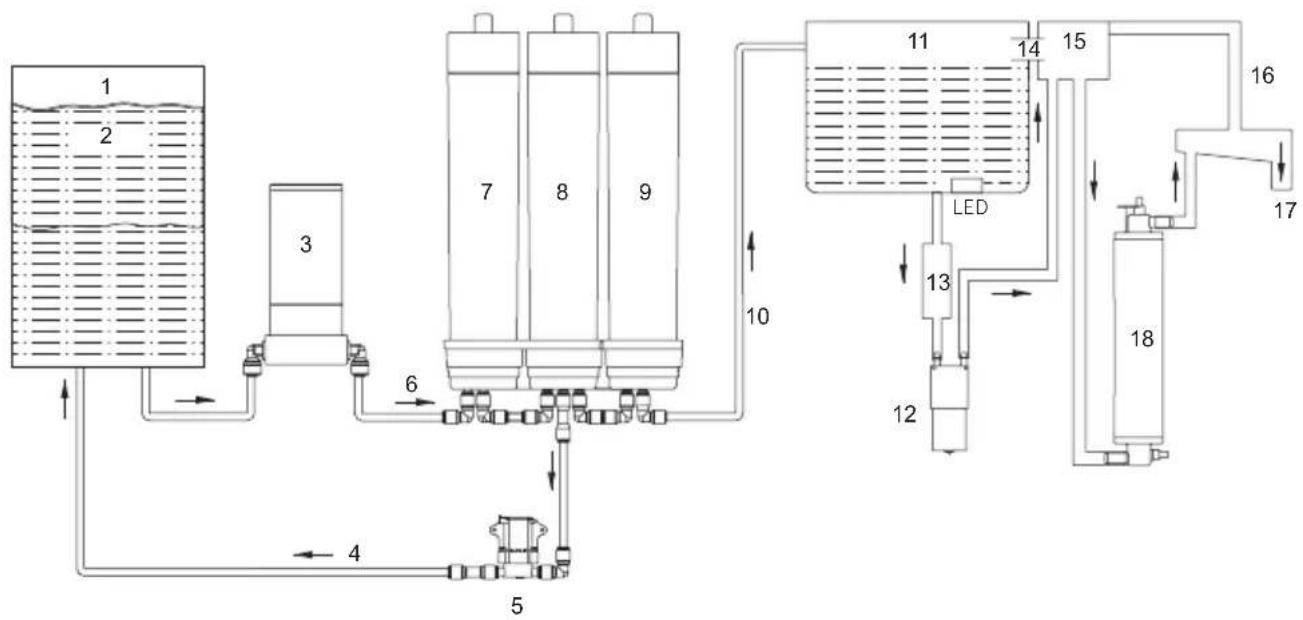
Waterway diagram
flowchart
graph TD
    A["1"] --> B["2"]
    B --> C["3"]
    C --> D["6"]
    D --> E["7"]
    E --> F["8"]
    F --> G["9"]
    G --> H["10"]
    H --> I["11"]
    I --> J["14"]
    J --> K["15"]
    K --> L["16"]
    L --> M["17"]
    M --> N["18"]
    N --> O["12"]
    O --> P["13"]
    P --> Q["LED"]
    Q --> R["4"]
    R --> S["5"]
    S --> T["6"]
| 1. Raw water tank | 7. Microfiber and activated carbon composite filter | 13. Water level sensor |
| 2. Raw water | 8. RO membrane filter | 14. Exhaust outlet |
| 3. Booster pump | 9. Activated carbon filter | 15. Check valve |
| 4. Waste water | 10. RO purified water | 16. Exhaust tube |
| 5. Flush valve | 11. Pure water tank | 17. Water outlet |
| 6. Raw water | 12. Outlet pump | 18. Heating tube |
Manufacturer Information
| Manufacturer Kingclean Electric | Co., Ltd |
| Address | No.1 Xiangyang Road, Suzhou New District, Jiangsu Province 215009,China |
Disposal
The machine, accessories and packaging should be sorted for environmental-friendly recycling.

Do not dispose of the machine into household waste!
Subject to change without notice.
Warranty Information
This product enjoys two years warranty from the date of purchase.
Excluded from the guarantee is replacement filters, normal wear, commercial use, alterations to the appliance as purchased, cleaning activities, consequences of improper use or damage by the purchaser or a third person, damage that can be attributed to external circumstances.
Wskaźnik błędu
natural_image
Line drawing of a modern water dispenser with a downward arrow indicating flow or movement (no text or symbols present)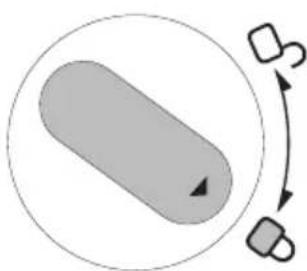
flowchart
graph TD
    A["Start"] --> B{Step 1}
    B --> C["Process Step"]
    C --> D["End"]
Kierunek blokowania
| Producent Kingclean Electric Co., Ltd | |
| Adres | No.1 Xiangyang road, Suzhou New District, Jiangsu province, 215009, China |
Filterersetzung
natural_image
Line drawing of a coffee maker with a lid and base, showing internal components and a downward arrow indicating motion (no text or symbols)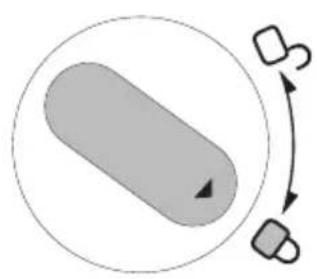
natural_image
Simple diagram showing a shaded oval shape inside a circle with two small blocks and an arrow indicating direction (no text or symbols)Sperrrichtung
natural_image
Line drawing of a modern water dispenser with a downward arrow indicating action (no text or symbols)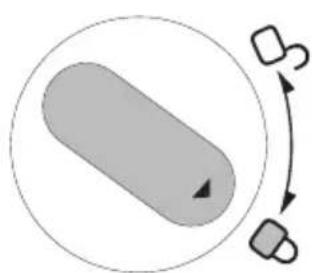
flowchart
graph TD
    A["Start"] --> B{Decision}
    B -->|S| C["Output S"]
    B -->|B| D["Output B"]
Take out the machine and all accessories. Remove upper cover, pure water cup cover, raw water tank, raw water tank cover from the machine and place the machine for 8 to 12 hours and then put all parts back.
Before inserting the power cable plug into the power socket, please ensure that the power supply is 220V-230V\~. Keep the power plug and hand dry.
natural_image
Line drawing of a mechanical device with an arrow indicating downward motion (no text or symbols present)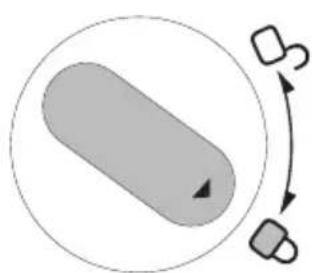
flowchart
graph TD
    A["Start"] --> B{Decision}
    B -->|S| C["Output S"]
    B -->|B| D["Output B"]
direzione di blocco
Please check the following issues before sending to designated repair offices.
| Produttore Kingclean Electric Co., Ltd | |
| Indirizzo | No.1 Xiangyang Road, Suzhou New District, Jiangsu Province 215009, China |
Disposizione
natural_image
Line drawing of a mechanical device with a downward arrow indicating motion or assembly (no text or symbols present)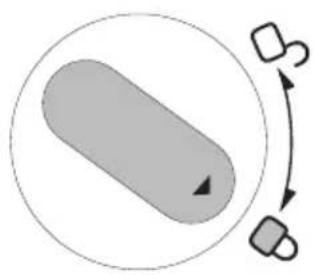
flowchart
graph TD
    A["Start"] --> B{Decision}
    B -->|Yes| C["Process Step"]
    B -->|No| D["End"]
Please check the following issues before sending to designated repair offices.
natural_image
Line drawing of a modern coffee maker with a downward arrow indicating compression or cooling (no text or symbols present)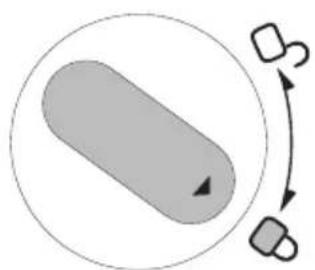
flowchart
graph TD
    A["Start"] --> B{Decision}
    B -->|Yes| C["Process Step"]
    B -->|No| D["End"]
Напрямок блокування
- Contents
- Important Safety Instructions
- WARNING
- Notes
- Product Assembly and Flushing
- Parts Name
- Placement position
- New machine inspection
- Connect the power supply
- Flushing before first use
- Step1: Ambient temperature water path flushing
- Repeat for 3 times.
- Step2: Hot water path flushing
- Note:
- Product Use
- Product function introduce
- Temperature button
- Water volume button
- Water purification indicator
- Raw water replacement indicator
- Child lock function
- Raw water / Pure water TDS value indicator
- Filter life indicator
- Error indicator
- Usage of device
- Start up
- Take ambient temperature water
- Take hot water
- Customize water volume
- Replace raw water
- Flushing
- Turn on and turn off the raw water 999 warning
- Turn on/ off energy-saving mode
- Cleaning and Maintenance
- Clean the water tank
- Filter replacement
- Filter life description
- Attention:
- Filter replacement method and filter life indicator reset
- Trouble Shooting
- Product Specification
- Technical specification
- Circuit Diagram
- Waterway diagram
- Disposal
- Warranty Information
- Wskaźnik błędu
- Filterersetzung
- Disposizione
Brand : JIMMY
Model : Matrix M9 Pro
Category : Water filter