E40CS16 - Saw Anova - Free user manual and instructions
Find the device manual for free E40CS16 Anova in PDF.

| Brand | Anova |
| Model | E40CS16 |
| Product type | Cordless chainsaw |
| Nominal voltage | 40 V |
| Cutting length | 16 inches (406 mm) |
| Chain pitch | 3/8 inch |
| Chain brake | Yes, stopping time < 0.12 s |
| Oil reservoir capacity | 150 ml |
| Battery type | Removable lithium-ion |
| Automatic lubrication | Yes, adjustable |
| Chain tensioner | Tool-free, side adjustment |
| Handles | Front and rear, non-slip coating |
| Weight (without battery) | Approximately 4.5 kg |
| Sound level | Conforms to EN standards |
| Handle vibrations | 14.5 m/s² (declared value) |
| User protection | Chain brake, hand guard, safety lock |
| Intended use | Wood cutting, pruning, bucking |
| Certifications | CE, conforming to EN 62841 |
| Warranty period | Legal warranty (see manual) |
| Spare parts | Chain, guide bar, battery, charger available from retailer |
Frequently Asked Questions - E40CS16 Anova
User questions about E40CS16 Anova
0 question about this device. Answer the ones you know or ask your own.
Ask a new question about this device
Download the instructions for your Saw in PDF format for free! Find your manual E40CS16 - Anova and take your electronic device back in hand. On this page are published all the documents necessary for the use of your device. E40CS16 by Anova.
USER MANUAL E40CS16 Anova
natural_image
Exterior view of a gray and black chain-link electric drive (no text or symbols visible)anova® e+
ES
Millasur S.L.U.
Rúa Eduardo Pondal, nº 23 - Pol. Ind. Sigüeiro
15688 - Oroso - A Coruña - 981 696 465 - www.millasur.com


anova®
natural_image
Diagram of a mechanical chain with a gear and directional arrow indicating motion (no text or symbols)natural_image
Diagram of a chain drive mechanism with gear and blade (no text or labels)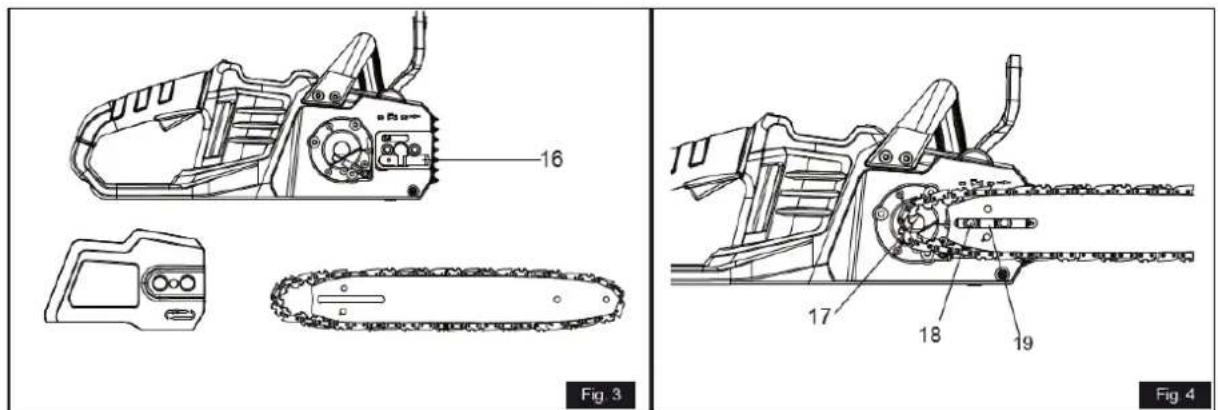
ES

natural_image
Technical line drawing of a mechanical device with two views: top shows internal components, bottom shows a control panel (no text or symbols)

natural_image
Line drawing of a person holding a chainsaw, standing with one hand extended (no text or symbols)


natural_image
Illustration of a person using a tool to cut through tree branches, labeled with numbers 39 and 38 (no text or symbols on the diagram itself)
natural_image
Technical line drawing of a mechanical clamp or vise (no text or symbols)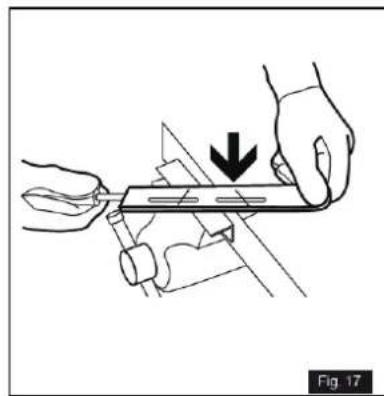
natural_image
Illustration of hands using a tool to cut or mark a mechanical component, with a downward arrow indicating the process (no text or symbols present)
natural_image
Mechanical assembly diagram showing a conveyor belt system with a grid-patterned component (no text or symbols)
natural_image
Technical line drawing of a mechanical assembly with hands operating a tool (no text or symbols)
natural_image
Illustration of a hand using a tool to press or adjust a flat object, with arrows indicating motion direction (no text or symbols)
natural_image
Illustration of a hand holding a tool with a textured surface, labeled 'Fig. 21' (no text or symbols on the diagram itself)
10. CERTIFICADO CE
natural_image
Close-up of a black-and-white photo of a ValoRa chain-linking tool (no text or symbols visible)anova® e+
PT
Millasur SLU
natural_image
Diagram of a mechanical chain with a gear and directional arrow indicating motion (no text or symbols)natural_image
Diagram of a chain drive mechanism with gear and blade (no text or labels)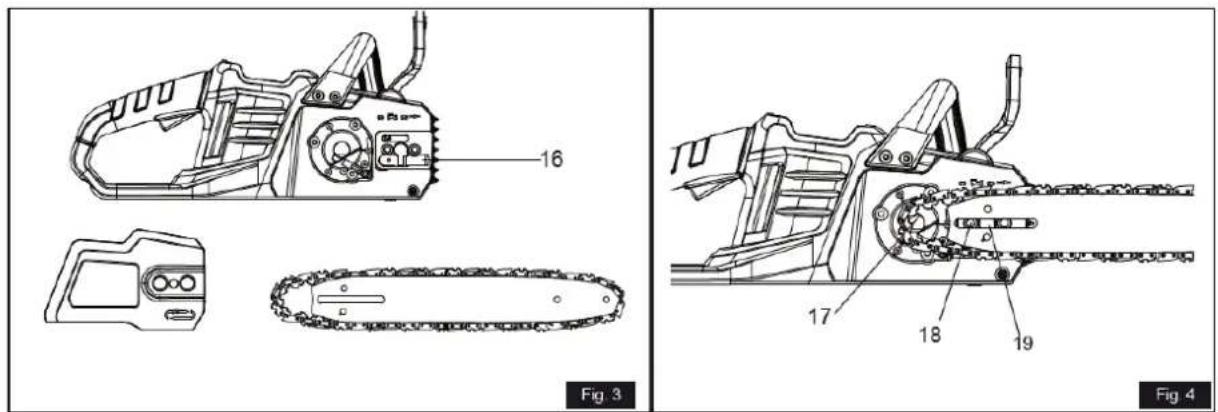
PT


natural_image
Technical line drawing of a mechanical device with two views: top shows internal components, bottom shows a control panel (no text or symbols)

natural_image
Line drawing of a person holding a chainsaw, standing with one hand extended (no text or symbols)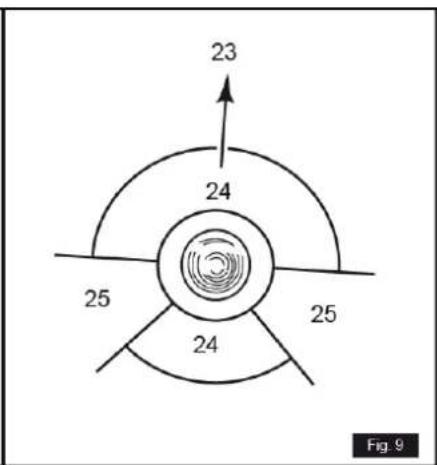

natural_image
Illustration of a person using a tool to cut tree branches, labeled with numbers 39 and 38 (no text or symbols on the diagram itself)
natural_image
Technical line drawing of a mechanical clamp or vise device (no text or symbols)PT

natural_image
Illustration of hands using a tool to cut or mark a mechanical component, with a downward arrow indicating the process (no text or symbols present)
natural_image
Mechanical assembly diagram showing a conveyor belt system with a grid-patterned component (no text or symbols)
natural_image
Technical line drawing of a mechanical assembly with hands operating a component (no text or symbols)
natural_image
Illustration of a hand using a tool to press or mark a surface, with arrows indicating direction (no text or symbols)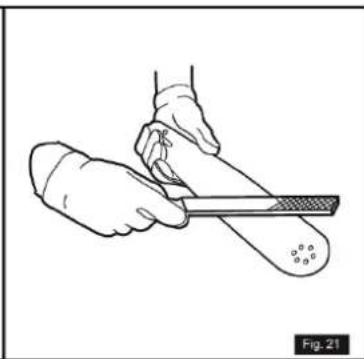
natural_image
Illustration of a hand holding a tool with a textured surface, labeled 'Fig. 21' (no text or symbols on the diagram itself)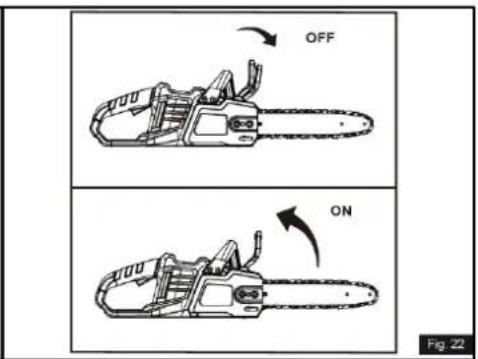
Veja as figuras 16 a 21.
10. CERTIFICADO CE
natural_image
Exterior view of a gray and black manual chain drive (no visible text or symbols)anova® e+
PT
anova®
natural_image
Diagram of a mechanical cutting tool with a blade and gear mechanism (no text or symbols)natural_image
Diagram of a chain saw cutting through a gear with an arrow indicating direction (no text or labels)natural_image
Technical line drawing of a mechanical device with two views: top shows internal components, bottom shows a control panel (no text or symbols)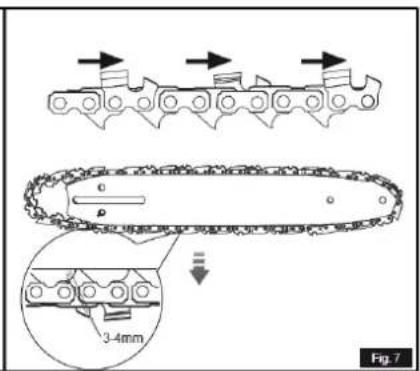
natural_image
Line drawing of a person holding a chainsaw, standing with one hand extended (no text or symbols)


natural_image
Illustration of a person using a tool to cut through tree branches, labeled with numbers 39 and 38 (no text or symbols on the diagram itself)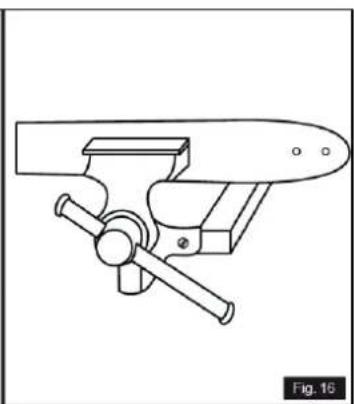
natural_image
Technical line drawing of a mechanical clamp or vise (no text or symbols)PT

natural_image
Illustration of hands using a tool to cut or mark a mechanical component, with a downward arrow indicating the process (no text or symbols present)
natural_image
Mechanical assembly diagram showing a conveyor belt system with a grid-patterned component (no text or symbols)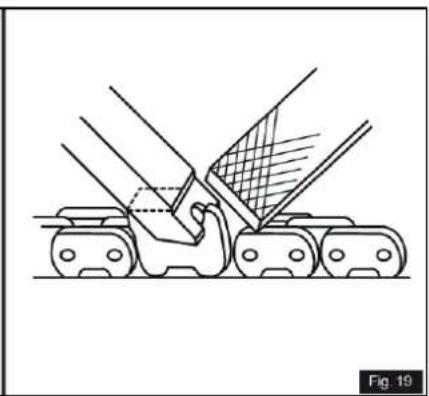
natural_image
Technical line drawing of a mechanical assembly with hands operating a tool (no text or symbols)
natural_image
Illustration of a hand using a tool to lift a cylindrical object, with arrows indicating direction (no text or symbols)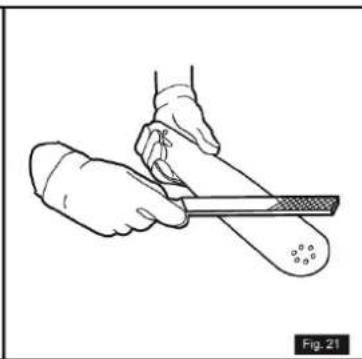
natural_image
Illustration of two hands using a tool to cut a piece of material (no text or symbols present)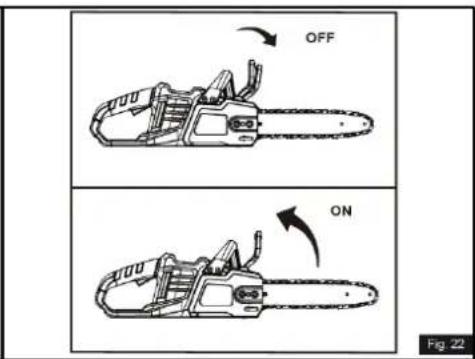
10. CERTIFICAT CE
SOCIÉTÉ DE DISTRIBUTION
MILLASUR, SL
DÉCLARATION DE CONFORMITÉ CE
Directive 2006/42/CE
2014/30/UE
natural_image
Exterior view of a gray and black chain-link electric drive (no text or symbols visible)anova® e+
IT
anova®
natural_image
Diagram of a mechanical or optical setup with a rotating ring and directional arrow (no text or symbols)natural_image
Diagram of a chain drive mechanism with gear and blade (no text or labels)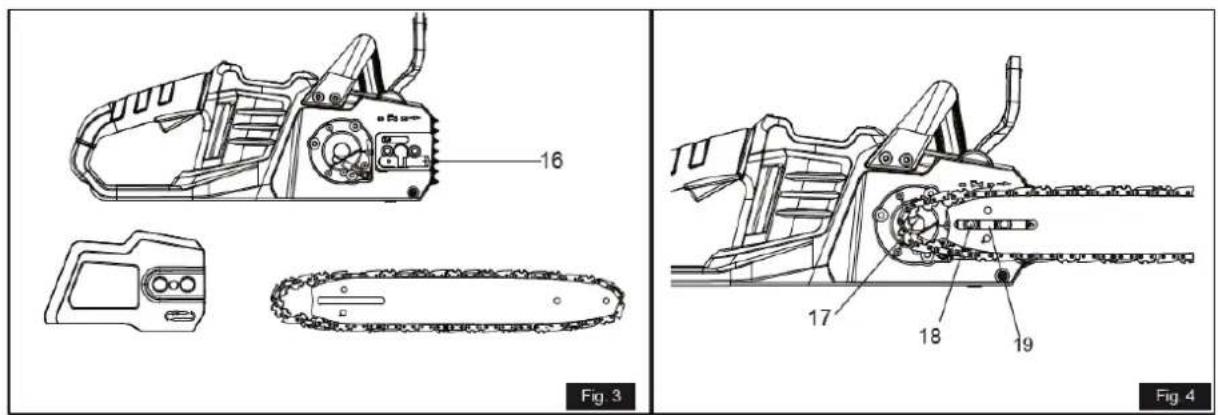
IT

10. CERTIFICATO CE
Instructions and user manual

natural_image
Exterior view of a gray and black chain-link electric drive (no text or symbols visible)anova® e+
EN
anova®
Anova We would like to congratulate you on choosing one of our products and guarantee the assistance and cooperation that has always distinguished our brand over time.
This machine is designed to last for many years and to be of great use if used according to the instructions in the user manual. We therefore recommend that you carefully read this instruction manual and follow all our recommendations.
For more information or questions, you can contact us through our web support at www.anova.es.
INFORMATION ABOUT THIS MANUAL
Pay attention to the information provided in this manual and on the appliance for your safety and the safety of others.
- This manual contains instructions for use and maintenance.
- Take this manual with you when you go to work with the machine.
- The content is correct at the time of printing.
- We reserve the right to make changes at any time without affecting our legal responsibilities.
- This manual is considered an integral part of the product and must remain with it in case of loan or resale.
- Request a new manual from your distributor if it is lost or damaged.
READ THIS MANUAL CAREFULLY BEFORE USING THE MACHINE

To ensure your machine delivers the best results, carefully read the usage and safety guidelines before using it.
OTHER WARNINGS:
Improper use could cause damage to the machine or other objects.
Adapting the machine to new technical requirements could cause differences between the content of this manual and the product purchased.
Read and follow all instructions in this manual. Failure to follow these instructions could result in serious personal injury.
INDEX
- SAFETY INSTRUCTIONS
- PRODUCT DESCRIPTION
- TECHNICAL SPECIFICATIONS
- ASSEMBLY AND OPERATION
- MAINTENANCE
- TROUBLESHOOTING
- WARRANTY
- ENVIRONMENT
- EXPLODED VIEW
10.CE CERTIFICATE
1. SAFETY INSTRUCTIONS
1.1. General safety instructions
▲ Important

Make sure to read and understand all safety instructions in this instruction manual, including all warning symbols, before using this tool. Failure to follow all instructions listed below may result in electric shock, fire, and/or serious personal injury.
The operation of any power tool can cause foreign objects to fall into the eyes, which can result in serious eye damage. Before using a power tool, always wear safety glasses and a full-face shield when necessary. We recommend a wide-vision safety mask to be worn over standard safety glasses with side shields.
Some of the dust generated by sawing and other machine-based construction activities contains hazardous chemicals. To reduce your exposure to these chemicals, work in a well-ventilated area and wear approved safety equipment, such as dust masks specifically designed to filter out microscopic particles.
1.2. Safety symbols
This section shows and describes the safety symbols that may appear on this product and other warnings that should be taken into account. Read, understand, and follow all machine instructions before attempting to assemble and use it.
 | Indicates a potential risk of personal injury. | |
| CE Marking | ||
 | To reduce the risk of injury, the user must read and understand the user manual before using this product. Failure to do so may result in serious injury to the operator and/or bystanders. | |
 | Use appropriate and approved personal protective equipment (PPE) when operating the machine. Wear ear protection, head protection, safety gloves, and non-slip footwear. These protective measures will help reduce the risk of injury. | |
 | ||
 | Do not use the machine when it is raining. Do not expose the product to rain and do not use it in humid conditions. | |
 | Keep other people out of the work area during operation. The distance between the machine and other people must be at least 15 meters. | |
 | Remove the battery from the product before any inspection, cleaning and/or maintenance work. |
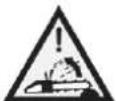 | Risk of ricochet. Contact of the sword tip with any object should be avoided. |
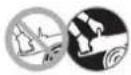 | Always use the unit with both hands. |
| [xWG8] | Any damaged or discarded electrical or electronic device should be taken to the appropriate collection centers.Do not dispose of power tools or rechargeable batteries with household waste. Power tools and batteries that have reached the end of their useful life must be collected separately and returned to an environmentally friendly recycling facility. Consult your local authority or dealer for recycling advice and collection points. |
1.3. General safety instructions
Read all safety warnings, instructions, illustrations, and specifications provided with this tool. Failure to follow all instructions listed below may result in serious injury to both persons and damage to the unit.
Keep all warnings and instructions for future reference.
Note: The term "power tool" in the warnings refers to your power tool connected to the mains (corded) or battery (cordless).
1.3.1. Workplace safety
- Keep your work area clean and well-lit. Cluttered or dark areas invite accidents.
- Do not use power tools in explosive atmospheres, such as in the presence of flammable liquids, gases, or dusts. Power tools create sparks that can ignite dust or vapors.
- Keep children and other people and/or pets away while using a power tool (battery operated).
- Distractions can cause you to lose control.
- Avoid hazardous environments: do not use tools in damp or wet places.
1.3.2. Electrical safety
- Avoid bodily contact with grounded surfaces, such as pipes, radiators, stoves, and refrigerators. There is a greater risk of electric shock if your body is grounded.
- The plugs on electrical appliances (chargers) must match the power outlet. Never modify the plug in any way.
- Do not expose power tools to rain or wet conditions. Water entering a power tool will increase the risk of electric shock.
- Do not abuse the cable. Never use the cable to carry, pull, or unplug the charger. Keep the cable away from heat, oil, sharp edges, or moving parts. Damaged or tangled cables increase the risk of electric shock.
1.3.3. Personal safety
- Stay alert, watch what you are doing, and use common sense when using a power tool. Do not use a power tool if you are tired or under the influence of substances that impair
your control of the machine. A moment of distraction while using power tools can result in serious personal injury.
- Always use personal protective equipment. Personal protective equipment such as eye protection, dust masks, non-slip safety shoes, hard hats, and/or hearing protection, when used properly, will reduce personal injury.
- Prevent accidental starting. Make sure the switch is in the OFF position before connecting the battery, lifting, or carrying the tool. Carrying power tools with your finger on the switch or starting power tools with the switch on can cause accidents.
- Remove any wrenches or adjustment keys before turning on the power tool. A wrench or key inserted in a moving part of the power tool can cause personal injury.
- Do not overexert yourself. Maintain proper posture and balance at all times. This allows for better control of the power tool in unexpected situations.
- Dress appropriately. Do not wear loose clothing or jewelry. Keep your hair and clothing away from moving parts. Loose clothing, jewelry, or long hair can get caught in moving parts.
- If devices for connecting dust extraction and collection systems are provided, ensure they are connected and used correctly. Using dust collection systems can reduce dust-related hazards.
- Don't let familiarity gained from frequent tool use lead you to become complacent and ignore tool safety principles. A careless action can result in serious injury in a split second.
1.4. Safety regarding the use and care of power tools
- Do not force the power tool. Use the appropriate power tool for your application.
The right power tool will do the job better and more safely at the rate it was designed for. - Do not use the power tool if the switch does not turn it on and off.
Any power tool that cannot be controlled with the switch is dangerous and must be repaired. - Remove the battery pack, if detachable, from the power tool and/or activate any battery disable device before removing jammed material, making adjustments, changing accessories, cleaning, or storing power tools.
These preventative safety measures reduce the risk of accidentally starting the power tool. - Store idle power tools out of the reach of children and do not allow persons unfamiliar with the power tool or these instructions to use it.
Power tools are dangerous in the hands of untrained users. - Maintain power tools and accessories. Check for misalignment or binding of moving parts, broken parts, and any other condition that could affect the power tool's operation. If damaged, have the power tool repaired before use. Many accidents are caused by poorly maintained power tools and accessories.
- If applicable, keep cutting tools sharp and clean.
Cutting tools that are properly maintained and have sharp cutting edges are less likely to jam and are easier to control. - Use the power tool, accessories, etc., in accordance with these instructions, taking into account the working conditions and the task to be performed. Using the power tool for operations other than those intended could result in a dangerous situation.
- Keep handles and gripping surfaces dry, clean, and free of oil and grease. Slippery handles and gripping surfaces can lead to unsafe handling and/or loss of control of the tool.
1.5. Safety regarding the use and care of battery-powered tools
- Make sure the switch is in the OFF position before inserting the battery. Inserting a battery into power tools with the switch on can cause accidents.
- Only recharge with the manufacturer's approved charger.
A charger designed for one type of battery can create a fire hazard when used with a different type of battery. Use only with the correct battery packs and chargers. - Use power tools only with specifically designed battery packs. Using any other battery pack may result in injury and fire.
- When the battery is not in use, keep it away from other metal objects, such as paper clips, coins, keys, nails, screws, or other small metal objects that could establish a connection from one terminal to another.
A short circuit between the battery terminals can cause burns or a fire. - Under abusive conditions, fluid may leak from the battery; avoid contact. If accidental contact occurs, rinse with water. If fluid gets into the eyes, seek medical help. Fluid leaking from the battery may cause irritation or burns.
- Do not use a damaged or modified battery or tool. Damaged or modified batteries can exhibit unpredictable behavior that may result in fire, explosion, or injury.
- Do not expose a battery or tool to fire or excessive temperatures.
Exposure to fire or high temperatures can cause an explosion. - Follow all charging instructions and do not charge the battery or tool outside the temperature range specified in the instructions. Improper charging or charging at temperatures outside the specified range can damage the battery and increase the risk of fire.
1.6. Service and maintenance
- Have your power tool/battery serviced by a qualified technician using only manufacturer-approved replacement parts. This will ensure the tool remains safe.
- Never service damaged battery packs.
- Battery pack servicing should only be performed by the manufacturer or authorized service providers.
1.7. Chainsaw safety instructions
- Keep all parts of your body away from the chain when the chainsaw is running. Before starting the chainsaw, make sure the chain is not in contact with anything. A moment of distraction while using the chainsaw can cause your clothing or body to become entangled in the chain.
- Always hold the chainsaw with your right hand on the rear handle and your left hand on the front handle. Holding the chainsaw with the wrong hand increases the risk of personal injury.
- Hold the chainsaw only by the insulated gripping surfaces, as the chain may come into contact with hidden wires. Chains that come into contact with a live wire can cause exposed metal parts of the chainsaw to become live and could result in an electric shock to the operator.
- Wear eye protection. Additional protective equipment for the ears, head, hands, legs, and feet is recommended. Proper protective equipment will reduce personal injury from flying debris or accidental contact with the chain.
-
Do not operate a chainsaw on a ladder, from a roof, or any unstable support. Operating a chainsaw in this manner could result in serious personal injury.
-
Always maintain a proper footing and operate the chainsaw only when standing on a stable, secure, and level surface. Slippery or unstable surfaces can cause loss of balance or control of the chainsaw.
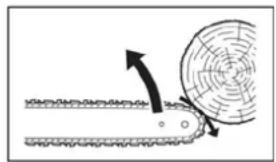
- When cutting a branch that is under tension, be alert for it bouncing back. When the tension in the wood fibers is released, the branch can strike the operator and/or cause the chainsaw to lose control.
- Be very careful when cutting brush and saplings. Thin material can get caught in the saw chain and be thrown towards you or cause you to lose your balance.
- Carry the chainsaw by the front handle with the chainsaw switched off (battery removed) and away from your body. When carrying or storing the chainsaw, always use the bar cover. Proper chainsaw handling will reduce the likelihood of accidental contact with the moving chain.
- Follow the instructions for lubricating, tensioning the chain, and changing the bar and chain. An improperly tensioned or lubricated chain can break or increase the likelihood of kickback.
- Cut wood only. Do not use the chainsaw for purposes other than those intended. Using the chainsaw for unauthorized operations could create a dangerous situation and will void the warranty.
- Using the chainsaw for operations other than those intended could cause serious injury to the operator or bystanders.
- Follow all instructions when removing jammed material, storing, or servicing the chainsaw. Make sure the switch is off and the battery is removed. Unexpected operation of the chainsaw while removing jammed material or performing maintenance can result in serious personal injury.
- Do not use a chainsaw on a tree unless you have been specifically trained to do so. Operating a chainsaw on a tree without proper training could increase the risk of serious personal injury.
1.8. Causes and prevention of the counterattack
Kickback can occur when the tip of the bar touches an object, or when the wood closes and tightens around the chain in the cut. In some cases, contact with the tip can cause a sudden reverse reaction, making the bar rise and return toward the operator.
Tightening the chain along the top of the sword can quickly push the sword towards the operator.
Any of these reactions can cause you to lose control of the tool, which could lead to serious personal injury. Don't rely solely on the safety devices built into your machine. As a chainsaw user, you should take several precautions to keep your cutting jobs safe from accidents and injuries.
- Maintain a firm grip, with your thumbs and fingers encircling the chainsaw handles, both hands on the machine, and position your body and arm to resist kickback forces. The operator can control kickback forces if proper precautions are taken. Do not let go of the chainsaw.
- Do not overshoot or cut above shoulder height. This helps prevent accidental contact with the blade and allows for better control of the chainsaw in unexpected situations.
- Use only bars and chains approved by the manufacturer. Improper replacement may result in chain breakage and/or kickback.
- Follow the chain manufacturer's sharpening and maintenance instructions. Lowering the depth gauge height may cause increased kickback.
1.8.1. Safety precautions against recoil
- In some cases, contact with the tip can cause an ultra-fast reverse reaction, pushing the bar upward and backward toward the operator (this is called rotational backlash). Tightening the chain along the top of the bar can quickly push the bar toward the operator (this is called linear recoil).
natural_image
Diagram of a mechanical chain with a rotating wheel and directional arrows indicating motion (no text or symbols)- Any of these reactions can cause you to lose control of the machine and come into contact with the moving chain, which could result in serious personal injury. As a chainsaw user, you should take several precautions to keep your cutting jobs safe from accidents or injuries.
natural_image
Diagram of a chain saw cutting through a gear with an arrow indicating direction (no text or labels)- With a basic understanding of kickback, you can reduce the element of surprise. Sudden surprise contributes to accidents. Understand that rotational kickback can be prevented by keeping the tip of an unprotected sword from touching an object or the ground.
- Do not operate a chainsaw with one hand. One-handed operation can cause serious injury to the operator, helpers, or bystanders. For proper control, always use both hands when operating a chainsaw, with one hand operating the trigger. Otherwise, the chainsaw may "slip," which could result in personal injury due to loss of control.
- Make sure the area you are cutting is free of obstructions. Do not allow the tip of the blade to come into contact with a log, branch, or any other obstruction that could be struck while using the tool.
1.9. Other important safety instructions
- If the power tool begins to vibrate abnormally or make noise, stop the motor and immediately check for the cause. Abnormal noise is usually a warning sign of trouble.
- Ensure all appropriate guards and other safety devices are properly and securely in place before using this product. Do not use without the guards in place.
- Do not charge the battery in the rain or in humid places.
- Do not throw the battery into a fire. The cells may explode. Consult local codes for any special disposal instructions.
- Do not open or break the battery. The released electrolyte is corrosive and can cause eye or skin damage. It may be toxic if swallowed.
- Battery-powered tools do not need to be plugged into an electrical outlet; therefore, they are always ready to use. Be aware of potential hazards even when the tool is not in operation. Exercise caution when performing maintenance or servicing.
- Do not wash the product with a hose. Prevent water from entering the motor and electrical connections.
- If situations arise that are not covered in this manual, exercise caution and good judgment. Contact your authorized dealer for assistance and/or advice.
EN
- Keep these instructions. Refer to the manual frequently and use it to instruct others who may use this tool. If you lend this tool to someone else, also give them these instructions to prevent misuse of the product and possible injury.
- It has been reported that vibrations from hand tools can contribute to a condition called Raynaud's syndrome in some people. The operator can take steps to potentially reduce the effects of vibration (keeping the body warm if the temperature is low, using appropriate personal protective equipment, promoting circulation during and after work, taking breaks, etc.). If you experience any symptoms, consult your doctor.
- Do not cut logs with a diameter larger than the appropriate one, as this will cause excessive wear on the tool.
1.10. Residual risks
▲ Important
Even if it complies with the relevant product safety regulations, residual risks may exist given the characteristics of the equipment and the work for which it has been designed.
Failure to follow the instructions contained in the instruction manual may result in other residual risks due to improper use.
Residual risks can be minimized by following safety instructions.
- You will reduce the risk of personal injury and damage to equipment if you follow these instructions and are careful.
- Failure to comply with these safety instructions may result in injury to the operator or damage to property.
- Lack of care, improper use, or failure to comply with safety regulations can lead to injuries to the hands and fingers.
- There is a risk of electrocution if you use non-approved electrical connections.
- There is a risk of hearing loss when working with the machine without protection for long periods.
Note: Even if you take preventive measures, there may be residual, non-obvious risks.
Warning
This power tool generates a magnetic field during operation. Under certain circumstances, this field may interfere with the function of active or passive medical implants. To reduce the risk of serious injury or death, we recommend that individuals with a medical implant consult a physician and the implant manufacturer before using this device.
2. PRODUCT DESCRIPTION
2.1. Explanatory images
EN

natural_image
Illustration of a person using a power tool to cut a tree trunk in a forest (no text or symbols)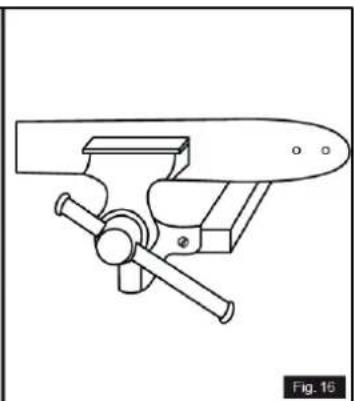
natural_image
Technical line drawing of a mechanical clamp or vise (no text or symbols)
natural_image
Illustration of hands using a tool to cut or mark a surface, with a downward arrow indicating the process (no text or symbols present)
natural_image
Mechanical assembly diagram showing a conveyor belt system with a mesh structure and an arrow indicating motion (no text or symbols)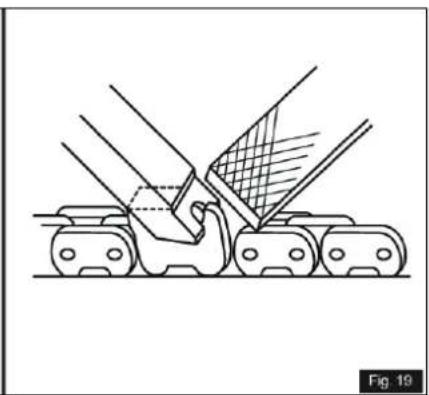
natural_image
Technical line drawing of a mechanical assembly with hands operating a tool (no text or symbols)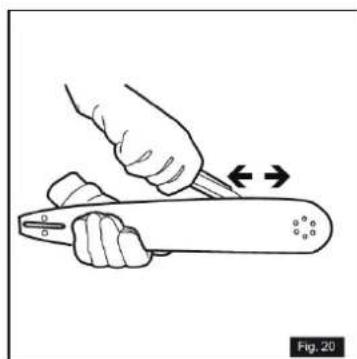
natural_image
Illustration of a hand using a tool to press or adjust a device, with arrows indicating motion (no text or symbols)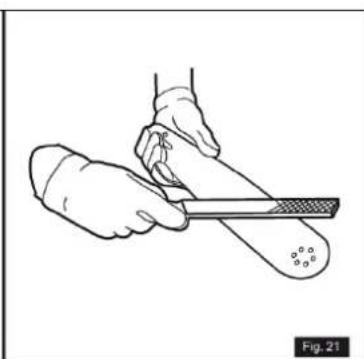
natural_image
Illustration of two hands using a tool to cut a piece of material (no text or symbols visible)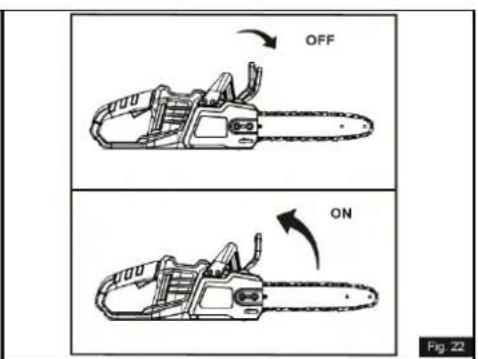
EN
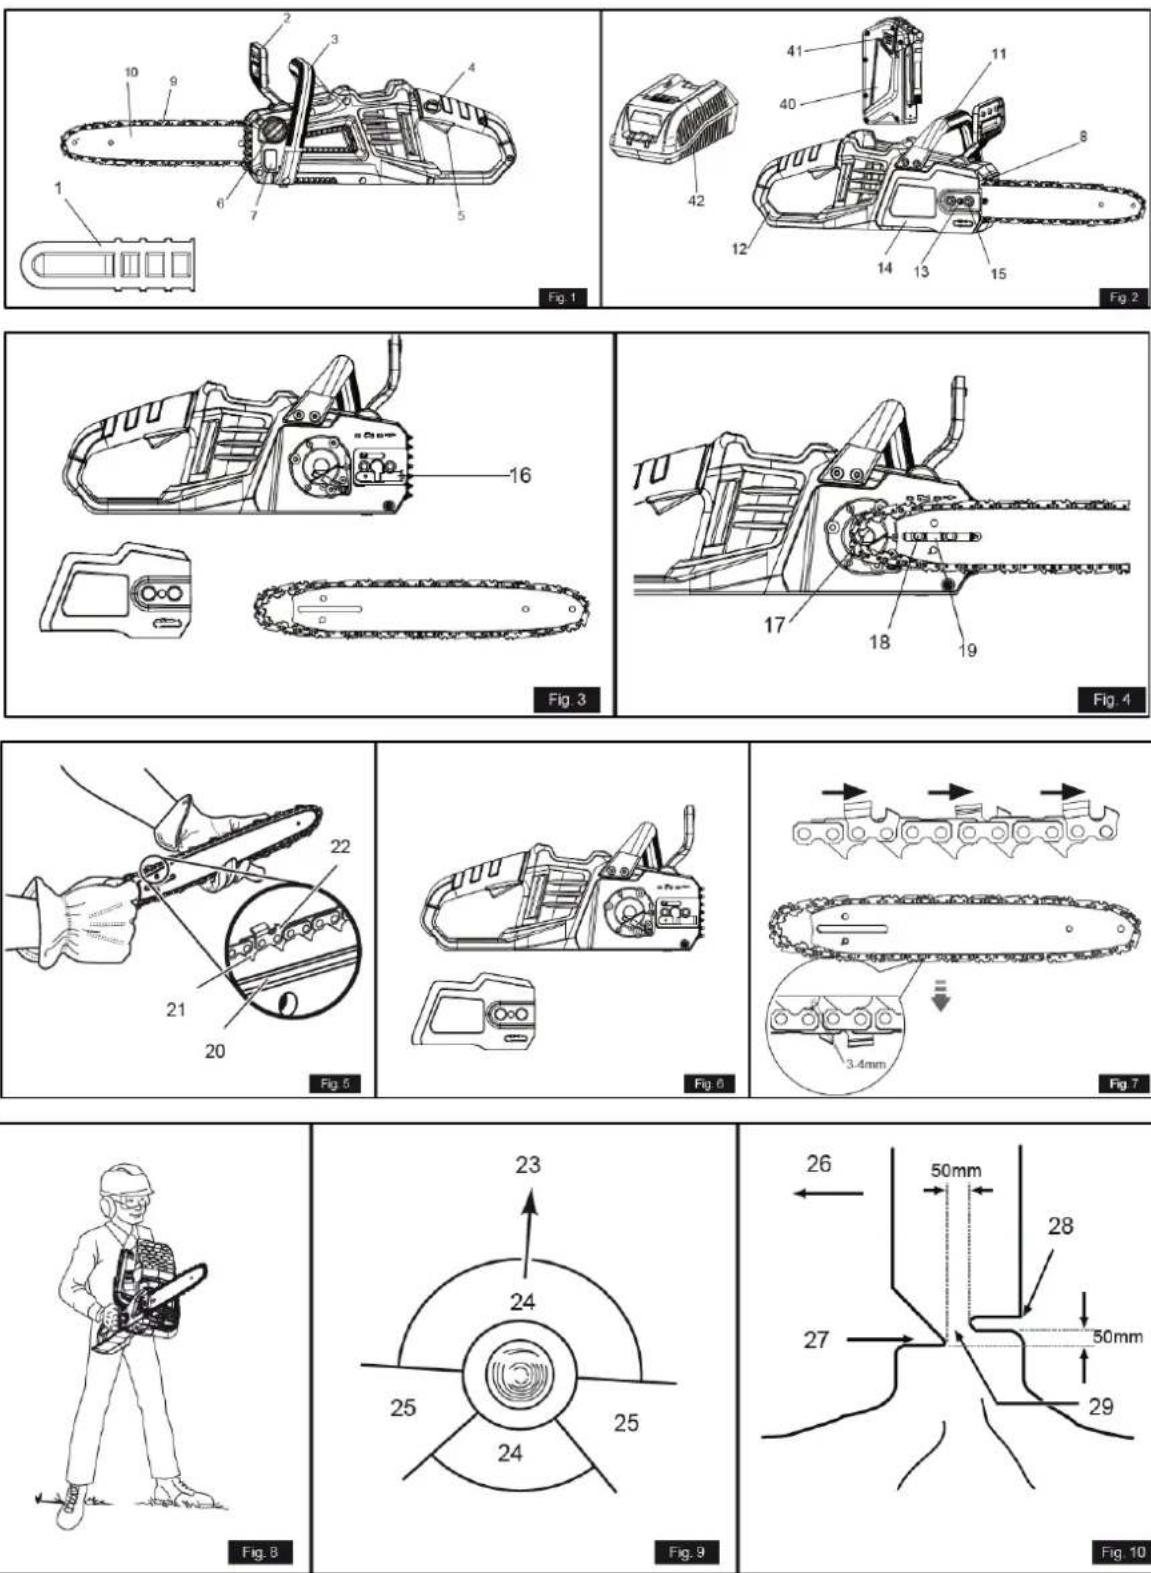
-
Sword protector
-
Front handlebar guard / chain brake
-
Front handle
-
Safety lock button
-
Switch Trigger
-
Oil reservoir cap
-
Oil level indicator
-
Chain entry stop
9.Chain
10.Sword
-
Nuts
-
Rear handle
-
Chain tensioner adjustment knob
-
Sprocket cover
-
Sprocket cover tightening knob
-
Chain tensioning bolt
-
Pinion
-
Sword Guide
-
Oil outlet
20.Sword groove
-
Links in the chain
-
Chain tooth
-
Felling direction
-
Danger Zone
-
Escape route
-
Direction of fall
27.Notch
-
Rear cut of felling
-
Hinge
-
Branch cutting
-
Keep the work off the ground, leave the supporting branches until the trunk is cut
-
Trunk supported along its entire length
-
Cut from above (above the support), avoid cutting on the ground
-
Trunk supported at one end
35.Under the support
-
On the support
-
Log supported at both ends
-
Cutting a log
-
Stand on the uphill side when cutting, as the log may roll.
-
Battery
-
Battery closure button
-
Charger
Note: Due to technical product updates, the item and this document are subject to change without notice.
Note: Never transport or use the tool without the guard firmly in place. The guard must always be on the tool to protect the user.
3. TECHNICAL SPECIFICATIONS
| Technical specifications | |
| Voltage | 40V |
| No-load speed | 14.5 m/s ^2 |
| Cutting length | 16” – 406mm |
| Chain brake | < 0.12s |
| Chain oil reservoir capacity | 150 ml |
| Chain | 3/8” |
Note: Due to technical product updates, this document is subject to change without notice.
Note 2: The declared vibration value was measured using a standard test method and can be used to compare one tool to another. The declared vibration value can be used in a preliminary exposure assessment.
Actual vibration values during tool use may differ from those indicated above and depend on the use made of the tool; the need to identify safety measures to protect the operator is based on an estimate of exposure under actual usage conditions (taking into account all phases of the operating cycle, such as times when the tool is switched off and when it is running idle, in addition to the activation time).
4. ASSEMBLY AND OPERATION
4.1. Unpacking
After unpacking the product, check the contents of the box:
- Carefully remove the product and all accessories from the box. Make sure all items are included.
Attention
Make sure it contains all the listed materials. Check that it has not been damaged in transit. Do not discard the packaging material until you have carefully inspected and successfully used the tool.
Immediately inform the distributor or supplier of any damage or missing parts, as claims made after this date will not be recognized.
4.1. Mounting
Warning
If any part is damaged or missing, do not use this product until the part is replaced. Using this product with damaged or missing parts could result in serious personal injury.
Do not attempt to modify this product or create accessories not recommended for use with this product. Any such alteration or modification constitutes misuse and could result in a dangerous condition that could cause serious personal injury, voiding the warranty.
To prevent accidental starting that could cause serious personal injury, always remove the plug/battery pack from the tool when mounting parts, making adjustments, cleaning, or when not in use.
All adjustments must be made when the chain is cold. Always wear gloves when working with a chain. Otherwise, personal injury may occur.
Warning
Always wear gloves when assembling or replacing any machine component. Take extra care with the cutting parts. Check the chain tension and add oil as described later in this manual before each operation.
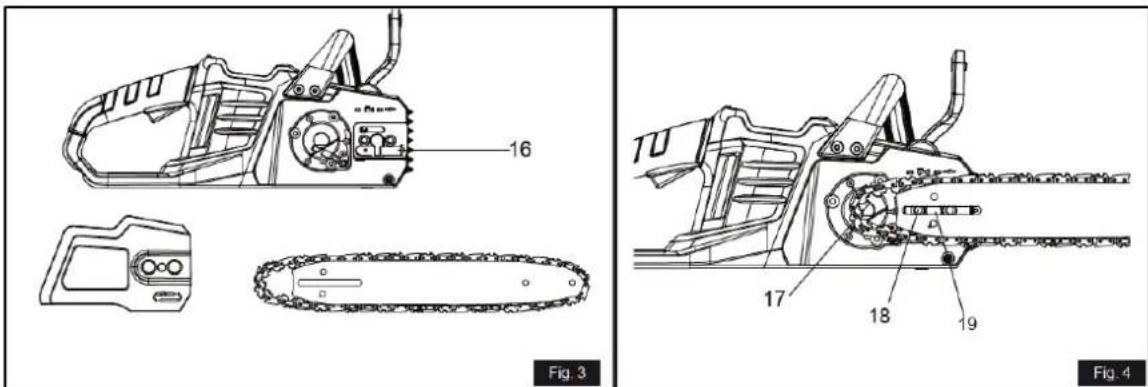
4.1.1. Assembling the sword and chain
See Figure 2-7
- Unscrew the pinion cover, tighten the knob (item 15) and remove the pinion cover.
- The chain should be oriented in the direction of chain rotation. If they are facing backward, turn them around.
- Place the chain drive links into the slot in the bar.
- Position the chain so that there is a link at the back of the sword.
- Hold the chain in position on the bar and place the links around the sprocket, ensuring it is properly assembled. Make sure the hole in the bar aligns correctly with the bolt (item 16) for tensioning the chain.
EN
- Replace the sprocket cover, turn the chain tension adjustment knob (item 13) clockwise until the saw chain is properly tensioned. Then, push the bar upwards, recheck the chain tension, and do not overtighten it.
- Once the chain is properly tensioned, tighten the knob again (item 15).
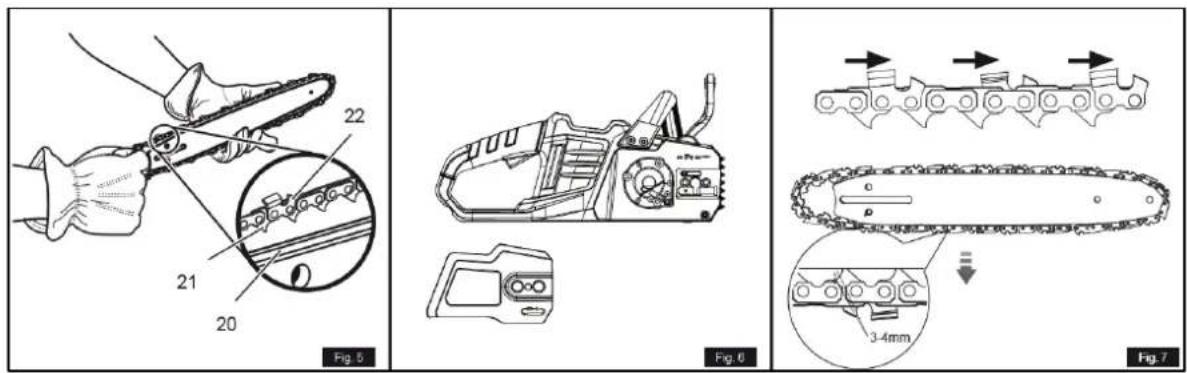
Note: The chain is correctly tensioned if, at the center of the bar, it can be lifted 3 to 4 mm from the edge of the bar. Restart the machine with a new chain and let it run for 2 to 3 minutes. After this time, check the chain tension and re-tension it if necessary.
4.2. Operation
For complete battery charging instructions, refer to the manuals for your tool's battery and charger models. Use a charger that meets the charging standard. To prevent serious personal injury, always remove the battery and keep your hands away from the locking button when carrying the tool. Before each use, check the chain tension. See Figure 2.
Warning
Remove the battery from the chainsaw before checking the chain tension or making any adjustments. Wear protective gloves when handling the chain, bar, or areas near the chain.
Pull the chain located in the center of the bottom of the blade away from the blade. The distance between the chain and the blade should be between 3 mm and 4 mm.
4.2.1. To install the battery
See Figure 2.
- Place the battery in the chainsaw.
- Align the battery slots with the slots on the chainsaw's battery port.
- Make sure the latch on the bottom of the battery pack clicks into place and that the battery pack is fully seated and secure in the chainsaw before you start using it.
4.2.2. To remove the battery
See Figure 2.
- Release the trigger to stop the chainsaw.
- Press and hold the battery latch button, located on the bottom of the battery pack.
- Remove the battery from the chainsaw.
4.2.3. Checking the chain lubricant
See Figure 1.
Check the amount of oil in the chainsaw by looking at the oil level indicator (item 7). If the oil level is low, follow the steps outlined in the relevant section of this manual.
Important note: Check the chain tension before each use of the saw.
Warning
Never use the chainsaw without sufficiently lubricating the chain, as this could damage the saw and pose a safety risk. Check the chain lubricant level before each use.
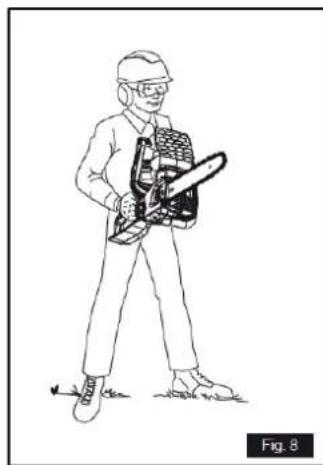
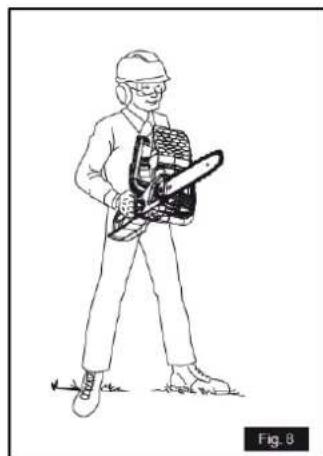
4.2.4. Hold the chainsaw
See Figure 8
Always hold the chainsaw with your right hand on the rear handle and your left hand on the front handle. Grip both handles with your thumbs and hands. Make sure your left hand grips the front handle so that your thumb is underneath. To prevent rollback, follow these safety instructions:
- Never cut with the tip of the sword. Be careful when continuing with previous cuts.
- Always start cutting when the chainsaw is already running.
- Make sure the chain is always sharp.
- Never cut more than one branch at a time. When pruning branches, be careful not to touch other branches.
- When making crosscuts, pay attention to logs that are very close together. If possible, use a sawhorse.
4.2.5. Starting and stopping the machine
Start-up
- Before starting the operation, you must install the battery in the machine.
- Press the power on/off switch (item 44), this makes the switch trigger operational.
- Start the machine: press the safety lock button (item 4) and then press the switch trigger (item 5).
Machine stoppage
- Release the ignition switch trigger (item 5) to stop the chainsaw.
4.2.6. How the chain brake works
See Figure 22
- Check the operating status of the chain brake before each use.
- Activate the chain brake by twisting your left hand around the front handle so that the back of your hand pushes the chain brake/hand guard lever towards the bar while the chain is spinning rapidly.
- Make sure to keep both hands on the saw handles at all times.
- Return the chain brake to the RUN position by grasping the top of the chain brake lever/hand guard and pulling it towards the front handlebar.
Warning
If the chain brake does not stop the chain immediately, or if the chain brake does not remain in the operating position unaided, take the saw to your authorized dealer for repair before using it.
4.3. Uses of the chainsaw
Always make sure you have good balance and hold the machine firmly with both hands while the motor is running.
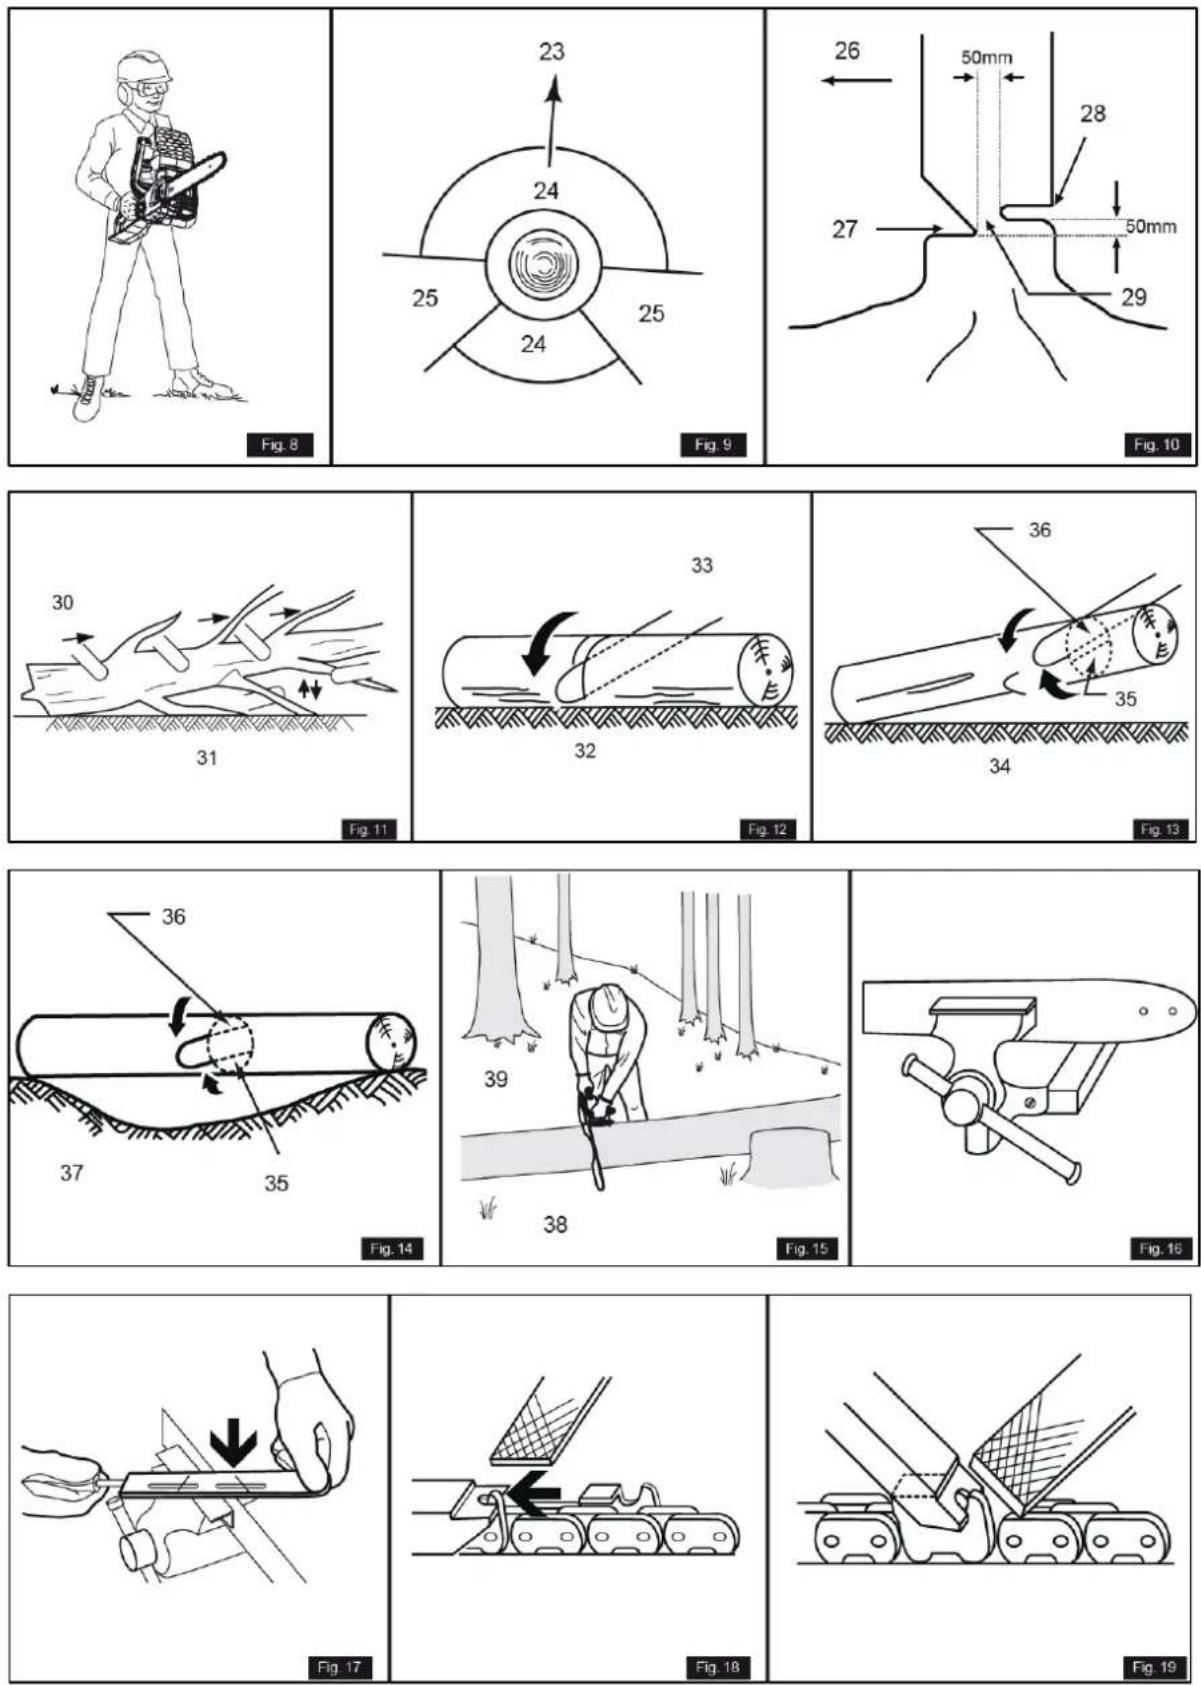
4.3.1. Basic techniques for felling, delimbing and cross-cutting
See Figure 9
TREE FELLING
When two or more people are performing felling and cutting operations simultaneously, the felling operation must be separated from the cutting operation by a distance at least twice the
EN
height of the tree being felled. Trees must not be felled in a manner that endangers any person, strikes any utility lines, or causes property damage. If a tree comes into contact with a utility line, the utility company must be notified immediately.
The chainsaw operator must remain on higher ground, as the tree is likely to roll or slide downhill after being felled.
An escape route must be planned and cleared before cutting begins. The escape route must extend rearward and diagonally to the back of the intended fall line. Do not perform this activity if you are not qualified. Do not force the machine at any time; stop the operation.
Before starting the felling, take into account the natural inclination of the tree, the location of the largest branches, and the wind direction to determine which way the tree will fall.
Remove dirt, stones, loose bark, nails, and staples from the tree.
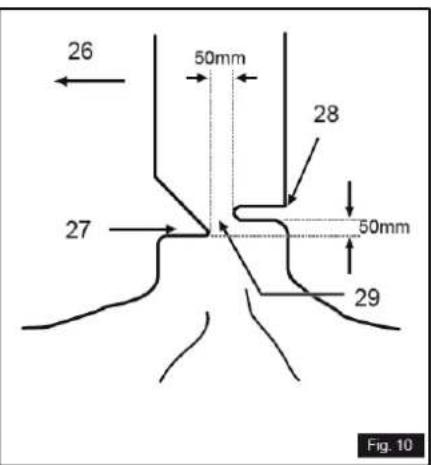
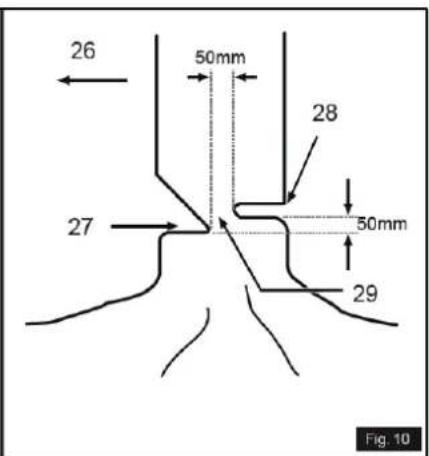
Lower cutting slit
(Cleft in a tree to direct the fall). See figure 10.
Make the notch with a diameter of 1/3 the tree, perpendicular to the direction of the fall. Make the lower horizontal cut of the notch first; this will help prevent the saw chain or bar from getting stuck when making the second notch.
Rear cut
(The final cut in a tree felling operation, made on the opposite side of the tree from the back cut). See Figure 10.
Make the back felling cut at least 50 mm higher than the horizontal cut. Keep the back felling cut parallel to the horizontal cut. Make the back felling cut so that enough wood remains to act as a hinge. The hinge wood prevents the tree from twisting and falling in the wrong direction. Do not cut the hinge. As the felling cut approaches the hinge, the tree should begin to fall. If there is a possibility that the tree will not fall in the desired direction or that it will swing backward and jam the chain, stop cutting before completing the back felling cut and use wooden, plastic, or aluminum wedges to open the cut and bring the tree down along the desired fall line. When the tree begins to fall, remove the chainsaw from the cut, stop the engine, place the chainsaw on the ground, and use the planned retreat route. Watch for falling branches and be careful where you step.
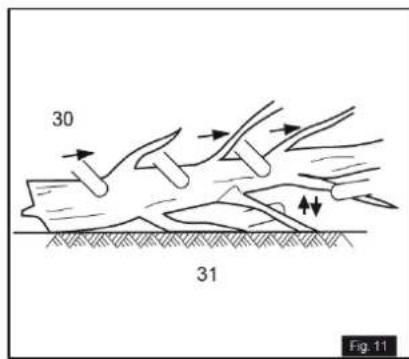
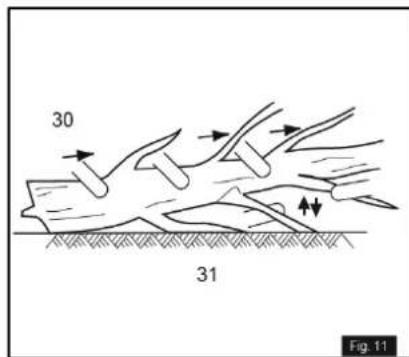
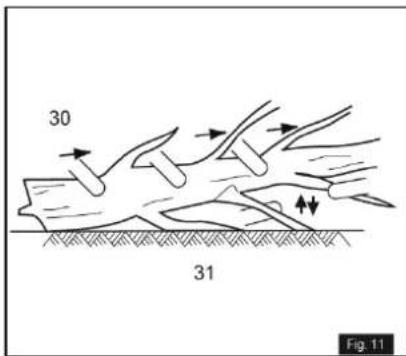
PRUNING A TREE
See Figure 11.
Pruning involves removing branches from a fallen tree, for example. When pruning, leave the larger lower branches to support the trunk and keep it off the ground. Remove small branches with a single cut. Branches under tension should be cut from the bottom up to prevent the chainsaw from getting stuck.
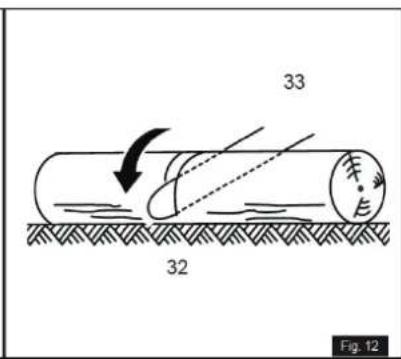
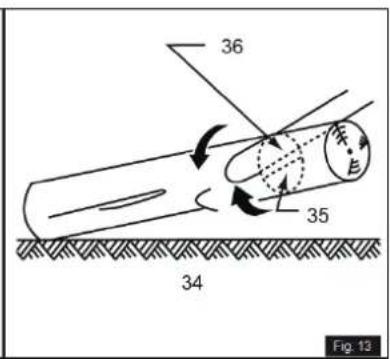
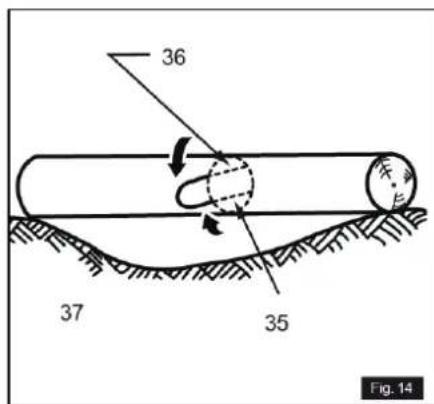
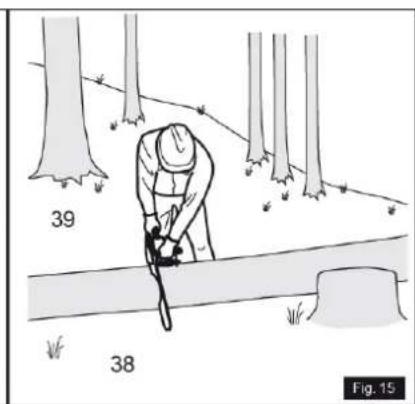
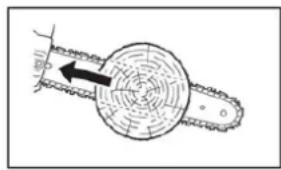
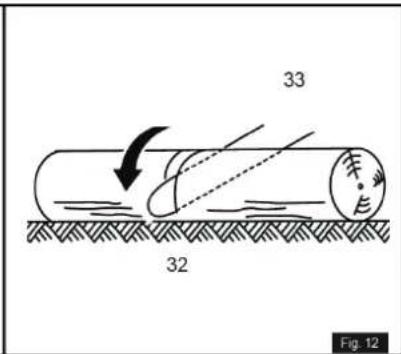
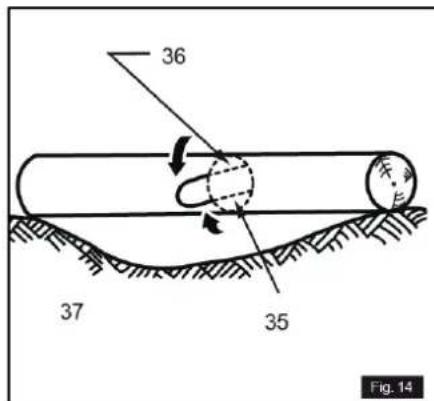
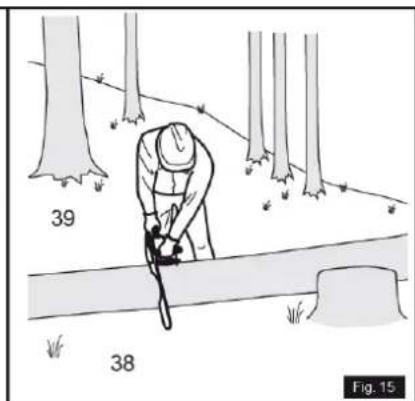
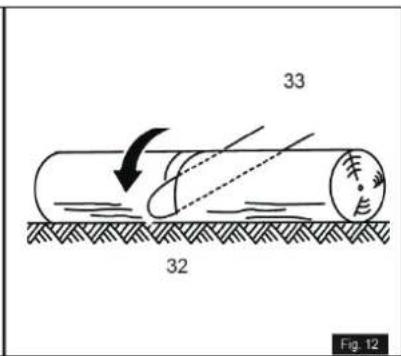
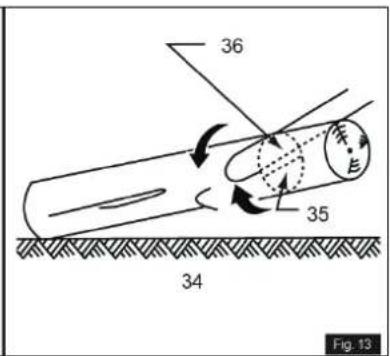
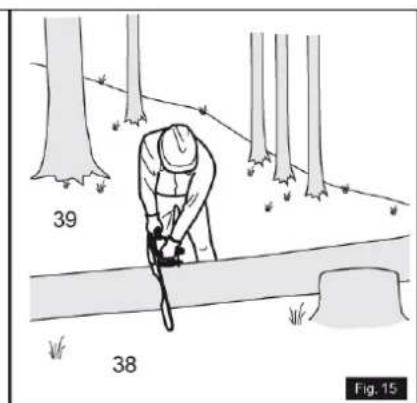
CUT LOG
See Figure 12-15
It is important to ensure that you maintain a firm stance and that your weight is evenly distributed between both feet. Whenever possible, your torso should be raised and supported using branches, logs, or wedges.
Follow these simple instructions to easily cut firewood:
- When the trunk is supported along its entire length, it is cut from the top (top cut).
- When the log is supported at one end, cut 1/3 of the diameter from the bottom (bottom cut). Then, make the final cut with a top cut to join the first cut.
-
When the log is supported at both ends, cut 1/3 of that diameter from the top (top cut). Then, make the final cut with a bottom cut on the lower 2/3 to join the first cut.
-
When cutting on a slope, always position yourself on the uphill side of the log. When cutting, to maintain full control, release the cutting pressure near the end of the cut without loosening your grip on the chainsaw handles.
Do not allow the chain to touch the ground. Once the cut is complete, wait for the saw chain to stop before moving the chainsaw. Always stop the engine before moving from one tree to another.
5. MAINTENANCE
5.1. Maintenance
Warning
When performing maintenance, use only manufacturer-approved replacement parts. Using any other part may create a hazard or damage the product. For safety and reliability, all repairs must be performed by an authorized dealer.
Always wear thick gloves when performing any maintenance on the chainsaw chain. Be careful with the chain and protect your hands to avoid injury.
To prevent serious personal injury from accidental machine start-up, disconnect the product's battery when cleaning or performing any maintenance.
All maintenance, except for the most basic tasks, must be performed by your authorized dealer. If you have any doubts, do not perform any maintenance without first consulting your dealer.
Always remove the battery from the machine before checking the chain tension or making adjustments to the chain. Wear protective gloves when handling the chain, the bar, or areas near the chain.
5.1.1. Chain tension adjustment
See Figure 2
- Loosen the gear cover adjustment knob slightly (item 15) by turning it counterclockwise.
- To increase chain tension, turn the chain tensioner adjustment knob (item 13) clockwise and check the chain tension frequently. To decrease chain tension, turn the chain tensioner adjustment knob (item 13) counterclockwise and check the chain tension frequently.
- The chain tension is correct when the distance between the chain blade and the bar is between 3 mm and 4 mm. Pull the chain down at the center of the bottom of the bar (away from the bar) and measure the distance between the bar and the chain blades.
- Tighten the pinion cover adjustment knob (item 15) by turning it clockwise.
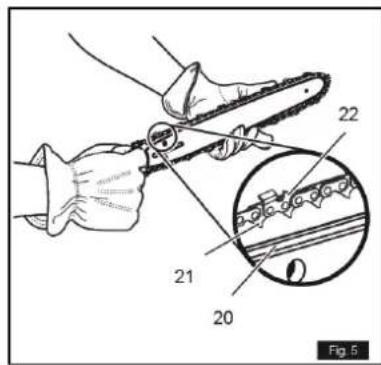
5.1.2. Replacement of the sword and chain
See figures 2, 3, 5 and 7.
- Place the machine on a flat, level surface to make adjustments to the chain.
- Make sure you have the correct replacement bar and chain.
- Unscrew the pinion cover tightening nut (item 15) by turning it counterclockwise until the pinion cover (item 14) comes loose.
EN
- Remove the sprocket cover. Remove the saw bar and chain from the unit.
- To replace the blade with a new one, unscrew the safety tip nut, mount the safety tip on the new blade and tighten the nut.
- Place the new chain in the correct direction, as shown in Figure 7, over the bar and make sure the drive links are aligned in the groove of the bar (Figure 5).
- Attach the bar to the chainsaw and wrap the chain around the drive sprocket, as shown in Figure 3.
- Replace the sprocket cover (item 14), tighten the cover and tighten the knob (item 15).
- Adjust the chain tension according to the instructions in this manual. If you have any questions, contact your dealer.
5.1.3. Add lubricant for chains and bars
- Unscrew and remove the oil reservoir cap (item 6).
- Pour the oil into the reservoir and check the oil level indicator (item 7). Make sure no dirt enters the reservoir while filling it.
- Replace the tank lid and tighten it.
- A full oil tank will allow you to use the saw for 20-40 minutes.
5.1.4. Other adjustments and points to consider
Sword protector
See Figure 1
The guard for the bar and chain must be attached to the chain and bar as soon as the cutting work is completed and whenever it is necessary to transport the machine.
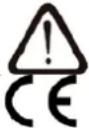
Sharpening and adjusting the chain
See Figures 16 to 21.
When the chain has difficulty penetrating the wood, it needs to be sharpened:
- Tighten the chain. Secure the sword in a vise so the chain can slide freely. Attach the file to the holder and position it over the blade at a 35° angle.
- File only with forward movements until all worn parts of the edge are removed.
- Count the number of passes you give to the cutter as a reference and file with the same number of passes on all other cutters.
- If the depth gauge protrudes from the template after several sharpenings, readjust its level. Use a flat file.
- Finally, round off the depth gauge.
Note: For greater safety, it is recommended that sharpening be carried out by your official distributor.
Sword maintenance
When you've finished working, clean the groove and oil passages with a scraper hook. Periodically trim the sides of the rails with a file. If this isn't done regularly, the beveled edges could break and damage the blade.
If one rail is higher than the other, it needs to be leveled with a flat file and then smoothed with a file or fine-grit abrasive paper.
Warning
During maintenance, use only manufacturer-approved replacement parts. Using any other part may be hazardous or cause damage to the product, and the warranty will be voided.
To avoid serious personal injury, always remove the battery from the tool when cleaning or performing any maintenance.
General maintenance
Before each use, inspect the entire product for damaged, missing, or loose parts, such as screws, nuts, bolts, caps, etc.
Tighten all fasteners and caps securely and do not use this product until all missing or damaged parts have been replaced. Contact your authorized dealer for assistance.
Avoid using solvents to clean plastic parts. Most plastics are susceptible to damage from various types of commercial solvents. Use clean cloths to remove dirt, dust, oil, grease, etc.
5.2. Cleaning
- After each use, clean the chain and bar debris with a soft brush. Wipe the chainsaw surface with a clean cloth dampened with a mild soap solution.
- For a deep clean, remove the side cover assembly, lower the bar and chain, and then use a soft brush to thoroughly remove debris from the bar, chain, and sprocket.
- Always clean wood chips, sawdust, and dirt from the bar groove when replacing the chain.
Warning
- Never use water to clean your tool. Avoid using solvents when cleaning plastic parts. Most plastics are susceptible to damage from various types of commercial solvents. Use a clean cloth to remove dirt, dust, oil, grease, etc.
- Chemicals can damage, weaken, or destroy plastic, which can lead to serious personal injury.
5.3. Transportation and storage
- Before transporting the chainsaw, always remove the battery and place the chain guard over the bar and chain. If you are going to make several cuts with the chainsaw, it must be switched off between each cut.
- Remove the battery from the unit before storing it.
- Clean any foreign material from the unit.
- Store it in a place inaccessible to children and/or pets.
- Keep it away from corrosive agents, such as gardening chemicals and de-icing salts.
- Store and charge the batteries in a cool, dry place. Temperatures above or below normal room temperature will shorten battery life.
- Never store discharged batteries. Store batteries with a proper charge level. All batteries gradually lose charge. The higher the temperature, the faster they will lose charge. If you are going to store the unit for an extended period without use, charge the battery as usual every six months. This practice will prolong the battery's lifespan.
- Do not store or transport the chainsaw while it is running. Always disconnect the battery before storing or transporting it.
- Always place the bar cover over the bar and chain before storing or transporting the chainsaw. Be careful to avoid the sharp teeth of the chain.
- Thoroughly clean the chainsaw before storing it. Store the chainsaw indoors in a dry, locked location, out of reach of children.
6. TROUBLESHOOTING
Danger
Insufficient maintenance and care can lead to accidents and unforeseen injuries. Repairs and work necessary for the proper use of the machine must be carried out by qualified and authorized personnel. For more extensive maintenance or repairs, take the machine to your authorized dealer. Power tool repairs must be performed by a specialized service.
Note: If you have any questions or problems persist, please contact your official distributor.
| Problem/symptom | Possible cause | Possible solution |
| The sword and chain are hot and smoking. | Check that the chain is not too tight.The sword's lubricant reservoir is empty. | Set the chain tension correctly.Check the sword's lubricant reservoir. |
| The engine runs, but the chain doesn't turn. | The chain tension is too high. Check the bar and chain assembly.Check that the sword and chain are not damaged. | Inspect the sword and chain.See the section on chain tension.See the section on replacing the sword and chain. |
7. WARRANTY
If your product suffers any manufacturing defect during the established warranty period, please contact or go directly to your point of sale with the necessary documentation.
Your purchase receipt should be kept as proof of the purchase date. Your tool must be returned to your distributor in acceptable and clean condition, in its original molded case, if applicable, along with your corresponding proof of purchase.
7.1. Warranty period
The legal warranty period for the product begins on the original date of purchase by the first initial buyer and its duration will be that established by the Royal Decree-Law on the protection of consumers and users against situations of social and economic vulnerability of the year corresponding to the time of acquisition of the product.
Some countries do not have limitations on how long an implied warranty lasts or do not allow the exclusion or limitation of consequential or incidental damages, in which case the above limitation and exclusion may not apply to you. This warranty gives you specific legal rights, and you may also have other rights that vary from state to state or country to country.
7.2. Exclusions
This warranty does not cover product damage or performance problems caused by:
- Natural wear and tear from use.
- Misuse, negligence, careless operation, or lack of maintenance.
- Defects caused by improper use, damage caused by handling by personnel not authorized by Anova or use of non-original spare parts.
- Defects in normal wear parts, such as bearings, brushes, cables, plugs or accessories such as drills, drill bits, saw blades, etc.
- Damage or defects resulting from abuse, accidents, or alterations.
- Incorrect use and storage (explicit reference to the fact that the rules described in the operating instructions have not been followed).
- Wear and tear caused by the customer (e.g., broken saw blades, consumed carbon brushes, etc.).
- Wear and secondary damage due to lack of maintenance, repair, lubricants (e.g., overheating damage due to blocked cooling slots, bearing damage as a result of dirt, frost damage, etc.)
- Damage as an obvious result of overuse/overload.
- Damage caused by inappropriate supplies (e.g., incorrect fuel)
- Load-induced breakage of housing components or accessories due to abnormal stress
- Load-induced deformation of the housing components or accessories due to abnormal stress.
- Damage resulting from the operation of supplies that are overfilled or leak due to improper storage, improper cleaning agents, or other damaging chemical components.
- Damage due to improper exposure to extreme temperatures (e.g., frost cracking, thermal deformation of components, etc.)
- Damage from permanent exposure to ultraviolet radiation.
- Damage caused by inadequate maintenance.
- Any damage caused by failure to follow the instructions in the instruction manual
- Any product that has been repaired by an unqualified professional.
- Any product connected to an unsuitable power source (amps, voltage, frequency).
- Any damage caused by external influences (water, chemicals, physical, impacts) or foreign substances.
- Use of unsuitable accessories or parts.
- It does not cover defects in normal wear and tear parts, nor does it cover damage or defects resulting from abuse, accidents or alterations, nor transportation costs.
Furthermore, the warranty is voided if the product has been altered or modified, or if the trademark/serial number of the machine has been defaced or removed.
Routine maintenance, tuning, adjustments, or normal wear and tear are not covered under this warranty.
This manual does not cover all possible situations regarding warranty exclusions; for more information, please contact your nearest Anova distributor.
7.3. In case of incident
The warranty must be correctly completed with all the requested information and accompanied by the purchase invoice.
Anova reserves the right to refuse any claim where the purchase cannot be verified or where it is clear that the product was not properly maintained (maintenance, clean ventilation slots, lubrication, regularly maintained carbon brushes, cleaning, storage, etc.).
Private use is defined as personal domestic use by an end consumer. Commercial use, on the other hand, means all other uses, including uses for business purposes, income generation, or rental. Once the product has been used for commercial purposes, it will be considered a commercial product thereafter for the purposes of this warranty.
These are our standard warranty terms, but occasionally there may be additional warranty coverage not specified at the time of publication. For more information, please contact your nearest authorized Anova dealer or visit www.millasur.com.
Warranty service is only available through authorized Anova distributors. You can find your nearest distributor on our distributor map at www.anova.es.
8. ENVIRONMENT
It is essential to ensure that products and their components are disposed of responsibly to protect the environment. Below, you will find general guidelines for the proper disposal of various materials used in your machine.
Dispose of your machine in an environmentally friendly way. We shouldn't throw machines away with the regular household waste. Their plastic and metal components can be sorted according to their type and recycled.
When disposing of machinery or metal products, it's important to remember that their metal components, such as iron, steel, or aluminum, must be properly recycled at metal recycling facilities. This will contribute to their potential reuse in the manufacture of new products.
Oils and Fuels
Used oils and fuels, among other things, must be recycled properly. Do not pour these liquids down drains, into soil, rivers, lakes, or seas, as they can cause serious environmental damage. Take them to a recycling center or specialized collection point. This process helps prevent water and soil contamination and allows for the safe reuse of oils, if possible.
Plastics
Plastics should be separated and taken to designated recycling points. Do not throw them away with regular household waste. Plastics can be recycled, helping to reduce waste.
Cardboard
Packaging materials, such as cardboard, are recyclable. Be sure to separate clean, dry cardboard and place it in designated recycling containers or at an official waste collection point. Do not dispose of it with household waste.
Batteries
Batteries and other electronic components from machines must be disposed of at designated collection points to prevent the release of toxic substances into the environment. Do not throw them away with regular trash. Take them to appropriate recycling centers for safe and responsible handling.
By following these guidelines, you contribute to environmental protection and resource conservation. For more information on material disposal and recycling, please contact your local authorities and consult the necessary information.
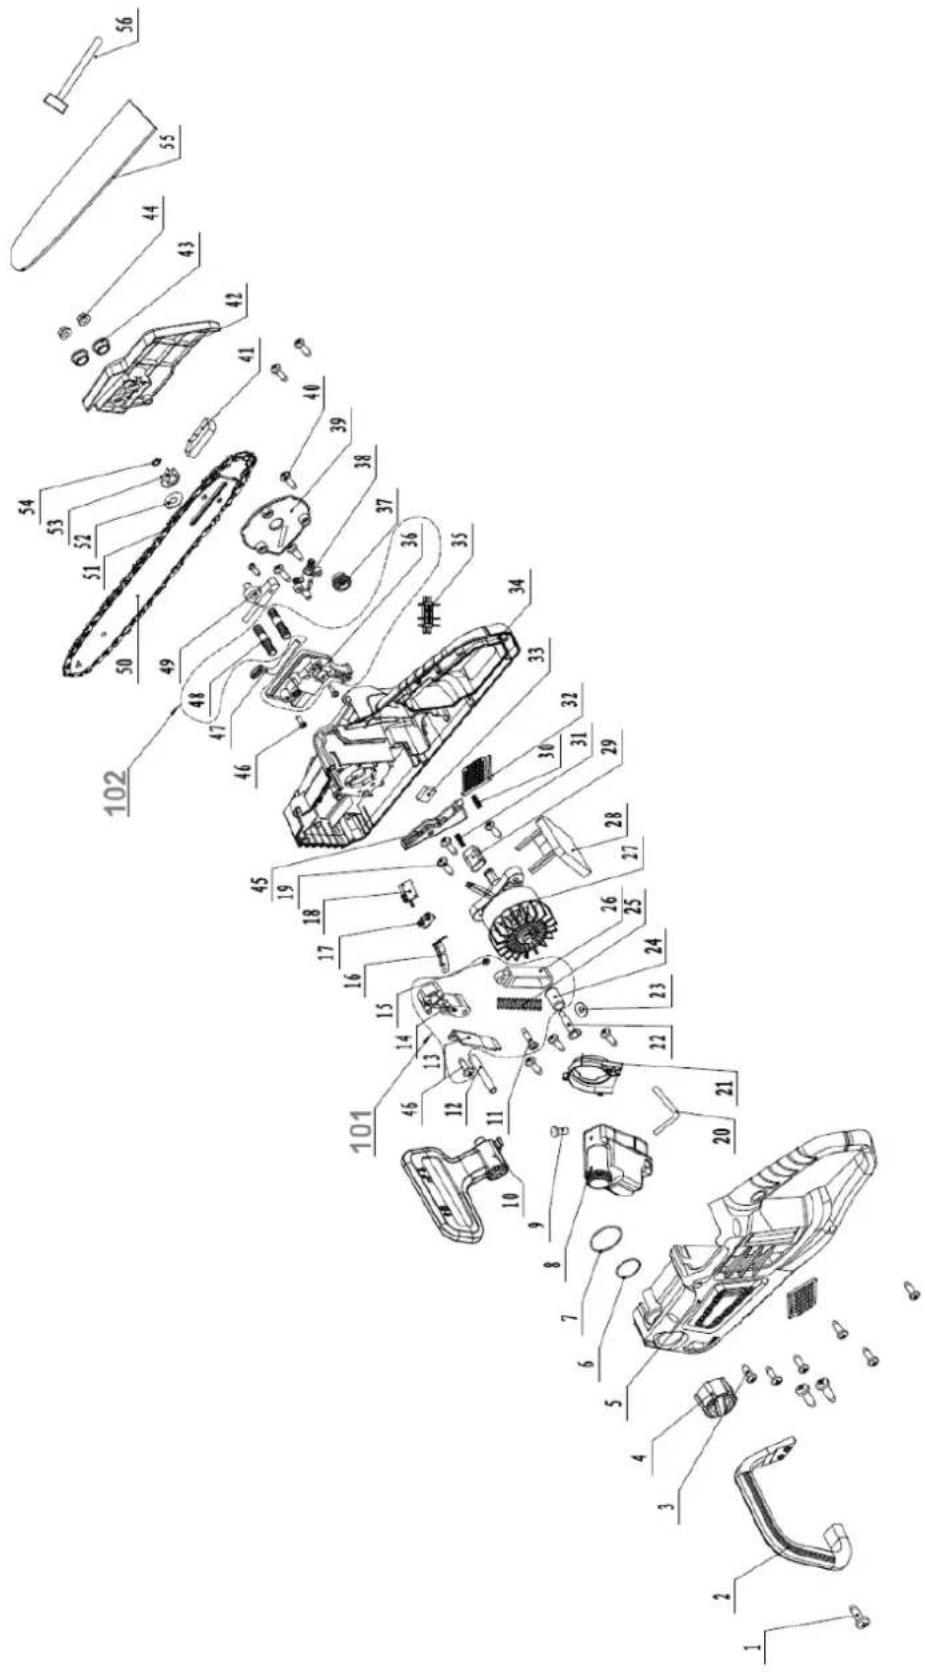
9. EXPLODED VIEW
10. CE CERTIFICATE
DISTRIBUTION COMPANY
MILLASUR, SL
CE DECLARATION OF CONFORMITY
In compliance with the various EC directives, this document confirms that, due to its design and construction, and as indicated by the CE marking affixed by the manufacturer, the machine identified herein meets the relevant and fundamental health and safety requirements of the EC directives. This declaration authorizes the product to display the CE marking.
In the event that the machine is modified, and this modification is not approved by the manufacturer and communicated to the distributor, this declaration will lose its value and validity.
Machine name: BATTERY-POWERED CHAINSAW
Model: E40CS16
Recognized and approved standard to which it conforms:
Directive 2006/42/EC 2014/30/EU
Tested according to regulations:
EN IEC 55014-1:2021
EN IEC 55014-2:2021
EN 62841-1:2015+AC:2015
EN 62841-4-1:2020
Company seal
MILLASUR, S.L.U. Rúa Eduardo Pondal, 23 - Pol.Emp..Sigüeiro 15688-Oroso-A Coruña Tel. (+34) 981 69 64 65 - Fax (+34) 981 69 08 61 e-mail: millasur@millasur.com CIF: B-15 749 922
30/09/2025
Kettensäge
E40CS16
ANOVA®
natural_image
Close-up of a black-and-white photo of a Li Auto chain saw (no visible text or symbols)anova® e+
DE
Millasur SLU
Rúa Eduardo Pondal, Nr. 23 – Pol. Ind. Sigüeiro
15688 – Oroso – A Coruña – 981 696 465 – www.millasur.com


anova®
natural_image
Diagram of a mechanical or industrial process showing a rotating blade with a circular component and directional arrows (no text or symbols)natural_image
Diagram of a chain drive mechanism with gear and blade (no text or labels)natural_image
Illustration of a person using a power tool to cut a tree trunk in a forest (no text or symbols)
natural_image
Technical line drawing of a mechanical clamp or vise (no text or symbols)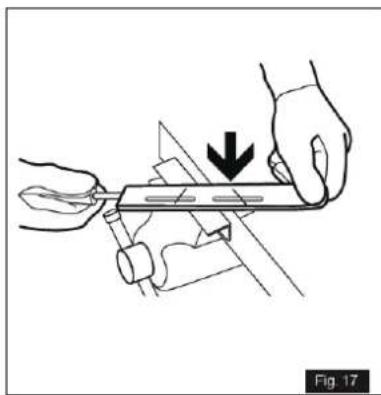
natural_image
Illustration of hands using a tool to cut or mark a surface, with a downward arrow indicating the process (no text or symbols present)
natural_image
Mechanical assembly diagram showing a conveyor belt system with a mesh structure and an arrow indicating motion (no text or symbols)
natural_image
Technical line drawing of a mechanical assembly with clamping components (no text or symbols)
natural_image
Illustration of a hand using a tool to press or adjust a device, with arrows indicating motion (no text or symbols)
natural_image
Illustration of two hands using a tool to cut a piece of material (no text or symbols visible)
DE
10. CE-ZERTIFIKAT
natural_image
Close-up of a black-and-white photo of a Li Auto chain saw (no visible text or symbols)anova® e+
NL
anova®
ANDERE WAARSCHUWINGEN:
natural_image
Diagram of a mechanical device with a rotating wheel and chain, showing motion direction (no text or symbols)natural_image
Diagram of a chain drive with gear teeth and a central blade, showing no text or symbols2. PRODUCTBESCHRIJVING
NL

natural_image
Technical line drawing of a mechanical device with two views: top shows internal components, bottom shows a close-up view (no text or symbols)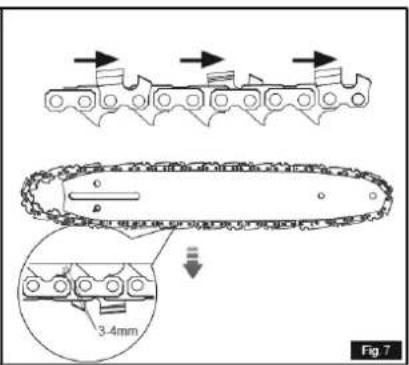
natural_image
Line drawing of a person wearing a hard hat and holding a chainsaw (no text or symbols)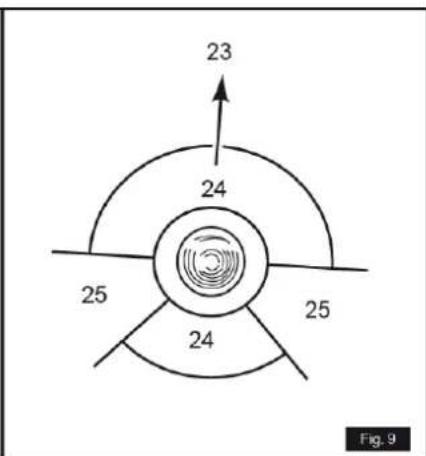

natural_image
Illustration of a person using a saw to cut a tree trunk in a forest (no text or symbols)
natural_image
Technical line drawing of a mechanical clamp or bracket assembly (no text or symbols)NL

natural_image
Illustration of hands using a tool to cut or mark a mechanical component, with a downward arrow indicating the process (no text or symbols present)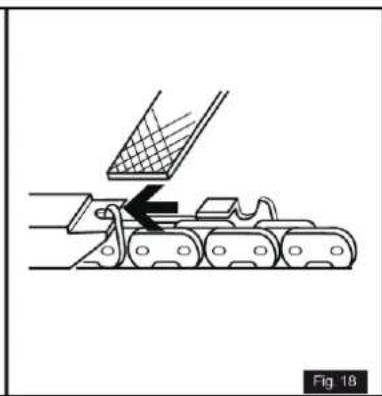
natural_image
Mechanical assembly diagram showing a conveyor belt system with a grid-patterned component (no text or symbols)
natural_image
Technical line drawing of a mechanical assembly with hands operating a tool (no text or symbols)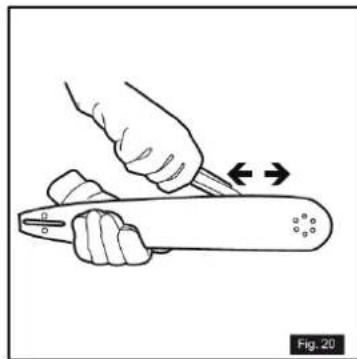
natural_image
Illustration of a hand using a tool to press or adjust a surface, with arrows indicating direction (no text or symbols)
natural_image
Illustration of two hands using a tool to cut a piece of material (no text or symbols present)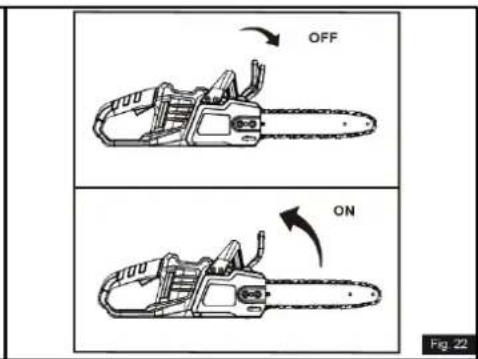
6. PROBLEEMOPLOSSING
Gevaar
10. CE-CERTIFICAAT
DISTRIBUTIEBEDRIJF
MILLASUR, SL