MG262 - Saw Anova - Free user manual and instructions
Find the device manual for free MG262 Anova in PDF.

User questions about MG262 Anova
0 question about this device. Answer the ones you know or ask your own.
Ask a new question about this device
Download the instructions for your Saw in PDF format for free! Find your manual MG262 - Anova and take your electronic device back in hand. On this page are published all the documents necessary for the use of your device. MG262 by Anova.
USER MANUAL MG262 Anova
natural_image
Illustration of a chain drive with visible branding and external blade (no text or symbols on the device itself)ANOVA®
natural_image
Technical line drawing of a chain-linking device with an inset showing the blade and gear (no text or symbols)
natural_image
Illustration of a hand using a chainsaw to cut a chain, showing motion direction (no text or symbols)
IMPORTANTE
ACEITE DE CADENA
natural_image
Line drawing of a hand using a chainsaw to lift a tree stump (no text or symbols)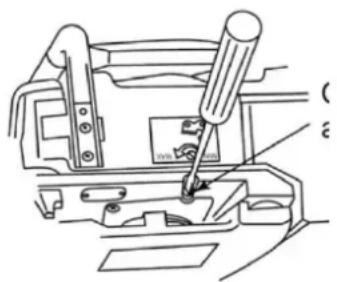
natural_image
Technical line drawing of a mechanical assembly with no visible text or symbolsnatural_image
Line drawing of a mechanical device with no visible text or symbols(b)
natural_image
Diagram of a mechanical device with directional arrows indicating movement or force (no text or symbols)natural_image
Illustration of a person using a chainsaw to cut tree stump (no text or symbols)1) Apague el motor.
natural_image
Prohibition sign showing a diagonal pair of scissors crossed over a pipe, enclosed in a circle (no text or symbols)natural_image
Illustration of a person using a saw to cut a chain with a circular cutterhead nearby (no text or symbols)natural_image
Illustration of a person using a power tool to cut a circular saw blade, with an arrow indicating the process (no text or symbols present)natural_image
Illustration of a hand using a tool to lift a ball on a cutting board, with an arrow indicating rotation (no text or symbols)natural_image
Simple line drawing of a ground surface with a downward arrow indicating a drop or fall (no text or symbols)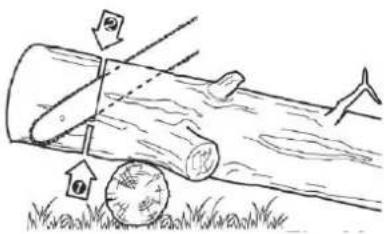
natural_image
Two hand-drawn diagrams showing a person climbing a ladder to lift a tree trunk, with no text or symbols present.
natural_image
Technical line drawing showing a hand operating a mechanical component with a close-up view of the handle (no text or symbols present)natural_image
Technical line drawing of a mechanical device with gears and rollers (no text or symbols)3. Espada de corte
natural_image
Illustration of a hand holding a knife with a labeled tool (1), no text or symbols present4. Otros
natural_image
Line drawing of a mechanical component with a tool inserted, showing hands and a circular component (no text or symbols)natural_image
Two technical line drawings of a mechanical tool, one showing a tree stump and the other a clamping device (no text or symbols)

natural_image
Illustration of a black-and-white chain drive with visible branding and external gear (no text or symbols on the device itself)ANOVA®
Millasur, SL.
Rúa Eduardo Pondal, nº 23 - Pol. Ind. Sigüeiro
15688 - Oroso - A Coruña 981 696465 www.millasur.com
natural_image
Illustration of a no-smoking cigarette placed on a campfire (no text or symbols)ÓLEO DE CORRENTE
Use óleo de serra especial durante todo o ano.
natural_image
Technical line drawing of a mechanical assembly with no visible text or symbolsnatural_image
Line drawing of a person using a power tool to lift a tree stump (no text or symbols)natural_image
Line drawing of a mechanical device with chains and gears (no text or symbols)(b)

natural_image
Technical line drawing of a mechanical component with no visible text or symbols
natural_image
Line drawing of a person using a chainsaw to cut a tree stump (no text or symbols)7. CORTE COM A SERRA DE CORRENTE
natural_image
Illustration of a person using a chain mill to cut a circular saw (no text or symbols present)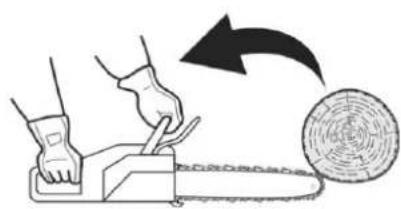
natural_image
Illustration of a person using a power tool to cut a tree stump with a circular cutter (no text or symbols)
natural_image
Illustration of a hand using a tool to cut tree bark with a curved arrow indicating rotation (no text or symbols)Poda
natural_image
Technical line drawing showing a hand operating a mechanical device with a tool, alongside a close-up of the component being held (no text or symbols present)
natural_image
Technical line drawing of a mechanical device with gears and chains (no text or symbols)- Espada de corte
natural_image
Line drawing of a hand using a tool to adjust or install a mechanical component (no text or symbols visible)- vela de ignição
natural_image
Two technical line drawings of a mechanical tool or bracket, showing a cut and a pin (no text or symbols present)
Directiva 2006/42 / CE
Testado de acordo com:
EN ISO 11681-1: 2011
Sello de empresa
millasûr
Rúa Eduardo Pondal, n° 23 Pol. Ind. Sigüeiro - 15688 Oroso - A Coruña Tlf. 981 696465 / Fax. 981 690861
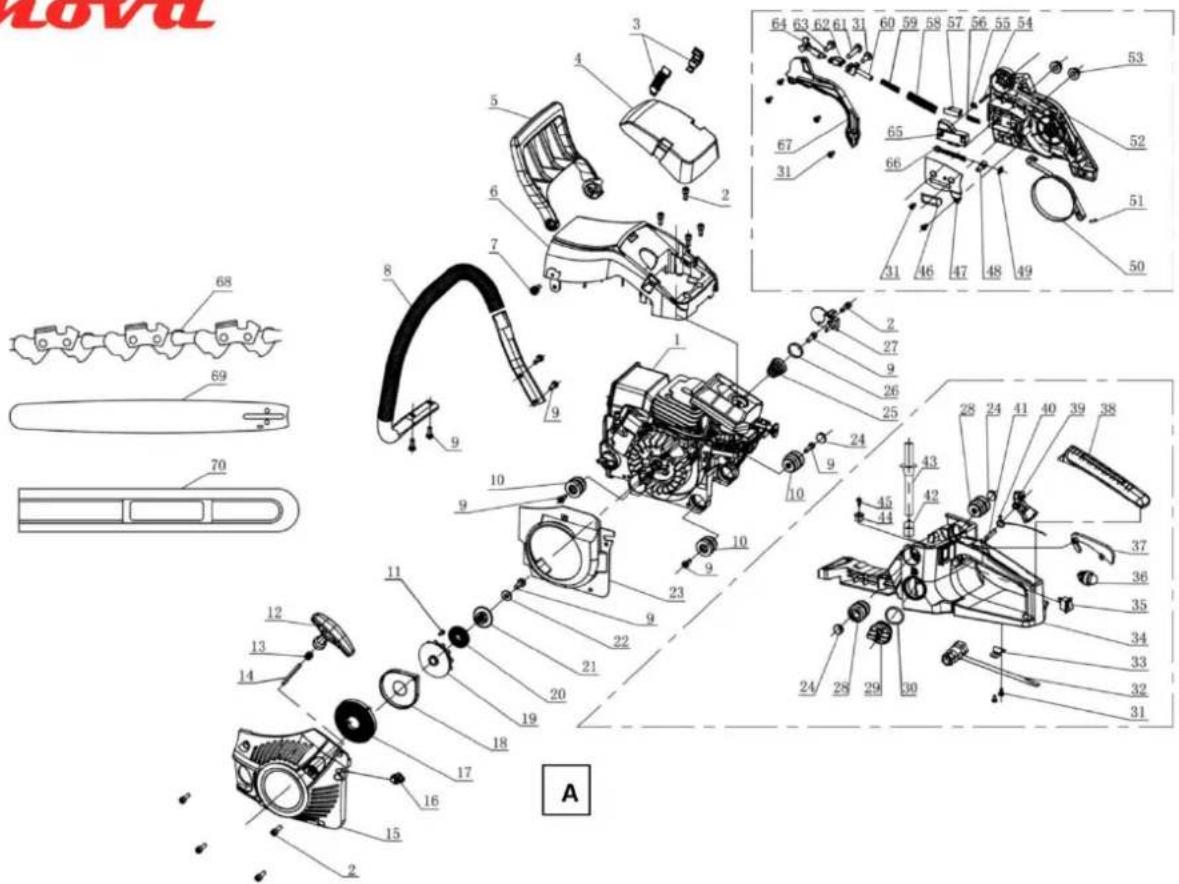
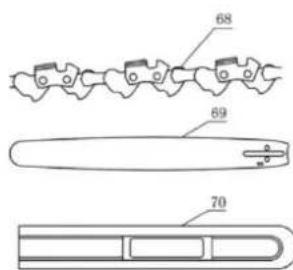
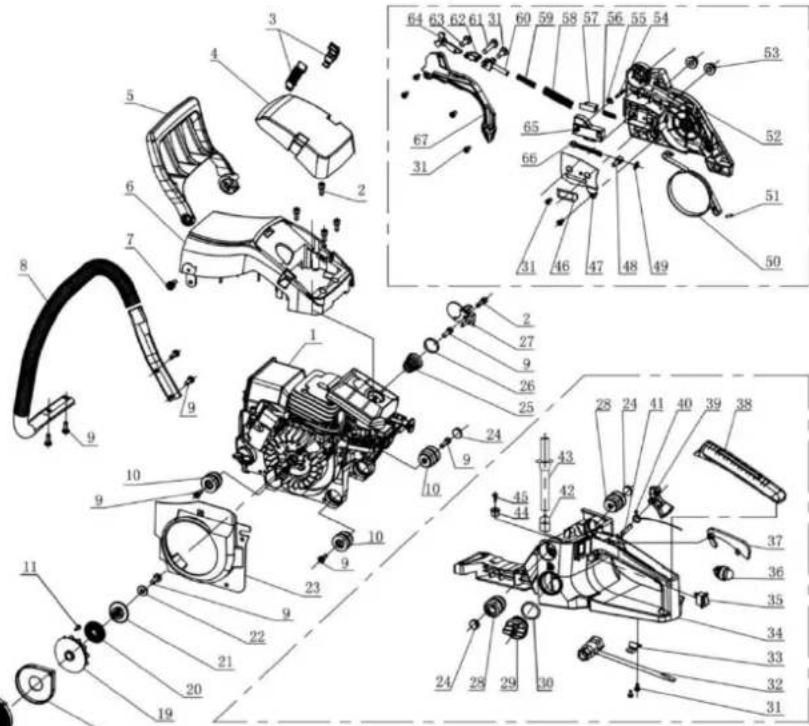
16. VISTA EXPLODIDA
anova

natural_image
Illustration of a chain drive with visible branding and external blades (no text or symbols on the device itself)ANOVA®
INFORMATIONS SUR CE MANUEL

natural_image
Technical line drawing of a chain-linking machine with gear and blade assembly (no text or symbols)

IMPORTANT
HUILE DE CHAÎNE
natural_image
Line drawing of a person using a chain-linking tool to lift a tree stump (no text or symbols)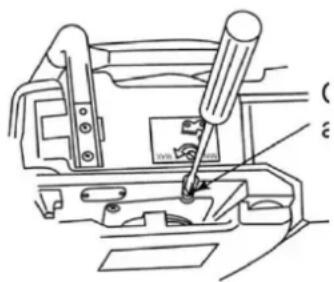
natural_image
Line drawing of a mechanical device with no visible text or symbols(b)

natural_image
Diagram of a mechanical device with directional arrows indicating movement or force (no text or symbols present)natural_image
Illustration of a person using a chainsaw to lift a tree stump (no text or symbols)natural_image
Illustration of a person using a power saw to cut a tree stump with a circular pile, showing mechanical advantage (no text or symbols)natural_image
Illustration of a person using a power tool to cut a circular saw blade, showing motion direction (no text or symbols)natural_image
Illustration of a person using a chain-linking tool to cut tree logs, with no text or symbols present.natural_image
Simple line drawing of a pipe or channel with a downward arrow indicating flow or direction (no text or symbols)
natural_image
Two identical line drawings of a tree with a ladder and crossbar, no text or symbols present.
natural_image
Technical line drawing showing two mechanical assembly steps: one with a tool and component, the other with a hand holding a motor (no text or symbols)natural_image
Technical line drawing of a mechanical device with gears and chains (no text or symbols)3. Épée de coupe
natural_image
Illustration of a hand holding a knife with a labeled tool (1), no text or symbols presentQuatre. Autres
natural_image
Line drawing of a mechanical component with a tool inserted, showing internal components and hands (no text or symbols)natural_image
Two technical line drawings of a mechanical tool, one showing a tree stump and the other a clamping device (no text or symbols)
DÉCLARATION CE DE CONFORMITÉ
Directive 2006/42 / CE
Testé selon:
EN ISO 11681-1: 2011
Sceau de la société
millasûr
Rúa Eduardo Pondal, n° 23 Pol. Ind. Sigüciro - 15688 Oroso - A Coruña Tlf. 931 696465 / Fax. 981 690861
17/06/2020
16. PIÈCES
anova
A

Instructions and user manual
MG246
MG252
MG262

natural_image
Black-and-white photo of a chain drive with visible branding and external gear (no text or symbols on the device itself)ANOVA®
ANOVA wishes to congratulate you for choosing one of our products and guarantees the assistance and cooperation that has always distinguished our brand over time.
This machine is designed to last for many years and to be very useful if used in accordance with the instructions contained in the user manual. We therefore recommend that you read this instruction manual carefully and follow all our recommendations.
For more information or questions, you can contact us through our web supports such as www.anovama Maquinaria.com.
INFORMATION ABOUT THIS MANUAL
Please pay attention to the information provided in this manual and on the appliance for your safety and that of others.
- This manual contains instructions for use and maintenance.
- Take this manual with you when you go to work with the machine.
- Contents are correct at time of printing.
- The rights to make alterations are reserved at any time without affecting our legal responsibilities.
- This manual is considered an integral part of the product and should remain with it in the event of loan or resale.
- Ask your dealer for a new manual in case of loss or damage.
READ THIS MANUAL CAREFULLY BEFORE USING THE MACHINE
To ensure that your machine provides the best results, please read the usage and safety guidelines carefully before using it.
OTHER WARNINGS:
Incorrect use could cause damage to the machine or other objects. Adapting the machine to new technical requirements could cause differences between the content of this manual and the product purchased.
Read and follow all instructions in this manual. Failure to follow these instructions could result in serious personal injury.
CONTENTS
- Contents of the box
- Symbols on the machine
- Safe operation
- Chain and cutter bar installation
- Fuel and chain oil
- Operation
- Cut with the chainsaw
- Maintenance
- Maintenance of the saw chain and guide bar
- Storage
- Waste disposal and environmental protection
- Warranty
- Troubleshooting guide
- Specifications
- CE certification
- Parts

Attention! Read these notes before starting to work with the machine and keep them with the machine.
Read the instructions carefully. Familiarize yourself with the control elements to be able to use the device safely. Always keep these operating instructions with the chain saw.

Attention! Risk of hearing damage.
Under normal operating conditions, this device can expose the operator to a noise level of 80 dB (A) or more.
The chain saw will be held with the right hand on the rear handle and the left hand on the front handle.

Attention: Protection against noise! Please observe local
hearing protectors.
regulations when using your device. Use appropriate and approved
Intended / unintended use:
The chain saw is used to cut logs, square beams and to cut branches, according to the available cutting length. The chainsaw is designed for cutting in wood.
Appropriate personal protective equipment (PPE) is required in accordance with applicable regulations.
This product is designed to be used by a trained logging operator. Damage or injury resulting from improper application will be the responsibility of the user / operator and not the manufacturer.
Suitable cutting chains and bar combinations may be used as mentioned in the operating instructions for the indicated machine only.
People who operate the machine should be trained and familiar with this product and think of all possible hazards. In addition to the current regulations for the prevention of accidents, special attention will be paid to the prevention of serious injuries and other general regulations in accordance with industrial medicine.
Unauthorized changes to the machine completely exclude a support from the manufacturer, as well as possible causes in possible damage. Such modifications will also void the warranty.
It is important to especially observe different unforeseen events depending on the type and construction of the machine and a possible danger or damage:
- Contact with the unprotected saw chain (cuts)
- Unexpected and sudden movement of the saw blade (cuts)
- Damage to the hearing system, if ear protection is not prescribed
- Inhalation of poisonous particles, combustion engine exhaust gases.
- Contact of gasoline on the skin and irritations.
- High noise. Keep rest periods and you may need to restrict work hours to a minimum. For your personal protection and protection of people working in the vicinity, suitable hearing protection should be worn.
- Vibration.

Warning: The current value of vibration emission during the use of the machine may deviate from the manual or the specified manufacturer. This can be caused by the
following factors, before or during each use should be considered:
- If the machine is used correctly
- If the method of cutting the material and how it is processed correctly.
- The state of the machine.
- Condition of the sharpening of the cutting tool.
- The grab handles are mounted back on the optional vibration handles and are attached to the body of the machine.
If you notice an unpleasant sensation or discoloration of the skin on your hands while using the machine, stop working. Get a proper work break. Without observing the appropriate work breaks, there may be a vibration syndrome.

Warning: there may be national regulations (Occupational Health and Safety, environment) that may restrict the use of the chainsaw. Check local regulations.
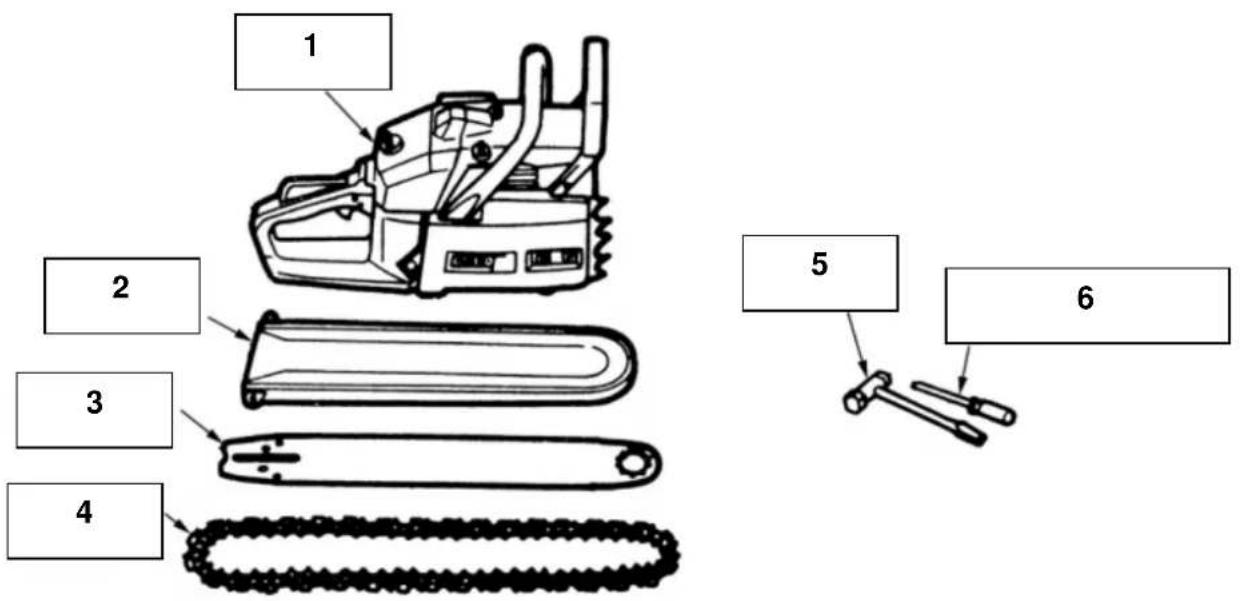
1 CONTENTS OF THE BOX
- Motor unit
- Sword guard
- Guide bar
- Cutting chain
- Spark plug wrench
- Carburetor adjustment screwdriver
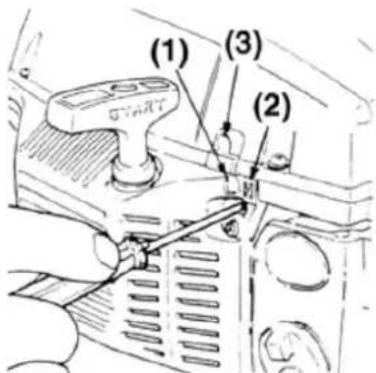
2.SYMBOLS ON THE MACHINE

(1) Read, understand and follow all warnings.
(2) Warning! Kickback hazard. Be careful of the kickback of the chain saw and avoid contact with the tip of the bar.
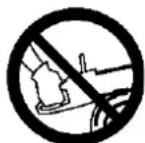
(3) Do not use the saw with one hand.

(4) Always use the saw with both hands

(5) You should wear ear, eye and head protection.

(6) Read the operator's instruction book before operating this machine.

(7) Always wear anti-vibration and anti-cut safety gloves when using this device.

(8) Always wear slip resistant boots when operating the machine.
For safe operation and maintenance, symbols are embossed on the machine. In accordance with these guidelines, be careful not to make any mistakes.

(a). The "MIX GASOLINE" mixture fuel fill port Position: near the fuel cap.

(b). The chain oil refill port.
Position: near the oil cap

(c). Operate the engine switch
By turning the switch to the "O" position, the motor will immediately stop, "O" and "I" are displayed on the switch button.
Position: behind and to the left of the rear handle.

Pull out the primer button to close it; press it to open it.
Position: r behind and to the left of the rear handle.

(e). Oil pump adjustment
If you turn the rod clockwise with a screwdriver, the oil flow flows more, and if you turn it counter-clockwise, less.
Position: Bottom of the rear handle.

(f). The screw under the "H" seal is the high speed mix adjusting screw..

The screw under the "L" is the low speed adjusting screw.
The screw on the "T" is the idle adjustment screw.

Position: above and to the left of the rear handle

(g). Shows the directions in which the chain brake is released (white arrow) and engaged (black arrow).
Position: Front Handlebar


(h). Shows the installation direction of the chain saw. Position: In front of the chain cover
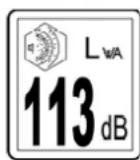
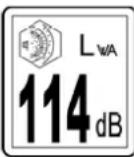
(I). Sound level of this equipment.
MG246:113 dB (A)
MG252: 114 dB (A)
(J). Manual engine start.

k) Decompression valve (if included)
Press the button on the decompression valve to open it.
3.SAFE OPERATION
■ Before operating the product
- Before using our products, please read this manual carefully to understand the correct use of your unit.
- Never operate a chain saw when you are fatigued, ill or upset, or under the influence of medications that can cause drowsiness or if you are under the influence of alcohol or drugs.
- Use the chain saw only in well ventilated areas. Never start or run the engine inside a closed room or building. Exhaust gases contain dangerous carbon monoxide. Lube oil mist and saw dust are poisonous to the operator.
- Never mow in strong wind, bad weather, when visibility is poor or in very high or low temperatures. Always check the tree and any dead branches that could fall during the felling operation.
- Wear non-slip, safety footwear, tight-fitting clothing, and eye, hearing, and head protection. Use the anti-vibration (AV) glove.
A condition called Raynaud's phenomenon, which affects the fingers of certain individuals, is believed to be caused by exposure to vibration and cold. Loss of color and numbness in the fingers. The following precautions are recommended, as the minimal exposure that could cause illness is unknown:
Keep your body warm, especially your head, neck, feet, ankles, hands, and wrists. Maintain good blood circulation by doing vigorous arm exercises during frequent work breaks and also by not smoking. Keep the saw chain sharp and the saw, including the AV system, well maintained. A dull chain will increase cutting time, and pressing a slack chain through the wood will increase the vibrations transmitted to your hands. A saw with loose components or with damaged or worn shock absorbers will also tend to have higher vibration levels. Limit hours of operation.
Continuous and regular users should closely monitor the condition of their fingers and hands while working.
If any of the symptoms described appear, consult a doctor immediately.
■ Working with the machine
- Always be careful when handling fuel. Clean up all spills and then move the chain saw at least ten (10) feet (three (3) m) from the point of supply before starting the engine.
- Eliminate all sources of sparks or flames (for example, smoking, open flames, or work that can cause sparks) in areas where fuel is mixed, poured, or stored. Do not smoke while handling fuel or while operating the chainsaw.
- Do not allow other people to be near the chain saw when starting the engine or
cutting wood. Keep bystanders and animals out of the work area. Children, pets, and bystanders must be a minimum of 30 feet (10m) away when starting or operating the chain saw.
- Never start mowing until you have a clear work area, secure footing, and a planned retreat path from the falling tree.
- Always hold the chain saw firmly with both hands when the engine is running. Use a firm grip with your thumb and fingers around the chain saw handles.
- Keep all parts of your body away from the saw chain when the engine is running. Before starting the engine, make sure the saw chain is not in contact with anything.
- Always carry the chainsaw with the engine stopped, the guide bar and saw chain back, and the muffler away from your body.
- Always inspect the chainsaw before each use for worn, loose, or changed parts. Never operate a chain saw that is damaged, improperly adjusted, or not completely and securely assembled. Make sure the saw chain stops moving when the throttle control trigger is released.
- All chain saw services, other than those listed in the Operator's Manual, must be performed by the manufacturer or importer maintenance center (for example, if improper tools are used to remove the flywheel or if the an improper tool to hold the flywheel to remove the clutch, structural damage to the flywheel could result in disintegration of the flywheel).
- Always shut off the engine before adjusting or making any changes.
- Be very careful when cutting small-sized stumps and young trees because thin material can catch the saw chain and be whipped towards or removed from you.
- When cutting a limb that is under tension, be alert for the back of the tension so that you will not be struck when the tension in the wood fibers is released.
- Keep handles dry, clean and free of oil or fuel mixture.
- Protect against ricochets. Kickback is the upward movement of the guide bar that occurs when the saw chain on the nose of the bar contacts an object. Kickback can lead to dangerous loss of control of the chainsaw.
- When transporting and storing the chain saw, make sure the bar protection sheath is in place. Firmly position the machine during transportation to avoid fuel loss, damage, or injury.
- Apply only light pressure and run the engine at full speed while using a chainsaw to avoid locking the saw into the wood.
SAFETY PRECAUTIONS FOR CHAINSAW USERS
Bounce can occur when the nose or tip of the guide bar touches an object, or when the wood comes in and pinches the chain at the cut.
Contact at the tip in some cases can cause quick reverse action, flipping the bar toward the operator. Cutting the chain saw along the top of the guide bar can quickly propel the guide bar towards the operator.
Any of these reactions can cause loss of control of the saw which can result in serious injury.

Do not rely exclusively on the safety devices built into your saw. As a chain saw user, there are several steps you need to take to keep your cutting jobs free from accident or injury. Check your safety at all times.
(1) With a basic understanding of rebound you can reduce or eliminate the element of surprise. Sudden surprise contributes to accidents.
(2) Maintain a good grip on the saw with both hands, the right hand on the rear handle and the left hand on the front handle, when the engine is running. Use a firm grip with your thumbs and fingers around the chain saw handles. A firm grip will help reduce kickback and maintain control of the saw. Don't let her go.
(3) Make sure the area in which you cut is clear of obstructions. Do not allow the nose of the guide bar to touch a log, branch, or any other obstruction that could be struck while operating the saw.
Cutting at high engine speeds.
Do not extend or cut above shoulder height.
(4) Follow the manufacturer's sharpening and maintenance instructions for the saw chain.
(5) Use only replacement bars and chains specified by the manufacturer or its equivalent.
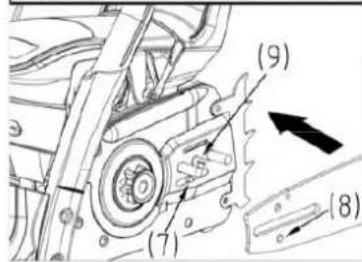
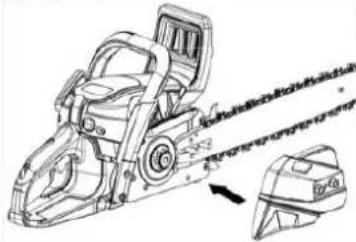
4 INSTALLING THE CHAIN AND CUTTING SWORD
The saw chain has very sharp edges. Wear protective gloves for your safety. Make sure the motor has stopped and is off before adjusting the bar and saw chain.
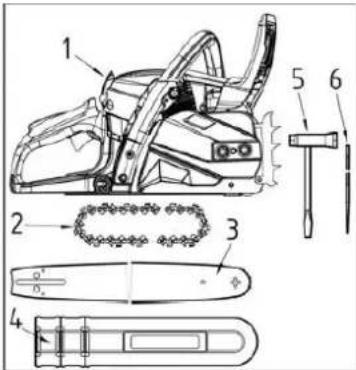
The chainsaw box must contain the items shown below:
(1) Machine
(2) Saw chain
(3) Cutting sword
(4) Guide bar protection sleeve
(5) Spark plug wrench
(6) lime
(7) Chain tensioning nut
(8) Hole
(9) Chain tensioning bolt
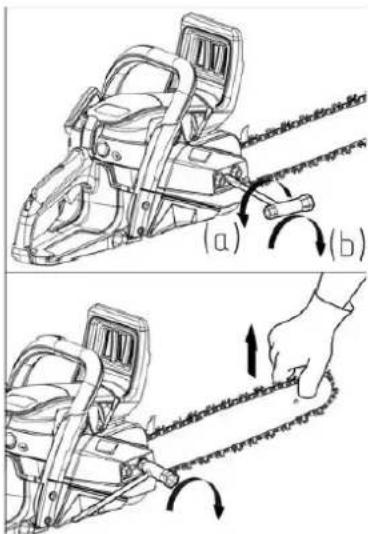
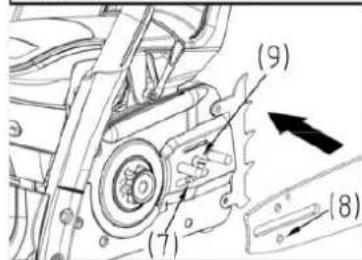
Open the box and install the guide bar and saw chain on the machine as shown.
- Move the guard towards the front handle to check that the chain brake is not engaged.
- Loosen the two nuts and remove the clutch cover.
- Mount the cutting bar on the machine; while inserting
the chain tensioner nut into the hole below the guide bar. Engage the chain to the sprocket and, while adjusting the chain around the guide bar, then install the clutch cover and finger tighten two nuts.

natural_image
Technical line drawing of a chain-linking machine with a separate inset showing a blade and gear (no text or symbols)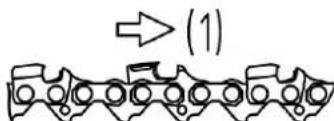
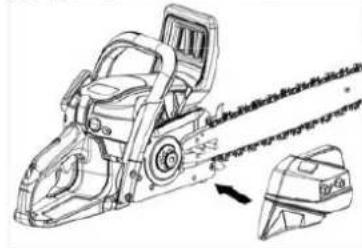
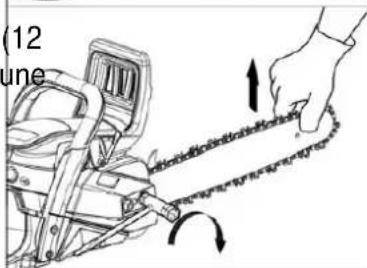
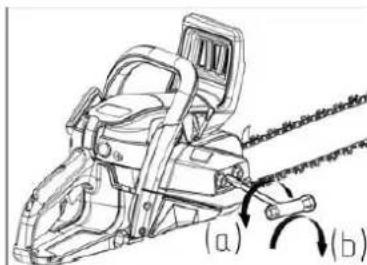
Pay attention to the correct direction of the chain.
(1) Direction of movement
While holding the tip of the bar, adjust the chain tension by turning the tensioner screw until the tie-down straps touch the bottom of the bar rail.
Firmly tighten the nuts with the tip of the bar held (12 \~ 15 Nm). Next, check the chain for smooth rotation and proper tension while moving by hand. If necessary, readjust with the chain cover loose.
Adjust the chain tensioner bolt.
(a) Turn left: If you loosen the chain
(b) Turn right: If you tighten the chain


IMPORTANT
It is very important to maintain proper chain tension. Rapid wear on the guide bar or chain that comes off easily can be caused by improper tension.
Especially when using a new chain, take good care of it, as it must expand when used for the first time.
The spiky bumper belongs to the chainsaw. It must be screwed into the chainsaw before initial use. Please fix the spike bumper with two screws on the front of the chain saw.
5. FUEL AND OIL IN THE MACHINE
■ Fuel
The engines are lubricated by oil specially formulated for the use of air-cooled 2-stroke gasoline engines. If oil is not available, use a quality oil expressly labeled for air-cooled 2-stroke engine use.
RECOMMENDED MIXING RATIO GASOLINE 25: OIL 1
These engines are certified to run on unleaded gasoline.

Gasoline is highly flammable. Do not smoke or bring flames or sparks near fuel.

- GASOLINE WITHOUT OIL (RAW GASOLINE) - Causes severe damage to the engine and its internal parts very quickly and can render the machine unusable.
- OIL FOR 4-CYCLE ENGINE USE OR WATER-COOLED 2-CYCLE ENGINE USE - May cause ignition of the spark plug, blockage of the exhaust port or sticking of the piston ring
■HOW TO MIX FUEL
- Measure the amounts of gasoline and oil to be mixed.
- Put some of the gasoline into a clean, approved fuel container.
- Pour in all the oil and shake well.
- Pour in the remaining gasoline and shake again for at least one minute.
Put a clear indication on the outside of the container to avoid mixing with gasoline or others.

CHAIN OIL
Use special saw oil throughout the year.

Do not use waste or regenerated oils that can damage the oil pump.
6 OPERATION
■ TO START THE ENGINE
Cold start: A "cold" start of the engine means starting it after at least 10 minutes after it was shut down or after refueling.
- Unscrew the gas tank cap and oil cap completely, but do not remove them from the machine, just hang up.
- Put fuel and oil into the fuel tank and oil tank up to 80% of full capacity.
- Firmly hold the two caps and wipe up any fuel spills around the unit.
- Continuously push the primer bulb until fuel enters the bulb.
- Turn the choke knob clockwise. The choke will close and the throttle trigger will be set to the home position.
When restarting immediately after stopping the engine assembly choke in the open position.
Press the button on the decompression valve. (If equipped)
When the trip occurs, the decompression valve will return to the closed position automatically, you must press the decompression valve button before each start.
- Push the front handle guard down to activate the chain brake.
- While holding the chainsaw securely on the ground, grasp the starter handle, slowly pull the cord with your right hand until feel some resistance (the starter pawls grab), and now, quickly and powerfully pull the rope. Never get your hand caught in the rope.
- When the first shot occurs, turn the choke knob counterclockwise to open it. Note: Adjusting the choke manually can temporarily adjust the throttle to a partially open position for easier starting.
- Hold the chain saw firmly on the ground, and repeat pulling the cord until the engine starts.
- Lift the front handle shield toward the front handle to release the brake.
Then let the engine warm up with the trigger pulled slightly.

Before starting the engine, make sure the saw chain is not in contact with anything. Make sure the chain brake is always activated before every start.
Hot start:
To warm start the engine immediately after it has stopped, follow steps 1 - 2 - 3 - 4 - 6 - 7 - 10 - 11 of the above procedure, making sure that the primer bulb is activated only 2-3 times.
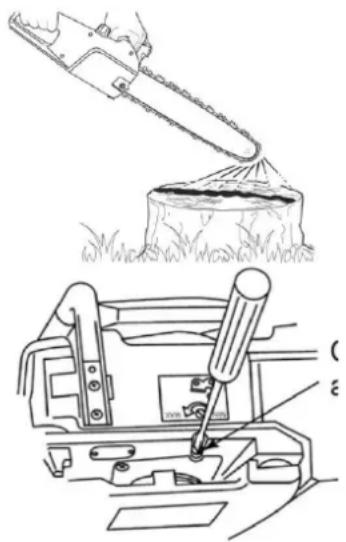
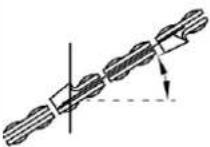
■OIL SUPPLY CHECK
After starting the engine, run the chain at medium speed and check if the chain oil is dispersed as shown in the figure. The chain oil flow can be changed by inserting a screwdriver into the hole at the bottom of the clutch side. Adjust according to your working conditions.
Chain Oil Flow Adjusting Shaft Rotate Shaft Clockwise - Rich Flow
Rotate shaft counter clockwise - Poor flow
The oil tank should be almost empty by the time the fuel is used up. Be sure to refill the oil tank each time you reload the saw.
natural_image
Technical line drawing showing a chain cutter operating a gear with a bucket, alongside a mechanical device (no text or symbols)■CLUTCH FUNCTIONAL CHECK
Before each use, you must confirm that there is no chain movement when the chain saw is idling.
■ CARBURETOR ADJUSTMENT
The carburetor in your unit has been adjusted at the factory, but may require fine tuning due to changing operating conditions. If it is necessary to adjust the carburetor, contact your dealer or maintenance service center of the manufacturer or importer. Do not adjust it by yourself.
Before adjusting the carburetor, make sure they are supplied with fresh, clean fuel / air.
When adjusting, take the following prompts :
Make sure to adjust the carburetor with the bar chain attached.
H and L needles are adjusted by authorized persons. The authorized range within the turn number as shown below.
Needle H -1/4 Needle L -1/4
-
Start the engine and let it warm up at low speed for a few minutes.
-
Turn the idle speed adjusting screw (T) counterclockwise b so that the saw chain does not rotate. If the idle speed is too slow, turn the screw clockwise a.
-
Make a test cut to adjust the H needle for best cutting power, not maximum speed.
(T) Idle adjusting screw (L) Low speed needle (H) High speed needle
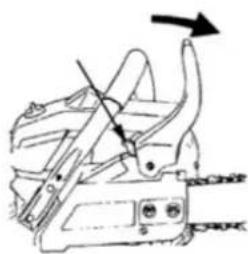
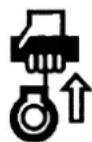
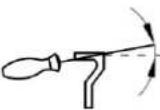
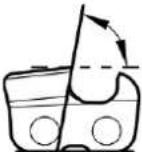
■CHAIN BRAKE
The chain brake is a device that stops the chain instantly if the chain saw backs up due to kickback.
Normally, the brake is activated automatically by inertial force. Can also be activated manually
Pushing the brake lever (front handlebar guard) down. When the
(a)
natural_image
Line drawing of a mechanical device with no visible text or symbols(b)

natural_image
Technical line drawing of a mechanical device with no visible text or symbolsbrake works, a white cone comes out of the base of the brake lever. To release the brake, lift the front handle shield toward the front handle until a clicking sound is heard.
When the brake comes on, release the throttle trigger to reduce engine speed. Continuous operation with the brake engaged will generate heat from the clutch and can cause problems.

Be sure to check the operation of the brake in the daily inspection.
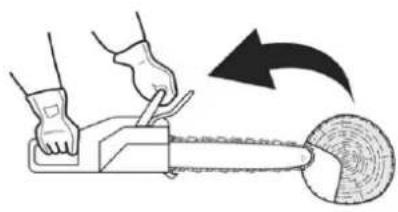
How to check the chain brake:
natural_image
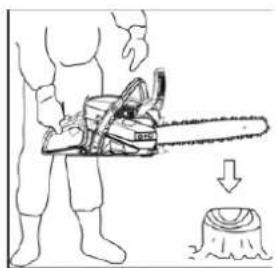
Illustration of a person using a chainsaw to cut a tree stump (no text or symbols present)1) Turn off the motor.
2) Hold the chain saw horizontally, release your hand from the front handle, tap the tip of the guide bar to a stump or piece of wood, and confirm brake operation. The level of operation varies according to the size of the bar.
In case the brake is not effective, consult our dealer.
7. CUTTING WITH THE CHAINSAW
Before continuing with your work, read the section "For Safe Operation", it is recommended to practice cutting simple logs first. This also helps you get used to your unit.
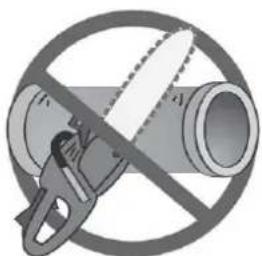
Always follow all safety regulations that may restrict the use of the machine. The chain saw should only be used to cut wood. Cutting other types of material is
prohibited. Vibrations and kickback vary with different materials and the requirements of safety regulations will not be respected. Do not use the chain saw as a lever to lift, move or divide objects. Do not lock it on fixed supports. It is forbidden to install tools or applications on the PTO that are not specified by the manufacturer. It is not necessary to force the saw into the cut. Apply only light pressure while running the engine at full speed.
natural_image
Illustration of a hand using a power tool to lift a tree stump with a circular pile (no text or symbols)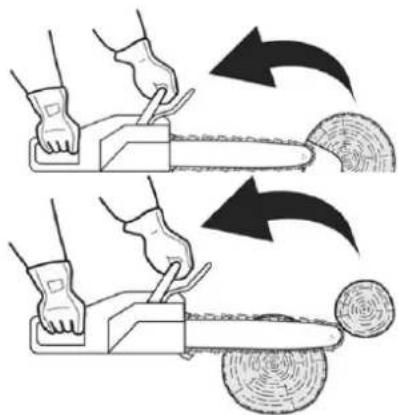
natural_image
Illustration of two hands using a chain saw to cut tree bark, showing blade rotation and cutting process (no text or symbols)Daily inspection is recommended before use and after dropping or other impacts to identify significant damage or defects.
Loading the engine with the chain caught in a cut can damage the clutch system. When the saw chain is caught in the cut, do not try to force it out, but use a wedge or crowbar to open the cut.
■ Kickback protector
This saw is also equipped with a chain brake that will stop the chain in the event of kickback if it works properly. You should check the chain brake operation before each use, running the saw at full speed for 1 or 2 seconds and pushing the front hand guard forward. The chain should stop immediately with the engine running at full speed. If the chain stops slowly or does not stop, contact the maintenance center of the manufacturer or importer to replace the brake band and clutch drum before use.
It is extremely important that the chain brake is checked for proper operation before each use and that the chain is sharpened to maintain the level of recoil safety of this saw. Removal of safety devices, improper maintenance, or improper replacement of the bar or chain can increase the risk of serious personal injury due to kickback.
■ Cutting down a tree
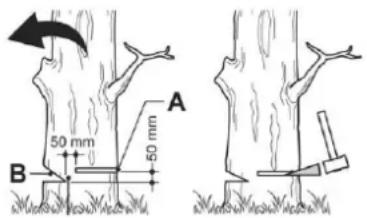
- Decide the direction of felling taking into account the wind, support of the tree, the location of heavy branches, ease of work after felling, and other factors.
(A) Felling cut.
(B) Notch cuts.
- While cleaning the area around the tree, organize a good foothold and retreat path.
- Make a notch one-third of the way in the tree on the felling side.
- Make a felling cut from the opposite side of the notch and at a level slightly higher than the bottom of the notch.

When felling a tree, be sure to warn neighboring workers of the danger.
■LOG CUTTING AND SPREADING
- Always make sure your footing, as well as the stability of the tree.
- Watch for the rolling of a cut log.
- Read the "Safe Operation" instructions to avoid kickback from the saw.
Before starting work, check the direction of the bending force inside the log to be cut.
Always finish cutting from the opposite side of the folding direction to prevent the guide bar from getting caught in the cut.
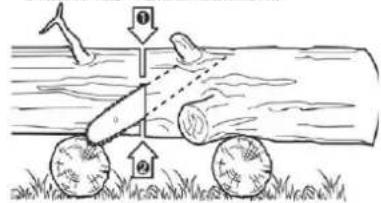
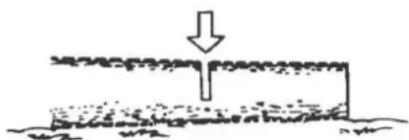
Cutting an unsupported log
Saw half way, then roll the log and cut from the opposite side.
natural_image
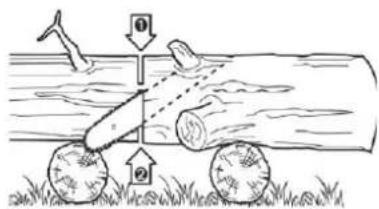
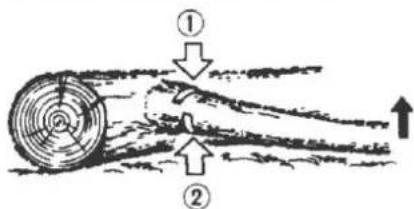
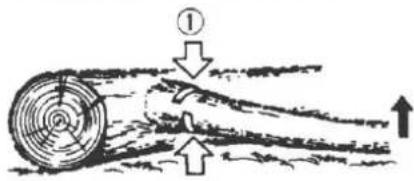
Simple line drawing of a pipe or channel with a downward arrow indicating flow or direction (no text or symbols)Cut a supported log
In area A in the image above, saw from the bottom one third and finish sawing from the top. In area B, saw down from the top one third and finish sawing from the bottom.
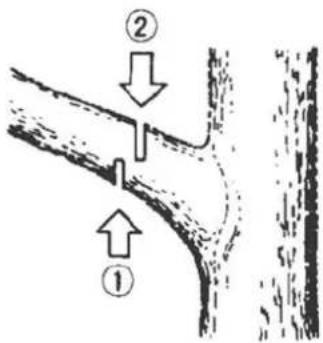
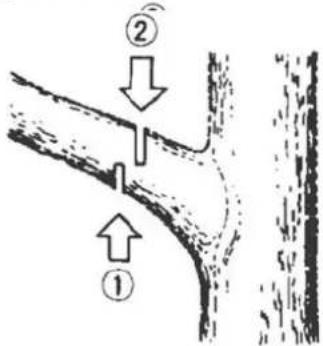
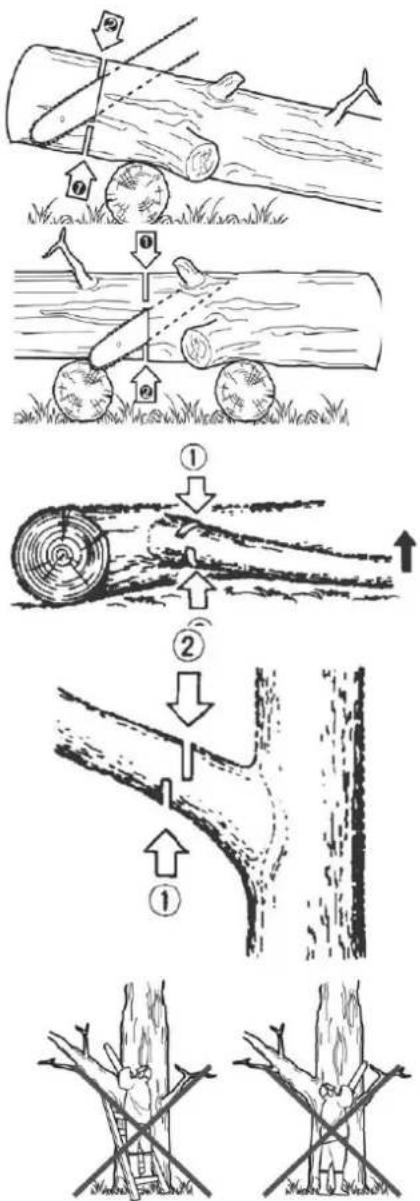
Delimbing a felled tree
First check in which direction the limb is bent. Next, make a shallow cut on the compressed side to prevent the limb from tearing. Cut through the taut side.

Be alert to kickback from a cut branch that is compressed or resisting pressure.
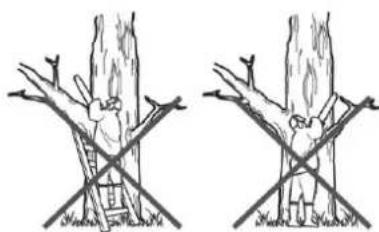
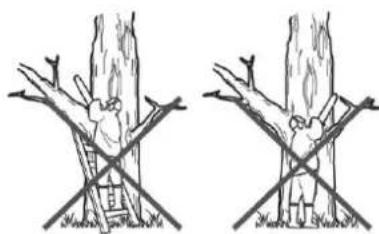
Pruning
Cut from the bottom, finish from the top

- Do not use an unstable base or ladder.
- Don't go too far.
- Do not cut above shoulder height.
- Always use both hands to tighten the saw.
flowchart
graph TD
    A["Step 1: Tree planting"] --> B["Step 2: Tree opening"]
    B --> C["Step 3: Tree opening"]
    C --> D["Step 4: Tree opening"]
    D --> E["Step 5: Tree opening"]

The spike bumper should always be put on while using the chainsaw on the tree trunk. Push the spiked bumper into the trunk using the rear handle. Push the front handle in the direction of the cutting line. The pointed bumper should be fixed to follow the guidance of the saw if necessary. Use a pointed bumper when cutting trees and thick branches can ensure your safety and decrease the work force and vibration level. If there is an obstacle between the cutting material and the chainsaw, turn off the machine. Wait until it comes to a complete stop. Wear the safety glove and remove the barrier. If the chain must be removed, follow the instructions in the installation part in the manual. A test should be carried out after cleaning and re-installation. If vibration or mechanical noise is discovered, please stop use and contact your dealer.
8. MAINTENANCE
Before cleaning, inspecting, or repairing the unit, make sure the engine has stopped and is cool. Disconnect the spark plug to avoid accidental starting.
Follow the instructions for performing regular maintenance, preoperative procedures, and
Daily maintenance routines. Improper maintenance can cause serious damage to the machine.
Keep your chain saw in good working condition at all times.
■ Maintenance after each use
1. Air filter
Dust on the surface of the air filter can be removed by tapping a corner of the filter against a hard surface. To clean the dirt on the screens, divide the filter in half and brush with gasoline. When using compressed air, blow from the inside.
natural_image
Technical line drawing showing a hand operating a mechanical component with a close-up view of the handle (no text or symbols present)To assemble the filter halves, press the edge until it clicks.
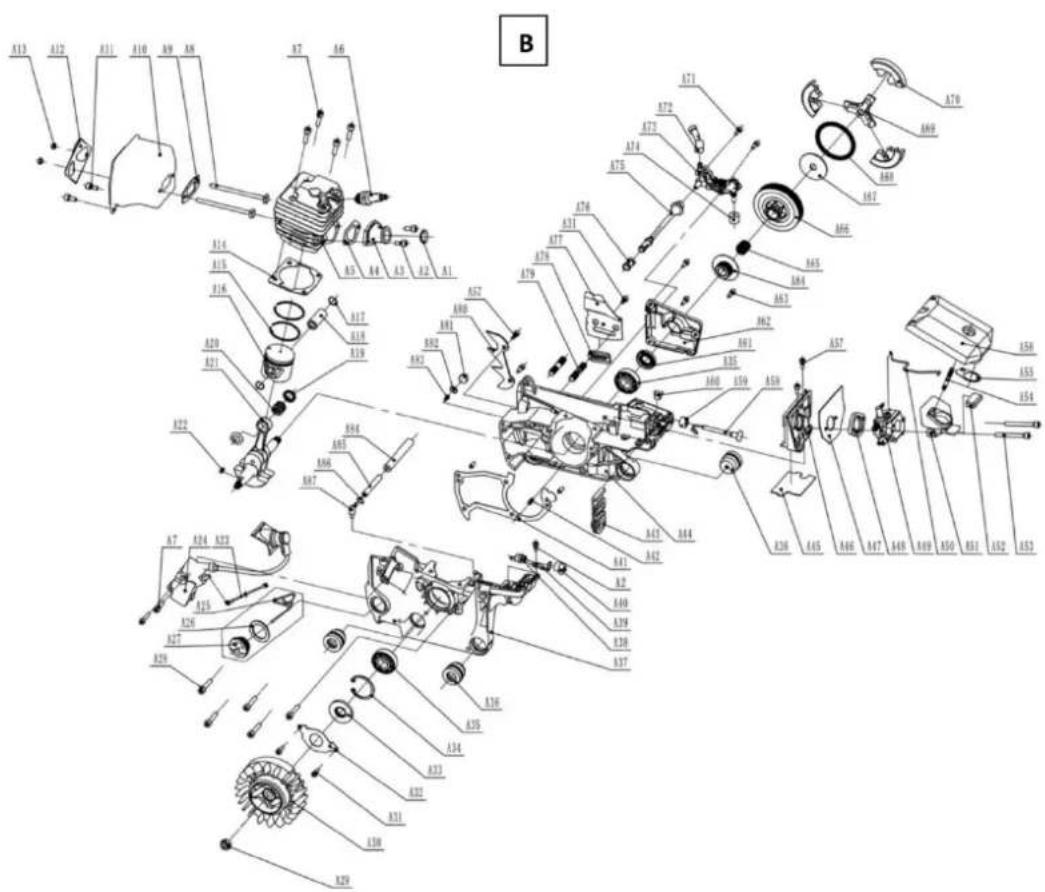
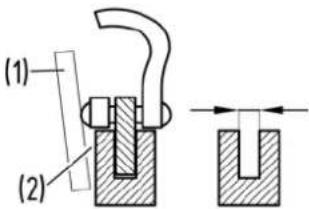
2. Oil port
Remove guide bar and check oil port for clogging.
(1) Oil port
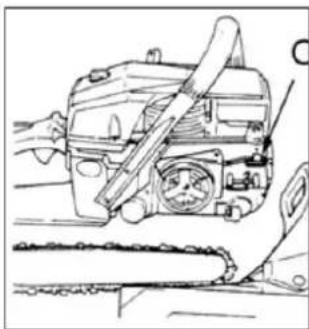
natural_image
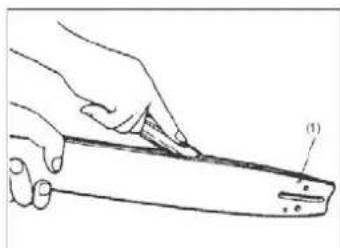
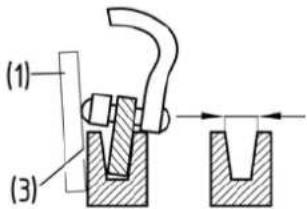
Technical line drawing of a mechanical device with a tool and rollers (no text or symbols)3. Cutting sword
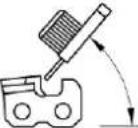
When the guide bar is removed, remove the sawdust in the bar groove and the grease hole.
Grease the nose sprocket from the feed hole at the tip of the bar.
(1) Greasing port
(2) Grease port
(3) Sprocket

natural_image
Line drawing of a hand holding a tool, with no visible text or symbolsFour. Others
Check for fuel leaks and loose fasteners and damage to major parts, especially handle seals and guide bar assembly. If you find any defects, be sure to rep
plow them before using the machine again.
■ Periodic service points
1. Cylinder fins
Dust clogging between the cylinder fins will cause the engine to overheat. Periodically check and clean the cylinder fins after removing the air filter and cylinder cover. When installing the cylinder cap, make sure the switch wires and grommets are properly in place.
2. Fuel filter
(a) Using a wire hook, pull the filter out of the fill hole.
(b) Remove the filter and wash it with gasoline, or replace it with a new one if necessary.
(c) After removing the filter, use a pliers to hold the end of the suction tube.

natural_image
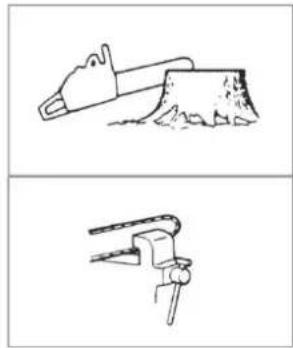
Line drawing of a hand using a tool to adjust or install a mechanical component (no text or symbols visible)3. Spark plug
Clean the electrodes with a wire brush and readjust the gap to 0.6mm - 0.7mm as necessary.
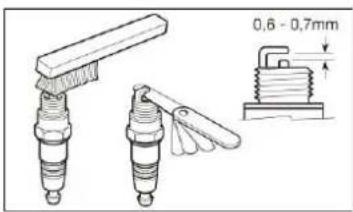
Spark plug type : NGK BPMR7A
4. Pinion
Check for cracks and if excessive wear interferes with chain drive. If the wear is advanced, contact your dealer or the importer manufacturer's maintenance to replace it. Never put a new chain on a worn sprocket, or a worn chain on a
new sprocket.
- Ring E
- Washer
- Needle bearing
- Clutch drum
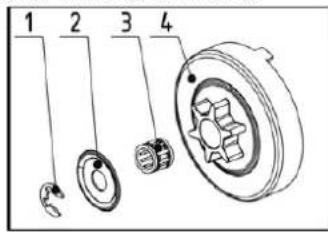
- Front and rear shock absorber spring
Replace if spring is deformed

Use only the replacement parts indicated in this manual. Using the other replacement part can cause serious injury.
Cutting teeth sharpening standards:
Chain

It is very important for a smooth and safe operation to always keep the chain sharp.
Your cutting teeth need to be sharp when:
- Sawdust becomes dusty.
- You need additional force to cut.
• The cut does not go straight.
• Vibration increases. - Fuel consumption increases.
natural_image
Two technical line drawings of a mechanical tool or bracket, showing a cutaway view and a pin (no text or symbols present)
Be sure to wear cut resistant safety gloves.
12. MAINTENANCE OF THE CHAIN AND GUIDE BAR
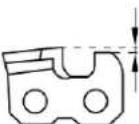
Use a round file of the correct size for your chain. Check the size and type of chain and have a file that fits these measurements for a good sharpening.
Place your file on the chain and push forward. Maintain the position of the file as illustrated in the figure below.
After each cutting tooth has been sharpened, check the depth gauge and file to the proper level as shown.
Make sure to close the front stop to reduce the chance of chain kickback or breakage.
Make sure each tooth has the same length and edge angles as illustrated.
| Chain type | File diameter | Top plate angle | Lower angle | Inclination angle (55°) | Depth gauge standard |
 |  |  |  |  | |
| Screw rotation | Screw inclinatio | Lateral angle | |||
 |  |  | |||
| 2 | 3/1 | 30° | 10° | 85° | 0.025" |
 |  | ||||
| Depth gauge | lime | ||||
Guide bar
- Reverse the bar occasionally to avoid partial and unbalanced wear of the chain and bar.
- The bar rail should always be square. Check the bar rail for wear. Apply a ruler to the bar and to the outside of a cutter. If there is a gap between them, the lane is normal. Otherwise, the bar rail is worn. This bar needs to be corrected or replaced.
(1) Ruler (2) Gap (3) No gap (4) Chain incline

ATTENTION
The table contains a list of all possible combinations between the bar and the chain, indicating those that can be used in each machine, marked with the symbol "*".
| Inclination | Guide bar | Chain | |||||||
| Chain pitch | Length | Hound[inches/mm] | Ref. | Pinio n | Ref. | Links | MG246 | MG252 | MG262 |
| 0.325 " | 16"/ 40cm | 0.058 "/1.5mm | Oregon 168PXBK095 | 10 | Oregon two1BPX06 6Y | 66 | * | * | * |
| 0.325 " | 18"/ 45cm | 0.058 "/1.5mm | Oregon 188PXBK095 | 10 | Oregon two1BPX07 2X | 72 | * | * | * |
| 0.325 | twenty"/ 50cm | 0.058 "/1.5mm | Oregon 208PXBK095 | 10 | Oregon two1BPX07 8X | 78 | * | * | * |
Use bar and chain combinations only authorized by your reference center. Never use the machine for a job not indicated and do not apply unauthorized components. It may cause serious damage and injury to the user or third parties.
10. STORAGE
- Drain the fuel tank.
- Drain the oil tank.
- Clean and maintain the entire unit.
- Store the unit in a dry place out of the reach of children.
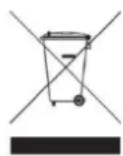
11. DISPOSAL AND ENVIRONMENTAL PROTECTION
Never pour waste chain lubricant or 2-stroke fuel mixture into the drain or sewer system or ground, but dispose of it in an appropriate,
environmentally friendly manner, for example, at a special collection point or landfill.
If your machine does not work at any time, in the future or you do not need it any longer, do not dispose of the device together with your household waste, but dispose of it in an environmentally friendly way.
Completely drain the oil / lubricant and fuel tanks and dispose of the waste in a special collection point or landfill. Also dispose of the device at
an appropriate collection / recycling point. In this way, plastic and metal parts can be separated and recycled.
Information on disposal of materials and devices is available from your local administration.

12. WARRANTY
For this gasoline tool, the company provides the end user - regardless of the obligations of the retailer resulting from the purchase contract - with the following guarantees:
The warranty period is 24 months from the delivery of the device which must be proven by the original purchase document. For commercial use and rental use, the warranty period is shortened to 12 months. Excluded from this warranty are wear parts and defects caused by the use of inappropriate accessories, repair with parts that are not original
manufacturer parts, the use of force, shock and breakage, as well as a mischievous overload of the motor. Warranty replacement only includes defective parts, not complete devices. Warranty repair will be carried out exclusively by authorized dealers or company customer service. In the event of any intervention by unauthorized personnel, the warranty will be void.
All shipping or shipping costs, as well as any other subsequent costs, will be borne by the customer.
13. TROUBLESHOOTING
| TROUBLE | CAUSE | SOLUTION |
| 1) Failure to start | -Replace the fuel in case of finding water or another mixture of inferior quality.-Check for engine flooding.-Check spark plug spark | -Replace with appropriate fuel.-Remove and remove the spark plug wire.-Then pull the starter again without primer.-Replace with a new one. |
| 2) Lack of force / poor acceleration / uneven idle | -Check the fuel for water or some inferior quality mixture.-Check the air filter for clogs -Check carburetor for improper settings. | -Replace with appropriate fuel.CleanReadjust needle speed |
| 3) The oil does not come out | -Check for inferior quality oil -Check the oil flow for any obstruction | ReplaceClean |
Should the unit require additional overhaul service, consult an authorized ANOVA service facility in your area.
14. TECHNICAL SPECIFICATIONS
| Model | MG246 | MG252 | MG262 |
| Displacement: | 45 cm^3 | 52 cm^3 | 61.5 cm^3 |
| Maximum motor power: | 1.7 kW | 2.1kW | 2.85kW |
| Fuel: | Mixture (25 Unleaded Gasoline: Two Cycle Oil 1) | ||
| Fuel tank capacity: | 550 ml | ||
| Chain oil: | SAE 10-30 | ||
| Oil tank capacity: | 260 ml | ||
| Carburetor: | diaphragm | ||
| Idle speed range: | 3000 ± 300 min^-1 | ||
| Maximum speed with cutting system | 10300 min^-1 | ||
| Maximum chain speed: | 21 m / s | ||
| Ignition system: | Electric coil | ||
| Spark plug: | BOSCH L8RTF / CHAMPION RCJ7Y | ||
| Oil feeding system: | Mechanical oil pump with adjustment | ||
| Pinion Teeth x Tilt: | 6T × 9.525mm (0.325in) | ||
| Dry weight (without guide bar and chain, empty tanks): | 6.4 kg | 6.4 kg | 6.7 kg |
| Declared sound power level LWAd | 117 dB (A) | ||
| Sword | Anova | ||
| Kind: | Rolled with pinion | ||
| Size: | 18 " | 18 " | 20" |
| Cutting length: | 45 cm | 45cm | 51cm |
| Saw chain | |||
| Kind: | Anova 18 " | Anova 20" | |
| Chain pitch: | 8.255 mm (0.325 in) | ||
| Caliber: | 1.47mm (0.058in) | ||
Specifications are subject to change without notice.
15. EC DECLARATION OF CONFORMITY
DISTRIBUTION COMPANY
MILLASUR, SL
CE DECLARATION OF CONFORMITY
In compliance with the different CE directives, it is hereby confirmed that, due to its design and construction, and according to the CE mark printed by the manufacturer on it, the machine identified in this document complies with the relevant and fundamental requirements in health and safety. of the aforementioned CE directives. This declaration validates the product to display the CE symbol.
In the event that the machine is modified and this modification is not approved by the manufacturer and communicated to the distributor, this declaration will lose its value and validity.
Machine name: CHAINSAW
Model / os: MG246 / MG252 / MG262
Recognized and approved standard to which it conforms:
Directive 2006/42 / EC
Tested according to:
EN ISO 11681-1: 2011
Company seal
millasúr
Rúa Eduardo Ponda!, n° 23
Pol. Ind. Sigüeiro - 15688 Oroso - A Coruña
Tlf.931 696465/Fax.981 690861

17/06/2020
16. PARTS
анова