
Power Espresso 20 Cream - Coffee machine CECOTEC - Free user manual and instructions
Find the device manual for free Power Espresso 20 Cream CECOTEC in PDF.

User questions about Power Espresso 20 Cream CECOTEC
0 question about this device. Answer the ones you know or ask your own.
Ask a new question about this device
Download the instructions for your Coffee machine in PDF format for free! Find your manual Power Espresso 20 Cream - CECOTEC and take your electronic device back in hand. On this page are published all the documents necessary for the use of your device. Power Espresso 20 Cream by CECOTEC.
USER MANUAL Power Espresso 20 Cream CECOTEC
natural_image
Exterior view of a modern CECU/TEC coffee maker with digital display and lever mechanism (no text or symbols visible)Safety instructions 8
-
Parts and components
-
Before use 51
-
Operation 52
-
Cleaning and maintenance 57
-
Troubleshooting 59
-
Technical specifications 60
-
Disposal of old electrical and
electronic appliances 61
-
Technical support and warranty 61
-
Copyright 61
SOMMAIRE
Read these instructions thoroughly before using the appliance. Keep this instruction manual for future reference or new users. - All safety instructions must be closely followed when using the appliance.
This appliance can be used by children aged 8 years and above and people with reduced physical, sensory, or mental capabilities or lack of experience and knowledge if they have been given supervision or instruction concerning use of the appliance in a safe way and understand the hazards involved. Children must not play with the appliance. Cleaning and user maintenance should not be carried out by children unless they are over 8 years old and are under supervision. Keep this appliance and its power cable out of reach of children under the age of 8.
- Check the power cable regularly for visible damage. If the power cable is damaged, it must be replaced by the official Cecotec Technical Support Service or similar qualified personnel to avoid risks.
This symbol means "Caution, Hot Surface". Accessible surfaces are likely to heat up during use.
This appliance is designed for domestic use only and is not intended for bars, restaurants, farmhouses, hotels, motels, and offices.
- WARNING: the filling opening must not be opened during operation.
-
WARNING: take precautions to avoid spillage of liquids on the cable.
WARNING: incorrect or improper use can be dangerous for the user and damage the appliance. Use the appliance only for the purposes described in this manual. The surface of the heating element is subject to residual heat after use. -
Ensure that the mains voltage matches the voltage specified on the appliance rating label and that the plug is earthed.
- Do not immerse the cable, plug, or any other non-removable part of the device in water or any other liquid or expose electrical connections to water. Make sure your hands are dry before handling the plug or switching on the device.
- Do not twist, bend, pull, or damage the power cable. Protect it from sharp edges and heat sources. Do not allow the cable to touch hot surfaces. Do not let the cable hang over the edge of the working surface or worktop.
- Turn off and unplug the appliance from the mains supply when not in use and before cleaning it. Pull from the plug, not the cable, to disconnect it from the outlet.
- Place the appliance on a dry, stable, flat, heat-resistant surface.
- Do not use the appliance under the following circumstances:
- On or near a gas or electric hob, in heated ovens, or near open flames.
- On soft surfaces (such as carpets) or where it may tip over during use.
- Outdoors or in areas with high humidity levels.
- Do not wash the appliance in dishwashers.
- Maintain a minimum safety distance of 20 cm to the sides and 30 cm on top of the appliance when in operation.
- Do not place the appliance under cabinets or kitchen furniture, as the steam emitted may damage them.
- Do not overfill the filter.
- Do not operate the appliance without water.
- Never use the appliance without a suitable container under the coffee spout or the milk tank spout.
Supervise children to prevent them from playing with the appliance. Close supervision is necessary when the appliance is being used by or near children.
INSTRUCTIONS DE SÉCURITÉ
A3. Single Cappuccino
A4. Double Cappuccino
A5. Single Latte
A6. Double Latte
A7. Temperature display
B Power switch
C Removable drip tray
D Buoy indicator
E Drip tray
F Water tank cover
G Connection between the cover and the tank
H Water tank
1 Milk tank cover
J Milk froth level knob
K Lever
L Milk frother
M Milk tank tube
N Milk tank
O Portafilter
P Portafilter handle
Q Filters (for single and double Espresso)
R Measuring spoon/Tamper
NOTE:
The graphics in this manual are schematic representations and may not exactly match the device.
2. BEFORE USE
- This appliance is packaged in a way as to protect it during transport. Take the appliance out of its box and remove all packaging materials. You can keep the original box and other packaging elements in a safe place to prevent damage to the device if you need to transport it in the future. In case the original packaging is disposed of, make sure all packaging materials are recycled accordingly.
ENGLISHENGLISH
- Make sure all parts and components are included and in good conditions. If there is any piece missing or in bad conditions, contact the official Cecotec Technical Support Service immediately.
Box content
- Semi-automatic coffee machine
- Single coffee filter
- Double coffee filter
- Portafilter
- Measuring spoon with tamper
- Instruction manual
- Do not remove the serial number of the appliance in order to keep a correct traceability of it in case of assistance.
Before using the coffee machine for the first time
- Before using the appliance for the first time, clean it for optimum performance.
- Before cleaning the appliance, make sure that the switch is in the off position.
- Remove all packaging materials and promotional labels or stickers from the appliance.
- First, remove and wash the water tank, milk tank, portal filter, filters and measuring spoon/tamper with water and a little neutral detergent. Then, rinse these parts thoroughly and replace them in the appliance.
- Before fitting the portafilter or filters, please refer to the relevant section of this instruction manual.
- To clean the inside of the appliance, follow the steps in the "Cleaning and Maintenance" section. Make sure that there is water in both tanks and that the filter does not contain ground coffee. Do not immerse the appliance or its power cable in water.
3. OPERATION
Preparing the coffee machine
- To prime the appliance, run a steaming cycle following the steps below:
- Make sure that the water level in the water tank is between the "MIN" and "MAX" marks.
- The milk level in the milk tank must not exceed the "MAX" mark. Once you have filled this tank, place it back into the coffee machine. To do this, lift it up and slide it into the machine. During the process, hold it by the cover. When the tank is correctly positioned in place, you will notice that it clicks into place. Fig. 2
- Select one of the filters and place it inside the portafilter. Place the portafilter in the appliance ensuring it is properly locked and place a cup (or a glass) under it. Also, make
sure that the end of the milk frother points towards the inside of the cup.
- Connect the coffee machine to the power socket.
- Place the power switch in the on position.
- The six icons on the display will light up. This means that you can now use the machine normally.
Warning: if the milk tank is not in the correct position, the Cappuccino and Latte icons will not light up.
Choosing the right cup
- Before preparing a drink, be sure to select the appropriate cup size. To do so, please refer to the information in the table below:
| Drinks Recommended cup | |||
| Espresso |  | Single | 50 ml |
| [TOTO] | Double | 100 ml | |
| Cappuccino | [2064] | Single | 180 ml |
| [COOK] | Double | 350 ml | |
| Latte | [80CD] | Single | 340 ml |
| [4x9x1] | Double | 450 ml | |
Note: the values given in the table only refer to the capacity of the cup. The total amount of drink dispensed by the appliance may vary depending on the type of milk and the level of froth.
Choosing the right type of coffee
Coffee
The coffee should be freshly ground and dark roasted. You may want to try a French or Italian roast ground for espresso. Pre-ground coffee will only retain its flavour for 7-8
ENGLISHENGLISH
days, provided it is stored in an airtight container and in a cool, dark area. Do not store in a refrigerator or freezer. Whole beans are recommended to be ground just before use. The aroma of coffee beans stored in an airtight container retains its flavour for up to 4 weeks.
The level of grinding
- This is a crucial step in the coffee-making process. It may take some practice. The coffee should be finely ground.
- Once ground, the thickness of the coffee should be similar to that of table salt.
- If the coffee is ground too finely, the water will not flow through it, regardless of its pressure. In addition, the coffee will look like powder and feel like you are touching flour.
- On the other hand, if it is ground too coarsely, the water will pass through the beans very quickly, so the full flavour will not be extracted. Be sure to use a good-quality grinder for uniform consistency.
Operation
Filling up the water tank
- Fill up the water tank. To do this, you can use a jug or remove it from the coffee machine and fill it under the tap. Make sure that the water level does not exceed the "MAX" mark. Do not put warm or hot water in the tank.
- Close the water tank cover. If you have removed it from the appliance to fill it with water, be sure to put it back in place.
Filling up the milk tank
- If you are preparing a cappuccino or latte, remove the milk tank from the appliance by lifting it up and sliding it out. Then, pour in the amount of cold milk you think you will need. Fig. 2
Note: make sure that the milk level does not exceed the "MAX" mark.
- When you have finished filling the tank, place it back into the appliance, making sure that it is correctly fitted.
Note: you can use any type of milk you prefer: whole or semi-skimmed.
Portafilter
- This coffee machine includes a portafilter suitable for ground coffee.
Choosing the filter
- Select the filter you want to use as follows:
a. If you want to make a single drink, use the Single Espresso filter.
b. If you want to make a double drink, use the Double Espresso filter. By placing two
small cups under the dispenser of the coffee machine, you can prepare two single coffees at the same time.
Placing the filter in the portafilter
- Insert the filter into the portafilter, making sure to align the hole in the filter with the slot in the portafilter.
- Then, turn the filter left and right until it clicks into place. Fig. 3
Note: to clean the filter, you will need to remove it. To do this, turn it to the left or right to align the hole in the filter with the slot in the filter holder.
WARNING: make sure that the filter has cooled down before attempting to remove it from the portafilter.
Filling the filter
- For ground coffee, place the selected filter in the portafilter as follows:
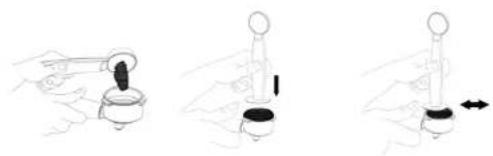
- Fill the filter with fresh Espresso coffee with a fine grind. Make sure not to overfill it; leave approximately 2 mm clearance from the edge.
- Use the measuring spoon/tamper to press the coffee so that it is compact and uniform. Fig. 4
- Wipe any coffee residue from the edge of the portafilter to ensure that it is securely attached to the appliance head to prevent leakage.
Placing the portafilter
Fig. 5
- Place the portafilter in the appliance.
- Make sure that the handle is aligned with the unlocking mark on the appliance and that it fits correctly into the slot.
- Then slowly turn it clockwise until it is aligned with the locking mark.
Placing the cup(s) of coffee
- If you are going to use a large Cappuccino or latte cup, remove the grille that is on the drip tray.
Warning: when making a Cappuccino or latte, be sure to adjust the lever so that the milk frother points towards the inside of the cup to be used.
Switching on the coffee machine
- First of all, make sure that the coffee machine is connected to the mains.
- Next, place the power switch in the on position.
- The icons on the display will flash during the heating process until the water and milk (if preparing a Cappuccino or latte) reach the perfect temperature. When the icons stop flashing, the appliance is ready for use.
ENGLISHENGLISH
Warning: if the milk tank is not in the correct position, the Cappuccino and Latte icons will not light up.
Selecting a drink
Preparing an Espresso
- If you press the Single Espresso icon, it will start flashing and the appliance will prepare this drink.
- If you wish to prepare a Double Espresso or two Single Espressos at the same time, press the Double Espresso icon. It will start flashing and the machine will brew the drink.
- When the appliance has finished brewing the selected drink, the corresponding icon will stop flashing.
Note: you can press the selected icon again to cancel brewing.
Preparing a Cappuccino
- Before making a Cappuccino, turn the milk froth level knob to choose the desired level of milk froth. If you turn it to the right, more froth will be produced; if you turn it to the left, less froth will be produced.
Note: the milk froth level can also be adjusted while the drink is being brewed.
- To prepare a single Cappuccino, press the corresponding icon. It will flash and the appliance will brew the drink.
- To prepare a double Cappuccino, press the corresponding icon. It will flash and the appliance will brew the drink.
- When the appliance has finished brewing the selected drink, the corresponding icon will stop flashing.
Preparing a Latte
- Before making a Latte, turn the milk froth level knob to choose the desired level of milk froth. If you turn it to the right, more froth will be produced; if you turn it to the left, less froth will be produced.
- To prepare a single Latte, press the corresponding icon. It will flash and the appliance will brew the drink.
- To prepare a double Latte, press the corresponding icon. It will flash and the appliance will brew the drink.
- When the appliance has finished brewing the selected drink, the corresponding icon will stop flashing.
After preparing milk drinks
- Once you have finished preparing a milk drink, store the milk tank in the refrigerator for reuse or dispose of the excess milk and clean the milk tank as described in section "4. Cleaning and maintenance".
Automatic shut-off function
- After turning the switch to the on position, if no operation is performed within 25 minutes, the appliance will automatically switch off.
4. CLEANING AND MAINTENANCE
Cleaning of the tank and the milk frother
- Regularly clean the tank and the milk frother. To clean the tank, follow the instructions below:
- Remove the milk tank from the appliance by lifting it up and sliding it out.
- Remove the cover and discard the excess milk.
- Fill the milk tank with water, making sure not to exceed the "MAX" mark. Once you have filled this tank, place it back into the coffee machine. To do this, lift it up and slide it into the machine. During the process, hold it by the cover.
Warning: if the milk tank is not in the correct position, the Cappuccino and Latte icons will not light up.
- Place a large cup under the milk frother.
- Press the icon for Cappuccino or Double Latte. The appliance will start dispensing hot water through the milk frother. Repeat the cleaning cycle until no more milk comes out of the frother.
- Turn the milk froth level knob to the cleaning position ○ and then press the Double Cappuccino or Double Latte icon. The appliance will start dispensing hot steam through the milk frother. Run several cleaning cycles.
Note: make sure that the water level in the water tank is between the "MIN" and "MAX" marks.
- Dispose of the remaining water in the water tank and the milk tank, then wash both tanks with soap and water. Before placing them back in the appliance, be sure to rinse and dry them thoroughly. Do not use any cleaning products or abrasive sponges as they may damage the finish of the appliance.
Note: the milk tank is dishwasher safe, whereas the cover is not.
ENGLISHENGLISH
Cleaning the spout, portafilter and filters
- Turn the switch to the off position and then unplug the machine from the mains.
- Some of the metal parts of the appliance may still be hot. Do not touch them until they have cooled completely.
- Remove the portafilter and clean any coffee residue. Wash both the portafilter and filter with warm soapy water and rinse them well. Before placing them back in the appliance, be sure to dry them thoroughly.
Note: do not wash the portafilter and filters in the dishwasher.
- Wipe the bottom part of the spout with a damp cloth or paper towel to remove any coffee grounds.
- Place the portafilter (without any filter) in the coffee spout of the machine.
- Place an empty large cup under the spout.
- Next, plug the power cable into a power outlet. Place the power switch in the on position. Press the Single Espresso Icon once and let the machine split out water until it stops.
Water tank cleaning
- Empty the remaining water in the water tank. It is recommended that the water tank is emptied every time the appliance is used.
- Wash the tank and its cover with warm soapy water. Before placing them back in the appliance, be sure to rinse and dry them thoroughly.
Note: do not wash the water tank or its cover in the dishwasher.
Warning: do not immerse the appliance or its power cable in water.
Cleaning the outer surface of the coffee machine
- Clean the housing with a soft damp cloth. Do not use abrasive cleaning agents or abrasive sponges as they may damage the finish.
- Do not leave the portafilter in place when storing the appliance.
Descaling
- The accumulation of mineral deposits in the appliance may affect its operation. Therefore, we recommend that you descale the appliance when you start to notice an increase in brewing time or when excessive steam is produced. You may also notice a build-up of mineral deposits in the nozzle. The frequency of cleaning depends on the hardness of the water used. The recommended cleaning intervals are given in the table below.
| Water type | Cleaning frequency |
| Soft (filtered) water | Every 80-100 drink preparations |
Hard water (tap water) Every 40–50 drink preparations
Descaling the water tank
- Fill up the water tank with a descaler agent following the proportions indicated by the descaler manufacturer.
- Rinse the water tank thoroughly. To do this, fill it halfway with tap water and then drain this water. Repeat this process twice.
Descaling of internal parts
- Before descaling the internal parts of the appliance, be sure to descale the water tank first by following the steps before.
- Make sure that the power switch is in the off position and the power cable is unplugged from the power outlet.
- Fill up the water tank and the milk tank with a descaler agent following the proportions indicated by the descaler manufacturer and follow the manufacturer's instructions.
-
Insert the portafilter (with filter, but without coffee) and place a large empty cup on top of the drip tray and under the spout.
-
Next, plug the power cable into a power outlet.
-
Place a large cup under the milk frother.
-
Place the power switch in the on position. When the icons on the display have stopped flashing, press the Cappuccino or Double Latte icon. The appliance will start dispensing hot water through the milk frother. Run several cleaning cycles.
Note: make sure that the water level in the water tank is between the "MIN" and "MAX" marks.
- TROUBLESHOOTING
| Problem Possible | causes Possible solutions | |
| No coffee comes out | No water in the water tank. Add water. | |
| Coffee is too fine. Grind medium-ground | coffee. | |
| There is too much coffee in the filter. Fill filter with less coffee. | ||
| The appliance is not connected to the mains or switched on. | Connect the appliance to a power supply and turn it on. | |
| Coffee has been tamped/compressed too much. | Fill the filter with ground coffee and press it firmly. | |
ENGLISHENGLISH
| The coffee comes out of the edge of the portafilter | The portafilter has not been rotated to the locked position. | Turn the portafilter to the locked position. |
| Coffee grounds around the filter basket edge. | Wipe off the edge. | |
| There is too much coffee in the filter. Fill with less coffee. | ||
| Milk is not frothy after frothing or milk is not coming out of the milk frother | Ran out of steam. | Ensure there is enough water in the water tank. |
| The milk is not cold enough. | Cool the milk before making a Cappuccino or Latte. | |
| The milk frother is blocked. | Clean the milk tank and the milk frother according to the instructions In this manual. | |
| Coffee comes out too quickly | The coffee powder is too coarse. | Use a finer grind. |
| Not enough coffee in filter. Fill filter with more coffee. | ||
| The coffee does not have much flavour | You are using a single Espresso filter to make a double Espresso. | Use the double Espresso filter. |
| The coffee powder is too coarse. Use a finer grind. | ||
Do not disassemble the coffee machine yourself. If you cannot find the cause of the problem, contact the official Cecotec Technical Support Service.
6. TECHNICAL SPECIFICATIONS
Product reference: 00651
Product: Power Espresso 20 Cream
Voltage: 220 - 240 V-
Frequency: 50 - 60 Hz
Power: 1350 W
Technical specifications may change without prior notification to improve product quality. Made in China | Designed in Spain
7. DISPOSAL OF OLD ELECTRICAL AND ELECTRONIC APPLIANCES

This symbol indicates that, according to the applicable regulations, the product and/or batteries must be disposed of separately from household waste. When this product reaches the end of its shelf life, you should dispose of the cells/batteries/accumulators and take them to a collection point designated by the local authorities.
Consumers must contact their local authorities or retailer for information concerning the correct disposal of old appliances and/or their batteries.
Compliance with the above guidelines will help protecting the environment.
B. TECHNICAL SUPPORT AND WARRANTY
Cecotec shall be liable to the end user or consumer for any lack of conformity that exists at the time of delivery of the product under the terms, conditions, and deadlines established by the applicable regulations.
It is recommended that repairs be carried out by qualified personnel.
If at any moment you detect any problem with your product or have any doubt, do not hesitate to contact the official Cecotec Technical Support Service at +34 963 210 728.
9. COPYRIGHT
The intellectual property rights over the texts in this manual belong to CECOTEC INNOVACIONES, S.L. All rights reserved. The contents of this publication may not, in whole or in part, be reproduced, stored in a retrieval system, transmitted, or distributed by any means (electronic, mechanical, photocopying, recording or similar) without the prior authorization of CECOTEC INNOVACIONES, S.L.
FRANÇAISFRANÇAIS
1. PIÈCES ET COMPOSANTS
Img.1
A4. Double cappuccino
A5. Latte simple
A6. Double latte
Product: Power Espresso 20 Cream
Voltage: 220 - 240 V-
A4. Duble cappuccino
A5. Basit Latte
A6. Duble latte
Fig./Img./Abb./Afb./Rys.1
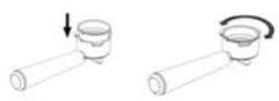
Fig./Img./Abb./Afb./Rys.3
natural_image
Three-step illustration showing a hand holding a small object, with no visible text or symbolsFig./Img./Abb./Afb./Rys.4
natural_image
Four-panel diagram showing mechanical assembly steps with arrows indicating direction (no text or symbols)Fig./Img./Abb./Afb./Rys.2

Fig./Img./Abb./Afb./Rys.5
www.cecotec.es
- SOMMAIRE
- INSTRUCTIONS DE SÉCURITÉ
- BEFORE USE
- ENGLISHENGLISH
- Box content
- Before using the coffee machine for the first time
- OPERATION
- Preparing the coffee machine
- Choosing the right cup
- Choosing the right type of coffee
- Coffee
- The level of grinding
- Operation
- Filling up the water tank
- Filling up the milk tank
- Portafilter
- Choosing the filter
- Placing the filter in the portafilter
- Filling the filter
- Placing the portafilter
- Placing the cup(s) of coffee
- Switching on the coffee machine
- Selecting a drink
- Preparing an Espresso
- Preparing a Cappuccino
- Preparing a Latte
- After preparing milk drinks
- Automatic shut-off function
- CLEANING AND MAINTENANCE
- Cleaning the spout, portafilter and filters
- Water tank cleaning
- Cleaning the outer surface of the coffee machine
- Descaling
- Descaling the water tank
- Descaling of internal parts
- TECHNICAL SPECIFICATIONS
- DISPOSAL OF OLD ELECTRICAL AND ELECTRONIC APPLIANCES
- TECHNICAL SUPPORT AND WARRANTY
- COPYRIGHT
- FRANÇAISFRANÇAIS
- PIÈCES ET COMPOSANTS
- Img.1
Brand : CECOTEC
Model : Power Espresso 20 Cream
Category : Coffee machine