
66932 - Air purifier Lund - Free user manual and instructions
Find the device manual for free 66932 Lund in PDF.

| Product type | Air purifier |
| Brand | Lund |
| Model | 66932 |
| Power supply | 220-240 V~, 50/60 Hz |
| Rated power | 65 W |
| Protection class | II (double insulation) |
| Coverage area | 50 to 70 m² |
| Maximum air flow (CADR) | 420 m³/h |
| Noise level | < 70 dB(A) |
| Weight | 6.7 kg |
| Filtration system | Pre-filter + high-efficiency filter + UV-C lamp + ionizer |
| Functions | Adjustable speed, timer, auto mode, night mode, ionizer, germicidal lamp, child lock, air quality indicator (PM2.5, temperature, humidity), remote control |
| Display | Touch control panel with backlight |
| Air quality sensor | Built-in, cleaning recommended every 2 months |
| Maintenance | Clean exterior with damp cloth; replace filters when indicator light flashes; replace UV lamp after approximately 8000 hours (with gloves) |
| Safety | Child lock, automatic shutdown not specified but follow safety instructions |
| Included accessories | Remote control with battery, user manual |
| Recommended use | Household, living rooms, do not use in bathrooms or kitchens |
Frequently Asked Questions - 66932 Lund
User questions about 66932 Lund
0 question about this device. Answer the ones you know or ask your own.
Ask a new question about this device
Download the instructions for your Air purifier in PDF format for free! Find your manual 66932 - Lund and take your electronic device back in hand. On this page are published all the documents necessary for the use of your device. 66932 by Lund.
USER MANUAL 66932 Lund
natural_image
Exterior view of a modern air purifier unit with a digital display and ventilation slots (no text or symbols visible)CE
PL D RUS UA LT LV CZ SK H RO E F I NL GR
natural_image
Close-up of hands holding a white plastic sheet with metal plates and mounting holes (no text or symbols visible)
natural_image
Two-panel image showing a hand holding a grid-patterned device inside a device frame, with no visible text or symbols.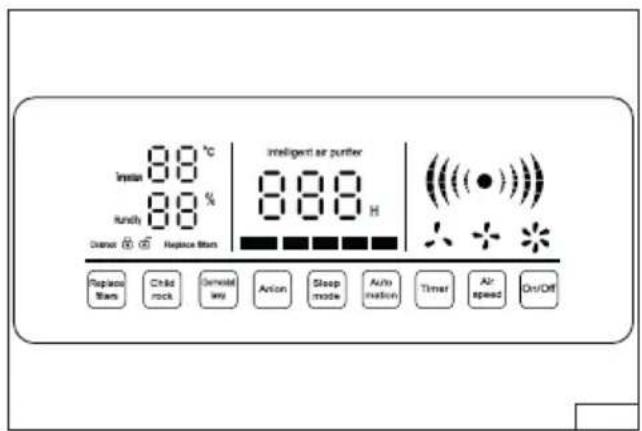
natural_image
Microscopic view of a device with internal components and directional arrows (no text or symbols)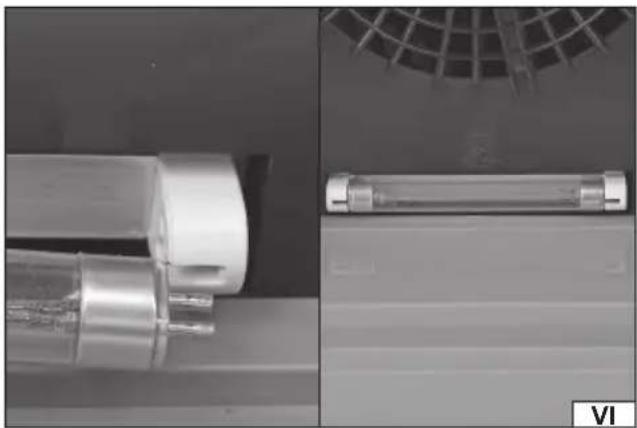
natural_image
Close-up of mechanical components including a cylindrical component and a rectangular cylindrical component, with no visible text or symbols.PL
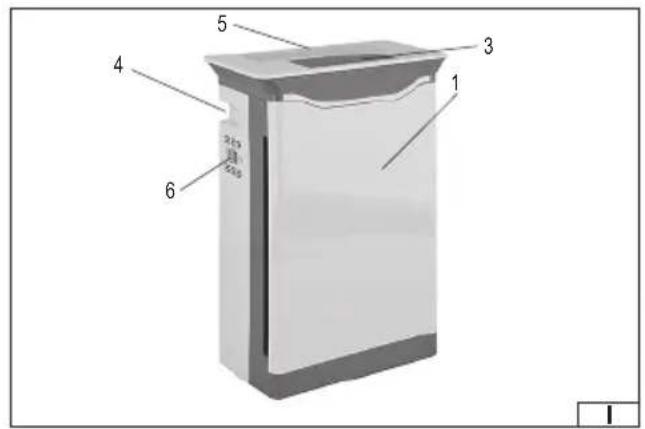
- filter cover
- filter
- control panel
- handle
- vents
- sensor
LT
Read the operating instruction
Second class of insulation
This symbol indicates that waste electrical and electronic equipment (including batteries and storage cells) cannot be disposed of with other types of waste. Waste equipment should be collected and handed over separately to a collection point for recycling and recovery, in order to reduce the amount of waste and the use of natural resources. Uncontrolled release of hazardous components contained in electrical and electronic equipment may pose a risk to human health and have adverse effects for the environment. The household plays an important role in contributing to reuse and recovery, including recycling of waste equipment. For more information about the appropriate recycling methods, contact your local authority or retailer.
The air purifier is used to filter the air in rooms. The air is passed through a set of filters which remove particles from the air. Quiet and efficient work allows uninterrupted operation. The appliance is intended for home use only. The correct, reliable, and safe operation of the appliance depends on its proper use, therefore:
Read and keep the entire manual before the first use of the appliance.
The supplier shall not be liable for any damage resulting from failure to comply with the safety instructions and recommendations specified in this manual.
ACCESSORIES
The appliance is delivered complete but requires preparation before beginning operation.
SAFETY INSTRUCTIONS
Recommendations concerning transport and installation
The appliance must be placed on a hard, flat, level and non-flammable surface. Maintain at least 20 cm of free space around the side walls of the appliance and at least 30 cm of free space above the appliance. The location should ensure that the outlet and inlet vents are not obstructed. No solids or liquids may enter the inlet ports. This can cause damage to the appliance, which can result in an electric shock. Do not place the appliance near gas appliances, heaters or fireplaces. Avoid locations where the appliance will be exposed to direct sunlight or heat. Do not set anything on the appliance or place any objects over the appliance. Do not stand or sit on the appliance. It is recommended to set the appliance directly on the ground. However, if it is placed on other objects, it should not be placed too close to the edge to prevent it from falling. It is forbidden to drill any holes in the appliance, as well as to make any other modifications of the appliance not described in the manual. Disconnect the power cord from the socket before moving the appliance. Move the appliance by grasping the handle or housing. Do not move the appliance by pulling on the power cord.
Recommendations for connecting the product to the power supply
Before connecting the appliance to the power supply, make sure that the voltage, frequency and performance of the power supply correspond to the values shown on the appliance's rating plate. The plug must fit into the socket. It is forbidden to modify the plug or socket in any manner to make them fit. The appliance must be connected directly to a single power supply socket. It is forbidden to use extension cords, adapters or double sockets. Avoid contact of the power cord with sharp edges, hot objects or surfaces. During operation, the power cord must always be fully extended and the position of the power cord must be set so that it does not become an obstacle during operation. The power cord should not be placed in a manner which would pose a risk of tripping. The power supply socket should be located in a place where it is always possible to quickly remove the appliance power cord plug. Always pull the power cord by the plug housing when unplugging it, never by the cord. If the power cord or the plug is damaged, immediately disconnect it from the power supply and contact an authorised service centre of the manufacturer for replacement. Do not use the appliance with a damaged power cord or plug. The power cord or plug cannot be repaired and must
GB
be replaced with a new one which is free of defects if these components are damaged. If the plug has a ground contact, it must be connected to a power supply socket which is also equipped with a ground contact.
Instructions for use
Warning! The appliance does not remove gaseous pollutants such as carbon monoxide (CO) and must not be used for smoke removal. Before using the appliance, make sure it is properly assembled. During operation, do not allow water or other liquids to enter the appliance. Do not spray flammable liquids near the appliance. Do not use the appliance in a room where insect repellents or oil-containing substances such as incense have been sprayed. The appliance must not operate in rooms with high humidity and/or high temperature, e.g. bathroom or kitchen. Do not use the appliance even in rooms exposed to high temperature fluctuations. These conditions may cause condensation to form inside the appliance. The appliance does not replace regular cleaning and airing of rooms. Do not place fingers or other objects in the appliance vents. Use only original filters supplied with the appliance or replacement ones specified by the manufacturer. Maintenance of the appliance should be carried out in accordance with the manual. Do not use aggressive substances, solvents, caustics, alcohol, petrol or abrasives for cleaning. The appliance may be used by children aged 8 years and over if they are supervised or instructed to use the appliance in a safe manner and if they understand the risks involved. Cleaning and maintenance should not be carried out by children unless they are 8 years or older, and are supervised. Keep the appliance and its power cord out of reach of children under 8 years of age.
APPLIANCE OPERATION
Preparing for operation
Unpack the appliance by removing all packaging components. The covers can be secured during transport with adhesive tape, which must be removed. The filters can be factory packed in plastic bags. Before starting operation, remove the filters from the bags and install them in the correct order and in the correct manner in the appliance. Clean the outer surfaces of the appliance according to the instructions in the section "Appliance maintenance".
Installation of fi Iters
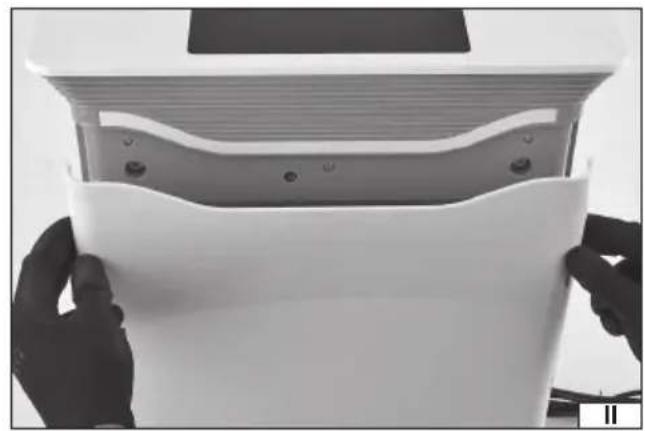
Warning! Before removing the filter cover, make sure that the appliance is disconnected from the power supply. and the power cord is unplugged from the power supply socket.
Caution! If the appliance has more than one filter, always replace all filters.
Remove the filter cover (II).
Remove the filter(s) by pulling the ribbon at the edge of the filter(s) (III).
The filter(s) should be installed in such a manner that the ribbons are placed outside and allow easy removal of the filter. Installing the filter wrong will result in incorrect air filtration and the appliance will not function properly.
After the filter(s) have been installed, the appliance cover must be mounted.
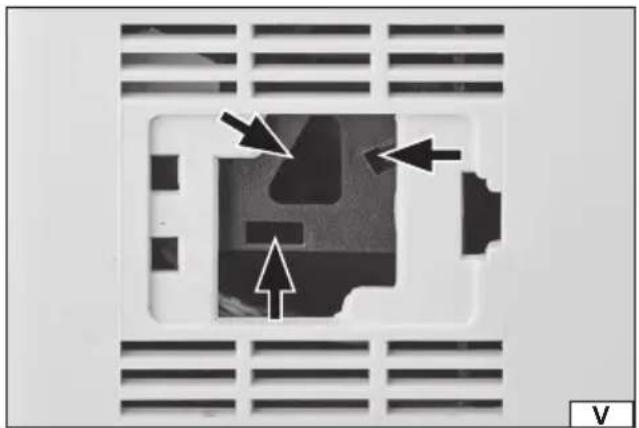
Air quality sensor
An air quality sensor is located on the side wall of the appliance, under the flap. Periodically, every two months, open the flap and then use a swab on a stick moistened with water to clean the slots indicated in the illustration (V). After cleaning, dry the slots with a dry swab. If there are vents around the sensor flap, they should also be cleaned with a damp cloth and then dried with a dry cloth.
UV fluorescent lamp
Warning! The fluorescent lamp can be hot during and immediately after operation. Wait until it cools down on its own before replacing it.
A UV fluorescent lamp emits ultraviolet UV-C radiation, which has antibacterial properties. The fluorescent lamp is subject to natural wear and should be replaced after approx. 8,000 hours (approx. 11 months) of operation. The fluorescent lamp should be
GB
rotated in the socket so that the contacts on both sides are in the plane of the fixing slot (VI). Then remove the fluorescent lamp and install a new one by sliding it into the socket and turning it.
Caution! The surface of the fluorescent lamp should not be touched with bare fingers. The replacement must be done in gloves.
The used fluorescent lamp should be handed over to an electrical waste treatment plant in accordance with local regulations.
Remote control
The remote control has buttons which are described and operate in the same manner as the control panel buttons. Batteries must be installed in the remote control for proper operation, paying attention to the correct polarity of the batteries.
Control panel
The control panel allows you to control the operation of the appliance. The panel is equipped with touch buttons and indicator lights informing about the appliance settings.
The "ON/OFF" button is used to turn the appliance on and off. When the appliance is switched off, only the switch is illuminated. When the appliance is on, all buttons and selected indicator lights are illuminated.
The "Air speed" button is used to set the fan speed. Higher speed increases operation capacity, but also causes more noise.
The “Timer” button is used to set the operating time. The next press of a button increases the operation time which is presented on the display. Flashing button illumination indicates that the timer is set, which will switch off the appliance after the pre-set time. The button’s constant illumination indicates uninterrupted operation.
The “Automation” button - starts and stops the automatic mode where the appliance automatically selects the operating parameters. The activation of this mode is indicated by flashing button illumination.
The “Sleep mode” button - starts and stops the night mode, where the appliance switches off the control panel in addition to illuminating the “Sleep mode” button. This mode should be set for the night when the appliance is to operate in the same room where people are sleeping. Pressing the button will cause its illumination to flash, and after a few seconds the appliance will automatically turn the control panel illumination off and leave only this button illuminated. You can exit the night mode by pressing any button and then pressing the “Sleep mode” button again to stop the illumination from flashing. The flashing of the “Sleep mode” button illumination means that the appliance will automatically switch to night mode after a few seconds.
The “Anion” button starts or stops the air ioniser. When the ioniser is activated, oxygen anions are produced in the appliance, which can have a positive effect on your well-being. When the air ionisation is activated, the button illumination will flash.
The “Germicidal lamp” button activates or deactivates the UV emitting fluorescent lamp. When the fluorescent lamp is activated, the button illumination will flash.
The "Child lock" button activates the control panel lock, which does not allow any of the buttons to be pressed. The lock is deactivated by touching and holding this button for a few seconds.
The "Replace filter" button - flashing of this button's illumination means that the filters must be replaced. After replacing the filters, press the button to stop the illumination from flashing.
The “Child lock” indicator light - informs about the lock status of the control panel. If the open padlock symbol is illuminated this means that the lock is not active, and when the closed padlock symbol is illuminated this means the control panel is locked.
The “Temperature” indicator light shows the air temperature in the room where the appliance operates.
The "Humidity" indicator light shows the relative humidity of the room where the appliance operates.
The “Intelligent air purifier” indicator light shows the amount of PM2.5 particles in the air in g/m^3 and also shows the air quality using the illumination colour. Green - good quality, orange - medium quality, red - bad quality. The air quality is also indicated by the illumination colour of the lamp at the front of the appliance.
An indicator light with a fan symbol shows the current fan speed.
MAINTENANCE, TRANSPORT AND STORAGE
Warning! All maintenance works and transport must be carried out with the appliance's electric power supply disconnected. Pull the plug out of the power supply socket.
Clean the appliance from outside with a slightly damp cloth and then wipe dry with a dry cloth. Clean the inlet and outlet vents with a paintbrush or soft bristle brush. The filters do not require cleaning, dirty filters should be replaced with new ones. The filters cannot be regenerated or cleaned.
If the water tank is installed in the appliance, it must be emptied. In addition to the removable tank, there is a fixed tank in the appliance, which must be emptied by pulling water from it using a pump (not included). Water should be removed from the tanks not less frequently than every three days. Do not keep the water in the tank due to the possibility of growth of microorganisms. Before refilling, clean the tank with clean water. Remove any scale, sediments or film which has accumulated on the walls or inside the tank. Then wipe the tank dry. Pour one tablespoonful of citric acid into the tank and 100 ml of warm water with the temperature not exceeding 70^ C. Mix the acid and leave the solution in the tank for 5 minutes. Then empty the tank, rinse with clean water and leave it open until completely dry.
Never use solvents, acids, or alcohol for cleaning. Clean the base and the lid with a soft, damp cloth. Never immerse the appliance in water or any other liquid.
Transport the appliance by gripping the handles. Transport in operating position. If transported over longer distances, transport
GB
the appliance in a packaging which protects it from damage. Store the appliance in rooms which protect against dust and moisture and are well ventilated. It is recommended to store the appliance in its original packaging. Do not place anything on the appliance during storage.
Caution! During long-term storage, the filters wear out, although at a lower rate than during use. For long-term storage, it is recommended to pack the filters in airtight plastic bags. Remove the filters from the bags before use.
TECHNICAL DATA
| Parameter Unit Value | ||
| Catalogue No. 66932 | ||
| Rated voltage [V~] 220 - 240 | ||
| Rated frequency [Hz] 50/60 | ||
| Rated power [W] 65 | ||
| Protection class II | ||
| Maximum particulate removal capacity [m] | ^3/h 420 | |
| Operation area [m] | ^2 50 - 70 | |
| Weight | [kg] | 6.7 |
| Noise level – sound pressure L_w^2 | [dB(A)] <70 |
GERÄTEBESCHREIBUNG


- PL
- LT
- ACCESSORIES
- SAFETY INSTRUCTIONS
- Recommendations concerning transport and installation
- Recommendations for connecting the product to the power supply
- GB
- Instructions for use
- APPLIANCE OPERATION
- Preparing for operation
- Installation of fi Iters
- Air quality sensor
- UV fluorescent lamp
- Remote control
- Control panel
- MAINTENANCE, TRANSPORT AND STORAGE
- GERÄTEBESCHREIBUNG
Brand : Lund
Model : 66932
Category : Air purifier