PML56-225ES - Lawn mower SCHEPPACH - Free user manual and instructions
Find the device manual for free PML56-225ES SCHEPPACH in PDF.

| Brand | Scheppach |
| Model | PML56-225ES |
| Category | Lawn mower |
| Product type | Petrol lawn mower with electric and manual start |
| Weight | 34.4 kg |
| Cutting width | 56 cm |
| Cutting height adjustment | 7 positions, from 25 to 75 mm |
| Grass catcher capacity | 65 L |
| Engine fuel | Unleaded petrol (max 10% bioethanol), tank 1.2 L |
| Engine oil | SAE 10W-40, capacity 0.4 L |
| Starting battery | Lithium-ion 20 V, 2000 mAh / 37 Wh, charging time 50 min |
| Charger | Input 230-240 V AC, charging current 2.4 A |
| Engine | 4-stroke air-cooled, 224 cm³, power 4.4 kW (6.0 PS), speed 2800 min⁻¹ |
| Main functions | Mulching, side discharge, grass catcher, assisted drive, blade stop in 7 seconds |
| Maintenance and cleaning | Water cleaning via connection, air filter every 25 h, spark plug every 50 h, oil change each season, blade sharpening in workshop |
| Safety | Engine brake, automatic blade stop, spark plug cap to remove before maintenance, PPE recommended |
| Spare parts and repairability | Blade ref. 7911200639, oil ref. 7850000025, wear parts (spark plug, filter, belt, battery), repair by authorized workshop |
| Sound level | Sound power level L_WA 94.7 dB(A), sound pressure level L_pA 91.5 dB(A) |
| Vibrations | a_hv 5.7 m/s², uncertainty K=2.3 m/s² |
| General information | Domestic use, do not use on slopes >15°, frost-free storage, optimal temperature 5-30 °C |
Frequently Asked Questions - PML56-225ES SCHEPPACH
User questions about PML56-225ES SCHEPPACH
0 question about this device. Answer the ones you know or ask your own.
Ask a new question about this device
Download the instructions for your Lawn mower in PDF format for free! Find your manual PML56-225ES - SCHEPPACH and take your electronic device back in hand. On this page are published all the documents necessary for the use of your device. PML56-225ES by SCHEPPACH.
USER MANUAL PML56-225ES SCHEPPACH
natural_image
Black and white photo of a lawn mower with visible blades and mounting bracket (no text or symbols)
PML56-225ES
| DE | Benzin-RasenmäherOriginalbetriebsanleitung | 8 |
| GB | Petrol lawnmowerTranslation of original instruction manual | 27 |
| FR | Tondeuse à gazon thermiqueTraduction des instructions d'origine | 43 |
| IT | Tosaerba a benzinaLa traduzione dal manuale di istruzioni originale | 61 |
| NL | Benzine grasmaaierVertaling van de originele gebruikshandleiding | 79 |
| ES | Cortacésped de gasolinaTraducción del manual de instrucciones original | 96 |
| CZ | Benzínová sekačka na trávuPřeklad originálního návodu k obsluze | 114 |
| SK | Benzínová kosačka na trávuPreklad originálneho návodu na obsluhu | 130 |
| HU | Benzines fünyíróEredeti használati utasítás fordítása | 147 |
| EE | Bensiini-muruniidukOriginaalkäitusjuhendi tõlge | 164 |
| FI | Bensiinikäyttöinen ruohonleikkuriKäännös alkuperäisestä käyttöohjeesta | 180 |
| DK | Benzindrevet græsslåmaskineOversættelse fra den oprindelige betjeningsvejledning | 196 |
| BG | Бензинова градинска косачкаПревод на оригиналното ръководство за експлоатация | 212 |
| IS | BensínsláttuvélinÞýðing á upprunalegum notkunarleiðbeiningum | 231 |
| SE | BensingräsklippareÖversättning av originalinstruktionsmanualen | 247 |
natural_image
Close-up of a hand holding a black cable with a labeled component '5' and directional arrows indicating motion (no text or symbols beyond labels)
natural_image
Mechanical component with labeled parts and a circled feature, no readable text or symbols present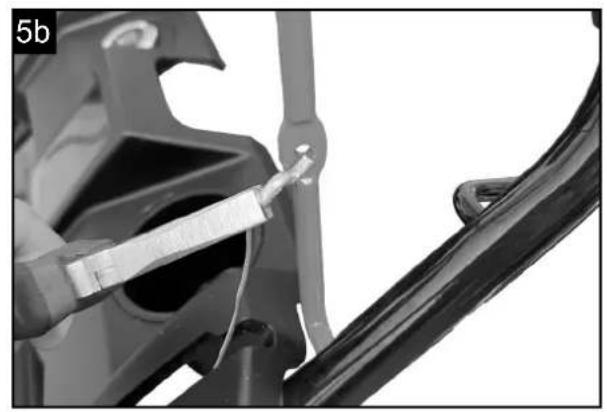
natural_image
Close-up of a mechanical component with a metallic tool inserted, showing no visible text or symbols.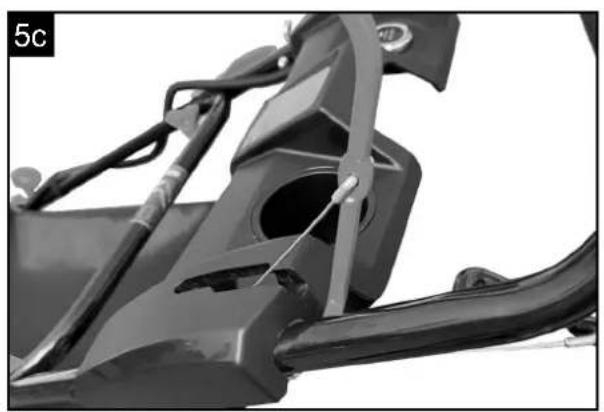
natural_image
Mechanical assembly diagram showing a bracket with attached wires and components (no text or symbols)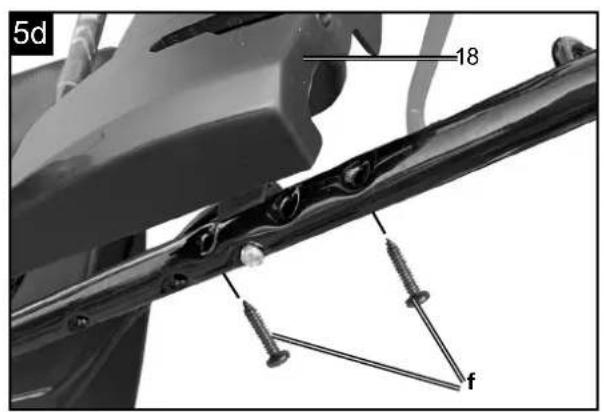
natural_image
Close-up of a mesh net inside a container with arrows indicating flow direction (no text or symbols)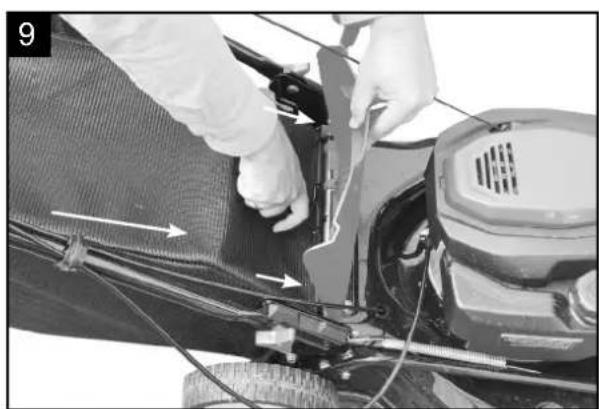
natural_image
Close-up of a person in protective gear adjusting a lawn mower component with visible wiring and tools (no text or symbols)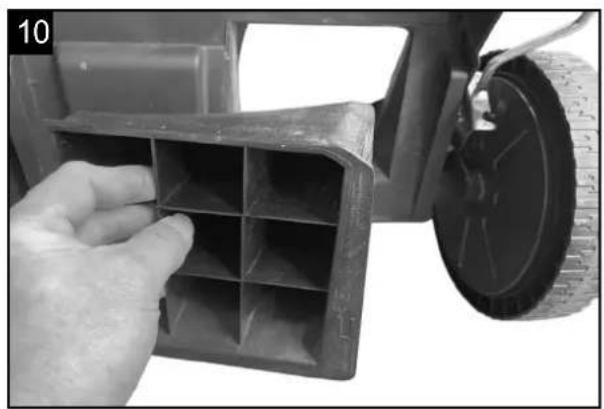
natural_image
Close-up of a hand placing a plastic bucket into a vehicle wheel (no text or symbols visible)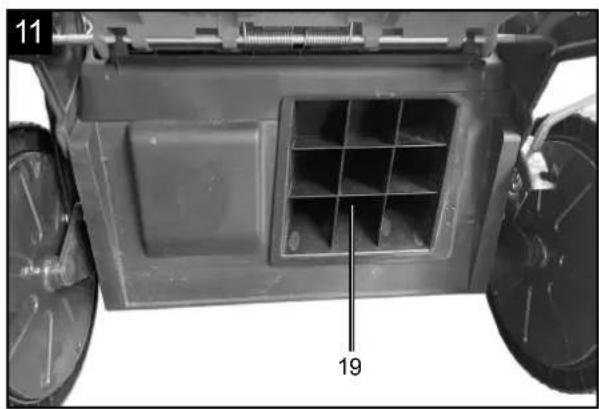
natural_image
Top-down view of a vehicle's rear wheel assembly with numbered components (11 and 19), no visible text or symbols beyond labels.
natural_image
Close-up of a mechanical component with labeled parts 12 and 15, showing internal structure (no readable text or symbols beyond labels)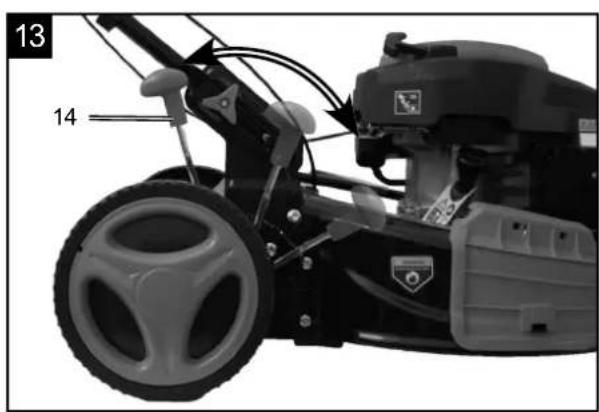
natural_image
Close-up of a lawn mower with visible components and wheels (no text or symbols)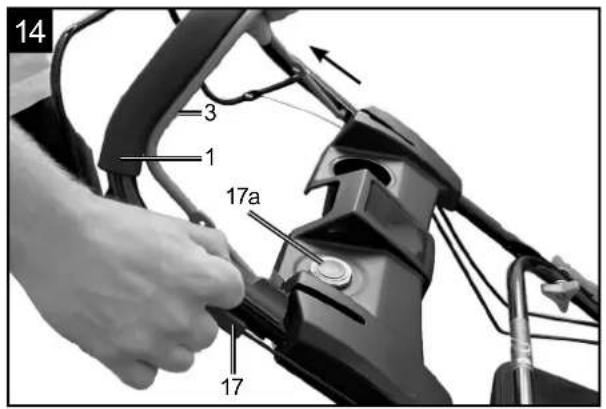
natural_image
Close-up of a car's internal gear assembly showing a mesh component being inserted, with no visible text or symbols.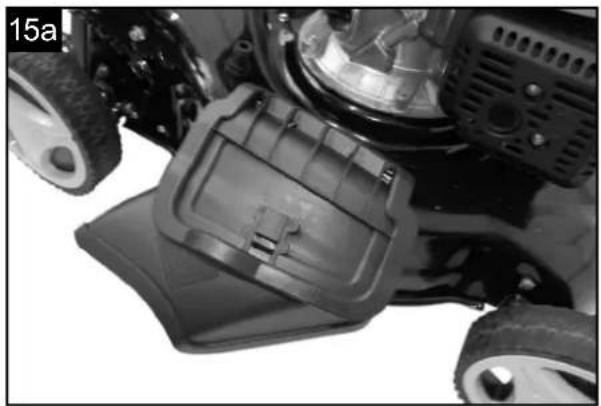
natural_image
Close-up of a mechanical assembly with visible gears and housing (no text or symbols)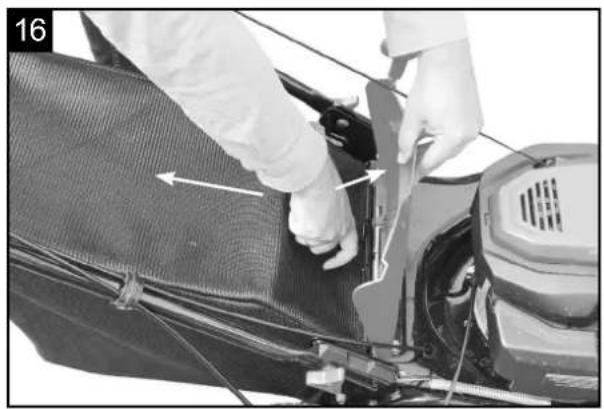
natural_image
Person in protective suit installing or adjusting a lawn mower component with tools and wiring (no visible text or symbols)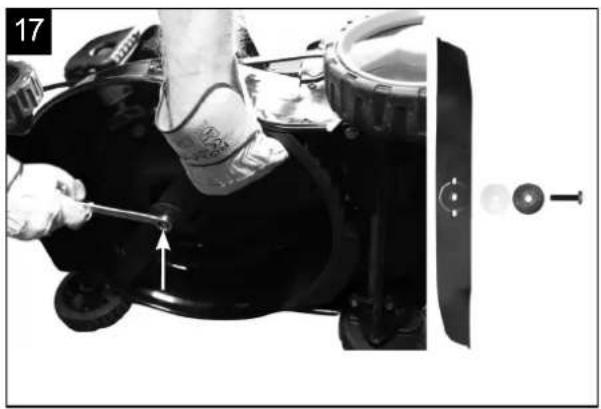
natural_image
Close-up of a person using a tool on a motorcycle seat, with no visible text or symbols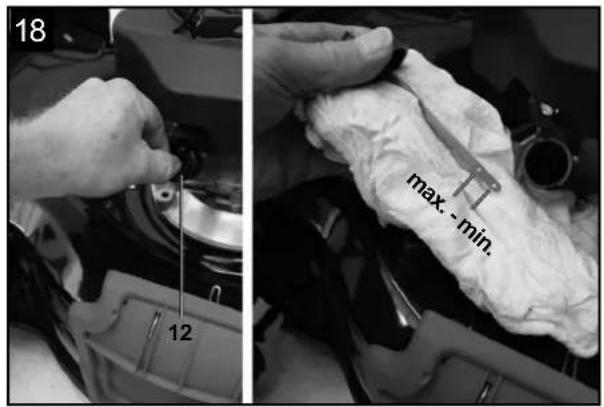
natural_image
Close-up of a mechanical assembly with visible components and mounting holes (no text or symbols)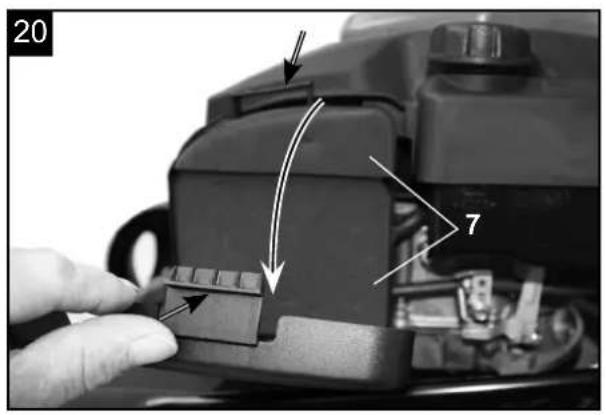
natural_image
Close-up of a hand pressing a small component with arrows indicating motion (no text or symbols visible)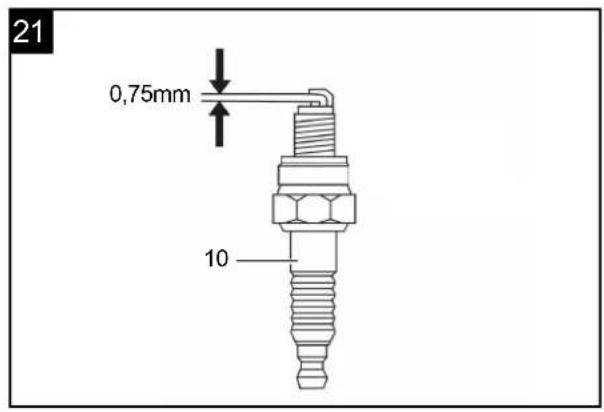
natural_image
Black-and-white photo of a small utility vehicle with visible wheels, hoses, and control panel (no text or symbols)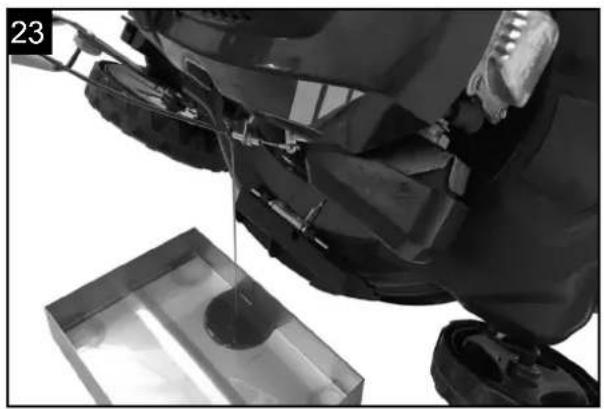
natural_image
Close-up of a robotic arm with a transparent box and mechanical components, no visible text or symbols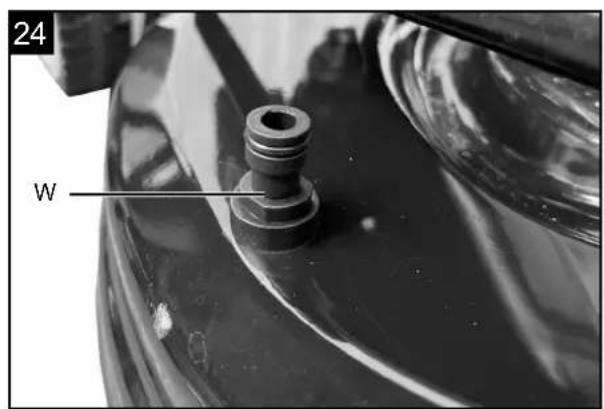


natural_image
Black industrial electrical terminal block with control panel and indicator lights (no visible text or symbols)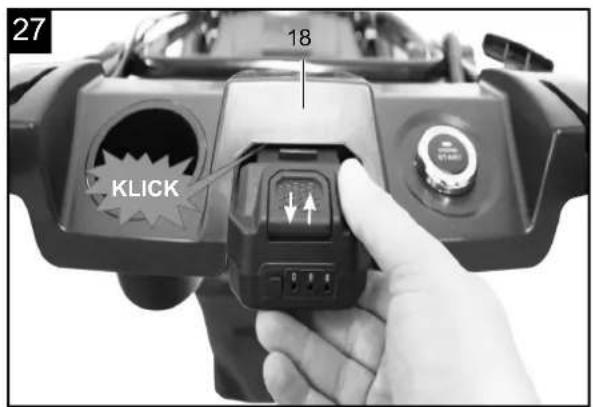
Günzburger Straße 69
D-89335 Ichenhausen
Verehrter Kunde
Explanation of the symbols on the device
Symbols are used in this manual to draw your attention to potential hazards. The safety symbols and the accompanying explanations must be fully understood. The warnings themselves will not rectify a hazard and cannot replace proper accident prevention measures.
 | Observe all safety instructions before use! |
 | Read and understand all text in the operating instructions before start up. |
 | Do not mow uphill or downhill. |
 | Before operating the lawnmower, remove any small parts lying around that could be thrown about. |
 | Make sure that other persons maintain a sufficient safety distance. Danger due to parts flying off while the engine is running. |
 | Remove the spark plug connector prior to all maintenance work. |
 | Keep your hands and feet away from the rotating blades. |
 | Important. The exhaust gases are toxic. Do not operate the engine in areas that are not ventilated. |
 | Attention: hot surface - risk of burns! |
 | Use hearing and eye protection! |
 | ATTENTION! Operating materials are flammable and explosive - danger of burning. Do not refuel while the engine is hot or running. |
 | Tank contents |
 | Engine oil |
 | Blade length. Max. cutting width |
 | Guaranteed sound power level |
 | The product complies with the applicable European directives. |
 | Check the oil level. |
 | Only use engine oil (SAE 10W-40). |
 | DRIVE - drive leverSTOP - engine brake lever |
 | Use only indoors! |
 | Protection class II (double insulation) |
 | Device fuse |
 | Do not throw batteries away with household wasteDo not throw old equipment away with household waste |
 | The battery is used as a device key |
 | Protect batteries from water and moisture. |
 | Protect batteries from heat and fire. |
 | Protect batteries from temperatures over 45°C. |
Table of contents: Page:
- Introduction ...... 30
- Device description....30
- Scope of delivery....30
- Proper use....30
- Safety instructions....31
- Technical data....34
- Unpacking 34
- Assembly / Before commissioning.... 35
- Start up....35
- Cleaning 38
- Transport....38
- Storage....39
- Maintenance.... 39
- Disposal and recycling 41
- Troubleshooting....42
- Declaration of conformity 265
1. Introduction
Manufacturer:
Scheppach GmbH
Günzburger Straße 69
D-89335 Ichenhausen
Dear Customer
We hope your new device brings you much enjoyment and success.
Note:
In accordance with the applicable product liability laws, the manufacturer of this device assumes no liability for damage to the device or caused by the device arising from:
- Improper handling
- Failure to comply with the operating instructions
• Repairs carried out by third parties, unauthorised specialists
• Installing and replacing non-original spare parts
• Application other than specified - Failure of the electrical system in the event of the electrical regulations and VDE provisions 0100, DIN 57113 / VDE0113 not being observed
Note:
Read through the complete text in the operating manual before installing and commissioning the device.
This operating manual should help you to familiarise yourself with your device and to use it for its intended purpose.
The operating manual includes important instructions for safe, proper and economic operation of the device, for avoiding danger, for minimising repair costs and downtimes, and for increasing the reliability and extending the service life of the device.
In addition to the safety instructions in this operating manual, you must also observe the regulations applicable to the operation of the device in your country.
Keep the operating manual at the device, in a plastic sleeve, protected from dirt and moisture. They must be read and carefully observed by all operating personnel before starting the work.
The device may only be used by personnel who have been trained to use it and who have been instructed with respect to the associated hazards. The required minimum age must be observed.
In addition to the safety instructions in this operating manual and the separate regulations of your country, the generally recognised technical rules relating to the operation of such machines must also be observed.
We accept no liability for accidents or damage that occur due to a failure to observe this manual and the safety instructions.
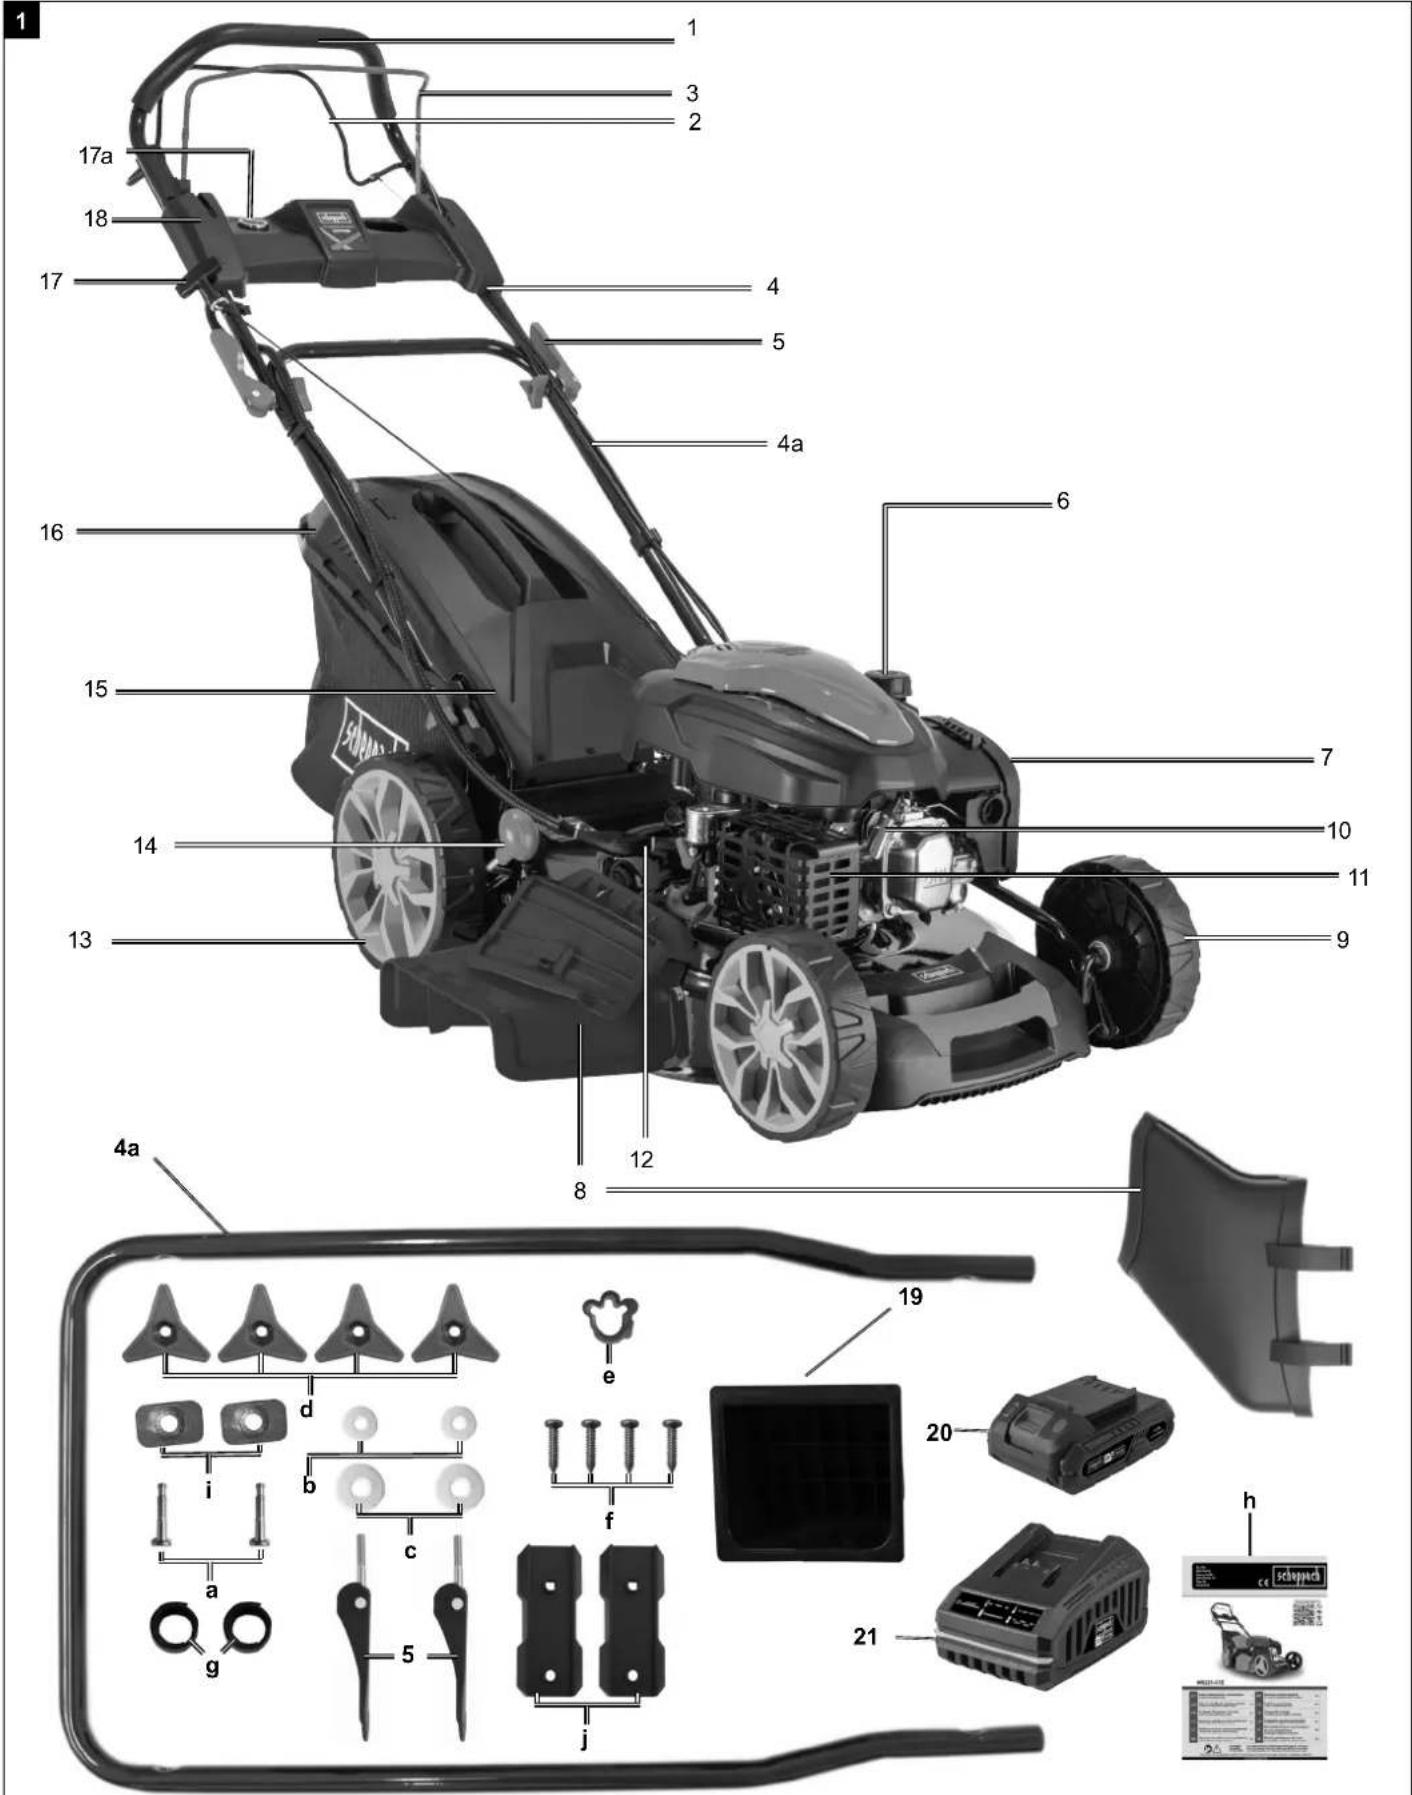
2. Device description
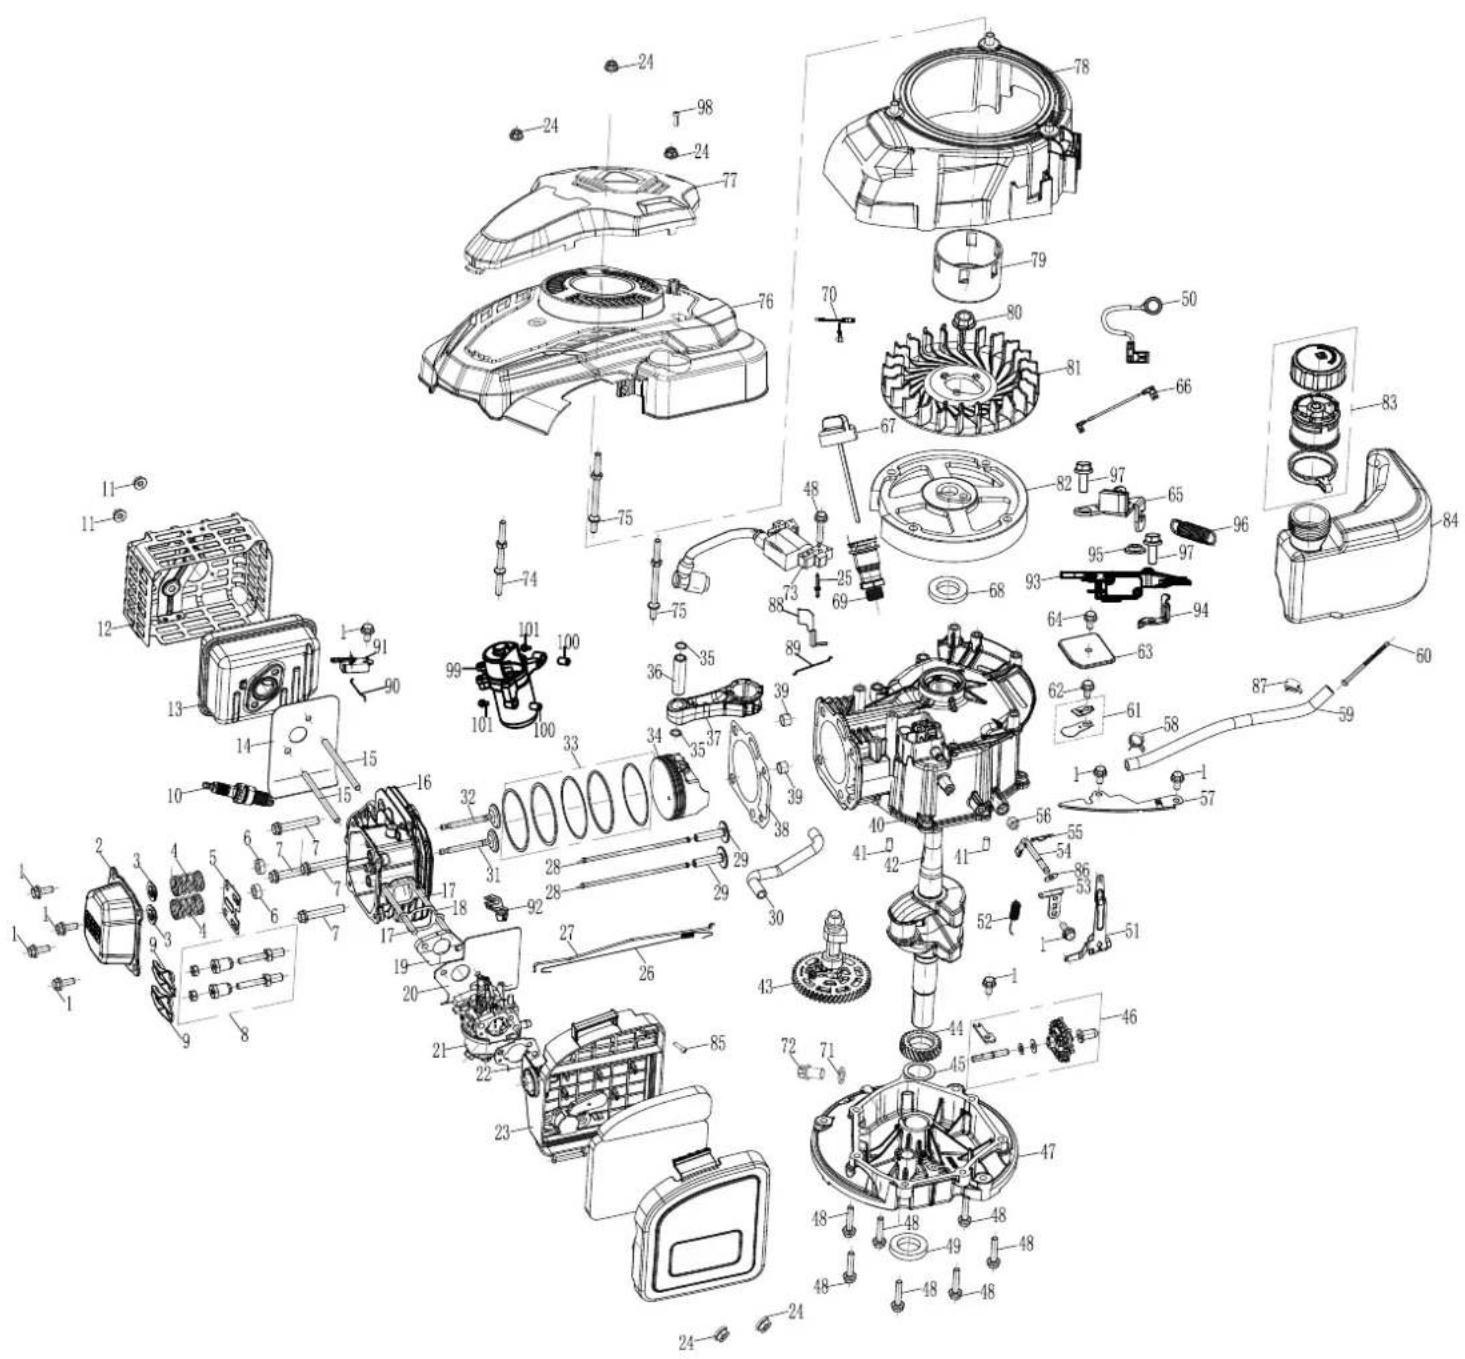
Fig. 1 (1 - 27)
- Handle
- Drive lever
- Engine brake lever
- Upper push bar, 4a. Lower push bar
- Quick clamp lever
- Fuel tank
- Air filter
- Side discharge (side discharge flap and side discharge adapter)
- Idler
- Spark plug
- Exhaust pipe
- Oil dipstick
- Drive wheel
- Wheel height adjustor lever
- Discharge flap
- Catch basket
- Cable starter, 17a. Electric starter
- Electric starter unit
- Mulching insert
- Battery
- Battery charger
3. Scope of delivery
Fig. 1 (a - j)
a) 2 x Round-headed screws M8
b) 2 x Washer, small
c) 2 x washer, large
d) 4 x Plastic nut
e) 1 x Cable clip
f) 4 x Screws
g) 2 x Velcro tape
h) 1 x Operating manual
i) 2 x plastic disc
j) 2 x plastic holder
- Mulching insert (19)
• Side discharge adapter (8)
- Battery (20)
- Battery charger (21)
4. Proper use
The machine complies with the applicable EC machinery directive. Before starting any work, all protective and safety devices must be in place.
- The operator is responsible for third parties in the area of operations.
- The machine has been designed to be operated by one person.
- Observe all safety information and danger notices on the machine.
-
Ensure that all of the safety information and danger notices on the machine are complete and in legible condition.
-
Only use the machine when in a technically faultless condition, appropriately and in compliance with the operating manual and with full knowledge of safety and hazards!
- In particular, rectify malfunctions that could impair safety immediately (or commission rectification works accordingly)!
- The manufacturer's safety, operating and maintenance specifications as well as the dimensions given in the technical data must be observed.
- Relevant accident prevention regulations and other generally recognized safety and technical rules must also be observed.
- The machine may only be used, maintained or repaired by trained persons who are familiar with it and have been informed of the dangers. Any liability of the manufacturer for damages resulting from arbitrary changes to the machine is excluded.
- The machine is intended for use only with original accessories and original tools from the manufacturer.
- Any use beyond this is improper use. The manufacturer is not responsible for the resultant damages, the user bears this risk alone.
- The machine must not be used for commercial, technical or industrial applications.
- If you are not sure whether working conditions are safe or unsafe, do not work with the machine.
- The petrol lawnmower is intended for private use i.e. for use in home and gardening environments. Private use of the lawnmower refers an annual operating time generally not exceeding that of 50 hours, during which time the machine is primarily used to maintain small-scale, residential lawns and home/hobby gardens. Public facilities, sporting halls, and agricultural/forestry applications are excluded.
Attention! Due to the high risk of bodily injury to the user, the lawnmower may not be used to trim bushes, hedges or shrubs, to cut scaling vegetation, planted roofs, or balcony-grown grass, to clean (suck up) dirt and debris off walkways, or to chop up tree or hedge clippings. Moreover, the lawnmower may not be used as a power cultivator to level out high areas such as molehills.
- For safety reasons, the lawnmower may not be used as a drive unit for other work tools or toolkits of any kind.
⚠ WARNING
For your own safety, please thoroughly read this manual and the general safety instructions before turning the device on. If you give the device to third parties, always include these usage instructions.
5. Safety instructions
We have marked points in these operating instructions that impact your safety with this symbol: △
Furthermore, the operating manual contains other important text sections that are marked with the word "ATTENTION!".
DANGER
A failure to observe these instructions poses an extreme danger of death or the risk of life-threatening injuries.
⚠ WARNING
A failure to observe these instructions poses a danger of death or the risk of serious injuries.
CAUTION
A failure to observe these instructions poses a minor to moderate danger of injury.
NOTE
A failure to observe these instructions poses a risk of damage to the device or other property.
⚠ Attention!
When using equipment, several safety warnings must be observed to prevent injuries and damage. For this reason, please carefully read this operating manual / safety instructions. Keep them in a safe place so that the information is available at all times. If you hand the device over to another person, please hand over this operating manual / safety instructions as well. We accept no liability for accidents or damage that occur due to a failure to observe this manual and the safety instructions.
Incorrect use of the battery or battery charger can cause electric shock or fire.
During operation
- Keep the battery charger and the battery dry. Do not expose the battery charging system to rain or moisture.
• To avoid electric shocks, make sure that no water gets into the plug. - Do not short-circuit the device. Never insert objects into the battery contacts.
When charging the battery
- Use only the original battery charger to charge the battery.
-
Do not use the battery charger to charge other batteries.
-
Keep the battery charger and battery dry. Do not expose the battery charging system to rain or moisture.
- When removing the battery charger, do not pull on the cable but on the plug, otherwise the plug or cable could be damaged.
- Do not use the battery charger if the plug or cable is damaged. The cable cannot be replaced. If the cable is damaged, the battery charger must be replaced immediately.
- Do not use the battery if it has received a severe blow, been dropped or otherwise damaged. If the battery is damaged, it must be replaced. The battery cannot be serviced.
- Do not disassemble or attempt to repair the charger.
- To avoid electric shock, disconnect the battery charger plug from the socket before cleaning.
- Do not short-circuit the device. Never insert objects into the contacts.
- The battery charger must not be used by persons (including children) with impaired physical or mental abilities or limited perception, unless they have been instructed in the use of the device by a person responsible for their safety.
- Children must be supervised so that they cannot play with the battery charger.
When storing the battery charging system
Keep the battery charger and battery dry. Do not expose the battery charging system to rain or moisture.
Before adjustment or repair work
Remove the battery from the motor battery compartment.
WARNING
Battery chemicals are toxic and corrosive.
Fire or explosions can lead to severe injury or death.
- Discarded or used batteries must not be incinerated because they can explode. When batteries are burnt, toxic vapours and residues are produced.
- Do not use batteries that have been crushed, dropped or damaged.
Warning! This power tool generates an electromagnetic field during operation. This field can impair active or passive medical implants under certain circumstances. In order to prevent the risk of serious or deadly injuries, we recommend that persons with medical implants consult with their physician and the manufacturer of the medical implant prior to operating the power tool.
Who is not permitted to use the device:
- Children and other persons who do not know the instructions for use (local regulations may specify the minimum age of the user).
• People under the influence of alcohol, drugs and medication, as well as those who are tired or ill.
Safety instructions for hand-operated lawnmowers Note
- Read the usage instructions with due care. Familiarise yourself with the settings and proper operation of the machine.
- Never allow children or other persons who are unfamiliar with the usage instructions to use the lawnmower. Contact your local governmental agency for information regarding minimum age requirements for operating the lawnmower.
- Never mow while people, especially children or animals are nearby. Always keep in mind that the operator is responsible for accidents involving other persons and/or their property.
- If you give the device to any other person, give them this operating manual as well.
- Make sure you have a secure footing, wear shoes with non-slip, well gripping soles and long trousers. Never mow barefoot or in sandals.
- Check the terrain on which the machine will be used and remove all objects that could be caught up and violently flung out of the chute (like stones, toys, sticks and wires etc.).
-
Stop the engine and remove the spark plug cap and make sure that all moving parts have stopped and that the ignition key, if present, is removed:
-
Before you dislodge any blockages or clogs in the ejector chute.
- Before checking or cleaning the lawnmower or performing work on it.
- If it came into contact with a foreign object. Inspect the mower for damage and perform the required repairs before starting again and working with the mower, If the lawnmower begins to experience exceptionally strong vibrations, immediately switch it off and check it.
- Any time you leave the lawnmower.
- Before you refuel.
⚠ WARNING
Petrol is highly flammable:
- Only store petrol in the designated containers.
- Only refuel the unit outdoors and do not smoke when filling.
- Petrol must be filled before starting the engine. While the engine runs or if the mower is hot, the fuel cap must not be opened and petrol must not be filled.
- If petrol overflows, no attempts should be made to start the engine. Instead, the machine must be removed from the area contaminated with petrol. Do not try to start the engine until the fuel vapours have evaporated.
- For safety reasons, the fuel tank cap and other fuel caps must be replaced if damaged.
- Never store petrol near a source of sparks. Always use a tested canister. Keep petrol away from children.
-
Replace defective silencers.
-
Before use, always visually check whether the cutting tools, fastening bolts and the entire cutting unit are worn out or damaged. To prevent an imbalance, worn out or damaged cutting tools and bolts may only be replaced in sets.
- Please note that where a mower has more than one blade, the rotation of one of the blades can cause the others to rotate as well.
Handling
- Do not run the combustion engine in closed rooms in which hazardous carbon monoxide can collect.
- Only mow in daylight or with good artificial lighting. Avoid using the device on wet grass as far as possible.
- Do not use the lawnmower in a thunderstorm - risk of lightning strike!
• Always maintain good footing on inclines. - Only guide the machine at walking pace.
- The following applies to wheeled machines: Always mow across hills i.e. never straight up or straight down.
• Take particular care when changing direction on a slope. - Do not mow on excessively steep slopes and nearby rubbish tips, ditches and dykes. Take particular care when reversing the lawnmower or pulling it towards you.
- Stop the cutting blade when the lawnmower has to be tilted, when transporting over areas other than grass and when moving the lawnmower to and from the area to be mowed.
- Never use the lawnmower if the blade or safety grilles are damaged, or without the attached guards, e.g. deflectors and/or grass catching devices.
- Do not adjust or overclock the engine speed settings.
- Release the engine brake before you start the engine.
- Disconnect all work tools and drives before starting the engine.
- Start the engine with care, in accordance with the manufacturers instructions. Ensure that your feet are far enough away from the cutting blade.
- Do not tilt the lawnmower when you start the engine unless the mower must raised off of the ground a little in order to start it. In this case, only tilt as far as absolutely required and only lift the side away from the operator.
- Do not start the engine if you are standing in front of the ejector chute.
- Never out hands and feet on or under rotating parts. Always keep clear of the ejection opening.
- Never lift or carry a lawnmower while the engine is running.
- Operating the machine with excessive speed can increase the risk of accidents.
-
When the engine runs out, close the throttle valve. If the engine has a petrol shut-off valve, close it after mowing.
-
Be careful when adjusting the machine and avoid trapping fingers between the moving cutting tool and rigid parts of the machine.
- Be particularly careful when mowing on yielding ground, nearby rubbish tips, ditches and dykes.
- The user must be adequately trained in the use, adjustment and operation of the machine (including prohibited operations).
- Check the device regularly and make sure that all start locks and push buttons are working properly before each use.
- Please note that improper maintenance, the use of non-compliant spare parts, or the removal or modification of safety devices can result in damage to the device and serious injury to the person working with it.
- Please note that the lawnmower's safety systems or equipment must not be tampered with or deactivated.
- Please note that the user must not change or manipulate any sealed engine speed control settings.
- Use only cutting tools and accessories recommended by the manufacturer. Use of other insert tools and accessories may result in injury to the user.
- Always keep the lawnmower in good operating condition.
- It is necessary to take enough breaks to reduce noise and vibration exposure.
- Caution! The lawnmower must not be operated without either the full grass catcher or the self-closing separating guard for the ejection opening in place.
- Make sure that all nuts, bolts and screws are securely tightened so that the device is kept in a safe working condition.
- Never store the machine with petrol in the tank inside a building in which fuel vapours may come into contact with naked flames or sparks.
- Allow the engine to cool before storing the machine in enclosed spaces.
- In order to avoid fire hazards, keep the engine, exhaust pipe and the area around the fuel tank free of grass, leaves and leaking grease (oil).
- Regularly check the grass catcher for signs of wear or loss of functionality.
- For safety reasons, replace worn or damaged parts.
- If the fuel tank has to be drained, you must do this outdoors.
Residual risks and protective measures
Neglect of ergonomic principles
Negligent use of personal protective equipment (PPE)
Careless use or omission of personal protective equipment may result in serious injury.
- Wear prescribed protective equipment.
Human behaviour, misconduct
- Always concentrate fully on all work.
⚠️ Residual hazard - can never be ruled out.
Danger from noise
Hearing damage
Prolonged unprotected work with the device may cause hearing damage.
- Always wear hearing protection as a matter of principle.
Behaviour in an emergency
In the event of an accident, initiate the necessary first aid measures and seek medical assistance as quickly as possible.
6. Technical data
Type of engine 4-Stroke engine / air cooled
| Displacement | 224 cm3 |
| Rotation speed | 2800 rpm |
| Power | 4.4 kW / 6.0 PS |
| Fuel | Regular petrol / unleaded max. 10% bioethanol |
| Tank contents | 1.2 l |
| Engine oil | SAE 10W-40 |
| Tank capacity / oil | 0.4 l |
| Cutting height adjustment | 25-75 mm / 7 stages |
| Catch basket capacity | 65 l |
| Cutting width | 56 cm |
| Weight | 34.4 kg |
Lithium ion battery
| Lithium ion battery system | 20 V |
| Minutes charging time | 50 min |
| Charge current | 2.4 A |
| AC input of the battery charger (variable) | 230 - 240 V |
| Battery capacity | 2000 mAh / 37 Wh |
Subject to technical changes!
Noise & vibration
⚠ Warning: Noise can have serious effects on your health. If the machine noise exceeds 85 dB, please wear suitable hearing protection.
Noise data
Sound pressure level L_PA 91.5 dB
Measurement uncertainty K_PA 3 dB
Sound power level L_WA 94.7 dB
Measurement uncertainty K_WA 1.92 dB
Vibration parameters
Vibration a_hv 5.7 m/s ^2 Measurement uncertainty K_h 2.3 m/s ^2
Keep the noise level and vibration to a minimum!
- Only use faultless devices.
- Maintain and clean the device at regular intervals.
- Adapt your working methods to the device.
- Do not overload the device.
- Have the device checked if necessary.
- Switch the device off if it is not in use.
- Wear gloves.
When using the petrol lawnmower for extended periods, vibration-induced circulatory problems may occur (white finger disease).
Information about the duration of use cannot be provided in this case, since this can vary from person to person.
Raynaud's syndrome is a vascular disease that causes the small blood vessels on the fingers and toes to cramp in spasms. The affected areas are no longer supplied with sufficient blood and therefore appear extremely pale. The frequent use of vibrating devices can cause nerve damage in people whose circulation is impaired (e.g. smokers, diabetics).
If you notice unusual adverse effects, stop working immediately and seek medical advice.
The following factors can influence the condition:
• Circulatory problems in the user's hands
- Low outside temperatures
• Extended periods of use
We therefore recommend you wear warm work gloves and take regular breaks.
7. Unpacking
- Open the packaging and carefully remove the device.
- Remove the packaging material, as well as the packaging and transport safety devices (if present).
- Check whether the scope of delivery is complete.
- Check the device and accessory parts for transport damage. In the event of complaints the carrier must be informed immediately. Later claims will not be recognised.
- If possible, keep the packaging until the expiry of the warranty period.
- Familiarise yourself with the device by means of the operating manual before using for the first time.
- With accessories as well as wearing parts and replacement parts use only original parts. Spare parts can be obtained from your specialist dealer.
- When ordering please provide our article number as well as type and year of manufacture for your equipment.
ATTENTION!
The device and the packaging material are not children's toys! Do not let children play with plastic bags, films or small parts! There is a danger of choking or suffocating!
8. Assembly / Before commissioning
ATTENTION!
Always make sure the device is fully assembled before commissioning!
Some parts of the delivery come disassembled. For quick and easy assembly, read and follow the instructions below.
Note!
You will need the following additional tools, which is not included in the scope of delivery, for assembly, and also for maintenance work:
• One oil collecting tray, flat (for oil change)
• A 1 litre measuring beaker (oil / petrol-proof)
- A petrol canister (5 litres is sufficient for approx. 6 hours of operation)
• A funnel (to suit the petrol filler neck of the tank)
- Household wipes (to wipe up oil/petrol residue; dispose of these at a filling station)
- A petrol suction pump (plastic version, available in DIY stores)
- An oil can with hand pump (available in DIY stores)
• 0.4 I Engine oil SAE 10W-40
Assembly
- Remove the lawnmower and attachments from the packaging and check if all parts are available.
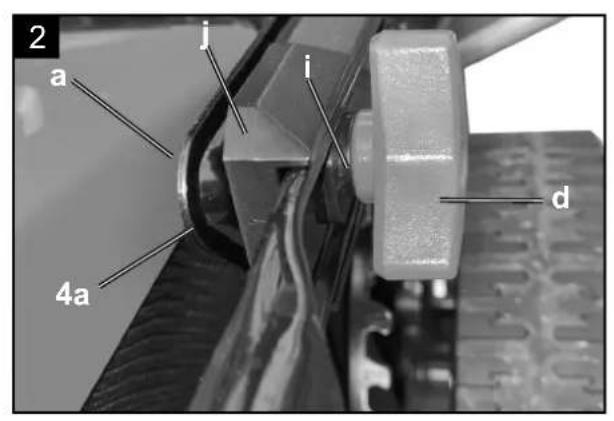
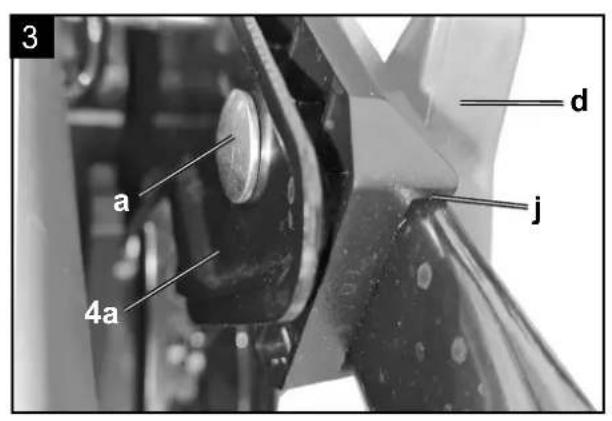
- Screw down the lower push bar (4a) with one M8 round head screw (a), one plastic washer (i) and one plastic star nut (d) each, together with one plastic holder (j) on both sides. When doing so, make sure that the cable pulls, which will later be attached with a cable clip (e), are not in the way. (Fig. 2-3).
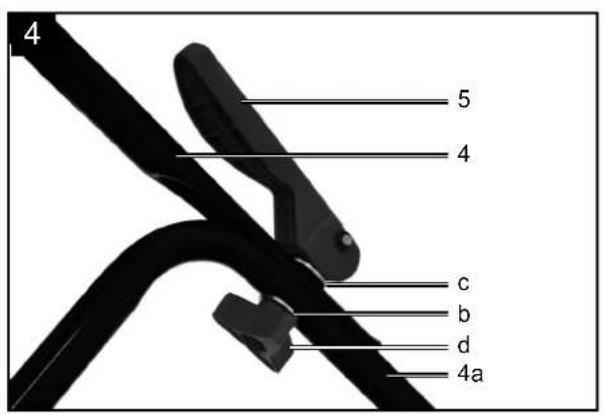
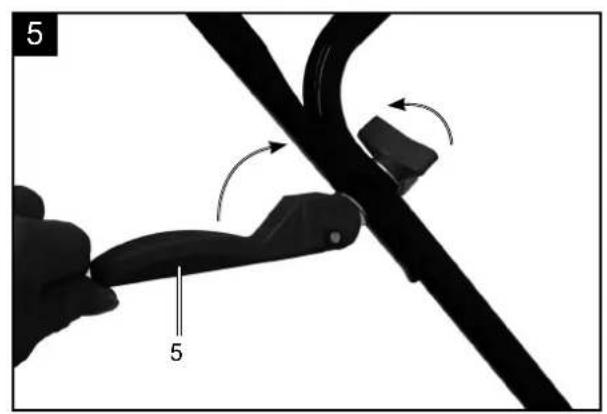
- Screw the upper push bar (4) to the lower push bar (4a) with a quick-release lever (5), a washer large (c), a washer small (b) and a plastic star nut (d) on both sides (fig. 4-5).
- Pull the throttle cable through the electric starter unit (18) as shown in figure 5a.
- Use a pliers to place the throttle cable in the engine brake lever (3). (Fig. 5b-5c)
- Secure the electric starter unit (18) to the upper push bar (4) using the screws (f). (fig. 5d)
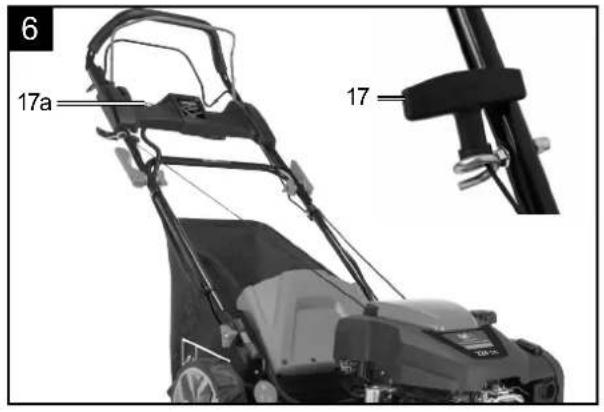
- Insert the handle of the pull cable starter (17) in the designated hook as shown in fig. 6.
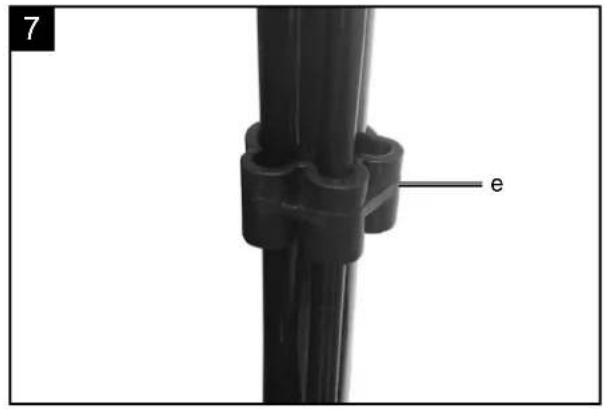
- Fix the cables to the push bar with the cable clip (e) provided (Fig. 7).
-
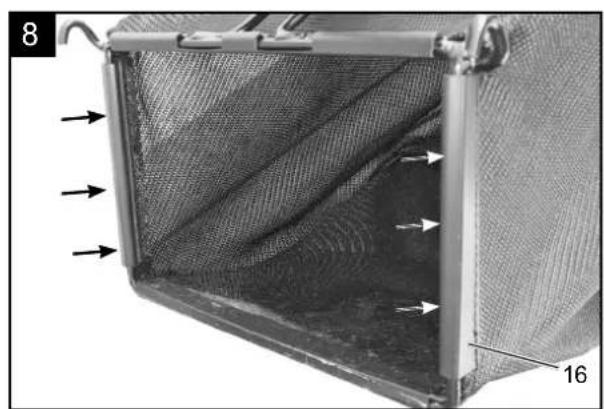
Catch basket (16) - open it up and click the plastic clips into position on the frame. (Fig. 8)
-
Mowing without the catch basket: Lift the discharge flap (15) with one hand and hook in the catcher bag (16) as shown in Fig.9.
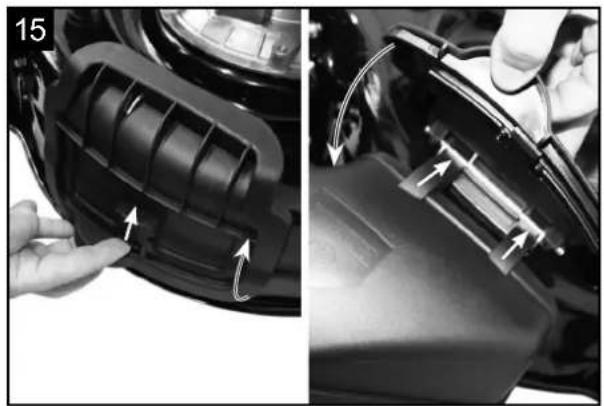
- Mowing with side discharge (8): Lift the side discharge flap and insert the side discharge adapter (fig. 15/15a). If attached, remove the catch basket (16) and install the mulching insert (19).
- Mulching: If the catch basket (16) is attached, remove it and replace it with the mulching insert (19) as shown in fig. 10-12.
Attention:
The side discharge cover must not be installed when mulching.
Setting the cutting height
△ Attention! Adjust the cutting height only when the engine is switched off and the plug boot has been pulled.
- Before you begin to mow, check to ensure that the blade is not blunt and that none of the fasteners are damaged.
- To prevent any imbalance, replace blunt and/or damaged blades as a set only (if applicable). To carry out this check, first switch off the engine and pull the spark plug connector.
- The cutting height is centrally adjusted with the wheel height adjustor lever (fig. 13/ item 14). 7 different cutting heights can be selected.
- Pull the adjustor lever out and select the desired cutting height. The lever snaps into the desired position (fig. 13).
Preparing the area to be mowed
Before mowing, carefully examine the area. Remove stones, sticks, bones, wires, toys and other objects that may be ejected by the device.
9. Start up
⚠ Attention!
The engine does not come with oil in it. Therefore, ensure that you add oil before starting it up. Use normal multigrade oil (SAE 10W-40). The oil level in the engine must be checked each time before mowing. You will also need to fill in petrol, as this is also not supplied upon delivery.
- To prevent the lawn mower from starting unintentionally, it is equipped with an engine brake lever (fig. 1, item 3), which must be actuated before the lawn mower is started. When the engine control lever is released it must return to its initial position, at which point the engine automatically switches off.
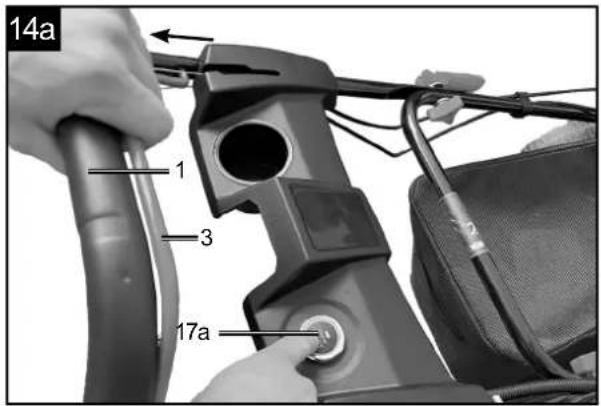
- Press the engine brake lever (3) together and give the pull cable starter (17) a vigorous pull. (Fig. 14)
ATTENTION: The cutter blade rotates even when the engine brake lever is released as soon as you pull the cable starter. Make sure that there are no body parts in the danger zone of the cutting blade.
- When the engine is running, press the drive lever (2) to the handle (1) in order to engage the drive on the mower.
- Before you start mowing, you should run through this process several times in order to ensure that the machine is working properly.
⚠ WARNING
Whenever you need to perform any kind of adjustment and/or repair work on your lawnmower, wait until the blade has come to a complete stop. Always switch off the engine and take out the spark plug before carrying out any adjustments, maintenance or repairs.
Using the drive:
- Engine brake: Use the engine brake lever (3) to stop the engine. When you release the engine brake lever, the engine and cutter stop automatically.
- To mow, pull the drive lever (2) towards the handle (1). Before actually mowing, check the engine brake lever (3) several times. Ensure that the pull cable can be smoothly operated.
- Drive lever (2):
If you press this, the clutch for the drive will be closed and the lawnmower will start to move with the engine running. Release the drive lever in good time to stop the moving lawnmower. Practice starting and stopping before you use the mower for the first time until you are familiar with controlling the mower.
Warning: The cutter blade rotates when the engine is started.
Important: Before starting the engine, move the engine brake several times to check that the stop cable is also working well.
Note: The engine is designed for the cutting speed for grass, and grass ejection into the catch basket and for a long engine service life
- Check the oil level.
- Open the fuel fuel cap and fill the fuel tank (6) up to the lower point of the tank inlet with about 1.2 litres of petrol. Use a funnel and measuring container for filling. Do not overfill the tank. Only use fresh, clean, unleaded fuel.
Never mix oil with petrol. Purchase fuel in quantities that can be used within 30 days to ensure that the fuel is fresh.
Note: Use standard unleaded petrol with max. 10% bioethanol component.
⚠ WARNING
Always only use a safety petrol canister. Do not smoke when filling petrol. Remove any oil or petrol residues. Switch the engine off before filling petrol and let the engine cool for several minutes.
Start the engine (Fig. 14a)
- Check the motor oil level. See "oil level check" section.
- Inspect the battery compartment at the top of the electric starter unit (18) for foreign objects and clean with a brush or cloth if necessary. Install the battery in the battery compartment on the electric starter unit (18) (Fig. 27). Make sure that the battery is securely fastened. The battery is the key to the device.
- Make sure that the controls for the device drive, if any, are out of operation.
- Press the engine brake lever (3) against the handle (1). Operate the electric starter (17a). The engine will start.
Start the engine (Fig. 14)
- Make sure that the device is connected properly to the spark plug.
- Stand behind the mower. One hand pushes the engine brake lever (3) to the handle (1), the other hand should be on the cable starter (17).
- Start the engine with the pull cable starter (17). To do this pull the handle approx. 10 – 15 cm (until you feel a resistance) and then start the engine with a sharp pull. If the engine does not start, pull on the handle again.
- Due to protective coating on the engine, a small amount of smoke may be present during the initial use of the device and should be considered normal. This is a normal process.
⚠ Attention!
- Never allow the pull cable starter to snap back.
- Attention: In case of cool weather, it may be necessary to repeat the starting process numerous times.
Switch the engine off:
- To turn off the engine, release the drive lever (2), then the engine brake lever (3) and wait for the blades to stop.
- Pull the spark plug connector off the spark plug (10) to prevent unintentional start of the engine.
- Before you start the engine again, check the cable for the engine brake. Check that the cable is correctly fitted. If the cable is kinked or damaged, it should be replaced.
- Remove the battery. The battery is the key to the device.
Before mowing
Important notes:
- Make sure you have a secure footing, wear shoes with non-slip, well gripping soles and long trousers. Never mow barefoot or in sandals.
- Check the cutting blade. If a blade is bent or otherwise damaged, it must be replaced with an original blade.
- Only fill the fuel tank outdoors. Use a filling funnel and a measuring jug. Wipe off any spilled petrol.
- Read and follow the operating instructions and also the instructions regarding the engine and the accessories. Keep the manual accessible for other users of the device.
- Exhaust gas is dangerous. Only start the engine outdoors.
- Make sure that all safety devices are in place and working properly.
- The device should only be operated by a person who is capable of doing so.
- Mowing wet grass can be dangerous. Mow grass when it is as dry as possible.
- Instruct other persons or children to stay away from the mower.
- Never mow when visibility is poor.
- Pick up loose objects lying around, such as stones, toys, sticks and wires, etc., from the ground before mowing.
Hints for mowing correctly
Attention! Never open the discharge flap when the catcher is being emptied and the engine is still running. The rotating blade can lead to injuries.
Always secure the discharge flap and the catch basket carefully. Switch off the engine before removing. The safety distance between the blade housing and the user given by the guide rails must always be maintained. Special care must be taken when mowing and changing direction on embankments and slopes. Make sure you have a secure footing, wear shoes with non-slip, well gripping soles and long trousers. Always mow across slopes.
For safety reasons, slopes with an inclination of more than 15 degrees must not be mowed with the lawn mower.
Exercise particular caution when moving backwards and pulling the lawnmower. Risk of tripping!
Mulching
When mulching, the cuttings are shredded in the closed mower housing and then dispersed on the lawn. Grass collection and disposal is not required.
⚠️ NOTE! Mulching is only possible on relatively short lawns.
To use the mulching function, unhook the catch basket (16) and slide the mulching adapter (Fig.10-12 / 19) into the discharge opening and close the discharge flap (15).
Mowing
Cut only with sharp, clean cutting blades so that the blades of grass do not fray and the lawn does not turn yellow.
To achieve a clean cut, guide the lawnmower in the straightest possible paths. These strips should always overlap by a few centimetres so that no patches remain.
Keep the underside of the mower housing clean and remove any grass deposits. Deposits make the starting process more difficult, impair cutting quality and grass discharge. On slopes, the cutting path should be made perpendicular to the slope. It is possible to prevent the lawnmower from slipping by lifting it upwards at an angle. Set the cutting height depending on the actual length of the lawn. Carry out several passes so that a maximum of 4 cm of lawn is removed at a time.
Switch off the engine before carrying out any checks on the blade. Remember that the blade will continue to rotate for a few seconds after the engine is switched off. Never try to stop the blade.
Regularly check that the blade is properly fastened, in good condition and sharpened. Sharpen or replace it if this is not the case. If the moving blade strikes an object, stop the mower and wait for the blade to come to a complete stop. Then check the condition of the blade and the blade holder. If it is damaged, it must be replaced.
Tips for mowing:
- Pay attention to ensure that you do not run into or over solid objects. The lawnmower could be damaged and/or the machine could inflict bodily injury.
- A hot engine, exhaust pipe or drive unit can burn the skin. Thus, do not touch these parts.
- Use extra caution when mowing on inclines and steep grades.
- Only mow when there is sufficient light.
- Check the mower, the blade and other parts if they have struck a foreign object or if the machine vibrates more than usual.
- Do not make any adjustments or repairs until the engine has been switched off. Pull off the spark plug connector.
- Pay special attention to traffic if you are mowing directly next to a street or are close by one. Always keep the grass chute pointed away from the street.
-
Avoid mowing in places where the wheels have trouble gripping or mowing is unsafe in any other way. Before you back up, ensure that nobody is standing behind you (especially little children).
-
In dense, tall grass, set the highest cutting level and mow more slowly. Before you remove any grass or blockages of any kind, switch off the engine and disconnect the ignition cable.
- Never remove any safety-related parts.
- Never fill the engine with petrol when it is hot or is running.
Emptying the catch basket
The catch basket (16) has a level indicator (Fig. 16). This is opened by the air flow generated by the mower during operation. If the flap (Fig. 16) closes during mowing, the catch basket (16) is full and should be emptied. The holes under the flap must always be clean and passable for the level indicator to function properly.
As soon as grass residues are left lying behind on the ground during mowing, the catch basket must be emptied.
⚠ WARNING
Before removing the catch basket, stop the engine and wait for the cutting tool to come to a standstill.
To remove the catch basket (16), lift the discharge flap (15) with one hand and remove the catch basket (16) by the carrying handle with the other hand (Fig. 16). In accordance with the safety regulations, the discharge flap (15) closes when the catch basket is unhooked and closes the rear ejection opening.
If grass cuttings remain in the opening, it is advisable to pull the lawnmower back about 1m to make it easier to start the engine. Do not remove cuttings in the mower housing and on the working tool by hand or with your feet, but with suitable aids, e.g. brush or hand brush.
To ensure good collection, the catch basket (16) and in particular the air grille must be cleaned from the inside after use.
Only hook in the catch basket (16) when the engine is switched off and the cutting tool is stationary.
Lift the discharge flap (15) with one hand and hold the catch basket (16) by the handle with the other hand and hook it in from above. (Fig. 9)
After mowing
- Always allow the motor to cool off before parking the lawnmower in an enclosed room. Remove grass, leaves, grease, and oil before storage. Do not store other objects on the mower.
- Check all screws and nuts before the next use. Tighten all loose screws.
• Empty the catch basket (16) before the next use. - Remove the spark plug connector to prevent unauthorised use.
-
Make sure that the mower is not parked next to a source of danger. Escaping gas can cause explosions.
-
Only original parts or parts approved by the manufacturer may be used for repairs (see address on guarantee certificate).
- In case of longer idle periods of the mower, empty the petrol tank with a petrol extraction pump.
- Oil and maintain the machine
10. Cleaning
The mower should be thoroughly cleaned after each use. In particular, the underside and the blade retainer.
⚠ Attention!
For safety reasons, disconnect the spark plug cable before cleaning.
It is best to tilt the mower backwards. The spark plug should point upwards to prevent engine oil from entering the intake tract or leaking out.
Alternatively, you can tilt the device on its side, but you must make sure that the air filter is on the upper side.
Note: Before tilting the lawnmower, empty the fuel tank fully with a petrol extraction pump.
Do not tilt the lawnmower beyond 90 degrees.
It is easiest to remove the dirt and grass immediately after mowing.
Grass residues and dirt that have dried on can impair mowing. Check that the grass ejection channel is clear of grass residues and remove these if necessary.
Never clean the mower with a water jet or high pressure cleaner. The motor should remain dry.
Do not use aggressive cleaning products such as cold cleaners or white spirit.
Clean the appliance with water as follows (Fig. 24)
- Remove the mulch insert / remove the catcher box.
- Put the hose connector on the water connection (w) and open the water tap. (Fig. 24)
- Start the mower and switch off after approx. 30 sec. The rotating blade bar dashes the water against the underside of the mower and in doing so cleans it.
- Close the water tap and disconnect the hose-connection piece.
- Clean the top side with a cloth (do not use sharp objects).
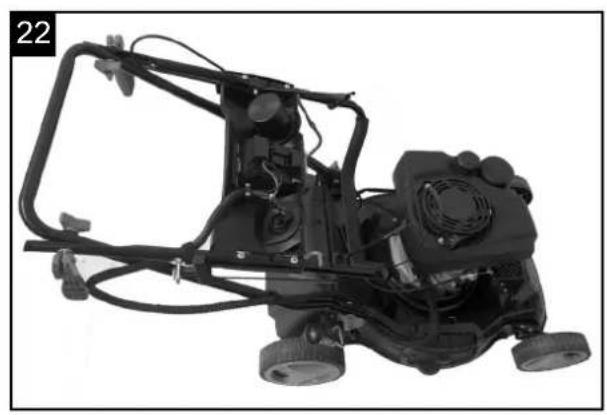
11. Transport
Preparing the lawnmower for transport (Fig. 22)
• Empty the fuel tank with a petrol extraction pump.
- Always let the engine run until it has used up the remainder of petrol in the tank.
- Drain the motor oil of the warm motor.
- Remove the spark plug connector from the spark plug.
- Clean the cooling fins of the cylinder and the housing.
- Remove the pull cable starter (17) from the hook. Release the quick-release levers (5) and fold down the upper push bar (4). Make sure that the cables are not bent during this process.
- Wedge a few layers of corrugated cardboard between the upper and lower push bars and the engine to prevent any chafing.
- The product must be secured against tipping and slipping during transport in vehicles in order to prevent damage and injuries.
12. Storage
Clean and maintain the unit before storage.
Store the device and its accessories in a dark, dry and frost-free place that is inaccessible to children. The optimum storage temperature lies between 5 and 30 °C.
Store the power tool in its original packaging.
Cover the power tool to protect it from dust or moisture. Store the operating manual with the power tool.
- Never store the lawnmower with petrol in the tank inside a building in which petrol fumes may come into contact with naked flames or sparks.
- Allow the engine to cool down before you put the lawnmower in an enclosed area.
- In order to avoid fire hazards, keep the engine, exhaust pipe and the area around the fuel tank free of grass, leaves and leaking grease (oil).
Preparing the lawnmower for long-term storage
Warning: Do not remove the petrol in enclosed spaces, near fire or when smoking. Petrol fumes can cause explosions and fire.
- Empty the fuel tank with a petrol extraction pump.
- Start the engine and let it run until the remaining petrol is used up.
- Change the oil at the end of every season. To do so, remove the used engine oil from a warm engine and refill with fresh oil.
- Remove the spark plug from the cylinder head.
- Fill the cylinder with approx. 20 ml of oil from an oil can.
- Slowly pull back the starter handle, which will bathe the cylinder wall with oil.
- Attach the spark plug again.
- Clean the cooling fins of the cylinder and the housing.
- Be sure to clean the entire device to protect the paint.
- Store the device in a well-ventilated place.
Battery and battery charger
Disconnect the battery charger and store it in a cool, dry place when not in use. In humid environments, corrosion of terminals and electrical contacts may occur. If stored for a long time at high temperatures (50°C), the battery may be permanently damaged. Check electrical terminals and contacts on battery and battery charger.
Wipe with a clean cloth or blow clean with compressed air.
Normal charging may be required after storage. To check the available charge, press the battery level indicator button (E) and charge if necessary. See the battery level indicator section.
13. Maintenance
Ensure that the unit is in good working order during its entire service life. Improper maintenance may lead to life-threatening injuries.
- Regular, careful servicing is required to guarantee the safety level and performance of the device.
- Make sure that all nuts, bolts and screws are securely tightened so that the device is in a safe working condition.
- Regularly check the catch basket for signs of wear and loss of functionality.
- Regularly clean the catch basket with water and let it dry thoroughly.
- For safety reasons, replace worn or damaged parts.
- When storing the machine for a longer period of time or when maintaining it, the fuel tank must be emptied. This should only be done outdoors using a petrol suction pump (available from DIY shops).
⚠ WARNING
Never work on or touch conducting parts on the ignition unit with the engine running. Always remove the spark plug connector from the spark plug before starting any work of care or maintenance. Never perform any work on the machine while it is running. Any work not described in this operating manual must be performed by an authorised service workshop only.
Attention!
Always shut the engine down and remove the spark plug connector before carrying out any maintenance work.
Wheel axles and wheel hubs
• These should be lightly greased once a season.
Blade
For safety reasons, only have your mowing blade sharpened, balanced and fitted by an authorised specialist workshop. For optimum results it is recommended that the blade should be inspected once a year.
Changing the blade (fig. 17)
When changing the cutting tool, only use original replacement parts.
Wear gloves to avoid cut injuries while changing the blade.
Never install another blade.
- Empty the fuel tank before removing the blade.
- Undo the screw to replace the blade.
- Reinstall as illustrated in fig. 17. Fasten the screw correctly. The fastening torque is 45Nm . Also replace the blade screw when replacing the blade.
Damaged blades
Should the blade, in spite of all precautions, come into contact with an obstruction, shut down the engine immediately and remove the spark plug connector.
Tip the lawnmower onto its side and check the blade for damage. Damaged or bent blades must be replaced. Never attempt to bend a bent blade back to straight again. Never mow the lawn with a bent or heavily worn blade as this will cause vibrations and can lead to further damage to the mower.
⚠ Attention! There is a risk of injury if you work with a damaged blade.
Resharpening the blade
The blades can be resharpened with a metal file. In order to avoid imbalance, the blade should be re-sharpened by an authorised service workshop.
Oil level check
⚠ Attention! Never operate the engine without oil or with too little oil. This could cause severe damage to the engine. Only use SAE 10W-40 engine oil.
Checking the oil level (fig. 18):
- Position the lawnmower on a straight, level surface.
- Remove the oil dipstick (12) by turning it to the left, then wipe off the dipstick. Insert the dipstick back in the filling nozzle as far as the stop, but do not screw it back in.
- Pull out the dipstick and read the oil level horizontally. The oil level must be positioned between the max and min of the oil dipstick (12).
Oil change (Fig. 23)
- The engine oil change should be completed annually before the start of the season while the engine is at operating temperature and shut off.
- Only use engine oil (SAE 10W-40).
• Empty the fuel tank (with a petrol extraction pump). - Place a flat oil collecting tray in front of the mower (min. volume 1 litre).
- Unscrew the oil dipstick and tilt the mower until all the oil has drained into the collection tray.
- Then fill in fresh engine oil up to the upper mark of the oil dipstick (approx. 0.4 l), do not overfill the device.
- Attention! To check the oil level, do not screw in the oil dipstick, but only insert it up to the thread.
Dispose of the used oil in accordance with applicable regulations.
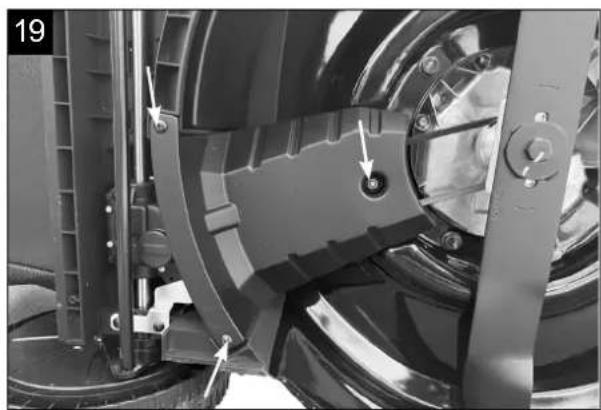
Cleaning the belts (fig. 17, 19)
- Remove the blade and the transmission housing by undoing the screws.
- Clean the elements of the transmission and the V-belt once or twice a year with a brush or compressed air.
- Refit the transmission housing and the blade using the screws.
Maintaining and adjusting the cables
Oil the cables at regular intervals and check that they move easily.
Air filter maintenance (Fig. 20)
Contaminated air filters (7) diminish the engine output due to reduced air supply to the carburettor. Regular inspection is therefore essential.
The air filter (7) should be checked every 25 operating hours and cleaned as required. If the air is very dusty, check the air filter (7) more often.
Unclip the air filter cover and remove the sponge filter element. Replace the air filter to avoid objects falling into the air intake (fig. 20).
Attention: Never clean the air filter (7) with petrol or flammable solvents. Clean the air filter (7) only with compressed air or by tapping it out.
Maintaining the spark plug (fig. 21)
Check the spark plug for contamination for the first time after 10 operating hours and clean it with a copper wire brush if necessary. Then service the spark plug every 50 operating hours.
Remove the spark plug connector with a twist.
Remove the spark plug (10) with a spark plug wrench.
Use a feeler gauge to set the gap to 0.75 mm(0.030").
Replace the spark plug (10) and take care not to pull it too firmly.
Engine brake lever (fig. 1)
The engine is equipped with a mechanical engine brake which must be checked regularly. When the motor brake lever (3) is released, the blade must come to a standstill within 7 seconds; if this is not the case, the machine must not be used. Contact an authorised specialist dealer.
Ensure that the device is in perfect condition for the entire duration of its service life. Improper maintenance may lead to life-threatening injuries.
Repairs
After repairs or maintenance, make sure that all safety-related parts are installed and are in perfect condition. All parts which may cause injury must be kept where they are inaccessible to children or others.
Attention: According to the German Product Liability Act, no liability is accepted for damage caused by improper repairs or by not using original spare parts.
Such work should be performed by a customer service centre or an authorised specialist. The same applies to accessory parts.
Operating times
Please comply with statutory regulations to lawnmower operating times, which may vary from location to location.
Please provide the following information in the event of any enquiries:
• Type of current for the motor
• Machine data - type plate
- Engine data - type plate
Important note in the case of repairs:
For return delivery of the device for repair, please ensure for safety reasons that it is free of oil and fuel when it is sent to the service centre.
Spare parts / accessories
Lawnmower blade - Article no.: 7911200639
Engine oil - Article no.: 7850000025
Service information
Only use original Scheppach parts for accessories and wear and spare parts, otherwise there may be a risk of accidents resulting in personal injury or damage to the machine.
With this product, it is necessary to note that the following parts are subject to natural or usage-related wear, or that the following parts are required as consumables. Wearing parts*: Spark plug, air filter, fuel filter, blade, V-belt, battery
* may not be included in the scope of delivery!
Spare parts and accessories can be obtained from our Service Centre. To do this, scan the QR code on the front page.
14. Disposal and recycling
Notes for packaging


The packaging materials are recyclable. Please dispose of packaging in an environmentally friendly manner.
Notes on the electrical and electronic equipment act [ElektroG]
![SCHEPPACH PML56-225ES - Notes on the electrical and electronic equipment act [ElektroG] - 1](/content/2026/04/745416/images/41ec57e19ae5b924551c5f7d6a60736436fe98de4dde066b5c360da3a54bc176.jpg)
Electrical and electronic appliances do not belong in household waste, but should be collected and disposed of separately.
- Used batteries or rechargeable batteries that are not installed permanently in the old appliance must be removed non-destructively before disposal.
Their disposal is regulated by the battery act.
- Owners or users of electrical and electronic devices are legally obliged to return them after use.
- The end user is responsible for deleting their personal data from the old device being disposed of!
- The symbol of the crossed-out dustbin means that waste electrical and electronic equipment must not be disposed of with household waste.
-
Waste electrical and electronic equipment can be handed in free of charge at the following places:
-
Public disposal or collection points (e.g. municipal works yards).
- Points of sale of electrical appliances (stationary and online), provided that dealers are obliged to take them back or offer to do so voluntarily.
- Up to three waste electrical devices per type of device, with an edge length of no more than 25 centimetres, can be returned free of charge to the manufacturer without prior purchase of a new device from the manufacturer or taken to another authorised collection point in your vicinity.
- For additional take-back conditions of the manufacturers and distributors, please contact the respective customer service.
- In the case of delivery of a new electrical device by the manufacturer to a private household, the latter may arrange for the free collection of the old electrical device upon request from the end-user. Get in contact with the manufacturer's customer service.
- These statements only apply to devices installed and sold in the countries of the European Union and which are subject to the European Directive 2012/19/EU. Different provisions may apply to the disposal of electrical and electronic appliances in countries outside the European Union.
Notes on lithium-ion batteries

Removing the battery before disposing of the device!
- Do not dispose of the battery in household waste, in a fire (risk of explosion) or in water. Damaged batteries can harm the environment and your health if toxic vapours or liquids escape.
- Defective or used batteries must be recycled in accordance with Directive 2023/1542/EC.
- Hand in the device and the battery charger at a recycling centre. The plastic and metal parts used can be separated by type and thus recycled.
- Dispose of batteries when discharged. We recommend covering the poles with an adhesive strip to protect against a short circuit. Do not open the battery.
- Dispose of batteries according to local regulations. Return batteries to a used battery collection point where they can be recycled in an environmentally friendly manner. Ask your local waste disposal company about this.
Contact your local refuse disposal authority for more details of how to dispose of your worn-out electrical devices.
Fuels and oils
- Before disposing of the unit, the fuel tank and the engine oil tank must be emptied!
- Fuel and motor oil do not belong in household waste or drains, but must be collected or disposed of separately!
- Empty oil and fuel tanks must be disposed of in an environmentally friendly manner.
15. Troubleshooting
The following table shows fault symptoms and describes remedial measures in the event of your machine failing to work properly. If you cannot localise and rectify the problem with this, please contact your service workshop.
| Fault Possible cause Remedy | ||
| Unsteady running, strong vibration of the device | Screws are loose Check screws | |
| Blade fasteners are loose Check blade fasteners | ||
| Blade is unbalanced Replace blade | ||
| Engine does not run | Engine brake lever not pressed Press engine brake lever | |
| Throttle in wrong position Check setting | ||
| Spark plug is defective Replace spark plug | ||
| Fuel tank is empty Refill with fuel | ||
| Contaminated fuel | Empty fuel tank and fill with clean fuel | |
| Cold environment | Press the primer key (if available) | |
| Engine defective | Contact authorised customer service | |
| Engine runs unsteadily | Air filter dirty | Clean the air filter |
| Spark plug dirty | Clean the spark plug | |
| Lawn turns yellow, uneven mowing results | Blade is blunt | Sharpen the blade |
| Cutting height is too low | Set correct height | |
| The discharge of grass clippings is unclean | Cutting height is too low | Set height |
| Blade is worn | Replace the blade | |
| Catch basket is clogged | Empty the catch basket or remove the blockage | |
Günzburger Straße 69
D-89335 Ichenhausen
Cher client,
Günzburger Straße 69
89335 Ichenhausen, Germania
Egregio cliente,
Günzburger Straße 69
D-89335 Ichenhausen
Geachte klant,
Günzburger Straße 69
Günzburger Straße 69
D-89335 Ichenhausen
Vážený zákazníku,
Günzburger Straße 69
D-89335 Ichenhausen
Vážený zákazník,
Günzburger Straße 69
D-89335 Ichenhausen
Tisztelt Ügyfelünk!
Günzburger Straße 69
D-89335 Ichenhausen
Austatud klient!
Günzburger Straße 69
D-89335 Ichenhausen
Arvoisa asiakas
Günzburger Straße 69
D-89335 Ichenhausen, Tyskland
Kære kunde
Günzburger Straße 69
D-89335 Ichenhausen, Германия
Уважаеми клиенти,
Günzburger Straße 69
D-89335 Ichenhausen
Skipting hnifa (Mynd 17)
Günzburger Straße 69
D-89335 Ichenhausen
Bästa Kund!
B
Scheppach GmbH, Günzburger Str. 69, 89335 Ichenhausen
| DE | EU-KonformitätserklärungÜbersetzung der OriginalkonformitätserklärungWir erklären in alleiniger Verantwortung, dass das hier beschriebene Produkt mit den geltenden Richtlinien und Normen übereinstimmt. | Der hier beschriebene Gegenstand der Erklärung erfüllt die Vorschriften der Richtlinie 2011/65/EU des Europäischen Parlaments und des Rates vom 8. Juni 2011 zur Beschränkung der Verwendung bestimmter gefährlicher Stoffe in Elektro- und Elektronikgeräten.*Technische Unterlagen verfügbar bei: ** | ||
| Artikelnummer*** | Artikelbezeichnung: Benzin-Rasenmäher PML56-225ES | Marke**** | ||
| GB | EU Declaration of ConformityTranslation of the original Declaration of ConformityWe declare under our sole responsibility that the product described here complies with the applicable directives and standards. | The object of the declaration described here fulfils the regulations of the directive 2011/65/EU of the European Parliament and Council from 8th June 2011, on the restriction of the use of certain hazardous substances in electrical and electronic equipment.*Technical documentation available at: ** | ||
| Item number*** | Item designation: Petrol lawnmower PML56-225ES | Brand**** | ||
| FR | Déclaration UE de conformitéTraduction de la déclaration de conformité originaleNous déclarons, sous notre propre responsabilité, que le produit décrit ici est conforme aux directives et normes en vigueur. | L'appareil décrit ci-dessus dans la déclaration est conforme aux réglementations de la directive 2011/65/EU du Parlement Européen et du Conseil du 8 juin 2011 visant à limiter l'utilisation de substances dangereuses dans la fabrication des appareils électriques et électroniques.*Dossier technique auprès de: ** | ||
| Référence*** | Désignation de l'article: Tondeuse à gazon thermique PML56-225ES | Marque**** | ||
| IT | Dichiarazione di conformità UETraduzione della dichiarazione di conformità originaleDichiariamo sotto la nostra esclusiva responsabilità che il prodotto qui descritto è conforme alle direttive e alle norme vigenti. | L'oggetto della dichiarazione, qui descritto, soddisfa le disposizioni della Direttiva 2011/65/UE del Parlamento Europeo e del Consiglio dell'8 giugno 2011, sulla restrizione nell'utilizzo di determinate sostanze pericolose negli apparecchi elettrici ed elettronici.*Documentazione tecnica disponibile presso: ** | ||
| Gaminio numeris*** | Nome articolo: Tosaerba a benzina PML56-225ES | Marchio**** | ||
| NL | EU-conformiteitsverklaringVertaling van de originele conformiteitsverklaringWij verklaren onder eigen verantwoordelijkheid dat het hier beschreven product voldoet aan de geldende richtlijnen en normen. | Het hier beschreven onderwerp van deze verklaring voldoet aan de voorschriften van richtlijn 2011/65/EU van het Europese Parlement en de Raad van 8 juni 2011 omtrent de beperking van het gebruik van bepaalde gevaarlijke stoffen in elektrische en elektronische apparaten.*Technische documentatie verkrijgbaar bij: ** | ||
| Artikelnummer*** | Artikelnaam: Benzine grasmaaier PML56-225ES | Merk**** | ||
| ES | Declaración de conformidad UETraducción de la Declaración de conformidad originalDeclaramos, bajo nuestra exclusiva responsabilidad, que el producto aquí descrito cumple las directivas y normas aplicables. | El objeto de la declaración aquí descrito cumple las disposiciones de la Directiva 2011/65/UE del Parlamento Europeo y el Consejo del 8 de junio de 2011 sobre restricciones a la utilización de determinadas sustancias peligrosas en aparatos eléctricos y electrónicos.*Documentación técnica disponible en: ** | ||
| Número de artículo*** | Denominación del artículo: Cortacésped de gasolina PML56-225ES | Marca**** | ||
| CZ | EU prohlásení o shoděPřeklad originálního prohlásení o shoděProhlašujeme na svou výlučnou odpovědnost, že zde popsaný výrobek odpovídá platným směrnicím a normám. | Zde popsaný předmět prohlásení splňuje předpisy směrnice 2011/65/EU Evropského parlamentu a Rady ze dne 8. června 2011 pro omezení používání určitých nebezpečných látek v elektrických a elektronických zařizeních.*Technické podklady k dispozici u: ** | ||
| Číslo výrobku*** | Název výrobku: Benzínová sekačka na trávu PML56-225ES | Značka**** | ||
| SK | EÚ vyhlásenie o zhodePreklad originálneho vyhlásenia o zhodeNa vlastnú zodpovednosť vyhlasujeme, že tu popísaný výrobok je v súla-de s platnými smernicami a normami. | Tu opísaný predmet vyhlásenia je v súlade s predpismi smernice Európskeho parlamentu a Rady 2011/65/EÚ z 8. júna 2011 o ob-medzení používania určitých nebezpečných látek v elektrických a elektronických zariadeniach.*Technické podklady sú k dispozícii na: ** | ||
| Číslo výrobku*** | Označenie výrobku: Benzínová kosačka na trávu PML56-225ES | Značka**** | ||
| HU | EU megfelelőségi nyilatkozatAz eredeti megfelelőségi nyilatkozat fordításaSaját kizárólagos felelősségünkre kijelentljük, hogy az ítt ismertelett ler-mék megfelel az érvényes irányelveknek és szabványoknak. | A nyilatkozat itt megnevezett tárgya teljesíti az Európai Parlament és Tanács 2011. június 8-i, egyes veszélyes anyagok elektromos és elektronikus berendezésekben való alkalmazásának korlátozá-sáról szóló 2011/65/EU irányelvének előírásait.*A műszaki dokumentáció elérhető: ** | ||
| Cikkszám*** | Termék megnevezése: Benzines fűnyíró PML56-225ES | Márka**** | ||
| EE | EL vastavusdeklaratsioonVastavusdeklaratsiooni originaali tõlgeMe deklareerimine ainuisikuliselt vastutades, et siin kirjeldatud toode üh-tib esitatud direktiivide ja normidega. | Deklaratsiooni objektiks olev siin kirjeldatud ese vastab EuroopaParlamendi ja nõukogu direktiivile 2011/65/EU kuupäevaga 8. juuni2011 teatud ohtlike ainete kasutamispiirangu kohta elektri- ja elekt-roonikaseadmetes.*Tehnilised dokumendid on saadaval: ** | ||
| Artiklinumber*** | Art nimetus: Bensiini-muruniiduk PML56-225ES | Kaubamärk**** | ||
| SE | EU-försäkran om överensstämmelseÖversättning från försäkran omöverensstämmelse i originalVi förklarar under eget ansvar att produkten som beskrivs här överens-stämmer med gällande riktlinjer och standarder. | Föremålet för försäkran som beskrivs här överensstämmer medbestämmelserna i Europaparlamentets och rådets direktiv 2011/65/EU av den 8 juni 2011 om begränsning av användningen av vissafarliga ämnen i elektriska och elektroniska produkter.*Teknisk dokumentation tillgänglig hos: ** | ||
| Artikelnummer*** | Artikelbeteckning: Bensingräsklippare PML56-225ES | Märke**** | ||
| FI | EU-vaatimustenmukaisuusvakuutusAlkuperäisen vaatimustenmukaisuusvakuutuksenkäännösVakuutamme omalla vastuullamme, että tässä kuvattu tuote täyttää voimassa olevien direktiivien ja standardien määräykset. | Tässä kuvattu vakuutuksen kohde täyttää tiettyjen vaarallisten aineiden käytön rajoittamisesta sähkö- ja elektroniikkalaitteissa 8. kesäkuuta 2011 annetun Euroopan parlamentin ja neuvoston direktiivin2011/65/EU määräykset.*Tekniset asiakirjat saatavana: ** | ||
| Tuotenro*** | Tuotenimike: Bensiinikäyttöinen ruohonleikkuri PML56-225ES | Merkki**** | ||
| DK | EU-overensstemmelseserklæringOversættelse af den originaleoverensstemmelseserklæringVi erklærer under eget ansvar, at det her beskrevne produkt overholderde gældende direktiver og standarder. | Genstanden for den her beskrevne erklæring overholder bestem-melserne i Europa-Parlamentets og Rådets direktiv 2011/65/EU af8. juni 2011 vedr. begränsning af brugen af visse farlige stoffer ielektrisk og elektronisk udstyr.*Tekniske dokumenter findes på: ** | ||
| Artikelnummer*** | Art.-betegnelse: Benzindrevet græsslåmaskine PML56-225ES | Mærke**** | ||
| BG | EC Декларация за съответствиеПревод на оригиналната декларация насъответствиеНие декларираме на своя отговорност, че описаният тук продуктотговаря на приложимите директиви и стандарти. | Описаният предмет в декларацията отговаря на разпоредби-те на Директива 2011/65/EC на Европейския парламент и наСъвета от 8 юни 2011 г. относно ограничението на употребатана определени опасни вещества в електрическото и електронното оборудване.*Техническата документация се предоставя от: ** | ||
| Каталожен номер*** | Обозначение на артикула: Бензинова градинска косачкаPML56-225ES | Марка**** | ||
| IS | SamræmingaryfirlýsingPýðing upphaflegrar samræmingaryfirlýsingarVið lýsum því formlega y fír á okkar eigin ábyrgð, að varan sem hér er lýstsamræmist gildandi reglugerðum og stöðlum. | Viðfangsefni yfirlýsingarinnar sem hér er lýst uppfyllir ákvæði tilskipunar Evrópupingsins og ráðsins 2011/65/ESB frá 8. júní 2011um takmarkanir á notkun tiltekinna, hættulegra efna í rafbúnaði ografeindabúnaði.*Tæknilegar upplýsingar fáanlegar hjá: ** | ||
| Vörunúmer*** | Vöruheiti: Bensínslátutvélin PML56-225ES | Vörumerki**** | ||
| ***5911276815 / 5911276915 | ****SCHEPPACH | |||
** :Stefan HartingerGünzburger Str. 69D-89335 Ichenhausen i. V. Andreas Pytcher /Head of Project Management i. V. Andreas Pytcher /Head of Project Management i.V. Simon Schunk /Division Manager Product CenterIchenhausen, 07.10.2025 i.V. Simon Schunk /Division Manager Product CenterIchenhausen, 07.10.2025 | ☒ 2011/65/EU*☒ 2014/30/EU☐ 2014/29/EU☐ 2014/35/EU☐ 2004/22/EG☐ 2014/68/EU☐ 89/686/EWG_96/58/EG☐ 90/396/EWG☐ 2023/826/EU | ☒ 2006/42/EG☐ Annex IVNotified Body:Notified Body No.:Certificate No.: | ☒ 2000/14/EG_2005/88/EGNoise:measured L_WA = 94,7 dBguaranteed L_WA = 98 dB☐ Annex V☒ Annex VINotified Body: TÜV SÜDProduct Service GmbHNotified Body No.: 0036 | |
| ☒ 2016/1628/EU | Emission No.: e24*2016/1628*2018/989SRA1/P*0456*00 | |||
| EN ISO 5395-1:2013/A1:2018; EN 5395-2:2013/A2:2017; EN 14982:2009 | ||||
Garantie DE
Apparent defects must be notified within 8 days from the receipt of the goods. Other wise, the buyer's rights of claim due to such defects are invalidated. We guarantee for our machines in case of proper treatment for the time of the statutory warranty period from delivery in such a way that we replace any machine part free of charge which provably becomes unusable due to faulty material or defects of fabrication within such period of time.
- With respect to parts not manufactured by us we only warrant insofar as we are entitled to warranty claims against the upstream suppliers. The costs for the installation of the new parts shall be borne by the buyer. The cancellation of sale or the reduction of purchase price as well as any other claims for damages shall be excluded.