SEMB 1100 B1 - Coffee machine SILVERCREST - Free user manual and instructions
Find the device manual for free SEMB 1100 B1 SILVERCREST in PDF.

User questions about SEMB 1100 B1 SILVERCREST
0 question about this device. Answer the ones you know or ask your own.
Ask a new question about this device
Download the instructions for your Coffee machine in PDF format for free! Find your manual SEMB 1100 B1 - SILVERCREST and take your electronic device back in hand. On this page are published all the documents necessary for the use of your device. SEMB 1100 B1 by SILVERCREST.
USER MANUAL SEMB 1100 B1 SILVERCREST
ESPRESSO MACHINE / ESPRESSOMASCHINE / MACHINE À EXPRESSO SEMB 1100 B1
GB IE
ESPRESSO MACHINE
Operating instructions
FR BE
MACHINE À EXPRESSO
Mode d'emploi
CZ
ESPRESSO KÁVOVAR
Návod k obsluze
SK
KÁVOVAR
Návod na obsluhu
DK
ESPRESSOMASKINE
MACCHINA PER CAFFÈ ESPRESSO
Before reading, unfold the page containing the illustrations and familiarise yourself with all functions of the device.
DE AT CH
GB/IE Operating instructions Page 1
natural_image
Simple line drawing of a vertical pole with a circular top and a numbered label (14) pointing to the center (no text or symbols on the pole itself)Contents
Introduction 2
Intended use 2
Warnings and symbols used 2
Safety instructions 3
Package contents 5
Appliance description .... 5
Setting up the appliance ....6
First use 6
Operation 6
Heating before use 6
Preparing espresso 7
Frothing milk /Preparing cappuccino. 9
Tips for the perfect espresso 10
Tips for the milk froth 10
Drawing hot water 11
Cleaning and care 11
Cleaning the milk frother 11
Cleaning the hot water shower 12
Cleaning the accessories 12
Cleaning the appliance 12
Descaling the appliance 12
Storage 13
Troubleshooting 13
Disposal....14
Disposal of the appliance 14
Disposal of the packaging 15
Technical data....15
Congratulations on the purchase of your new appliance.
You have selected a high-quality product. The operating instructions are part of this product. They contain important information on safety, usage and disposal. Before using the product, familiarise yourself with all operating and safety instructions. Use the product only as described and for the specified areas of application. Please also pass on these operating instructions to any future owner.
Intended use
The device is designed exclusively for the preparation of espresso/cappuccino and for frothing milk. It is exclusively intended for use in private households.
Do not use it for commercial applications.
The appliance is not intended for any other purpose, nor for use beyond the scope described.
Warnings and symbols used
The following warnings and symbols are used in these operating instructions, on the packaging and on the appliance (where applicable):
 | DANGER! A warning with this symbol and the signal word "DANGER" indicates an imminently hazardous situation that will result in death or serious injury if not avoided. |
 | WARNING! A warning with this symbol and the signal word "WARNING" indicates a potentially hazardous situation that could result in death or serious injury if not avoided. |
| CAUTION! A warning with this symbol and the signal word "CAUTION" indicates a potentially hazardous situation that could result in a minor or moderate injury if not avoided. | |
| ATTENTION! A warning with this symbol and the signal word "ATTENTION" indicates a potential situation that could result in property damage if not avoided. | |
| Note: A note identifies additional information that facilitates the use of the appliance. | |
| AC current/voltage | |
| Dishwasher-proof. | |
| All of the parts of this appli-ance that come into contact with food are food-safe. | |
| Read the instructions. |
Safety instructions
WARNING!
■ Prior to use, check the appliance for visible external damage. Do not operate an appliance that has been damaged or dropped.
■ The appliance and its connecting cable must be kept away from children younger than 8 years old.
■ This appliance may be used by children aged 8 years or over if they are supervised or have been instructed how to use the appliance safely and have understood the potential risks.
■ This appliance may be used by people with reduced physical, sensory or mental capabilities or lack of experience and/or knowledge if they are supervised and have been instructed in how to use the appliance safely and have understood the potential risks.
■ Cleaning and user maintenance must not be carried out by children, unless they are aged 8 or over and are supervised.
■ Children must not use the appliance as a plaything.
■ ⚠ WARNING! Risk of suffocation! Do not allow children to play with packaging materials. There is a risk of suffocation.
■ All repairs must be carried out by authorised specialist companies or by the Customer Service department. Improper repairs can pose significant risks to the user. It will also invalidate any warranty claims.
■ Never submerge the appliance in water or other liquids! Danger of electric shock!
■ Never touch the appliance with wet or moist hands.
■ To avoid risks, arrange for defective plugs and/or power cables to be replaced at once by qualified technicians or our Customer Service Department.
■ Risk of burns! During use, some parts become very hot!
■ Hot vapour plumes are formed when the product is in use. Take care to ensure that you do not scald yourself! Keep a safe distance away from the steam.
■ The appliance should only be connected to correctly installed and earthed mains power sockets.
■ After use, the surfaces of the heating elements will still have some residual heat.
- Do not allow any liquid to get onto the appliance's plug connections.
■ Use the appliance only for its intended purpose. Misuse can lead to injuries.
! ATTENTION!
■ Defective components must always be replaced with original replacement parts. Compliance with safety requirements can only be guaranteed if original replacement parts are used.
■ Protect the appliance from penetration by moisture and liquids.
■ Protect the appliance against knocks, dust, chemicals, extreme temperatures, etc. and keep it away from sources of heat (ovens, radiators).
■ NEVER submerse the appliance in water or other liquids!
■ Always remove the mains adapter from the mains outlet; never pull on the power cable.
■ Never leave the appliance unattended during operation.
■ Do not use an external timer switch or a separate remote control system to operate the appliance.
■ Do not operate the appliance in rooms where the temperatures are below or around 0^ C. If the water in the pipes or the water tank freezes, the appliance could be damaged.
■ Never operate the appliance outdoors. This appliance is intended for indoor use only.
■ Do not generate steam when the descaler solution is in the water tank!
■ The espresso machine must not be put in a cupboard when in use.
Package contents
The appliance is supplied with the following components as standard:
- Espresso Machine
- Sieveholder
• Large espresso sieve - Small espresso sieve
● Measuring spoon with compactor - Operating instructions
(i) Note:
▶ Check the package for completeness and for signs of visible damage. If the contents are incomplete or damaged due to defective packaging or through transportation, contact the Service Hotline (see section Service).
Appliance description
Figure A:
① ON/OFF switch with integrated ready lamp
② "Espresso" button with control lamp
③ "Steam" button with control lamp
4 Cup holder
⑤ Steam control
6 Water tank
⑦ Milk frother handle
8 Milk frother
⑨ Drip grille
10 Drip tray
⑪ Water level indicator
12 Hot water outlet
Figure B:
13 Portafilter
⑭ Coffee spoon with pusher
15 Large espresso sieve (for 2 cups)
16 Small espresso sieve (for 1 cup)
Setting up the appliance
1) Take the appliance out of the packaging, remove all packaging materials and any protective film from the appliance.

Pull out the water tank ⑥ and remove the transport lock.
3) Clean all removable parts as described in the section "Cleaning and care".
4) Make sure that all parts are completely dry before operating the appliance.
5) Place the appliance on a level and heat-resistant surface. Ensure that the mains outlet is in easy reach. Maintain a minimum distance of at least 10 cm around the appliance on all sides.
6) Insert the drip grille ⑨ so that the water level indicator ⑪ can protrude through the opening in the drip grille ⑨.
First use
1) Open the lid of the water tank ⑥ and lift out the water tank ⑥ using the handle. Fill the water tank ⑥ with cold water:
Fill it with water to at least the Min marking. Never fill it with more water than up to the Max marking.
Alternatively, you can open the lid of the water tank ⑥ and fill the water tank ⑥ while it is still in the appliance. As you do this, take care that no water drips onto the mains power cable.
2) Place the water tank ⑥ back in the appliance and close the lid.
3) Place the portafilter ⑬ in the appliance by positioning it in the appliance aligned with the marking ⏻ on the side next to the hot water outlet ⑫. Then turn it anti-clockwise until the handle of the portafilter ⑬ points forwards (marking 🔒
4) Plug the power plug into a mains socket.
5) Place a suitable container, such as a cup, under the hot water outlet ⑫. Make sure that the steam control ⑤ is set to the position "O".
6) Switch the appliance on using the ON/OFF switch ① The ready lamp flashes, and the appliance begins to heat up.
Before first use, proceed as follows to clean the internal pipes:
1) When the integrated ready lamp of the ON/OFF switch ① lights up continuously, the heating phase has ended. Press the "Espresso" button and allow water to run through the appliance. Repeat this step 4-5 times until about 100 ml of water has passed through. Please also refer to the section "Operation".
2) Press the "Steam" button ⏻1 ^3 and wait until it no longer flashes and remains lit. Generate steam for about 30 seconds by slowly turning the steam control anticlockwise. Please also refer to the section "Operation".
The appliance is now ready for use.
(i) Note:
During the first use, the control lamp may flash after the "Espresso" button is pressed. This is normal. In this case, press the "Espresso" button. The control lamp will stop flashing.
Operation
Heating before use
To prepare a good espresso, it is important for the espresso machine to be heated up well first. Heat the appliance as follows before every use:
1) Fill the water tank Ⓐ with tap water.
2) Place either the large 15 or the small espresso sieve 16 in the sieve holder 13:
- Make sure that the small indentation on the large 15 or small espresso sieve 16 is located above the indentation on the sieve holder 13 when inserted (see Figure 1).
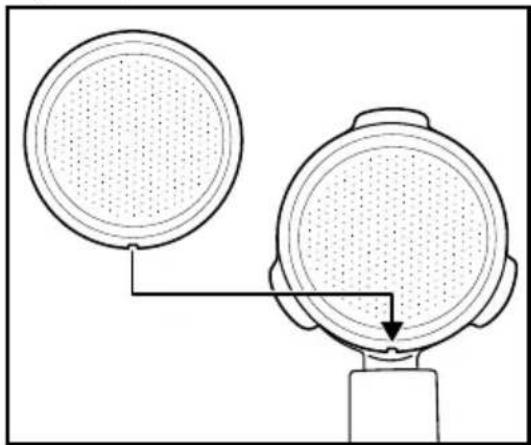
natural_image
Diagram of two circular devices connected by a pointer, with one device emitting particles (no text or symbols)Fig. 1
- Then turn the large 15 or small espresso sieve 16 slightly to ensure it cannot fall out (see Figure 2).
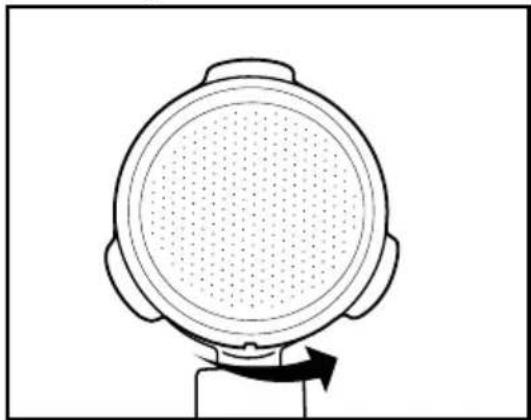
natural_image
Diagram of a circular mechanical component with a rotating arrow indicating rotation (no text or symbols)Fig. 2
(i) Note:
▶ Wait until the espresso sieve 15/16 has cooled down before taking it out! In order to remove the espresso sieves 15/16 from the sieve holder 13, turn the inserted espresso sieve 15/16 until the indentation on the espresso sieve 15/16 is located directly above the indentation on the sieve holder 13. You can now remove the espresso sieve 15/16.
3) Place the sieve holder 13 in the appliance by inserting the 🔒 mark, which is located next to the hot water shower 12, into the appliance and then turning it clockwise until the handle of the sieve holder 13 is facing the front ( 🔒 mark).
4) Place a cup under the sieve holder ⑬.
5) Plug the power plug into a mains socket. Make sure that the steam control is set to the position "O".
6) Switch the appliance on using the ON/OFF switch ⏻. The ready lamp flashes, and the appliance begins to heat up.
7) Once the ready lamp remains lit, press the "Espresso" button ☐ ② so that the appliance draws water from the water tank ⑥. Once water escapes from the openings of the portafilter, press the "Espresso" button ☐ ② again to stop the pump.
8) If necessary, wait until the ready lamp is lit continuously again.
The preheating is complete. You can now prepare an espresso/cappuccino.
(i) Note:
▶ If you want to prepare several espressos or cappuccinos in a row, you do not need to heat up the machine again and rinse it.
Preparing espresso
(i) Note:
▶ Always ensure that the espresso sieve 15/16 is clean and free of coffee powder residues.
1) When the appliance is heated up: To prepare an espresso, place the small espresso sieve ⑯ into the sieve holder ⑬. To prepare two espressos, place the large espresso sieve ⑮ into the sieve holder ⑬.
2) Fill the small espresso sieve 16 with espresso powder up to the Max marking. This corresponds to approx. 7 g of powder or a level measuring spoon 14.
Or...
Fill the large espresso sieve 15 with espresso powder up to the Max marking. This equates to about 7 g + 7 g of powder or two level measuring spoons 14.
3) Tamp down the espresso powder using the compactor on the measuring spoon 14. Add more espresso powder, if required, until the espresso sieve 15/16 is full up to the Max marking. Tamp the coffee powder down once again.
(i) Note:
▶ Compaction of the coffee powder is an essential process for the preparation of an espresso. If the espresso powder is compacted very strongly, the espresso runs through more slowly and more crema is generated. If the espresso powder is not so strongly compacted, the espresso runs through more quickly and it creates very little crema.
4) Place the sieve holder ⑬ in the appliance at the Ⓜ mark, then turn it clockwise until the handle of the sieve holder ⑬ is facing the front (○mark).
5) Place one (or two) cup(s) under the sieve holder openings. We recommend that you rinse the cups out with hot water beforehand, so that the espresso does not cool so quickly. You can place the cups onto the storage space ④.
6) For one cup of espresso, press the "Espresso" button ☐ ② once, for two cups, press the "Espresso" button ☐ ② twice in a row. The control lamp flashes quickly. The espresso flows into the cup(s). The appliance automatically stops dispensing the espresso.
(i) Note:
For one cup of espresso, the coffee is dispensed for about 15 seconds; for two cups, it takes about 25 seconds. You can also manually stop the dispensing of espresso by pressing the "Espresso" button 📄② again.
You can now drink the espresso.
WARNING!
Never remove the portafilter ® while espresso is being dispensed!
The resulting splashes of hot espresso can cause injuries! Wait until the coffee dispensing is finished before removing the portafilter 13.
7) If you no longer wish to use the appliance, switch it off by pressing the ON/OFF switch ① ⏻.
8) Remove the espresso powder from the espresso sieve 15/16 after every use. Remove the portafilter 13 from the appliance. Now empty the espresso sieve 15/16 by turning the portafilter 13 upside down and tapping out the espresso powder. Always dispose of the espresso powder in an environmentally appropriate way, such as in organic waste.
9) Remove the plug from the power socket and allow the appliance to cool down completely.
(i) Note:
If the "Espresso" ② or "Steam" buttons 1/3 are not pressed for about 30 minutes, the appliance switches off automatically.
Always clean the portafilter ⑬ and hot water outlet ⑫ after every use. Please refer to the section "Cleaning and care". Regularly empty the drip tray ⑩, at the latest when the water level indicator ⑪ can be seen through the opening in the drip grille ⑨.
Frothing milk /Preparing cappuccino
WARNING!
Be careful when working with steam for the milk froth production!
The hot steam or hot splashes can lead to injuries! Always operate the steam control ⑤ slowly.
1) Always prepare the espresso first. For a cappuccino, follow the instructions for preparing two cups of espresso. If you would like to prepare more than one cup of cappuccino, first prepare all espressos and then froth the milk for all cappuccinos.
(i) Note:
▶ For cappuccino, always use bigger cups than for espresso because frothed milk will be added.
2) Fill a froth container (preferably of stainless steel) one third full with cold milk. 100 ml of cold milk per cup of cappuccino is the optimal amount. When selecting the froth container, consider that frothing can as much as double the volume of the milk. Make sure that the container is tall enough.
3) Ensure that the steam control ⑤ is closed (turn it as far as it will go in the direction "O").
4) Push the milk frother ⑧ out to the side. Always hold it by the handle ⑦.
5) Press the "Steam" button 📄 Wait until the "Steam" control lamp lights up continuously.
6) Hold an empty container under the milk frother ⑧. Slowly turn the steam control ⑤ in the direction „//.”. Pressurised water/spray comes from the nozzle. This cleans the nozzle and the water circuit inside the appliance.
7) Wait 15 seconds and turn the steam control ⑤ towards "O" until no more steam comes out of the nozzle. Pour the water in the container away.
8) Now hold the frothing container in your hand to feel the milk temperature and guide the nozzle of the milk frother ⑧ gently into the milk. Hold the frothing container at a slight angle.
9) Slowly turn the steam control ⑤ in the direction „/A
10) Move the frothing container around in a circular motion while keeping the tip of the nozzle under the surface of the milk: deep enough that the milk does not spray out, but shallow enough to create a thick froth. Done properly, a deep buzzing sound is audible.
11) As the milk froth rises, push the nozzle deeper into the milk to froth up the next "layer" and to avoid a burnt taste in the froth.
12) Finally, insert the nozzle completely and close the steam control ⑤ approximately halfway, so that the milk is heated. Hold the frothing container at a slight angle, so that the milk gently swirls around while it is being stirred with the nozzle.
13) Once the milk froth has reached the desired consistency and temperature, turn the steam control ⑤ to off (up to the stop in the direction of the "O").
14) Now you can remove the nozzle from the milk.
(i) Note:
The control lamp of the "Espresso" button may flash rapidly if you press the "Espresso" button directly after preparing frothed milk. This means that the appliance is too hot to prepare a perfect espresso. Allow the appliance to cool down for at least 5 minutes.
Alternatively, you can cool the appliance faster with the "drawing hot water" function.
15) If you no longer wish to use the appliance, switch it off with the ON/OFF switch ① ⏻.
(i) Note:
If the "Espresso" ② or "Steam" 🔊/ 🔊 ③ buttons are not pressed for about 30 minutes, the appliance switches off automatically.
16) Now add the frothed milk into the previously prepared espresso. The cappuccino is now ready. You can add sugar or sprinkle it with cocoa powder according to taste.
i Note:
▶ Always clean the milk frother ⑧ after every use. See also the section "Cleaning and Care".
Tips for the perfect espresso
One of the most important factors for making a good espresso is the so-called extraction time or flow time - in other words the duration of contact between coffee powder and hot water until the finished coffee has flowed into the cup.
The extraction time depends chiefly on the quantity and grind of the coffee powder as well as its compactness. The finer and more compact the coffee powder, the more slowly the water runs through it.
However, you can adjust the extraction time yourself if you feel that the espresso does not taste or look as it should.
If the crema is very light, has little consistency and dissolves quickly, the espresso has gone through too quickly; this is called under-extraction. The espresso tastes sour and watery, and the aroma does not develop fully. This is usually due to too small a quantity of coffee powder, which may also be ground too coarsely or not compacted firmly enough.
If the crema is very dark and interspersed with light spots in the middle or has a hole, the coffee has been flowing too long. This is called over-extraction. The espresso tastes bitter. The cause is usually that the coffee powder is too finely ground or you have used too much coffee powder. If neither of these is the case, the coffee powder has been compacted too firmly.
Use only espresso coffee powder: it is usually more finely ground and also more strongly roasted. Ideally, you should use around 7 g of ground coffee for one cup of espresso coffee. Do not overfill the sieve. Compact the coffee powder in the sieve using the tamper of the measuring spoon without compacting the coffee powder too firmly.
■ Experiment until you find the optimal balance of all factors.
Tips for the milk froth
■ Generally, any type of milk can be frothed, including soy and rice milk. However, some types of milk can only be frothed to a certain extent.
■ Low fat or skimmed milk does not burn as easily as whole milk, however, a too low fat content adds to the risk that the milk will not be well frothed. Therefore use a milk with a fat content of 3.5% or 1.5%, if possible.
■ Well-cooled milk can be better frothed than less cold. For the best results, use milk at a temperature of about 7^ C.
■ Do not froth the milk a second time, otherwise it may burn.
■ Allow frothed milk to stand for about 30 seconds before you pour it onto the espresso. This allows the larger bubbles to burst; the still liquid milk sinks to the bottom. You can then pour the fine froth onto the espresso.
Drawing hot water
You can also use the milk frother ⑧ to draw hot water; for example, to dilute a coffee (café americano) or prepare tea.
1) Once the appliance has heated up: Place a heat-resistant container under the milk frother ⑧.
2) Press the "Steam" button ⏻/☐☐ ③ two times. The pump starts to operate.
3) Turn the steam control ⑤ at least half way towards "###/A". Hot water will come out of the milk frother ⑧.
4) Press the "Steam" button 🎨 1 🔊 3 or the "Espresso" button 📋 again to stop the hot water.
(i) Note:
▶ If you do not press a button, the hot water output will stop automatically after about 60 seconds.
5) Close the steam control ⑤ (turn it as far as it will go in the direction "O").
(i) Note:
▶ You can also use this function to cool the appliance more quickly, such as if you would like to prepare an espresso immediately after frothing milk. In this case, allow the water to flow for at least 15 seconds.
Cleaning and care
DANGER!
Always remove the plug from the mains power socket before you clean the appliance. Risk of electric shock!

Never immerse the appliance in water or other liquids! Risk of electric shock!
WARNING!
Always allow the appliance to cool down before cleaning it. Risk of burns!
! ATTENTION!
▶ To avoid damage, never use abrasive, aggressive or chemical cleaning agents to clean the surfaces of the appliance.
Cleaning the milk frother
1) Place an empty container under the milk frother ⑧.
2) Immediately after use, turn the steam control ⑤ to the „” position and allow the steam to escape for a few seconds.
3) Turn the steam control ⑤ off (as far as it will go in the direction "O"), switch the appliance off and remove the plug from the mains power socket.
4) Allow the nozzle to cool down.
5) Pull the sleeve off the milk frother ⑧ (see Figure 3), and clean it carefully in warm water with some detergent. Use a small brush, if necessary, to clean the inside of the sleeve as well. Rinse the sleeve afterwards with plenty of clean water.
6) Wipe the nozzle under the casing with a damp cloth. If necessary, add a little mild detergent onto the cloth. After cleaning with detergent, always wipe off with a cloth moistened with clean water. Ensure that there is no detergent residue left on the nozzle.
7) Push the casing back onto the nozzle (Figure 3).
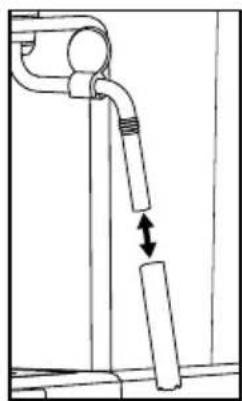
natural_image
Simple line drawing of a mechanical device with a lever and lever assembly (no text or symbols)Fig. 3
Cleaning the hot water shower
Clean the hot water shower ⑫ after each use:
1) After you have prepared the espresso/cappuccino and removed the sieve holder ⑬, wipe the entire surface of the hot water shower ⑫ with a moistened cloth to remove all powder residues.
2) Replace the sieve holder ⑬ without the espresso filters ⑮/⑯.
3) Place an empty cup under the portafilter ⑬ and press the "Espresso" button ②. Water flows out of the hot water shower ⑫ rinsing out the remaining powder residue.
4) If water no longer flows out of the hot water outlet ⑫, switch off the appliance with the ON/OFF switch ⑪.
5) Remove the sieve holder ⑬ again.
Cleaning the accessories
1) Clean the portafilter ⑬, the two espresso sieves ⑮/⑯, the water tank ⑥, the coffee spoon ⑭, the drip grille ⑨ and the drip tray ⑩ in warm water.
(i) Note:
▶ If you put detergent into the water, it may effect the taste of the espresso. If the stains can only be removed with detergent, always rinse the items afterwards with lots of clean water.
2) Dry all parts well.
i Note:
The two espresso sieves 15/16, the measuring spoon 14 and the drip tray 10 are dishwasher-safe.
Cleaning the appliance
Clean the appliance with a moist cloth. If necessary, use a little detergent on the cloth.
Ensure that the appliance is completely dry before the next use.
Descaling the appliance
ATTENTION!
Do not generate steam when the descaler solution is in the water tank 6!
Descale the appliance regularly. The appliance should be descaled after about 3 months. This value can vary depending on the hardness of the water in your region.
Proceed as follows to decalcify the appliance:
1) Add commercial liquid descaler for espresso machines to the water tank ⑥. The water/descaler ratio is typically 4:1. Follow the manufacturer's instructions for the exact amount. Instead of descaler, you can also use pure lemon juice (available from a pharmacy) in a ratio of 3:100 (3 parts lemon juice to 100 parts water).
2) Fill the water tank ⑥ up to the Max mark with water and place the tank back in the appliance.
3) Insert the portafilter 13 into the appliance without an espresso sieve 15/16.
4) Place a container capable of holding at least 1.2 litres under the portafilter openings. You can remove the drip tray ⑩ to make space for the container.
5) Switch the appliance on with the ON/OFF switch ① ⏻. Make sure the steam control ⑤ is shut off.
6) When the ready lamp remains lit, press the "Espresso" button ☐ ② so that the appliance draws water from the water tank ⑥. Once water escapes from the openings of the portafilter, press the "Espresso" button ☐ ② again to stop the pump.
7) If necessary, wait until the ready lamp is lit continuously again.
8) As soon as the ready lamp lights up continuously, press the "Espresso" button twice. Allow the descaler solution to flow through until the pump stops automatically.
9) After about 5 seconds, press the "Steam" button ⏻1 ^3 and wait until the control lamp remains lit.
10) Turn the steam control ⑤ to the position 🎨/ 🔊 and allow steam to escape for about 2 minutes. Then turn the steam control ⑤ back to "O".
11) Switch the appliance off with the ON/OFF switch ① ⏻ and allow the descaler solution to work for at least 15 minutes.
12) Switch the appliance on again, and repeat steps 6 to 10 three more times. After the last time, empty the water tank Ⓞ completely by pressing the "Espresso" button 📋 ② a number of times. Carefully pour out the used descaler solution.
13) Rinse out the water tank ⑥ with fresh water and fill it with fresh water up to the Max mark.
14) Repeat steps 6 to 10 three more times until all the water is used up. Carefully pour out this water.
15) Then switch the appliance off.
16) After descaling, wipe off the appliance with a damp cloth to remove any splashes of the descaler solution. Ensure that the appliance is completely dry before the next use.
Storage
If you do not intend to use the appliance for a longer period of time, empty the internal pipes by letting off steam for approx. 2 minutes.
- Allow the appliance to cool down completely before putting it into storage.
■ Store the cleaned appliance in a clean, dust-free and dry location.
Troubleshooting
| Malfunction Cause Solution | ||
| The espresso no longer flows out. | · The espresso powder is too moist and/or compressed too tightly. | · Re-prepare the espresso without compressing the powder as firmly; if necessary, use new powder. |
| · No water in the water tank 6. | · Fill the water tank 6 with water. | |
| · The holes of the sieve holder openings are blocked. | · Clean the sieve holder 13. | |
| The espresso drips over the edges of the sieve holder 13, not from the openings. | · The sieve holder 13 is not correctly inserted. | · Insert the sieve holder 13 correctly. |
| · The sieve holder openings are blocked. | · Clean the sieve holder 13. | |
| · There are espresso powder residues on the edges of the sieve holder 13. | · Clean the espresso powder residues from the edges of the sieve holder 13. | |
| The espresso is cold. | · The appliance was not preheated. | · Preheat the appliance. |
| · The cups were not pre-warmed. | · Pre-warm the cups. | |
| The pump is unusually noisy. | · The water tank 6 is empty. | · Fill the water tank 6 with water. |
| The crema is too light (the espresso runs out of the sieve holder 13 quickly). | · Not enough espresso powder. | · Use more espresso powder. |
| · The espresso powder is too coarsely ground. | · Use only espresso powder spe- cially manufactured for espresso. | |
| The crema is too dark (the espresso runs out of the sieve carrier 13 slowly). | · Too much espresso powder. | · Use less espresso powder. |
| · The powder is too finely ground or moist. | · Use only espresso powder spe- cially manufactured for espresso. | |
| · The sieve 15/16 is blocked. | · Clean the sieve 15/16. | |
| The milk does not froth. | · The milk is not cold enough. | · Use milk from the refrigerator. |
| · The milk frother 8 is dirty. | · Clean the milk frother 8. | |
| The pump stops during operation, the "Espresso" control lamp 2 flashes. | · The pump stops after about 3 minutes of operation to prevent overheating. | · Allow the appliance to cool down before you use it again. |
If the malfunction cannot be corrected using one of the suggestions above or if you have found some other kind of malfunction, please contact our Customer Service department.
Disposal
Applies only to France:

The product, its packaging and the operating instructions are recyclable. They
are subject to an extended manufacturer responsibility and will be collected separately.
Disposal of the appliance
The adjacent symbol of a crossed-out dustbin means that this appliance is subject to Directive 2012/19/EU. This directive states that this appliance may not be disposed of in the normal household waste at the end of its useful life, but must be taken to specially set-up collection locations, recycling depots or disposal companies.
The disposal is free of charge for the user. Protect the environment and dispose of this appliance properly.
If your old appliance has stored any personal data, you are responsible for deleting it yourself before returning it.

Your local community or municipal authorities can provide information on how to dispose of the worn-out product.
Disposal of the packaging

The packaging materials have been selected for their environmental friendliness and ease of disposal and are therefore recyclable.
Dispose of packaging materials that are no longer needed in accordance with applicable local regulations.

Dispose of the packaging in an environmentally friendly manner. Note the labelling on the packaging and separate the packaging material components for disposal, if necessary. The packaging material is labelled with abbreviations (a) and numbers (b) with the following meanings: 1–7: plastics, 20–22: paper and cardboard, 80–98: composites.
Applies only to Spain:
The packaging contains paper and/or cardboard components.

The packaging contains plastic and/or metal components.
Technical data
| Mains voltage | 220 - 240 V ~,50-60 Hz |
| Rated power 1100 W | |
| Pump pressure | approx. 1.5 MPa(15 bar) |
This appliance has a 3-year warranty valid from the date of purchase. If this product has any faults, you, the buyer, have certain statutory rights. Your statutory rights are not restricted in any way by the warranty described below.
Warranty conditions
The warranty period starts on the date of purchase. Please keep your receipt in a safe place. This will be required as proof of purchase.
If any material or manufacturing fault occurs within three years of the date of purchase of the product, we will either repair or replace the product for you or refund the purchase price (at our discretion). This warranty service requires that you present the defective appliance and the proof of purchase (receipt) within the three-year warranty period, along with a brief written description of the fault and of when it occurred.
If the defect is covered by the warranty, your product will either be repaired or replaced by us. The repair or replacement of a product does not signify the beginning of a new warranty period.
Warranty period and statutory claims for defects
The warranty period is not prolonged by repairs effected under the warranty. This also applies to replaced and repaired components. Any damage and defects present at the time of purchase must be reported immediately after unpacking. Repairs carried out after expiry of the warranty period shall be subject to a fee.
Scope of the warranty
This appliance has been manufactured in accordance with strict quality guidelines and inspected meticulously prior to delivery.
The warranty covers material faults or production faults. The warranty does not extend to product parts subject to normal wear and tear or to fragile parts which could be considered as consumable parts such as switches or parts made of glass.
The warranty does not apply if the product has been damaged, improperly used or improperly maintained. The directions in the operating instructions for the product regarding proper use of the product are to be strictly followed. Uses and actions that are discouraged in the operating instructions or which are warned against must be avoided.
This product is intended solely for private use and not for commercial purposes. The warranty shall be deemed void in cases of misuse or improper handling, use of force and modifications / repairs which have not been carried out by one of our authorised Service centres.
Warranty claim procedure
To ensure quick processing of your case, please observe the following instructions:
■ Please have the till receipt and the item number (IAN) 483345_2410 available as proof of purchase.
■ You will find the item number on the type plate on the product, an engraving on the product, on the front page of the operating instructions (below left) or on the sticker on the rear or bottom of the product.
If functional or other defects occur, please contact the service department listed either by telephone or by e-mail.
■ You can return a defective product to us free of charge to the service address that will be provided to you. Ensure that you enclose the proof of purchase (till receipt) and information about what the defect is and when it occurred.

You can download these instructions along with many other manuals, product videos and installation software at www.lidl-service.com.
This QR code will take you directly to the Lidl service page (www.lidl-service.com) where you can open your operating instructions by entering the item number (IAN) 483345_2410.
Service
GB Service Great Britain
Tel.: 0800 404 7657
E-Mail: kompernass@lidl.co.uk
IE ServiceIreland
Tel.: 1800 101010
E-Mail: kompernass@lidl.ie
IAN 483345_2410
Importer
Please note that the following address is not the service address. Please use the service address provided in the operating instructions.
KOMPERNASS HANDELS GMBH
BURGSTRASSE 21
44867 BOCHUM
GERMANY
www.kompernass.com
Inhaltsverzeichnis
Einleitung 18
natural_image
Diagram of two circular devices connected by a line, one with dotted pattern and the other with solid fill (no text or symbols)Abb. 1
natural_image
Diagram of a circular mechanical component with a rotating arrow indicating rotation (no text or symbols)Abb. 2
i Hinweis
natural_image
Simple line drawing of a mechanical lever system with a pull rod and directional arrow (no text or symbols)Abb. 3
KOMPERNASS HANDELS GMBH
BURGSTRASSE 21
44867 BOCHUM
DEUTSCHLAND
www.kompernass.com
Table des matières
Introduction 36
Usage conforme 36
natural_image
Diagram of two circular devices connected by a pointer, with one device showing internal dot pattern and the other showing an arrow pointing downward (no text or symbols)Fig. 1
natural_image
Top-down schematic of a mechanical component with a circular top and arrow indicating rotation (no text or symbols)Fig. 2
i Remarque :
natural_image
Simple line drawing of a mechanical device with a lever and lever arm, showing motion direction (no text or symbols)Fig. 3
KOMPERNASS HANDELS GMBH
BURGSTRASSE 21
44867 BOCHUM
ALLEMAGNE
www.kompernass.com
Inhoud
Inleiding 56
natural_image
Diagram of two circular devices connected by a pointer, with one device emitting particles (no text or symbols)Afb. 1
natural_image
Diagram of a circular mechanical component with a rotating arrow indicating rotation (no text or symbols)Afb. 2
i Opmerking:
natural_image
Simple line drawing of a mechanical device with a lever and lever assembly (no text or symbols)Afb. 3
KOMPERNASS HANDELS GMBH
BURGSTRASSE 21
44867 BOCHUM
DUITSLAND
www.kompernass.com
Obsah
Úvod....74
natural_image
Diagram of two circular devices connected by a pointer, with one device emitting particles (no text or symbols)Obr. 1
natural_image
Diagram of a circular mechanical component with a rotating arrow indicating rotation (no text or symbols)Obr. 2
i Upozornění:
natural_image
Simple line drawing of a mechanical device with a lever and handle, showing motion direction (no text or symbols)Obr. 3
KOMPERNASS HANDELS GMBH
BURGSTRASSE 21
44867 BOCHUM
NĚMECKO
www.kompernass.com
Spis treści
W step 90
natural_image
Diagram of two circular devices connected by a line, with one device showing a dotted pattern and the other a solid outline (no text or symbols)Rys. 1
natural_image
Diagram of a circular mechanical component with a rotating arrow indicating rotation (no text or symbols)Rys. 2
i Wskazówka:
natural_image
Simple line drawing of a mechanical device with a lever and lever mechanism (no text or symbols)Rys. 3
KOMPERNASS HANDELS GMBH
BURGSTRASSE 21
44867 BOCHUM
NIEMCY
www.kompernass.com
Obsah
Úvod....108
natural_image
Diagram of two circular devices with dotted patterns connected by a line, no text or symbols presentObr. 1
natural_image
Diagram of a circular device with a dotted pattern and an arrow indicating rotation (no text or symbols)Obr. 2
i Upozornenie:
natural_image
Simple line drawing of a mechanical lever system with a pull rod and directional arrow (no text or symbols)Obr. 3
KOMPERNASS HANDELS GMBH
BURGSTRASSE 21
44867 BOCHUM
NEMECKO
www.kompernass.com
Índice
Introducción....124
Uso previsto 124
natural_image
Diagram of two circular devices connected by a line, one with dotted pattern and the other with arrow pointing downward (no text or symbols)Fig. 1
natural_image
Diagram of a circular mechanical component with a rotating arrow indicating rotation (no text or symbols)Fig. 2
i Indicación:
natural_image
Simple line drawing of a vertical pipe with a downward arrow indicating force or movement (no text or symbols)Fig. 3
KOMPERNASS HANDELS GMBH
BURGSTRASSE 21
44867 BOCHUM
ALEMANIA
www.kompernass.com
Indholdsfortegnelse
Introduktion 142
Anvendelsesområde 142
Anvendte advarsler og symboler 142
natural_image
Diagram of two circular devices connected by a line, one with dotted pattern and the other with solid dots (no text or symbols)Fig. 1
natural_image
Diagram of a circular mechanical component with a rotating arrow indicating rotation (no text or symbols)Fig. 2
i Bemærk:
natural_image
Simple line drawing of a mechanical device with a lever and lever assembly (no text or symbols)Fig. 3
KOMPERNASS HANDELS GMBH
BURGSTRASSE 21
44867 BOCHUM
TYSKLAND
www.kompernass.com
Indice
Introduzione....158
Uso conforme 158
natural_image
Diagram of two circular devices connected by a pointer, with one device showing internal structure and the other showing a downward arrow (no text or symbols)Fig. 1
natural_image
Diagram of a circular mechanical component with a rotating arrow indicating rotation (no text or symbols)Fig. 2
i Nota:
natural_image
Simple line drawing of a mechanical lever system with a hanging rod and directional arrows (no text or symbols)Fig. 3
KOMPERNASS HANDELS GMBH
BURGSTRASSE 21
44867 BOCHUM
GERMANIA
www.kompernass.com
Tartalomjegyzék
Bevezető 176
natural_image
Diagram of two circular components connected by a pointer, with one larger and one smaller, showing internal patterns (no text or symbols)- ábra
natural_image
Diagram of a circular mechanical component with a rotating arrow indicating rotation (no text or symbols)- ábra
i Tudnivaló:
natural_image
Simple line drawing of a mechanical device with a vertical rod and arrow indicating motion (no text or symbols)ábra. 3
KOMPERNASS HANDELS GMBH
BURGSTRASSE 21
44867 BOCHUM
NÉMETORSZÁG
www.kompernass.com

KOMPERNASS HANDELS GMBH
BURGSTRASSE 21
44867 BOCHUM
GERMANY
www.kompernass.com
Last Information Update · Stand der Informationen · Version des informations
Stand van de informatie · Stav informací · Stan informacji · Stav informácií
Estado de las informaciones · Tilstand af information · Versione delle informazioni