WIE-CCD-100 - Door automation Wiesenfield - Free user manual and instructions
Find the device manual for free WIE-CCD-100 Wiesenfield in PDF.


| Product Type | Chicken coop door automatic opener (chicken door opener) |
| Model | WIE-CCD-100 |
| Brand | Wiesenfield |
| Overall dimensions (L x W x H) | 670 x 300 x 100 mm |
| Weight | 1.6 kg |
| Power supply | 4 AA batteries (1.5 V) or 1 6 V battery (not included) |
| Operating ambient temperature | Above -18 °C |
| Operating modes | Timer-Timer (fixed times) / Light-Light (according to brightness) |
| Brightness adjustment range | Opening: 15-23; Closing: 0-14 |
| Adjustable protection level | 0-8 (OFF) |
| Main functions | Programmed opening/closing, light sensor, timer, display |
| Display | Digital screen with Menu, ↑, ↓ buttons |
| Sensor | Built-in light sensor (left side of the panel) |
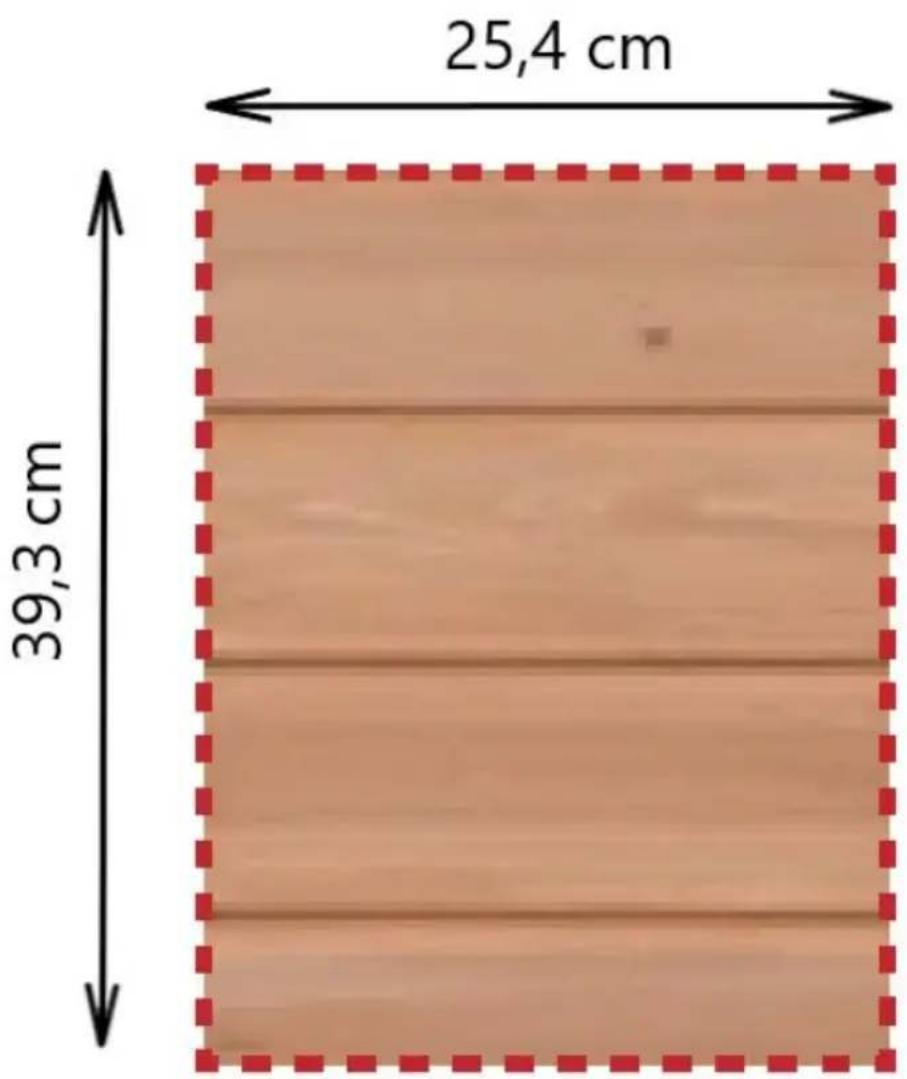
| Recommended chicken coop opening | 39.3 x 25.4 cm (height x width) |
| Materials | Plastic, electronic components, magnets |
| Cleaning and maintenance | Remove batteries before cleaning; soft cloth, no caustic products; dry completely; store in a dry place away from sunlight |
| Battery life | Varies according to use; remove if not used for a long time |
| Protection rating | Not waterproof; avoid water; for outdoor use (chicken coop) |
| Error codes | Error 1 (front panel), Error 2 (blockage), Error 3 (working time), Error 4 (motor) |
| Available spare parts | Magnets, cables, screws, batteries; contact manufacturer for replacement |
| Repairability | Repair by after-sales service only; do not repair yourself |
| Safety | Use under supervision for children and people with reduced capacities; do not modify the device |
| General information | Product conforms to CE standards; recyclable; manual in multiple languages |
Frequently Asked Questions - WIE-CCD-100 Wiesenfield
User questions about WIE-CCD-100 Wiesenfield
0 question about this device. Answer the ones you know or ask your own.
Ask a new question about this device
Download the instructions for your Door automation in PDF format for free! Find your manual WIE-CCD-100 - Wiesenfield and take your electronic device back in hand. On this page are published all the documents necessary for the use of your device. WIE-CCD-100 by Wiesenfield.
USER MANUAL WIE-CCD-100 Wiesenfield
This User Manual has been translated for your convenience using machine translation. Reasonable efforts have been made to provide an accurate translation; however, no automated translation is perfect nor is it intended to replace human translators. The official User Manual is the English version. Any discrepancies or differences created in the translation are not binding and have no legal effect for compliance or enforcement purposes. If any questions arise related to the accuracy of the information contained in the User Manual, please refer to the English version of those contents which is the official version.
Technical data
| Parameter description | Parameter value |
| Product name | CHICKEN DOOR OPENER |
| Model | WIE-CCD-100 |
| Batteries | 4xAA or 6V |
| Ambient temperature [°C]. | > -18 |
| Overall dimensions (width x depth x height) (mm] | 670 x 300 x 100 |
| Weight [kg] | 1.6 |
1. General Description
This manual is intended to assist you for safe and reliable use. The product is designed and manufactured strictly according to technical specifications using the latest technology and components and maintaining the highest quality standards.
CAREFULLY READ AND UNDERSTAND THIS MANUAL BEFORE STARTING THE WORK.
To ensure long and reliable operation of the device, make sure to operate and maintain it properly in accordance with the guidelines in this instruction manual. The technical data and specifications in this manual are up-to-date. The manufacturer reserves the right to make changes in order to improve the quality. Taking the technical progress and the possibility of reducing noise into account, the unit is designed and built in such a way so that risks resulting from noise emissions are reduced to the lowest possible level.
Explanation of symbols
| CE | The product complies with applicable safety standards. |
| Read the manual before use. | |
| Recyclable product. | |
| CAUTION! or WARNING! or REMEMBER! describing a given situation (general warning sign). |

CAUTION! The figures in this manual are illustrative only and may vary in some details from the actual appearance of the product.
2. Safety of use

CAUTION!
Read all safety warnings and instructions. Failure to follow the warnings and instructions may result in electric shock, fire and/or serious injury or death.
The term "device" or "product" in the warnings and in the description of the instructions refers to CHICKEN DOOR OPENER.
2.1. Safety in the workplace
a) If you have any doubts as to whether the product is working properly or if it is damaged, contact the manufacturer's service department.
b) Only the manufacturer's service department may repair the appliance. Do not attempt to repair the product on your own!
c) Keep this manual for future reference. If the unit is to be passed on to third parties, the operating instructions must also be handed over together with the unit.
d) Keep packaging components and small installation parts out of the reach of children.
2.2. Personal safety
a) The product is not intended to be used by individuals (including children) with reduced mental, sensory or intellectual capacity or lack of experience and/or knowledge, unless they are supervised by an individual responsible for their safety or have been given instructions by the responsible individual on how to operate the product.
b) The appliance is not a toy. Children should be watched to ensure that they do not play with the appliance.
2.3. Safe use of the device
a) Repairs and maintenance should be carried out by qualified personnel using only original spare parts. This will ensure the safety of use.
b) To ensure the designed operational integrity of the device, do not remove factory-installed covers or loosen screws.
c) Avoid situations where the unit stops working because it is handling a heavy load. This can cause overheating of the drive elements and consequent damage to the equipment.
d) Do not touch any moving parts or accessories unless the device is unplugged.
e) Clean the device regularly to prevent permanent dirt build-up.
f) The product is not a toy. Cleaning and maintenance must not be performed by children without adult supervision.
g) Do not tamper with the device to alter its performance or design.
h) Keep the unit away from sources of fire and heat.
i) Batteries that are not rechargeable should not be charged.
j) Do not mix different types of batteries, or old and used batteries.
k) Install batteries according to the polarity direction indicated on the unit and battery symbols.
I) Remove used batteries from the unit and dispose of them safely in accordance with the law.
m) Do not use the appliance to lift doors that weigh more than recommended.
n) Do not immerse the unit in water or other liquids.
o) Be careful when lowering the door. Despite the low power of the unit's motor, it is recommended to avoid contact with the moving door.

CAUTION! Although the product has been designed to be safe, with adequate safeguards, and despite the additional safety features provided to the user,
there is still a slight risk of accident or injury when handling the unit. Caution and common sense are advised when using the product.
3. Instructions for use
The product is intended to be used as an automatically opening and closing door to a poultry house.
The user is responsible for any damage resulting from misuse.
3.1. Product overview
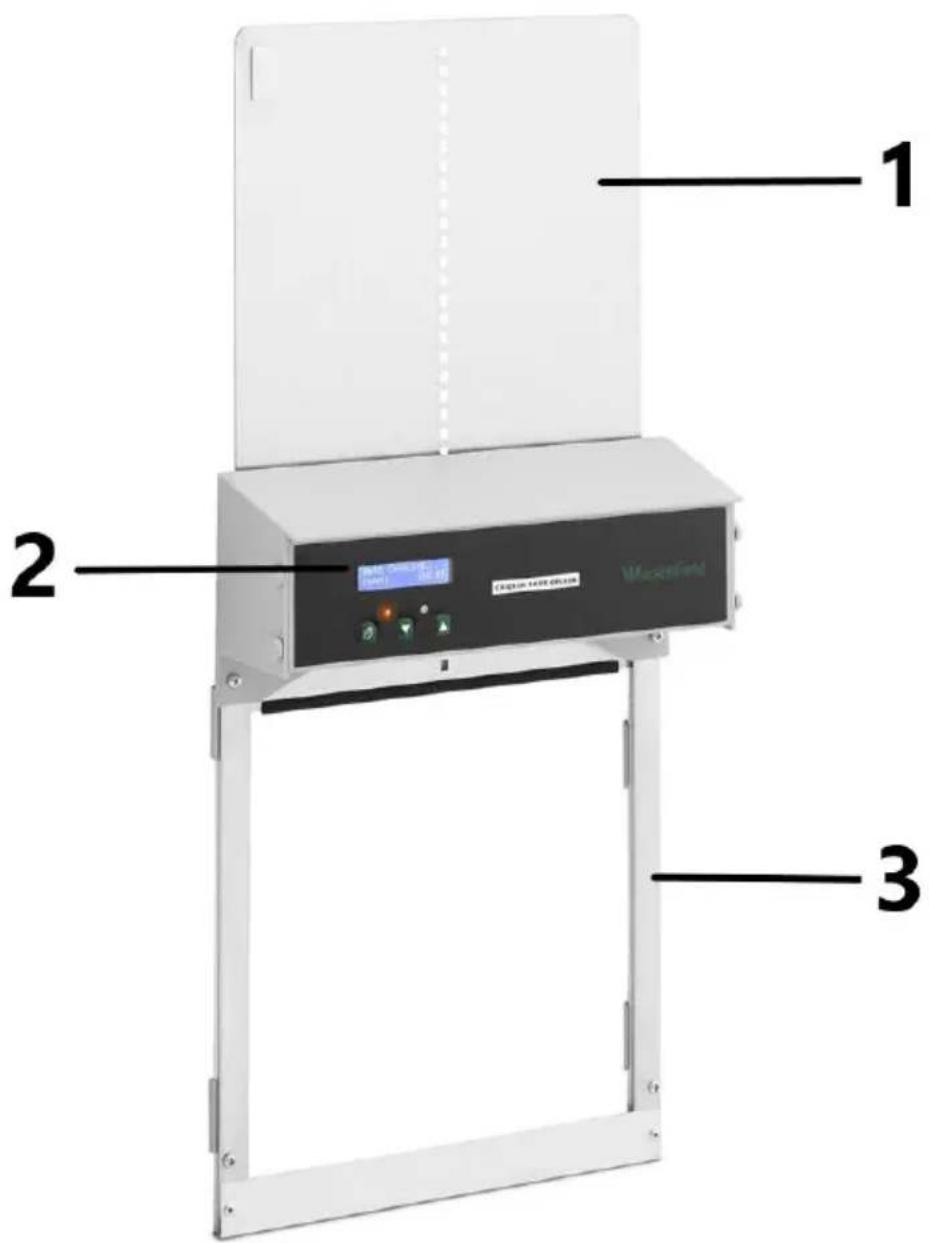
2 - Control panel
3- Bar
Control panel
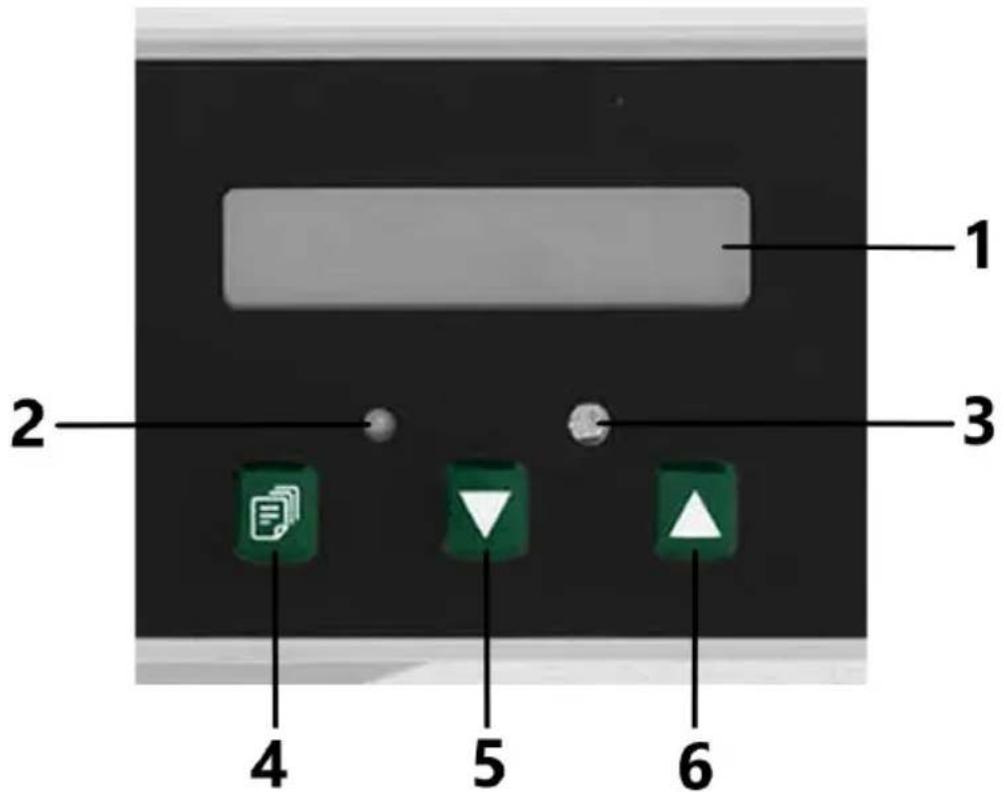
1 - Display
2 - Warning light
3 - Light sensor
4 - "MENU" button
5- " " button (down)
6- "个" button (up)
3.2. Preparation for operation
Set contents
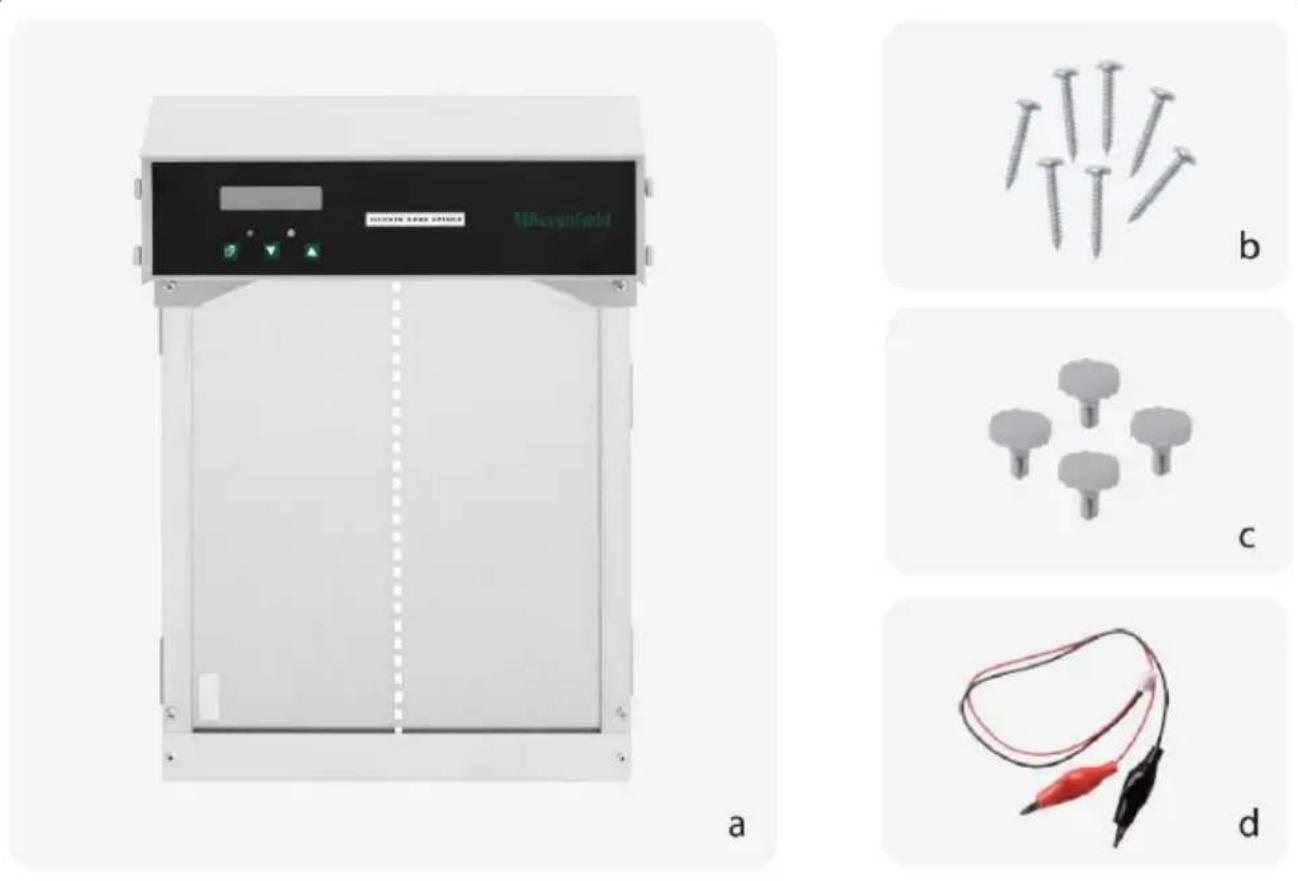
a - Controller
b - 7x M4 x 12 self-tapping screws
c - 4x M4 knobs
d - 6V battery terminals
Note: a screwdriver (not included) is a tool for assembling the unit.
Place of installation:
- The door should be mounted on the outer wall of the poultry house (the controller has a light sensor).
The ambient temperature should not fall below -18ircC
Assembly
1) The recommended size of the entrance to the poultry house is 39.3 × 25.4 cm (height x width).
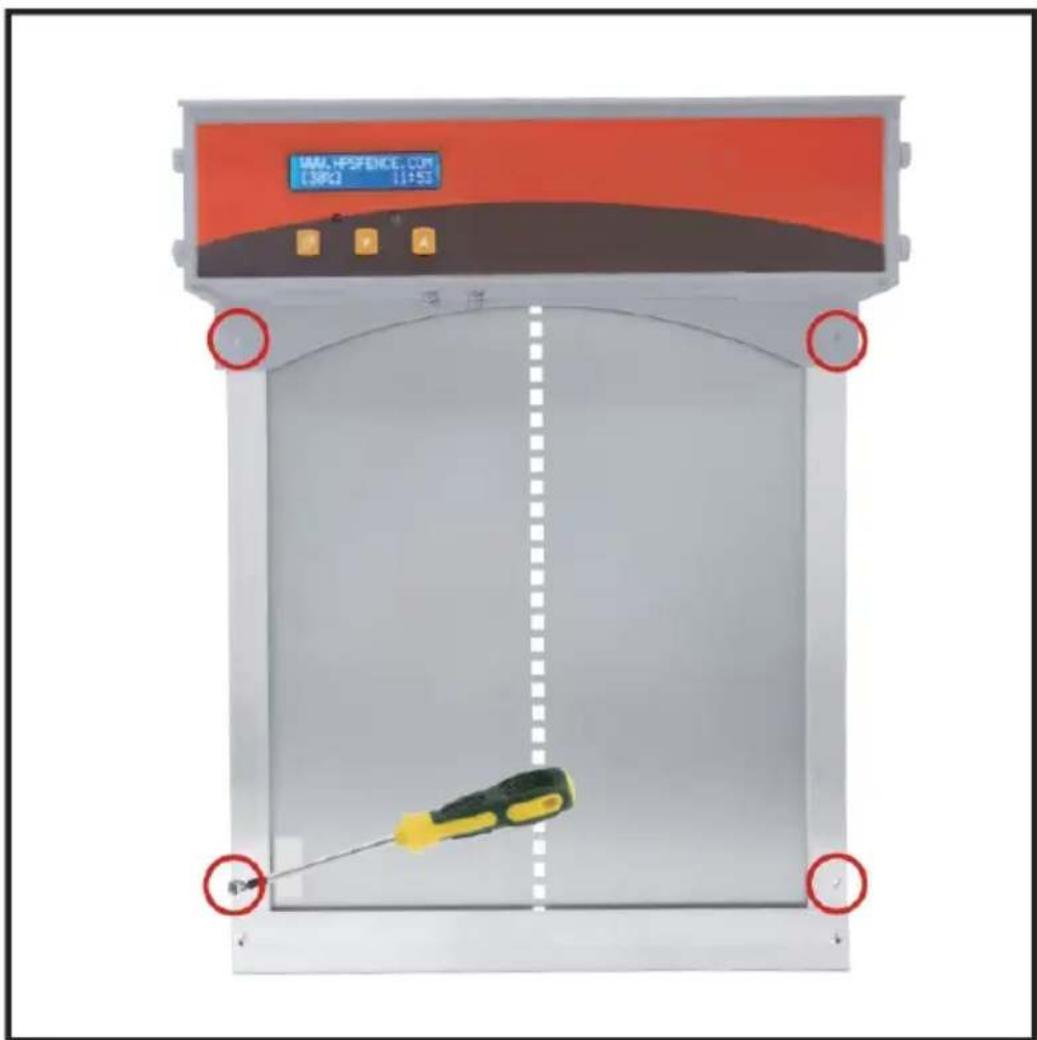
2) Screw the guides to the wall of the poultry house with 4 self-tapping screws.
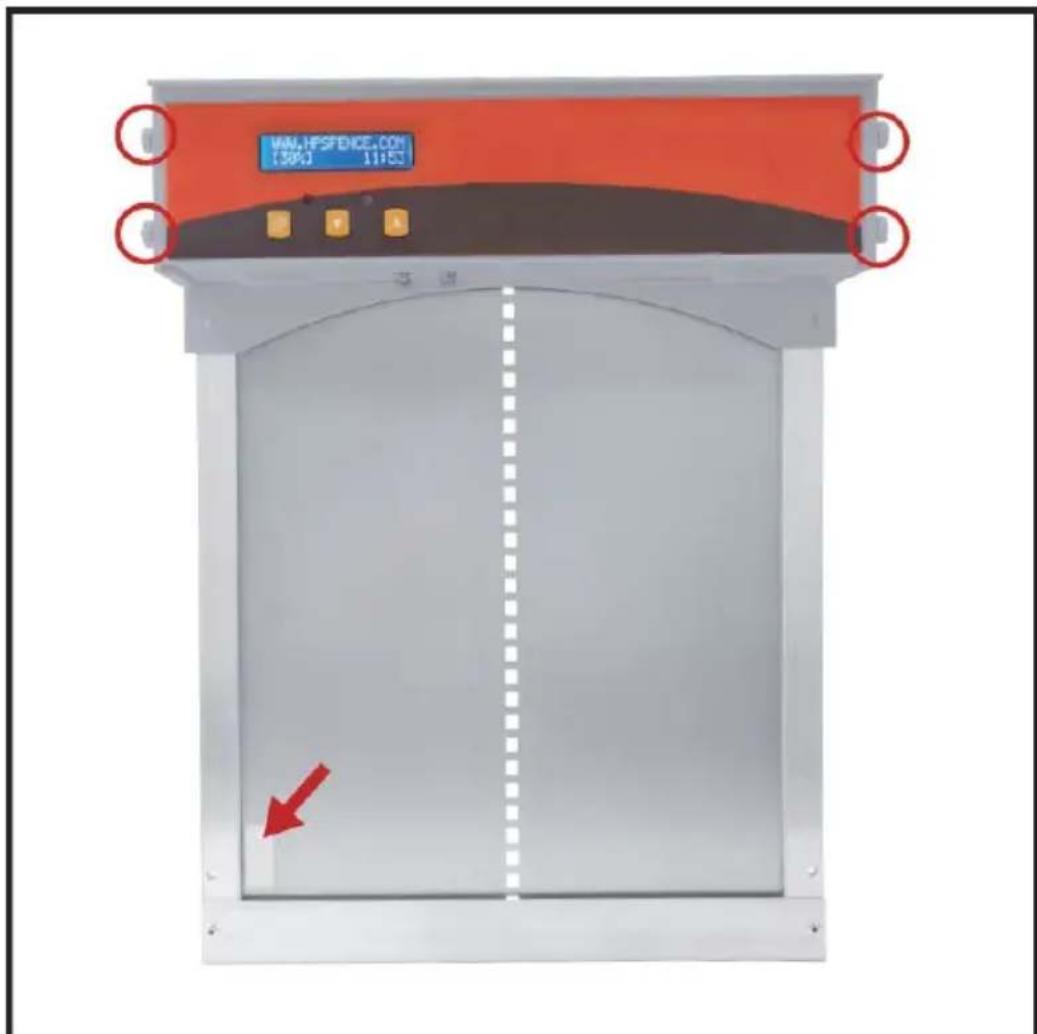
3) Remove the 4 locking knobs from the sides of the controller. Make sure the sensor is on the left side of the door, in the lower corner.
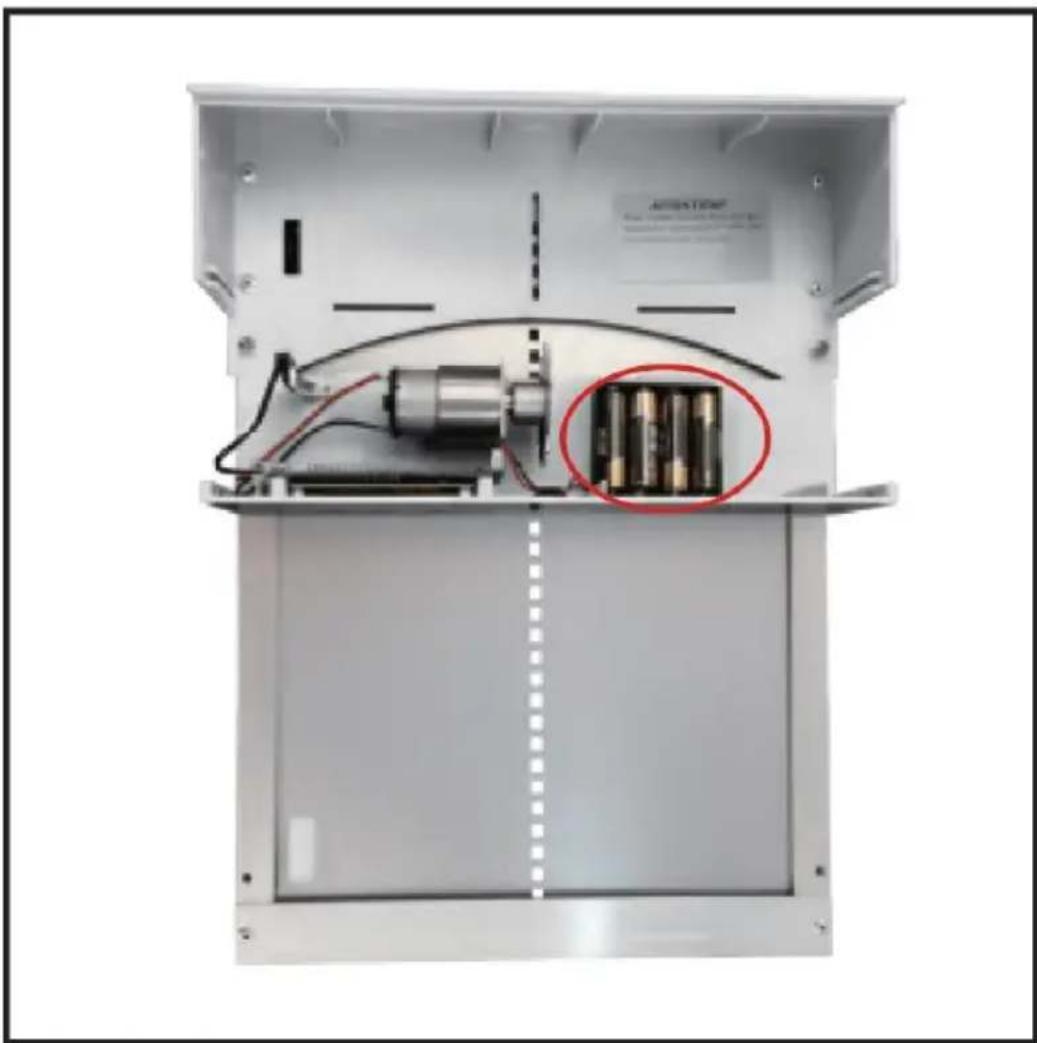
4) Gently remove the control panel cover to install 4 AA batteries or 1 6V battery. Next reinstall the front panel of the controller and tighten the 4 locking knobs.
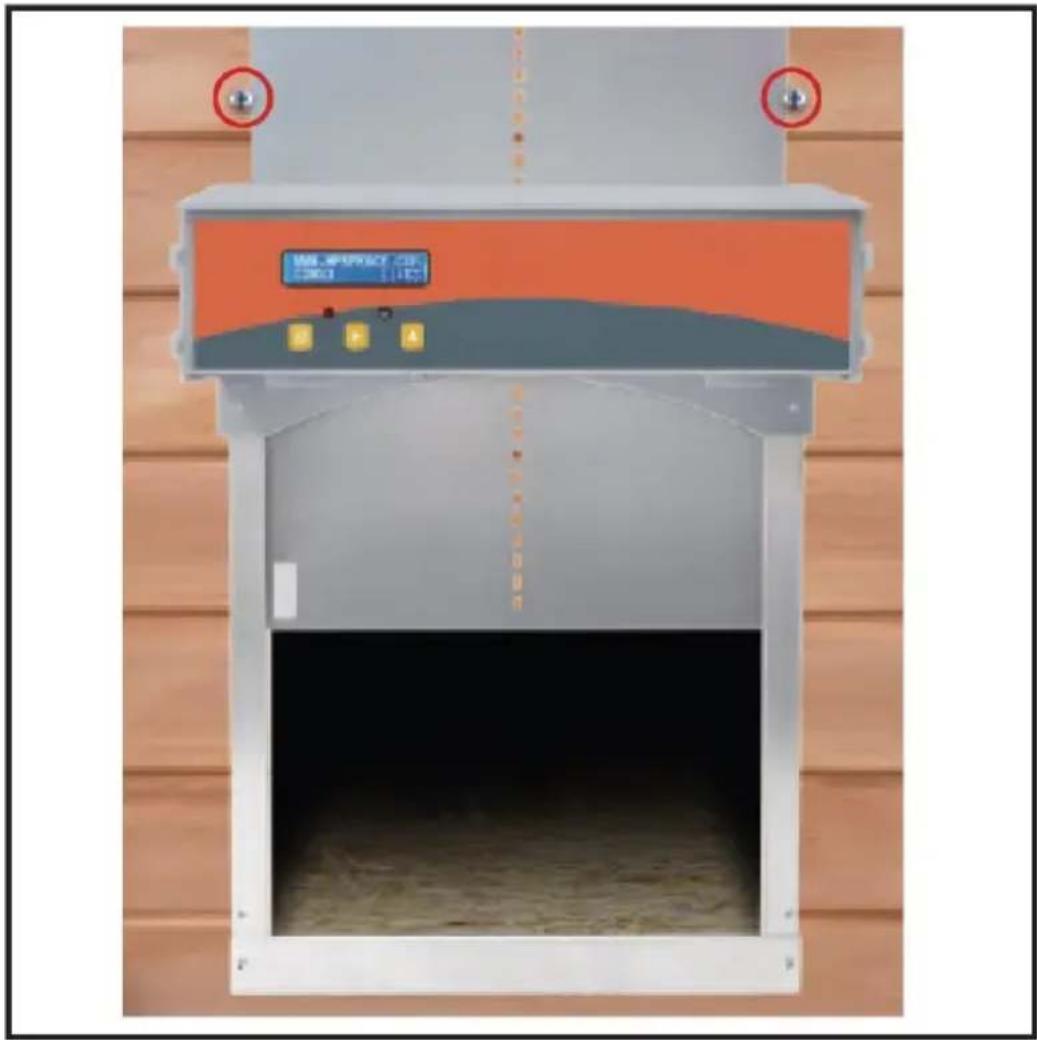
5) Press "↑" to open the door. Install 2 screws approximately 10cm above the control panel in the wall of the poultry house to prevent the door from tilting to the left or right. The screws should be screwed in right next to the door protruding above the controller. Be careful not to damage the door.
3.3. Working with the device
Driver settings
1) The current time
Press and hold the "MENU" button for 2 seconds to start changing the clock settings.
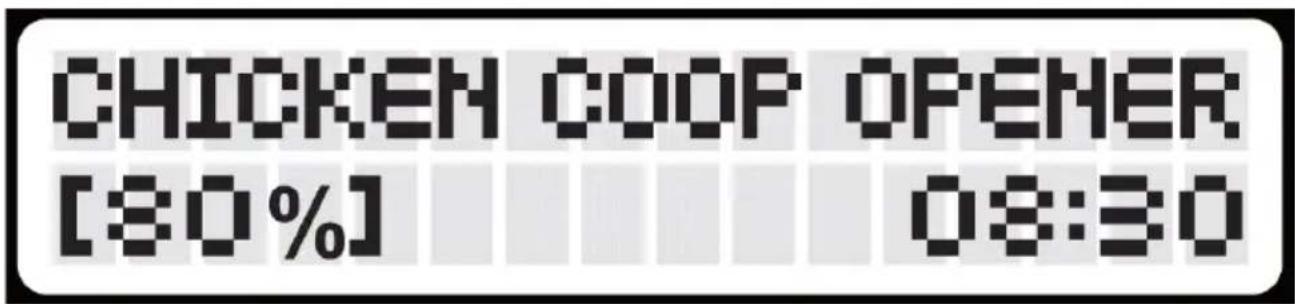
Press the "Menu" button to switch between hours and minutes. Press "↑" or "↓" to change the values.
CURRENT TIME:
08:12
2) Mode of operation
The device can operate in one of the two available modes:
- TIMER-TIMER: closing and opening depending on the time
LIGHT-LIGHT: closing and opening depending on the lighting
The TIMER-TIMER operation mode allows users to set the time of automatic opening and closing of the door. Press the "MENU" button to go to the settings.
Mode selection:
Press the "↑" or "↓" button to toggle between the TIMER-TIMER and LIGHT-LIGHT modes.
OPERATING MODE:
TIMER-TIMER
Opening time:
Press the "Menu" button to switch between hours and minutes. Press "↑" or "↓" to change the values.
OPEN UP TIME:
06:00
Closing time:
Press the "Menu" button to switch between hours and minutes. Press "↑" or "↓" to change the values.
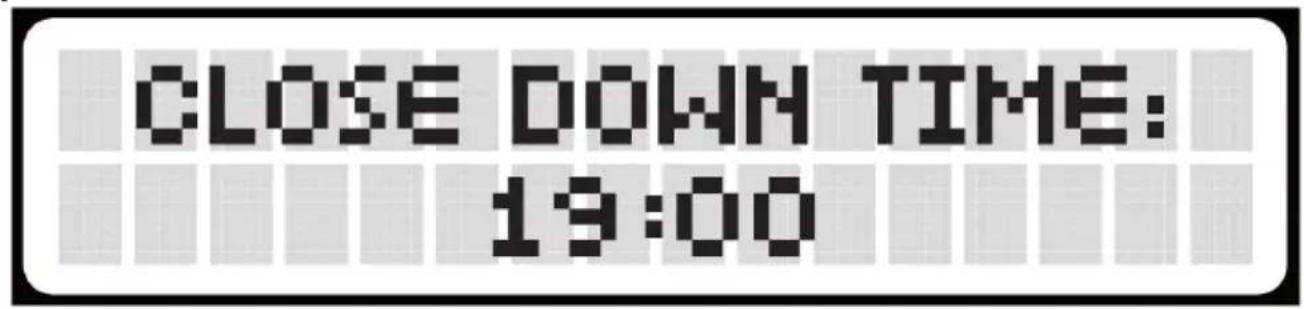
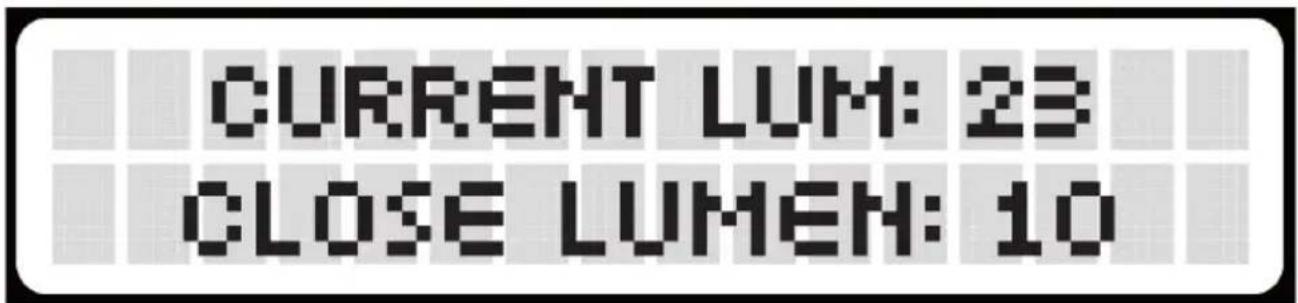
The LIGHT-LIGHT mode allows the user to set when the door is to open and close automatically depending on the lighting. The degree of light can be set from 0 to 23. Smaller values correspond to lower lighting. Press the "MENU" button to go to the settings.
Opening lighting:
Adjust the lighting level that triggers the opening by pressing "↑" or "↓" (in the range 15-23).
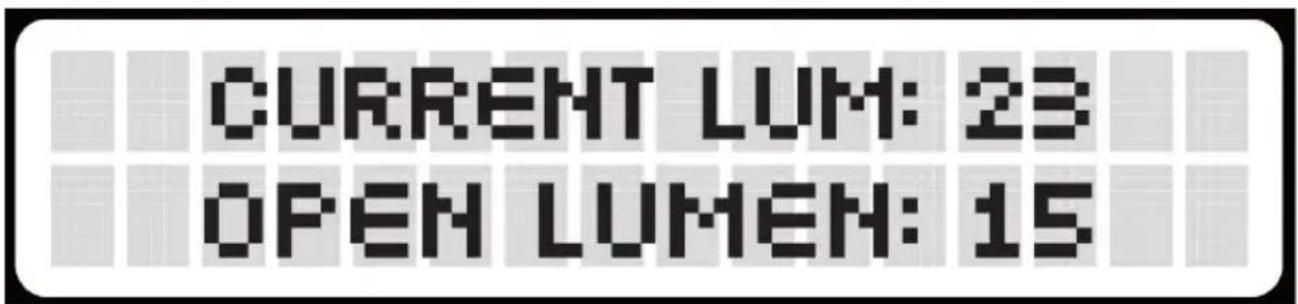
Closing lighting:
Adjust the closing level by pressing "↑" or "↓" (in the range 0-14).
3) Protection level
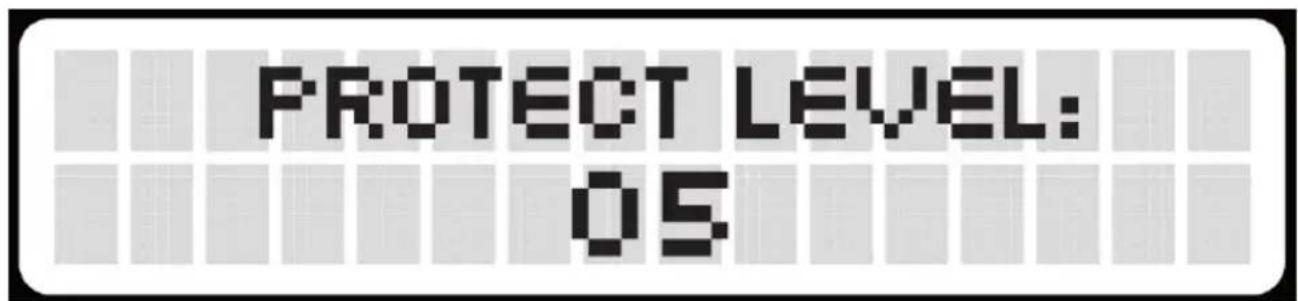
This screen allows users to set the protection level (in the range 0-8 OFF).
Press "↑" or "↓" to select the level. The higher the value, the higher the level can be.
4) Saving the settings
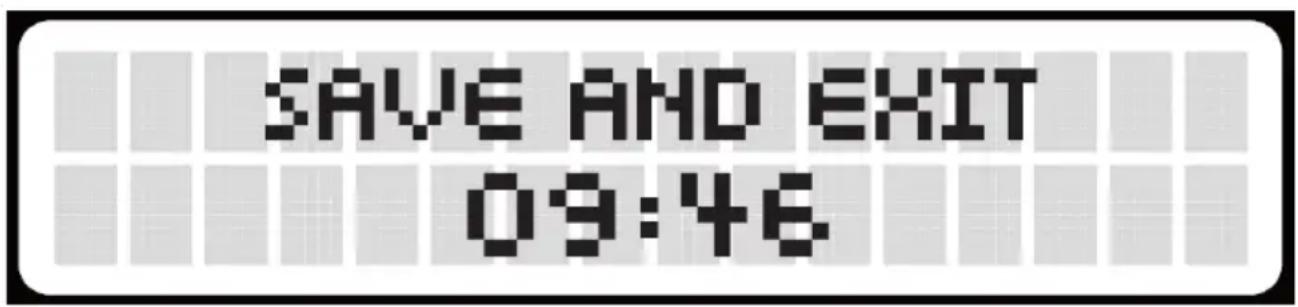
Press the "MENU" button to save the settings.
Tips:
- When it comes to the light level setting mode, the range in which the door will stay open is 15-23 and the range in which the door will close is 0-14. 0 means complete darkness and 23 means total brightness.
- If "Error" is displayed on the screen while in use, check the "Error Codes" table.
- If the red indicator light flashes frequently, it means that an error has occurred. Press the "MENU" button to wake up the screen and display the error code.
- If the "TIMER-TIMER" mode is used, the user may have to wait to see if the device is working properly.
- The "LIGHT-LIGHT" mode can be tested by covering the light sensor. After a few seconds, the door will begin to close. When the door is nearly closing, uncover the light sensor and the door will be raised to its original position.
- If the device is disconnected and reconnected to the power supply, the controller will remain in sleep mode for 30 minutes until the "MENU" button is pressed.
After replacing the batteries, set the current time again and save the settings.
Manually closing/opening the door
- Press and hold the "↓" button for 4 seconds - the door will close temporarily (it will open after 3 minutes).
- Press and hold the "↑" button for 4 seconds - the door will open temporarily (it will close after 3 minutes).
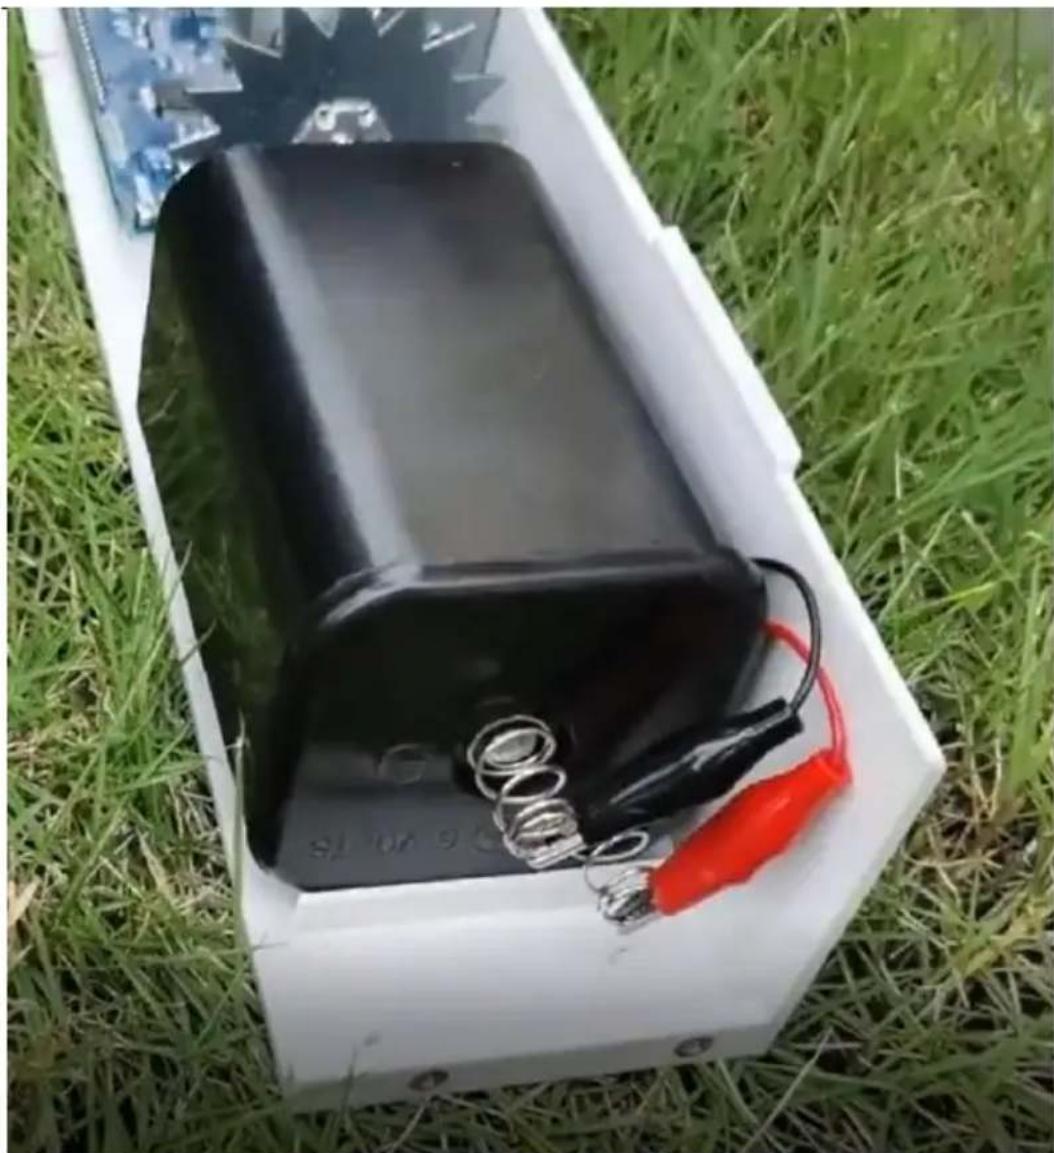
Connecting 6V/4xAA batteries
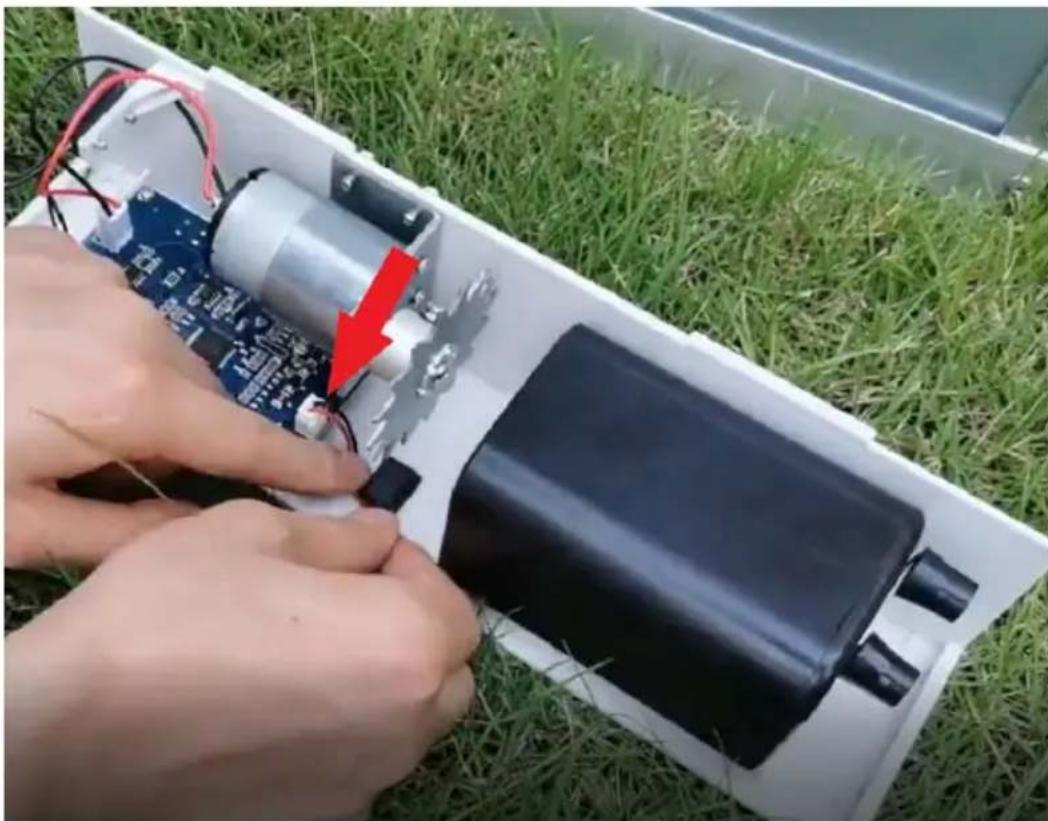
Cables for connecting to different types of batteries are included in the set. Depending on the user's choice, connect the cable plug to the PCB and the other end to the AA battery compartment or to the 6V battery (in this case, attach the terminals to the appropriate poles of the battery).
The drawings show the connection to a 6V battery (not included):
3.4. Cleaning and maintenance
a) Before cleaning the device, remove the batteries.
b) Use only non-corrosive cleaning agents for cleaning the surfaces.
c) After each cleaning, all the parts should be dried well before the unit is used again.
d) Store the unit in a dry and cool place protected from moisture and direct sunlight.
e) Do not spray the unit with a stream of water or immerse it in water.
f) Use a soft cloth for cleaning.
g) Do not leave the batteries in the unit when it will not be used for a long time.
INSTRUCTIONS FOR THE SAFE DISPOSAL OF BATTERIES.
The appliances are equipped with batteries.
Remove used batteries from the unit in the same way you put them in.
Return the batteries to a unit responsible for their disposal.
DISPOSAL OF USED UNITS.
At the end of its useful life, this product should not be disposed of with normal household waste but should be taken to a collection point for the recycling of electrical and electronic equipment. This is indicated by the symbol on the product, operating instructions or packaging. The materials used in this appliance are recyclable according to their marking. By reuse, recycling or applying other forms of use of waste machines, you make a significant contribution to the protection of our environment.
Your local administration will provide you with information about the appropriate disposal point for used appliances.
ERROR CODES:
| Error code | Screen | Reason | Solution |
| Error 1 | Panel out! | 1. Front panel | Check if the front panel is installed correctly. If not, install the front panel and screw the 4 knobs on the sides. |
| 2. The position sensor does not detect the magnet on the door | Pull out the front panel to lower the door and make sure that there are no objects at the bottom of the door that obstruct its movement. Then reinstall the panel and screw it on. | ||
| 3. The upper magnet has fallen off | Install the magnet or contact the manufacturer if a new magnet is needed. | ||
| 4. Internal position sensor error | If there is still an error after "1, 2, 3", send the unit for repairs. | ||
| 5. PCB is defective | If there is still an error after "1, 2, 3", send the unit for repairs. | ||
| Error 2 | Open Restricted | Door blocked while opening | 1. Check if the gear is not blocked. 2. Check if there are no obstacles in the guides. 3. If there are no obstructions, add some lubricant to the guides. After solving the problem, press the "MENU" button to clear the error. |
| Close Restricted | Door blocked while closing | 1. Check if there are no obstructions at the bottom of the door. 2. Check if there are no obstacles in the guides. | |
| 3. If there are no obstructions, add some lubricant to the guides. 4. Increase the degree of protection After solving the problem, press the "MENU" button to clear the error. | |||
| The top door magnet has fallen off | Reinstall the magnet, then press "MENU" to clear the error. Contact the manufacturer if a new magnet is required. | ||
| Error 3 | Work Time Out | 1. Low battery charge makes the door to open slowly | Use new batteries, then set the current time and save the settings. |
| 2. When opening the door, the gear becomes jammed, making the door to open slowly | Make sure that the gear is not blocked by any objects. After solving the problem, press the "MENU" button to clear the error. | ||
| 3. Obstacles on the guides make the door open slowly | Check if there are no obstacles on the guides. If necessary, add some lubricant to the guides. After solving the problem, press the "MENU" button to clear the error. | ||
| 4. The top door magnet has fallen off | Pull out the front panel and reinstall the magnet, then press the "MENU" button. Contact the manufacturer if a new magnet is required. | ||
| Error 4 | Motor Error! | The motor is not working properly | 1. Check if the motor cables are in good condition and if all plugs are connected. 2. If the error persists after following all the recommendations in this table, send the device to the manufacturer's service centre. |

For the disposal of the device please consider and act according to the national and local rules and regulations.
CONTACT
expondo Polska sp. z o.o. sp. k.


- Technical data
- General Description
- CAREFULLY READ AND UNDERSTAND THIS MANUAL BEFORE STARTING THE WORK.
- Explanation of symbols
- Safety of use
- CAUTION!
- Safety in the workplace
- Personal safety
- Safe use of the device
- Instructions for use
- Product overview
- Control panel
- Preparation for operation
- Set contents
- Place of installation:
- Assembly
- Working with the device
- CURRENT TIME:
- 08:12
- 2) Mode of operation
- OPERATING MODE:
- TIMER-TIMER
- OPEN UP TIME:
- 06:00
- 4) Saving the settings
- Tips:
- Manually closing/opening the door
- Connecting 6V/4xAA batteries
- Cleaning and maintenance
- DISPOSAL OF USED UNITS.
- CONTACT
Brand : Wiesenfield
Model : WIE-CCD-100
Category : Door automation