
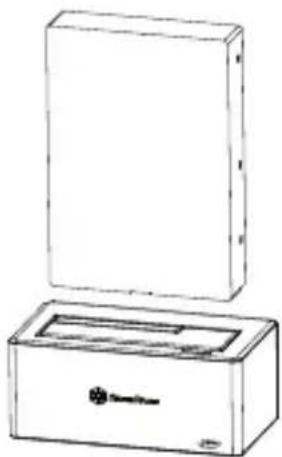
TS11-C - Hard Drive Docking Station SILVERSTONE - Free user manual and instructions
Find the device manual for free TS11-C SILVERSTONE in PDF.

| Product Type | Hard Drive Docking Station |
| Brand | SilverStone |
| Model | TS11-C |
| Interfaces | USB 3.1 Type C (host), SATA III 6 Gbit/s |
| Disk Compatibility | SATA 2.5" and 3.5" HDD/SSD, capacity >4 TB |
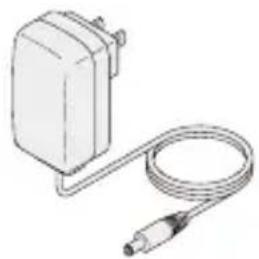
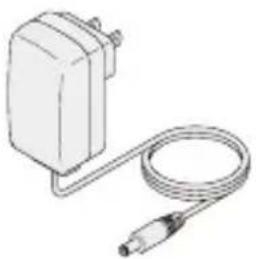
| Power Supply | 12V/2A power adapter, input 100-240V AC |
| Indicators | Blue power LED, disk activity LED (blue/red) |
| Functions | Hot-swap, UASP support, GPT format for >2 TB |
| Dimensions (approx.) | 150 x 100 x 60 mm |
| Weight (approx.) | 200 g |
| Safety | Surge protection, do not expose to moisture, disconnect during storms |
| Maintenance | Keep dry, avoid dust and solvents, temperature 5-40°C |
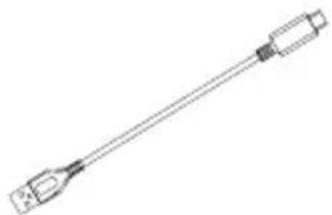
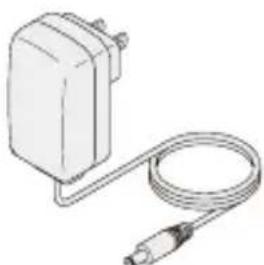
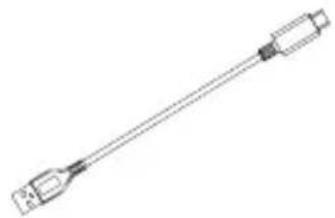
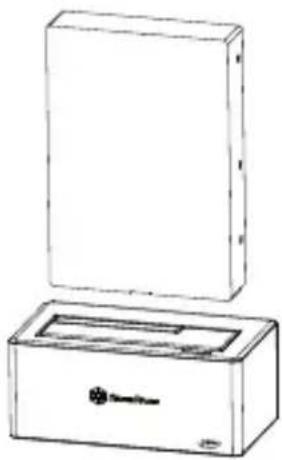
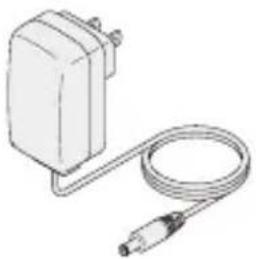
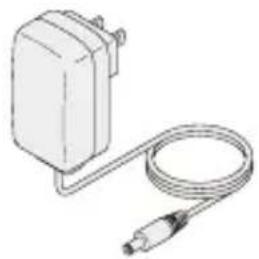
| Package Contents | TS11-C enclosure, USB 3.1 Type C to Type A cable, 12V/2A power adapter, user manual |
| Warranty | Contact SilverStone customer service |
| Insertion Cycles | Up to 10,000 cycles |
Frequently Asked Questions - TS11-C SILVERSTONE
User questions about TS11-C SILVERSTONE
0 question about this device. Answer the ones you know or ask your own.
Ask a new question about this device
Download the instructions for your Hard Drive Docking Station in PDF format for free! Find your manual TS11-C - SILVERSTONE and take your electronic device back in hand. On this page are published all the documents necessary for the use of your device. TS11-C by SILVERSTONE.
USER MANUAL TS11-C SILVERSTONE
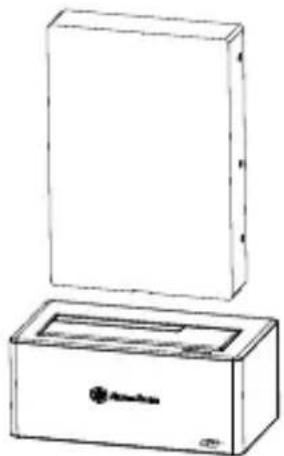
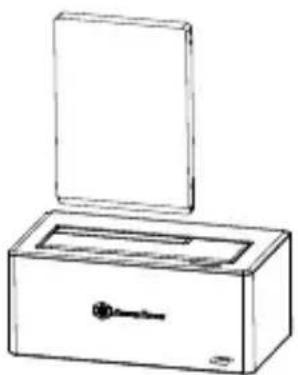
Treasure Series TS11-C
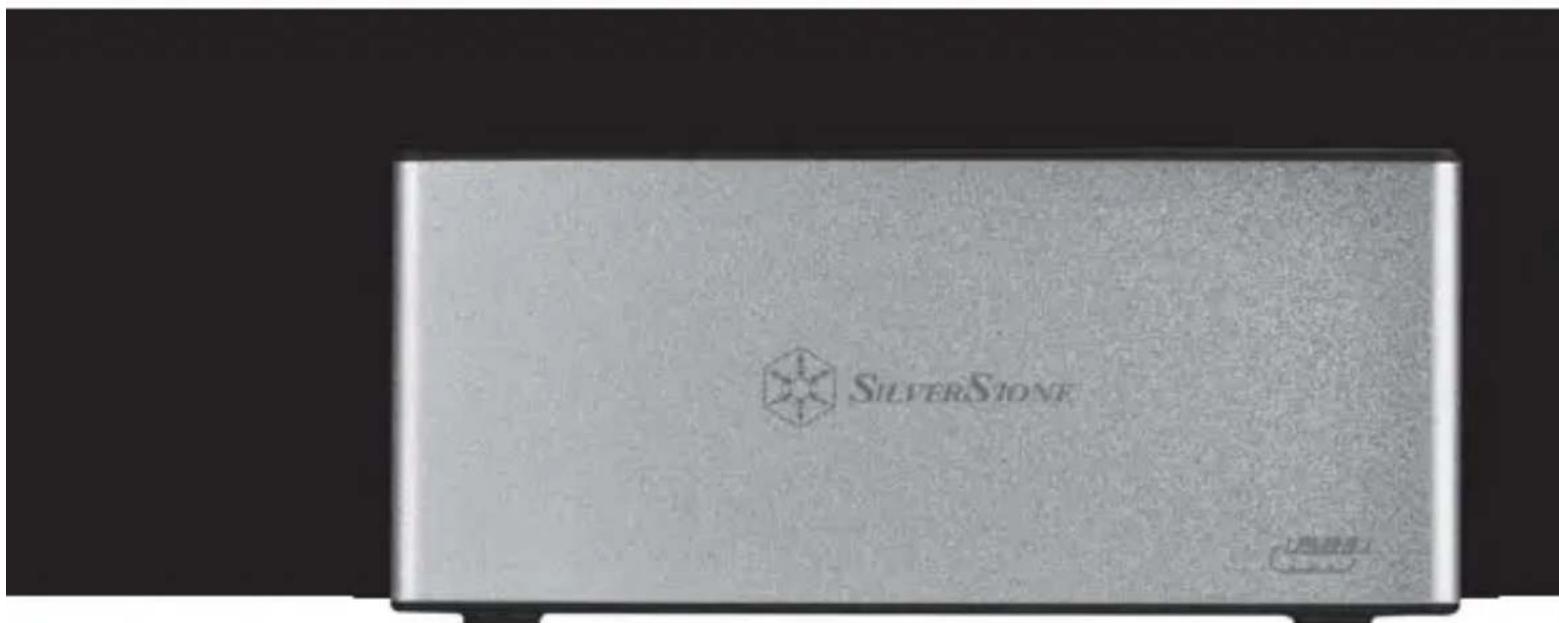
USB 3.1 Type-C 2.5" & 3.5" SATA drive docking station
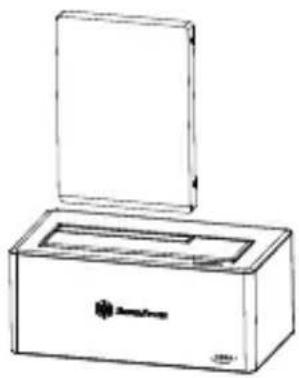
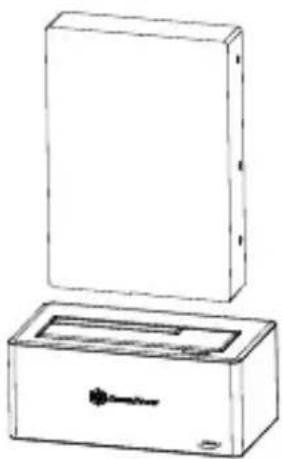
Product Overview
Introduction
SilverStone TS11-C is an external hard drive docking station made to accommodate 2.5" or 3.5" drive at speeds up to 10Gb/s with its USB 3.1
Gen2 capability and Type-C connector. This plug and play device is easy to setup and with its tray-less design, a user can quickly hot-swap drives on it in no time. For enthusiasts or professionals requiring even greater performance, the TS11-C is also equipped with UASP
(USB Attached SCSI Protocol) so those with computers that support it can take their data transfer rate up another level.
natural_image
Exterior view of a silver and black electronic device labeled 'SilverSieve' (no additional text or symbols visible)Specifications
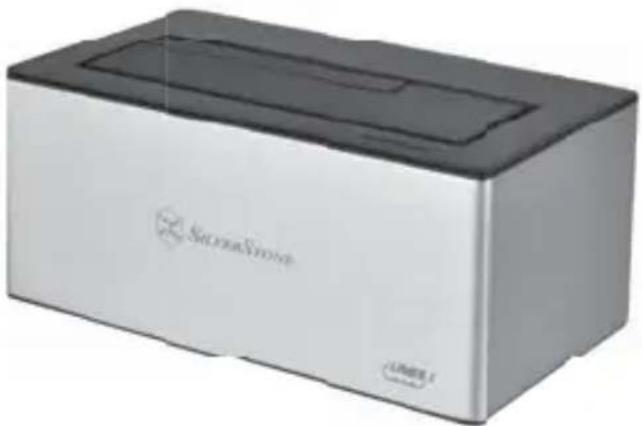
| Model | SST-TS11G-C |
| Material | Aluminum body with plastic-ABS cover |
| Chipset | ASM1351 |
| Color | Gold |
| Connector | USB 3.1 Type-C to Type-A connector |
| Data Transfer rate | USB 3.1 Gen2 up to 10Gbps (Compatible with USB 3.0 / 2.0 / 1.1) |
| LED Indicator | Power LED: Blue for power onRed light flashing: Read and write |
| Driver interface support | SATA I / II / III |
| Support Operating system | Microsoft Windows 7 (32bit/64bit)*, 8/8.1/10 (32bit/64bit)** or future release versionMac OS 10.5*** or above |
| Environment | Operating Temperature: 5°C ~ 35°COperating Humidity: 20%RH ~ 80%RHSstorage Temperature: -20°C ~ 50°CStorage Humidity: 20%RH ~ 80%RH |
| Net Weight | 990g ± 20g |
| Dimension | 72mm (W) x 55mm (H) x 130mm (D) |
* If your OS version is Windows 7 or earlier, please install driver (available from SilverStone website) prior to using the TS11-C.
** Windows 8 or 8.1, 10 supports TS11-C automatically so you do not need to install additional driver for it.
*** User should check for XHCI function in Mac OS, if computer system supports XHCI function then it can support TS11-C automatically without additional driver installation.
Instruction
EN
Foreword
Thank you for purchasing TS11-C docking station from SilverStone. Before using this product, please read the instructions carefully.
Safety Precautions
Please read the safety precautions for proper usage.
- Observe the safety precautions and warning signs to prevent damage to life.
■ The degree of harm and damage is divided into the following categories.
Caution
■ Smoke, burnt odor, unusual noise
Please turn the power off, unplug the power cable, and contact our customer support.
■ Do not disassemble or modify this product as it may cause hardware damage.
- Keep dry.
Failure to observe this precaution could result in fire or electric shock.
■ Do not expose the product to flame or to excessive heat.
■ Do not place the product on unstable surface.
If the product is dropped, it may cause equipment damage.
■ Please observe the voltage requirements.
This product's voltage range is AC 100\~240V, exceeding the specified voltage will cause fire, electric shock or malfunction.
- Do not damage, modify, or forcibly tug or bend the power cable. Do not place it under heavy objects or expose it to heat or flame.
■ Do not touch the power plug during lightning strike.
It may cause electric shock or fire.
■ Do not handle the plug or charger with wet hands.
Failure to observe this precaution could result in electric shock.
Warning
■ Please keep away from kitchen, stove, and any place with smoke and fumes.
■ Please keep away from bathroom, green house, or any place with very high humidity.
- Please keep away from the heat and the place under 5°C or up to 40°C.
■ Please keep away from organic solvent, corrosive gas.
- Please keep away from metal powder, grinding material, wheat meal, chemicals and dust.
■ Please keep away from direct sun light.
■ Please remove power cable when not in use.
Notes
■ Do not install any system which does not support USB 3.1 / 3.0 / 2.0
■ SilverStone will not be responsible for damages caused by electric main or grid.
This product is for 3.5"/2.5"SATA HDD/SSD, not for PATA (IDE) HDD/SSD.
Attention
■ We are not obligated to notify you of updates to the manual.
If there's any question, please contact SilverStone customer service.
■ We are not responsible for lost or damaged data so please backup whenever possible.
■ Mac is the registered trademark of Apple Inc.
■ We are not obligated to notify you of updates to the specifications.
■ Beware of static electricity when you connect HDD/SSD and keep it away from water.
Package Content
natural_image
Line drawing of a USB cable with two connectors (no text or symbols)TS11-C enclosure USB 3.1 Type- C to Type- A cable
natural_image
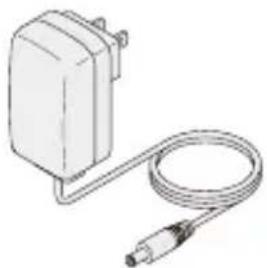
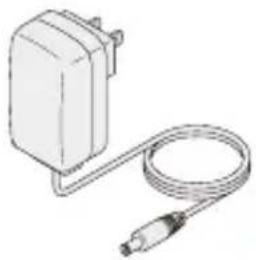
Illustration of a white electric shock absorber with a coiled cable and connector (no text or symbols)Power Adapter (12V/2A) User manual

natural_image
Simple line drawing of a document with two horizontal lines, no text or symbols present.• Product Description
Application for 3.5" /2.5"SATA HDD/SSD (SATA III 6Gbps /SATA II 3.0Gbps /SATA I 1.5Gbps)
■ This product is designed for SATA HDD/SSD only and is not applicable for PATA(IDE) based HDD.
This product supports SATA 6Gbps SATA HDD/SSD. If the HDD only supports SATA II 3.0Gbps, the transfer speed will be limited to 3.0Gbps
This product can support hard drives with more than 4TB capacity.
■ Windows XP operating system limits HDD capacity to 2TB.
- Loading / Removing hard drive may cause slight scratching.
■ When USB 3.0 adapter is used, proper connections is not guaranteed.
■ PowerPC Macintosh with CPU at 2GHz and memory at 1GB may not work properly.
The following USB Host controller models have been validated.
Intel H87 chipset USB 3.0 host controller
■ ETron EJ168 USB 3.0 host controller
Intel Z77 chipset USB 3.0 host controller
Intel Z77 chipset USB 3.0 host controller
■ ASMedia ASM1042 USB 3.0 host controller
■ Frescologic FL1100 USB 3.0 host controller
■ ASMedia ASM1142 USB 3.1 host controller
※ Please update each host controller (adapter) driver to the latest version.
Instruction
EN
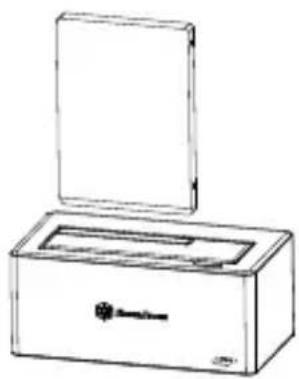
Appearance
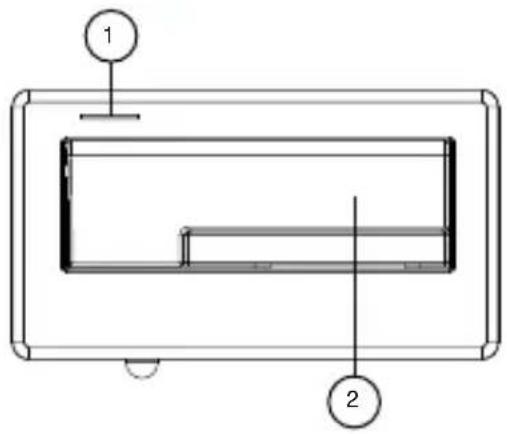
(Upper)
1. Power indicator/ HDD indicator
2. 3.5"or 2.5" HDD/SDD slot
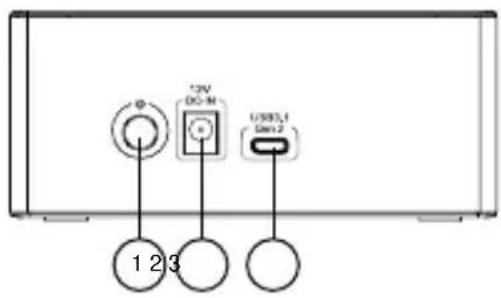
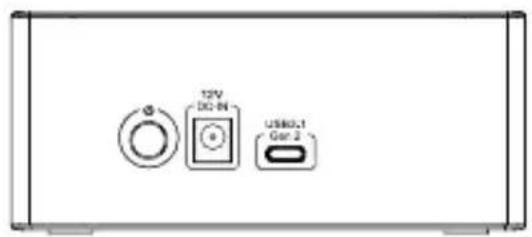
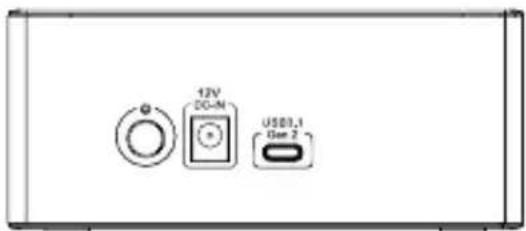
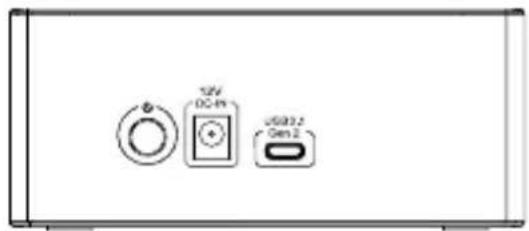
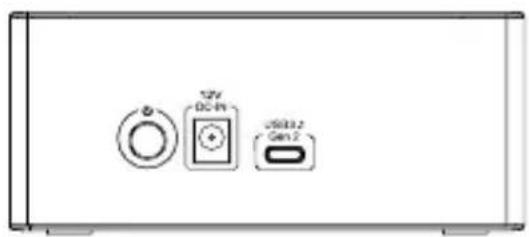
(Back)
1. Power Button
2. Power supply host connector
3. USB 3.1 Type-C host connector.
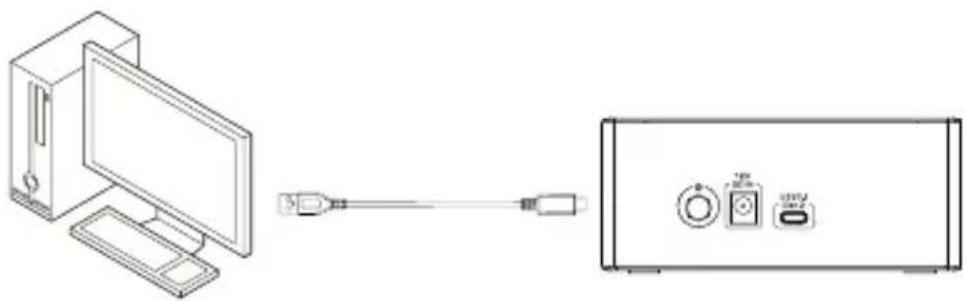
Installation Guide
-
When mounting a hard drive, please be mindful of static electricity as it can cause device malfunction. Please touch other metal objects to discharge or wear antistatic gloves before handling hard drive.
■ If hard drive already contains data, please backup it up before installation to prevent data loss. -
Connect USB cable to the computer
natural_image
Line drawing of a desktop computer connected to a device via cable (no text or symbols)- Connected the power adapter
natural_image
Illustration of a portable electronic device with a coiled cable and connector (no text or symbols)
natural_image
Simple diagram showing three circular icons with labels: a ring, a square, and a rectangular block (no text or symbols)- Insert hard drive to the hard drive slot

natural_image
Line drawing of a rectangular box with an open lid and internal compartments (no text or symbols)2.5"HDD
natural_image
Line drawing of a rectangular box with a lid and base, no text or symbols present3.5"HDD
- Press the power button to boot up

Caution
EN
Troubleshooting
If a suspected case of failure occurs, please check for the following:
■ Device cannot be identified.
Please check
■ Are power and signal cable connected correctly?
■ Is the blue power LED lit?
■ Is the driver installed correctly?
■ Is the latest driver version installed?
■ Does eSATA used support Port Multiplier?
■ Are you running Windows XP whilst trying to use drive with over 2TB capacity? (Windows XP can't identify drives over 2TB capacity.)
■ When using a PC or Mac system, it cannot wake from hibernation?
This product does not support PC or Mac Hibernation mode, so please remove or disconnect this product before entering hibernation.
■ My device is recognized as USB 2.0, not USB 3.0.
Try to power off your computer and connect the cable again.
■ Only 2TB capacity can be identified when using a drive over 2TB (Windows Vista/7/8/10)?
Please use GPT format for over 2TB capacity.
■ When connected as a USB 3.0 device, my system cannot recognize it after a period of time?
Please update the USB 3.0 driver.
■ Why some drives don't show up in "My Computer" (Windows)?
Make sure the hard disk letter is assigned in C \~ Z range.
■ When using a new drive, it cannot be recognized by my OS?
Please format the drive.
■ When using a 2TB drive, the capacity in the OS only shows 1.8TB?
Most hard drive manufacturers use decimal, but the OS uses duodecimal to calculate drive capacity.
Due to different calculation methods, you will see 200GB less capacity on a 2TB drive.
Caution
EN
FAQ
Q : Can I use drives that already have existing data?
A : Mostly yes, but depending on the environment in which the drive was previously used, there may be incompatibility, so to avoid unpredictable data loss, please backup first before using it in TS11-C.
Q : Does this product support hot plug?
A: Yes.
Q : What kinds of hard drives are supported ?
A : The product can support 2.5" and 3.5" SATA HDD/SSD, but not IDE, SAS, SCSI HDD.
Q : How many drive insertion cycles can TS11-C withstand?
A : This product's SATA connector durability is rated up to 10,000 cycles.
Q : Can TS11-C be used in horizontal position?
A : No.
Q : Why does the status LED blink blue and red when drive is not being used? Is it normal?
A : A program in your computer may be active in the background (anti-virus, software update) and the LED will show active status.
Q : Why does disk format take so much time in Windows?
A : You can select quick format when performing the format function.
Q: Why can't my drive access S.M.A.R.T information?
A : This product does not support S.M.A.R.T function.
Q: Do I need to install the driver on Windows 8 or 10?
A: No, you only need to install driver on Windows 7 or previous versions.
Q : Does TS11-C support USAP function?
A: Yes, but your system also needs to support USAP for it to work.
Einleitung
DE
Vorwort
natural_image
Line drawing of a USB cable with two connectors (no text or symbols)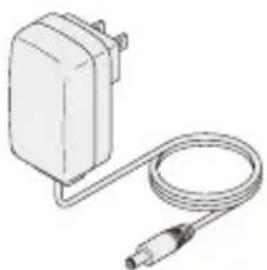
natural_image
Illustration of a small electric motor connected to a cable (no text or symbols visible)natural_image
Simple line drawing of a closed book with three horizontal lines on top (no text or symbols)natural_image
Line drawing of a computer connected to a device via cable (no text or symbols)Einleitung
DE
natural_image
Illustration of a connected electrical plug with a coiled cable (no text or symbols)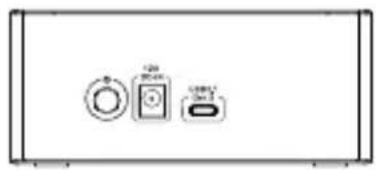
natural_image
Pure electrical circuit lines without any symbolsnatural_image
Line drawing of a closed storage box with lid and handle (no text or symbols)
natural_image
Line drawing of a rectangular box with a lid and top panel, no text or symbols presentAchtung
DE
Problemlösung
natural_image
Line drawing of a mechanical tool or connector with a long handle and flange (no text or symbols)Carcasa TS11-C Cable USB 3.1 Tipo-C a Tipo-A
natural_image
Line drawing of a small electrical adapter connected to a coiled cable (no text or symbols)
natural_image
Simple line drawing of a blank document or paper sheet with three horizontal lines (no text or symbols)natural_image
Line drawing of a desktop computer connected to a device via cable (no text or symbols)natural_image
Illustration of a small electronic device connected to a coiled cable (no text or symbols visible)
natural_image
Simple line drawing of a refrigerator front panel with three buttons (no text or symbols)- Insert hard drive to the hard drive slot
natural_image
Line drawing of a rectangular box with an open lid and internal compartments (no text or symbols)2.5"HDD

natural_image
Line drawing of a rectangular box with an open top, containing a small internal object (no text or symbols)3.5"HDD
- Press the power button to boot up
ATENCIÓN
ES
natural_image
Line drawing of a mechanical tool or probe with a pointed tip and two protruding ends (no text or symbols)natural_image
Illustration of a rectangular device connected to a coiled cable with a terminal connector (no text or symbols)
natural_image
Simple line drawing of a blank document with three horizontal lines, no text or symbols present.natural_image
Line drawing of a computer connected to a device via cable (no text or symbols)natural_image
Illustration of a small electronic device connected to a coiled cable (no text or symbols visible)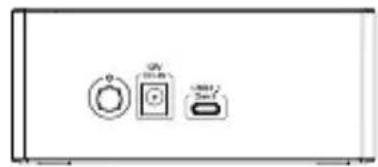
natural_image
Simple line drawing of a three-pin electronic device with circular and rectangular buttons (no text or symbols)natural_image
Line drawing of a rectangular box with an open lid and internal compartments (no text or symbols)2.5"HDD
natural_image
Line drawing of a rectangular box with an open top, containing a small internal object and a small symbol on the base (no text or labels)3.5"HDD
natural_image
Line drawing of a USB cable with connector port (no text or symbols)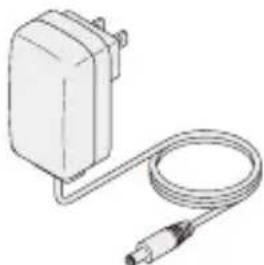
natural_image
Line drawing of a white electrical adapter with a coiled cable (no text or symbols)natural_image
Simple line drawing of a document with three horizontal lines, no text or symbols present.-
Power Button
-
Power supply host connector
-
USB 3.1 Type-C host connector.
natural_image
Line drawing showing a computer monitor connected to a USB cable and a device with ports (no text or symbols)natural_image
Illustration of a small electronic device connected to a coiled cable (no text or symbols visible)
natural_image
Simple line drawing of a three-pin electronic device with circular and rectangular buttons (no text or symbols)natural_image
Line drawing of a rectangular box with an open lid and internal compartments (no text or symbols)2.5"HDD

natural_image
Line drawing of a rectangular box with an open top and a smaller internal component, no text or symbols present.3.5"HDD
- Press the power button to boot up

Attenzione
IT
natural_image
Illustration of a small electric motor connected to a cable with a terminal connector (no text or symbols)natural_image
Line drawing of a mechanical tool or connector with a pointed tip and rectangular body (no text or symbols)natural_image
Simple line drawing of a blank document or paper sheet with three horizontal lines (no text or symbols)(Back)
1. Power Button
2. Power supply host connector
3. USB 3.1 Type-C host connector.
natural_image
Line drawing of a desktop computer connected to a device via cable (no text or symbols)natural_image
Illustration of a small electric power adapter connected to a coiled cable (no text or symbols)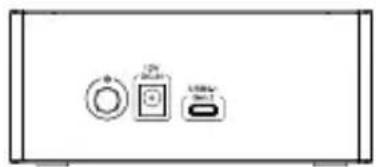
natural_image
Simple line drawing of three electronic components: a circular switch, a square button, and a rectangular device (no text or symbols)natural_image
Line drawing of a box with an open lid and a logo on the front face (no text or symbols on the main body)natural_image
Line drawing of a rectangular box with a lid and a smaller base (no text or symbols)natural_image
Line drawing of a medical or laboratory probe with a long, straight rod and two connectors (no text or symbols)natural_image
Illustration of a small electrical plug connected to a coiled cable (no text or symbols)
natural_image
Simple line drawing of a blank document with three horizontal lines, no text or symbols present.natural_image
Line drawing showing a computer monitor connected to a USB cable and a device panel (no text or symbols)紹介
JP
- 電源アダプタを接続します。
natural_image
Illustration of a small electric power adapter connected to a coiled cable (no text or symbols)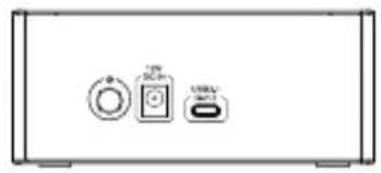
natural_image
Front view of a rectangular electronic device with three labeled ports (no text or symbols visible)natural_image
Line drawing of a box with an open lid and a small logo on the front face (no text or symbols)2.5"HDD

natural_image
Line drawing of a rectangular box with a lid and internal compartments, no text or symbols present3.5"HDD
- 電源ボタンを押して起動させます
ご注意
JP
- トラブルシューティング
natural_image
Line drawing of a mechanical tool or connector with a long handle and flange (no text or symbols)natural_image
Simple line drawing of a connected electrical plug with a cable (no text or symbols)natural_image
Simple line drawing of a blank document or paper sheet (no text or symbols)제품 설명
3.5"/2.5" SATA HDD/SSD (SATA III 6Gbps /SATA II 3.0Gbps /SATA I 1.5Gbps) 전용
natural_image
Line drawing showing a computer monitor connected to a device via cable (no text or symbols)소개
KR
- 전원 어댑터를 연결합니다
natural_image
Line drawing of a connected electrical plug with a coiled cable (no text or symbols)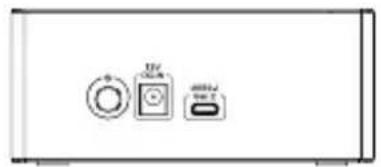
natural_image
Pure electrical circuit lines without any symbolsnatural_image
Line drawing of a closed box with an open lid and internal slot (no text or symbols)2.5"HDD
natural_image
Line drawing of a rectangular box with a lid and base, no text or symbols present3.5"HDD
- 전원 버튼을 눌러서 부팅합니다
문제 해결

natural_image
Line drawing of a handheld electronic device with a bulb and connector (no text or symbols)natural_image
Illustration of a connected electrical device with a cable (no text or symbols)變壓器 (12V/2A) 使用手冊
natural_image
Simple line drawing of a blank document with three horizontal lines (no text or symbols)產品說明
natural_image
Line drawing of a computer monitor connected to a device via cable (no text or symbols)簡介
TW
- 接上變壓器。
natural_image
Illustration of a small electrical adapter connected to a coiled cable (no text or symbols)
natural_image
Pure electrical circuit lines without any symbols- 將硬碟對準硬碟槽插入。
natural_image
Line drawing of a rectangular box with an open lid and a key inserted into the interior (no text or symbols)2.5"HDD

natural_image
Line drawing of a rectangular box with a lid and base, no text or symbols present3.5"HDD
- 按電源鍵開機。
故障排除
natural_image
Line drawing of a handheld electronic device with a pointed tip and rectangular body (no text or symbols)natural_image
Illustration of a small electronic device with a coiled cable and connector (no text or symbols)变压器(12V/2A)使用手册

natural_image
Simple line drawing of a blank document with three horizontal lines, no text or symbols present.产品说明
应用于3.5" /2.5"SATA HDD/SSD(SATA III 6Gbps /SATA II 3.0Gbps /SATA I 1.5Gbps)
natural_image
Line drawing of a computer monitor connected to a device via cable (no text or symbols)简介
CN
- 接上变压器。
natural_image
Line drawing of a small electrical plug connected to a coiled cable (no text or symbols)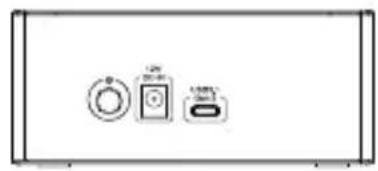
natural_image
Pure electrical circuit lines without any symbols- 将硬盘对准硬盘槽插入。
natural_image
Line drawing of a closed open box with a key inserted (no text or symbols)2.5"HDD
natural_image
Line drawing of a rectangular box with a lid and internal compartments, no text or symbols present3.5"HDD
- 按电源键开机。

注意
CN
故障排除
Programs and Features
Power Options
Event Viewer
System
Device Manager
Network Connections
Disk Management
Computer Management
Command Prompt
Command Prompt (Admin)
natural_image
Simple line drawing of a computer mouse with a curved cable (no text or symbols)ENGLISH
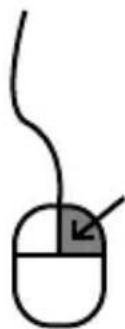
In Windows 10 / 8.1 / 8
Please right-click on the lower left corner of the Start button, select "Disk Management." (as shown in the illustration).
In Windows 7 / Vista or prior versions
Please right-click "Computer" on the Start menu, and open "Manage." (as shown in the illustration).
DEUTSCH
Unter Windows 10/8.1/8
ENGLISH
In the "Computer Management" window, select "Disk Management."
It will show disk drive as "not initialized". Please Right-click and select "Disk initialization."
DEUTSCH
ENGLISH
The window "Disk initialization" will appear. Press the OK button.
※ About partition format MBR partition formatted capacity limit is 2TB. We suggest using GPT format on disk drives with capacity of 2TB or above, but GPT may not be recognized by Windows 2000 and XP In addition, some older hardware cannot divide sectors with over 2TB capacity.
DEUTSCH
The state of disks will turn to "connection", when the "Initialization Disk" is completed. This state still cannot be used, you must create a partition and format it. Please right click the "unallocated" sector and select "New Simple Volume."
DEUTSCH
The “New Simple Volume Wizard” window will open, then press “Next”.
ENGLISH
When the "specify volume size" pop up, you can set partition size to arbitrary value.
The size is not particularly specified as the maximum capacity setting.
After the setup is complete, press "Next."
DEUTSCH
The size is not particularly specified as the maximum capacity setting.
After the setup is complete, press "Next."
ITALIANO
ENGLISH
In the "assigned drive letter and path" window.
- Assign drive letter. Drive letter is usually done in alphabets starting with letter C, if not specified, it will be assigned in alphabetical order.
- Do not select "hanging in the following empty NTFS folder" and "does not assign a drive letter or drive path" under normal circumstances.
※ When selecting these options, please refer to your Windows documentation or other related materials.
■ Press "Next."
DEUTSCH
ENGLISH
The "Format Partition" window.
■ For "File System", choose NTFS. Please do not use other file format.
- You can specify the size of the allocation unit size when configuring partition. If you don't need to specify, then please select default volume. Set the name of volume for display in "My Computer".
- Check this option to perform a quick format, it will perform a quick format.
■ Boot files and Compression folders.
Check this option to enable file and folder compression.
You can increase available drive capacity with this option, but drive speed will be lower than with no compression. When setup is complete, press "Next."
DEUTSCH
ENGLISH
"Completing the New Simple Volume Wizard" window. If settings are correct, press Finish and formatting will begin.
DEUTSCH
When formatting, disk window will display the format condition. After formatting is complete, this disk icon will appear in "My Computer".
Now you can start using the formatted drive.
DEUTSCH
■ While in the formatting process, a warning window will appear but it does not mean formatting has failed.
■ While in the formatting process, please do not power off the PC, power off the docking station, unplug cables, or turn off Windows, etc...
DEUTSCH
Open the "Disk Utility." ※ "Disk Utility" in the "Applications" "Utilities" folder.
The left column displays the disks that can be formatted, this docking will be displayed as "Xx GB (HDD / SSD capacity) Media."
Click to format it.
DEUTSCH
ENGLISH
The disk information will show on this page.
DEUTSCH
Click the "Partition." You can change the partition setting.
DEUTSCH
Are you sure you want to partition the disk "JMicron Generic DISK03 Media"?
Partitioning this disk will change one of the partitions. No partitions will be erased.
This partition will be added: "Untitled 1"
Cancel
Partition
ENGLISH
Click the lower right corner "Apply" after setting.
The warning window wills popup.
Click "Partition" to confirm. If not, click "Cancel."
DEUTSCH
natural_image
Gray USB switch icon with 'Untitled 1' text below (no other symbols or text)ENGLISH
The disk partition will appear on the desktop.
DEUTSCH
Warranty Information
This product has a limited 1 year warranty in North America and Australia.
For information on warranty periods in other regions, please contact your reseller or SilverStone authorized distributor.
Warranty terms & conditions
- Product component defects or damages resulted from defective production is covered under warranty.
Defects or damages with the following conditions will be fixed or replaced under SilverStone Technology's jurisdiction.
a) Usage in accordance with instructions provided in this manual, with no misuse, overuse, or other inappropriate actions.
b) Damage not caused by natural disaster (thunder, fire, earthquake, flood, salt, wind, insect, animals, etc...)
c) Product is not disassembled, modified, or fixed. Components not disassembled or replaced.
d) Warranty mark/stickers are not removed or broken.
Loss or damages resulted from conditions other than ones listed above are not covered under warranty. - Under warranty, SilverStone Technology's maximum liability is limited to the current market value for the product (depreciated value, excluding shipping, handling, and other fees). SilverStone Technology is not responsible for other damages or loss associated with the use of product.
- Under warranty, SilverStone Technology is obligated to repair or replace its defective products. Under no circumstances will SilverStone Technology be liable for damages in connection with the sale, purchase, or use including but not limited to loss of data, loss of business, loss of profits, loss of use of the product or incidental or consequential damage whether or not foreseeable and whether or not based on breach of warranty, contract or negligence, even if SilverStone Technology has been advised of the possibility of such damages.
- Warranty covers only the original purchaser through authorized SilverStone distributors and resellers and is not transferable to a second hand purchaser.
- You must provide sales receipt or invoice with clear indication of purchase date to determine warranty eligibility.
- If a problem develops during the warranty period, please contact your retailer/reseller/SilverStone authorized distributors or SilverStone http://www.silverstonetek.com.
Please note that: (i) You must provide proof of original purchase of the product by a dated itemized receipt; (ii) You shall bear the cost of shipping (or otherwise transporting) the product to SilverStone authorized distributors, SilverStone authorized distributors will bear the cost of shipping (or otherwise transporting) the product back to you after completing the warranty service; (iii) Before you send the product, you must be issued a Return Merchandise Authorization ("RMA") number from SilverStone. Updated warranty information will be posted on SilverStone's official website. Please visit http://www.silverstonetek.com for the latest updates.
Additional info & contacts
For North America (usasupport@silverstanetek.com)
SilverStone Technology in North America may repair or replace defective product with refurbished product that is not new but has been functionally tested.
Replacement product will be warranted for remainder of the warranty period or thirty days, whichever is longer. All products should be sent back to the place of purchase if it is within 30 days of purchase, after 30 days, customers need to initiate RMA procedure with SilverStone Technology in USA by first downloading the "USA RMA form for end-users" form from the below link and follow its instructions.
http://silverstonetek.com/contactus.php
For Australia only (support@silverstonetek.com)
Our goods come with guarantees that cannot be excluded under the Australian Consumer Law.
You are entitled to a replacement or refund for a major failure and for compensation for any other reasonably foreseeable loss or damage.
You are also entitled to have the goods repaired or replaced if the goods fail to be of acceptable quality and the failure does not amount to a major failure.
Please refer to above "Warranty terms & conditions" for further warranty details.
SilverStone Technology Co., Ltd. 12F No. 168 Jiankang Rd., Zhonghe Dist., New Taipei City 235 Taiwan R.O.C. + 886-2-8228-1238
(standard international call charges apply)
For Europe (support.eu@silverstonetek.de)
For all other regions (support@silverstonetek.com)
SilverStone Technology Co., Ltd.
www.silverstonetek.com
support@silverstonetek.com
NO: G11225200