
NY2009-20MRE - Heating MIDEA - Free user manual and instructions
Find the device manual for free NY2009-20MRE MIDEA in PDF.

| Product type | Oil-filled radiator |
| Brand | Midea |
| Model | NY2009-20MRE |
| Nominal power | 800 W (0.8 kW) |
| Minimum power | 700 W (0.7 kW) |
| Maximum power | 800 W (0.8 kW) |
| Power supply | 220-240 V ~50 Hz |
| Number of power levels | 3 (high, medium, low) |
| Thermostat type | Electronic with room temperature control |
| Timer | Yes, from 0 to 24 hours |
| Remote control | Yes |
| Overheat protection | Yes (triggers at 50 °C) |
| Automatic shutdown | Yes (via timer) |
| Thermal fluid | Special oil (exact quantity) |
| Recommended use | Well-insulated spaces or occasional use |
| Cleaning | Soft, damp cloth, no abrasives |
| Maintenance | Do not use hard tools to avoid damaging the paint |
| Repairability | Service reserved for manufacturer or authorized agent for opening the oil tank |
| Included accessories | Remote control, casters (mounting kit) |
| Standby consumption | 0 W (according to technical data sheet) |
Frequently Asked Questions - NY2009-20MRE MIDEA
User questions about NY2009-20MRE MIDEA
0 question about this device. Answer the ones you know or ask your own.
Ask a new question about this device
Download the instructions for your Heating in PDF format for free! Find your manual NY2009-20MRE - MIDEA and take your electronic device back in hand. On this page are published all the documents necessary for the use of your device. NY2009-20MRE by MIDEA.
USER MANUAL NY2009-20MRE MIDEA
natural_image
Simple line drawing of a remote control with buttons and a plus/minus mark (no text or symbols)
natural_image
Line drawing of a multi-tiered solar power heater with wheels and ventilation slots (no text or symbols)
natural_image
Simple line drawing of a remote control with no text or symbolsnatural_image
Front view of a remote control with buttons and a plus/minus function (no text or symbols beyond basic icons)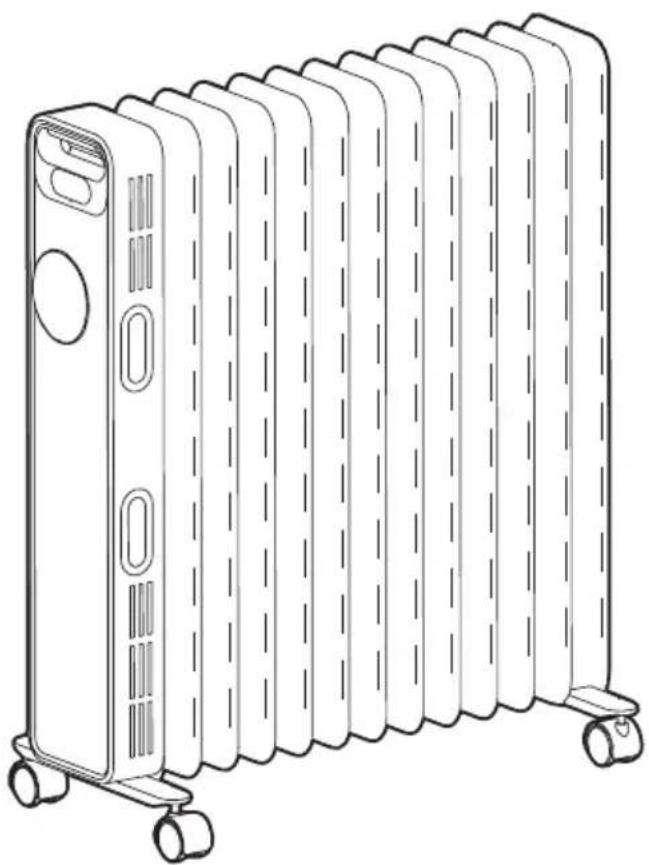
natural_image
Line drawing of a multi-tiered solar power heater with wheels and ventilation slots (no text or symbols)This product is only suitable for well insulated spaces or occasional use.
READ AND SAVE THESE INSTRUCTIONS
Attention: Pictures in the IM are for reference only.
SAFETY INSTRUCTION
1.
Warning: In order to avoid overheating, do not cover the heater.
- If the supply cord is damaged, it must be replaced by the manufacturer or its service agent or a similarly qualified person in order to avoid a hazard.
- This appliance can be used by children aged from 8 years and above and persons with reduced physical, sensory or mental capabilities or lack of experience and knowledge if they have been given supervision or instruction concerning use of the appliance in a safe way and understand the hazards involved. Children shall not play with the appliance. Cleaning and user maintenance shall not be made by children without supervision.
- The heater must not be located immediately below a socket-outlet.
- Do not use this heater in the immediate surroundings of a bath, a shower or a swimming pool.
-
Children of less than 3 years should be kept away unless continuously supervised. Children aged from 3 years and less than 8 years shall only switch on/off the appliance provided that it has been placed or installed in its intended normal operating position and they have been given supervision or instruction concerning use of the appliance in a safe way and understand the hazards involved. Children aged from 3 years and less than 8 years shall not plug in, regulate and clean the appliance or perform user maintenance.
-
CAUTION — Some parts of this product can become very hot and cause burns. Particular attention has to be given where children and vulnerable people are present.
-
This heater is filled with a precise quantity of special oil. Repairs re-quiring opening of oil-container are only to be made by the manufac-turer or his service agent who should be contacted if there is an oil leak. When scrapping the heater, follow the regulations concerning the disposal of oil.
-
Correct Disposal of this product This marking indicates that this product should not be disposed with other household wastes throughout the EU. To prevent possible harm to the environment or human health from uncontrolled waste disposal, re-cycle it responsibly to promote the sustainable reuse of material re-sources. To return your used device, please use the return and collection systems or contact the retailer where the product was purchased. They can take this product for environmental safe recycling.
-
This heater cannot achieve accurate temperature control of the environment, and thus cannot be used as insulation device for storage environment, items, animals and plants.
PART FIGURE
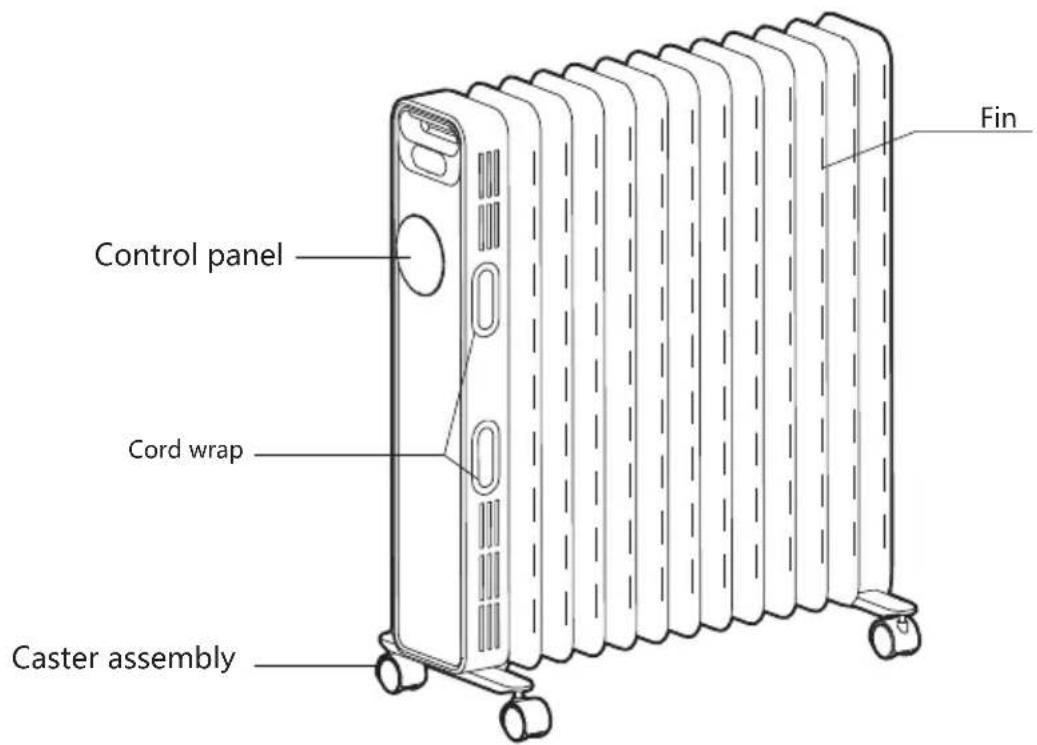
Use of oil filled radiator
1, Turn the heater upside down.
2. As shown in figure 1, align the mounting hole of a set of caster assembly and install it on the screw of the caster pad plate at the end of the radiator fin, and The other caster assembly is aligned to the screws mounted at the bottom of the control box.
3, As shown in figure 2, two sets of caster components are tightened with four butterfly nuts. Install solid and then put the heater in place-just put the wheels on the ground.
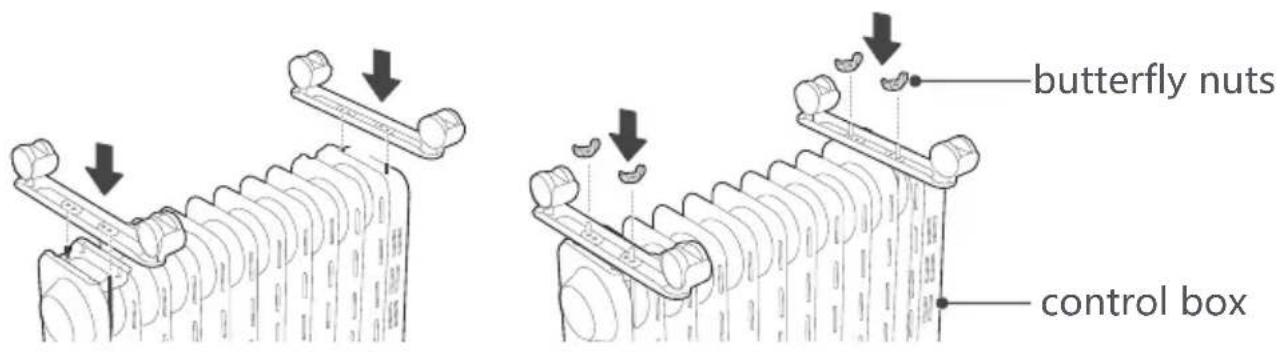
figure 1 figure 2
[Inspection before start]
- The power cord shall not be damaged or fractured.
- Please verify the rated current of the power socket is in line with the requirements in the table above and is equipped with a safety grounding device before use; otherwise, replace the socket.
[Operating Instructions]
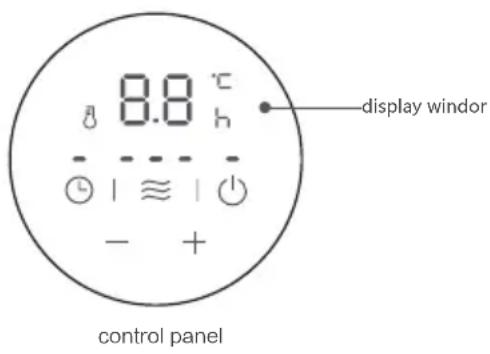
A: the scope of scheduling is for 0\~24hours, and press" + "key or" - "key each time to increase or decrease 1 hour. When the set value is 0H, press the" - "key to set the time for 24H. When the set value is 24H, press the" + "key, and the setting time is 0H. When the set value is 0H, the scheduling is canceled. When the set value is not 0H, the scheduling is started. Set the appointment time, press the timing key" "key or " ≈ "key, or without operation for 5 seconds, exit scheduling mode.
B: If the scheduling time isset, press the power button "☐" to enter the standby state and cancel the scheduling.
C: After the scheduling is started, press the scheduling key "to check the remaining time of the appointment and reset the scheduling time. During the scheduled time, the machine is shut down or started up under temperature control, and the scheduled time is always normal, and free from down time. During the scheduled time, it is cleared in case of power failure.
[Note]
To use the machine for the first time or to re-insert the socket, please pay attention to check whether the plug and the socket are fitted well.
Insert the power plug into the socket and start for use; after about half an hour, turn off and pull out the plug. Check whether the plug pins are hot; replace the socket if so (more than about 50 °C) to avoid burning the plug or even causing a fire caused by overheating of the socket due to poor contact.
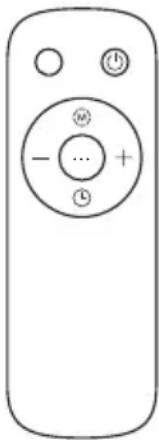
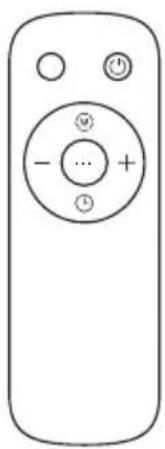
USING THE REMOTE CONTROL
Instructions for remote-control unit Button function are basically consistent with the operation panel of the body, and the remote-control unit cannot control the combination key.
| ON/OFF key | |
| Function key | |
| + | “+” key |
| - | “-” key |
| Timer key |
natural_image
Line drawing of a remote control with no text or symbols| Table for information requirements for electric local space heaters | |||||
| Model identifier(s): NY2009-20MR | |||||
| Item | Symbol | Value | Unit | Item | Unit |
| Heat output | Type of heat input, for electric local space heaters only (select one) | ||||
| Nominal heat output | Pnom | 0.8 | kW | Manual heat charge control with integrated thermostat | [no] |
| Minimum heat output (indicative) | Pmin | 0.7 | kW | Manual heat charge control with room and/or outdoor temperature feedback | [no] |
| Maximum continuous heat output | Pmax | 0.8 | kW | Electronic heat charge control with room and/or outdoor temperature feedback | [no] |
| Auxiliary electricity consumption | Fan assisted heat output | [no] | |||
| At nominal heat output | elmax | 0.000 | kW | Type of heat output/room temperature control (select one) | |
| At minimum heat output | elmin | 0.000 | kW | Single stage heat output and no room temperature control | [no] |
| In standby mode | eISB | 0.000* | W | Two or more manual stages, no room temperature control | [no] |
| With mechanic thermostat room temperature control | [no] | ||||
| With electronic room temperature control | [yes] | ||||
| Electronic room temperature control plus day timer | [no] | ||||
| Electronic room temperature control plus week timer | [no] | ||||
| Other control options (multiple selections possible) | |||||
| Room temperature control, with presence detection | [no] | ||||
| Room temperature control, with open window detection | [no] | ||||
| With distance control option | [no] | ||||
| With adaptive start control | [no] | ||||
| With working time limitation | [yes] | ||||
| With black bulb sensor | [no] | ||||
| Contact details: | Midea Italia S.r.l.Via Lazzaroni 5, 21047 Saronno (VA) | ||||
| Remark:For electric local space heaters, the measured seasonal space heating energy efficiency ηs cannot be worse than the declared value at the nominal heat output of the unit. | |||||
| The seasonal space heating energy efficiency of all local space heaters except commercial local space heaters, ηs (%) | 36 | ||||
CLEANING AND MAINTENANCE INSTRUCTION
- The electric heater should be cleaned regularly to wipe out the dust on the surface of flanges. As this may influence the radiating efficiency.
- Disconnect electricity supply and allow radiator to cool, wipe out dust with a soft damp cloth. Do not use detergent or abrasives.
- Do not scrap the surfaces of flanges with sharp hard tools, to avoid surfaces getting rusty, because of damage of the paint coat.
Midea
使用说明书
油汀
产品型号
NY2009-20MR
natural_image
Line drawing of a remote control with buttons and a plus/minus function (no text or symbols)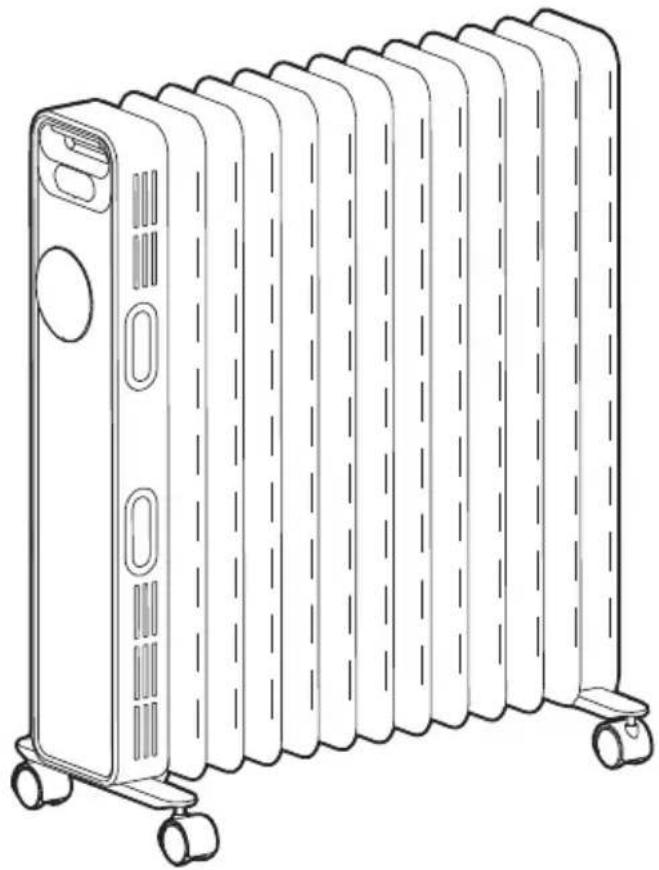
natural_image
Line drawing of a multi-tiered solar power heater with wheels and ventilation slots (no text or symbols)本产品仅适用于绝缘良好的空间或偶尔使用
natural_image
Simple line drawing of a remote control with buttons and a plus/minus function (no text or symbols)natural_image
Line drawing of a right-hand electrical heater with a remote control panel (no text or symbols)natural_image
Simple line drawing of a remote control with no text or symbolsnatural_image
Simple line drawing of a remote control with buttons and a plus/minus mark (no text or symbols)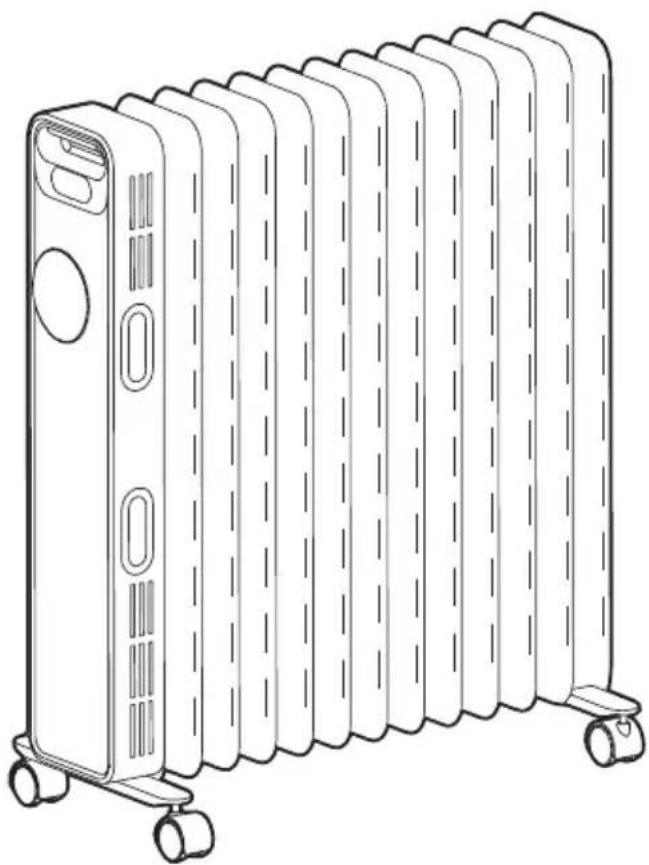
natural_image
Line drawing of a multi-tiered solar power heater with wheels and ventilation slots (no text or symbols)Panel de control
UTILICE EL CONTROL REMOTO
natural_image
Simple line drawing of a remote control with no text or symbolsnatural_image
Simple line drawing of a remote control with buttons and a plus/minus function (no text or symbols)
natural_image
Line drawing of a multi-tiered solar power heater with wheels and ventilation slots (no text or symbols)natural_image
Simple line drawing of a remote control with buttons and a plus/minus sign (no text or symbols beyond basic electrical symbols)natural_image
Front view of a remote control with buttons and a plus/minus icon (no text or symbols)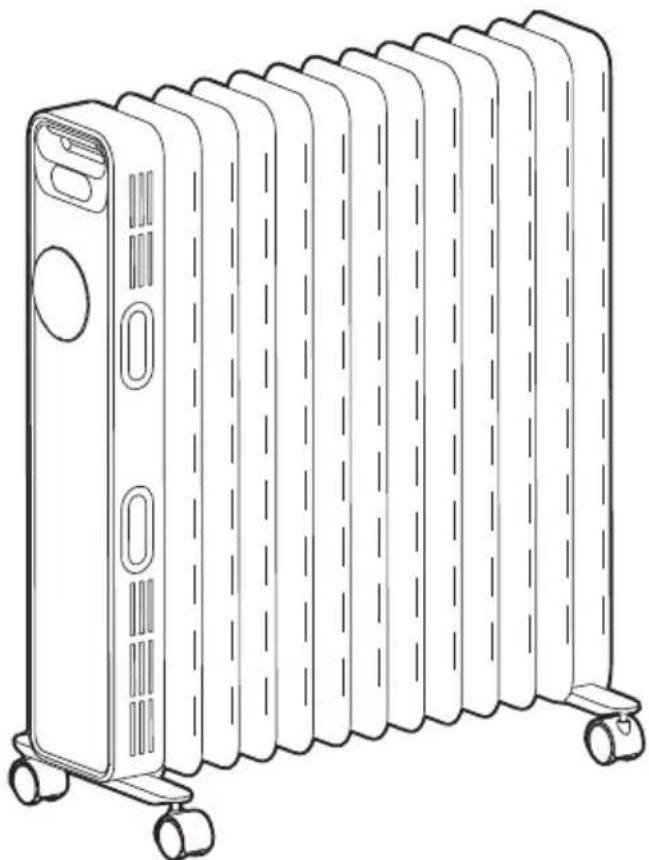
natural_image
Line drawing of a multi-tiered solar power heater with wheels and ventilation slots (no text or symbols)Ovaj je proizvod prikladan samo za dobro izolirane prostore ili za povremenu upotrebu.
PROČITAJTE I ČUVITE TE UPUTE
Upozorenje: slike u priručniku predstavljaju samo referencu.
SIGURNOSNE UPUTE

natural_image
Simple line drawing of a remote control with no text or symbols| Tablica za potrebe informacija za električne grijače lokalnog prostora | |||||
| Predložak: NY2009-20MR | |||||
| Objekt Objekt | Simbol Vrijednost | Jedinica | Unità | ||
| Toplinska snaga | Način unosa topline, samo za električne grijače lokalnog prostora (odaberite jedan) | ||||
| Nominalna toplinska snaga | Pnom | 0.8 | kW | Ručno upravljanje termičkim nabojem s integriranim termostatom | [no] |
| Minimalna toplotna snaga (indikativno) | Pmin | 0.7 | kW | Ručno upravljanje toplinskim nabojem s povratnim informacijama o okolišu i / ili vanjskoj temperaturi | [no] |
| Toplinska snaga kontinuirani maksimum | Pmax | 0.8 | kW | Elektronsko upravljanje toplinskim nabojem s povratnim informacijama o okolišu i / ili vanjskoj temperaturi | [no] |
| Pomoćna električna potrošnja | Toplinska snaga uz pomoć ventilatora | [no] | |||
| Kod nazivne toplinske snage | elmax | 0.000 | kW | Vrsta regulacije toplinske energije / sobne temperature (odaberite jednu) | |
| Uz minimalnu toplinsku snagu | elmin | 0.000 | kW | Jednostupanjska toplina i bez sobne temperature | [no] |
| U stanju čekanja | eISB | 0.000* | W | Dva ili više ručnih koraka, bez kontrole sobne temperature | [no] |
| S mehaničkim termostatom za kontrolu sobne temperature | [no] | ||||
| S elektroničkom kontrolom temperature u prostoriji | [yes] | ||||
| Elektronska kontrola temperature u sobi plus dnevni tajmer | [no] | ||||
| Elektronička kontrola temperature u prostoriji plus tjedni tajmer | [no] | ||||
| Ostale mogućnosti upravljanja (moguće je više odabira) | |||||
| Kontrola temperature u prostoriji, s otkrivanjem prisutnosti | [no] | ||||
| Regulacija temperature u prostoriji, s otkrivanjem otvorenih prozora | [no] | ||||
| S opcijom kontrole udaljenosti | [no] | ||||
| Sa prilagodljivim upravljanjem startom | [no] | ||||
| Uz ograničenje radnog vremena | [yes] | ||||
| Sa senzorom crne žarulje | [no] | ||||
| Podaci za kontakt: | Midea Italia S.r.l.Via Lazzaroni 5, 21047 Saronno (VA) | ||||
| Bilješka: Za električne lokalne grijače prostora, izmjereną sezonska energetska učinkovitost grijanja prostora ne može biti lošija od vrijednosti nabijene na nazivni toplinski učinak jedinice. | |||||
| Sezonska energetska učinkovitost grijanja prostora za sve uređaje za grijanje prostora osim komercijalnih uređaja za lokalno grijanje prostora | _s (%) | 36 | |||
UPUTE ZA ČIŠĆENJE I ODRŽAVANJE

Brand : MIDEA
Model : NY2009-20MRE
Category : Heating