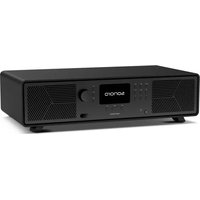
AVATON - Loudspeaker SONORO - Free user manual and instructions
Find the device manual for free AVATON SONORO in PDF.


| Product type | Multi-source connected speaker |
| Dimensions (W x D x H) | 510 x 258 x 140 mm |
| Weight | 7.9 kg |
| Power supply | AC 100-240 V, 50/60 Hz |
| Deep standby power consumption | 0.3 W |
| Network standby power consumption | < 2.0 W |
| Display | 4" TFT color display (800 x 480 px), automatic brightness adjustment |
| Audio configuration | 2 x 0.75" tweeters, 2 x 3" mid-range drivers, 1 x 5.25" downward-firing subwoofer |
| Amplification | 5 separate class D amplifiers, DSP processor |
| Sound features | Bass/treble equalizer ±12 dB, 3D sound, dynamic bass |
| Built-in radio | FM (87.5-108 MHz), DAB+ (Band III), Internet radio (over 50,000 stations) |
| Streaming services | Amazon Music, Deezer, Napster, Qobuz Connect, Spotify Connect, TIDAL Connect |
| Wireless connectivity | Wi-Fi 6E (2.4 / 5 / 6 GHz), Bluetooth 5.3 (with Auracast), AirPlay, Google Cast |
| Wired connectivity | Ethernet 10/100, HDMI ARC, TOSLINK optical, S/PDIF coaxial, AUX 1 (RCA), AUX 2 (3.5 mm), USB-A, USB-C, 3.5 mm headphone jack |
| Supported audio formats | WAV, FLAC, AIFF, ALAC, AAC, MP3, OGG Vorbis, WMA, M4A up to 24 bit/192 kHz |
| Presets | 99 presets (stations, tracks, podcasts, inputs) |
| Remote control | CR2032 battery, IR range |
| Operating temperature | 0 °C to +40 °C |
| Care and cleaning | Clean the exterior with a soft, dry cloth; for heavy soiling, use a slightly damp cloth then dry |
| Safety | Indoor use only; avoid moisture, heat sources, magnetic fields; do not open the device; maintain at least 10 cm ventilation at the rear |
| Spare parts and repairability | Contact sonoro customer service or an authorized dealer; do not attempt repairs yourself |
| General information | Support: https://support.sonoro.com ; declaration of conformity available online |
Frequently Asked Questions - AVATON SONORO
User questions about AVATON SONORO
0 question about this device. Answer the ones you know or ask your own.
Ask a new question about this device
Download the instructions for your Loudspeaker in PDF format for free! Find your manual AVATON - SONORO and take your electronic device back in hand. On this page are published all the documents necessary for the use of your device. AVATON by SONORO.
USER MANUAL AVATON SONORO
Index
DE-Bedienungsanleitung .... 3
EN-Operating Instructions....64
FR- Mode d'emploi ....125
IT- Manuale d'uso ....186
NL- Gebruiksaanwijzing ....247
ES- Manual de instrucciones ....308
All-In-One Audio Music System AVATON
5.2.3 Podcasts....38
5.3 Externe Eingangsquellen....39
5.3.1 AUX IN 1....39
5.3.2 AUX IN 2....39
5.3.3 Optisch / Koaxial....39
5.3.4 HDMI....40
5.4 Bluetooth ® 41
5.5 AuracastTM 43
6. Favoriten 44
7.4.15 Cyber security ....51
A
B

Settings and information (e.g. IP address, subnet, gateway, DNS) are assigned manually.
•Automatic DHCP
Settings and information (e.g. IP address, subnet, gateway, DNS) are assigned automatically.
- Netzwerk Typ
7.4.15 Cyber security
A BLUETOOTH* TECHNOLOGY
Works with Apple AirPlay
All-In-One Audio Music System AVATON
EN-Operating Instructions
Document information
Operating instructions for
All-In-One Audio Music System AVATON
▶Read these instructions carefully.
▶Keep the instructions accessible.
▶Observe the instructions in the corresponding safety manual.
▶ When passing on the device, also hand over these instructions and the associated safety manual.
These operating instructions are part of the product and protected by copyright. Reproduction, reprinting and distribution only with permission.
Manufacturer:
sonoro audio GmbH
▶Visit our support website for more information.
https://support.sonoro.com
Table of Contents
1. Safety information ....68
1.1 Intended use 68
1.2 General safety instructions....68
2. Product information....70
2.1 Equipment 70
2.2 Scope of delivery....71
2.3 Front of device....72
2.4 Rear of device 73
2.5 Bottom of device....74
2.6 Remote control 75
2.7 Display icons 76
2.8 Technical data 77
3. Setting up ....79
3.1 Unpacking the device....79
3.2 Positioning the device .....80
3.3 Preparing the remote control 80
3.4 Replace the battery....80
3.5 Connecting antennas....81
3.5.1 Wi-Fi antennas....81
3.5.2 FM/DAB telescopic antenna....82
3.5.3 FM/DAB aerial....83
3.6 Establishing a power supply 84
3.7 Initial setup....85
3.8 Network connection....86
3.8.1 WPS....86
3.8.2 Wired Connectivity....86
4. Operation....87
4.1 Control 87
4.1.1 Control on device....87
4.1.2 Control via the remote control....88
4.1.3 Control via sonoro audio app....89
4.1.4 Control via sonoro web client....89
4.2 Functions....90
5. Sources....92
5.1 Radio 93
5.1.1 DAB Radio 93
5.1.2 FM Radio 94
5.1.3 Internet radio....95
5.2 Streaming Music....96
5.2.1 My Music....96
5.2.2 Music services....98
5.2.3 Podcasts 99
5.3 External input sources 100
5.3.1 AUX IN 1.... 100
5.3.3 AUX IN 2....100
5.3.2 Optical / Coaxial 100
5.3.4 HDMI....101
5.4 Bluetooth ® 102
5.5 AuracastTM 104
6. Favourites ....105
6.1 Preset keys 106
7. Home Menu....107
7.1 Favourites.... 107
7.2 Sources / Menu Items.... 107
7.3 Recently played 107
7.4 Settings 107
7.4.1 Sound settings.... 107
7.4.2 Sleep timer.... 108
7.4.3 Alarm....108
7.4.4 Network settings.... 109
7.4.5 Network Info 110
7.4.6 Language 110
7.4.7 Date & time 110
7.4.8 Device info 110
7.4.9 Software update 110
7.4.10 Factory reset 110
7.4.11 Streaming audio quality 111
7.4.12 Google Cast.... 111
7.4.13 AirPlay password.... 111
7.4.14 Display & Power management.... 111
7.4.15 Cyber security 112
- Smart Home....113
- Streaming .....114
- Troubleshooting ..... 115
- Cleaning and care....118
- Disposal....119
12.1 Disposing of the packaging 119
12.2 Disposing of the device 119
- Appendix .....120
13.1 Marks of conformity and certificates 120
13.2 Legal notice on Smart Home functionality 122
13.3 Cyber security 123
13.4 Declaration of conformity 124
1. Safety information
1.1 Intended use
The device is suitable for the following:
- For playing analogue and digital radio stations that can be accessed via antenna.
- For playing streaming services, radio stations and podcast programmes accessible via the Internet.
- For playing from devices and to devices paired via Bluetooth® and Auracast™.
- For playing from external devices connected via the following inputs:
•AUX 1
•AUX 2
•Optical
•Coaxial
•HDMI
•USB (also for an external CD drive)
- For playing from media servers or streaming applications that are on the same network.
- For playing from sources or to devices connected via Smart Home systems.
- For charging external devices connected via the USB input.
Only use the device if it is in faultless technical condition and has been set up correctly. Any other use is considered contrary to the intended use.
Intended use also includes reading and observing these instructions and the associated safety manual.
The contents of this document are subject to change at any time without prior notice.
1.2 General safety instructions
WARNING!
Danger due to non-observance of the safety instructions!
The associated safety manual contains important information for the safe use of the device. Special attention is drawn to possible dangers. Failure to observe these may result in serious injury or damage to the device.
▶ Read the associated safety manual and these instructions carefully.
▶Follow the safety instructions.
▶Store the documents in an accessible location.
Use of the device is prohibited in the following cases:
- In case of damage to the device or individual components.
- In the event of unauthorized conversions or modifications to the device.
• After improper repairs.
The manufacturer accepts no liability for damage in the following cases:
- If these instructions are not followed.
• In case of improper use.
• In case of improper handling. - In the case of unauthorized conversions or modifications.
• Device for indoor use only in dry, clean, dust-free environments.
•
Do not use in:
• High humidity or condensation
- Aggressive/corrosive gases, vapors, or solvents
• Extreme temperature changes or direct sunlight
• Oil vapors, grinding/cutting dust
- Salty or chlorinated air
• Strong magnetic fields or electromagnetic interference
• Explosive atmospheres.
- Operate only in safe technical condition and in accordance with this manual.
- Proper use includes installation, commissioning, and operation following all safety and function-related instructions.
- Do not install in closed spaces (e.g., wall recess, closed cabinet).
- Keep away from heat sources (radiators, stoves, etc.).
- Maintain at least 10 cm clearance at the rear for sufficient ventilation.

WARNING!
Note:
The safety points listed above represent the most important requirements.
Further details are provided in the separate document "Safety Instructions", which is mandatory to read and follow.
2. Product information
2.1 Equipment
Sound • 2x 0.75" Tweeter
- 2x 3" Midrange Driver
- 1x 5.25" Downfiring Subwoofer
• Digital Signal Processor - 5 separate Class-D amplifiers
• Equaliser function to adjust bass and treble
• 3D sound and dynamic bass function
Display High-resolution 4" TFT color display
with automatic brightness adjustment.
FM / DAB+radio
Automatic and manual.
Station scan
Sleep timer Switch-off function with precise setting to the minute (5 - 120 min).
Favourites A total of 99 memory locations.
Operation • Directly on the device, via remote control, via the sonoro audio app or via the sonoro web client
- Smart Home ready
Music transmission • FM and Digital radio DAB+, internet radio, podcast
- Bluetooth® audio, Auracast™ ready, Apple® AirPlay audio, Google Cast®
- Amazon Music™, Deezer™, Napster™, Qobuz Connect™, Spotify Connect™, TIDAL Connect™
- DLNA, UPnP
Connections • TV HDMI ARC
• Digital optical and coaxial input
- Analogue Cinch and 3.5 mm Jack Input
• USB-A, USB-C (charging and playback function)
• Headphones 3.5mm jack on Front
2.2 Scope of delivery
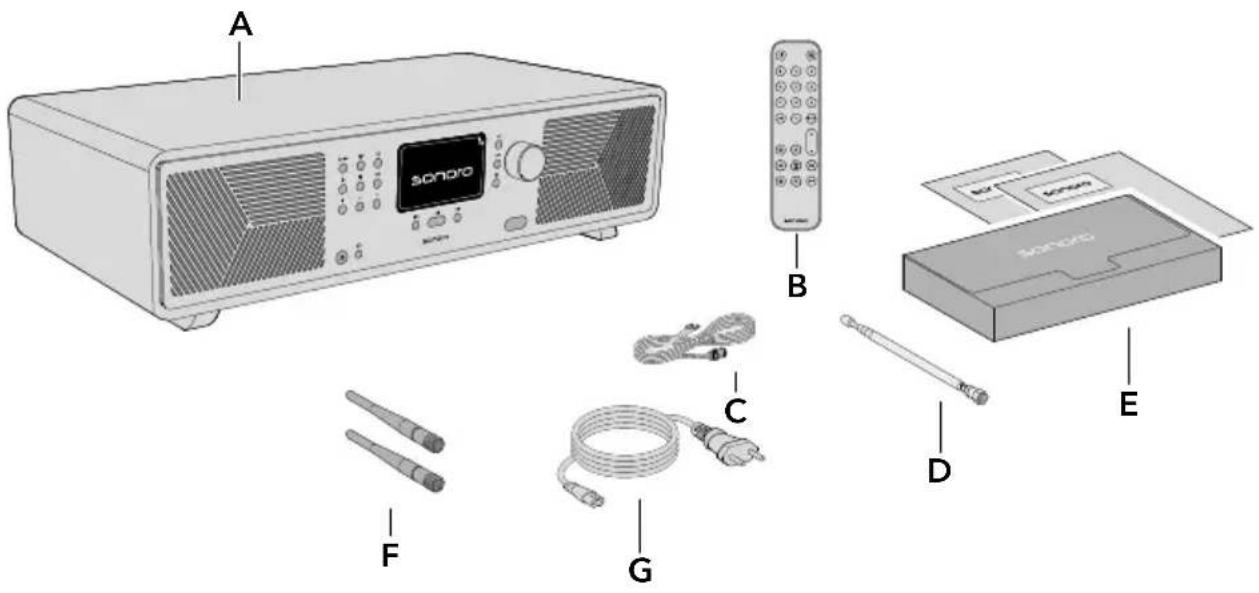
A AVATON
B Remote Control (RC351)
C FM/DAB aerial
D FM/DAB telescopic antenna
E Document box with Quick Start Guide and safety manual
F 2 x Wi-Fi / BT antennas
G Power cable
2.3 Front of device
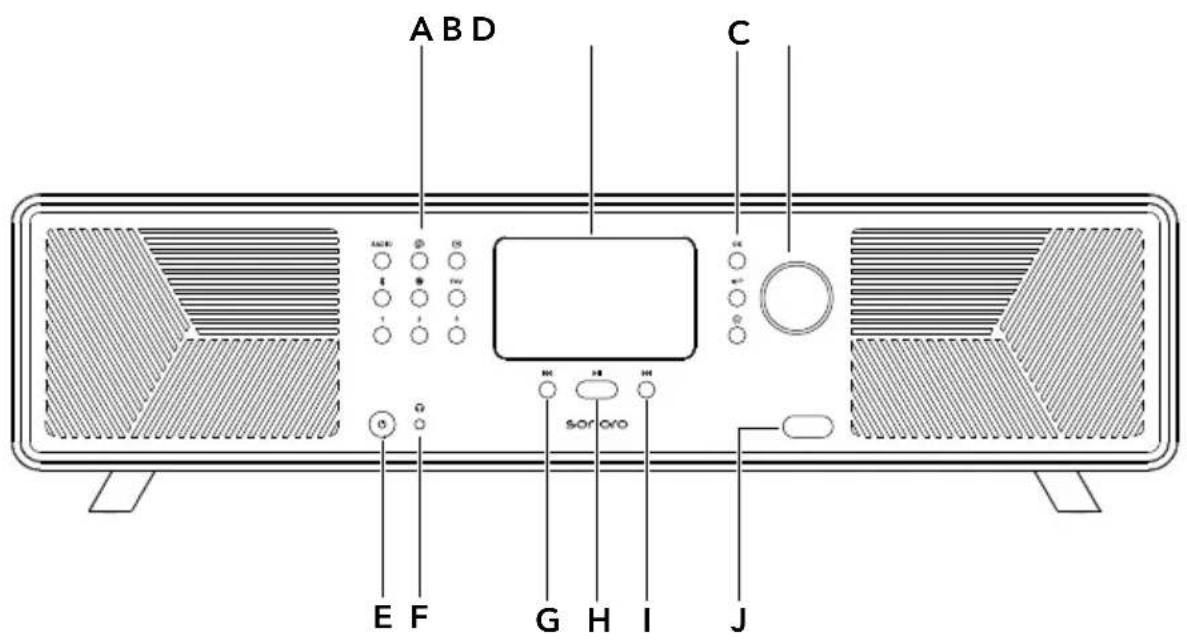
A Source and Preset buttons
- Radio (RADIO)
- Streaming services ( musical)
• External input sources (☐) - Bluetooth® (✗)
- Auracast™ (®)
- FAV (FAV)
- Preset 1 (1)
- Preset 2 (2)
- Preset 3 (3)
B Display
C Navigation buttons
- OK button (OK)
- Back button (←)
- Home button ( 🔊)
D Rotary control
E Standby button ( ⏻)
F 3.5 mm Headphone jack ( 📞)
G Previous title / station button ( |◀◀)
H Play / pause button ( ▶III)
I Next title / station button ( ▶▶▶)
J Infrared and light sensor
2.4 Rear of device
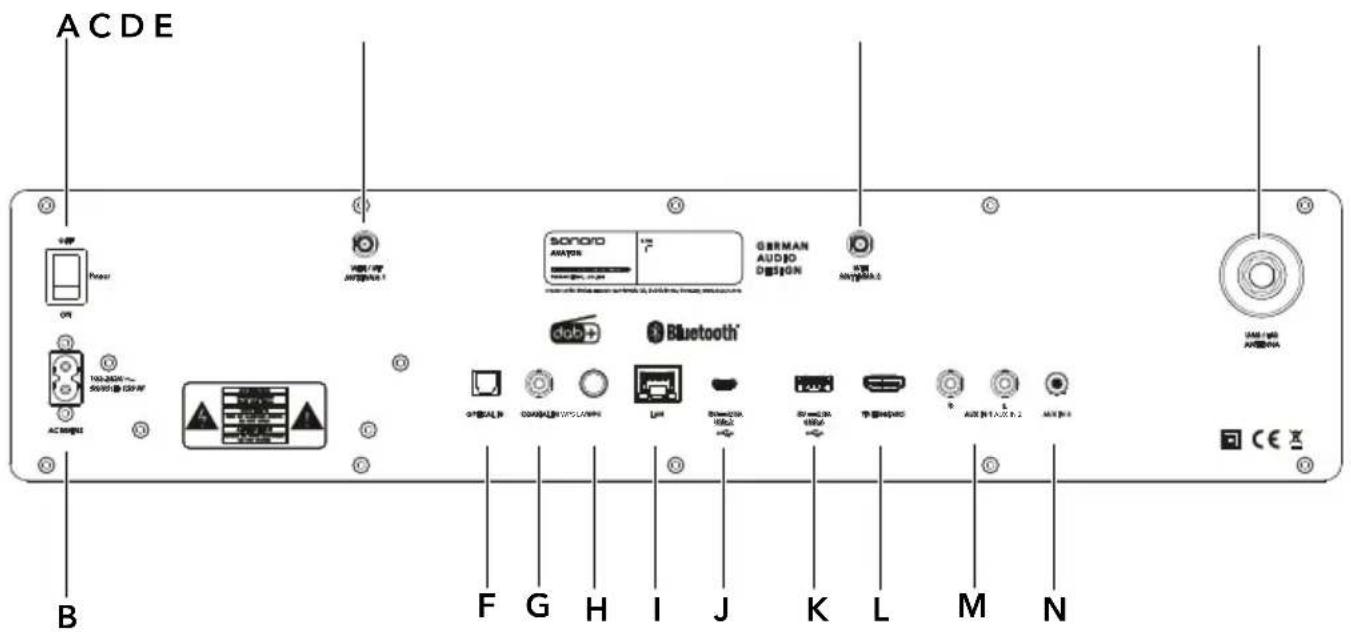
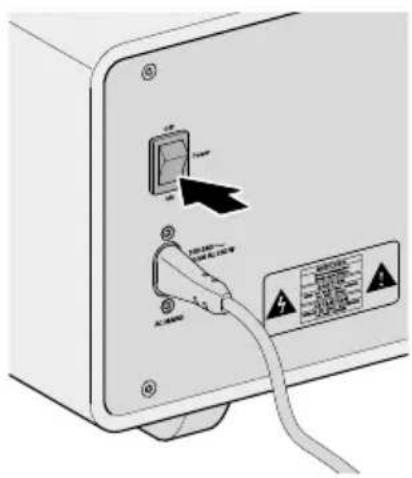
A Main ON/OFF switch
B Socket for power cable
C Socket for Wi-Fi / BT antenna 1
D Socket only for Wi-Fi antenna 2
E Socket for FM / DAB aerial antenna / telescopic antenna
F Optical input
G Coaxial input
H WPS button
I LAN socket RJ45
J USB-C connection
K USB-A connection
L HDMI ARC (TV)
M AUX 1 input (Cinch)
N AUX 2 input (3.5 mm)
2.5 Bottom of device
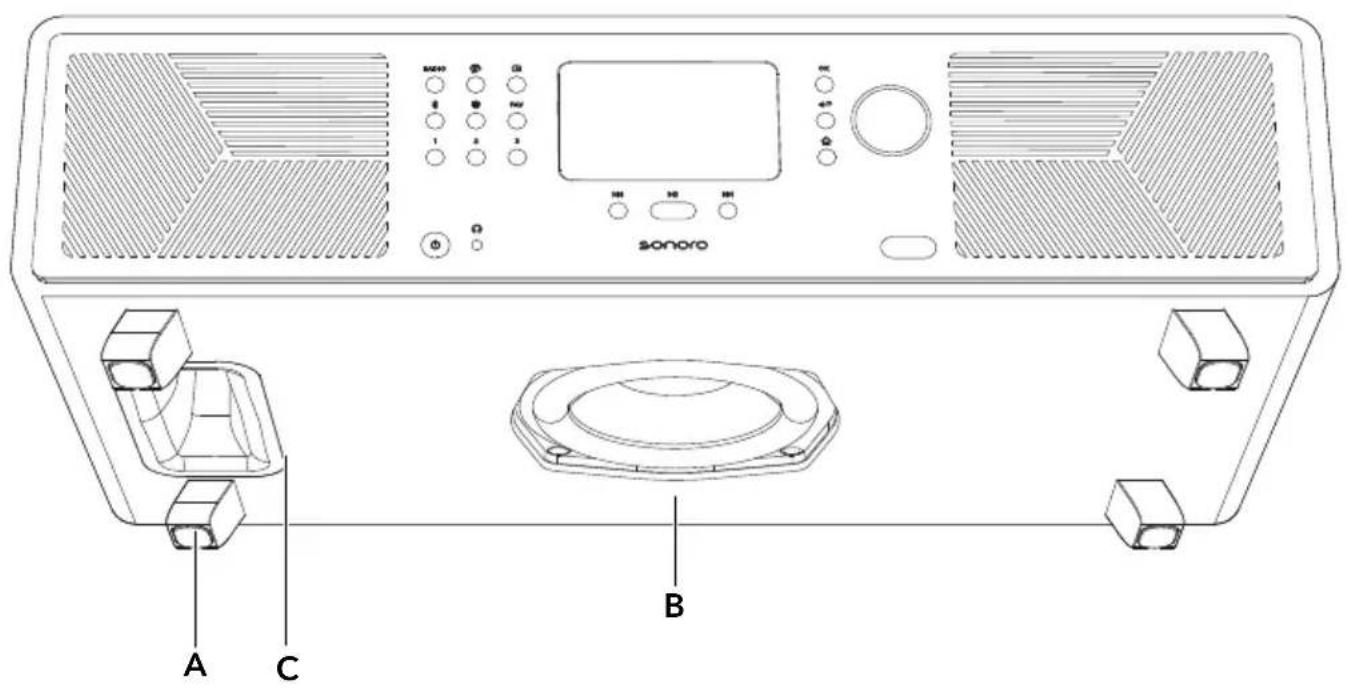
A Feet
B Subwoofer
C Bass reflex port
Operating instructions AVATON
Content
Front
Product information
Support
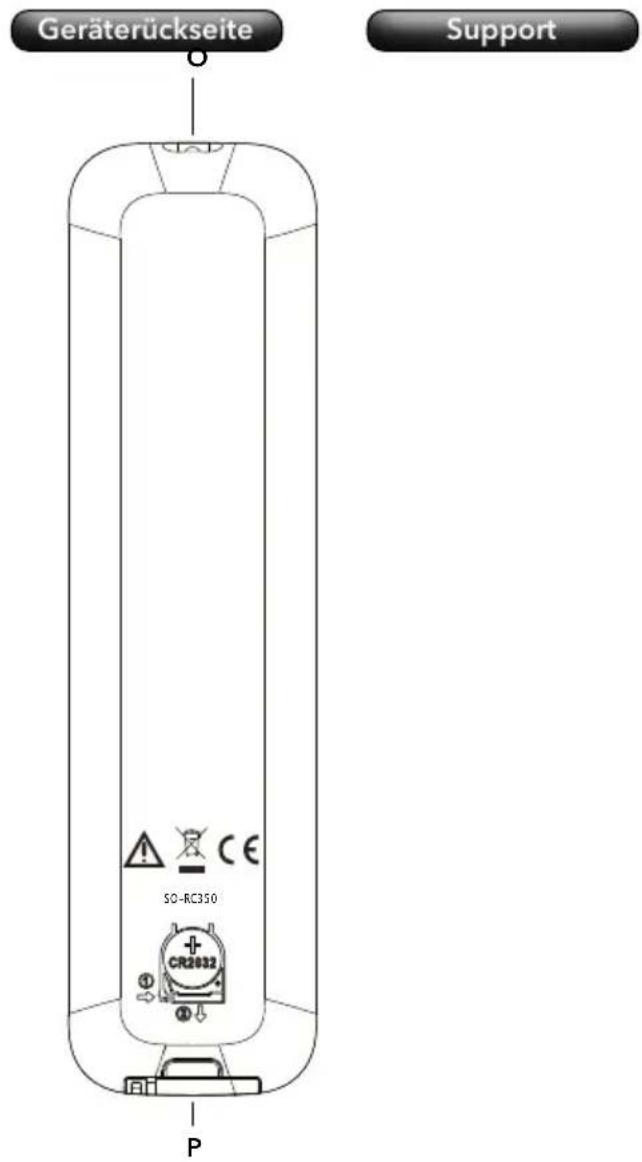
2.6 Remote control
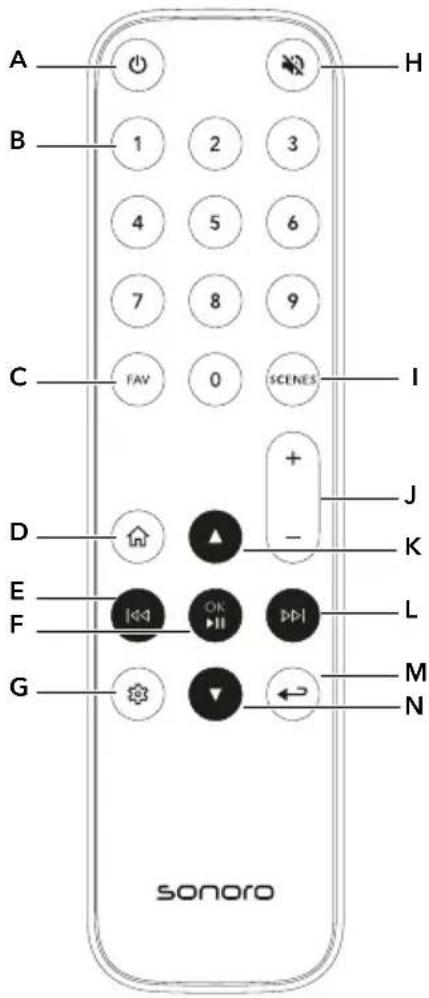
A Standby button
B Favorite direct-dial keys (0-9)
C Favourites button
D Home button
E Left button, skip previous
F Play/Pause button, OK button
G Settings
H Mute button
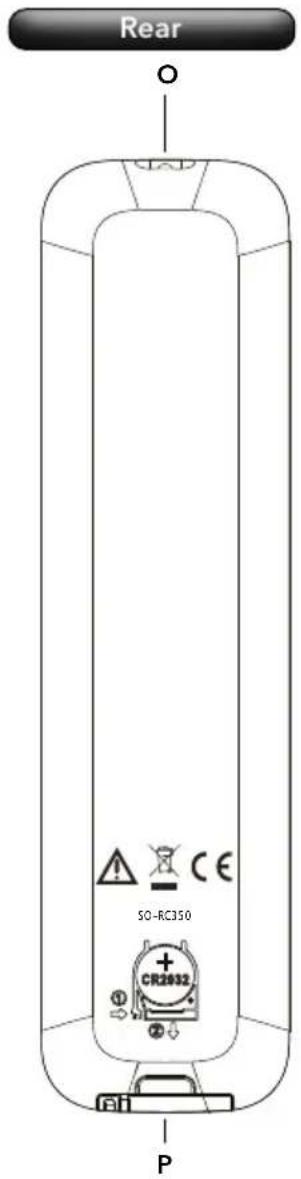
I Scenes button
J Volume up / down button
K Up button
L Right button, skip next
M Back / submenu button
N Down button
○ Infrared transmitter
P Battery compartment
2.7 Display icons
The Wi-Fi connection is established (with display of signal strength).
The Wi-Fi connection is interrupted.
The Wi-Fi connection is interrupted and is in configuration mode ("SoftAP").
The LAN network is connected.
The LAN network is disconnected.
Bluetooth is in search/discoverable mode.
An audio Bluetooth device is connected.
A Bluetooth headset is connected.
The radio station / music track is in the favourites list.
The radio signal is being received (with display of the signal strength).
The playback mode "Repeat all" is active.
The playback mode "Repeat one" is active.
The playback mode "Repeat folder" is active.
Shuffle is active.
The sleep timer is active.
The alarm is active.
The snooze function is active.
Headphones are connected (supports one pair only).
The sound output is muted.
The streaming playback is loading.
The streaming playback is buffering.
▶ Playback in progress.
Playback is paused.
□ Playback is stopped.
2.8 Technical data
| Dimensions Approx. 510 x 258 x 140 mm (W x D x H) | |
| Weight Approx. 7.9 kg | |
| Operating temperature 0 °C to +40 °C | |
| Display 4" TFT colour display (800 x 480 px) | |
| FM Frequency range 87.50 MHz - 108.00 MHz | |
| DAB/DAB+ Band III, 174.928 MHz - 239.200 MHz | |
| Internet radio More than 50,000 stations worldwide | |
| Favourites Total of 99 for FM Radio / DAB Radio / Internet Radio /Podcasts / Amazon Music / TIDAL / Deezer / Qobuz / My Music/ Spotify (max. 20) | |
| USB / Playback via external CD-Driver | Type C, type A - charging power 5 V DC, max. 2.1 A,System formats for playback: FAT, FAT 32, exFAT, NTFS, EXT2/3/4 |
| Sensitivity AUX-IN • AUX-IN 1 (RCA socket) 2000 mV / 1000 mV / 500 mV,AUX-IN 2 (3.5 mm) 300 mV | |
| Digital inputs | • Optical In (TOSLINK) - Linear PCM, STEREO 44.1 kHz ~ 192kHz, 24 bit• Coaxial In (S / PDIF) - Linear PCM, STEREO, 44.1 kHz ~ 192kHz, 24 bit |
| HDMI | HDMI ARC (television) - PCM, STEREO, max. 192 KHz, 16-24 bit |
| Headphone impedance | 16 - 32 Ω |
| Streaming profile | Bluetooth®, AuracastTM, AirPlay, Google Cast, compatible with UPnP |
| Supported network | IEEE 802.11 a/b/g/n/ac/ax 2x2 MIMO(Wi-Fi 6E)2.412 GHz - 2.472 GHz / 5.18 GHz - 5.70 GHz |
| Transmitted power | 19.25 dBm (2.4 GHz), 21.99 dBm (5 GHz), 21.20 dBm (6 GHz) |
| Wired Network | Ethernet, 10BASE-T/100BASE-TX |
| Encryption | WEP, WPA2 (PSK), WPA3, WPS |
| Bluetooth® | Version 5.3, AVRCP v1.6 profile, A2DP 1.3.1,2.402 GHz - 2.480 GHz,SBC, BLE, LE Audio / Auracast readyrange approx. 10 m |
Transmitted power 6.80 dBm (BT), 6.23 dBm (BTL)
| Supported audio formats | WAV, FLAC & AIFF - max. 24 bit / 192 kHzALAC (Apple Lossless Audio Codec) - max. 24 bit / 192 kHzAAC - max. 48 kHz, 320 kbps, 16 bitMP3 - max. 48 kHz, 320 kbps, 16 bitAAC (LC / HE-AAC / (v2) - max. 48 kHz, 320 kbps, 16 bitOGG Vobis and WMA - max. 48 kHz, 320 kbps, 16 bitM4A - max. 48 kHz, 320 kbps, 16 bit |
| Supported playlist formats | ASX (Microsoft®), M3U, PLS / WPL |
| Remote control battery | 1 x CR2032 3 V |
| Supply voltage AC 100 - 240 V, 50/60 Hz | |
| Deep sleep mode 0.3 W | |
| Network standby power consumption | < 2.0 W |
Specifications are subject to change without notice.
3. Setting up
The instructions in the corresponding safety manual must be observed.
3.1 Unpacking the device
▶ Carefully unpack the device and all enclosed parts.
▶Place the device in a suitable location.
▶Check the device and all parts included for damage.
▶Check the scope of delivery for completeness.
→See chapter "2.2 Scope of delivery" (page 71).
▶If possible, keep the packaging.
If parts are missing or damaged:
▶Contact your dealer or sonoro customer service immediately.
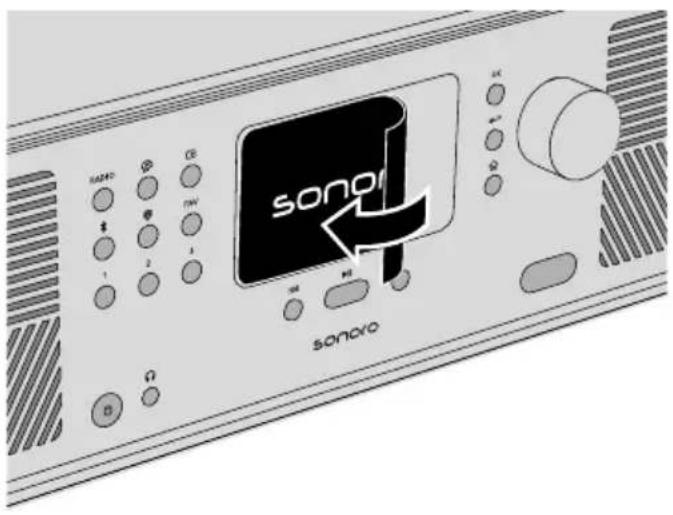
▶Remove the protective film from the display.
3.2 Positioning the device
The following points must be observed when setting up the device:
- There must be no interfering objects or equipment in the vicinity (e.g. heat sources, metal, water, steam, vibrations).
- The mains socket used must be accessible at all times.
• Stains may appear on natural wood with oiled or waxed surfaces.
▶Choose a suitable location for the device.
3.3 Preparing the remote control
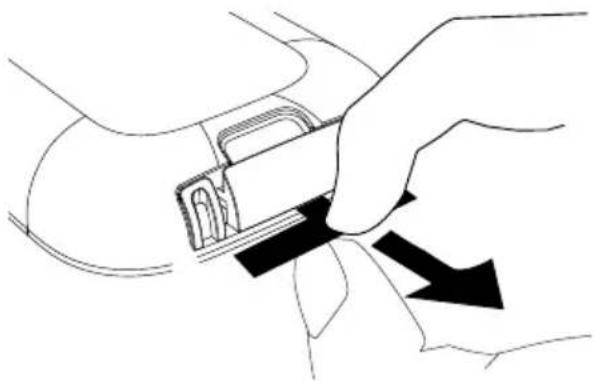
▶Pull out the insulating PVC sheet.
▶Do not block the infrared sensor.
3.4 Replace the battery
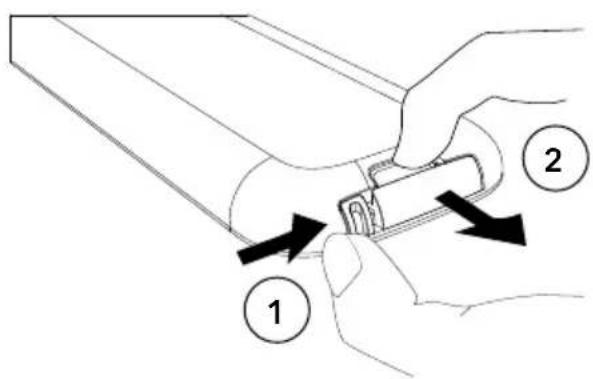
▶Press and hold the release tab in the direction indicated.
▶Slide the battery holder out in the direction indicated.
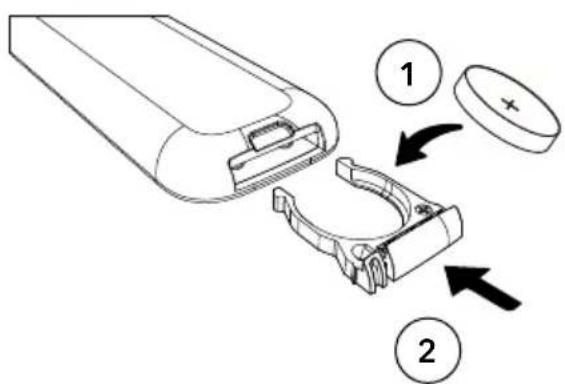
▶Insert the battery CR2032, 3 V with the label (+) side up.
▶Slide the battery holder into the remote control until it locks.
3.5 Connecting antennas
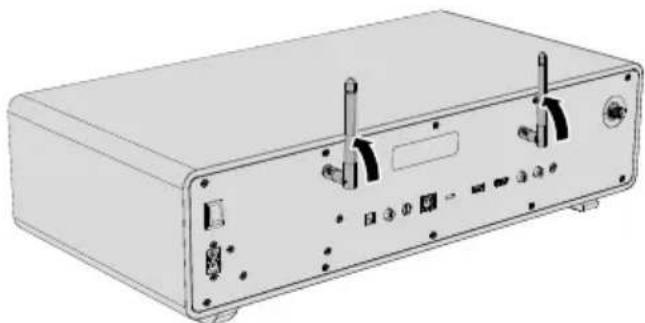
For reception in the wireless network, connect the two Wi-Fi antennas.
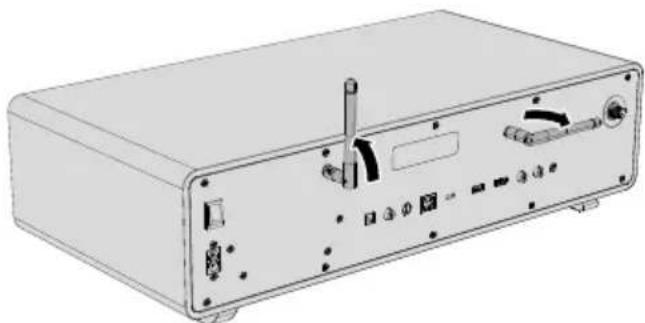
An aerial and a telescopic antenna are available for radio reception (FM/DAB).
Alternatively, the device can be connected directly to a connection on the house aerial using a suitable aerial cable (F connector not included in the scope of delivery).
3.5.1 Wi-Fi antennas
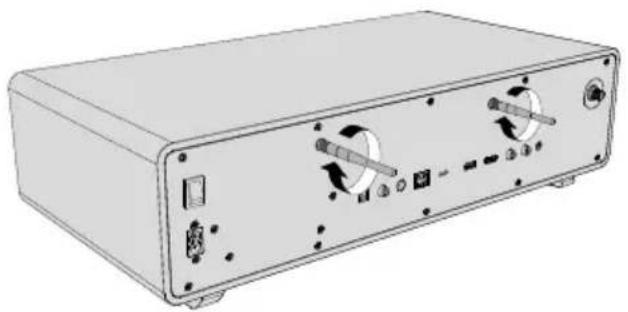
▶Point the antennas upwards.
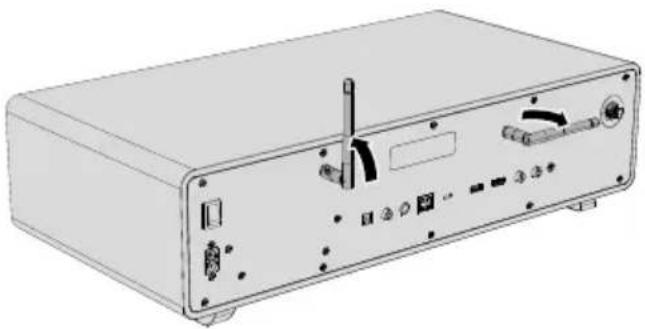
▶Adjust the two antennas so that one is positioned vertically and the other horizontally (90° to each other). This usually provides the best possible reception quality.
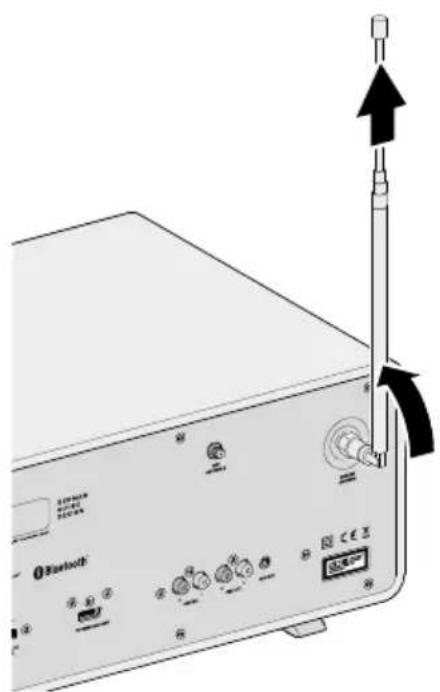
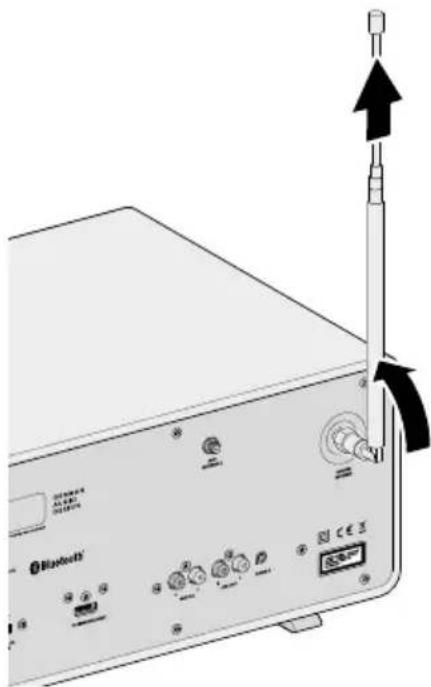
3.5.2 FM/DAB telescopic antenna
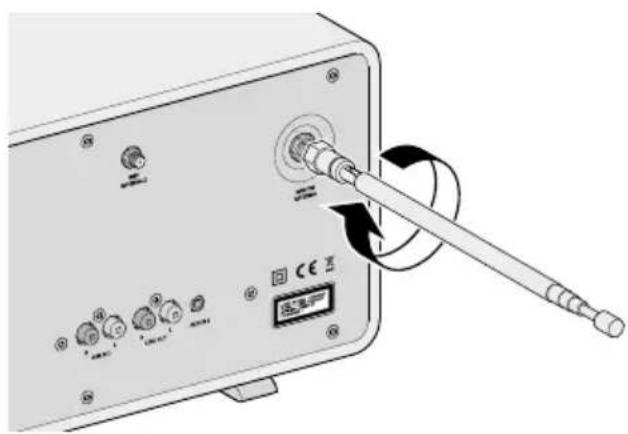
▶Screw on the antenna.
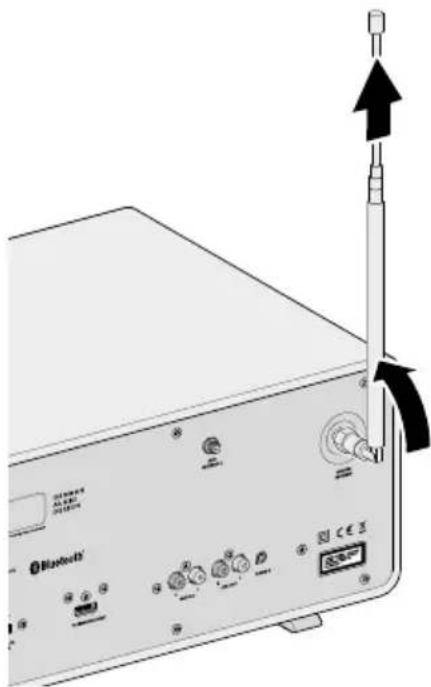
▶Pull out the antenna completely.
▶Align the antenna so that the reception is optimal.
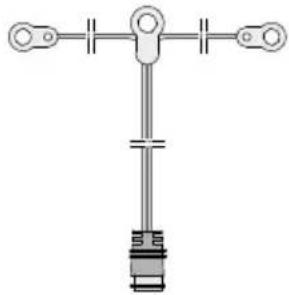
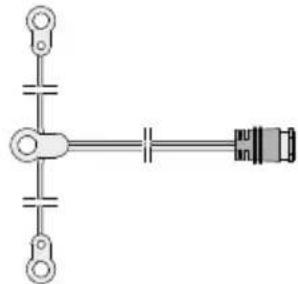
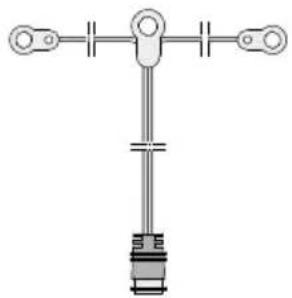
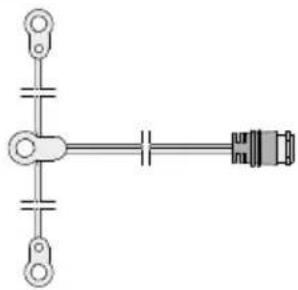
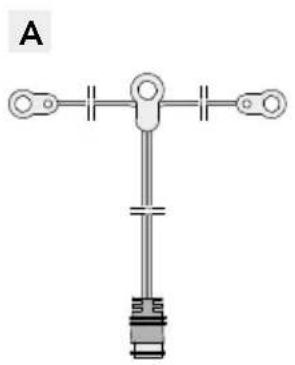
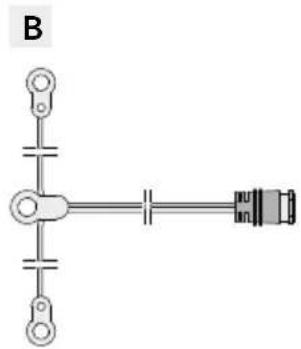
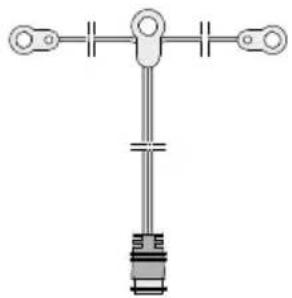
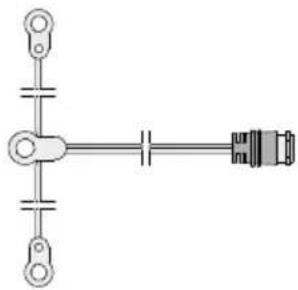
3.5.3 FM/DAB aerial
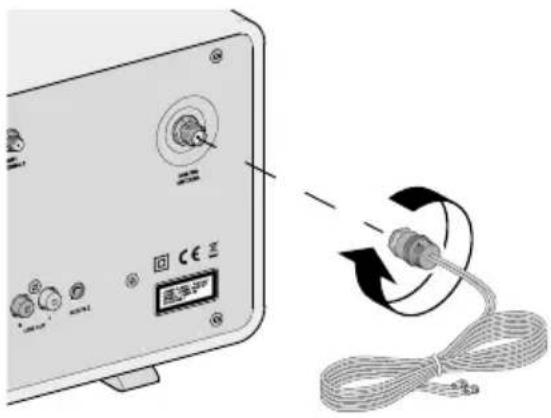
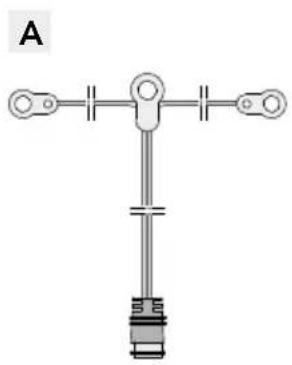
A
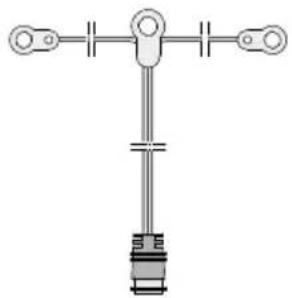
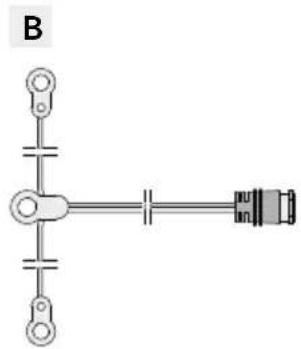
B
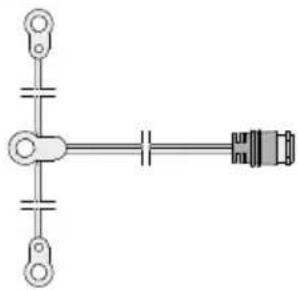
▶Screw on the antenna.
▶Unfold the antenna so that both ends and the cable form a "T".
▶Align the antenna so that the reception is optimal.
A Recommendation for FM radio reception: Both ends horizontal.
B Recommendation for DAB radio reception: Both ends vertical.
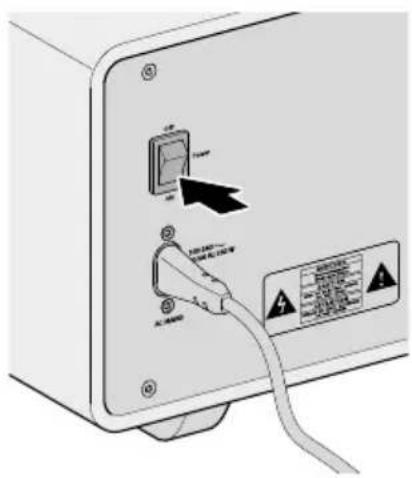
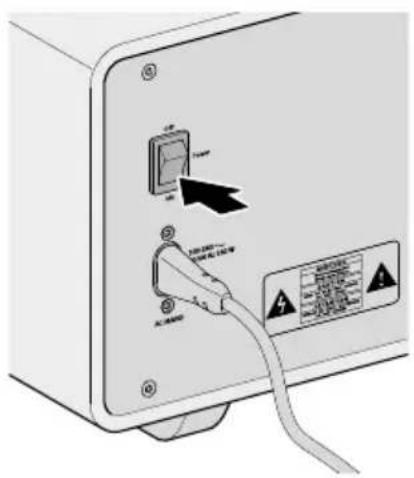
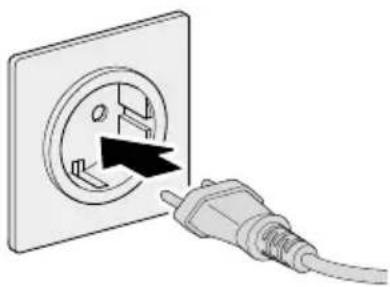
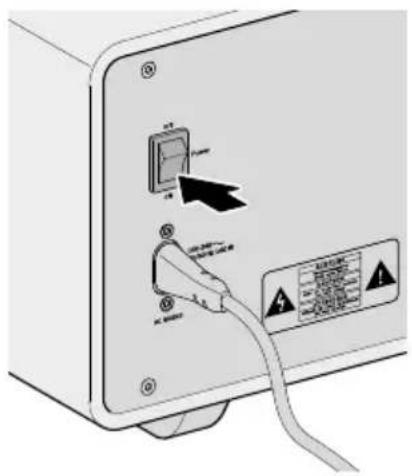
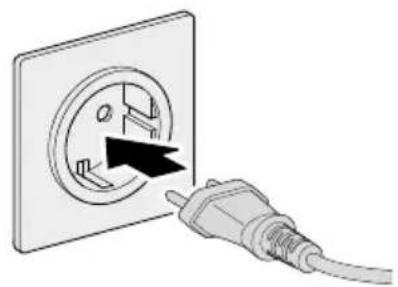
3.6 Establishing a power supply
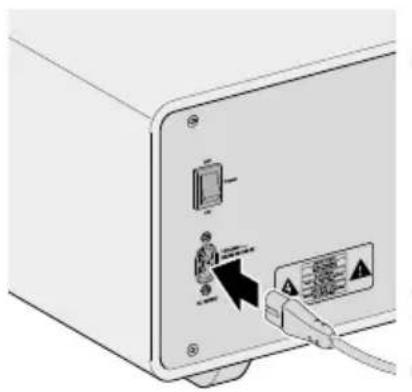
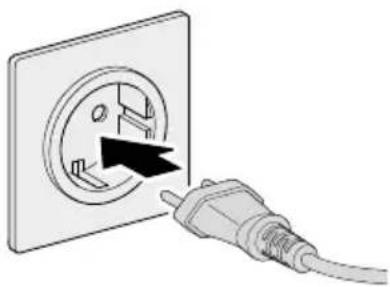
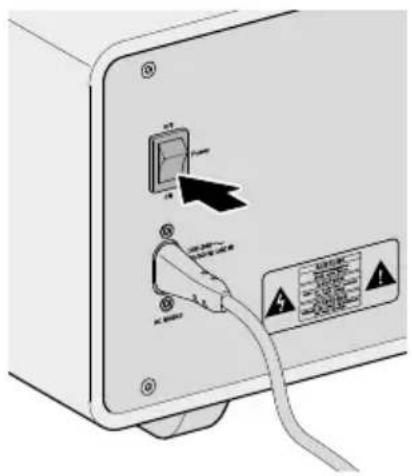
▶Plug the power cable into the device.
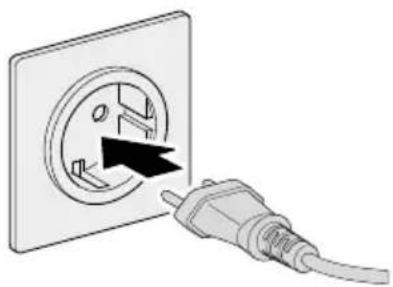
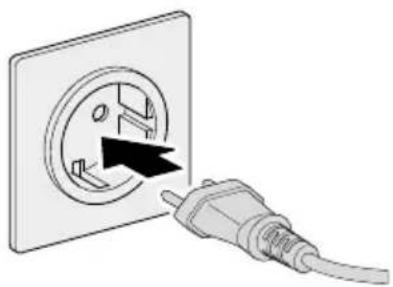
▶Connect the power cable to the mains socket.
▶Make sure that the mains socket used is accessible at all times.
▶Switch on the main switch.
3.7 Initial setup
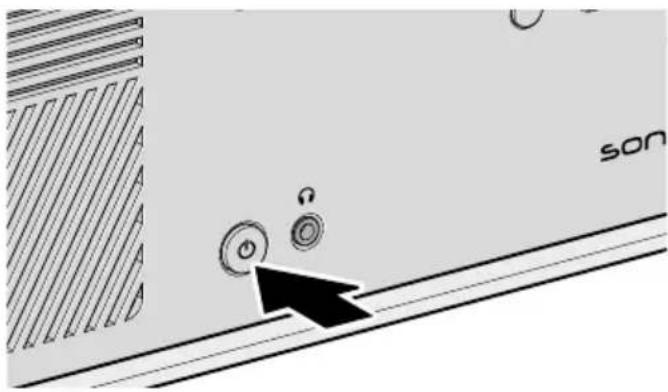
▶Switch on the device.
▶Wait a few seconds.
The setup wizard will start automatically.
Information on the control and operation of the setup wizard:
→See chapter "4.1 Control" (page 87).
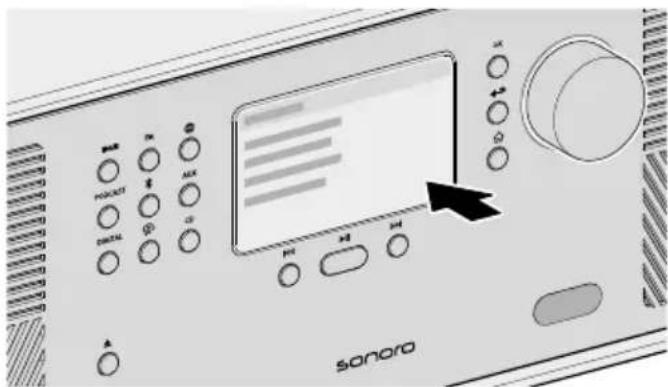
▶Follow the instructions shown on the display.
▶Accept the privacy policy.
▶Set the language.
For immediate use, Google Cast can be started directly during setup or alternatively at a later time.
→See chapter "7.4.12 Google Cast" (page 111).
Setup includes the connection to the network.
→See chapter "3.8 Network connection" (page 86).
The initial setup includes an automatic update search for the device. We recommend that you confirm the update.
Completion of the setup is confirmed with a message on the display:
"Setup is complete - congratulations! The device is set up."
3.8 Network connection
3.8.1 WPS
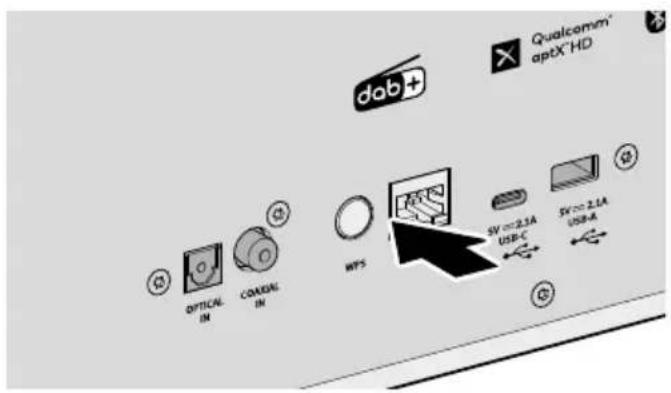
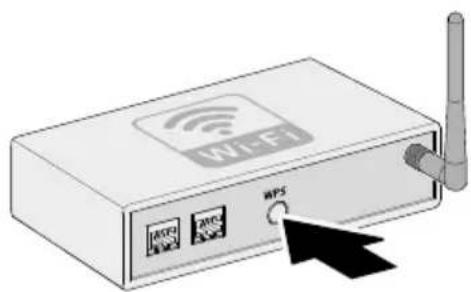
▶Briefly press the WPS button on the back of the device.
▶Then briefly press the WPS button on your router.
The connection is established automatically
3.8.2 Wired Connectivity
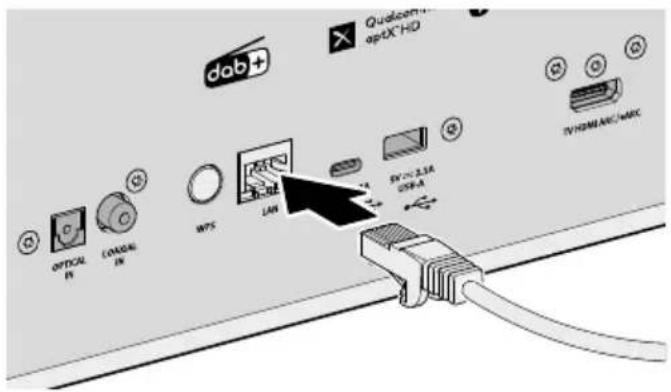
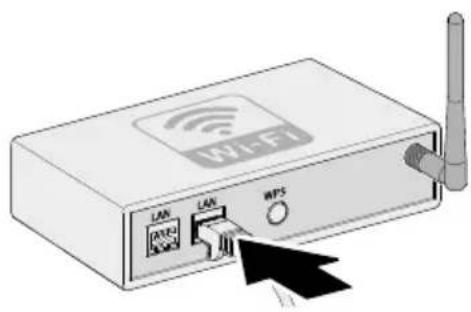
▶Connect the LAN cable with the device.
▶Connect the LAN cable with your router.
The connection is established automatically
Further connection options:
Home menu → Settings → Network settings
→See chapter "7.4.4 Network settings" (page 109).
4. Operation
4.1 Control
The following options are available for operating the device:
- Directly on the device
→See chapter "4.1.1 Control on device" (page 87).
- Via remote control.
→See chapter "4.1.2 Control via the remote control" (page 88).
- Via the app.
→See chapter "4.1.3 Control via sonoro audio app" (page 89).
- Via web client
→See chapter "4.1.4 Control via sonoro web client" (page 89).
4.1.1 Control on device
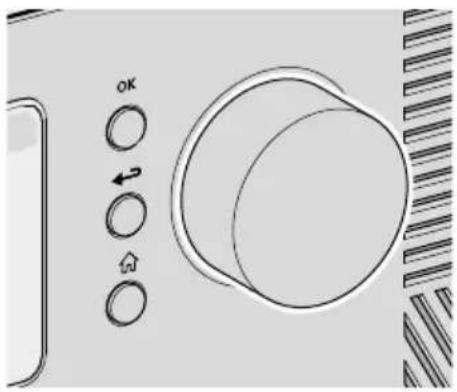
The device is controlled and operated using navigation keys and rotary control (e.g. to select menu items or follow the instructions on the display).
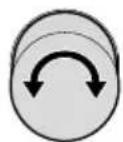
If a menu is currently being displayed:
▶Turn rotary control to select a menu item or input.
If a source is currently playing:
▶Turn rotary control to adjust the volume.
OK
If a menu is currently being displayed:
▶Press OK button to confirm the selection.
When a source is playing and a station image or music track cover appears on the display:
- Pressing OK button briefly displays information about the station or track.
- Pressing and holding OK button enlarges the display.
- By briefly pressing OK button again, the previous display reappears.

If a menu is currently being displayed:
▶Press back button to go back to the previous menu item.
If a source is currently playing:
▶Press back button to enter the submenu of the source.

▶Press Home button to access the Home menu.
4.1.2 Control via the remote control
The device can also be controlled and operated via the remote control (e.g. to select menu items or follow the instructions on the display).

If a source is currently playing / Alarm goes off:
▶Press (-) / (+) to adjust volume.
Press and hold:
▶Continuous volume adjustment


If a menu is currently being displayed:
▶Press to navigate through menu levels/text.
If a source is currently playing:
▶Press to navigate tracks.
Press and Hold:
If the playback source allows it, a rewind/fast-forward within the current title takes place (e.g. with CD, podcast, My Music) or a station scan (with FM radio).

If a menu is currently being displayed:
▶Press to confirm selection.
If a source is currently playing / Alarm goes off:
▶ Press for toggling between pause / play / activate snooze timer

If a menu is currently being displayed:
▶Press back button to go back to the previous menu.
If a source is currently playing:
▶Press back button to enter the submenu of the source.

▶Press Home button to access the main menu.
4.1.3 Control via sonoro audio app
The sonoro audio app is available for controlling the device via smartphone or tablet.
Apple App Store (iOS)
ay Store (Android)
When connecting the app with your device for the very first time, you will be prompted to approve the connection. Once you grant approval, the device will remember your choice and future connections will be established automatically without requiring additional confirmation. For more information:
→See chapter "7.4.15 Cyber security" (page 112).
The sonoro audio app is an independent software product and is not affiliated with any mobile device manufacturer. The availability and functionality of individual services may vary depending on region, device, or third-party providers. No claims may be asserted against the provider as a result of such changes.
4.1.4 Control via sonoro web client
The IPv4 address of the device is required for using the sonoro web client.
→See chapter "7.4.5 Network Info" (page 110).
▶ Enter the IPv4 address of the device in the address line of the web browser (only the numbers separated by a dot, e.g. "192.168.0.23").
When connecting the web client with your device for the very first time, you will be prompted to approve the connection. Once you grant approval, the device will remember your choice and future connections will be established automatically without requiring additional confirmation. For more information:
→See chapter "7.4.15 Cyber security" (page 112).
4.2 Functions
The following functions are accessed directly via buttons on the device or on the remote control.

• Power on
The device starts with the last selected playback source.
• Power off
The device switches to standby mode.
When the device is switched on but not playing and not being operated:
After the standby timeout has expired (default setting 15 minutes), the device automatically switches to network standby mode.
→See chapter "7.4.14 Display & Power management" (page 111).

- Play Playing a playback source is continued.
- Pause Playing a playback source is paused.

- Press The playback source changes to the previous title, station or frequency.
- Press and hold If the playback source allows it, a rewind within the current title takes place (e.g. with podcast or My Music) or a station scan (with FM radio).

- Press The playback source changes to the next title, station or frequency.
- Press and hold If the playback source allows it, fast forward within the current title (E.g. with podcast or My Music) or station scan (with FM radio).

- Listen Inserting the jack plug into the headphone socket on the device results in playback on the connected headphones; playback on the speakers is deactivated.
When the headphone is connected via the headphone jack, playback sound via loudspeakers is not possible.
FAV
→See chapter "6. Favourites" (page 105).
1
2
3

- Press to mute / unmute

- Press and press the buttons 1-9 for direct access to Smart Home functions.
5. Sources
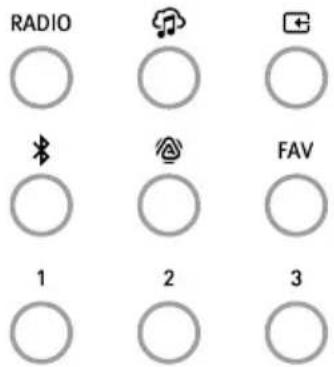
Selection of the desired playback source.
The following options are available:
- Dedicated buttons directly on the device which offer the option of selecting other sources:
•RADIO- See chapter "5.1 Radio" (page 93).
- Streaming services - See chapter "5.2 Streaming Music" (page 96).
- External input sources - See chapter "5.3 External input sources" (page 100).
• Dedicated buttons directly on the device:
- Bluetooth®
- Auracast™ (coming soon)
•Favourites
When a source is playing and shown on the display:
- Pressing the back button or selecting the source again calls up the source submenu.
• After pressing the back button in the submenu, the source is shown again on the display.
Buttons on the device or on the remote control (e.g. favourites, play, pause, change to the next or previous title) are available for all play sources.
5.1 Radio
RADIO
For the sources:
• DAB
• FM
- Internet radio
5.1.1 DAB Radio

For playing digital radio stations that can be received via antenna. An automatic search is carried out the first time the device is started.
Submenu:
- Station list When started, automatic scanning is carried out, available stations are stored in the station list.
- Rescan
- Manual tuning
- Prune invalid stations
When calling up a station that is no longer being received, an error message "Error-failed to start playback" appears.
After a rescan, stations that can no longer be received are marked as invalid in the station list with "?" in front of the station name.
Confirming this menu item removes invalid channels from the list.
• DRC ("Dynamic Range Compression")
Some DAB radio stations offer dynamic range compression (DRC).
Compressing the dynamic range of a radio signal can increase the volume of quiet sounds and decrease the volume of loud sounds. Use of the function is recommended for noisy environments.
- Station order
•Alphanumeric (default setting)
- Ensemble
-Valid
5.1.2 FM Radio
FM For playing analogue radio stations that can be reached via antenna. An automatic search is carried out the first time the device is started.
Submenu:
- Station list
When started, automatic scanning is carried out, available stations are stored in the station list with indication of the frequency. - Save station
Stations can be stored manually after scanning with the "Left / Previous Station" and "Right / Next Station" buttons.
- Scan setting
• Strong stations only (default setting)
- All stations
Press and hold the "Left / Previous station" or "Right / Next station" button to perform corresponding scanning.
- Audio settings
- Listen in stereo FM (default setting)
- Listen in mono FM
- Scan
To start scanning, select the menu items "Scan".
5.1.3 Internet radio

For playing radio stations that are accessible via streaming over the Internet.
Submenu:
- Favourites
To call up previously saved Internet radio stations from the favourites list. - History
To call up the last Internet radio stations played.
- Recommendations
- Local stations
- Popular stations
- Trending
- High quality
- New stations
- Filter
- By location
- By language
- By genre
- Search
Enter the term in the menu item "Search", start the function after selecting the menu item "Search".
5.2 Streaming Music

For playback from sources:
• My Music - USB-A, USB-C and UPnP/DLNA music server.
- Music services - Amazon Music®, Deezer®, Napster®, Qobuz®, TIDAL® Spotify Connect®, TIDAL Connect®, Qobuz Connect®
- Podcast
ATTENTION!
Risk of material damage due to improper handling!
Connection to live equipment may cause voltage damage to the device.
▶ Never connect the device to the USB port of a computer or to storage media (e.g. external hard drive) connected to the power supply.
5.2.1 My Music
For playback from sources:
- External devices that are connected via "USB" inputs.
• Media servers that are in the same network.
Submenu:
- Shared Music (UPnP)
The connected network is searched for sources with audio files. When a media server that has been found is selected, the audio files it contains can be played on the device. The selection is made according to the file structure on the media server.
- USB-A
Access to content according to existing file structure.
- USB-C
Access to content according to existing file structure.
- Play queue
- "Play queue is empty"
• "Try to add some songs to the play queue"
To add a title to the play queue:
▶Select a source in "My Music".
▶Select a title without confirming the title.
▶Press and hold the Play / Pause button.
▶Select "Add to play queue".
Content
Front
Rear
Support
▶Select "Now", "After current" or "Append".
- Playlists
- "Create new playlist"
- Select existing playlist
To add a title to a playlist:
▶Select a source in "My Music".
▶Select a title without confirming the title.
▶Press and hold the Play / Pause button.
▶Select "Add to Playlist".
▶Select "Now", "After current" or "Append".
- Shuffle
- Shuffle on
- Shuffle off
- Repeat
- Repeat all
- Repeat one
- Repeat folder
- Repeat off
5.2.2 Music services
The following music services can be connected via the sonoro audio app:

Amazon Music® TIDAL®


Deezer ® Qobuz ®


Napster®
The following music services offer direct control via the app of the streaming provider:

Spotify Connect®

TIDAL Connect®
Qobuz Connect®
Favourites
Personal playlists or favourites are always linked to the respective user account. Other accounts can only access them if the playlist is set to public.
Example: If another user accesses the device via Spotify Connect and attempts to play a previously saved local favorite, this will only work if the playlist is public.
Private playlists remain strictly visible to the original user and cannot be accessed by others.
TIDAL® and Qobuz® Local Favourites
With TIDAL Connect® and Qobuz Connect®, local favourites cannot be stored.
To save playlists as local favourites on your sonoro device, please log in directly with your account credentials either via the sonoro App or on the device itself.
For further information, please refer to the documentation (e.g. instructions, websites) of the respective streaming provider.
5.2.3 Podcasts
For playing back podcast programmes that can be accessed via streaming on the Internet.
Submenu:
- Favourites
To recall previously saved podcast programmes from the favourites list.
- History
To call up the most recently played podcast programmes.
- Popular podcasts
- Trending
- Filter
- By location
- By language
- By genre
- Search
5.3 External input sources

For playback of external devices connected via the inputs
- AUX IN 1
- AUX IN 2
- Optical
- Coaxial
- HDMI
• External USB CD drive
5.3.1 AUX IN 1
For playback of external devices connected via the 'AUX IN 1' input.
Submenu:
Adjust the input sensitivity:
- Low (2000 mV)
• Medium (1000 mV) (default setting) - High (500 mV)
5.3.3 AUX IN 2
For playback of external devices connected via the 'AUX IN 2' input.
The input sensitivity is fixed (300 mV).
5.3.2 Optical / Coaxial
For playback of external devices connected via the 'Optical / Coaxial' input.
Submenu:
- Input gain Input gain is a function for adjusting the volume level of optical, coaxial, and HDMI inputs. The value can be set from 0 dB (default setting) up to +18 dB to compensate for differences in the input volume levels of various sources.
- Audio latency compensation Audio latency compensation is a function to adjust a time offset between video and audio signals. The value is adjustable from 0 ms (default setting) to 480 ms.
5.3.4 HDMI
For playback of external devices connected via the 'HDMI' input.
Submenu:
• HDMI CEC (Consumer Electronics Control)
This function allows the use of control commands from or to an external device connected via HDMI.
If 'On' is selected, a message will appear indicating that increased power consumption may occur.
- HDMI auto-switching
If HDMI CEC is set to 'On', HDMI Auto Switching' becomes available. HDMI Auto Switching means that the input automatically changes to the HDMI source when the connected device is powered on.
- Input gain
Input gain is a function for adjusting the volume level of optical, coaxial, and HDMI inputs. The value can be set from 0 dB (default setting) up to +18 dB to compensate for differences in the input volume levels of various sources.
• Audio latency compensation
Audio latency compensation is a function to adjust a time offset between video and audio signals. The value is adjustable from 0 ms (default setting) to 480 ms.
Connection to the television
For digital sound output, activate PCM or Stereo and CEC in the television settings if not already enabled.
Depending on the television manufacturer, the CEC function may be named differently e.g
• Sony BraviaSync
•Philips Easylink
•LG Simplink
•Samsung Anynet+
The bidirectional control between the television and the device only takes place when the HDMI source is selected on the sonoro device.
Please note that no control commands are recognised when deep sleep mode is activated.
5.4 Bluetooth®

For playback from paired audio sources (e.g. smartphone, tablet, computer) and to paired Bluetooth devices (e.g. headphones, sound box, speakers) within a range of approx. 10 meters.
Before connecting to a Bluetooth device
▶Disconnect an existing connection on the Bluetooth device.
▶ Make sure the Bluetooth device is in discovery mode and ready for pairing.
The instructions for the Bluetooth device must be followed.
Connecting to a Bluetooth device for the first time
▶ Press the Bluetooth button on the device or select Bluetooth from the menu. When the ✕ icon flashes, the device is in searching mode.
▶ Start scanning automatically.
▶Wait until the name of the Bluetooth device is displayed.
▶Select the Bluetooth device.
▶Press the OK button to confirm.
▶Select "Pair".
▶Press the OK button to confirm.
When the devices have been successfully paired:
- The message "Bluetooth paired" appears briefly on the display.
- The ✝ or ⌘ icon (for headphone) is displayed.
An active connection with a paired audio source or a paired Bluetooth headphone is displayed with "Name of Bluetooth device | Active".
Submenu:
- Searching for Bluetooth devices Searching can take 30 seconds.
- Paired audio sources devices Active or already paired audio sources (e.g. smartphone, tablet, computer) are displayed.
- Paired headphones / speaker devices Active or already paired Bluetooth devices (e.g. headphones, soundbox, speakers) are displayed.
- New devices All new Bluetooth devices are displayed. - max. 6 devices
Connecting to an already paired Bluetooth device
The last connected Bluetooth device is automatically reconnected.
For other previously paired Bluetooth devices:
▶ Press the Bluetooth button on the device or select Bluetooth from the menu.
▶Select the Bluetooth device.
▶ Select the device, choose "Connect", then press OK to confirm.
Disconnecting from a paired Bluetooth device
▶ Press and hold the Bluetooth button on the device / remote control. Disconnection from the Bluetooth device is confirmed on the display.
Unpairing a Bluetooth device
▶Call up the Bluetooth submenu.
▶Select the Bluetooth device.
▶Press the OK button to confirm.
▶Select "Unpair".
▶Press the OK button to confirm.
5.5 Auracast™

Coming soon
6. Favourites
FAV
The device has space to store 99 favourites, e.g. for:
- Radio stations
- Titles from streaming services
- Podcast broadcasts
• Digital and analogue inputs
Save favourites
The desired source must be playing.
FAV

▶ Press and hold the button until the favourites list is displayed.
▶Select a storage space.
OK

▶Press the button to confirm.
Call up favourites
FAV

▶Briefly press the button. The favourites list is displayed.
▶Select the favorite.
OK

▶Press the button to confirm.
6.1 Preset keys
On the device


Directly save and call up 3 favourites.
▶ Press and hold one of the three buttons to save the favorite in that position. The desired source must be playing.
▶Press the button briefly to call up the favorite.
On the remote control
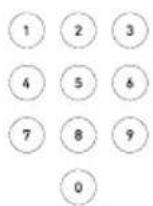
Preset 1-9
▶Press and hold to save the favorite in that position.
▶Press the button briefly to call up the favorite.
Playback starts after two seconds. Press OK to skip the waiting time.
Preset 10-99
▶ Briefly press the first digit then press and hold the second digit to save the favorite in that position.
▶Press the buttons briefly to call up the favorite.
7. Home Menu

The Home menu can be reached by pressing the Home button directly on the device or on the remote control.
7.1 Favourites
To call up a previously saved source (e.g. radio stations, titles from streaming services or podcast programmes).
→See chapter "6. Favourites" (page 105).
7.2 Sources / Menu Items
The following sources or menu items can be accessed by pressing the Home button on the device or on the remote control and selecting the desired option, or by using the direct selection buttons on the device.
DAB Radio HDMI
FM Radio Spotify
Internet Radio Amazon Music
Podcast Tidal
Bluetooth Deezer
AUX IN 1 Napster
AUX IN 2 Qobuz
Optical My Music
Coaxial
7.3 Recently played
Calls up the list with the most recently played sources.
If the storage spaces are exceeded, the oldest entry is overwritten.
7.4 Settings

To select the general settings of the device, press the gear button on the remote control to directly access the settings menu
7.4.1 Sound settings
To adjust the sound to your own preferences (e.g. treble, bass).
The following options are available for selection in the menu:
• 3D Sound - ON / OFF
This function expands the stereo image, making the sound appear more spacious and room-filling.
• Dynamic Bass - ON / OFF
This function enhances low frequencies at lower volumes, ensuring a rich and balanced sound experience even when listening quietly.
• Bass - from -12 dB to +12 dB
- Treble - from -12 dB to +12 dB
7.4.2 Sleep timer
The Sleep Timer function lets you set a countdown between 5 and 120 minutes, after which the device automatically switches off for undisturbed rest.
The activated sleep timer is indicated by the 📁 icon. The sleep timer can be ended immediately by switching off the device.
7.4.3 Alarm
To set up the alarm function the menu includes the following options:
- Alarm list
Stored wake-up times are managed in the alarm list. After selecting an alarm time, the stored settings can be confirmed, changed or deleted. Each editing of a wake-up time must be confirmed by saving.
- Add alarm
To appear in the alarm list, a desired alarm time must be added with the following settings saved:
- Enable - Off, Daily, Once, Weekdays, Weekends or a specific day of the week.
• Time - Time to the minute.
• Sound - Alarm tone "Morning vibes" or a source from the stored favourites
•Volume
The setting of the alarm time must be confirmed by saving.
The activated alarm is indicated by the Ⓐ icon. In standby, the alarm time is displayed at the bottom.
Snooze function
The alarm can be temporarily silenced by pressing the OK, Play / Pause or Mute button. The snooze function icon 🔒 flashes and the remaining time is displayed.
The duration (default setting 10 minutes) can be changed (5, 10, 15, 20, 30, 45 or 60 minutes) using the rotary control or the Up / Down buttons on the remote control.
Pressing the standby button ends the snooze function.
7.4.4 Network settings
Connection to the network can be established by Wi-Fi (wireless) or by cable (LAN).
If your router supports setup via WPS ("Wi-Fi Protected Setup"), the device can establish a fast and secure connection to the wireless network via its own WPS button.
The following options are available for selection in the menu:
- Configure wireless
- Scan network
For manual selection of the network with entry of the network key via the navigation keys and the rotary control.
•WPS button
For automatic connection via the WPS button on the device.
•WPS Pin code
To call up a pin code to be entered on the router web page.
- Manual (DHCP enabled or DHCP disabled)
For manual connection to the network and individual configuration options.
If DHCP ("Dynamic Host Configuration Protocol") is activated, settings and information (e.g. IP address, subnet, gateway, DNS) are assigned automatically.
- Configure wired
- DHCP disabled
Settings and information (e.g. IP address, subnet, gateway, DNS) are assigned manually.
•Automatic DHCP
Settings and information (e.g. IP address, subnet, gateway, DNS) are assigned automatically.
- Network type
To preset the desired connection method.
•Automatic
• Wireless (WLAN)
•Wired
- Reset network settings
To delete the existing network connection or to set it again in case of connection problems.
7.4.5 Network Info
After calling up, the following information is displayed:
- Status • IPv6 address
- Network type • Auto-configured • Wireless / Wired • Gateways
- SSID ·IPv4 address
- Encryption
• Quality
- IPv4 address
- Mask
• DNS
- IPv4 address
- IPv6 address
•IPv6 address
7.4.6 Language
To select the system language. If another language is selected, a message will appear indicating that a restart is required. Confirm this by selecting 'Yes' or 'No'.
7.4.7 Date & time
- Set time format - 12 hours or 24 hours
• Country and region
To select the set country and region
7.4.8 Device info
After opening, the following information is displayed:
• Device name (editable) • MCU
- Device ID ·DSP
- Software information •DAB/FM
- sonoroSDK •HDMI
- Spotify
7.4.9 Software update
- Check for update
• USB update - Please contact our support.
7.4.10 Factory reset
To set the device back to the factory defaults. All saved settings are deleted. The device must be set up again.
7.4.11 Streaming audio quality
Adjustable for, Napster ® , Qobuz ® and TIDAL
- Low
- Normal
- High
- Premium
7.4.12 Google Cast
Google Cast can be started directly when setting up the device ("Cast is enabled") or at a later time ("Activate Cast").
- Send device usage and crash reports by selecting "Yes" or "No".
7.4.13 AirPlay password
To request a one-time password on the screen from the iOS device.
▶Password
▶Clear password
7.4.14 Display & Power management
- Auto Standby
When the device is switched on but not playing and not being operated: Setting of the length of time until the device switches off automatically.
- 5 minutes
• 15 minutes (default setting) - 30 minutes
- 60 minutes
•24 hours
•Off
• Show time and date in standby
Displays the current time and date on the screen when the device is in standby mode.
- Screensaver
When the device is switched on and playing but not being operated:
Setting of the length of time until the display switches off automatically. The screensaver is intended to allow watching TV or listening to music without the TFT display light causing any disturbance."
- Off (default setting)
- 10 seconds
- 1 minute
- 5 minutes
Content
Front
Rear
Support
- Deep sleep mode - Enable or Disable (default setting is "Disable")
If the device has been switched to standby mode, the set alarm has no function in deep sleep mode. The device cannot be recognised on the network.
• Display brightness - Automatic (default setting)
Choose a display brightness value for Bright surroundings" and "Dark surroundings". This is set automatically depending on the ambient brightness.
•Bright surroundings
•Dark surroundings
- Brightness setting - manual
•Brightness - Independent of the ambient brightness
- Menu timeout
•Turn off
•15 seconds (default setting)
- 30 seconds
- Mini player
Showing the current playing mode information in the bottom status bar.
- Home menu style
Showing two different styles of icon mode screen.
• Line view (default setting)
-Grid view
- Text view
7.4.15 Cyber security
- Blacklisted clients
- Privacy policy
For more information please refer to the appendix.
→See chapter "13.3 Cyber security" (page 123).
8. Smart Home
The device is prepared to be operated via building automation systems ("Smart Home").
The following control of the music system is possible via Smart Home:
- Switch the device on and off.
- Select the desired playback source.
- Access functions (e.g. play / pause, previous/next track or station).
- Adjust the volume (including mute).
- Play playlists (including repeat or shuffle).
- Access and save favourites.
- Call up scenes or individual functions via the sonoro remote control of the AVATON.
By pressing the key combination "Scene" followed by pressing the number key "1-9" (for a maximum of 2 seconds), a total of 9 commands can be sent. This allows you to operate lighting, blinds, or other functions via KNX.
- New functions reserved for future updates.
NOTE:
Work on electrical installations of the building may only be carried out by qualified electricians. To connect the device to a Smart Home system, please contact an authorised sonoro Smart Home specialist dealer or sonoro customer service.
For information on which Smart Home systems support which specific functions, please visit:
→www.sonoro.com/smart-home
Legal notice on Smart Home functionality
→ For the legal notice on Smart Home functionality, please refer to the appendix.
9. Streaming
The device is prepared for data transfer and content playback by connecting to streaming applications.
→ See chapter "13.1 Marks of conformity and certificates" (page 120).
- Google Cast
The connection is possible if the smartphone or tablet is connected to the device via the same wireless network.
- Google Home
Setup takes place via the Google Home app when the smartphone or tablet is connected to the device via the same wireless network.
- AirPlay
The connection is possible if the iOS device is connected to the device via the same network.
- Spotify Connect®
Use your phone, tablet or computer as a remote control for Spotify. Go to spotify.com/connect to learn how
- TIDAL Connect®
Control is directly via the TIDAL app when the smartphone or tablet is connected to the device via the same wireless network.
- Qubuz Connect®
Control is directly via the TIDAL app when the smartphone or tablet is connected to the device via the same wireless network.
Streaming services, software updates, and other cloud solutions
The availability of music services may vary depending on the region. Certain services may not be accessible at the time of purchase. Some services may be added or discontinued from time to time, depending on the decisions of the respective music service provider, smart home control provider, other cloud-based service providers, or other third parties. The manufacturer has no influence over such decisions, and no claims may be asserted against the manufacturer as a result of changes in the availability of these services. In addition, it may be necessary to temporarily or permanently restrict or disable certain functions of this device due to legal requirements, particularly in the areas of data protection and IT security. In such cases, the manufacturer shall not be held liable, to the extent permitted by applicable law.
10. Troubleshooting
Possible malfunctions are described as follows:
Description of the fault.
- Possible cause.
▶Remedy the fault.
→Reference to corresponding chapter.
The device does not switch on.
- No power supply.
▶Check the power supply (e.g. fuse from the circuit).
▶Make sure that the power cable is connected correctly.
The device does not respond.
- Error on the device.
▶ Disconnect the device from the power supply for a few seconds (e.g. unplug the power cable).
▶Switch the device on again.
The device automatically switches to standby mode.
• The sleep timer is activated.
▶Switch on the device.
▶ Start playback again.
- The inactivity standby function is active because the device has not been used for the set time.
▶Switch on the device.
▶ Start playback again.
Poor sound quality.
• Interference from other radio transmitters or devices.
▶ Increase the distance to other devices.
▶To connect via HDMI, use a good, shielded HDMI cable.
The remote control does not react or reacts incorrectly.
• The distance to the device is too great.
▶ Reduce the distance between the remote control and the device.
• The battery is empty.
▶ Replace the battery.
→See chapter "3.3 Preparing the remote control" (page 80).
No connection to the wireless network.
- The router is too far away or communication is blocked.
▶Make sure that the router is not shielded.
▶Place the device closer to the router.
▶Change the orientation of the Wi-Fi antennas.
- The router is not switched on or is not working properly.
▶Switch on your router.
▶Check the status of the router.
- Incorrect set-up procedure.
▶ Check that your router supports WPS and uses the correct setup procedure (WPS or PIN).
▶ Repeat the connection process.
→See chapter "3.8 Network connection" (page 86).
No sound audible.
• The sound is switched off.
▶Adjust the volume.
- The device is not in the correct play mode.
▶Select another playback source.
• The headphone is plugged in.
▶Disconnect the headphone plug.
- No FM/DAB reception.
▶Connect or align the FM / DAB antenna.
- No network connection.
▶Check the connection.
→See chapter "7.4.4 Network settings" (page 109).
- No sound from the external device connected via the optical or coaxial input.
▶Select PCM as the output on the external device.
- No sound from the television connected via the "HDMI" input.
▶Use the HDMI socket "ARC" on the television.
▶Select PCM as the output on the external device.
Internet radio station does not work from time to time.
- Some stations only support a limited number of listeners.
▶Try again later.
• The radio station is not broadcasting.
▶Try again later.
Internet radio station disappears from the station list.
- The station is removed from the list if it is not transmitting.
▶ Try again later. When the station is transmitting again, it will reappear in the list.
The USB device does not work.
- Playback is not supported.
▶Check files and the file system on the USB device.
• There are hidden files on the USB device.
▶Remove the hidden files from the USB device.
The USB device is not charging.
- No connection to the USB device.
▶Check the USB cable.
The Bluetooth connection does not work.
- Bluetooth is already connected to another Bluetooth device.
▶Disconnect the connected device and try again.
• The Bluetooth device has problems.
▶Switch Bluetooth on the Bluetooth device off and on again.
- The Bluetooth device does not support the required profile.
▶Check the configuration from the Bluetooth device.
11. Cleaning and care
ATTENTION!
Risk of property damage due to improper cleaning!
Sharp-edged objects, abrasive cleaners or unsuitable cleaning agents can damage the surface of the device. Incorrect cleaning measures can restrict the functionality.
▶Never use abrasive or solvent-based cleaning agents.
▶Never use hot or compressed air to dry the device.
▶ Protect edges and corners of the device from excessive pressure.
• Fingerprints and light soiling:
▶ Only clean the outside of the device with a soft, dry cloth.
- Heavy soiling:
▶ Only clean the outside of the device with a slightly damp cloth.
▶Then dry the device with a soft, dry cloth.
12. Disposal
12.1 Disposing of the packaging
ATTENTION!
Risk of environmental damage due to improper disposal of the packaging!
▶Do not put the packaging in the normal household waste.
▶ Dispose of the packaging in an environmentally friendly and appropriate manner (recycling).
The packaging serves to protect against transport damage. The packaging materials are selected according to environmentally friendly aspects and are made of recyclable materials. The packaging materials can be returned to the raw material cycle after use.
▶ Dispose of the packaging in an environmentally friendly manner, separated according to materials.
12.2 Disposing of the device
ATTENTION!
Danger of environmental damage due to improper disposal of the device!
▶ Do not dispose of the device in normal household waste at the end of its working life.
▶ Ask your city or municipal administration about the possibilities of environmentally friendly and proper recycling or disposal of the device.
Correctly handing in the device for recycling makes a contribution to the reuse of materials and the protection of resources.
▶ Dispose of the device in accordance with the legal requirements via a specialist disposal company, via your municipal waste disposal facility or by returning it to the distributor who is obliged to take it back.
If batteries or rechargeable batteries are used:
▶Remove the batteries from the device.
▶ Dispose of batteries and rechargeable batteries by returning them to the distributor of the battery type or to a municipal collection point.
13. Appendix
13.1 Marks of conformity and certificates

Bluetooth®
The Bluetooth® word mark and logos are owned by Bluetooth SIG, Inc. and are used by sonoro audio GmbH under licence. Other trademarks and brand names are those of their respective owners.

AURACAST.
A BLUETOODH* TECHNOLOGY
"The Auracast™ word mark and logos are trademarks owned by Bluetooth SIG, Inc. and any use of such marks by sonoro audio GmbH is under license. Other trademarks and trade names are those of their respective owners."

Spotify®
Use your phone, tablet or computer as a remote control for Spotify. Visit spotify.com/connect to find out how. The Spotify software is subject to third-party licences, which can be found here: https://www.spotify.com/connect/third-party-licenses/
amazon music
Amazon, Amazon Music Unlimited and all associated logos are trademarks of Amazon.com, Inc. or its subsidiary companies.

TIDAL
TIDAL and the TIDAL logo are registered trademarks of Aspiro AB in the European Union and other countries.

DEEZER
Deezer and the Deezer logo are international trademarks of Deezer S.A., registered in France and other countries.

Napster.
Napster and the Napster logo are registered trademarks of Rhapsody International Inc registered in the United States and other countries.
qobuz
Qobuz and its logo are registered trademarks of Xandrie S.A.

Works with Apple AirPlay
AirPlay, iPad, iPad Air, iPad Pro and iPhone are trademarks of Apple Inc., registered in the United States and other countries.
Use of the "Works with Apple" mark means that an accessory has been designed specifically for the technology specified in the mark and has been certified by the developer to meet Apple performance standards.
iTunes is a trademark of Apple Inc. registered in the United States and other countries.
App Store is a service mark of Apple Inc. registered in the United States and other countries.
iOS is a trademark or registered trademark of Cisco in the United States and other countries and is used under licence.
Mac, Mac OS, OS X, macOS Sierra and macOS High Sierra are trademarks of Apple Inc. and are registered in the United States and other countries.

HIGH-DEFINITION MULTIMEDIA INTERFACE
The terms HDMI, HDMI High-Definition Multimedia Interface, HDMI Trade Dress and the HDMI logos are trademarks or registered trademarks of HDMI LicensingAdministrator, Inc.

Google Cast
Android, Google Cast and other related trademarks and logos are trademarks of Google LLC.
Microsoft, Windows and Windows Media are either trademarks or registered trademarks of Microsoft Corporation in the United States and/or other countries.
Other company names, product names and logos in this document are trademarks or registered trademarks of their respective owners.
13.2 Legal notice on Smart Home functionality
The purchase of this device does not establish any claim to the permanent or unrestricted availability of Smart Home control functions. The provision of such functions may be discontinued, modified, or replaced in whole or in part by new functions and systems at any time by third-party providers. sonoro Audio GmbH assumes no liability for the availability, functionality, or compatibility of such third-party services.
Technical or functional adjustments may result in certain functions being temporarily or permanently unavailable. In such cases, no claims can be made against sonoro Audio GmbH.
Due to legal requirements, it may be necessary to temporarily or permanently restrict or deactivate certain functions or applications of this device. sonoro Audio GmbH assumes no liability for any resulting limitations or downtime in usage.
A software update of the device may require an update of the supported Smart Home system as well. Any costs arising therefrom, including those for third-party software or services, shall be borne exclusively by the user. sonoro Audio GmbH provides no warranty, cost coverage, or guarantee for software changes that limit use with a Smart Home system or make an update necessary.
In the event of a factory reset, all settings – including network configurations, device name, and saved favourites – will be deleted. These must be fully reconfigured after the reset. It may also be necessary to reintegrate the sonoro music system into the respective Smart Home system. sonoro Audio GmbH does not accept any liability or cost coverage for this either.
13.3 Cyber security
Data Security
sonoro Audio GmbH implements appropriate technical measures to protect your data against loss, misuse, or unauthorized access. Regular updates ensure legally compliant operation. We assume no liability for any damages, malfunctions, or usage restrictions resulting from missing or delayed software or system updates. Responsibility for performing these updates rests solely with the user.
To ensure that our privacy policy always complies with current legal requirements, we reserve the right to make changes at any time. This also applies if the privacy policy must be adjusted due to new or revised services, such as new service features. The current version of the privacy policy can be found at:
To ensure secure access via a network connection to your sonoro device, initial authentication is required when you:
- use an unknown mobile device,
- use a new PC, laptop, or browser,
- access the web client for the first time via its IP address,
- connect a new smart home system, or
- reset your music system to factory settings.
The device display will show a security prompt with the options "Yes" / "No", requiring confirmation directly on the device.
Each new access attempt from an unknown device or system requires this confirmation.
If the user confirms with "Yes", control via the app, smart home system, or web client will be enabled.
If the confirmation is rejected, the external system/control element will appear under "Blacklisted clients". See chapter "7.4.15 Cyber security" (page 112).
Only after removing the device from "Blacklisted clients" can a new request from that system/control element be made. The maximum confirmation time is 150 seconds; after this period, a new request must be initiated.
13.4 Declaration of conformity
Manufacturer:
sonoro audio GmbH
We hereby declare that the product
All-In-One Audio Music System AVATON
by virtue of its development, design and construction, complies with the essential requirements of the following Directives:
• Radio Equipment Directive 2014/53/EC
• Ecodesign Directive 2009/125/EC & EU 2023/826
- Directive on the restriction of the use of certain hazardous substances in electrical and electronic equipment 2011/65/EC
In the event of a modification of the device that has not been approved by the manufacturer, the declaration of conformity automatically loses its validity.
FR- Mode d'emploi
All-In-One Audio Music System AVATON
F Bouton lecture/pause, bouton OK
G Réglages
H Bouton muet
I Bouton scènes
J Bouton volume + / -
K Bouton haut
- Ma Musique - Serveur musical USB-A, USB-C et UPnP/DLNA
- Services musicaux - Amazon Music®, Deezer®, Napster®, Qobuz®, TIDAL®, Spotify Connect®, TIDAL Connect®, Qobuz Connect®
- Podcast
ATTENTION!
7.4.15 Cyber security
- Blacklisted clients
- Privacy policy
For more information please refer to the appendix.
Possible malfunctions are described as follows:
▶Redémarrez la lecture.
▶Redémarrez la lecture.
A BLUETOOTH* TECHNOLOGY
Works with Apple AirPlay
All-In-One Audio Music System AVATON
All-In-One Audio Music System AVATON
▶Estrarre completamente l'antenna.
A
B
- Servizi musicali - Amazon Music®, Deezer®, Napster®, Qobuz®, TIDAL®, Spotify Connect®, TIDAL Connect®, Qobuz Connect®
- Podcast
ATTENZIONE!
7.4.15 Cyber security
A BLUETOOTH* TECHNOLOGY
Works with Apple AirPlay
All-In-One Audio Music System AVATON
All-In-One Audio Music System AVATON
7.4.15 Cyber security 295
A Bron- en presetknoppen
- Radio (RADIO)
- Streaming services ( musical)
• Externe ingangsbronnen (←) - Bluetooth® (✗)
- Auracast™ (®)
- FAV (FAV)
- Preset 1 (1)
- Preset 2 (2)
- Preset 3 (3)
▶Schroef de antennes vast.
▶Richt de antennes omhoog.
▶Schroef de antenne vast.
▶Schroef de antenne vast.
▶ Steek de stroomkabel in het apparaat.
The following options are available for operating the device:
▶Continue volumeregeling


For playback from paired audio sources (e.g. smartphone, tablet, computer) and to paired Bluetooth devices (e.g. headphones, sound box, speakers) within a range of approx. 10 meters.
▶Selecteer "Ontkoppelen".
▶Druk ter bevestiging op de OK-toets.
▶Press the OK button to confirm.
Inhoud
Voorkant
Achterkant
Supporto
5.5 Auracast™

The alarm can be temporarily silenced by pressing the OK, Play / Pause or Mute button. The snooze function icon 🔒 flashes and the remaining time is displayed.
The duration (default setting 10 minutes) can be changed (5, 10, 15, 20, 30, 45 or 60 minutes) using the rotary control or the Up / Down buttons on the remote control. Pressing the standby button ends the snooze function.
Inhoud
Voorkant
Achterkant
Supporto
7.4.4 Netwerkinstellingen
7.4.15 Cyber security
▶Schakel de router in.
▶Controleer de verbinding.
A BLUETOOTH* TECHNOLOGY
Works with Apple AirPlay
▶Enrosque la antena.
A
B
▶Enrosque la antena.

▶Conecte el cable LAN a su router.
- Servicios de música - Amazon Music®, Deezer®, Napster®, Qobuz®, TIDAL®, Spotify Connect®, TIDAL Connect®, Qobuz Connect®
- Pódcast
ATENCIÓN!
The input sensitivity is fixed (300 mV).
5.3.2 Optical / Coaxial
After opening, the following information is displayed:
7.4.15 Cyber security
A BLUETOOTH* TECHNOLOGY
Works with Apple AirPlay
All-In-One Audio Music System AVATON

- INDEX
- ALL-IN-ONE AUDIO MUSIC SYSTEM AVATON
- FAVORITEN 44
- 7.4.15 CYBER SECURITY
- WORKS WITH APPLE AIRPLAY
- EN-OPERATING INSTRUCTIONS
- DOCUMENT INFORMATION
- MANUFACTURER
- TABLE OF CONTENTS
- SAFETY INFORMATION ....68
- PRODUCT INFORMATION....70
- SETTING UP ....79
- OPERATION....87
- SOURCES....92
- FAVOURITES ....105
- HOME MENU....107
- SAFETY INFORMATION
- 1.1 INTENDED USE
- 1.2 GENERAL SAFETY INSTRUCTIONS
- WARNING
- DANGER DUE TO NON-OBSERVANCE OF THE SAFETY INSTRUCTIONS
- DO NOT USE IN
- NOTE
- PRODUCT INFORMATION
- 2.1 EQUIPMENT
- 2.2 SCOPE OF DELIVERY
- 2.3 FRONT OF DEVICE
- 2.4 REAR OF DEVICE
- 2.5 BOTTOM OF DEVICE
- OPERATING INSTRUCTIONS AVATON
- CONTENT
- FRONT
- SUPPORT
- 2.6 REMOTE CONTROL
- 2.7 DISPLAY ICONS
- SETTING UP
- 3.1 UNPACKING THE DEVICE
- 3.2 POSITIONING THE DEVICE
- 3.3 PREPARING THE REMOTE CONTROL
- 3.4 REPLACE THE BATTERY
- 3.5 CONNECTING ANTENNAS
- 3.5.1 WI-FI ANTENNAS
- 3.5.2 FM/DAB TELESCOPIC ANTENNA
- 3.5.3 FM/DAB AERIAL
- 3.6 ESTABLISHING A POWER SUPPLY
- 3.7 INITIAL SETUP
- 3.8 NETWORK CONNECTION
- 3.8.1 WPS
- 3.8.2 WIRED CONNECTIVITY
- OPERATION
- 4.1 CONTROL
- 4.1.1 CONTROL ON DEVICE
- OK
- 4.1.2 CONTROL VIA THE REMOTE CONTROL
- 4.1.3 CONTROL VIA SONORO AUDIO APP
- 4.1.4 CONTROL VIA SONORO WEB CLIENT
- 4.2 FUNCTIONS
- FAV
- SOURCES
- 5.1 RADIO
- RADIO
- 5.1.1 DAB RADIO
- SUBMENU
- 5.1.2 FM RADIO
- 5.1.3 INTERNET RADIO
- 5.2 STREAMING MUSIC
- ATTENTION
- 5.2.1 MY MUSIC
- REAR
- 5.2.2 MUSIC SERVICES
- FAVOURITES
- TIDAL® AND QOBUZ® LOCAL FAVOURITES
- 5.2.3 PODCASTS
- 5.3 EXTERNAL INPUT SOURCES
- 5.3.1 AUX IN 1
- 5.3.3 AUX IN 2
- 5.3.2 OPTICAL / COAXIAL
- 5.3.4 HDMI
- CONNECTION TO THE TELEVISION
- 5.4 BLUETOOTH®
- BEFORE CONNECTING TO A BLUETOOTH DEVICE
- CONNECTING TO A BLUETOOTH DEVICE FOR THE FIRST TIME
- CONNECTING TO AN ALREADY PAIRED BLUETOOTH DEVICE
- DISCONNECTING FROM A PAIRED BLUETOOTH DEVICE
- UNPAIRING A BLUETOOTH DEVICE
- 5.5 AURACAST™
- SAVE FAVOURITES
- CALL UP FAVOURITES
- 6.1 PRESET KEYS
- ON THE DEVICE
- ON THE REMOTE CONTROL
- PRESET 1-9
- PRESET 10-99
- HOME MENU
- 7.1 FAVOURITES
- 7.2 SOURCES / MENU ITEMS
- 7.3 RECENTLY PLAYED
- 7.4 SETTINGS
- 7.4.1 SOUND SETTINGS
- 7.4.2 SLEEP TIMER
- 7.4.3 ALARM
- SNOOZE FUNCTION
- 7.4.4 NETWORK SETTINGS
- 7.4.5 NETWORK INFO
- 7.4.6 LANGUAGE
- 7.4.7 DATE & TIME
- 7.4.8 DEVICE INFO
- 7.4.9 SOFTWARE UPDATE
- 7.4.10 FACTORY RESET
- 7.4.11 STREAMING AUDIO QUALITY
- 7.4.12 GOOGLE CAST
- 7.4.13 AIRPLAY PASSWORD
- 7.4.14 DISPLAY & POWER MANAGEMENT
- SMART HOME
- STREAMING
- STREAMING SERVICES, SOFTWARE UPDATES, AND OTHER CLOUD SOLUTIONS
- TROUBLESHOOTING
- DESCRIPTION OF THE FAULT
- THE DEVICE DOES NOT SWITCH ON
- THE DEVICE DOES NOT RESPOND
- THE DEVICE AUTOMATICALLY SWITCHES TO STANDBY MODE
- POOR SOUND QUALITY
- THE REMOTE CONTROL DOES NOT REACT OR REACTS INCORRECTLY
- NO CONNECTION TO THE WIRELESS NETWORK
- NO SOUND AUDIBLE
- INTERNET RADIO STATION DOES NOT WORK FROM TIME TO TIME
- INTERNET RADIO STATION DISAPPEARS FROM THE STATION LIST
- THE USB DEVICE DOES NOT WORK
- THE USB DEVICE IS NOT CHARGING
- THE BLUETOOTH CONNECTION DOES NOT WORK
- CLEANING AND CARE
- DISPOSAL
- 12.1 DISPOSING OF THE PACKAGING
- 12.2 DISPOSING OF THE DEVICE
- APPENDIX
- 13.1 MARKS OF CONFORMITY AND CERTIFICATES
- BLUETOOTH®
- AURACAST
- SPOTIFY®
- AMAZON MUSIC
- TIDAL
- DEEZER
- NAPSTER
- QOBUZ
- GOOGLE CAST
- 13.2 LEGAL NOTICE ON SMART HOME FUNCTIONALITY
- 13.3 CYBER SECURITY
- DATA SECURITY
- 13.4 DECLARATION OF CONFORMITY
- FR- MODE D'EMPLOI
- ATTENZIONE
- 7.4.4 NETWERKINSTELLINGEN
- ATENCIÓN
Brand : SONORO
Model : AVATON
Category : Loudspeaker