
GS650 - Sander SCHEPPACH - Free user manual and instructions
Find the device manual for free GS650 SCHEPPACH in PDF.

| Product Type | Sharpening Station |
| Brand | Scheppach |
| Model | GS650 |
| Input Voltage | 230 V~, 50 Hz |
| Power Consumption | 65 W (S3 15%) |
| Rated Speed | 6700 min⁻¹ |
| Protection Class | II |
| Protection Type | IP20 |
| Weight | 1.5 kg |
| Sharpened Drill Diameter | 3 – 13 mm |
| Sharpened Knife Width | 6 – 51 mm |
| Abrasion Angle Range | 20° – 40° |
| Grinding Wheel Outer Diameter | max. 48 mm |
| Grinding Wheel Bore | 10 mm |
| Sound Pressure Level (LpA) | 74 dB(A) |
| Sound Power Level (LWA) | 87 dB(A) |
| Intended Use | Sharpening of drills, knives, scissors, chisels, gouges |
| Power Supply | Mains 230 V~ |
| Maintenance | Clean regularly with a damp cloth and black soap |
| Storage | Dark, dry, frost-free place, 5–30 °C |
| Wear Parts | Abrasive, carbon brushes, deburring discs, angle guides, V-belt |
Frequently Asked Questions - GS650 SCHEPPACH
User questions about GS650 SCHEPPACH
0 question about this device. Answer the ones you know or ask your own.
Ask a new question about this device
Download the instructions for your Sander in PDF format for free! Find your manual GS650 - SCHEPPACH and take your electronic device back in hand. On this page are published all the documents necessary for the use of your device. GS650 by SCHEPPACH.
USER MANUAL GS650 SCHEPPACH
natural_image
Close-up of a black industrial electrical contactor device with no visible text or symbols on the body itself.GS650
natural_image
Close-up of a mechanical component with a circular housing and a labeled pin (13), no readable text or symbols beyond the number.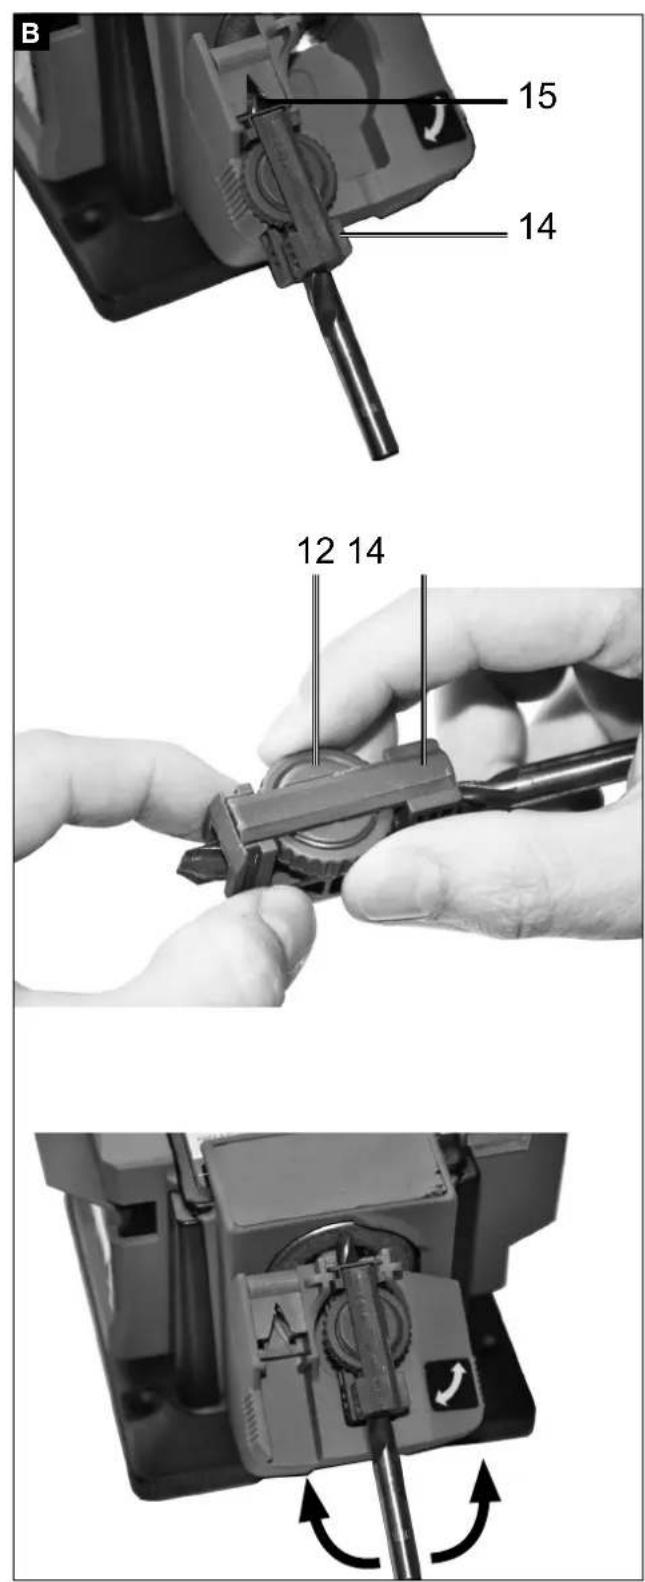
natural_image
Close-up of a hand using a handheld device to interact with a transparent plastic clip (no visible text or symbols)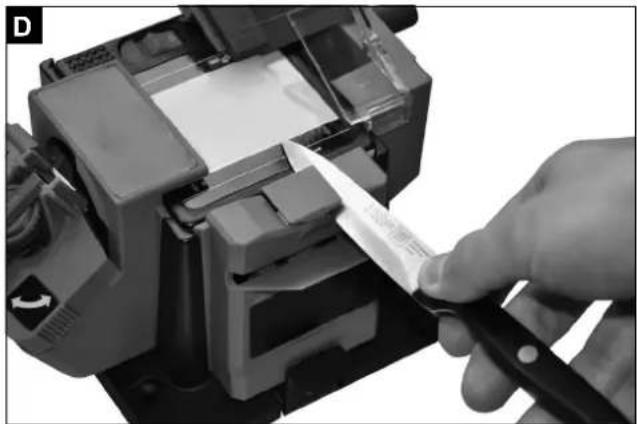
natural_image
Close-up of a hand using a tool to cut or apply a mechanical component, no visible text or symbols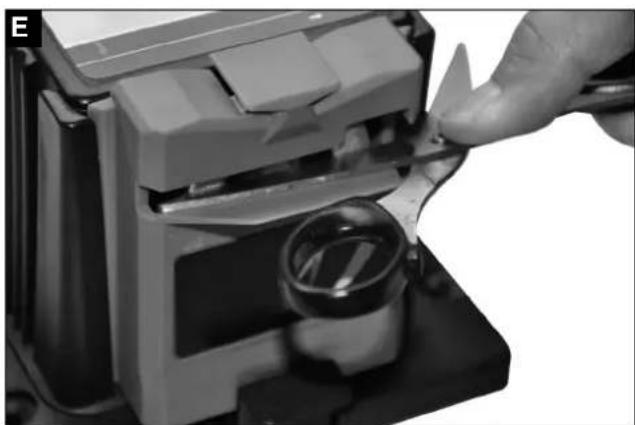
natural_image
Close-up of a hand turning a component into a mechanical housing (no visible text or symbols)Günzburger Straße 69
D-89335 Ichenhausen
Verehrter Kunde,
Explanation of the symbols on the equipment
 | Read instruction manual and safety instructions before starting up and pay attention! |
 | Wear safety goggles! |
 | Wear ear-muffs! |
 | Wear a breathing mask! |
 | Protection class II |
Table of contents: Page:
- Introduction......17
- Device Description ....17
- Intended use....17
- General safety instructions for electric tool....18
- Further Safety Instructions....19
- Technical Data....20
- Assembly....20
- Transport....22
- Maintenance....22
- Storage....22
- Electrical connection 22
- Disposal and recycling 23
1. Introduction
Manufacturer:
scheppach
Günzburger Straße 69
D-89335 Ichenhausen
Dear Customer,
We hope your new tool brings you much enjoyment and success.
Note:
According to the applicable product liability laws, the manufacturer of the device does not assume liability for damages to the product or damages caused by the product that occurs due to:
- Improper handling,
• Non-compliance of the operating instructions, - Repairs by third parties, not by authorized service technicians,
- Installation and replacement of non-original spare parts,
- Application other than specified,
- A breakdown of the electrical system that occurs due to the non-compliance of the electric regulations and VDE regulations 0100, DIN 57113 / VDE0113.
We recommend:
Read through the complete text in the operating instructions before installing and commissioning the device.
The operating instructions are intended to help the user to become familiar with the machine and take advantage of its application possibilities in accordance with the recommendations.
The operating instructions contain important information on how to operate the machine safely, professionally and economically, how to avoid danger, costly repairs, reduce downtimes and how to increase reliability and service life of the machine.
In addition to the safety regulations in the operating instructions, you have to meet the applicable regulations that apply for the operation of the machine in your country.
Keep the operating instructions package with the machine at all times and store it in a plastic cover to protect it from dirt and moisture. Read the instruction manual each time before operating the machine and carefully follow its information. The machine can only be operated by persons who were instructed concerning the operation of the machine and who are informed about the associated dangers. The minimum age requirement must be complied with.
In addition to the safety requirements in these operating instructions and your country's applicable regulations, you should observe the generally recognized technical rules concerning the operation of woodworking machines.
We accept no liability for accidents or damage that occur due to a failure to observe this manual and the safety instructions.
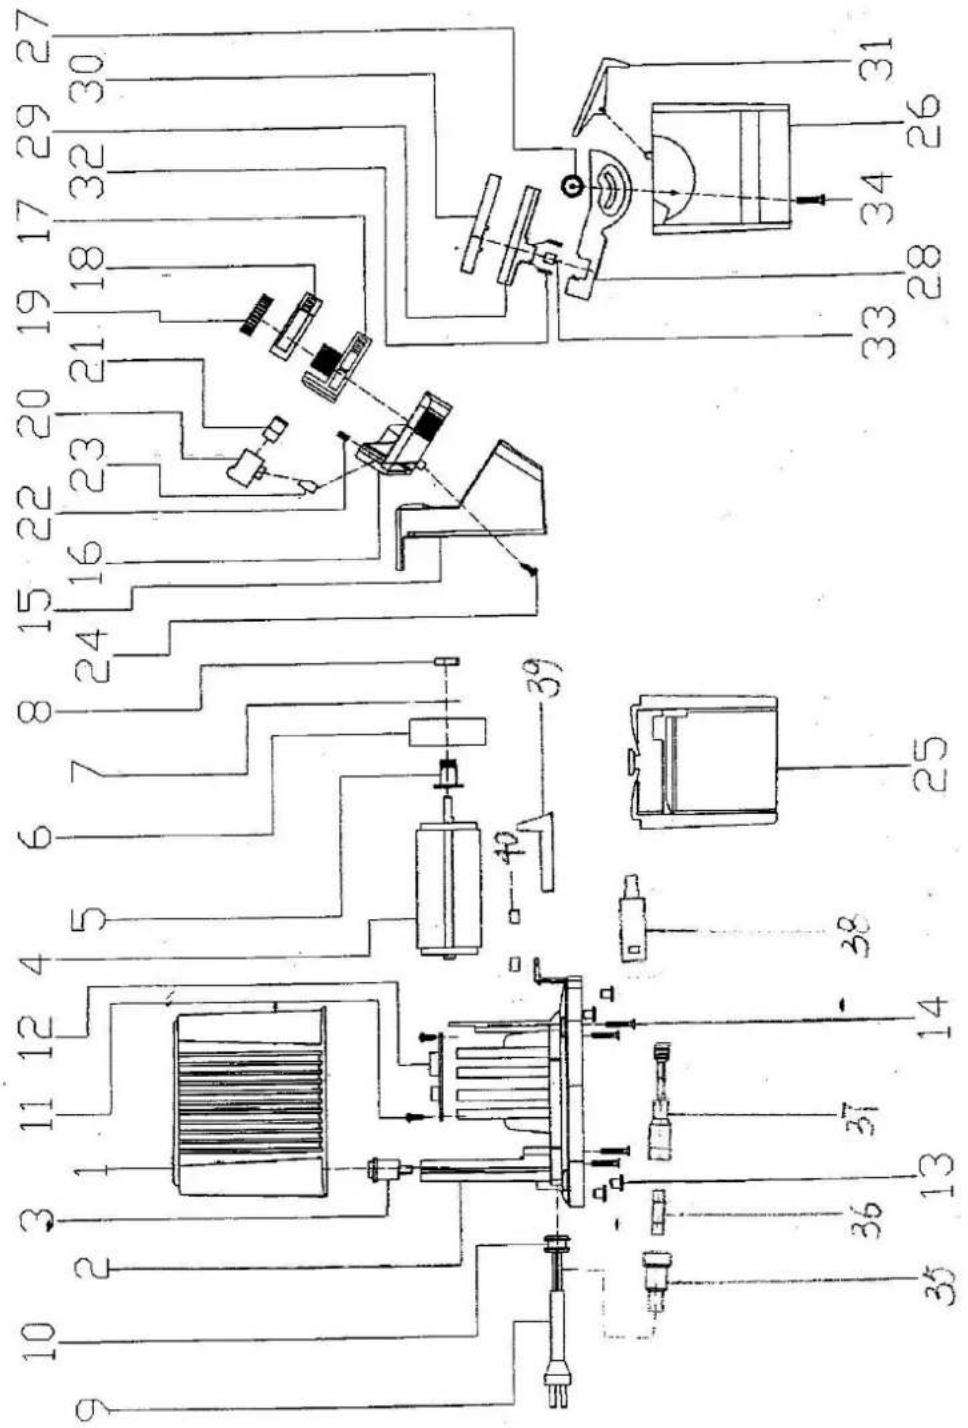
2. Device Description (Fig. A)
- Mains plug
- Sharpener for knives and scissors
- On/off switch
- Spacer
- Magnet holder
- Tool table
- Retaining screw for angular adjustment
- Protective hood
- Mounting holes for work bench assembly
- Grinding disc
- rotatable drill mount
- Knurled nut for drill-fastening
- Release lever for sharpener
- Drill holder
- Adjusting device
- Grinding wheel nuts
Unpacking
- Open the packaging and remove the device carefully.
- Remove the packaging material as well as the packaging and transport bracing (if available).
- Check that the delivery is complete.
- Check the device and accessory parts for transport damage.
- If possible, store the packaging until the warranty period has expired.
ATTENTION
The device and packaging materials are not toys! Children must not be allowed to play with plastic bags, film and small parts! There is a risk of swallowing and suffocation!
3. Intended use
The sharpening station is suitable for sharpening tools (e.g. drills, knives, scissors, picks, chisel).
The device is not intended for all other types of applications (e.g. grinding with unsuitable grinding tools, grinding with a coolant solution, grinding hazardous materials such as asbestos).
The equipment is intended for use in the field of DIY. It is not designed for commercial use.
The equipment is designed for use by adults. Young people under the age of 16 are permitted to use the equipment only under supervision.
The manufacturer shall not be liable for damages caused by use other than for the intended purpose or by incorrect operation.
4. General safety instructions for electric tool
CAUTION: Read all safety regulations and instructions.
Any failures made in following the safety regulations and instructions may result in an electric shock, fire and/or serious injury.
Keep all safety regulations and instructions in a safe place for future use.
The term “electric tool” used in the safety instructions refers to electric tools operated from the mains power supply (with a power cable) and to battery operated electric tools (without a power cable).
Workplace
- Keep your work area clean and tidy. Cluttered and dark working areas are accident-prone.
- Do not operate power tools in explosive atmospheres, where flammable liquids, gases or dust are present. Power tools generate sparks which may ignite the dust or fumes.
- Keep children and other persons away while operating a power tool. Distractions can be a reason for losing control of the tool.
Electrical safety
- Power tool plugs must match the outlet. Do not modify the plug in any way. Do not use any adapter plugs with grounded devices. Unmodified plugs and matching outlets will reduce the risk of electric shock.
- Avoid physical contact with grounded surfaces such as pipes, radiators, ranges and refrigerators. If your body is grounded the risk of an electric shock increases.
- Do not expose the power tool to rain or wet conditions. Water that enters a power tool will increase the risk of electric shock.
- Do not abuse the cord; do not use the cord to carry or hang up the power tool or to unplug the power tool from the mains. Keep the power cord away from heat, oil, sharp edges or the power tool's moving parts. Damaged or tangled power cords will increase the risk of electric shock.
- When operating a power tool outdoors, use only extension cords that are approved for outdoor use. The use of an extension cord that is adapted for outdoor use reduces the risk of electric shock.
- If working with the power tool in a damp location cannot be avoided, use a ground fault circuit interrupter. The use of a ground fault circuit interrupter reduces the risk of electric shock. Always check whether the mains voltage complies with the voltage specified on the nameplate of the power tool.
Personal safety
- Stay alert. Watch what you are doing and use common sense when operating a power tool. Do not use the power tool while you are tired or under the influence of drugs, alcohol or medication. A moment of inattention while operating power tools may result in serious personal injury.
- Use personal protective equipment. Always wear safety glasses. Safety equipment such as a dust mask, non-skid safety shoes, a hard hat or ear protection depending on the type and use of the power tool will reduce personal injuries.
- Prevent unintentional starting. Ensure that the power tool is switched off before connecting it to the power supply and/or battery, picking it up or carrying the tool. Carrying power tools with your finger on the switch or energizing power tools that have the switch on invite accidents.
- Remove any adjusting tool or wrench before turning the power tool on. A wrench or a key which has been left attached to a rotating part may induce personal injury. Do not overreach. Keep proper footing and balance at all times. This enables you to better control the power tool in situations which cannot be foreseen.
- Dress properly. Do not wear loose clothing or jewellery. Keep your hair, clothing and gloves away from moving parts. Loose clothes, jewellery or long hair may get caught in moving parts.
- If dust extraction and collection units are installed, make sure that these are connected and properly used. Using such devices reduces hazards associated with dust.
Power tool use and care
- Do not force the power tool. Use the correct power tool for your application. With the correct power tool you will do the job better and safer at the specified power rate.
- Do not use the power tool if it has a defective switch. A power tool, which cannot be turned on or off with the switch, is dangerous and must be repaired.
-
Unplug the power cord from the outlet and/or remove the battery before making any adjustments to the tool, changing accessories, or storing the power tool. Such preventive safety measures prevent starting the tool accidentally.
-
Store idle power tools out of children's reach. Do not allow persons unfamiliar with the tool or these instructions to operate the power tool. Power tools are dangerous in the hands of untrained users.
- Keep the power tools in good condition. Check that moving parts are functioning smoothly and do not lock, whether parts are broken or for any other condition that may affect the power tool's operation. If damaged, have the power tool repaired before use. Many accidents are associated with poorly maintained power tools.
- Keep cutting tools sharp and clean. Properly maintained cutting tools with sharp cutting edges are likely to block less and are easier to control.
- Use the power tool, the accessories, bits, etc. in accordance with these instructions and in the manner intended for the particular type of equipment. Take into account the working conditions and the work to be performed. Using power tools for operations different from those intended can lead to hazardous situations.
Service
- Have your electric tool repaired only by trained personnel using only genuine spare parts. This will ensure that your electric tool remains safe to use
5. Further Safety Instructions
- Connect the device only to a power point with a residual current protective device (RCD) with a measured residual current of not more than 30 mA.
- Keep the mains cable and extension cable away from the grinding disk and saw chain. In the event that it is damaged or severed, immediately disconnect the plug from the socket. Do not touch the cable before it has been disconnected from the mains. Risk of electric shock.
- The replacement of the plug or the connection line must always be executed by the manufacturer of the electric tool or his/her customer service in order to avoid any hazards.
- Only switch the device on once it is safely fixed to the worktop.
- For your own safety only use accessories and attachments which were stated in the operating instructions or recommended or specified by the tool manufacturer.
- Only use grinding discs where the printed rotational speed is at least as high as what has been specified on the name plate of the device.
- Carry out a visual inspection of the grinding disc before use. Do not use any damaged or deformed grinding discs. Replace any damaged or worn grinding discs.
-
Make sure that the sparks produced by grinding do not present a danger, e.g. reach people or ignite flammable substances.
-
Never keep the fingers between the grinding disc and spark protection or in close proximity to the protective hoods. There is a risk of crushing.
- The rotating parts of the device cannot be covered due to functional reasons. Therefore, proceed cautiously and hold the workpiece firmly in order to avoid slipping which could cause your hands to come into contact with the grinding belt or grinding disc.
- The workpiece gets hot during grinding. Do not touch the machined area, allow it to cool down. There is a risk of burning. Do not use coolants or the like.
- If you are tired or have consumed alcohol or tablets, do not work with the device. Always have a break on time.
- Switch the device off and remove the mains plug
- to loosen a blocked insertion tool,
- if the connection line is damaged or entangled,
- in case of unusual sounds.
Residual risks
Even if you use this electric power tool in accordance with instructions, certain residual risks cannot be rules out. The following hazards may arise in connection with the equipment's construction and layout:
- Lung damage if no suitable protective dust mask is used.
- Damage to hearing if no suitable ear protection is used.
- Health damage caused by hand-arm vibrations if the equipment is used over a prolonged period or is not properly guided and maintained.
Warning! This electric tool generates an electromagnetic field during operation. This field can impair active or passive medical implants under certain conditions. In order to prevent the risk of serious or deadly injuries, we recommend that persons with medical implants consult with their physician and the manufacturer of the medical implant prior to operating the electric tool.
6. Technical Data
Nominal input voltage 230V\~50Hz
| Power consumption | 65W (S3 15%)* |
| Measurement idling speed n_0 | 6700 min ^-1 |
| Safety class | II |
| Protection category | IP20 |
| Weight | 1.5 kg |
| Grinding angle range | 20° - 40° |
| Sharpness drill diameter | 3 - 13mm |
| Sharpness knife width | 6 - 51mm |
| Grinding disc: | |
| Outer diameter | max. 48mm |
| Borehole diameter | 10mm |
* Operating mode S3 - 15% - 10min: S3 = Intermittent mode without influencing the starting process. This means that during a period of 10 min the max. operating time is 15% (1.5 min).
Noise values
The total noise values determined in accordance with EN 61029.
| Sound pressure level L_pA | 74 dB(A) |
| Uncertainty K_pA | 3 dB |
| Sound power level L_WA | 87 dB(A) |
| Uncertainty K_WA | 3 dB |
Wear hearing protection.
The effects of noise can cause a loss of hearing. Total vibration values (vector sum - three directions) determined in accordance with EN 61029.
7. Assembly
⚠ Caution! Risk of injury!
- Ensure that you have sufficient space in which to work, and that you do not endanger other people.
- All covers and protective devices must be assembled properly before commissioning.
- Disconnect the mains plug before changing the setting on the device.
Setting up
Place the sharpening station on firm surface and fasten the device. Ideally, bolt the drill to the surface. Use the mounting holes for the work bench assembly (9) in the baseplate for this.
The screws and nuts required for assembly are not part of the scope of delivery.
Mount the sharpener
- Select one of the three sharpeners.
- In order to remove a sharpener from the working position, you must press down the release lever for the sharpener (13).
- Remove the sharpener from the guide rails, upwards.
- In the storage positions, the sharpeners are not fixed to the right and left side and can be easily removed from the guide rails.
- In order to fasten the selected sharpener in the working position, from above push this into the guide rails. Press the sharpener down until it snaps into place.
The sharpeners also present a safety device. Never use this device without a sharpener. Risk of injury!
Operation
⚠ Caution! Risk of injury!
- Always disconnect the plug from the mains socket before working.
- Use only grinding disks and accessories recommended by the manufacturer. The use of other insertion tools and other accessories may cause risk of injury.
- Never operate the device without the visual protection disk.
- Switch on the equipment only when it is safely installed on the work surface.
Despite spark protection, always wear safety goggles while working in order to avoid eye injuries.
Keep your hands away from the grinding disc and grinding belt when the device is in operation. Injury hazard!
Switching on and off
Ensure that the mains voltage matches the specifications on the rating plate.
Connect the equipment to the mains.
- To switch on, press the "I" On switch and the device starts up (see 3).
- To switch off, press the "0" off switch and the device switches off (see 3).
After switching on the device, wait until the device has reached its max. speed. Only then must you start with the grinding.
⚠ The disk will continue to run after the equipment is switched off. There is a risk of injury.
Test run:
Before starting work and after each change of grinding disk, carry out a test run of at least 60 seconds with no load. Switch off the equipment immediately if the disk runs lumpy, substantial vibrations occur, or abnormal noises are generated.
Sharpening drills (Fig. B)
Drills with a diameter of 3-13 mm can be sharpened.
- Mount the selected sharpener (see Mounting sharpener).
- Remove the drill holder (14) from the sharpener.
- Insert the drill into the drill holder (14).
- Insert the drill holder (14) into the adjusting device (15).
- Push the drill to the front into the V-nut up to the metal stop. The cutting edges of the drill must fit closely to the metal surfaces.
- Using the knurled nut fasten the drill for drill-fastening (12).
- Remove the drill holder (14) and insert it into the rotatable drill mount (11).
- Check the alignment of the drill. The cutting edges of the drill must be touching the grinding wheel (10).
- Switch the device on and grind the drill.
- Switch the device off and wait for the grinding wheel (10) to stop.
- Remove the drill holder (14) and insert it into the rotatable drill mount (11) by rotating in by 180^ . Using the same adjustment, you can grind the opposite cutting edge of the drill.
- Switch the device on and grind the drill.
- Switch the device off and wait for the grinding wheel (10) to stop.
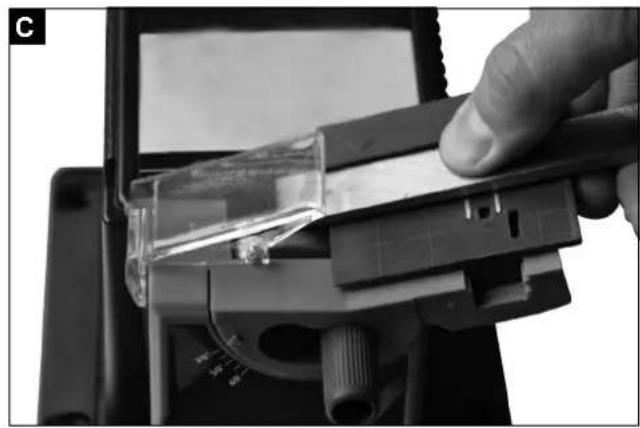
Sharpening picks and chisels (Fig. C)
- Mount the selected sharpener (see Mounting sharpener).
- Place the blade on the tool table (6) so that the end to be sharpened fits closely to the edge of the tool table (6). The magnetic holder (5) keeps the blade in position.
- For small picks, use the spacer (4).
- Select the angle according to the existing bevel angle (angle of the bevelled edge).
- Release the retaining screw for the angular adjustment (7) and turn the tool table (6) into position.
- Tighten the retaining screw for angular adjustment (7) again.
- Switch the device on and move the tool table (6) equally back and forth along the grinding wheel (10).
-
Always use light pressure while sharpening and slowly push the blade towards the grinding wheel (10).
-
Repeat the sharpening process until all irregularities have been removed.
- Switch the device off and wait for the grinding wheel (10) to stop.
Sharpening knives (Fig. D)
- Mount the selected sharpener (see Mounting sharpener).
- Insert the blade of the knife right into the knife sharpening slot.
- Using light pressing guide the blade along the grinding wheel (10) and evenly and slowly pull the knife towards you.
- Turn the knife and insert the knife blade into the opposite knife sharpening slot.
- Repeat this grinding process for this side of the blade as well.
- Execute the alternating grinding process until the cutting edge is burr-free and sharp.
- Switch the device off and wait for the grinding wheel (10) to stop.
The device is not suitable for grinding serrated knives.
Sharpening scissors (Fig. E)
- Mount the selected sharpener (see Mounting sharpener).
- Completely open the scissors.
- Insert the scissor blades into the scissor sharpening slot.
- Using light pressure guide the blade from the screw up to the tip along the grinding wheel (10).
- Remove the scissors from the sharpening station and turn the scissors to sharpen the other blade.
- Insert the other scissor blade into the scissor sharpening slot.
- Using light pressure guide the blade from the screw up to the tip along the grinding wheel (10).
- Execute the alternating grinding process until the cutting edges are burr-free and sharp.
- Switch the device off and wait for the grinding wheel (10) to stop.
The device is not suitable for grinding serrated scissors. The device is not suitable for grinding pinking shears.
Change grinding disc
Information on replacement:
- Never operate the device without protective equipment.
- Ensure that the grinding disc dimensions match those of the device.
- Never use separate bushings or adapters in order to make grinding discs whose hole is too large fit the device.
-
Do not use any saw blades.
-
Always reassemble the device completely after replacing the grinding disc.
Switch the device off and remove the mains plug. Allow the device to cool down.
When the grinding disc nut (16) is being tightened or loosened, the axle has to be held firmly in place with a pair of pliers or the grinding disc (10) held firm by hand.
- Release the grinding wheel nut (16) in the clockwise direction (left-handed thread).
- Remove the grinding wheel (10).
- Set up a new grinding wheel (10). Screw the grinding wheel nut (16) in the anti-clockwise direction (left-handed thread).
- Test run: Before starting work and after each change of grinding disk, carry out a test run of at least 60 seconds with no load. Switch off the equipment immediately if the disk runs lumpy, substantial vibrations occur, or abnormal noises are generated.
8. Transport
- Turn off the power tool before any transport and disconnect it from the power supply.
- Protect the power tool from knocks, bumps and strong vibrations, such as during transport in vehicles.
- Never use the safety devices for handling or transporting purposes.
9. Maintenance
⚠ Warning! Prior to any adjustment, maintenance or service work disconnect the mains power plug!
General maintenance measures
- Keep all safety devices, air vents and the motor housing free of dirt and dust as far as possible. Wipe the equipment with a clean cloth or blow it down with compressed air at low pressure.
- We recommend that you clean the equipment immediately after you use it.
- Clean the equipment regularly with a damp cloth and some soft soap. Do not use cleaning agents or solvents; these may be aggressive to the plastic parts in the equipment. Ensure that no water can get into the interior of the equipment.
Service information
Please note that the following parts of this product are subject to normal or natural wear and that the following parts are therefore also required for use as consumables.
Wear parts*: grinding medium, Carbon brushes, sharpening wheel, angle gauge, v-belt
* Not necessarily included in the scope of delivery!
10. Storage
Store the device and its accessories in a dark, dry and frost-proof place that is inaccessible to children. The optimum storage temperature is between 5 and 30°C.
Store the electrical tool in its original packaging. Cover the electrical tool in order to protect it from dust and moisture.
Store the operating manual with the electrical tool.
11. Electrical connection
The electrical motor installed is connected and ready for operation. The connection complies with the applicable VDE and DIN provisions.
The customer's mains connection as well as the extension cable used must also comply with these regulations.
Damaged electrical connection cable
The insulation on electrical connection cables is often damaged.
This may have the following causes:
- Passage points, where connection cables are passed through windows or doors.
- Kinks where the connection cable has been improperly fastened or routed.
- Places where the connection cables have been cut due to being driven over.
• Insulation damage due to being ripped out of the wall outlet.
- Cracks due to the insulation ageing.
Such damaged electrical connection cables must not be used and are life-threatening due to the insulation damage.
Check the electrical connection cables for damage regularly. Make sure that the connection cable does not hang on the power network during the inspection. Electrical connection cables must comply with the applicable VDE and DIN provisions. Only use connection cables with the marking „H05VV-F“.
The printing of the type designation on the connection cable is mandatory.
AC motor
- The mains voltage must be 230 V\~
- Extension cables up to 25 m long must have a cross-section of 1.5 ~mm^2 .
Connections and repairs of electrical equipment may only be carried out by an electrician.
Please provide the following information in the event of any enquiries:
• Type of current for the motor
• Machine data - type plate
• Machine data - type plate
12. Disposal and recycling
The equipment is supplied in packaging to prevent it from being damaged in transit. The raw materials in this packaging can be reused or recycled. The equipment and its accessories are made of various types of material, such as metal and plastic. Defective components must be disposed of as special waste. Ask your dealer or your local council.
Old devices must not be disposed of with household waste!

This symbol indicates that this product must not be disposed of together with domestic waste in compliance with the Directive (2012/19/EU) pertaining to waste electrical and electronic equipment (WEEE). This product must be disposed of at a designated collection point. This can occur, for example, by handing it in at an authorised collecting point for the recycling of waste electrical and electronic equipment. Improper handling of waste equipment may have negative consequences for the environment and human health due to potentially hazardous substances that are often contained in electrical and electronic equipment. By properly disposing of this product, you are also contributing to the effective use of natural resources. You can obtain information on collection points for waste equipment from your municipal administration, public waste disposal authority, an authorised body for the disposal of waste electrical and electronic equipment or your waste disposal company.
Günzburger Straße 69
D-89335 Ichenhausen
Cher client,
Günzburger Straße 69
D-89335 Ichenhausen
Egregio cliente,
Günzburger Straße 69
D-89335 Ichenhausen
Vážený zákazníku,
Günzburger Straße 69
D-89335 Ichenhausen
Vážený zákazník,
Günzburger Straße 69
D-89335 Ichenhausen
Hea klient,
Günzburger Straße 69
D-89335 Ichenhausen
Gerbiamas Kliente,
Günzburger Straße 69
D-89335 Ichenhausen
Cienijamais klient,
Günzburger Straße 69
D-89335 Ichenhausen
Tisztelt vásárló!
Günzburger Straße 69
D-89335 Ichenhausen
Drogi Kliencie,
Günzburger Straße 69
D-89335 Ichenhausen
Estimado cliente,
Günzburger Straße 69
D-89335 Ichenhausen
Arvoisa asiakas,
Günzburger Straße 69
D-89335 Ichenhausen
Geachte klant,
CE - Declaration of Conformity
| 2014/29/EU | 2004/22/EC | 89/686/EC_96/58/EC | 2000/14/EC_2005/88/EC | ||||
| 2014/35/EU | 2014/68/EU | 90/396/EC | Annex V | ||||
| X | 2014/30/EU | X | 2011/65/EU* | Annex VINoise: measured L_WA = xx dB(A); guaranteed L_WA = xx dB(A)P = xx KW; L/∅ = cmNotified Body:Notified Body No.: | |||
 | |||||||
| Annex IVNotified Body:Notified Body No.:Certificate No.: | 2010/26/EC | ||||||
| Emission. No: | |||||||
Standard references:
EN 61029-1:2009+A11:2010; EN ISO 12100:2010;
EN 55014-1:2017; EN 55014-2:2015; EN 61000-3-2:2014; EN 61000-3-3:2013
This declaration of conformity is issued under the sole responsibility of the manufacturer.
The object of the declaration described above fulfils the regulations of the directive 2011/65/EU of the European Parliament and Council from 8th June 2011, on the restriction of the use of certain hazardous substances in electrical and electronic equipment.
Subject to change without notice
Documents registar: Georg Kohler
Günzburger Str. 69, D-89335 Ichenhausen
Garantie DE
Apparent defects must be notified within 8 days from the receipt of the goods. Otherwise, the buyer's rights of claim due to such defects are invalidated. We guarantee for our machines in case of proper treatment for the time of the statutory warranty period from delivery in such a way that we replace any machine part free of charge which provably becomes unusable due to faulty material
or defects of fabrication within such period of time. With respect to parts not manufactured by us we only warrant insofar as we are entitled to warranty claims against the upstream suppliers. The costs for the installation of the new parts shall be borne by the buyer. The cancellation of sale or the reduction of purchase price as well as any other claims for damages shall be excluded.
Garantie FR


- GS650
- Verehrter Kunde,
- Table of contents: Page:
- Introduction
- Manufacturer:
- scheppach
- Dear Customer,
- Note:
- We recommend:
- Device Description (Fig. A)
- Unpacking
- ATTENTION
- Intended use
- General safety instructions for electric tool
- CAUTION: Read all safety regulations and instructions.
- Keep all safety regulations and instructions in a safe place for future use.
- Workplace
- Electrical safety
- Personal safety
- Power tool use and care
- Service
- Further Safety Instructions
- Residual risks
- Technical Data
- Noise values
- Wear hearing protection.
- Assembly
- ⚠ Caution! Risk of injury!
- Setting up
- Mount the sharpener
- Operation
- Switching on and off
- Test run:
- Sharpening drills (Fig. B)
- Sharpening picks and chisels (Fig. C)
- Sharpening knives (Fig. D)
- Sharpening scissors (Fig. E)
- Change grinding disc
- Information on replacement:
- Transport
- Maintenance
- General maintenance measures
- Service information
- Storage
- Electrical connection
- Damaged electrical connection cable
- AC motor
- Disposal and recycling
- Old devices must not be disposed of with household waste!
- Cher client,
- Egregio cliente,
- Vážený zákazníku,
- Vážený zákazník,
- Hea klient,
- Gerbiamas Kliente,
- Cienijamais klient,
- Tisztelt vásárló!
- Drogi Kliencie,
- Estimado cliente,
- Arvoisa asiakas,
- Geachte klant,
- CE - Declaration of Conformity
- Standard references:
- Garantie DE
- Garantie FR
Brand : SCHEPPACH
Model : GS650
Category : Sander