FX-WKS1500 - Saw Fuxtec - Free user manual and instructions
Find the device manual for free FX-WKS1500 Fuxtec in PDF.

| Product Type | Log Saw with Stand |
| Brand | Fuxtec |
| Model | FX-WKS1500 |
| Dimensions (L × W × H) | 860 × 775 × 990 mm |
| Sawhorse Support | 735 mm |
| Weight | 69 kg |
| Power Supply | 220–240 V ~ 50 Hz |
| Power Input (P1) | 2.6 kW |
| Power Output (P2) | 1.8 kW |
| Rated Current | 10.6 A |
| Blade Diameter | 500 / 505 mm |
| No-load Speed | 2800 rpm |
| Cutting Speed | 74 m/s |
| Max. Cutting Height | 170 mm |
| Min. Cutting Height | 60 mm |
| Max. Firewood Diameter | 250 mm |
| Operating Mode | S6 - 40% |
| Sound Power Level (machining) | 104 dB(A) |
| Sound Pressure Level (machining) | 95 dB(A) |
| Motor Brake | Stops in less than 10 seconds |
| Electrical Protection | Fuse 16 A (time-delay) |
| Spare Parts | Available from the dealer, please provide the article number |
Frequently Asked Questions - FX-WKS1500 Fuxtec
User questions about FX-WKS1500 Fuxtec
0 question about this device. Answer the ones you know or ask your own.
Ask a new question about this device
Download the instructions for your Saw in PDF format for free! Find your manual FX-WKS1500 - Fuxtec and take your electronic device back in hand. On this page are published all the documents necessary for the use of your device. FX-WKS1500 by Fuxtec.
USER MANUAL FX-WKS1500 Fuxtec
Firewood rocker circular saw
natural_image
Exterior view of a FUXTEC industrial machine with wheels and a cylindrical component (no visible text or symbols on the device itself)CE


natural_image
Two white plastic sheet metal components with mounting holes and four small circular fasteners below, shown with a legend for a black square (no text or symbols on the main objects)
natural_image
Mechanical device with black frame and central connector, no visible text or symbols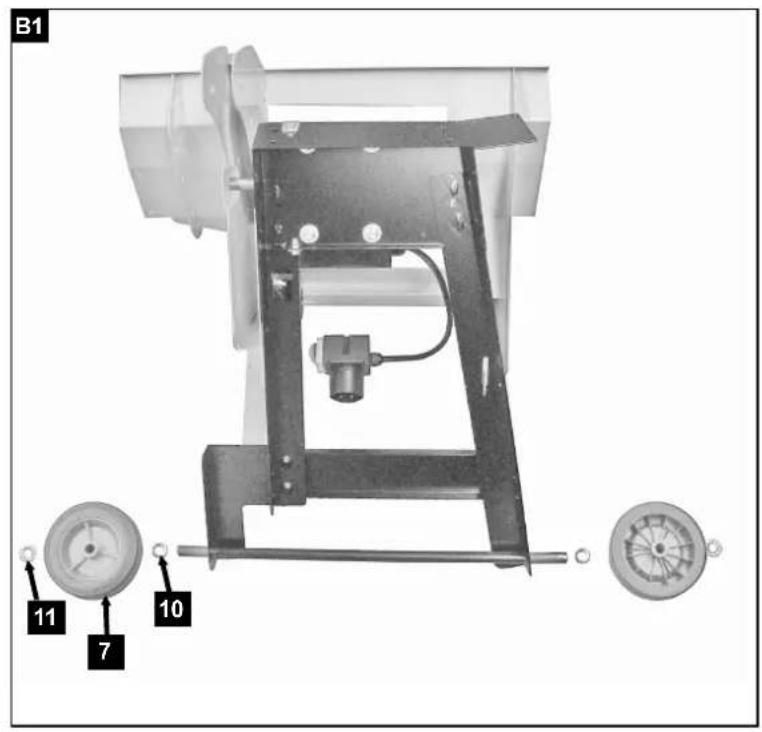
natural_image
Close-up of a hand holding a mechanical component, showing blades and a central hub (no text or symbols visible)
natural_image
Close-up of a mechanical assembly with a wooden tool and a wheel (no visible text or symbols)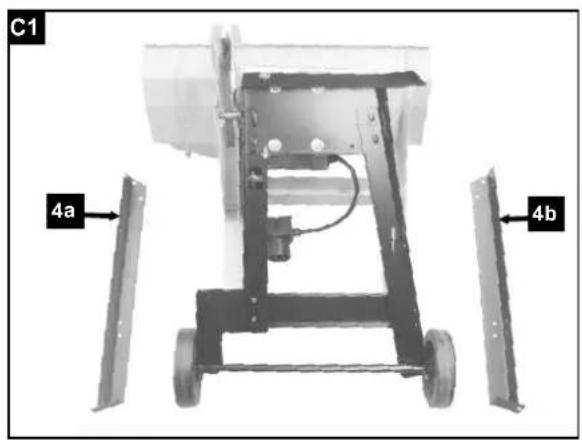
natural_image
Mechanical device with labeled component '8a' and wheels, no readable text or symbols beyond label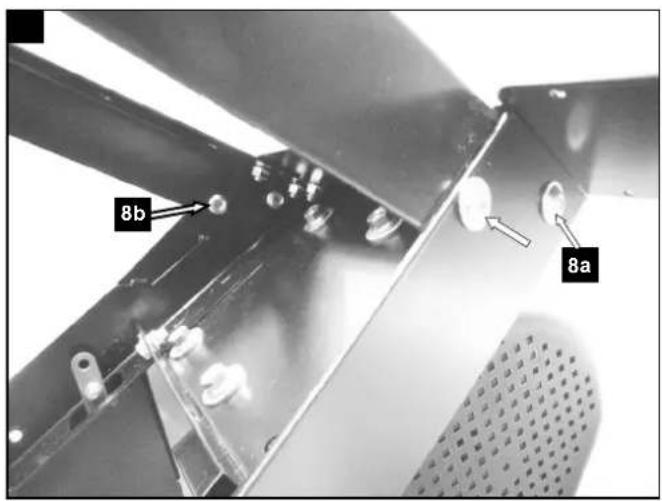

natural_image
Close-up of a metal truss structure with visible bolts and supports (no text or symbols)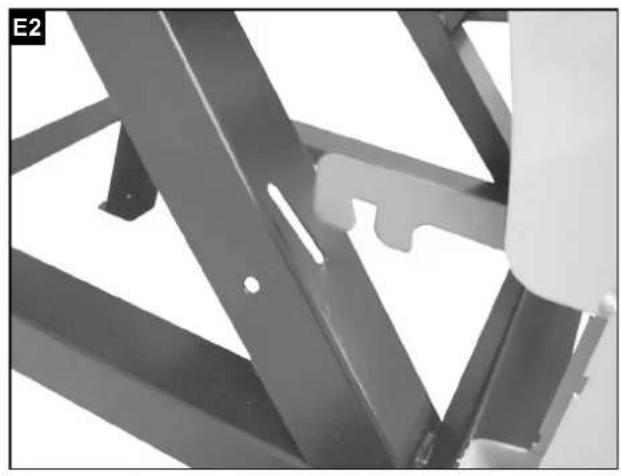
natural_image
Close-up of metallic structural beams with cutouts, no visible text or symbols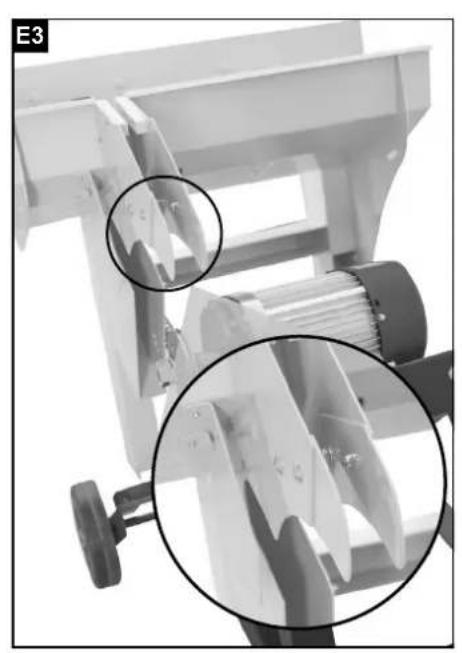
natural_image
Close-up of a mechanical device with two circular insets highlighting internal components (no visible text or symbols)
natural_image
Close-up of hands operating a mechanical device with a propeller and spring, no visible text or symbols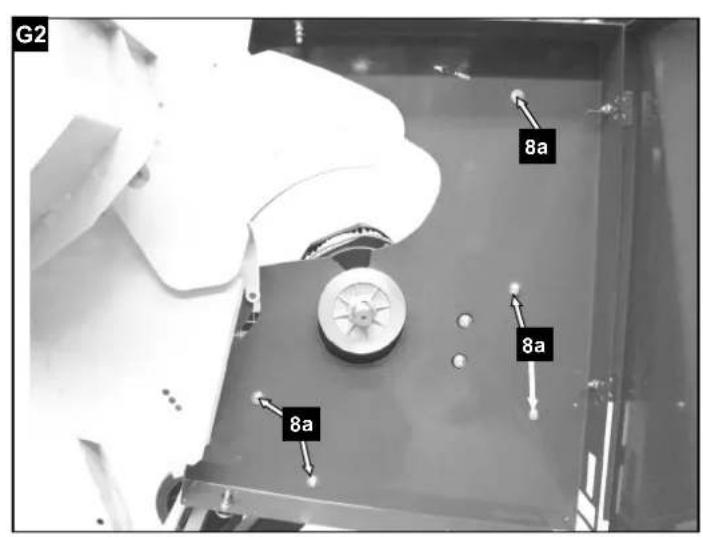
natural_image
Close-up of a mechanical component with a threaded shaft and flange, mounted on a metallic housing (no visible text or symbols)
natural_image
Close-up of a mechanical component with two black arrows pointing to features, no visible text or symbols.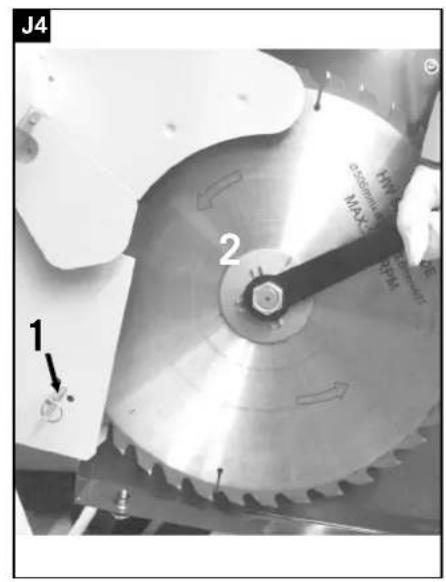
natural_image
Close-up of industrial machinery with metal components and a hexagonal bolt (no visible text or symbols)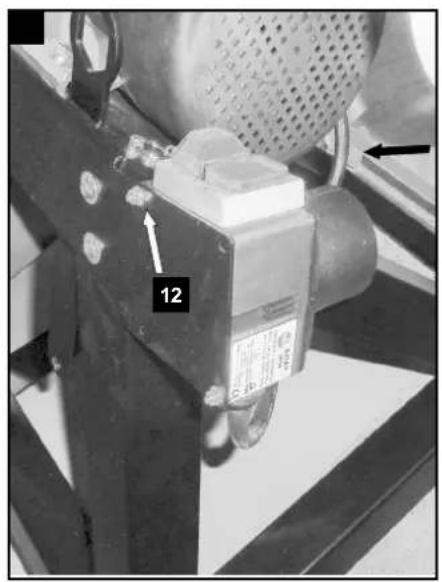
natural_image
Mechanical assembly diagram showing a frame with two upward-pointing arrows indicating motion or force directions (no text or symbols present)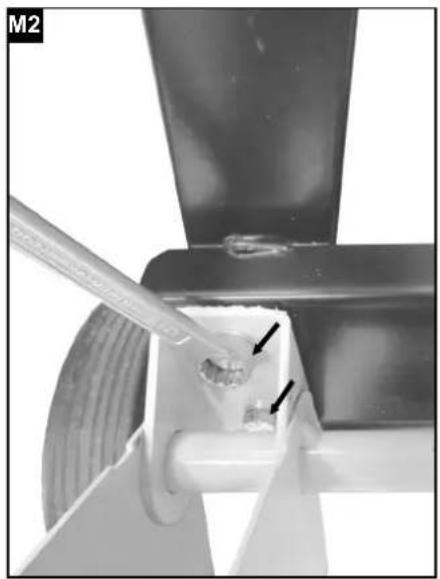
natural_image
Close-up of a mechanical component with a tool inserted, showing a small feature and arrows indicating direction (no text or symbols)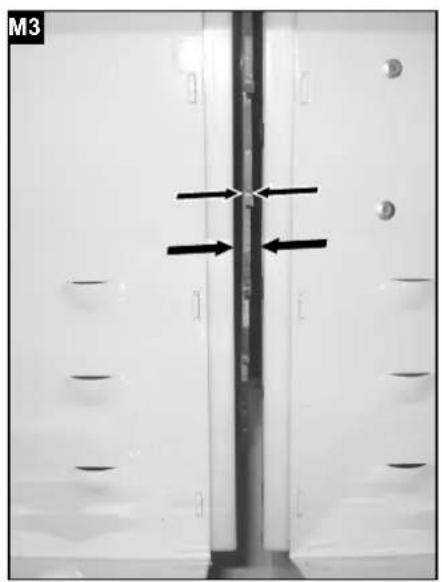
natural_image
Close-up of a vertical metallic rod with arrows indicating direction, mounted on a wall with multiple cylindrical components (no text or symbols visible)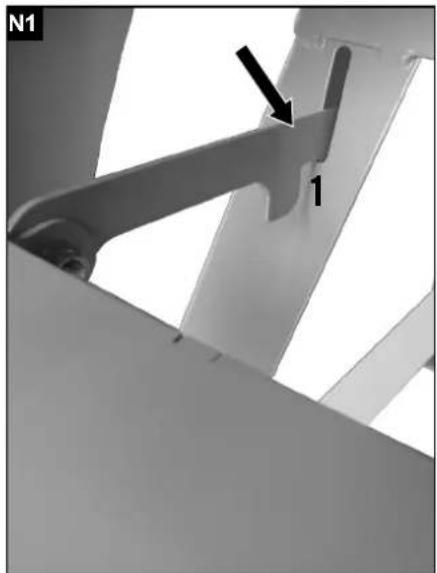
natural_image
Close-up of a mechanical bracket with a black arrow pointing to a component labeled '1' (no text or symbols beyond label)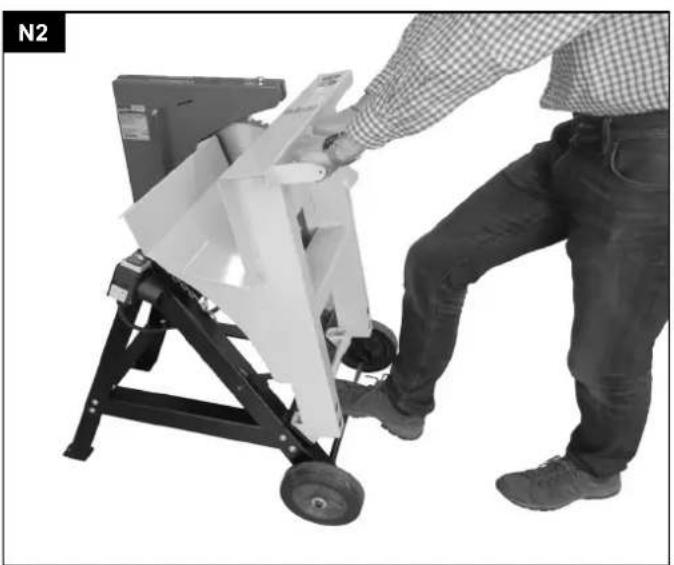
natural_image
Person operating a mechanical device with wheels, no visible text or symbols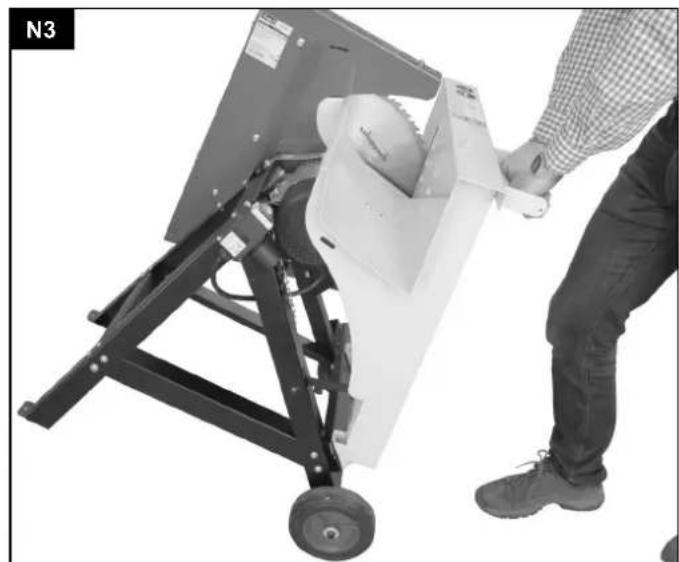
natural_image
Person operating a mechanical lift or lift device with wheels, no visible text or symbolsGünzburger Straße 69
D-89335 Ichenhausen
Verehrter Kunde,
natural_image
Technical line drawing of a soldering iron with a curved tip and handle (no text or symbols)Inbetriebnahme
Günzburger Straße 69
0-89335 Ichenhausen / BRD
Dear client,
We hope you enjoy your new firewood circular saw and wish you success with it.
INFORMATION:
The manufacturer of this tool is, according to the current product liability law, not liable for damages caused to or by this tool because of:
- incorrect usage,
- failure to observe the manual,
•repairs by third parties, not authorized specialists, - fitting and exchange of non-original exchange parts,
•non-intended use, - falling out of the electrical installations because of inobservance of the electrical Rules and VDE-Regulations 0100, DIN 57113/VDE0113.
We recommend that you:
Read the entire operating instructions before assembling and implementing.
This instruction manual should make it easier for you to get to know your machine and to use its range of applications as intended. The manual contains important information on how to work with the machine in a secure, correct and efficient way, and how you can avoid risks, save repair costs, reduce down time and increase the reliability and life span of the machine. Apart from the safety rules mentioned in these operating instructions, you should implicitly pay attention to the valid regulations of your country for the use of the machine. Keep the manual, in a plastic cover protected against dirt and humidity, with the machine. They should be read and observed carefully by every member of staff before starting to work. Only people instructed on how to use the machine and informed about the possible risks, should be allowed to use it. The required minimum age is to be adhered to. Besides the safety instructions in this manual and the special regulations of your country the recognized technical rules for the operation of wood processing machines need to be observed.
General instructions
- After unpacking please check all parts for possible damage during transport. In case of complaints the driver needs to be contacted as soon as possible.
- Complaints coming in later will not be recognized as such.
- Check if the consignment is complete.
- Familiarize yourself with the machine by means of the operating instructions before implementing it.
- In case of replacing worn or exchange parts, as for accessories, only use original Scheppach parts. You can obtain exchange parts at the specialized dealer.
- Upon ordering, please specify our article n^0 s as well as type and year of construction of the tool.
Safety instructions
- In these operation instructions we have indicated positions that concern your safety, with this mark.
Training of the operator
- Forward the safety instructions to all people working on or with this machine.
- The minimum age for the operating person is 18 years. Trainees should be minimum 16 years of age, but are only allowed to work with the machine under supervision.
• People running the machine should not be distracted. - Keep children away from the to the net connected machine.
- Do not wear tight clothing. Take off jewelry, rings and wristwatches.
- Be careful at work: Danger of damaging finger(s) and hand(s) by the rotating cutting tool.
• Take notice of all safety and danger information of the machine and keep them readable.
Steadfastness
- Please be vigilant the machine is steadfast while being assembled.
Power supply line of the machine
- Check power supply lines. Do not use defective lines. See "Electrical connection".
- Pay attention to the motor and tool rolling direction. See „Electrical connection“.
- Installations, repairs and maintenance installations to the electrical installation should only be carried out by experienced staff.
- To repair disorders switch off the machine. Pull out the power plug.
- Upon leaving the work site switch of the motor. Pull out the power plug.
- Also at the slightest movement of the machine disconnect it from any external power supply! To restart orderly reconnect the machine to the power supply!
Setting-up and adjusting of the machine
- Setting-up, modifying, measuring as well as cleaning to be carried out only when motor is switched off. Pull out power plug and wait for stagnation of the rotating tool.
- All protection and safety facilities have to be assembled again directly after repair and maintenance works have finished.
- Use only well sharpened, slit free and non-deformed saw blades.
⚠️ Safety notes
• Take due note of all this information before and while working with the saw.
- Do not lose these safety regulations.
- When equipment is not being used it should be kept in a dry, closed place out of childrens reach.
- Keep mounted attachments sharp and clean to enable you to work well and safely.
- Warning! The use of other tools and accessories may put you at risk of injury.
- Give these safety regulations to all persons who work on the machine.
- Caution! Hands and fingers may be injured on the rotating saw blade.
- Warning: Always unplug the power plug prior to starting any of the maintenance work described in this manual.
- Do not leave the saw in the rain and never use it in damp or wet conditions.
- Provide good lighting.
- Do not saw near flammable liquids or gases.
- Wear suitable work clothes! Loose garments or jewelry may become caught up in the rotating saw blade.
• Non-slip shoes are recommended when working outdoors.
- Wear a hair net if you have long hair.
- Avoid abnormal working postures.
- The minimum age for the operating person is 18 years. Trainees should be minimum 16 years of age, but are only allowed to work with the machine under supervision. Keep children away from the machine when the motor is running.
- Keep your workplace clean of wood scrap and any unnecessary objects.
- An untidy work area invites accidents.
- Do not allow other persons, especially children, to touch the tool. Keep them out of your work area.
- Persons working on the machine should not be distracted.
- Note the direction of rotation of the motor and saw blade. Use only blades whose permissible maximum speed is not lower than the maximum spindle speed of the circular saw and of the material to be cut.
• After you have switched off the motor, never slow down the saw blade by applying pressure to its side.
- Only fit blades which are well sharpened and have no cracks or deformations.
- Do not use circular saw blades made of high-alloy high-speed steel (HSS).
- Only use saw blades that are recommended by the manufacturer, comply with EN 847-1 and bear a warning note. When replacing the saw blade ensure that the cutting width is no smaller and the basic blade thickness of the saw blade is no larger than the thickness of the splitter.
- Faulty saw blades must be replaced immediately.
- Never use saw blades which do not comply with the data specified in this manual.
- Never dismantle the machines safety devices or render them inoperative.
- If the table insert is worn, replace it.
• Always stand to the side of the saw blade when working with the saw.
- Never load the machine so much that it cuts out.
- Make sure that off-cuts do not catch on the saw blade crown. Risk of catapulting!
- Never remove loose splinters, chips or jammed pieces of wood when the saw blade is running.
• To rectify faults or remove jammed pieces of wood, always switch off the machine first. Unplug the power plug!
- If the sawing gap is worn, replace the table insert.
- Carry out retooling work, adjustments, measurements and cleaning jobs only when the motor is switched off. Unplug the power plug
- Before switching on, make sure that all keys and wrenches have been removed from the tool.
- Switch off the motor and unplug the power plug before you leave the workplace.
• Refit all guards and safety devices immediately after you have completed any repairs or maintenance work.
- Be sure to observe the safety information and operating and maintenance instructions issued by the manufacturer, as well as the dimensions listed in the Technical Data.
- It is imperative to observe the accident prevention regulations in force in your area as well as all other generally recognized rules of safety.
- Do not use any low-powered machines for heavy duty work.
- Make sure you stand squarely and keep your balance at all times.
- Check the tool for damage.
• Each time before re-using the tool, carefully check that the guards or any slightly damaged parts are working as intended.
- Check that the moving parts are in good working order, that they do not jam, and that no parts are damaged. Make sure that all parts are fitted correctly and that all other operating conditions are properly fulfilled.
- Unless otherwise stated in the operating instructions, damaged safety devices and parts must be repaired or replaced by an authorized service center.
- Have damaged switches replaced by a customer service workshop.
- If necessary, wear suitable personal protection equipment. This could consist of:
- Ear plugs to prevent the risk of damaging your hearing;
- A breathing mask to avoid the risk of inhaling hazardous dust.
- Always wear gloves when handling saw blades and rough materials. Whenever practicable, saw blades must be carried in a container.
- The operator must be informed about the conditions that influence the generation of noise (for example saw blades designed to reduce noise emissions, caring for blades and the machine).
- Faults on the machine or its guards, safety devices and blade must be reported to the person in charge as soon as they are discovered.
- Use only the transport devices to move the machine. Never use the guards for handling and moving the machine.
- All operators must receive proper training in the use, adjustment and operation of the machine.
- Do not saw any materials that contain foreign bodies such as wires, cables or ties.
- Only use sharp saw blades
Use only as authorized:
The machine corresponds to the valid EC guideline.
• The log saw is constructed as 1-man-operating stand and is only to be used in outdoor locations.
- The log saw is a portable circular saw. It is only applicable to cross cut firewood with a feeding rocker according to the technical specifications.
- The saw is constructed solely for cross cutting of firewood.
- Regardless of the diameter of the wood only 1 work piece is to be put on the rocker.
- Observe all safety and hazard notes on the machine and ensure they are kept complete and in a legible condition.
- The machining range and surrounding areas of the machine must be clear of interfering foreign matter to prevent accidents occurring.
• Workpieces must be completely free of foreign objects, i.e. nails or screws.
- The circular sawbench is designed exclusively for the machining of wood and materials similar to wood. Only original Scheppach tools and accessories may be used. Use the required sawblade in accordance with the EN 847-1 norm depending on the type of cut and type of wood (solid wood, plywood or chipboard). Please observe the „Special Tool Accessories“.
- The machine must only be used in technically perfect condition in accordance with its designated use and the instructions set out in the operating manual, and only by safety-conscious persons who are fully aware of the risks involved in operating the machine. Any functional disorders, especially those affecting the safety of the machine, should therefore be rectified immediately.
- Relevant accident prevention regulations and other, generally recognized safety-technical rules must also be adhered to.
- The Scheppach machine may only be used, maintained, and operated by persons familiar with it and instructed in its operation and procedures. Arbitrary alterations to the machine release the manufacturer from all responsibility for any resulting damages.
- The Scheppach machine may only be used with original accessories and original tools made by the manufacturer.
- Any other use exceeds authorization. The manufacturer is not responsible for any damages resulting from unauthorized use; risk is the sole responsibility of the operator.Remaining hazards.
Ohter risks
The machine has been built using modern technology in accordance with recognized safety rules. Some remaining hazards, however, may still exist.
• The rotating saw blade can cause injuries to fingers and hands if the work piece is incorrectly fed.
- Thrown work pieces can lead to injury if the work piece is not properly secured or fed.
- Noise can be a health hazard. The permitted noise level is exceeded when working. Be sure to wear personal protective gear such as ear protection.
- Defective saw blades can cause injuries. Regularly inspect the structural integrity of saw blades.
- The operating instructions supplied with the special accessories must be observed and carefully read when Scheppach special accessories are used.
• Even when all safety measures are taken, some remaining hazards which are not yet evident may still be present.
- Remaining hazards can be minimized by following the instructions in “Safety Precautions”, “Proper Use” and in the entire operating manual.
Attention: risk of accident!
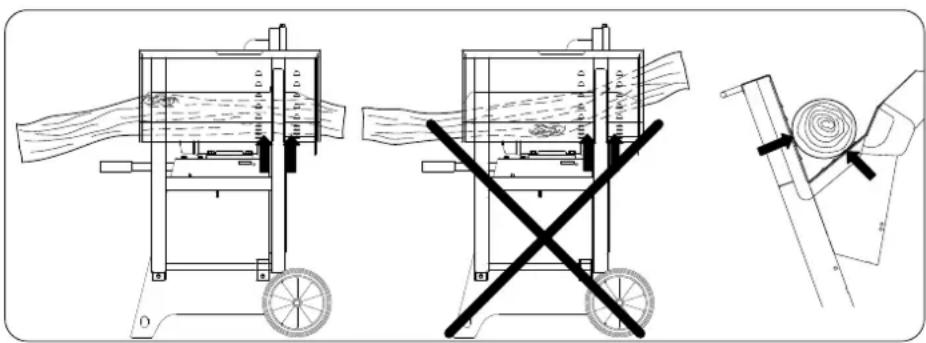
The wood must always be seated on both sides of the saw blade on the v-block of the rocker. (see arrows)
Scopeofdelivery
Rocker circular saw
Female six fold wrench or open-end wrench
Locking pin
Operational instructions

Accident risk!
Wear safety shoes.
Accident risk!
Before commissioning instruction manual read.

Accident risk!
To wear ear protection. Wear safety glasses.
Accident risk!
Before blade change, Repairs, cleaning and maintenance of the machine.
| Technical specifications | ||
| FX-WKS1500 | ||
| Artikelnummer 59051079922 | ||
| Construction measurements: | ||
| Total length | mm 860 | |
| Total width | mm 775 | |
| Total height | mm 990 | |
| Rocker support | mm 735 | |
| Saw blade ∅ | mm 50 | |
| Idle - Motor | 1/min 2800 | |
| Cutting speed- Saw blade | m/sec 74 | |
| Weight | kg 69 | |
| Power unit: | ||
| Motor V/Hz 220 - 240 / 50 | ||
| Input power P1 | kW 2,6 | |
| Output power P2 | kW | 1,8 |
| Operating mode | S6 / 40% | |
| Rated current | A 10,6 | |
| Work information | ||
| Cutting height Spar | max. mm 170 | |
| min. mm 60 | ||
| Firewood | max. mm 250 | |
| Reserve technical changes! | ||
Specific noise values
The according to the EN 23746 for the sound pressure level resp. EN 31202 (correction factor k3 after supplement A.2 from EN 31204 calculated) for the sound pressure level on the working site ascertained noise emission value amounts under the foundations of ISO 7904 supplement A performed working conditions to:
| Sound pressure level in dB | |
| Idle LWA / Processing LWA | 98 / 104 |
| Sound pressure level on working site in dB | |
| Idle LpAeq / Processing LpAeq | 89 / 95 |
The specified values are emission values and therefore should not at the same time be reliable working site values. Although there is a correlation between emission and immersion levels, it cannot unfailingly be derived if extra precautions need to be taken or not. Factors, which influence the actual available immersion value on working site, include the peculiarities of working area, other sources of noise, e.g. the number of machines and other adjoining processes. The allowed working values could vary from country to country. However, the information should qualify the user, to be able to make an estimation of the dangers and risks.
Electrical connection
- Connect the machine with a CEE-plug to the power supply, provided supply should be 16.
- Switch on the machine with the power switch, the motor runs up.
- Upon switching off the saw shaft is slowed down within 10 seconds.
Changing of rolling direction
The installed electrical motor is connected ready to operate. The connection complies with the relevant VDE and DIN-regulations.
The power supplied by the customer as well as the used extension cable should comply with these regulations resp. the local regulations.
natural_image
Technical line drawing of a mechanical assembly with a cylindrical component and a tool (no text or symbols)Motor-brake appliance
The brake slows down the motor of the saw shaft within 10 seconds. The electrical braking is interrupted after maximum 14 seconds.
In case the braking takes more than 10 seconds the machine should not be used again, as the brake is defective. The machine implicitly needs to be disconnected from the power supply. Only an electronic specialist should be instructed to repair this malfunction.
The electrical motor is dimensioned for operating mode S 6 - 40 %.
S6 = pass operation with load exposure
40% = related to 10 min. 4min. load; 6min. pass operation
If the motor gets overcharged, it automatically switches off, as a winding thermal switch is built in in the winding of the motor. After a cool-down period (time varies) the motor can be switched on again.
Defective electrical power supply cords
Electrical power supply cords often suffer insulation damages.
Possible causes:
- Pressure spots, when power supply cords are being led through windows or doors.
- Buckling spots by incorrect attachment or guidance of the power supply cords.
•Cuttings by driving over a power supply cord.
• Insulation damages through pulling out of the socket. - Cracks in worn-out insulation.
Such defective electrical power supply cords should not be used and are extremely dangerous because of the insulation damage.
Check electrical power supply cords on damages on a regular base. Please pay attention that upon checking the power supply cord is not plugged in. Electrical power supply cords have to comply with the relevant VDE and DIN-regulations. Only use power cables with the qualification H 07 RN. The type denomination should be imprinted.
There has to be an imprint of the type denomination on the connection cable.
- Extension cables must be up to 25m long, have a cross cut of 1.5 square millimeter, be over 25m length, and have a minimum 2.5 square millimeter.
•The powersupply should be 16 A.
Rotary current motor
•The power supply has to be 380-420 Volt / 50 Hz.
- The power supply and the extension cables must be 5-fold leads = 3 P + N + SL.
- Extension cables must have a minimum cable cross section of 1.5 square millimeter.
•The power supply should be maximum 16 A.
- In case of connection to the power supply or moving site the rotary direction should be checked, otherwise the polarity has to be changed.
Alternating current motor
•The supply voltage hast to be 220-240 Volt / 50 Hz.
- Extension cables must be up to 25 m long, have a cross cut of 1.5 square millimeter, be over 25 m long, and have a minimum 2.5 millimeter.
•The power supply should be 16 A.
Connections and repairs of the electrical equipment should only be carried out by an electrical specialist. In case you have further questions, please specify the following:
- Motor manufacturer
- Current type of the motor
•Information of the machine type label
• Information of the switch type label
If you send the motor back, always return the complete power unit with electro-control.
Scope of delivery
Remove all the parts from the box and check these for completeness. (S. 2)
- Base frame with swivel, motor, switch
- Wrench with locking pin
- Rear strut
- Foot, rear left and right
- Saw blade.
- Strut, left and right
- Wheel, 2 units
8-13 Bag of small parts enclosed. - Protective hood, assembled
- Guard bracket
- Protective cover
- Swivel protection, 2 units
8-13 Bag enclosed, containing:
- 29 x lenticular flange head screw M 8x16 (Fig. 8a)
• 29 x locking nut M 8 (Fig. 8b)
• 2 x hexagon screw M 6x12 (Fig. 9a)
• 2 x locking nut M6 (Fig. 9b)
• 2 x washer D 20 mm (Fig. 10)
- 2 x lock washer without cap D 18 mm (Fig. 11)
- 2 x fillister head screw M 4x60 (Fig. 12b)
• 2 x locking nut M 4 (Fig. 12a)
• 1 x hexagon screw M 5x12 (Fig. 13e)
• 1 x collar bushing (Fig. 13g)
• 2 x plastic washer (Fig.13b)
• 1 x pivot bushing (Fig.13c)
- 1 x hexagon nut, self-locking M 5 (Fig. 13h)
• 1 x cover panel with clinch stud (Fig.13a)
• 1 x hexagon nut, self-locking M 6 (Fig.13d)
4 x Mushroom head screw M6x12 (Fig.17a)
4 x Washer D6 (Fig.17b)
4 x Hexagon nut, self-locking M6 (Fig. 17c)
Assembly
For packaging reasons, the swivel log saw does not come fully assembled and must be assembled on a completely level surface.
A. Place the packaging cardboard or similar on the floor to prevent damage.
Remove the base frame from the packaging and position the machine with the swivel side on top. (Fig. A).
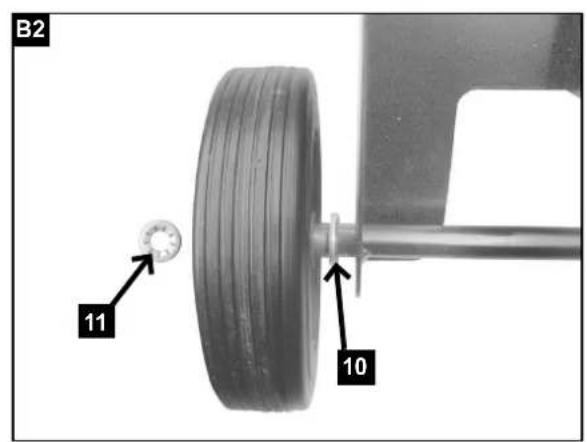
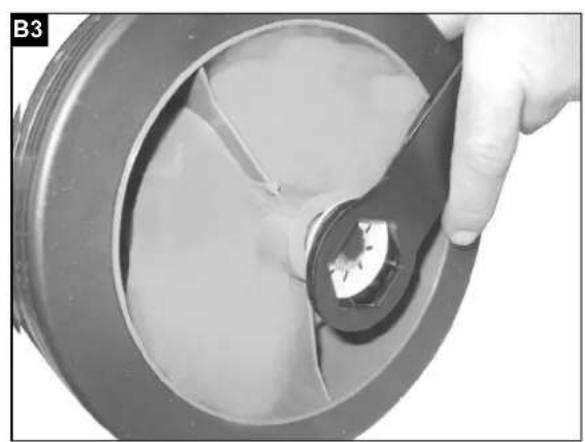
B. Lift wheel axle slightly, slide one washer (10) and one wheel (7) (for external side see Fig. B3, B4) onto the axle on each side.
Fit lock washer (11) on the axle with the saw blade wrench and knock onto the shaft with the hammer.
(Secure lock washer against falling with adhesive tape) (Fig. B1, B2, B3, B4).
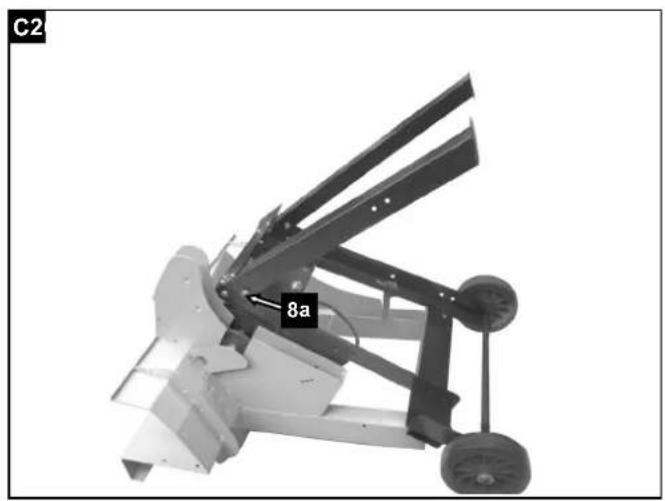
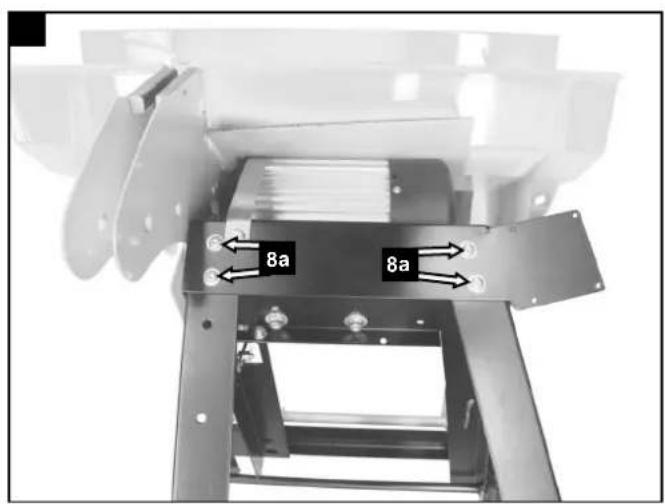
C. Mount foot left and right (4 a, b) on the base frame, each with 4 lenticular flange head screws M8x16 (8 a) and locking nut M8 (8
b). (Fig. C1, C2, C3, C4).
Lightly tighten all frame screws by hand.
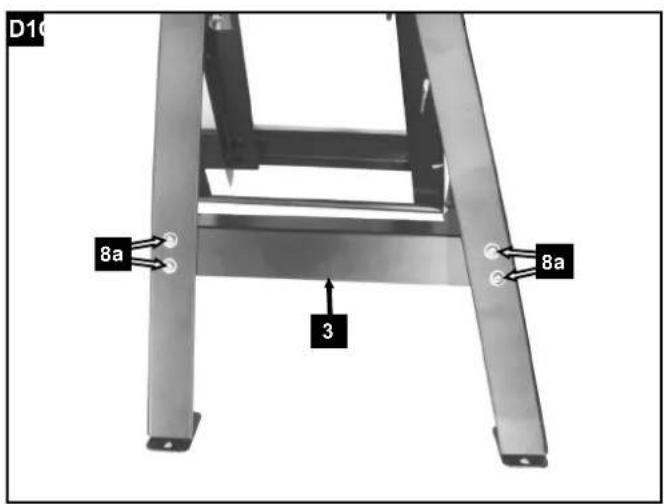
D. Screw rear strut (3) onto the mounted feet with 4 lenticular flange head screws M8x16 (8 a) and locking nut M8 (8 b).
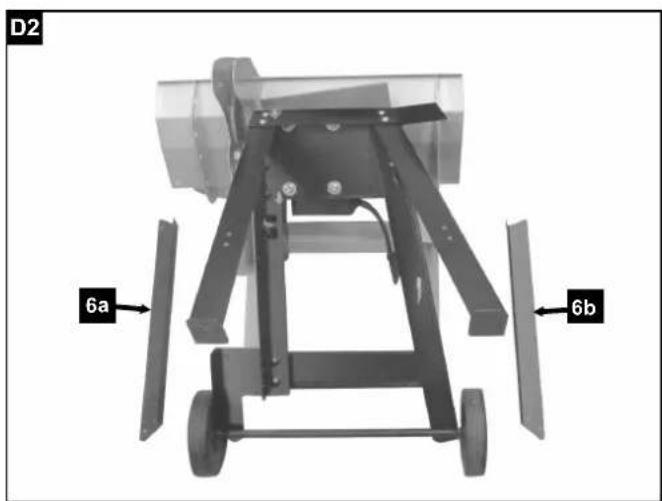
Mount strut left and right (6 a, b) on the side of the feet (4 a, b), each with 5 lenticular flange head screws M8x16 (8 a) and locking nut M8 (8 b). (Fig. D1, D2, D3).
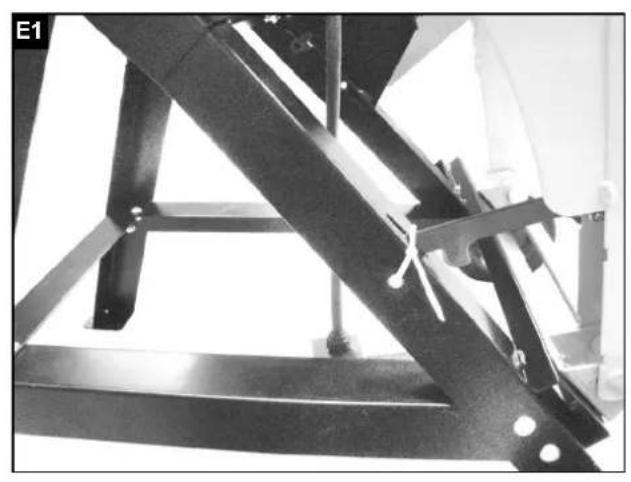
E. Place machine on the feet, cut the cable tie, release the locking lever and tilt the swivel out.
(Fig. E1, E2, E3).
Tighten all frame screws well. It is important here that the swivel log saw stands on a level surface.
Mount swivel protection (17) on the inside of the swivel with 2 mushroom head screws M6 x 12, 2 washers 6mm and 2 self-locking nuts M6 respectively and tighten securely.
Make sure that the mushroom head screws are guided in from the outside. (Fig. E3)
F. Mount guard bracket (15) on the right rear foot with 2 lenticular flange head screws M8x16 (8 a) and locking nut M8 (8 b). (Fig. F)
G. Take the protective hood with protective cover (14 and 16) out of the packaging, loosen 2 hexagon screws top and bottom and remove the protective cover.
To ease assembly, remove the front saw blade flange.
Slide protective hood (14) over the saw blade flange, fasten and secure with 5 lenticular flange head screws M8x16 (8 a) and locking nut M8 (8 b). (Fig. G1, G2, G3).
H. Mount and fasten protective cover (14) with the 2 hinges on the protective hood using 2 hexagon screws M6x12 (9 a) and 2 locking nuts M6 (9 b). (Fig. H1, H2, H3).
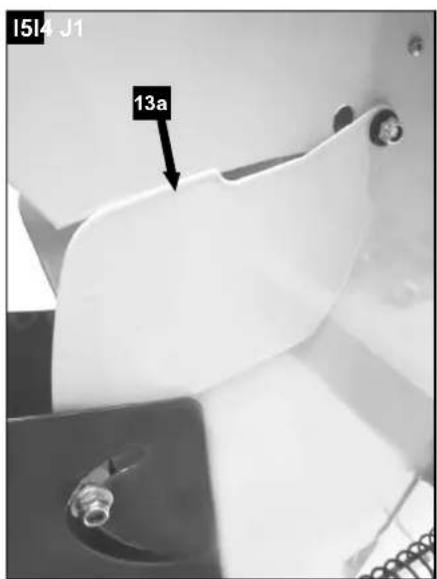
I. Mount complete guard panel with clinch stud (13a), to do so guide 1 hexagon screw M5 x 12 (13e) through the screw-mounted protective hood from the saw blade side, slide plastic washer (13b), cover panel (13a)
and plastic bush (13g) onto the hexagon screw (13e)
and then tighten a little with the self-locking hexagon nut M5 (13h).
It must be possible for the cover panel to move.
Slide plastic washer (13b) onto the threaded bolt of the cover panel (13a) and guide into the circular recess. Slide on galvanised pivot bushing (13c) and secure with self-locking hexagon nut M5 (13d). (Fig. I1, I2, I3, I4, I5). Now lightly tighten both threaded connections. It must be possible for the panel to move easily.
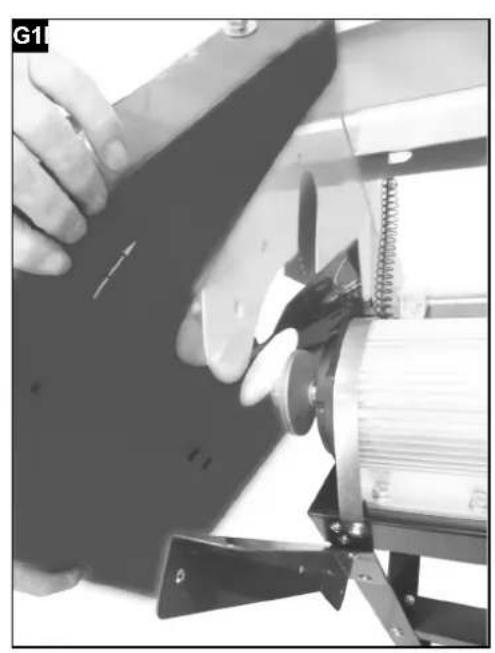
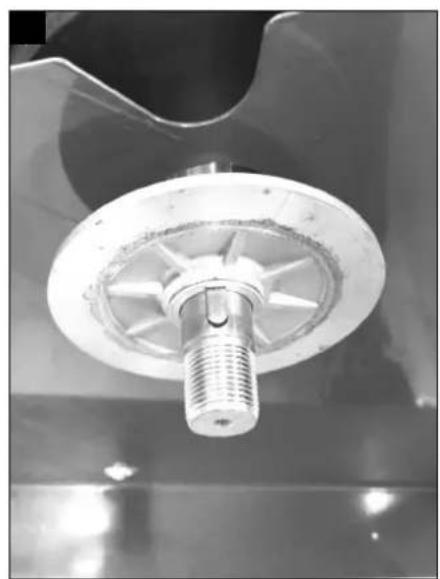
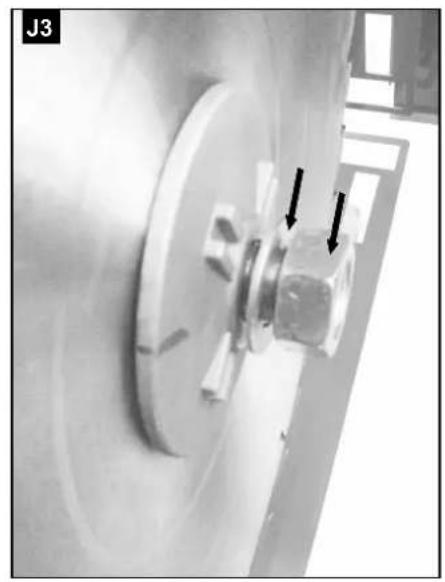
J. Position the saw blade, screw on by hand with flange, washer and hexagon nut.
Insert locking pin and tighten the nut well using the saw blade wrench.
Remove locking pin once more. (J1, J2, J3, J4).
Attention! When inserting the saw blade, make sure the direction of rotation is correct.
Always wear gloves when inserting and tightening the saw blade.
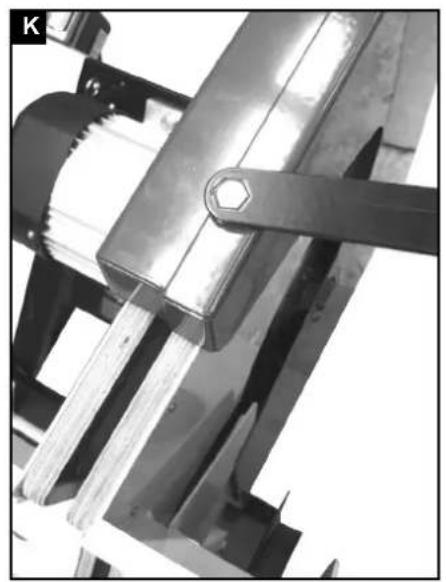
K. Close blade guard and secure top and bottom with the hexagon screws.
L. Guide electrical cable through the frame feet, screw and secure switch with 2 fillister head screws M4x60 and locking nut.
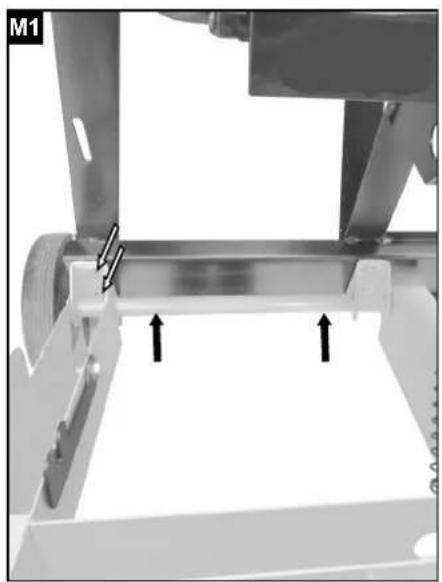
Place saw blade wrench and locking pin (2) in the recess.
M. Check that the saw blade is central, if necessary loosen the two hexagon screws (M1) on the swivel axle (M1, M2) and align the swivel with the saw blade (M3). Following alignment, retighten the hexagon screws (M2).
!Test the swivel and saw blade function.
Connect the machine to the mains power supply and perform a test run by switching on briefly.
Rocker lock and transport.
- For Trans Sport of Wippkreissäge engage the rocker lock in position (1). (N1).
- Tipping machine carefully forward and transport. (N2, N3).
Commissioning
Before commissioning observe the safety notes.
- All safety and auxiliary installations must be fitted.
- Check the rocker inlet for wear and replace it if necessary.
- Check the rocker that it returns to its home position autonomously.
- Check the saw blade for perfect fitting and correct direction of rotation.
- The saw is constructed solely for the cross cutting of firewood.
- Regardless of the diameter of the wood only one work piece is to be put on the rocker.
- ATTENTION! Do not saw faggots or multiple pieces at once.
- Put curved wood on the rocker in such a way that the curved-out side is directed to the saw blade.
- Ensure the machine is securely placed on solid ground.
- Prior to each startup of the device, the two shaft bearings must be lubricated on the lubricating nipples using bearing grease.
Operation notes
Make sure the machine is completely and expertly assembled. Check before every use:
- The machine for any possible damage.
• The firm seat of all bolts.
• The motor oil level and the fuel level.
Sawing
- Turn on the machine.
- Wait until the saw blade has reached full speed.
- Put the wood on the rocker.
- Take hold of both handle bars of the rocker with both hands and lead it evenly to the saw blade; thus the saw blade is revealed.
- Push the rocker evenly to ensure the engine speed does not drop.
- Remove the sawn wood from the rocker before putting on the next piece.
End of work
- Turn off the machine by turning the ignition switch to OFF.
- Observe general maintenance instructions.
- Place the jack in the transport position and secure it with the locking lever
Maintenance
Before undertaking any maintenance or checking work, the working area must be cleaned. Keep the necessary tools within the reach of your hand.
The intervals mentioned herein are based on normal conditions of use. An excessive use of the machine shortens the intervals accordingly.
Clean the panels, screens and control levers with a soft cloth. The cloth should be dry or slightly humid with a neutral cleaning agent. Do not use any solvents like alcohol or benzene as they could damage the surfaces.
Store oil and grease outside the reach of unauthorized personnel. Strictly follow the instructions on the bins. Avoid direct contact with the skin. Rinse well after use.
Switch off the motor before undertaking any converting, maintenance, or cleaning work.
Preventive maintenance
Turn off engine and disengage all command levers. Engine must be cool. Disconnect the plug cap.
Inspect the general condition of the unit. Check for loose screws, misalignment or binding of moving parts, cracked or broken parts, and any other condition that may affect its safe operation.
Remove all debris and other materials that may have accumulated to the brush. Clean after each use.
Then use a premium quality lightweight machine oil to lubricate all moving parts.
⚠️ Never use a “pressure washer” to clean your unit. Water can penetrate tight areas of the machine and its transmission case and cause damage to spindles, gears, bearings, or the engine. The use of pressure washers will result in shortened life and reduce serviceability.
Experienced craftsmen can perform minor repairs on the machine itself.
- Check the saw blade regularly. Use only well-sharpened, crack-free and not distorted saws. Use only tools that comply with the European standard EN 847-1.
• Exchange immediately rocker that run out. - Check all safety installations after each maintenance and cleaning activities.
- Ensure that there are no tools or other materials on or in the machine before putting it into operation.
- Remove possible sawdust blockages at the discharge.s
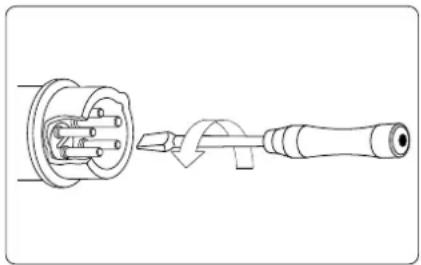
Exchange of saw blade (J4)
- The exchange of the saw blade can only be undertaken in firewood cut position.
- Open side lid.
- Put the locking pen (1) through the bottom saw blade protection to lock the saw blade.
- Loosen the saw blade with the supplied open-end wrench / female six fold wrench (2).
- Carefully remove the blade. To do so, wear safety gloves.
- Before installing the new blade, clean the flange with a cloth or brush.
- Insert the blade and the flange and tighten the flange nut firmly again
- Now remove the locking pin so that the saw blade can rotate freely again
- close lid.
• Function test the rocker and blade perform.
⚠️ Achtung! When inserting the saw blade in the right direction
Troubleshooting
| Upon switching off the saw does not slow down. | 1. Brake board defect 1. Renew brake board | |
| Saw blade comes loose after the engine is turned off. | 1. Mounting nut has not been sufficiently tightened. | 1. Tighten the mounting nut; right-hand thread. |
| Burnt areas on the cutting surface | 1. Blunt saw blade2. Incorrect saw blade | 1. Sharpen the saw blade, replace it.2. Replace the saw blade |
| Engine does not start 1. | The spark plug cable has been disconnected.2. No fuel or old fuel.3. The choke is not in the open position4. The fuel line is blocked.5. Dirty spark plug.6. The engine has stalled.7. The engine oil level is low. | 1. Connect the spark plug cable securely to the spark plug2. Put in clean, fresh petrol.3. The throttle lever has to be in the CHOKE position during cold start.4. Clean the fuel line.5. Clean, set gap or replace.6. Wait a few minutes before restarting, but do not let the engine draw in petrol.7. The oil monitor prevents the engine starting if the oil level is low - check the oil level. |
| The engine runs irregularly. | 1. The spark plug cable is loose.2. The engine runs with CHOKE.3. The fuel line is blocked or old fuel is in the tank.4. The ventilation hole is blocked.5. There is water or contamination in the fuel system.6. Dirty air filter.7. Incorrect carburettor setting. | 1. Connect the plug cable and secure it.2. Turn the choke lever to OFF.3. Clean the fuel line. Fill the tank with clean, fresh petrol.4. Clear the ventilation hole.5. Empty the tank. Fill the tank with fresh fuel..6. Clean or replace the air filter.7. Contact the Service Department. |
| The engine has over-heated. | 1. The engine oil level is low.2. Dirty air filter.3. The air flow is restricted.4. The carburettor is not set correctly. | 1. Fill the crankcase with the correct oil.2. Clean the air filter.3. Remove the casing and clean it.4. Contact the Service Department |
Electrotechnical maintenance works should only be carried out by an electronics technician!
On removal of the machine the local legal regulations have to be abided by.
GB
The following details are required to allow correct and fast processing of a spare parts order:
- Machine type
- Machine number
- Description, order number for spare part.
- When ordering spare parts for electric equipment, the date shown on the nameplate of motor and switch must be quoted.
- The color (RAL number) of the desired spare part.
- Quantity of the required spare part.
- Exact details of address and type of dispatch.
Fabricant :
Günzburger Straße 69
D-89335 Ichenhausen
Cher client,
natural_image
Technical line drawing of a mechanical device with wheels and a cross-shaped tool, showing no text or symbols.Günzburger Straße 69
D-89335 Ichenhausen
Vážený zákazníku,
Nehoda riziko!
Günzburger Straße 69
D-89335 Ichenhausen
Kedves Ügyfelünk!
Balesetveszély!
natural_image
Technical line drawing of a mechanical component with a tool inserted into a housing (no text or symbols)Nesreća rizik!
Drvo uvijek mora ležati na obje strane lista pile u prizmu rockera. (Vidi strelice)
Rezanje
- Pričekajte da rezni list postigne punu brzinu vrtnje.
- Položite drvo u klackalicu.
- Primate ručku klackalice objema rukama i vodite je ravnomjerno prema listu pile, čime će se list pile deblokirati.
- Pri rezanju pritisnite klackalicu tek toliko da se brzina vrtnje lista pile ne smanji.
- Izvadite rezano drvo iz klackalice nakon što se ona vrati u početni položaj i list pile se pokrije. Zatim položite sljedeće drvo.

Pozor!
Günzburger Straße 69
D-89335 Ichenhausen
Szanowny kliencie,
natural_image
Technical line drawing of a mechanical assembly with a cylindrical component and a tool (no text or symbols)Uruchomienie
Günzburger Straße 69
D-89335 Ichenhausen
Vážený zákazník,
Nehoda riziko!
natural_image
Technical line drawing of a mechanical tool or connector assembly (no text or symbols)natural_image
Cross-sectional diagram of a mechanical component with internal channels (no text or labels)
Subject to change without notice
Documents registar: Reinhold Bauer
Günzburger Str. 69, D-89335 Ichenhausen
DE

Only for EU countries. Do not dispose of electric tools together with household waste material! In observance of European directive 2012/19/EU on wasted electrical and electronic equipment and its implementation in accordance with national law, electric tools that have reached the end of their life must be collected separately and returned to an environmentally compatible recycling facility.
FR