USER MANUAL E30 Ultra MOVA
Robot Vacuum and Mop with
Auto-Empty and Mop Self-Cleaning
User Manual

natural_image
Line drawing of a modern kitchen appliance with a cylindrical lid and base mount (no text or symbols)


Far more support, contact us via https://mova-tech.com
Manufactured By: Dreamie Trading (Tiehjinn) Co., Ltd.
Made in China EU A30

The illustrations in this manual are for reference only. Please refer to the actual product.
MOVA
Contents
ER User Manual 01
To avoid electric shock, fire or injury caused by improper use of the appliance, please read the user manual carefully before using the appliance and keep it for future reference.
Usage Restrictions
This product should not be used by children younger than 8 years old nor persons with physical, sensory, intellectual deficiencies, or limited experience or knowledge without the supervision of a parent or guardian to ensure safe operation and to avoid any risks. Cleaning and maintenance shall not be performed by children without supervision.
The appliance is only to be used with the power supply unit provided with the appliance.
This appliance contains batteries that are only replaceable by skilled persons. Clear the area to be cleaned. Children shall not play with the appliance. Ensure children and pets are kept at a safe distance from the robot while it is operating.
Do not install, charge or use the appliance in the bathrooms or around the pools.
This product is for floor cleaning in a home environment only. Do not use it outdoors, on non-floor surfaces, or in a commercial or industrial setting. Ensure that the appliance operates correctly in a proper environment. Otherwise, do not use the appliance.
If the power cord is damaged, it must be replaced by a special cord or assembly available from the manufacturer or its service agent.
EN
Usage Restrictions
- Do not use the robot in an area suspended above ground level without a protective barrier.
Do not place the robot upside down. Do not use the LDS cover, robot cover, or bumper as a handle for the robot.
Use the robot in environments with an ambient temperature above 0^ C and below 40^ C. Make sure there is no liquid or sticky substance on the floor.
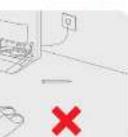
To prevent damage or harm from dragging, clear any loose objects from the floor, and remove cables or power cords on the cleaning path before operating the appliance.
Remove fragile or small items from the floor to prevent the robot from bumping into and damaging them.
Keep hair, fingers, and other body parts away from the suction opening of the robot.
Keep the cleaning tool out of reach of children.
Do not operate the appliance in a room where an infant or child is sleeping. Do not place children, pets, or any item on top of the robot regardless of whether it is stationary or moving.
Only clean water and the officially-approved cleaning solution can be added to the clean water tank. Do not add any other liquid such as alcohol or disinfectant. The ratio of the cleaning solution to clean water can be checked on the cleaning solution bottle. Keep the cleaning solution out of reach of children.
2
Usage Restrictions
Do not use the robot to clean any burning objects. Do not use the robot to pick up flammable or combustible liquids, corrosive gases, or undiluted acids or solvents.
Do not vacuum hard or sharp objects. Do not use the appliance to pick up objects such as stones, large pieces of paper or any item that may clog the appliance.
Plug must be removed from the socket-outlet before cleaning or maintaining the appliance.
Do not wipe the robot or the base station with a wet cloth or rinse them with any liquid. After cleaning washable parts, fully dry the parts before reinstalling and using them.
Please use this product in accordance with the instructions in the User Manual. Users are responsible for any loss or damage that arise from improper use of this product.
Batteries and Charging
Do not use any third-party battery or base station. The robot can only be used with the model RCEE0301 base station.
Do not attempt to disassemble, repair, or modify the battery or the base station on your own.
Do not place the base station near a heat source.
Do not use a wet cloth or wet hands to wipe or clean the base station's charging contacts.
EN
3
Batteries and Charging
Do not improperly dispose of old batteries. Unneeded batteries should be discarded at an appropriate recycling facility.
If the power cord becomes damaged or broken, stop using it immediately and contact after-sales service.
Make sure the robot is turned off when being transported and kept in its original packaging if possible.
If the robot will not be used for an extended period of time, fully charge it, then turn it off and store it in a cool, dry place. Recharge the robot at least once every 3 months to avoid over-discharging the battery.
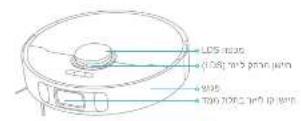
Laser Safety Information
The laser sensor in this product meets the IEC 60825-1:2014/EN 60825-1:2014/A11:2021 Standard for Class 1 laser products. Please avoid direct eye contact with it during use.
CLASS 1 LASER PRODUCT
CONSUMER LASER PRODUCT
EN 50689:2021
Hereby, Desmo Trading (Tianjin) Co., Ltd. declares that the radio equipment type FILEST SE is in compliance with Directive 2014/53/EU. The full text of the EU declaration of conformity is available at the following internet address: https://mova-tech.com For detailed e-manuals, please go to https://www.mova-tech.com/pages/user-manuals-and-taqs
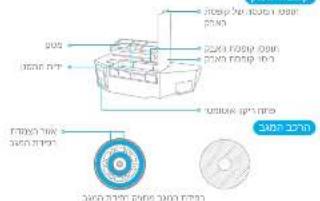
Product Overview
Package Contents

haber
Base Station
Other Accessories

Side approach

Pavetard

user 3x14d

Base Station Ramp
Extension Plate

Mop Part x 2
(proportions)

Mop Red
(50)21.8.2

(1)

Product Overview
Robot
3
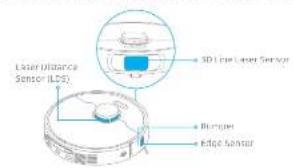
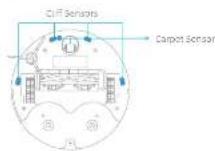
Product Overview
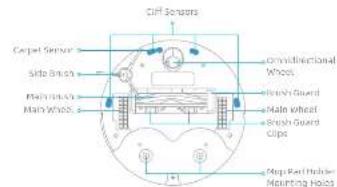
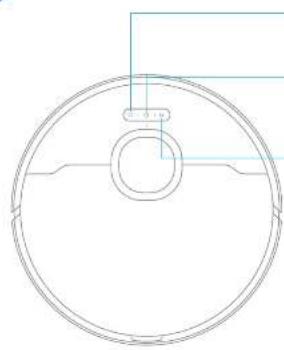
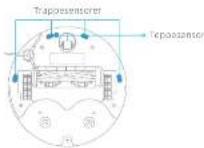
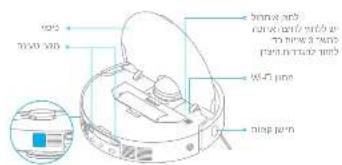
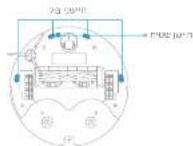
Robot and Sensors

also empty vent

EN
7

Product Overview
3
Preparing Your Home
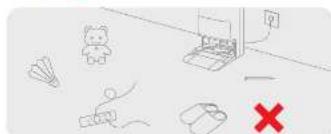
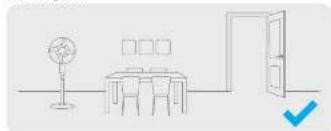
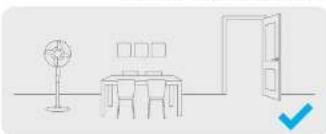
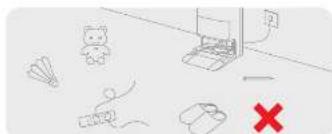
Before cleaning, please move away unstable, fragile, valuable or dangerous items, and clean up cables, cloths, toys, hard objects and sharp objects on the ground to avoid being entangled, scratched or knocked over by the robot and causing josses.
natural_image
Simple line drawing of a dining table with a lamp and door, no text or symbols present
Open the door of the room to be cleaned, and put the furniture in its proper place to leave more space.
Note:
- When operating the robot for the first time, follow it around while cleaning to remove any potential obstacles in time.
- De not vacuum hard objects like stones, steel balls and toy parts, or sharp objects like construction waste, broken glass and nails, otherwise the ground may be scratched.

natural_image
Architectural diagram showing a balcony with railing and a sofa, plus two checkmark indicators (no text or symbols)
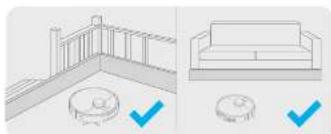
Before cleaning, place a physical barrier at the edge of the stairs and sofa to ensure the secure and smooth operations of the robot.
natural_image
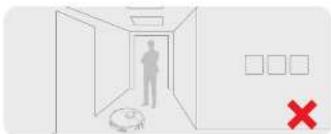
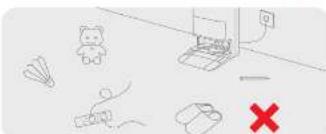
Interior hallway with a person standing near the door and a robot on the floor, no text or symbols present
To prevent the robot from not recognizing areas that need to be cleaned, do not stand in front of the robot, threshold, hallway, or narrow places.

3

Before Use
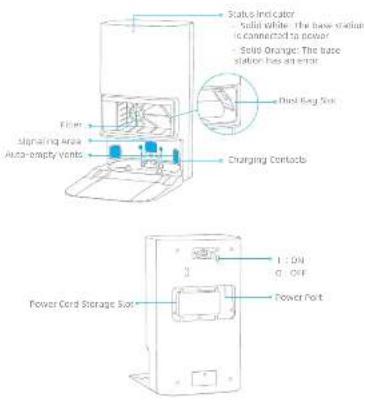
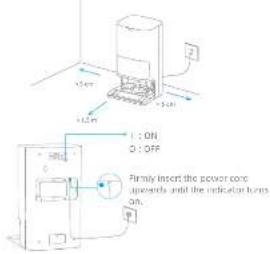
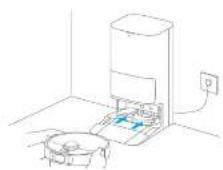
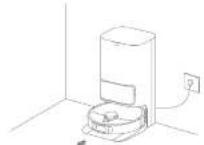
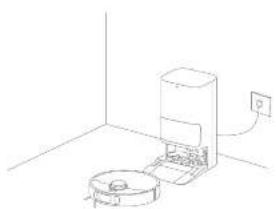
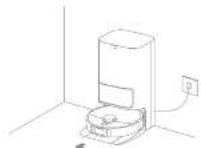
- Place the Base Station and Connect to an Electrical Outlet
Place the base station in a location that is as open as possible with a good W-Flag signal. Remove any objects that are closer than 1.5 m from the front and a 10 m from either side of the base station. Insert the power contact into the base station and plug it into the socket.
Koh:
- Make sure that no objects might block the signaling area.
- To prevent water slabs from wetting wood floors or carpets, placing the base station on the floors or marble floors is recommended.
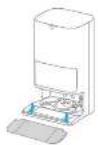
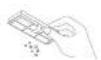
- Install the Ramp Extension Plate
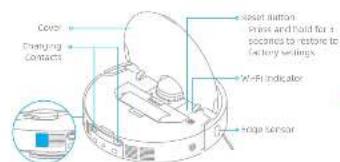
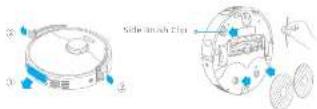
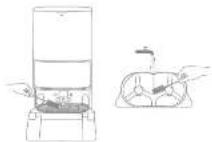
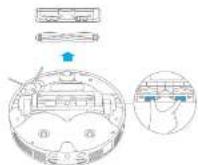
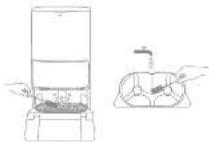
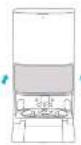
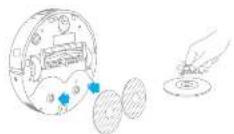
- Remove Robot Protections, and Install the Side Brush and Mop Assembly
Before Use
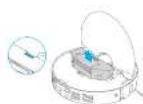
- Connect the Robot to the Base Station
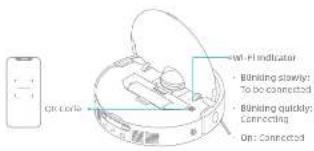
Press and hold the button (in the robot for 3 seconds to turn it on. Place the robot onto the base station with the prop assembly facing toward the destination. Then you will hear a voice notification when the robot successfully connects to the base station.
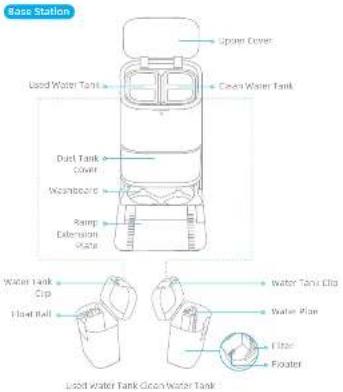
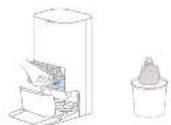
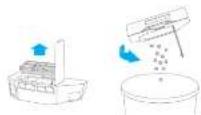
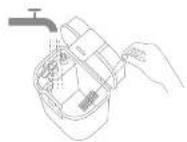
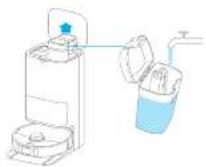
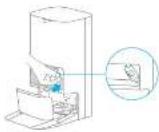
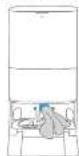
- Add Water to the Clean Water Tank
Take out the clean water tank from the base station and fill up the tank with clean water. Then install it into the base station.
Note: it is recommended to fully charge the robot before its first use, when the robot cannot be turned on after the battery is delivered, manually connect the robot with the station to charge it.
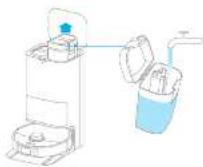
Note: do not sell but seller into the water tank, as this may cause the load to become deformed.

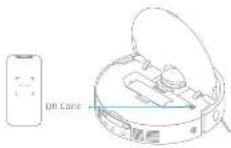
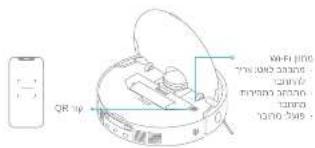
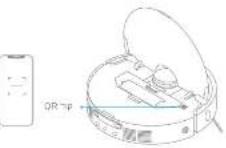
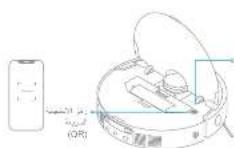
Connecting with the App
- Download the App
can the 100 cores on the robot to download and install the app
Note:
- Only 2/ GHz will - it supported.
- Due to upgrades in the chip software, the actual operations may differ from the directions in this manual. Please follow the instructions based on the current approval.
- Add Device
Open the app, See "Scan get code to connect", and scan the same get code on the robot again to add the device. Please follow the prompts to finish the Wi-Fi connection.
Notes: If you want to reset Wi-Fi, repeat step 2 and then follow the prompts to finish the Wi-Fi connection.
How to Use
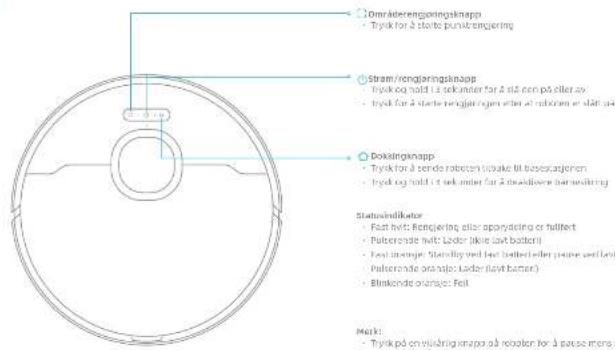
Lyn Qn/D平
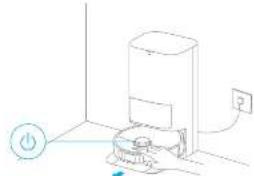
Press and hold the button (for 3 seconds to turn on the robot. The power indicator should be illuminated. Place the robot onto the base station, the robot should turn on automatically and begin charging. To turn off the robot move the robot away from the base station and press and hold the button (for 3 seconds.
Fast Mapping
After configuring the network for the first time, following the instructions in the app to quickly create a map. The robot will start mapping without cleaning. When the robot returns to the base station, the mapping process has been completed and the map will be saved automatically.
Pause/Sleep
When the robot is running, access any button to pause it. If the robot is paused for more than 10 minutes, it automatically enters sleep mode. All indicators on the robot will turn off. Press any button on the robot, or use the soap to wake up the robot.
Note: If the robot is paused and placed onto the base station, the current cleaning process will end.
Auto Resume Cleaning
If the battery is too low, the roof will automatically return to the base station to charge. After charging to the appropriate battery level, it will resume unfinished cleaning tasks.
Note: To use this function, please enable it in the app.

Do Not Disturb (ONO) Mode
When the robot is set to the DIO and DIOA (DIO) mode, the robot will be prevented from resuming cleaning and the power indicator goes out. The DIO mode is disabled by default as the factory. You can use the app to enable the DIO mode to qualify the DIO period. The DIO period is 27.00-5.00 by default.
- The scheduled cleaning tasks will be performed as usual during the next period.
- The robot will resume cleanup where it left off after the DVD period expires.
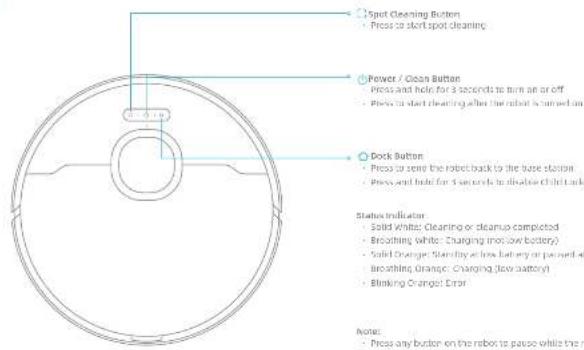
Spot Cleaning
When the robot is on standby, press briefly the human to enable the spot cleaning mode. In this mode, the robot covers a square-shaped area of 1.5 × 1.5 meters around it and returns to its starting point once the spot cleaning is completed.
Robot Restarting
If the robot stops responding or cannot be turned off, press and hold the button (for 10 seconds to turn it off). Then, press and hold the button (for 8 seconds to turn the robot on.

How to Use
Vacuum and Mop
Note: When using the mop assembly for the first time, the robot performs the "Vacuum and Mop" less by default.
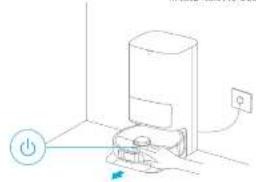
- Start cleaning
Press the button on the route, or use the app to make the robot start from the base station. Then the robot will plan the optimal cleaning route and perform the cleaning task based on the created map.
natural_image
Line drawing of a hand holding a device with a power button and electrical outlet (no text or symbols)
Note:
- In ensure the robot safety returns to the base station after clearing, it is recommended to move the robot start from the base station.
- The map parks will be cleaned before the robot start's mapping, please wait patiently.
Do not move the base station, the clean water tank, the used water tank, or the wash board during operation.
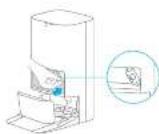
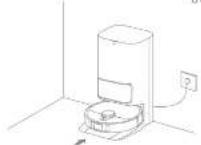
- Auto mop washing
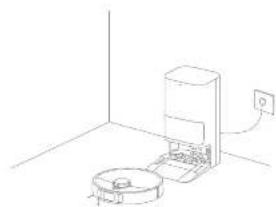
When cleaning, the robot will automatically return to the base station to wash crop pads based on the ramp and ceasting frequency specified in the spin.
natural_image
Line drawing of a robotic vacuum cleaner inside a room with a wall-mounted power outlet (no text or symbols)
How to Use
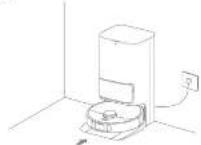
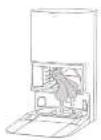
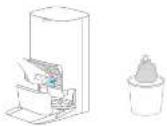
- Automatically empty the dust box and wash and dry the mop pads
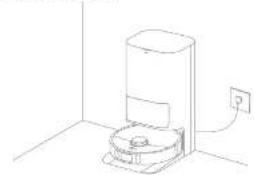
After the robot finishes a cleaning task and returns to the base station to charge, the base station will automatically start employing the first box. Then it will wash and dry the mop pads.
natural_image
Line drawing of a simple kitchen appliance with a wall-mounted power outlet (no text or symbols)
Norlet
- If the auto-empty function is turned off in the app, the base station will not automatically empty the dust box.
- The base station will empty the dust box according to the setting in the app.
The base station will simply the dust box according to the setting in the app.
- Clean the used water tank
After the robot has completed its tank, please clean the used water tank to prevent any odor.
Mop after Vacuuming
Enable the incoming after vacuuming function in the app, and the robot will automatically lift the mop assembly to vacuum the floor. After vacuuming is completed, the robot will return to empty the dust box, and then start mapping after automatically lowering the mop assembly.
Vacuum Only
replace the vacuuming function in the space, and the root cell automatically fills the map assembly and start vacuuming.
Map Only
Enable the mapping function in the app, and the robot will check the map assembly is installed. If not, manually install the map assembly, and then the robot will automatically start mapping.
the boat in good condition; it is recommended to refer to the accessory usage in the top of the following table for routine maintenance.
| Part Maintenance Frequency Replacement Period | |
| Used water tank After each use | / |
| Clean water tank | Once every 7 weeks |
| Main brush Every 6 to 12 months | |
| Hand box's filter | | Every 3 to 6 months |
| Side brush | | |
| Map part holder / | | |
| Worstboone | |
| Base stations signaling area | |
| Chanding contacts | |
| Auto-empty vents | |
| Generalised wheel wheel | |
| Edge sensor | |
| Later Distance Sensor (LDS) | |
| at line later sensor | |
| Puff Maintenance Frequency Replacement Period | |
| Carpel sensor | Once every month | / |
| Cliff sensors |
| Bumper |
| Bottom of the robot |
| Dust box Clean fit as needed |
| Dust bag | / | Every 2 in 3 months. |
| Nup pod Every 1 to 3 months | |
Note: The replacement frequency will depend on your usage of the robot, if an exception occurs to special circumstances, the parts should be replaced.
Routine MaintenanceRoutine Maintenance
Washboard Base
- Enable the washboard base cleaning function in the apo, and the robot will exit the base station automatically. Take out the washboard and wait for water to fill the bottom of the base station.
- Rinse the washboard with clean water, and use a greater cleaning tool to clean the bottom of the base station.
- After a moment, the base station will automatically pump out the used water. Then dry it with a soft and dry cloth, and put the way toward back into place.
- Use the app or briefly press the button on the root to make it return to the save station.
Note: During cleaning, do not make the robot return to the base station.

Routine Maintenance
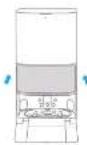
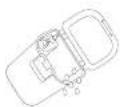
Dust Bag
1. Remove the dust tank cover and discard the dust bag.
Note: Rolling outwards on the handle will seal the bag to prevent the dust and clears from accidentally falling out.
-
install a new dust bag.
-
No install the dust tank cover, 2. remove the dust and rubels from the filter with a cry cloth.
Routine Maintenance
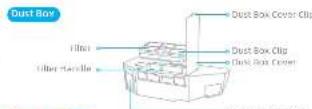
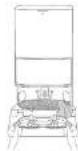
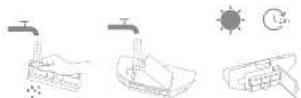
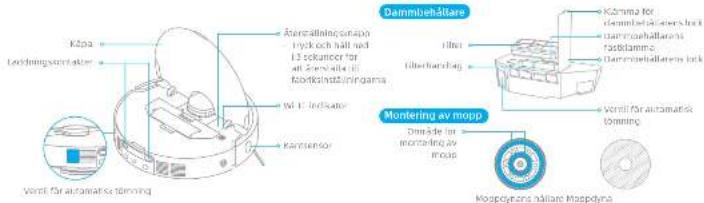
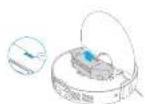
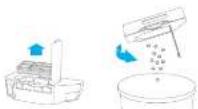
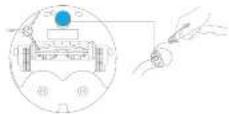
Dust Box and Filter
Open the robot cover and press the dust box clip to remove the dust box.
2. Open the dust box cover, remove the filter, and then empty the dust box as shown in the diagram.
- Gently tap the basket of the filter to remove the filter.

Note: Error attempt to clear the filter with a trigger, a trigger or stop objects in present damage.
- Rinse the dual box and filter with oven and dry item completely before inloading.
Name:
- In case the dust box and filter with clean water only, do not use any detergent.
- Use the dust box and filler only when they are completely dry.

Routine Maintenance
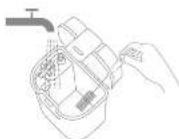
Used Water Tank
Remove the user water tank, open its cover and pour out the used water.
- Inse the load water tank with clean water, and use a proper cleaning tool to clean the inner wall of the load water tank.
Note: The float ball in the used water tank is a movable part. Do not apply too much force when cleaning it to avoid damaging it.
20 21
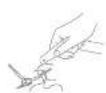
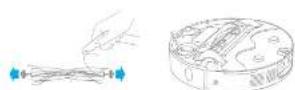
Main Brush
I press the brush guard clips inserts to remove the brush guard and lift the brush out of the robot.
- Full out the brush covers at both ends of the brush as shown in the figure. Use a proper cleaning tool to remove any hair ranged in the brush. Reinstall the brush covers on both ends of the brush, and then winstall the brush. Press on the brush guard to lock it in place.

Routine Maintenance
Side Brush
Remove and clean the side brush.
Mop Pad Holder
Remove and clean the map pad holder

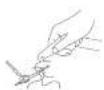
Omnidirectional Wheel
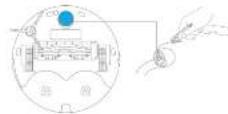
Ricke:
- Use a tool such as a small screwdriver to separate the side and line of the omnidirectional wheel. Do not use excessive force.
- Raise the omnidirectional wheel under the running water and put it back after drying it completely.


Routine Maintenance
Robot Sensors
Wipe robot sensors by using a soft and dry cloth as shown in the below figure:
Note: A wet cloth can damage sensitive elements within the robot and the base station. Please use a dry cloth for cleaning.
Charming Contacts and Signaling Area
Clean the charging contacts and the signaling area with a soft and dry cloth.
Auto-empty Vents
Clean the auto or any vents of the robot and the base station with a soft and dry cloth.

Routine Maintenance
Non Rad
Remove the modal pin from the modal pin holder to replace it.

Battery
The robot remains a high-performance tool on the battery pack. Make sure that the battery remains well-charged for daily use to maintain optimal battery performance. If the robot is not used for an extended period of time, turn it off and put it away. To prevent damage from ocean discharging, change the robot at least once every three months.

EN
Troubleshooting
| Problem solution | |
| The robot will not turn on. | The battery is low. Recharge the roost on the base and try again.The temperature of the battery is too low or too high. It is recommended to operate the appliance at a temperature between 32°F (30°C) and 194°F (46°C). |
| The robot will not change. | The base station is not connected to power, please make sure both ends of its power card are correctly plugged in. The contact between the charging contacts on the base station and the roost is poor, please clean the charging contacts.Check whether there is any foreign object at the convactor of the robot and remove the foreign object if any. |
| The robot fails to connect to Wi-Fi. | The Wi-Fi network password is incurred. Make sure the password used to connect to your Wi-Fi network is correct.The robot does not support a 5 GHz Wi-Fi connection. Make sure the robot is connected to a 2.4 GHz Wi-Fi connection.The Wi-Fi signal is weak. Make sure the robot is in an area with good Wi-Fi coverage.The robot may not be ready to be configured, please wait and re-ure the app, and then try again as instructed. |
| The robot cannot time and return to the base station. | The base station is disconnected from power or moved when the robot is not on it. Please connect the base station to the power supply or place the robot onto the base station on to charge.there are too many obstructions around the base station. Place the base station in a more open area.Moving the robot may cause a re-position itself, and it will recreate a mix of re-positioning falls. If the robot is too far from the base station, it might not be able to automatically return on its own, in which leave you still need to mentally place the robot onto the base station.Wipe the signaling area on the base station to remove dust or debris. |
| The robot gets stuck in front of the base station and cannot return to it. | Clear any obstruction within 5 cm on the left and right sides or within 1.5 m in front of the base station to prevent the robot from being slacked.The route for returning to change is blocked, e.g. the door is closed.The robot may slip if the floor in front of the base station is overly wet, if so, clean the excess water before trying again.It is recommended to move the base station to a different place and try again.Make sure the some extension plate is installed properly. |
| The robot will not turn off. | The robot cannot be turned off when it is charging. It is recommended to move the robot from the base station, and then press and hold the button (or 3 seconds to turn it off.If the robot cannot be turned off by performing step 1, press and hold the button 2, for 10 seconds to family turn off the robot, if the problem persists, please contact after-sales service. |
Troubleshooting
| Problem solution | |
| The charging speed is slow. | It takes about 3.2 hours to fully charge the robot when its battery is low.If you operate the robot at temperatures outside of the specified range, the charging speed will automatically slow down to extend the battery life.The charging contacts on both the robot and the base may be dirty, please wipe them with a dry cloth. |
| The noise increases while the robot is operating. | Check whether the cloud box filter is designed, if so, clean it or replace it.A hard object may be caught in the main brush or the dust box. Check and remove any hard objects.the main brush or the side brush may become tangent, check and remove any foreign objects.Switch the suction mode to Standard or Quiet. |
| The robot moves without following the set route. | Setters such as power cords and slippers should be organized before using the robot.Working on wet slippery surfaces causes the main wheel to slip, it is recommended to cry the wet places before using the robot.Wipe the 3D line later sensor on the robot with a clean, soft cloth to keep it clean and unobstructed. |
| The robot misses the rooms to be cleaned. | Make sure that the floors of the rooms to be cleaned are open.Check whether there is a threshold higher than about 2 cm at the door of the room. The robot cannot climb over high frostride or icecoat.The place in front of the room to be cleaned may be wet and slippery, cleaning the robot to slip and work ahnormally.Please try crying the floor before using the robot. |
| The robot will not resume cleaning after charging. | Make sure that the robot is not set in the Da'at Daxiana (DAX) mode, which will present it from resuming cleaning.The robot will not resume cleaning after you manually place the robot on the base station or send the robot to charge via the eipir or the button [IMAGE] |
EN
EN Troubleshooting
| Problem | Solution |
| The station cannot automatically employ the dust box. | Check another the dust bag in the dust tank is full, if the dust bags are not full, check whether there is any obstruction at the water-empty venta of the robot, the base station or the dust box, if any clean the ablated part in time. |
| The water level in the wallboard is abnormal. | Check whether the seat on the used water tank is some of nor correctly installed, and manually reset it if so if the problem persists, please contact the other-sales service team. Gently press down on the used water tank to make sure it is installed correctly. Therefore the wellboard and lock water for the sewage drain is too bad and clean it. Check the cleaning solution. Do not add any fluid other than the officially approved cleaning solution. |
| The stop pad holder is raised alternately. | Please remove the mode pad holder to check if there is any foreign object stuck in it, and try to return the rotor. If the problem persists, please contact the other-sales service team. |
| There is water under the cabin water tank or around the bed. | When taking out the clean water tanks, some water in the pipe may be left under the tank or around the gas. This is normal. Please wipe with a dry cloth. |
For some support, we will be https://home-tech.com
Specifications
Robot
| Model RLS15C | |
| Charging Time Approx. 4.5 hours | |
| Rated Voltage 10V/V | — |
| Rated Power 74 kV | |
| Operation Frequency JWD, Max.5 MHz |
| Maximum Output Power <20 dBm |
Base Station
| Rated RCD0301 | |
| Rated input 220-240 V, SB 60 Hz | ~ |
| Rated Output 20 V, 2 A | = |
| Rated Power (using dual emptying) 70 W | W |
| Rated Power (using closing) 40 W | |
| Rated Power (using closing and closing) | 89 W |
under normal use of condition, the equipment should be kept a separate land distance of at least 20 cm between the antenna and the body of the user.
Note: Rated Power (during charging and drying) is determined by the power value during full load period.

Battery Disposal and Removal
The built-in lithium-ion battery contains substances that are hazardous to the environment. Before disposing of the battery, more sure the battery is removed in its material and thus exists on an appropriate intrinsic fuel.
- the battery must be removed from the appliance before it is scrapped.
The solutions must be disconnected from the supply inside when removing the battery.
the battery is to be disposed of safety.
CAUTION:
Before removing the battery, disconnect the power and run out the battery as much as possible.
Unneeded batteries should be discarded at an appropriate recycling facility.
Do not expose to high-temperature environment to avoid risks of explosion.
Under abusive conditions, liquid may be ejected from the battery. If contact occurs, flush with water and seek medical help.
Removal Guide:
- Turn over the robot, use a proper tool to remove the screws on the back of the robot, and then remove the cover.
- Hopping the batteries between the battery and PCL board to remove the battery.
All products being this symbol are waste electrical and electronic equipment (WEE as an directive 2012/T19/EU) which should not be mixed with reported household waste, insecticide, gas should protect human health and the environment by handling over your waste equipment to a designated collection plant for the recycling of waste electrical, and electronic equipment, appointed by the government or local authorities. Correct disposal and recycling will prevent potential negative consequences to the environment and human health. Please contact the organizer or local authorities for more information about the location as well as terms and conditions of such collection forms.
Sicherheitshinweise
LASERPRODUKT DER KLASSE 1
LASERPRODUKT FÜR VERBRAUCHER
EN 50689:2021
https://mova-tech.com

(4)scaped×2:
(No/instalbert)

Wischspedtender x 2

Siambeijel
[varitality]


Produktübersicht
Roboter
natural_image
Pure technical drawing of a circular mechanical part with centerlines and no text or symbols
natural_image
Simple line drawing of a dining table with a lamp and door, no text or symbols present
natural_image
Architectural diagram showing a balcony with railing and a sofa, alongside two checkmark indicators (no text or symbols present)
natural_image
Interior hallway with a person standing at the entrance and a robot nearby, marked with a red X (no text or symbols)
natural_image
Line drawing of a kitchen appliance with a power button and electrical outlet (no text or symbols)
milyach:
natural_image
Simple line drawing of a room with a mounted appliance and a small circular component (no text or symbols)
Anwendung
natural_image
Line drawing of a microwave oven with a power outlet, no text or symbols present
Mircawis

Serpiliere = 2 (prostellations)

Support the
scrollions > 2

Set a posphere (potinasta)
natural_image
Simple line drawing of a dining table with a lamp and door, no text or symbols present
natural_image
Architectural diagrams showing wall-mounted railing and sofa views with checkmarks (no text or symbols)
natural_image
Interior hallway with a person standing near the door, a clock on the floor, and a red X mark (no text or symbols)
Aspiration of nettoyana
natural_image
Simple line drawing of a device with a power button and a switch, no text or symbols present.
Remetique :
natural_image
Simple line drawing of a room with a refrigerator and a vacuum cleaner (no text or symbols)


natural_image
Line drawing of a vacuum cleaner in a room with a power outlet (no text or symbols)
Remarjus:
Point play of assistance, contacts minus 6e https://invest-tert.com

natural_image
Simple line drawing of a dining area with table, lamp, and door (no text or symbols)
natural_image
Architectural line drawings showing a balcony and a sofa with checkmarks indicating selection (no text or symbols present)
natural_image
Interior hallway with a person standing near the door, a clock on the floor, and a red X mark indicating cancellation (no text or symbols present)
natural_image
Simple line drawing of a washing machine with a power button and electrical outlet (no text or symbols)
Note:
natural_image
Line drawing of a room with a refrigerator and a vacuum cleaner (no text or symbols)


Utilizzo
natural_image
Line drawing of a laboratory apparatus with a power outlet and a cylindrical chamber (no text or symbols)
Note
Per ulenore supporto, contactatoi tram to https://mova-tech.com
Specifiche
Robot
natural_image
Simple line drawing of a dining area with table, lamp, and door (no text or symbols)
natural_image
Architectural line drawings showing a balcony and a sofa with checkmarks indicating selection (no text or symbols present)
natural_image
Interior hallway with a person standing near the door and a clock on the floor, marked with a red X (no text or symbols)
natural_image
Simple line drawing of a device with a power button and electrical outlet (no text or symbols)
Note:
natural_image
Simple line drawing of a room with a refrigerator and a vacuum cleaner (no text or symbols)

Modo de uso
natural_image
Line drawing of a vacuum cleaner in a room with an electrical outlet (no text or symbols)
natural_image
Simple line drawing of a dining area with table, lamp, and door (no text or symbols)
natural_image
Architectural line drawings showing a balcony and a sofa with checkmarks indicating selection (no text or symbols present)
natural_image
Interior hallway with a person standing near the door, a clock on the floor, and a red X mark indicating cancellation (no text or symbols present)
natural_image
Simple line drawing of a washing machine with a power button and electrical outlet (no text or symbols)
UW412:
natural_image
Simple line drawing of a robotic vacuum cleaner inside a room with a wall-mounted device (no text or symbols)

Sposób użytkowania
natural_image
Simple line drawing of a vacuum cleaner inside a room with an electrical outlet (no text or symbols)
Uwangs:
KLASSE 1 LASERPRODUCT
LASERPRODUCT VOOR CONSUMENTEN
EN 50689:2021
natural_image
Architectural diagram showing a railing and a sofa with checkmarks indicating inspection or status (no text or symbols present)
natural_image
Interior hallway with a person standing at the entrance and a robot nearby, marked with a red X (no text or symbols)
- Align 3.4 City with word understanding
Ade de nixie, apn and beel valvend, dure in devabarel and wiser in malen om gezion to vodidation.

Specifications
Robot
| Model RLE513C | |
| Diplachijl Ongower 5,5 mZ | |
| Nominale spening 14,0 V | — |
| Nominale vermogen 75 W | |
| Verkingsfrequenla 2400 J483,5 mZ | |
| Maximaal uitgangsvermögen < 20 dBm | |
Basisstation
KLASSE 1-LASERPRODUKT
FORBRUKERLASERPRODUKT
EN 50689:2021
Med dette erklazer Broame Trading (Tianjin) Co., Ltd at radioutstbyt typa RLES15E er i semovar med direktiv 2014/53/EU. Den komplette teksten til EU-semuvarserklaeringer er tilgjengelig på folgende internetiadresse: https://mova-tech.com
For en detaljert elektronisk bruksanvisning kan du besake https://www.mova-tech.com/pages/user-manuals-and-taqs
202-203
Produktoversikt
Pakkans innhold

saher
Barestayer
Annet tilbcher

Società


Moppepoleleve

Bookwriting/Sanlcelling for longelsesiste for

torfengelsespoisie for

Surprise (for hand movement)


Produktoversikt
Robot
204-205
natural_image
Architectural line drawing showing a railing and sofa with checkmarks indicating inspection or status (no text or symbols)
natural_image
Interior hallway with a person standing at the entrance and a robot on the floor, marked with a red X (no text or symbols)
For å hindre at roboten ikke gjankornor området som rangjeres, må du liko så foran roboten, denstokken, gånger eller kange steder.

Før bruk
network:
work: those fixed some two or more than, since there can have fill all behaleon all deformers.

Koble til appen
- Last nod appen
nskann üt koden på røhoten for å laste ned og installere apen.

Merk:
- 8000元/GB/T 10000
- 25 gärnt, als oppgradierings! Appensions programären, den die fahrische operasjornene ovelte fra sehningene I denige brutschwischen. Felig instaksjernere I den gleichende appraisjernen.
- Lago til onhet
natural_image
Line drawing of a kitchen appliance with a power button and electrical outlet (no text or symbols)
Merk:
- Far Å sikre at tohoten erkelt kevremet till basostatjenen efter terquading, annafales net å fåt aberet till å starte fra basostasjonen.
Vent et oveblik men's moogepulane reaugeres for 'rboletavsageten slatter moopringen
natural_image
Line drawing of a robotic vacuum cleaner inside a room with a wall-mounted power outlet (no text or symbols)
Bruk
natural_image
Line drawing of a kitchen appliance in a room with a wall-mounted power outlet (no text or symbols)
Merk:
- Hås den autometoke termelunkgoren er svåt avl appen: wilke besestasjonen automadisk temme steynuren.
Bosestesjorden tæmmer stredunken (henhold til inngstillingene rappen.
mark: En salt klu tar skane sensitiva elementar på rolnabr og bespetaçom, Bank en tar slut til resqlaring.
220 22
Ikle absen tateriet for haye temperature for å unmagå riske for espiogon.
LASERPRODUKT KLASS 1
LASERPRODUKT FÖR KONSUMENTBRUK
EN 50689:2021
natural_image
Simple line drawing of a dining table with a lamp and door, no text or symbols present
natural_image
Architectural diagram showing a balcony with railing and a sofa, plus two checkmark indicators (no text or symbols)
natural_image
Interior hallway with a person standing at the entrance and a robot nearby, marked with a red X (no text or symbols)
Obs:
- Ended 2/6 GHz with stocks.
natural_image
Line drawing of a kitchen appliance with a power button and electrical outlet (no text or symbols)
Clin:
natural_image
Simple line drawing of a washing machine in a corner with a small circular component nearby (no text or symbols)
210 242
Bruksanvisning
natural_image
Line drawing of a room with a cylindrical device and a power outlet (no text or symbols)
Obv:
For mer support, kontakta oss via https://mova-tech.com
Specifikationer
Robot
The following table is in Chinese:
The following table is in English:

הכלה

Brown 201

DEKMO

(###)

2×200

2x30mm per
• Among private law, the law is not
• (the law is not)
• (in) 100% of the
The image is too blurry to recognize any text content.
•
He
260 261
תָאַעְרִי

אַלְרָה אַלְרָה
natural_image
Architectural line drawings of a balcony and sofa with checkmark indicators (no text or symbols)
In this way, the following is not to be a result of that.
בְרָהִי, אַלְׁוֹת, אַלְׁוֹת, אַלְׁוֹת, אַלְׁוֹת, אַלְׁוֹת, אַלְׁוֹת, אַלְׁוֹת, אַלְׁוֹת, אַלְׂוֹת, אַלְׁוֹת, אַלְׁוֹת, אַלְׁוֹת, אַלְׁוֹת, אַלְׁוֹת, אַלְׁוֹת, אַלְׁוֹת, אַם

natural_image
Interior hallway scene with a person standing at the doorway and a robot on the floor, marked with a red X (no text or symbols)
The following table is provided in the image:
natural_image
Simple line drawing of a dining area with a table, lamp, and door (no text or symbols)
The 1960s to account the share of the U.S. stock, which is not a share of the stock.
(4) 求东证券股份有限公司
2750
•
•
[Unreadable]
·万向新书
· 2017年7月
Ht
בַרְשָׁה
•
The following table provides the information in a specific format:
הכלהה
The image is too blurry to recognize any text content.
(1) 13.15.04.07.08.09.10.11.12.13.14.15.16.17.18.19.20.21.22.23.24.25.26.27.28.29.30.31.32.33.34.35.36.37.38.39.40.41.42.43.44.45.46.47.48.49.50.51.52.53.54.55.56.57.58.59.60.61.62.63.64.65.66.67.68.69.70.71.72.73.74.75.76.77.78.79.80.81.82.83.84.85.86.87.88.89.90.91.92.93.94.95.96.97.98.99.100
□10
The following table provides the information in a tabular format:
近19日
• 100 GHz
• Interactions
ال electrocardiogram: 100%
Jahara, pram, ik, enti, kai, 60, cama. De Not Disturb (DND) and two stam, teke
napponen wannengjne, pram, twan bhan mora nana, dwn aon, tao hna
22:00 8:00 on DND in the DND and the rada in DND in the zada no
37:00 mora
•
The image is too blurry to recognize any text content.
The following table is a simple diagram and cannot be extracted.
The text in the source image is a non-textual, stylized graphic and does not contain any legible characters or punctuation. Therefore, no valid OCR text can be generated that matches the visual content of the image.
The image is too blurry to recognize any text content.
2016-10-29 19:45, 0:03:19:45, 0:03:19:45, 0:03:19:45, 0:03:19:45
The image is too blurry to recognize any text content.
الله Policy Policy Policy Policy Policy Policy Policy Policy Policy Policy Policy Policy Policy Policy Policy Policy Policy Policy Policy Policy Policy Policy Policy Policy Policy Policy Policy Policy Policy Policy Policy Policy Policy Policy Policy Policy Policy Policy Policy Policy Policy Policy Policy Policy Policy Policy Policy Policy Policy Policy Policy Policy Policy Policy Policy Policy Policy Policy Policy Policy Policy Policy Policy Policy Policy Policy Policy Policy Policy Policy Policy Policy Policy Policy Policy Policy Policy Policy Policy Policy Policy Policy Policy Policy Policy Policy Policy Policy Policy Policy Policy Policy Policy Policy Policy Policy Policy Policy Policy Policy Strategy, Model, Model, Model, Model, Model, Model, Model, Model, Model, Model, Model, Model, Model, Model, Model, Model, Model, Model, Model, Model, Model, Model, Model, Model, Model, Model, Model, Model, Model, Model, Model, Model, Model, Model, Model, Model, Model, Model, Model, Model, Model, Model, Model, Model, Model, Model, Model, Model, Model, Model,
In M. 1980, the U.S. government's policy and policy of the United States
natural_image
Line drawing of a robotic vacuum cleaner in a room with an electrical outlet (no text or symbols)
natural_image
Line drawing of a kitchen appliance with a power button and electrical outlet (no text or symbols)
2019年
הכלהה
• ne2019
The case is a case that the case is a case that the case is a case that the case is a case that the case is a case that the case is a case that the case is a case that the case is a case that the case is a case that the case is a case that the case is a case that the case is a case that the case is a case that the case is a case that the case is a case that the case is a case that the case is a case that the case is a
הכלה
natural_image
Line drawing of a vacuum cleaner in a room with an electrical outlet (no text or symbols)
10000000000000000000000000000000000000000
| ### | ### | ### |
| ### |
| ### |
| ### ### ### ### |
| ### ### | ### ### |
| ### ### | |
[Unreadable due to severe distortion and noise]
The following table is provided in the image:
1916.2023.09.28
الله بعربية مز. حُم. 1960, 1961, 1962, 1963, 1964, 1965, 1966, 1967, 1968, 1969, 1970, 1971, 1972, 1973, 1974, 1975, 1976, 1977, 1978, 1979, 1980, 1981, 1982, 1983, 1984, 1985, 1986, 1987, 1988, 1989, 1990, 1991, 1992, 1993, 1994, 1995, 1996, 1997, 1998, 1999, 2000,
The proof to obtain the first two variants of the second method is a result that can be used in the form
הכלהה
PAB5
- 2016, 1985, 1986, 1987, 1988, 1989, 1990, 1991, 1992, 1993, 1994, 1995, 1996, 1997, 1998, 1999, 2000, 2001, 2002, 2003, 2004, 2005, 2006, 2007, 2008, 2009, 2010, 2011, 2012, 2013, 2014, 2015, 2016, 2017, 2018, 2019, 2020, 2021, 2022, 2023, 2024, 2025, 2026, 2027, 2028, 2029, 2030, 2031, 2032, 2033, 2034, 2035, 2036, 2037, 2038, 2039, 2040, 2041, 2042, 2043, 2044, 2045, 2046, 2047, 2048, 2049, 2050, 2051, 2052, 2053, 2054, 2055, 2056, 2057, 2058, 2059, 2060, 2061, 2062, 2063, 2064, 2065, 2066, 2067, 2068, 2069, 2070, 2071, 2072, 2073, 2074, 2075, 2076, 2077, 2078, 2079, 2080, 2081,


•
• 1970, 2018, 2019
The image is too blurry to recognize any text content.
(16)5712301
10.12.13.14.15.16.17.18.19.20.21.22.23.24.25.26.27.28.29.30.31.32.33.34.35.36.37.38.39.40.41.42.43.44.45.46.47.48.49.50.51.52.53.54.55.56.57.58.59.60.61.62.63.64.65.66.67.68.69.70.71.72.73.74.75.76.77.78.79.80.81.82.83.84.85.86.87.88.89.90.91.92.93.94.95.96.97.98.99.100
The following table is in English:
(1) 2023年5月16日
301704
The image is too blurry to recognize any text content.
The following text in the image is a non-textual, stylized graphic:
The following table is provided in the image.
The following table is in English:
The image is too blurry to recognize any text content.
1.
The following table is in English:
280 282
All
معنومات السلامة
المن Expected Assistance
natural_image
Architectural diagram showing a railing and a sofa with checkmarks indicating selection (no text or symbols present)
يُحْتَمَّعِ مَدَلَّى لَوْبَيْلِيُ عَلَّمَ مَعَةٍ لَمْرِجِ وَالَإِنْكَانْهُ لَمْدَى فِي لَكَشَّيْفِ لَسْمِيْ لَتَّقِيرِ الَا يُمْ وَالَمْسِ لَمْرِجِتُ
natural_image
Simple line drawing of a dining table with a lamp and door, no text or symbols present
W-Fe 1.000 g/1000 g/1000 g/1000 g/1000 g/1000 g/1000 g/1000 g/1000 g/1000 g/1000 g/1000 g/1000 g/1000 g/1000 g/1000 g/1000 g/1000
Wi-Fi مُمْنَرِ الْحَوَانِيَةٍ
natural_image
Line drawing of a robotic vacuum cleaner inside a room with an electrical outlet (no text or symbols)

natural_image
Simple line drawing of a device with a power button and electrical outlet (no text or symbols)
natural_image
Line drawing of a laboratory apparatus with a power outlet, no text or symbols present
;لاستة
S(m)^2 < a > 0
Uzbek وعربية Democracy