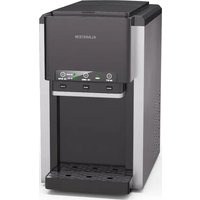
Aqueous - Ice Maker Klarstein - Free user manual and instructions
Find the device manual for free Aqueous Klarstein in PDF.

User questions about Aqueous Klarstein
0 question about this device. Answer the ones you know or ask your own.
Ask a new question about this device
Download the instructions for your Ice Maker in PDF format for free! Find your manual Aqueous - Klarstein and take your electronic device back in hand. On this page are published all the documents necessary for the use of your device. Aqueous by Klarstein.
USER MANUAL Aqueous Klarstein
text_image
COOKINGCO COOKINGCO KINGCOOKING KINGCOOKING COOKINGCO KINGCOOKING KINGCOOKING KINGCOOKING
KLARSTEIN
www.klarstein.com

area
| Category | Value | | -------- | ----- | | A | 100 | | B | 100 | | C | 100 | | D | 100 | | E | 100 | | F | 100 | | G | 100 | | H | 100 | | I | 100 | | J | 100 | | K | 100 | | L | 100 | | M | 100 | | N | 100 | | O | 100 | | P | 100 | | Q | 100 | | R | 100 | | S | 100 | | T | 100 | | U | 100 | | V | 100 | | W | 100 | | X | 100 | | Y | 100 | | Z | 100 |text_image
QR code image containing encoded data, no visible human-readable textINHALTSVERZEICHNIS
text_image
Exploded view diagram of a microwave oven with numbered parts for identificationtext_image
Technical diagram showing two steps of a coffee maker press, labeled #1 and #2, with numbered instructions and a magnified view of the device.text_image
HOT ICE COLD #3text_image
HOT ICE COLD #4text_image
HOT ICE COLD #5flowchart
graph LR
    A["Person with circular head"] --> B["Hand pressing down"]
    B --> C["Presser with upward arrow"]
    C --> D["Shipped into refrigerator"]
    D --> E["Shipped into screen"]
    E --> F["#6"]
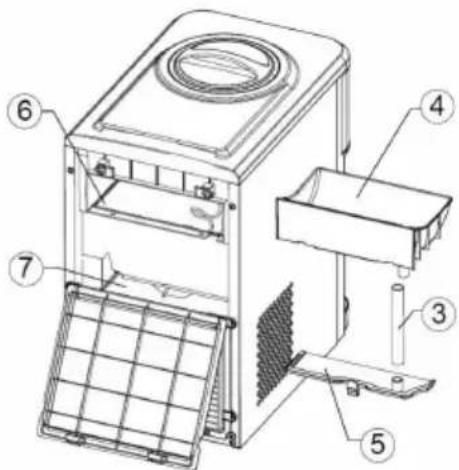
Interne Komponenten reinigen (#7)
natural_image
Technical line drawing of a rectangular appliance with ventilation grilles and a circular vent (no text or symbols)(A)

text_image
Technical diagram of a microwave oven with labeled components and airflow indicators(B)
text_image
Technical diagram of a microwave oven with numbered components for identification(C)
7
natural_image
Symbol of a trash bin crossed with a diagonal line, no text or numbers presentBerlin Brands Group UK Limited
PO Box 42
272 Kensington High Street
London, W8 6ND
United Kingdom
Dear customer,
Congratulations on your purchase. Please read the following instructions carefully and follow them to prevent potential damage. We accept no liability for damage caused by disregarding the instructions and improper use. Please scan the QR code to access the latest operating instructions and further information about the product.

text_image
QR code image containing encoded data, no visible human-readable textCONTENTS
Safety Instructions 22
Device overview 24
Control panel and button functions 25
Installation 26
Operation 28
Cleaning and maintenance 31
Troubleshooting 34
Disposal considerations 36
Manufacturer & importer (UK) 36
TECHNICAL DATA
| Model 10041845, 10046167 | |
| Voltage/ Frequency 220 – 240 V/ 50 Hz | |
| Cold water temperature ≤ 8 °C | |
| Cold water tank capacity 2.5 litres | |
| Hot water temperature ≥ 90 °C | |
| Hot water tank capacity 0.8 litres | |
| Unit dimensions (W x D x H) 428 mm x 278 mm x 479 mm | |
| Net weight 14.9 kg |
SAFETY INSTRUCTIONS
- Place the device on a level surface.
- Only use the unit indoors.
- Unplug the device when not in use.
- Never immerse the power cord or the plug in water or other liquids.
- Only use equipment that is expressly recommended for this device by the manufacturer.
- Do not place the device directly under a power socket.
- Do not let the power cord hang off the work surface so that children cannot pull on it.
- Do not overfill the unit, otherwise short circuits and electric shocks may occur.
- Make sure that the lid is always closed during operation.
- Do not pull the plug out of the socket by the cable; instead, hold it securely with your hand while unplugging it.
- Only use this device for its defined purpose. We accept no liability for damage caused by disregarding the instructions or improper use. Only use the device in the household.
- Do not connect the device to a timer or remote-controlled socket.
- Do not immerse the device in water.
- If the power cord is damaged, it must be replaced by the manufacturer, an authorised specialist company or a similarly qualified person.
- When disposing of the appliance, follow the local regulations for the disposal of appliances containing flammable gas.
- Do not store highly flammable or explosive substances in the unit.
- Only fill the device with drinking water.
- Children from the age of 8 years and mentally, sensory and physically impaired persons may only use the device if they have been informed in detail about the functions and safety precautions by a supervisor responsible for them beforehand and understand the associated risks.
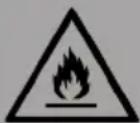
This unit contains the refrigerant Isobutane (R600a), a natural gas that has high environmental compatibility, but is flammable. Although it is flammable, it does not damage the ozone layer or increase the greenhouse effect. The use of this refrigerant results in a slightly higher noise level of the unit. In addition to the compressor noise, you can hear the flow of refrigerant. This is unavoidable and has no negative effect on the performance of the device. Be careful during transport to avoid damage to the refrigerant circuit. Refrigerant leaks can irritate the eyes.
WARNING
Fire hazard from improper disposal! Please observe the local regulations for the disposal of appliances containing flammable refrigerants and gases.
- Keep ventilation openings in the unit housing free of obstructions.
- Do not damage the refrigerant circuit.
- Do not use mechanical devices or other means to speed up the defrosting process or the ice-making process.
- Do not use any other type of electrical appliance inside the ice maker.
Special Notes
- When positioning the unit, take care that the power cord is not pinched or damaged.
- Make sure that there are no multiple sockets or power supply units on the back of the device.
To avoid contamination of food, please follow the instructions below:
- Regularly clean surfaces that may come into contact with food. Clean the water drain regularly.
- If the device has a water tank, clean it if the device has not been used for 48 hours. Rinse the tank if no water has been drawn for 5 days.

WARNING
When using, during maintenance and when disposing of the device, pay attention to the left symbol located on the back or on the compressor of the device. This symbol warns you of possible fires. There are flammable substances in the refrigerant lines and in the compressor. Keep the appliance away from sources of fire during use, maintenance and disposal.
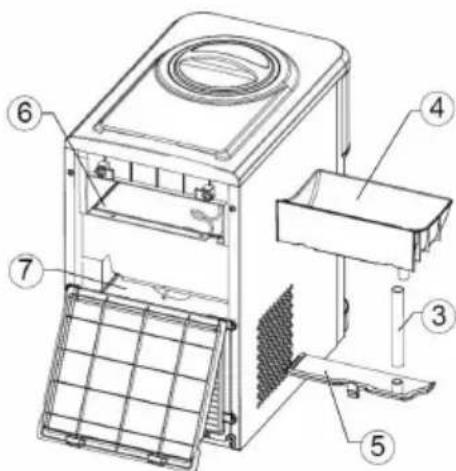
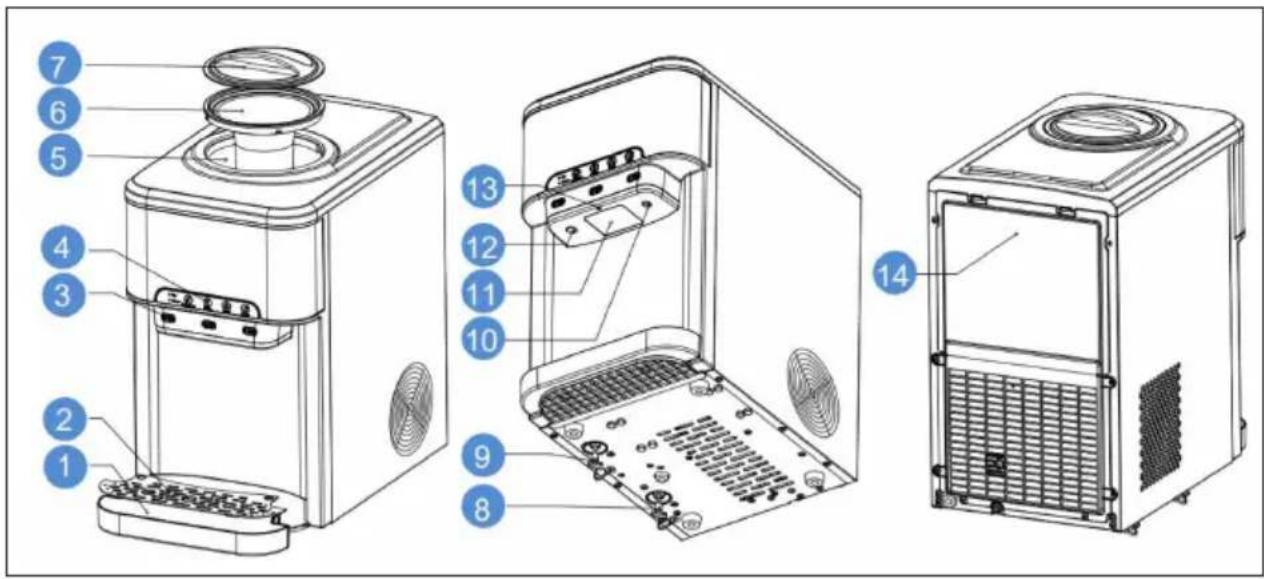
DEVICE OVERVIEW
text_image
Exploded view diagram of a microwave oven with numbered parts for identification| 1 Removable drip tray 8 Drain for cold water | ||
| 2 Drip tray cover 9 Drain for hot water | ||
| 3 Hot/cold/ice button 10 Outlet for cold water | ||
| 4 Touchscreen display 11 Outlet for ice cubes | ||
| 5 Water tank 12 Outlet for hot water | ||
| 6 Bottle holder 13 Night light | ||
| 7 Cover 14 Back cover |
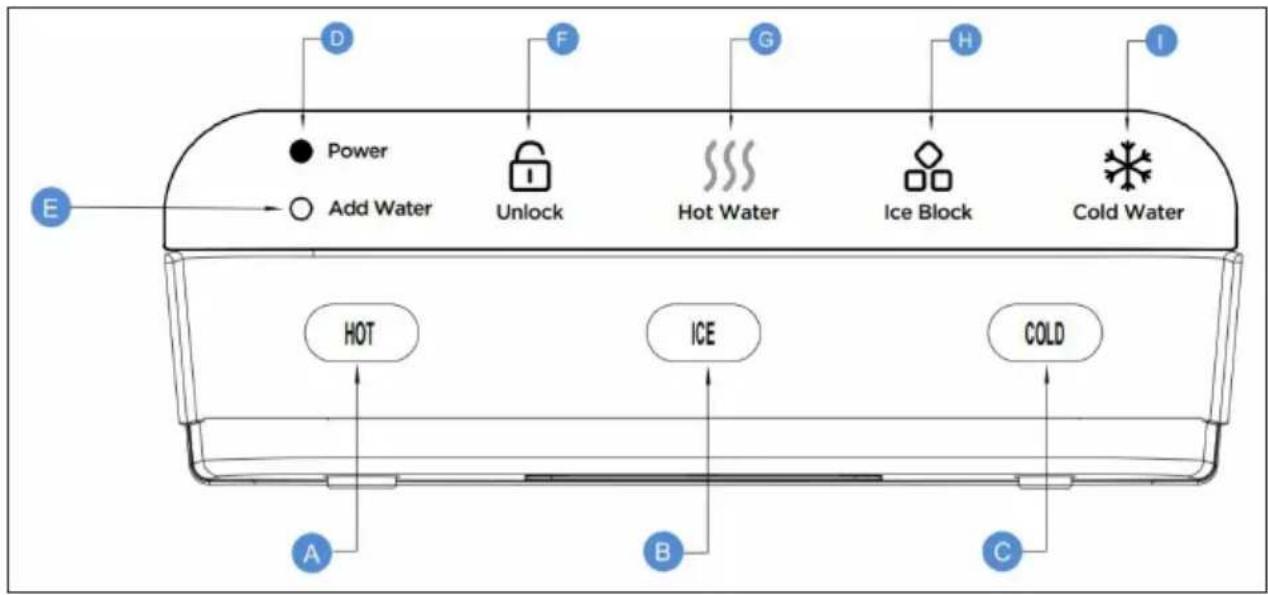
CONTROL PANEL AND BUTTON FUNCTIONS
flowchart
graph TD
    E["Power"] --> D["D"]
    D --> F["F"]
    F --> G["G"]
    G --> H["H"]
    H --> I["I"]
    I --> ColdWater["Cold Water"]
    ColdWater --> C["C"]
    C --> B["B"]
    B --> A["A"]
    A --> HOT["HOT"]
    HOT --> H
    H --> Ice["ICE"]
    Ice --> B
    B --> ColdWater
    style E fill:#f9f,stroke:#333
    style ColdWater fill:#ccf,stroke:#333
| A Hot water button: Press to get hot water | |
| B Ice dispensing button: Press to get ice cubes | |
| C Cold water button: Press to get cold water | |
| D Power display | |
| E Indicator light: When the indicator lights up, add water. | |
| F Key lock: Press to lock or unlock the hot water button. | |
| G | Heating indicator: When this indicator is permanently lit, it means that hot water can be drawn off. When this indicator flashes, it means that the water is being heated up |
| H | Ice-making indicator: When this indicator is permanently lit, it means that the ice bin is full. When this indicator flashes, it means that the appliance is in the ice cube making process |
| I | Cooling indicator: When this indicator is permanently lit, it means that cold water can be drawn off. When this indicator flashes, it means that the water is being cooled |
INSTALLATION
Determine installation location
- Place the appliance with water dispenser upright.
- Place the appliance with water dispenser on a stable and level surface in a cool, shady place near an earthed socket.
- Be sure that the back and the left side of the icemaker with water dispenser are not closer than 10 cm and the right side not less than 15 cm from a wall or obstacle and that the air can circulate freely between the wall or obstacle and the icemaker with water dispenser.
Note: Do not connect the mains cable until the entire installation has been completed.
Installing the drip tray with grid
Remove the drip tray from the packaging and slide it into the lower slot at the front of the appliance until it is properly seated.
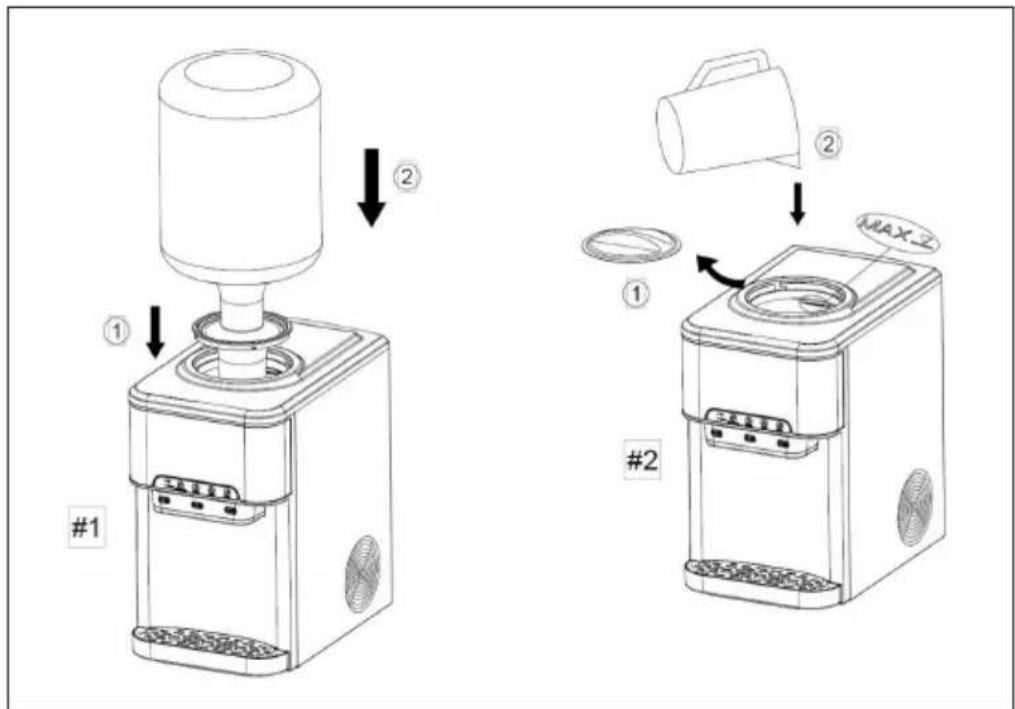
Install a water bottle (#1)
- Remove the plastic seal from the top of the bottle, but do not remove the protective cap from the water bottle.
- Clean the bottle top and the bottle neck with a damp, warm cloth.
- Lift the bottle, turn it upside down and place it securely on the bottle holder. The inside of the collar is equipped with a probe that pierces the lid of the water bottle to prevent liquids and bacteria from entering the water.
- Wait 5 minutes for the water tanks to fill with water before operating the appliance.
- Remove the air from the tanks by placing a cup under each water outlet and drain at least 4 cups (1 litre) of water before first use.
Please note:
- To avoid dry heating, do not switch on the heating and cooling until you have completed the steps in this procedure.
- This unit is compatible with 5-gallon water bottles. It is recommended to use water bottles with a hole diameter of more than 20 ~mm (3/4 inch) and a bottle neck diameter of less than 69 ~mm (2 3/4 inch).
- Make sure that the lower water drain plug is correctly seated and properly fastened.
text_image
Technical diagram showing two steps of a coffee maker press, labeled #1 and #2, with arrows indicating process flow.Filling water manually (#2)
Pour drinking water into the upper container. Make sure that the water level is below the MAX mark.
Please note:
• Fill up with drinking water only.
- This unit has been tested and disinfected before packing and shipping. During transport, dust and odours may accumulate in the water tank and pipes. Remove and discard at least one litre of water before drinking.
• After unpacking, the appliance must stand upright for at least two hours before you connect it to the mains, otherwise the compressor may be damaged, which will shorten the life of the unit.
OPERATION
Turning the appliance on and off
- Connect the appliance.
- Run water through the cold and hot water outlets until the water starts to bubble.
- To switch on the cooling system, press the COLD button. Then the cooling indicator starts flashing. When the cold water is available, the indicator lights up constantly. Press the COLD button again to deactivate cooling.
- To switch on the heating system, press the Hot water button. The heating indicator starts flashing. When the hot water is available, the indicator lights up continuously. Press the hot water button again to deactivate the function.
- To turn on the appliance, press the HOT/ICE/COLD button. When the ice cube tray is full, the indicator lights up permanently. Press the button again to switch off the appliance.
Dispensing cold water (#3)
Note: After connecting and switching on, it takes about 1 hour for the water to cool down completely. As soon as the water has cooled down completely, the cooling indicator lights up continuously.
- Place a drinking glass or container under the cold water tap. Press the COLD button to dispense cold water.
- Press the COLD button again to stop dispensing cold water when the container is full.
The output time is 8 seconds. If you need more cold water, repeat the above procedure.

text_image
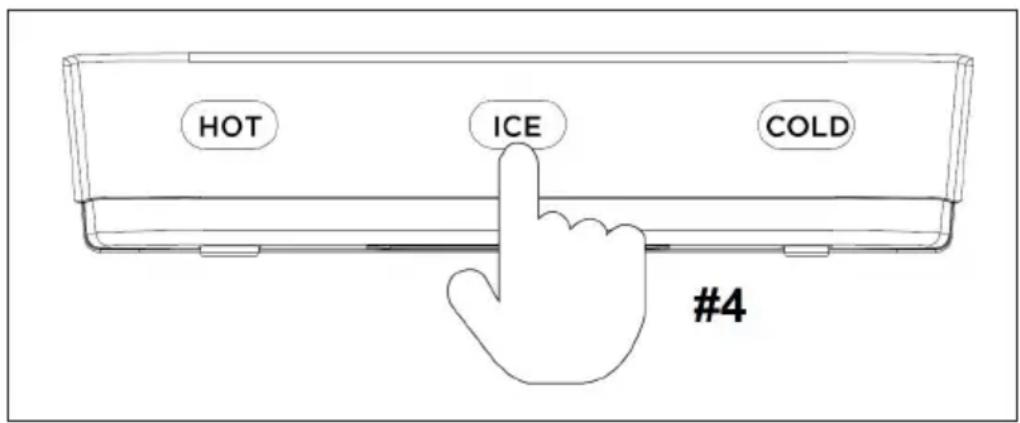
HOT ICE COLD #3Dispensing ice cubes (#4)
Note: After connecting and switching on the appliance, it takes about 6-13 minutes to make the ice cubes. The ice bin can hold 1.8 kg (4 pounds) of ice cubes.
- To dispense ice cubes, place a drinking glass or container under the ice spout and press the ICE button.
- Press the ICE button again to stop dispensing ice.
The dispensing time is 150 seconds and all the ice cubes in the ice bin will be dispensed unless you press the ICE button again to stop dispensing. If you need more ice cubes, repeat the above procedure.
text_image
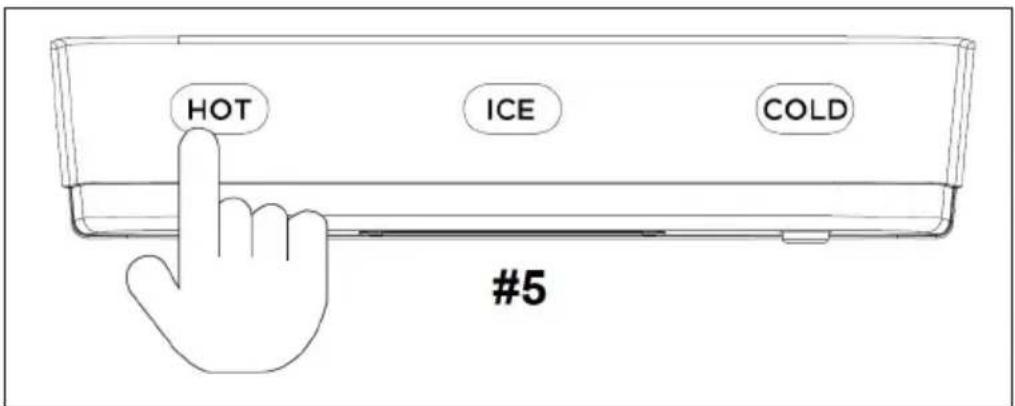
HOT ICE COLD #4Dispensing hot water and deactivating the lock (#5)

CAUTION
Risk of burns! This appliance emits water at temperatures that can cause severe burns. Avoid direct contact with hot water. Keep children and pets away from the appliance during dispensing.
Never allow children to dispense hot water without adequate and direct supervision. Deactivate the heating function by moving the heating button to the OFF position.
Note: After connecting and switching on the appliance, it takes about 15 to 20 minutes for the hot water to reach its highest temperature.
- This appliance is equipped with a key lock to prevent accidental pouring of water. To deactivate the key lock, press the key lock button.
- To dispense hot water, place a glass or mug under the hot water outlet and press the HOT button.
- Press the HOT button again to stop dispensing hot water when the tank is full.
Note: The Unlock function works within 2 seconds and is automatically reactivated if no input is made after 2 seconds.
The dispensing time is 12 seconds if you do not press the HOT button again to stop dispensing hot water. If you need more hot water, repeat the above procedure.
text_image
HOT ICE COLD #5CLEANING AND MAINTENANCE
Note: Always switch off and disconnect the appliance from the mains before cleaning and maintenance. Do not use bleach or vinegar to clean the internal components.
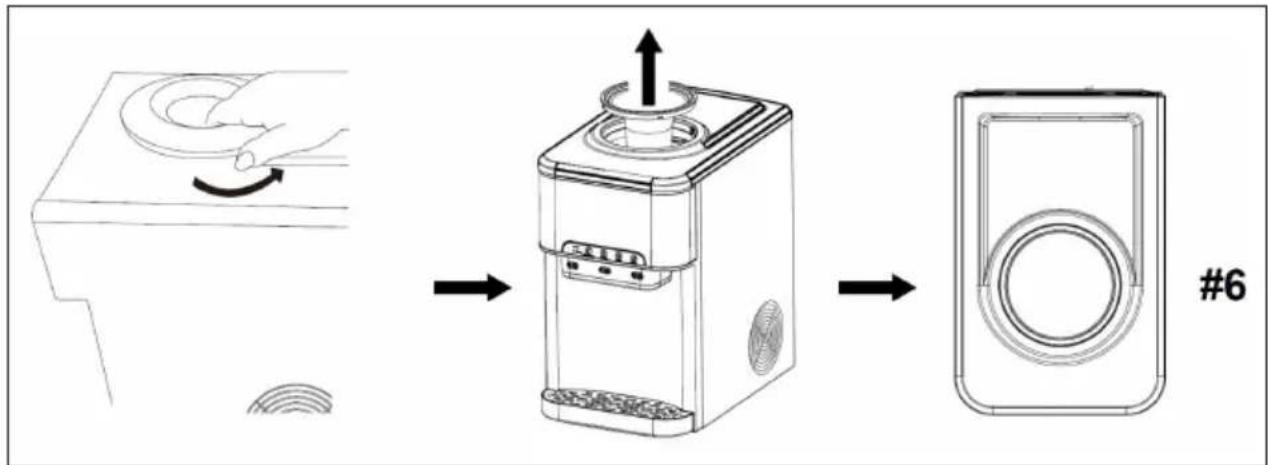
Cleaning the upper water tank (#6)
- Turn or lift off the bottle holder.
- Clean the water tank and make sure to remove the hot water drain plug at the bottom of the appliance to drain the water completely.
- Dry the water tank with a soft cloth.
- Make sure that the hot water drain plug is replaced after cleaning and before using the appliance.
flowchart
graph LR
    A["Device with circular sensor"] -->|Rotation| B["Presser with scroll wheel"]
    B -->|Pushing| C["Device with circular button"]
    C --> D["Device with circular ring"]
    D --> E["Component #6"]
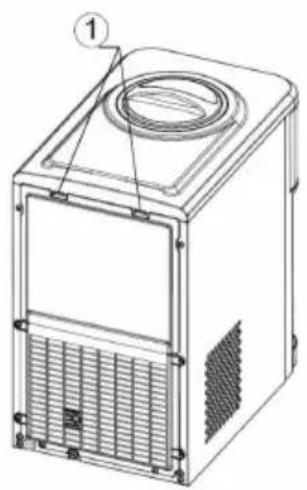
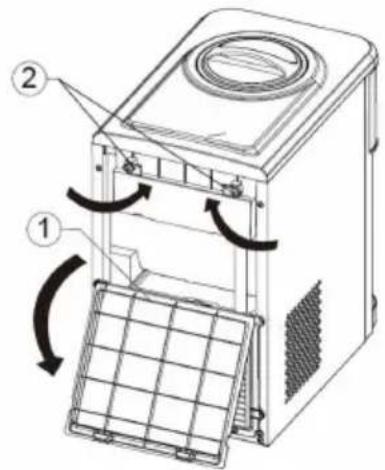
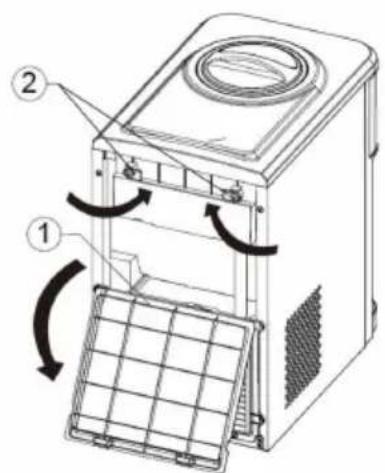
Clean internal components (#7)
-
Press the two clips on the upper part of the back wall to open the back wall.
-
Turn the two vertical fasteners in the middle to the horizontal position.
-
Pull out the ice cube tray.
-
Press the clip on the cold water tank cover and open the cold water tank.
-
Note: Always switch off and disconnect the appliance from the mains before cleaning and maintenance.
-
Drain the water from the bottom by pulling out the cold water drain plug. Make sure you put the plug back in after draining the water.
-
Replace the cover of the cold water container and push back the ice cube tray by turning the two clips clockwise.
-
Make sure that the silicone hose is well connected.
-
Push back the back wall.
CAUTION
Risk of burns! The appliance heats water to a temperature of approx. 90 °C. Careless handling can cause severe burns. Be careful when operating and cleaning. Let the hot water inside the appliance cool down sufficiently before draining it.
natural_image
Technical line drawing of a rectangular industrial machine with ventilation grilles and a circular top component (no text or symbols)(A)

text_image
Technical diagram of a microwave oven with labeled components and airflow indicators(B)

text_image
Technical diagram of a device with numbered components for identification(C)
7
Important cleaning instructions
To prolong the life of the machine, it is recommended to clean and disinfect the machine manually every month.
- Clean the outside of the appliance with a mild detergent solution and warm water. Use a soft cloth for wiping to avoid scratching or damaging the surface of the appliance.
- Store the unit in a dry and cool place and avoid direct sunlight.
- Make sure that the distance to the wall is at least 10 cm on the back and left side of the unit and at least 15 cm on the right side.
- Never place the appliance on paper or foam, as water may collect there and contaminate it. Do not place any flammable objects next to the appliance.
- Do not use the appliance outdoors or in a place where water is splashed.
- If you do not use the appliance for more than 24 hours, unplug the appliance to save electricity and drain the remaining water.
- Clean the housing, the controls, the bottle probe and the outlet every time you change your water bottle. Use a clean, soft cloth and a food-safe disinfectant or bleach.
- Empty and clean the drip tray, the grille and the float.
TROUBLESHOOTING
| Problem Solution | |
| Indicator light "Add water" is permanently lit | Insert a new water bottle. Fill the water tank with water up to the maximum marking |
| Clean the water tank and make sure that the water level measurement is working correctly | |
| Add water" indicator light flashes quickly | Clean the water tank and make sure that the water level measurement is working correctly |
| The operation indicator flashes Contact customer service | |
| The cold water indicator flashes quickly | The cold water sensor is defective, have it replaced |
| The indicator light for ice dispensing lights up | The ice bin is full, take out some ice cubes |
| Sensor error "ice bin full", press the ice making button for more than 5 seconds to start 20 ice making cycles | |
| The indicator light for ice dispensing flashes quickly | The motor is broken. Have this replaced |
| The hot water indicator light flashes quickly | The hot water sensor is defective. Have this replaced |
| The unlock indicator light flashes quickly | The ambient temperature sensor is defective. Have this replaced |
| The ice cubes are too small Place the appliance in a cool location | |
| The ice cubes are too big Move the appliance to a warmer place | |
| The unit does not dispense water Check if the How water bottle and the upper water tank are empty and insert a new water bottle if necessary | |
| Water leaks Make sure that the water bottle has been installed correctly | |
DISPOSAL CONSIDERATIONS
natural_image
Symbol of a trash bin with crossed lines indicating no waste or discharge, and a solid black rectangle below (no text or labels)If there is a legal regulation for the disposal of electrical and electronic devices in your country, this symbol on the product or on the packaging indicates that this product must not be disposed of with household waste. Instead, it must be taken to a collection point for the recycling of electrical and electronic equipment. By disposing of it in accordance with the rules, you are protecting the environment and the health of your fellow human beings from negative consequences. For information about the recycling and disposal of this product, please contact your local authority or your household waste disposal service.
MANUFACTURER & IMPORTER (UK)
Manufacturer:
Chal-Tec GmbH, Wallstrasse 16, 10179 Berlin, Germany.
Importer for Great Britain:
Berlin Brands Group UK Limited
PO Box 42
272 Kensington High Street
London, W8 6ND
United Kingdom
Cher client, chère cliente,
text_image
QR code image containing encoded data, no visible human-readable textSOMMAIRE
text_image
Exploded view diagram of a microwave oven with numbered parts for identificationtext_image
D F G H I Power Add Water Unlock Hot Water Ice Block Cold Water E HOT ICE COLD A B Ctext_image
Technical diagram showing two steps of a coffee maker press, labeled #1 and #2, with numbered instructions and a magnified view of the device.text_image
HOT ICE COLD #3Distribuer des glaçons (#4)
text_image
HOT ICE COLD #4text_image
HOT ICE COLD #5NETTOYAGE ET MAINTENANCE
flowchart
graph LR
    A["Device with circular sensor"] --> B["Switch to mouse"]
    B --> C["Speaker with antenna"]
    C --> D["Speaker with circular lens"]
    D --> E["Component #6"]
natural_image
Technical line drawing of a microwave oven with labeled component (no text or symbols present)(A)
text_image
Technical diagram of a microwave oven with labeled components and airflow indicators(B)
text_image
Technical diagram of a device with numbered components for identification(C)
7
Consignes de nettoyage importantes
natural_image
Symbol of a trash bin crossed with a diagonal line, no text or numbers presentBerlin Brands Group UK Limited
PO Box 42
272 Kensington High Street
London, W8 6ND
United Kingdom
Estimado cliente:
text_image
QR code image containing encoded data, no visible human-readable textÍNDICE
text_image
Exploded view diagram of a microwave oven with numbered parts for identificationtext_image
Technical diagram showing two steps of a coffee maker press, labeled #1 and #2, with numbered instructions and a magnified view of the device.text_image
HOT ICE COLD #3text_image
HOT ICE COLD #4text_image
HOT ICE COLD #5LIMPIEZA Y MANTENIMIENTO
flowchart
graph LR
    A["Device with circular sensor"] --> B["Presser with ↑ arrow"]
    B --> C["Speaker Plate with circular lens"]
    C --> D["Speaker Plate with circular lens"]
    style A fill:#f9f,stroke:#333
    style D fill:#bbf,stroke:#333
natural_image
Technical line drawing of a microwave oven with ventilation grilles and a top vent (no text or symbols)(A)
text_image
Technical diagram of a microwave oven with labeled components and airflow indicators(B)

text_image
Technical diagram of a device with numbered components for identification(C)
7
natural_image
Symbol of a trash bin with crossed lines indicating no waste or discharge (no text or labels)Berlin Brands Group UK Limited
PO Box 42
272 Kensington High Street
London, W8 6ND
United Kingdom
Gentile cliente,
text_image
QR code image containing encoded data, no visible human-readable textINDICE
text_image
Exploded view diagram of a microwave oven with numbered parts for identificationtext_image
Technical diagram showing two steps of a coffee maker press, labeled #1 and #2, with arrows indicating process flow.text_image
HOT ICE COLD #3text_image
HOT ICE COLD #4text_image
HOT ICE COLD #5flowchart
graph LR
    A["Device with circular sensor"] --> B["Switch to mouse"]
    B --> C["Speaker with antenna"]
    C --> D["Speaker with circular lens"]
    D --> E["Component #6"]
Pulire i componenti interni (#7)
natural_image
Technical line drawing of a microwave oven with labeled component (no text or symbols present)(A)

text_image
Technical diagram of a washing machine with labeled parts and directional arrows indicating motion or assembly.(B)
text_image
Technical diagram of a microwave oven with numbered components for identification(C)
7
natural_image
Symbol of a trash bin crossed with a diagonal line, no text or numbers presentPRODUTTORE E IMPORTATORE (UK)
Produttore:
Chal-Tec GmbH, Wallstraße 16, 10179 Berlino, Germania.
Berlin Brands Group UK Limited
PO Box 42
272 Kensington High Street
London, W8 6ND
United Kingdom

area
| Category | Value | | -------- | ----- | | A | 100 | | B | 100 | | C | 100 | | D | 100 |