Arctic Blend - Ice Maker Klarstein - Free user manual and instructions
Find the device manual for free Arctic Blend Klarstein in PDF.

User questions about Arctic Blend Klarstein
0 question about this device. Answer the ones you know or ask your own.
Ask a new question about this device
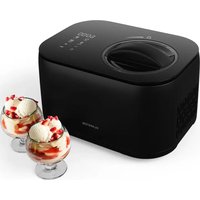
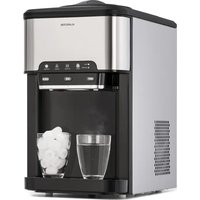
Download the instructions for your Ice Maker in PDF format for free! Find your manual Arctic Blend - Klarstein and take your electronic device back in hand. On this page are published all the documents necessary for the use of your device. Arctic Blend by Klarstein.
USER MANUAL Arctic Blend Klarstein
text_image
COOKINGCO COOKINGCO KINGCOOKING KINGCOOKING COOKINGCO KINGCOOKING KINGCOOKING KINGCOOKING
KLARSTEIN
www.klarstein.com

area
| Category | Value | | -------- | ----- | | 1 | 100 | | 2 | 100 | | 3 | 100 | | 4 | 100 | | 5 | 100 | | 6 | 100 | | 7 | 100 | | 8 | 100 | | 9 | 100 | | 10 | 100 | | 11 | 100 | | 12 | 100 | | 13 | 100 | | 14 | 100 | | 15 | 100 | | 16 | 100 | | 17 | 100 | | 18 | 100 | | 19 | 100 | | 20 | 100 | | 21 | 100 | | 22 | 100 | | 23 | 100 | | 24 | 100 | | 25 | 100 | | 26 | 100 | | 27 | 100 | | 28 | 100 | | 29 | 100 | | 30 | 100 | | 31 | 100 | | 32 | 100 | | 33 | 100 | | 34 | 100 | | 35 | 100 | | 36 | 100 | | 37 | 100 | | 38 | 100 | | 39 | 100 | | 40 | 100 | | 41 | 100 | | 42 | 100 | | 43 | 100 | | 44 | 100 | | 45 | 100 | | 46 | 100 | | 47 | 100 | | 48 | 100 | | 49 | 100 | | 50 | 100 | | 51 | 100 | | 52 | 100 | | 53 | 100 | | 54 | 100 | | 55 | 100 | | 56 | 100 | | 57 | 100 | | 58 | 100 | | 59 | 100 | | 60 | 100 | | 61 | 100 | | 62 | 100 | | 63 | 100 | | 64 | 100 | | 65 | 100 | | 66 | 100 | | 67 | 100 | | 68 | 100 | | 69 | 100 | | 70 | 100 | | 71 | 100 | | 72 | 100 | | 73 | 100 | | 74 | 100 | | 75 | 100 | | 76 | 100 | | 77 | 100 | | 78 | 100 | | 79 | 100 | | 80 | 100 | | Note: The actual values are not provided in the code. I have used the label 'Value' as a placeholder for the value detection. You would need to run the code to get the actual values from the code list. Please note that the actual values would be the result of this example. You would need to run the code to get the actual values from the code list. You would need to run the code to get the actual values from the code list. You would need to run the code to get the actual values from the code list. You would need to run the code to get the actual values from the code list. You would need to run the code to get the actual values from the code list. You would need to run the code to get the actual values from the code list. You would need to run the code to get the actual values from you would need to run the code.text_image
QR code image containing encoded data, no visible human-readable textINHALT
Technische Daten 13
text_image
Technical diagram of a desktop computer case with labeled components and exploded viewsBedienfeld

flowchart
graph TD
    A["ON/OFF"] --> B["Power"]
    B --> C["ICE CUBES"]
    C --> D["Add WATER"]
    D --> E["ICE FULL"]
    E --> F["Pour Water"]
    subgraph ON/OFF
        A
        G
        B
        H
        C
    end
    subgraph POWER
        G
        B
        C
    end
    subgraph ICE CUBES
        B
        C
    end
    subgraph ADD WATER
        D
        E
    end
    subgraph ICE WATER
        C
        D
        E
    end
    subgraph Crush Ice
        D
    end
    subgraph Pour Ice
        E
    end
    subgraph Pour Water
        F
    end
natural_image
Illustration showing a food machine and a hand pouring liquid into a container (no text or symbols)2. Eis herstellen
natural_image
Technical line drawing of a computer tower case with ventilation slots and ventilation grilles (no text or symbols)natural_image
Symbol of a trash bin crossed with a diagonal line, no text or labels presentBerlin Brands Group UK Limited
PO Box 42
272 Kensington High Street
London, W8 6ND
United Kingdom
Dear Customer,
Congratulations on purchasing this equipment. Please read this manual carefully and take care of the following hints on installation and use to avoid technical damages. Any failure caused by ignoring the items and cautions mentioned in the operation and installation instructions are not covered by our warranty and any liability. Scan the QR code to get access to the latest user manual and more product information.

text_image
QR code image containing encoded data, no visible human-readable textCONTENTS
Technical Data 19
Safety Instructions 20
Product Overview 23
Instructions for use 26
Cleaning and Maintenance 30
Troubleshooting 32
Disposal Considerations 33
Manufacturer & Importer (UK) 33
TECHNICAL DATA
| Article number 10046191 | |
| Climate Type SN/N/ST | |
| Safety Level I | |
| Power supply 220-240 V - 50/60 Hz | |
| Rated current 0.85 A | |
| Rated power 130 W | |
| Refrigerant R290/ 28g | |
| Vesicant C | _5H_12 |
| Insulation EPS | |
| Net Weight 13.4 kg | |
| Gross Weight 15.2kg | |
| Housing shell Stainless steel | |
| Product size 434x277x480 mm | |
| Type of ice Bullet ice | |
| Output ice per cycle 12 pcs. | |
SAFETY INSTRUCTIONS
- In order to avoid harm caused by misuse, please read the instruction manual carefully before using this product and use this product strictly in accordance with the purpose stated in the instruction manual.
- Place the device on a level surface.
- Use the device indoors only.
- Unplug the device from the power outlet when not in use.
- Never immerse the power cord and plug in water or other liquids.
- Only use accessories that are expressly recommended by the manufacturer for this device.
- Do not place the device directly under an electrical outlet.
- Do not let the power cord hang from the work surface so that children cannot pull on it.
- Do not overfill the unit, otherwise short circuits and electric shocks may occur.
- Make sure that the lid is always closed during operation.
- Do not pull the plug out of the outlet by the cord, but hold it by hand when unplugging.
- Use this device only for its intended purpose. We accept no liability for damage caused by disregarding the instructions and improper use. Only use the device in the household.
- Do not connect the device to a timer or remote-controlled socket.
- Do not immerse the device in water.
- The use of an extension cord is not recommended, as it may overheat and become a risk of fire.
- If the power cord or plug is damaged, it must be replaced by the manufacturer, an authorized service centre, or a similarly qualified person.
- Follow local regulations for disposal of equipment containing flammable gas.
- Do not store highly flammable or explosive substances in the device.
- Never touch the evaporator surface by hand when the ice maker is working. It may cause frostbite to your skin.
- Do not overturn the Ice Maker. If the machine is overturned, leave it to stand for 2 hours before switching it on.
- If the Ice Maker is brought in from outside in winter, allow it to warm up to room temperature for a few hours before switching it on.
- Dispose of the appliance only at an authorised waste disposal facility. Do not expose to flame.
- This appliance is not intended for use by persons (including children) with reduced physical, sensory or mental capabilities, or lack of experience and knowledge, unless they have been given supervision or instruction concerning use of the appliance by a person being responsible for their safety.
- Children shall not play with the appliance. Cleaning and user maintenance shall not be made by children without supervision.
- Children between the ages of 3 and 8 are not allowed to load and unload refrigeration equipment.
- This appliance is intended to be used in household and similar applications such as
– staff kitchen areas in shops, offices and other working environments;
- farm houses and by clients in hotels, motels and other residential type environments;
- bed and breakfast type environments;
- catering and similar non-retail applications.
This appliance contains the refrigerant propane (R290), a natural gas which is environmentally friendly. Although it is flammable, it does not damage the ozone layer and does not increase the greenhouse effect. The use of this coolant has, however, led to a slight increase in the noise level of the appliance. In addition to the noise of the compressor, you might be able to hear the coolant flowing around the system. This is unavoidable and does not have any adverse effect on the performance of the appliance. Care must be taken during the transportation and setting up of the appliance that no parts of the cooling system are damaged. Leaking coolant can damage the eyes.
WARNING
Fire hazard due to improper disposal! Please observe the local regulations for the disposal of appliances containing flammable refrigerants and gases.
- Keep ventilation openings in the unit housing free of obstacles.
- Do not damage the refrigerant circuit.
- The refrigeration system contains a high-pressure refrigerant. Do not damage the refrigeration system.
- The maintenance of the refrigeration system shall be done by professionals.
- Do not use any mechanical devices or other means to accelerate the defrosting process or the ice recovery process.
- Do not use electrical appliances inside the food storage compartments of the appliance, unless they are of the type recommended by the manufacturer.
- Unplug the ice maker before cleaning or making any repairs or servicing.
- Do not clean the ice maker with flammable liquids, as this could cause a fire or explosion.
- Refrigerant and insulation blowing gas are flammable.
Special Notes
- When positioning the unit, make sure that the power cord is not pinched or damaged.
- Make sure that there are no multiple sockets or power supplies on the back of the unit.
To avoid contamination of food, please follow the instructions below:
- Regularly clean surfaces that may come into contact with food. Clean the water drain regularly.
- Fill the device with potable water only.
- If the appliance contains a water tank, clean it if it has not been used for 48 hours. Rinse the tank if no water has been removed for 5 days.
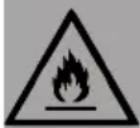
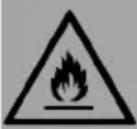
WARNING
When using, servicing and disposing of the unit, pay attention to the left symbol on the rear of the unit or on the compressor. This symbol warns of possible fires. There are flammable substances in the refrigerant lines and in the compressor. Keep the appliance away from sources of fire during use, maintenance and disposal.
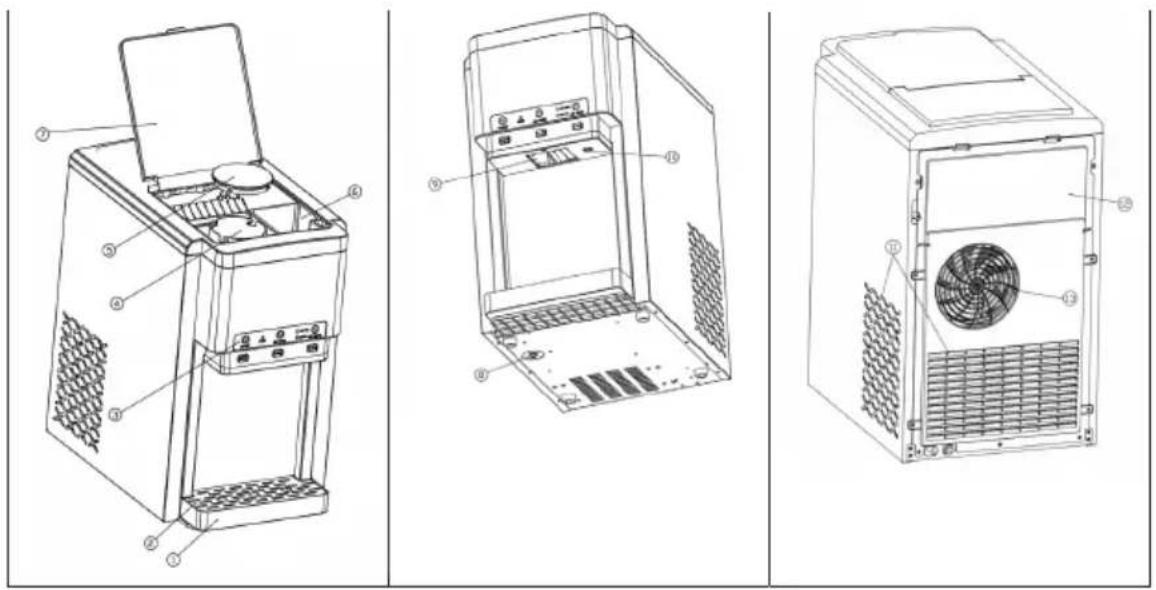
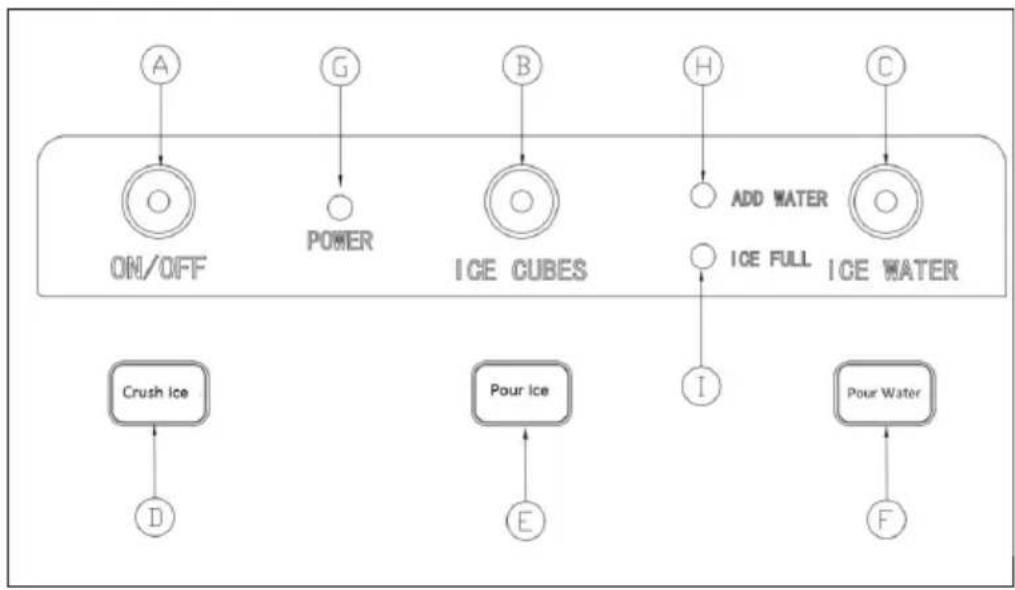
PRODUCT OVERVIEW
Appliance
text_image
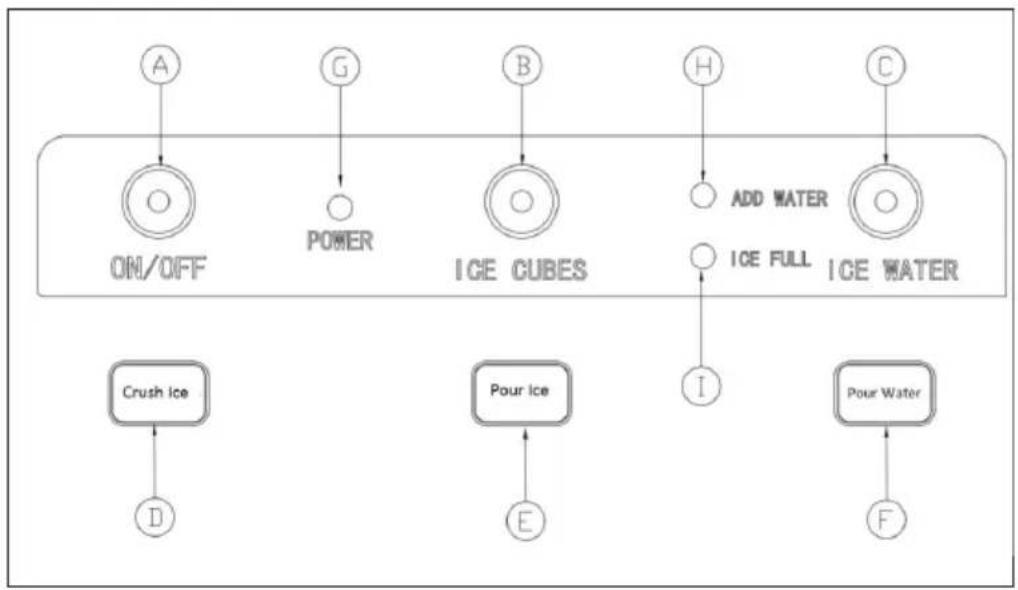
Technical diagram of a desktop computer case with labeled components and exploded viewsControl panel
flowchart
graph TD
    A["ON/OFF"] --> B["Power"]
    B --> C["ICE CUBES"]
    C --> D["Add WATER"]
    D --> E["ICE FULL"]
    E --> F["Pour Water"]
    subgraph ON/OFF
        A
        G
        B
        H
        C
    end
    subgraph POWER
        G
        B
        C
    end
    subgraph ICE CUBES
        B
        C
    end
    subgraph ADD WATER
        D
        E
    end
    subgraph ICE WATER
        C
        D
        E
    end
    subgraph Crush Ice
        D
    end
    subgraph Pour Ice
        E
    end
    subgraph Pour Water
        F
    end
| 1 Water box |
| 2 Water box cover |
| 3 Operation panel |
| 4 Crushed ice box: This box should be filled with ice before crushing |
| 5 Crushed ice box lid: The lid must be closed after filling with ice |
| 6 Manual water addition box: If there is no external water source, you can manually pour water into the water addition box until the water level does not drop |
| 7 Flip cover: The ice crushing function cannot be used until the top flip cover is closed |
| 8 Lower water tank drain plug: When cleaning the machine's reservoir and cold water tank, pull out the drain plug at the bottom of the machine, drain the water and replace the drain plug after draining |
| 9 Ice outlet / crushed ice outlet |
| 10 Ice water outlet |
| 11 Air inlet: The distance between the air inlet and obstacles must be greater than 10 cm |
| 12 Rear panel |
| 13 Air outlet: The distance between the air outlet and any obstructions must be greater than 15 cm in order to ensure proper ventilation of the unit |
| A ON/OFF: Press to switch the appliance on/off |
| B ICE CUBES: Press to start ice cube making process |
| C ICE WATER: Press to start making ice water |
| D Crush ice: Press to crush ice |
| E Pour Ice: Press to dispense ice cubes |
| F Pour water: Press to dispense ice water |
| G POWER: Power indicator; lights up green when appliance is turned on |
| H ADD WATER: Add water indicator |
| I ICE FULL: Ice full indicator |
Icon overview
| Icon Meaning Icon lit Icon is | blinking | Icon is not lit | |||
 ON/OFF ON/OFF   ICE CUBES ICE CUBES | Turn the appliance on/off | The appliance is in standby-mode | The appliance is turned off | ||
| Power indicator light | Turns green as soon as the appliance is on. | The appliance is turned off | |||
| Make ice The appliance is making ice | 1. Ice-making is off2."Make ice" function is waiting to start | ||||
 ICE WATER ICE WATER | Make ice water | The appliance is making ice water | 1. Ice-water-making is off.2. "Make ice water" function is waiting to start. | ||
 ADD WATER[CE FULL] ADD WATER[CE FULL] | Add water Not enough water in water tank; necessary to refill water | ||||
| Ice full The ice | storage is full of ice; machine stops ice making process | ||||
INSTRUCTIONS FOR USE
- Remove all internal and external packaging to check for missing hoses and tap adapters. If any of the accessories are missing, contact the customer service department.
- The machine's power socket must be securely grounded and supplied by a separate plug.
- Place the machine in a well ventilated place with a relatively low ambient temperature and position it horizontally. The distance between the air outlet and the obstacle must be more than 15 cm, and the distance between the two sides and the obstacle must be not less than 10 cm.
- If the machine has been turned upside down during transport and handling, it is recommended to let the machine stand for more than 2 hours before turning it on.
- It is strongly recommended that the entire machine is thoroughly cleaned before use. Please follow the cleaning instructions in "Cleaning and Maintenance" to clean the machine.

machine.
WARNING
When adding water to refill the machine, please add potable water, preferably pure water from a barrel or bottle. The quality of the water directly affects the clarity of the ice cubes and the life of the
1. Add water
Automatically adding water(External water source)
Step 1: Connect one side (20mm) of the adapter to the tap.
Step 2: Connect one end of the white PE hose to the other end ( 6.5 mm) of the adapter.
Step 3: Connect the other end of the white PE hose to the Tap Water Inlet.

text_image
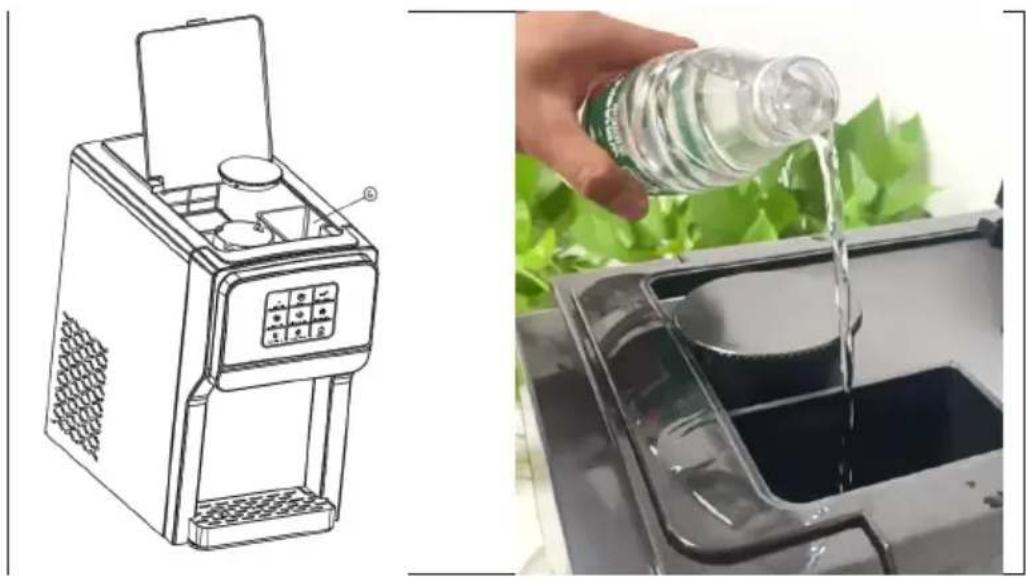
Tap water inlet faucet White PE hose adapterAdding water manually
Open the upper flap of the machine and pour drinking water into ⑥ "manual water addition box" until the water level does not drop any more.
Caution: Drinking water with high acidity and alkalinity will corrode the frozen column.
natural_image
Illustration showing a food machine and a hand pouring liquid into a container (no text or symbols)2. Make Ice
- Connect the machine and press the ON/OFF button on the control panel lightly. The machine will start to detect the water level and will request to be filled with water. Press the "ICE CUBES" button to start making ice. The "ICE CUBES" light remains on during the ice making process. One ice making cycle takes approximately 9 minutes and can produce 12 ice cubes. The ice making time will vary depending on the ambient temperature, the higher the temperature, the longer the ice making time. During ice making, the "MAKE ICE" icon will always be lit.
- If you first touch the "ICE WATER" button and then touch the "ICE CUBES" button, the "ICE CUBES" icon will keep flashing. It indicates that the "Making Ice" function will be performed after the Make Ice Water function is finished. "Make Ice" is waiting to start.
- If the "ICE FULL" icon is always lit, the machine will stop making ice. However, it will continue to make ice after the ice cubes have been removed from the ice tray.
- If the "ADD WATER" icon is always lit, the machine is low on water and needs to be refilled. The machine will automatically start working once it has replenished the water.
- In the process of making ice, touch the "ICE CUBES" button to stop making ice.
3. Make cold ice water
- Plug in the machine and lightly press the ON/OFF button on the control panel. Then the machine will start to detect the water level and request to be filled with water. Touch the "ICE WATER" button, the machine will detect the temperature of the water. When the temperature reaches the set temperature to start, the "ICE WATER" will be lit and the machine will start making ice water. Otherwise the "ICE WATER" will be flashing and waiting to start. In the process of ice water making, when the temperature of the water reaches the set temperature to stop ice water making, the "ICE WATER" icon keeps flashing.
- If you first touch the "ICE CUBES" button and then the "ICE WATER" button, the "ICE WATER" icon will continue to flash. It indicates that the "Making Ice Water" function will continue after the "Making Ice" function is finished. "Make Ice Water" is waiting to start.
- In the process of making cold ice water, touch the "ICE WATER" button to stop making ice water.
4. Crush ice
- Open the flip cover and remove the crushed ice tray cover. Manually add ice cubes to the "Crushed Ice Bowl", close the "Crushed Ice Bowl Cover" and flip it tightly, then press the "Crush Ice" button to crush the ice. The ice cubes are automatically dispensed and ejected from the Crushed Ice dispenser.
- In the process of crushing ice, press the "Crush Ice" button from the ice crusher.
5. Dispense ice cubes/ ice water
- Gently press the Pour Ice button, the impeller in the ice bin will begin to rotate and the ice cubes will begin to fall from the Pour Ice position. Press the Pour Ice button again and the impeller will stop rotating, ending the ice dispensing process. For optimal ice dispensing, make sure there are enough ice cubes in the ice tray and a cup ready to be filled with ice cubes.
• Gently press the "Pour Water" button, water will flow from the "Pour Water" position. Press the Pour Water button again to stop the ice water coming out.
Note: If you press the "Pour Water" button without first operating the "ICE CUBES" or "ICE WATER" buttons, the water that comes out will not be ice water. The "Pour Water" function is automatically deactivated if it is used for more than 10 seconds.
Important information
- Check the cleanliness of the water tank and ice bin. Please clean and change the water regularly.
- The temperature of the added water directly affects the ice production. The lower the water temperature, the greater the ice production.
- The lower the ambient temperature where the machine is placed, the greater the ice production.
- The quality of the water used will affect the life of the machine's water pump. It is best to use softened water, pure water or drinking distilled water. Some abnormal noises during the operation of the water pump are caused by impurities in the water. This is a normal phenomenon and does not affect the use of the machine.
CLEANING AND MAINTENANCE
- Unpack the unit.
- Use a neutral detergent, warm water and a soft cloth to scrub and clean the water tank, crushed ice tray, crushed ice tray cover and silicone hose.
- The machine cabinet can be cleaned with the machine switched off. It is best to wipe with a dry cloth.
- You can also add water to make ice for 1–2 cycles, then throw away all ice cubes and water.
• After cleaning, replace the drain plug at the bottom of the machine. - If the machine has not been used for a long time, drain the water in the water tank.
Note: When the machine has been used for a long time, please clean the inside of the machine according to the following instructions.
Opening the rear panel
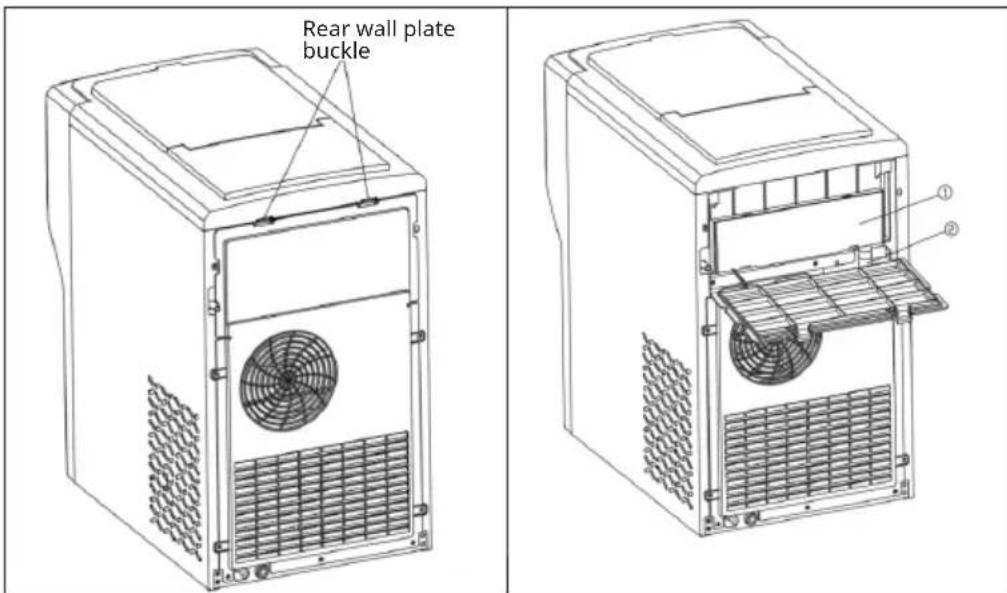
text_image
Rear wall plate buckle ① ②- Disconnect the power plug, place the machine on a level surface, press the two "Rear panel buckles" on the back of the machine and open the rear panel downwards.
- Pull out the ② "Silicone Drain Tube" first. Pull out the ① "Ice and water box".
- Use cleaning tools to clean the Ice Maker Water Box and Silicone Hose.
Note: After cleaning, all parts must be returned to their original positions.
Drainage operation
There is a drain plug ⑥ at the bottom of the machine.
Place the machine on a stable surface and remove the drain plug.
Drain the water from the machine immediately.
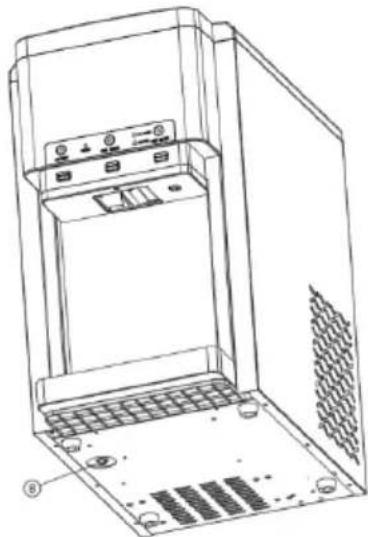
natural_image
Technical line drawing of a computer tower case with ventilation grilles and control panel (no text or symbols)TROUBLESHOOTING
| Problem Possible Cause Solution | ||
| "Add water" indicator light always on | Lack of water in the water tank | Manually refill water tank. |
| The level switch float in the cold water tank is stuck and will not rise. | Clean the cold water tank and level switch. | |
| Ice cubes are too thin Ambient temperature too high | Move the machine to a cooler location | |
| Poor ventilation The distance between the back, left and right sides of the machine and the obstacle is greater than 15cm | ||
| Ice too thick Ambient temperature too low | Move the machine to a warmer place | |
| The ice cycle is normal, but no ice is produced | The ambient temperature is too high or the water temperature in the water tank is too high. | Move to a location where the ambient temperature is less than 32°C and add cold water |
| Refrigerant leak Requires professional repair | ||
| Refrigerant pipe blocked requires professional repair | ||
| The machine does not produce cold water | Lack of water in the water tank | Check the water pressure of the inlet channel and the smoothness of the channel |
| The machine does not produce ice | The ice making time is too short and there is no ice or less ice in the fridge | One ice-making cycle takes approximately 9 minutes. A few more ice-making cycles will make it normal. |
DISPOSAL CONSIDERATIONS
natural_image
Symbol of a trash bin with crossed lines indicating no waste, and a solid rectangle below (no text or labels)If there is a legal regulation for the disposal of electrical and electronic devices in your country, this symbol on the product or on the packaging indicates that this product must not be disposed of with household waste. Instead, it must be taken to a collection point for the recycling of electrical and electronic equipment. By disposing of it in accordance with the rules, you are protecting the environment and the health of your fellow human beings from negative consequences. For information about the recycling and disposal of this product, please contact your local authority or your household waste disposal service.
MANUFACTURER & IMPORTER (UK)
Manufacturer:
Chal-Tec GmbH, Wallstrasse 16, 10179 Berlin, Germany.
Importer for Great Britain:
Berlin Brands Group UK Limited
PO Box 42
272 Kensington High Street
London, W8 6ND
United Kingdom
Estimado cliente:
text_image
QR code image containing encoded data, no visible human-readable textCONTENIDO
Datos técnicos 35
text_image
Technical diagram of a desktop computer case with labeled components and exploded viewsPanel de control
flowchart
graph TD
    A["ON/OFF"] --> B["POWER"]
    B --> C["ICE CUBES"]
    C --> D["ADD WATER"]
    D --> E["ICE FULL"]
    E --> F["Pour Water"]
    subgraph OK/OFF
        A
        G
        B
        H
        C
    end
    subgraph POWER
        G
        B
        C
    end
    subgraph ICE CUBES
        B
        C
    end
    subgraph ADD WATER
        H
        C
    end
    subgraph ICE WATER
        C
        D
        E
        F
    end
    subgraph Crush Ice
        D
    end
    subgraph Pour Ice
        E
    end
natural_image
Illustration showing a food machine and a hand pouring liquid into a container (no text or symbols)2. Producir hielo
natural_image
Technical line drawing of a computer tower case with ventilation grilles and control panel (no text or symbols)ES
natural_image
Symbol of a trash bin crossed with a diagonal line and a horizontal bar below (no text or labels)Berlin Brands Group UK Limited
PO Box 42
272 Kensington High Street
London, W8 6ND
United Kingdom
Cher client, chère cliente,
text_image
QR code image containing encoded data, no visible human-readable textSOMMAIRE
Fiche technique 51
text_image
Technical diagram of a desktop computer case with labeled components and exploded viewsPanneau de commande

flowchart
graph TD
    A["ON/OFF"] --> B["Power"]
    B --> C["ICE CUBES"]
    C --> D["Add WATER"]
    D --> E["ICE FULL"]
    E --> F["Pour Water"]
    subgraph ON/OFF
        A
        G
        B
        H
        C
    end
    subgraph POWER
        G
        B
        C
    end
    subgraph ICE CUBES
        B
        C
    end
    subgraph ADD WATER
        D
        E
    end
    subgraph ICE WATER
        C
        D
        E
    end
    subgraph Crush Ice
        D
    end
    subgraph Pour Ice
        E
    end
    subgraph Pour Water
        F
    end
natural_image
Illustration showing a food machine and a hand pouring liquid into a container (no text or symbols)natural_image
Technical line drawing of an electronic device casing with internal components and ventilation slots (no text or symbols)IDENTIFICATION ET RÉSOLUTION DES PROBLÈMES
natural_image
Symbol of a trash bin with crossed lines indicating no waste or discharge, and a solid rectangle below (no text or labels)Berlin Brands Group UK Limited
PO Box 42
272 Kensington High Street
London, W8 6ND
United Kingdom
Gentile cliente,
text_image
QR code image containing encoded data, no visible human-readable textINDICE
Dati tecnici 67
text_image
Technical diagram of a desktop computer case with labeled components and exploded viewsflowchart
graph TD
    A["ON/OFF"] --> B["Power"]
    B --> C["ICE CUBES"]
    C --> D["Add WATER"]
    D --> E["ICE FULL"]
    E --> F["Pour Water"]
    subgraph ON/OFF
        A
        G
        B
        H
        C
    end
    subgraph POWER
        G
        B
        C
    end
    subgraph ICE CUBES
        B
        C
    end
    subgraph ADD WATER
        D
        E
    end
    subgraph ICE WATER
        C
        D
        E
    end
    subgraph Crush Ice
        D
    end
    subgraph Pour Ice
        E
    end
    subgraph Pour Water
        F
    end
natural_image
Illustration of a food processing machine and a hand pouring liquid into a container (no text or symbols)natural_image
Technical line drawing of a computer tower case with ventilation grilles and control panel (no text or symbols)IT
natural_image
Symbol of a trash bin with crossed lines and a rectangular block below (no text or labels)PRODUTTORE E IMPORTATORE (UK)
Produttore:
Chal-Tec GmbH, Wallstraße 16, 10179 Berlino, Germania.
Berlin Brands Group UK Limited
PO Box 42
272 Kensington High Street
London, W8 6ND
United Kingdom