Dolce Bacio Smart - Ice Maker Klarstein - Free user manual and instructions
Find the device manual for free Dolce Bacio Smart Klarstein in PDF.

User questions about Dolce Bacio Smart Klarstein
0 question about this device. Answer the ones you know or ask your own.
Ask a new question about this device
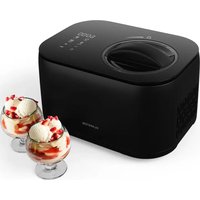
Download the instructions for your Ice Maker in PDF format for free! Find your manual Dolce Bacio Smart - Klarstein and take your electronic device back in hand. On this page are published all the documents necessary for the use of your device. Dolce Bacio Smart by Klarstein.
USER MANUAL Dolce Bacio Smart Klarstein
text_image
COOKINGCO COOKINGCO KINGCOOKING KINGCOOKING COOKINGCO KINGCOOKING KINGCOOKING KINGCOOKING
KLARSTEIN
www.klarstein.com

area
| Category | Value | | -------- | ----- | | 1 | 100 | | 2 | 100 | | 3 | 100 | | 4 | 100 | | 5 | 100 | | 6 | 100 | | 7 | 100 | | 8 | 100 | | 9 | 100 | | 10 | 100 | | 11 | 100 | | 12 | 100 | | 13 | 100 | | 14 | 100 | | 15 | 100 | | 16 | 100 | | 17 | 100 | | 18 | 100 | | 19 | 100 | | 20 | 100 | | 21 | 100 | | 22 | 100 | | 23 | 100 | | 24 | 100 | | 25 | 100 | | 26 | 100 | | 27 | 100 | | 28 | 100 | | 29 | 100 | | 30 | 100 | | 31 | 100 | | 32 | 100 | | 33 | 100 | | 34 | 100 | | 35 | 100 | | 36 | 100 | | 37 | 100 | | 38 | 100 | | 39 | 100 | | 40 | 100 | | 41 | 100 | | 42 | 100 | | 43 | 100 | | 44 | 100 | | 45 | 100 | | 46 | 100 | | 47 | 100 | | 48 | 100 | | 49 | 100 | | 50 | 100 | | 51 | 100 | | 52 | 100 | | 53 | 100 | | 54 | 100 | | 55 | 100 | | 56 | 100 | | 57 | 100 | | 58 | 100 | | 59 | 100 | | 60 | 100 | | 61 | 100 | | 62 | 100 | | 63 | 100 | | 64 | 100 | | 65 | 100 | | 66 | 100 | | 67 | 100 | | 68 | 100 | | 69 | 100 | | 70 | 100 | | 71 | 100 | | 72 | 100 | | 73 | 100 | | 74 | 100 | | 75 | 100 | | 76 | 100 | | 77 | 100 | | 78 | 100 | | 79 | 100 | | 80 | 100 | | Note: The actual values are not provided in the code. I have used the label 'Value' as a placeholder for the value detection. You would need to run the code to get the actual values from the code list. Please note that the actual values would be the result of this example. You would need to run the code to get the actual values from the code list. You would need to run the code to get the actual values from the code list. You would need to run the code to get the actual values from the code list. You would need to run the code to get the actual values from the code list. You would need to run the code to get the actual values from the code list. You would need to run the code to get the actual values from the code list. You would need to run the code to get the actual values from you would need to run the code.text_image
QR code image containing encoded data, no visible human-readable textINHALTSVERZEICHNIS
text_image
Labeled diagram of a microwave oven with numbered parts for identificationnatural_image
Symbol of a trash bin crossed with a diagonal line, no text or numbers presentCongratulations on the purchase of your appliance. Please read the following instructions carefully and follow them to prevent potential damage. We accept no liability for damage caused by disregarding the instructions and improper use. Please scan the QR code to access the latest operating instructions and further information about the product.

text_image
QR code image containing encoded data, no visible human-readable textCONTENTS
Safety Instructions 24
Device overview 26
Display indications 27
Control panel 27
General operation 28
Operation in detail 30
Cleaning and care 33
Device control via smartphone 34
Ice cream recipes 36
Troubleshooting 39
Disposal Considerations 40
Declaration of Conformity 40
TECHNICAL INFORMATION
| Article number 10040048 | |
| Power supply 220 -240 V~ 50 Hz | |
| Power consumption 180 W | |
| Power consumption in Standby mode* max. 0.8 W | |
| Power consumption in Standby mode* with WiFi enabled | max. 1.8 W |
| Capacity 2 litres | |
| Weight 12 kg | |
* The product enters standby mode 10 minutes after no user operation (after the main function ends).
SAFETY INSTRUCTIONS
- Before use, check the voltage on the rating plate and only connect the appliance to sockets that match the voltage of the appliance.
- If the power cord is damaged, it must be replaced by the manufacturer, an authorised specialist company or a similarly qualified person.
- Do not turn the unit upside down or tilt it more than 45^ .
- Never immerse the device completely in water or other liquids and make sure that the plug and power cord do not get wet.
- Pull the plug out of the socket when you are no longer using or cleaning the device.
- Leave 8cm of space around the unit to ensure sufficient air circulation.
- Only use accessories that are expressly approved for this purpose by the manufacturer.
- Children over 8 years as well as mentally, sensory and physically impaired persons may only use the device if they have been informed in detail about the functions and safety precautions by a supervisor responsible for them beforehand and understand the associated risks.
- Do not use the appliance near flames, hot hobs or ovens.
- Do not switch the unit on and off several times in succession. Wait at least 5 minutes before switching the unit on again to avoid damaging the compressor.
- Do not insert metal sheets or other objects into the appliance to avoid fire and short circuits.
- To avoid damaging the device, do not hit the container or the rim of the container when removing the ice cream.
- Do not switch on the appliance until you have attached the container and the stirring blade.
- The temperature for ingredients is 25 ± 5^ C . Do not pre-chill the ingredients, otherwise the blade could jam before the ice cream is ready.
- Do not remove the stirring blade while it is in operation.
- Do not use the device outdoors.
- Do not clean the device with scouring powder or scouring pads.
- Do not store explosive substances in the unit, such as spray cans with highly flammable propellants.
- The appliance is intended for use in the home and similar environments only. It is not intended for commercial use.
This unit contains the refrigerant Isobutane (R600a), a natural gas that has high environmental compatibility, but is flammable. Although it is flammable, it does not damage the ozone layer or increase the greenhouse effect. The use of this refrigerant results in a slightly higher noise level of the unit. In addition to the compressor noise, you can hear the flow of refrigerant. This is unavoidable and has no negative effect on the performance of the device. Be careful during transport to avoid damage to the refrigerant circuit. Refrigerant leaks can irritate the eyes.
Special notes
- When positioning the unit, take care that the power cord is not pinched or damaged.
- Make sure that there are no multiple sockets or power supply units on the back of the device.
To avoid contamination of food, please follow the instructions below:
- Regularly clean surfaces that may come into contact with food.

WARNING
When using, during maintenance and when disposing of the appliance, pay attention to the left symbol located on the back or on the compressor of the appliance. This symbol warns you of possible fires. There are flammable substances in the refrigerant lines and in the compressor. Keep the appliance away from sources of fire during use, maintenance and disposal.
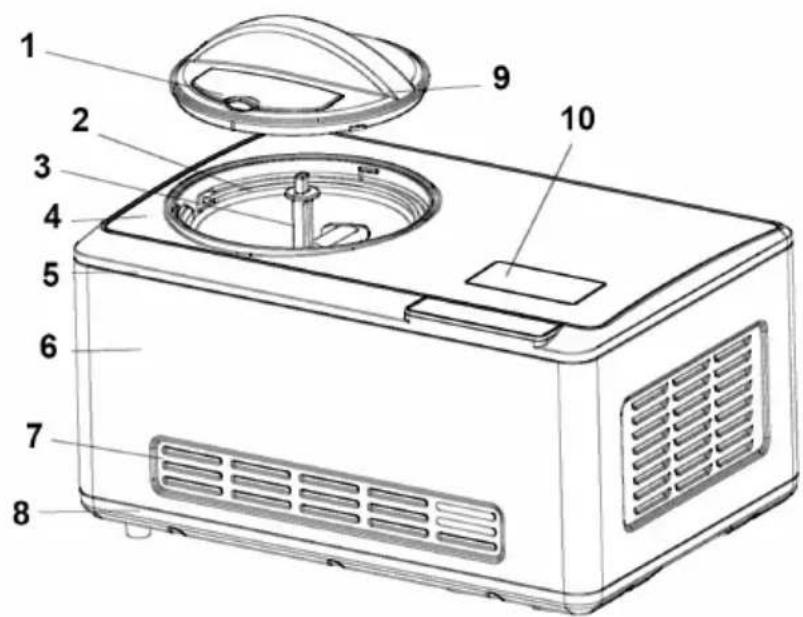
DEVICE OVERVIEW
text_image
Labeled diagram of a microwave oven with numbered parts for identification| 1 Transparent window 6 Metal housing | ||
| 2 Removable bowl 7 Ventilation slots | ||
| 3 Stirrer blade 8 Base plate | ||
| 4 Metal plate 9 Transparent lid | ||
| 5 Top cover 10 Display |
DISPLAY INDICATIONS
| A Time D Ice cream hardness | |||
| B Mix mode E Yoghurt | |||
| C Cooling mode F Ice cream mode | |||
| G W Fi icon | |||
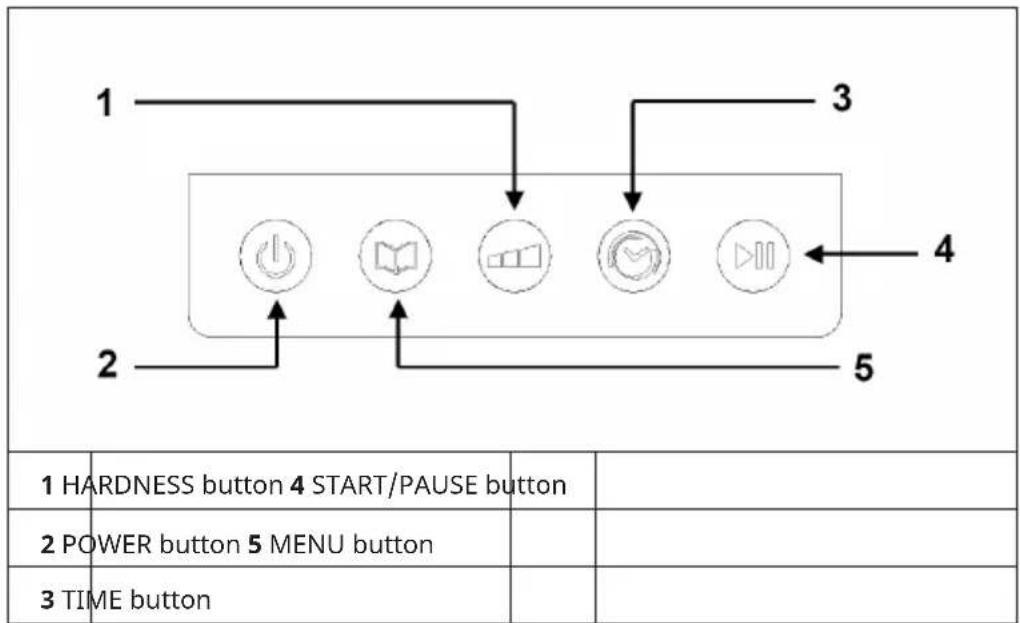
CONTROL PANEL
text_image
1 HARDNESS button 4 START/PAUSE button 2 POWER button 5 MENU button 3 TIME buttonGENERAL OPERATION
Clean and prepare the ice cream machine
Before using the appliance for the first time, clean all parts that come into contact with the ice cream. These include the fixed bowl, the removable container, the stirring knife, the transparent lid, the refill lid and the spoon. Place the ice cream maker upright on a flat surface so that the compressor can work at its best.
| 1 | Prepare the ingredients according to the list of ingredients in the recipe section of the instruction manual. You don't need to cool the ice cream container extra beforehand. The appliance has a built-in compressor that cools the ingredients during ice cream preparation. Pour the prepared ingredients into the removable container and mix well. | 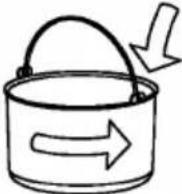 |
| 2 | Insert the ice cream container into the ice cream maker and turn it around slightly until it is firmly attached to the fixed bowl. |  |
| 3 | Insert the stirring blade into the removable container and make sure that the lower part of the stirring blade is firmly connected to the motor. Place the transparent lid on the ice cream maker and screw it on counterclockwise. |  |
| 4 | Insert the plug into the socket and press the POWER button to switch on the unit. | |
| 5 | Then press the MENU button to select the working mode. | |
| 6 | Press the TIME button to adjust the working time. | |
| 7 | Add the desired ingredients through the window. | |
Open the window and add ingredients 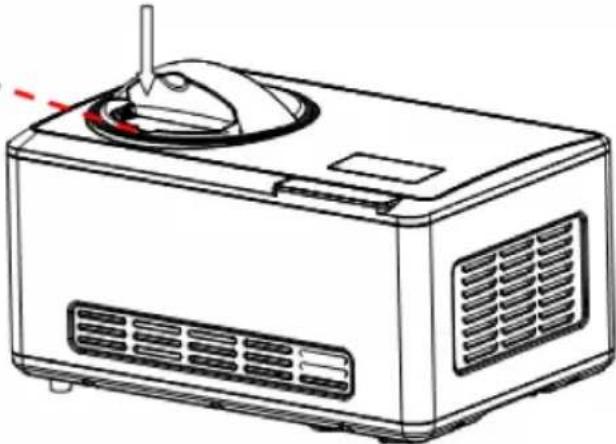 | ||
| 8 | When ice cream preparation is complete, first press the POWER button to switch off the appliance. Only then remove the bowl. | |
(2) Remove the b 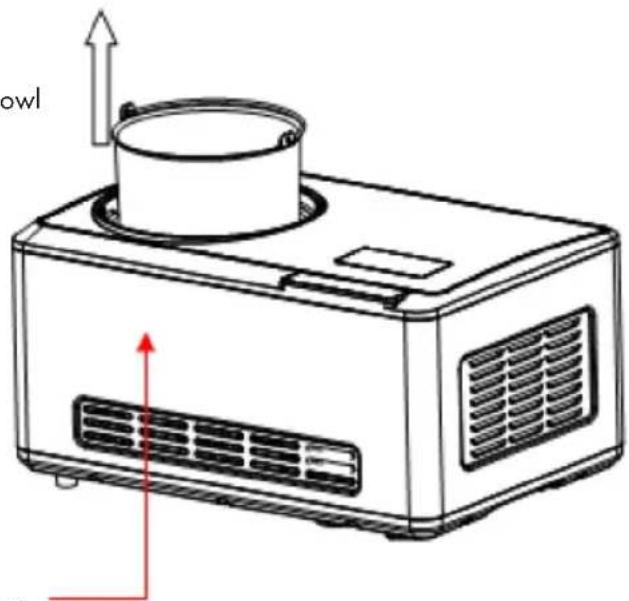 (1) Press the POWER button (1) Press the POWER button | ||
OPERATION IN DETAIL
| 1 | Plug the power plug into the mains socket. The backlight flashes. The display shows [00] and flashes. Press the POWER button. The ice cream mode is preset. At the same time, the symbol for ice cream mode flashes (the symbols for the other modes also light up). The backlight of the display lights up for 15 seconds and then goes out. In this case, press the POWER button again to return to the power-on state. |
| 2 | Press the MENU button to enter one of the following modes: Ice Cream, Cooling (only), Mixing (only), Yoghurt. The symbol of the selected mode flashes (the symbols of the other modes also light up) and the standard time for this mode flashes. If the backlight goes out within 15 seconds without any other operation being performed, press and hold the MENU button to return to mode selection. |
Hardness setting mode in ice cream mode
In ice cream mode, the degree of hardness can be set manually. The time cannot be adjusted in this mode.
| 1 | Press the HARDNESS button to enter the hardness setting mode. The degree of hardness increases with each press of the button. After the start, the time display starts at [00:00]. |
| 2 | If the hardness setting is interrupted unexpectedly, press the HARDNESS button again to set the desired hardness level. As the ice cream has now reached a certain degree of hardness, level 2 or level 3 must now be selected. |
Time setting mode in ice cream mode
In ice cream mode, the time can be set manually. The hardness cannot be adjusted in this mode.
| 1 | Press the TIME button to enter the time setting mode. Briefly press the TIME button to increase the time in 1-minute steps. Press and hold the time button to set the time faster up to 60 minutes. |
| 2 | While in ice cream mode, press the TIME button to adjust the ice cream making time. The setting method is the same as described in point 1. |
Time setting mode in yoghurt mode
The yoghurt mode has a reminder function. The factory setting for this mode is 8 hours, the display shows [08H]. The next time you use this function, the time setting you made the last time will be saved and recalled.
| 1 | Briefly press the TIME button to increase the time in 1-hour steps up to 24 hours. When you have reached 24 hours and press the TIME button again, the value decreases by 4 hours each time you press the button until you are back at the initial value. |
| 2 | After setting the time, press the START/PAUSE button to start the programme. During yoghurt preparation, the yoghurt symbol flashes continuously. If you press the START/PAUSE button during production, production pauses and the machine switches to standby mode after 10 minutes. |
Time setting mode in (just) cooling mode
The preset time for this mode is 30 minutes, the display shows [30:00]. Briefly press the TIME button to increase the time in 1-minute steps. Press and hold the time button to set the time faster up to 60 minutes. When you have reached 60 minutes and press the TIME button again, the time setting starts again at 5 minutes.
Time setting mode in (just) mixing mode
The preset time for this mode is 10 minutes, the display shows [10:00]. Briefly press the TIME button to increase the time in 1-minute steps. Press and hold the time button to set the time faster up to 60 minutes. When you have reached 60 minutes and press the TIME button again, the time setting starts again at 5 minutes.
Start ice cream production
After setting the time or hardness level, press the START/PAUSE button to start the set mode. The display stays on the whole time and counts down the set time. When you have set the hardness level, the display starts counting up from 0. The hardness bar flashes and grows from the left (soft) to the right (hard).
If you press the START/PAUSE button while the process is running, the stirring motor pauses. The display shows the current remaining time. Press the START/PAUSE button again to restart the current process.
- If you press the START/PAUSE button briefly during production, the motor stops for 3 minutes. If you do not restart the process within 10 minutes, the unit switches to standby mode and 3 short beeps sound.
- If you press and hold the START/PAUSE button during production, the machine switches off and returns to the selected operating mode. If no other operation is performed, the backlight turns off after 15 seconds.
- If you press the TIME button or the HARDNESS button during the break, you can adjust the time and hardness level afterwards. However, the degree of hardness can only be adjusted upwards.
After ice cream production
When production is finished, the machine automatically starts the keep-cool function. [COOL] flashes on the display and the hardness level is measured. To do this, the machine first stands still for 5 minutes, then the motor stirs for 15 seconds and then performs the hardness test.
- If the hardness is insufficient after test 1, the ice cream production continues.
- If the hardness is still insufficient at test 2, this cycle is continued for 120 minutes.
- If the hardness is sufficient, the keep-cool function is started automatically.
Keep-cool function
The keep-cool function prevents the finished ice cream from melting during your absence. If the ice cream is ready and no one is operating the machine, the chilling time is 120 minutes. After 120 minutes, the machine switches to standby mode. The display shows [COOL] and the final hardness bar.
Note on the motor protection device
If the ice cream becomes harder, the stirrer motor may be blocked. Then the motor protection device ensures that the stirrer motor stops operating to ensure the service life of the motor.
Note on the filling quantity of the ingredients
To avoid overflowing, make sure that the ingredients do not exceed 60% of the capacity of the removable bowl, as the ice cream expands during production.
CLEANING AND CARE
- Switch off the device immediately and pull the plug out of the socket.
- Remove the stirring blade and wipe it with a damp cloth.
- Remove the removable container and clean it with a damp cloth.
- Wipe the transparent lid and the refill lid with a damp cloth.
- Remove dirt on the unit or other stains with a damp cloth. Make sure that the cable, the plug and the ventilation do not get wet and do not immerse the device completely in water or other liquids.
- Dry all parts carefully and put them back in place.
DEVICE CONTROL VIA SMARTPHONE
If you integrate your Klarstein appliance into your home WLAN, you can operate it conveniently via the associated Klarstein app. The app not only allows you to control the appliance remotely via your smartphone, but also gives you access to recipes and further information.
Follow these steps to connect your smartphone to your Klarstein appliance:
- First download the Klarstein app by scanning the QR code with your smartphone (see below) or download it directly from the App Store or Google Play.
- Make sure that your smartphone is connected to the same WiFi network that your Klarstein device is to be connected to.
- Open the Klarstein app.
- Log in with your account. If you don't have an account yet, register in the Klarstein app.
- Follow the instructions in the app.
App download
Use the scan function of your mobile phone to scan the QR code and save the app on your smartphone.
Note: Further instructions on how to use the app and help on how to connect to your device are provided by the app when you open it for the first time.
| iOS Android | |
 |  |
Troubleshooting connection problems
If your Klarstein device cannot be found in the WLAN, check the following:
- The device is not plugged in. Make sure that your unit is plugged into a power outlet.
- The unit is not in pairing mode. Make sure that the WiFi indicator (LED) on the control panel of the smart device is flashing as described in the "Reset WiFi settings" instruction of your smart device (instructions can usually be found under Device connection).
- The WiFi access point does not operate on 2.4 GHz. Make sure your access point is operating on the 2.4 GHz band and that you have your own SSID on the 2.4 GHz band. If you are unsure about the operating band of your access point, please contact your internet provider.
Important: Please note that if your WiFi router has a dual band - i.e. operates in both the 2.4 GHz and 5 GHz bands - you must separate the SSIDs for each band and use the 2.4 GHz SSID for the connection
-
Check the firewall settings of your WiFi network. The firewall setting of your WiFi network may not allow the Klarstein App to configure the WiFi settings on your smart device. Please ensure that you do not use a public WiFi network, e.g. airports, dormitories, companies, etc.
-
Different login data in the smartphone and in the app. Make sure that the WiFi login details entered in the Klarstein app match those to which your smartphone is connected.
If you have followed the above points and your smartphone still cannot connect to the app, please contact us by email for assistance: appsupport@go-bbg.com
ICE CREAM RECIPES
Vanilla ice cream
Ingredients:
200 ml whole milk 100 ml granulated sugar 150 ml cream (chilled) 1-2 teaspoons vanilla flavouring
Preparation:
Mix the milk and sugar in a mixing bowl. Mix the two on low speed with a hand mixer until the sugar has dissolved. Then add the cream and vanilla flavouring and mix all the ingredients together. Switch on the ice cream maker, pour the mixture into the ice cream container and mix for about 30-40 minutes until it is thick.
Variants: Mint chip
Omit the vanilla flavouring and replace it with 1-1 ½ teaspoons of peppermint flavouring. Chop dark chocolate into small pieces and add the chocolate pieces in the last 5 minutes before the end of the preparation time.
Butter pecan
Melt 1 knob of salted butter in a 26 cm frying pan. Add 200 ml coarsely chopped pecans and 1 teaspoon salt. Cook the mixture over medium heat until the nuts are lightly brown, stirring regularly. Remove the pan from the heat and sieve the mixture through (you can use the butter for other purposes). Let the nuts cool completely and add them in the last 5 minutes before the end of the preparation time.
Chocolate ice cream
Ingredients:
200 ml whole milk
100 ml granulated sugar
240 g dark chocolate
200 ml cream (chilled)
1 teaspoon vanilla flavouring
Preparation:
Heat the milk on the cooker or in the microwave until it bubbles at the edges. Grind the chocolate together with the sugar in a mixer with a metal blade until the chocolate is finely chopped. Add the warm milk and continue to mix until smooth. Pour the mixture into a medium bowl and leave to cool completely. Add the cream and the vanilla flavouring. Switch on the ice cream maker, pour the mass into the ice cream container and mix for about 30-40 minutes until it is thick.
Variants: Chocolate almond
Add 12 teaspoon of almond flavouring together with the vanilla flavouring. Add 100-150 ml chopped almonds or chocolate almonds in the last 5-10 minutes before the end of the preparation time.
Chocolate cookie
Add a 100 ml coarsely chopped biscuits in the last 5 minutes before the end of cooking time.
Chocolate marshmallow swirl
When you transfer the finished ice cream to freeze, cover it with a few blobs of chocolate sauce and a few blobs of marshmallow cream.
Fresh strawberry ice cream
Ingredients:
250 g fresh strawberries
1 ½ teaspoon lemon juice
100 ml sugar
200 ml whole milk
200 ml cream
1 teaspoon vanilla flavouring
Preparation:
Place the chopped strawberries in a small bowl with the freshly squeezed lemon juice and half the sugar. Stir gently and leave the strawberries to soak for 2 hours. Take a medium sized bowl. Mix the milk and the other half of the sugar for 1-2 minutes with a hand mixer or whisk until the sugar has dissolved. Then add the cream, all the collected juice from the strawberries and the vanilla flavouring. Turn on the ice cream maker, pour the mixture into the ice cream container, and blend for about 30-40 minutes until thick. Add the strawberry pieces in the last 5 minutes before the end of the preparation time.
Note: The ice cream is naturally light pink. If you want the shade of the ice cream to be darker, add food colouring until the ice cream is the desired colour.
Fresh lemon sorbet
Ingredients:
300 ml sugar
300 ml water
200 ml lemon juice
1 tablespoon lemon peel
Preparation:
Mix the sugar with the water in a small saucepan and bring the mixture to the boil. Then let the mixture simmer on low heat for 3-5 minutes until the sugar has dissolved. Let the mixture cool down completely. Then add the freshly squeezed lemon juice and the finely chopped lemon zest and mix everything carefully. Turn on the ice cream maker, pour the mixture into the ice cream container, and blend for about 30-40 minutes until thick.
Iced chocolate yoghurt
Ingredients:
200 ml whole milk
180 g dark chocolate
400 ml vanilla yoghurt
50 ml sugar
Preparation:
Mix the milk and chopped chocolate in a blender with a metal blade for 20-30 seconds until you get a smooth mixture. Add the yoghurt and sugar and mix for another 15 seconds. Turn on the ice cream maker, pour in the mixture, and blend for about 50-60 minutes until thick.
TROUBLESHOOTING
| Problem Potential cause | Solution | |
| The bowl cannot be removed after ice cream production. | Frozen water drops between the bowl and the refrigerator compartment. | Wait 1-2 minutes before removing the bowl. |
| The production time of the ice cream machine (time mode) has not expired but the ice cream production has still finished. | With ice cream in time mode, the device is controlled simultaneously by time and hardness. If the ice cream is hard before the time has elapsed, ice cream production stops. | This process is normal and requires no action. |
| Ice cream production is not yet complete, yet the motor stops. | The harder the ice cream gets, the more likely it is that the engine will overheat. | Switch off the unit, wait 3 minutes and then restart the unit. |
| The unit has gone into standby mode or is not working as expected. | The START/PAUSE button may have been pressed twice by mistake. | Press the START / PAUSE button only once to start a programme. If you press the button twice, the unit pauses and automatically switches to standby mode after a certain time. |
DISPOSAL CONSIDERATIONS

natural_image
Symbol of a trash bin crossed with a diagonal line, no text or labels presentIf there is a legal regulation for the disposal of electrical and electronic devices in your country, this symbol on the product or on the packaging indicates that this product must not be disposed of with household waste. Instead, it must be taken to a collection point for the recycling of electrical and electronic equipment. By disposing of it in accordance with the rules, you are protecting the environment and the health of your fellow human beings from negative consequences. For information about the recycling and disposal of this product, please contact your local authority or your household waste disposal service.
DECLARATION OF CONFORMITY
CE
Manufacturer & Importer for Great Britain:
Chal-Tec GmbH, Mühlenstrasse 25, 10243 Berlin, Germany.
Contact: info@electronic-star.de
Hereby, Chal-Tec GmbH declares that the radio equipment type Bacio Smart is in compliance with Directive 2014/53/EU. The full text of the EU declaration of conformity is available at the following internet address: use.berlin/10040048
For Great Britain: Hereby, Chal-Tec GmbH declares that the radio equipment type Bacio Smart is in compliance with the relevant statutory requirements. The full text of the declaration of conformity is available at the following internet address: use.berlin/10040048
Estimado cliente:
text_image
QR code image containing encoded data, no visible human-readable textÍNDICE
text_image
Labeled diagram of a microwave oven with numbered parts for identificationnatural_image
Symbol of a trash bin crossed with a diagonal line, no text or numbers presentCher client, chère cliente,
text_image
QR code image containing encoded data, no visible human-readable textSOMMAIRE
text_image
Labeled diagram of a microwave oven with numbered parts for identificationnatural_image
Symbol of a trash bin crossed with a diagonal line, no text or numbers presentDÉCLARATION DE CONFORMITÉ

Fabricant :
text_image
QR code image containing encoded data, no visible human-readable textINDICE
text_image
Labeled diagram of a microwave oven with numbered parts for identificationnatural_image
Symbol of a trash bin crossed with a diagonal line, no text or numbers presentarea
| Category | Value | | -------- | ----- | | 1 | 100 | | 2 | 100 | | 3 | 100 | | 4 | 100 | | 5 | 100 | | 6 | 100 | | 7 | 100 | | 8 | 100 | | 9 | 100 | | 10 | 100 | | 11 | 100 | | 12 | 100 | | 13 | 100 | | 14 | 100 | | 15 | 100 | | 16 | 100 | | 17 | 100 | | 18 | 100 | | 19 | 100 | | 20 | 100 | | 21 | 100 | | 22 | 100 | | 23 | 100 | | 24 | 100 | | 25 | 100 | | 26 | 100 | | 27 | 100 | | 28 | 100 | | 29 | 100 | | 30 | 100 | | 31 | 100 | | 32 | 100 | | 33 | 100 | | 34 | 100 | | 35 | 100 | | 36 | 100 | | 37 | 100 | | 38 | 100 | | 39 | 100 | | 40 | 100 | | 41 | 100 | | 42 | 100 | | 43 | 100 | | 44 | 100 | | 45 | 100 | | 46 | 100 | | 47 | 100 | | 48 | 100 | | 49 | 100 | | 50 | 100 | | 51 | 100 | | 52 | 100 | | 53 | 100 | | 54 | 100 | | 55 | 100 | | 56 | 100 | | 57 | 100 | | 58 | 100 | | 59 | 100 | | 60 | 100 | | 61 | 100 | | 62 | 100 | | 63 | 100 | | 64 | 100 | | 65 | 100 | | 66 | 100 | | 67 | 100 | | 68 | 100 | | 69 | 100 | | 70 | 100 | | 71 | 100 | | 72 | 100 | | 73 | 100 | | 74 | 100 | | 75 | 100 | | 76 | 100 | | 77 | 100 | | 78 | 100 | | 79 | 100 | | 80 | 100 | | Note: The actual values are not provided in the code. I have used the label 'Value' as a placeholder for the value detection. You would need to run the code to get the actual values from the code list. Please note that the actual values would be the result of this example. You would need to run the code to get the actual values from the code list. You would need to run the code to get the actual values from the code list. You would need to run the code to get the actual values from the code list. You would need to run the code to get the actual values from the code list. You would need to run the code to get the actual values from the code list. You would need to run the code to get the actual values from the code list. You would need to run the code to get the actual values from you would need to run the code. You would need to run the code to get the actual values from you would need to run the code.