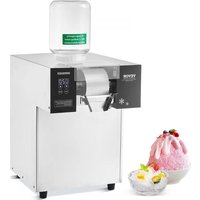
SKF-300BLS - Ice machine Vevor - Free user manual and instructions
Find the device manual for free SKF-300BLS Vevor in PDF.

User questions about SKF-300BLS Vevor
0 question about this device. Answer the ones you know or ask your own.
Ask a new question about this device
Download the instructions for your Ice machine in PDF format for free! Find your manual SKF-300BLS - Vevor and take your electronic device back in hand. On this page are published all the documents necessary for the use of your device. SKF-300BLS by Vevor.
USER MANUAL SKF-300BLS Vevor
Technical Support and E-Warranty Certificate www.vevor.com/support
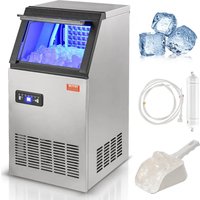
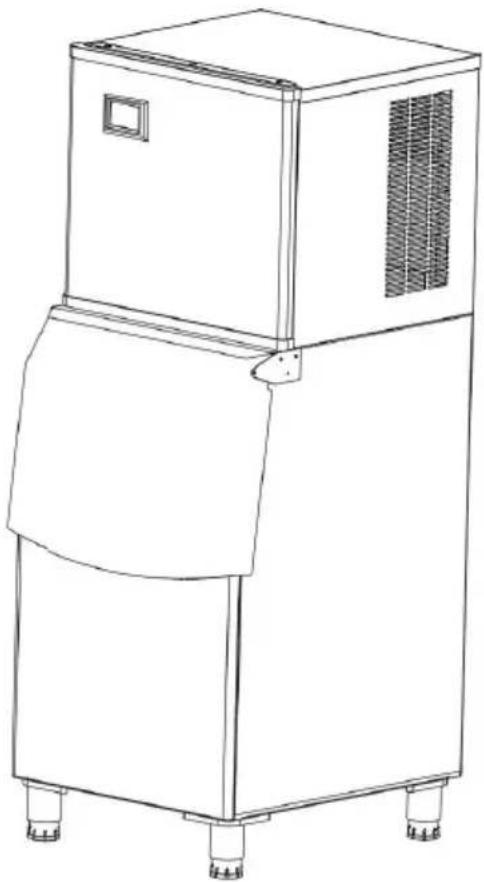
ICE MACHINE
MODEL:SKF300BLS/SKF-500BLS
We continue to be committed to provide you tools with competitive price. "Save Half", "Half Price" or any other similar expressions used by us only represents an estimate of savings you might benefit from buying certain tools with us compared to the major top brands and does not necessarily mean to co all categories of tools offered by us. You are kindly reminded to verify carefully when you are placing an order with us if you are actually Saving Half in comparison with the top major brands.
MODEL: SKF300BLS/SKF-500BLS

natural_image
Line drawing of a three-tier industrial refrigerator with cooling unit and vented door (no text or symbols)NEED HELP? CONTACT US!
Have product questions? Need technical support? Please feel free to contact us:
Technical Support and E-Warranty Certificate www.vevor.com/support
This is the original instruction, please read all manual instructions carefully before operating. VEVOR reserves a clear interpretation of o user manual. The appearance of the product shall be subject to the product you received. Please forgive us that we won't inform you ag there are any technology or software updates on our product.
 | Warning-To reduce the risk of injury, user must re instructions manual carefully. |
 | This product is subject to the provision of European D 2012/19/EC. The symbol showing a wheelie bin cros through indicates that the product requires separate re collection in the European Union. This applies to the and all accessories marked with this symbol. Products as such may not be discarded with normal domestic w must be taken to a collection point for recycling electr electronic devices |
SAFETY PRECAUTION

Before the appliance is used, please read the manual carefully. To reduce the risk of fire, electrical shock or injury when using the
appliance, follow basic precaution, including the following:

DANGER:
◆ Read all instructions before using the ice-making machine.
◆ Plug into a grounded 3-prong outlet, do not remove grounding prong, do not use an adapter, and do not use an extension cord.
It is recommended that a separate circuit, serving only your appliance be provided. Use an outlet that cannot be turned off by a switch.
◆ Never clean appliance parts with flammable fluids. These fumes can create fire hazard or explosion. And do not store or use gasoline or other flam vapours and liquids in the vicinity of this or any other appliance. The fu can create a fire hazard or explosion.
◆ Before proceeding with cleaning and maintenance operations, make sure the power line of the unit is disconnected.
◆ Do not connect or disconnect the electric plug when your hands are wet.
◆ Unplug the appliance or disconnect power before cleaning or servicing.
Failure to do so can result in electrical shock or death.
Do not attempt to repair or replace any part of your appliance unless it specifically recommended in this material. All other servicing should be referred to a qualified technician.
◆ To prevent a child from being entrapped, Keep out of reach of children a not in the vicinity of ice-making machine.
◆ Before you throw away your old ice-making machine, take off the door but leave the shelves in place so that children may not easily climb inside.
◆ Never allow children to operate, play with, or crawl inside the appliance.
Warning :
◆ This machine should be operated by professionals or trained personnel;
Make sure the machine is reliably connected to the ground to keep safe
◆ Use the power consistent with the one in the nameplate, and the bias vc is less than ± 10% of the rated voltage. The professionals must do the
◆ If the supply cord is damaged, it must be replaced by the manufacturer, service agent or similarly qualified persons in order to avoid a hazard.;
◆ Before maintaining the machine, make sure you have cut off the power;
- Don’t wet or sprinkle the liquid onto the plugs, motors, or other electrical
to avoid electric shock;
This appliance can be used by children aged from 8 years and above are persons with reduced physical, sensory or mental capabilities or lack of experience and knowledge if they have been given supervision or instructi concerning use of the appliance in a safe way and understand the haze involved. Children shall not play with the appliance. Cleaning and user maintenance shall not be made by children without supervision.
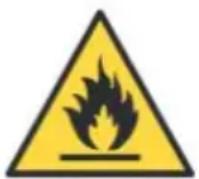
FLAMMABLE REFRIGERANT
For your safety observe the following recommendations.
This appliance contains a small quantity of R290/R600a ice-making machine which is environmentally friendly, but flammable. It does not damage the ozone layer, nor does it increase the greenhouse effect.
◆ During transportation and installation, ensure that the tubing of the refrigeration circuit is not damaged.
◆ when handling, moving and use of the refrigerator or freezer to avoid either damaging the refrigerant tubing or increasing the risk of a leak.
◆ Avoid using or manipulating sharp objects near by the appliances.
◆ Leaking refrigerant can ignite and may damage the eyes.
◆ In the event any damage does occur, avoid exposure to open fires and a device which creates a spark. Disconnect the appliance from the mains power.
◆ Thoroughly ventilate the room in which the appliance is located for several
minutes.
◆ Notify Customer Service for necessary action and advice.
◆ The ice-making machine quantity contained in this appliance is listed above grams; it is also noted on the Rating Plate of the appliance.
R290/R600a
◆ WARNING: During using, service and disposal the appliance, please pay attention to symbol similar as left side, which is located on rear of appliance (rear panel or compressor) and with yellow or orange color. It's risk of fi warning symbol. There are flammable materials in refrigerant pipes ar compressor. Please be far away fire source during using, service and disposal.

Note:
◆ Please keep the water or other conductive liquids away from the machine;
◆ Don’t stick clubs into the machine;
◆ During the movement of the machine, it should be carefully carried at an angle of less than 45 degrees.
Prohibit water discharge pipe or water supply pipe from being bent so that pipes are damaged and water leaks out from the pipes.
◆ The distance between the air outlets and the wall should be over 30 cm. Besides, keep good ventilation and ensure the machine is dry and clean.
QUICK USAGE INSTRUCTIONS
Installation requirements:
- The surface of the machine is covered with a metal protective film, which to be removed before use
- In order to extend the service life of the ice maker, it must be placed up least 6 hours before being powered on.
- The host of this product should be placed directly above the ice storage by the left, right, and back of the ice maker host should be aligned with the ice bin
- Pay attention to personal safety when placing the main unit of the ice makes the main unit should not tilt more than 15 ° and be at least 30cm away from obstacles
- Please install the water inlet and outlet pipes of the ice maker host accord the installation diagram on the back of the host
- The ambient temperature of this product should not exceed 38 °C, and the water temperature should not exceed 32 °C
- If there is an E04 alarm, please check the ambient temperature and water temperature in a timely manner and make corresponding adjustments
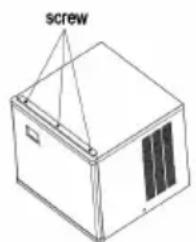
- Before use, the protective tape needs to be removed. The specific steps are follows
step1: Loose the screws.
step2: Remove the tape.
step3:Remove the pearl cott
Cleaning requirements:
text_image
screw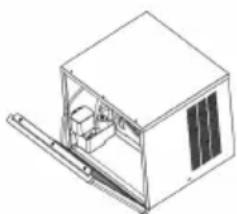
natural_image
Isometric line drawing of a box with a door and window, no text or symbols present
natural_image
Line drawing of a mechanical device with a housing and internal components (no text or symbols)- Due to significant difference
in water quality among different regions, it is recommended to connect the in prevent impurities from depositing and blocking pipelines and water pumps
- Adding a water purification device to the water pipe may cause impurities to deposit and block the water path, which is not a product quality issue. Please clean the machine regularly
- It is recommended to clean the main water system (sink, water pump, water every 10-14 days
- Before manual cleaning mode, add the prepared cleaning agent (such as acid descaling agent) to the water tank. Clean for about 40 minutes
Function Description:
- Ice thickness setting function: Press "reservation/addition" twice in the startu state to enter the ice thickness gear state. At this time, you can adjust the thickness according to the actual ice thickness by pressing "reservation/addition and "lighting/reduction". It is recommended that the ice thickness gear is not than 0
- Cleaning function: Press the "switch" to display OFF, then press "clean/set" enter the cleaning mode. The cleaning time in the cleaning mode is about 4 minutes
SAVE THESE INSTRUCTIONS
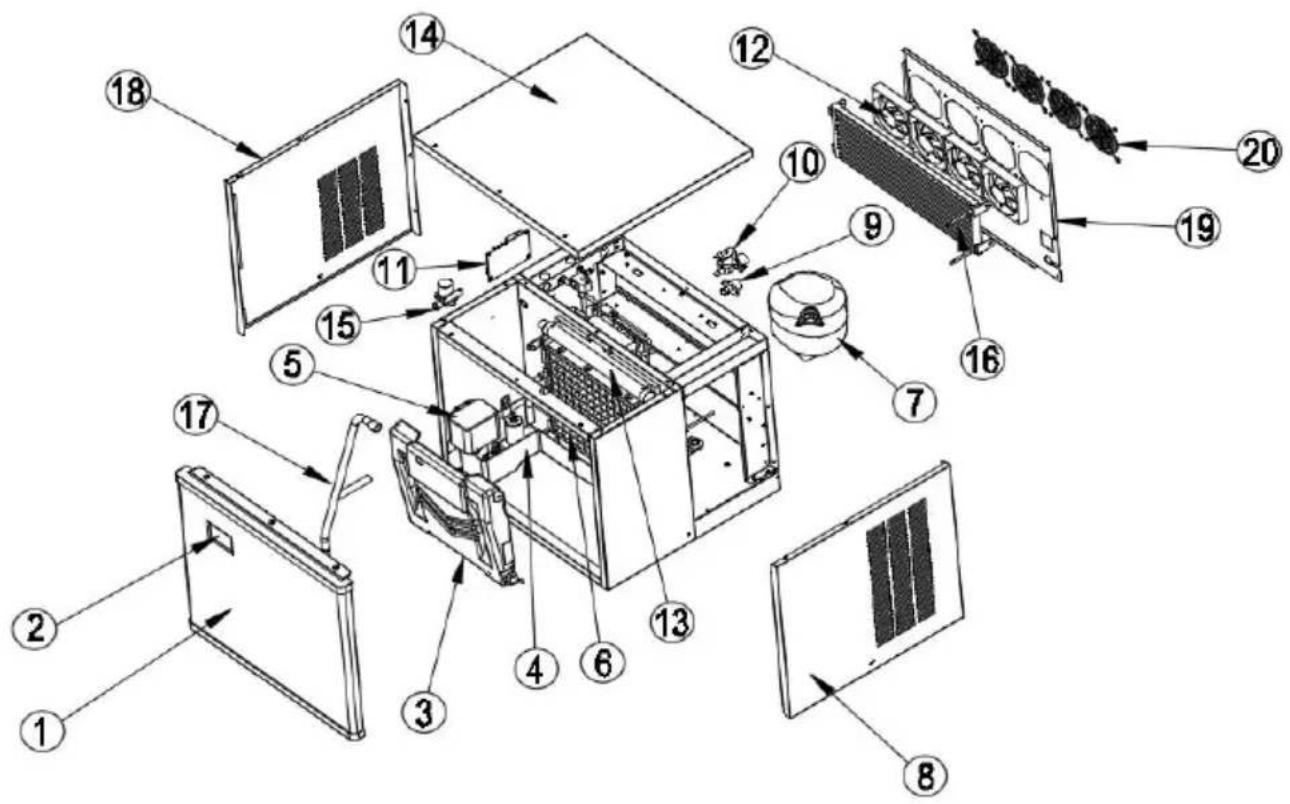
BASIC STRUCTURE
Split type
| No. | Name | No. | Name |
| 1 | Front panel | 11 | electric control panel |
| 2 | Control panel | 12 | Fan motor |
| 3 | Evaporator cover | 13 | spray pipe |
| 4 | Water storage tank | 14 | Top panel |
| 5 | Water pump | 15 | drain valve |
| 6 | Evaporator | 16 | condenser |
| 7 | Compressor | 17 | water pump outlet pipe |
| 8 | Right panel | 18 | Left panel |
| 9 | outfall | 19 | back shroud |
| 10 | water supply valve | 20 | fan guard |
text_image
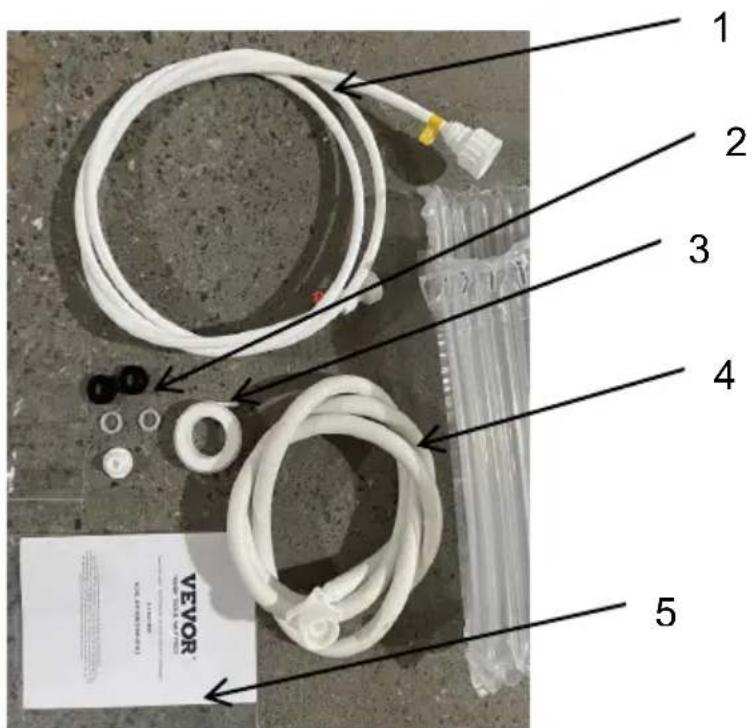
Exploded view diagram of a device with numbered components for identificationICE MACHINE ACCESSORIES
text_image
1 2 3 4 5 VEVOR (100%) (100%) (100%) (100%) (100%) (100%) (100%) (100%)| No. | Name |
| 1 | Water inlet pipe |
| 2 | Sealing ring |
| 3 | PTFE tape |
| 4 | Water drainage pip |
| 5 | Instructions |
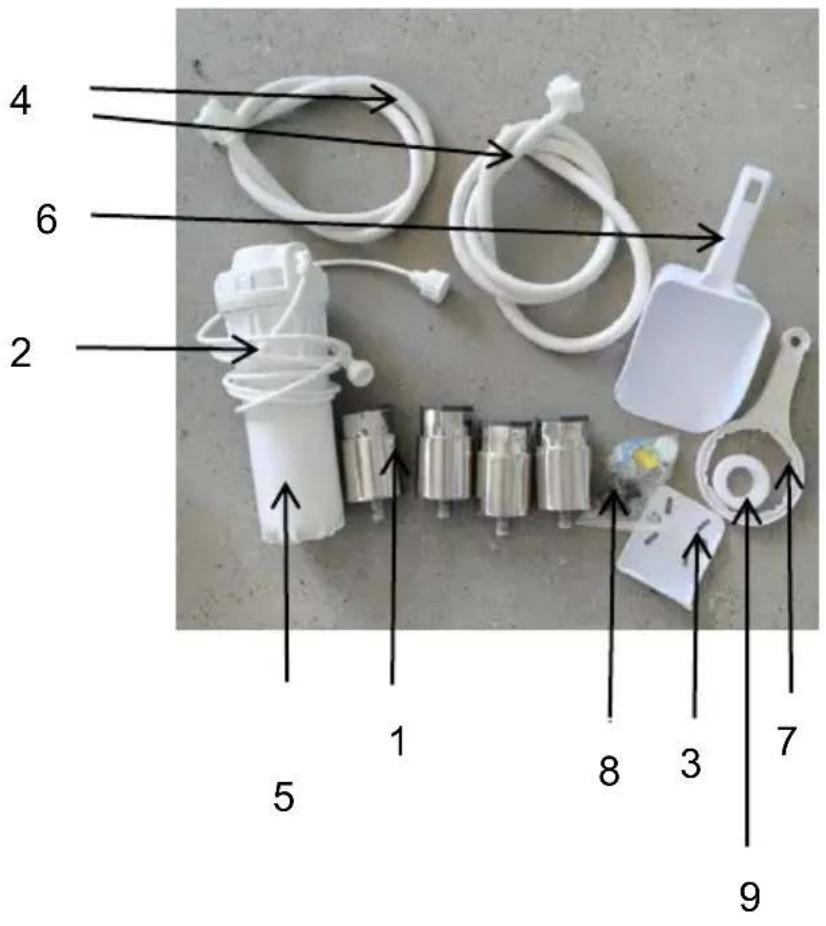
text_image
4 6 2 1 5 8 3 7 9| No. | Name |
| 1 | Adjustable feet |
| 2 | Filter connection pipe |
| 3 | mounting plate |
| 4 | Ice storage bucket drain pipe |
| 5 | Water filter |
| 6 | Ice shovel |
| 7 | wrench |
| 8 | accessories package |
| 9 | thread seal tape |
※This batch of attachments
need to buy ice storage buckets
INSTALLATION
Open the case, move the machine to a appropriate location. Check the pack and the contents, if they are different, please inquire your dealer.
2. Operating environment
A. Environment temperature: SN·N·ST: 10℃ \~ 38℃
Environment humidity: relative humidity ≤90%
- Take out the feet of the ice storage bucket and install them at the bottom ice storage bucket.
- Two people carry the ice machine host and place it on the ice storage I and it is flush with the ice storage bucket.
- Maintain the level of the main eng adjusting the feet of the ice bucket machine.
The ice maker is to be installed in accordance with the Safety Standard for Refrigeration Systems, ASHRAE 15. In addition, the ice maker shall not be installed in corridors or hallways of public buildings.
Please use it with the ice storage bu provided by the manufacturer. Do not replace it at will.
natural_image
Line drawing of a refrigerator with a downward arrow indicating compression or cooling (no text or symbols present)
text_image
Hot! Cold!! Least30mm Least30mmThe distance between the air outlets and the wall should be over 30 cm. B keep good ventilation and ensure the machine is dry and clean. The position place the ice maker must be far away from the heat source, such as a ba electric cooker, etc.
B. Water source is suitable for the sanitary standards, the water temperature and pressure is suitable. For getting the biggest efficiency, the inlet water temperature value should be 0.6\~32°C, and the pressure should be 0.1 \~ 0.63MPa.

text_image
Diagram showing a faucet with a dial indicator and a beaker with a thermometer, illustrating water level measurement or inspection.C. There should be a sewer. While working, some of the water will be discharged, so the sewer is necessary. Furthermore, the sewer must be unblocked.
natural_image
Simple line drawing of a cube with a curved line and a circular base, no text or symbols present.POWER SUPPLY
a Select the proper power supply according to the voltage and power on the nameplate.
b Connect the power wire and supply, ensuring the yellow and green wires connected with the ground wire firmly.
Caution:
a. For safety, ensure the ground connection is in good c b. All the exterior wires and other appliances must confirm national standard.
c If the voltage fluctuation range is extensive (± 10% over the rated voltage), it will
cause many faults, such as the machine can't be started, the electronic control board is damaged, or the compressor being damaged. Therefore, you must use suitable automatic voltage regulator.
text_image
Drinking tap water Socket with ground wire filter Water inlet direction Power Cord Inlet pipe Drain pipeFor the SKF-300BLS·SKF-500BLS, you must remove the decorative panel so as to turn on the power.
4. Connect the water supply pipe
Take out the water supply pipe from accessory bag, connect pipe's double e the water supply valve and water faucet. First, sleeve the connector 1 to the faucet, then join one end of water supply pipe which has steel balls to the connector 1(hang on this water supply pipe's end, loose it after being connected the connector 1), and connect the other end which is attached with a screw water supply valve, the valve also has a screw in its end, screw down the clockwise. Once finished installation, check the connect part if it is leaks or you should connect the water pipes according to the diagram on the rear pa The flow rate of condensate water is adjustable according to customers' need (Condensate flow relates to the speed of making ice)
Warning: The water used to make edible ice block m drinking water, furthermore, water's temperature must b among 0.6\~32°C and the pressure among 0.1\~0.63Mp
5. Connect the water discharge pipe
The water discharge pipe is situated at the back of the machine, extended p end to the sewer.

natural_image
Warning symbol: black exclamation mark inside a triangle (no text or numbers)Attention: In order to keep the water discharged smoo discharge pipe's lowest point must be above the highest the sewer, so to prevent the discharge water to flow
6. Keep the main body in level situation
Please keep the main body level to ensure the ice m usually works. First, screw down the two adjustable leg the machine's nuts. You can adjust the two legs prop main body is not level.

natural_image
Diagram of a mechanical or electrical component with directional arrows indicating rotation (no text or symbols)SERVICE INSTRUCTION
1. Operation process
First, turn on the water faucet, power, and water supply valve, then fill the water, and turn off the faucet when the sink is filled with appropriate water.
2. Ice-make process
After several minutes, the water pump starts work, and the water will be put and flowed through the ice model evenly. At last, the ice is formed in the 1 When the ice thickness sensor detects the regulated thickness of ice, the ice to drop.
3. Ice-drop process
The water pump stops working, the water supply valve will be opened, and go into the sink. The heating valve will be turned on, and the refrigerant ga into the ice model; the ice root will be melted, and after about 2 minutes, 1 block drop into the ice cabinet. The falling ice block hit the retaining board inductive switch, which is fixed on the right side of the retaining board, till r circle is over, and the new ice-make circle will start.
4. Auto-stop
When the ice cabinet is filled with ice blocks, the continuing falling ice block locked between the retained board and evaporator; the retained board would opened continually and couldn't return to the original position. After several seconds, the ice maker will stop working automatically. Once the ice block lo between the retained board and evaporator is taken away, the retained board return to the its original position, and the ice maker will restart to make ice.
5. Running check
A When the ice maker is in the working process, a sudden interruption of water supply can lead to the sink not being filled with appropriate water. The ice will turn into standby condition and not make ice as usual. After the water is becomes normal and restart the machine, it can work normally.
B·The fan motor for condenser is controlled by temperature, when condenser's surface temperature is lower, the fan motor will stop, so as to save power; surface temperature rises up, the fan motor will work again, so fan motor would intermittently during the ice-make process.
C When a commercial ice maker works at a lower ambient temperature, the ice-drop process will be later than usual. If it occurs three times continuously machine will stop automatically, and the red light in the electrical box alternat flickers with the other four lights. After restarting the machine, it will become normal. Therefore, we suggest the user not use the machine at a low ambient temperature.
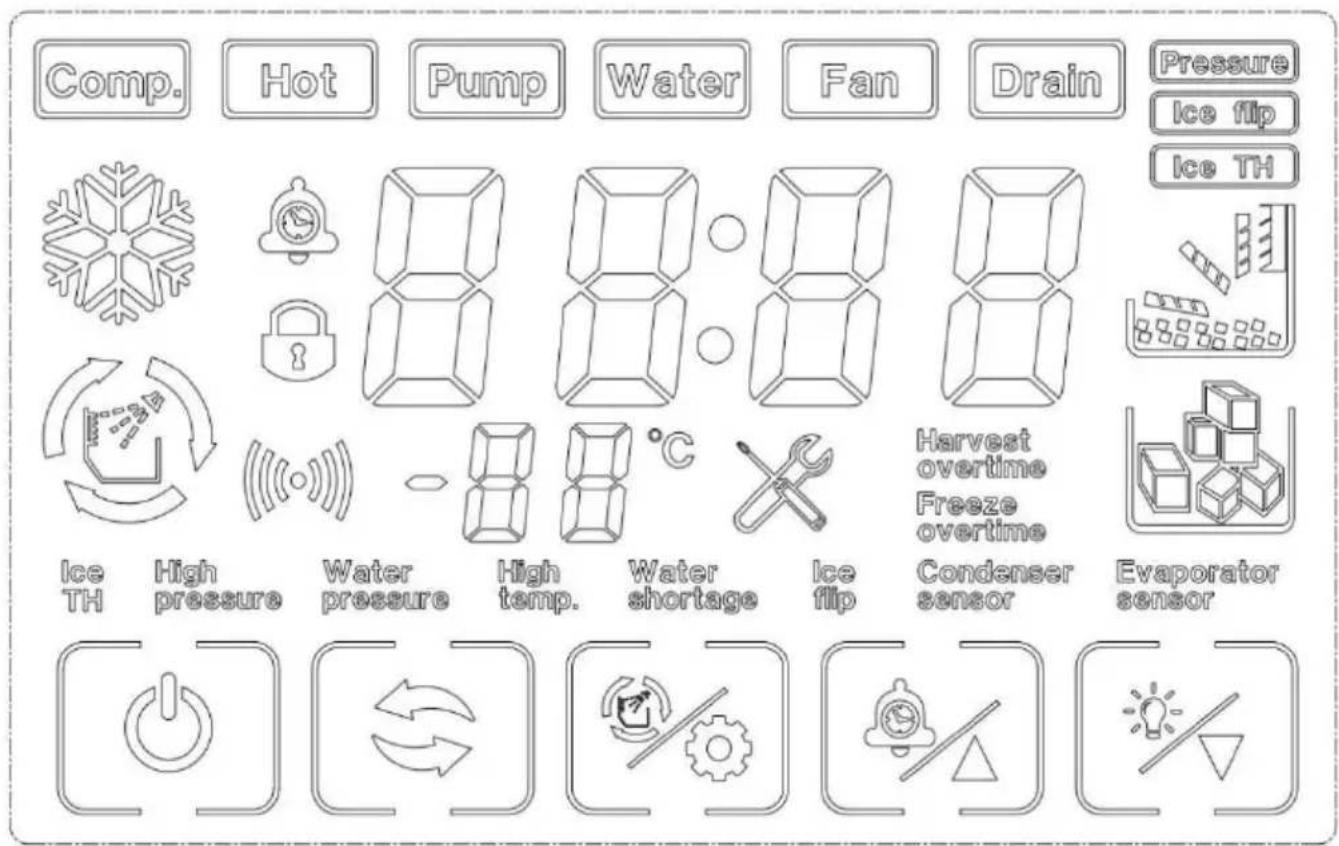
LCD FULL PAGE DISPLAY

text_image
Comp. Hot Pump Water Fan Drain Pressure Ice flip Ice TH Ice TH High pressure Water pressure High temp. Water shortage Ice flip Harvest overtime Freeze overtime Condenser sensor Evaporator sensor7. Buttons on display board
Boot / shutdown:
press 3 seconds to turn off the machine under turn on status
press on/off button to turn on the machine under turn off status press the c button to exit setting under ice thickness setting and filling water adjust status
Mode button:

Switch the ice making program
Clean / Set Button:

Press to clean status under machine turn off status
+/reservation button:

press to ice thickness adjust under pressure equilibrium 'making ice unload ice'
ice full status
click to increase 1, long press the button to increase continuously under ice thickness adjust status
click to reservation time setting status under turn off status
-/light button:

click to decrease 1, long press the button to decrease continuously under ice thickness adjust status
Instruction: when the machine is in the “lack-water protection” condition, it can restart automatically after the sink is filled with appropriate water. If other fault cause the machine to stop, press the start button or supply power again after forty-five minutes, and the machine will start again.
Clean
 | |
| Before cleaning or maintaining the ice maker, unplug the ice maker from the power supply network.. | |
| It is strictly prohibited to flush the ice maker directly with water sprayer. | |
 | |
| When using neutral or sodium hypochlorite solutions, be sure to read and understand the accompanying instructions to avoid potential health problems. | |
[a] Ice maker and refrigerator housing
Wipe the ice maker's shell with a clean, soft cloth at least once a week, and wipe grease and dirt with a damp cloth containing a neutral cleaner.
![Vevor SKF-300BLS - [a] Ice maker and refrigerator housing - 1](/content/2026/04/737299/images/46b5fcaf9139d1733feee4fd85cedb53e39861d8c3af0410e6c75b0cf7bd79a4.jpg) | |
| Do not use a hard brush, wire brush, do not use detergent powder, gasoline, banana water, acetone and other organic solutions, do not use boiling water or containing strong acids, alkali cleaning agents to clean the ice machine. | |
| Please do not wash directly with water when cleaning, so as not to affect the insulation of electrical appliances. | |
[b]Ice machine cleaning and disinfection (recommended more than 2 times per month)
Note: Some areas may need to be cleaned and disinfected more frequently due to different water quality.
![Vevor SKF-300BLS - [b]Ice machine cleaning and disinfection (recommended more than 2 times per month) - 1](/content/2026/04/737299/images/ce2f8647d0dbd3d989d851882c85bdc1f7749ce95f012962b7b4cbcddba061cb.jpg) |
| Before cleaning, at the end of the ice machine cycle, all the ice cubes slide behind, shut down, open the front panel, and remove all the ice cubes in the ice machine and ice storage bucket.。 |
| Do not use tools to peel the ice from the ice mold, otherwise it may cause damage to the ice mold. |
| Do not use any liquid containing alcohol to clean or disinfect the ice machine, or it may cause cracks in the plastic parts. |
![Vevor SKF-300BLS - [b]Ice machine cleaning and disinfection (recommended more than 2 times per month) - 2](/content/2026/04/737299/images/4bd9eef92fe3ae30784d68f7c7eca43b45d75b1631a32014d1750536741bdab9.jpg) |
| During the cleaning and disinfection process, please pay attention to protection, wear goggles and gloves, if the cleaning agent or disinfectant on the skin or eyes may cause inflammation. In case of accidental contamination, please follow the precautions of the medicine. |
| During cleaning, attention should be paid to ventilation. Chlorine gas produced by disinfectants is a health hazard. Please handle it in a ventilated place. |
Cleaning and disinfection sequence
Please clean and disinfect in the following order.
| order of use | Pharmaceutical species | use |
| 1 | Citric acid detergent (dilution ratio refer to detergent instructions) | rinse |
| 2 | Disinfectant (dilution ratio refer to disinfectant instructions ) | sterilie |
Cleaning and disinfection procedures
Daily cleaning and maintenance methods(10-15 days)
- Click the" button on the display screen after the ice maker finishes all the ice sliding. The display screen displays "off". Open the ice bucket door and remove all the ice.

text_image
OFF %
natural_image
Person cleaning a refrigerator with a cloth (no visible text or symbols)- Open the front panel, put the dissolved detergent (or disinfectant) into the water storage tank, and then close the front panel.

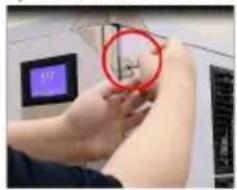
natural_image
Close-up of hands holding a small object with a red circle highlighting a feature, next to a digital display (no visible text or symbols)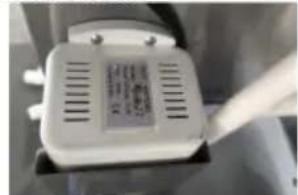
natural_image
Close-up of a white electronic device with ventilation slots and a label (no readable text or symbols)
text_image
0:06 27°C- In the "off" state, press the "("%)" . When you see that the key flashes, release it and enter the cleaning mode.
- After entering the cleaning procedure, the equipment will follow the instructions: (1) Water inlet →(2) cleaning for 15 minutes →(3) drainage for 1 minute →(4) Water inlet →(5) rinsing for 3 minutes →(6) drainage → Repeat steps (4) to (6) for 5 times → End. After completing the above steps, the cleaning procedure is over.
Note: Detergent (or disinfectant) should be adjusted according to its own use instructions.
After entering the cleaning program, it will run automatically without operation. Do not add disinfectant and cleaning agent to the sink at the same time.
Note: If cleaning and disinfecting steps are performed at the same time, please follow the above steps twice.
Deep cleaning and maintenance methods(2 months)

natural_image
Close-up of hands performing a medical procedure with a red circle highlighting a small anatomical feature (no text or symbols visible)
natural_image
Close-up of a white electronic device with ventilation grilles and a hand pointing to it (no visible text or symbols)
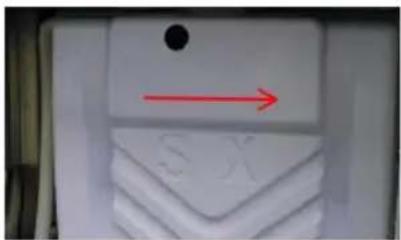
natural_image
Close-up of a hand pressing down on a purple surface with a red arrow pointing to the left side (no text or symbols visible)
natural_image
Close-up of a white cylindrical object with a red circle highlighting a small feature, possibly a component or fixture (no visible text or symbols)
natural_image
Close-up of a hand pointing at a grid of small objects, possibly electronic components or tools, with no visible text or symbols.Step 1: Turn off the switch and unplug the power cord.
Step 2: Use a cross driver to remove the two screws on the right panel of the ice maker.
Step 3: Open the front panel.
Note: The opening Angle of the door panel should not exceed 180^ .
Step 4: Remove the plug under the water storage tank and drain the water from the water storage tank.
Step 5: Remove evaporator cover.(Pry open the evaporator cover slightly to the right.)
Step 6: Remove water pipe retaining cover and water pipe

natural_image
Close-up of a small mechanical component with a red circle highlighting a small feature, no visible text or symbols.
natural_image
Close-up of a hand holding a white cylindrical object with a red arrow pointing to it, next to a ruler (no visible text or symbols)
natural_image
Close-up of a hand holding a small object with a red arrow pointing to it, next to a white surface (no visible text or symbols)
text_image
Close-up of a white electronic device with visible label and control buttons, likely a sensor or terminal component.
natural_image
Close-up of a hand resting on a blue surface (no text or symbols visible)
natural_image
Close-up of a hand holding a rolled paper or dough with a red arrow indicating a finger movement (no text or symbols visible)
natural_image
Close-up of a beige cylindrical object with a red circle highlighting a small green object, no visible text or symbols.

natural_image
Close-up of a white object with a red circle highlighting a small feature, possibly part of a device or tool (no visible text or symbols)Step 7: Remove the screw top of the water pipe and take out the inner and outer water pipes.
Step 8: Use a small brush to clean the inside and outside walls of the pipe.
Step 9: Use a small brush to clean the inside and outside of the evaporator cover.
Step 10: Remove the screws that secure the water pump, and remove the pump water pipe.
Step 11: Remove the two screws from the water level sensor.
Step 12: Use a small brush to clean the bottom of the pump.
Step 13: Use a small brush to clean under the water level sensor.
Step 14: Use a clean, soft cloth to clean the inside surface of the ice maker, the surface of the evaporator, the surface of the sink, and the inside of the ice bucket.
install
Step 1: Install the water pipe and tighten the screws at both ends of the water pipe (note: that the direction of the water outlet hole of the inner water pipe is opposite to that of the outer water pipe).
Step 3: Install water pipe retaining cover, water pump, water level sensor.
Step 4: Close the front pane, Tighten the two side screws.
natural_image
Close-up of a white plastic object with a red arrow pointing right, no visible text or symbols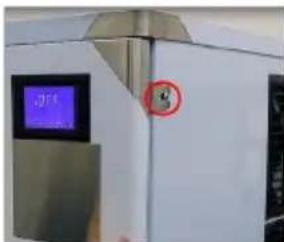
text_image
J11 8Note: After the ice machine is cleaned, the pre-made 5 sheets of ice should not be eaten. Cleaning and maintenance cycle please adjust according to the local water quality, recommended Daily cleaning and maintenance methods(10-15 days), Deep cleaning and maintenance methods(2 months), if there is serious scale, please first follow the deep maintenance cleaning, and check the filter condition.
TROUBLE SHOOTING
| LED Panel | LCD Panel | Possible Cause | Solution |
| E01 |  Ice flip Ice flip | 1. De-icing plate is missing or misplaced;2. The polarity of the magnetic induction element is reversed;3. Abnormal ice full switch; | 1. Reset the ice removal plate;2. Replace the ice removal plate/full ice sensor;3. Contact after-sales service/visual trouble guidance/confirm the fault point; |
| E03 |  Harvest overtime Harvest overtime | 1. The ice cube setting is too thin;2. The water tank is insufficient;3. The ambient temperature is too low;4. De-icing solenoid valve failure; | 1. Check and set the water thickness parameters(Recommended gears 0-2)2. Check the water inlet system, or if the water sufficient;3. Use membrane materials to block the ventilation inlet area proportionally;4. Check if the ice is stuck;5. Check if the machine is placed horizontally;6. Contact after-sales/video guidance/confirm the point of failure; |
| E04 |  High Temp. High Temp. | 1. The ambient temperature is too high;2. The cooling effect of the condensing system is poor;3. The cooling fan is damaged; | 1. Improve environmental ventilation or displacement, or turn on air conditioning;2. Clean the condenser;3. The distance between the machine and the obstruction should be at least 30cm;4. Check if the fan is working;5. Contact after-sales/confirm the point of failure; |
| E05 |  Water Pressure Water Pressure | 1. No water supply;2. The water supply pressure is too low;3. Water tank leaks;4. The water level sensor fails;5. Malfunction of the inlet valve; | 1. Check the water source or whether the water filter is blocked;2. Check the water supply pressure or whether the water filter is blocked;3. Check whether the bottle cap at the bottom of the water tank is tightened and sealed;4. Check for scale on the water level switch;5. Contact after-sales/video guidance/confirm the point of failure; |
| E06 | [YBTX]High Pressure | 1. The condenser temperature is too high;2. The refrigeration system is blocked;3. Pressure switch failure;4. The main control board is abnormal; | 1. Improve environmental ventilation or displacement, or turn on air conditioning;2. Check the condensation heat dissipation system;3. Contact after-sales/video guidance/confirm the point of failure; |
| E11 |  | 1. The ring temperature is too high;2. Poor dissipation effect of the condensing system;3. Leakage of refrigeration system; | 1. Check if the water pump is started and running2. Clean the condenser;3. The distance between the machine and the obstruction should be at least 30cm;4. Contact after-sales/video guidance/confirm the point of failure; |
TECHNICAL PARAMETER AND WIRING DIAGRAM
A. Technology parameters are on the nameplate.
B·The electrical schematic diagram is on the inner side of the board.
VEVOR®
TOUGH TOOLS, HALF PRICE
Technical Support and E-Warranty Certificate www.vevor.com/support
VEVOR®
TOUGH TOOLS, HALF PRICE
MODELE: SKF300BLS/SKF-500BLS
MODELE: SKF300BLS/SKF-500BLS
natural_image
Line drawing of a three-tier industrial ice cream machine with cooling unit and vented door (no text or symbols)POTRZEBUJESZ POMOCY? SKONTAKTUJ SIĘ Z NAMI!
natural_image
Line drawing of a mechanical device with a housing and lever mechanism (no text or symbols)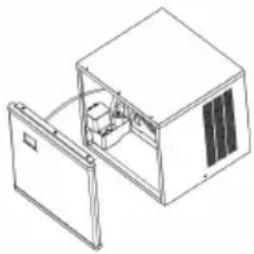
natural_image
Isometric line drawing of a mechanical device with a housing and internal components (no text or symbols)czyszczenia:
text_image
Exploded view diagram of an electronic device with numbered components for identificationICE MACHINE ACCESSORIES
ICE STORAGE BUCKET ACCESSORIES
natural_image
Line drawing of a refrigerator with a downward arrow indicating compression or cooling (no text or symbols present)
text_image
Diagram showing a faucet with a dial indicator and a beaker with a dropper, illustrating water level measurement or inspection.natural_image
Simple line drawing of a cube with a curved line extending from its top, no text or symbols present.POWER SUPPLY
text_image
Drinking tap water Socket with ground wire filter Water inlet direction Power Cord Inlet pipe Drain pipetext_image
Warning symbol image with exclamation mark inside trianglenatural_image
Diagram of a mechanical or electrical component with directional arrows indicating rotation or force (no text or symbols)SERVICE INSTRUCTION
LCD FULL PAGE DISPLAY
text_image
Comp. Hot Pump Water Fan Drain Pressure Ice flip Ice TH Ice TH High pressure Water pressure High temp. Water shortage Ice flip Harvest overtime Freeze overtime Condenser sensor Evaporator sensorDAILY CLEANING AND MAINTENANCE
Clean
| Warning |
| Before cleaning or maintaining the ice maker, unplug the ice maker from the power supply network.. |
| It is strictly prohibited to flush the ice maker directly with water sprayer. |
| Attention |
| When using neutral or sodium hypochlorite solutions, be sure to read and understand the accompanying instructions to avoid potential health problems. |
[a]ice maker and refrigerator housing
Wipe the ice maker's shell with a clean, soft cloth at least once a week, and wipe grease and dirt with a damp cloth containing a neutral cleaner.
| ⚠ Attention |
| Do not use a hard brush, wire brush, do not use detergent powder, gasoline, banana water, acetone and other organic solutions, do not use boiling water or containing strong acids, alkali cleaning agents to clean the ice machine. |
| Please do not wash directly with water when cleaning, so as not to affect the insulation of electrical appliances. |
[b]Ice machine cleaning and disinfection (recommended more than 2 times per month)
Note: Some areas may need to be cleaned and disinfected more frequently due to different water quality.
| Attention |
| Before cleaning, at the end of the ice machine cycle, all the ice cubes slide behind, shut down, open the front panel, and remove all the ice cubes in the ice machine and ice storage bucket.。 |
| Do not use tools to peel the ice from the ice mold, otherwise it may cause damage to the ice mold. |
| Do not use any liquid containing alcohol to clean or disinfect the ice machine, or it may cause cracks in the plastic parts. |
| Attention | |
| During the cleaning and disinfection process, please pay attention to protection, wear goggles and gloves, if the cleaning agent or disinfectant on the skin or eyes may cause inflammation. In case of accidental contamination, please follow the precautions of the medicine. | |
| During cleaning, attention should be paid to ventilation. Chlorine gas produced by disinfectants is a health hazard. Please handle it in a ventilated place. | |
Cleaning and disinfection sequence
Please clean and disinfect in the following order.
| order of use | Pharmaceutical species | use |
| 1 | Citric acid detergent (dilution ratio refer to detergent instructions) | rinse |
| 2 | Disinfectant (dilution ratio refer to disinfectant instructions ) | sterilie |
Cleaning and disinfection procedures
Daily cleaning and maintenance methods(10-15 days)
- Click the" button on the display screen after the ice maker finishes all the ice sliding. The display screen displays "off". Open the ice bucket door and remove all the ice.

text_image
OFF %
natural_image
Person cleaning a refrigerator with a cloth (no visible text or symbols)- Open the front panel, put the dissolved detergent (or disinfectant) into the water storage tank, and then close the front panel.
natural_image
Close-up of hands holding a small object with a red circle highlighting a feature, next to a digital display (no visible text or symbols)
natural_image
Close-up of a white electronic device with ventilation slots and a label (no readable text or symbols)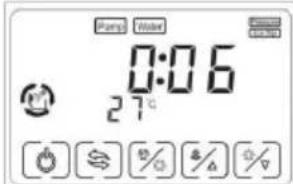
text_image
0:06 27°C- In the "off" state, press the "("%)" . When you see that the key flashes, release it and enter the cleaning mode.
- After entering the cleaning procedure, the equipment will follow the instructions: (1) Water inlet →(2) cleaning for 15 minutes →(3) drainage for 1 minute →(4) Water inlet →(5) rinsing for 3 minutes →(6) drainage → Repeat steps (4) to (6) for 5 times → End. After completing the above steps, the cleaning procedure is over.
Note: Detergent (or disinfectant) should be adjusted according to its own use instructions.
After entering the cleaning program, it will run automatically without operation. Do not add disinfectant and cleaning agent to the sink at the same time.
Note: If cleaning and disinfecting steps are performed at the same time, please follow the above steps twice.
Deep cleaning and maintenance methods(2 months)

natural_image
Close-up of hands performing a medical procedure with a red circle highlighting a small anatomical feature (no text or symbols visible)
natural_image
Close-up of a white electronic device with ventilation grilles and a hand pointing to it (no visible text or symbols)
natural_image
Close-up of a hand pressing down on a purple surface with a red arrow pointing to the left side (no text or symbols visible)
natural_image
Close-up of a white cylindrical object with a red circle highlighting a small feature, possibly a component or fixture (no visible text or symbols)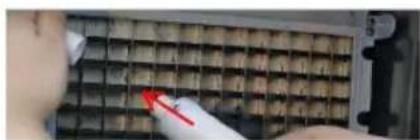
natural_image
Close-up of a hand pointing at a grid of small objects, possibly electronic components or tools, with no visible text or symbols.Step 1: Turn off the switch and unplug the power cord.
Step 2: Use a cross driver to remove the two screws on the right panel of the ice maker.
Step 3: Open the front panel.
Note: The opening Angle of the door panel should not exceed 180^ .
Step 4: Remove the plug under the water storage tank and drain the water from the water storage tank.
Step 5: Remove evaporator cover.(Pry open the evaporator cover slightly to the right.)
Step 6: Remove water pipe retaining cover and water pipe

natural_image
Close-up of a small mechanical component with a red circle highlighting a small feature, no visible text or symbols.
natural_image
Close-up of a hand holding a white cylindrical object with a red arrow pointing to it, next to a ruler (no visible text or symbols)
natural_image
Close-up of a hand holding a small object with a red arrow pointing to it, next to a white surface (no visible text or symbols)
text_image
Close-up of a white electronic device with visible label and control buttons, likely a sensor or terminal component.
natural_image
Close-up of a hand resting on a blue surface (no text or symbols visible)
natural_image
Close-up of a hand holding a rolled paper or dough with a red arrow indicating a finger movement (no text or symbols visible)
natural_image
Close-up of a beige cylindrical object with a red circle highlighting a small green object, no visible text or symbols.

natural_image
Close-up of a white object with a red circle highlighting a small feature, possibly part of a device or tool (no visible text or symbols)Step 7: Remove the screw top of the water pipe and take out the inner and outer water pipes.
Step 8: Use a small brush to clean the inside and outside walls of the pipe.
Step 9: Use a small brush to clean the inside and outside of the evaporator cover.
Step 10: Remove the screws that secure the water pump, and remove the pump water pipe.
Step 11: Remove the two screws from the water level sensor.
Step 12: Use a small brush to clean the bottom of the pump.
Step 13: Use a small brush to clean under the water level sensor.
Step 14: Use a clean, soft cloth to clean the inside surface of the ice maker, the surface of the evaporator, the surface of the sink, and the inside of the ice bucket.
install
Step 1: Install the water pipe and tighten the screws at both ends of the water pipe (note: that the direction of the water outlet hole of the inner water pipe is opposite to that of the outer water pipe).
Step 3: Install water pipe retaining cover, water pump, water level sensor.
Step 4: Close the front pane, Tighten the two side screws.

natural_image
Close-up of a white plastic object with a red arrow pointing right, no visible text or symbols
text_image
J11 8Note: After the ice machine is cleaned, the pre-made 5 sheets of ice should not be eaten. Cleaning and maintenance cycle please adjust according to the local water quality, recommended Daily cleaning and maintenance methods(10-15 days), Deep cleaning and maintenance methods(2 months), if there is serious scale, please first follow the deep maintenance cleaning, and check the filter condition.
TROUBLE SHOOTING
| LED Panel | LCD Panel | Possible Cause | Solution |
| E01 | Ice flip | 1. De-icing plate is missing or misplaced;2. The polarity of the magnetic induction element is reversed;3. Abnormal ice full switch; | 1. Reset the ice removal plate;2. Replace the ice removal plate/full ice sensor;3. Contact after-sales service/visual trouble guidance/confirm the fault point; |
| E03 | [2T25]Harvest overtime | 1. The ice cube setting is too thin;2. The water tank is insufficient;3. The ambient temperature is too low;4. De-icing solenoid valve failure; | 1. Check and set the water thickness parameters(Recommended gears 0-2)2. Check the water inlet system, or if the water sufficient;3. Use membrane materials to block the ventilation inlet area proportionally;4. Check if the ice is stuck;5. Check if the machine is placed horizontally;6. Contact after-sales/video guidance/confirm the point of failure; |
| E04 | High Temp. | 1. The ambient temperature is too high;2. The cooling effect of the condensing system is poor;3. The cooling fan is damaged; | 1. Improve environmental ventilation or displacement, or turn on air conditioning;2. Clean the condenser;3. The distance between the machine and the obstruction should be at least 30cm;4. Check if the fan is working;5. Contact after-sales/confirm the point of failure; |
| E05 | Water Pressure | 1. No water supply;2. The water supply pressure is too low;3. Water tank leaks;4. The water level sensor fails;5. Malfunction of the inlet valve; | 1. Check the water source or whether the water filter is blocked;2. Check the water supply pressure or whether the water filter is blocked;3. Check whether the bottle cap at the bottom of the water tank is tightened and sealed;4. Check for scale on the water level switch;5. Contact after-sales/video guidance/confirm the point of failure; |
| E06 | [0CCK]High Pressure | 1. The condenser temperature is too high;2. The refrigeration system is blocked;3. Pressure switch failure;4. The main control board is abnormal; | 1. Improve environmental ventilation or displacement, or turn on air conditioning;2. Check the condensation heat dissipation system;3. Contact after-sales/video guidance/confirm the point of failure; |
| E11 | | 1. The ring temperature is too high;2. Poor dissipation effect of the condensing system;3. Leakage of refrigeration system; | 1. Check if the water pump is started and running2. Clean the condenser;3. The distance between the machine and the obstruction should be at least 30cm;4. Contact after-sales/video guidance/confirm the point of failure; |
TECHNICAL PARAMETER AND WIRING DIAGRAM
natural_image
Line drawing of a three-tier industrial refrigerator with cooling unit and vented door (no text or symbols)natural_image
Line drawing of a small industrial or laboratory device with a lid and internal components (no text or symbols)
natural_image
Line drawing of a mechanical device with a housing and internal components (no text or symbols)text_image
Exploded view diagram of an electronic device with numbered components for identificationICE MACHINE ACCESSORIES
ICE STORAGE BUCKET ACCESSORIES
natural_image
Line drawing of a refrigerator with an open lid and cooling unit, showing internal components and a downward arrow indicating motion (no text or symbols)
text_image
Diagram showing a faucet with a water level test tube and a magnified view of the water level measurement.natural_image
Simple line drawing of a cube with a curved line and a circular base, no text or symbols present.POWER SUPPLY
text_image
Drinking tap water Socket with ground wire filter Water inlet direction Power Cord Inlet pipe Drain pipetext_image
Warning symbol image with exclamation mark inside trianglenatural_image
Diagram of a mechanical component with rotational arrows indicating motion (no text or symbols)SERVICE INSTRUCTION
1. Betriebsablauf
LCD FULL PAGE DISPLAY

text_image
Comp. Hot Pump Water Fan Drain Pressure Ice flip Ice TH Ice TH High pressure Water pressure High temp. Water shortage Ice flip Harvest overtime Freeze overtime Condenser sensor Evaporator sensorDAILY CLEANING AND MAINTENANCE
Clean
| Warning |
| Before cleaning or maintaining the ice maker, unplug the ice maker from the power supply network.. |
| It is strictly prohibited to flush the ice maker directly with water sprayer. |
| Attention |
| When using neutral or sodium hypochlorite solutions, be sure to read and understand the accompanying instructions to avoid potential health problems. |
[a]ice maker and refrigerator housing
Wipe the ice maker's shell with a clean, soft cloth at least once a week, and wipe grease and dirt with a damp cloth containing a neutral cleaner.
| ⚠ Attention |
| Do not use a hard brush, wire brush, do not use detergent powder, gasoline, banana water, acetone and other organic solutions, do not use boiling water or containing strong acids, alkali cleaning agents to clean the ice machine. |
| Please do not wash directly with water when cleaning, so as not to affect the insulation of electrical appliances. |
[b]Ice machine cleaning and disinfection (recommended more than 2 times per month)
Note: Some areas may need to be cleaned and disinfected more frequently due to different water quality.
| Attention |
| Before cleaning, at the end of the ice machine cycle, all the ice cubes slide behind, shut down, open the front panel, and remove all the ice cubes in the ice machine and ice storage bucket.。 |
| Do not use tools to peel the ice from the ice mold, otherwise it may cause damage to the ice mold. |
| Do not use any liquid containing alcohol to clean or disinfect the ice machine, or it may cause cracks in the plastic parts. |
| Attention | |
| During the cleaning and disinfection process, please pay attention to protection, wear goggles and gloves, if the cleaning agent or disinfectant on the skin or eyes may cause inflammation. In case of accidental contamination, please follow the precautions of the medicine. | |
| During cleaning, attention should be paid to ventilation. Chlorine gas produced by disinfectants is a health hazard. Please handle it in a ventilated place. | |
Cleaning and disinfection sequence
Please clean and disinfect in the following order.
| order of use | Pharmaceutical species | use |
| 1 | Citric acid detergent (dilution ratio refer to detergent instructions) | rinse |
| 2 | Disinfectant (dilution ratio refer to disinfectant instructions ) | sterilie |
Cleaning and disinfection procedures
Daily cleaning and maintenance methods(10-15 days)
- Click the"button on the display screen after the ice maker finishes all the ice sliding. The display screen displays "off". Open the ice bucket door and remove all the ice.

text_image
OFF %
natural_image
Person cleaning a refrigerator with a cloth (no visible text or symbols)- Open the front panel, put the dissolved detergent (or disinfectant) into the water storage tank, and then close the front panel.

natural_image
Close-up of hands holding a small object with a red circle highlighting a feature, next to a digital display (no readable text)
natural_image
Close-up of a white electronic device with ventilation slots and a label (no readable text or symbols)
text_image
0:06 27°C- In the "off" state, press the "("%)" . When you see that the key flashes, release it and enter the cleaning mode.
- After entering the cleaning procedure, the equipment will follow the instructions: (1) Water inlet →(2) cleaning for 15 minutes →(3) drainage for 1 minute →(4) Water inlet →(5) rinsing for 3 minutes →(6) drainage → Repeat steps (4) to (6) for 5 times → End. After completing the above steps, the cleaning procedure is over.
Note: Detergent (or disinfectant) should be adjusted according to its own use instructions.
After entering the cleaning program, it will run automatically without operation. Do not add disinfectant and cleaning agent to the sink at the same time.
Note: If cleaning and disinfecting steps are performed at the same time, please follow the above steps twice.
Deep cleaning and maintenance methods(2 months)

natural_image
Close-up of hands performing a medical procedure with a red circle highlighting a small anatomical feature (no text or symbols visible)
natural_image
Close-up of a white electronic device with ventilation grilles and a hand pointing to it (no visible text or symbols)
natural_image
Close-up of a hand pressing down on a purple surface with a red arrow pointing to the left side (no text or symbols visible)
natural_image
Close-up of a white cylindrical object with a red circle highlighting a small feature, possibly a component or fixture (no visible text or symbols)
natural_image
Close-up of a hand pointing at a grid of small objects, possibly electronic components or tools, with no visible text or symbols.Step 1: Turn off the switch and unplug the power cord.
Step 2: Use a cross driver to remove the two screws on the right panel of the ice maker.
Step 3: Open the front panel.
Note: The opening Angle of the door panel should not exceed 180^ .
Step 4: Remove the plug under the water storage tank and drain the water from the water storage tank.
Step 5: Remove evaporator cover.(Pry open the evaporator cover slightly to the right.)
Step 6: Remove water pipe retaining cover and water pipe

natural_image
Close-up of a small mechanical component with a red circle highlighting a small feature, no visible text or symbols.
natural_image
Close-up of a hand holding a white cylindrical object with a red arrow pointing to it, next to a ruler (no visible text or symbols)
natural_image
Close-up of a hand holding a small object with a red arrow pointing to it, next to a white surface (no visible text or symbols)
text_image
Close-up of a white electronic device with visible label and control panel, likely a sensor or terminal block.
natural_image
Close-up of a hand resting on a blue surface (no text or symbols visible)
natural_image
Close-up of a hand holding a rolled paper or dough with a red arrow indicating a finger movement (no text or symbols visible)
natural_image
Close-up of a beige cylindrical object with a red circle highlighting a small green object, no visible text or symbols.

natural_image
Close-up of a white object with a red circle highlighting a small feature, possibly part of a device or tool (no visible text or symbols)Step 7: Remove the screw top of the water pipe and take out the inner and outer water pipes.
Step 8: Use a small brush to clean the inside and outside walls of the pipe.
Step 9: Use a small brush to clean the inside and outside of the evaporator cover.
Step 10: Remove the screws that secure the water pump, and remove the pump water pipe.
Step 11: Remove the two screws from the water level sensor.
Step 12: Use a small brush to clean the bottom of the pump.
Step 13: Use a small brush to clean under the water level sensor.
Step 14: Use a clean, soft cloth to clean the inside surface of the ice maker, the surface of the evaporator, the surface of the sink, and the inside of the ice bucket.
install
Step 1: Install the water pipe and tighten the screws at both ends of the water pipe (note: that the direction of the water outlet hole of the inner water pipe is opposite to that of the outer water pipe).
Step 3: Install water pipe retaining cover, water pump, water level sensor.
Step 4: Close the front pane, Tighten the two side screws.

natural_image
Close-up of a white plastic object with a red arrow pointing right, no visible text or symbols
text_image
J11 8Note: After the ice machine is cleaned, the pre-made 5 sheets of ice should not be eaten. Cleaning and maintenance cycle please adjust according to the local water quality, recommended Daily cleaning and maintenance methods(10-15 days), Deep cleaning and maintenance methods(2 months), if there is serious scale, please first follow the deep maintenance cleaning, and check the filter condition.
TROUBLE SHOOTING
| LED Panel | LCD Panel | Possible Cause | Solution |
| E01 | Ice flip | 1. De-icing plate is missing or misplaced;2. The polarity of the magnetic induction element is reversed;3. Abnormal ice full switch; | 1. Reset the ice removal plate;2. Replace the ice removal plate/full ice sensor;3. Contact after-sales service/visual trouble guidance/confirm the fault point; |
| E03 | [2HYC]Harvest overtime | 1. The ice cube setting is too thin;2. The water tank is insufficient;3. The ambient temperature is too low;4. De-icing solenoid valve failure; | 1. Check and set the water thickness parameters(Recommended gears 0-2)2. Check the water inlet system, or if the water sufficient;3. Use membrane materials to block the ventilation inlet area proportionally;4. Check if the ice is stuck;5. Check if the machine is placed horizontally;6. Contact after-sales/video guidance/confirm the point of failure; |
| E04 | High Temp. | 1. The ambient temperature is too high;2. The cooling effect of the condensing system is poor;3. The cooling fan is damaged; | 1. Improve environmental ventilation or displacement, or turn on air conditioning;2. Clean the condenser;3. The distance between the machine and the obstruction should be at least 30cm;4. Check if the fan is working;5. Contact after-sales/confirm the point of failure; |
| E05 | Water Pressure | 1. No water supply;2. The water supply pressure is too low;3. Water tank leaks;4. The water level sensor fails;5. Malfunction of the inlet valve; | 1. Check the water source or whether the water filter is blocked;2. Check the water supply pressure or whether the water filter is blocked;3. Check whether the bottle cap at the bottom of the water tank is tightened and sealed;4. Check for scale on the water level switch;5. Contact after-sales/video guidance/confirm the point of failure; |
| E06 |  High Pressure High Pressure | 1. The condenser temperature is too high;2. The refrigeration system is blocked;3. Pressure switch failure;4. The main control board is abnormal; | 1. Improve environmental ventilation or displacement, or turn on air conditioning;2. Check the condensation heat dissipation system;3. Contact after-sales/video guidance/confirm the point of failure; |
| E11 | | 1. The ring temperature is too high;2. Poor dissipation effect of the condensing system;3. Leakage of refrigeration system; | 1. Check if the water pump is started and running2. Clean the condenser;3. The distance between the machine and the obstruction should be at least 30cm;4. Contact after-sales/video guidance/confirm the point of failure; |
TECHNICAL PARAMETER AND WIRING DIAGRAM
natural_image
Line drawing of a three-tier industrial refrigerator with cooling unit and vented door (no text or symbols)BESOIN D'AIDE ? CONTACTEZ-NOUS !
natural_image
Line drawing of a simple 3D box with internal components and a diagonal extension (no text or symbols)
natural_image
Isometric line drawing of a mechanical device with a door and internal components (no text or symbols)text_image
Exploded view diagram of a device with numbered components for identificationICE MACHINE ACCESSORIES

text_image
1 2 3 4 5 VEVOR (100%) (100%) (100%) (100%) (100%) (100%) (100%) (100%) (100%) (100%)natural_image
Line drawing of a refrigerator with a downward arrow indicating compression or cooling (no text or symbols present)
text_image
Diagram showing a faucet with a water level test tube and a magnified view of the water level measurement.natural_image
Simple line drawing of a cube with a curved line extending from its base, no text or symbols present.POWER SUPPLY
text_image
Drinking tap water Socket with ground wire filter Water inlet direction Power Cord Inlet pipe Drain pipetext_image
Warning symbol image with exclamation mark inside a trianglenatural_image
Diagram of a mechanical or electrical component with directional arrows indicating rotation or force (no text or symbols)SERVICE INSTRUCTION
LCD FULL PAGE DISPLAY

text_image
Comp. Hot Pump Water Fan Drain Pressure Ice flip Ice TH Ice TH High pressure Water pressure High temp. Water shortage Ice flip Harvest overtime Freeze overtime Condenser sensor Evaporator sensorDAILY CLEANING AND MAINTENANCE
Clean
| Warning |
| Before cleaning or maintaining the ice maker, unplug the ice maker from the power supply network.. |
| It is strictly prohibited to flush the ice maker directly with water sprayer. |
| Attention |
| When using neutral or sodium hypochlorite solutions, be sure to read and understand the accompanying instructions to avoid potential health problems. |
[a]ice maker and refrigerator housing
Wipe the ice maker's shell with a clean, soft cloth at least once a week, and wipe grease and dirt with a damp cloth containing a neutral cleaner.
| ⚠ Attention |
| Do not use a hard brush, wire brush, do not use detergent powder, gasoline, banana water, acetone and other organic solutions, do not use boiling water or containing strong acids, alkali cleaning agents to clean the ice machine. |
| Please do not wash directly with water when cleaning, so as not to affect the insulation of electrical appliances. |
[b]Ice machine cleaning and disinfection (recommended more than 2 times per month)
Note: Some areas may need to be cleaned and disinfected more frequently due to different water quality.
| Attention |
| Before cleaning, at the end of the ice machine cycle, all the ice cubes slide behind, shut down, open the front panel, and remove all the ice cubes in the ice machine and ice storage bucket.。 |
| Do not use tools to peel the ice from the ice mold, otherwise it may cause damage to the ice mold. |
| Do not use any liquid containing alcohol to clean or disinfect the ice machine, or it may cause cracks in the plastic parts. |
| Attention | |
| During the cleaning and disinfection process, please pay attention to protection, wear goggles and gloves, if the cleaning agent or disinfectant on the skin or eyes may cause inflammation. In case of accidental contamination, please follow the precautions of the medicine. | |
| During cleaning, attention should be paid to ventilation. Chlorine gas produced by disinfectants is a health hazard. Please handle it in a ventilated place. | |
Cleaning and disinfection sequence
Please clean and disinfect in the following order.
| order of use | Pharmaceutical species | use |
| 1 | Citric acid detergent (dilution ratio refer to detergent instructions) | rinse |
| 2 | Disinfectant (dilution ratio refer to disinfectant instructions ) | sterilie |
Cleaning and disinfection procedures
Daily cleaning and maintenance methods(10-15 days)
- Click the "☐" button on the display screen after the ice maker finishes all the ice sliding. The display screen displays "off". Open the ice bucket door and remove all the ice.

text_image
OFF %
natural_image
Person cleaning a refrigerator with a cloth (no visible text or symbols)- Open the front panel, put the dissolved detergent (or disinfectant) into the water storage tank, and then close the front panel.

natural_image
Close-up of hands holding a small object with a red circle highlighting a feature, next to a digital display (no visible text or symbols)
natural_image
Close-up of a white electronic device with ventilation slots and a label (no readable text or symbols)
text_image
0:06 27°C- In the "off" state, press the "[%]" . When you see that the key flashes, release it and enter the cleaning mode.
- After entering the cleaning procedure, the equipment will follow the instructions: (1) Water inlet →(2) cleaning for 15 minutes →(3) drainage for 1 minute →(4) Water inlet →(5) rinsing for 3 minutes →(6) drainage → Repeat steps (4) to (6) for 5 times → End. After completing the above steps, the cleaning procedure is over.
Note: Detergent (or disinfectant) should be adjusted according to its own use instructions.
After entering the cleaning program, it will run automatically without operation. Do not add disinfectant and cleaning agent to the sink at the same time.
Note: If cleaning and disinfecting steps are performed at the same time, please follow the above steps twice.
Deep cleaning and maintenance methods(2 months)

natural_image
Close-up of hands performing a medical procedure with a red circle highlighting a small anatomical feature (no text or symbols visible)
natural_image
Close-up of a white electronic device with ventilation grilles and a hand pointing to it (no visible text or symbols)
natural_image
Close-up of a hand pressing down on a purple surface with a red arrow pointing to the left side (no text or symbols visible)
natural_image
Close-up of a white cylindrical object with a red circle highlighting a small feature, possibly a component or fixture (no visible text or symbols)
natural_image
Close-up of a hand pointing at a grid of small objects, possibly electronic components or tools, with no visible text or symbols.Step 1: Turn off the switch and unplug the power cord.
Step 2: Use a cross driver to remove the two screws on the right panel of the ice maker.
Step 3: Open the front panel.
Note: The opening Angle of the door panel should not exceed 180^ .
Step 4: Remove the plug under the water storage tank and drain the water from the water storage tank.
Step 5: Remove evaporator cover.(Pry open the evaporator cover slightly to the right.)
Step 6: Remove water pipe retaining cover and water pipe

natural_image
Close-up of a small mechanical component with a red circle highlighting a small feature, no visible text or symbols.
natural_image
Close-up of a hand holding a white cylindrical object with a red arrow pointing to it, next to a ruler (no visible text or symbols)
natural_image
Close-up of a hand holding a small object with a red arrow pointing to it, next to a white surface (no visible text or symbols)
text_image
Close-up of a white electronic device with visible label and control panel, likely a sensor or terminal component.
natural_image
Close-up of a hand resting on a blue surface (no text or symbols visible)
natural_image
Close-up of a hand holding a rolled paper or dough with a red arrow indicating a finger movement (no text or symbols visible)
natural_image
Close-up of a beige cylindrical object with a red circle highlighting a small green object, no visible text or symbols.

natural_image
Close-up of a white object with a red circle highlighting a small feature, possibly part of a device or tool (no visible text or symbols)Step 7: Remove the screw top of the water pipe and take out the inner and outer water pipes.
Step 8: Use a small brush to clean the inside and outside walls of the pipe.
Step 9: Use a small brush to clean the inside and outside of the evaporator cover.
Step 10: Remove the screws that secure the water pump, and remove the pump water pipe.
Step 11: Remove the two screws from the water level sensor.
Step 12: Use a small brush to clean the bottom of the pump.
Step 13: Use a small brush to clean under the water level sensor.
Step 14: Use a clean, soft cloth to clean the inside surface of the ice maker, the surface of the evaporator, the surface of the sink, and the inside of the ice bucket.
install
Step 1: Install the water pipe and tighten the screws at both ends of the water pipe (note: that the direction of the water outlet hole of the inner water pipe is opposite to that of the outer water pipe).
Step 3: Install water pipe retaining cover, water pump, water level sensor.
Step 4: Close the front pane, Tighten the two side screws.

natural_image
Close-up of a white plastic object with a red arrow pointing right, no visible text or symbols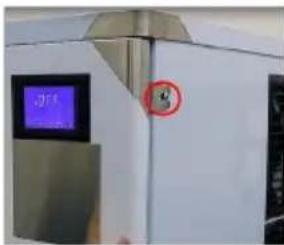
text_image
J11 8Note: After the ice machine is cleaned, the pre-made 5 sheets of ice should not be eaten. Cleaning and maintenance cycle please adjust according to the local water quality, recommended Daily cleaning and maintenance methods(10-15 days), Deep cleaning and maintenance methods(2 months), if there is serious scale, please first follow the deep maintenance cleaning, and check the filter condition.
TROUBLE SHOOTING
| LED Panel | LCD Panel | Possible Cause | Solution |
| E01 | Ice flip | 1. De-icing plate is missing or misplaced;2. The polarity of the magnetic induction element is reversed;3. Abnormal ice full switch; | 1. Reset the ice removal plate;2. Replace the ice removal plate/full ice sensor;3. Contact after-sales service/visual trouble guidance/confirm the fault point; |
| E03 | [T47S]Harvest overtime | 1. The ice cube setting is too thin;2. The water tank is insufficient;3. The ambient temperature is too low;4. De-icing solenoid valve failure; | 1. Check and set the water thickness parameters(Recommended gears 0-2)2. Check the water inlet system, or if the water sufficient;3. Use membrane materials to block the ventilation inlet area proportionally;4. Check if the ice is stuck;5. Check if the machine is placed horizontally;6. Contact after-sales/video guidance/confirm the point of failure; |
| E04 | -High Temp. | 1. The ambient temperature is too high;2. The cooling effect of the condensing system is poor;3. The cooling fan is damaged; | 1. Improve environmental ventilation or displacement, or turn on air conditioning;2. Clean the condenser;3. The distance between the machine and the obstruction should be at least 30cm;4. Check if the fan is working;5. Contact after-sales/confirm the point of failure; |
| E05 | [W20K]Water Pressure | 1. No water supply;2. The water supply pressure is too low;3. Water tank leaks;4. The water level sensor fails;5. Malfunction of the inlet valve; | 1. Check the water source or whether the water filter is blocked;2. Check the water supply pressure or whether the water filter is blocked;3. Check whether the bottle cap at the bottom of the water tank is tightened and sealed;4. Check for scale on the water level switch;5. Contact after-sales/video guidance/confirm the point of failure; |
| E06 | [247Z]-High Pressure | 1. The condenser temperature is too high;2. The refrigeration system is blocked;3. Pressure switch failure;4. The main control board is abnormal; | 1. Improve environmental ventilation or displacement, or turn on air conditioning;2. Check the condensation heat dissipation system;3. Contact after-sales/video guidance/confirm the point of failure; |
| E11 | | 1. The ring temperature is too high;2. Poor dissipation effect of the condensing system;3. Leakage of refrigeration system; | 1. Check if the water pump is started and running2. Clean the condenser;3. The distance between the machine and the obstruction should be at least 30cm;4. Contact after-sales/video guidance/confirm the point of failure; |
TECHNICAL PARAMETER AND WIRING DIAGRAM
natural_image
Line drawing of a three-tier industrial ice cream machine with cooling unit and vented door (no text or symbols)HULP NODIG? NEEM CONTACT MET ONS OP!
natural_image
Line drawing of a 3D printer or enclosure with a door and slotted base (no text or symbols)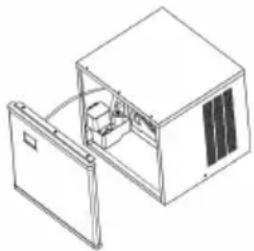
natural_image
Isometric line drawing of a mechanical device with a door and internal components (no text or symbols)text_image
Exploded view diagram of a device with numbered components for identificationICE MACHINE ACCESSORIES

text_image
1 2 3 4 5 VEVOR (100%) (100%) (100%) (100%) (100%) (100%) (100%) (100%) (100%) (100%) (100%) (100%)natural_image
Line drawing of a refrigerator with a downward arrow indicating compression or cooling (no text or symbols present)
text_image
Diagram showing a faucet with a water level test tube and a magnified view of the water level measurement.natural_image
Simple line drawing of a cube with a curved line and a circular base, no text or symbols present.POWER SUPPLY
text_image
Drinking tap water Socket with ground wire filter Water inlet direction Power Cord Inlet pipe Drain pipenatural_image
Warning symbol: black exclamation mark inside a triangle (no text or numbers)natural_image
Simple line drawing of a mechanical component with arrows indicating motion (no text or symbols)SERVICE INSTRUCTION
1. Bedieningsproces
LCD FULL PAGE DISPLAY

text_image
Comp. Hot Pump Water Fan Drain Pressure Ice flip Ice TH Ice TH High pressure Water pressure High temp. Water shortage Ice flip Harvest overtime Freeze overtime Condenser sensor Evaporator sensorDAILY CLEANING AND MAINTENANCE
Clean
| Warning |
| Before cleaning or maintaining the ice maker, unplug the ice maker from the power supply network.. |
| It is strictly prohibited to flush the ice maker directly with water sprayer. |
| Attention |
| When using neutral or sodium hypochlorite solutions, be sure to read and understand the accompanying instructions to avoid potential health problems. |
[a]ice maker and refrigerator housing
Wipe the ice maker's shell with a clean, soft cloth at least once a week, and wipe grease and dirt with a damp cloth containing a neutral cleaner.
| ⚠ Attention |
| Do not use a hard brush, wire brush, do not use detergent powder, gasoline, banana water, acetone and other organic solutions, do not use boiling water or containing strong acids, alkali cleaning agents to clean the ice machine. |
| Please do not wash directly with water when cleaning, so as not to affect the insulation of electrical appliances. |
[b]Ice machine cleaning and disinfection (recommended more than 2 times per month)
Note: Some areas may need to be cleaned and disinfected more frequently due to different water quality.
| Attention |
| Before cleaning, at the end of the ice machine cycle, all the ice cubes slide behind, shut down, open the front panel, and remove all the ice cubes in the ice machine and ice storage bucket.。 |
| Do not use tools to peel the ice from the ice mold, otherwise it may cause damage to the ice mold. |
| Do not use any liquid containing alcohol to clean or disinfect the ice machine, or it may cause cracks in the plastic parts. |
| Attention | |
| During the cleaning and disinfection process, please pay attention to protection, wear goggles and gloves, if the cleaning agent or disinfectant on the skin or eyes may cause inflammation. In case of accidental contamination, please follow the precautions of the medicine. | |
| During cleaning, attention should be paid to ventilation. Chlorine gas produced by disinfectants is a health hazard. Please handle it in a ventilated place. | |
Cleaning and disinfection sequence
Please clean and disinfect in the following order.
| order of use | Pharmaceutical species | use |
| 1 | Citric acid detergent (dilution ratio refer to detergent instructions) | rinse |
| 2 | Disinfectant (dilution ratio refer to disinfectant instructions ) | sterilie |
Cleaning and disinfection procedures
Daily cleaning and maintenance methods(10-15 days)
- Click the "☐" button on the display screen after the ice maker finishes all the ice sliding. The display screen displays "off". Open the ice bucket door and remove all the ice.

text_image
OFF %
natural_image
Person cleaning a refrigerator with a cloth (no visible text or symbols)- Open the front panel, put the dissolved detergent (or disinfectant) into the water storage tank, and then close the front panel.

natural_image
Close-up of hands holding a small object with a red circle highlighting a feature, next to a digital display (no visible text or symbols)
natural_image
Close-up of a white electronic device with ventilation slots and a label (no readable text or symbols)
text_image
0:06 27°C- In the "off" state, press the "[%]" . When you see that the key flashes, release it and enter the cleaning mode.
- After entering the cleaning procedure, the equipment will follow the instructions: (1) Water inlet →(2) cleaning for 15 minutes →(3) drainage for 1 minute →(4) Water inlet →(5) rinsing for 3 minutes →(6) drainage → Repeat steps (4) to (6) for 5 times → End. After completing the above steps, the cleaning procedure is over.
Note: Detergent (or disinfectant) should be adjusted according to its own use instructions.
After entering the cleaning program, it will run automatically without operation. Do not add disinfectant and cleaning agent to the sink at the same time.
Note: If cleaning and disinfecting steps are performed at the same time, please follow the above steps twice.
Deep cleaning and maintenance methods(2 months)

natural_image
Close-up of hands performing a medical procedure with a red circle highlighting a small anatomical feature (no text or symbols visible)
natural_image
Close-up of a white electronic device with ventilation grilles and a hand pointing to it (no visible text or symbols)
natural_image
Close-up of a hand pressing down on a purple surface with a red arrow pointing to the left side (no text or symbols visible)
natural_image
Close-up of a white cylindrical object with a red circle highlighting a small feature, possibly a component or fixture (no visible text or symbols)
natural_image
Close-up of a hand pointing at a grid of small objects, possibly electronic components or tools, with no visible text or symbols.Step 1: Turn off the switch and unplug the power cord.
Step 2: Use a cross driver to remove the two screws on the right panel of the ice maker.
Step 3: Open the front panel.
Note: The opening Angle of the door panel should not exceed 180^ .
Step 4: Remove the plug under the water storage tank and drain the water from the water storage tank.
Step 5: Remove evaporator cover.(Pry open the evaporator cover slightly to the right.)
Step 6: Remove water pipe retaining cover and water pipe

natural_image
Close-up of a small mechanical component with a red circle highlighting a small feature, no visible text or symbols.
natural_image
Close-up of a hand holding a white cylindrical object with a red arrow pointing to it, next to a ruler (no visible text or symbols)
natural_image
Close-up of a hand holding a small object with a red arrow pointing to it, next to a white surface (no visible text or symbols)
text_image
Close-up of a white electronic device with visible label and control buttons, likely a sensor or terminal component.
natural_image
Close-up of a hand resting on a blue surface (no text or symbols visible)
natural_image
Close-up of a hand holding a rolled paper or dough with a red arrow indicating a finger movement (no text or symbols visible)
natural_image
Close-up of a beige cylindrical object with a red circle highlighting a small green object, no visible text or symbols.

natural_image
Close-up of a white object with a red circle highlighting a small feature, possibly part of a device or tool (no visible text or symbols)Step 7: Remove the screw top of the water pipe and take out the inner and outer water pipes.
Step 8: Use a small brush to clean the inside and outside walls of the pipe.
Step 9: Use a small brush to clean the inside and outside of the evaporator cover.
Step 10: Remove the screws that secure the water pump, and remove the pump water pipe.
Step 11: Remove the two screws from the water level sensor.
Step 12: Use a small brush to clean the bottom of the pump.
Step 13: Use a small brush to clean under the water level sensor.
Step 14: Use a clean, soft cloth to clean the inside surface of the ice maker, the surface of the evaporator, the surface of the sink, and the inside of the ice bucket.
install
Step 1: Install the water pipe and tighten the screws at both ends of the water pipe (note: that the direction of the water outlet hole of the inner water pipe is opposite to that of the outer water pipe).
Step 3: Install water pipe retaining cover, water pump, water level sensor.
Step 4: Close the front pane, Tighten the two side screws.

natural_image
Close-up of a white plastic object with a red arrow pointing right, no visible text or symbols
text_image
J11 8Note: After the ice machine is cleaned, the pre-made 5 sheets of ice should not be eaten. Cleaning and maintenance cycle please adjust according to the local water quality, recommended Daily cleaning and maintenance methods(10-15 days), Deep cleaning and maintenance methods(2 months), if there is serious scale, please first follow the deep maintenance cleaning, and check the filter condition.
TROUBLE SHOOTING
| LED Panel | LCD Panel | Possible Cause | Solution |
| E01 | [W4KS]Ice flip | 1. De-icing plate is missing or misplaced;2. The polarity of the magnetic induction element is reversed;3. Abnormal ice full switch; | 1. Reset the ice removal plate;2. Replace the ice removal plate/full ice sensor;3. Contact after-sales service/visual trouble guidance/confirm the fault point; |
| E03 | [05TT]Harvest overtime | 1. The ice cube setting is too thin;2. The water tank is insufficient;3. The ambient temperature is too low;4. De-icing solenoid valve failure; | 1. Check and set the water thickness parameters(Recommended gears 0-2)2. Check the water inlet system, or if the water sufficient;3. Use membrane materials to block the ventilation inlet area proportionally;4. Check if the ice is stuck;5. Check if the machine is placed horizontally;6. Contact after-sales/video guidance/confirm the point of failure; |
| E04 |  High Temp. High Temp. | 1. The ambient temperature is too high;2. The cooling effect of the condensing system is poor;3. The cooling fan is damaged; | 1. Improve environmental ventilation or displacement, or turn on air conditioning;2. Clean the condenser;3. The distance between the machine and the obstruction should be at least 30cm;4. Check if the fan is working;5. Contact after-sales/confirm the point of failure; |
| E05 | [7H24]Water Pressure | 1. No water supply;2. The water supply pressure is too low;3. Water tank leaks;4. The water level sensor fails;5. Malfunction of the inlet valve; | 1. Check the water source or whether the water filter is blocked;2. Check the water supply pressure or whether the water filter is blocked;3. Check whether the bottle cap at the bottom of the water tank is tightened and sealed;4. Check for scale on the water level switch;5. Contact after-sales/video guidance/confirm the point of failure; |
| E06 | [KCOT]High Pressure | 1. The condenser temperature is too high;2. The refrigeration system is blocked;3. Pressure switch failure;4. The main control board is abnormal; | 1. Improve environmental ventilation or displacement, or turn on air conditioning;2. Check the condensation heat dissipation system;3. Contact after-sales/video guidance/confirm the point of failure; |
| E11 | [3YTS] | 1. The ring temperature is too high;2. Poor dissipation effect of the condensing system;3. Leakage of refrigeration system; | 1. Check if the water pump is started and running2. Clean the condenser;3. The distance between the machine and the obstruction should be at least 30cm;4. Contact after-sales/video guidance/confirm the point of failure; |
TECHNICAL PARAMETER AND WIRING DIAGRAM
natural_image
Line drawing of a multi-tiered industrial appliance with cooling unit and vented door (no text or symbols)BEHÖVER DU HJÄLP? KONTAKTA OSS!
natural_image
Line drawing of a simple 3D box with internal components and a diagonal extension (no text or symbols)
natural_image
Line drawing of a mechanical device with a housing and internal components (no text or symbols)text_image
Exploded view diagram of an electronic device with numbered components for identificationICE MACHINE ACCESSORIES
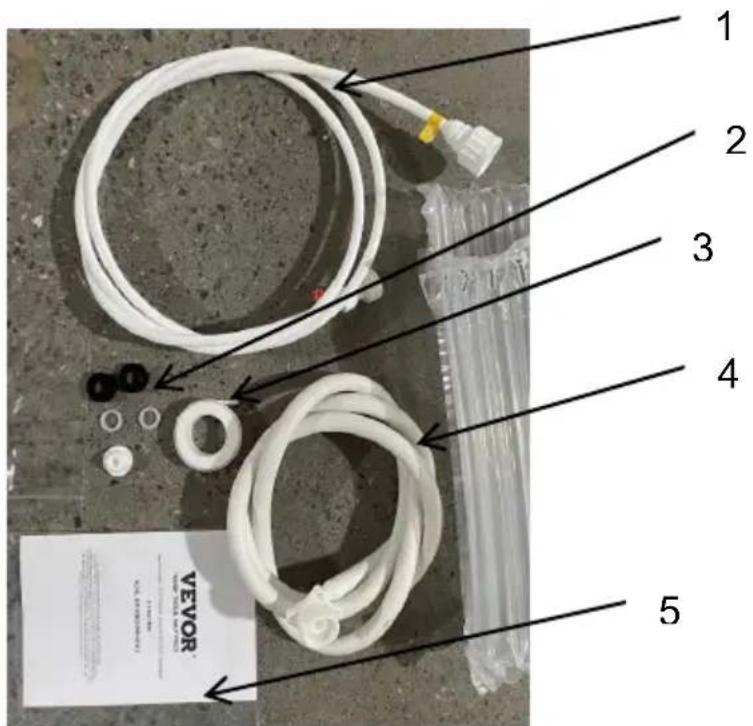
text_image
1 2 3 4 5 VEVORnatural_image
Line drawing of a refrigerator with a downward arrow indicating compression or cooling (no text or symbols present)
text_image
Diagram showing a faucet with a dial indicator and a beaker with a dropper, illustrating water level measurement or inspection.natural_image
Simple line drawing of a cube with a curved line and a heart symbol on top (no text or labels)POWER SUPPLY
text_image
Drinking tap water Socket with ground wire filter Water inlet direction Power Cord Inlet pipe Drain pipetext_image
Warning symbol image with exclamation mark inside a trianglenatural_image
Simple line drawing of a mechanical component with arrows indicating rotation (no text or symbols)SERVICE INSTRUCTION
1. Driftsprocess
LCD FULL PAGE DISPLAY

text_image
Comp. Hot Pump Water Fan Drain Pressure Ice flip Ice TH Ice TH High pressure Water pressure High temp. Water shortage Ice flip Harvest overtime Freeze overtime Condenser sensor Evaporator sensor| Warning |
| Before cleaning or maintaining the ice maker, unplug the ice maker from the power supply network.. |
| It is strictly prohibited to flush the ice maker directly with water sprayer. |
| Attention |
| When using neutral or sodium hypochlorite solutions, be sure to read and understand the accompanying instructions to avoid potential health problems. |
[a]ice maker and refrigerator housing
Wipe the ice maker's shell with a clean, soft cloth at least once a week, and wipe grease and dirt with a damp cloth containing a neutral cleaner.
| ⚠ Attention |
| Do not use a hard brush, wire brush, do not use detergent powder, gasoline, banana water, acetone and other organic solutions, do not use boiling water or containing strong acids, alkali cleaning agents to clean the ice machine. |
| Please do not wash directly with water when cleaning, so as not to affect the insulation of electrical appliances. |
[b]Ice machine cleaning and disinfection (recommended more than 2 times per month)
Note: Some areas may need to be cleaned and disinfected more frequently due to different water quality.
| Attention |
| Before cleaning, at the end of the ice machine cycle, all the ice cubes slide behind, shut down, open the front panel, and remove all the ice cubes in the ice machine and ice storage bucket.。 |
| Do not use tools to peel the ice from the ice mold, otherwise it may cause damage to the ice mold. |
| Do not use any liquid containing alcohol to clean or disinfect the ice machine, or it may cause cracks in the plastic parts. |
| Attention | |
| During the cleaning and disinfection process, please pay attention to protection, wear goggles and gloves, if the cleaning agent or disinfectant on the skin or eyes may cause inflammation. In case of accidental contamination, please follow the precautions of the medicine. | |
| During cleaning, attention should be paid to ventilation. Chlorine gas produced by disinfectants is a health hazard. Please handle it in a ventilated place. | |
Cleaning and disinfection sequence
Please clean and disinfect in the following order.
| order of use | Pharmaceutical species | use |
| 1 | Citric acid detergent (dilution ratio refer to detergent instructions) | rinse |
| 2 | Disinfectant (dilution ratio refer to disinfectant instructions ) | sterilie |
Cleaning and disinfection procedures
Daily cleaning and maintenance methods(10-15 days)
- Click the" button on the display screen after the ice maker finishes all the ice sliding. The display screen displays "off". Open the ice bucket door and remove all the ice.
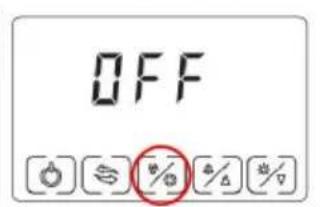
text_image
OFF %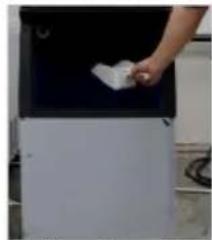
natural_image
Person cleaning a refrigerator with a cloth (no visible text or symbols)- Open the front panel, put the dissolved detergent (or disinfectant) into the water storage tank, and then close the front panel.

natural_image
Close-up of hands holding a small object with a red circle highlighting a feature, next to a digital display (no readable text)
natural_image
Close-up of a white electronic device with ventilation slots and a label (no readable text or symbols)
text_image
0:06 27°C- In the "off" state, press the "("%)" . When you see that the key flashes, release it and enter the cleaning mode.
- After entering the cleaning procedure, the equipment will follow the instructions: (1) Water inlet →(2) cleaning for 15 minutes →(3) drainage for 1 minute →(4) Water inlet →(5) rinsing for 3 minutes →(6) drainage → Repeat steps (4) to (6) for 5 times → End. After completing the above steps, the cleaning procedure is over.
Note: Detergent (or disinfectant) should be adjusted according to its own use instructions.
After entering the cleaning program, it will run automatically without operation. Do not add disinfectant and cleaning agent to the sink at the same time.
Note: If cleaning and disinfecting steps are performed at the same time, please follow the above steps twice.
Deep cleaning and maintenance methods(2 months)

natural_image
Close-up of hands performing a medical procedure with a red circle highlighting a small anatomical feature (no text or symbols visible)
natural_image
Close-up of a white electronic device with ventilation grilles and a hand pointing to it (no visible text or symbols)
natural_image
Close-up of a hand pressing down on a purple surface with a red arrow pointing to the left side (no text or symbols visible)
natural_image
Close-up of a white cylindrical object with a red circle highlighting a small feature, possibly a component or fixture (no visible text or symbols)
natural_image
Close-up of a hand pointing at a grid of small objects, possibly electronic components or tools, with no visible text or symbols.Step 1: Turn off the switch and unplug the power cord.
Step 2: Use a cross driver to remove the two screws on the right panel of the ice maker.
Step 3: Open the front panel.
Note: The opening Angle of the door panel should not exceed 180^ .
Step 4: Remove the plug under the water storage tank and drain the water from the water storage tank.
Step 5: Remove evaporator cover.(Pry open the evaporator cover slightly to the right.)
Step 6: Remove water pipe retaining cover and water pipe

natural_image
Close-up of a small mechanical component with a red circle highlighting a small feature, no visible text or symbols.
natural_image
Close-up of a hand holding a white cylindrical object with a red arrow pointing to it, next to a ruler (no visible text or symbols)
natural_image
Close-up of a hand holding a small object with a red arrow pointing to it, next to a white surface (no visible text or symbols)
text_image
Close-up of a white electronic device with visible label and control panel, showing Chinese text and symbols.
natural_image
Close-up of a hand resting on a blue surface (no text or symbols visible)
natural_image
Close-up of a hand holding a rolled paper or dough with a red arrow indicating a finger movement (no text or symbols visible)
natural_image
Close-up of a beige cylindrical object with a red circle highlighting a small green object, no visible text or symbols.
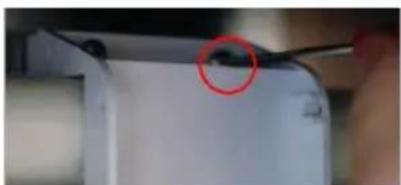
natural_image
Close-up of a white object with a red circle highlighting a small feature, possibly part of a device or tool (no visible text or symbols)Step 7: Remove the screw top of the water pipe and take out the inner and outer water pipes.
Step 8: Use a small brush to clean the inside and outside walls of the pipe.
Step 9: Use a small brush to clean the inside and outside of the evaporator cover.
Step 10: Remove the screws that secure the water pump, and remove the pump water pipe.
Step 11: Remove the two screws from the water level sensor.
Step 12: Use a small brush to clean the bottom of the pump.
Step 13: Use a small brush to clean under the water level sensor.
Step 14: Use a clean, soft cloth to clean the inside surface of the ice maker, the surface of the evaporator, the surface of the sink, and the inside of the ice bucket.
install
Step 1: Install the water pipe and tighten the screws at both ends of the water pipe (note: that the direction of the water outlet hole of the inner water pipe is opposite to that of the outer water pipe).
Step 3: Install water pipe retaining cover, water pump, water level sensor.
Step 4: Close the front pane, Tighten the two side screws.

natural_image
Close-up of a white plastic object with a red arrow pointing right, no visible text or symbols
text_image
J11 8Note: After the ice machine is cleaned, the pre-made 5 sheets of ice should not be eaten. Cleaning and maintenance cycle please adjust according to the local water quality, recommended Daily cleaning and maintenance methods(10-15 days), Deep cleaning and maintenance methods(2 months), if there is serious scale, please first follow the deep maintenance cleaning, and check the filter condition.
TROUBLE SHOOTING
| LED Panel | LCD Panel | Possible Cause | Solution |
| E01 | Ice flip | 1. De-icing plate is missing or misplaced;2. The polarity of the magnetic induction element is reversed;3. Abnormal ice full switch; | 1. Reset the ice removal plate;2. Replace the ice removal plate/full ice sensor;3. Contact after-sales service/visual trouble guidance/confirm the fault point; |
| E03 | Harvest overtime | 1. The ice cube setting is too thin;2. The water tank is insufficient;3. The ambient temperature is too low;4. De-icing solenoid valve failure; | 1. Check and set the water thickness parameters(Recommended gears 0-2)2. Check the water inlet system, or if the water sufficient;3. Use membrane materials to block the ventilation inlet area proportionally;4. Check if the ice is stuck;5. Check if the machine is placed horizontally;6. Contact after-sales/video guidance/confirm the point of failure; |
| E04 | -High Temp. | 1. The ambient temperature is too high;2. The cooling effect of the condensing system is poor;3. The cooling fan is damaged; | 1. Improve environmental ventilation or displacement, or turn on air conditioning;2. Clean the condenser;3. The distance between the machine and the obstruction should be at least 30cm;4. Check if the fan is working;5. Contact after-sales/confirm the point of failure; |
| E05 | Water Pressure | 1. No water supply;2. The water supply pressure is too low;3. Water tank leaks;4. The water level sensor fails;5. Malfunction of the inlet valve; | 1. Check the water source or whether the water filter is blocked;2. Check the water supply pressure or whether the water filter is blocked;3. Check whether the bottle cap at the bottom of the water tank is tightened and sealed;4. Check for scale on the water level switch;5. Contact after-sales/video guidance/confirm the point of failure; |
| E06 | [522K]-High Pressure | 1. The condenser temperature is too high;2. The refrigeration system is blocked;3. Pressure switch failure;4. The main control board is abnormal; | 1. Improve environmental ventilation or displacement, or turn on air conditioning;2. Check the condensation heat dissipation system;3. Contact after-sales/video guidance/confirm the point of failure; |
| E11 | | 1. The ring temperature is too high;2. Poor dissipation effect of the condensing system;3. Leakage of refrigeration system; | 1. Check if the water pump is started and running2. Clean the condenser;3. The distance between the machine and the obstruction should be at least 30cm;4. Contact after-sales/video guidance/confirm the point of failure; |
TECHNICAL PARAMETER AND WIRING DIAGRAM
www.vevor.com/support
VEVOR®
TOUGH TOOLS, HALF PRICE
natural_image
Line drawing of a multi-tiered industrial appliance with cooling unit and vented door (no text or symbols)text_image
Exploded view diagram of a device with numbered components for identificationICE MACHINE ACCESSORIES

text_image
1 2 3 4 5 VEVOR (100%) (100%) (100%) (100%) (100%) (100%) (100%) (100%) (100%) (100%) (100%) (100%)natural_image
Line drawing of a refrigerator with a downward arrow indicating compression or cooling (no text or symbols present)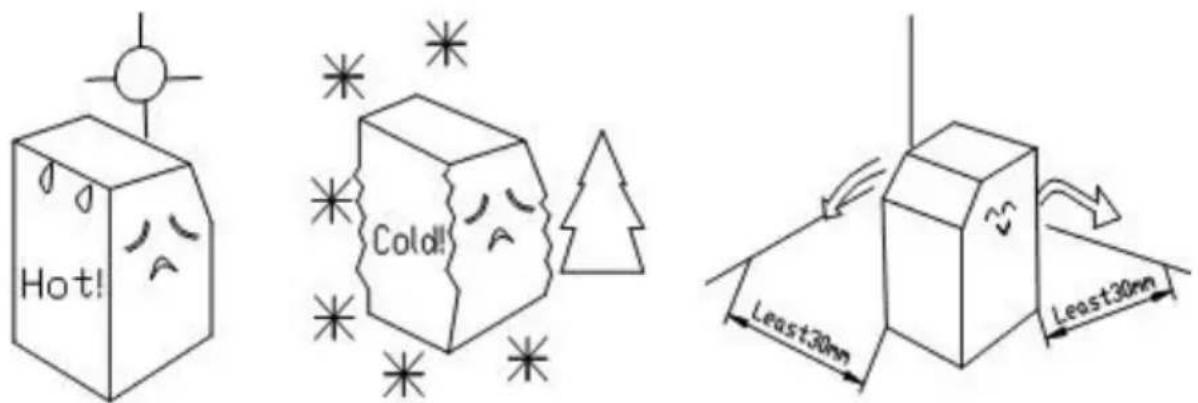
text_image
Diagram showing a faucet with a water level test tube and a magnified view of the water level measurement.natural_image
Simple line drawing of a cube with a curved line extending from its top, no text or symbols present.POWER SUPPLY
text_image
Drinking tap water Socket with ground wire filter Water inlet direction Power Cord Inlet pipe Drain pipenatural_image
Warning symbol: black exclamation mark inside a triangle (no text or numbers)natural_image
Diagram of a mechanical or electrical component with arrows indicating rotation or force direction (no text or symbols)SERVICE INSTRUCTION
LCD FULL PAGE DISPLAY

text_image
Comp. Hot Pump Water Fan Drain Pressure Ice flip Ice TH Ice TH High pressure Water pressure High temp. Water shortage Ice flip Harvest overtime Freeze overtime Condenser sensor Evaporator sensorDAILY CLEANING AND MAINTENANCE
Clean
| Warning |
| Before cleaning or maintaining the ice maker, unplug the ice maker from the power supply network.. |
| It is strictly prohibited to flush the ice maker directly with water sprayer. |
| Attention |
| When using neutral or sodium hypochlorite solutions, be sure to read and understand the accompanying instructions to avoid potential health problems. |
[a]ice maker and refrigerator housing
Wipe the ice maker's shell with a clean, soft cloth at least once a week, and wipe grease and dirt with a damp cloth containing a neutral cleaner.
| ⚠ Attention |
| Do not use a hard brush, wire brush, do not use detergent powder, gasoline, banana water, acetone and other organic solutions, do not use boiling water or containing strong acids, alkali cleaning agents to clean the ice machine. |
| Please do not wash directly with water when cleaning, so as not to affect the insulation of electrical appliances. |
[b]Ice machine cleaning and disinfection (recommended more than 2 times per month)
Note: Some areas may need to be cleaned and disinfected more frequently due to different water quality.
| Attention |
| Before cleaning, at the end of the ice machine cycle, all the ice cubes slide behind, shut down, open the front panel, and remove all the ice cubes in the ice machine and ice storage bucket.。 |
| Do not use tools to peel the ice from the ice mold, otherwise it may cause damage to the ice mold. |
| Do not use any liquid containing alcohol to clean or disinfect the ice machine, or it may cause cracks in the plastic parts. |
| Attention | |
| During the cleaning and disinfection process, please pay attention to protection, wear goggles and gloves, if the cleaning agent or disinfectant on the skin or eyes may cause inflammation. In case of accidental contamination, please follow the precautions of the medicine. | |
| During cleaning, attention should be paid to ventilation. Chlorine gas produced by disinfectants is a health hazard. Please handle it in a ventilated place. | |
Cleaning and disinfection sequence
Please clean and disinfect in the following order.
| order of use | Pharmaceutical species | use |
| 1 | Citric acid detergent (dilution ratio refer to detergent instructions) | rinse |
| 2 | Disinfectant (dilution ratio refer to disinfectant instructions ) | sterilie |
Cleaning and disinfection procedures
Daily cleaning and maintenance methods(10-15 days)
- Click the "☐" button on the display screen after the ice maker finishes all the ice sliding. The display screen displays "off". Open the ice bucket door and remove all the ice.

text_image
OFF %
natural_image
Person cleaning a refrigerator with a cloth (no visible text or symbols)- Open the front panel, put the dissolved detergent (or disinfectant) into the water storage tank, and then close the front panel.

natural_image
Close-up of hands holding a small object with a red circle highlighting a feature, next to a digital display (no visible text or symbols)
natural_image
Close-up of a white electronic device with ventilation slots and a label (no readable text or symbols)
text_image
0:06 27°C- In the "off" state, press the "[%]" . When you see that the key flashes, release it and enter the cleaning mode.
- After entering the cleaning procedure, the equipment will follow the instructions: (1) Water inlet →(2) cleaning for 15 minutes →(3) drainage for 1 minute →(4) Water inlet →(5) rinsing for 3 minutes →(6) drainage → Repeat steps (4) to (6) for 5 times → End. After completing the above steps, the cleaning procedure is over.
Note: Detergent (or disinfectant) should be adjusted according to its own use instructions.
After entering the cleaning program, it will run automatically without operation. Do not add disinfectant and cleaning agent to the sink at the same time.
Note: If cleaning and disinfecting steps are performed at the same time, please follow the above steps twice.
Deep cleaning and maintenance methods(2 months)

natural_image
Close-up of hands performing a medical procedure with a red circle highlighting a small anatomical feature (no text or symbols visible)
natural_image
Close-up of a white electronic device with ventilation grilles and a hand pointing to it (no visible text or symbols)
natural_image
Close-up of a hand pressing down on a purple surface with a red arrow pointing to the left side (no text or symbols visible)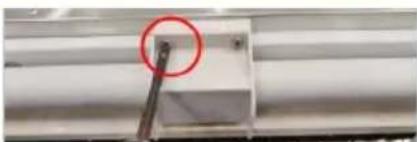
natural_image
Close-up of a white cylindrical object with a red circle highlighting a small feature, possibly a component or fixture (no visible text or symbols)
natural_image
Close-up of a hand pointing at a grid of small objects, possibly electronic components or tools, with no visible text or symbols.Step 1: Turn off the switch and unplug the power cord.
Step 2: Use a cross driver to remove the two screws on the right panel of the ice maker.
Step 3: Open the front panel.
Note: The opening Angle of the door panel should not exceed 180^ .
Step 4: Remove the plug under the water storage tank and drain the water from the water storage tank.
Step 5: Remove evaporator cover.(Pry open the evaporator cover slightly to the right.)
Step 6: Remove water pipe retaining cover and water pipe

natural_image
Close-up of a small mechanical component with a red circle highlighting a small feature, no visible text or symbols.
natural_image
Close-up of a hand holding a white cylindrical object with a red arrow pointing to it, next to a ruler (no text or symbols visible)
natural_image
Close-up of a hand holding a small object with a red arrow pointing to it, next to a white surface (no visible text or symbols)
text_image
Close-up of a white electronic device with visible label and control panel, showing Chinese text and symbols.
natural_image
Close-up of a hand resting on a blue surface (no text or symbols visible)
natural_image
Close-up of a hand holding a rolled paper or dough with a red arrow indicating a finger movement (no text or symbols visible)
natural_image
Close-up of a beige cylindrical object with a red circle highlighting a small green object, no visible text or symbols.

natural_image
Close-up of a white object with a red circle highlighting a small feature, possibly part of a device or tool (no visible text or symbols)Step 7: Remove the screw top of the water pipe and take out the inner and outer water pipes.
Step 8: Use a small brush to clean the inside and outside walls of the pipe.
Step 9: Use a small brush to clean the inside and outside of the evaporator cover.
Step 10: Remove the screws that secure the water pump, and remove the pump water pipe.
Step 11: Remove the two screws from the water level sensor.
Step 12: Use a small brush to clean the bottom of the pump.
Step 13: Use a small brush to clean under the water level sensor.
Step 14: Use a clean, soft cloth to clean the inside surface of the ice maker, the surface of the evaporator, the surface of the sink, and the inside of the ice bucket.
install
Step 1: Install the water pipe and tighten the screws at both ends of the water pipe (note: that the direction of the water outlet hole of the inner water pipe is opposite to that of the outer water pipe).
Step 3: Install water pipe retaining cover, water pump, water level sensor.
Step 4: Close the front pane, Tighten the two side screws.

natural_image
Close-up of a white plastic object with a red arrow pointing right, no visible text or symbols
text_image
J11 8Note: After the ice machine is cleaned, the pre-made 5 sheets of ice should not be eaten. Cleaning and maintenance cycle please adjust according to the local water quality, recommended Daily cleaning and maintenance methods(10-15 days), Deep cleaning and maintenance methods(2 months), if there is serious scale, please first follow the deep maintenance cleaning, and check the filter condition.
TROUBLE SHOOTING
| LED Panel | LCD Panel | Possible Cause | Solution |
| E01 | Ice flip | 1. De-icing plate is missing or misplaced;2. The polarity of the magnetic induction element is reversed;3. Abnormal ice full switch; | 1. Reset the ice removal plate;2. Replace the ice removal plate/full ice sensor;3. Contact after-sales service/visual trouble guidance/confirm the fault point; |
| E03 | Harvest overtime | 1. The ice cube setting is too thin;2. The water tank is insufficient;3. The ambient temperature is too low;4. De-icing solenoid valve failure; | 1. Check and set the water thickness parameters(Recommended gears 0-2)2. Check the water inlet system, or if the water sufficient;3. Use membrane materials to block the ventilation inlet area proportionally;4. Check if the ice is stuck;5. Check if the machine is placed horizontally;6. Contact after-sales/video guidance/confirm the point of failure; |
| E04 | High Temp. | 1. The ambient temperature is too high;2. The cooling effect of the condensing system is poor;3. The cooling fan is damaged; | 1. Improve environmental ventilation or displacement, or turn on air conditioning;2. Clean the condenser;3. The distance between the machine and the obstruction should be at least 30cm;4. Check if the fan is working;5. Contact after-sales/confirm the point of failure; |
| E05 | Water Pressure | 1. No water supply;2. The water supply pressure is too low;3. Water tank leaks;4. The water level sensor fails;5. Malfunction of the inlet valve; | 1. Check the water source or whether the water filter is blocked;2. Check the water supply pressure or whether the water filter is blocked;3. Check whether the bottle cap at the bottom of the water tank is tightened and sealed;4. Check for scale on the water level switch;5. Contact after-sales/video guidance/confirm the point of failure; |
| E06 | High Pressure | 1. The condenser temperature is too high;2. The refrigeration system is blocked;3. Pressure switch failure;4. The main control board is abnormal; | 1. Improve environmental ventilation or displacement, or turn on air conditioning;2. Check the condensation heat dissipation system;3. Contact after-sales/video guidance/confirm the point of failure; |
| E11 | | 1. The ring temperature is too high;2. Poor dissipation effect of the condensing system;3. Leakage of refrigeration system; | 1. Check if the water pump is started and running2. Clean the condenser;3. The distance between the machine and the obstruction should be at least 30cm;4. Contact after-sales/video guidance/confirm the point of failure; |
TECHNICAL PARAMETER AND WIRING DIAGRAM
natural_image
Line drawing of a three-tier industrial refrigerator with cooling unit and vented door (no text or symbols)natural_image
Line drawing of a simple industrial machine with a door and internal components (no text or symbols)
natural_image
Isometric line drawing of a mechanical device with a door and internal components (no text or symbols)text_image
Exploded view diagram of a device with numbered components for identificationICE MACHINE ACCESSORIES
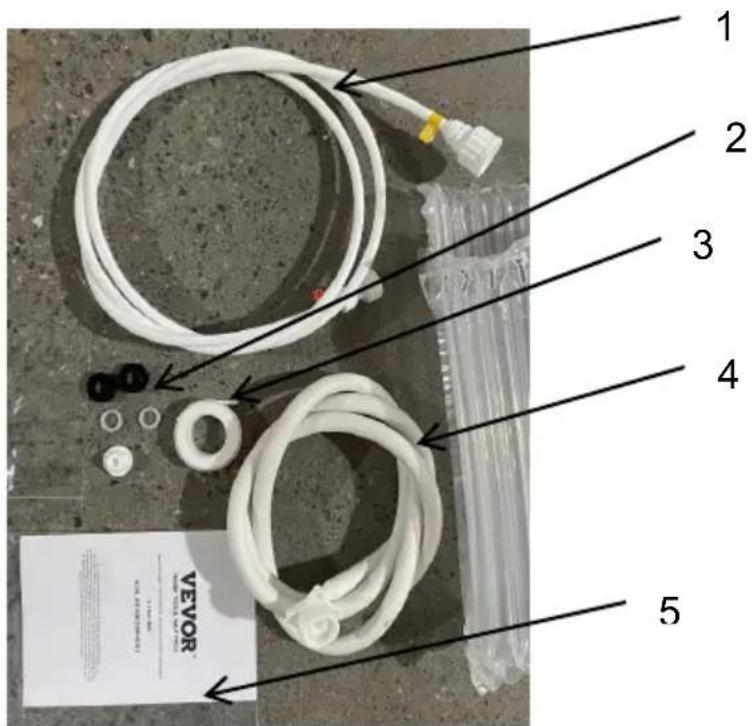
text_image
1 2 3 4 5 VEVOR (100%) (100%) (100%) (100%) (100%) (100%) (100%) (100%)natural_image
Line drawing of a refrigerator with a downward arrow indicating compression or cooling (no text or symbols present)
text_image
Diagram showing a faucet with a water level test tube and a magnified view of the water level measurement.natural_image
Simple line drawing of a cube with a curved line and a small heart symbol on top (no text or labels)POWER SUPPLY
text_image
Drinking tap water Socket with ground wire filter Water inlet direction Power Cord Inlet pipe Drain pipetext_image
Warning symbol image with exclamation mark inside trianglenatural_image
Diagram of a mechanical component with rotational arrows indicating motion (no text or symbols)SERVICE INSTRUCTION
LCD FULL PAGE DISPLAY

text_image
Comp. Hot Pump Water Fan Drain Pressure Ice flip Ice TH Ice TH High pressure Water pressure High temp. Water shortage Ice flip Harvest overtime Freeze overtime Condenser sensor Evaporator sensorDAILY CLEANING AND MAINTENANCE
Clean
| Warning |
| Before cleaning or maintaining the ice maker, unplug the ice maker from the power supply network.. |
| It is strictly prohibited to flush the ice maker directly with water sprayer. |
| Attention |
| When using neutral or sodium hypochlorite solutions, be sure to read and understand the accompanying instructions to avoid potential health problems. |
[a]ice maker and refrigerator housing
Wipe the ice maker's shell with a clean, soft cloth at least once a week, and wipe grease and dirt with a damp cloth containing a neutral cleaner.
| ⚠ Attention |
| Do not use a hard brush, wire brush, do not use detergent powder, gasoline, banana water, acetone and other organic solutions, do not use boiling water or containing strong acids, alkali cleaning agents to clean the ice machine. |
| Please do not wash directly with water when cleaning, so as not to affect the insulation of electrical appliances. |
[b]Ice machine cleaning and disinfection (recommended more than 2 times per month)
Note: Some areas may need to be cleaned and disinfected more frequently due to different water quality.
| Attention |
| Before cleaning, at the end of the ice machine cycle, all the ice cubes slide behind, shut down, open the front panel, and remove all the ice cubes in the ice machine and ice storage bucket.。 |
| Do not use tools to peel the ice from the ice mold, otherwise it may cause damage to the ice mold. |
| Do not use any liquid containing alcohol to clean or disinfect the ice machine, or it may cause cracks in the plastic parts. |
| Attention | |
| During the cleaning and disinfection process, please pay attention to protection, wear goggles and gloves, if the cleaning agent or disinfectant on the skin or eyes may cause inflammation. In case of accidental contamination, please follow the precautions of the medicine. | |
| During cleaning, attention should be paid to ventilation. Chlorine gas produced by disinfectants is a health hazard. Please handle it in a ventilated place. | |
Cleaning and disinfection sequence
Please clean and disinfect in the following order.
| order of use | Pharmaceutical species | use |
| 1 | Citric acid detergent (dilution ratio refer to detergent instructions) | rinse |
| 2 | Disinfectant (dilution ratio refer to disinfectant instructions ) | sterilie |
Cleaning and disinfection procedures
Daily cleaning and maintenance methods(10-15 days)
- Click the "☐" button on the display screen after the ice maker finishes all the ice sliding. The display screen displays "off". Open the ice bucket door and remove all the ice.

text_image
OFF %
natural_image
Person cleaning a refrigerator with a cloth (no visible text or symbols)- Open the front panel, put the dissolved detergent (or disinfectant) into the water storage tank, and then close the front panel.

natural_image
Close-up of hands holding a small object with a red circle highlighting a feature, next to a digital display (no readable text)
natural_image
Close-up of a white electronic device with ventilation slots and a label (no readable text or symbols)
text_image
0:06 27°C- In the "off" state, press the "[%]" . When you see that the key flashes, release it and enter the cleaning mode.
- After entering the cleaning procedure, the equipment will follow the instructions: (1) Water inlet →(2) cleaning for 15 minutes →(3) drainage for 1 minute →(4) Water inlet →(5) rinsing for 3 minutes →(6) drainage → Repeat steps (4) to (6) for 5 times → End. After completing the above steps, the cleaning procedure is over.
Note: Detergent (or disinfectant) should be adjusted according to its own use instructions.
After entering the cleaning program, it will run automatically without operation. Do not add disinfectant and cleaning agent to the sink at the same time.
Note: If cleaning and disinfecting steps are performed at the same time, please follow the above steps twice.
Deep cleaning and maintenance methods(2 months)
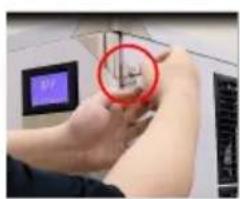
natural_image
Close-up of hands performing a medical procedure with a red circle highlighting a small anatomical feature (no text or symbols visible)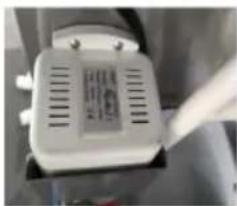
natural_image
Close-up of a white electronic device with ventilation grilles and a hand pointing to it (no visible text or symbols)
natural_image
Close-up of a hand pressing down on a purple surface with a red arrow pointing to the left side (no text or symbols visible)
natural_image
Close-up of a white cylindrical object with a red circle highlighting a small feature, possibly a component or fixture (no visible text or symbols)
natural_image
Close-up of a hand pointing at a grid of small objects, possibly electronic components or tools, with no visible text or symbols.Step 1: Turn off the switch and unplug the power cord.
Step 2: Use a cross driver to remove the two screws on the right panel of the ice maker.
Step 3: Open the front panel.
Note: The opening Angle of the door panel should not exceed 180^ .
Step 4: Remove the plug under the water storage tank and drain the water from the water storage tank.
Step 5: Remove evaporator cover.(Pry open the evaporator cover slightly to the right.)
Step 6: Remove water pipe retaining cover and water pipe

natural_image
Close-up of a small mechanical component with a red circle highlighting a small feature, no visible text or symbols.
natural_image
Close-up of a hand holding a white cylindrical object with a red arrow pointing to it, next to a ruler (no visible text or symbols)
natural_image
Close-up of a hand holding a small object with a red arrow pointing to it, next to a white surface (no visible text or symbols)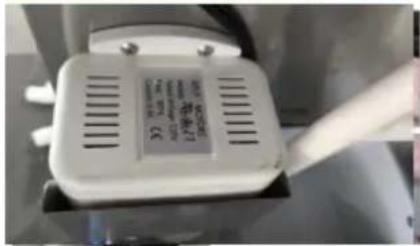
text_image
Close-up of a white electronic device with visible label and control panel, likely a sensor or terminal component.
natural_image
Close-up of a hand resting on a blue surface (no text or symbols visible)
natural_image
Close-up of a hand holding a rolled paper or dough with a red arrow indicating a finger movement (no text or symbols visible)
natural_image
Close-up of a beige cylindrical object with a red circle highlighting a small green object, no visible text or symbols.

natural_image
Close-up of a white object with a red circle highlighting a small feature, possibly part of a device or tool (no visible text or symbols)Step 7: Remove the screw top of the water pipe and take out the inner and outer water pipes.
Step 8: Use a small brush to clean the inside and outside walls of the pipe.
Step 9: Use a small brush to clean the inside and outside of the evaporator cover.
Step 10: Remove the screws that secure the water pump, and remove the pump water pipe.
Step 11: Remove the two screws from the water level sensor.
Step 12: Use a small brush to clean the bottom of the pump.
Step 13: Use a small brush to clean under the water level sensor.
Step 14: Use a clean, soft cloth to clean the inside surface of the ice maker, the surface of the evaporator, the surface of the sink, and the inside of the ice bucket.
install
Step 1: Install the water pipe and tighten the screws at both ends of the water pipe (note: that the direction of the water outlet hole of the inner water pipe is opposite to that of the outer water pipe).
Step 3: Install water pipe retaining cover, water pump, water level sensor.
Step 4: Close the front pane, Tighten the two side screws.

natural_image
Close-up of a white plastic object with a red arrow pointing right, no visible text or symbols
text_image
J11 8Note: After the ice machine is cleaned, the pre-made 5 sheets of ice should not be eaten. Cleaning and maintenance cycle please adjust according to the local water quality, recommended Daily cleaning and maintenance methods(10-15 days), Deep cleaning and maintenance methods(2 months), if there is serious scale, please first follow the deep maintenance cleaning, and check the filter condition.
TROUBLE SHOOTING
| LED Panel | LCD Panel | Possible Cause | Solution |
| E01 | Ice flip | 1. De-icing plate is missing or misplaced;2. The polarity of the magnetic induction element is reversed;3. Abnormal ice full switch; | 1. Reset the ice removal plate;2. Replace the ice removal plate/full ice sensor;3. Contact after-sales service/visual trouble guidance/confirm the fault point; |
| E03 | Harvest overtime | 1. The ice cube setting is too thin;2. The water tank is insufficient;3. The ambient temperature is too low;4. De-icing solenoid valve failure; | 1. Check and set the water thickness parameters(Recommended gears 0-2)2. Check the water inlet system, or if the water sufficient;3. Use membrane materials to block the ventilation inlet area proportionally;4. Check if the ice is stuck;5. Check if the machine is placed horizontally;6. Contact after-sales/video guidance/confirm the point of failure; |
| E04 | -High Temp. | 1. The ambient temperature is too high;2. The cooling effect of the condensing system is poor;3. The cooling fan is damaged; | 1. Improve environmental ventilation or displacement, or turn on air conditioning;2. Clean the condenser;3. The distance between the machine and the obstruction should be at least 30cm;4. Check if the fan is working;5. Contact after-sales/confirm the point of failure; |
| E05 | Water Pressure | 1. No water supply;2. The water supply pressure is too low;3. Water tank leaks;4. The water level sensor fails;5. Malfunction of the inlet valve; | 1. Check the water source or whether the water filter is blocked;2. Check the water supply pressure or whether the water filter is blocked;3. Check whether the bottle cap at the bottom of the water tank is tightened and sealed;4. Check for scale on the water level switch;5. Contact after-sales/video guidance/confirm the point of failure; |
| E06 | -High Pressure | 1. The condenser temperature is too high;2. The refrigeration system is blocked;3. Pressure switch failure;4. The main control board is abnormal; | 1. Improve environmental ventilation or displacement, or turn on air conditioning;2. Check the condensation heat dissipation system;3. Contact after-sales/video guidance/confirm the point of failure; |
| E11 | | 1. The ring temperature is too high;2. Poor dissipation effect of the condensing system;3. Leakage of refrigeration system; | 1. Check if the water pump is started and running2. Clean the condenser;3. The distance between the machine and the obstruction should be at least 30cm;4. Contact after-sales/video guidance/confirm the point of failure; |