WKG280 - Sander Vevor - Free user manual and instructions
Find the device manual for free WKG280 Vevor in PDF.

| Product Type | Grinder (floor grinder) |
| Brand | Vevor |
| Model | WKG280 |
| Weight | 57.9 kg |
| Motor Power | 2.2 kW (3 HP) |
| Motor Speed | 1430 RPM |
| Power Supply | Single-phase |
| Plate Type | Standard 10-inch grinding head |
| Construction | Powder-coated steel |
| Usage | Dry or wet grinding |
| Dust Extraction System | Compatible with industrial vacuum cleaner |
| Water Connection | With ball valve for regulation |
| Handle | Foldable for transport |
| Rear Wheels | Extendable for stability |
| Handle Height | Adjustable |
| Cowling | Removable for edge grinding |
| Suitable Materials | Concrete, masonry, etc. |
| Safety | Manual reading mandatory, PPE required |
| Maintenance | Regular motor cleaning, bolt inspection |
| Spare Parts | Available via www.vevor.com/support |
| Warranty | Electronic warranty certificate |
Frequently Asked Questions - WKG280 Vevor
User questions about WKG280 Vevor
0 question about this device. Answer the ones you know or ask your own.
Ask a new question about this device
Download the instructions for your Sander in PDF format for free! Find your manual WKG280 - Vevor and take your electronic device back in hand. On this page are published all the documents necessary for the use of your device. WKG280 by Vevor.
USER MANUAL WKG280 Vevor
Technical Support and E-Warranty Certificate www.vevor.com/support
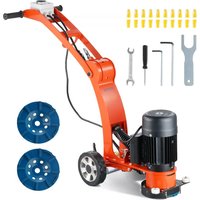
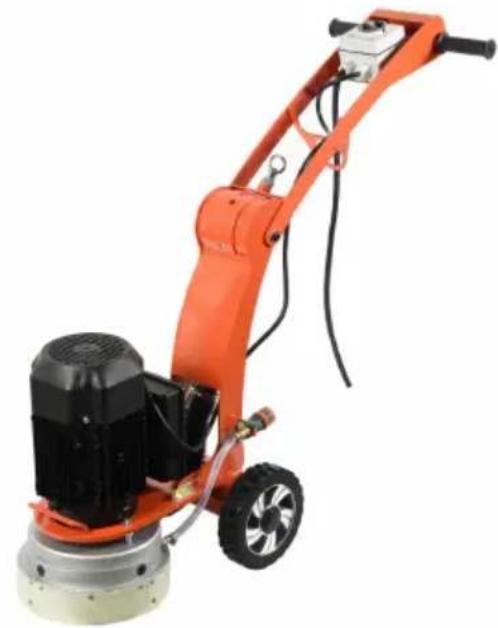
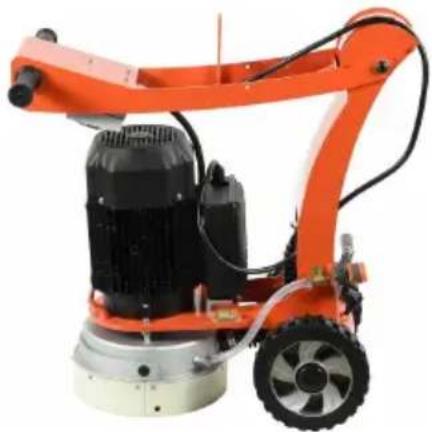
FLOOR GRINDER
MODEL:WKG280
We continue to be committed to provide you tools with competitive price. "Save Half", "Half Price" or any other similar expressions used by us only represer estimate of savings you might benefit from buying certain tools with us compared to top brands and does not necessarily mean to cover all categories of tools offered by are kindly reminded to verify carefully when you are placing an order with us if yo actually saving half in comparison with the top major brands.
MODEL:WKG280
natural_image
Orange industrial cleaning machine with black and white components (no visible text or symbols)NEED HELP? CONTACT US!
Have product questions? Need technical support? Please feel free contact us:
Technical Support and E-Warranty Certificate www.vevor.com/support
This is the original instruction, please read all manual instructions carefully before operating. VEVOR reserves a clear interpretation of user manual. The appearance of the product shall be subject to the product you received. Please forgive us that we won't inform you there are any technology or software updates on our product.
 | Warning-To reduce the risk of injury, user must read instructions manual carefully. |
 | This product is subject to the provision of European Dire 2012/19/EC. The symbol showing a wheelie bin crosse through indicates that the product requires separate refus collection in the European Union. This applies to the pro and all accessories marked with this symbol. Products ma as such may not be discarded with normal domestic wast must be taken to a collection point for recycling electrica electronic devices |
Instructions
Thank you very much for choosing this floor grinder. Please read all of t instructions before using it. The information will help you achieve the bes possible results.
natural_image
Orange industrial robotic arm with black and white components, no visible text or symbolsPARAMETER LIST
| Motor HP | 3.0 hp |
| Motor KW Rating | 2.2kw |
| Motor RPM | 1430rpm |
| Unit Weight | 57.9kg/127.6lb |
| Plate Type | Standard 10 inch grinding head |
| Main Construction | Powder Coated Steel |
Introduction and Description
This manual is intended to provide operation and service information necessary for the safe and efficient use of Floor Grinder. Operating or servicing the unit other than in accordance with the instructions given ma subject the machine to conditions beyond its capability.This may result in the machine failure or personal injury.
IMPORTANT:
Read the entire operating manual carefully before attempting to use the floor grinder. Special attention should be given to the section entitled “Safety Precautions.”
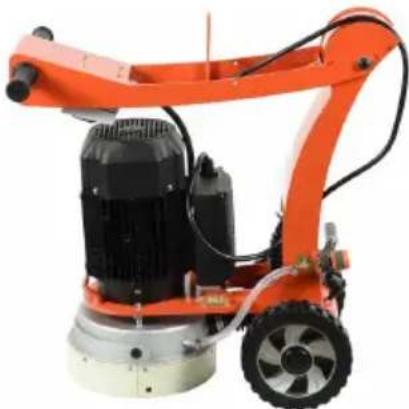
The floor grinder is a sturdy, reliable and easy to use machine.
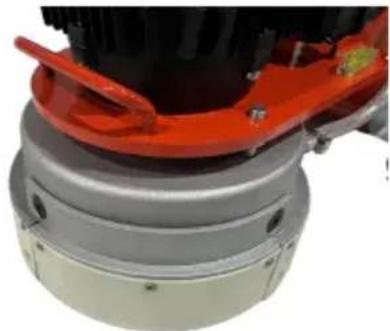
The floor grinder is fitted with a single-phase motor. This motor offers a direct drive to the grinding plate by way of a flexible coupling between the motor and the plate.
The shroud system is unique in design by automatically adjusting to suit segment height and floor angle. This shroud system when used in conjunction with an appropriate industrial vacuum unit helps eliminate dust during grinding. The shroud has 2 removable sections to allow the operate to maneuver the grinder close to the wall. Please note that fugitive dust will likely occur when using the grinder with the two shroud sections removed
The floor grinder comes complete with a water connection for wet grindin if required. The water connection incorporates a ball valve that allows the operator to regulate the water supply to obtain the best grinding results.
The floor grinder has a foldable handle which enables it to be easily transported in the trunk of most vehicles. The rear wheels can be extended outward for added stability during use. The operator can raise or lower the height of the handle to maximize comfort.
The newly designed lifting handle system makes the machine easy to lift.
Operating instruction
Cup wheels layout
| 1. 3pcs grinding shoes | 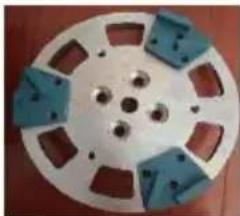 |
| 2.1pc 10inch grinding wheel(customer can buy other 10inch grinding wheto set, centre hole is 20mm) | 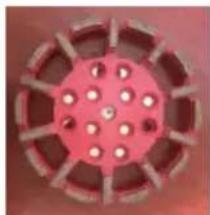 |
Connect the vacuum cleaner
| Make sure that the filters in the vacuum cle are intact and clean. Pay attention to dust d operation. | 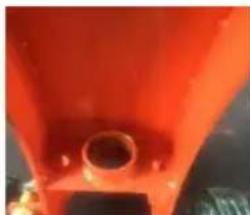 |
Level and water cooling

Removable shroud for edge grinding
natural_image
Close-up of a mechanical assembly with red and gray components (no visible text or symbols)Transport
The machine can be folded to minimize space needed for transport. Carefully fold the machine forward. Put padding between the motor and the electric box to prevent damage to the machine
natural_image
Orange industrial robotic arm with black and silver components, no visible text or symbolsCalibration
The floor grinder is designed to be used either wet or dry. If the applica requires dry grinding, a suitable industrial vacuum is required.
Consult Safety Data Sheets for the materials being ground. Concrete dust and floor coatings contain materials that can be harmful. SEE SAFETY PRECAUTIONS FOR Silica Dust Warning.
Contact your industrial hygiene professional for detailed information on required personal protective equipment PPE. Always use appropriate personal protective equipment (Hearing, Eye, Respiratory and Hand Protection).
Calibration
- Make sure the diamond tooling is suitable for the material being ground and that the tooling is correctly balanced.
- Ensure that the grinding plates are in good condition and properly mounted. Never use damaged tooling.
- All countersunk bolts must be tightened to specifications and firmly in place. Take periodic breaks to ensure that bolts are properly tightened, a they can loosen during operation.
- Check that the grinding plate is adjusted so that it sits level on the w surface (use the bubble-level on the machine as a reference).
- Check that all nuts and bolts on the folding handle latch are tight and secure.
- Raise the grinding plates from the floor.
- Start the motor by pressing the switch.
- Lower the grinding plate and begin grinding. Keep the grinding head moving side to side on the work surface to create an evenly ground surf until the desired results are reached.
Note:
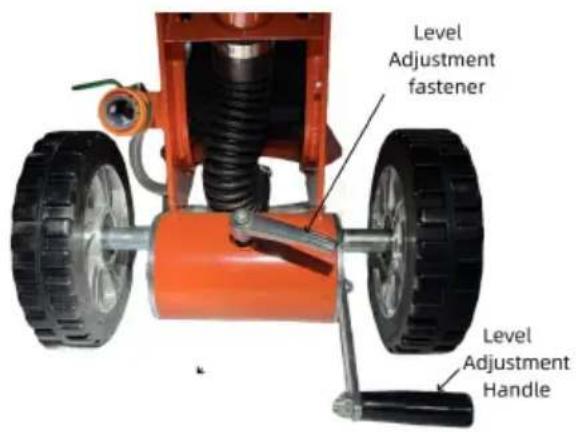
The position of the axle may be adjusted as needed for leveling.
-
Adjust the vertical grinding position by loosening the level adjustment fastener counter clockwise.
-
Lifting the level adjustment handle raises the back end of the grinder.
-
Lowering the level adjustment handle lowers the back end of the grinder
-
Use "bubble-level", mounted on the machine as a reference.
-
Secure desired grinder position by tightening the level adjustment fastener clockwise.
Care instructions
The Floor Grinder has been designed to minimize noise, vibration levels and to provide maximum operator safety. However, incorrect use of the grinder may cause serious injury and therefore the following precautions must be taken:
- Do not use the grinder for longer than prescribed in your local environmental working regulations, as the noise load from extensive daily use may result in hearing damage.
- Always use hearing protection, goggles, gloves and appropriate footwear.
3.Do not modify the grinder in any manner.Do not use a machine that h been modified by anyone other than the manufacturer or authorized dealers. - Do not add weight to the machine. Use different grinding plates to achieve the desired grinding performance.
- Do not operate the grinder with the grinding head raised any higher than necessary. i.e. tipped back on handle.
- Always be sure that folding handle latch is secure and has not become loose during use.
- During normal use the machine is exposed to vibration.
Occasionally check machine for bolts/nuts which may have vibrated loose
8.Do not allow water or flammable materials to enter the interior of the motor.
Respirable silica dust warning
Grinding/cutting/drilling of masonry, concrete, metal and other materials can generate dust, mists and fumes containing chemicals known to cause serious or fatal injury or illness, such as respiratory disease, cancer, birth defects or other reproductive harm. If you are unfamiliar with the risks associated with the particular process and/or material being cut or the composition of the tool being used, review the Safety Data Sheets (SDS) and/or consult your employer, the manufacturers/suppliers, governmental agencies such as OSHA and NIOSH and other sources on hazardous materials. The state of California and other authorities have published lists of substances known to cause cancer, reproductive toxicity, or other harmful effects.
Use engineering controls to control dust, mist and fumes at the source wherever possible. Use good work practices and follow the recommendations of the manufacturers/suppliers, OSHA/NIOSH, and occupational and trade associations. Water should be used for dust suppression when wet grinding/cutting/drilling is feasible. When the hazards from inhalation of dust, mists and fumes cannot be eliminated, the operator and any bystanders should always wear a respirator approved by NIOSH/MSHA for the material being used.
Grinding/cutting/drilling of masonry, concrete and other materials containing silica may generate dust or mists containing crystalline silica. Silica is a basic component of sand, quartz, brick clay, granite and numerous other minerals and rocks. Repeated and/or substantial inhalation of airborne crystalline silica can cause serious or fatal respiratory disease including silicosis. The state of California and other authorities have listed respirable crystalline silica as a substance known to cause cancer. When grinding/cutting/drilling such materials, always follow the respiratory precautions mentioned above.
Trouble shooting
| Symptom | Possible Cause | Action |
| Grinder runs for short time then stops | The electrical power current limit screw is n adjusted properly. | Adjust the current limit (power source) |
| Grinder runs but does not perform adequately. | Tooling is not matched the application | Re-evaluate tooling selection. |
| Grinder vibrates during use | Grinding plates not correctly balanced | Replace grinding plates |
| Grinding noise coming from grinding head unde no-load operation. | Worn motor bearings d drive coupling | Have machine evaluated and serviced by authorized service professional. |
Maintenance
Daily cleaning: The motor should always be kept clean. No water, or foreign materials should be allowed to get into the interior of the motor. Check operating amperage draw: While the motor is in operation, take ca to keep the operating amperage below maximum level.
Operational sounds: During the operation of the motor there must be no rubbing sounds, squeals or other random noises. Stop the motor immediately and restart after inspection and corrections have been made.
Check the security of the adjustable folding handle latch periodically.
The wheel bearings use sealed bearings and require no regular greasing.
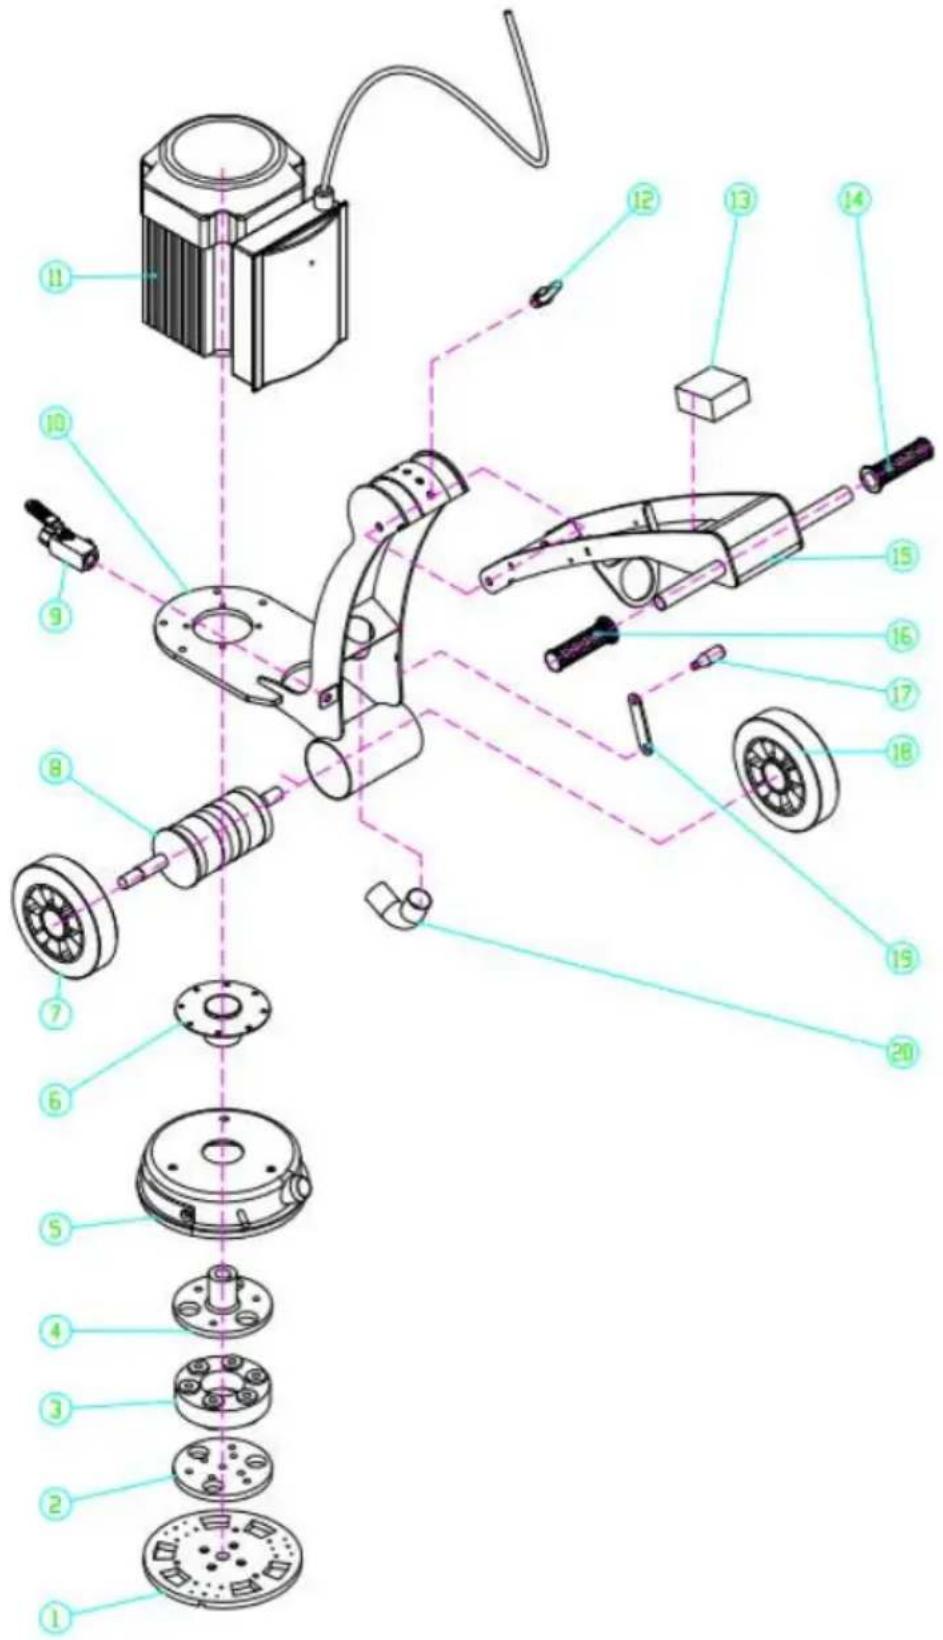
Parts Diagram
| Item# | Description | QTY | Item# | Description | QTY |
| 1 | Plate | 1 | 12 | Ring-pull | 1 |
| 2 | Plate connector | 1 | 13 | Switch | 1 |
| 3 | Rubber | 1 | 14 | Handle sleeve | 1 |
| 4 | Flange | 1 | 15 | Frame body part2 | 1 |
| 5 | Metal cover | 1 | 16 | Handle sleeve | 1 |
| 6 | Flange | 1 | 17 | Adjusting handle | 1 |
| 7 | Wheel | 1 | 18 | Wheel | 1 |
| 8 | Eccentric shaft | 1 | 19 | Connecting rod | 1 |
| 9 | Control valve | 1 | 20 | Dust absorption pipe | 1 |
| 10 | Frame body part 1 | 1 | 21 | Nylon wear strips | 1 |
| 11 | Electrical motor | 1 | 22 | Power cord | 1 |
Parts list
| No. | Name | Picture | QTY |
| 1 | Blade shoes | 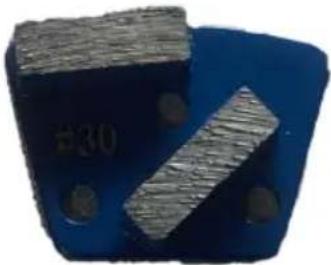 | 6 |
| 2 | Earplug |  | 10 |
| 3 | Screwdriver |  | 1 |
| 4 | Wrench(12-14) | 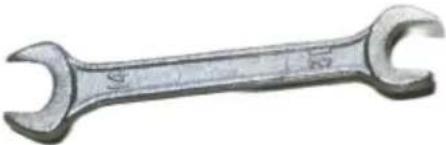 | 1 |
| 5 | Wrench(S=8) | 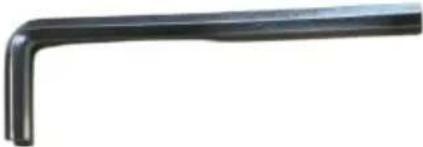 | 1 |
| 6 | Wrench(S=6) |  | 1 |
| 7 | Manual | 1 |
VEVOR®
TOUGH TOOLS, HALF PRICE
Technical Support and E-Warranty Certificate
www.vevor.com/support
VEVOR®
TOUGH TOOLS, HALF PRICE
natural_image
Orange industrial cleaning machine with black and silver components (no visible text or symbols)BESOIN D'AIDE? CONTACTEZ-NOUS!
natural_image
Orange industrial cleaning or maintenance tool with a black motor and circular base, no visible text or symbolsLISTE DES PARAMÈTRES
natural_image
Close-up of a mechanical assembly with red and gray components (no visible text or symbols)Transport
natural_image
Orange industrial robotic arm with black and white components, no visible text or symbolsÉtalonnage
Liste des pieces
natural_image
Orange industrial cleaning machine with black and silver components (no visible text or symbols)BRAUCHEN SIE HILFE? KONTAKTIERE UNS!
natural_image
Orange industrial cleaning or power tool with a black motor and wheels (no visible text or symbols)PARAMETERLISTE
natural_image
Close-up of a mechanical assembly with red and gray components (no visible text or symbols)Transport
natural_image
Orange industrial robotic arm with black and silver components, no visible text or symbolsKalibrierung
Pflegehinweise
www.vevor.com/support
VEVOR®
TOUGH TOOLS, HALF PRICE
natural_image
Orange industrial cleaning machine with black and silver components (no visible text or symbols)HO BISOGNO DI AIUTO? CONTATTACI!
natural_image
Orange industrial robotic arm with black and white components, no visible text or symbolsELENCO PARAMETRI
natural_image
Close-up of a mechanical assembly with red and gray components (no visible text or symbols)Trasporto
natural_image
Orange industrial robotic arm with black and white components, no visible text or symbolsCalibrazione
Elenco delle parti
elettronica www.vevor.com/support
VEVOR®
TOUGH TOOLS, HALF PRICE
natural_image
Orange industrial cleaning machine with black and silver components (no visible text or symbols)natural_image
Orange industrial cleaning or power tool with a black motor and circular base, no visible text or symbolsLISTA DE PARÁMETROS
natural_image
Close-up of a robotic arm with red and gray components, no visible text or symbolsTransporte
natural_image
Orange industrial robotic arm with black and white components, no visible text or symbolsCalibración
Lista de partes
natural_image
Orange industrial cleaning machine with black and silver components (no visible text or symbols)POTRZEBUJE POMOCY? SKONTAKTUJ SIĘ Z NAMI!
natural_image
Orange industrial robotic arm with black and white components, no visible text or symbolsLISTA PARAMETRÓW
natural_image
Close-up of a mechanical assembly with red and gray components (no visible text or symbols)Transport
natural_image
Orange industrial cleaning or dust removal machine with black and white components (no visible text or symbols)Kalibrowanie
Instrukcje opieki
Lista części
www.vevor.com/support
VEVOR®
TOUGH TOOLS, HALF PRICE
Technische ondersteuning en e-garantiecertificaat www.vevor.com/support
VLOER SLIJPER
MODEL: WKG280
natural_image
Orange industrial cleaning machine with black and silver components (no visible text or symbols)HULP NODIG? NEEM CONTACT MET ONS OP!
natural_image
Orange industrial cleaning or maintenance tool with a black motor and circular base, no visible text or symbolsPARAMETERLIJST
natural_image
Close-up of a mechanical assembly with red and gray components (no visible text or symbols)Vervoer
natural_image
Orange industrial robotic arm with black and white components, no visible text or symbolsKalibratie
Onderdelen lijst
garantiecertificaat www.vevor.com/support
VEVOR®
TOUGH TOOLS, HALF PRICE
natural_image
Orange industrial cleaning machine with black and silver components (no visible text or symbols)BEHÖVS HJÄLP? KONTAKTA OSS!
natural_image
Orange industrial cleaning or power tool with a black motor and circular base, no visible text or symbolsPARAMETERLISTA
natural_image
Close-up of a mechanical assembly with red and gray components (no visible text or symbols)Transport
natural_image
Orange industrial cleaning or dust removal machine with black components and wheels (no visible text or symbols)Kalibrering
Skötselråd
Delarlista
www.vevor.com/support