
TM1000 - Clock Vevor - Free user manual and instructions
Find the device manual for free TM1000 Vevor in PDF.
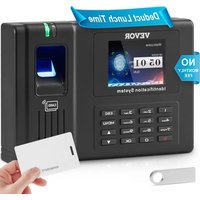


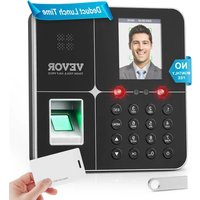
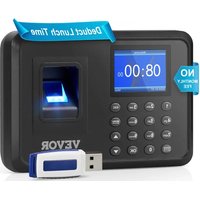
| Product Type | Biometric time clock with fingerprint, RFID and password |
| Brand | Vevor |
| Model | TM1000 |
| Power Supply | DC 12V, 1A, 12W power adapter (included) |
| Product Dimensions | 180 x 130 x 40 mm |
| Weight | Approximately 0.5 kg |
| Identification Methods | Fingerprint (up to 1,000 users), RFID card (125 kHz), Password (8 digits) |
| Display | Backlit LCD screen |
| User Capacity | Up to 1,000 users (according to manual) |
| Log Capacity | Up to 100,000 time records |
| Supported Languages | 11 languages including French, English, German, Spanish, Italian, Russian, Dutch, Swedish, Polish, Portuguese, Arabic |
| Schedule Management | Up to 8 time periods with 3 sections each, support for overtime and breaks |
| Data Export | Via USB key (Excel files for reports, schedules, and users) |
| Advanced Functions | Attendance reports (original, calendar, summary), manual punch, vacation management, bell |
| Maintenance and Cleaning | Clean with a dry, soft cloth. Avoid moisture, dust, and extreme temperatures (0°C to 45°C) |
| Safety | FCC compliant (Part 15). Do not install outdoors. Use only the provided adapter |
| Spare Parts and Repairability | Parts not repairable by user. Contact Vevor support for after-sales service |
| General Information | Support: www.vevor.com/support. Manufacturer: Shanghai Muxin Muye Co., Ltd. EU Importer: E-CrossStu GmbH |
Frequently Asked Questions - TM1000 Vevor
User questions about TM1000 Vevor
0 question about this device. Answer the ones you know or ask your own.
Ask a new question about this device
Download the instructions for your Clock in PDF format for free! Find your manual TM1000 - Vevor and take your electronic device back in hand. On this page are published all the documents necessary for the use of your device. TM1000 by Vevor.
USER MANUAL TM1000 Vevor
Technical Support and E-Warranty Certificate
www.vevor.com/support
TIME CLOCK
USER MANUAL
MODEL: TM1000
We continue to be committed to providing you with tools at competitive prices. "Save Half", "Half Price", or any other similar expressions used by us only represent an estimate of savings you might benefit from buying certain tools with us compared to the major top brands, and does not necessarily mean to cover all categories of tools offered by us. You are kindly reminded to verify carefully when placing an order with us if you are actually saving half in comparison with the top major brands.
VEVOR®
TOUGH TOOLS, HALF PRICE
TIME CLOCK
MODEL: TM1000
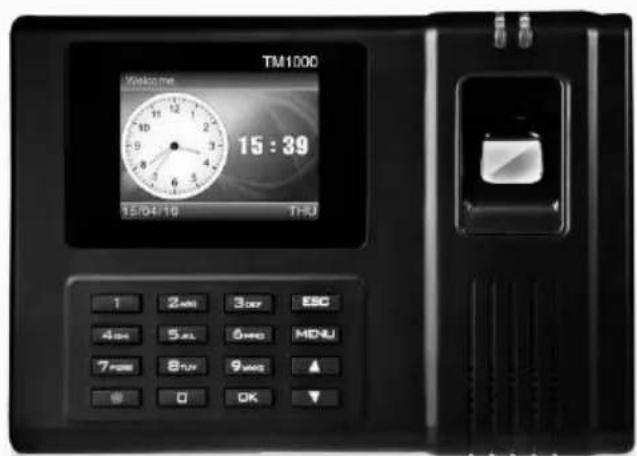
NEED HELP? CONTACT US!
Have product questions? Need technical support? Please feel free to contact us:
Technical Support and E-Warranty Certificate
www.vevor.com/support
This is the original instruction. Please read all manual instructions carefully before operating. VEVOR reserves a clear interpretation of the user manual. The appearance of the product shall be subject to the product you received. Please forgive us that we won't inform you again if there are any technology or software updates on our product.
 | Warning-To reduce the risk of injury, user must read instructions manual carefully. |
 | This device complies with Part 15 of the FCC Rules. Operat subject to the following two conditions:(1)This device may not harmful interference, and (2)this device must accept any inter received, including interference that may cause undesired oper |
 | This product is subject to the provision of European Directive 2012/19/EC. The symbol showing a wheelie bin crossed through indicates that the product requires separate refuse collection in European Union. This applies to the product and all accessor marked with this symbol. Products marked as such may not discarded with normal domestic waste, but must be taken to collection point for recycling electrical and electronic devices |
INSTALLATION CAUTIONS
- Do not install the machine in an environment with extreme temperatures. Please keep the device operating at a temperature between 0°C and 45°C.
- Do not install the machine in a dirty or humid place. Please keep the device in a dry and clean environment for a longer lifespan.
- Keep the device away from dust, water, and fire. All elements may short circuit and cause damage to the mainboard.
- Do not attempt to repair the machine at the user's end. Contact the retailer or wholesaler for after-sales service under warranty.
- Do not install the machine outdoors. It is recommended to install the machine in a location that ensures data and device safety.
- Perform regular data backups to avoid unexpected data loss.
- Use the matched stable voltage power adapter from the default package. The machine may be damaged due to current differences from other types of power adapters.
TECHNICAL PARAMETERS
| Model | TM1000 |
| Working Power | DC12V 1A 12W |
| Language Selection | Supports 11 languages; (English, German, French, Spanish, Italian, Russian, Dutch, Swedish, Polish, Portuguese, Arabic) |
| Product Size | 180*130*40mm |
PARTS LIST
| 1 | Adapter (with adapter plug) | 1 |
| 2 | RFID Card | 5 |
| 3 | Flash Drive | 1 |
| 4 | Machine Screw | 2 |
| 5 | Self-tapping Screw | 4 |
| 6 | Plastic Expansion Sleeve | 4 |
| 7 | USB Extension Cable | 1 |
| 8 | Rear Hanging Plate | 1 |
STEP 1
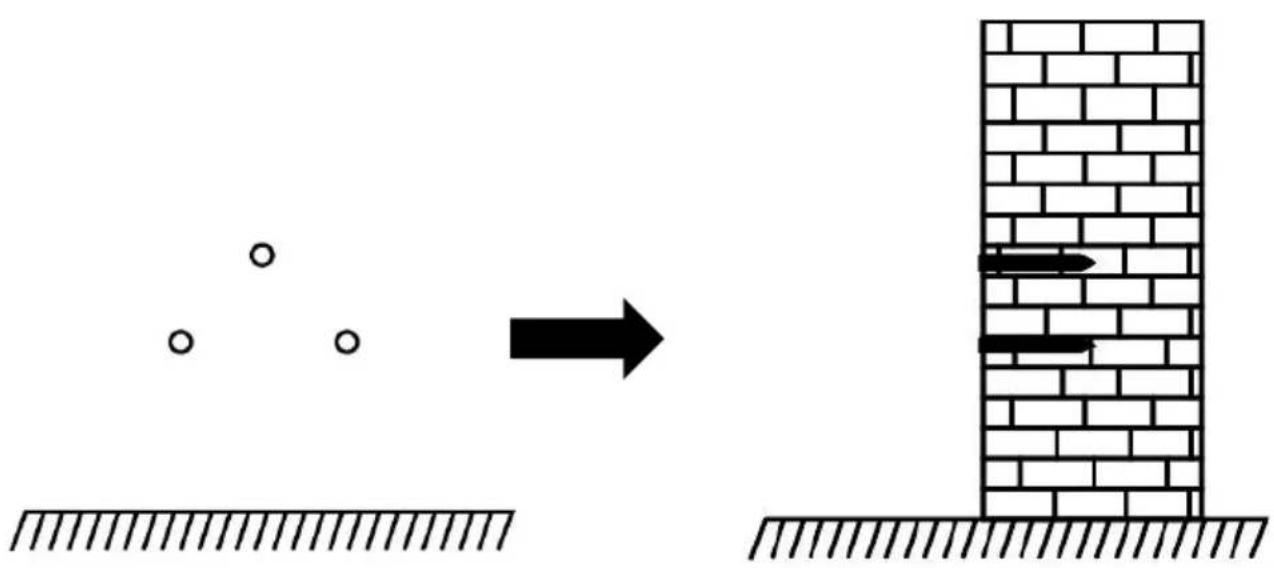
Disassemble the rear hanging plate and attach it to the wall to select the suitable installation position, then make a mark.
Drill holes on the wall according to the marked position.
STEP 2
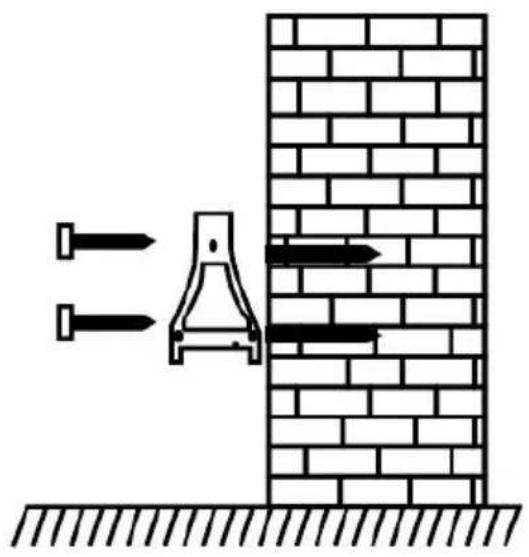
Fix the rear hanging plate onto the wall.
STEP 3![graph TD A["设备输入"] --> B["操作按钮1-2"] B --> C["输出按钮3"] C --> D["设备输出"] D --> E["执行按钮4"] style A fill:#f9f,stroke:#333 style E fill:#bbf,stroke:#333](/content/2026/04/736671/images/36fa84fad8ead429151b253d9f71ac903af5f17c417526463a87895f37ad7ecf.jpg)
Install the device on the rear hanging plate and fix it, then power it up
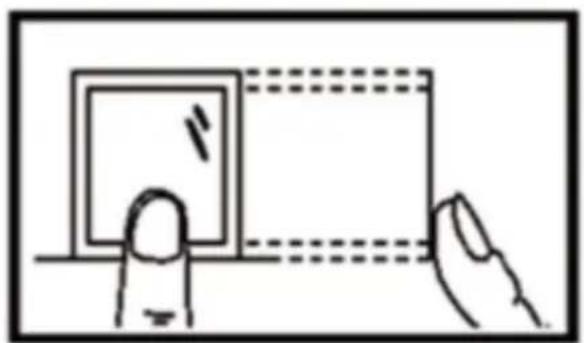
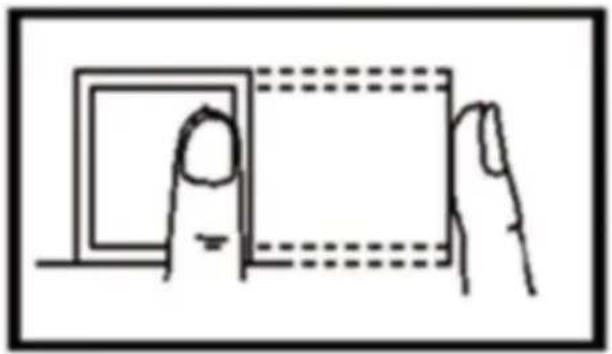
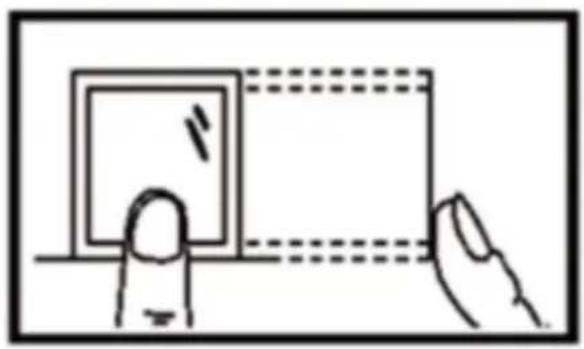
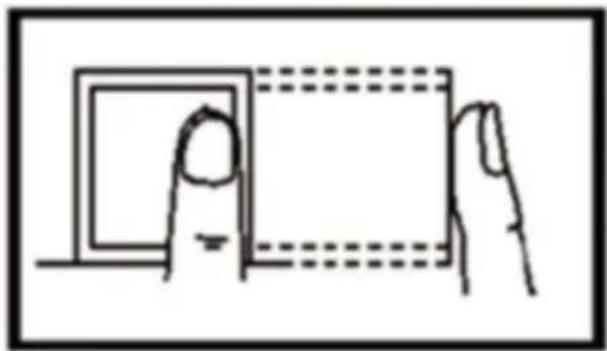
HOW TO MAKE FINGERPRINT PUNCH?
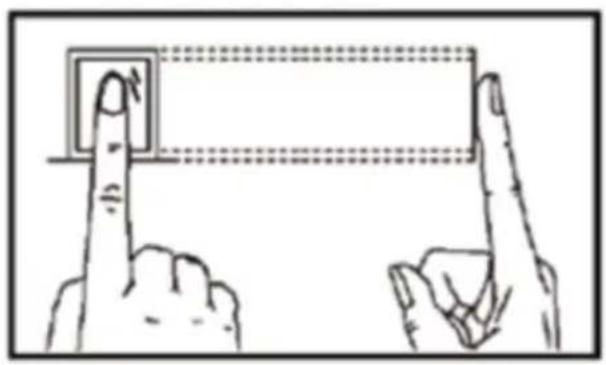
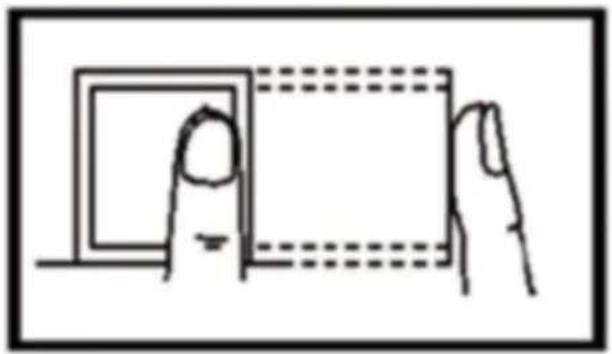
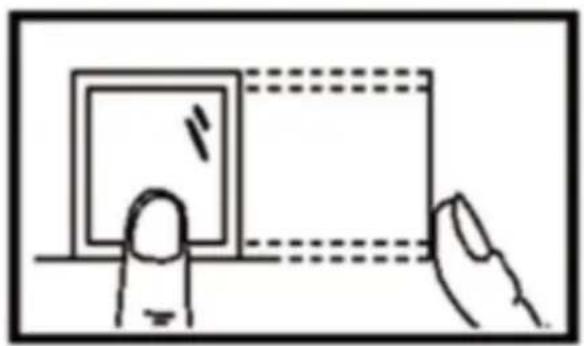
Correct Method
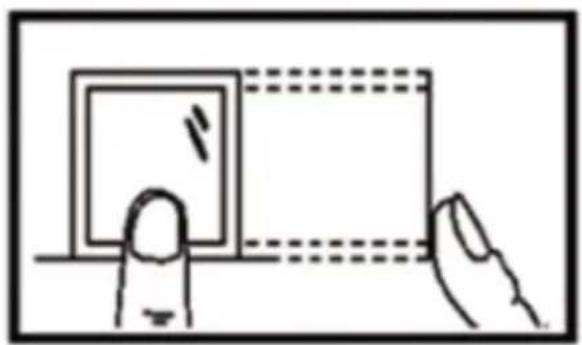
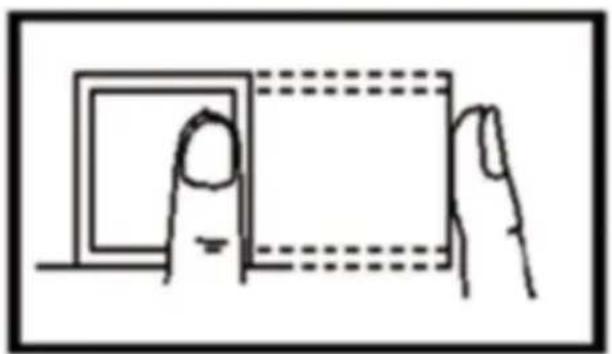
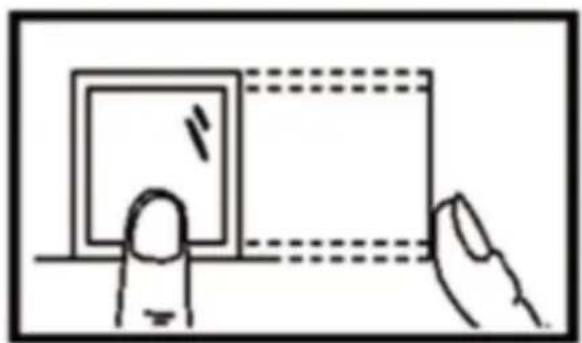
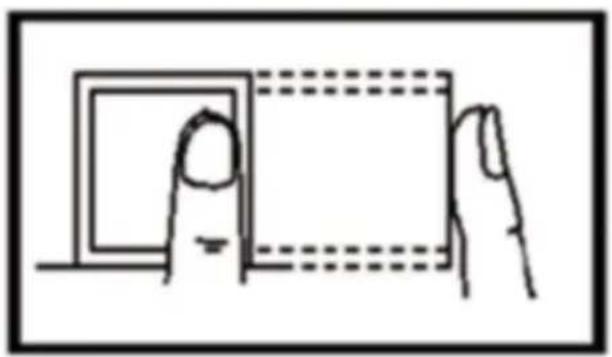
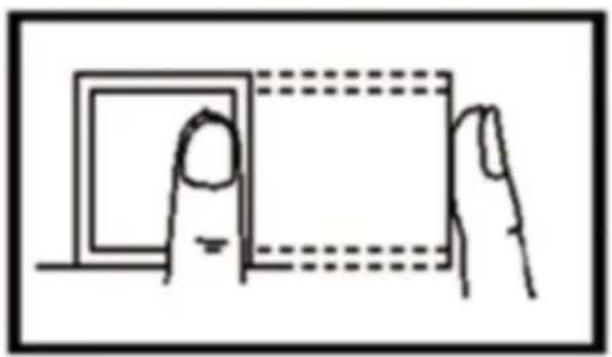
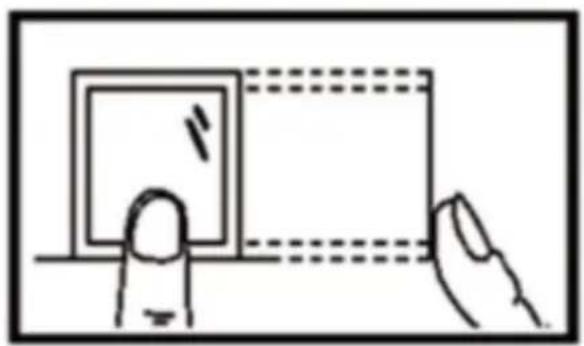
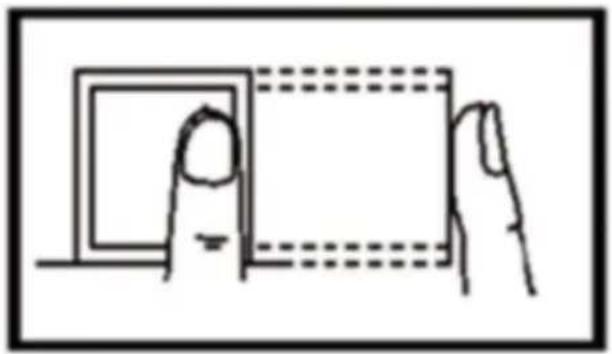
Please place your finger smoothly and closely press it at the center of Fingerprint Scanner on the Device.
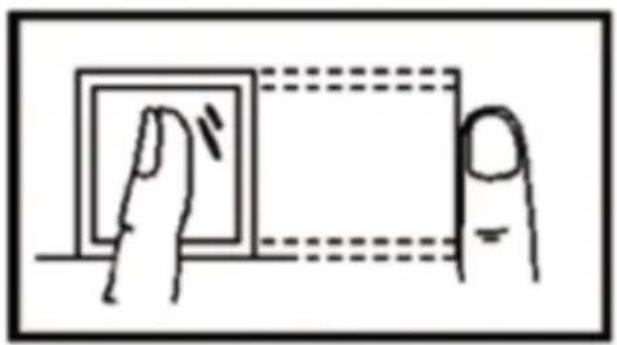
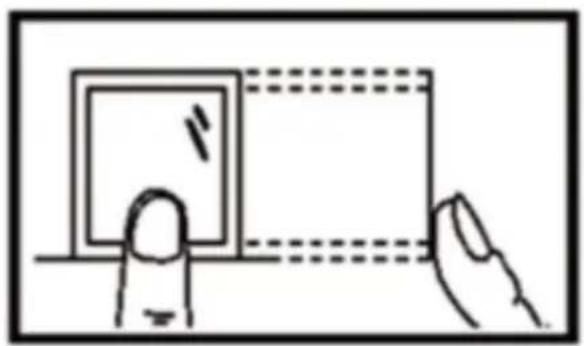
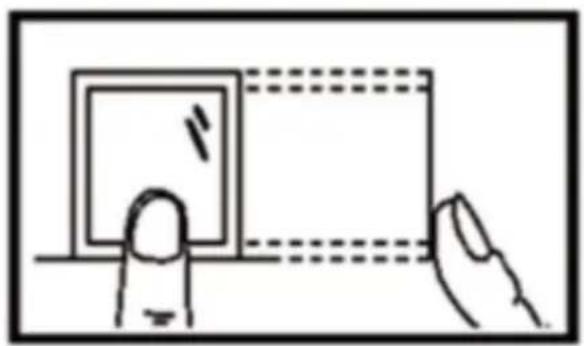
Incorrect Method As Below
Vertical Fingerprint Pressing Scanner Edge Fingerprint Pressing
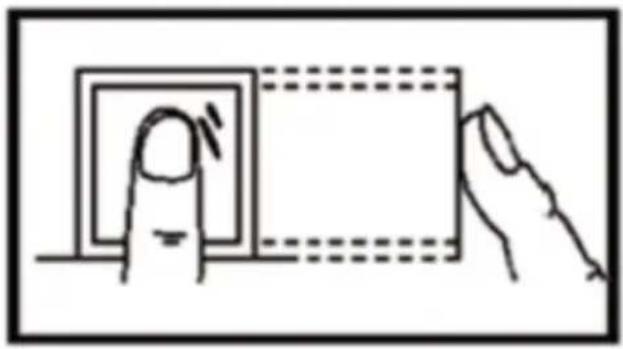
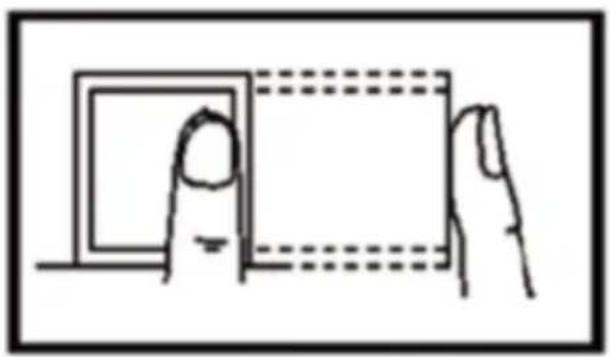
Inclined Fingerprint Pressing Lower Part Fingerprint Pressing
1.SHIFT SETUP
Press "MENU" button to access the menu.
1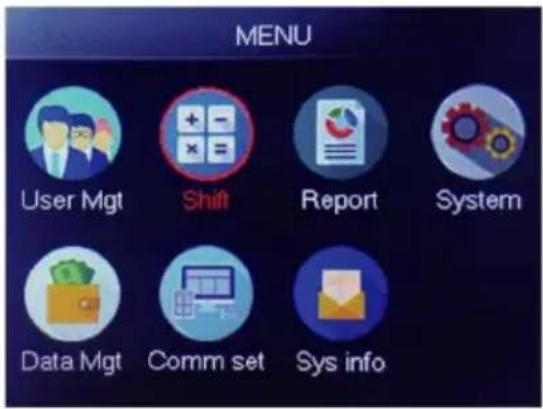
Select "Shift", press "OK"
2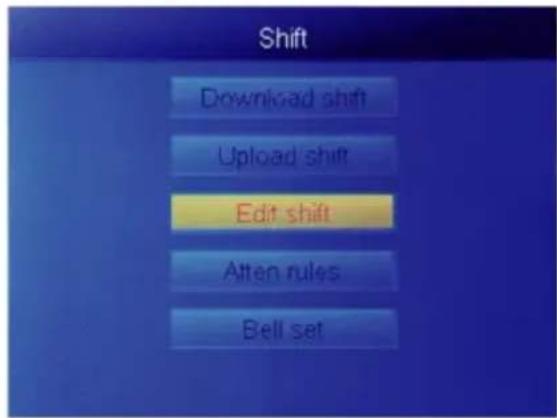
Select "Edit Shift", press "OK"
3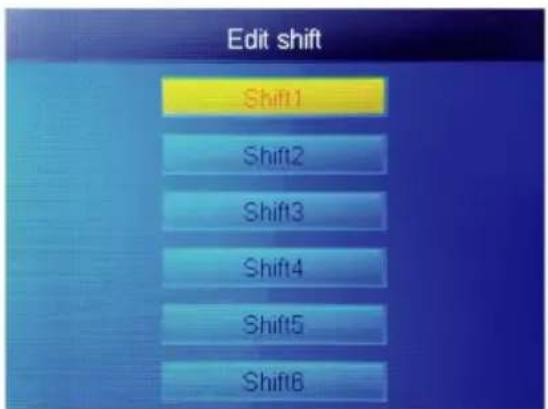
Select "Shift1", press "OK"
4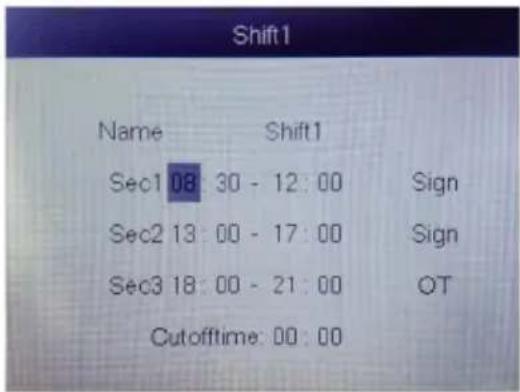
Every shift has 3 sections. Press number key to set time then press "OK" to set next one, and you can select section type of section.
For each shift, there is a 【Cutoff Time】located one row below, used for setting transition from night to the new day.
【Cutoff Time】must be set later than the last attendance time, but earlier than the first check-in time on work day.
2. ADD USER
Press "MENU" button to access the menu.
1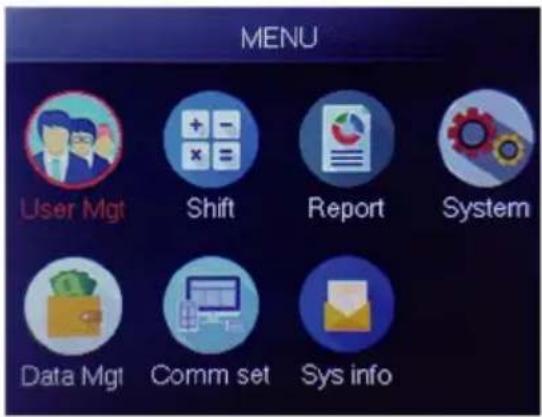
Select "User Mgt", press "OK"
2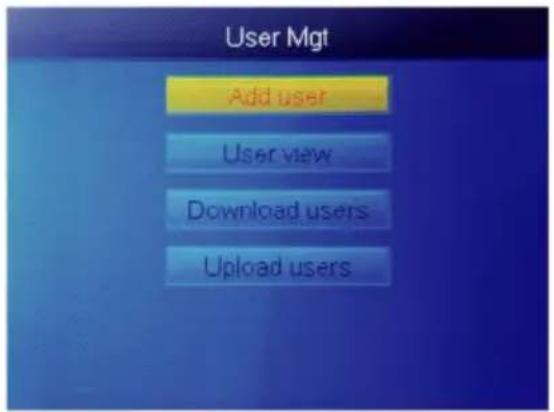
Select "Add User", press "OK"
3
| Add user | |
| ID | |
| Name | |
| FP | 0 |
| Card | No |
| Privilege | User |
| PWD | No |
The smallest unregistered ID is displayed as default ID.
4
| Add user | |
| ID | |
| Name | |
| FP | |
| Card | N |
| Privilege | Use |
| PWD | N |
Select "User Name" and enter user name.
5![Add user ID Name Sophie FP Card No [Abc]](/content/2026/04/736671/images/b508acc27852355d98ffb0a6faa21ffc251b97f7c222161a375a9ff8ca714048.jpg)
Press a number that represents the letter you want to input, press "OK". Press "MENU" to switch between letters and numbers.
6
| Add user | |
| ID | 1 |
| Name | Sophie |
| FF | |
| Card | No |
| Privilege | User |
| PWD | No |
Select "FP" or "Card" or "PWD" and press "OK".
7
Press your finger 3 times. If successful, a message indicating success will appear and the screen will return to the upper menu.
9
| Add user | |
| ID | 1 |
| Name | Sophie |
| FP | 1 |
| Card | No |
| Privage | User |
| PWD | Manager |
Select the corresponding privilege for the user. "User" and "Manager" can be selected.
8
| Add user | |
| ID | 1 |
| Card | No |
| Privilege | User |
| PWD | No |
| Shift | Shift1 |
| Dept | ### |
Select the department. It can be added by uploading the user table in [UserMgt] > [Upload User].
3. USER VIEW
You can view all users here and select a user to perform corresponding operations, including changing basic user information, deleting users, checking user attendance records, and doing manual punches for users. Press the "MENU" button to access the menu.
1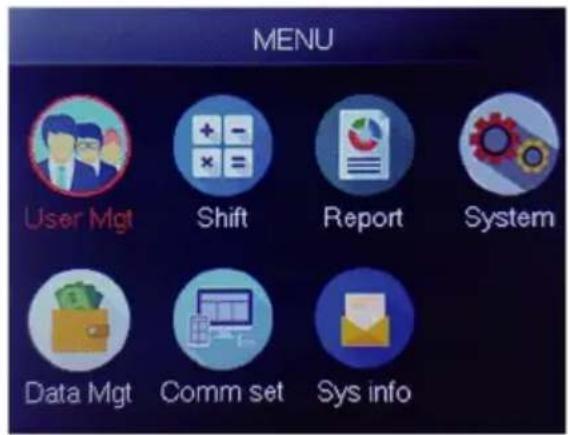
Select "User Mgt" and press "OK".
2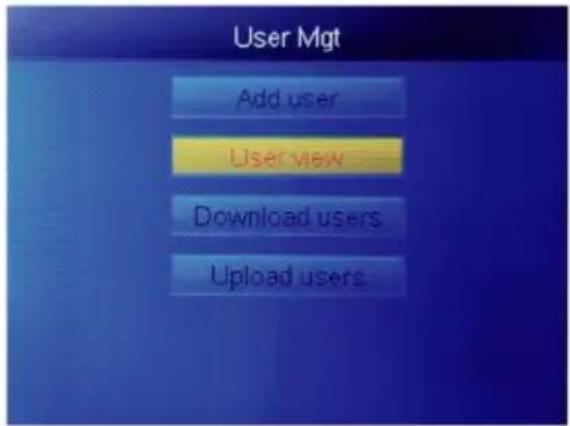
Select "User View", press "OK"
3
| ID | Name | FP | Car | Pwc | Shif | Mg |
| 1 | Sophie | 1 | 1 | |||
| 2 | Gina | 0 | 1 | |||
| 3 | Kathy | 0 | 1 |
Select the corresponding user you want to operate, press "OK".
4
| ID | Name | FP | Car | Pwc | Shif | Mi |
| 1 | Sophie | 1 | 1 | |||
| 2 | Gina | 0 | E | |||
| 3 | Kathy | 0 | ||||
| L | ||||||
| S | ||||||
In this page, press【Menu】and a quick query window will pop up, then input user ID to locate the user. Or press up and down to find the user.
1) Edit user info: 【Select the user to edit】→【Edit】: The same as【Add User】 2) Delete user:【Select the user to delete】→【Del】, press 'OK' in the delete window to delete the selected user 3) View the log: 【Select the user to view the log】→【Log】, can view attendance logs 4) Manual punch:【Select the user to add log】→【Sign】, due to an unexpected situation, a user forgot to punch or other reasons caused missing logs, but actually that user was present, so you can use the【Sign】function to add a log for the user.
4. REPORT
Insert USB disk into the USB port of the fingerprint machine. Press "MENU" button to access the menu.
1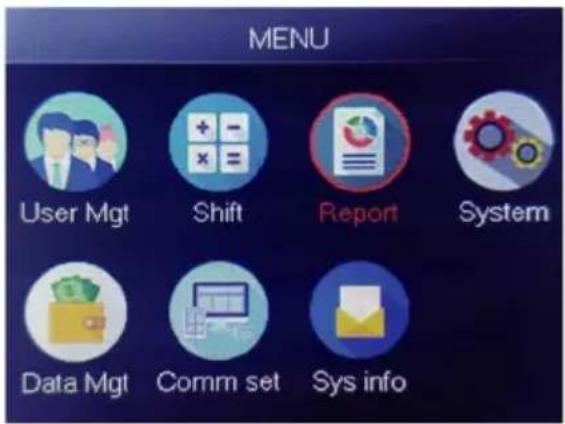
Select "Report", press "OK"
2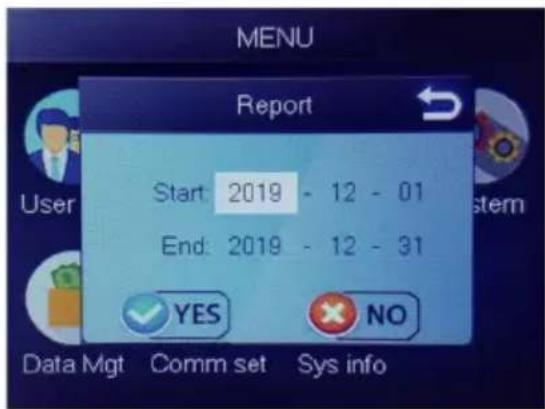
Input the start date and end date then press "OK"
The report includes original record sheet (Original Record), attendance detailed sheet (Schedule) and summary sheet (Summary Report).
Original Record: You can check all users' attendance records in the sheet. Please refer to the picture below:

Schedule: Attendance device can automatically analyse the clock-in and clock-out data, and transmit these data in EXCEL file to the U disk. Format as below:
(Remark: Red text indicates that the attendance is abnormal, such as being late or leaving early. Blue means overtime)
| schedule | ||||||||||||
| ID:1 | Name:Lucas | |||||||||||
| Dept.:Office | Shift:Day Shift | Date:2019-8-1~2019-8-31 | ||||||||||
| Date | week | Sec1 | Sec2 | Sec3 | Work hours | OT hours | Late minutes | Leave minutes | ||||
| IN | OUT | IN | OUT | IN | OUT | Normal | Actual | |||||
| 8-1 | THU | 08:25 | 12:03 | 13:26 | 18:04 | 8 | 8 | 0 | 0 | 0 | ||
Summary Report: It is a Statistics display of employee attendance for month.
Summary Report
| Date: 2019-8-1~2019-8-31 | ||||||||||||
| ID | Name | Dept. | Work hours | Late minutes | Leave minutes | OT hours | Work Dates(Normal /Actual) | Truancy | ||||
| Normal | Actual | TIMES | Minutes | TIMES | Minutes | Normal | ||||||
| 1 | Lucas | Office | 248.0 | 248 | 77.5 | 31.0/31.0 | 0 | |||||
| ▶ ▶ Original record schedule Summary Report | ||||||||||||
FUNCTIONS
1. HOW TO CHANGE THE DATE AND TIME
Press "MENU" button to access the menu.
1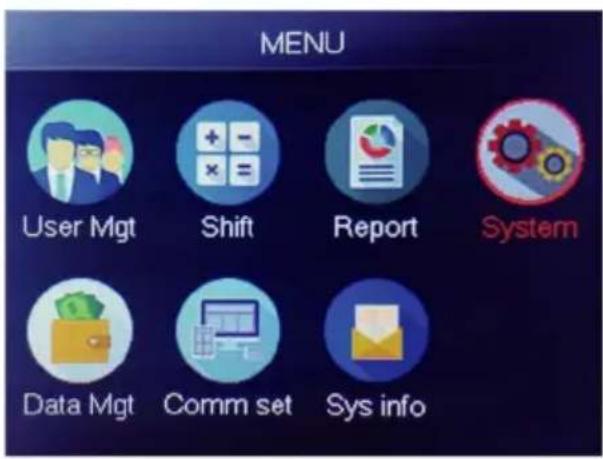
Select "System", press "OK"
2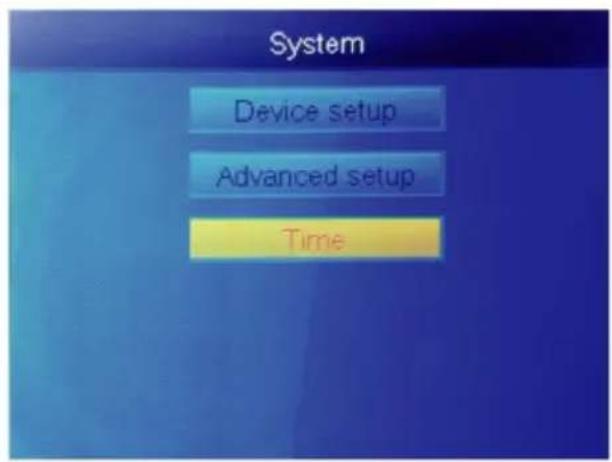
Select "Time", press "OK"
3
| Time | |
| Date fmt | Y/M/D |
| Time fmt | 24H |
You can change device time date and format.
2.HOW TO DELETE RESIGNED USER
Press "MENU" button to access the menu.
1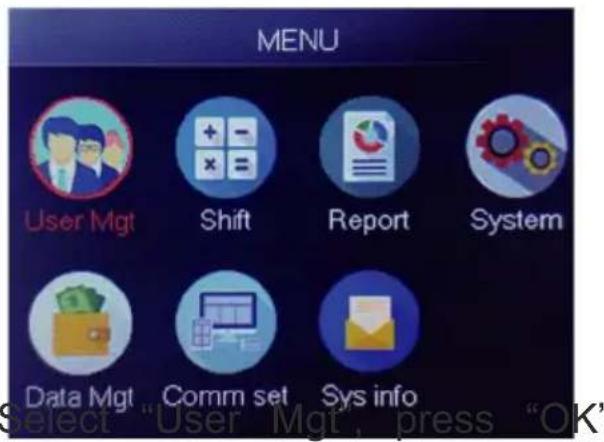
2
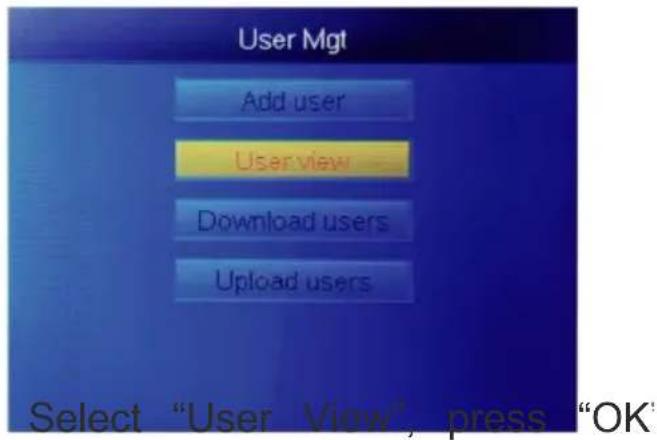
3
| ID | Name | FP | Car | Pwc | Shif | Mg |
| 1 | Sophie | 1 | 1 | |||
| 2 | Gina | 0 | 1 | |||
| 3 | Kathy | 0 | 1 |
Select the one you want to delete, press "OK"
4
| ID | Name | FP | Car | Pwc | Shif | Mi |
| 1 | Sophie | 1 | 1 | |||
| 2 | Gina | 0 | Eu | |||
| 3 | Kathy | 0 | B | |||
| Lo | ||||||
| Slo | ||||||
Select "Delete", delete user
Note: For resigned employees, don't use their register ID immediately.
3. System settings
Press "MENU" button to access the menu.
1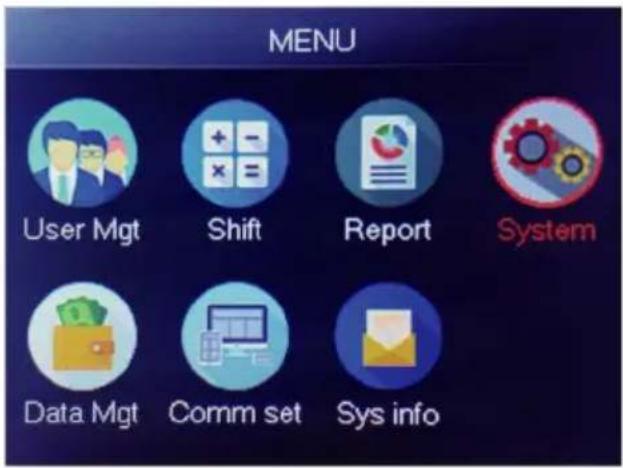
Select "System", press "OK"
2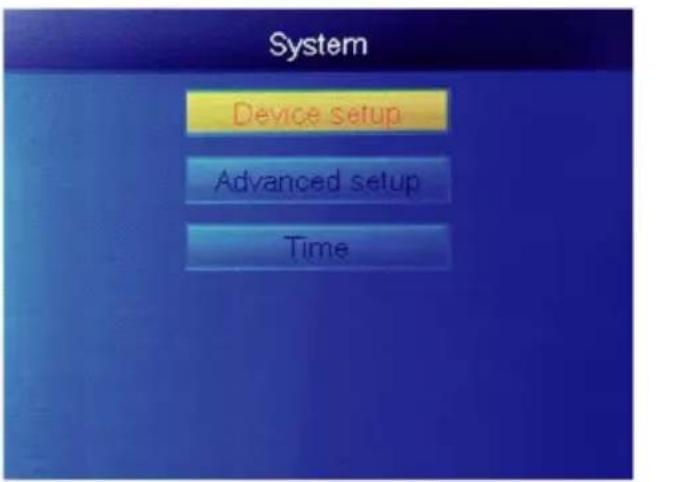
Select "Device setup", press "OK"
| Item | Meaning |
| Device ID | Set device ID, it is related to software communication |
| Language | Set device language |
| Voice | Set the voice of speaker |
| Sleep mode | Only when you touch fingerprint scanner, it's light will on, it can extend the use time of the fingerprint scanner |
| Power off | Whether to enable the function of the bottom left key of key board, device will shut down by long pressing that key about 3 seconds |
| Screen saver | How long does it take to enter screen saver when the main Interface is not operating |
4. HOW TO DOWNLOAD ALL RECORDS
Press "MENU" button to access the menu, insert USB flash disk.
1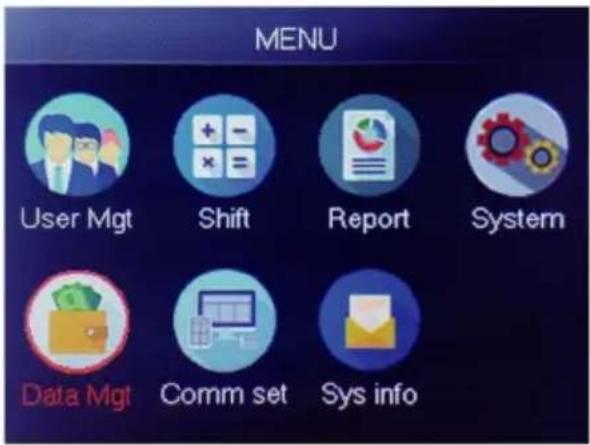
2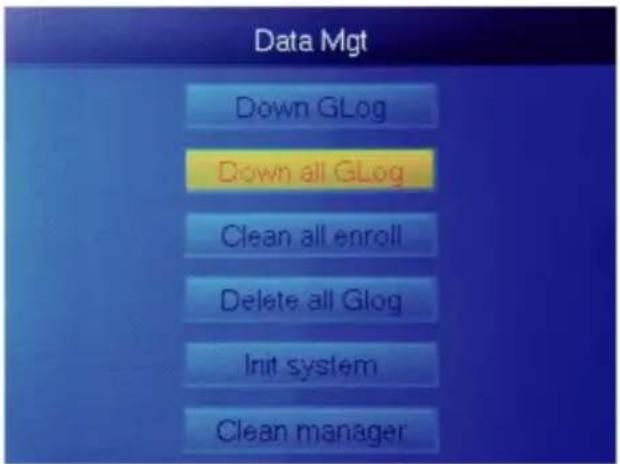
Select "Data Mgt", press "OK". Select "Down all Glog", press "OK".
5. HOW TO DELETE ALL USERS
Press "MENU" button to access the menu.
1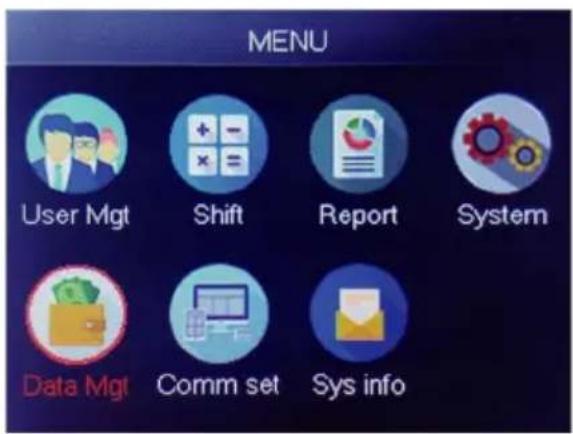
Select "Data Mgt", press "OK".
2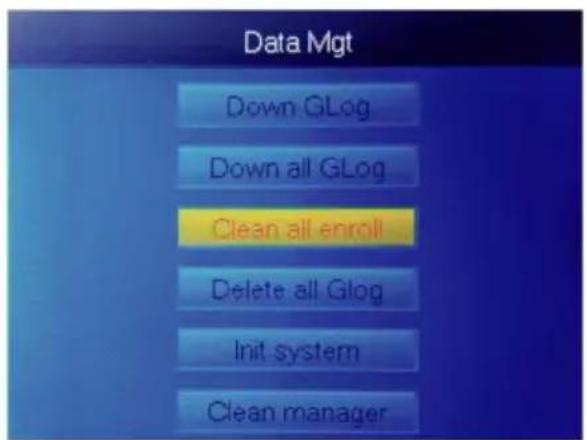
Select "Clean all Enroll", press "OK".
Select "Delete all Glog", press "OK".
7. HOW TO INITIALIZE SYSTEM
Press "MENU" button to access the menu.
1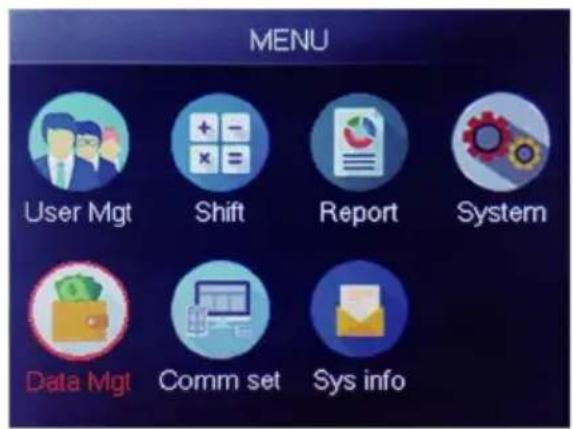
Select "Data Mgt", press "OK".
2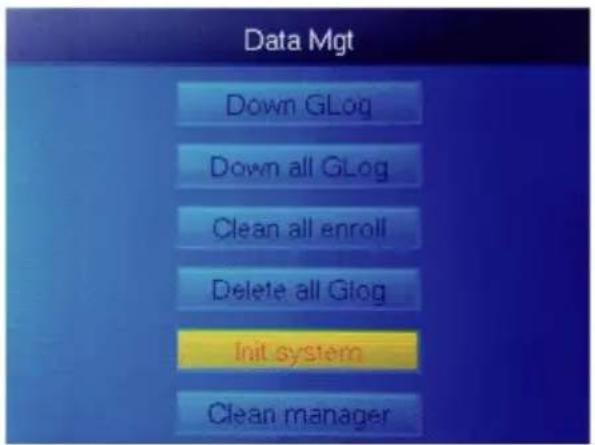
Select "Init system", press "OK".
8. HOW TO CLEAN MANAGER
Press the "MENU" button to access the menu.
1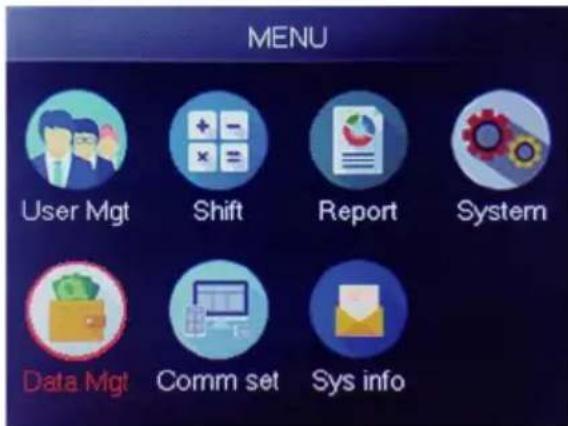
Select "Data Mgt", press "OK".
2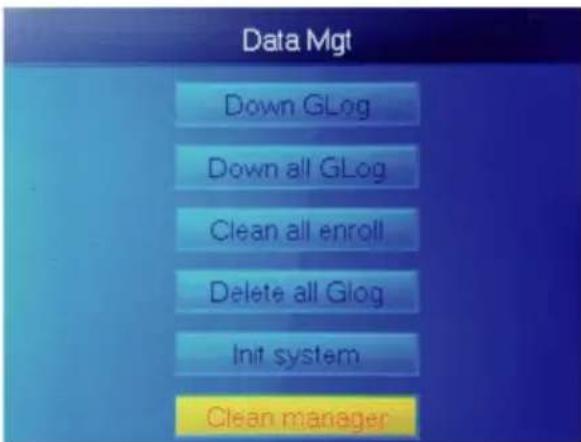
Select "Clean manager", press "OK".
Method 2: After verification is successful via fingerprint, card, or password, press 'OK' to display personal logs. This method is suitable for querying logs without entering the menu.
Method 3: Insert a USB flash drive, press [Menu] > [Data Mgt] > [Down all Glog], then check the TXT file on your PC.
10. [SHIFT] Download/Upload
This product allows you to download the shift table to an Excel file via USB disk. You can edit the Excel file (shift time, section type) in command and then upload it back to the device.
(Note: Besides setting shifts, the sheet includes the settings for holiday access time zones and bell settings.)
Operating Steps:
Press 'MENU' > [Shift] > [Download Shift], insert the U-Disk, click
[Download Shift], then you can download the Excel format file of the shift arrangement. You can also edit the file on your PC. Please refer to the picture below.
| Shift | |||||||||||
| Note: A, shift name: up to 48 words. B. Section type: 0: normal attendance.1: overtime. C. cut off time: if the punch before the cut off time ,it will calculate as the previous day | |||||||||||
| NO. | Name | Sec1 | Sec2 | Sec3 | CutoffTime: | ||||||
| IN | OUT | Sec_type | IN | OUT | Sec_type | IN | OUT | Sec_type | |||
| 1 | Normal | 08:30 | 12:00 | 0 | 13:30 | 18:00 | 0 | 18:30 | 21:00 | 1 | 00:00 |
| 2 | Night | 23:00 | 06:00 | 0 | 07:00 | ||||||
| 3 | Day | 08:30 | 12:00 | 0 | 13:30 | 18:00 | 0 | 00:00 | |||
Edit the shift arrangement according to the prompts in the form header. A maximum of 8 shifts can be set. Click [Save] after editing and save the file to the U-disk.
Note:
1) Attendance time must be in the format of time, and attendance type must be in the format of digits. So when you handle the setting, please pay attention to that the input method is in English half-angle status. Check Method: For example, when you input 10:30, double click this cell, the software will automatically turn the digits into 10:30:00.
2) If you set the shift of cross time, then the Clock-in before the cross
will be counted as the record of previous day. And shift should start the cross time. For example:
| NO. | Shift Name | Section 1 | Section 2 | Section 3 | Cross time | ||||||
| IN | OUT | Type | IN | OUT | Type | IN | OUT | Type | |||
| 1 | Shift1 | 20:30 | 23:00 | 0 | 23:30 | 8:00 | 0 | 9:00 | |||
3) If it is normal attendance in that time zone, then attendance type is “0”. If it is overtime work in that time zone, then attendance type is “1” 4) Time Skip setting is not allowed. For example, when you complete setting of Section 1, you cannot skip Section 2 and get to set Section
Holiday: Set the fixed holiday
Holidays
Note: A. Name: within 48 words. B. date format: yyyy-mm-dd
Lock time zone: It includes the time definition of day time zone, week zone and normal open time zone. See the function introduction of access control for detailed description.
(Note: It will only work in that device with access control function, the device in your hand does not have access control function, no need to set, it is invalid for your device)
| Day Timezone | |||||||||
| Note:Timeformat:HH:MM.one day have1~5sections. | |||||||||
| NO. | Sec1 | Sec2 | Sec | Sec4 | Sec5 | ||||
| 1 | 8:00 | 15:20 | |||||||
| 2 | 9:00 | 10:00 | 11:00 | 13:00 | 14:00 | 18:00 | |||
| 3 | 8:00 | 22:00 | |||||||
| 4 | |||||||||
| 5 | |||||||||
| 6 | |||||||||
| 7 | |||||||||
| 8 | |||||||||
| Week Timezone | |||||||||
| Note:SUN~SAT input the NO. of Day Timezones(0~8),input 0:not control,every time can access | |||||||||
| NO. | SUN | MON | TUE | WED | THU | FRI | SAT | ||
| 1 | 1 | 1 | 1 | 1 | 1 | 1 | 1 | ||
| 2 | 2 | 2 | 2 | 2 | 2 | 2 | 2 | ||
| 3 | |||||||||
| 4 | |||||||||
| 5 | |||||||||
| 6 | |||||||||
| 7 | |||||||||
| 8 | |||||||||
| Normal Open Time | |||||||||
| Note:SUN~SAT input the NO. of Day Timezones(0~8),input 0:not control | |||||||||
| NO. | SUN | MON | TUE | WED | THU | FRI | SAT | ||
| 1 | 1 | 1 | 1 | 1 | 1 | 1 | 1 | ||
Bell Time: Set bell time and bell date. represents valid bell time, represents invalid bell time.
| BellTime | ||||||||
| NO. | Time | SUN | MON | TUE | WED | THU | FRI | SAT |
| 1 | 11:25 | 1 | 1 | 1 | 1 | 1 | 1 | 1 |
| 2 | 13:00 | 0 | 0 | 0 | 0 | 0 | 0 | 0 |
Upload shift: After editing, insert U-disk and click【Upload Shift】, then you can upload the edited shift arrangements into device.
12.【STAFF INFORMATION】Download/ Upload
This product supports downloading staff information to EXCEL file by disk. Another file AFP_001. DAT stores fingerprint information.
Edit staff information in excel file in a computer and then upload it to the self-service machine.
Operating Steps:
Press 'MENU' > [User Mgt] > [Download User], then insert a U-disk. Click [Download User], then you can download staff information in Excel form. You can also edit the form on a PC. Please refer to the picture below:
| Staff | ||||||||||
| ID | Name | Dept. | Shift | Manager | FP | PWD | Card | Lock timezone | Start: | End: |
| 1 | Sophie | Office | 1 | 0 | 1 | |||||
| 2 | Gina | Finance | 1 | 0 | 0 | |||||
| 3 | Kathy | R&D | 1 | 0 | 0 | |||||
Fill in personnel information according to the tips below. For the "Shift" item, enter the shift number as defined in the time attendance settings. When you finish editing, click [Save] and save the edited file to the U-disk. After editing the shift form, press 'MENU' > [User Mgt] > [Upload User], then insert the U-disk, click [Upload User] to transmit the edited user information to the device.
Tip:
- ID: 8-digit maximum, enrollment number (required).
- Name: Up to 16 characters (required).
- Department: Up to 10 characters, up to 16 departments (optional).
- Shift: Input "1~8", representing the corresponding shift time. If no shift is set for the user, enter "0" or leave blank.
- Admin: 0 (or blank) for User, 1 for Manager.
- Fingerprint: FP only output, do not fill.
- Password: Maximum 8-digit password (optional).
- Card: Card number, 10 digits (optional).
- Lock time zone: Input "1~8", representing the corresponding week time zone set in the shift table. If not needed, leave blank.
- Start and End: Set the valid access date range for users. If there is no limitation, leave blank.
(Note: [Lock time zone] and [Start and End] only work on devices with access control function. If your device does not have access control function, these settings are invalid and need not be set.)
T9 input method
Keypad Diagram:
![graph TD A["1.-_:@"] --> B["2ABC"] B --> C["3DEF"] C --> D["ESC"] E["4GHI"] --> F["5JKL"] F --> G["6MNO"] G --> H["MENU"] I["7PQRS"] --> J["8TUV"] J --> K["9WXYZ"] L["⊙"] --> M["0"] M --> N[" backspace "] M --> O[" OK "] P["ES"] <-- ESC Q["SwitchChar,NUM"] <-- SwitchChar,NUM R["▲"] --> S["Page turni…](/content/2026/04/736671/images/426dae719b48e311e5c5239ab42279055312a13fb3b94a3ea19f2be145bf2887.jpg)
An example on the next page for your reference.
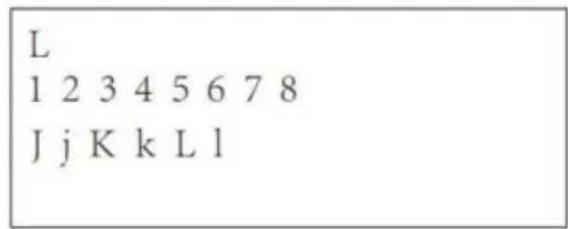
When you need to input letters, press Menu to switch to 'Char'. For example, to input 'LI':
1 2 3 4 5 6 7 8
J j K k L l
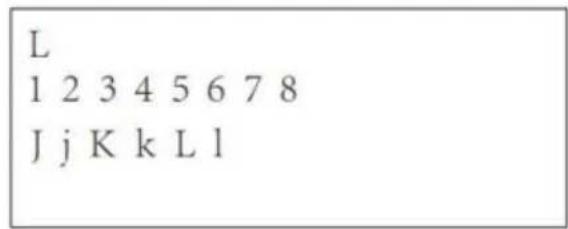
Press '5', the screen appears as shown on the left, then press 'OK'. Directly press the number that corresponds to 'L'. Here, 'L' corresponds to '5'.
L
1 2 3 4 5 6 7 8
J j K k L l
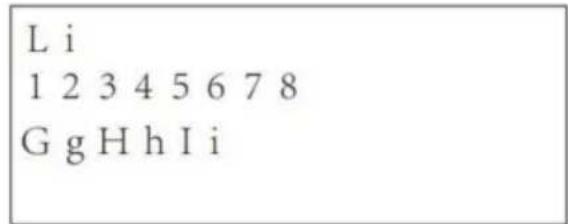
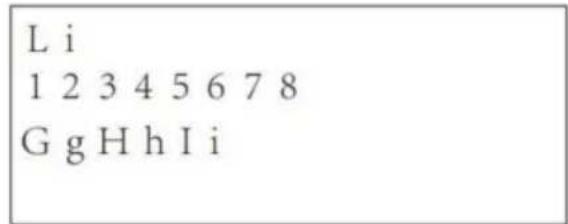
Press '4', the screen appears as shown on the left, then press 'OK'. Directly press the number that corresponds to 'I'. Here, 'I' corresponds to '4'.
Li
1 2 3 4 5 6 7 8
G g H h I i
Selected letters are displayed on the screen. If you need to input more letters, repeat the above steps. When the input is completed, confirm with 'OK'. When finished, press 'ESC' to exit.
When you need to input numbers, press Menu to switch to 'NUM'. Directly press the key to input the corresponding number. (To clear wrong input, press 'MENU' to switch to 'PINGYIN' or 'Char', then press '0' to clear.)
Manufacturer: Shanghaimuxinmuyeyouxiangongsi
Address: Shuangchenglu 803nong11hao1602A-1609shi, baoshanqu, shanghai 200000 CN.
Imported to AUS: SIHAO PTY LTD. 1 ROKEVA STREETEASTWOOD NSW 2122 Australia
Imported to USA: Sanven Technology Ltd. Suite 250, 9166 Anaheim Place, Rancho Cucamonga, CA 91730
| EC | REP |
E-CrossStu GmbH
Mainzer Landstr.69, 60329 Frankfurt am Main
| UK | REP |
YH CONSULTING LIMITED.
C/O YH Consulting Limited Office 147, Centurion House, London Road, Staines-upon-Thames, Surrey TW18 4AX
VEVOR®
TOUGH TOOLS, HALF PRICE
Technical Support and E-Warranty Certificate
www.vevor.com/support
VEVOR®
TOUGH TOOLS, HALF PRICE
Correct method
OPERATION GUIDE
1. SHIFT SETUP
| schedule | ||||||||||||
| ID:1 | Name:Lucas | |||||||||||
| Dept.:Office | Shift:Day Shift | Date:2019-8-1~2019-8-31 | ||||||||||
| Date | week | Sec1 | Sec2 | Sec3 | Work hours | OT hours | Late minutes | Leave minutes | ||||
| IN | OUT | IN | OUT | IN | OUT | Normal | Actual | |||||
| 8-1 | THU | 08:25 | 12:03 | 13:26 | 18:04 | 8 | 8 | 0 | 0 | 0 | ||
| ▶▶ Original record | schedule Summary Report | |||||||||||
| Item | Meaning |
| Device ID | Set device ID, it is related to software communication |
| Language | Set device language |
| Voice | Set the voice of speaker |
| Sleep mode | Only when you touch fingerprint scanner, it's light will on, it can extend the use time of the fingerprint scanner |
| Power off | Whether to enable the function of the bottom left key of key board, device will shut down by long pressing that key about 3 seconds |
| Screen saver | How long does it take to enter screen saver when the main Interface is not operating |
4. HOW TO DOWNLOAD ALL RECORDINGS
| NO. | Shift Name | Section 1 | Section 2 | Section 3 | Cross time | ||||||
| IN | OUT | Type | IN | OUT | Type | IN | OUT | Type | |||
| 1 | Shift1 | 20:30 | 23:00 | 0 | 23:30 | 8:00 | 0 | 9:00 | |||
Note: A. Name: within 48 words. B. Date format: yyyy-mm-dd
| NO. | Name | Start: | End: |
| 1 | new year | 2019-01-01 | 2019-01-01 |
| 2 | Labor day | 2019-05-01 | 2019-05-01 |
| 3 | National Day | 2019-10-01 | 2019-10-03 |
| Shift | Holidays | Lock Timezone | BellTime |
Machine Translated by Google
Press '5', screen appears as shown on the left, then press 'OK', directly press the number that corresponds to 'L', here 'L' corresponds to '5'.
L
1 2 3 4 5 6 7 8
J j K k L l
Press '4', screen appears as shown on the left, then press 'OK', directly press the number that corresponds to 'I', here 'I' corresponds to '5'.
Li
1 2 3 4 5 6 7 8
G g H h I i
Selected letters are displayed on the screen. If you need to input more letters, repeat the above step. When the input is completed, confirm with 'OK'. When finished, press 'ESC' to exit.
C/O YH Consulting Limited Bureau 147, Centurion
Maison, London Road, Staines-upon-Thames, Surrey, TW18 4AX
VEVOR®
TOUGH TOOLS, HALF PRICE
www.vevor.com/support
ZEIT UHR
BENUTZERHANDBUCH
MODELL:TM1000
Richtige Methode
BEDIENERFÜHRUNG
1.SCHICHT-SETUP
| schedule | ||||||||||||
| ID:1 | Name:Lucas | |||||||||||
| Dept.:Office | Shift:Day Shift | Date:2019-8-1~2019-8-31 | ||||||||||
| Date | week | Sec1 | Sec2 | Sec3 | Work hours | OT hours | Late minutes | Leave minutes | ||||
| IN | OUT | IN | OUT | IN | OUT | Normal | Actual | |||||
| 8-1 | THU | 08:25 | 12:03 | 13:26 | 18:04 | 8 | 8 | 0 | 0 | 0 | ||
| ▶▶ Original record | schedule Summary Report | |||||||||||
| Item | Meaning |
| Device ID | Set device ID, it is related to software communication |
| Language | Set device language |
| Voice | Set the voice of speaker |
| Sleep mode | Only when you touch fingerprint scanner, it's light will on, it can extend the use time of the fingerprint scanner |
| Power off | Whether to enable the function of the bottom left key of key board, device will shut down by long pressing that key about 3 seconds |
| Screen saver | How long does it take to enter screen saver when the main Interface is not operating |
| NO. | Shift Name | Section 1 | Section 2 | Section 3 | Cross time | ||||||
| IN | OUT | Type | IN | OUT | Type | IN | OUT | Type | |||
| 1 | Shift1 | 20:30 | 23:00 | 0 | 23:30 | 8:00 | 0 | 9:00 | |||
Note: A, Name: within 48 words. B, date format: yyyy-mm-dd
Press '5', screen appears as shown on the left, then press 'OK', directly press the number that corresponds to 'L', here 'L' corresponds to '5'.
L
1 2 3 4 5 6 7 8
J j K k L l
Press '4', screen appears as shown on the left, then press 'OK', directly press the number that corresponds to 'I', here 'I' corresponds to '5'.
Li
1 2 3 4 5 6 7 8
G g H h I i
Selected letters are displayed on the screen. If you need to input more letters, repeat the above step. When the input is completed, confirm with 'OK'. When finished, press 'ESC' to exit.
C/O YH Consulting Limited Office 147, Centurion
Haus, London Road, Staines-upon-Thames, Surrey,
TW18 4AX
VEVOR®
TOUGH TOOLS, HALF PRICE
www.vevor.com/support
VEVOR®
TOUGH TOOLS, HALF PRICE
electronics www.vevor.com/support
TIME CLOCK
USER MANUAL
MODEL: TM1000
Correct method
Place your finger
OPERATING GUIDE
| schedule | ||||||||||||
| ID:1 | Name:Lucas | |||||||||||
| Dept.:Office | Shift:Day Shift | Date:2019-8-1~2019-8-31 | ||||||||||
| Date | week | Sec1 | Sec2 | Sec3 | Work hours | OT hours | Late minutes | Leave minutes | ||||
| IN | OUT | IN | OUT | IN | OUT | Normal | Actual | |||||
| 8-1 | THU | 08:25 | 12:03 | 13:26 | 18:04 | 8 | 8 | 0 | 0 | 0 | ||
| ▶▶ Original record | schedule Summary Report | |||||||||||
| Item | Meaning |
| Device ID | Set device ID, it is related to software communication |
| Language | Set device language |
| Voice | Set the voice of speaker |
| Sleep mode | Only when you touch fingerprint scanner, it's light will on, it can extend the use time of the fingerprint scanner |
| Power off | Whether to enable the function of the bottom left key of key board, device will shut down by long pressing that key about 3 seconds |
| Screen saver | How long does it take to enter screen saver when the main Interface is not operating |
4. HOW TO DOWNLOAD ALL RECORDS
| NO. | Shift Name | Section 1 | Section 2 | Section 3 | Cross time | ||||||
| IN | OUT | Type | IN | OUT | Type | IN | OUT | Type | |||
| 1 | Shift1 | 20:30 | 23:00 | 0 | 23:30 | 8:00 | 0 | 9:00 | |||
Note: A, Name: within 48 words. B. date format: yyyy-mm-dd
Press '5', screen appears as shown on the left, then press 'OK', directly press the number that corresponds to 'L', here 'L' corresponds to '5'.
L
1 2 3 4 5 6 7 8
J j K k L l
Press '4', screen appears as shown on the left, then press 'OK', directly press the number that corresponds to 'I', here 'I' corresponds to '5'.
Li
1 2 3 4 5 6 7 8
G g H h I i
Selected letters are displayed on the screen. If you need to input more letters, repeat the above step. When the input is completed, confirm with 'OK'. When finished, press 'ESC' to exit.
Imported into AUS: SIHAO PTY LTD. 1 ROKEVA STREET EASTWOOD NSW 2122 Australia
C/O YH Consulting Limited Office 147, Centurion
House, London Road, Staines-upon-Thames, Surrey, TW184AX
VEVOR®
TOUGH TOOLS, HALF PRICE
electronics www.vevor.com/support
VEVOR®
TOUGH TOOLS, HALF PRICE
Fix the rear hanging plate on the wall.
STEP 3![graph TD A["设备输入"] --> B["操作按钮"] B --> C["输出设备"] style A fill:#f9f,stroke:#333 style C fill:#bbf,stroke:#333](/content/2026/04/736671/images/f27f9366019bbf4b94d9d004c4e482c45d0eecec62225eb4ce285f05e7048702.jpg)
Correct method
| schedule | ||||||||||||
| ID:1 | Name:Lucas | |||||||||||
| Dept.:Office | Shift:Day Shift | Date:2019-8-1~2019-8-31 | ||||||||||
| Date | week | Sec1 | Sec2 | Sec3 | Work hours | OT hours | Late minutes | Leave minutes | ||||
| IN | OUT | IN | OUT | IN | OUT | Normal | Actual | |||||
| 8-1 | THU | 08:25 | 12:03 | 13:26 | 18:04 | 8 | 8 | 0 | 0 | 0 | ||
| ▶▶ Original record | schedule Summary Report | |||||||||||
Select "Time", press "OK"
3
| Time | |
| Date fmt | Y/M/D |
| Time fmt | 24H |
| Item | Meaning |
| Device ID | Set device ID, it is related to software communication |
| Language | Set device language |
| Voice | Set the voice of speaker |
| Sleep mode | Only when you touch fingerprint scanner, it's light will on, it can extend the use time of the fingerprint scanner |
| Power off | Whether to enable the function of the bottom left key of key board, device will shut down by long pressing that key about 3 seconds |
| Screen saver | How long does it take to enter screen saver when the main Interface is not operating |
4. HOW TO DOWNLOAD ALL RECORDS
Select "Download all Glog", press "OK"
5. HOW TO DELETE ALL USERS
Select "Clear all Register", press "OK"
6. HOW TO DELETE ALL ATTENDANCE RECORDS
Select "Start system", press "OK"
Select "Cleanup administrator", press "OK"
| NO. | Shift Name | Section 1 | Section 2 | Section 3 | Cross time | ||||||
| IN | OUT | Type | IN | OUT | Type | IN | OUT | Type | |||
| 1 | Shift1 | 20:30 | 23:00 | 0 | 23:30 | 8:00 | 0 | 9:00 | |||
Note: A, Name: within 48 words. B, date format: yyyy-mm-dd
| NO. | Name | Start: | End: |
| 1 | new year | 2019-01-01 | 2019-01-01 |
| 2 | Labor day | 2019-05-01 | 2019-05-01 |
| 3 | National Day | 2019-10-01 | 2019-10-03 |
| Shift | Holidays | Lock Timezone | BellTime |
Press '5', screen appears as shown on the left, then press 'OK', directly press the number that corresponds to 'L', here 'L' corresponds to '5'.
Press '4', screen appears as shown on the left, then press 'OK', directly press the number that corresponds to 'I', here 'I' corresponds to '5'.
Selected letters are displayed on the screen. If you need to input more letters, repeat the above step. When the input is completed, confirm with 'OK'. When finished, press 'ESC' to exit.
C/O YH Consulting Limited Office 147, Centurion House, London Road, Staines-upon-Thames, Surrey, TW18 4AX
VEVOR®
TOUGH TOOLS, HALF PRICE
Correct method
Please gently
1. CHANGE SETTINGS
| schedule | ||||||||||||
| ID:1 | Name:Lucas | |||||||||||
| Dept.:Office | Shift:Day Shift | Date:2019-8-1~2019-8-31 | ||||||||||
| Date | week | Sec1 | Sec2 | Sec3 | Work hours | OT hours | Late minutes | Leave minutes | ||||
| IN | OUT | IN | OUT | IN | OUT | Normal | Actual | |||||
| 8-1 | THU | 08:25 | 12:03 | 13:26 | 18:04 | 8 | 8 | 0 | 0 | 0 | ||
| ▶▶ Original record | schedule Summary Report | |||||||||||
| Item | Meaning |
| Device ID | Set device ID, it is related to software communication |
| Language | Set device language |
| Voice | Set the voice of speaker |
| Sleep mode | Only when you touch fingerprint scanner, it's light will on, it can extend the use time of the fingerprint scanner |
| Power off | Whether to enable the function of the bottom left key of key board, device will shut down by long pressing that key about 3 seconds |
| Screen saver | How long does it take to enter screen saver when the main Interface is not operating |
4. HOW TO DOWNLOAD ALL DISCS
| NO. | Shift Name | Section 1 | Section 2 | Section 3 | Cross time | ||||||
| IN | OUT | Type | IN | OUT | Type | IN | OUT | Type | |||
| 1 | Shift1 | 20:30 | 23:00 | 0 | 23:30 | 8:00 | 0 | 9:00 | |||
Note: A, Name: within 48 words. B. date format: yyyy-mm-dd
| NO. | Name | Start: | End: |
| 1 | new year | 2019-01-01 | 2019-01-01 |
| 2 | Labor day | 2019-05-01 | 2019-05-01 |
| 3 | National Day | 2019-10-01 | 2019-10-03 |
| Shift | Holidays | Lock Timezone | BellTime |
Machine Translated by Google
Press '5', screen appears as shown on the left, then press 'OK', directly press the number that corresponding to 'L', here 'L' corresponds to '5'.
L
1 2 3 4 5 6 7 8
J j K k L l
Press '4', screen appears as shown on the left, then press 'OK', directly press the number that corresponding to 'I', here 'I' corresponds to '5'.
Li
1 2 3 4 5 6 7 8
G g H h I i
Selected letters are displayed on the screen, if you need input more letters, repeat above step when the input is completed, confirm with 'OK' When finished, press 'ESC' to exit.
C/O YH Consulting Limited Office 147, Centurion House, London Road, Staines-upon-Thames, Surrey, TW18 4AX
VEVOR®
TOUGH TOOLS, HALF PRICE
www.vevor.com/support
VEVOR®
TOUGH TOOLS, HALF PRICE
www.vevor.com/support
TIME CLOCK
USER MANUAL
MODEL: TM1000
NEED HELP? CONTACT US!
INSTALLATION WARNINGS
Correct method
Place your finger
smoothly and press it
OPERATING GUIDE
1. SHIFT SETTING
Select "Shift", press "OK"
2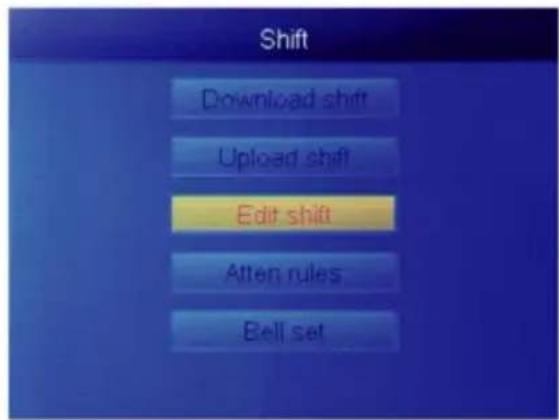
Select "Shift1", press "OK"
4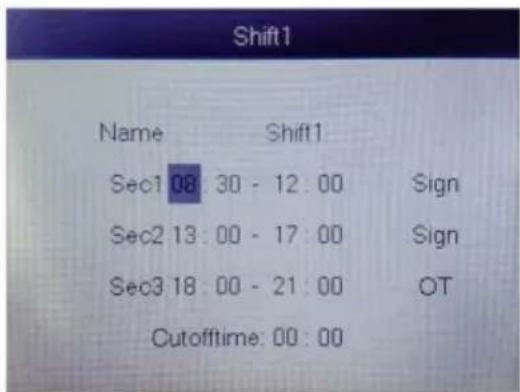
Select "FP" or "Card" or "PWD", press "OK".
7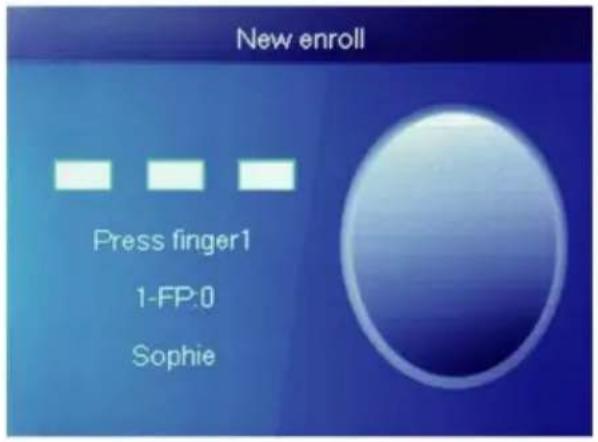
| schedule | ||||||||||||
| ID:1 | Name:Lucas | |||||||||||
| Dept.:Office | Shift:Day Shift | Date:2019-8-1~2019-8-31 | ||||||||||
| Date | week | Sec1 | Sec2 | Sec3 | Work hours | OT hours | Late minutes | Leave minutes | ||||
| IN | OUT | IN | OUT | IN | OUT | Normal | Actual | |||||
| 8-1 | THU | 08:25 | 12:03 | 13:26 | 18:04 | 8 | 8 | 0 | 0 | 0 | ||
| ▶▶ Original record | schedule Summary Report | |||||||||||
Select "System", press "OK"
2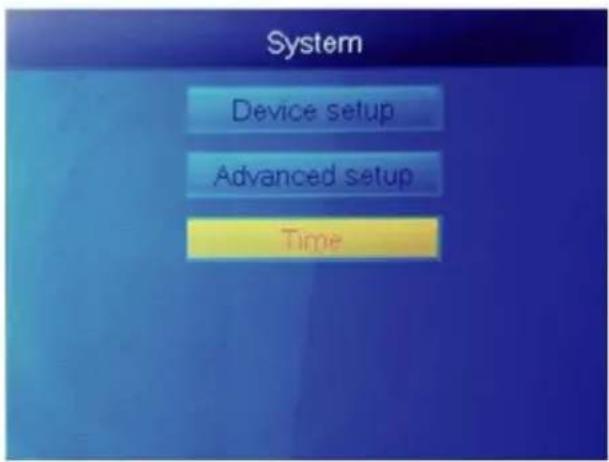
Select "Time", press "OK"
3
| Time | |
| Date fmt | Y/M/D |
| Time fmt | 24H |
Select "System", press "OK"
2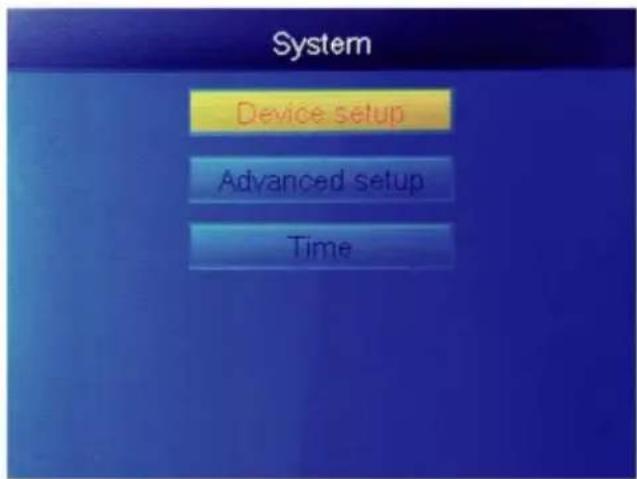
Select "Device setup", press "OK"
| Item | Meaning |
| Device ID | Set device ID, it is related to software communication |
| Language | Set device language |
| Voice | Set the voice of speaker |
| Sleep mode | Only when you touch fingerprint scanner, it's light will on, it can extend the use time of the fingerprint scanner |
| Power off | Whether to enable the function of the bottom left key of key board, device will shut down by long pressing that key about 3 seconds |
| Screen saver | How long does it take to enter screen saver when the main Interface is not operating |
Select "All down Glog", press "OK"
Select "Init system", press "OK"
8. HOW TO CLEAN THE MANAGER
Select "Clean manager", press "OK"
9. HOW TO VIEW USER ATTENDANCE DATA
10. SHIFT Download/upload
| NO. | Shift Name | Section 1 | Section 2 | Section 3 | Cross time | ||||||
| IN | OUT | Type | IN | OUT | Type | IN | OUT | Type | |||
| 1 | Shift1 | 20:30 | 23:00 | 0 | 23:30 | 8:00 | 0 | 9:00 | |||
Note: A, Name: within 48 words. B, date format: yyyy-mm-dd
Press '5', screen appears as shown on the left, then press 'OK', directly press the number that corresponds to 'L', here 'L' corresponds to '5'.
L
1 2 3 4 5 6 7 8
J j K k L l
Press '4', screen appears as shown on the left, then press 'OK', directly press the number that corresponds to 'I', here 'I' corresponds to '5'.
Li
1 2 3 4 5 6 7 8
G g H h I i
Selected letters are displayed on the screen. If you need to input more letters, repeat the above step. When the input is completed, confirm with 'OK'. When finished, press 'ESC' to exit.
C/O YH Consulting Limited, Office 147, Centurion
House, London Road, Staines-upon-Thames, Surrey, TW18 4AX
VEVOR®
TOUGH TOOLS, HALF PRICE
Warranty certificate www.vevor.com/support
VEVOR®
TOUGH TOOLS, HALF PRICE
www.vevor.com/support
TID KLOCKA
USER MANUAL
MODEL: TM1000
www.vevor.com/support
INSTALLATION PRECAUTIONS
Correct method
Tilting fingerprint pressing
USER GUIDE
1. SHIFT SETTING
| schedule | ||||||||||||
| ID:1 | Name:Lucas | |||||||||||
| Dept.:Office | Shift:Day Shift | Date:2019-8-1~2019-8-31 | ||||||||||
| Date | week | Sec1 | Sec2 | Sec3 | Work hours | OT hours | Late minutes | Leave minutes | ||||
| IN | OUT | IN | OUT | IN | OUT | Normal | Actual | |||||
| 8-1 | THU | 08:25 | 12:03 | 13:26 | 18:04 | 8 | 8 | 0 | 0 | 0 | ||
| ▶▶ Original record | schedule Summary Report | |||||||||||
| User view | ||||||
| ID | Name | FP | Car | Pwc | Shif | M |
| 1 | Sophie | 1 | 1 | |||
| 2 | Gina | 0 | Eo | |||
| 3 | Kathy | 0 | D | |||
| Lo | ||||||
| Sig | ||||||
| Item | Meaning |
| Device ID | Set device ID, it is related to software communication |
| Language | Set device language |
| Voice | Set the voice of speaker |
| Sleep mode | Only when you touch fingerprint scanner, it's light will on, it can extend the use time of the fingerprint scanner |
| Power off | Whether to enable the function of the bottom left key of key board, device will shut down by long pressing that key about 3 seconds |
| Screen saver | How long does it take to enter screen saver when the main Interface is not operating |
4. HOW TO LOAD ALL POR
| NO. | Shift Name | Section 1 | Section 2 | Section 3 | Cross time | ||||||
| IN | OUT | Type | IN | OUT | Type | IN | OUT | Type | |||
| 1 | Shift1 | 20:30 | 23:00 | 0 | 23:30 | 8:00 | 0 | 9:00 | |||
Note: A, Name: within 48 words. B, date format: yyyy-mm-dd
Press '5', screen appears as shown on the left, then press 'OK', directly press the number that corresponds to 'L', here 'L' corresponds to '5'.
Press '4', screen appears as shown on the left, then press 'OK', directly press the number that corresponds to 'I', here 'I' corresponds to '5'.
Selected letters are displayed on the screen. If you need to input more letters, repeat the above step. When the input is completed, confirm with 'OK'. When finished, press 'ESC' to exit.
C/O YH Consulting Limited Office 147, Centurion House, London Road, Staines-upon-Thames, Surrey, TW18 4AX
VEVOR®
TOUGH TOOLS, HALF PRICE
www.vevor.com/support
- TIME CLOCK
- USER MANUAL
- VEVOR®
- NEED HELP? CONTACT US
- INSTALLATION CAUTIONS
- TECHNICAL PARAMETERS
- PARTS LIST
- STEP
- HOW TO MAKE FINGERPRINT PUNCH
- CORRECT METHOD
- INCORRECT METHOD AS BELOW
- SHIFT SETUP
- ADD USER
- USER VIEW
- REPORT
- FUNCTIONS
- HOW TO CHANGE THE DATE AND TIME
- HOW TO DELETE RESIGNED USER
- SYSTEM SETTINGS
- HOW TO DOWNLOAD ALL RECORDS
- HOW TO DELETE ALL USERS
- HOW TO INITIALIZE SYSTEM
- HOW TO CLEAN MANAGER
- [SHIFT] DOWNLOAD/UPLOAD
- OPERATING STEPS
- NOTE
- HOLIDAY: SET THE FIXED HOLIDAY
- HOLIDAYS
- 【STAFF INFORMATION】DOWNLOAD/ UPLOAD
- TIP
- T9 INPUT METHOD
- KEYPAD DIAGRAM
- TOUGH TOOLS, HALF PRICE
- OPERATION GUIDE
- HOW TO DOWNLOAD ALL RECORDINGS
- MACHINE TRANSLATED BY GOOGLE
- ZEIT UHR
- BENUTZERHANDBUCH
- MODELL:TM
- RICHTIGE METHODE
- BEDIENERFÜHRUNG
- SCHICHT-SETUP
- MODEL: TM
- OPERATING GUIDE
- HOW TO DELETE ALL ATTENDANCE RECORDS
- CHANGE SETTINGS
- HOW TO DOWNLOAD ALL DISCS
- INSTALLATION WARNINGS
- SHIFT SETTING
- HOW TO CLEAN THE MANAGER
- HOW TO VIEW USER ATTENDANCE DATA
- SHIFT DOWNLOAD/UPLOAD
- TID KLOCKA
- WWW.VEVOR.COM/SUPPORT
- INSTALLATION PRECAUTIONS
- USER GUIDE
- HOW TO LOAD ALL POR
Brand : Vevor
Model : TM1000
Category : Clock