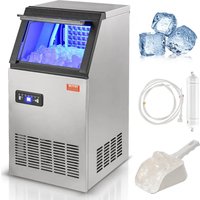
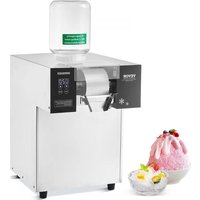
KJ-AT25F - Ice machine Vevor - Free user manual and instructions
Find the device manual for free KJ-AT25F Vevor in PDF.

| Product Type | Ice Machine |
| Brand | Vevor |
| Model | KJ-AT25F |
| Operating Ambient Temperature | 3 °C to 40 °C |
| Required Water Pressure | 0.1 – 0.4 MPa |
| Water Connection | Drinking water only |
| Manufacturing Time Adjustment | From -5 to +8 minutes per cycle |
| Delayed Programming | Automatic on/off from 0 to 24 h |
| Functions | Ice making, self-cleaning, blue lighting, reservation |
| Cleaning | Weekly cleaning of internal and external parts; self-cleaning with vinegar or lemon juice |
| Safety | Grounding mandatory; dedicated outlet; do not use extension cord |
| Included Accessories | Manual, water filter, drainage hose, ice scoop, nylon ties, ring, gaskets, blue clips, spare plug |
| Rubber Feet | Yes |
Frequently Asked Questions - KJ-AT25F Vevor
User questions about KJ-AT25F Vevor
0 question about this device. Answer the ones you know or ask your own.
Ask a new question about this device
Download the instructions for your Ice machine in PDF format for free! Find your manual KJ-AT25F - Vevor and take your electronic device back in hand. On this page are published all the documents necessary for the use of your device. KJ-AT25F by Vevor.
USER MANUAL KJ-AT25F Vevor
Technical Support and E-Warranty Certificate www.vevor.com/support
Commercial Ice Machine
MODEL: KJ-AT25F
We continue to be committed to provide you tools with competitive price. "Save Half", "Half Price" or any other similar expressions used by us only represent of savings you might benefit from buying certain tools with us compared top brands and does not necessarily mean to cover all categories of tools offered are kindly reminded to verify carefully when you are placing an order with us actually saving half in comparison with the top major brands.
MODEL: KJ-AT25F

natural_image
Line drawing of a front-mounted air conditioner unit with ventilation grilles and control panel (no text or symbols)NEED HELP? CONTACT US!
Have product questions? Need technical support? Please feel fr contact us:
Technical Support and E-Warranty Certificate www.vevor.com/support
This is the original instruction, please read all manual instruction carefully before operating. VEVOR reserves a clear interpretation user manual. The appearance of the product shall be subject to product you received. Please forgive us that we won't inform you there are any technology or software updates on our product.
 | Warning-To reduce the risk of injury, user must re instructions manual carefully. |
 | This device complies with Part 15 of the FCC Rules. is subject to the following two conditions:(1)This device not cause harmful interference, and (2)this device must any interference received, including interference that m cause undesired operation. |
 | This product is subject to the provision of European D 2012/19/EC. The symbol showing a wheelie bin cros through indicates that the product requires separate re collection in the European Union. This applies to the and all accessories marked with this symbol. Products as such may not be discarded with normal domestic w must be taken to a collection point for recycling electr electronic devices |

IMPORTANT SAFETYINSTRUCTIONS
When using electrical appliances, basic safety precautions should be followed to reduce the risk of fire, electric shock, and injury to person or property. Read all instructions before operating the machine for the first time.
CAUTION: ICE CAN'T BE STORED IN THE ICE BIN DURING NIGHT-TIME, IT'S NOT FRIDGE, ICE WILL BE MELTED TO WATER FLOW OUT OF THE MACHINE.
-
If connect with water supply, CAUTION: must connect the potable w supply;
-
The machine is intended to be used in household and similar applications such as:
-staff kitchen areas in shops, offices, and other working environments;
-farmhouses
-by clients in hotels, motels, and other residential type environments; -Catering industry and similar industries.
-
The machine should be used indoors and without obstacles surround good ventilation place. There is must be 50cm at least between the sides of the machine with the wall.
-
When using electrical appliances, basic safety precautions should be followed to reduce the risk of fire, electric shock, and injury to person property. Read all instructions before using any appliance.
-
Don't operate this or any other appliance with a damaged cord.
-
Connect to properly polarized outlets only. No other appliance should be plugged into the same outlet. Be sure that the plug is fully inserted socket.
-
Don't place the machine and power cord near flammable material. Cover the cord. Do not submerge it in water.
-
We do not recommend the use of an extension cord, as it may own and become a risk of fire.
-
Unplug the ice maker before cleaning or making any repairs or ser
-
Exercise caution and supervision when the appliance is used near children.
-
Don't use your ice maker outdoors. Avoid direct sunlight and make that there is at least 5 inches of space between the back and sides your unit and the wall.
-
Don't use any liquid other than water in the unit to make the ice
-
Do not clean your ice maker with flammable detergents. The fumes create a fire hazard or explosion.
-
Do not tip the machine over.
-
If the ice maker is brought indoors from outdoors during the winter give it a few hours to warm up to room temperature before plugging power source.
-
This unit should be properly grounded for your safety. The power equipped with a three-prong plug mated with standard three-prong wall outlets to minimize the possibility of electric shock.
-
Plug your appliance into a dedicated, properly installed, and ground wall outlet. Do not, under any circumstance power and /or grounding should be directed toward a certified electrician.
- The foaming materials inside are combustible which must be kept from fire.
- It's forbidden to pull the cable to unplug the plug, pull the plug is IMPORTANCE: To avoid hazards due to instability, the unit must be pl on an even and flat surface.
| WARNING: This appliance must be grounded. | |
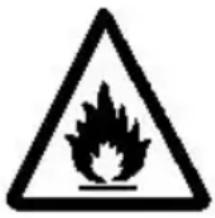 Warning:Combustible materials Warning:Combustible materials | 1)The fuse on the PCB is 15A,if change,must be by a technician.2)voltage fluctuation can't be exceeded ±10% than rated voltage,or a Voltage stabilizer is needed.3)In addition to the method recommended by the manufacturer, mechanical equipment or other method must not be used to accelerate the defrosting proc and the refrigeration system must not be damaged.4)The refrigeration system contains high-pressure refrigerant, and the refrigeration system must not be damaged. Be especially careful when installing and moving. Installation and maintenance must be performed by the manufacturer or professional. Scrap must be disposed of by the designated recycling department.5)There are heat insulation materials in the appliance which are combustible materials, and must be kept from fire sources. Repairs must be performed by the manufacturer or professionals. Scrap must be disposed by the designated recycling department. |
| IMPORTANCE: To avoid hazards due to instability, the unit must placed on an even and flat surface. | |
Installation and connection
- Place the machine on a flat place.

2.Ways of adding water Use water faucet as water source

Connect to faucet
- Connect to drainpipe Plug into the socket
Earthed socket
- Make ice
Press ON/OFF button, the machine will work automatically.
Note: The installation must be carried out by professionals according instructions.
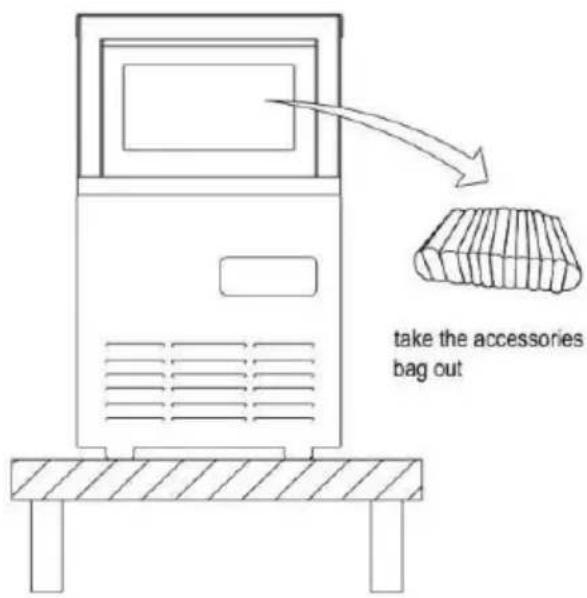
UNPACKING YOUR ICE MAKER
- Remove all exterior and interior packaging materials. Check whether the below accessories are included or not. If any parts are missing, contact our customer service. After you unpack the machine, we recommend you to leaving it for 24 hours before turning it on.
- Clean the interior with lukewarm water and a soft cloth or clean th using the Self-Clean function.
- Find a location for your ice maker where it's protected from direct and other sources of heat (i.e. stove, furnace, radiator). Place the ice maker on a level surface. Make sure that there is at least 5 inches between the back and sides of your ice maker and the wall.
- Allow one hour for the refrigerant to settle before plugging the unit initial use.
- The appliance must be positioned where the plug is accessible.
Package Contents
natural_image
Line drawing of a front-mounted air conditioner unit with ventilation grilles and control panel (no text or symbols)Ice maker machine x 1
Warm Tips: Check whether all below accessories are included.
| Accessories list | ||||
| NO. | Description | Picture | Usage | QTY |
| 1 | Manual |  | Operation manual | 1PC |
| 2 | Filter |  | Filter water | 1PC |
| 3 | Drainage pipe |  | Drain | 1PC |
| 4 | Ice spoon | 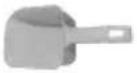 | Take ice cubes | 1PC |
| 5 | nylon cable ties | 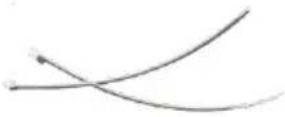 | Fix pipe if need | 2PCS |
| 6 | Hoop | 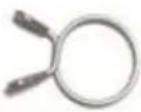 | fasten the outlet and the drainage pipe together if needed | 1PC |
| 7 | Seal ring | 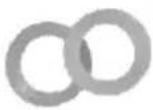 | Do put it in th faucet of the intake pipe.The other one is spare. | 2PCS |
| 8 | Spare blue clip | 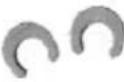 | Spare blue clip needed. | 2PCS |
| 9 | Spare plug | 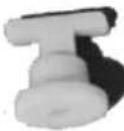 | Spare plug which plug the tank i needed. | 1PC |
The place of installation
a) The appliance should be placed in a clean place with good ventilat which should be kept from sunlight and rain.
b) The machine cannot be placed near any heat source.
c) The ambient temperature around should not be lower, than 3 higher than 40, and there is must be 15cm at least between the four sides of the machine with the wall.
d) The machine should be placed in a flat place.
e) Do not place anything on top of the appliance.
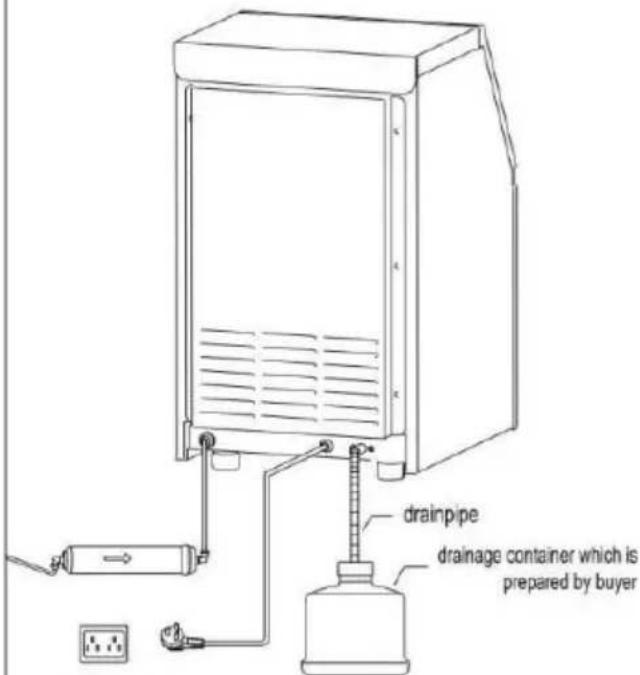
Connect drainage pipe and water intake pipe
Warning:1) The machine can only connect with drinking water sources, a must meet local drinking water standards
2) The water pressure must be in 0.1-0.4Mpa, if exceed 0.4Mpa, a press reducing valve must be connected.
3) Drainage: The outlet of the drainage pipe must be lower than the on the machine
CONNECTING WITH WATER
Please connect your ice maker with other parts by referring the diag below.
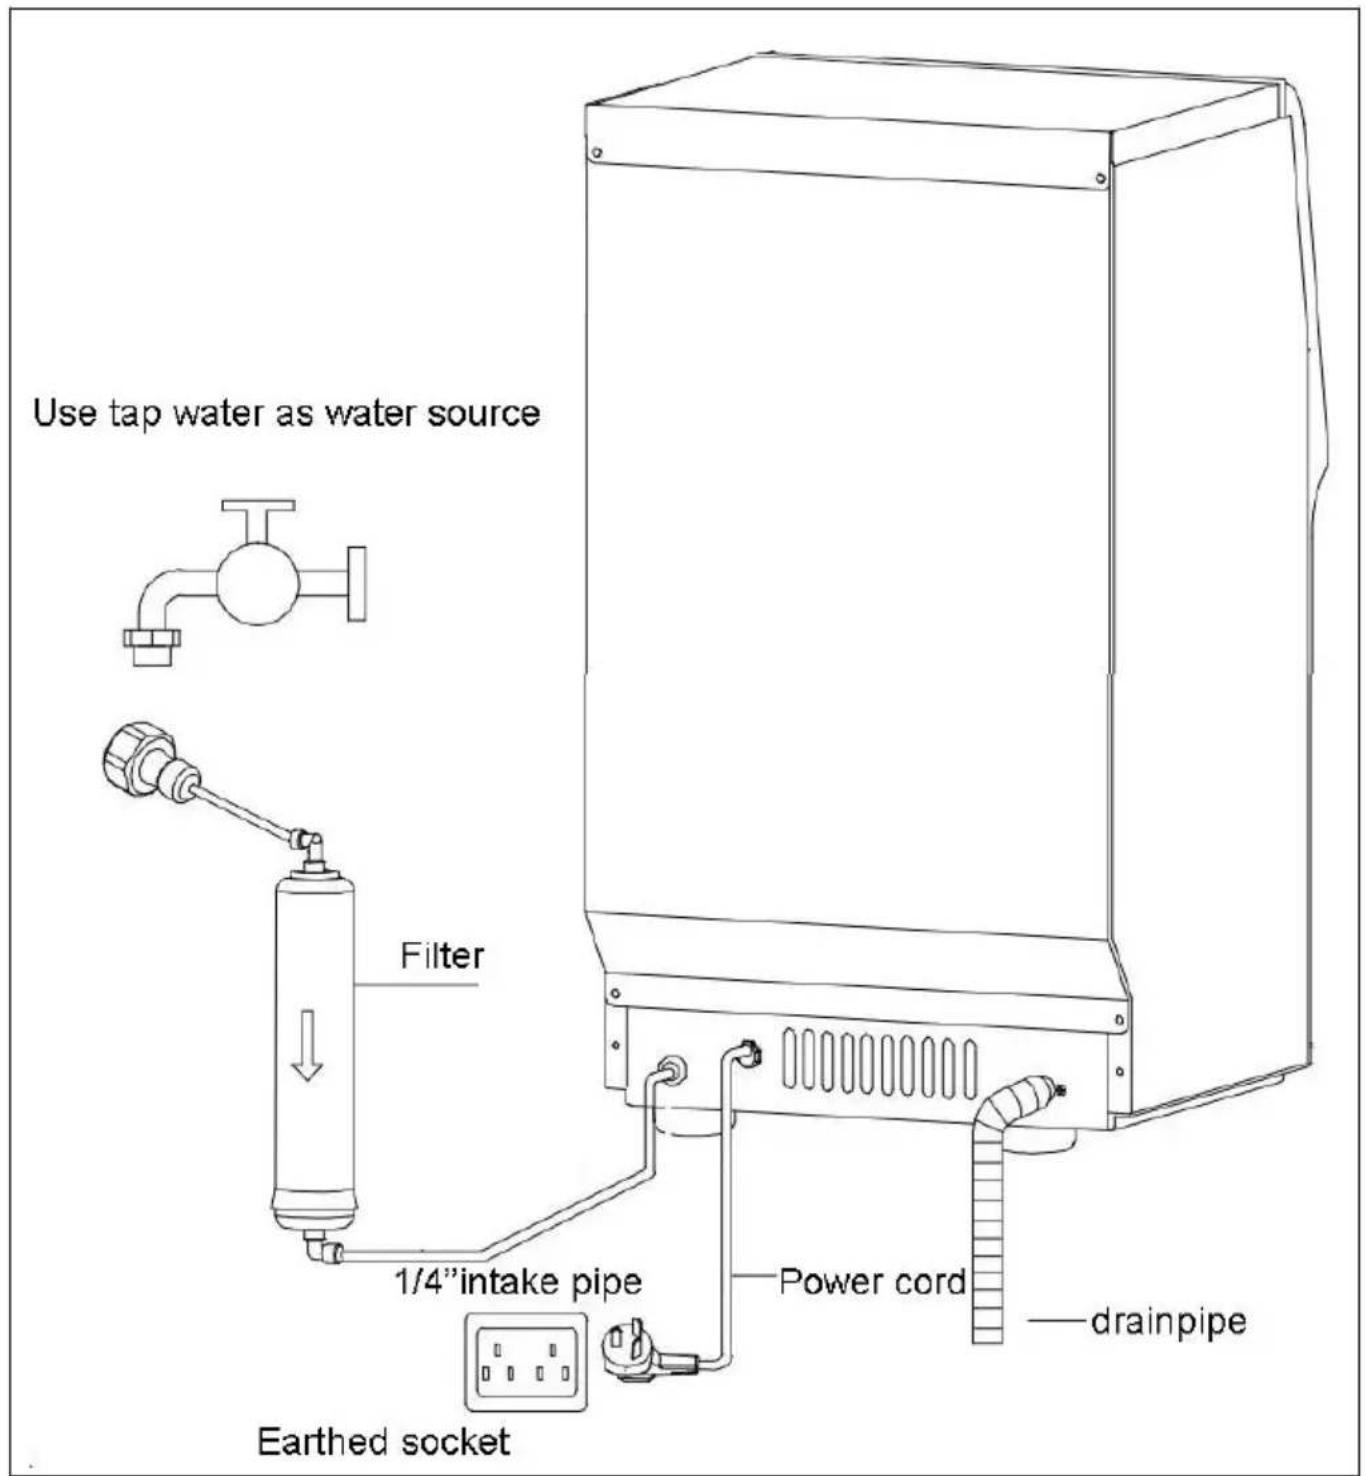
Water Hose Connecting Guide

natural_image
Technical illustration of a mechanical component with an arrow indicating a process or assembly (no text or symbols present)Step 1
Insert the water hose as much as you can, otherwise you might experience water leaking.

Step 2
Water hose successfully connected.
Drain.
Warning: Because the ice in the inner tank will melt, drain pipe must be connected before using, and insert the drain pipe into a container or the sewer.
Note: Connect one end of the drain pipe to the machine, and the o to a container or sewer. The other port of the drain pipe must be in the drain port of the machine.
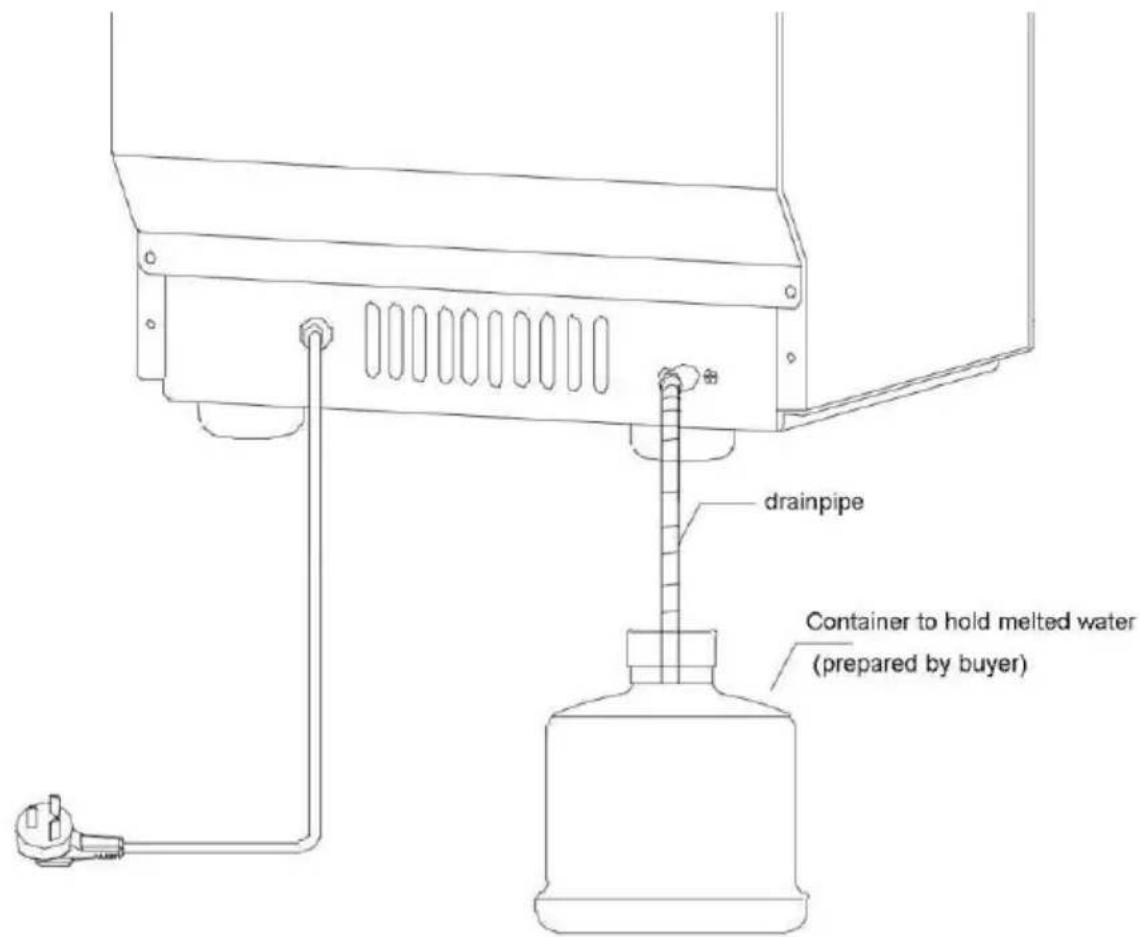
Connect the drainppe with a conatainer or insert to sewer
MACHINE OPERATIONS

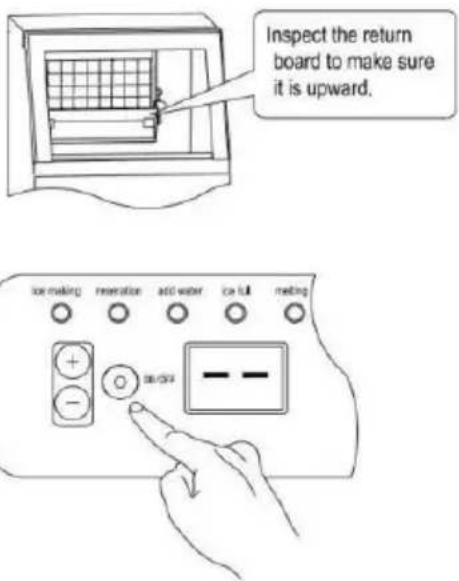
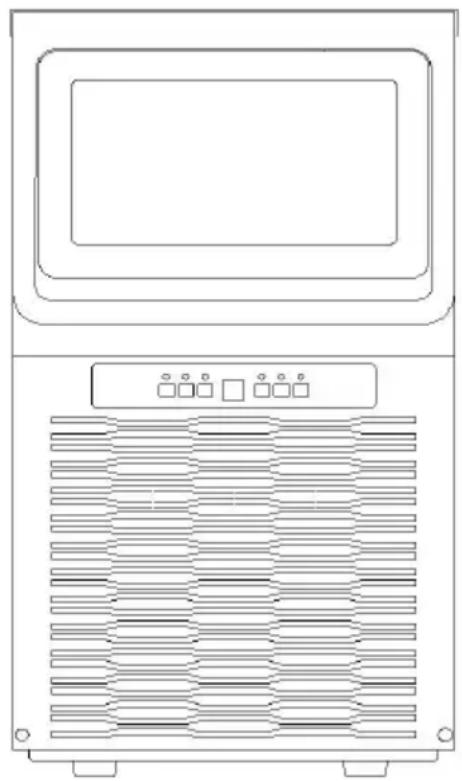
Operation Panel
ON/OFF BUTTON:
Press this button under standby mode( display “--”)to make the machine to work,press the button for 2 seconds during working time,the machine will be power off.
“+”/”-” BUTTON
- Adjust ice making time:
Through “+”/“-” to increase or decrease ice making time, which will be effected at the current cycle
.Press “+” button,if the screen display “1”,means ice making time will added 1 min,max time can be added 8min. If press “-” button and c “-1”,means ice making time will be decreased 1min,the max time is 5 That means the time can be adjusted from -5 to 8 min.
- Set auto-turn-off /auto-turn-on time
Reservation button:
Press this button under standby mode with the reservation indicator Flicker. and the “+” / “-” button to set the auto-turning-on time (in hours from 0-24h). The machine will automatically turns on after The countdown is finished.and the “+” / “-” button to set the auto-turning-off time (in hours from 0-24h). The machine will automatically turns off after the countdown is finished.
If we succeed in reservation, the reservation light will be always on. Press reservation button to cancel the reservation and the reservation indicator will be off.
Clean button:
- Long press this button for 1s under standby mode to make the en cleaning
mode for 5min and with cleaning indicator is on. And it will enter standby mode after cleaning.
Press cleaning button during cleaning mode to make the machine end
the cleaning in advance.
- You can long press the “clean” button 2 second during the ice to make the ice cubes drop from the ice mold ahead of time.
Light button:
Press this button to turn off the blue light, press again to turn it on.
Notes:
The surrounding environmental temperature will influence the time need for ice making.
Warning:
- The appliance is used to make ice cubes and store ice temporarily please follow the following principles to keep the ice cubes clean:
Wash your hands before taking out the ice cubes and use the plasti scoop provided to take ice.
Except ice cubes, please do not put anything else in the machine.
Clean the storage tank before use. Keep the ice scoop clean and use neutral detergent to clean it. Close the door after taking ice to prevent
- The use of any electrical appliances must follow basic guidelines, especially:
- A high humidity environment will increase the risk of short circuit or electric shock. If in doubt, please cut off the power of the machine.
- Please do not pull the power cord directly to turn off the machine
- Without adult supervision, the ice maker cannot be used alone by children or the elderly.
CLEANING & MAINTENANCE
Please thoroughly clean your ice maker before initial use.
1) Cleaning of internal and external parts
Note: Unplug the power plug before doing any cleaning or maintenance procedures.
Clean the condenser at least once a year, so that the ice maker can better.
Do not use alcohol to clean the ice machine, as this may cause the to crack.
External
Use a clean soft cloth to wipe the ice machine at least once a week then use a soft cloth with a neutral detergent to remove grease or impurities.
b) Ice scoop cleaning (weekly)
Dip the ice scoop in a mixture of neutral detergent and water for at minutes, then rinse with water.
c) Storage tank cleaning (weekly)
Open the ice door and remove all ice cubes.
Use a neutral detergent to clean the inner wall of the tank, and then with water.
Wipe the inner wall with a cloth with neutral detergent, rinse with wa finally dry the inner surface with another clean cloth.
d) Water pump cleaning (weekly)
The pump must be cleaned once a week. Before cleaning, unplug the Power Plug, take out the pump, with a small brush to clean the water inlet, and then put back to the original position.
INTERIOR: please use the following Self-Clean function:
-
Add water and vinegar or lemon juice mix (1:1 ratio)
-
Plug in unit, press and hold the CLEAN button for approximately 3 seconds, then release. The unit will automatically enter Self-clean program. This process takes about 5-6 minutes. When the Self-Clean program is finished, unit will automatically power off.
-
The fan blade will be rotating. This process rinses the inside parts s times.
-
After the Self-Clean program is completed, unplug the power cord and drain out the water by unplugging the drain cap on the side. Replace
cap.
- Add fresh water to the water reservoir, up to the water level mark.
- Plug the unit and repeat the Self-Clean process by repeating steps This will rinse out the vinegar/lemon residue.
- After draining the water, replace and tighten drain cap.
- Dry the interior and exterior with a clean, soft cloth.
NOTE: It is strongly recommended to clean the unit before initial use after the unit has not been in use for a long period of time.
2) Long-term storage of the ice maker
a) Unplug the power plug to cut off the power supply;
b) Turn off the water supply and remove the water inlet pipe;
c) Remove all ice cubes and drain the water ;
d) Wash and dry the inner walls of the storage tank and water tank
Common malfunction analysis
| E1 | No ice deflecto detected | The ice guide plate came off | Reinstall the ice guide |
| Magnetic sensitive switch damaged | Replace the magnetic sensitive switch | ||
| The ice guide plate not reset | Reset ice guide plate | ||
| E2 | Ice making is normal | The fourth ice cycle stops | Replace the magnetic sensitiv switch |
| There is no water in the water-box | The drain plug is no installed correctly | Install drain plug correctly | |
| External water supply | Check the water supply | ||
| The water tank overflowed into the refrigerator | External water supply | The water valve above the does not rotate horizontally | |
| Use tap water as a source of water | The external water pressure too high to cause the float to work, reduce the water pressure or change a new | ||
| There is water the water box | There is no water, n does the shower pipe run | The pump is seriously blocked should be replaced or clean | |
| The shower pipe is blocked. Clean it up | |||
| Just running water, not cooling or a little cold | There is thin ice on ice mold | Increase manufacturing time by pressing the "+" button on the operating panel | |
| There is thick ice or ice mold | Reduce manufacturing time by pressing the "-" button on the operating panel | ||
| Some water splashed into the refrigerator | Rotate and adjust the shower pipe | ||
| The back of the wat box is leaking into the refrigerator | Adjust the installation position the water box | ||
| The water is no cold | The main board is no powering the compressor | Replace the mainboard | |
| Compressor failure | Replace compressor | ||
| Compressor high temperature | Replace compressor | ||
| Compressor working, not cooling | Refrigerant leak, need repair | ||
| E3 | High temperature alarm | condensation temperature sensor is damage | Replacement |
| The cooling fan is blocked by foreign matter | Remove the barricade | ||
| Damage to cooling fa | Replacement | ||
| E4 | Abnormal condensation temperature sensor | Condensation temperature sensor short circuit or open circuit | Replacement |
| E5 | Abnormal ambient temperature sensor | Ambient temperature sensor short circuit of open circuit | Replacement |
| E6 | Lack of water | Interruption of externa water supply | Restore water supply |
| Water intake solenoid valve damaged | Replacement |
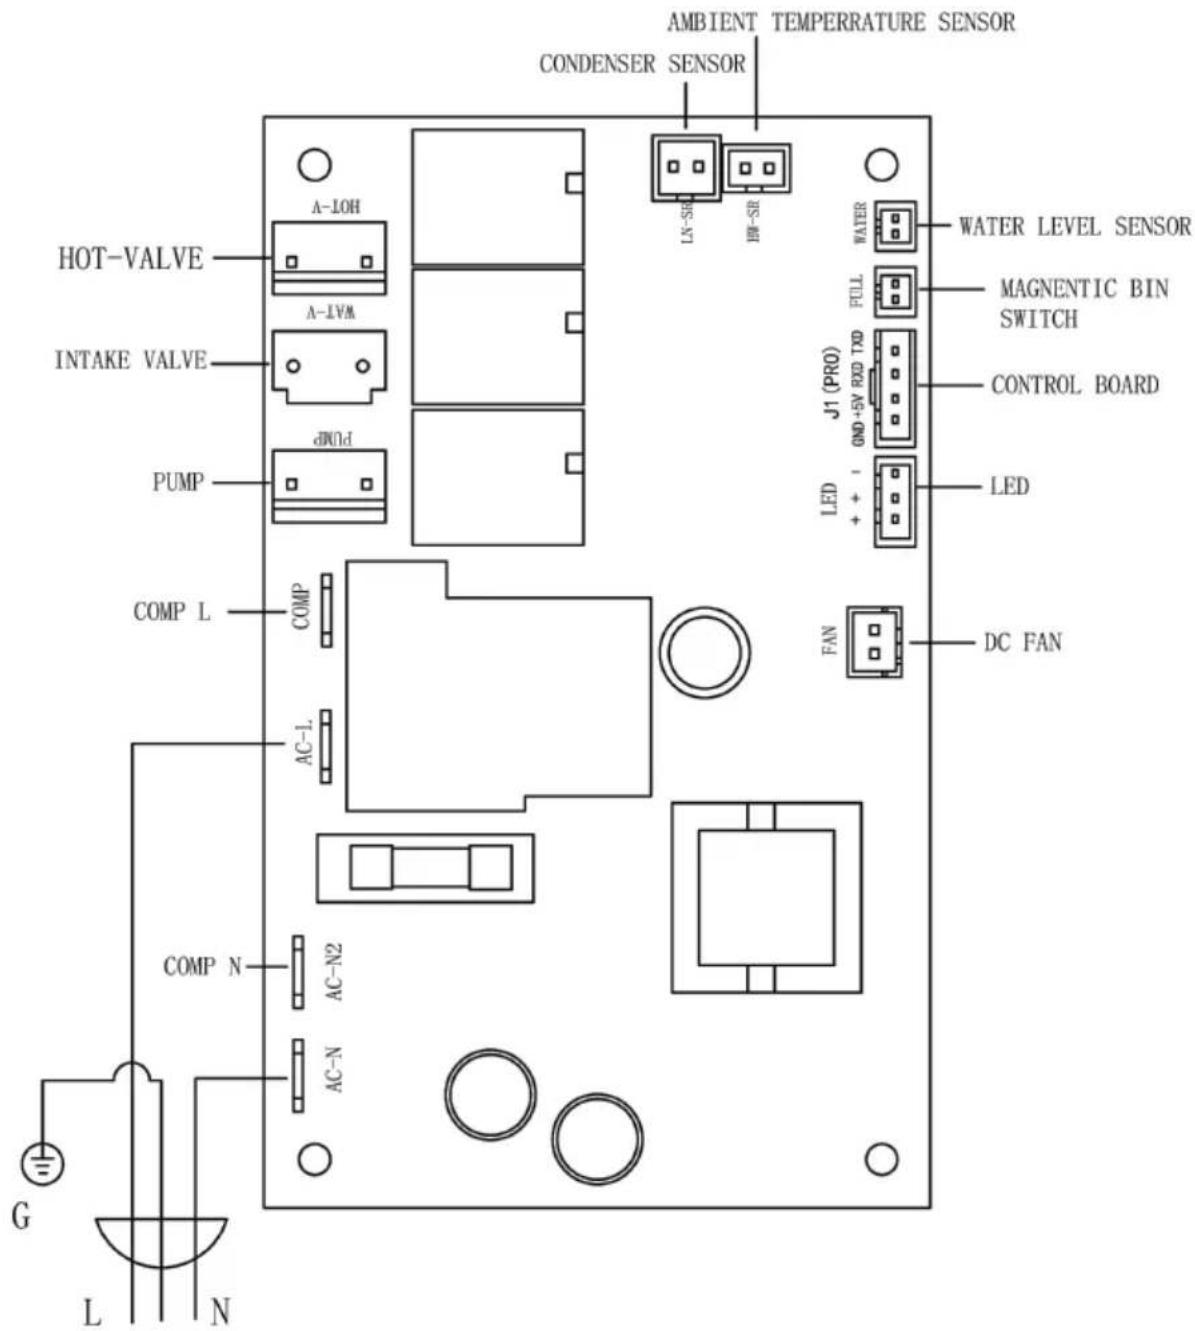
Circuit Diagram
Explosive diagram
| 1. Door 2. Door frame 3. Top cover 4. Back panel 5. Front panel 6. Front plate 7. Display board 7. Inner tank 9. Water tank | 10. Ice mold 11. Float 12. Pump 13. Compressor 14. DC fan 15. Condenser 16. Main board 17. Main board box 18. Rubber feet |
Made In China
VEVOR®
TOUGH TOOLS, HALF PRICE
Technical Support and E-Warranty Certificate
www.vevor.com/support
VEVOR®
TOUGH TOOLS, HALF PRICE
www.vevor.com/support
Commercial Glace Machine
MODÈLE: KJ- AT25F
We continue to be committed to provide you tools with competitive price. "Save Half", "Half Price" or any other similar expressions used by us only represent of savings you might benefit from buying certain tools with us compared top brands and does not necessarily mean to cover all categories of tools offered are kindly reminded to verify carefully when you are placing an order with us actually saving half in comparison with the top major brands.
MODÈLE: KJ- AT25F
natural_image
Line drawing of a front-mounted air conditioner unit with ventilation grilles and control panel (no text or symbols)NEED HELP? CONTACT US!
Have product questions? Need technical support? Please feel fr contact us:
Technical Support and E-Warranty Certificate www.vevor.com/support
This is the original instruction, please read all manual instruction carefully before operating. VEVOR reserves a clear interpretation user manual. The appearance of the product shall be subject to product you received. Please forgive us that we won't inform you there are any technology or software updates on our product.
Avertissement:
1. Place the machine on a flat place.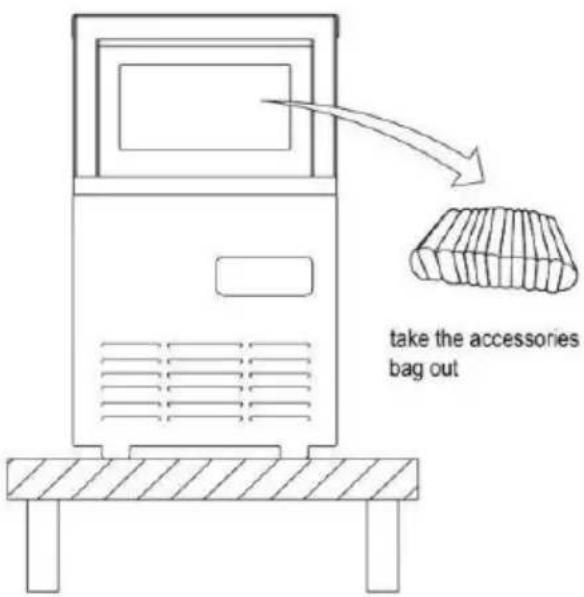 | 2. Ways of adding waterUse water faucet as water source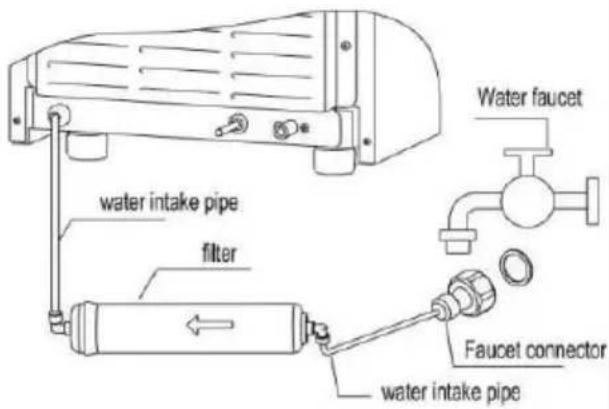 Connect to faucet Connect to faucet |
3. Connect to drainpipePlug into the socket | 4. Make ice 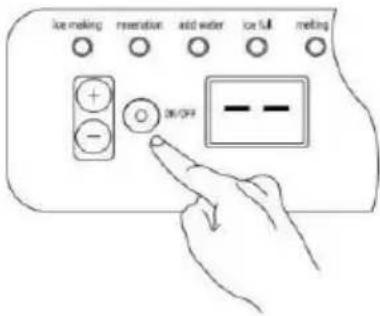 Press ON/OFF button,the machine will work automatically. Press ON/OFF button,the machine will work automatically. |
natural_image
Line drawing of a front-mounted air conditioner unit with ventilation grilles and control panel (no text or symbols)Water Hose Connecting Guide

natural_image
Technical illustration of a mechanical assembly showing a cylindrical component and a separate cylindrical shaft with an arrow indicating motion (no text or symbols)Step 1
Insert the water hose as much as you can, otherwise you might experience water leaking.

Step 2
Water hose successfully connected.
Égoutter .
Panneau de commande
BOUTON MARCHE/ARRÊT :
www.vevor.com/support
VEVOR®
TOUGH TOOLS, HALF PRICE
We continue to be committed to provide you tools with competitive price. "Save Half", "Half Price" or any other similar expressions used by us only represent of savings you might benefit from buying certain tools with us compared top brands and does not necessarily mean to cover all categories of tools offered are kindly reminded to verify carefully when you are placing an order with us actually saving half in comparison with the top major brands.
MODELL: KJ- AT25F

natural_image
Line drawing of a front-mounted air conditioner unit with ventilation grilles and control panel (no text or symbols)NEED HELP? CONTACT US!
Have product questions? Need technical support? Please feel fr contact us:
Technical Support and E-Warranty Certificate www.vevor.com/support
This is the original instruction, please read all manual instruction carefully before operating. VEVOR reserves a clear interpretation user manual. The appearance of the product shall be subject to product you received. Please forgive us that we won't inform you there are any technology or software updates on our product.
| 1. Place the machine on a flat place. | 2. Ways of adding waterUse water faucet as water sourceConnect to faucet |
3. Connect to drainpipePlug into the socket | 4. Make icePress ON/OFF button,the machine will work automatically. |
natural_image
Line drawing of a front-mounted air conditioner unit with ventilation grilles and control panel (no text or symbols)Eismaschine x 1
Water Hose Connecting Guide

natural_image
Technical illustration of a mechanical assembly showing a cylindrical component and a separate cylindrical shaft with an arrow indicating motion (no text or symbols)Step 1
Insert the water hose as much as you can, otherwise you might experience water leaking.
Step 2
Water hose successfully connected.
Abtropfen lassen .
Bedienfeld
AN / AUS SCHALTER:
www.vevor.com/support
VEVOR®
TOUGH TOOLS, HALF PRICE
We continue to be committed to provide you tools with competitive price. "Save Half", "Half Price" or any other similar expressions used by us only represent of savings you might benefit from buying certain tools with us compared top brands and does not necessarily mean to cover all categories of tools offered are kindly reminded to verify carefully when you are placing an order with us actually saving half in comparison with the top major brands.
MODELLO: KJ- AT25F

natural_image
Line drawing of a front-mounted air conditioner unit with ventilation grilles and control panel (no text or symbols)NEED HELP? CONTACT US!
Have product questions? Need technical support? Please feel fr contact us:
Technical Support and E-Warranty Certificate www.vevor.com/support
This is the original instruction, please read all manual instruction carefully before operating. VEVOR reserves a clear interpretation user manual. The appearance of the product shall be subject to product you received. Please forgive us that we won't inform you there are any technology or software updates on our product.
Avvertimento:
Materiali combustibili
| 1. Place the machine on a flat place. | 2. Ways of adding waterUse water faucet as water sourceConnect to faucet |
| 3. Connect to drainpipePlug into the socket | 4. Make icePress ON/OFF button,the machine will work automatically. |
natural_image
Line drawing of a front-mounted air conditioner unit with ventilation grilles and control panel (no text or symbols)Water Hose Connecting Guide

natural_image
Technical illustration of a mechanical component with an arrow indicating a process or assembly (no text or symbols present)Step 1
Insert the water hose as much as you can, otherwise you might experience water leaking.

Step 2
Water hose successfully connected.
Scolare .
Pannello operativo
PULSANTE ON/OFF:
www.vevor.com/support
VEVOR®
TOUGH TOOLS, HALF PRICE
We continue to be committed to provide you tools with competitive price. "Save Half", "Half Price" or any other similar expressions used by us only represent of savings you might benefit from buying certain tools with us compared top brands and does not necessarily mean to cover all categories of tools offered are kindly reminded to verify carefully when you are placing an order with us actually saving half in comparison with the top major brands.
MODELO: KJ- AT25F

natural_image
Line drawing of a front-mounted air conditioner unit with ventilation grilles and control panel (no text or symbols)NEED HELP? CONTACT US!
Have product questions? Need technical support? Please feel fr contact us:
Technical Support and E-Warranty Certificate www.vevor.com/support
This is the original instruction, please read all manual instruction carefully before operating. VEVOR reserves a clear interpretation user manual. The appearance of the product shall be subject to product you received. Please forgive us that we won't inform you there are any technology or software updates on our product.
| 1. Place the machine on a flat place. | 2. Ways of adding waterUse water faucet as water sourceConnect to faucet |
3. Connect to drainpipePlug into the socket | 4. Make icePress ON/OFF button,the machine will work automatically. |
natural_image
Line drawing of a front-mounted air conditioner unit with ventilation grilles and control panel (no text or symbols)Water Hose Connecting Guide
natural_image
Technical illustration of a mechanical component with an arrow indicating a process or assembly (no text or symbols present)Step 1
Insert the water hose as much as you can, otherwise you might experience water leaking.

Step 2
Water hose successfully connected.
Drenar .
www.vevor.com/support
VEVOR®
TOUGH TOOLS, HALF PRICE
We continue to be committed to provide you tools with competitive price. "Save Half", "Half Price" or any other similar expressions used by us only represent of savings you might benefit from buying certain tools with us compared top brands and does not necessarily mean to cover all categories of tools offered are kindly reminded to verify carefully when you are placing an order with us actually saving half in comparison with the top major brands.
MODEL: KJ- AT25F
natural_image
Line drawing of a front-mounted air conditioner unit with ventilation grilles and control panel (no text or symbols)NEED HELP? CONTACT US!
Have product questions? Need technical support? Please feel fr contact us:
Technical Support and E-Warranty Certificate www.vevor.com/support
This is the original instruction, please read all manual instruction carefully before operating. VEVOR reserves a clear interpretation user manual. The appearance of the product shall be subject to product you received. Please forgive us that we won't inform you there are any technology or software updates on our product.
| 1. Place the machine on a flat place. | 2. Ways of adding waterUse water faucet as water sourceConnect to faucet |
| 3. Connect to drainpipePlug into the socket | 4. Make icePress ON/OFF button,the machine will work automatically. |
natural_image
Line drawing of a front-mounted air conditioner unit with ventilation grilles and control panel (no text or symbols)Water Hose Connecting Guide

natural_image
Technical illustration of a mechanical component with an arrow indicating a process or assembly (no text or symbols present)Step 1
Insert the water hose as much as you can, otherwise you might experience water leaking.

Step 2
Water hose successfully connected.
Odcedź .
Panel sterujący
WŁĄCZNIK / WYŁĄCZNIK:
www.vevor.com/support
VEVOR®
TOUGH TOOLS, HALF PRICE
Technisch Ondersteuning en e-garantiecertificaat www.vevor.com/support
Reclame Ijs Machine
MODEL: KJ- AT25F
We continue to be committed to provide you tools with competitive price. "Save Half", "Half Price" or any other similar expressions used by us only represent of savings you might benefit from buying certain tools with us compared top brands and does not necessarily mean to cover all categories of tools offered are kindly reminded to verify carefully when you are placing an order with us actually saving half in comparison with the top major brands.
MODEL: KJ- AT25F

natural_image
Line drawing of a front-mounted air conditioner unit with ventilation grilles and control panel (no text or symbols)NEED HELP? CONTACT US!
Have product questions? Need technical support? Please feel fr contact us:
Technical Support and E-Warranty Certificate www.vevor.com/support
This is the original instruction, please read all manual instruction carefully before operating. VEVOR reserves a clear interpretation user manual. The appearance of the product shall be subject to product you received. Please forgive us that we won't inform you there are any technology or software updates on our product.
| 1. Place the machine on a flat place. | 2. Ways of adding waterUse water faucet as water sourceConnect to faucet |
| 3. Connect to drainpipePlug into the socket | 4. Make icePress ON/OFF button,the machine will work automatically. |
natural_image
Line drawing of a front-mounted air conditioner unit with ventilation grilles and control panel (no text or symbols)IJsmachine x 1
Water Hose Connecting Guide

natural_image
Technical illustration of a mechanical assembly showing a cylindrical component and a separate cylindrical shaft with an arrow indicating motion (no text or symbols)Step 1
Insert the water hose as much as you can, otherwise you might experience water leaking.

Step 2
Water hose successfully connected.
Afvoer .
Bedieningspaneel
AAN / UIT KNOP:
www.vevor.com/support
VEVOR®
TOUGH TOOLS, HALF PRICE
We continue to be committed to provide you tools with competitive price. "Save Half", "Half Price" or any other similar expressions used by us only represent of savings you might benefit from buying certain tools with us compared top brands and does not necessarily mean to cover all categories of tools offered are kindly reminded to verify carefully when you are placing an order with us actually saving half in comparison with the top major brands.
MODELL: KJ- AT25F

natural_image
Line drawing of a front-mounted air conditioner unit with ventilation grilles and control panel (no text or symbols)NEED HELP? CONTACT US!
Have product questions? Need technical support? Please feel fr contact us:
Technical Support and E-Warranty Certificate www.vevor.com/support
This is the original instruction, please read all manual instruction carefully before operating. VEVOR reserves a clear interpretation user manual. The appearance of the product shall be subject to product you received. Please forgive us that we won't inform you there are any technology or software updates on our product.
- Place the machine on a flat place.
2.Ways of adding water Use water faucet as water source

Connect to faucet
- Connect to drainpipe Plug into the socket

Earthed socket
- Make ice

Press ON/OFF button, the machine will work automatically.
natural_image
Line drawing of a front-mounted air conditioner unit with ventilation grilles and control panel (no text or symbols)Ismaskin x 1
Water Hose Connecting Guide

natural_image
Technical illustration of a mechanical component with an arrow indicating a process or assembly (no text or symbols present)Step 1
Insert the water hose as much as you can, otherwise you might experience water leaking.

Step 2
Water hose successfully connected.
Dränera .
Manöverpanel
PÅ/AV-KNAPP:
www.vevor.com/support