
DR12 - Scissors Vevor - Free user manual and instructions
Find the device manual for free DR12 Vevor in PDF.
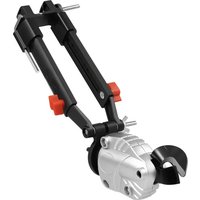


| Product Type | Metal Shear Attachment |
| Brand | Vevor |
| Model | DR12 |
| Blade Material | ADC12 (aluminum alloy) |
| Maximum Cutting Gauge | 18 GA (galvanized steel), 20 GA (stainless steel) |
| Shank Diameter | 1/4" hexagonal |
| Compatible Materials | Sheet metal, wire mesh, steel wire |
| Required Power Tool Type | Drill or impact driver with chuck or hexagonal nose |
| Dimensions (approx.) | Length: 15 cm, Width: 8 cm, Height: 6 cm |
| Weight (approx.) | 0.45 kg |
| Power Source | Driven by power tool (not included) |
| Main Functions | Cutting sheet metal, mesh, wire |
| Recommended Cutting Angle | 10 to 15 degrees |
| Blade Replacement | Possible, upper and lower blades |
| Maintenance | Clean with a damp cloth and mild soap, avoid solvents |
| Lubrication | Grease on blades and drive shaft |
| Safety | Wear gloves, goggles, dust mask, and hearing protection |
| Spare Parts | Blades, screws, washers, gearbox |
| Repairability | Disassembly for blade replacement and maintenance |
| General Information | Do not sharpen blades, use only original parts |
| Warranty | Refer to manufacturer's terms |
Frequently Asked Questions - DR12 Vevor
User questions about DR12 Vevor
0 question about this device. Answer the ones you know or ask your own.
Ask a new question about this device
Download the instructions for your Scissors in PDF format for free! Find your manual DR12 - Vevor and take your electronic device back in hand. On this page are published all the documents necessary for the use of your device. DR12 by Vevor.
USER MANUAL DR12 Vevor
ELECTRIC METAL SHEAR
MODEL:DR12
VEVOR
MODEL:DR12
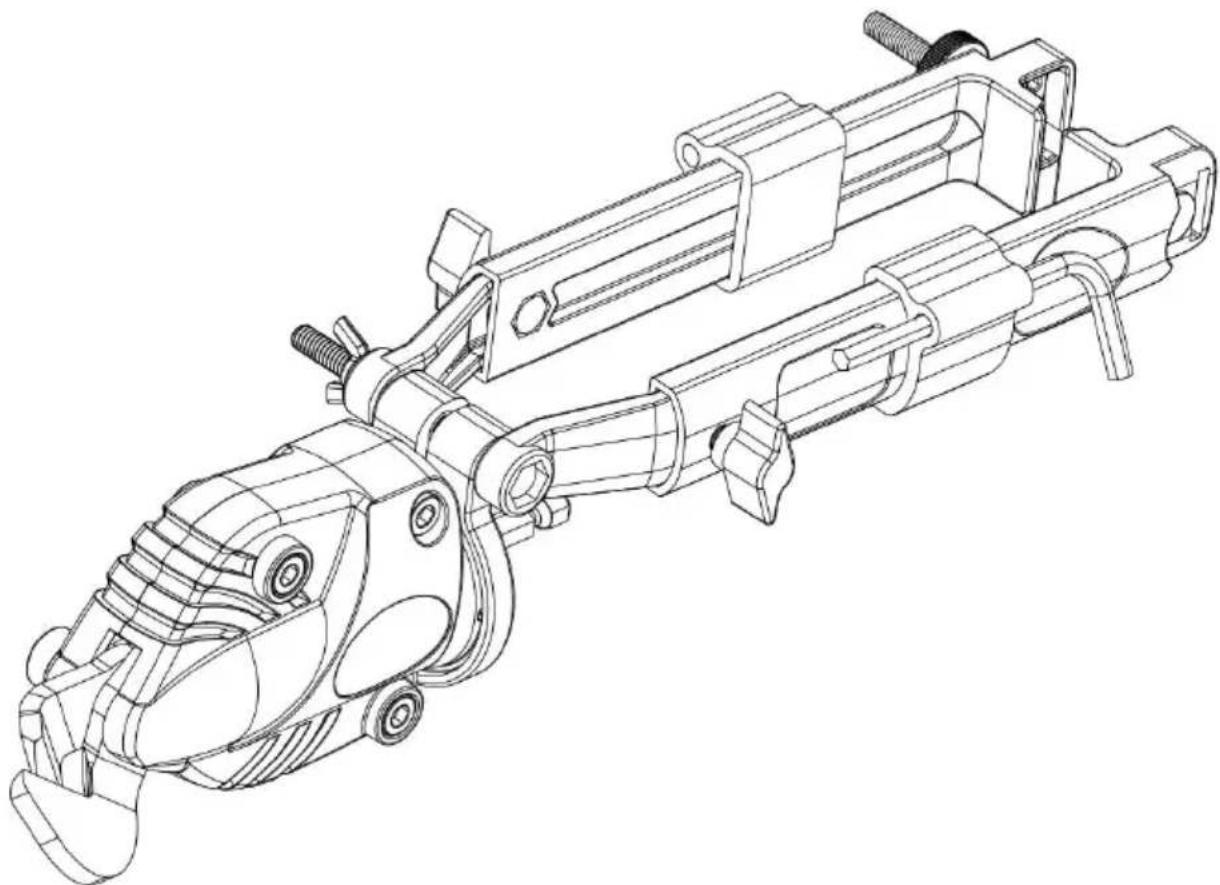
This is the original instruction. Please read all manual instructions carefully before operating. VEVOR reserves a clear interpretation of the user manual. The appearance of the product shall be subject to the product you received. Please forgive us that we won't inform you again if there are any technology or software updates on our product.
 | Warning-To reduce the risk of injury, user must read instructions manual carefully. |
 | This product is subject to the provision of European D 2012/19/EC. The symbol showing a wheelie bin crossed through indicates that the product requires separate refu collection in the European Union. This applies to the p and all accessories marked with this symbol. Products as such may not be discarded with normal domestic w must be taken to a collection point for recycling electri electronic devices |
 | Class II appliance,reinforced insulation or double insulatio |
 | Warning- Be sure to wear ear protectors when using product. |
 | Warning- Be sure to wear eye protectors when using product. |
 | Warning- Be sure to wear dust masks when using this product. |
WARNING!
READ AND UNDERSTAND THESE INSTRUCTIONS and the instructions for the power tool used with this product.
FAILURE TO FOLLOW all instructions listed may result in electric shock, fire, and/or serious personal injury.
CUT HAZARD: Never have any part of your body near the blades or parts of the power tool. Serious personal injury may occur.
- Before use, ensure the shear attachment is properly attached to the power tool.
- Turn the tool OFF and/or disconnect the battery pack before installing or removing accessories, before adjusting, or when making repairs.
- To prevent accidental operation, lock the trigger switch in the OFF position when the tool is not in use or when storing the tool.
- DO NOT sharpen blades. DO NOT use the shear with any kind of accessory or attachment.
- Wear gloves when handling sheet metal. The edges are sharp and can cause serious personal injury. For best results, always clamp or anchor the material to be cut.
DO NOT use under wet conditions or in the presence of flammable gases.
DO NOT let children come into contact with the shear. Supervision is required when inexperienced operators use this tool.
DO NOT hold the shear attachment as a primary gripping surface.
- Make sure the power tool is set to the “forward” (clockwise) direction before use.
- Hold the power tool on insulated gripping surfaces (if a drill uses both hands). The shear contacting a live wire may make exposed metal parts of the shear and the power tool "live" and could give the operator an electric shock.
- AVOID body contact with earthed or grounded surfaces, such as pipes and appliances. There is an increased risk of electric shock if your body is earthed or grounded. ·DO NOT use solvents or other harsh chemicals to clean the shear's non-metallic parts. These chemicals may weaken the plastic materials used in these parts. Use a cloth dampened only with water and mild soap.
- DO NOT let any liquid get inside the shear or immerse any part of the shear into a liquid.
TECHNICAL DATA
| METAL SHEAR ATTACHMENT | |
| Model | DR12 |
| Blade Material | ADC12 |
| Max Gauge | 18GA |
| Shank Size | 1/4”Hex |
| Materials to Cut | Sheet metal, steel mesh, wire |
| Cutting Capacity | 18GA Galvanized Steel, 20GA Stainless Steel |
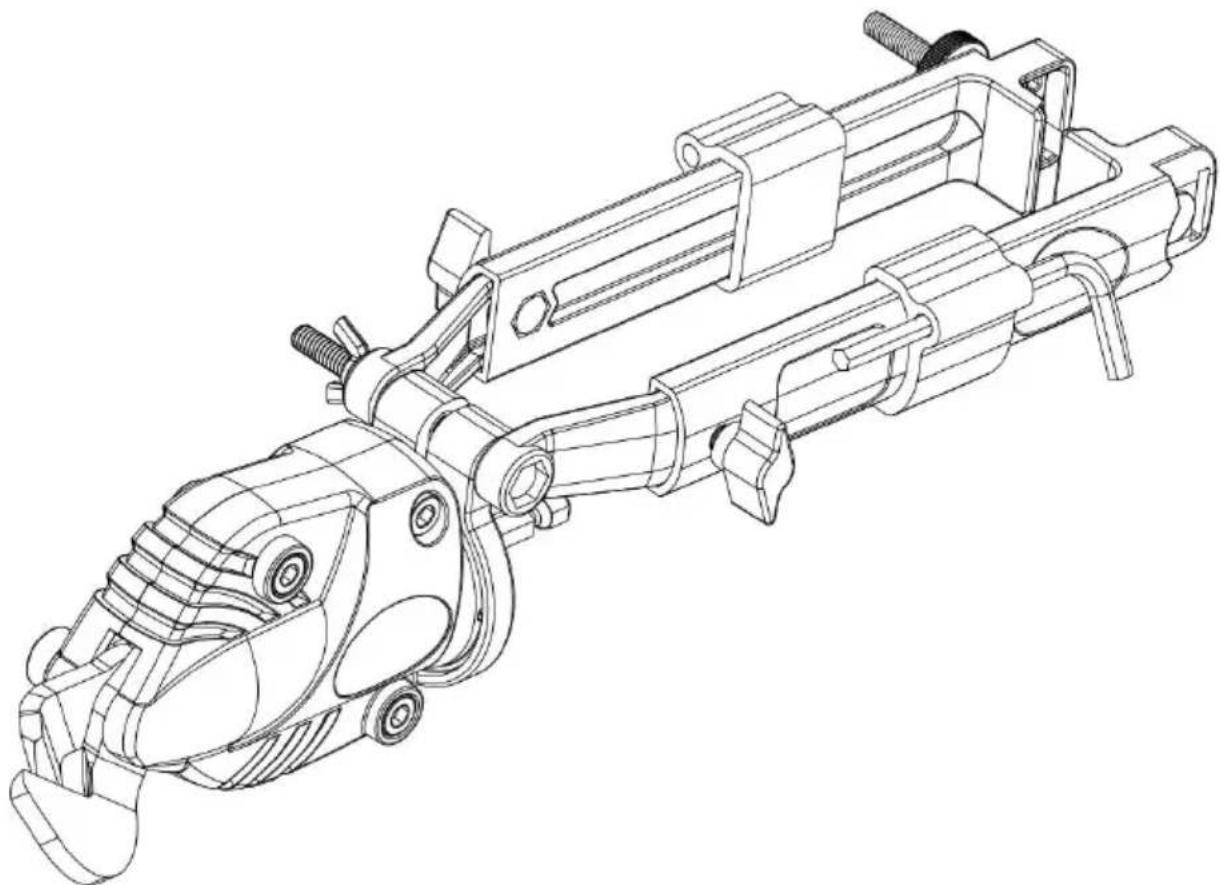
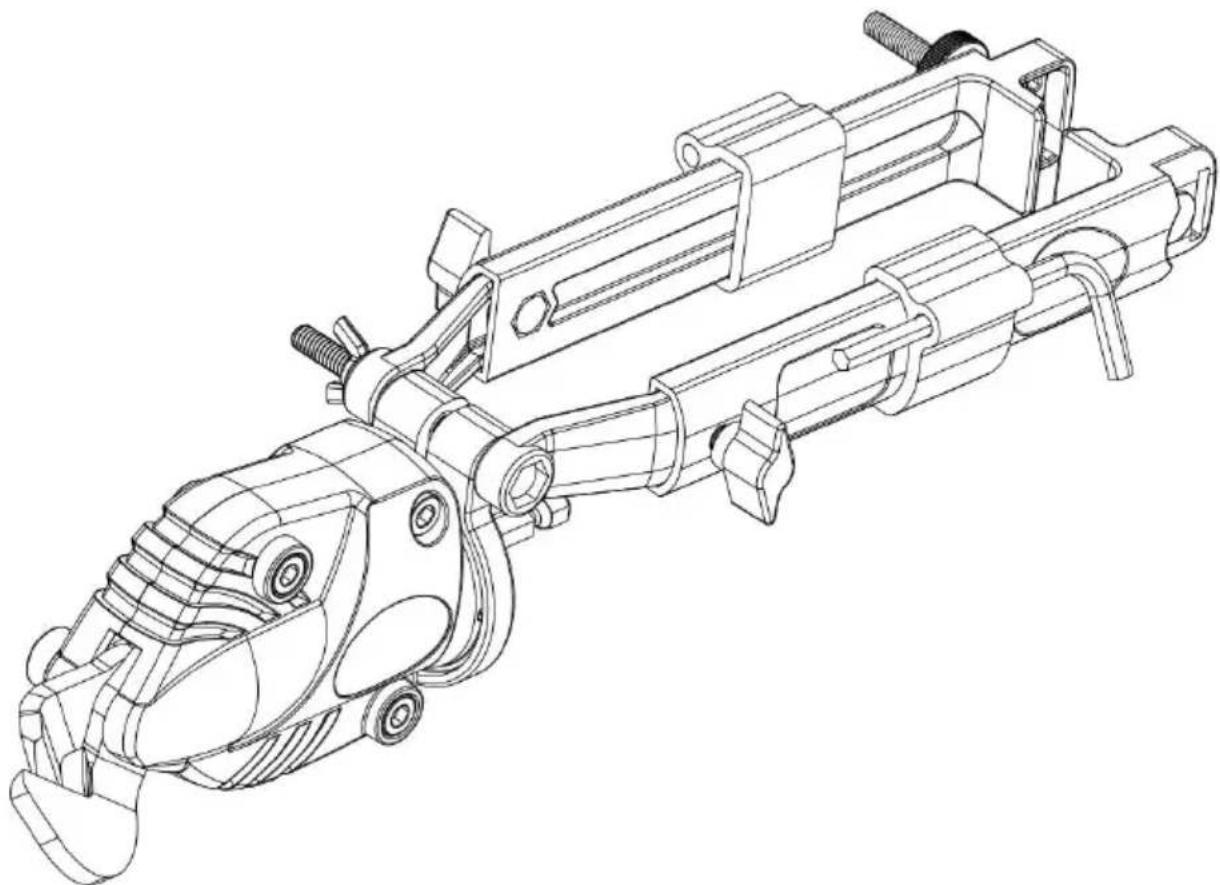
- Insert the shank end of the shears into the nose of the impact driver or chuck, if using a drill. Tighten the chuck securely.
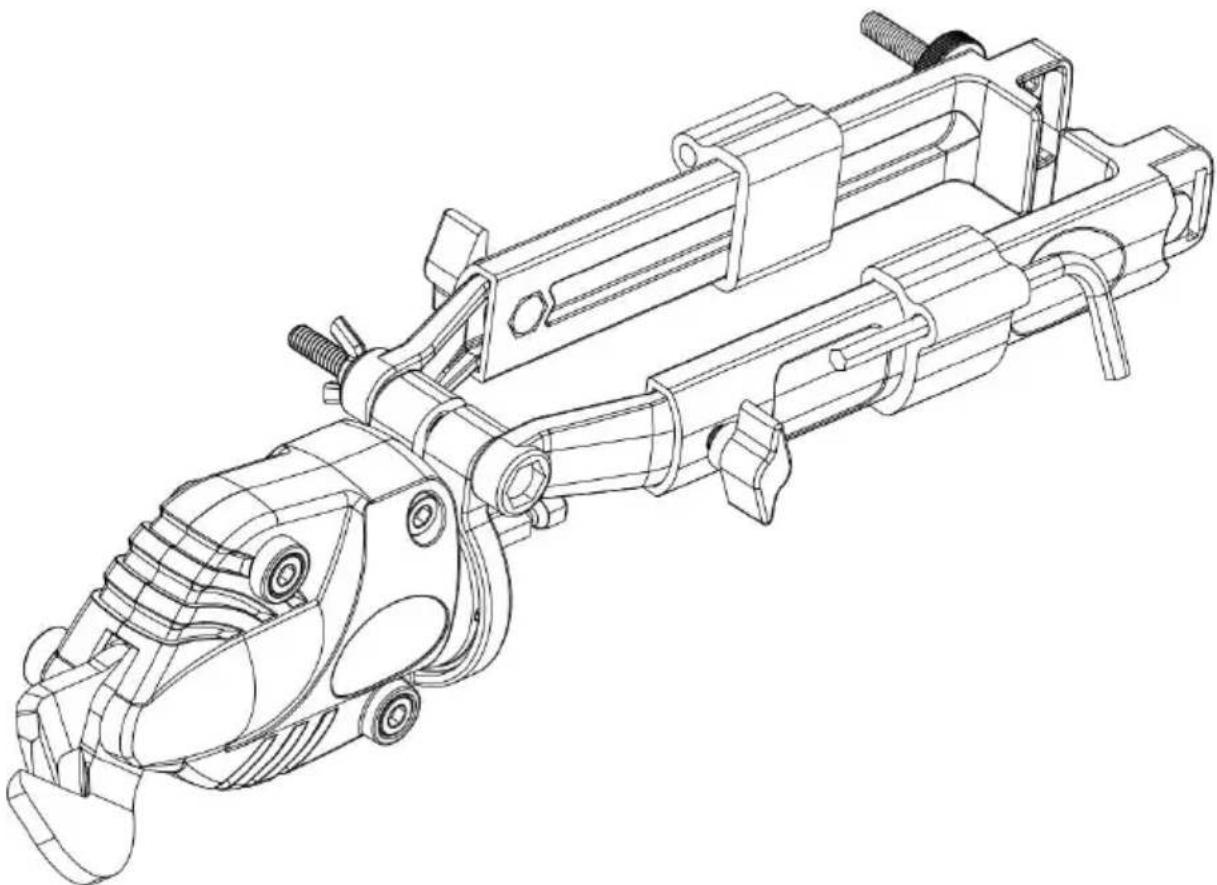
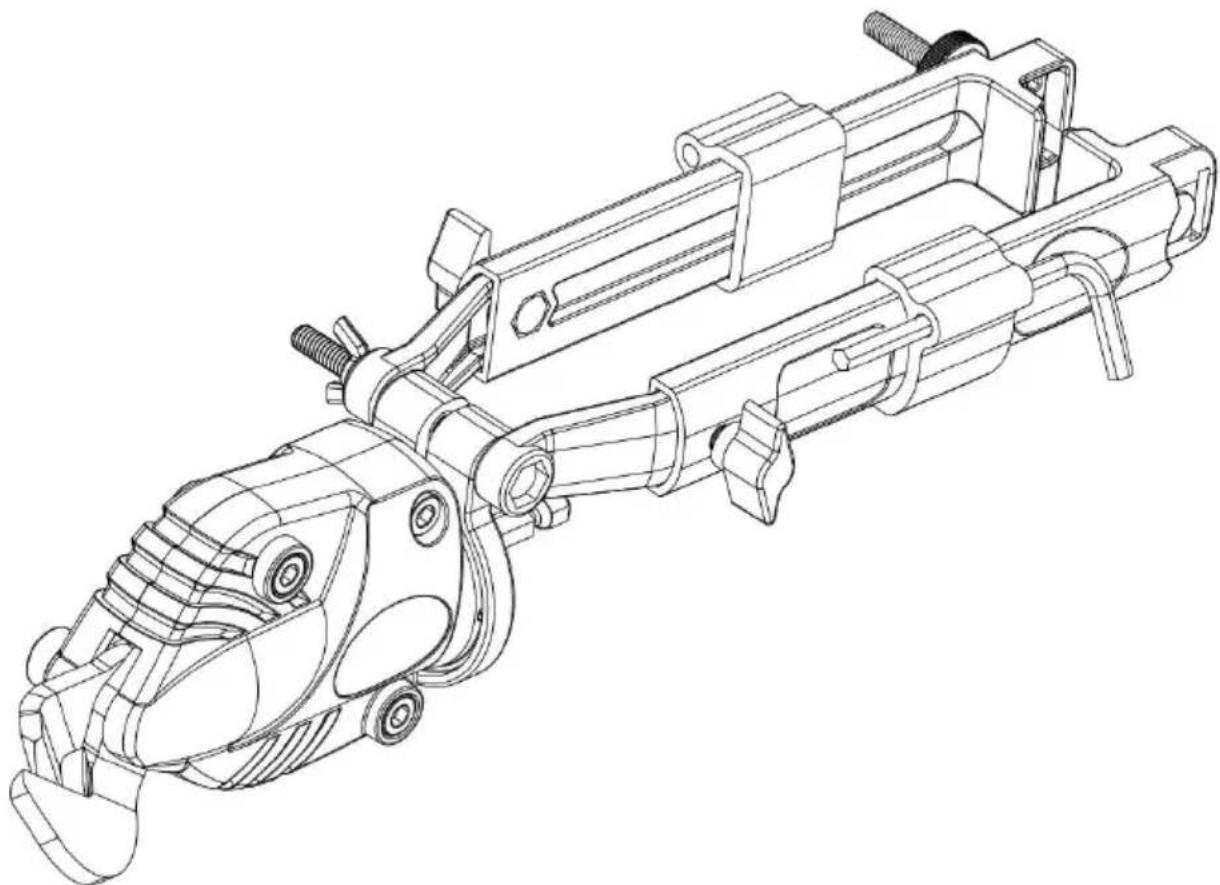
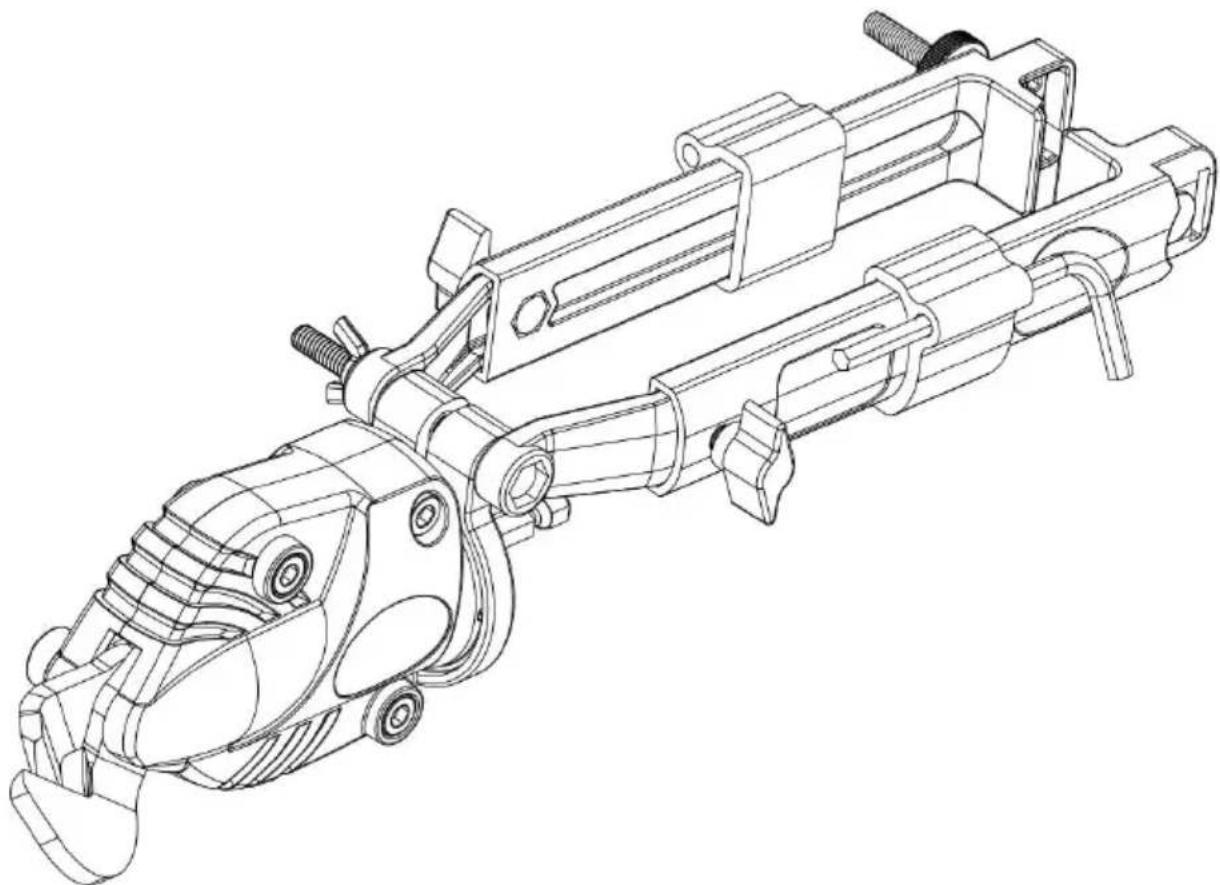
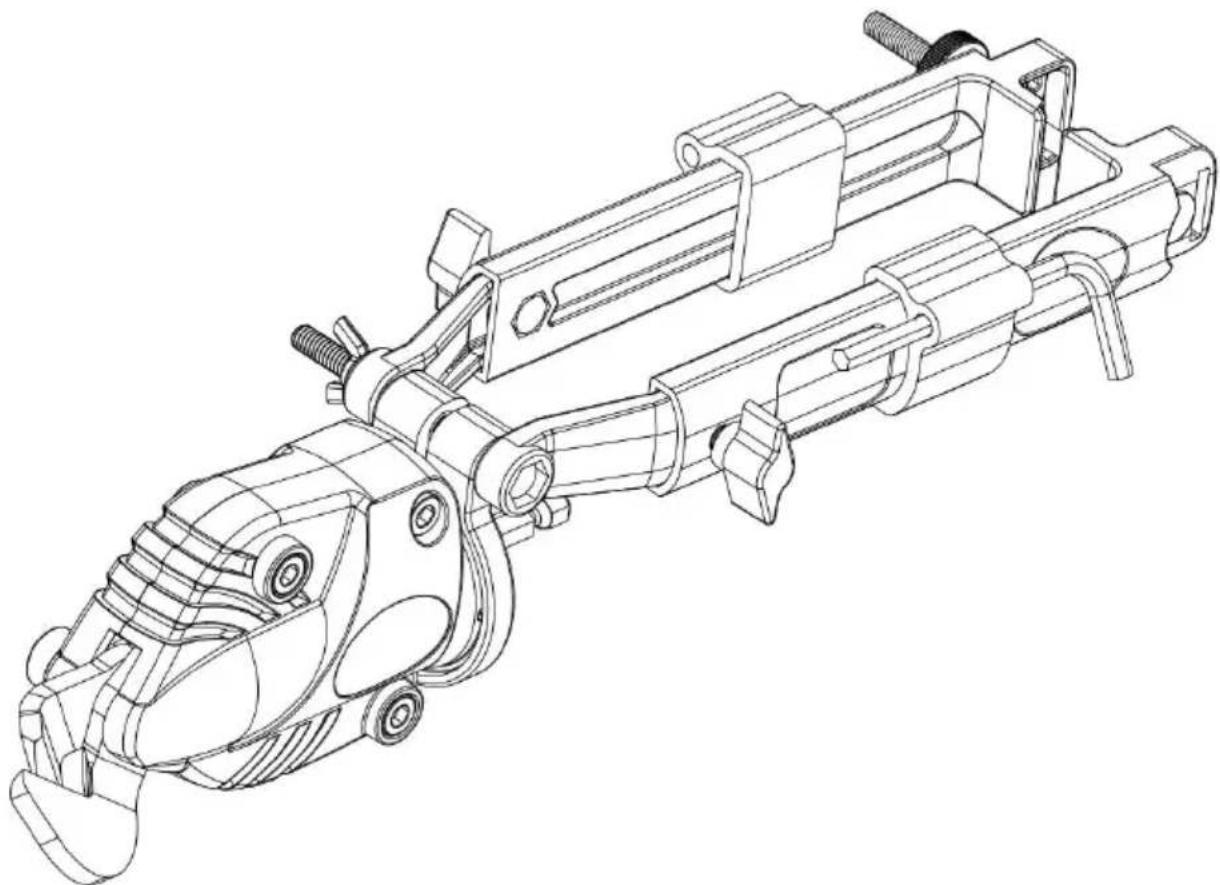
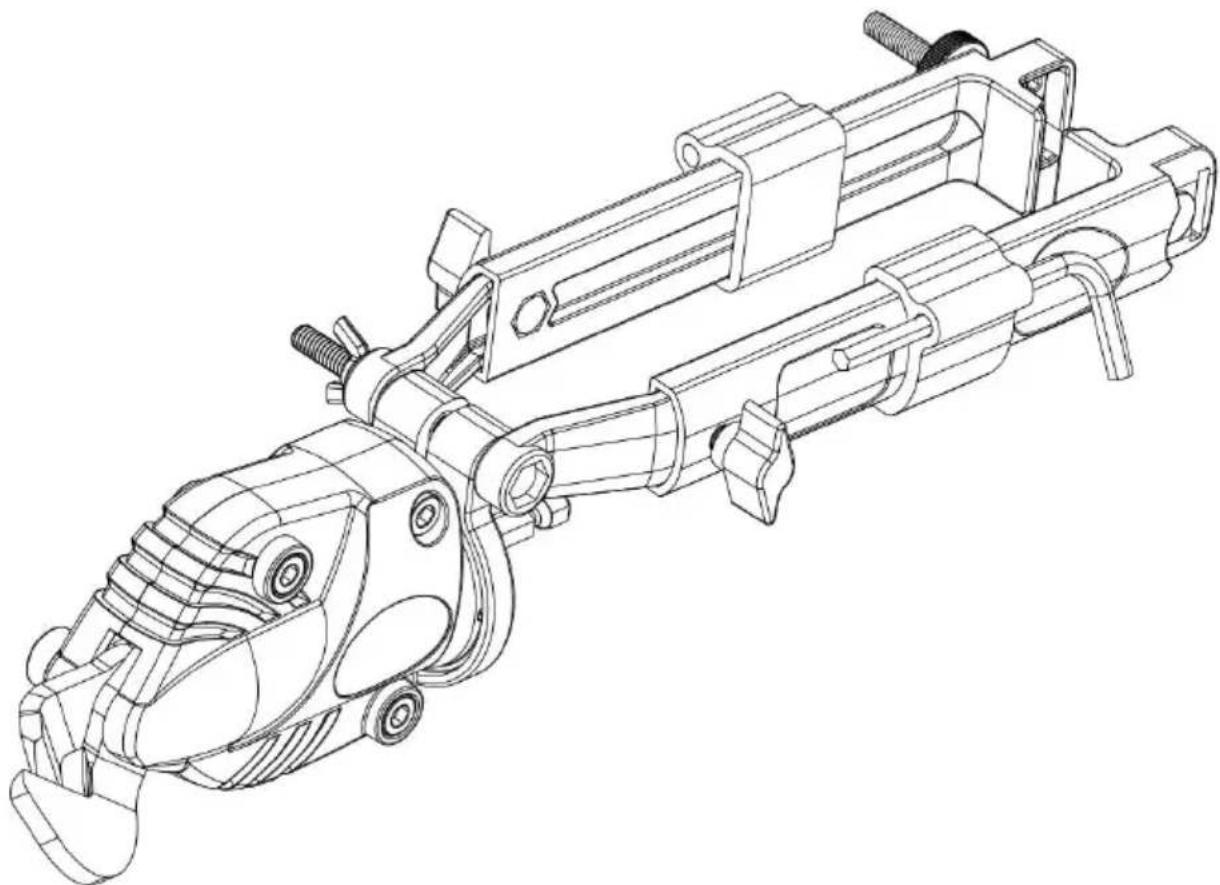
- Pivot the telescoping clamp toward the back of the tool and adjust the clamp (both width and length) to fit securely on the tool.
a. Adjust the width by turning the nut (1) located on the left side of the clamp. Turn the nut clockwise/counter-clockwise to reduce/increase the width.
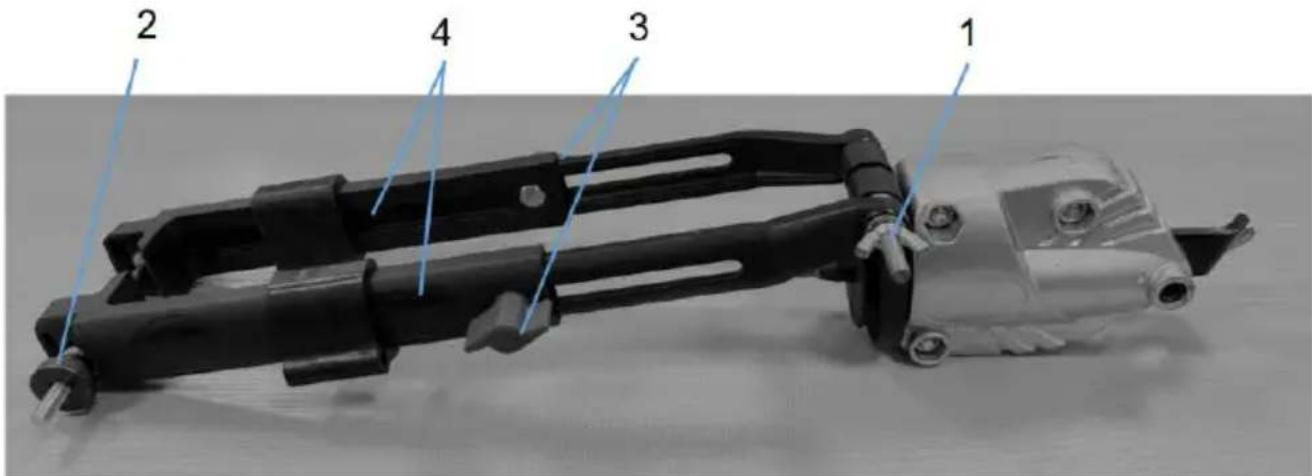
b. Rotate the knobs (3) on both sides to loosen the clamp. Then adjust the length of the clamp by pulling or pushing on the length adjusting lever (4) of the telescoping clamp.
c. Adjust the width by turning the nut (2) located on the left side of the clamp. Turn the nut clockwise to reduce the width, or counter-clockwise to increase it.
- Ensure the shear is secure on the tool.
REPLACING BLADES
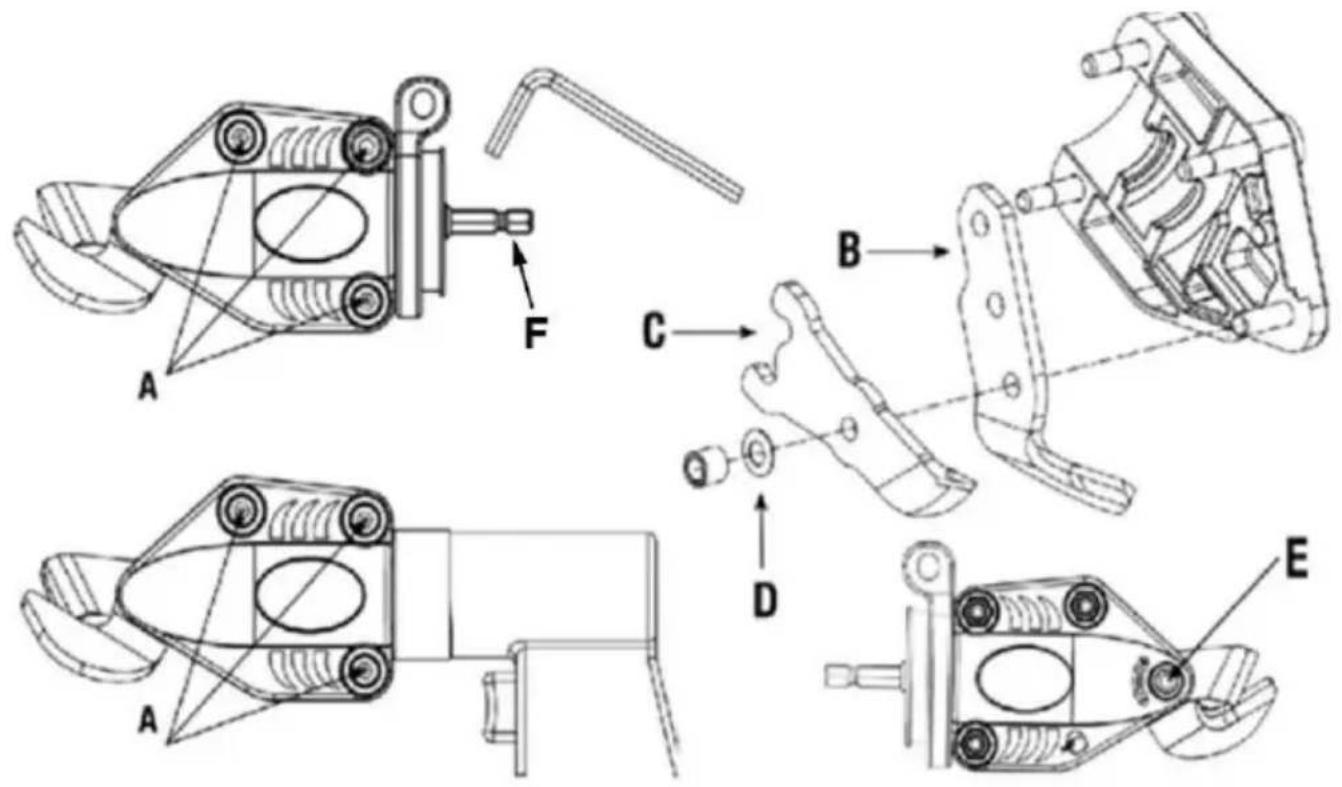
- Use the 5mm hex key provided to remove the three hexagon screws (A) holding the casing together.
- Separate the casings.
NOTE: There is grease in the casing.
- Remove the blades. Be sure to keep the reusable washer (D).
- Place the new lower blade (B) onto the casing as shown in the drawing above.
- Apply a thin layer of grease (not provided) on the side of the lower blade (B).
- Place the new upper blade (C) into the casing.
NOTE: When replacing the washer (D), reinstall it convex side up and under the upper blade (C).
- Apply a liberal amount of grease (not supplied) to the space between the driveshaft (F) and the upper blade (C).
- Reassemble the casings and screws (E).
- Use the 5mm hex key provided to tighten the hexagon screws to achieve proper cutting performance.
Note when cutting
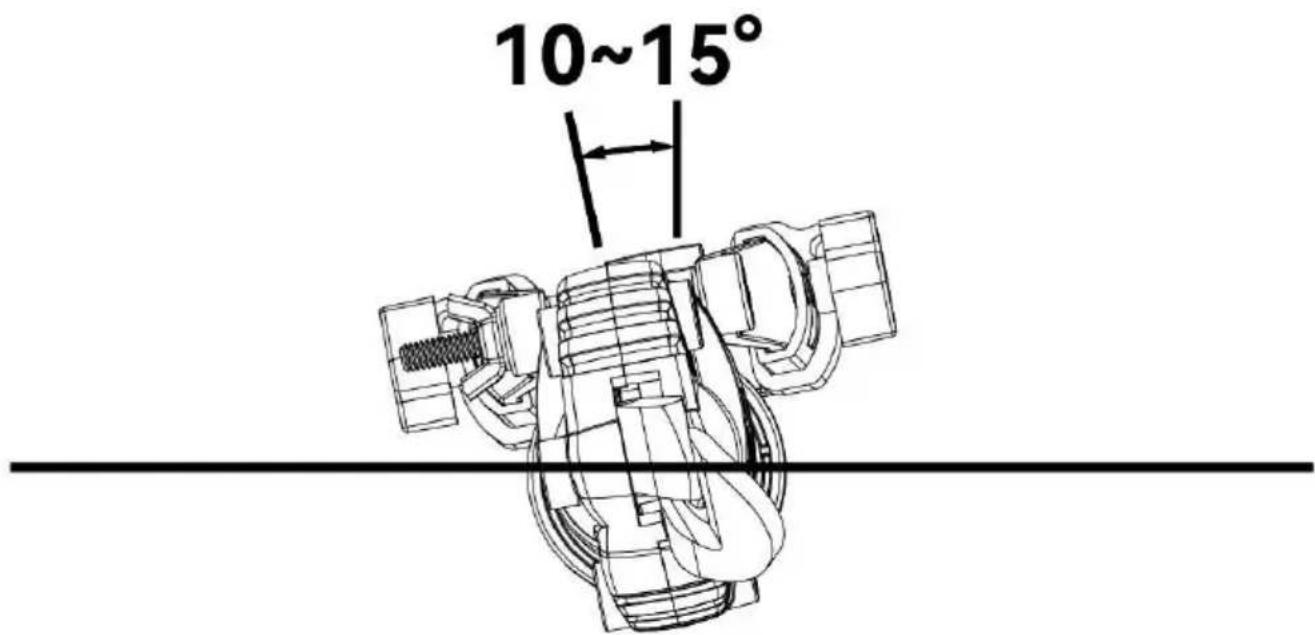
- Adjust your shear within 10-15 degrees when cutting for a smoother cutting.
- To better protect your blade, try to keep the item at a stable position instead of twisting it all the time, or the blade may break easily. Please see the figure below.
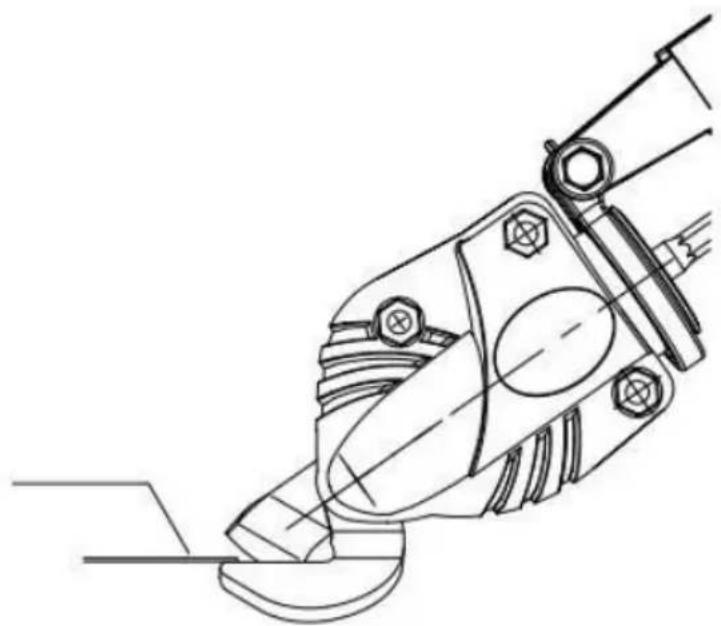
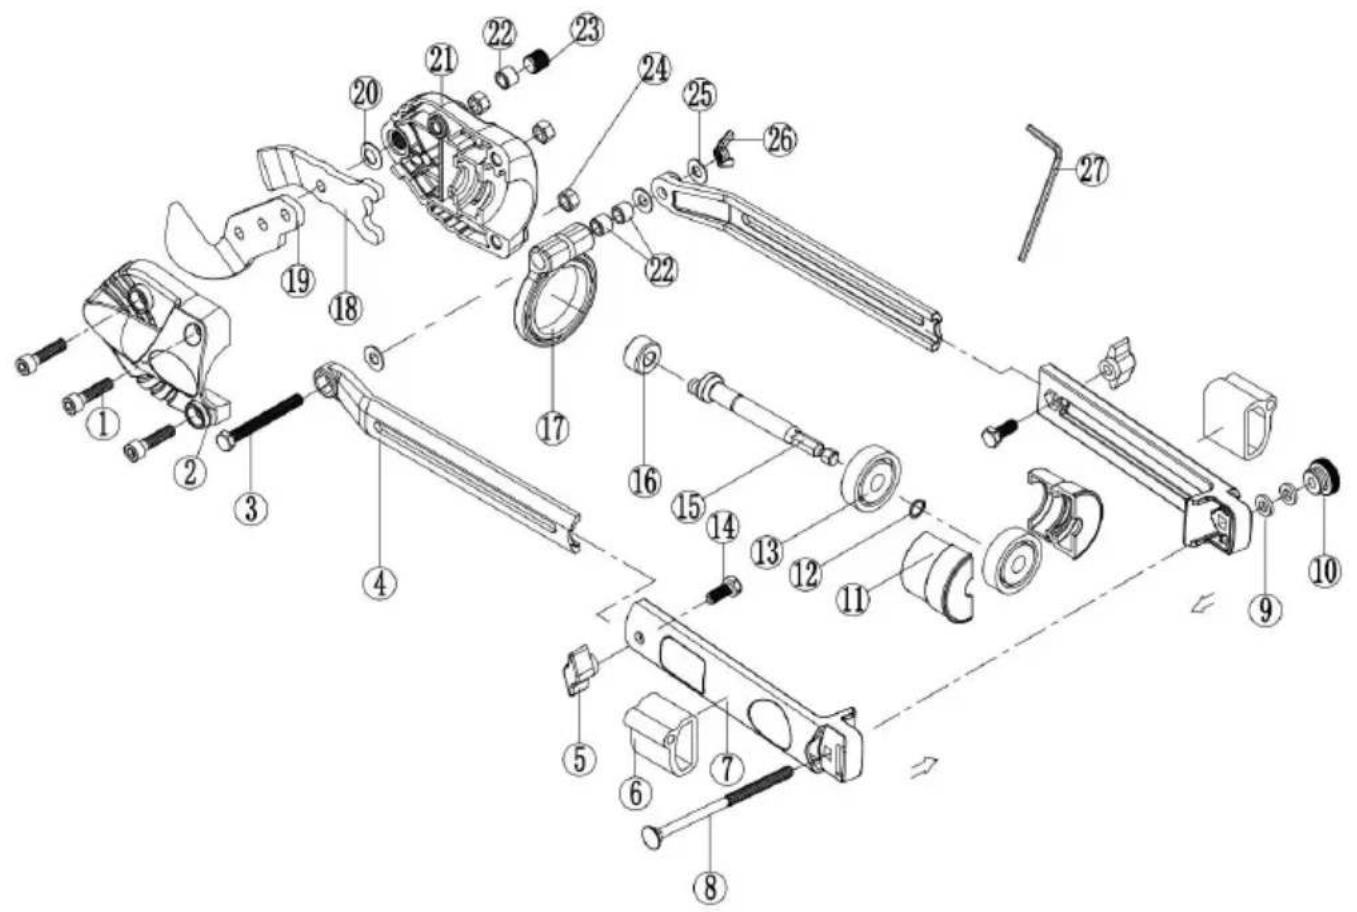
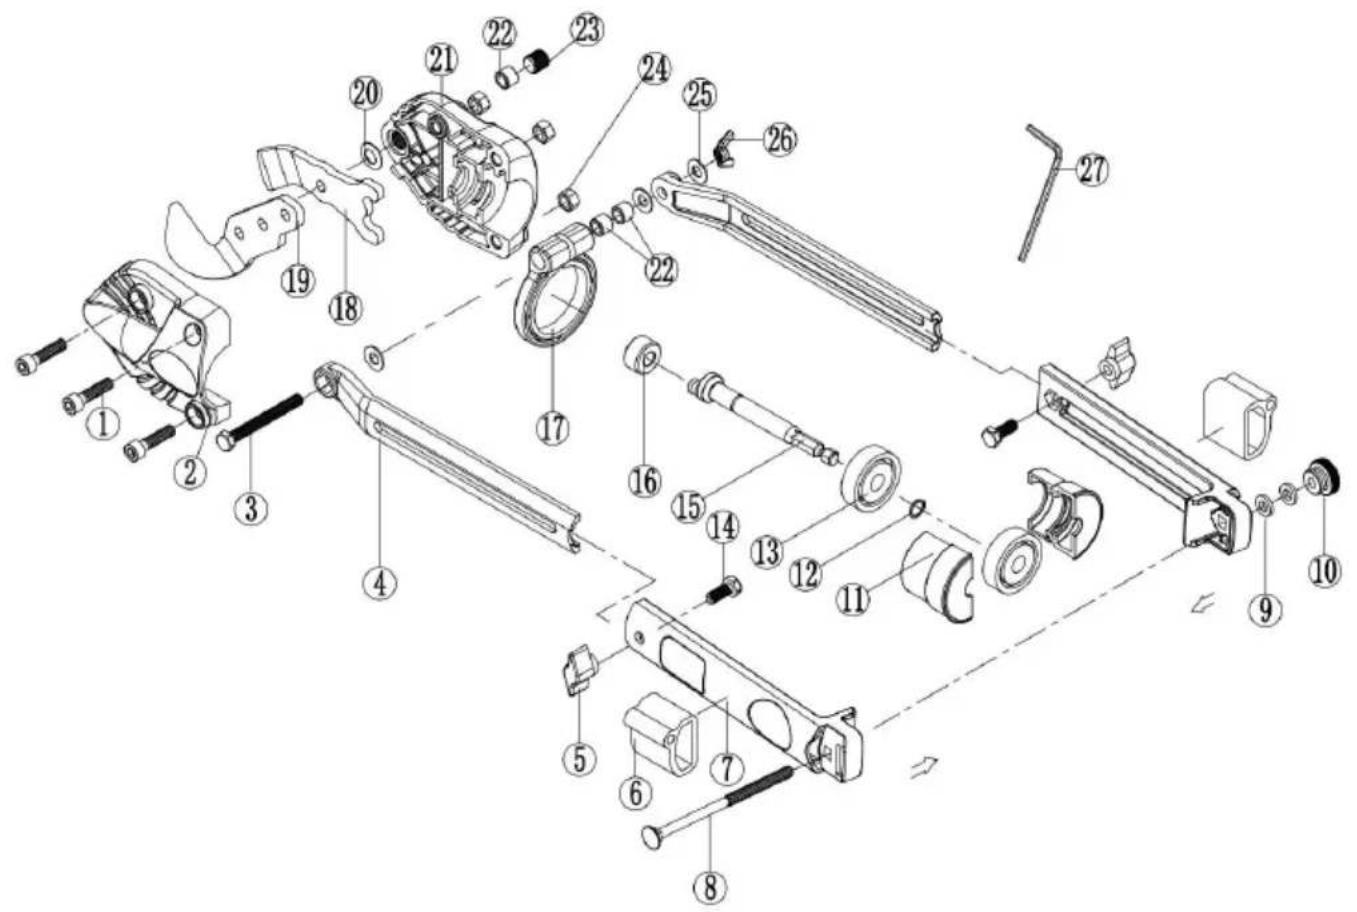
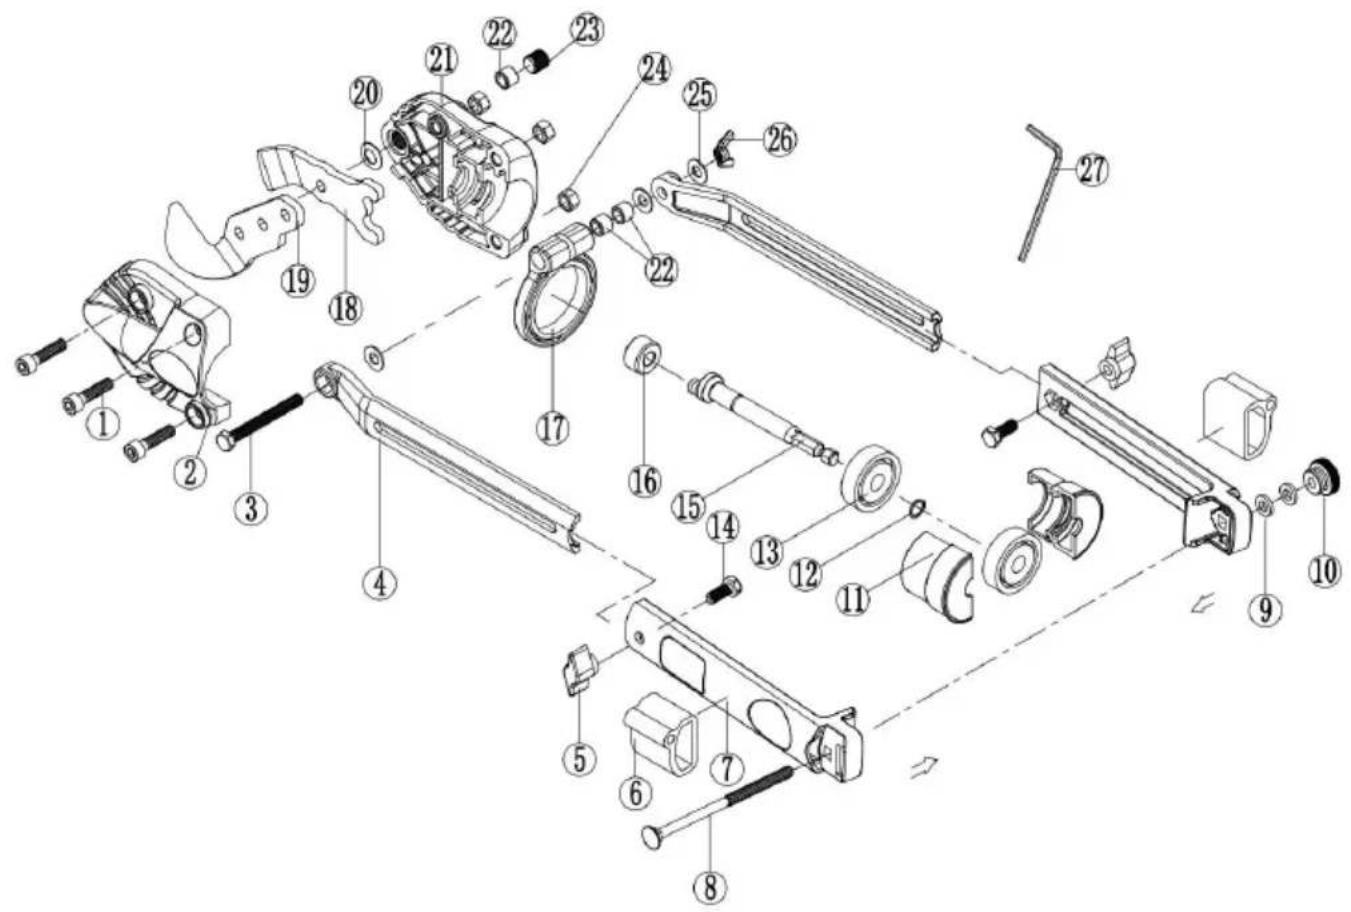
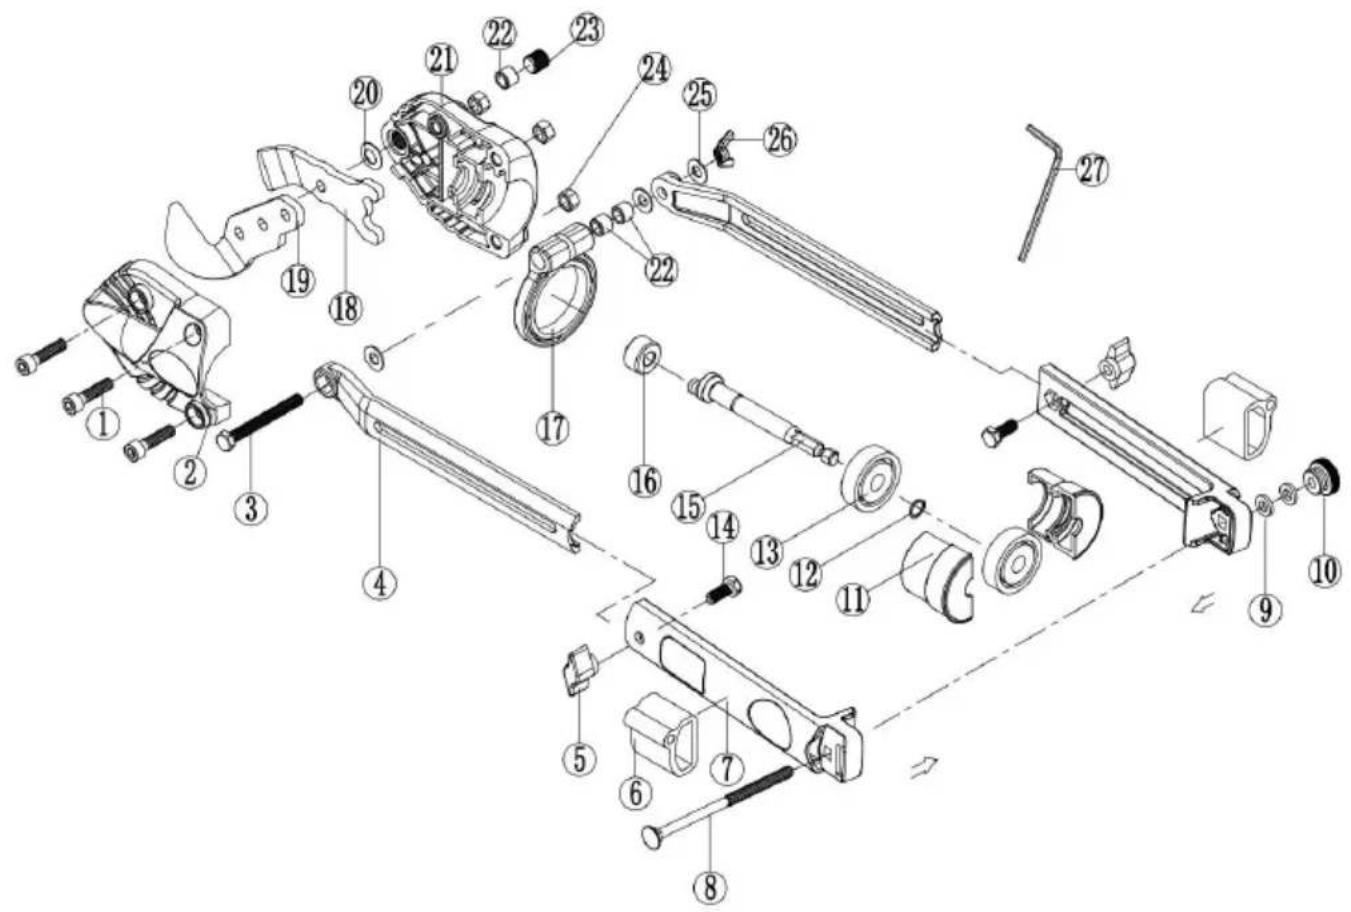
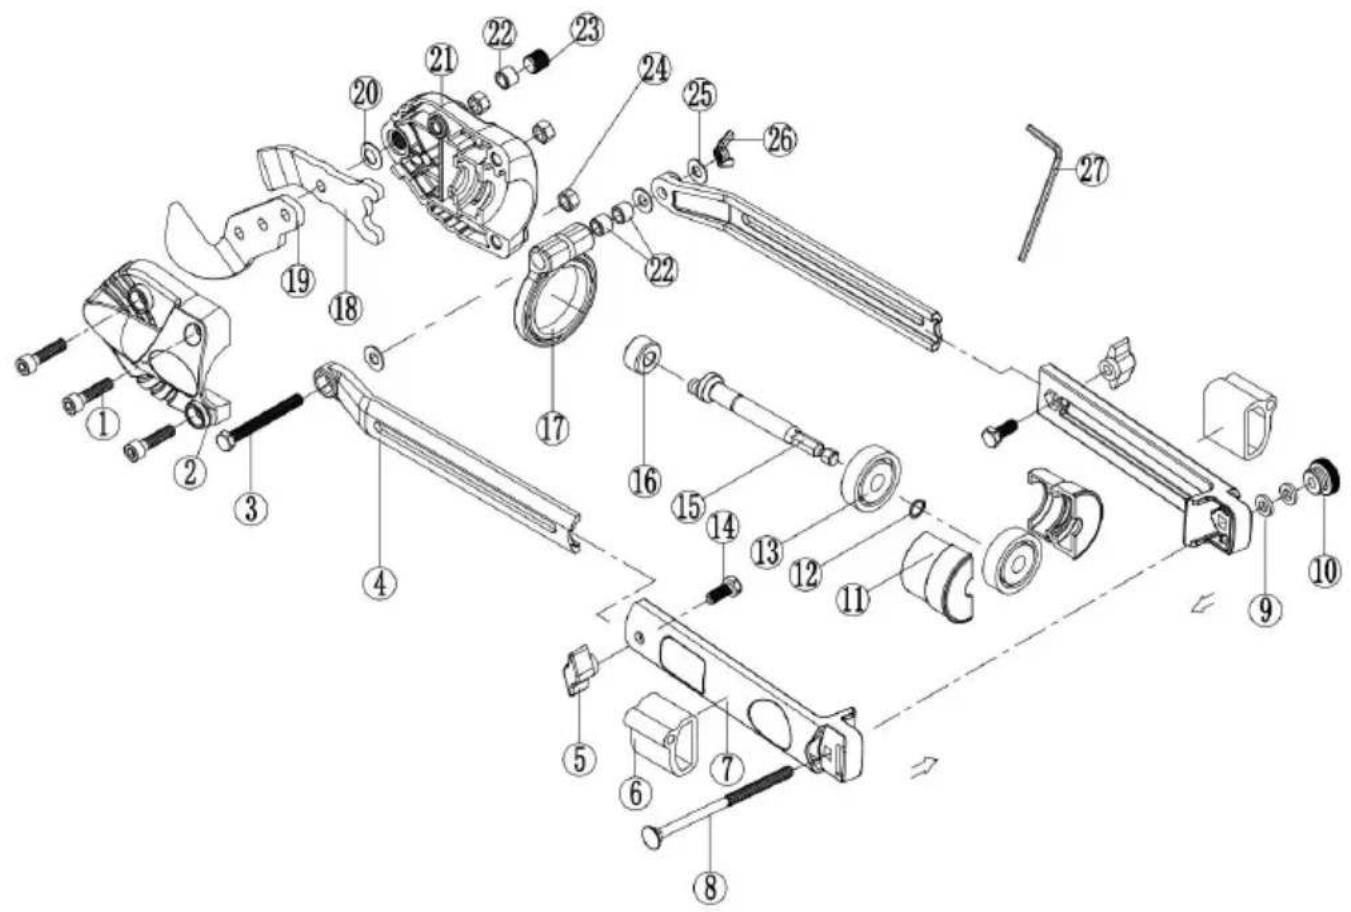
- When cutting, try to parallel the material to be cut with the fixed blade (No.21 in the diagram).
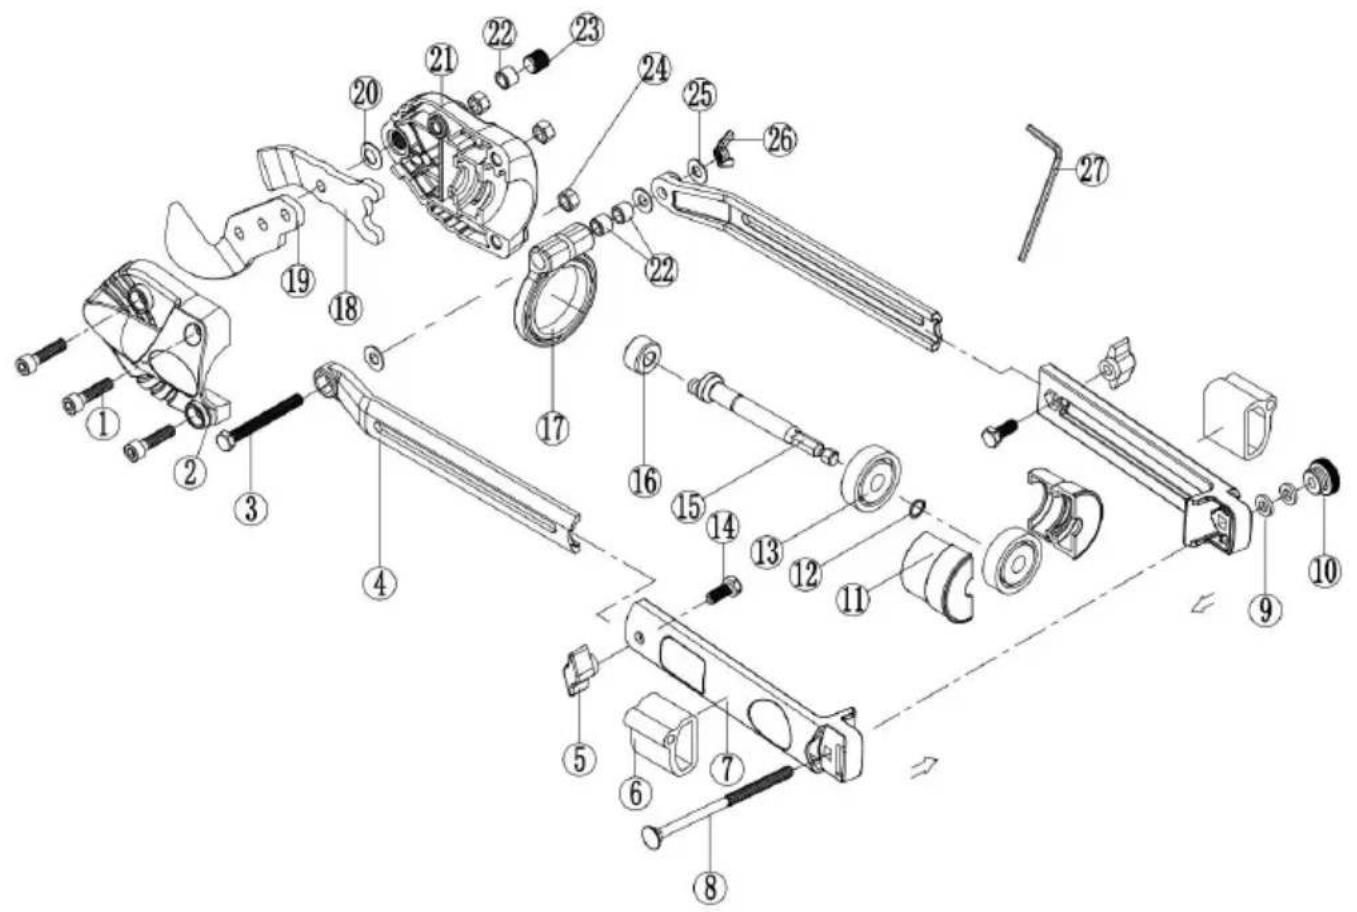
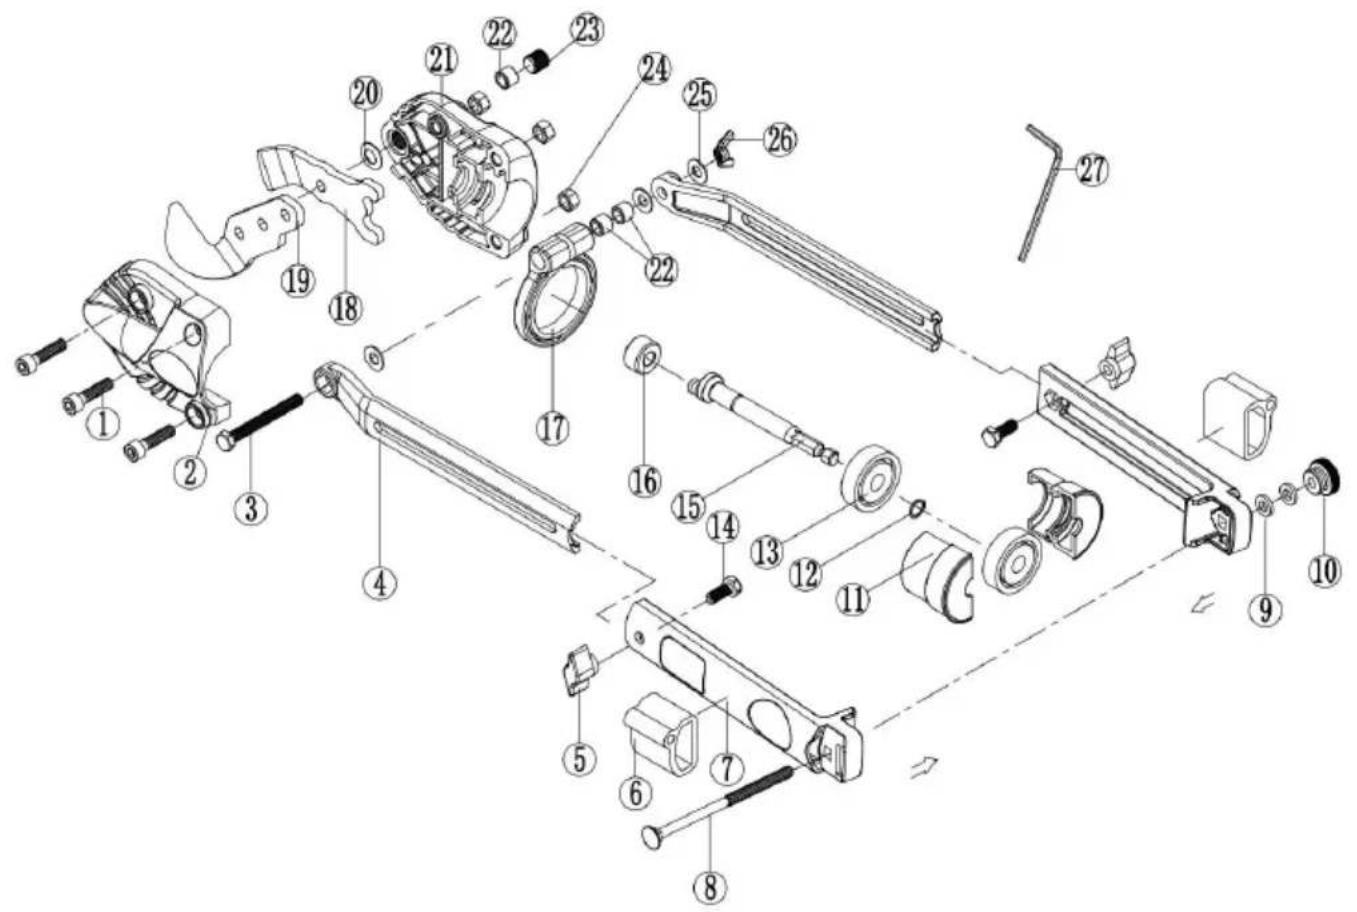
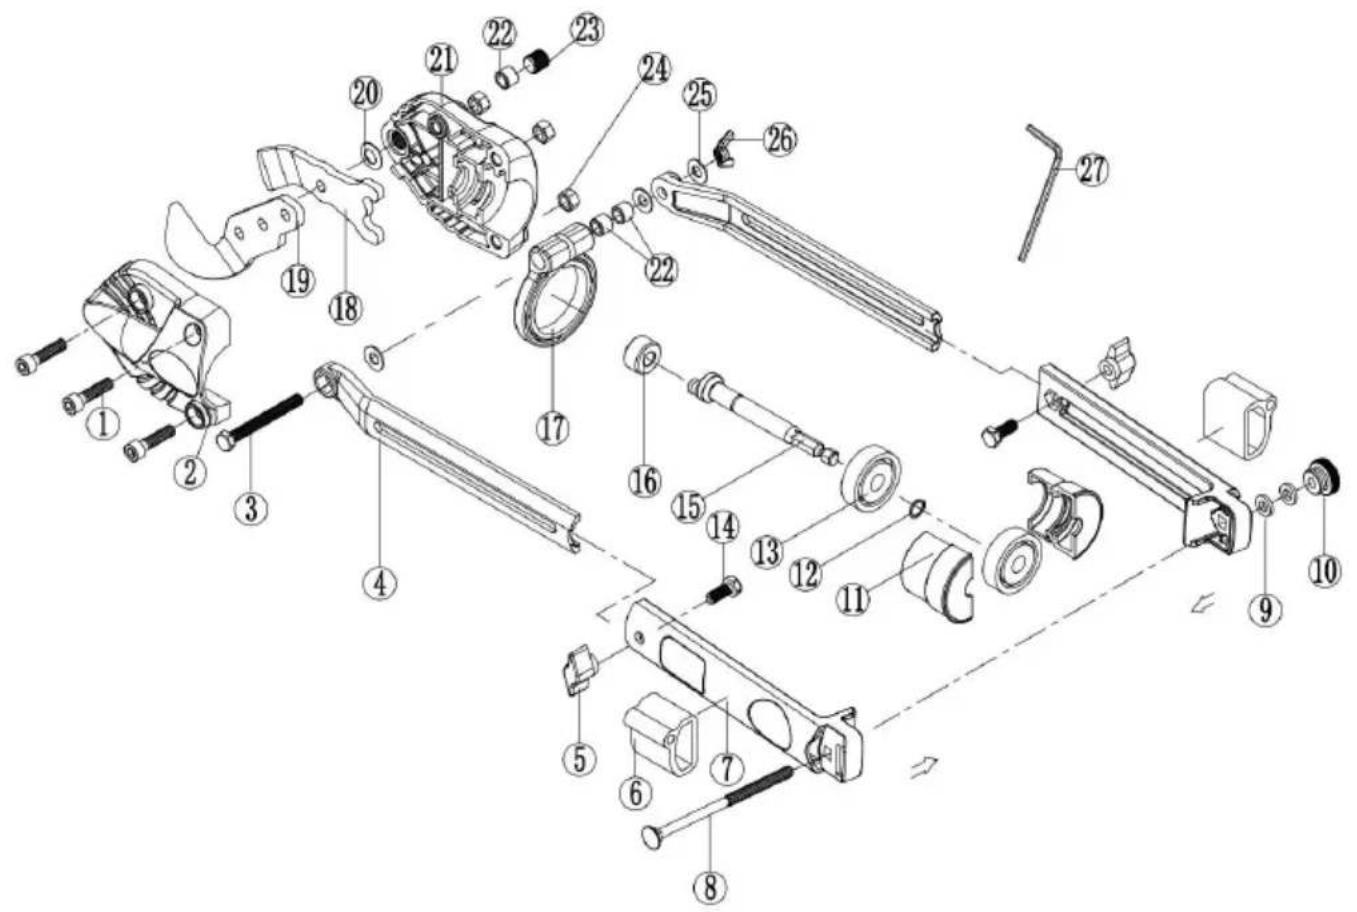
| ITEM NO. | DESCRIPTION | QUANTITY |
| 1 | Inner hexagon head screw | 3 |
| 2 | Gear box cover | 1 |
| 3 | hexagon head bolts | 1 |
| 4 | Length adjusting lever | 2 |
| 5 | Knob | 2 |
| 6 | Hexagon wrench fixing sleeve | 2 |
| 7 | Connecting link | 2 |
| 8 | Coach bolt | 1 |
| 9 | Washer | 2 |
| 10 | Nut | 1 |
| 11 | Gear Box | 2 |
| 12 | Check Ring | 1 |
| 13 | Ball Bearing | 1 |
| 14 | Hexagon Head Bolts | 2 |
| 15 | Output Shaft | 1 |
| 16 | Trolley | 1 |
| 17 | Hose Clamps | 1 |
| 18 | Movable Blade | 1 |
| 19 | Fixed Blade | 1 |
| 20 | Washer | 1 |
| 21 | Gear Box | 1 |
| 22 | Inner Bushing | 3 |
| 23 | Knob | 1 |
| 24 | Universal Torque Type Hex Nut | 3 |
| 25 | Washer | 3 |
| 26 | Nut | 1 |
| 27 | Spanner | 1 |
WARNING!
When servicing, use only original equipment replacement parts. The use of any other parts may create a safety hazard or cause damage to the tool. Any attempt to repair or replace electrical parts on this tool may create a safety hazard unless a qualified technician performs repairs.
Manufacturer: Shanghai Muxin Muye Youxian Gongsi
Address: Shuangchenglu 803nong11hao1602A-1609shi, Baoshanqu, Shanghai 200000 CN.
Imported to AUS: SIHAO PTY LTD. 1 ROKEVA STREET EASTWOOD NSW 2122 Australia
Imported to USA: Sanven Technology Ltd. Suite 250, 9166 Anaheim Place, Rancho Cucamonga, CA 91730
| UK | REP |
YH CONSULTING LIMITED. C/O YH Consulting Limited Office 147, Centurion House, London Road, Staines-upon-Thames, Surrey, TW18 4A>
| EC | REP |
Affordable. Reliable. Home Improvement.
Affordable. Reliable. Home Improvement.
MODEL: DR12
Place, Rancho Cucamonga, CA 91730
| UK | REP |
YH CONSULTING LIMITED. C/O YH Consulting
Limited Office 147, Centurion House, London
Road, Staines-upon-Thames, Surrey, TW18 4AX
| EC | REP |
E-CrossStu GmbH
Mainzer Landstr.69,
60329 Frankfurt am Main.

VEVOR
Affordable. Reliable. Home Improvement.
ELECTRIC METAL SHEARS
MODEL: DR12
VEVOR
Affordable. Reliable. Home Improvement.
MODEL: DR12
YH CONSULTING LIMITED. C/O YH Consulting Limited Office 147, Centurion House, London Road, Staines-upon-Thames, Surrey, TW18 4AX
| EC | REP |
Affordable. Reliable. Home Improvement.
ELECTRIC METAL CUTTER
MODEL: DR12
VEVOR
Affordable. Reliable. Home Improvement.
MODEL: DR12
YH CONSULTING LIMITED. C/O YH Consulting Limited Office 147, Centurion House, London Road, Staines-upon-Thames, Surrey, TW18 4A>
| EC | REP |
Affordable. Reliable. Home Improvement.
METAL ELECTRIC CUTTING
MODEL: DR12
VEVOR
Affordable. Reliable. Home Improvement.
MODEL: DR12
YH CONSULTING LIMITED. C/O YH Consulting Limited Office 147, Centurion House, London Road, Staines-upon-Thames, Surrey, TW18 4A>
| EC | REP |
Affordable. Reliable. Home Improvement.
METAL ELECTRIC CUTTING
MODEL: DR12
VEVOR
Affordable. Reliable. Home Improvement.
MODEL: DR12
YH CONSULTING LIMITED. C/O YH Consulting Limited Office 147, Centurion House, London Road, Staines-upon-Thames, Surrey, TW18 4A>
| EC | REP |
Affordable. Reliable. Home Improvement.
Affordable. Reliable. Home Improvement.
MODEL: DR12
YH CONSULTING LIMITED. C/O YH Consulting Limited Office 147, Centurion House, London Road, Staines-upon-Thames, Surrey, TW18 4A>
| EC | REP |
Affordable. Reliable. Home Improvement.
ELECTRIC METAL SHEARS
MODEL: DR12
VEVOR
Affordable. Reliable. Home Improvement.
MODEL: DR12
YH CONSULTING LIMITED. C/O YH Consulting Limited Office 147, Centurion House, London Road, Staines-upon-Thames, Surrey, TW18 4A>
| EC | REP |
Brand : Vevor
Model : DR12
Category : Scissors