
C300PLUS - Diving breathing apparatus Vevor - Free user manual and instructions
Find the device manual for free C300PLUS Vevor in PDF.

User questions about C300PLUS Vevor
0 question about this device. Answer the ones you know or ask your own.
Ask a new question about this device
Download the instructions for your Diving breathing apparatus in PDF format for free! Find your manual C300PLUS - Vevor and take your electronic device back in hand. On this page are published all the documents necessary for the use of your device. C300PLUS by Vevor.
USER MANUAL C300PLUS Vevor
Technical Support and E-Warranty Certificate www.vevor.com/support
DIVING RESPIRATOR
MODEL: C300PLUS
We continue to be committed to provide you tools with competitive price. "Save Half", "Half Price" or any other similar expressions used by us only represents an estimate of savings you might benefit from buying certain tools with us compared to the major top brands and does not necessarily mean to cover all categories of tools offered by us. You are kindly reminded to verify carefully when you are placing an order with us if you are actually Saving Half in comparison with the top major brands.
VEVOR®
TOUGH TOOLS, HALF PRICE
DIVING RESPIRATOR
MODEL: C300PLUS
NEED HELP? CONTACT US!
Have product questions? Need technical support? Please feel free to contact us:
Technical Support and E-Warranty Certificate www.vevor.com/support
This is the original instruction, please read all manual instructions carefully before operating. VEVOR reserves a clear interpretation of our user manual. The appearance of the product shall be subject to the product you received. Please forgive us that we won't inform you again if there are any technology or software updates on our product.
PRODUCT INTRODUCTION
- This product is suitable for wading activities such as snorkeling, recreational diving and indoor diving teaching and the maximum applicable depth is no more than 10 meters underwater;
- When used as an underwater emergency rescue or backup air supply for professional diving equipment, the maximum applicable depth is within 30 meters underwater. In this case, it can only be used as an emergency air supply.
WARNING
- This product is suitable for waters within 10 meters deep;
- When used as underwater emergency rescue, the maximum depth can reach 30 meters. At this moment, it can only be used as an emergency backup air supply;
- Before use, you're strongly recommended to participate in and obtain the scuba diving technical training and related certificates by valid authentication institution. It is dangerous for those who have not been authenticated by professional institution to use this product and serious injury or death may occur;
- This product is suitable for waters above 10 degrees Celsius with the approval by the managers of the waters; please carefully observe the surrounding environment before use to ensure that the waters are safe without any dangers; beware of collisions with passing ships;
- Please inflate the product before use and check any possible damages or air leakage. Do not use when it's damaged, leaking or has other signs of malfunction;
- The maximum pressure of this product is 20MPa and it can only be filled with compressed air in accordance with the requirements of human breathing. Filling other undesirable gases may cause the
internal filtering device and channels to be blocked;
- Please store the product in a cool and dry place away from direct sunlight, do not store it in the car trunk or the place of high temperature, it is forbidden to throw this product into fire;
It belongs to high-precision product, please do not disassemble the product without authorization. Non-professionals may cause damages to the product; - Do not use this product in the water alone, more than two companions should be needed;
- In the case of danger, this product cannot provide personal safety protection, it can only provide a proper amount of compressed air to the human body as a source of breathing air;
- After use, make sure to clean the product with clean water and dry it before storage;
- When the pressure is less than 2MPa , please go to the water surface, then use it after refill air again;
- Please practice in shallow water when use this product for the first time;
It is strictly forbidden to use this product after drinking alcohol or taking drugs, otherwise it will cause serious consequences;
It is strictly forbidden for children under 14 years old and seniors over 60 years old to use this product. Juveniles over 14 years old should use it under adult supervision; pregnant women, patients and other people who are not suitable for diving/swimming are prohibited to use this product.
PRODUCT CONFIGURATION
| Model | C300PLUS |
| Maximum Applicable Pressure | 20MPa |
| Single Cylinder Volume | 0.5L |
PRODUCT CONFIGURATION
| Model | Item number | Gas cylinder (PCS) | 1st generation air pump | 2st generation air pump | adapter | Back bag | Diving mask | Storage bag | shoulder bag | Lost rope | Diving goggles |
| C300PLUS | C300PLUS-B6-US | 1 | - | 1 | - | - | 1 | 1 | - | 1 | - |
| C300PLUS-B6-EU | |||||||||||
| C300PLUS-A6-US | 1 | - | - | - | - | 1 | 1 | - | 1 | - | |
| C300PLUS-A6-EU | |||||||||||
| C300PLUS-A7-US | 1 | - | - | 1 | - | 1 | 1 | 1 | 1 | - | |
| C300PLUS-B2-EU | 1 | 1 | - | - | - | - | - | 1 | 1 | - | |
| C300PLUS-A2-EU | 1 | - | - | - | - | - | - | 1 | 1 | - | |
| C300PLUS-C2-US | 2 | 1 | - | 1 | - | - | 1 | 2 | 2 | 2 | |
| C300PLUS-C2-EU |
DIVING RESPIRATOR ACCESSORIES
| ITEM | Name | Q'TY | ITEM | Name | Q'TY |
| 1 | Green O-ring | 1PCS | 3 | One character batch | 1PCS |
| 2 | Black O-ring | 1PCS | 4 | manual | 1PCS |
OPERATION PRINCIPLE
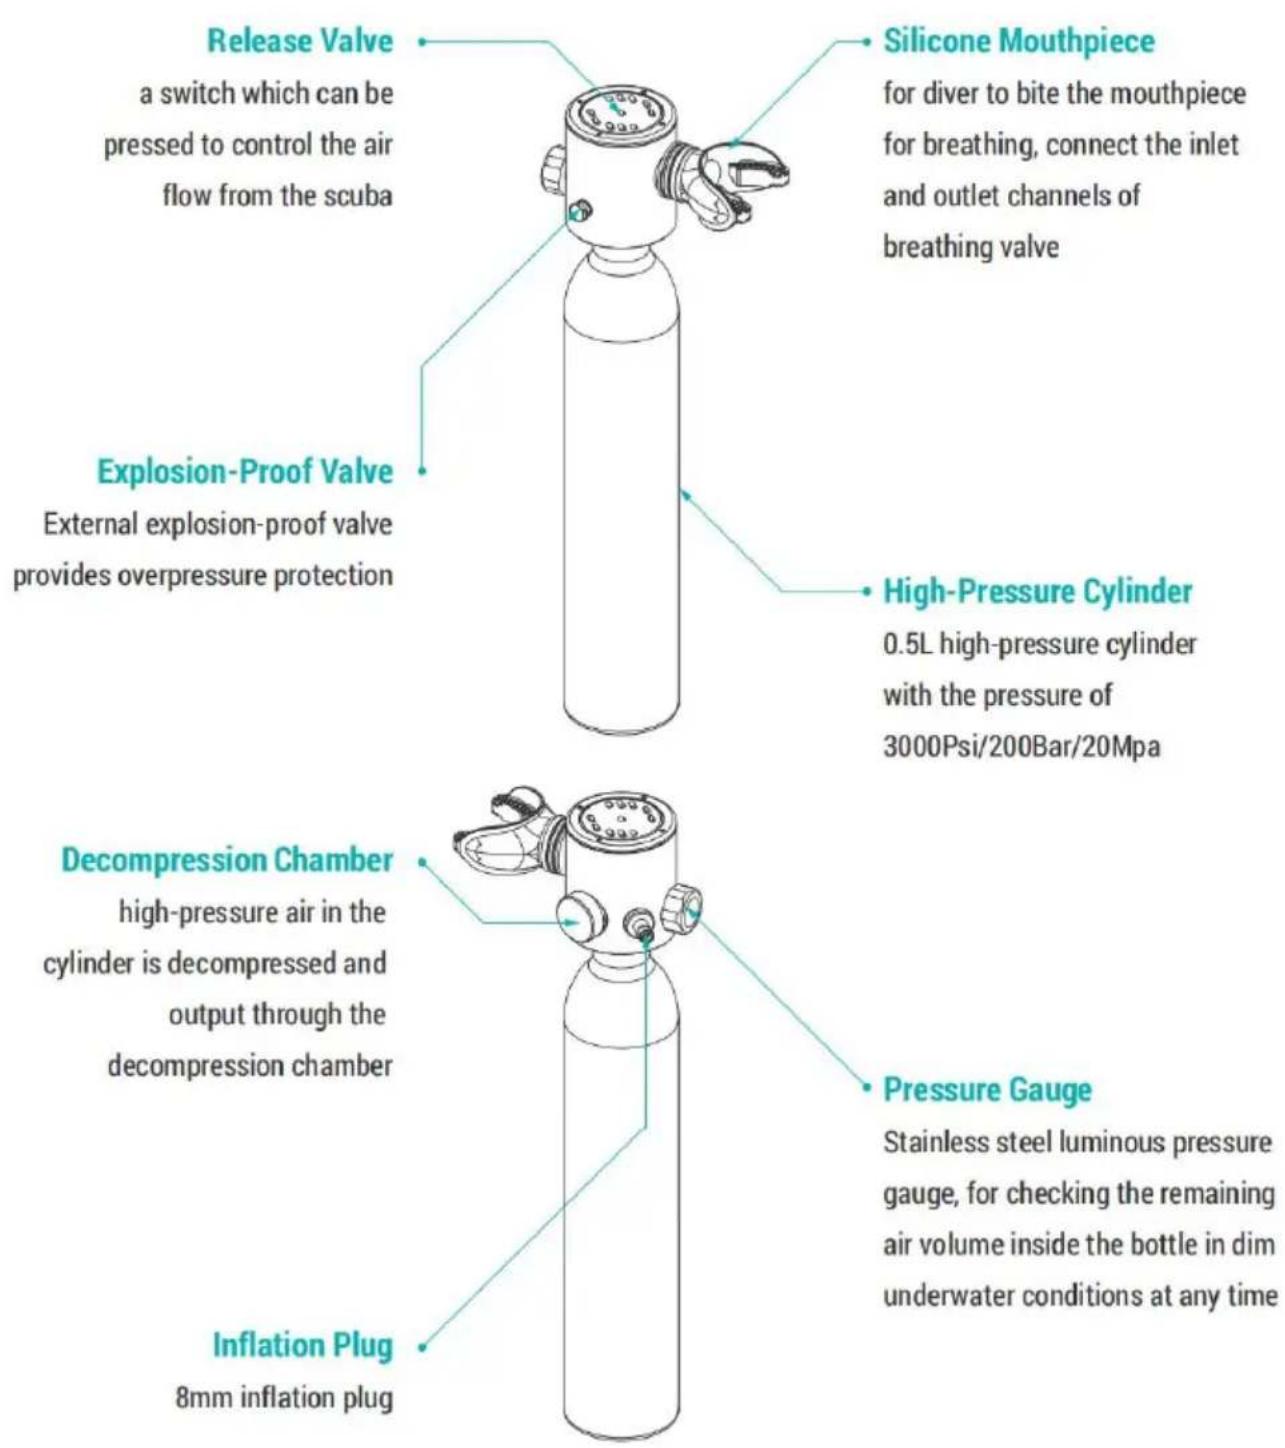
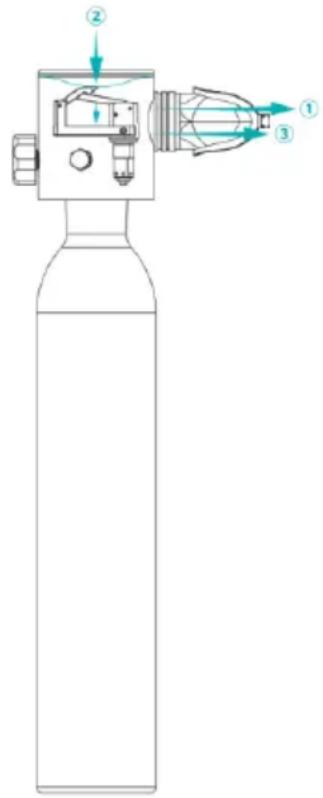
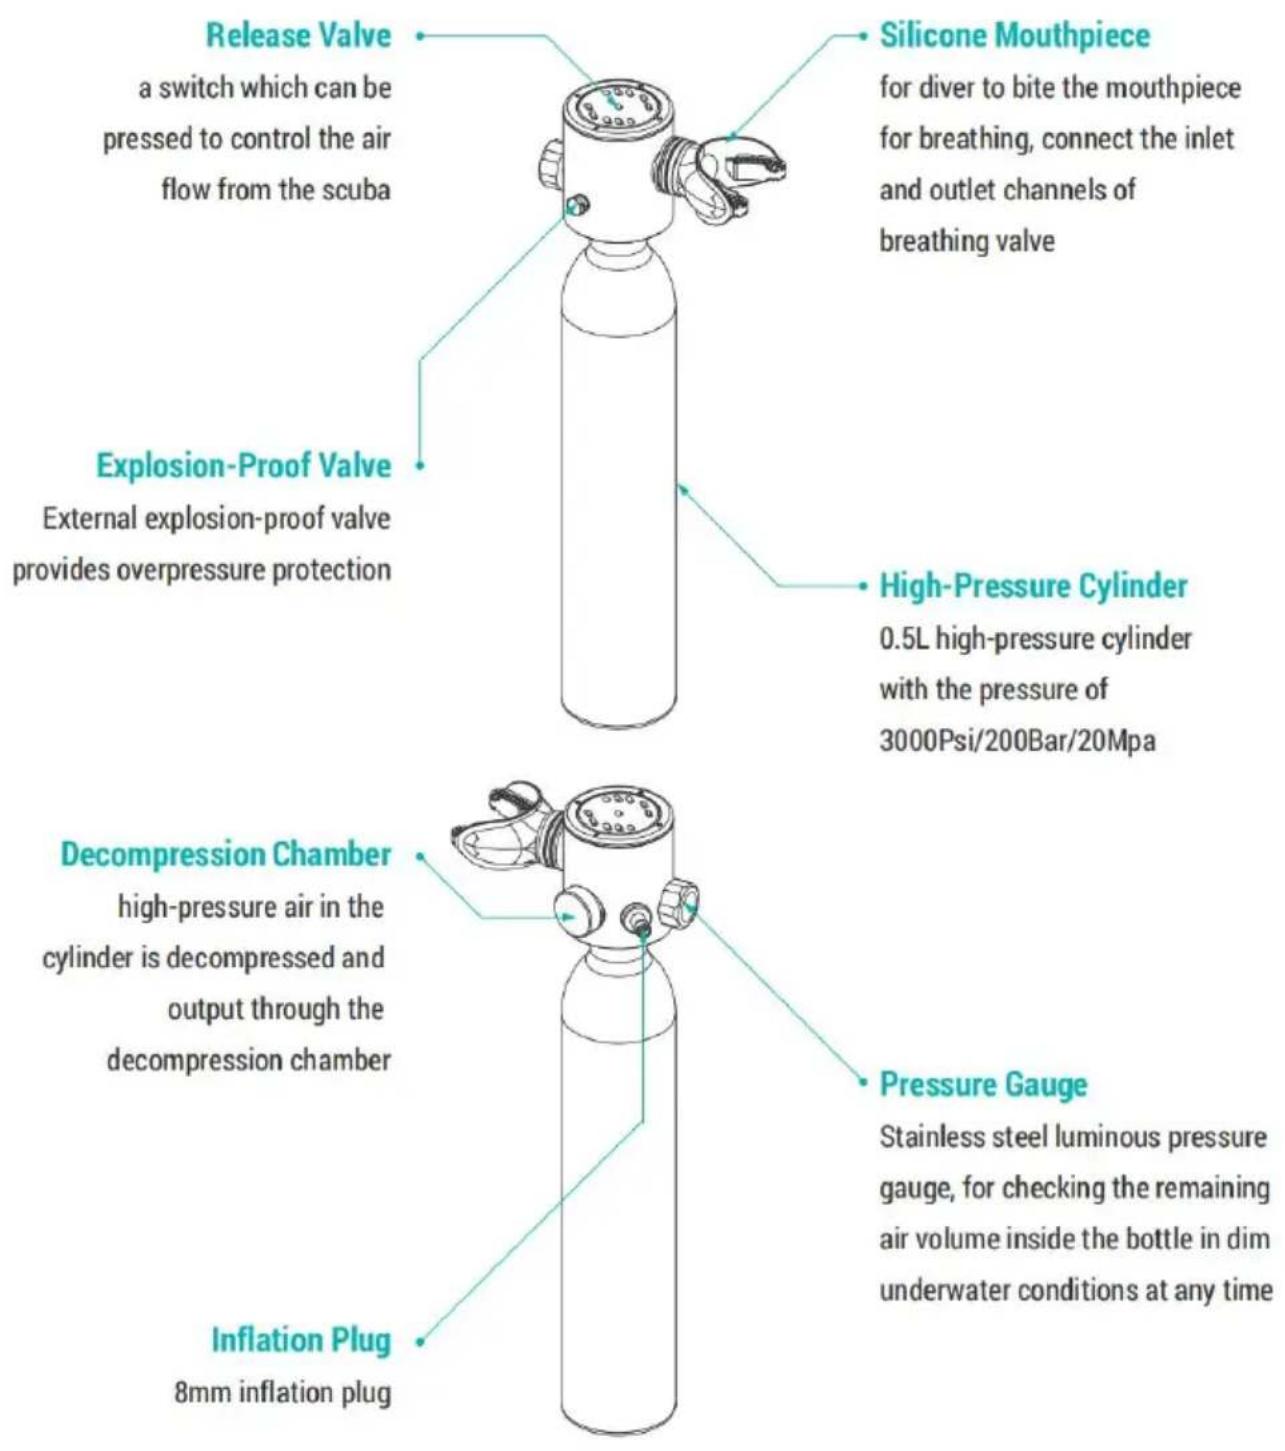
- When the diver bites the mouthpiece and inhales, the pressure in the cavity decreases to prompt the release valve to open downward so that the air flows out into the oral cavity through the mouthpiece.
- When the diver bites the mouthpiece and exhales, the exhaled gas flows into the cavity to increase the pressure in the cavity, to prompt the one-way silicone gasket in the valve at the bottom of the cylinder to open, and the gas is discharged to the outside through the two exhaust holes.

OPERATION TUTORIAL
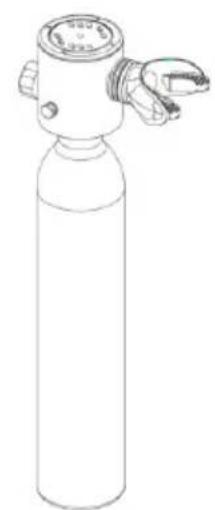
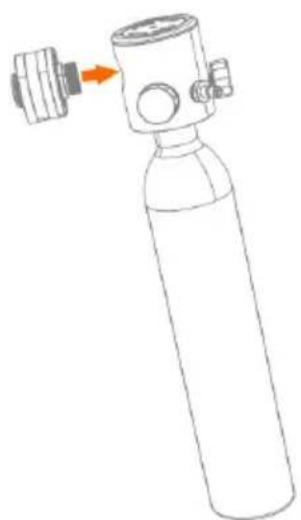
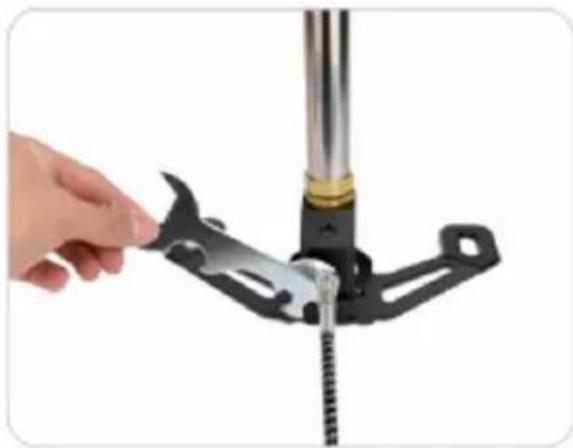
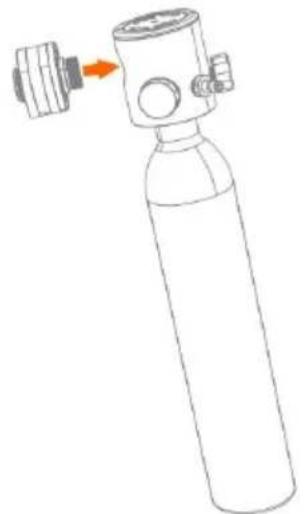
1. Assembly
C300 PLUS scuba is divided into two parts: the cylinder valve and high-pressure cylinder. When receiving the product, please check any possible missing parts. Remove the screw protection sleeve at the bottom of the cylinder valve and check the thread connection. After carefully check, please tighten the cylinder valve and have it inflated for use.
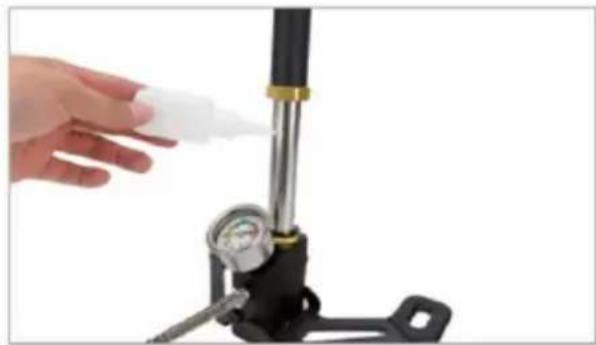
2. Inflation
- Please check any possible air leakage when inflating. In case of any leakage,
stop the inflation immediately; the gas is filled with compressed air (it's strictly forbidden to fill in pure oxygen or other gases harmful to human body). When the air pressure in the cylinder reaches 3000psi /200bar/20MPa, stop the inflation immediately to avoid any accidents.
- Common Inflation Methods: electric pump inflation, manual pump inflation and adapter inflation. When the aforesaid tools are used, please ensure that the pressure can reach 3000psi/200bar/20MPa, otherwise the cylinder will not be fully filled. When electric pump/manual pump is used for inflation, oil-water separator shall be equipped.
- The compressed air filled shall meet the requirements of human breathing to ensure the air is pure and harmless to human body. If the pure compressed air suitable for human body is not filled as required, the filter system or channel in the cylinder valve may be blocked to cause malfunction.
3. Pressure Release
Press the release valve on the top of the cylinder valve to release the pressure. If air leakage occurs after air filling, release the pressure in this way and check the malfunction.
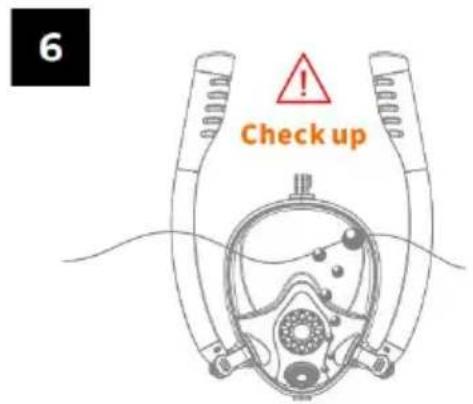
4. How to Use
Before use, please check any possible air leakage or water seeping into breathing cavity of the cylinder valve. In case of air leakage, stop using it immediately. In case of water seepage, please drain the water before use. The specific operation is shown as follows:
- Keep all the mouthpiece in mouth, bite the silicon part with teeth and shut the mouth tightly. Press the silicone cap on the top of cylinder valve to discharge the water in the breathing cavity by the released air, and then have normal breathing with the mouth.
- Check whether there are foreign objects (such as sand, etc.) in the breathing cavity. If any, please clean up in time before use.
- Use only after safety hazards have been eliminated. When in use, you can breathe normally by biting the mouthpiece completely.
COMMON TROUBLESHOOTING
| Trouble | Repair method |
| Air leakage at the connection between pressure gauge and cylinder valve / Air leakage at the connection between 8mm inflation plug and cylinder valve? | Use a wrench to tighten the pressure gauge and the inflation plug to eliminate the malfunction. |
| Air leakage at the connection between the cylinder valve and the cylinder? | Take out the gasket and other accessories at the bottom of the cylinder valve in order, rearrange them properly and reinstall back in order. The valve should be aligned with the screw of cylinder and tightened to eliminate the malfunction. |
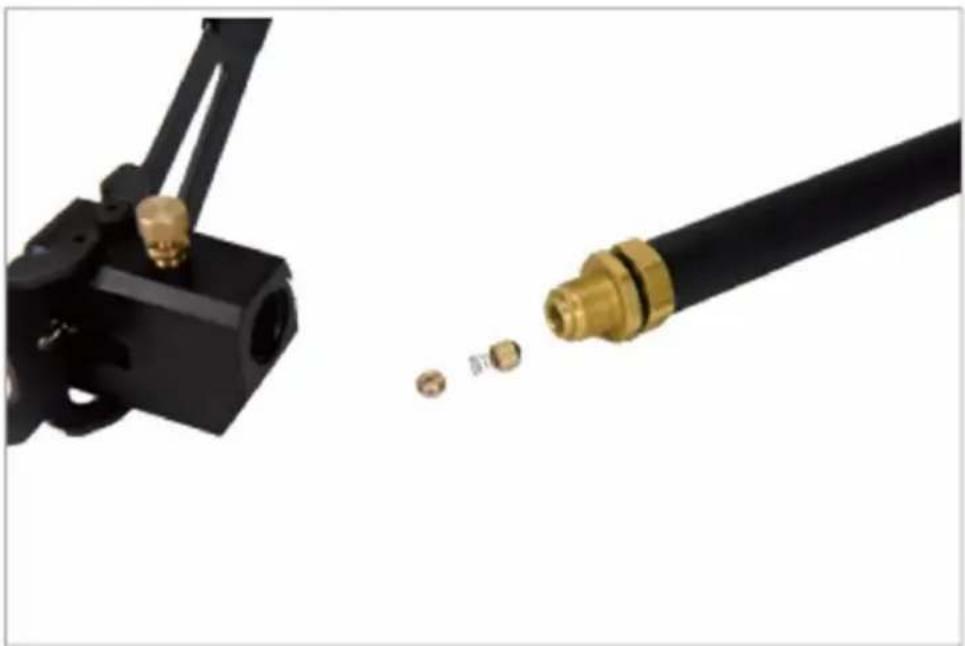
| Air leakage at the port of inflation plug? | Remove the inflation plug, take off the O-shaped rubber ring at the bottom and clean/replace with clean water, wipe off the water and reinstall back to the original place. Make it tightened to eliminate the malfunction. |
STORAGE AND MAINTENANCE
1. Storage Conditions:
It should be stored in the place with ambient temperature of 5^ 30^ and relative humidity of 40% 70% ;
It should not be placed within one meter from the heat source and in direct sunlight;
The warehouse where scuba is stored should not have oils, acids, alkalis and other gaseous substances that can damage rubber material.
2. Transportation Conditions:
300Plus scuba is small and light in weight, so it's very
convenient to carry. Violent shocks and vibrations during transportation should be avoided. It should be kept clean without contacting with oils, acids, alkalis and other substances that damage rubber and fabrics.
3. Product Maintenance:
- This product should be inspected or maintained once a year by an authorized dealer or a professional diving organization to ensure it can be used normally.
- Cylinders need to be hydrostatically tested every 5 years.
- An annual visual inspection is recommended and the cylinder should be inspected for corrosion, dents, cracks or other damage, both inside and outside.
- The O-ring is a vulnerable part. If it is damaged during use, please replace it immediately.
4. Deposited Conditions
The product should be disposed if the following cases occur:
The product itself is damaged, that is, it meets the disposal requirement and cannot be used anymore; for example, the cylinder case is broken, the screw of cylinder valve is damaged or deformed, the cylinder valve or cylinder is deformed.
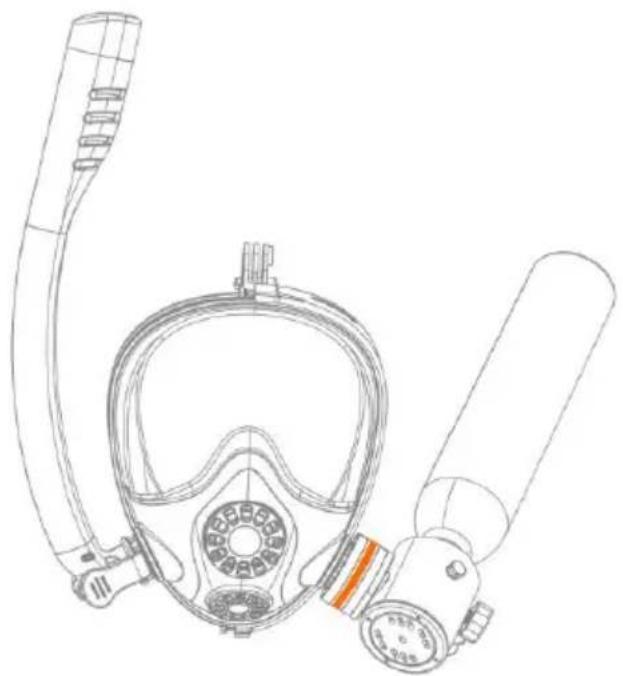
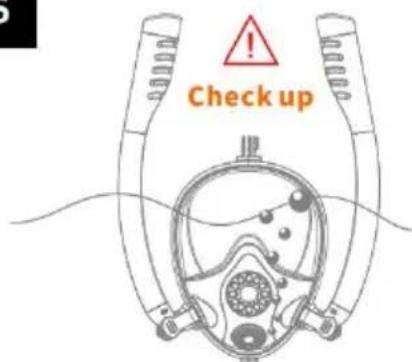
INTRODUCTION TO DIVING MASK
WARNING:
- Do not use this mask for free diving or scuba diving.
- Please read and follow the instructions in the manual carefully before using this mask.
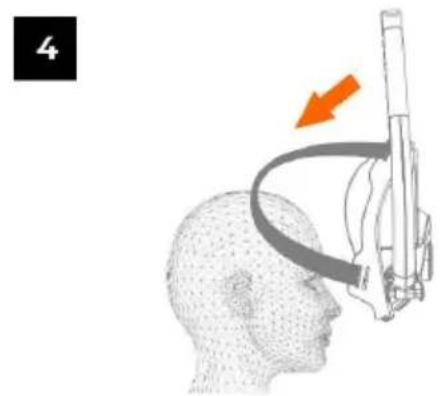
Children under 12 should supervised by an adult to use this mask. Do not try to remove the anti-fog film inside the mask. And keep the mask away from sand.
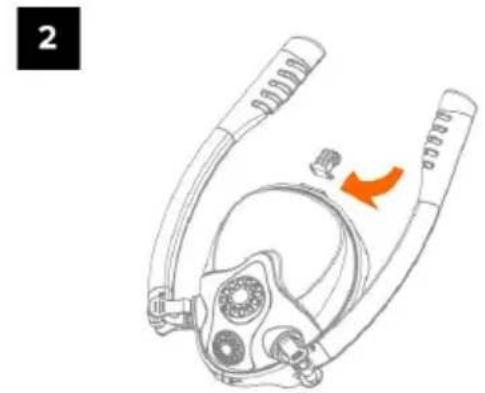
1. Composed of DIVING MASK
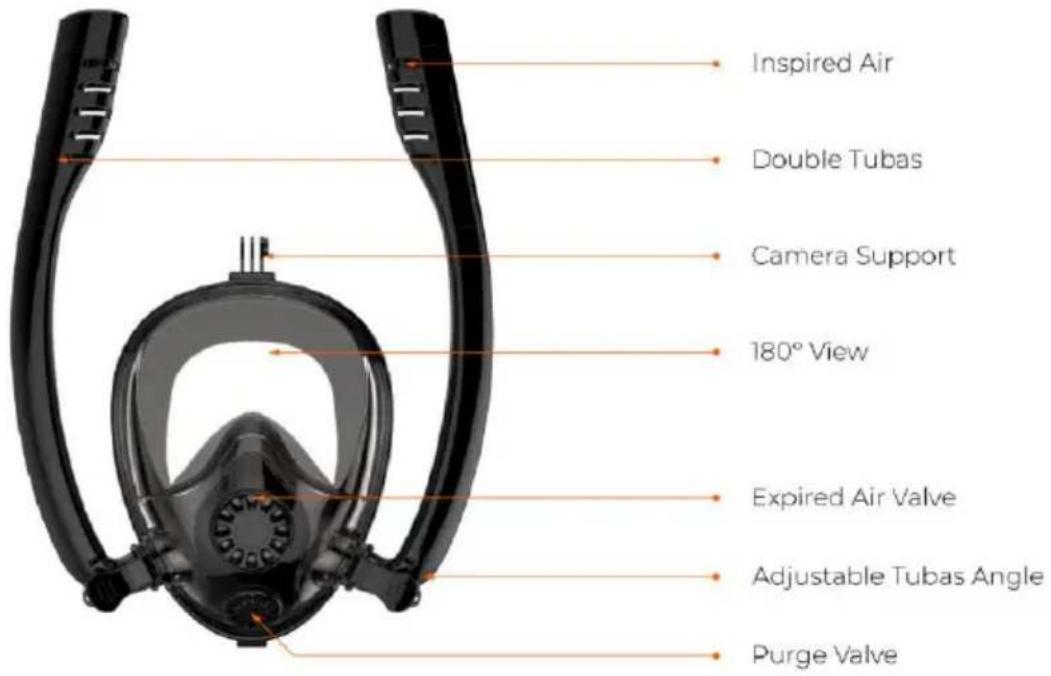
2. How to use
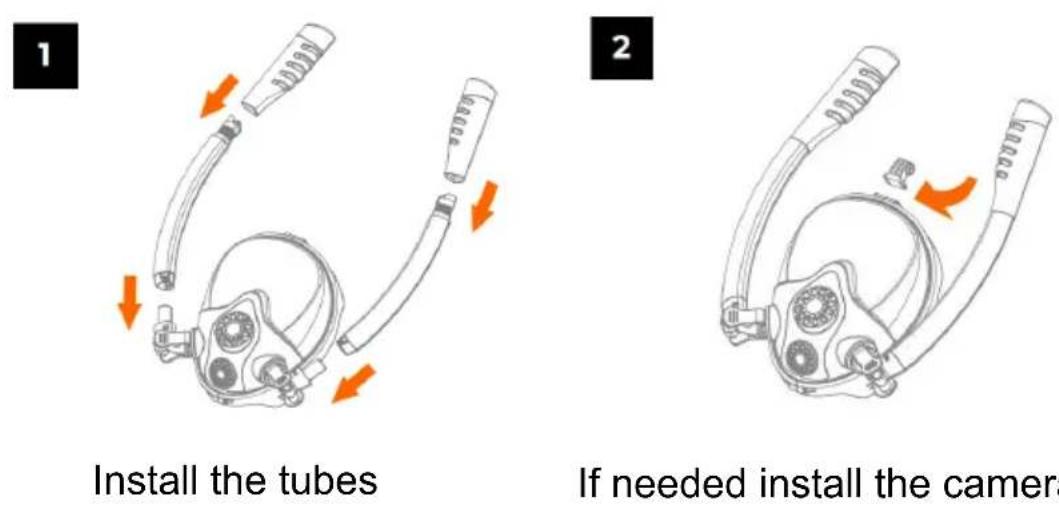


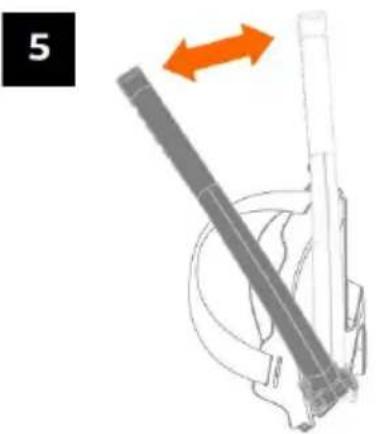
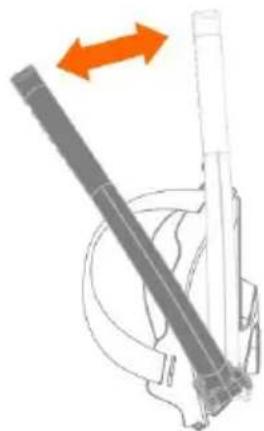
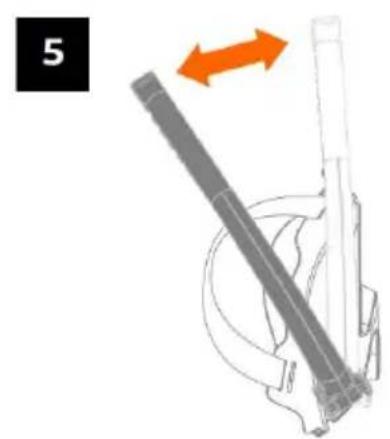
Depending of your swim change the angle of your tubes
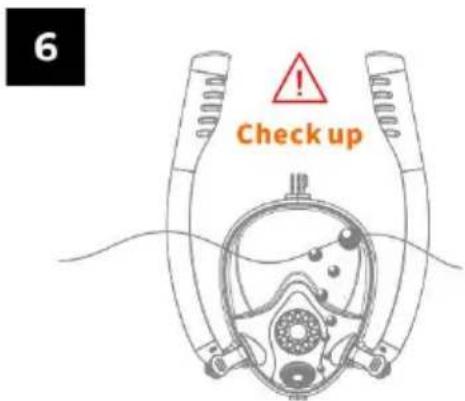
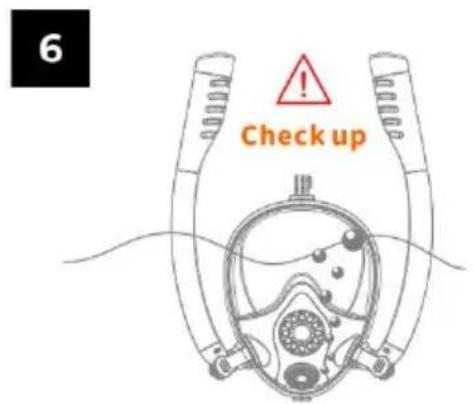
Please be sure that the mask is properly installed and test the mask in a safety place before swimming
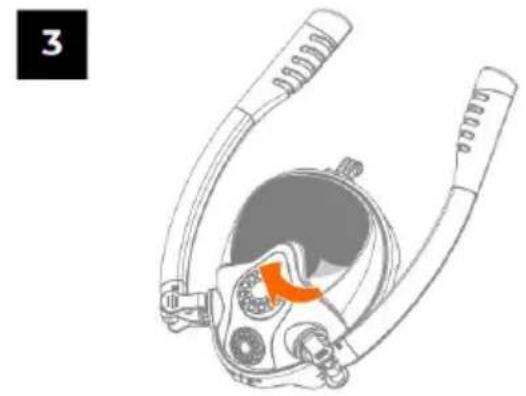
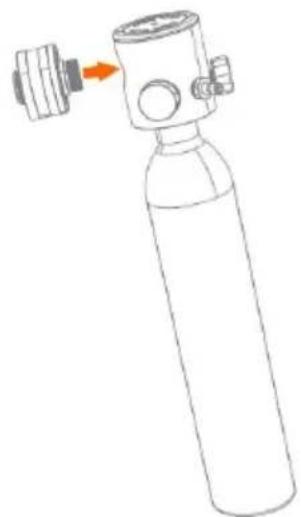
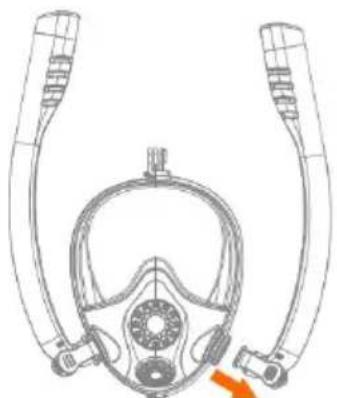
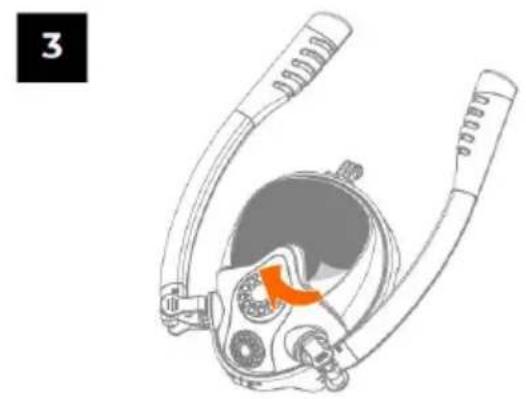
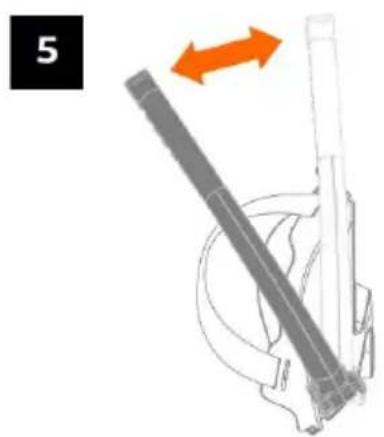
How to install a mini scuba tank?


Remove one of the tubes from the mask

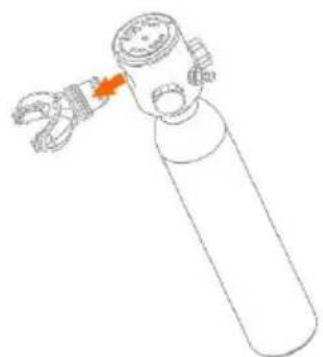
Remove the Mouthpiece and its connector from the valve head


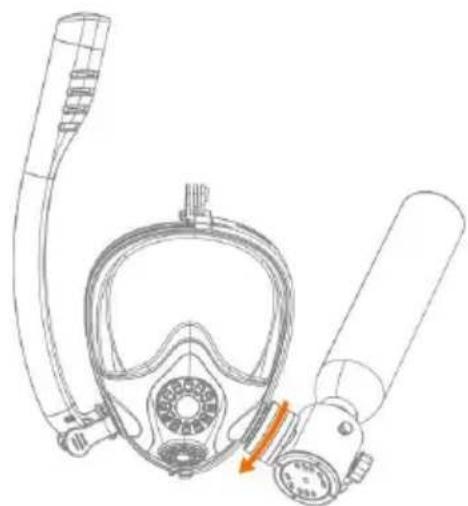
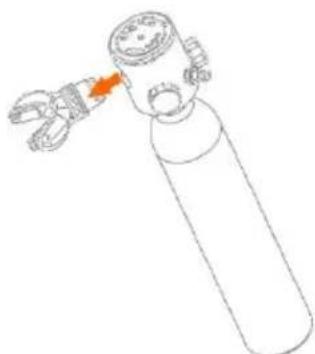
Install the mask adapter into the
Rotate the adapter in the direction of
valve head
the arrow and install it into the mask
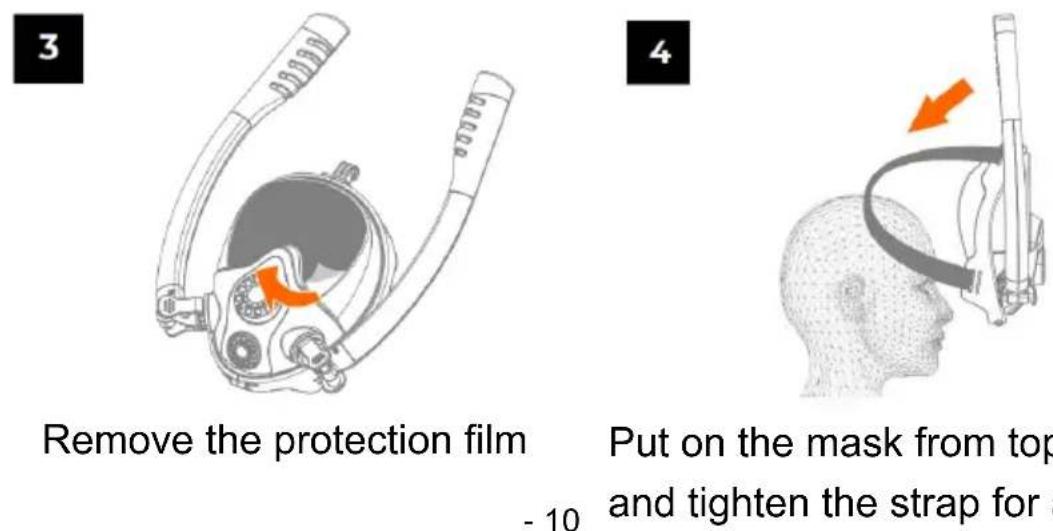
3.Maintenance and caution
- Please rinse and dry your mask before putting it in your bag.
- Remove the tubes for a more efficient storage.
To increase the life of the product do not store it with sharp objects.
We decline any responsibility in case of misuse. - Regular breaks, by removing the mask, are recommended every 30 minutes.
INTRODUCTION TO 1ST GENERATION AIR PUMP
Precautions
After the new gas cylinder is installed, it is necessary to check whether it is leaking, and then empty it for dozens of times to drain the oil and water. Test the air leakage method. After assembling, use the plug shown in the figure above, jam it in the female head, and then pump up to 10MPa. Observe whether the pointer of the pressure gauge drops. If the pointer of the pressure gauge does not drop, it proves that there is no leakage. If the pressure gauge drops, it will leak. You can put the air outlet hose of the base pressure gauge into the water to pump air to test and observe where the air is leaking. Tighten it a little bit, and no air leaks.
After the air pump is completed, the pressure needs to be relieved before the joint can be taken. Loosen the pressure relief screw as shown above to relieve the pressure.
- The new gas cylinder does not need to add lubricating oil, it has been added before leaving the factory. The amount of silicone oil should not be too much.
It is normal for the air to be out of pressure when the container is not connected to the empty test. The working principle of the pump is to compress the gas both up and down to achieve the purpose of multi-stage compression.
1. Accessories List

| ITEM | Name | Q'TY | ITEM | Name | Q'TY |
| 1 | Spare O-rings | 10PCS | 8 | High-pressure air pipe | 1PCS |
| 2 | White washers | 1PCS | 9 | Special wrench | 1PCS |
| 3 | Black washers | 2PCS | 10 | Oil-water separator carbon rod | 1PCS |
| 4 | High-pressure piston springs | 2PCS | 11 | Handle screw | 2PCS |
| 5 | Screws | 2PCS | 12 | Oil-water separator | 1PCS |
| 6 | Inflatable adapters | 1PCS | 13 | Hexagonal wrench | 1PCS |
| 7 | Test plugs | 1PCS | 14 | Unidirectional sealing ball | 2PCS |
2. Assembly steps
Note: only the parts shown in the figure below are used in the accessory package.
2.1 Situation One Finger screw version
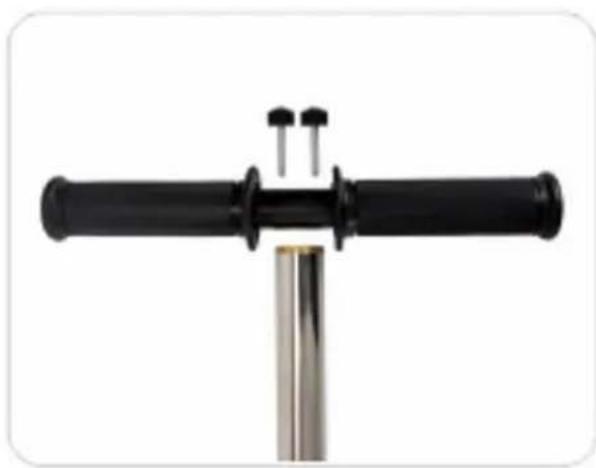
Mounting handle case 1

Tightendirectlybyhand
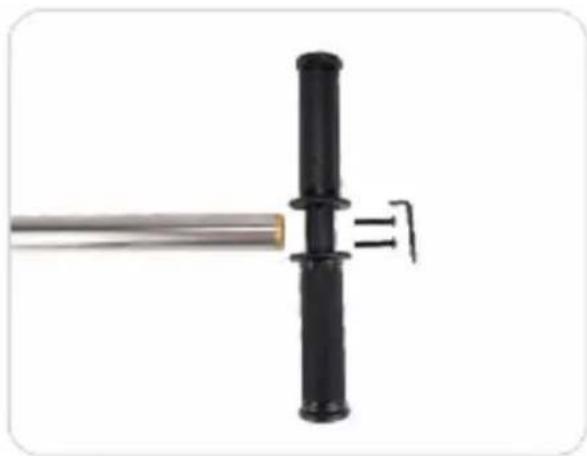
2.2 Situation two Hexagon screw version
Mounting handle case 2
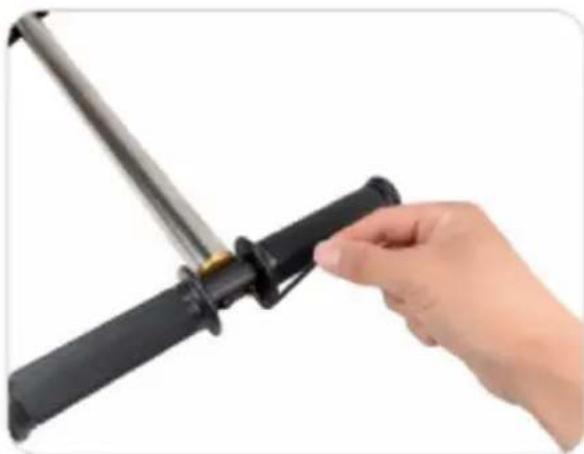
Tighten the hexagon wrench
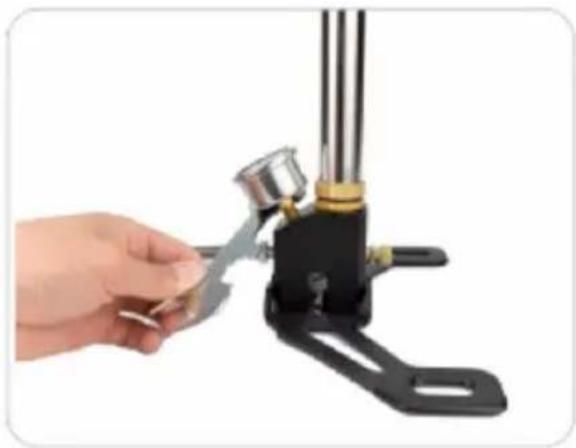
2.3 Install pressure gauge and hose with a wrench.
3. Add lubricating oil
The new pump does not need to be refueled. It has been filled in the factory. It needs to be refueled once every 1500 times and at two positions (as shown in the figure below). Three
drops in one place. After refueling, you need to hit 50 times empty before using.

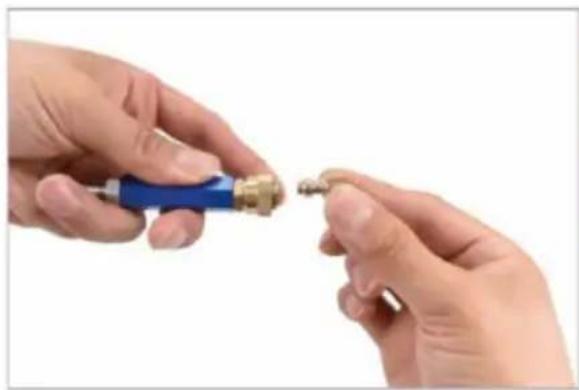
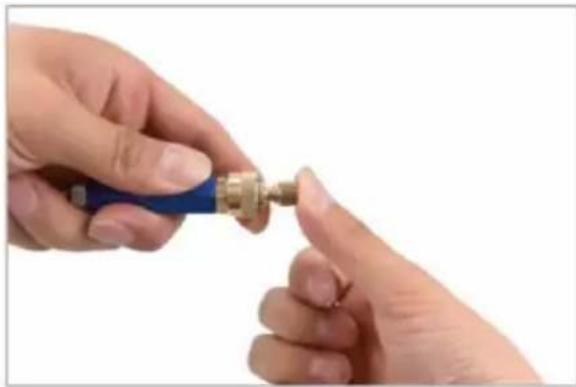
4. Installation method of female head
The correct installation method of female head is: pull back the outer ring of female head, insert male head or test plug, and then restore the outer ring of female head. As shown in the figure below.


5. Check valve cleaning
The indicator value of the pressure gauge rises when the air cylinder is pressed down and inflated, and decreases when it is pulled up or automatically rebounded.
a. There is oil stain at the check valve, which needs to be cleaned.
b. Check valve O-ring damaged, replace check valve O-ring.
c. Check valve spring is damaged, replace check valve spring (as shown in the figure below)
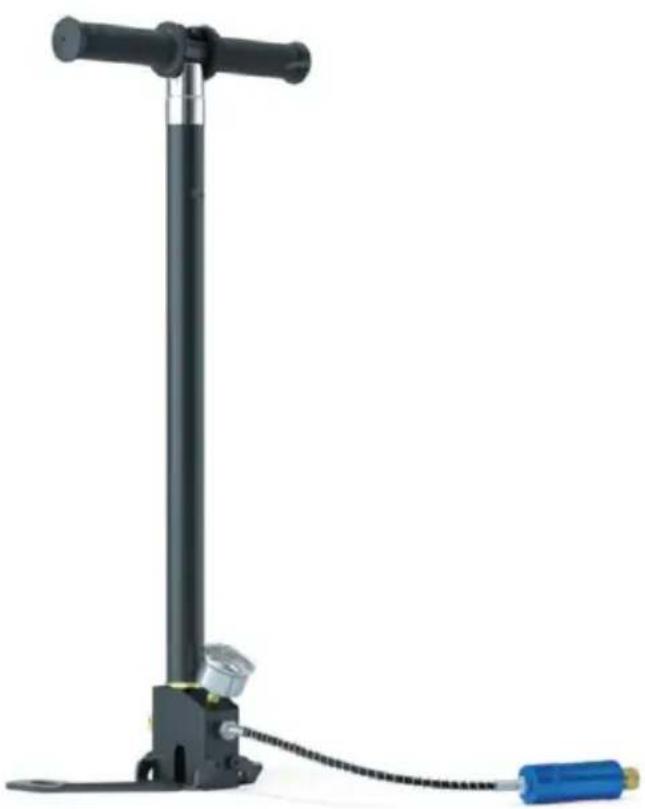
INTRODUCTION TO 2ND GENERATION AIR PUMP
1. Accessories List
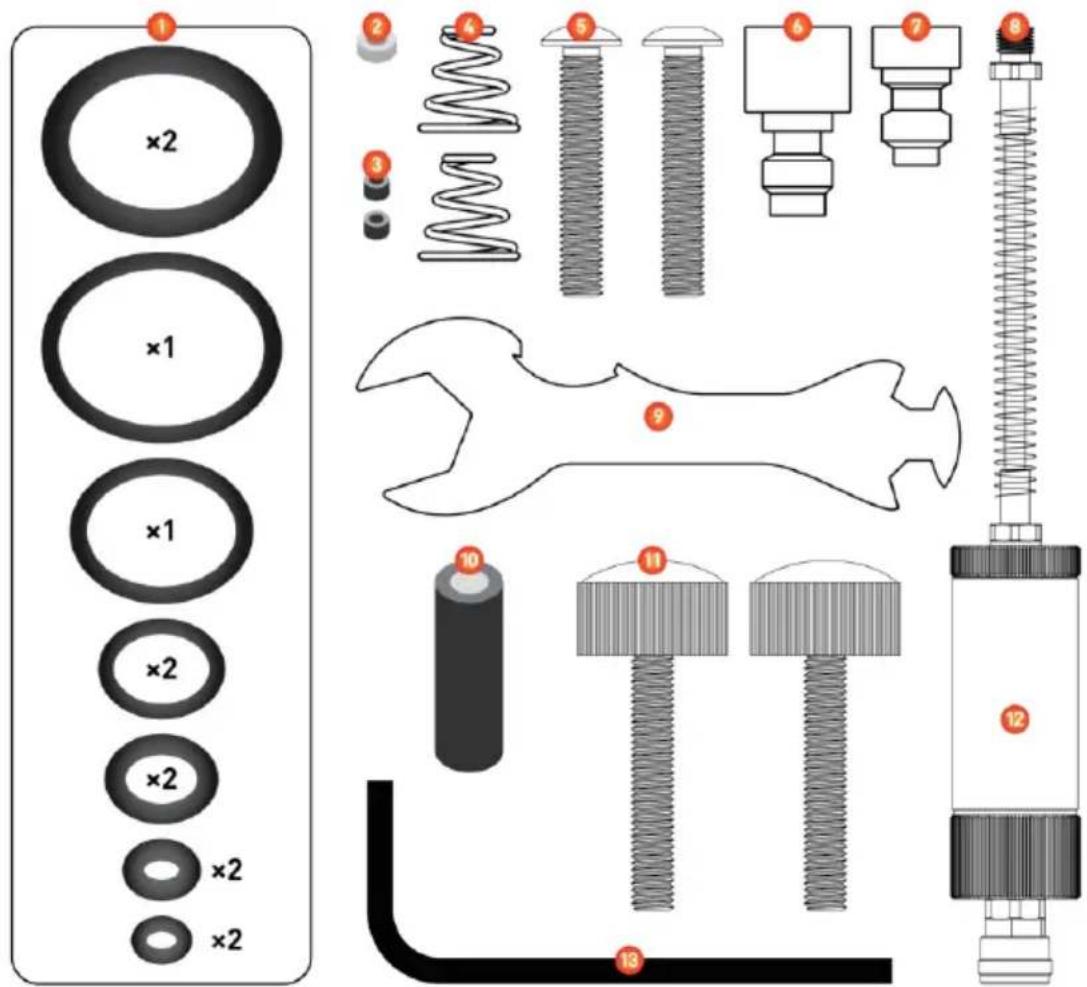
| ITEM | Name | Q'TY | ITEM | Name | Q'TY |
| 1 | Spare O-rings | 12PCS | 8 | High-pressure air pipe | 1PCS |
| 2 | White washers | 1PCS | 9 | Special wrench | 1PCS |
| 3 | Black washers | 2PCS | 10 | Oil-water separator carbon rod | 1PCS |
| 4 | High-pressure piston springs | 2PCS | 11 | Handle screw | 2PCS |
| 5 | Screws | 2PCS | 12 | Oil-water separator | 1PCS |
| 6 | Inflatable adapters | 1PCS | 13 | Hexagonal wrench | 1PCS |
| 7 | Test plugs | 1PCS | 14 |
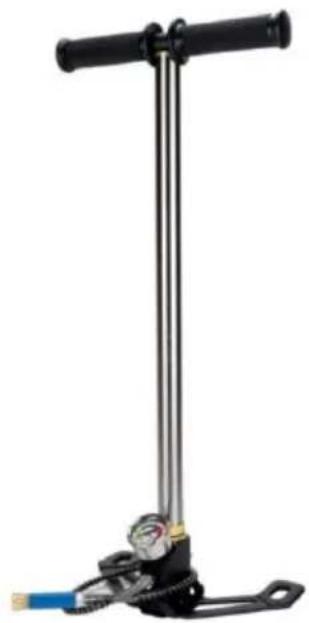
2. Installation Notes
Assemble as shown in the figure below, use a special wrench to tighten the joints (pressure gauge, high pressure charging Air pipe and oil-water separator), (Note: Moderate force is enough, too tight will cause pressure.
The sealing rubber between the table and the hose and the base is deformed and caused leakage). The handle screw installation must be tightened. Do not loosen.
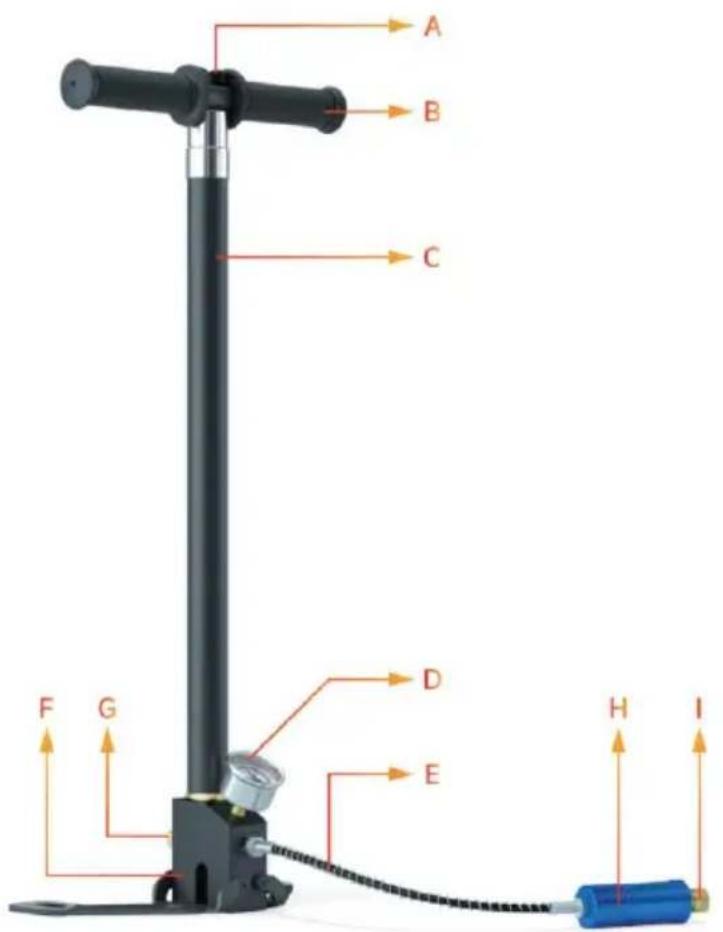
A. Handle screw
B. Rubber handle
C. pump barrel
D. pressure gauge
E. High pressure inflatable tube
F. base
G. pressure relief valve
H. Water separator
I. 8mm quick connector
3. Test before Use
Test Methods:
- Install the test plug;
- Tighten the pressure relief valve and inflate to 10MPa ; open the pressure relief valve to release the gas pressure;
3.Tighten the pressure relief valve again and inflate to 20MPa - Observe for about two minutes to check whether the pressure gauge of the pump has dropped. If the pressure gauge does not drop, the performance of the pump is normal; if the pointer of the pressure gauge drops, it is recommended to put the entire pump base, high-pressure inflation tube and test plug into the water to check for air leaks.
4. Instructions
4.1 Please be familiar with the operation method before use. Improper operation may cause harm to the user, or damage the pump.
4.2 Connect the air cylinder to the container to be inflated first. (Please read the relevant manual to familiarize yourself with the content Inflatable connection port of the device).
4.3 Check whether the pressure relief valve is tightened, if it is loose. Tighten it.
4.4 When inflating, step on the bottom plate of the pump with both feet to ensure the stability of the pump.
4.5 Place the container to be inflated flat on a horizontal surface. And then start to inflate.
4.6 After the inflation is completed, twist the pressure relief valve of the air cylinder to discharge the oil-water mixture generated during the inflation process.
Danger Warning
After inflating, do not release the pressure until the pressure relief valve releases the pressure Disassemble any connectors, if under pressure Disassembly of connectors may result in serious injury.
Also, do not place your hands on Near the air outlet or point it at anyone! Otherwise, Serious injury may result. Before inflating the container, please familiarize yourself with the container capabilities and their parameters.
8mm quick connector disassembly method (As shown in the picture)
5. Common problems and solutions
5.1 After the gas cylinder is connected to the container, after a period of inflation, the pressure is still displayed as zero or the pressure speed is increased very slow?
Problem Analysis: Leakage.
Solution: put the pump base, high-pressure inflation tube and test plug into the water to check for leaks.
5.2 During the pumping process, the air pump pumps up heavily, and it will automatically suck down when it is pulled to the end?
Problem analysis: There is a problem with the one-way valve needle of the three-stage piston group.
Solution:
- Open the air release valve, disassemble the outer tube and handle connecting screw (only one) and pour water or silicon After reassembly, dry air several times in quick succession to discharge the sundries stuck in the valve.
- Remove the three-stage piston group, find out the cause of air leakage, or replace the sealing piston.
5.3 The more you pump, the harder you pump and push down?
Problem Analysis: There is a serious shortage of oil in the pump.
Solution: Add 2~3 drops of special lubricating oil to the secondary tube and tertiary tube of the gas cylinder. (Notice: After refueling, it must be empty for 50 times, drain the excess oil, and then use it again.) (See the following figure) (The new pump does not need to be refueled, it has been refueled at the factory, and it is refueled every 1500 or so pumps.)
5.4 The pressure gauge does not return to zero?
Problem analysis: The excess oil is not drained cleanly, and the oil and gas expand at about 20MPa , and the oil and gas expand instantly. If the pressure exceeds 40MPa , the pressure gauge will be damaged due to overload, or the pressure of the gas cylinder will be damaged during carrying. The watch was severely shaken, causing the hands to shift.
Solution: replace the pressure gauge.
Manufacturer: Shanghaiuxinmuyeyouxianggsi
Address: Shuangchenglu 803nong11hao1602A-1609shi, baoshanqu, shanghai 200000 CN.
Imported to AUS: SIHAO PTY LTD. 1 ROKEVA STREETEASTWOOD NSW 2122 Australia
Imported to USA: Sanven Technology Ltd. Suite 250, 9166 Anaheim Place, Rancho Cucamonga, CA 91730

YH CONSULTING LIMITED.
C/O YH Consulting Limited Office 147,
Centurion House, London Road,
Staines-upon-Thames, Surrey, TW18 4AX
E-CrossStu GmbH
Mainzer Landstr.69,
60329 Frankfurt am Main.
VEVOR®
TOUGH TOOLS, HALF PRICE
Technical Support and E-Warranty Certificate www.vevor.com/support
VEVOR®
TOUGH TOOLS, HALF PRICE
PRODUCT INTRODUCTION
PRODUCT CONFIGURATION
PRODUCT CONFIGURATION
DIVING RESPIRATOR ACCESSORIES
INTRODUCTION TO DIVING MASK
OSTRZEŽENIE:
Remove the protection film Put on the mask from top to bottom and tighten the strap for a better

Depending of your swim chang. Please be sure that the mask is the angle of your tubes properly installed and test the m in a safety place before swimm
Remove one of the tubes fror Remove the Mouthpiece and it the mask connector from the valve head


Install the mask adapter into Rotate the adapter in the direction valve head the arrow and install it into the m
A. Handle screw
B. Rubber handle
C. pump barrel
D. pressure gauge
E. High pressure inflatable tube
F. base
G. pressure relief valve
H. Water separator
I. 8mm quick connector
C/O YH Consulting Limited Office 147,
Centurion House, London Road,
Staines-upon-Thames, Surrey, TW18 4AX
| EC | REP |
E-CrossStu GmbH
Mainzer Landstr.69,
60329 Frankfurt am Main.
VEVOR
TOUGH TOOLS, HALF PRICE
www.vevor.com/support
VEVOR®
TOUGH TOOLS, HALF PRICE
www.vevor.com/support
PRODUCT INTRODUCTION
PRODUCT CONFIGURATION
PRODUCT CONFIGURATION
| Modell | Artikelnummer | Gasflasche(PCS) | 1.GenerationLuftpumper | 2.GenerationLuftpumper | Adapler | Rucksack | Tauchermaske | Aufbewahrungstasche | Umhängetasche | Seilverlen | Taucherbrille |
| C300P LUS | C300PLUS-B6-US | 1 | - | 1 | - | - | 1 | 1 | - | 1 | - |
| C300PLUS-B6-EU | |||||||||||
| C300PLUS-A6-US | 1 | - | - | - | - | 1 | 1 | - | 1 | - | |
| C300PLUS-A6-EU | |||||||||||
| C300PLUS-A7-US | 1 | - | - | 1 | - | 1 | 1 | 1 | 1 | - | |
| C300PLUS-B2-EU | 1 | 1 | - | - | - | - | - | 1 | 1 | - | |
| C300PLUS-A2-EU | 1 | - | - | - | - | - | - | 1 | 1 | - | |
| C300PLUS-C2-US | 2 | 1 | - | 1 | - | - | 1 | 2 | 2 | 2 | |
| C300PLUS-C2-EU |
DIVING RESPIRATOR ACCESSORIES
| ARTI KEL | Name | Menge | ARTI KEL | Name | Menge |
| 1 | Grüner O-Ring | 1 STÜCK | 3 | Ein Zeichenstapel | 1 STÜCK |
| 2 | Schwarzer O-Ring | 1 STÜCK | 4 | Handbuch | 1 STÜCK |
INTRODUCTION TO DIVING MASK
WARNING:
Remove the protection film Put on the mask from top to be and tighten the strap for a better


Depending of your swim chang. Please be sure that the mask is the angle of your tubes properly installed and test the m in a safety place before swimm
Remove one of the tubes for Remove the Mouthpiece and in the mask connector from the valve head


Install the mask adapter into Rotate the adapter in the direction valve head the arrow and install it into the m
A. Handle screw
B. Rubber handle
C. pump barrel
D. pressure gauge
E. High pressure inflatable tube
F. base
G. pressure relief valve
H. Water separator
I. 8mm quick connector
C/O YH Consulting Limited Office 147,
Centurion House, London Road,
Staines-upon-Thames, Surrey, TW18 4AX
| EC | REP |
E-CrossStu GmbH
Mainzer Landstr.69,
60329 Frankfurt am Main.
VEVOR®
TOUGH TOOLS, HALF PRICE
PRODUCT INTRODUCTION
PRODUCT CONFIGURATION
PRODUCT CONFIGURATION
DIVING RESPIRATOR ACCESSORIES
| C300PLUS-C2-EU |
INTRODUCTION TO DIVING MASK
AVERTISSEMENT:
Remove the protection film Put on the mask from top to be and tighten the strap for a better


Depending of your swim chang. Please be sure that the mask is the angle of your tubes properly installed and test the m in a safety place before swimm
Remove one of the tubes fror Remove the Mouthpiece and it the mask connector from the valve head


Install the mask adapter into Rotate the adapter in the direction valve head the arrow and install it into the m
A. Handle screw
B. Rubber handle
C. pump barrel
D. pressure gauge
E. High pressure inflatable tube
F. base
G. pressure relief valve
H. Water separator
I. 8mm quick connector
C/O YH Consulting Limited Office 147,
Centurion House, London Road,
Staines-upon-Thames, Surrey, TW18 4AX
| EC | REP |
E-CrossStu GmbH
Mainzer Landstr.69,
60329 Frankfurt am Main.
VEVOR®
TOUGH TOOLS, HALF PRICE
Assistance technique et certificate de garantie electronique www.vevor.com/support
VEVOR®
TOUGH TOOLS, HALF PRICE
Technische ondersteuning en e-garantiecertificaat www.vevor.com/support
DUIKMASKER
MODEL: C300PLUS
HULP NODIG? NEEM CONTACT MET ONS OPI
PRODUCT INTRODUCTION
PRODUCT CONFIGURATION
| Model | C300PLUS |
| Maximale Toepasbare Druk | 20MPa |
| Enkel cylinder volume | 0,5L |
PRODUCT CONFIGURATION
DIVING RESPIRATOR ACCESSORIES
INTRODUCTION TO DIVING MASK
WAARSCHUWING:
If needed install the camera suppo
Remove the protection film
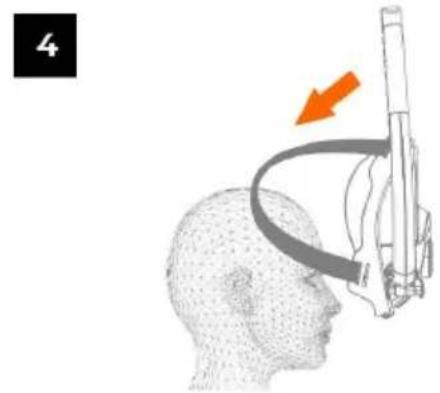
Put on the mask from top to be and tighten the strap for a bette
Depending of your swim the angle of your tubes
chang Please be sure that the mask isproperly installed and test the m in a safety place before swimmi
Remove one of the tubes for Remove the Mouthpiece and in the mask connector from the valve head


Install the mask adapter into Rotate the adapter in the directionvalve head the arrow and install it into the m
A. Handle screw
B. Rubber handle
C. pump barrel
D. pressure gauge
E. High pressure inflatable tube
F. base
G. pressure relief valve
H. Water separator
I. 8mm quick connector
C/O YH Consulting Limited Office 147,
Centurion House, London Road,
Staines-upon-Thames, Surrey, TW18 4AX
| EC | REP |
E-CrossStu GmbH
Mainzer Landstr.69,
60329 Frankfurt am Main.
VEVOR®
TOUGH TOOLS, HALF PRICE
Technische ondersteuning en e-garantiecertificaat www.vevor.com/support
VEVOR®
TOUGH TOOLS, HALF PRICE
PRODUCT INTRODUCTION
PRODUCT CONFIGURATION
| Modell | C300PLUS |
| Maximalt tillämpligt tryck | 20 MPa |
| Encylindrig volym | 0,5 L |
PRODUCT CONFIGURATION
| Modell | Artikelnummer | Gasflas ka (PCS) | 1:a generatio nen luftpump | 2:a generatio nen luftpump | adapte er | Ryggvä ske | Dykma sk | Förvaringsp Åse | axelväs ka | Tapp at rep | Dykarglasö gon |
| C300PL | C300PLUS-B | 1 | - | 1 | - | - | 1 | 1 | - | 1 | - |
| US | 6-USC300PLUS-B6-EU | ||||||||||
| C300PLUS-AS-6-USC300PLUS-A6-EU | 1 | - | - | - | - | 1 | 1 | - | 1 | - | |
| C300PLUS-AS-7-US | 1 | - | - | 1 | - | 1 | 1 | 1 | 1 | - | |
| C300PLUS-B2-EU | 1 | 1 | - | - | - | - | - | 1 | 1 | - | |
| C300PLUS-AS2-EU | 1 | - | - | - | - | - | - | 1 | 1 | - | |
| C300PLUS-C2-USC300PLUS-C2-EU | 2 | 1 | - | 1 | - | - | 1 | 2 | 2 | 2 |
DIVING RESPIRATOR ACCESSORIES
| PUN KT | Namn | ANTA L | PUN KT | Namn | ANTA L |
| 1 | Grön O-ring | 1 st | 3 | En teckensats | 1 st |
| 2 | Svart O-ring | 1 st | 4 | manuell | 1 st |
PRODUCT STRUCTURE

OPERATION PRINCIPLE
INTRODUCTION TO DIVING MASK
WARNING:
Remove the protection film Put on the mask from top to bottom and tighten the strap for a better


Depending of your swim the angle of your tubes
changPlease be sure that the mask isproperly installed and test the m in a safety place before swimmin
Hur installerar man en mini scuba tank?


Remove one of the tubes from the mask
Remove the Mouthpiece and it connector from the valve head


Install the mask adapter into Rotate the adapter in the direction
valve head
the arrow and install it into the m
A. Handle screw
B. Rubber handle
C. pump barrel
D. pressure gauge
E. High pressure inflatable tube
F. base
G. pressure relief valve
H. Water separator
I. 8mm quick connector
C/O YH Consulting Limited Office 147,
Centurion House, London Road,
Staines-upon-Thames, Surrey, TW18 4AX
E-CrossStu GmbH
Mainzer Landstr.69,
60329 Frankfurt am Main.
VEVOR®
TOUGH TOOLS, HALF PRICE
PRODUCT INTRODUCTION
PRODUCT CONFIGURATION
PRODUCT CONFIGURATION
| Modelo | Número de articULO | Cilindr o de gas (PZS) | 1ra generaci on bomba de aire | 2da generaci on bomba de aire | adaptad or | Bolsa de espald a | Másca ra de buceo | Bolsa de almacenamie nto | bolso de hombr o | Cuerd a perdid a | Gafa s de buce o |
| C300PL US | C300PLUS-B6-EE.UU.C300PLUS-B6-EU | 1 | - | 1 | - | - | 1 | 1 | - | 1 | - |
| C300PLUS-A6-EE.UU.C300PLUS-A6-EU | 1 | - | - | - | - | 1 | 1 | - | 1 | - | |
| C300PLUS-A7-EE.UU. | 1 | - | - | 1 | - | 1 | 1 | 1 | 1 | - | |
| C300PLUS-B2-UE | 1 | 1 | - | - | - | - | - | 1 | 1 | - | |
| C300PLUS-A2-EU | 1 | - | - | - | - | - | - | 1 | 1 | - | |
| C300PLUS-C2-EE.UU.C300PLUS-C2-UE | 2 | 1 | - | 1 | - | - | 1 | 2 | 2 | 2 |
DIVING RESPIRATOR ACCESSORIES
INTRODUCTION TO DIVING MASK
ADVERTENCIA:
If needed install the camera suppo

Remove the protection film Put on the mask from top to bottom and tighten the strap for a better

Depending of your swim the angle of your tubes
chang Please be sure that the mask isproperly installed and test the m in a safety place before swimmi
Remove one of the tubes for Remove the Mouthpiece and in the mask connector from the valve head


Install the mask adapter into Rotate the adapter in the direction ofvalve headthe arrow and install it into the m
A. Handle screw
B. Rubber handle
C. pump barrel
D. pressure gauge
E. High pressure inflatable tube
F. base
G. pressure relief valve
H. Water separator
I. 8mm quick connector
3. Probar antes de usar
Métodos de prueba:
C/O YH Consulting Limited Office 147,
Centurion House, London Road,
Staines-upon-Thames, Surrey, TW18 4AX
| EC | REP |
E-CrossStu GmbH
Mainzer Landstr.69,
60329 Frankfurt am Main.
VEVOR
TOUGH TOOLS, HALF PRICE
Soporte专业技术o y certificate de garantia electrònica www.vevor.com/support
VEVOR®
TOUGH TOOLS, HALF PRICE
PRODUCT INTRODUCTION
PRODUCT CONFIGURATION
PRODUCT CONFIGURATION
| Modello | Numero dell'articolo | Bombol a di gas (PZ) | 1a generazione pompa d'aria | 2a generazione pompa d'aria | adattatore | Borsa da viaggi o | Mascher a subacqu e a | Borsa portaogge tti | borsa a tracoll a | cord a pers a | Occhia li da sub |
| C300PLU S | C300PLUS-B6-US | 1 | - | 1 | - | - | 1 | 1 | - | 1 | - |
| C300PLUS-B6-EU | |||||||||||
| C300PLUS-A6-US | 1 | - | - | - | - | 1 | 1 | - | 1 | - | |
| C300PLUS-A6-EU | |||||||||||
| C300PLUS-A7-US | 1 | - | - | 1 | - | 1 | 1 | 1 | 1 | - | |
| C300PLUS-B2-EU | 1 | 1 | - | - | - | - | - | 1 | 1 | - | |
| C300PLUS-A2-EU | 1 | - | - | - | - | - | - | 1 | 1 | - | |
| C300PLUS-C2-US | 2 | 1 | - | 1 | - | - | 1 | 2 | 2 | 2 | |
| C300PLUS-C2-EU |
DIVING RESPIRATOR ACCESSORIES
INTRODUCTION TO DIVING MASK
AVERTIMENO:
If needed install the camera suppo

Remove the protection film Put on the mask from top to be and tighten the strap for a bette
Depending of your swim the angle of your tubes

chang Please be sure that the mask isproperly installed and test the m in a safety place before swimmi
Remove one of the tubes for Remove the Mouthpiece and in the mask connector from the valve head


Install the mask adapter into Rotate the adapter in the directionvalve_head the arrow and install it into the m
A. Handle screw
B. Rubber handle
C. pump barrel
D. pressure gauge
E. High pressure inflatable tube
F. base
G. pressure relief valve
H. Water separator
I. 8mm quick connector
Importato in AUS: SIHAO PTY LTD. 1 ROKEVA STREETEASTWOOD NSW 2122 Australia
Importato negli USA: Sanven Technology Ltd. Suite 250, 9166 Anahe Place, Rancho Cucamonga, CA 91730
| UK | REP |
YH CONSULTING LIMITED.
C/O YH Consulting Limited Office 147,
Centurion House, London Road,
Staines-upon-Thames, Surrey, TW18 4AX
| EC | REP |
E-CrossStu GmbH
Mainzer Landstr.69,
60329 Frankfurt am Main.
VEVOR
TOUGH TOOLS, HALF PRICE
www.vevor.com/support


