B35IM - Fridge Vevor - Free user manual and instructions
Find the device manual for free B35IM Vevor in PDF.

User questions about B35IM Vevor
0 question about this device. Answer the ones you know or ask your own.
Ask a new question about this device
Download the instructions for your Fridge in PDF format for free! Find your manual B35IM - Vevor and take your electronic device back in hand. On this page are published all the documents necessary for the use of your device. B35IM by Vevor.
USER MANUAL B35IM Vevor
Technical Support and E-Warranty Certificate www.vevor.com/support
CAR REFRIGERATOR
USER MANUAL
MODEL: B35IM
We continue to be committed to provide you tools with competitive price. "Save Half", "Half Price" or any other similar expressions used by us only represent the estimate of savings you might benefit from buying certain tools with us compared to top brands and does not necessarily mean to cover all categories of tools offered. Are kindly reminded to verify carefully when you are placing an order with us actually saving half in comparison with the top major brands.
VEVOR®
Car Refrigerator
MODEL:B35IM
NEED HELP? CONTACT US!
Have product questions? Need technical support? Please feel fr contact us:
Technical Support and E-Warranty Certificate www.vevor.com/support
This is the original instruction, please read all manual instruction carefully before operating. VEVOR reserves a clear interpretation user manual. The appearance of the product shall be subject to product you received. Please forgive us that we won't inform you there are any technology or software updates on our product.
| Warning-To reduce the risk of injury, user must re instructions manual carefully. | |
| This product is subject to the provision of European D 2012/19/EC. The symbol showing a wheelie bin cross through indicates that the product requires separate recollection in the European Union. This applies to the and all accessories marked with this symbol. Products as such may not be discarded with normal domestic w must be taken to a collection point for recycling elec electronic devices |
Attention
Before using the refrigerator, please read this manual carefully and keep it properly
1.Before using the refrigerator, clean it inside and outside with a dam cloth.
2. Do not fill the refrigerator with corrosive liquids. Do not directly pour liquids into the refrigerator.
3. When the refrigerator is not used for a long time, please disconnect power supply and keep it dry.
4. Regularly clean the inner chamber to prevent odor and bacteria and ensure food safety.
5.Shut down the refrigerator and battery before pulling by the trolley (battery).
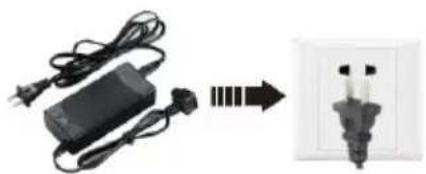
Connect the Power Supply
- Find the DC power cord in the kit. Connect DC plug to the power the car refrigerator.
- Well place the refrigerators in the car (back-up, seats...).
3.Lay out power cords per your car's interior space. Insert the cigar
lighter plug (one side of the power cord) into the car cigarette lighter
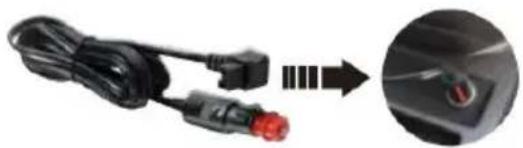
Adapter Connect the car cigarette lighter
DC 12/24V
Connect the car refrigerator
- The refrigerator can be connected to more than one energy source.
- The refrigerator can connect directly to the DC12V/24V power supply
- If the refrigerator is used an AC100-240V power supply, an AC加拿大 should be adopted.
Car Refrigerator Operation
Car battery protection voltage reference:
Built-in ECO electronic control module can automatically monitor car battery voltage. The refrigerator will be automatically cut off when the power is excessively consumed, protecting the battery consumption from being too low to affect auto-ignition.
| Battery Voltage | Factory default voltage protection value H | ||
| H (high) level | M (medium) level | L (low) level | |
| DC12V | DC11.3V OFF | DC10.1V OFF | DC9.6V OFF |
| DC12.5V ON | DC11.4V ON | DC10.9V ON | |
| DC24V | DC24.6V OFF | DC22.3V OFF | DC21.3V OFF |
| DC26.0V ON | DC23.7V ON | DC22.7V ON | |
Note: When the power supply is connected and the refrigerator is turned on, disconnecting or starting refers to disconnecting or starting the compressor.
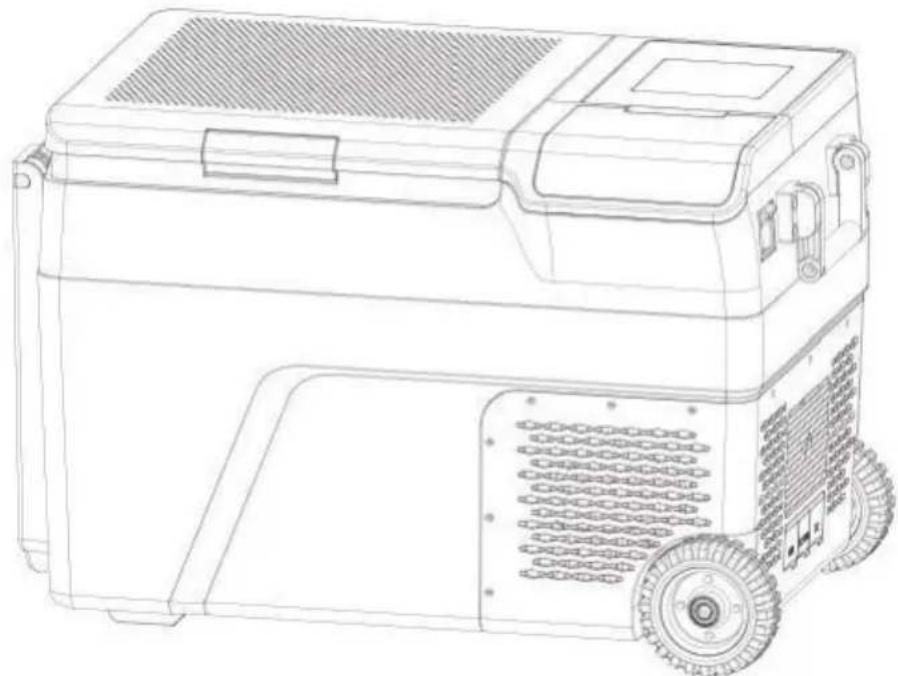
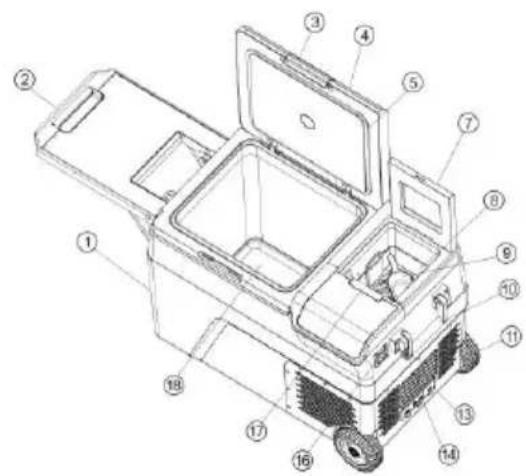
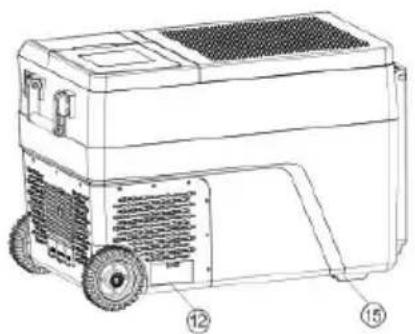
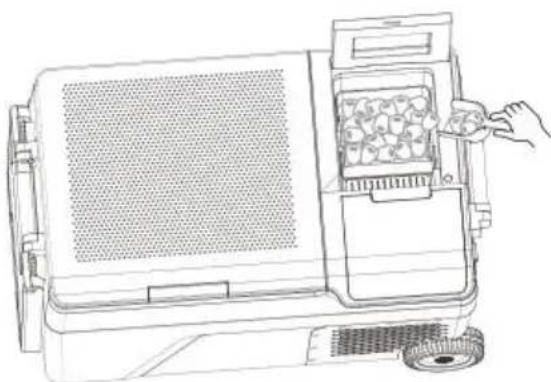
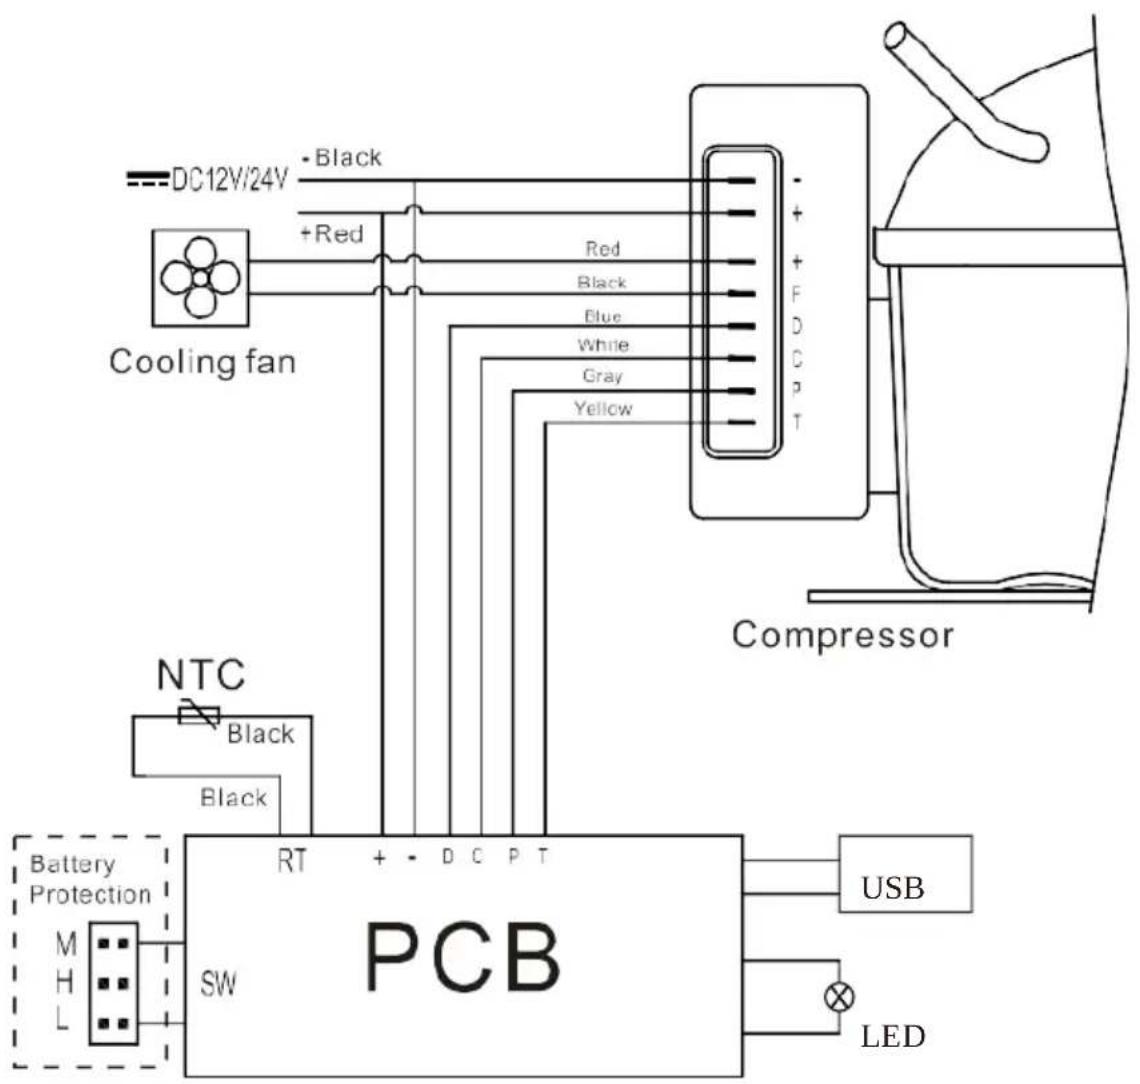
Component Diagram
Parts schematic
① Cabinet
③Door buckle
⑤Sealing strip
⑦Make ice cube li
⑨ Ice shovel
⑪ roller
⑬ convenienvereceptacle
⑤Foot pad
①Door cover button
② Small table board
④Lid
⑥ Control panel
⑧ Icebasket
⑩ Recessed handle
12Drain cover
⑭battery cover
⑥ corkscrew
Storage compartment

Function and operation
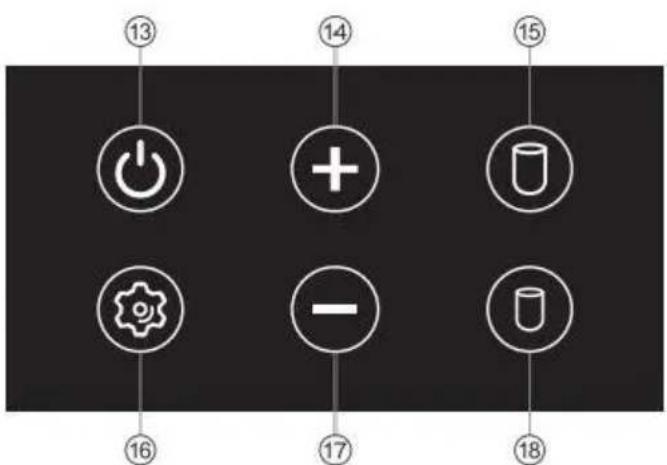
| ①Battery capacity ②Voltage display ③ Fridge temperature display ④Ice making state ⑤ Hydropenia ⑥Ice full | ⑦ Battery Protection Mode ⑧ Cooling Mode ⑨ Temperature/time display ⑩ Large ice / small ⑪ Door open prompt | ⑫ Refrigerated conditio ⑬On / Off ⑭ Temperature control ⑮ Big Ice Mode ⑯Set ⑰ Temperature control ⑱Small Ice Mode |
-
Power Supply: connect to DC 12V/24V or AC 100-240V power (using dedicated adapter).
-
Display Screen Initialization: After powering on, the digital display is fully on for one second, and then displayed normally.
-
Power ON/OFF: press to switch ON/OFF. In standby state, 6 key lights are breathing flashing.
-
Temperature Setting: under the running state,press to increase temperature,and press to decrease temperature;keep pressing for adjusting the temperature quickly.The setting will saved automatically after stopping operating for three seconds. Temperature setting range:-20~20°C(-4~68°F)
-
Ice Production Mode:Press " " or " " when the refrigerator is turne
and the machine enters the ice making mode.
- Switching by touching the " " and " " keys. The time required for ice-making process is displayed in the display screen.
- Enter the forced unice mode by touching the and " " buttons same time.
- Pipeline cleaning mode: in ice making mode, enter the cleaning m long pressing + " and - " keys. After the pump runs for three minut will automatically switch to the refrigerator mode; drain the water and recharge the drinking water. You need to touch the ice making again enter ice making mode.
-
In the process of ice making, long press button for three seconds show the internal temperature of the refrigerator, and return to the ice making state after five seconds.
-
Temperature Unit Setting: under the running state, long
press and at the same time for three seconds to switch Celsius or Fahrenheit.
- Cooling Mode: under the running state,press to switch MAX(fast cooling)and ECO(Energy saving Mode).(*Factory setting is MAX.)
·Battery Protection Mode: under the running state, long press or three seconds until screen flashes, then press again to select protection mode H1、N2、L3, after no key action is detected, set the corresponding geflicker for 5 seconds, exit the setting, and save.
- Power-off Memory Function: There is a power-off memory function for car refrigerators. When the power is lost, the working state (On/Off state working mode, etc.) before power-off can be automatically recovered a
next startup; no need to set it again. ECO: Energy-saving cooling MAX Powerful cooling.
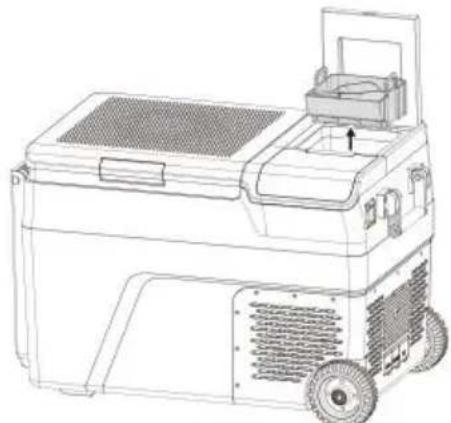
Water injection operation
-
Press the door cover button of the ice maker to open the door cover and remove the ice basket and ice shovel. Pour the water into the sink, the water level should not exceed the MAX position, and the water injection is about 1L. After adding water, put the ice basket back into the ice machine and close the door cover.(Make ice according to the first point of function, and the basket is about 1.2L)
-
Water quality requirements: the hardness of the water quality is less than 250ppm.

1
2
3
4
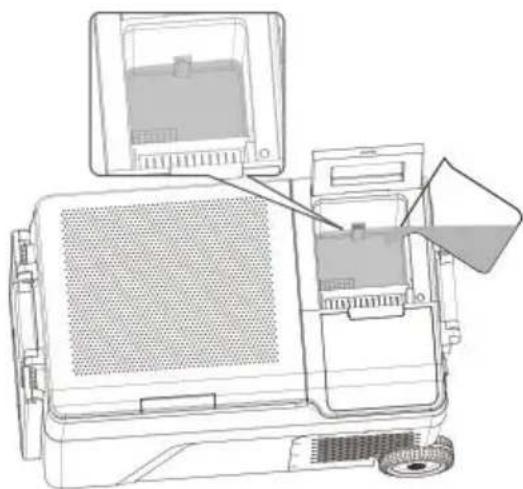
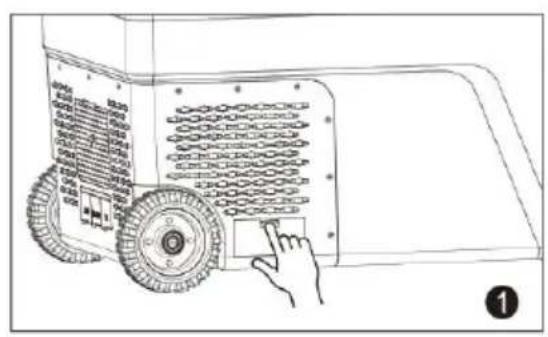
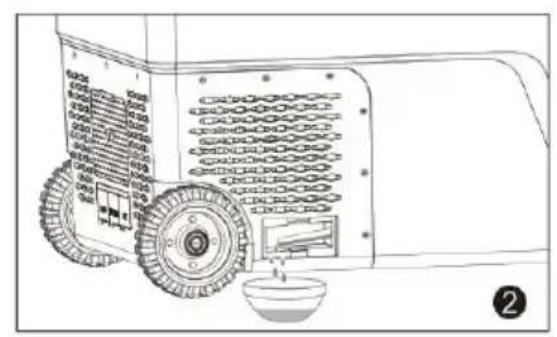
Drainage operation
- After continuous operation for 5 hours, it is recommended to remove the water in the water system and recharge the new water
- Press the drainage cover buckle pointed to by the arrow, take out drainage cover, built-in drainage pipe, pull out the drainage pipe, after drainage is completed
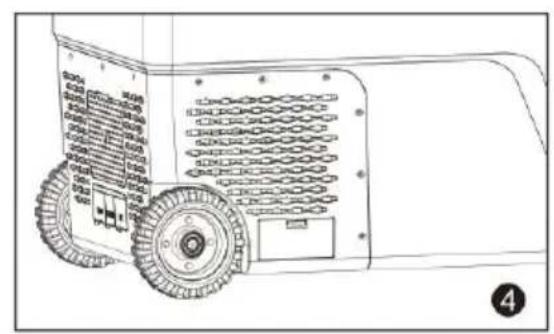
Put the drain pipe back in place to avoid water leakage from the rain water injection.
A kindly reminder! For the health of you and your family, please use soft cloth before / after

Simple Fault Analysis
Advice: If abnormal situations cannot be resolved through a simple face analysis, please get in touch with professional customer service for assistance.
Car Refrigerator Does Not Work
-
Check if the power is connected correctly. (check If the plug is loo or positive and negative poles are reversed).
-
Check if the power switch on the operation panel is turned on.
- Check if the cooling ventilation is normal.
- Check if the fuse is blown.
Poor Cooling Performance
- Check if the lid is closed correctly.
- Check if the door seal is damaged or deformed.
- Check if there is poor ventilation around the fridges.
- Check if the temperature is set correctly.
Definition of Error Codes on the Display
| Error Code | Error Type |
| E1 | Low Input Voltage |
| E2 | Fan Fault |
| E3 | Compressor start failed |
| E4 | Low Rotational Speed of Compressor |
| E5 | Controller module temperature too high |
| E6 | Open or Short Circuit of NTC |
Abnormal Noise
- The car refrigerator is not placed smoothly.
- Touch a wall or other object.
3.There are parts loose or falling off inside.
Condensation on Refrigerator Surface
When the ambient air humidity exceeds 75% , slight condensation will occur on the box surface, which is normal.
Failures and Solutions
E1 : Low Input Voltage
- Failure 1: Insert the refrigerator power cord into the cigarette lighter by the car starts. Solution 1: Wait a while to connect the car after it starts.
- Failure 2: The input voltage of the adapter is too low.
Solution 2: Adjust the battery protection level to middle-voltage or low-voltage. If it doesn't work, please replace a new adapter.
E2 : Fan Fault
Please replace a new fan when you identify there is a fan malfunction
E3: Input Voltage Fault Due to Compressor Frequently Start
When the refrigerator is used in the car, and E3 appears, Please shdow for 5 minutes and restart it.
If it doesn't work, that can be identified to be El fault; please solve according to the solution of El.
When the refrigerator is connecting with the adapter and E3 appearing
(1) Please adjust the battery protection level to the middle or low levels.
② If it doesn't work, please replace a new adapter.
E4: Low Rotational Speed of Compressor
Please adjust the input voltage and repower it.
E5: Overheating of Controller Chip
Please power off for 5 minutes and check if the lousy ventilation aro compressor causes the overheating.
Packing List
| No. | Item | Qty | Remark |
| 1 | Refrigerator | 1 set | |
| 2 | Cigarette wire | 1 set | |
| 3 | Power adapter | 1 set | |
| 4 | Manual | 1 pcs |
Use Suggestions
- If equipped with a backup battery, you can maintain any temperature set under any circumstances without worries.
- When placing ice cream, please adjust the temperature to the lowest must be powered on for a long time.
- Prevent the health problems of drinking bottled water caused by hot temperatures.
- Frozen food, rare seafood, and vehicle-mounted refrigerators let frozen fresh food accompany the journey.
- Healthcare products, insulin, and imported drugs need to be refrigerate and the precise temperature control of onboard refrigerators will escort health along the way.
- The tea leaves are effectively kept fresh in the car refrigerator, ar can drink fresh and delicious tea anytime during the self-driving tour.
- The best storage temperature of red wine is 10^ - 18^ (50 - 64.4 F).
The precise temperature control of the car refrigerator can effectively ensure the storage temperature of red wine.
- The storage time of high-grade fruit in the car at high summer temperatures will be at least 2 hours. The storage time is shorter ev the air conditioner is turned on. Using a car refrigerator can effectively preserve high-grade fruit.
- The coating of high-grade sunglasses will fall off under the high temperature in summer. The car refrigerator is an ideal place to place 10. High-grade cosmetics quickly deteriorate under high temperatures in the car. Carry cosmetics with the car; the car refrigerator will be your choice.
Safety Precautions
(1) Ensure that the power voltage connected to the onboard refrigerator correct at any time
(The parameters are labeled with the approved voltage parameters of
onboard refrigerator).
(2) Do not pour liquid directly into the car refrigerator.
(3) Modifying the refrigerator without permission is forbidden to avoid danger.
(4) This appliance is not intended for use by persons (including children with reduced physical, sensory, or mental capabilities or lack of experience and knowledge unless they have been given supervision or instruction concerning the use of the appliance by a person responsible for their safety.
(5) Children should be supervised to avoid playing with the appliance.
(6) This appliance can be used by children aged from 8 years and and persons with reduced physical, sensory or mental capabilities or I of experience and knowledge if they have been given supervision or instruction concerning use of the appliance in a safe way and unders the hazards involved. Children shall not play with the appliance. Clear and user maintenance shall not be made by children without supervisi
(7) To avoid a hazard due to the instability of the appliance, it must under the instructions.
(8) Do not store explosive substances such as aerosol cans with a flammable propellant in this appliance.
WARNING: This appliance contains flammable foaming agent
cyclopentane:
1) Please avoid contact fire when you transport and use it.
2) Please ask a professional for servicing when the machine breaks or
3) Please send it to your local appointed disposal station when you it.

WARNING: During use, service, and disposal of the appliance
please pay attention to a symbol similar to the left side, which is lothe rear of the appliance (rear panel or compressor) and with yellow orange color. It's a risk of fire warning symbol. There are flammablematerials in refrigerant pipes and compressors. Please be far away fir
source during use, service, and disposal.
FCC Information
CAUTION: Changes or modifications not expressly approved by the parties responsible for compliance could void the user's authority to operate the equipment!
This device complies with Part 15 of the FCC Rules. Operation is such the following two conditions:
1) This product may cause harmful interference.
2)This product must accept any interference received, including interference that may cause undesired operation.
WARNING: Changes or modifications to this product not expressly approved by the party.responsible for compliance could void the user's authority to operate the product.
Note: This product has been tested and found to comply with the IIR a Class B digital device pursuant to Part 15 of the FCC Rules, The are designed to provide reasonable protection against harmful interferer in a residential installation.
This product generates, uses and can radiate radio frequency energy, if not installed and used in accordance with the instructions, may cause harmful interference to radio communications. However, there is no guarantee that interference will not occur in a particular installation. If product does cause harmful interference to radio or television reception, which can be determined by turning the product off and on, user is encouraged to try to correct the interference by one or more following measures.
- Reorient or relocate the receiving antenna.
- Increase the distance between the product and receiver.
- Connect the product to an outlet on a circuit different from that to the receiver is connected.
· Consult the dealer or an experienced radio/TV technician for assista
VEVOR
TOUGH TOOLS, HALF PRICE
Technical Support and E-Warranty Certificate
https://www.vevor.com/support
VEVOR®
TOUGH TOOLS, HALF PRICE
Assistance technique et certificat de garantie electronique www.vevor.com/support
RéFRIGÉRATEUR DE VOITURE
MANUEL DE L'UTILISATEUR
MODELE:B35IM
Machine Translated by Google
https://www.vevor.com/support
VEVOR
TOUGH TOOLS, HALF PRICE
elettronica https://www.vevor.com/support
VEVOR®
TOUGH TOOLS, HALF PRICE
Soporte专业技术 y certificate de garantia electrònica www.vevor.com/support
REFRIGERADOR DE COCHE
MANUAL DE USUARIO
MODELO: B35IM
E2: Awaria wentylatora
https://www.vevor.com/support
VEVOR
TOUGH TOOLS, HALF PRICE
Technische ondersteuning en e-garantiecertificaat www.vevor.com/support
AUTO KOELKAST HANDLEIDING
MODEL: B35IM
HULP NODIG? NEEM CONTACT MET ONS OP!
garantiecertificaat https://www.vevor.com/support
VEVOR
TOUGH TOOLS, HALF PRICE
www.vevor.com/support
www.vevor.com/support