BR8504 - Screwdriver Vevor - Free user manual and instructions
Find the device manual for free BR8504 Vevor in PDF.

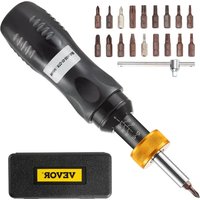
| Product Type | Cordless Drywall Screwdriver |
| Brand | VEVOR |
| Model | BR8504 |
| Power Source | Lithium-ion battery (18 V) |
| Battery Type | Rechargeable lithium-ion |
| Compatible Charger | BLD18A |
| Variable Speed | Yes, progressive trigger |
| Depth Clutch | Yes, collar adjustment |
| Forward/Reverse Rotation | Yes, control lever with lock |
| Switch Lock | Yes, for continuous operation |
| LED Work Light | Yes, integrated |
| Belt Hook | Yes, removable and reversible |
| Dead Spindle Action | Yes (press activation) |
| Weight (approx) | 1.5 kg (with battery) |
| Dimensions (L x W x H) | 260 x 75 x 230 mm (estimated) |
| No-load Speed (max) | Not specified (variable depending on pressure) |
| Maintenance and Cleaning | Blow out ventilation slots, do not use solvents, disassemble the nose for cleaning with warm water |
| Safety | Safety glasses, hearing protection, dust mask, fitted clothing |
| Spare Parts/Repairability | Authorized service center, identical spare parts |
| General Information | Professional tool, do not use in wet or explosive environments |
| Warranty | Electronic warranty certificate at www.vevor.com/support |
Frequently Asked Questions - BR8504 Vevor
User questions about BR8504 Vevor
0 question about this device. Answer the ones you know or ask your own.
Ask a new question about this device
Download the instructions for your Screwdriver in PDF format for free! Find your manual BR8504 - Vevor and take your electronic device back in hand. On this page are published all the documents necessary for the use of your device. BR8504 by Vevor.
USER MANUAL BR8504 Vevor
Technical Support and E-Warranty Certificate www.vevor.com/support
CORDLESS DRYWALL SCREWGUN
We continue to be committed to provide you tools with competitive price. "Save Half", "Half Price" or any other similar expressions used by us only represents an estimate of savings you might benefit from buying certain tools with us compared to the major top brands and does not necessarily mean to cover all categories of tools offered by us. You are kindly reminded to verify carefully when you are placing an order with us if you are actually saving half in comparison with the top major brands.
MODEL:BR8504
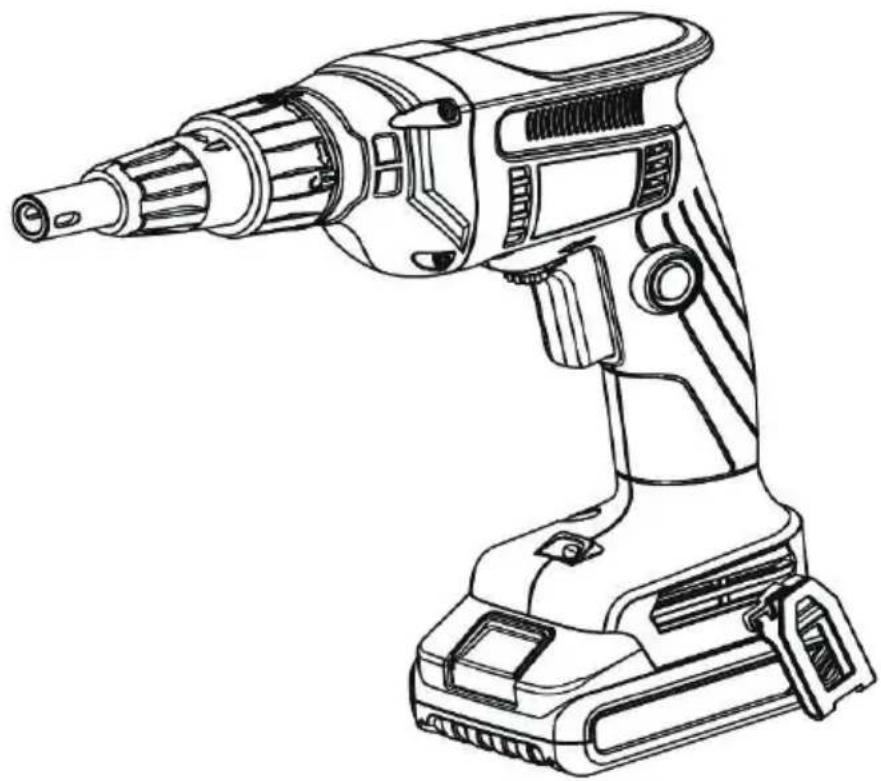
natural_image
Line drawing of a handheld electric drill press (no text or symbols)NEED HELP? CONTACT US!
Have product questions? Need technical support? Please feel free to contact us:
Technical Support and E-Warranty Certificate www.vevor.com/support
This is the original instruction, please read all manual instructions carefully before operating. VEVOR reserves a clear interpretation of our user manual. The appearance of the product shall be subject to the product you received. Please forgive us that we won't inform you again if there are any technology or software updates on our product.
Fig. A
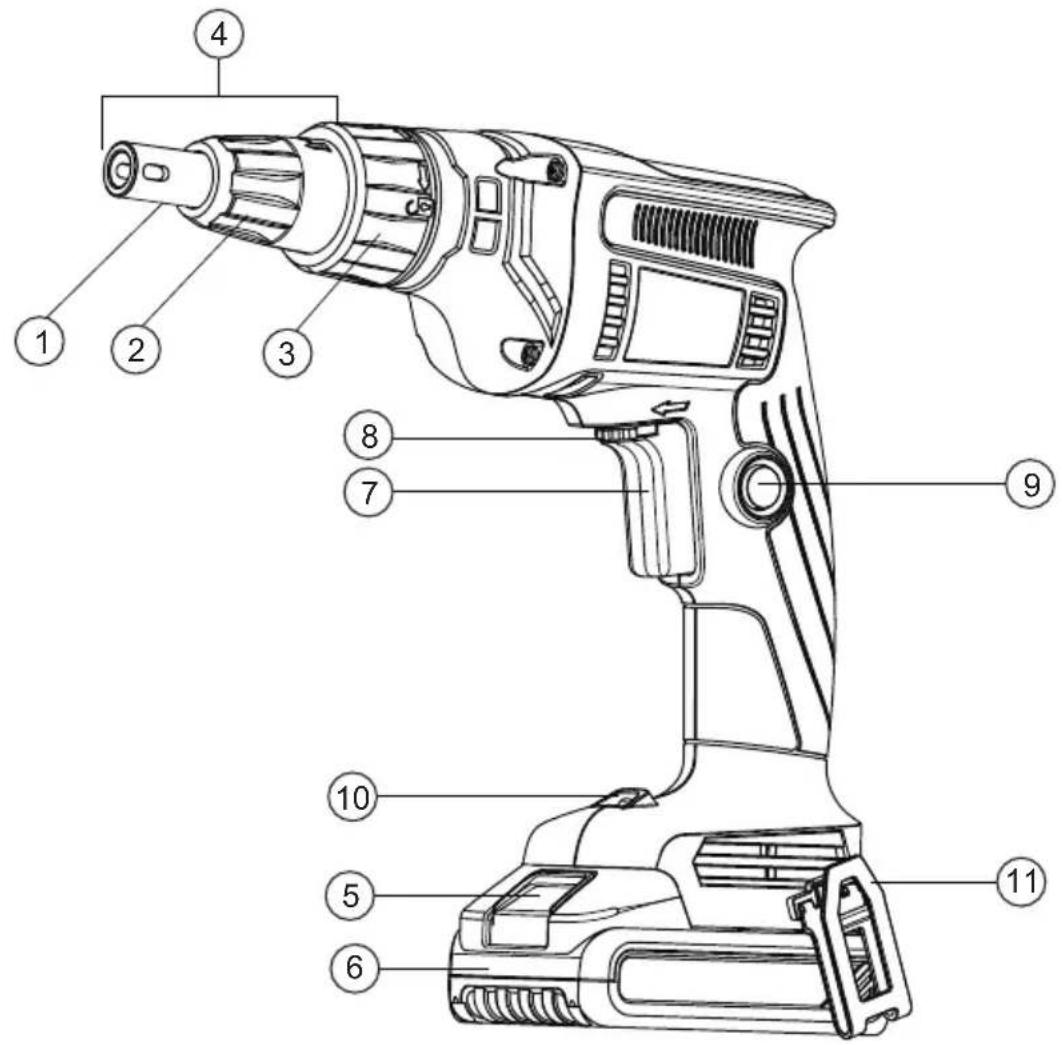
- Depth locator
- Screw depth adjustment collar
- Locking collar
- Nose cone
- Battery release button
- Battery pack
- Trigger switch
- Forward/reverse control lever
- Lock-on button
- LED worklight
- Belt hook
SAFETY ALERT SYMBOLS AND WORDS
This instruction manual uses the following safety alert symbols and words to alert you to hazardous situations and your risk of personal injury or property damage.
DANGER: Indicates an imminently hazardous situation which, if not avoided, will result in death or serious injury.
WARNING: Indicates a potentially hazardous situation which, if not avoided could result in death or serious injury.
CAUTION: Indicates a potentially hazardous situation which, if not avoided, may result in minor or moderate injury. (Used without word) Indicates a safety related message.
NOTICE: Indicates a practice not related to personal injury which, if not avoided, may result in property damage.
WARNING: Read all safety warnings and all instructions. Failure to follow the warnings and instructions may result in electric shock, fire and/or serious injury.
WARNING: To reduce the risk of injury, read the instruction manual.
GENERAL POWER TOOL SAFETY WARNINGS
WARNING! Read all safety warnings and all instructions. Failure to follow the warnings and instructions may result in electric shock, fire and/or serious injury.
SAVE ALL WARNINGS AND INSTRUCTIONS FOR FUTURE REFERENC
The term "power tool" in the warnings refers to your mains-operated (corded) power tool or battery-operated (cordless) power tool.
1) WORK AREA SAFETY
a) Keep work area clean and well lit.
Cluttered or dark areas invite accidents.
b) Do not operate power tools in explosive atmospheres, such as in the presence of flammable liquids, gases or dust. Power tools create sparks which may ignite the dust or fumes.
c) Keep children and bystanders away while operating a power tool. Distractions can cause you to lose control.
2) ELECTRICAL SAFETY
a) Power tool plugs must match the outlet. Never modify the plug in any way. Do not use any adapter plugs with earthed (grounded) power tools. Unmodified plugs and matching outlets will reduce risk of electric shock.
b) Avoid body contact with earthed or grounded surfaces such as pipes, radiators, ranges and refrigerators. There is an increased risk of electric shock if your body is earthed or grounded.
c) Do not expose power tools to rain or wet conditions. Water entering a power tool will increase the risk of electric shock.
d) Do not abuse the cord. Never use the cord for carrying, pulling or unplugging the power tool. Keep cord away from heat, oil, sharp edges or moving parts. Damaged or entangled cords increase the risk of electric shock.
e) When operating a power tool outdoors, use an extension cord suitable for outdoor use. Use of a cord suitable for outdoor use reduces the risk of electric shock.
f) If operating a power tool in a damp location is unavoidable, use a ground fault circuit interrupter (GFCI) protected supply. Use of a GFCI reduces the risk of electric shock.
3) PERSONAL SAFETY
a) Stay alert, watch what you are doing and use common sense when operating a power tool. Do not use a power tool while you are tired or under the influence of drugs, alcohol or medication. A moment of inattention while operating power tools may result in serious personal injury.
b) Use personal protective equipment. Always wear eye protection. Protective equipment such as dust mask, nonskid safety shoes, hard hat, or hearing protection used for appropriate conditions will reduce personal injuries.
c) Prevent unintentional starting. Ensure the switch is in the off position before connecting to power source and/or
battery pack, picking up or carrying the tool. Carrying power tools with your finger on the switch or energizing power tools that have the switch on invites accidents.
d) Remove any adjusting key or wrench before turning the power tool on. A wrench or a key left attached to a rotating part of the power tool may result in personal injury.
e) Do not overreach. Keep proper footing and balance at all times. This enables better control of the power tool in unexpected situations.
f) Dress properly. Do not wear loose clothing or jewelry. Keep your hair, clothing and gloves away from moving parts. Loose clothes, jewelry or long hair can be caught in moving parts.
g) If devices are provided for the connection of dust extraction and collection facilities, ensure these are connected and properly used. Use of dust collection can reduce dust-related hazards.
4) POWER TOOL USE AND CARE
a) Do not force the power tool. Use the correct power tool for your application. The correct power tool will do the job better and safer at the rate for which it was designed.
b) Do not use the power tool if the switch does not turn it on and off. Any power tool that cannot be controlled with the switch is dangerous and must be repaired.
c) Disconnect the plug from the power source and/or the battery pack from the power tool before making any adjustments, changing accessories, or storing power tools. Such preventive safety measures reduce the risk of starting the power tool accidentally.
d) Store idle power tools out of the reach of children and do not allow persons unfamiliar with the power tool or these instructions to operate the power tool. Power tools are dangerous in the hands of untrained users.
e) Maintain power tools. Check for misalignment or binding of moving parts, breakage of parts and any other condition that may affect the power tool's operation. If damaged, have the power tool repaired before use. Many accidents are caused by poorly maintained power tools.
f) Keep cutting tools sharp and clean.
Properly maintained cutting tools with sharp cutting edges are less likely to bind and are easier to control.
g) Use the power tool, accessories and tool bits, etc. in accordance with these instructions, taking into account the working conditions and the work to be performed. Use of the power tool for operations different from those intended could result in a hazardous situation.
5) BATTERY TOOL USE AND CARE
a) Recharge only with the charger specified by the manufacturer. A charger that is suitable for one type of battery pack may create a risk of fire when used with another battery pack.
b) Use power tools only with specifically designated battery packs. Use of any other battery packs may create a risk of injury and fire.
c) When battery pack is not in use, keep it away from other metal objects, like paper clips, coins, keys, nails, screws, or other small metal objects, that can make a connection from one terminal to another. Shorting the battery terminals together may cause burns or a fire.
d) Under abusive conditions, liquid may be ejected from the battery; avoid contact. If contact accidentally occurs, flush with water. If liquid contacts eyes, additionally seek medical help. Liquid ejected from the battery may cause irritation or burns.
6) SERVICE
a) Have your power tool serviced by a qualified repair person using only identical replacement parts. This will ensure that the safety of the power tool is maintained.
ADDITIONAL SAFETY RULES
- Hold power tool by insulated gripping surfaces, when performing an operation where the fastener may contact hidden wiring. Fasteners contacting a “live” wire may make exposed metal parts of the power tool “live” and could give the operator an electric shock.
• Air vents often cover moving parts and should be avoided. Loose clothes, jewelry or long hair can be caught in moving parts.
WARNING: ALWAYS use safety glasses. Everyday eyeglasses are NOT safety glasses. Also use face or dust mask if cutting operation is dusty. ALWAYS WEAR CERTIFIED SAFETY EQUIPMENT:
• ANSI Z87.1 eye protection (CAN/CSA Z94.3),
• ANSI S12.6 (S3.19) hearing protection,
• NIOSH/OSHA/MSHA respiratory protection.
WARNING: Some dust created by power sanding, sawing, grinding, drilling, and other construction activities contains chemicals known to the State of California to cause cancer, birth defects or other reproductive harm. Some examples of these chemicals are:
- Lead from lead-based paints,
• Crystalline silica from bricks and cement and other masonry products, and - Arsenic and chromium from chemically-treated lumber.
Your risk from these exposures varies, depending on how often you do this type of work. To reduce your exposure to these chemicals: work in a well ventilated area, and work with approved safety equipment, such as those dust masks that are specially designed to filter out microscopic particles.
- Avoid prolonged contact with dust from power sanding, sawing, grinding, drilling, and other construction activities. Wear protective clothing and wash exposed areas with soap and water. Allowing dust to get into your mouth, eyes, or lay on the skin may promote absorption of harmful chemicals.
WARNING: Use of this tool can generate and/or disperse dust, which may cause serious and permanent respiratory or other injury. Always use NIOSH/OSHA approved respiratory protection appropriate for the dust exposure. Direct particles away from face and body.
WARNING: Always wear proper personal hearing protection that conforms to ANSI S12.6 (S3.19) during use. Under some conditions and duration of use, noise from this product may contribute to hearing loss.
CAUTION: When not in use, place tool on its side on a stable surface where it will not cause a tripping or falling hazard. Some tools with large battery packs will stand upright on the battery pack but may be easily knocked over.
IMPORTANT SAFETY INSTRUCTIONS FOR ALL BATTERY PACKS
When ordering replacement battery packs, be sure to include the catalog number and voltage.
Consult the chart at the end of this manual for compatibility of chargers and battery packs.
The battery pack is not fully charged out of the carton. Before using the battery pack and charger, read the safety instructions below and then follow charging procedures outlined.
READ ALL INSTRUCTIONS
WARNING:
- Do not charge or use the battery pack in explosive atmospheres, such as in the presence of flammable liquids, gases or dust. Inserting or removing the battery pack from the charger may ignite the dust or fumes.
- NEVER force the battery pack into the charger. DO NOT modify the battery pack in any way to fit into a non-compatible charger as battery pack may rupture causing serious personal injury. Consult the chart at the end of this manual for compatibility of batteries and chargers.
- Charge the battery packs only in designated chargers.
- DO NOT splash or immerse in water or other liquids.
- Do not store or use the tool and battery pack in locations where the temperature may reach or exceed 105^ (40°C) (such as outside sheds or metal buildings in summer). For best life store battery packs in a cool, dry location.
NOTE: Do not store the battery packs in a tool with the trigger switch locked on. Never tape the trigger switch in the ON
position.
WARNING: Fire hazard. Never attempt to open the battery pack for any reason. If the battery pack case is cracked or damaged, do not insert into the charger. Do not crush, drop or damage the battery pack. Do not use a battery pack or charger that has received a sharp blow, been dropped, run over or damaged in any way (e.g., pierced with a nail, hit with a hammer, stepped on). Damaged battery packs should be returned to the service center for recycling.
WARNING: Fire hazard. Do not store or carry the battery pack so that metal objects can contact exposed battery terminals. For example, do not place the battery pack in aprons, pockets, tool boxes, product kit boxes, drawers, etc., with loose nails, screws, keys, etc. Transporting batteries can possibly cause fires if the battery terminals inadvertently come in contact with conductive materials such as keys, coins, hand tools and the like. The US Department of Transportation Hazardous Material Regulations (HMR) actually prohibit transporting batteries in commerce or on airplanes (e.g., packed in suitcases and carry-on luggage) UNLESS they are properly protected from short circuits. So when transporting individual battery packs, make sure that the battery terminals are protected and well insulated from materials that could contact them and cause a short circuit.
SPECIFIC SAFETY INSTRUCTIONS FOR LITHIUM ION (LI-ION)
- Do not incinerate the battery pack even if it is severely damaged or is completely worn out. The battery pack can explode in a fire. Toxic fumes and materials are created when lithium ion battery packs are burned.
- If battery contents come into contact with the skin, immediately wash area with mild soap and water. If battery liquid gets into the eye, rinse water over the open eye for 15 minutes or until irritation ceases. If medical attention is needed, the battery electrolyte is composed of a mixture of liquid organic carbonates and lithium salts.
- Contents of opened battery cells may cause respiratory irritation. Provide fresh air. If symptoms persist, seek medical attention.
WARNING: Burn hazard. Battery liquid may be flammable if exposed to spark or flame.
IMPORTANT SAFETY INSTRUCTIONS FOR ALL BATTERY CHARGERS
SAVE THESE INSTRUCTIONS: This manual contains important safety and operating instructions for battery chargers.
- Before using the charger, read all instructions and cautionary markings on the charger, battery pack and product using the battery pack.
WARNING: Shock hazard. Do not allow any liquid to get inside the charger. Electric shock may result.
CAUTION: Burn hazard. To reduce the risk of injury, charge only rechargeable battery packs. Other types of batteries may may overheat and burst resulting in personal injury and property damage.
NOTICE: Under certain conditions, with the charger plugged into the power supply, the charger can be shorted by foreign material. Foreign materials of a conductive nature, such as, but not limited to, grinding dust, metal chips, steel wool, aluminum foil or any buildup of metallic particles should be kept away from the charger cavities. Always unplug the charger from the power supply when there is no battery pack in the cavity. Unplug the charger before attempting to clean.
WARNING:
- DO NOT attempt to charge the battery pack with any chargers other than the ones in this manual. The charger and battery pack are specifically designed to work together.
• These chargers are not intended for any uses other than charging rechargeable batteries. Any other uses may result in risk of fire, electric shock or electrocution. - Do not expose the charger to rain or snow.
- Pull by the plug rather than the cord when disconnecting the charger. This will reduce the risk of damage to the electric plug and cord.
-
Make sure that the cord is located so that it will not be stepped on, tripped over or otherwise subjected to damage or stress.
-
Do not use an extension cord unless it is absolutely necessary. Use of improper extension cord could result in risk of fire, electric shock or electrocution.
- When operating a charger outdoors, always provide a dry location and use an extension cord suitable for outdoor use. Use of a cord suitable for outdoor use reduces the risk of electric shock.
otherwise damaged in any way. Take it to an authorized service center.
- Do not disassemble the charger; take it to an authorized service center when service or repair is required. Incorrect reassembly may result in a risk of electric shock, electrocution or fire.
- Disconnect the charger from the outlet before attempting any cleaning. This will reduce the risk of electric shock. Removing the battery pack will not reduce this risk.
- NEVER attempt to connect 2 chargers together.
CHARGERS
Be sure to read all safety instructions before using your charger.
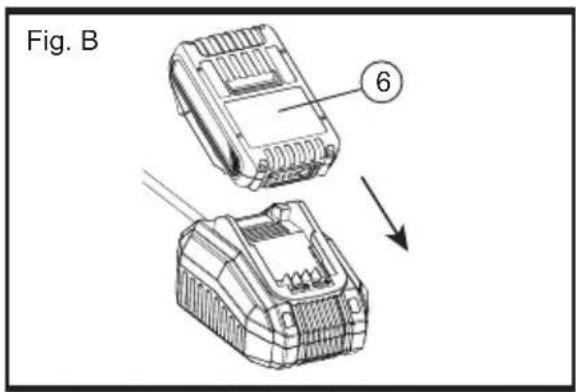
Charging Procedure (Fig. B)
- Plug the charger into an appropriate outlet before inserting battery pack.
- Insert the battery pack ⑥ into the charger, as shown in Fig B, making sure the pack is fully seated in charger. The red (charging) light will blink continuously indicating that the charging process has started.
- The completion of charge will be indicated by the green light remaining ON continuously, the red light OFF. The pack is fully charged and may be used at this time or left in the charger.
Indicator Light Operation BLD18A
| Red light Green light | |||
| Pack charging | ● | ||
| Pack charged | ● | ||
| Stand-by charger | ● | ||
Charge Indicators
This charger is designed to detect certain problems that can arise. Problems are indicated by no lights on. If this occurs, reinsert the battery pack into the charger. If the problem persists try a different battery pack to determine if the charger is working properly. If the new pack charges correctly, then the original pack is defective and should be returned to a service center or other collection site for recycling. If the new battery pack elicits the same trouble indication as the original, have the charger and the battery pack tested at an authorizee service center.
LEAVING THE BATTERY PACK IN THE CHARGER
The charger and battery pack can be left connected with the charge indicator showing Pack Charged.
WEAK BATTERY PACKS: Weak batteries
will continue to function but should not be expected to perform as much work.
FAULTY BATTERY PACKS: This charger will not charge a faulty battery pack. The charger will indicate faulty battery pack by refusing to light or by displaying problem pack or charger.
NOTE: This could also mean a problem with a charger.
WALL MOUNTING
These chargers are designed to be wall mountable or to sit upright on a table or work surface.
If wall mounting, locate the charger within reach of an electrical outlet. Mount the charger securely using drywall screws at least 1" (25.4 mm) long, screwed into wood to an optimal depth leaving approximately 7/32" (5.5 mm) of the screw exposed.
IMPORTANT CHARGING NOTES
- Longest life and best performance can be obtained if the battery pack is charged when the air temperature is between 65°F and 75°F (18–24°C). DO NOT charge the battery pack in air temperature below +40°F (+4.5°C), or above +105°F (+40.5°C). This is important and will prevent serious damage to the battery pack.
- The charger and battery pack may become warm to touch while charging. This is a normal condition, and does not indicate a problem. To facilitate the cooling of the battery pack after use, avoid placing the charger or battery pack in a warm environment such as in a metal shed, or an uninsulated trailer.
- If the battery pack does not charge properly:
a) Check operation of receptacle by plugging in a lamp or other appliance;
b) Check to see if receptacle is connected to a light switch which turns power off when you turn out the lights;
c) Move charger and battery pack to a location where the surrounding air temperature is approximately 65^ F– 75^ F (18– 24^ C);
d) If charging problems persist, take the tool, battery pack and charger to your local service center.
- The battery pack should be recharged when it fails to produce sufficient power on jobs which were easily done previously.
DO NOT CONTINUE to use under these conditions. Follow the charging procedure. You may also charge a partially used pack
whenever you desire with no adverse affect on the battery pack.
- Foreign materials of a conductive nature such as, but not limited to, grinding dust, metal chips, steel wool, aluminum foil, or any buildup of metallic particles should be kept away from charger cavities. Always unplug the charger from the power supply when there is no battery pack in the cavity. Unplug charger before attempting to clean.
- Do not freeze or immerse charger in water or any other liquid.
WARNING: Shock hazard. Don't allow any liquid to get inside the charger. Electric shock may result.
WARNING: Burn hazard. Do not submerge the battery pack in any liquid or allow any liquid to enter the battery pack. Never attempt to open the battery pack for any reason. If the plastic housing of the battery pack breaks or cracks, return to a service center for recycling.
STORAGE RECOMMENDATIONS
- The best storage place is one that is cool and dry, away from direct sunlight and excess heat or cold.
- For long storage, it is recommended to store a fully charged battery pack in a cool dry place out of the charger for optimal results.
NOTE: Battery packs should not be stored completely depleted of charge. The battery pack will need to be recharged before use.
INTENDED USE
This screwdriver is designed for professional fastening applications. DO NOT use under wet conditions or in presence of flammable liquids or gases.
This is a professional power tool. DO NOT let children come into contact with the tool. Supervision is required when inexperienced operators use this tool.
DEAD SPINDLE ACTION
All drywall screwguns provide a dead spindle output to permit fasteners to be located easily on the driving accessory. Clutches are held apart by a light spring pressure permitting the driving clutch to rotate without turning the driven clutch and accessory. When sufficient forward pressure is applied to the unit, the clutches engage and rotate the spindle and accessories. A reversing switch makes it
possible to drive or loosen either right or left hand fasteners.
Variable Speed Switch (Fig. A)
To turn the tool "ON", squeeze the trigger switch ⑦. To turn the tool "OFF" release the trigger. Your tool is equipped with a variable speed switch which enables you to select the best speed for a particular application. The farther you squeeze the trigger, the faster the tool will operate.
LOCK-ON BUTTON
To lock the switch in the ON position for continuous operation, depress the trigger switch ⑦ and push up the lock-on button ⑨. The tool will continue to run. To turn the tool off, from a locked on condition, squeeze and release the trigger once. Before using the tool (each time), be sure that the locking button release mechanism is working freely.
CAUTION: Be sure to release the locking mechanism before removing the battery from the tool. Failure to do so will cause the tool to start immediately the next time the battery is installed. Damage or injury could result.
Forward/Reverse Control Lever (Fig. A)
A forward/reverse control lever ⑧ determines the direction of the tool and also serves as a lock-off.
To select forward rotation, release the trigger switch and depress the forward/reverse control lever on the right side of the tool. To select reverse, release the trigger switch ⑦ and depress the forward/reverse control lever on the left side of the tool. The center position of the control lever locks the trigger switch ⑦ in the off position.
When changing the position of the control button, be sure the trigger is released.
NOTE: The first time the tool is run after changing the direction of rotation, you may hear a click on start up. This is normal and does not indicate a problem.
Worklight (Fig. A)
There is a worklight ⑩ located on the foot of the tool. The worklight is activated when the trigger switch is depressed, and will automatically turn off 5 seconds after the trigger switch is released. If the trigger switch remains depressed, the worklight will remain on.
NOTE: The worklight is for lighting the immediate work surface and is not intended to be used as a flashlight.
Belt Hook (Fig. A)
WARNING: To reduce the risk of serious personal injury, DO NOT suspend tool overhead or suspend objects from the belt hook. ONLY hang tool's belt hook from a work belt.
WARNING: To reduce the risk of serious personal injury, ensure the screw holding the belt hook is secure.
IMPORTANT: When attaching or replacing the belt hook ⑪, use only the screw that is provided. Be sure to securely tighten the screw. The belt hook ⑪ can be attached to either side of the tool using only the screw provided, to accommodate left- or right-handed users. If the hook is not desired at all, it can be removed from the tool. To move belt hook, remove the screw that holds it in place then reassemble on the opposite side. Be sure to securely tighten the screw.
SYMBOLS
On the product, the rating label and within these instructions you will find among others the following symbols and abbreviations. Familiarise yourself with them to reduce hazards like personal injuries and damage to property.
| V ~ Volt, (Alternating voltage) A Amperes | |||
| Hz Hertz W | Watt | ||
| min Minutes ~ or AC Alternating current | |||
| == or DC Direct current | ➊ | Class I Construction (grounded) | |
| ≈ or AC/DC Alternating or direct current | ➌ | Class II Construction (double insulated) | |
| n0 | No load speed /min or min | -1 | per minute |
| BPM Beats per minute n Rated speed | |||
| IPM Impacts per minute RPM | Revolutions per minute | ||
| ➊ | Earthing terminal sfpm Surface feet per minute | ||
| dB(A) | Decibel (A-rated) m/s2 | Metres per seconds squared | |
| kg | Kilogram | mm | Millimetre |
| °C | Degree celsius | SPM | Strokes per minute |
| ➊ | Safety alert symbol | ||

Lock/to tighten or secure.

Note/Remark.

Read the instruction.

Wear eye protection.

Wear protective gloves.

Switch the product off and disconnect it from the power supply before assembly, cleaning, adjustments, maintenance, storage and transportation.

The product complies with the applicable European directives and an evaluation method of conformity for these directives was done.

For use in dry indoor rooms only.

Switch the product off and remove battery pack before assembly, cleaning, adjustments, maintenance, storage and transportation.

Do not dispose of battery packs in rivers or immerse in water.

Do not expose battery pack to heat in excess of 40^ C. Do not charge or store the battery pack below 0^ C ( 32^ F) and above 40^ C ( 104^ F).

Unlock/to loosen.

Caution/ Warning.

Wear hearing protection.

Wear a dust mask.

Wear protective, slip-resistant footwear.

This product is of protection class II. That means it is equipped with enhanced or double insulation.
WEEE symbol. Waste electrical products should not be disposed of with household waste. Please recycle where facilities exist. Check with your Local Authority or local store for recycling advice.

Crossed out dust bin. Batteries and battery packs should not be disposed of with household waste. Please recycle where facilities exist. Check with your Local Authority or local store for recycling advice.

Do not dispose of battery packs in fire. They will explode and cause injury.

Do not smoke in the work area, around the product and in the vicinity of flammable materials!

Open flames in the work area, around the product and in the vicinity of flammable materials are prohibited!
OPERATION
WARNING: To reduce the risk of injury, turn unit off and disconnect it from power source before installing and removing accessories, before adjusting or when making repairs. An accidental start-up can cause injury.
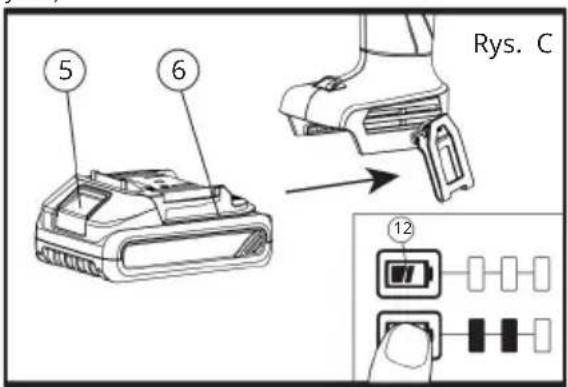
INSTALLING AND REMOVING THE BATTERY PACK (Fig. C)
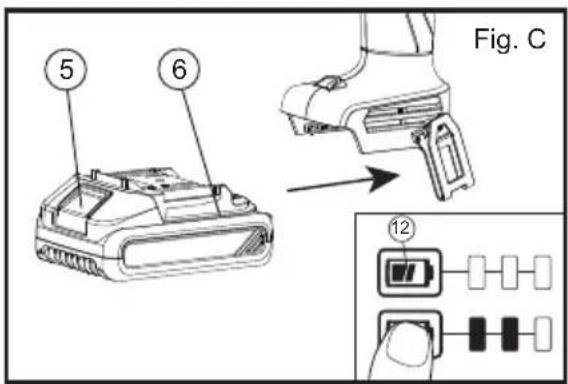
NOTE: For best results, make sure your battery pack is fully charged.
To install the battery pack ⑥ into the tool handle, align the battery pack with the rails inside the tool's handle and slide it into the handle until the battery pack is firmly seated in the tool and ensure that it does not disengage.
To remove the battery pack from the tool, press the release button ⑤ and firmly pull the battery pack out of the tool handle. Insert it into the charger as described in the charger section of this manual. Squeeze the tool trigger for three seconds to dissipate the slight electric charge that may still be in the tool. The worklight may come on for a brief moment.
FUEL GAUGE BATTERY PACKS (Fig. C)
Some battery packs include a fuel gauge which consists of three green LED lights that indicate the level of charge remaining in the battery pack.
To actuate the fuel gauge, press and hold the fuel gauge button ⑫.
A combination of the three green LED lights will illuminate designating the level of charge left. When the level of charge in the battery is below the usable limit, the fuel gauge will not illuminate and the battery will need to be recharged.
NOTE: The fuel gauge is only an indication of the charge left on the battery pack. It does not indicate tool functionality and is subject to variation based on product components, temperature and end-user application.
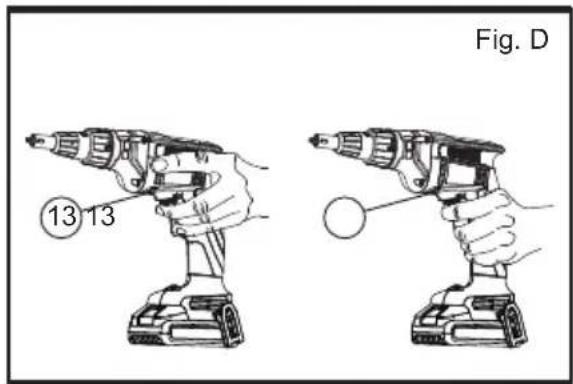
PROPER HAND POSITION (Fig. D)
WARNING: To reduce the risk of serious personal injury, ALWAYS use proper hand position as shown in Fig D. Proper hand position requires one hand on the rear grip. Take care to not block the air vents⑬.
CHANGING BIT HOLDERS (Fig. E)
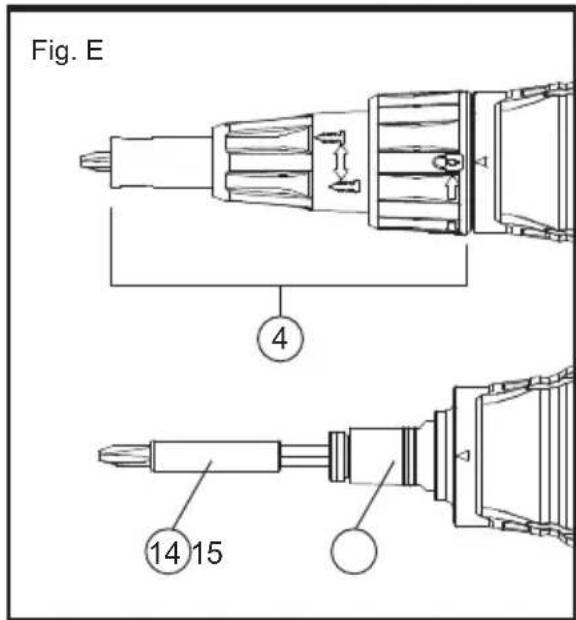
- Rotate the locking collar ③ 1/4 turn to unlock nose cone from gear case.
- Pull nose cone ④ off of gear case.
- To remove:
a) Grab the bit holder ⑭.
b) Push it into the gear case depressing the sleeve 15.
c) Rotate the bit holder until the clutch engages.
d) While holding the sleeve depressed, pull the bit holder out. - Push and rotate the new bit holder into gearcase, depressing the sleeve, until ball
lock snaps in groove in bit holder shank.
- Replace nose cone ④ by placing on gear case and rotating collar 1/4 turn to align arrow on gear case with the lock symbol on collar.
CHANGING BIT TIP (Fig. E)
- Rotate the locking collar ③ 1/4 turn to unlock nose cone from gear case.
2.Pull nose cone ④ off of gear case.
- Use pliers to remove worn bit and install new bit tip.
DEPTH ADJUSTMENT
Follow the graphic on the collar to increase or decrease the fastening depth. To seat the screw deeper in the workpiece, turn the adjustment collar to the right. To seat the screw higher in the workpiece, turn the adjustment collar to the left.
SCREWDRIVING (Fig. A)
- For best results, hold the screwgun with the hand directly in line with the fastener and press the variable speed switch with the last one or two fingers of the hand. This reduces the chance of the screw slipping from the drive accessory when pressure is applied.
- To drive the fastener, place it on the bit, press the variable speed switch and push the fastener into the workpiece with a smooth, continuous motion. When the fastener is seated, the clutch will disengage automatically.
- Install bit tip in bit holder.
- Adjust depth locator ①.
- Check for correct rotation, start screwgun and place screw on bit.
- Contact work surface, applying forward pressure to drive screw until depth locator contacts the work surface. Screwgun will ratchet automatically, disengaging bit from screw.
- This depth sensitive screwgun is suitable for driving drywall screws.
FOR THIS DEPTH SENSITIVE CLUTCH PLEASE REMEMBER:
- The bit will not turn until pressure is applied to the unit. Push to engage.
- Trigger switch will not depress unless tool is in either forward or reverse position.
MAINTENANCE

WARNING: To reduce the risk of injury, turn unit off and disconnect it from power source before installing and removing accessories, before adjusting or when making repairs. An accidental start-up can cause injury.
CLEANING
WARNING: Blow dirt and dust out of all air vents with clean, dry air at least once a week. To minimize the risk of eye injury, always wear ANSI Z87.1 approved eye protection when performing this.
WARNING: Never use solvents or other harsh chemicals for cleaning the non-metallic parts of the tool. These chemicals may weaken the plastic materials used in these parts. Use a cloth dampened only with water and mild soap. Never let any liquid get inside the tool; never immerse any part of the tool into a liquid.
CHARGER CLEANING INSTRUCTIONS
WARNING: Shock hazard. Disconnect the charger from the AC outlet before cleaning. Dirt and grease may be removed from the exterior of the charger using a cloth or soft non-metallic brush. Do not use water or any cleaning solutions.
NOSECONE MAINTENANCE (Fig. A, E)
If the nose cone ④ becomes hard to turn it may be contaminated with drywall dust.
- Remove nose cone from tool.
- Rinse thoroughly with warm water while rotating both screw depth adjustment collar ② and locking collar ③. Never use oil or solvents.
- Dry the nosecone completely before reattaching to tool.
ACCESSORIES
WARNING: Since accessories, other than those offered by manufacturer, have not been tested with this product, use of such accessories with this tool could be hazardous. To reduce the risk of injury, only recommended accessories should be used with this product. Recommended accessories for use with your tool are available at extra cost from your local dealer or authorized service center.
REPAIRS
WARNING: To assure product SAFETY and RELIABILITY, repairs, maintenance and adjustment (including power cord repairs, and brush inspection and replacement, when applicable) should be performed by a factory service center or authorized service center. Always use identical replacement parts.
FCC INFORMATION
CAUTION: Changes or modifications not expressly approved by the party responsible for compliance could void the user's authority to operate the equipment!
This device complies with Part 15 of the FCC Rules. Operation is subject to the following two conditions:
1) This product may cause harmful interference.
2) This product must accept any interference received, including interference that may cause undesired operation.
WARNING: Changes or modifications to this product not expressly approved by the party.responsible for compliance could void the user's authority to operate the product.
Note: This product has been tested and found to comply with the limits for a Class B digital device pursuant to Part 15 of the FCC Rules, These limits are designed to provide reasonable protection against harmful interference in a residential installation.
This product generates, uses and can radiate radio frequency energy, and if not installed and used in accordance with the instructions, may cause harmful interference to radio communications. However, there is no guarantee that interference will not occur in a particular installation. If this product does cause harmful interference to radio or television reception, which can be determined by turning the product off and on, the user is encouraged to try to correct the interference by one or more of the following measures.
- Reorient or relocate the receiving antenna.
- Increase the distance between the product and receiver.
- Connect the product to an outlet on a circuit different from that to which the receiver is connected.
- Consult the dealer or an experienced radio/TV technician for assistance.
Address: Shuangchenglu 803nong11hao1602A-1609shi, baoshanqu, shanghai 200000 CN.
Imported to AUS: SIHAO PTY LTD, 1 ROKEVA STREETEASTW NSW 2122 Australia
Imported to USA: Sanven Technology Ltd., Suite 250, 9166 Ana Place, Rancho Cucamonga, CA 91730
| REPE |
E-CrossStu GmbH
Mainzer Landstr.69, 60329 Frankfurt am Main.
| REPU |
YH CONSULTING LIMITED.
K/O YH Consulting Limited Office 147, Centurion Hou
London Road, Staines-upon-Thames, Surrey, TW18
VEVOR®
TOUGH TOOLS, HALF PRICE
Technical Support and E-Warranty Certificate
www.vevor.com/support
VEVOR®
TOUGH TOOLS, HALF PRICE
natural_image
Line drawing of a handheld electric drill press (no text or symbols)- Tiefenanzeige 2.
b) Use personal protective equipment.
to filter out microscopic particles.
WARNING: Burn hazard. Battery liquid may be flammable if exposed to spark or flame.
the air temperature is between 65°F and 75°F (18–24°C). DO NOT charge the battery pack in air temperature below +40°F (+4.5°C), or above +105°F (+40.5°C). This is important
approximately 65°F–75°F (18–24°C);
when it fails to produce sufficient power on
wet conditions or in presence of flammable
tool off, from a locked on condition, squeeze
HINWEIS: The first time the tool is run after
automatically turn off 5 seconds after the
Switch the product off and disconnect
Switch the product off and remove
injury, turn unit off and disconnect it
the handle until the battery pack is firmly
one or two fingers of the hand. This reduces
WARNING: Um das Risiko von injury, turn unit off and disconnect it
REPARATUREN

Technical Support and E-Warranty Certificate
www.vevor.com/support
VEVOR®
TOUGH TOOLS, HALF PRICE
natural_image
Line drawing of a handheld electric drill press (no text or symbols)BESOIN D'AIDE? CONTACTEZ-NOUS!
- Localisateur de
the influence of drugs, alcohol or
b) Use personal protective equipment.
Carrying power tools with your finger
together may cause burns or a fire. d) Under abusive conditions, liquid may
flush with water. If liquid contacts eyes,
to filter out microscopic particles.
presence of flammable liquids, gases or
in any way to fit into a non-compatible
batteries can possibly cause fires if the
a fire. Toxic fumes and materials are created
AVERTISSEMENT: Burn hazard. Battery liquid may be flammable if exposed to spark or flame.
IMPORTANTES CONSIGNES DE SÉCURITÉ INSTRUCTIONS POUR TOUS CHARGEURS DE BATTERIE
approximately 65°F–75°F (18–24°C);
when it fails to produce sufficient power on
tool off, from a locked on condition, squeeze
The first time the tool is run after
automatically turn off 5 seconds after the
Switch the product off and disconnect
Switch the product off and remove
Attention/Avertissement.

the handle until the battery pack is firmly
Technical Support and E-Warranty Certificate
www.vevor.com/support
VEVOR®
TOUGH TOOLS, HALF PRICE
Technische ondersteuning en e-garantiecertificaat www.vevor.com/support
SNOERLOZE GIPSPLAATSSCHROEFMACHINE
natural_image
Line drawing of a handheld electric drill press (no text or symbols)HULP NODIG? NEEM CONTACT MET ONS OP!
VEILIGHEIDSWAARSCHUWINGSSYMBOLEN EN WOORDEN
BEWAAR ALLE WAARSCHUWINGEN EN INSTRUCTIES VOOR TOEKOMSTIGE REFERENTIE.
b) Use personal protective equipment.
to filter out microscopic particles.
in any way to fit into a non-compatible
WAARSCHUWING: Brandgevaar. Bewaar of
batteries can possibly cause fires if the
Department of Transportation Hazardous Material
a fire. Toxic fumes and materials are created
WAARSCHUWING: Burn hazard. Battery liquid may be flammable if exposed to spark or flame.
BELANGRIJKE VEILIGHEIDSVOORSCHRIFTEN
INSTRUCTIES VOOR ALLE BATTERIJLADERS
service or repair is required. Een
tool off, from a locked on condition, squeeze
The first time the tool is run after
automatically turn off 5 seconds after the
Switch the product off and disconnect
Switch the product off and remove
the handle until the battery pack is firmly
WAARSCHUWING: Aangezien accessoires van than those offered by andere fabrikanten, have
Technical Support and E-Warranty Certificate
www.vevor.com/support
VEVOR®
TOUGH TOOLS, HALF PRICE
natural_image
Line drawing of a handheld electric drill press (no text or symbols)BEHÖVER HJÄLP? KONTAKTA OSS!
www.vevor.com/support
- Djupsökare 2.
Skruvdjupsjusteringskrage 3. Låskrage 4.
Noskon 5.
Batterifrigöringsknapp 6.
Batteripaket 7.
Avtryckare 8. Fram/
backreglage 9. Låsknapp 10. LED-
b) Use personal protective equipment.
Carrying power tools with your finger
any other condition that may affect the
operations different from those intended kan resultera i en farlig situation.
5) ANVÄNDNING OCH SKÖTSEL AV BATTERIVERKTYG
together may cause burns or a fire.
flush with water. If liquid contacts eyes,
to filter out microscopic particles.
presence of flammable liquids, gases or
batteries can possibly cause fires if the
a fire. Toxic fumes and materials are created
WARNING: Burn hazard. Battery liquid may be flammable if exposed to spark or flame.
VIKTIG SÄKERHET INSTRUKTIONER FÖR ALLA BATTERILADDARE
SPARA DESSA INSTRUKTIONER: Denna handbok
battery pack are specifically designed to work tillsammans.
shock, electrocution or fire.
OBS: The first time the tool is run after
automatically turn off 5 seconds after the
WARNING: Eftersom tillbehör, annan tillverkare than those offered by , have
Technical Support and E-Warranty Certificate
www.vevor.com/support
VEVOR®
TOUGH TOOLS, HALF PRICE
Machine Translated by Google
VEVOR®
TOUGH TOOLS, HALF PRICE
PANEL DE YESO INALÁMBRICO
natural_image
Line drawing of a handheld electric drill press (no text or symbols)- Localizador de
the influence of drugs, alcohol or
b) Use personal protective equipment.
the switch is in the off position before
Carrying power tools with your finger
any other condition that may affect the
b) Use power tools only with specifically
together may cause burns or a fire.
d) Under abusive conditions, liquid may
flush with water. If liquid contacts eyes,
qualified repair person using only
to filter out microscopic particles.
presence of flammable liquids, gases or
in any way to fit into a non-compatible
batteries can possibly cause fires if the
a fire. Toxic fumes and materials are created
ADVERTENCIA: Burn hazard. Battery liquid may be flammable if exposed to spark or flame.
battery pack are specifically designed to work juntos.
approximately 65°F–75°F (18–24°C);
when it fails to produce sufficient power on
NOTA: The first time the tool is run after
Switch the product off and disconnect
Switch the product off and remove
the handle until the battery pack is firmly
Technical Support and E-Warranty Certificate
www.vevor.com/support
VEVOR®
TOUGH TOOLS, HALF PRICE
natural_image
Line drawing of a handheld electric drill press (no text or symbols)- Localizzatore di
b) Use personal protective equipment.
to filter out microscopic particles.
AVVERTIMENTO: Burn hazard. Battery liquid may be flammable if exposed to spark or flame.
SICUREZZA IMPORTANTE ISTRUZIONI PER TUTTI CARICABATTERIE
approximately 65°F–75°F (18–24°C);
when it fails to produce sufficient power on
wet conditions or in presence of flammable liquidi o gas.
NOTA: The first time the tool is run after
Switch the product off and disconnect
Switch the product off and remove
Do not dispose of battery packs in fire.
one or two fingers of the hand. This reduces
injury, turn unit off and disconnect it
ISTRUZIONI PER LA PULIZIA DEL CARICABATTERIE
Technical Support and E-Warranty Certificate
www.vevor.com/support
VEVOR®
TOUGH TOOLS, HALF PRICE
natural_image
Line drawing of a handheld electric drill press (no text or symbols)POTRZEBUJESZ POMOCY? SKONTAKTUJ SIĘ Z NAMI!
SYMBOLE I SŁOWA ALARMOWE
electric shock, fire and/or serious injury.
b) Use personal protective equipment.
Carrying power tools with your finger
any other condition that may affect the
together may cause burns or a fire.
d) Under abusive conditions, liquid may
flush with water. If liquid contacts eyes,
qualified repair person using only
presence of flammable liquids, gases or
in any way to fit into a non-compatible
batteries can possibly cause fires if the
a fire. Toxic fumes and materials are created
battery pack are specifically designed to work
razem.
may result in risk of
shock, electrocution or fire.
the air temperature is between 65°F and 75°F (18–24°C). DO NOT charge the battery pack in air temperature below +40°F (+4.5°C), or above +105°F (+40.5°C). This is important
whenever you desire with no adverse affect
na akumulatorze.
approximately 65°F–75°F (18–24°C);
when it fails to produce sufficient power on
wet conditions or in presence of flammable ciecze lub gazy.
tool off, from a locked on condition, squeeze
UWAGA: The first time the tool is run after
automatically turn off 5 seconds after the
Switch the product off and disconnect
INSTALOWANIE I WYJMOWANIE AKUMULATORA (Rys. C)
the handle until the battery pack is firmly
PRAWIDŁOWA POZYCJA DŁONI (Rys. D)
injury, turn unit off and disconnect it
Technical Support and E-Warranty Certificate
www.vevor.com/support