LPY616Ti2-B9-09 - Oven Vevor - Free user manual and instructions
Find the device manual for free LPY616Ti2-B9-09 Vevor in PDF.

| Product type | Built-in electric oven |
| Brand | Vevor |
| Model | LPY616Ti2-B9-09 |
| Power supply | 220-240 V ~ 50/60 Hz |
| Total power | 3550 W |
| Top element | 850 W |
| Grill element | 1100 W |
| Bottom element | 1150 W |
| Circular element | 1600 W |
| Cooking modes | 16 modes: natural convection, fan-assisted convection, grill, pizza, pyrolysis, air fry, dehydration, fermentation, etc. |
| Cleaning type | Pyrolytic (75, 90 or 120 min) and steam cleaning |
| Child safety | Electronic control lock |
| Auto shut-off | Yes, depending on temperature (up to 24 h at low temperature) |
| Interior light | Lamp with replaceable bulb (G9, 25 W, 300 °C) |
| Removable door | Yes, for easier cleaning |
| Removable inner glass | Yes |
| Display | Electronic programmer with screen and rotary controls |
| Included accessories | Grid, baking tray, drip tray (not specified, but standard) |
| Warranty | Technical support and electronic warranty certificate at www.vevor.com/support |
| Repairability | User-replaceable bulb; other repairs by professional |
Frequently Asked Questions - LPY616Ti2-B9-09 Vevor
User questions about LPY616Ti2-B9-09 Vevor
0 question about this device. Answer the ones you know or ask your own.
Ask a new question about this device
Download the instructions for your Oven in PDF format for free! Find your manual LPY616Ti2-B9-09 - Vevor and take your electronic device back in hand. On this page are published all the documents necessary for the use of your device. LPY616Ti2-B9-09 by Vevor.
USER MANUAL LPY616Ti2-B9-09 Vevor
Technical Support and E-Warranty Certificate www.vevor.com/support
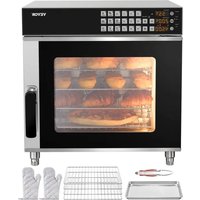
BUILT-IN ELECTRIC OVEN
MODEL:LPY616Ti2-B5-09
We continue to be committed to provide you tools with competitive price. "Save Half", "Half Price" or any other similar expressions used by us only represer estimate of savings you might benefit from buying certain tools with us compared to top brands and does not necessarily mean to cover all categories of tools offered by are kindly reminded to verify carefully when you are placing an order with us if yo actually saving half in comparison with the top major brands.
MODEL:LPY616Ti2-B5-09
natural_image
Line drawing of a multi-tiered oven or oven unit with visible door, vent, and front panel (no text or symbols)NEED HELP? CONTACT US!
Have product questions? Need technical support? Please feel free contact us:
Technical Support and E-Warranty Certificate www.vevor.com/support
This is the original instruction, please read all manual instructions carefully before operating. VEVOR reserves a clear interpretation of user manual. The appearance of the product shall be subject to the product you received. Please forgive us that we won't inform you there are any technology or software updates on our product.
 | Warning-To reduce the risk of injury, user must read instructions manual carefully. |
 | This product is subject to the provision of European Dire 2012/19/EC. The symbol showing a wheelie bin crosse through indicates that the product requires separate refus collection in the European Union. This applies to the pro and all accessories marked with this symbol. Products ma as such may not be discarded with normal domestic wast must be taken to a collection point for recycling electrical electronic devices |
SAFETY INSTRUCTIONS
The appliance becomes very hot during operation. Take care not to touch the heating elements inside the oven.
WARNING: Accessible parts may become hot during use. To avoid burns young children should be kept away.
Mains lead of adjacent appliances may be damaged by hobs or stuck between the oven doors, and produce short circuit,
therefore keep them at safe distance from the appliance.
Never put pans weighing on the opened door of the oven.
Do not use the oven in the event of a technical fault, once a technical fault caused, disconnect the power and report the fault to
the service center to be repaired.
Never clean the oven with the high-pressure steam cleaning device, as it may provoke short circuit.
Do not use harsh abrasive cleaners or sharp metal scrapers to clean the door glass as they can scratch the surface, which
could then result in the glass shattering.
The rules and provisions contained in this instruction manual should be strictly observed. Do not allow anybody who is not
familiar with the contents of this instruction manual to operate the oven.
During use the appliance becomes hot, care should be taken to avoid
touching heating elements inside the oven.
If the supply cord is damaged, it must be replaced by the manufacturer, service agent or similarly qualified persons in order to avoid a hazard.
The appliance is not intended for use by persons (including children) with reduced physical, sensory or mental capabilities, or
lack of experience and knowledge, unless they have been given supervision or instruction concerning use of the appliance by a person responsible for their safety.
Children should be supervised to ensure that they do not play with the appliance.
WARNING: Ensure that the appliance is switched off before replacing the lamp to avoid the possibility of electric shock.
WARNING: The appliance and its accessible parts become hot during use. Care should be taken to avoid touching heating elements.
Children less than 8 years of age shall be kept away unless continuously supervised
This appliance can be used by children aged from 8 years and above all persons with reduced physical, sensory or mental
capabilities or lack of experience and knowledge if they have been given supervision or instruction concerning use of the
appliance in a safe way and understand the hazards involved. Children shall not play with the appliance. Cleaning and user
maintenance shall not be made by children without supervision.
WARNING: Accessible parts may become hot during use.
Young children should be kept away
During use the appliance becomes hot. Care should be taken to avoid touching heating elements inside the oven
HOW TO SAVE ENERGY

Using energy in a responsible way not only saves money but also helps environment.
So let's save energy! And this is how you can do it:
Make use of residual heat from the oven. If the cooking time is greater 40 minutes, switch off the oven 10 minutes before the end time. Import when using the timer, set appropriately shorter cooking times according to the dish being prepared.
Make sure the oven door is properly closed.
Heat can leak through spillages on the door seals. Clean up any spillage immediately.
Do not install the oven in the direct vicinity of refrigerators/freezers.
Otherwise energy consumption increases unnecessarily.
UNPACKING
natural_image
Recycling symbol composed of five chasing arrows forming a triangle (no text or labels)During transportation, protective packaging was used to protect the appliance against any damage.
After unpacking, please dispose of all elements of packaging in a way that will not cause damage to the environment.
All materials used for packaging the appliance are environmentally friendly they are 100 % recyclable and are marked with the appropriate symbol.
Caution!
During unpacking, the packaging materials (polythene bags, polystyrene pieces, etc.) should be kept out of reach of children.
DISPOSAL OF THE APPLIANCE
Old appliances should not simply be disposed of with normal household waste, but should be delivered to a collection and recycling center for electric and electronic equipment.
A symbol shown on the product, the instruction manual or the packaging shows that it is Suitable for recycling.
Materials used inside the appliance are recyclable and are labeled with information concerning this. By recycling materials or other parts from use devices you are making a significant contribution to the protection of our environment.
Information on appropriate disposal centers for used devices can be provided by your local authority
DESCRIPTION OF THE APPLIANCE
The kitchen should be dry and have effective ventilation according to the existing technical provisions
Main lead behind the oven must be placed in such manner to avoid touching the back panel of the oven
because of the heat it develops during operation
Remove any packaging materials (foils, artificial foam, nails, etc.) from the reach of children, because they
represent potential danger. Children may swallow small parts, or suffocate with foils.
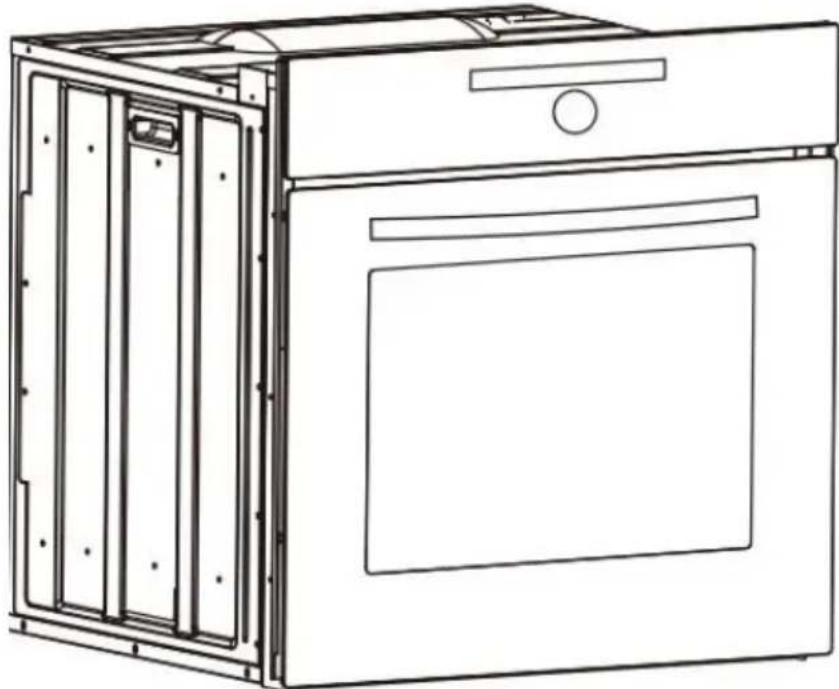
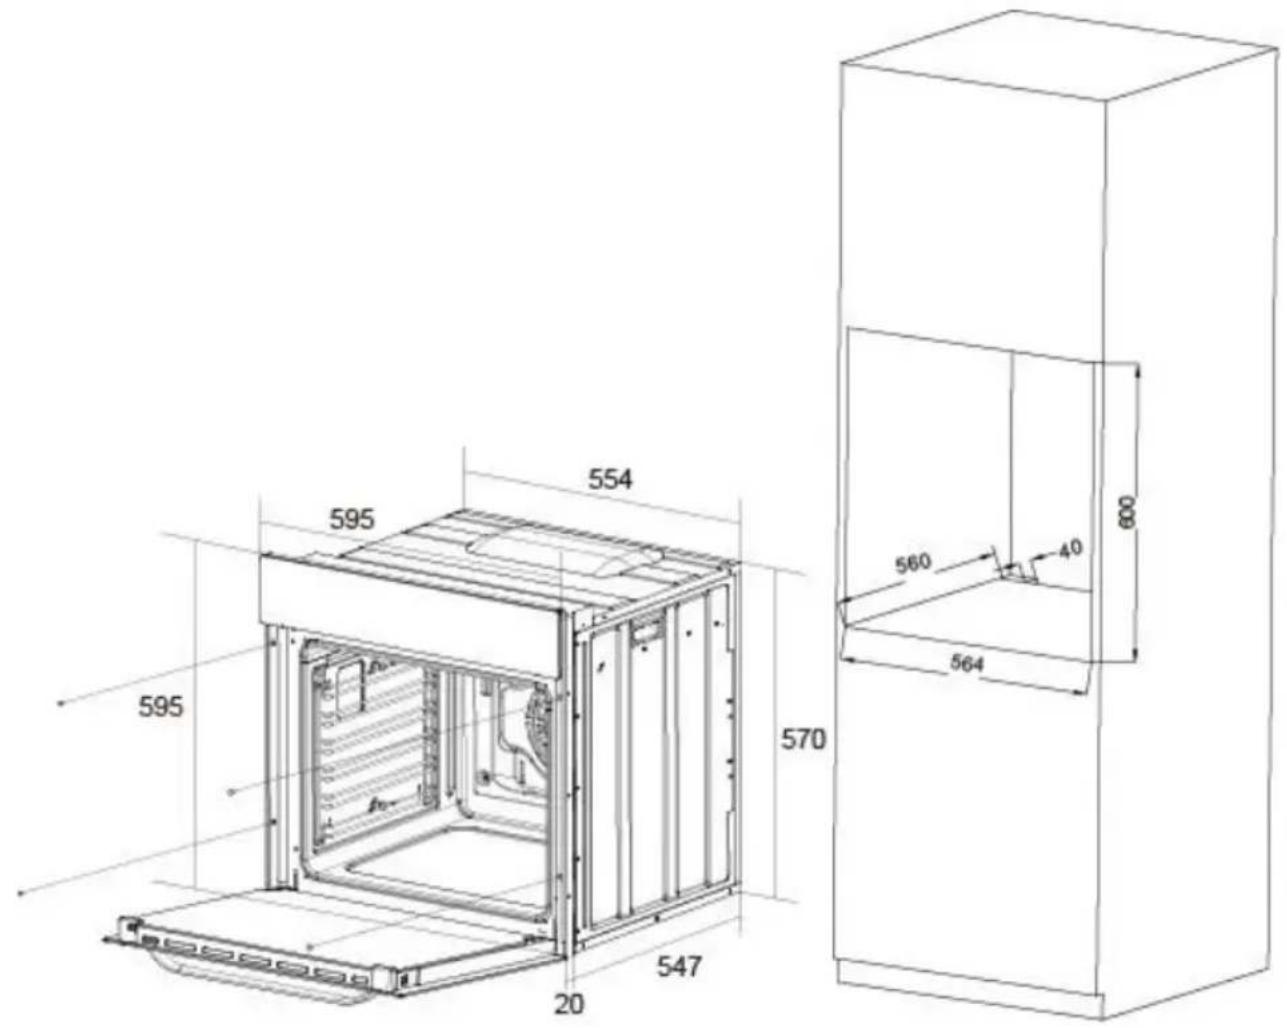
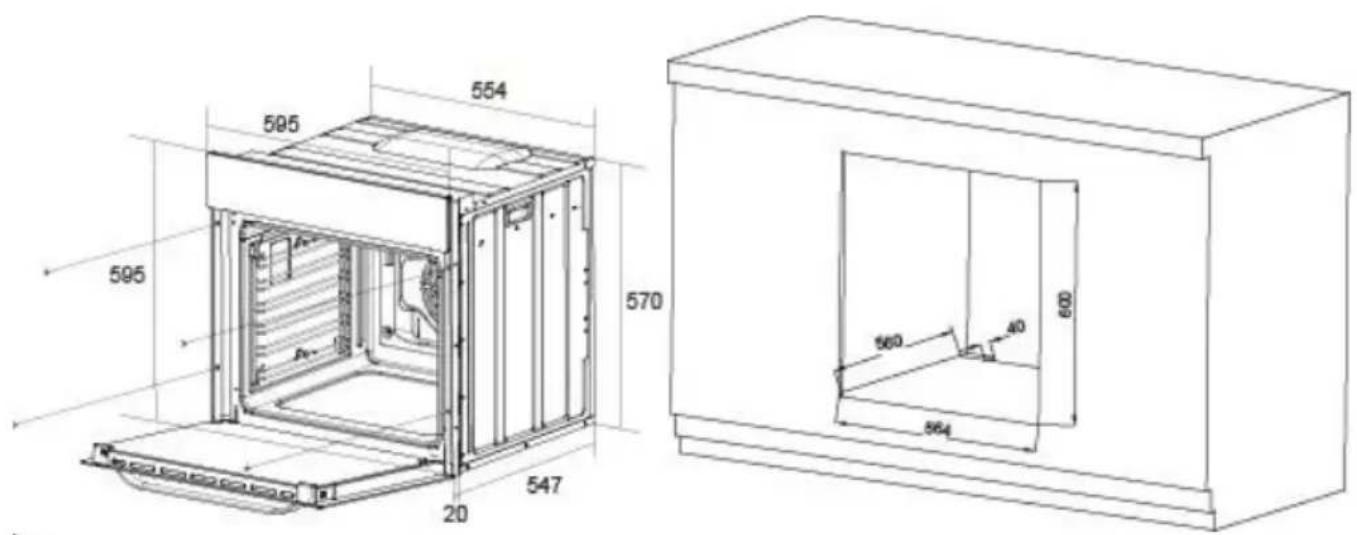
This is a built-in oven, which means that its back wall and one side wall be placed next to a high piece of furniture or a wall. Coating or veneer on fitted furniture must be applied with a heat resistant adhesive (100°C), this prevents surface deformation or detachment of the coating. If you are unsure of your furniture's heat resistance, you should leave approximately 2cm of free space around the oven. The wall behind the oven should be resistant to high temperatures. During operation its back side can warm up to around 500°C above the ambient temperature.
Make an opening with the dimensions given in the diagram for the oven be fitted. The appliance must be earthed.
Insert the oven completely into the opening without allowing the four screws in the places shown in the diagram to fall out.
INSTALLATION

Electrical connection
Warning!
All electrical work must be carried out by a suitably qualified and authori:
electrician. No alterations or willful changes in the electricity supply should be carried out.
- Before attempting the connection, check whether the voltage indicated on the rating plate corresponds to the actual mains voltage.
- Mains lead should be minimum 1.5m long.
- Earthing wire should be installed in such manner to be the last one p out in case the safety relief device of the mains lead should fail.
- Mains lead behind the oven must be placed in such manner to avoid touching the back panel of the oven because of the heat it develops during operation.
- The cable of correct size rating must be used cable type H05VV-F 3 × 1.5 ~mm^2 . the grounding wire shall be longer than the other wires.
Connection (by authorised electrician)
- Using the screwdriver open the connector cover at the rear of the appliance. Release two locks located at either side of the connector bottom.
●Mains lead must be led through the relief safety device, protecting the mains lead cable from disconnection.
●Tighten the relief device securely and close the connector cover.
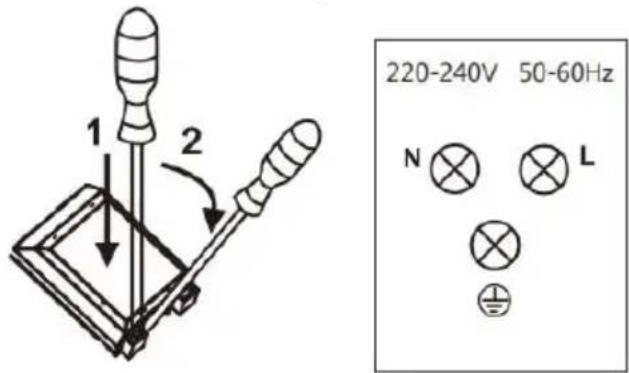
Colour code
L=exterior live wires, usually coloured black, brown.
N=neutral

OPERATION
Prior first use
- Remove packaging, clean the interior of the oven.
- Take out and wash the oven fittings with warm water and a little washing-up liquid.
- Switch on the ventilation in the room or open a window.
- Heat the oven (to a temperature of 250^ C, for approx. 30 min. remove stains and wash carefully.
Caution!
When heating the oven for the first time, it is normal phenomenon to give off smoke and peculiar smell. This will disappear about 30 min later.

Electronic programmer
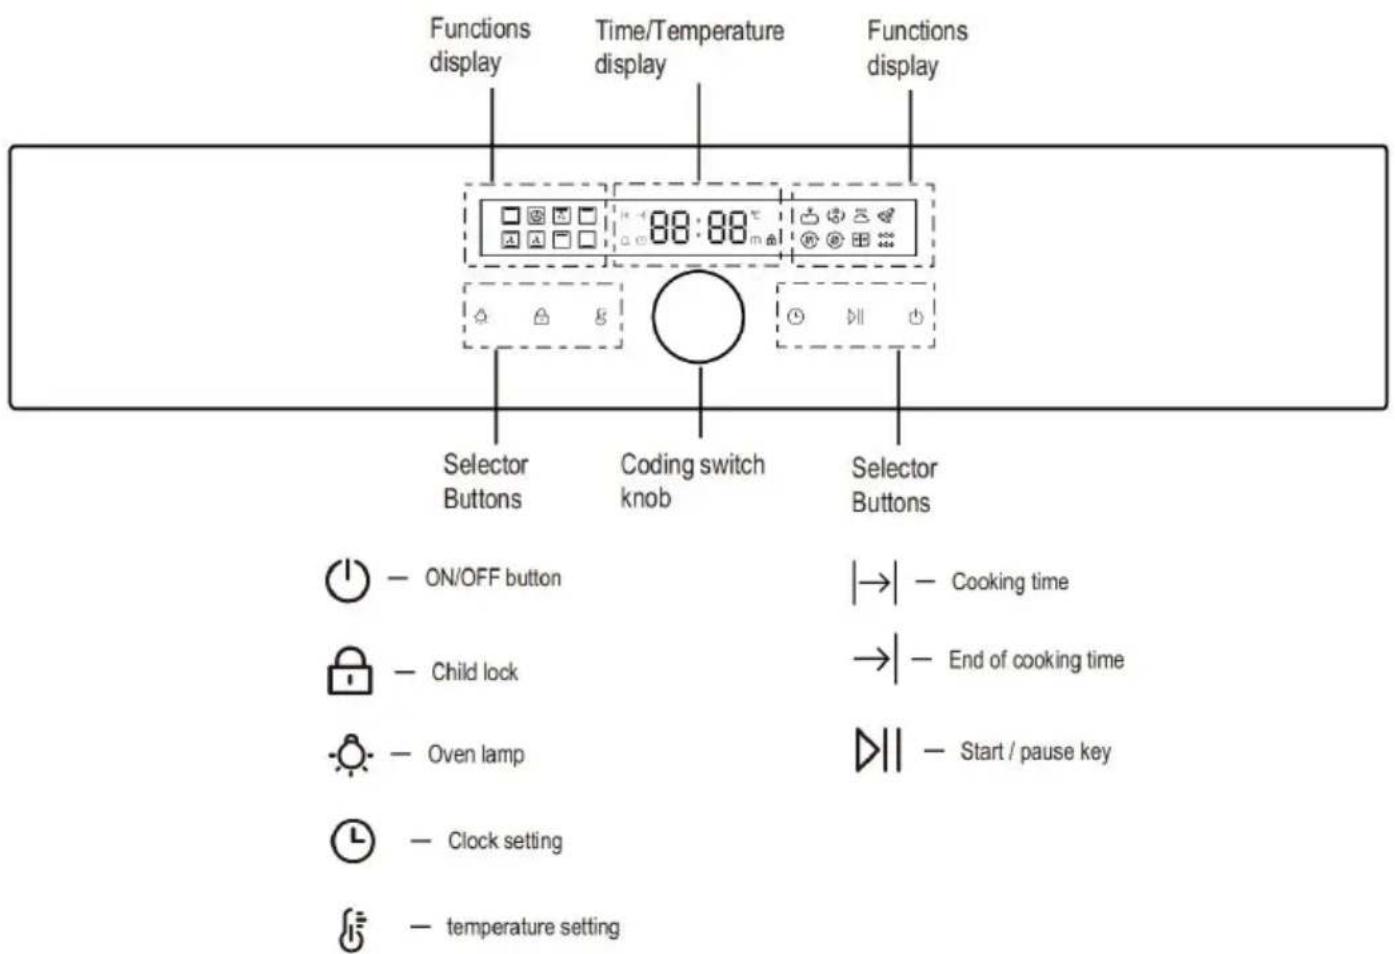
How to operate the oven
-
When the power is turned on for the first time, it enters the standby s: the display is completely 1s, buzzer prompt, time display the default time 12:00 and flash.
-
The rotary coding switch can set the time, after setting is completed that the coded switch confirmation or 5 seconds automatically confirm.
-
In standby mode, press and hold the power button for 2 seconds to turn, After boot, the first function is selected by default, display the default temperature and time.
-
When the oven function is selected, after setting the working temperature and related working time, press the key once, and the oven will start to run.
Caution!
- The clock can only be set in the standby state. After confirming, if you want to set the time again,
click the time button to set (same as the first power-on);
- Return to standby for 10 minutes without operation under power-on stat
Semi-automatic operation
- Setting the semi-automatic mode, click the time button or knob to
set the duration, the icon is lit, the clock display interface displays the set continuous working time, the encoding switch settings. After the setting is complete, click the knob to enter the next setting and confirm
previous one, or click the key to directly start the confirmation.
-
When the oven begins to run, the working time enters the countdown mode, the timing is a decrement count.
-
When the duration remains for 1 min, the duration icon starts to flash, display interface shows the countdown, when the countdown is 0, the time display area and the key are flicker, after the buzzer continuous buzzer 120s, the sound signal can be automatically stopped by pressing any key or after 120 seconds.
Caution!
-
After the duration function is activated, if you want to cancel the continuous working time, you can cancel the function by setting the time "0:00". (After canceling the duration, it will run according to the maximum working time).
-
Return to standby after 10 minutes of no operation after cooking.
Automatic operation
After the duration setting is completed, click the knob to set the end time the icon flashes, the knob is set, after the setting is completed, press the knob to enter the next item and confirm the previous item or click the key to confirm.
After the oven is set to the fully automatic mode, the clock display interf. will display the end time of the oven. After the appointment time is over, oven starts to work (the working method is the same as semi-automatic operation).
For example: Now the clock is set to 12:00 and the duration is set to 3 minutes, After the end time is 14:00, then the automatic mode is turned the clock display interface displays 14:00 and the time button is always bright, and when the clock is 13:30 minutes, The oven begins.
Caution!
End of cooking time range: current time<end of cooking time<current time+24hours.
End of cooking time= current time+cooking time+waiting time .
Temperature and time regulation
When the oven working program is selected, before starting to run, if you want to change the operating temperature and operating time, you can press the key and (Click the knob to cycle through the
settings ).
-
After selecting the cooking function, the default temperature value is displayed, point the temperature button, the temperature display module flashes, and the rotary coding switch can set the temperature. After the setting is completed, click the coding switch or click the start button to directly start the confirmation.
-
Touch time key sequentially to switch duration and end time, the display module displays the default time and flash, and the rotation coding switch
can set the length of time. After the setting is complete, press the " " button, the oven works in accordance with the new setting parameters.
- When you want to change the working time or the operating temperature
during the operation, you must first press the " " button at which point the time and temperature can be set according to the above steps, the
setting is completed, and the " " button can be confirmed to operate, the oven is set according to the new setting parameters.
Setting the alarm
-
Select the alarm setting by pressing the button, Alarm clock on. The rotary coding switch can set the time. After activating the cooking function, the alarm clock starts counting down.
-
When the alarm time is up, and the buzzer will sound for 90 seconds to remind the user. To silence the sound, press any key or it will automat stop beeping after 90 seconds, and the alarm clock icon will go out.
-
After the alarm function is activated, if you want to cancel the alarm, y can cancel the alarm function by setting the alarm time to "0:00".
Oven light
- The oven light can be turned on/off by the oven light button in the box
state.
- After selecting a function to start, the oven light will turn on, and the c light will automatically turn off after turning on for 1 minute.
Child Safety Device
-
In the boot state, press and hold for 3 seconds to enter the child lock function, accompanied by a prompt sound; except for the power button and the stove lamp button, the rest of the buttons will not be tou Enabling/canceling child lock does not affect the operation of existing functions.
-
Press and hold for 3 seconds to cancel the child lock function and restore the state before the child lock. When the key is invalid in the ch lock state, there will be a prompt sound.
Automatic shut-off feature
Each mode has a maximum working time, auto shut off function noted in the following criteria:
| Temperature | Working Hours |
| 35-120 °C | 24h |
| 121-200 °C | 6 h |
| 201-250 °C | 4 h |
When select oven cook time, its prior to the auto shut off function (assur that set shut off temperature to 201 °C-250 °C, set cook time to 5 hour oven will not auto shut off when working for 4 hours, and keep working when reach 5 hours).

Oven
Possible settings of the oven function knob
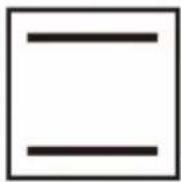
Bottom and top element on
Setting the knob to this position allows the oven to be heated conventionally.
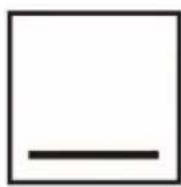
Bottom element
At this oven function knob position, the oven activates the bottom element
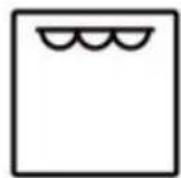
Full Grill
This function radiates the heat from the grill element and the top element. This function allows a higher temperature at the top of the cooking area which is ideal for grilling large portions.
Note: The end time cannot be set for this function.

At this function ,allows the oven to be heated up with forced air by thethermofan,which is in the central part of the oven tank.Heating the ovenin this way peimits ever heat circulation around the dish that is in the ov

Fan Assisted Oven
Using the top and bottom elements and the fan, this cooking function distributes the heat around the oven to give an even temperature throughout.

Fan with Lower Heater
This programme uses the bottom heater and the fan function. This is ideal for certain pastries and one-pot dishes.
Economy Grill
Use this grill function for grilling a small amount of food. Note: The end time cannot be set for this function.
Ferment
At this function is ferment mode, fan with rear heater is ON. Note: If the temperature is higher than the limit value, it cannot be started

Fanned Grill
This function uses the fan to circulate the heat from the grill element around the food. Note: The end time cannot be set for this function.

Keep warm
The fan with rear heater of the oven works to keep the cavity temperatu
Defrost
Using the fan with rear heater , this oven function circulates the air arouthe oven cavity, speeding up the natural defrost process.

Pizza
Excellent for cooking pizza as it crisps the base beautifully without overcooking the topping.
For best results, pre-heat a pizza stone for at least 1 hour and bake on oven shelf position 1 or 2.
| Pizza | Type | Accessories/ cookware | Shelf position | Temperature In°C | Cooking time in mins |
| Forze n | Thin base | Wire rack | 2 | 200 | 15-20 |
| Thick base | Wire rack | 2 | 200 | 20-25 | |
| Home made | Thin base | Baking tray | 2 | 200 | 10-15 |
| Thin base | Pizza tray | 2 | 250 | 8-12 | |
| Thick base | Baking tray | 2 | 200 | 15-20 | |
| Thick base | Pizza tray | 2 | 200 | 15-20 |
IMPORTANT!
Except for 310°C gear, if you don't set a duration for Pizza mode, the oven will continuously work until you stop the oven manually. You should pay more attention to observe the status of food to avoid the food overcooke
The 310°C is suitable for homemade thin-crust pizza. Put the pizza tray other containers in the oven to preheat. When the temperature reaches the temperature,buzzer to remind, put the pizza on the preheated container and use the high temperature inside the cavity and the container to finish cooking in about 5 minutes.The whole cooking time of this gear is 30 minutes and cannot be changed.

Air dry
In this mode, both the rear heater and the fan are on.
Recommended air drying temperature 60-100 °C.
Note: Use above 100^ C is easy to cause air-drying failure due to overcooking.
| Menu | Prepare | Temperature | Time | Shelf position |
| Cabbage leaf | Boiled | 70°C | 1H30min | 3 |
| Long bean | Boiled | 55°C | 3H | 3 |
| Sweet potato wedge | Steamed | 55°C | 13H,flip after 2H | 3 |
| Mango slice | / | 70°C | 8H,flip after 4H | 3 |
| Banana slice | Dipped in salt water | 55°C | 7H,flip after 2H | 3 |
| Lemon slice | / | 55°C | 15H,flip after 2H | 3 |
| Apple slice | Dipped in salt water | 55°C | 8H,flip after 2H | 3 |
| Raw pork lean | / | 55°C | 7H,flip after 2H | 3 |
| Raw chicken breast | / | 70°C | 5H,flip after 1H | 3 |
| Prawn with shell | Boiled | 70°C | 6H,flip after 2H | 3 |
| Beef jerky | Boiled and marinated | 90°C | 2H | 3 |
The cooking advice given is approximate and can be adjusted based on your previous experience and cooking preferences.

Pyrolytic Self-clean
Use this mode to break down food residue for an easy clean.
The duration of this function can be set to 75, 90 or 120 minutes deper on the level of cleaning needed.
- Remove all shelves, trays and other accessories from the oven. Clean if any major spills to avoid excessive smoke.
- Select Pyrolytic Self Clean: The default duration of 01:30 is displayed.
- Use the + and - buttons to adjust the running time. The running time be set to 01:15 or 02:00.
- Press and hold the Play/pause button for 3 seconds to confirm. This additional press is to prevent the feature from being selected accidentally - The door will lock and remain locked until the appliance is cool. The cooling fan will be on throughout this program, starting at a slow setting and increasing to its maximum speed when the oven heats up.
The oven cleans itself by a process known as pyrolysis, heating the cavity to a
temperature of approximately 420^ C, which takes about 35 minutes. This will burn off the
residue from spattering and spillages caused by cooking.
Air fry
Fast cooking with top grill, bottom grill, rear grill and rear fan. Mainly used for non-fried food.
| Menu | Temperature | Time | Shelf position |
| Chicken nuggets | 200 °C | 20-25min | 3 |
| Chicken wings | 200 °C | 18-23min | 3 |
| Fish fillet | 180 °C | 23-27min | 3 |
| French fries | 200 °C | 17-20min | 4 |
| Onion rings | 200 °C | 15-18min | 4 |
The cooking advice given is approximate and can be adjusted based on your previous experience and cooking preferences.
Auto menu
For better experience of cooking, there are some programs for recipes in can select.
- Use to select the display will show P1 , press , P1 blinks, turn the knob to switch the menu.
2.7 recipes are set in the oven, you can use to select P1\~P7.
3.Refer to below chart, use to select a recipe which you need.
- Press or to view the recommended temperature, and you can adjust it.
Press or to view the recommended time, and you can adjust it.
- Press to start preheat.
- When the temperature reached, the bee buzzes three times to prompt the food to be put in.
- Press to start cooking.
| Menu | Auto | Temperature | Time | Amount of food |
| P1 | Chiffon cake | 160 °C | 35min | 500g |
| P2 | Small cake | 160 °C | 18min | 20pcs |
| P3 | Egg tart | 190 °C | 21min | 12pcs |
| P4 | Cookies | 190 °C | 9min | 20pcs |
| P5 | Chicken nuggets | 200 °C | 17min | 20pcs |
| P6 | Chicken wings | 200 °C | 18, flip after 6min | 1200g |
| P7 | Ribs | 220 °C | 19min | 670g |
The time showed in the table is only for reference.
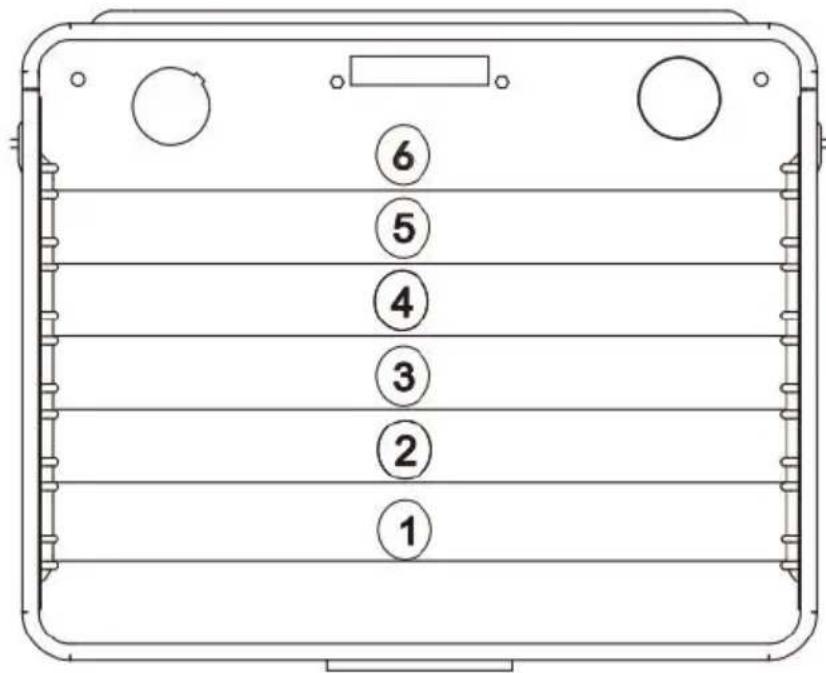
Oven guide levels
Baking pans and accessories (oven grid, baking tray, etc.) may be inserted into the oven in 6 guiding levels.
Appropriate levels are indicated in the tables that follow.
Always count levels from the bottom upwards!
By ensuring proper cleaning and maintenance of your oven you can have significant influence on the continuing fault-free operation of your appliance.
Before you start cleaning, the oven must be switched off and you should ensure that all knobs are set to the "0" position. Do not start cleaning until the oven has completely cooled.

Oven
- The oven should be cleaned after each use.
- Cool the oven completely before cleaning.
- Never clean the appliance with pressurized hot steam cleaner.
- The oven chamber should only be washed with warm water and a small amount of washing-up liquid.
- Steam cleaning
-pour 250ml of water (1 cup) into a bowl placed in the oven on the first from the bottom.
-Close the oven door.
-Set the temperature knob to 100^ C , and the function knob to the bottom heater position.
-Heat the oven chamber for approximately 30 minutes.
-Open the oven door, wipe the chamber inside with a cloth or sponge an
wash using warm water with washing-up liquid.
- After cleaning the oven chamber wipe it dry
Caution!
Do not use cleaning products containing abrasive materials for the cleaning and maintenance of the glass front panel.

Replacement of the oven light Bulb
Before any maintenance is started involving electrical parts, the appliance must be disconnected from the power supply.
If the oven has been in use, let the oven cavity and the heating element cool down before attempting any maintenance.
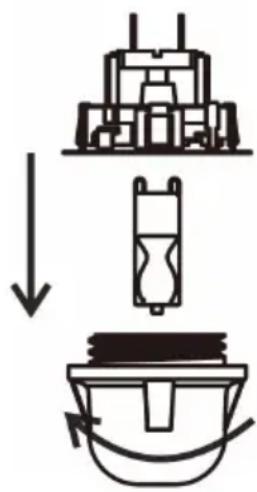
Changing the bulb
- Pull out the protective cover.
- We recommend that you wash and dry the glass cover at this point. Carefully remove the old bulb and insert the new bulb suitable for high temperatures (300°C) having
the following specifications: 220-240V, 25W, G9 fitting.
- Refit the protective cover.
IMPORTANT
Never use screwdrivers or other utensils to remove the light cover.
This could damage the enamel of the oven or the lamp holder. Remove only by hand
IMPORTANT
Never replace the bulb with bare hands as contamination from your finger can cause premature failure. Always use a clean cloth or gloves.
Please note:
The bulb replacement is not covered by your guarantee

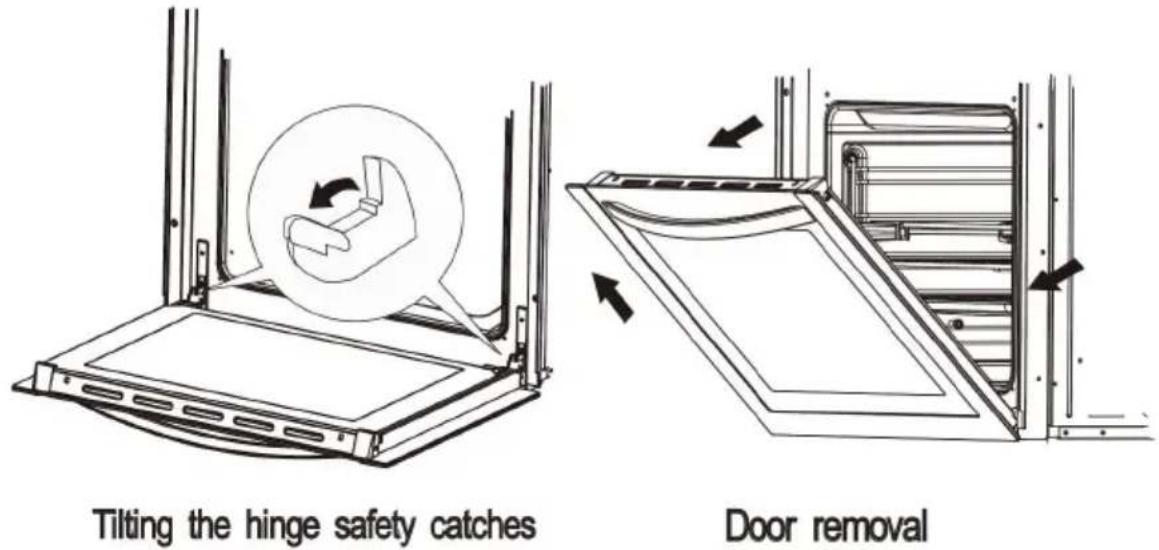
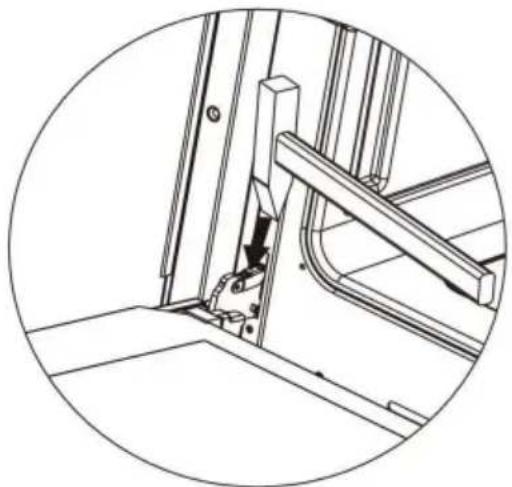
Door removal
In order to obtain easier access to the oven chamber for cleaning, it is possible to remove the door.
To do this, tilt the safety catch part of the hinge upwards. Close the door lightly, lift and pull it out towards you.
In order to fit the door back on to the cooker. Do the reverse. When fit ensure that the notch of the hinge is correctly placed on the protrusion of the hinge holder. After the door is fitted to the oven, the safety catch shall be carefully lowered down again. If new the safety catch is not set it may cause damage to the range when closing the door

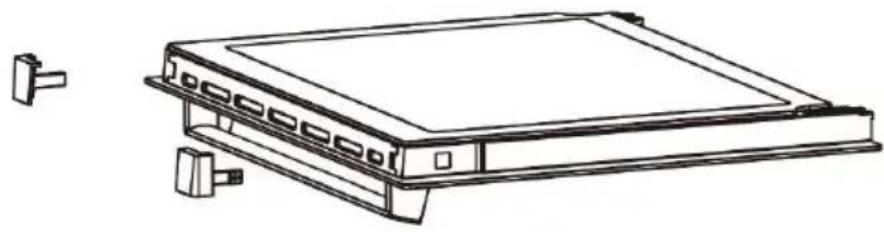
Removal of the internal glass panel
Press the symbol and outward the plastic latch that is in the corner at tl top of the door .
Next take out the glass from the second blocking mechanism and remove. After cleaning, insert and block the glass panel, and insert t in the block mechanism.
natural_image
Technical line drawing of a rectangular electronic device with mounting bracket and side connectors (no text or symbols)Removal of the internal glass panel

Install door

natural_image
Technical line drawing of a mechanical assembly with no visible text or symbolsOPERATION IN CASE OF EMERGENCY
In the event of an emergency, you should:
- Switch off all working units of the oven
- Call the service center
- Some minor faults can be fixed by referring to the instructions given in the table below. Before calling the customer support center or the service center check the following points that are presented in the table.
| PROBLEM | REASON | ACTON |
| 1.The appliance does not work | Breakin power supply | Check the household fuse box; if there is a blown fus replace it with a new one |
| Choose wrong function | Check if function knob. Temperature knob is set to the correct position. | |
| 2.The programmer display is flashing “0.00” | The appliance was disconnected from the mains or there was a temporary power cut. | Set the current time(see use of the programmer) |
| 3. The oven lighting does not work. | The bulb is loose of damaged. | Tighten up or replace the blown bulb(see cleaning and maintenance) |
BAKING IN THE OVEN

Baking pastry
Most appropriate position for baking is the application of both upper and lower heater, or the hot air.
Warning!
- The baking parameters given in Tables are approximate and can be corrected based on your own experience and cooking preferences;
- In case you may not find any particular type of cake in the tables, us information available for the next most similar type of cake.
Baking with upper and lower elements
- Use only a single guide level.
- This baking position is especially suitable for baking dry pastry, bread
and teacakes. Use dark baking pans. Light pans reflect heat and pastry not adequately browned.
- Always place baking pans on the grid rack. Remove the grid only if baking in the flat biscuit tray, supplied with the appliance.
- Preheating shortens the baking time. Do not put the cake in the oven until proper temperature is obtained.
Baking tips
Is cake baked?
Pierce the cake with a wooden skewer at the thickest part, if the dough does not stick to it, the cake is baked. You may switch off the oven and the remaining heat.
Cake has fallen
Check the recipe. Use less liquid next time. Follow the mixing times, especially when using electric kitchen mixers.
Cake is too light on the bottom
Use dark baking pan next time, or place the pan one level lower, or sw on the lower heater a while before the completion.
Cheesecake is undercooked
Next time reduce the baking temperature and extend the baking time.
Warnings regarding the baking tables
- The tables indicate the temperature range. Always select lower temperature first. You may always increase the temperature in case past needs more baking.
- Baking times are indicative only.
- The asterix indicates that the oven requires preheating.
BAKING IN THE OVEN
| Type of pastry | Guide level(from down upwards) | Temp (°C) | Guide level(from down upwards) | Temp (°C) | Baking time (in min) |
 |  | ||||
| Sweet pastry | |||||
| Sponge cake/ marble cake | 2 | 170-180 | 2 | 150-170 | 60-80 |
| Victoria sponge | 2 | 160-180 | 2 | 150-170 | 65-80 |
| Base for a laye cake | 2-3 | 170-180 | 2-3 | 150-170 | 20-30 |
| Sponge layer cake | 2 | 170-180 | 30-40 | ||
| Fruit cake(crispy base) | 2-3 | 160-180 | 60-70 | ||
| Cheesecake(short crust) | 2 | 140-150 | 60-90 | ||
| Teacake | 2 | 160-180 | 2 | 150-170 | 40-60 |
| Bread(e.g. wholegrain bread) | 2 | 210-220 | 2 | 150-170 | 50-60 |
| Fruit cake(crispy base) | 3 | 170-180 | 2 | 160-200 | 35-60 |
| Fruit cake(with yeast) | 2 | 160-170 | 30-50 | ||
| Crumble cake | 3 | 160-170 | 150-170 | 30-40 | |
| Sponge roll | 2 | 180-200 | 10-15 | ||
| Pizza(thin base) | 3 | 220-240 | 10-15 | ||
| Pizza(thick base) | 2 | 180-210 | 30-50 | ||
| Buns | 3 | 160-170 | 2 | 150-160 | 10-30 |
| Puff pastry | 3 | 180-190 | 2 | 170-190 | 18-25 |
| Meringues | 3 | 90-110 | 80-90 | ||
| Choux buns | 2 | 170-190 | 35-45 |

Roasting
Best results are obtained with the engagement of both upper and lower elements. Best heating mode for each type of roasting pan is indicated by bold print in the Roasting Tables.
Tips regarding roasting pans
- For best results, use light enamel pans, temperature resistant glass pa clay dishes or cast iron dishes.
- As stainless steel dishes reflect the heat, they are not recommended.
- If you cover your roast or wrap it in foil, it will preserve its juices and oven will remain clean.
- The roast will be cooked quicker if it is left uncovered. Large roasts c be placed directly on the grid with the oven tray below for catching the juices and melted fat.
Attention when roasting!
Roasting tables indicate suggested temperatures, guide level and roasting times. Roasting time largely depends upon the type of meat, its size and quality. So you may expect some variations
- Roasting of large chunks of meat may produce excessive steaming and condensation on the oven door. This is quite normal, and does not affect the operation of the oven.
However, after the completion of roasting wipe the oven door and the gla
thoroughly.
- Add as much liquid as necessary to prevent burning of juice, dripping from meat. Roast must be checked regularly and liquid added if necessary
- At approximately the middle of the indicated time turn the roast round, especially if you use the deep roast dish.
- When roasting on the grill grid, place the grid in the deep roasting pa and insert both into the sliding guide. The bottom pan will intercept dripp fat.
- Never leave roast to cool in the oven, as it might produce condensation and corrosion of the oven.
Roasting Table
| Type of meat | Guide level(from bottom up) | Temp (°C) | Roasting time (in min) | Temp (°C) | Roasting time (in min) |
 |  | ||||
| Beef | Per 1 cm | ||||
| Roast beef or file rare | 3 | 250 | 12-15 | ||
| Oven warmed up juicy("medium") | 3 | 250 | 15-25 | ||
| Oven warmed up "well done" | 3 | 210-230 | 25-30 | ||
| Oven warmed up Roast joint | 2 | 160-180 | 2 | 200-220 | 120-140 |
| Pork | |||||
| Roast joint | 2 | 160-180 | 2 | 200-210 | 90-140 |
| Ham | 2 | 160-180 | 2 | 200-210 | 60-90 |
| Fillet | 3 | 210-230 | 25-30 | ||
| VEAL | 2 | 160-170 | 2 | 200-210 | 90-120 |
| LAMB | 2 | 160-180 | 2 | 200-220 | 100-120 |
| VENISON | 2 | 175-180 | 2 | 200-220 | 100-120 |
| POULTRY | |||||
| Chicken | 2 | 170-180 | 2 | 220-250 | 50-80 |
| Goose(approx.2kg) | 2 | 160-180 | 2 | 190-200 | 150-180 |
| Fish | 2 | 175-180 | 2 | 210-220 | 50-80 |

Grilling
- Take extra precautions when grilling. Intensive heat from infrared element makes the oven and the accessories extremely hot. Use protective gloves and barbecue accessories!
- Perforated roast may produce spurting of hot grease (sausages). Use long grill tongs to prevent skin burns and protect your eyes.
- Supervise the grill at all time. Excessive heat may quickly burn your food and provoke fire!
- Do not let the children in the vicinity of the grill.
Grill heater is especially suitable for the preparation of low-fat sausages, meat and fish fillets and steaks, and for browning and crisping the roast skin.
Tips for grilling
- Grilling should be carried out with the oven door closed.
- Grilling tables indicate the recommended temperature, guide levels and grilling times, which may vary according to the weight and quality of mea
- Grill element should be pre-heated for 3 minutes.
- Oil the grill grid before placing food on it, to avoid food sticking to the
- Place the meat upon the grid, then place the grid upon the grease interception pan. Insert both trays into the oven guides.
- Turn the meat round after half of the grilling time has expired. Thinner slices will require only one turn, for larger chunks you might need to repeat the procedure. Always use barbecue tongs to avoid losing
excessive juice from meat.
- Dark beef meat is grilled quicker than lighter pork or veal.
- Clean the grill, the oven and the accessories each time after use.
Grill table
| Type of meat for grill | Weight (in grams) | Guide level (from bottom up) | Temp(°C) | Grill time (in min.) |
 | ||||
| Meat and sausages | ||||
| 2 beefsteaks, rare | 400 | 5 | 240 | 14-16 |
| 2beefsteaks, medium | 400 | 5 | 240 | 16-20 |
| 2 beefsteaks, well done | 400 | 5 | 240 | 20-23 |
| 2 pork chops | 400 | 5 | 240 | 20-23 |
| 2 veal stakes | 700 | 5 | 240 | 19-22 |
| 4 lamb cutlets | 700 | 5 | 240 | 15-18 |
| 4 grill sausages | 400 | 5 | 240 | 9-14 |
| 2 slices meat cheese | 400 | 5 | 240 | 9-13 |
| 1 chicken, halved | 1400 | 3 | 240-250 | 28-33(1.side) 23-28(2.side.) |
| Fish | ||||
| Salmon fillets | 400 | 4 | 240 | 19-22 |
| Fish in aluminum foil | 500 | 4 | 230 | 10-13 |
| Toast | ||||
| 4 slices of white bread | 200 | 5 | 240 | 1,5-3 |
| 2 slices of whole meal | 200 | 5 | 240 | 2-3 |
| Toast sandwich | 600 | 5 | 240 | 4-7 |
| Meat/poultry | ||||
| Chicken | 1000 | 3 | 180-200 | 60-70 |
| Pork roast | 1500 | 3 | 160-180 | 90-120 |
| Pork knuckle | 1000 | 3 | 160-180 | 120-160 |
| Roast beef/ beef fillet | 1500 | 3 | 190-200 | 40-80 |
TECHNICAL INFORMATION
| Model | LPY616Ti2-B5-09 |
| Voltage rating | AC220-240V50-60Hz |
| Total power | 3550W |
| Top element | 850W |
| Grill element | 1100W |
| Bottom element | 1150W |
| Circular element | 1600W |
VEVOR®
TOUGH TOOLS, HALF PRICE
Technical Support and E-Warranty Certificate
www.vevor.com/support
VEVOR®
TOUGH TOOLS, HALF PRICE
natural_image
Line drawing of an open oven with internal compartments and door (no text or symbols)BESOIN D'AIDE? CONTACTEZ-NOUS!
natural_image
Recycling symbol composed of five chasing arrows forming a triangle (no text or labels)INSTALLATION

IMPORTANT

natural_image
Technical line drawing of a rectangular electronic device with mounting bracket and side connectors (no text or symbols)Removal of the internal glass panel

Installer la porte
natural_image
Technical line drawing of a mechanical bracket assembly (no text or symbols)FONCTIONNEMENT EN CAS D'URGENCE
natural_image
Line drawing of an open oven with internal compartments and door (no text or symbols)BRAUCHEN SIE HILFE? KONTAKTIERE UNS!
natural_image
Recycling symbol composed of five chasing arrows forming a triangle (no text or labels)WICHTIG

natural_image
Line drawing of a rectangular electronic device with mounting bracket and side connectors (no text or symbols)Removal of the internal glass panel

Tür einbauen

natural_image
Technical line drawing of a mechanical assembly with no visible text or symbolsBETRIEB IM NOTFALL
www.vevor.com/support
VEVOR®
TOUGH TOOLS, HALF PRICE
FORNO ELETTRICO DA INCASSO
MODELLO:LPY616Ti2-B5-09
natural_image
Line drawing of an open oven with internal compartments and door (no text or symbols)HO BISOGNO DI AIUTO? CONTATTACI!
natural_image
Recycling symbol composed of five chasing arrows forming a triangle (no text or labels)INSTALLAZIONE

IMPORTANTE

natural_image
Line drawing of a rectangular electronic device with mounting brackets and a side-mounted bracket (no text or symbols)Removal of the internal glass panel

Installare la porta

natural_image
Technical line drawing of a mechanical bracket assembly (no text or symbols)elettronica www.vevor.com/support
VEVOR®
TOUGH TOOLS, HALF PRICE
natural_image
Line drawing of an open oven with internal compartments and door (no text or symbols)natural_image
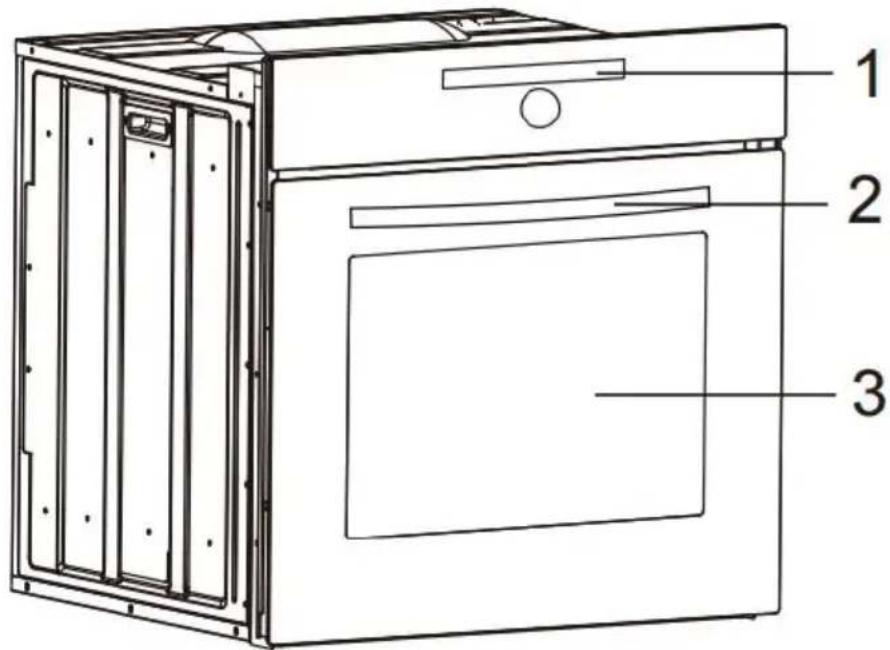
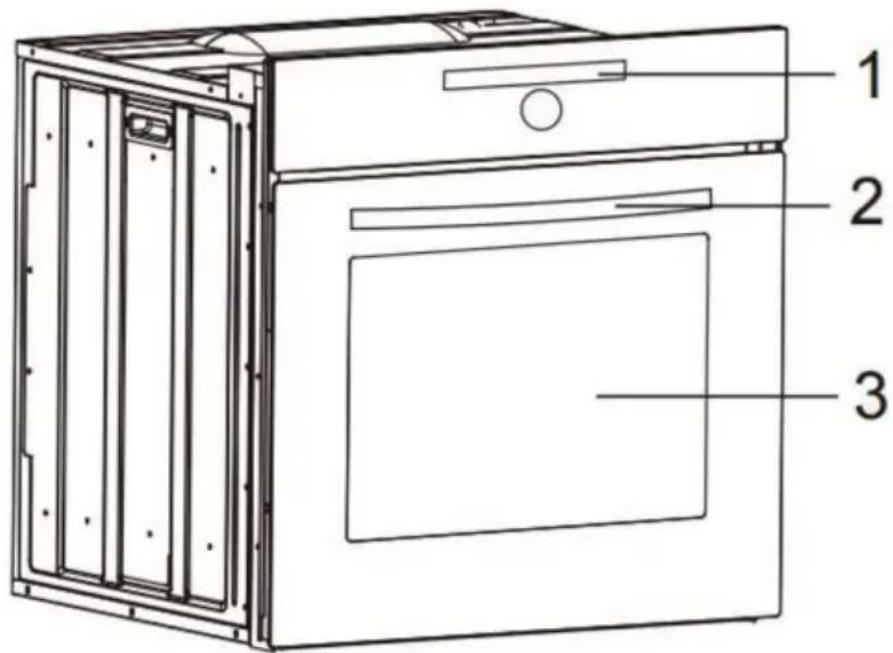
Recycling symbol composed of five chasing arrows forming a triangle (no text or labels)| 1. Panel de control 2. |
| Manija de la puerta del horno |
| 3. Continuar horno |

INSTALACIÓN

IMPORTANTE
natural_image
Line drawing of a rectangular electronic device with mounting brackets and a side-mounted bracket (no text or symbols)Removal of the internal glass panel

instalar puerta

natural_image
Technical line drawing of a mechanical bracket assembly (no text or symbols)natural_image
Line drawing of an open oven with internal compartments and door (no text or symbols)POTRZEBUJE POMOCY? SKONTAKTUJ SIĘ Z NAMI!
natural_image
Recycling symbol composed of five chasing arrows forming a triangle (no text or labels)WAŻNY

natural_image
Line drawing of a rectangular electronic device with mounting brackets and a side-mounted bracket (no text or symbols)Removal of the internal glass panel

Zainstaluj drzwi

natural_image
Technical line drawing of a mechanical bracket assembly (no text or symbols)DZIAŁANIE W RAZIE AWARYJNYM
www.vevor.com/support
VEVOR®
TOUGH TOOLS, HALF PRICE
Technische ondersteuning en e-garantiecertificaat www.vevor.com/support
INGEBOUWDE ELEKTRISCHE OVEN
MODEL:LPY616Ti2-B5-09
natural_image
Line drawing of an open oven with internal compartments and door (no text or symbols)HULP NODIG? NEEM CONTACT MET ONS OP!
natural_image
Recycling symbol composed of five chasing arrows forming a triangle (no text or labels)BESCHRIJVING VAN HET APPARAAT
BELANGRIJK

natural_image
Line drawing of a rectangular electronic device with mounting bracket and side connectors (no text or symbols)Removal of the internal glass panel

Deur installeren

natural_image
Technical line drawing of a structural joint or bracket assembly (no text or symbols)BEDIENING IN GEVAL VAN NOOD
natural_image
Line drawing of an open oven with internal compartments and door (no text or symbols)BEHÖVS HJÄLP? KONTAKTA OSS!
natural_image
Recycling symbol composed of five chasing arrows forming a triangle (no text or labels)| 1. Kontrollpanel 2. |
| Ugnsdörrshandtag |
| 3. Fortsätt ugnen |

INSTALLATION

•Välj Pyrolytic Self Clean

VIKTIG

natural_image
Line drawing of a rectangular electronic device with mounting bracket and side connectors (no text or symbols)Removal of the internal glass panel

Installera dörren

natural_image
Technical line drawing of a mechanical bracket assembly (no text or symbols)ANVÄNDNING I NÖDSFALL
www.vevor.com/support